The W.I.S.E. Generator System
|
|
|
- Alyson Bradley
- 5 years ago
- Views:
Transcription
1 D I S C L A I M E R O F L I A B I L I T Y A N D W A R R A N T Y This publication describes the author s opinions regarding the subject matter herein. The author and publisher are not rendering advice or services pertaining to specific individuals or situations. For specific advice, or if expert assistance is required, the services of a qualified professional should be obtained. The author and publisher assume no responsibility whatsoever for the use of the information in this publication or for decisions made or actions taken based, in whole or in part, on the information in this publication. The author and publisher make no warranties, express or implied, regarding the information. Without limiting the foregoing, the author and publisher specifically disclaim and will not be responsible for any liability, loss, or risk incurred directly, indirectly or incidentally as a consequence of the use or misuse of any advice or information presented herein. Use this publication and information with good judgment and do the best you can in your particular situation. You agree to indemnify and hold the author and publisher, and their respective officers, directors, agents, employees, contractors and suppliers, harmless from any claim or demand, including reasonable attorneys fees, related to your use or misuse of this publication or the information contained therein. You further agree that you will cooperate fully in the defense of any such claims. Notice: As the purchaser of this electronic document you are permitted to store it and print it for your own personal use only. Otherwise, no part of this publication may be reproduced, stored in a retrieval system or transmitted in any form or by any means, electronic, mechanical, photocopying, recording, or otherwise without the prior written permission of the copyright owner and publisher. It is illegal to make a copy of all or part of this publication for someone else, even if you do not charge for the copy. If you have purchased this book from anywhere other than WiseGenerator.com, including ebay, please report it to joe@wisegenerator.com immediately. C O P Y R I G H T Those who have received or purchased the guide are neither authorized nor permitted to transmit copies of this guide to anyone without written permission. Giving away copies to people who haven t paid for them is illegal under international copyright laws and will submit you to possible legal action. Therefore, the utilization of this file is limited to personal use only. T E R M S A N D D I S C L A I M E R By using, viewing, and interacting with this guide or the WiseGenerator.com website, you agree to all terms of engagement, thus assuming complete responsibility for your own actions. The authors and publishers will not be held liable or claim accountability for any loss or injuries. Use, view, and interact with these resources at your own risk. All products from WiseGenerator.com and its related companies are strictly for informational purposes only. While all attempts have been made to verify the accuracy of information provided on our website and within the publications, neither the authors nor the publishers are responsible for assuming liability for possible inaccuracies. The authors and publishers disclaim any responsibility for the inaccuracy of the content, including but not limited to errors or omissions. Loss of property, injury to self or others, and even death could occur as a direct or indirect consequence of the use and application of any content found herein.
2 The W.I.S.E. Generator System

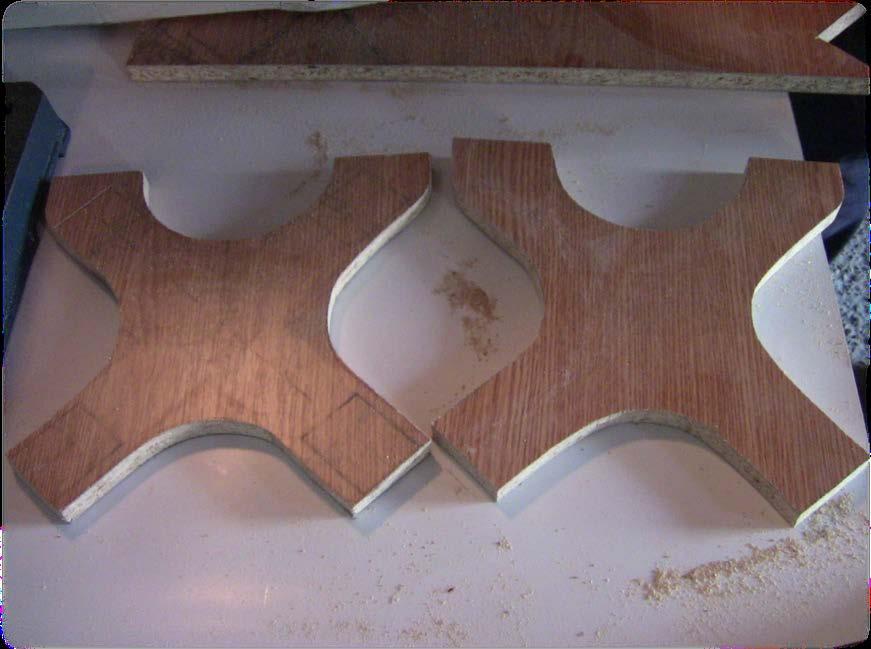
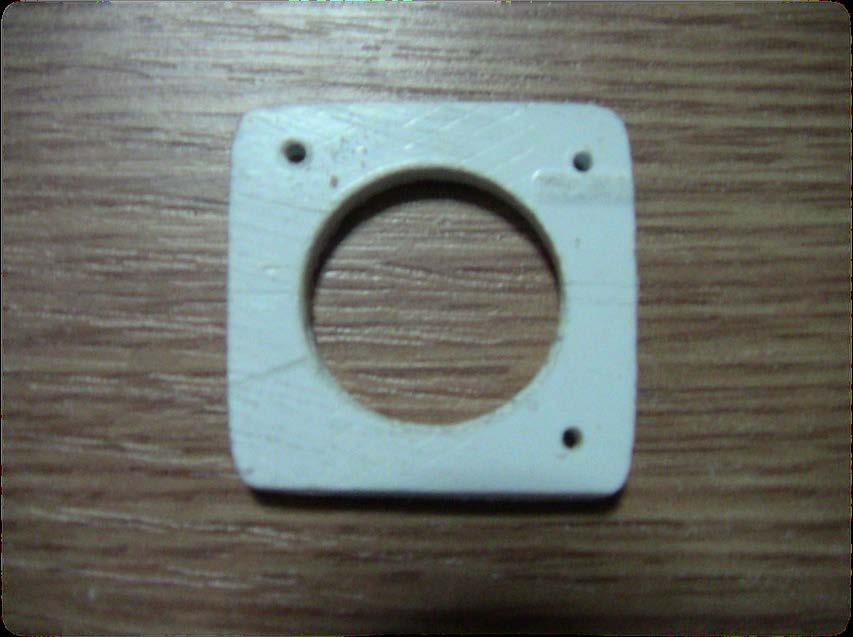
3 Fabrication & Assembly The Front Support You can make the supports from whatever material you consider and you can easily find. For this version of the W.I.S.E. Generator System we have used laminated chipboard or melamine because it s easier to cut and drill. Here s how to start:

4 Using the schematics/blueprints you can find in the Schematics & Photos document included in the W.I.S.E. Generator Package, draw the shape of the FRONT SUPPORT on a piece of laminated chipboard. You should come up with something similar to the photo above. NOTE: You can make the supports and the base of your system in any shape you like, but remember not to affect the functionality of the system, SO PLEASE BE CAREFUL. Next, using a jigsaw cut the FRONT SUPPORT from your piece of laminate chipboard. You can see how this is done in the VIDEOS included in The W.I.S.E. Generator Package. You should end up with a FRONT SUPPORT looking something like the one below.

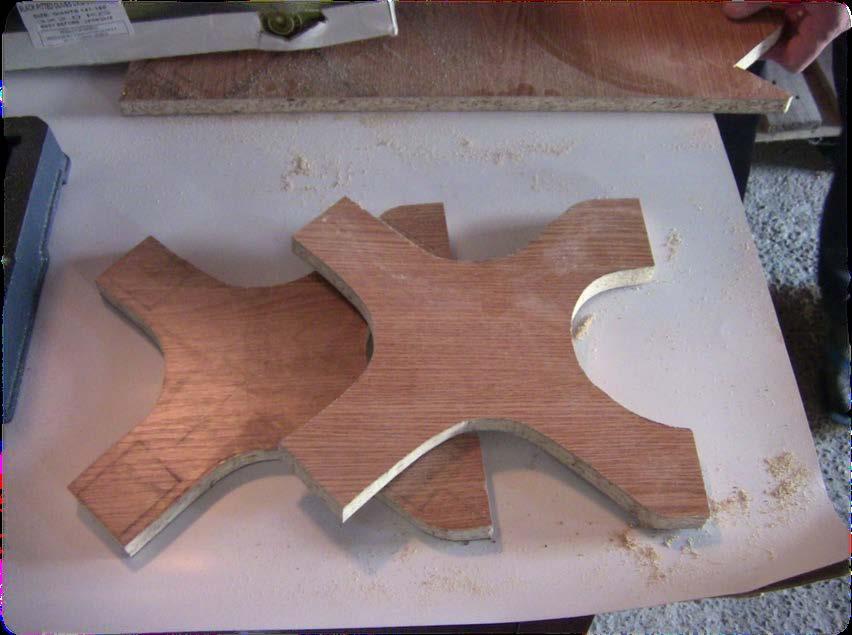
5 The Back Support For the BACK SUPPORT use the front support you just made to draw the shape onto another piece of laminated chipboard. Use a jigsaw to cut out the BACK SUPPORT. You should now have the front and back supports ready for the next step.
6

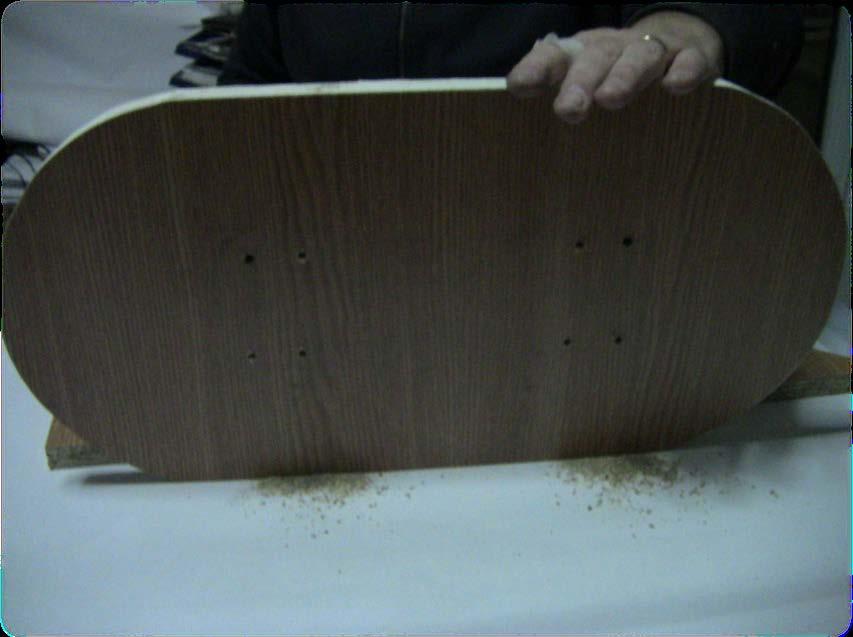
7 The Base For the BASE of the system we have used the same material which is laminated chipboard or melamine. You can feel free and use whatever material you like. Use the schematics/blueprints included in the package to draw the shape of the BASE on a piece of laminated chipboard. Use a jigsaw to cut out the BASE. You should end up with something like this:

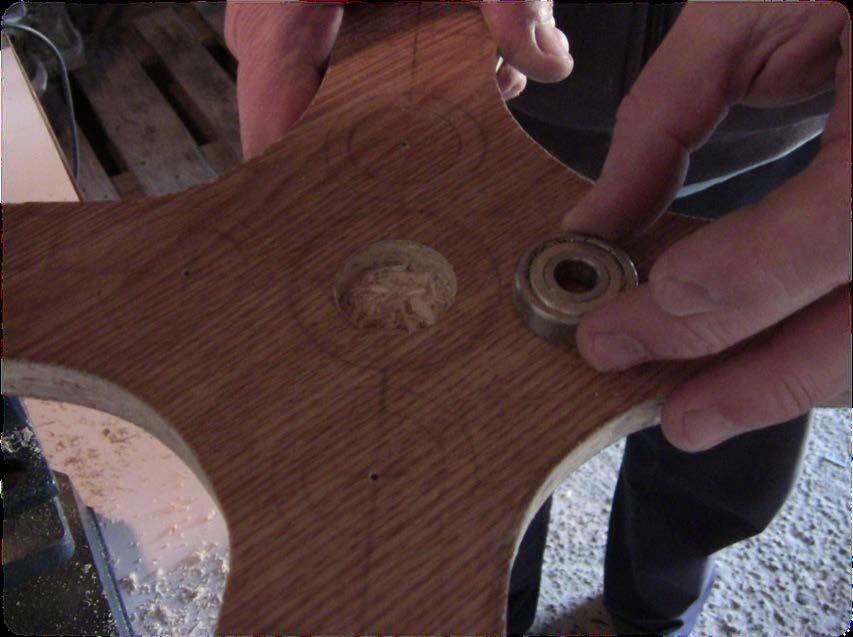
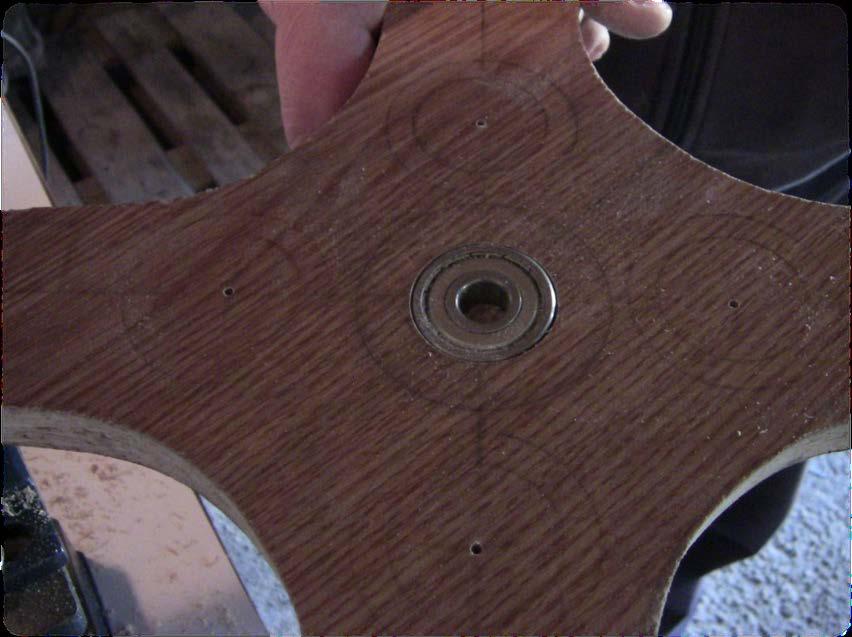
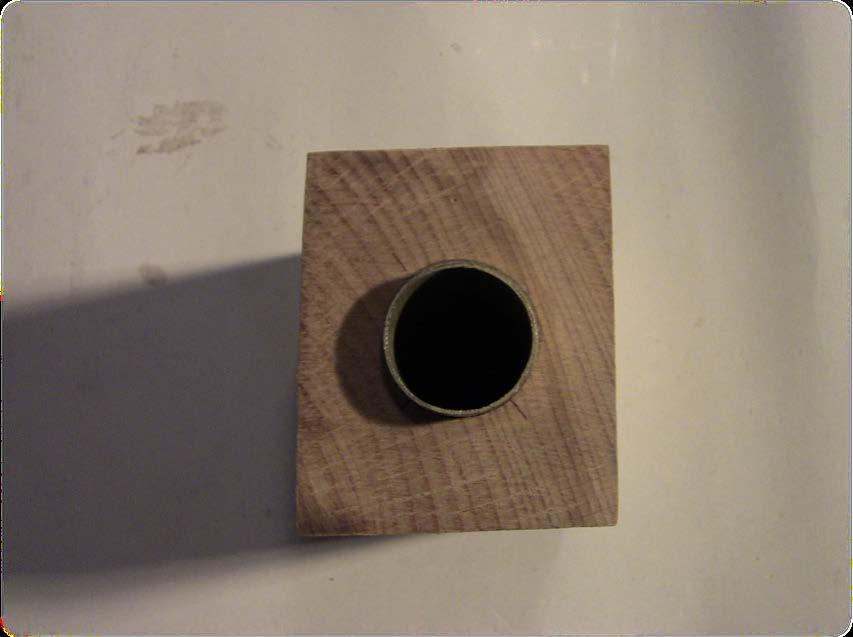
8 Preparing The Supports Next you ll need to prepare the supports. First you need to drill the bearing holes. In order to do that you should use a 1 3/16 milling drill bit. OPTIONAL you can first use a small spiral drill bit to drill a guide hole. NOTE: Don t drill the hole all the way through. Only drill a hole equal with the depth of your bearing. We used RS Bearing 10x30x9.
9

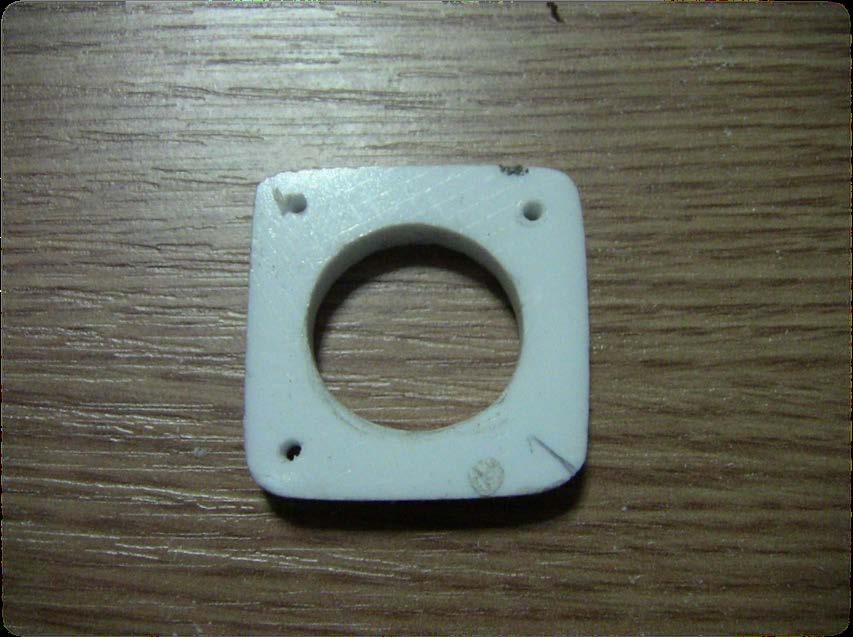
10 Next using the schematics/ blueprints included in the W.I.S.E. Generator Package draw the 4 holes around the bearing. These 4 holes are OPTIONAL. They don t play any role in the system. We have used them as technological holes for you to better see what is going on in the system. Use the same 1-3/16 milling drill bit.

11 Here are the two finished support plates with the bearings mounted:

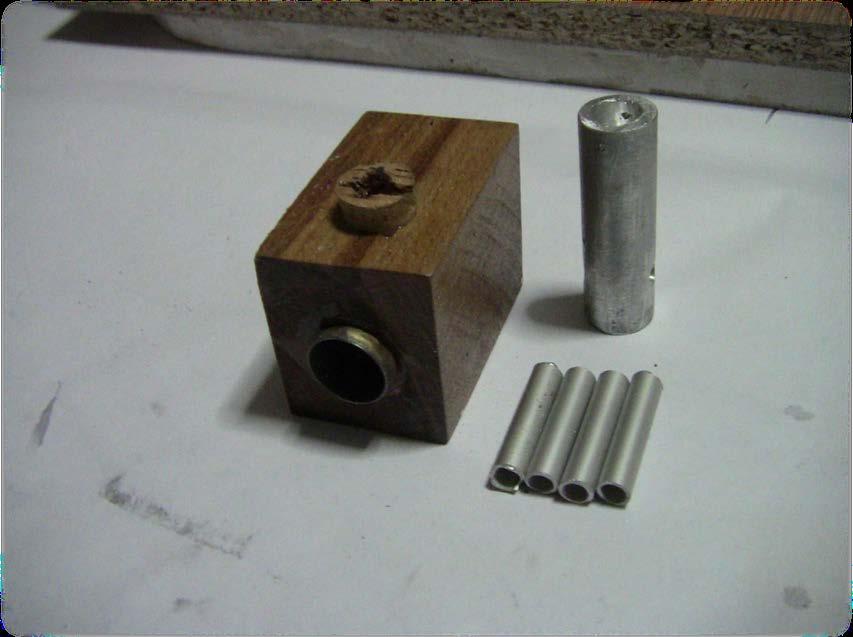
12 The Flywheel For the FLYWHEEL you can use a light weight wood such as linden wood or anything similar. For this version of the project we have used a cork like material which is very light. If you don t find a circular shaped material you must cut it yourself using a jigsaw. First off you need to drill the center hole for the main axle. Use a 25/64 drill bit. Also try to eliminate as much weight from the FLYWHEEL as you can. You should end up with something like this:

13 The Pistons For this design of the W.I.S.E. Generator System you will need 4 PISTONS. We have used an aluminum bar because it s lightweight and strong enough to support the pressure, also it s easier to cut and drill. Cut 4 pieces 2-1/8 long from a 47/64 diameter aluminum bar.

14

15 Next use different drill bits according to the schematics/blueprints included to drill the specific holes of the pistons.

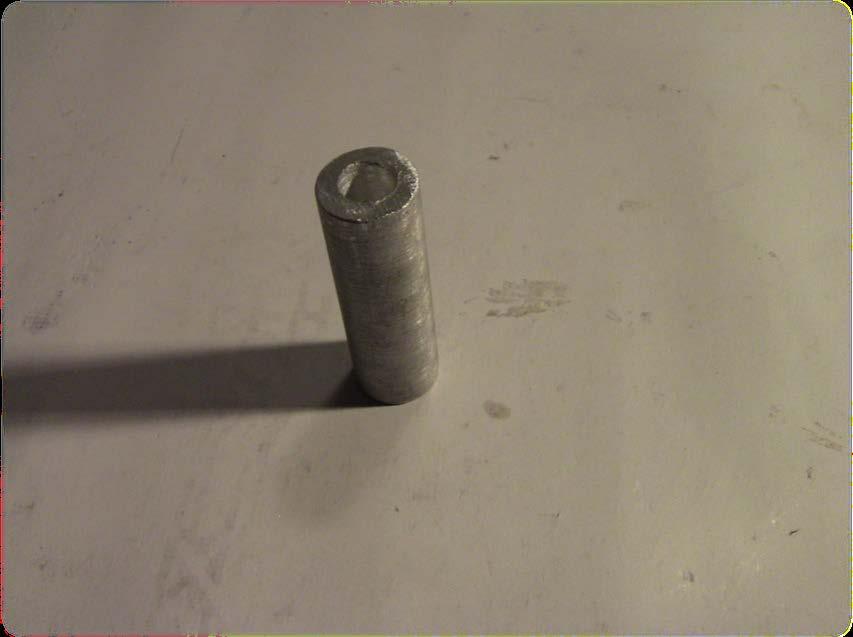
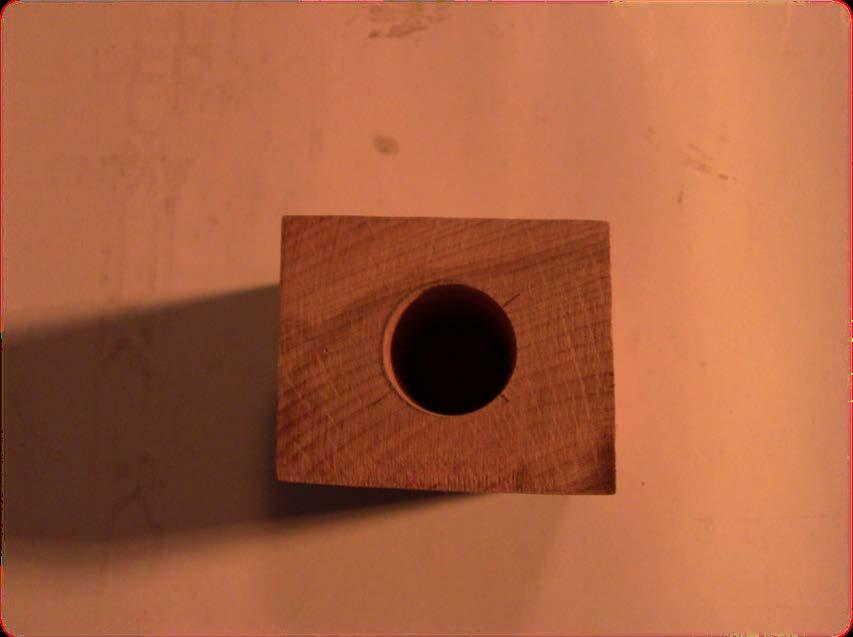
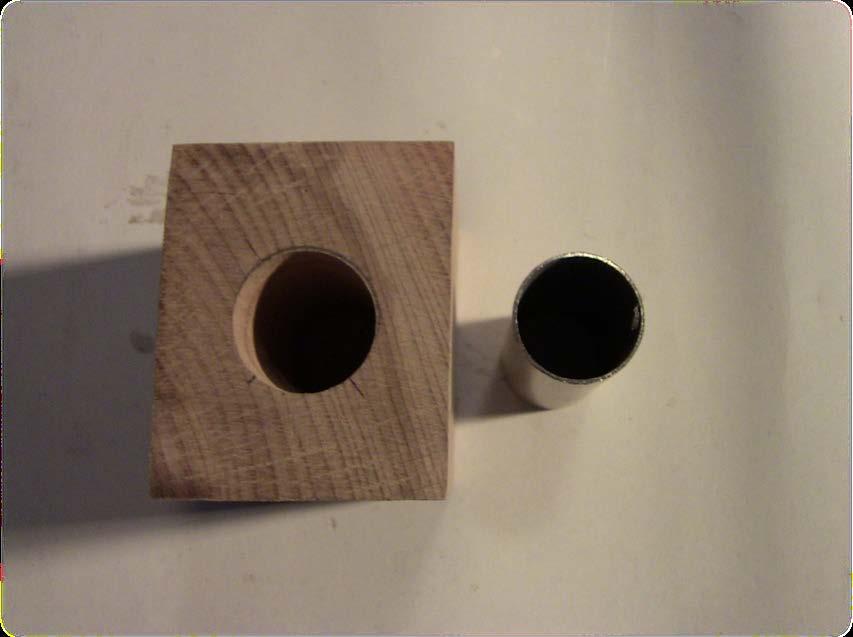
16 The Piston Cylinders For the piston cylinders you ll need 4 pieces of 2-1/8 brass tubing 25/32 in diameter. These will fit inside your piston cylinder housing. For the piston cylinder housing you should use a hard density material able to support high pressures. You could use whatever you can find such as high-density plastic/acryl or even wood.

17 First you need to drill the 25/32 holes for the pistons(left).
18
19
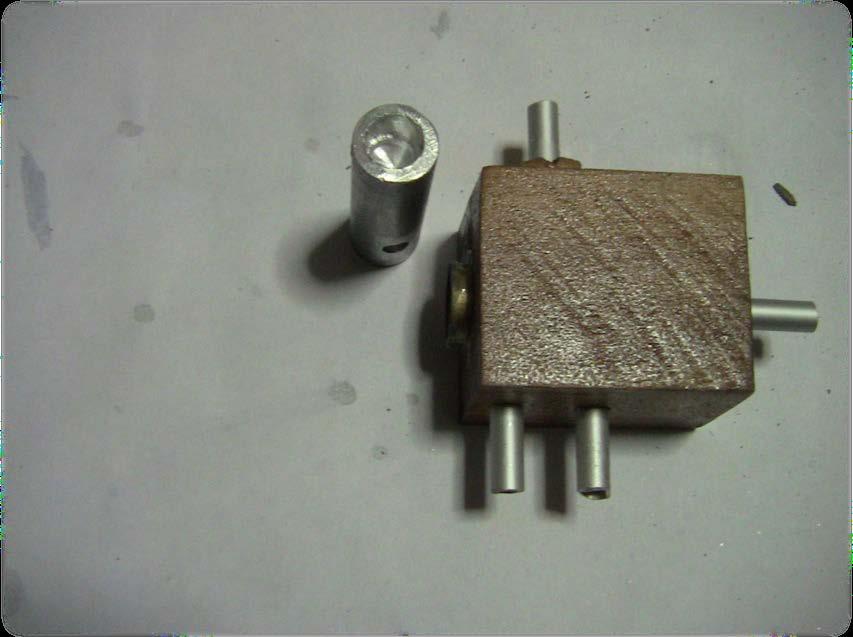
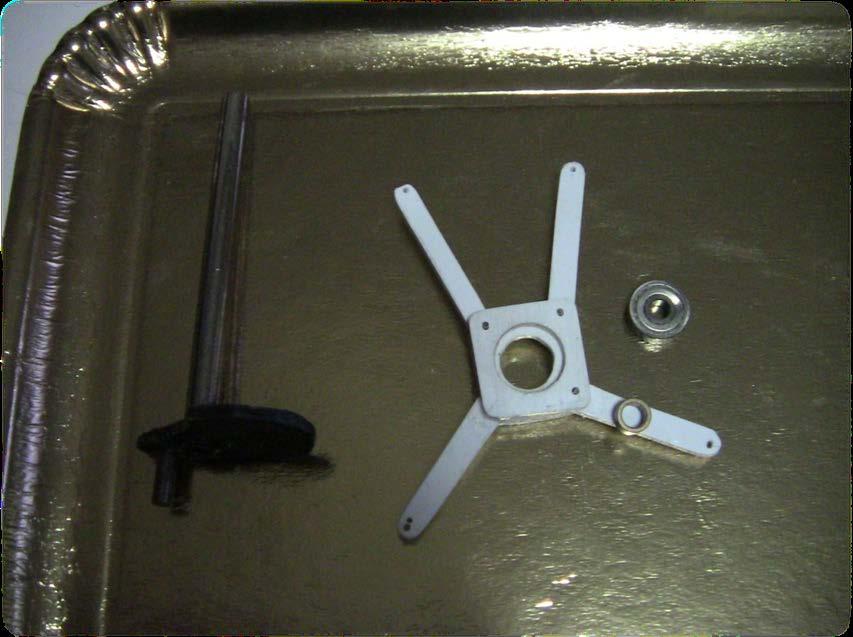
20


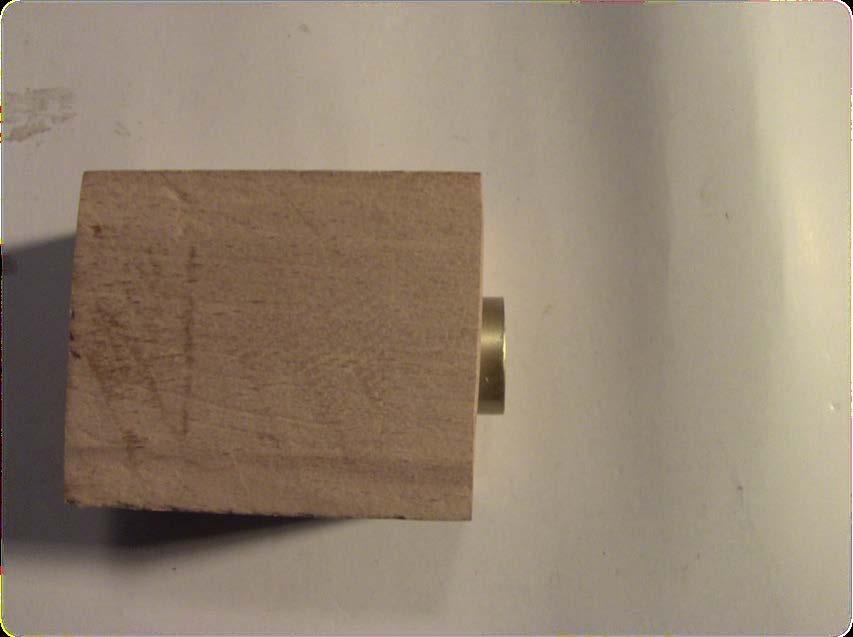
21 Next you need to drill the 5/16 intake hole on the opposite side of the piston cylinder.

22 Next drill the additional holes according to the schematics and blueprints. First, you will need to drill 2x 5/16 holes in the top part of you piston cylinder. After that you will need to drill a 19/32 hole in the bottom of your piston cylinder housing.


23 Next, use a 19/32 stopper and glue it in the 19/32 hole you just drilled.

24 You will need to drill a 5/16 hole right through the middle of the stopper you just glued in. Here s how it should look: Next you will need to cut 16 equal pieces of 5/16 aluminum tubing. You can use whatever material you may have lying around such as brass.

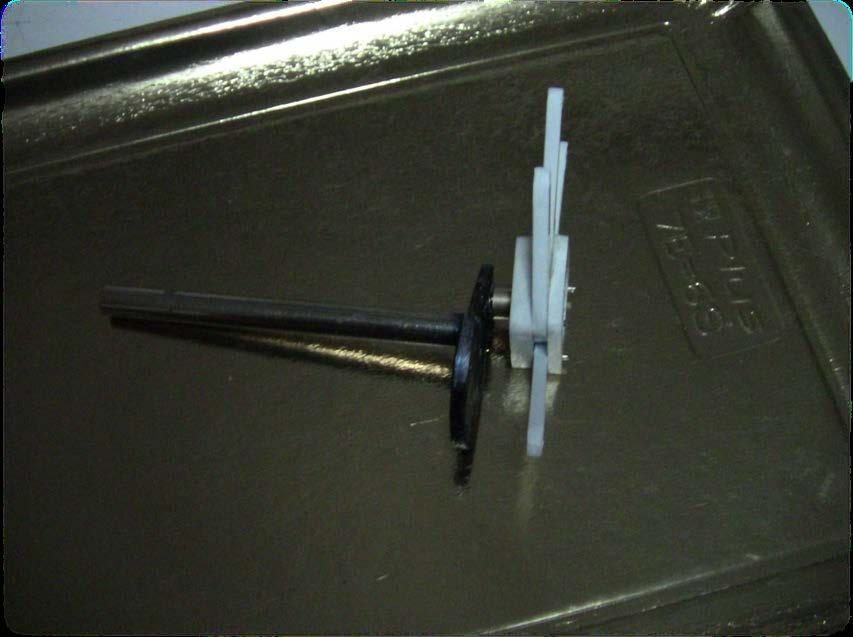
25 You will need 4 pieces of aluminum tubing for each piston cylinder housing. Insert the 4 pieces of aluminum tubing in the 5/16 holes of the piston cylinder housing and glue them in place. Make sure that no glue get s inside the piston cylinder. Here s how the finished piston cylinder should look like:
26


27 The Axle & Counterweight For the axle we have used a 25/64 diam. piece of aluminum tubing. For the counterweight we have cut a piece of lead into the desired shape. Drill a 25/64 hole in the counterweight. Now glue the main axle to the counterweight. You should end up with something like this:

28 Next up are the connecting rods and the linking mechanism. You need to start by creating the center piece. This is made from two equal 13/6 square parts with a 19/63 hole in the middle. You will also need to drill 3x 5/64 mounting holes in the square linking parts. For this you ll need a hard plastic or similar material.
29

30 Then you ll need to make the 4 linking arms. We have made them from the same hard plastic we did the square linking parts. You ll need to make 3 identical linking arms. Use the dimensions below:


31 You will also need to make 1 more linking arm that will hold the 696 2RS Bearing 6x15x5

32 Next you ll need to connect the central linking mechanism together using bolts or small pieces of steel wire. Continue by inserting and gluing the 696 bearing inside the square linking mechanism. Then connect the square linking mechanism to the axle and counterweight by gluing another piece of steel shaft to the second hole of the counterweight and connecting it to the bearing.
33


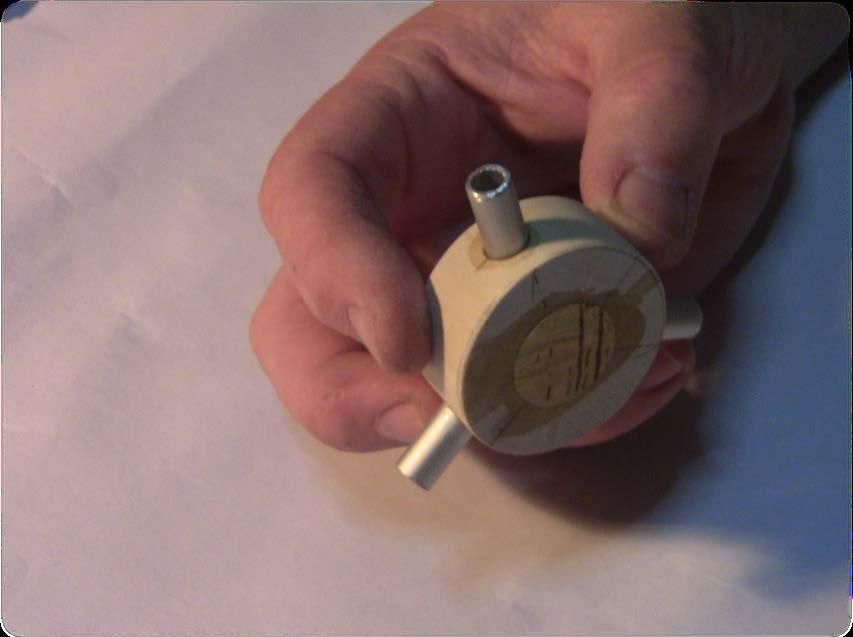
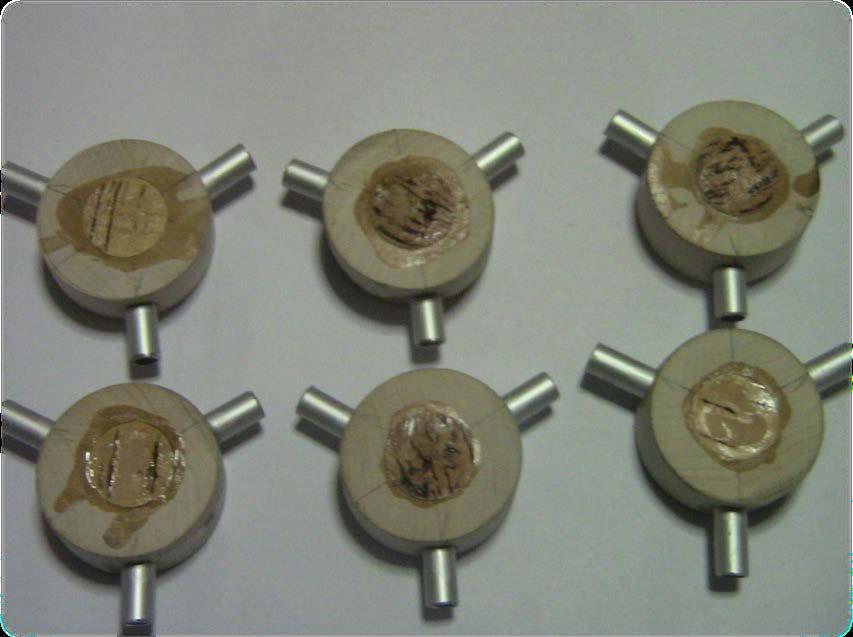
34 Assembly Start the assembly of the system by drilling two 1/8 holes for each of the 4 piston cylinder housing in the front support.

35 Now connect the 4 piston cylinder housings to the front support with the pistons facing inwards. To do this operation use techs crews. Now you need to fix the two supports to the base plate. To do this you must first drill 1/8 holes in both the base and the supports.
36

37

38 Fix the two supports to the base plate using tech screws. Here what you should have so far: Now you should connect the axle & counterweight along with the linking mechanism to the system. Simply insert the main axle through the front bearing. Next you should insert the axle through the flywheel and then through the back bearing.


39 NOTE: For better fixing of the flywheel you can use some brass spacers.


40 You will now need to attach the 4 connecting rods to the pistons. In order to do that you should use small bolts or cut some steel wire. Here is how the main piston rod should be connected:

41 The Splitters For The W.I.S.E. Generator System to work you will also need some air/steam splitters. We have used the same treated high density wood we used for the piston cylinder housing. You can use whatever material you have lying around. You need 6 round splitters with a diameter of 37/64.

42 You will need to drill 3x 5/16 holes in each splitter. The holes need to be 120 o apart. You will also need to drill/mill a 19/32 hole in the middle of each splitter.


43 Next you ll need to glue a wooden/cork stopper half haw through the center hole of each splitter.

44 Then you ll need to insert 3 aluminum tubing rods in each splitter and glue them in place. You should end up with something like this:
45

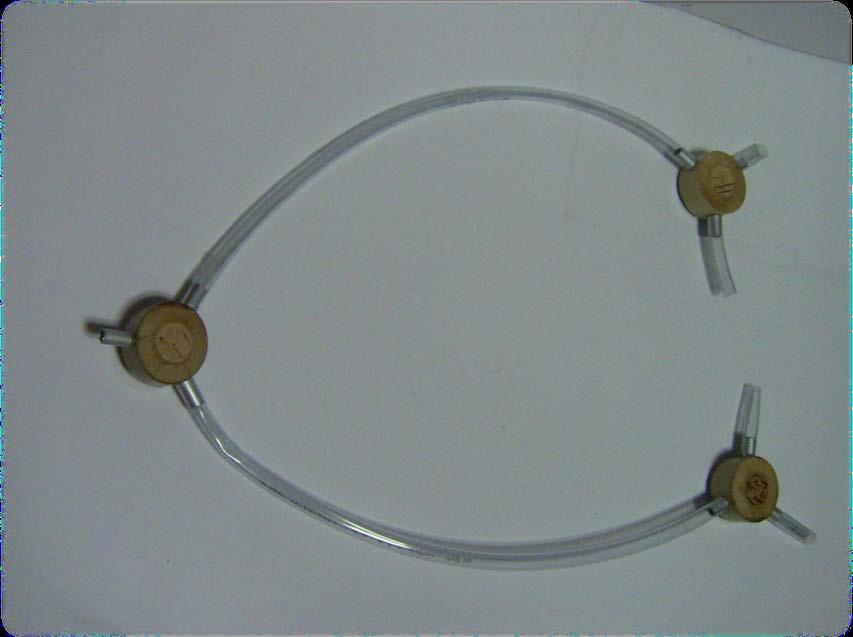
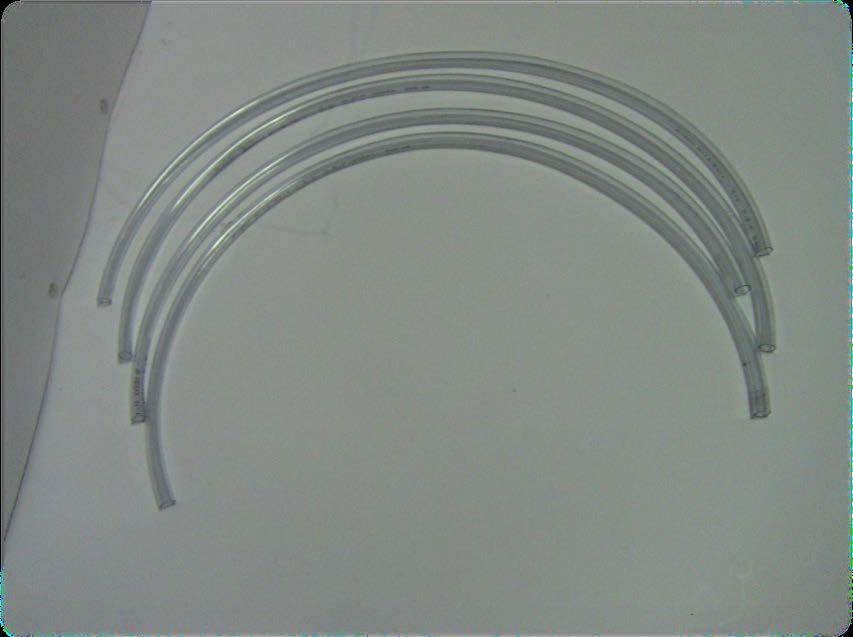
46 Final Connections Use the drawing below for the final connections. Use 5/16 diam. flexible plastic tubing.
47

48 Congratulations! Your W.I.S.E. Generator System Is Finished!
Harnessing the Power of Steam Poor man s guide
 D I S C L A I M E R O F L I A B I L I T Y A N D W A R R A N T Y This publication describes the author s opinions regarding the subject matter herein. The author and publisher are not rendering advice or
Text Your Way To the Bedroom How To Lure Any Woman To Sex
 Text Your Way To the Bedroom How To Lure Any Woman To Sex Page 1 D I S C L A I M E R O F L I A B I L I T Y A N D W A R R A N T Y This publication describes the author s opinions regarding the subject matter
The EDR Aerial Photo Decade Package
 Wickenburg/Forepaugh W. US Highway 60/N. 436th Ave Wickenburg, AZ 85390 Inquiry Number: April 22, 2011 The Aerial Photo Decade Package Aerial Photo Decade Package Environmental Data Resources, Inc. ()
 Support@Powrkraft.com 8ga. @ 0ft, 6ga. @ 50ft, ga @ 00ft, 0ga @ 00ft 3-6 Model Number Motor Diameter* 65556 500W 0 Volt 0 / Most Wood 0 4 ton 30 PSI 3.7 qt. 37 0 97 lb. 6 0W (-3 ISO Viscosity) Hydraulic
Peg Board Option for the GearBoss Shelving System
 Installation Instructions Peg Board Option for the GearBoss Shelving System Contents Important User Information...........................2 General...2 Manufacturer...2 Intended Use...2 Warranty...2 Safety
Wenger Corporation 2010 Printed in China 02/10 Part #148H Wenger Corporation, 555 Park Drive, P.O. Box 448, Owatonna, Minnesota
 Assembly Instructions Violin/Viola Storage Rack CONTENTS Safety Precautions.................................. Warranty.......................................... Important User Information............................
Signature Choral Riser Side Rail
 Assembly/Owner s Manual Signature Choral Riser Side Rail Signature Choral 3-Step Riser with Optional Side Rail Signature Choral 4-Step Riser with Optional Side Rail CONTENTS Visit the Signature Choral
The EDR Aerial Photo Decade Package
 I-710 Corridor - Segment 5 I-710 Corridor - Segment 5 Los Angeles County, CA 90201 Inquiry Number: March 25, 2009 The EDR Aerial Photo Decade Package EDR Aerial Photo Decade Package Environmental Data
Shrinker and stretcher
 Shrinker and stretcher Model 96465 Assembly And Operation Instructions Due to continuing improvements, actual product may differ slightly from the product described herein 3491 Mission Oaks Blvd, Camarillo,
Easy-to-Follow. Instruction Manual. 1-Foot Module assembly
 Easy-to-Follow Instruction Manual 1-Foot Module assembly Copyright Notice This instruction manual is protected under Copyright Law of the United States of America. This copy of the instruction manual is
(408) CLASS 2 TRANSFORMER INPUT: AC 12OV
 CLASS 2 TRANSFORMER INPUT: AC 12OV") T74C232 Paging System Transmitter U S E R M A N UA L Transmit Receive Power 9VAC T74C232 FCC ID: M74T7400 800.437.4996 www.pager.net RS-232 Installation, Warranty and Service Information Long Range Systems
T74C232 Paging System Transmitter U S E R M A N UA L Transmit Receive Power 9VAC T74C232 FCC ID: M74T7400 800.437.4996 www.pager.net RS-232 Installation, Warranty and Service Information Long Range Systems
9 PIECE TUNGSTEN CARBIDE HOLE SAW KIT. Model 90721
 9 PIECE TUNGSTEN CARBIDE HOLE SAW KIT Model 90721 Set up And Operating Instructions Diagrams within this manual may not be drawn proportionally. Due to continuing improvements, actual product may differ
The EDR Aerial Photo Decade Package
 Former Delco Chassis Plant -Site ID 1104 12950 Eckles Road Livonia, MI 48150 Inquiry Number: August 10, 2009 The EDR Aerial Photo Decade Package EDR Aerial Photo Decade Package Environmental Data Resources,
INSTALLATION INSTRUCTIONS
 CJ FULL WIDTH CONVERSION KIT The Poison Spyder Customs Full Width Axle Conversion Kit is designed to mount full width axle assemblies underneath 76 to 86 Jeep CJ s (CJ-5, CJ-7 & CJ-8). The kit is designed
Magnum low voltage drawout circuit breaker IEC horizontal stab cassette shutter kit (double wide A cassettes)
") kit (double wide 4000 6300A cassettes) i WARNING (1) ONLY QUALIFIED ELECTRICAL PERSONNEL SHOULD BE PERMITTED TO WORK ON THE EQUIPMENT. (2) ALWAYS DE-ENERGIZE PRIMARY AND SECONDARY CIRCUITS IF A CIRCUIT
kit (double wide 4000 6300A cassettes) i WARNING (1) ONLY QUALIFIED ELECTRICAL PERSONNEL SHOULD BE PERMITTED TO WORK ON THE EQUIPMENT. (2) ALWAYS DE-ENERGIZE PRIMARY AND SECONDARY CIRCUITS IF A CIRCUIT
Elimination of Elevator Bounce
 For the Agilent Archon Autosampler Rework Instructions CAUTION This kit is intended for use by Agilent Service personnel only. Elevator Removal 1 Open top cover. 2 Open front lower door. 3 Remove vial
PRC-LA Installation Guide
 1321 S. State College Blvd., Fullerton, CA 92831 USA Weight Limit Maximum Flat Panel Weight: Warning Statements 50 lbs. THE WALL STRUCTURE MUST BE CAPABLE OF SUPPORTING AT LEAST FOUR TIMES THE WEIGHT OF
Single Phase Rectifier Bridge, 2 A
 Single Phase Rectifier Bridge, 2 A 2KBP Series FEATURES Suitable for printed circuit board mounting Compact construction RoHS COMPLIANT D-44 PRODUCT SUMMARY I O V RRM 2 A 50 to 1000 V High surge current
Please read and understand the OnBoard Timpani Cart Owner s Manual before using the Timpani Cart.
 Assembly and Owner s Manual OnBoard Timpani Cart Performance Position Towing Position CONTENTS Important User Information...........................2 General......................................2 Manufacturer.................................2
Drawer Unit Assembly. Wenger Corporation 2006 Printed in USA 12/06 Part #121B115-01
 Assembly Instructions Rehearsal Resource Center Folio Box Option Model 121 Drawer Unit Assembly CONTENTS Warranty.......................................... 3 Important User Information............................
Three Phase Bridge (Power Modules), 25/35 A
, 25/35 A") 26MT/ D-63 FEATURES Universal, 3 way terminals: push-on, wrap around or solder High thermal conductivity package, electrically insulated case Center hole fixing Excellent power/volume ratio UL E3359 approved
26MT/ D-63 FEATURES Universal, 3 way terminals: push-on, wrap around or solder High thermal conductivity package, electrically insulated case Center hole fixing Excellent power/volume ratio UL E3359 approved
The RF probe is of conventional design using a signal diode to convert the AC voltage to a DC voltage; it is configured as a half wave rectifier.
 RF Sampler Meter Probe Background The meter probe is an RF probe that allows the user to monitor the voltage appearing at the sense coil of a traditional RF sampler. The meter probe when used as described
Ten Turns Servo or Bushing Mount Hall Effect Sensor in Size 09 (22.2 mm)
") Ten Turns Servo or Bushing Mount Hall Effect Sensor in Size 09 (22.2 mm) ELECTRICAL SPECIFICATIONS FEATURES All electrical angles available up to: 3600 Accurate linearity down to: ± 0.5 % Very long life:
Ten Turns Servo or Bushing Mount Hall Effect Sensor in Size 09 (22.2 mm) ELECTRICAL SPECIFICATIONS FEATURES All electrical angles available up to: 3600 Accurate linearity down to: ± 0.5 % Very long life:
Appendix B: Historic Aerial Photographs
 Yolo County - Solar Ground Tracker Project Phase I Environmental Site Assessment Appendix B: Historic Aerial Photographs Michael Brandman Associates H:\Client (PN-JN)\1759\17590008\Phase I ESA\17590008
Owner s Manual AE PLUG AERATOR MANUFACTURING QUALITY LAWN CARE EQUIPMENT SINCE Made In CHINA REV
 MANUFACTURING QUALITY LAWN CARE EQUIPMENT SINCE 1945 Owner s Manual AE-48 48 PLUG AERATOR IMPORTANT Read and follow all Safety Precautions and Instructions Before Operating this Equipment. Made In CHINA
Your Performance Partner
 Assembly Instructions Attic Storage System Your Performance Partner CONTENTS Safety Precautions.................................. 2 Warranty.......................................... 2 Important User Information............................
Sheet Metal Design Guidelines
 Sheet Metal Design Guidelines Issue XIV, Aug 2015 2 Copyright Notice Geometric Limited. All rights reserved. No part of this document (whether in hardcopy or electronic form) may be reproduced, stored
Sheet Metal Design Guidelines
 Sheet Metal Design Guidelines Hem Design Guidelines Issue XII, June 2015 2 Copyright Notice Geometric Limited. All rights reserved. No part of this document (whether in hardcopy or electronic form) may
INSTALLATION INSTRUCTIONS
 CREATING POSITIVE CUSTOMER EXPERIENCES INSTALLATION INSTRUCTIONS Universal Low Profile Tilt Mount for 42 to 63 Flat Panels NORTH AMERICA 3130 East Miraloma Avenue Anaheim, CA 92806 USA USA and Canada Phone:
Throttle Position Sensor in Hall Effect Technology Hollow and D-Shaft Versions
 Model 981 HE Throttle Position Sensor in Hall Effect Technology FEATURES Accurate linearity down to: ± 0.5 % Easy mounting principle Non contacting technology: Hall effect Model dedicated to all applications
14 Piece Slide Hammer and Puller Set
 Owner s Manual & Safety Instructions Save This This Manual Keep Keep this this manual manual for for the the safety safety warnings warnings and and precautions, assembly, assembly, operating, inspection,
INSTALLATION INSTRUCTIONS
 JK BODY ARMOR INSTALLATION Thank you for purchasing Poison Spyder Body Armor for your Jeep JK. Although it is a lengthy procedure, Installation is fairly simple with the right tools and good mechanical
MANUAL METAL SHRINKER/STRETCHER
 MANUAL METAL SHRINKER/STRETCHER Model 95062 ASSEMBLY AND OPERATING INSTRUCTIONS Due to continuing improvements, actual product may differ slightly from the product described herein. 3491 Mission Oaks Blvd.,
Model DB Disc Caliper Brake AIR CHAMP PRODUCTS. User Manual. (i) MTY (81)
 MTY (81)") DIST. AUTORIZADO MEX (55) 53 63 3 3 QRO (44) 95 7 60 MTY (8) 83 54 0 8 AIR CHAMP PRODUCTS User Manual Model DB Disc Caliper Brake (i) FORM NO. L-00-G-030 MEX (55) 53 63 3 3 MTY (8) 83 54 0 8 DIST. AUTORIZADO
DIST. AUTORIZADO MEX (55) 53 63 3 3 QRO (44) 95 7 60 MTY (8) 83 54 0 8 AIR CHAMP PRODUCTS User Manual Model DB Disc Caliper Brake (i) FORM NO. L-00-G-030 MEX (55) 53 63 3 3 MTY (8) 83 54 0 8 DIST. AUTORIZADO
PRIMO 56" FOOSBALL TABLE ASSEMBLY INSTRUCTIONS
 PRIMO 56" FOOSBALL TABLE ASSEMBLY INSTRUCTIONS NG1035 THANK YOU! Thank you for purchasing this product. We work around the clock and around the globe to ensure that our products maintain the highest possible
EVERSPIN s New 2mm Exposed Pad DFN Package Meets Both SOIC-8 and DFN8 PCB Layouts
 EVERSPIN s New 2mm Exposed Pad DFN Package Meets Both SOIC-8 and DFN8 PCB Layouts This Application Note is to inform Everspin customers that a new, DFN8 package with a 2mm bottom exposed pad has been added
Guitar Mobile Storage Rack
 Assembly Instructions Guitar Mobile Storage Rack CONTENTS Safety Precautions.................................. 2 Warranty.......................................... 2 Operation.........................................
Copyright 2010 Springbok Publishing All Rights Reserved- Page 1
 Copyright 2010 Springbok Publishing All Rights Reserved- www.woodensaddlerackplans.com Page 1 Legal Information All contents copyright 2010 by Springbok Publishing. All rights reserved. No part of this
Attic Accessory for 48 X-Cart
 Assembly Instructions Attic Accessory for 48 X-Cart Short Attic Tall Attic 48 X-Cart with Short Attic Accessory CONTENTS Important User Information...2 General...2 Manufacturer...2 Installation...2 Intended
High Current Density Surface Mount Dual Common-Cathode Schottky Rectifier
 High Current Density Surface Mount Dual Common-Cathode Schottky Rectifier esmp TM Series 2 TO-277A (SMPC) Anode FEATURES Very low profile - typical height of. mm Ideal for automated placement Low forward
PixController, Inc. Wireless Vibration Sensor For Indoor and Outdoor Use
 PixController, Inc. Wireless Vibration Sensor For Indoor and Outdoor Use Model: SEN-440 User s Manual Version 1.00 WARRANTY REGISTRATION PixController, Inc. warrants products sold by it and guarantees
Plans for The Siamese Twins
 Plans for The Siamese Twins Requests have been pouring in for plans for the Siamese Twins. In fact, another one poured in just last week! So I ve spent the past several days drawing them up. I think it
INSTALLATION INSTRUCTIONS
 INSTALLATION INSTRUCTIONS P4263F Universal Low Profi le Flat Mount for 42 to 63 Flat Panels NORTH AMERICA 3130 East Miraloma Avenue Anaheim, CA 92806 USA USA and Canada Phone: 1.800.368.9700 Fax: 1.800.832.4888
Aluminum Capacitors Little-Lytic Electrolytics
 QUICK REFERENCE DATA DESCRIPTION VALUE Operating temperature - 40 C to + 105 C Tolerance on C R G = + 75 %, - 10 % and F = + 50 %, - 10 % Ripple current Life validation test 2000 hours at + 85 C DC leakage
P4263TP. Installation Guide. Low-Profile Tilting Portrait Mount for Flat-Panels
 Low-Profile Tilting Portrait Mount for Flat-Panels 1321 S. State College Blvd., Fullerton, CA 92831 USA Weight Limit Maximum Flat Panel Weight: 175 lbs. Warning Statements THE WALL STRUCTURE MUST BE CAPABLE
Tablet Arm for Wenger Playright Chairs
 Assembly Instructions Tablet Arm for Wenger Playright Chairs CONTeNTs Before You Begin..........................................................2 Warranty.................................................................2
Installation Instructions Cage Kit JK Unlimited (4-Dr) Part # 76902
 Part # 76902") Please read instructions entirely before installing this product. Drilling is required to install this part. Parts Included Qty Parts Included Qty Driver Front Upright 1 Pass Side Drill Template (7289)
Please read instructions entirely before installing this product. Drilling is required to install this part. Parts Included Qty Parts Included Qty Driver Front Upright 1 Pass Side Drill Template (7289)
Owner s Manual & Safety Instructions
 Owner s Manual & Safety Instructions Save This Manual Keep this manual for the safety warnings and precautions, assembly, operating, inspection, maintenance and cleaning procedures. Write the product s
Spa & Hot Tub Necessities. Cover Removal System Installation & Use Manual
 Spa & Hot Tub Necessities Cover Removal System Installation & Use Manual SET-UP AND ASSEMBLY BEFORE BEGINNING ASSEMBLY, CAREFULLY READ THE FOLLOWING INFORMATION AND INSTRUCTIONS: Place all parts in a cleared
Single Phase Rectifier Bridge, 2 A
 Single Phase Rectifier Bridge, 2 A 2KBP Series FEATURES Suitable for printed circuit board mounting Compact construction RoHS COMPLIANT D-44 PRODUCT SUMMARY I O V RRM 2 A 50 to 1000 V High surge current
INSTALLATION INSTRUCTIONS
 INSTALLATION INSTRUCTIONS Universal Swingout Arm for 37 to 47 Flat Panels Model: AM80 NORTH AMERICA 3130 East Miraloma Avenue Anaheim, CA 92806 USA USA and Canada Phone: 1-800-368-9700 Fax: 1-800-832-4888
AM95 Installation Guide
 1321 S. State College Blvd., Fullerton, CA 92831 USA Included Components: Maximum Flat Panel Weight: 95 lb. / 43.1 kg. M4 X 25mm M5 X 25mm M6 X 12mm (Qty 2) M6 X 25mm M8 X 25mm Allen Key Plastic Cover
User Manual. Where Imagination Meets Innovation. FRESH AERO Easy Seat Tool For Grumman AA1 & AA5 Series Aircraft
 FRESH AERO Easy Seat Tool For Grumman AA1 & AA5 Series Aircraft Alpha Model For Grumman AA-1 & AA-5 Series Aircraft with Access Holes in Front Seat Buckets User Manual The Steelebrook Group Where Imagination
Thick Film Resistor Networks, Dual-In-Line, Molded DIP
 STANDARD ELECTRICAL SPECIFICATIONS POWER RATING / ELEMENT (1) RANGE NO. OF P 70 C PINS Ω W MDP 14 MDP 16 01 05 01 05 0.2 0.2 Consult factory Consult factory Notes (1) For resistor power ratings at + 25
Safety First! Use eye protection, always! Use ear protection with loud power tools. Stay with children while they work!
 TM TM ART TABLE Safety First! Use eye protection, always! Use ear protection with loud power tools Stay with children while they work! Follow tool manufacturers safety guidelines Page 1 ART TABLE Page
Assembly Instructions and Owner s Manual Flex TechBridge
 Assembly Instructions and Owner s Manual Flex TechBridge Contents Important User Information...........................2 Safety Precautions.................................2 Required Tools.....................................3
Hullavator Gas Spring Replacement (simplified)
") Hullavator Gas Spring Replacement (simplified) Some Thule Hullavators came with (original owner) lifetime warranties if you are the original owner of a defective Hullavator and can provide proof of purchase
Hullavator Gas Spring Replacement (simplified) Some Thule Hullavators came with (original owner) lifetime warranties if you are the original owner of a defective Hullavator and can provide proof of purchase
Easy-to-Follow. Instruction Manual. 2-Foot Module assembly
 Easy-to-Follow Instruction Manual 2-Foot Module assembly Copyright Notice This instruction manual is protected under Copyright Law of the United States of America. This copy of the instruction manual is
Essential Lab Workstation
 Assembly Instructions Essential Lab Workstation Contents Important User Information...........................2 Required Tools.....................................3 Hardware Parts List.................................3
9 QUICK RELEASE WOODWORKING VISE
 9 QUICK RELEASE WOODWORKING VISE 94386 OPERATING INSTRUCTIONS Due to continuing improvements, actual product may differ slightly from the product described herein. 349 Mission Oaks Blvd., Camarillo, CA
INSTALLATION INSTRUCTIONS
 JK BRAWLER ROCKERS INSTALLATION Thank you for purchasing Poison Spyder Brawler Rockers for your Jeep JK. Although it is a lengthy procedure, Installation is fairly simple with the right tools and good
Simple Business Plan. for SUCCESSFUL. Online Marketing. of your offline business. Workbook & Checklist. By Theresa Delgado of
 for SUCCESSFUL Online Marketing of your offline business Workbook & Checklist By Theresa Delgado of http://theresadelgado.co ALL RIGHTS RESERVED No part of this report may be reproduced or transmitted
Building Rudy Kouhoupt s Walking-Beam Engine
 Building Rudy Kouhoupt s Walking-Beam Engine Some time ago I came across a copy of Rudy Kouhoupt s article: "Build this Walking-Beam Engine" (Popular Mechanics August 1969), and decided to try and make
SECTION STRUCTURAL STEEL. A. PART A and DIVISION 1 of PART B are hereby made a part of this SECTION.
 SECTION 051200 PART 1 GENERAL 1.01 GENERAL REQUIREMENTS A. PART A and DIVISION 1 of PART B are hereby made a part of this SECTION. B. Examine all conditions as they exist at the project prior to submitting
Specifications. Important Safety Information
 Specifications Tire Rim Capacity 4 to 12 Rim Height 16 (2) Bead Breaker Handles 21 Long Includes Aluminum Centering Cone (2) Nylon Spacers Important Safety Information 1. Do not exceed max. tire capacity.
VHF variable capacitance diode
 Rev. 1 25 March 2013 Product data sheet 1. Product profile 1.1 General description The is a variable capacitance diode, fabricated in planar technology, and encapsulated in the SOD323 (SC-76) very small
Planishing hammer stand For use with SKU Planishing hammer
 Planishing hammer stand For use with SKU 94847 Planishing hammer Model 96300 Assembly And Operation Instructions Please Note: Planishing Hammer not included with Stand. Due to continuing improvements,
Surface Mounted Power Resistor Thick Film Technology
 DIMENSIONS in millimeters FEATURES AEC-Q200 qualified 35 W at 25 C case temperature Surface mounted resistor - TO-263 (D 2 PAK) style package Wide resistance range from 0.01 to 550 k Non inductive Resistor
Uni-Cross Universal Transmission Crossmember
 Uni-Cross Universal Transmission Crossmember Installation Guide Applications: Fits 1965-1970 Mustang READ THIS MANUAL IN ITS ENTIRETY PRIOR TO BEGINNING INSTALLATION Ford Performance Specialist 1001 Reno
Bonus Cash Explosion!
 Bonus Cash Explosion! Extra Money From Existing Traffic By Tony Herman www.tonyherman.com 2017 Tony Herman All Rights Reserved. Version 1.0 Disclaimers You are using any techniques, hints, cheats or advice
OnBoard Bass Drum/Gong Cart
 Assembly and Owner s Manual OnBoard Bass Drum/Gong Cart CONTENTS Important User Information...................................................................2 Safety...................................................................................3
ECM Installation Guide Installationsanleitung, Guía de Instalacíon, Guida de Installazione, Guide d Installation, Installatie gids
 Elliptical Ceiling Mount for 37 to 63 Flat Panels Model: ECM-3000 Warranty, Garantie, Garantía, Garanzia, Garantie, Waarborg: http://www.mounts.com/warranty 9531-000-001-0X Rev.0 www.mounts.com North America
2001A. 200KHz Function Generator Instruction Manual. 99 Washington Street Melrose, MA Phone Toll Free
 2001A 200KHz Function Generator Instruction Manual 99 Washington Street Melrose, MA 02176 Phone 781-665-1400 Toll Free 1-800-517-8431 Visit us at www.testequipmentdepot.com WARRANTY Global Specialties
Machining Design Guidelines
 Machining Design Guidelines Milling Rules Issue IV, Jan 2015 2 Copyright Notice Geometric Limited. All rights reserved. No part of this document (whether in hardcopy or electronic form) may be reproduced,
Surface Mount Ceramic Chip Antennas for 2.4 GHz
 Surface Mount Ceramic Chip Antennas for 2.4 GHz chip antenna The VJ5106W240 series are small form-factor, high-performance chip-antennas designed to be used in wireless, bluetooth and ISM band 2.4 GHz.
Preliminary Data Sheet
 Surface Mount Ceramic Chip Antennas for 400 MHz The VJ5301M400 series are small form-factor, high-performance chip-antennas optimized for industrial, automotive, and medical applications. chip antenna
HUSTLER 7' & 8' POOL TABLE ASSEMBLY INSTRUCTIONS
 HUSTLER 7' & 8' POOL TABLE ASSEMBLY INSTRUCTIONS Please Do Not Hesitate to Contact Our Consumer Hotline at 800-759-0977 with Any Questions That May Arise During Assembly or Use of This Product! NG2515PB/NG2520PB
INSTALLATION INSTRUCTIONS
 INSTALLATION INSTRUCTIONS Universal Low Profile Tilt Mount Model: U.S. Toll Free: 1-866-752-6271 Outside N. America: 1-503-748-5799 E-mail: ts@planar.com FRANCE Phone: +33 5 6378 3810 E-mail: emeats@planar.com
Fully Sealed Container Cermet Potentiometers Submarine Applications
 FEATURES High power rating W at 70 C Stainless steel shaft and bushing to endure sea salt water immersion Fully sealed IP68 on panel Tight temperature coefficient (± 75 ppm/ C typical) Compliant to RoHS
English FULL MOTION FLAT PANEL TV MOUNT. User Manual L102 TV Mount. 56 lb (25 kg) VESA. Supporting your digital lifestyle (
 VESA. Supporting your digital lifestyle (") English User Manual L102 TV Mount FULL MOTION FLAT PANEL TV MOUNT ±12 19-32 56 lb (25 kg) 50x50-200x200 VESA ±180 3-17 (7.6-43.2 cm) Supporting your digital lifestyle Table of Contents Table of Contents
English User Manual L102 TV Mount FULL MOTION FLAT PANEL TV MOUNT ±12 19-32 56 lb (25 kg) 50x50-200x200 VESA ±180 3-17 (7.6-43.2 cm) Supporting your digital lifestyle Table of Contents Table of Contents
High Speed Infrared Emitting Diode, 830 nm, GaAlAs Double Hetero
 High Speed Infrared Emitting Diode, 83 nm, GaAlAs Double Hetero 94 8389 DESCRIPTION is an infrared, 83 nm emitting diode in GaAlAs double hetero (DH) technology with high radiant power and high speed,
HIGH INTEGRITY DIE CASTING PROCESSES
 HIGH INTEGRITY DIE CASTING PROCESSES EDWARD J. VINARCIK JOHN WILEY & SONS, INC. HIGH INTEGRITY DIE CASTING PROCESSES HIGH INTEGRITY DIE CASTING PROCESSES EDWARD J. VINARCIK JOHN WILEY & SONS, INC. This
INSTALLATION INSTRUCTIONS
 INSTALLATION INSTRUCTIONS Universal Low Profile Flat Mount Model: U.S. Toll Free: 1-866-752-6271 Outside N. America: 1-503-748-5799 E-mail: ts@planar.com FRANCE Phone: +33 5 6378 3810 E-mail: emeats@planar.com
Installation Instructions
 Articulating Hex Monitor Mount Stand Installation Instructions UNPACKING Carefully open the carton, remove contents, and place them on a protected surface to avoid damage. Check the parts and the Supplied
Pulse Proof Thick Film Chip Resistors
 Pulse Proof Thick Film Chip Resistors FEATURES High pulse performance Stability R/R 1 % for 0 h at 70 C Pure tin solder contacts on Ni barrier layer provides compatibility with lead (Pb)-free and lead
Guard Rail with In-Fill Panel
 Assembly Instructions Guard Rail for Wenger Versalite TM TM, Trouper, Stagehand, Portamaster, Showmaker Platform Systems Guard Rail with In-Fill Panel CONTENTS Important User Information...........................................................................
BB Product profile. 2. Pinning information. 3. Ordering information. FM variable capacitance double diode. 1.1 General description
 SOT23 Rev. 3 7 September 2011 Product data sheet 1. Product profile 1.1 General description The is a variable capacitance double diode with a common cathode, fabricated in silicon planar technology, and
Heavy-Duty Gate Latch (Self-Latching)
") Heavy-Duty Gate Latch (Self-Latching) Installation Instructions PLEASE READ OWNER'S MANUAL COMPLETELY BEFORE INSTALLING YOUR HINGE KIT. 5010EPN V1 4/14 Owner's Manual Version 1.0 For use with; aluminum
Heavy-Duty Gate Latch (Self-Latching) Installation Instructions PLEASE READ OWNER'S MANUAL COMPLETELY BEFORE INSTALLING YOUR HINGE KIT. 5010EPN V1 4/14 Owner's Manual Version 1.0 For use with; aluminum
Single Flex and Double Flex Couplings (i)
") Single Flex and Double Flex Couplings (i) FORM NO. L00G00 In accordance with Nexen s established policy of constant product improvement, the specifications contained in this manual are subject to change
Single Flex and Double Flex Couplings (i) FORM NO. L00G00 In accordance with Nexen s established policy of constant product improvement, the specifications contained in this manual are subject to change
AST-2446 INSTALLATION INSTRUCTIONS
 AST-2446 Suspension Adapter AST-2446 INSTALLATION INSTRUCTIONS Single Stud Installation Step 1. Secure the ceiling plate to the ceiling structure (see WARNING). Step 2. Use suitable hardware (commercially
HowtoPlans. 5'x13' Chicken Tractor Plan. Designed for up to 8 chickens. .org
 HowtoPlans.org 5'x13' Chicken Tractor Plan Designed for up to 8 chickens Disclaimer The information provided here will show you how to build a chicken coop. However, we at howtoplans.org do not claim that
Installation Instructions
 With ComtronICS new EZ Dash Mount, your tablet is securely mounted on the vehicle s dash, adjusts for multiple viewing positions, and frees up valuable space in your vehicle s interior. 246548 - Center
Part Ordering code Type Marking Remarks BAT85S BAT85S-TR or BAT85S-TAP BAT85S Tape and Reel/Ammopack
 BAT85S Small Signal Schottky Diode Features Integrated protection ring against static discharge Very low forward voltage AEC-Q0 qualified Compliant to RoHS directive 2002/95/EC and in accordance to WEEE
SNAP-FAN INSTALLATION
 ! SNAP-FAN INSTALLATION Only a qualified and licensed electrician or contractor should install or service Snap-Fan products. If someone other than a licensed electrician installs a Snap-Fan, Snap-Fan disclaims
High Intensity Red Low Current Seven Segment Display
 High Intensity Red Low Current Seven Segment Display DESCRIPTION 19237 This series defines a new standard for low current displays. It is a single digit 7-segment LED display utilizing AllnGaP technology
RV 10 Interior Panels
 RV 10 Interior Panels Important Notice: This manual contains important information that may affect the safety of your aircraft. Read the Warranty / Agreement below. There is information in the Warranty
Metal Film Resistors, Non-Magnetic, Industrial, Precision
 CMF Non-Magnetic Metal Film Resistors, Non-Magnetic, Industrial, Precision STANDARD ELECTRICAL SPECIFICATIONS GLOBAL HISTORICAL MAXIMUM WORKING VOLTAGE (1) V (1) Continuous working voltage shall be P x
DIY CIDER PRESS. If you ever fancied making your own cider, now is your chance! To build a cider press you will need the following;
 DIY CIDER PRESS If you ever fancied making your own cider, now is your chance! To build a cider press you will need the following; Plain timber (we used CLS Timber 40x90cm) Plywood (we used 18mm marine
Part Ordering code Type Marking Remarks BAS85 BAS85-GS18 or BAS85-GS08 - Tape and Reel
 Small Signal Schottky Diode Features For general purpose applications This diode features low turn-on voltage The devices are protected by a PN junction guard ring against excessive voltage, such as electrostatic
Model-Based Design Toolbox
 Model-Based Design Toolbox License Installation & Management Manual An Embedded Target for S32K1xx Family of Processors Version 3.0.0 Target Based Automatic Code Generation Tools For MATLAB /Simulink /Stateflow