TM Machine WetAlert TM Wireless Wetness Detector In-center User s Guide
|
|
|
- Blaze Banks
- 5 years ago
- Views:
Transcription

1 TM Machine WetAlert TM Wireless Wetness Detector In-center User s Guide
2
3 WetAlert Wireless Wetness Detector In-Center User s Guide Copyright , 2016, Fresenius USA, Inc. All Rights Reserved For software versions 4.14 and above This document contains proprietary information of Fresenius Medical Care Renal Therapies Group, LLC and its affiliates ( Fresenius Medical Care ). The contents of this document may not be disclosed to third parties, copied, or duplicated in any form, in whole or in part, without the prior written permission of Fresenius Medical Care. Fresenius Medical Care, the triangle logo, 2008K@home, 2008, home logo, and WetAlert are trademarks of Fresenius Medical Care Holdings, Inc., and/or its affiliated companies. All other trademarks are the property of their respective owners. Caution: Federal law (U.S.) restricts this device to sale by or on the order of a physician. WetAlert device Indications for Use: The Wireless Wetness Detector is indicated for use with the Fresenius Medical Care 2008K@home hemodialysis machine and is an optional accessory to aid in the detection of blood and water leaks during hemodialysis. Home hemodialysis using the detector must be observed by a trained and qualified person as prescribed by their physician. 2008K@home hemodialysis machine Indications for Use: the 2008K@home hemodialysis machine is indicated for acute and chronic dialysis therapy in an acute or chronic facility. The 2008K@home hemodialysis machine is also indicated for hemodialysis in the home and must be observed by a trained and qualified person as prescribed by their physician. The WetAlert device is for use with the WetAlert Starter Kit (P/N ) or the WetAlert Retrofit Kit (P/N ) and requires special hardware for the 2008K@home hemodialysis machine. Without a kit installed, the machine cannot receive wireless signals from the WetAlert device. WetAlert Wireless Wetness Detector In-Center User s Guide P/N rev F 1
4 Table of Contents The WetAlert Wireless Wetness Detector... 3 Description... 3 General Warnings... 4 Before Treatment... 6 Activating the WetAlert Device... 8 Activating the WetAlert Device (continued) Starting Treatment with the WetAlert Device Troubleshooting Restarting a Treatment Reading Drop Icon Status After Treatment WetAlert Device Care WetAlert Device Storage Appendix Setting the Wireless Wetness option WetAlert Spare Parts WetAlert Device Disposal WetAlert Device RF Transmitter Characteristics Quality of Service Manufacturer s Electromagnetic Compatibility (EMC) Declaration 23 Additional Information WetAlert Wireless Wetness Detector In-Center User s Guide P/N rev F


5 The WetAlert Wireless Wetness Detector Description The WetAlert wireless wetness detector is a disposable device that can sense blood leaks. During the treatment, the WetAlert device transmits radio signals to the 2008K@home hemodialysis machine and will alert the machine if the device detects a blood leak. During a wetness alarm, the 2008K@home hemodialysis machine will automatically stop the blood pump, close the venous clamp, display a visual alarm, and sound an audible alarm. The WetAlert device should be placed at the venous access site. WetAlert Wireless Wetness Detector In-Center User s Guide P/N rev F 3
6 General Warnings Federal Communication Commission (FCC) Interference Statement This equipment has been tested and found to comply with Part 15 of the FCC Rules. Operation is subject to the following two conditions: (1) this device may not cause harmful interference, and (2) this device must accept any interference received, including interference that may cause undesired operation. This equipment generates, uses, and radiates radio frequency energy and, if not installed and used in accordance with the instructions, may cause harmful interference to radio communications. However, there is no guarantee that interference will not occur in a particular installation. If this equipment does cause harmful interference to radio or television reception, which can be determined by turning the equipment off and on, the user is encouraged to try to correct the interference by one or more of the following measures: Reorient or relocate the receiving antenna. Increase the separation between the equipment and receiver. Connect the equipment into an outlet on a circuit different from that to which the receiver is connected. Consult the dealer or an experienced radio/tv technician for help. Changing or modifying the WetAlert device without the expressed written consent of Fresenius Medical Care North America could void the user s authority to operate the equipment. See the Manufacturer s Electromagnetic Compatibility (EMC) declaration in the 2008K@home User s Guide (P/N ) or on page 23 of these instructions for more information. Warning: Radio signals can interfere with the WetAlert device. Particularly no Ham or Amateur radio operating in frequency range of 430Mhz to 450Mhz should be used in the vicinity of the WetAlert device. If radio signal interference occurs, the WetAlert device may not detect a blood or fluid leak and therefore the machine will not alarm. The 2008K@home hemodialysis machine monitors for radio signal interference. If the machine locates interference, it will display a Wetness No Comm. warning message and an audible alarm will sound. Possible sources of interference include any device operating in the frequency range of 430Mhz to 450Mhz like portable amateur radios, mobile amateur radio located in a vehicle, fixed location amateur radios, and wireless video cameras. For exact separation distance recommendation, please refer to the Manufacturer s EMC Declaration statement provided in the 2008K@home User s Guide (P/N ) or on page 23 of these instructions. 4 WetAlert Wireless Wetness Detector In-Center User s Guide P/N rev F
7 Warning: Keep vascular access sites uncovered and monitored. Machine alarms do not sound in every blood loss situation. Warning: External radio frequency disturbances in the same range as the WetAlert device may prevent you from activating the WetAlert device. If the WetAlert device is not activated, it will not cause the machine to alarm if wetness is detected. Warning: Do not use devices emitting strong electromagnetic radiation such as portable phones, radio equipment (walkietalkies, etc.), radio transmitters, and like equipment near your machine. Improper operation may result. Cellular phones and WiFi-connected devices may be conditionally allowed. However, if any interference is noted, such as false pressure readings that disappear when the external signal is removed, it is recommended to move the cellular phone at least ten feet away from the hemodialysis machine when making or receiving phone calls. If a WiFi-connected device (e.g. laptop computers, tablet devices, smartphones) is found to cause interference, it is recommended to use that device at least four feet away from the 2008K@home hemodialysis machine. For exact separation distance recommendation, please refer to the Manufacturer s EMC Declaration statement provided in the 2008K@home User s Guide (P/N ) or on page 23 of these instructions. Warning: The machine s modules and internal hydraulics involve fluids. Fluid leaks may cause excess fluid removal from the patient. Correct the problem immediately or take the machine out of service. Spills can cause slips and falls; clean up spills immediately. To contain such spills, the machine should be on a spill-tolerant surface. Caution: System leaks may occur. Unattended operation of the machine (for example, during disinfection at night) may result in flooding and can cause property damage. Spills can cause damage to carpeting and other surfaces. Clean up spills immediately. Caution: If the WetAlert device is to be used in a location with more than one WetAlert device equipped machine, the In Center option must be set; see page 21. Note: If the machine displays the message Wetness Low Battery, the WetAlert device must be replaced before the next treatment. Note: If the machine displays the message Wetness Not Active, the WetAlert device must be re-activated by touching the metal pattern on the bottom of the device again with a gauze pad damp with 1:100 bleach. WetAlert Wireless Wetness Detector In-Center User s Guide P/N rev F 5


8 Before Treatment Gather supplies Label WetAlert device 6 WetAlert Wireless Wetness Detector In-Center User s Guide P/N rev F
9 Gather supplies Follow your clinic s instructions to set up the 2008K@home hemodialysis machine, using the 2008K@home User s Guide (P/N ) as a reference. Use these steps before starting the Tx Clock to activate the WetAlert device. Supplies Needed: 1-2 layers of 2x2 gauze 1:100 bleach WetAlert device Permanent marker (to label the WetAlert device for the first time) Tape Gloves Warning: Splashes may occur when using bleach. Use appropriate Personal Protection Equipment (PPE). Note: Fresenius Medical Care recommends using either of the following medical tapes to secure the WetAlert device to the patient: (FMC P/N ) Clear 3M Transpore (FMC P/N ) White 3M Micropore Plus Using a stronger (stickier) tape may pull the label off the WetAlert device when removing the tape. Label WetAlert Device if not yet labeled Write the patient s name or ID number on the WetAlert label so it is patient-specific. When activating a WetAlert device for the first time, write an expiration (Exp) date of six months from today s date on the device s label. Fresenius Medical Care recommends replacing the WetAlert device every six months or when a Wetness Low Battery alarm occurs, whichever comes first. To write on the WetAlert device label: 1. Pull back the label flap to expose the Exp and blank line on the label. 2. Write the name/id number and the expiration date with a fine-tipped permanent marker. 3. Peel the white plastic backing off the flap to expose the sticky underside of the flap. 4. Firmly press the sticky flap over the label to cover the whole label and protect it. WetAlert Wireless Wetness Detector In-Center User s Guide P/N rev F 7


10 Activating the WetAlert Device WetAlert Wireless Wetness Detector In-Center User s Guide P/N rev F
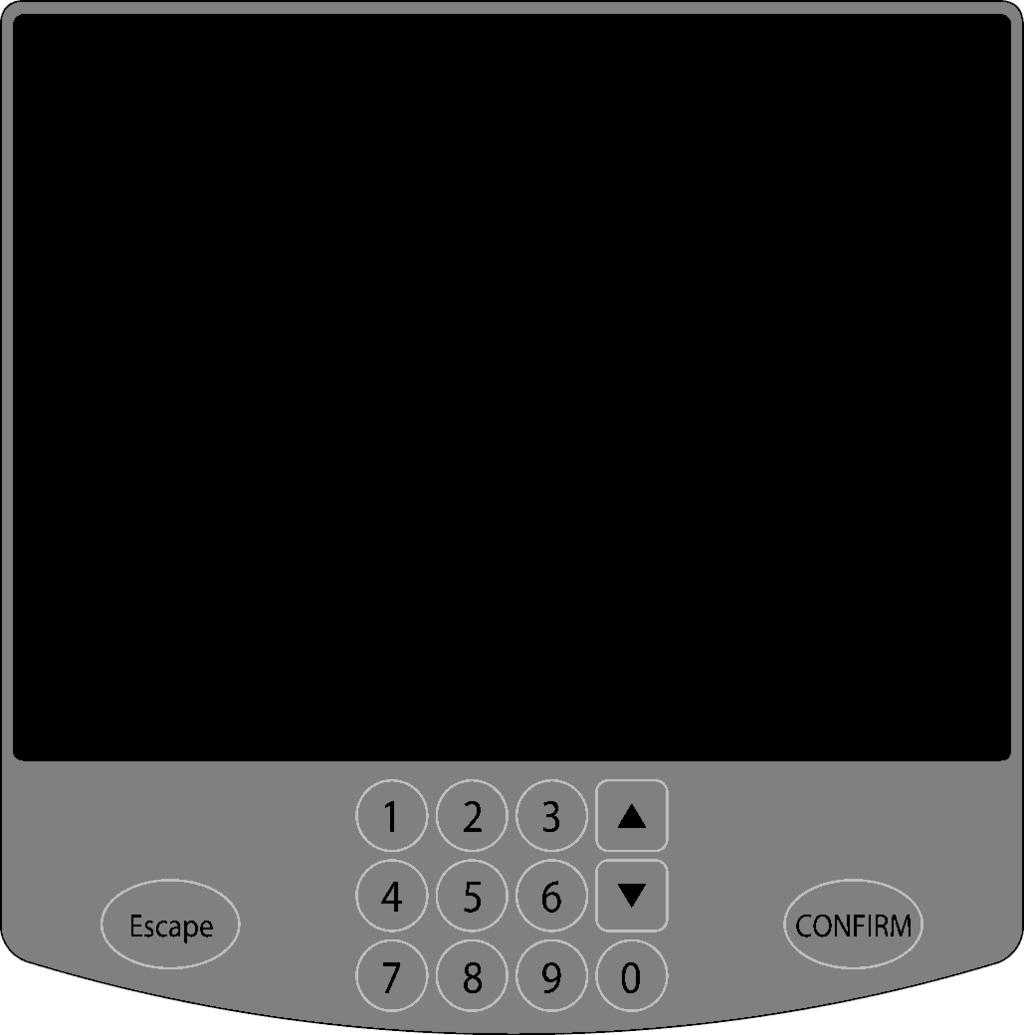
11 1 Check for Drop icon The hemodialysis machine displays a gray Drop icon in the Dialogue Box when the Wireless Wetness option has been set in Service Mode. This means that the machine is searching for a WetAlert device to activate. Look at the Dialogue Box in the upper right corner of the screen and make sure the Drop icon appears. Note: If the Drop icon does not appear in the Dialogue Box, the Wireless Wetness option must first be set in Service Mode; turn to page 21. The WetAlert device is not activated until the Drop icon is green. The Dialogue Box will remind you to touch the wetness detector when you reach the Tx Connect: Start Treatment screen. For more information about the Drop icon, see page 17. Note: The WetAlert device can be used in two different ways, depending on the location of the 2008K@home hemodialysis machine: in-center or at home. This option is set in Service Mode (see page 21 for more information). The In-Center setting is for use in locations with more than one WetAlert device equipped machine. (When the In-Center option is set, the UF Profile button is displayed on the Home screen.) This user s guide is written for In-Center use. The Home setting is only for use in locations with one WetAlert device equipped machine to prevent interference between machines. (When the Home option is set, no UF profiles are available from the Home screen.) Use the 2008K@home WetAlert Home User s Guide (P/N ) for instructions with this setting. 2 Touch detector To activate the WetAlert device: Create a wetness signal within six feet of the machine by touching the metal pattern on the bottom of the WetAlert device for at least three seconds. The WetAlert device will cause an alarm when it comes into contact with conductive fluids like blood or 1:100 bleach. Fresenius Medical Care North America recommends using gauze damp with 1:100 bleach to activate it. The metal pattern is the part of the WetAlert device that can sense fluid, be sure that this part is placed directly over the vascular access when instructed in step 7 on page 13 of these instructions. WetAlert Wireless Wetness Detector In-Center User s Guide P/N rev F 9

12 Activating the WetAlert Device (continued) WetAlert Wireless Wetness Detector In-Center User s Guide P/N rev F
13 3 Press 1 The machine will display the message Wetness Detected Press 1 to learn in the Dialogue Box. Press the 1 key on the Data Entry Keypad to 'learn' this WetAlert device so other WetAlert devices in the treatment area will not cause this machine to alarm. Note: The 1 key on the Data Entry Keypad is only used to learn the device. Pressing the RESET key will clear the alarm during treatment. 4 Check for green drop The Drop icon in the Dialogue Box will turn green, indicating that the WetAlert device is activated. Next you must test the device. Note: The 2008K@home hemodialysis machine periodically checks for communication from the activated WetAlert device when the Tx Clock is running. If the machine temporarily loses contact with the WetAlert device, the machine will display a Wetness No Comm. warning in the Status Box. Press the RESET key to clear the warning and continue. The audible alarm will sound only the first time this warning occurs. Afterward, the machine will display the Wetness No Comm. message in the Status Box only. If this warning occurs frequently, either locate and remove the source of radio frequency interference, or discontinue using the WetAlert device. See page 4 for more information on interference. If the machine permanently loses contact with the WetAlert device, it will display a Wetness Not Active alarm and sound an audible alarm. Note: If the same Wetness Detected alarm is reset three times within 10 minutes, the Dialogue Box will display the message Press 0 to disable Wetness Detector. To continue using the WetAlert device, press the RESET key to clear the alarm Or Press the 0 key on the Data Entry Keypad to deactivate the device for the remainder of the treatment. The Drop icon in the Dialogue Box will be yellow to show the WetAlert device is deactivated. WetAlert Wireless Wetness Detector In-Center User s Guide P/N rev F 11


14 Starting Treatment with the WetAlert Device 5 Retest 6 7 Place WetAlert device WetAlert Wireless Wetness Detector In-Center User s Guide P/N rev F

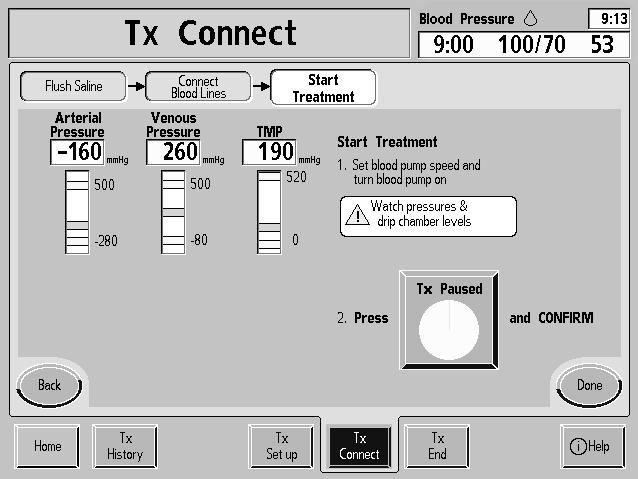
15 5 Test WetAlert device You must make certain the activated WetAlert device is linked to this machine. Touch the device again to cause a wetness signal. Make sure that an audible alarm sounds and the Status Box turns red and displays the message Wetness Detected #1. The Drop icon in the Dialogue Box will turn red to indicate wetness sensed. Note: If the device still does not cause an alarm after repeated attempts, you will not be able to use the WetAlert device for this treatment. For more information, see page 16 of the Troubleshooting section. 6 Press RESET Press the RESET key to clear the alarm. The Drop icon in the Dialogue Box will turn back to green. 7 Place WetAlert device Place 1-2 layers of gauze over the secured venous fistula needle. Place the metal pattern bottom side of the WetAlert device directly over this gauze and secure it with tape. 8 Touch Tx Paused Warning: Do not use more than two layers of gauze between the vascular access site and the WetAlert device. Do not place tape directly over gauze before placing the device on gauze. Do not use additional bandages or cover the vascular access site with a blanket. Doing so may allow a blood leak to go undetected. Undetected blood leaks can cause serious injury or death. Warning: When placing the WetAlert device, be careful not to create excessive pressure on the vascular access. Doing so may cause infiltration or damage to the vascular access. 9 Press CONFIRM Touch the Tx Paused button then press the CONFIRM key on the Data Entry Keypad. This will start the Tx Clock. Continue the treatment as prescribed. Note: If the WetAlert device senses blood, do the following: 1. Press the Mute key to silence the alarm. 2. Correct the condition causing the alarm. 3. Press the RESET key to start the blood pump again. 4. Clean and dry the WetAlert device with 1:100 bleach (see WetAlert Device Care on page 18). 5. Place the WetAlert device back on the vascular access as described in Step 7 above. WetAlert Wireless Wetness Detector In-Center User s Guide P/N rev F 13
16 Troubleshooting The following troubleshooting section is a guide to help you troubleshoot WetAlert device alarms, warnings, or advisory messages quickly. For a complete list of alarm messages, please see the Troubleshooting section of the 2008K@home User s Guide (P/N ). Messages shown in the Status Box and Dialogue Box are listed alphabetically. These messages are triggered by conditions and events that occur in the machine during operation. The messages will reset when the condition causing them is corrected. In some cases, you must reset them yourself. The LED light on the RESET key will flash if the alarm may be reset. Note: Doing the recommended action may or may not clear the alarm, warning, or advisory messages displayed. Follow your facility s instructions. Note: If you have any questions, please call Fresenius Medical Care Technical Support anytime at (800) If additional information exists for an alarm or warning, the Help screenbutton will flash in the bottom right corner of the touch screen. The 2008K@home hemodialysis machine will display the following on the Help screen: Message Meaning Action Required If a message is longer than the space provided allows, use the Up/Down arrow ( / ) keys on the data entry keypad to scroll up or down to view the rest of the message. At the end of the Troubleshooting section is also a procedure for restarting the treatment and a table explaining the different WetAlert Drop icon states. 14 WetAlert Wireless Wetness Detector In-Center User s Guide P/N rev F
17 Message Meaning Action Required Press 0 to disable The WetAlert device has alarmed three times in To continue using the WetAlert device that is alarming, press the RESET key. Wetness ten minutes. Or, Detector To stop using the alarming WetAlert device, press the 0 key on the Data Entry Keypad. The alarming WetAlert device will no longer be linked to the machine. It will not sense wetness until reactivated with a new treatment. Release Wetness Detector Touch and Hold Wetness Detector Touch Wetness Detector Wetness Detected Wetness Detected Press 1 to learn Wetness Learn Failed Wetness Learn Start Wetness Learn Success The WetAlert device is being linked to the machine. The machine is searching for a WetAlert device in range so it may link to it. The WetAlert device needs to be activated at this time. The WetAlert device has sensed wetness. The machine has sensed a WetAlert device as expected. The selected WetAlert device was not linked to the machine. The WetAlert device is ready to be linked to the machine. The selected WetAlert device is successfully linked to the machine. Stop touching the selected WetAlert device s sensor on the bottom of the device. Touch the metal sensor on the bottom of the WetAlert device so as to cause a wetness signal. Touch the WetAlert device s metal sensor on the underside then do one of the following: For In Center (UF profiles available on the Home screen), press the 1 key to continue. For Home mode (no UF Profiles available on the Home screen), press the RESET key to continue 1. Press the Mute key to silence the alarm. 2. Correct the condition causing the alarm. 3. Press the RESET key to start the blood pump again. 4. Clean and dry the WetAlert device with 1:100 bleach (see "WetAlert Device Care" on page 18). 5. Place the WetAlert device back on the vascular access as described on page 13. Press the 1 key to link the alarming WetAlert device to the machine. If you do not want to link this WetAlert device to the machine, press the RESET key. Select and confirm the desired Wetness Detector toggle-button again before trying to activate the device. Follow the prompts in the Status Box to link the WetAlert device to the machine. No action is necessary. Wetness The user is attempting The selected WetAlert device is already linked to Learned to learn a WetAlert this machine. Already device that is already linked to this machine. WetAlert Wireless Wetness Detector In-Center User s Guide P/N rev F 15
18 Message Meaning Action Required Wetness Low Battery The WetAlert device s battery is almost empty. Press the RESET key to clear the alarm. Replace the failing WetAlert device before the patient s next treatment. Wetness No Comm. Wetness Not Active Wetted After Learn Wetted Before Learn The machine has temporarily lost contact with the WetAlert device. The machine has lost contact with the WetAlert device. Or you must activate the WetAlert device before beginning the treatment. The WetAlert device was touched too late when learning the device. The WetAlert device was touched too soon when learning the device. Press the RESET key to clear the warning. If this warning occurs frequently, either locate and remove the source of radio frequency interference, or discontinue using the WetAlert device. See page 4 for more information on radio interference. To disable this WetAlert device: 1. Touch the metal sensor on the underside of the device to cause an alarm and then press the RESET key. 2. Repeat step Touch the metal sensor on the underside of the device to cause a third Wetness Detected alarm. This time press the 0 key on the Data Entry Keypad. The alarming WetAlert device will no longer be linked to the machine. It will not sense wetness until reactivated with a new treatment. Touch the metal sensor on the bottom of the WetAlert device to link it to the machine. Press the RESET key to clear the message. Select and confirm the desired Wetness Detector toggle-button again. Touch and hold the device when prompted in the Status Box. Select and confirm the desired Wetness Detector toggle-button again. Touch and hold the device when prompted in the Status Box. Restarting a Treatment If the WetAlert device cannot be linked to the machine after repeated tries, another troubleshooting step is to reset the entire treatment before blood is sensed and the Tx Clock is started. To restart the treatment: Press the Down Arrow ( ) key on the control panel and the CONFIRM key at the same time. Then press the CONFIRM key again to confirm a new treatment and re-enter all the parameters. You will be prompted to link a WetAlert device again at the end of the setup process. If you are still having trouble, please contact Technical Services at (800) WetAlert Wireless Wetness Detector In-Center User s Guide P/N rev F
19 Reading Drop Icon Status The Drop icon in the Dialogue Box indicates whether or not the primary WetAlert device is ready for the treatment. See the table below for an explanation of each Drop icon status. Drop Color Status Meaning No Drop WetAlert option not set in Service Mode The Wireless Wetness (WetAlert) option was not set in Service Mode. No WetAlert device can be used during treatment. Gray Green Red Yellow WetAlert device not yet enabled WetAlert device is enabled alarm WetAlert device is disabled The Wireless Wetness (WetAlert) option was set in Service Mode, but the device has not been activated yet. The machine will display Touch Wetness Detector in the Dialogue Box when entering the Tx Connect: Connect screen from the Tx Connect: Flush screen. If the Tx Connect screens are skipped, this message will appear when blood is sensed and you attempt to start the Tx Clock. The WetAlert device is not ready for use during treatment. You have correctly setup the WetAlert device, either during the Tx Connect screens or before running the Tx Clock. The WetAlert device will cause an alarm when it comes into contact with conductive fluids like blood or 1:100 bleach. The WetAlert device is ready for use during treatment. The activated WetAlert device has detected wetness. A blood alarm is occurring. Pressing the RESET key will clear the alarm and the icon will be green. If a device alarms three times within ten minutes, the Dialogue Box will display a message allowing the operator to disable the WetAlert device. Correct the condition causing the alarm before continuing with treatment. The activated WetAlert device was disabled (within a period of ten minutes, after its wetness alarm was reset twice, the 0 (zero) key was pressed during the third alarm). The WetAlert device is not active and is not able to detect wetness for the duration of the treatment WetAlert Wireless Wetness Detector In-Center User s Guide P/N rev F 17
20 After Treatment WetAlert Device Care The WetAlert device should be cleaned if it comes in contact with blood during the treatment and after every treatment. It can be cleaned with very dilute (1:100) bleach. Freshly prepared dilute bleach solution (1:100) is currently recommended by the Center for Disease Control as a suitable disinfectant for the Hepatitis virus. Because surface contamination is the general mode of transmission for this type of virus, thorough cleaning of the WetAlert device is essential. Caution: Do not use cleaners containing acetone (for example, nail polish remover) to clean the WetAlert device. Acetone will damage the surface of the WetAlert device's plastic case. WetAlert Device Storage Wipe the WetAlert device so it is dry before storing it. The storage location should be at room temperature; do not allow the WetAlert device to freeze. Store the WetAlert in a clean, dry location away from conductive materials like metal. Storing the WetAlert device on a conductive surface or in a conductive liquid bleach or other disinfectant will reduce the battery life. 18 WetAlert Wireless Wetness Detector In-Center User s Guide P/N rev F
21 This page is intentionally blank WetAlert Wireless Wetness Detector In-Center User s Guide P/N rev F 19


22 Appendix Set In Center option Select Wireless Wetness option 20 WetAlert Wireless Wetness Detector In-Center User s Guide P/N rev F
23 Setting the Wireless Wetness option Caution: Only qualified people authorized by your facility s medical director or by Fresenius Medical Care may set the Wireless Wetness option in Service Mode. Note: The In Center option must be set if you are using more than one WetAlert device equipped machine. If it is not already set: In Service Mode, on the Options: Treatment Options screen, touch the In Center Set up toggle-button to set the option to In Center and press the CONFIRM key again. To set up the 2008K@home hemodialysis machine for use with the WetAlert device, go to the Module Options screen in Service Mode. Touch the Wireless Wetness toggle-button to set the option to Yes then press the CONFIRM key to confirm your selection. The WetAlert device may now be activated during treatment setup. Wireless Wetness: In Center option No other setup is required. Note: After you set the Wireless Wetness toggle-button to Yes, two more wetness detector buttons will appear below the button. These buttons are not for use with these instructions and should be ignored. Wireless Wetness: Home option No other setup is required if only one WetAlert device equipped machine is used in your location. Use the 2008K@home WetAlert Home User s Guide (P/N ) for instructions. WetAlert Wireless Wetness Detector In-Center User s Guide P/N rev F 21
24 WetAlert Spare Parts Antenna P/N Note: WetAlert spare parts can be ordered through Fresenius Medical Care Technical Services at (800) Note: Additional WetAlert devices (P/N ) are a prescription item and must be ordered through Fresenius Medical Care Customer Service at (800) WetAlert Device Disposal The WetAlert device is not intended for use beyond the life of its battery. Disinfect the WetAlert device before disposing of it. You must comply with all local regulations regarding battery and circuit board recycling. WetAlert Device RF Transmitter Characteristics Radio Frequency (RF): Mhz Power: 30 microwatts Effective Range: Up to six feet Modulation: ASK (Amplitude Shift Keying) U.S. FCC ID #: UO20906 Canada Certification #: 6776A-0906 The Wireless Wetness Detector System operates a proprietary wireless protocol that does not contain patient specific data and does not support control of the 2008K@home hemodialysis machine. The wireless protocol reports only wetness status. Wireless security for the signal from the wetness detector is assured via internal checksum techniques, timing of the signal data protocol, and a unique 24-bit identification number in each wireless detector. Quality of Service The 2008K@home hemodialysis machine monitors for radio signal interference. If the 2008K@home hemodialysis machine detects interference, it will display a Wetness No Comm. warning message and an audible alarm will sound. Possible sources of interference include any device operating in the frequency range of 430Mhz to 450Mhz like portable amateur radios, mobile amateur radio located in a vehicle, fixed location amateur radios, and wireless video cameras. For separation distances, see the Manufacturer's EMC Declaration on the next page. 22 WetAlert Wireless Wetness Detector In-Center User s Guide P/N rev F
25 Manufacturer s Electromagnetic Compatibility (EMC) Declaration The 2008K@home hemodialysis machine has been certified to the requirements of ANSI/AAMI/IEC within the scope of equipment intended to be used in institutional environments, such as hospitals (1). This certification deems the 2008K@home Hemodialysis Machine to be safe with regards to emissions and immunity to electromagnetic energy when used in institutional environments and does not guarantee against interference upon common household electronics (2) when used in the home. (1) Emissions testing of the machine was performed using the limits for CISPR 11 Group 1, Class A which are specified for equipment intended to be used in institutional environments (such as hospitals) and not in homes (which typically requires Group 1, Class B limits). Therefore, use of the 2008K@home hemodialysis machine in residential environments may result in interference with some types of broadcast receivers such as televisions and radios. Should such interference occur, it will not permanently affect those receivers and can be reduced or eliminated by repositioning of the receiver or the 2008K@home hemodialysis machine. (2) In order to assure the safety of the 2008K@home hemodialysis machine as well as other medical devices when used with the 2008K@home hemodialysis machine in the home environment, a detailed technical analysis was performed. This analysis has shown that the emissions levels of the 2008K@home hemodialysis machine are significantly below the immunity requirements of ANSI/AAMI/IEC and therefore are not likely to impact the safe operation of other medical devices used within the proximity. Guidance and manufacturer s declaration electromagnetic emissions The 2008K@home hemodialysis machine is intended for use in the electromagnetic environment specified below. The customer or user of the 2008K@home hemodialysis machine should ensure it is used in such an environment. Emissions test Compliance Electromagnetic environment guidance RF Emissions CISPR 11 RF Emissions CISPR 11 Harmonic emissions IEC Voltage fluctuations/ flicker emissions IEC Group 1 Class A Not applicable Not applicable The 2008K@home hemodialysis machine uses RF energy only for its internal functions. Therefore, its RF emissions are very low and are not likely to cause any interference in nearby electronic equipment. The 2008K@home hemodialysis machine is suitable for use in all establishments other than domestic, and may be used in domestic establishments and those directly connected to the public low-voltage power supply network that supplies buildings used for domestic purposes, provided the following warning is heeded: Warning: When the 2008K@home hemodialysis machine is used in home environments, it may cause interference with some types of broadcast receivers such as televisions or radios. This interference is not harmful to such equipment and is only temporary. Should such interference occur, it can sometimes be reduced or eliminated by minor repositioning of the 2008K@home hemodialysis machine. WetAlert Wireless Wetness Detector In-Center User s Guide P/N rev F 23
26 Guidance and manufacturer s declaration electromagnetic immunity The 2008K@home hemodialysis machine is intended for use in the electromagnetic environment specified below. The customer or the user of the 2008K@home hemodialysis machine should assure that it is used in such an environment. Immunity test IEC test level Compliance level Electromagnetic environment guidance Electrostatic discharge (ESD) ±8 kv contact ±15 kv air (Level 4) ±8 kv contact ±15 kv air (Level 4) Can be used in a dry location (minimum 10% relative humidity) IEC Electrical fast transient/burst IEC ±2 kv for power supply lines ±1 kv for input/output lines ±2 kv for power supply lines ±1 kv for input/output lines Mains power quality should be that of a typical commercial and/or hospital environment. Surge IEC ±1 kv line(s) to line(s) ±2 kv line(s) to earth ±1 kv line(s) to line(s) ±2 kv line(s) to earth Mains power quality should be that of a typical commercial or hospital environment. Voltage Dips, short interruptions, and voltage variation on power supply input lines IEC <5 % U T (>95 % dip in U T ) for 0.5 cycles 40 % U T (60 % dip in U T ) for 5 cycles <5 % U T (>95 % dip in U T ) for 0.5 cycles 40 % U T (60 % dip in U T ) for 5 cycles Mains power quality should be that of a typical commercial or hospital environment. If the user of the 2008K@home hemodialysis machine requires continued operation during power mains interruptions, it is recommended that the 2008K@home hemodialysis machine be powered from an uninterruptible power supply or a battery. 70 % U T 70 % U T (30 % dip in U T ) (30 % dip in U T ) for 25 cycles for 25 cycles <5 % U T <5 % U T (>95 % dip in U T ) (>95 % dip in U T ) for 5 seconds for 5 seconds Power- Frequency (50/60 Hz) magnetic field 3 A/m 3 A/m Power frequency magnetic fields should be at levels characteristic of a typical location in a typical commercial or hospital environment. IEC NOTE U T is the a.c. mains voltage prior to application of the test level. 24 WetAlert Wireless Wetness Detector In-Center User s Guide P/N rev F
27 Guidance and manufacturer s declaration electromagnetic immunity The 2008K@home hemodialysis machine is intended for use in the electromagnetic environment specified below. The customer or the user of the 2008K@home hemodialysis machine should assure that it is used in such an environment. Immunity test IEC test level Compliance level Electromagnetic environment guidance Portable and mobile RF communications equipment should be used no closer to any part of the 2008K@home hemodialysis machine, including cables, than the recommended separation distance calculated from the equation applicable to the frequency of the transmitter. If abnormal performance is observed such as TMP alarms or blood leak alarms, additional measures may be necessary, such as re-orienting or relocating the equipment. Recommended separation distance Conducted RF IEC Vrms 150 khz to 80 MHz 3 Vrms 150 khz to 80 MHz 1.2 P Radiated RF IEC V/m 80 MHz to 2.5 GHz 3 V/m 80 MHz to 2.5 GHz 1.2 P 80 MHz to 800 MHz 2.3 P 800 MHz to 2.5 GHz where P is the maximum output power rating of the transmitter in watts (W) according to the transmitter manufacturer and d is the recommended separation distance in meters (m). Field strengths from fixed RF transmitters, as determined by an electromagnetic site survey, a should be less than the compliance level in each frequency range. b Interference may occur in the vicinity of equipment marked with the following symbol: NOTE 1 At 80 MHz and 800 MHz, the higher frequency range applies. NOTE 2 These guidelines may not apply in all situations. Electromagnetic propagation is affected by absorption and reflection from structures, objects, and people. a Field strengths from fixed transmitters, such as base stations for radio (cellular/cordless) telephones and land mobile radios, amateur radio, AM and FM radio broadcast and TV broadcast cannot be predicted theoretically with accuracy. To assess the electromagnetic environment due to fixed RF transmitters, an electromagnetic site survey should be considered. If the measured field strength in the location in which the 2008K@home hemodialysis machine is used exceeds the applicable RF compliance level above, the 2008K@home hemodialysis machine should be observed to verify normal operation. If abnormal performance is observed, additional measures may be necessary, such as reorienting or relocating the 2008K@home hemodialysis machine. b Over the frequency range 150 khz to 80 MHz, field strengths should be less than 3 V/m. WetAlert Wireless Wetness Detector In-Center User s Guide P/N rev F 25
28 Recommended separation distances between portable and mobile RF communications equipment and the hemodialysis machine The hemodialysis machine is intended for use in an electromagnetic environment in which radiated RF disturbances are controlled. The customer or the user of the hemodialysis machine can help prevent electromagnetic interference by maintaining a minimum distance between portable and mobile RF communications equipment (transmitters) and the 2008K@home hemodialysis machine as recommended below, according to the maximum output power of the communications equipment. Rated maximum output power of transmitter W Separation distance according to frequency of transmitter m 150 khz to 80 MHz 80 MHz to 800 MHz 800 MHz to 2.5 GHz d = 1.2 P d = 1.2 P d = 2.3 P For transmitters rated at a maximum output power not listed above, the recommended separation distance d in meters (m) can be estimated using the equation applicable to the frequency of the transmitter, where P is the maximum output power rating of the transmitter in watts (W) according to the transmitter manufacturer. NOTE 1 At 80 MHz and 800 MHz, the separation distance for the higher frequency range applies. NOTE 2 These guidelines may not apply in all situations. Electromagnetic propagation is affected by absorption and reflection from structures, objects, and people. Additional Information For more information, please contact: Fresenius Medical Care Fresenius Medical Care 4040 Nelson Avenue Canada Technical Support Concord, CA (888) (800) Manufactured by Fresenius Medical Care 4040 Nelson Avenue Concord, CA (800) WetAlert Wireless Wetness Detector In-Center User s Guide P/N rev F
29 WetAlert Wireless Wetness Detector In-Center User s Guide P/N rev F 27
30 28 WetAlert Wireless Wetness Detector In-Center User s Guide P/N rev F
31
32 Indications for Use: The WetAlert wireless wetness detector is indicated for use with the Fresenius Medical Care hemodialysis machine and is an optional accessory to aid in the detection of blood and water leaks during hemodialysis. Home hemodialysis using the detector must be observed by a trained and qualified person as prescribed by a physician. Caution: Federal (US) law restricts these devices to sale by or on the order of a physician or other licensed practitioner. Read the Instructions for Use for safe and proper use of these devices. For a complete description of hazards, contraindications, side effects, and precautions, see full package labeling available at P/N
Guidance and Declaration - Electromagnetic Compatibility (EMC) for the Delfi PTS ii Portable Tourniquet System
 for the Delfi PTS ii Portable Tourniquet System") Guidance and Declaration - Electromagnetic Compatibility (EMC) for the Delfi TS ii ortable Tourniquet System Guidance and manufacturer s declaration electromagnetic emissions The TS ii ortable Tourniquet
Guidance and Declaration - Electromagnetic Compatibility (EMC) for the Delfi TS ii ortable Tourniquet System Guidance and manufacturer s declaration electromagnetic emissions The TS ii ortable Tourniquet
Powered Traction Unit OPERATION MANUAL
 Powered Traction Unit OPERATION MANUAL CONTENTS Symbols Safety precautions Symbol for CAUTION Symbol for CONSULT INSTRUCTIONS FOR USE Symbol for SERIAL NUMBER Symbol for CATALOGUE NUMBER Symbol for AUTHORISED
HeRO duet
 HeRO duet CUSTOMER SERVICE TABLE OF CONTENTS TABLE OF CONTENTS OVERVIEW OVERVIEW OVERVIEW OVERVIEW USING HeRO duet USING HeRO duet USING HeRO duet Current HeRO Score HeRO USING HeRO duet USING HeRO duet
BIODEX MULTI- JOINT SYSTEM
 BIODEX MULTI- JOINT SYSTEM CONFORMANCE TO STANDARDS 850-000, 840-000, 852-000 FN: 18-139 5/18 Contact information Manufactured by: Biodex Medical Systems, Inc. 20 Ramsey Road, Shirley, New York, 11967-4704
English
 English Specifications Type Power Source Vibration Frequency Maximum Output Power Consumption Water Pressure Lighting NE134 AC120V 50/60Hz AC230V 50/60Hz 28~32kHz 8W Max. 42VA 0.1~0.5MPa (1~5kgf/cm
Biological Safety. Electromagnetic Compatibility (EMC) Observe the following precautions related to biological safety.
 Observe the following precautions related to biological safety.") Biological Safety Observe the following precautions related to biological safety. WARNING: Non-medical (commercial) grade peripheral monitors have not been verified or validated by SonoSite as being suitable
Biological Safety Observe the following precautions related to biological safety. WARNING: Non-medical (commercial) grade peripheral monitors have not been verified or validated by SonoSite as being suitable
General Safety/EMC and Electrical Information for i-limb ultra and i-limb digits
 1. General Safety 1.1 The i-limb ultra and i-limb digits devices are electrical devices, which under certain circumstances could present an electrical shock hazard to the user. Please read the accompanying
Electromagnetic compatibility Guidance and manufacturer s declaration DIN EN :2007 (IEC :2007)
") Compressor set Equipment Under Test (EUT) Type 028 Type 047 Type 052 Type 085 Electromagnetic compatibility Guidance and manufacturer s declaration DIN EN 60601-1-2:2007 (IEC 60601-1-2:2007) 2017 PARI
Compressor set Equipment Under Test (EUT) Type 028 Type 047 Type 052 Type 085 Electromagnetic compatibility Guidance and manufacturer s declaration DIN EN 60601-1-2:2007 (IEC 60601-1-2:2007) 2017 PARI
D C 01/2019 3
 D-0117968-C 01/2019 3 4 D-0117968-C 01/2019 Screw Driver Screw Driver Unplug both the Red & Blue connectors. (see above) Place a small flat head screw driver on the small orange tabs and push down while
Technical Specifications Micromedical VisualEyes 505 by Interacoustics
 VisualEyes 505 - Technical Specifications Page 0 Technical Specifications Micromedical VisualEyes 505 by Interacoustics D-0115523-B 2018/02 VisualEyes 505 - Technical Specifications Page 1 Included and
Nursing Beds with Dewert drive system
 Nursing Beds with Dewert drive system GB Casa Med Classic 4 / Classic (FS) Casa Med Ultra / Ultra (FS) Casa Med Classic Low Casa Med Classic (FS) 4 / Classic / Casa FS Med / Casa Classic Med Low Ultra
PHYSIOFLOW Q-LINK TM
 PHYSIOFLOW Q-LINK TM Service Manual Thursday, 20 October 2016 First placing on the market : 18 January 2012 User Manual PhysioFlow Q-Link 1/17 Table of contents 1. General Information... 3 About this manual...
USER MANUAL MHS-2500I. Please take time to read these instructions before starting to use the scale. Version /17
 USER MANUAL MHS-2500I Please take time to read these instructions before starting to use the scale Version 1.0 05/17 Contents Introduction 3 Product Specification 3 Safety Instructions 4 Explanation of
TH008F Multi-function Infrared Forehead Thermometer
 TH008F Multi-function Infrared Forehead Thermometer Specifications Functions Temperature measurement range: Forehead mode: 34~42.2 C (93.2~108 F), Surface mode: -22~80 C (-7.6~176 F) Operating temperature
User Instruction Computer Assisted Local Analgesia. 337 Marion, Le Gardeur QC, Canada, J5Z 4W8
 User Instruction Computer Assisted Local Analgesia 1-800-667-9622 337 Marion, Le Gardeur QC, Canada, J5Z 4W8 USER INSTRUCTION Congratulations on your new CALAJECT! Please read these instructions thoroughly
OtoRead - Technical Specifications Page 0. Technical Specifications. OtoRead D A 2017/06
 OtoRead - Technical Specifications Page 0 Technical Specifications OtoRead D-0116698-A 2017/06 OtoRead - Technical Specifications Page 1 OtoRead TM Configuration Overview The OtoReadTM is available in
(c) Medisave UK. Notice. Edition 1. i-pad Operator s Manual
 Medisave UK. Notice. Edition 1. i-pad Operator s Manual") Edition 1 Notice i-pad Operator s Manual CU Medical Systems, Inc. reserves the right to make changes on the device specifications contained in this manual at any time without prior notice or obligation
Edition 1 Notice i-pad Operator s Manual CU Medical Systems, Inc. reserves the right to make changes on the device specifications contained in this manual at any time without prior notice or obligation
USER MANUAL M-200. Please take time to read these instructions before starting to use the scale. Version /06
 USER MANUAL M-200 Please take time to read these instructions before starting to use the scale Version 1.0 07/06 Contents Introduction 3 Product Specification 3 Safety Instructions 4 Explanation of Graphic
INTRODUCTION. 4 SAFETY INSTRUCTIONS. 5 ABOUT THIS DEVICE. 6 FIRST OPERATION. 7 THE DISPLAY. 8 ATTACHING THE WRIST SLEEVE. 9 CORRECT MEASUREMENT.
 Table of contents INTRODUCTION.............................. 4 SAFETY INSTRUCTIONS........................ 5 ABOUT THIS DEVICE.......................... 6 FIRST OPERATION............................ 7
MedRx Avant Polar HIT AH-I-MPHITS-5 Effective 11/07/11
 INSTALLATION MANUAL 2 Contents Getting To Know Your AVANT POLAR HIT TM... 4 Setting up the System... 6 Software Installation... 7 Driver Installation Windows 7... 10 Driver Installation Windows XP... 13
VN415/VO425 Specifications
 VN415/VO425 Specifications Item No. 8105231-1 01/2014 Contents VN415 Specifications... 1 1.1 Technical Standards:...1 1.2 System Requirements:...1 1.3 Included and Optional Parts...2 VO425 Specifications...
DENTAL X-RAY OPERATOR'S INSTRUCTIONS. (for USA) Wall Mount Type...WK
 Wall Mount Type...WK") M 505 DENTAL X-RAY OPERATOR'S INSTRUCTIONS (for USA) Wall Mount Type...WK WARNING This X-ray equipment may be dangerous to patient and operator unless safe exposure factors, operating instructions and
M 505 DENTAL X-RAY OPERATOR'S INSTRUCTIONS (for USA) Wall Mount Type...WK WARNING This X-ray equipment may be dangerous to patient and operator unless safe exposure factors, operating instructions and
Rolyan Splint Pan OPERATION MANUAL. Item # Small Item # Large
 Rolyan Splint Pan OPERATION MANUAL Item #081544816 - Small Item #081544808 Large PLEASE READ THIS ENTIRE MANUAL BEFORE OPERATING YOUR NEW SPLINT PAN. Failure to follow these instructions could result in
RF (RADIO FREQUENCY) WIRELESS PENDANT
 WIRELESS PENDANT") NOTE: The following information is an addition to the Operation section in the lift system owner s manual. It describes the RF wireless pendant for your lift system. You must read the lift system owner
NOTE: The following information is an addition to the Operation section in the lift system owner s manual. It describes the RF wireless pendant for your lift system. You must read the lift system owner
INSTRUCTIONS FOR YOUR NEW PLASMAFLOW. Vascular Therapy System (Compressible Limb Sleeve Device)
") INSTRUCTIONS FOR YOUR NEW PLASMAFLOW Vascular Therapy System (Compressible Limb Sleeve Device) Customer Service Toll Free: 888-508-0712 Email: CustomerService@manamed.net Web: www.manamed.net 1511 W. Alton
INSTRUCTIONS FOR YOUR NEW PLASMAFLOW Vascular Therapy System (Compressible Limb Sleeve Device) Customer Service Toll Free: 888-508-0712 Email: CustomerService@manamed.net Web: www.manamed.net 1511 W. Alton
Connevans.info. DeafEquipment.co.uk. This product may be purchased from Connevans Limited secure online store at
 Connevans.info Solutions to improve the quality of life Offering you choice Helping you choose This product may be purchased from Connevans Limited secure online store at www.deafequipment.co.uk DeafEquipment.co.uk
Not for print. Microphone Test Device with SONNET MTD Adapter. User Manual. Cochlear Implants NOT FOR PRINT
 Cochlear Implants Microphone Test Device with SONNET MTD Adapter User Manual AW32690_1.0 (English) Table of contents 1. Table of contents 2. INTRODUCTION 3 Product description 3 3. INTENDED USE INDICATIONS
SAVI SCOUT Surgical Guidance System. Console Operation Manual
 SAVI SCOUT Surgical Guidance System Console Operation Manual 2 Copyrights and Trademarks 2016 Cianna Medical, Inc. All rights reserved. Patents pending. Cianna Medical and SAVI are registered trademarks
#
 INSTALLATION MANUAL 2 Contents Getting To Know Your AVANT POLAR HIT TM... 4 Setting up the System... 6 Software Installation... 7 Driver Installation Windows 7... 10 Driver Installation Windows XP... 13
M-400 M-410 M-420 M-430
 USER MANUAL M-400 M-410 M-420 M-430 Please take time to read these instructions before starting to use the scale Version 1.1 10/17 Contents Introduction 3 Product Specification 3 Safety Instructions 4
Technical Data. Electrocardiograph ECG-1250K TD.ECG1250_L. This technical data may be revised or replaced by Nihon Kohden at any time without notice.
 Technical Data Electrocardiograph ECG-1250K This technical data may be revised or replaced by Nihon Kohden at any time without notice. TD.ECG1250_L Specifications ECG input Input impedance: 20 MΩ Electrode
: 0089 GTIN
 GTIN: 00894912002050 PRECAUTIONS PROBE Non-invasive probes are for transcutaneous use only Probe transducer tips are thin and delicate. Be careful not to drop or hit the probe tip. After use, protect the
Operating Manual Infrared thermometer
 Operating Manual Infrared thermometer Model:IT-121 Professional Fast Accurate 1 CONTENTS 1 I n t r o d u c t i o n................ 3 1.1Product intended use 3 2 Basic principle 3 3 Pr o d u c t f e a t
SJM MRI Activator. Handheld Device. User's Manual. Model EX4000
 SJM MRI Activator Handheld Device User's Manual Model EX4000 Unless otherwise noted, indicates that the name is a trademark of, or licensed to, St. Jude Medical or one of its subsidiaries. ST. JUDE MEDICAL
H2 Check Operating Manual
 H2 Check Operating Manual Federal (USA) law restricts this device to sale by or on the order of a physician or licensed practitioner. Micro Direct, Inc. 803 Webster Street Lewiston, ME 04240 1-800-588-3381
The following languages can be found on our website: French. German. Spanish. Italian. Swedish. Portuguese. Russian. Dutch.
 Manufactured By: 5580 S. Nogales Hwy. Tucson, Az 85706 USA Telephone: 800-975-7987 Fax: 520-294-6061 www.westmedinc.com PN 74586, Rev. 10 MT Promedt Consulting GmbH Altenhofstr. 80 66386 St. Ingbert, Germany
Welch Allyn Home Scale (T- RPM-SCALE100)
") Welch Allyn Home Scale (T- RPM-SCALE100) Directions for use 901077 Weight scale, Software Version 1.0 2017 Welch Allyn. All rights are reserved. To support the intended use of the product described in
Welch Allyn Home Scale (T- RPM-SCALE100) Directions for use 901077 Weight scale, Software Version 1.0 2017 Welch Allyn. All rights are reserved. To support the intended use of the product described in
Operator s Manual External Remote Controller (ERC)
") OM0000-C, 2010-07 Page 1 of 25 Table of Contents 1. SYMBOLS DEFINITION:...3 2. PRODUCT WARNINGS:...6 3. PRODUCT DESCRIPTION:...8 4. COMPONENT IDENTIFICATION:...8 5. INSTRUCTIONS FOR USE:...9 6. EMERGENCY
OM0000-C, 2010-07 Page 1 of 25 Table of Contents 1. SYMBOLS DEFINITION:...3 2. PRODUCT WARNINGS:...6 3. PRODUCT DESCRIPTION:...8 4. COMPONENT IDENTIFICATION:...8 5. INSTRUCTIONS FOR USE:...9 6. EMERGENCY
TV Transmitter. User Guide Master
 TV Transmitter User Guide Master Content Before you start 3 Included in delivery 4 Components 4 Getting started 5 Connecting to power supply 5 Connecting to audio devices 6 Pairing the transmitter 7 Daily
OPERATOR S MANUAL AN APPLIED DIGITAL COMPANY
 OPERATOR S MANUAL AN APPLIED DIGITAL COMPANY Contents: VeriChip H2 Reader Assembly Part Number 600-000515-000 (includes all of the following): USER INSTRUCTIONS Description Part Number Description The
Setup Guide. support.spruceirrigation.com.
 FCC Compliance Statement This device complies with Part 15 of the FCC Rules. Operation is subject to the following two conditions: (1) this device may not cause harmful interference, and (2) this device
CardioMessenger II-S Transmitter for BIOTRONIK Home Monitoring. Technical Manual
 CardioMessenger II-S Transmitter for BIOTRONIK Home Monitoring 362454_D_GA_CM_II-S_US.indd 1 Technical Manual 17.04.08 16:28:16 by BIOTRONIK GmbH & Co. KG All rights reserved. Specifications subject to
ORiNOCO AP-4000MR-LR and AP-4900MR-LR Access Points Safety and Regulatory Compliance Information
 IMPORTANT! Visit http://support.proxim.com for the latest safety and regulatory compliance information for this product. ORiNOCO AP-4000MR-LR and AP-4900MR-LR Access Points Safety and Regulatory Compliance
Remote Control Outlets Operating Instructions
 Remote Control Outlets Operating Instructions - FOR INDOOR OR OUTDOOR USE - IMPORTANT SAFEGUARDS Signal Word Definitions NOTE: These are general definitions only; all may not pertain to the actual product
ON!Track smart tag AI T380. English. Printed: Doc-Nr: PUB / / 000 / 02
 ON!Track smart tag AI T380 English 1 Information about the documentation 1.1 About this documentation Read this documentation before initial operation or use. This is a prerequisite for safe, trouble-free
GTIN:
 GTIN: 00894912002920 TABLE OF CONTENTS Introduction...1 Features...1 Indications for Use...1 Contraindications...1 Warnings & Precautions...2 Controls...3 Operation...4 Recharging the Battery...5 Replacing
WRIST BLOOD PRESSURE MONITOR
 WRIST BLOOD PRESSURE MONITOR Instruction Manual MODEL: ABP801 www.accumed.com TABLE OF CONTENTS INTRODUCTION... 1 NOTES ON SAFETY... 1 ABOUT BLOOD PRESSURE... 3 PRECAUTIONS BEFORE US... 4 FEATURES OF THE
Uplink 5500EZ. Installation and User Guide. S e pte m be r 1 2,
 Uplink 5500EZ Installation and User Guide 4 13 464 7 2 S e pte m be r 1 2, 2 01 8 Important Notice Due to the nature of wireless communications, transmission and reception of data can never be guaranteed.
Quick Start Guide. Antenna Alignment Tool AIMWLLR0-35. QSG rev 7 AIMWLLR0-35 [NRB-0200] QSG.indd 1
![Quick Start Guide. Antenna Alignment Tool AIMWLLR0-35. QSG rev 7 AIMWLLR0-35 [NRB-0200] QSG.indd 1](/thumbs/86/94268876.jpg "Quick Start Guide. Antenna Alignment Tool AIMWLLR0-35. QSG rev 7 AIMWLLR0-35 [NRB-0200] QSG.indd 1") Quick Start Guide Antenna Alignment Tool AIMWLLR0-35 QSG-00097 rev 7 AIMWLLR0-35 [NRB-0200] QSG.indd 1 Welcome This quick start guide is designed to familiarize you with the features and use of the NetComm
Quick Start Guide Antenna Alignment Tool AIMWLLR0-35 QSG-00097 rev 7 AIMWLLR0-35 [NRB-0200] QSG.indd 1 Welcome This quick start guide is designed to familiarize you with the features and use of the NetComm
SwingTracker User Guide. Model: DKST02 User Guide
 SwingTracker User Guide Model: DKST02 User Guide PACKAGE CONTENTS What Comes in the Box USING YOUR SWINGTRACKER SENSOR Attach SwingTracker Sensor to your Bat Turn On your Sensor Pair your Sensor Remove
Ceiling Model Ceiling Model for LEDview Plus and Heliodent Plus. Installation Requirements. New as of: English
 New as of: 03.2017 Ceiling Model Ceiling Model for LEDview Plus and Heliodent Plus Installation Requirements English Installation Requirements Ceiling Version = Dentsply Sirona Installation Requirements
INSTALLATION MANUAL AVANT HIT+ Hearing Instrument Test Chamber.
 INSTALLATION MANUAL AVANT Hearing Instrument Test Chamber HIT+ www.medrx-int.com Contents Getting To Know Your AVANT HIT+. 3 Computer Requirements 4 Setup System. 5 Software Installation.. 6 Sound Card
Draft. User s Manual. Transmitter Model EX1150
 User s Manual Merlin @home Transmitter Model EX1150 CAUTION Federal (USA) law restricts this device to sale by or on the order of a physician. 2008 St. Jude Medical Cardiac Rhythm Management Division.
Wireless Rain Station
 Wireless Rain Station For online video support: http://bit.ly/laxtechtalk Instructional Manual Model: T84237 DC:102017 Table of Contents 1 Button Function Explanation 8 NOW Rainfall Alert (silent) 2 Setup
DIGITAL BLUETOOTH THEROMETER PBT
 DIGITAL BLUETOOTH THEROMETER PBT Index 1. 2. 3. 4. 5. 6. 7. 8. 9. 10. 11. 12. 13. 14. 15. Introduction Important Information Before Use Product Identification Description of LCD Display Battery Installation
Neo Ultrasound Module Manual
 Neo Ultrasound Module Manual Installation Instructions For complete User Operating Instructions, including Cautions, Warnings, Dangers, Indications, and Contraindications, refer to the User s Manuals.
DRAFT ONLY FOR CLINICAL TESTING Nucleus 7 Remote Control User Guide CR310
 DRAFT ONLY FOR CLINICAL TESTING Nucleus 7 Remote Control User Guide CR310 The Cochlear Nucleus 7 Remote Control (model number: CR310) is a hand-held device for controlling the commonly used functions of
Osmolarity System USER MANUAL FOR QUANTITATIVE MEASUREMENT OF OSMOLARITY OF OCULAR TISSUES. osdcare.com
 Osmolarity System FOR QUANTITATIVE MEASUREMENT OF OSMOLARITY OF OCULAR TISSUES USER MANUAL osdcare.com I-PEN User Guide I-PEN User Guide TABLE OF CONTENTS I-PEN I-PEN is a trademark of I-MED Pharma Inc.
Central Blood Pressure Meter Model cbp301. Operating Manual
 Central Blood Pressure Meter Model cbp301 Operating Manual Document cbp301-009 Issue 4 September 2011 Contents Introduction... 3 Package Contents... 5 Warnings and Cautions... 6 Contraindications... 7
Sensor. Wireless WR-CLIK. WRF-CLIK Wireless Rain/Freeze-Clik. Rain Sensor Shutoff for Automatic Irrigation Systems
 Wireless RAIN LIKTM Sensor Rain Sensor Shutoff for Automatic Irrigation Systems Owner s Manual and Installation Instructions WR-CLIK Wireless Rain-Clik WRF-CLIK Wireless Rain/Freeze-Clik TABLE OF CONTENTS
#0086.
 INSTALLATION MANUAL Contents Getting to Know Your AVANT REM Speech+... 3 Software Installation... 4 Driver Installation Windows 7... 7 EMC Precautions... 11 Safety... 15 Limited Warranty... 18 #0086 www.medrx-usa.com
L NKTEMP. Non-contact. Infrared Thermometer. User Manual LMP001
 L NKTEMP Non-contact Infrared Thermometer User Manual LMP001 TABLE OF CONTENTS Product Description Intended Use Product Features Safety Precautions Using the Thermometer Taking a Measurement Temperature
Disclaimers. Important Notice
 Disclaimers Disclaimers Important Notice Copyright SolarEdge Inc. All rights reserved. No part of this document may be reproduced, stored in a retrieval system, or transmitted, in any form or by any means,
IEC Second Edition
 Electromagnetic Compatibility of Medical Electrical Equipment Second Edition Prepared by Mr. James Conrad Presented by Dr. William A. Radasky 1 Second Edition Updates first edition on standards developed
On-Line Cardio Theater Wireless Digital Transmitter Installation and Instruction Manual
 On-Line Cardio Theater Wireless Digital Transmitter Installation and Instruction Manual Full installation instructions accompany your Cardio Theater equipment order. This On-Line version of our Installation/Instruction
HD STETH TM Quick Start User Guide
 Thank you and for choosing the futuristic HD Steth TM manufactured by HD Medical Inc. USA Indications for Use (IFU) HD Steth is an electronic stethoscope meant to assist a qualified clinician to capture,
Exergen TAT 5000S RS232 TTL Supplemental Instructions for Use
 www.exergen.com/s Exergen TAT 5000S RS232 TTL Supplemental Instructions for Use For additional specifications, see GE Healthcare CARESCAPE V100 Vital Signs Monitor Operator's Manual, Section 12. Symbol
Firmware version 1.05 supports all CMOS sensor based digital backs IQ150, IQ250 and A- series IQ250.
 RELEASE NOTE January, 2015 Firmware version 1.05 for IQ150, IQ250 and A-series IQ250 Firmware version 1.05 supports all CMOS sensor based digital backs IQ150, IQ250 and A- series IQ250. New functionality
Remote Control Extender AUDIO / VIDEO DEVICES EXTENDING SYSTEM
 Remote Control Extender AUDIO / VIDEO DEVICES EXTENDING SYSTEM MODEL NO.: AWX 701-A/AWX 701-B/AWX 701-C OPERATION MANUAL Remote Control Extender AUDIO / VIDEO DEVICES EXTENDING SYSTEM MODEL NO.: AWX 701-A/AWX
S ENSORLINK INSTALLATION MANUAL
 S ENSORLINK INSTALLATION MANUAL The SensorLink Transmitter (#7610) and SensorLink Receiver (#7611) are designed to work with Davis Instruments Weather Monitor II and the Weather Wizard III to enable wireless
ibed Locator Model 5212
 ibed Locator Model 5212 Connected Hospital Instructions for Use and Installation For Parts or Technical Assistance: USA: 1-800-327-0770 2011/03 5212-009-101 REV C www.stryker.com Table of Contents Symbols
Transcutaneous Electrical Nerve Stimulator
 Transcutaneous Electrical Nerve Stimulator Simple, effective pain relief *For the temporary relief of pain as part of current medication programme. Distributor Medi-Direct International Ltd. Unit 24, Wilford
Transmitter Model EX1100, EX1100W. User's Manual
 Merlin@home Transmitter Model EX1100, EX1100W User's Manual Unless otherwise noted, indicates that the name is a trademark of, or licensed to, St. Jude Medical or one of its subsidiaries. ST. JUDE MEDICAL
USER S MANUAL Volk Pictor Plus Fluorescein Angiography (FA) Module For Use with: Volk Pictor Plus
 Module For Use with: Volk Pictor Plus") USER S MANUAL Volk Pictor Plus Fluorescein Angiography (FA) Module For Use with: Volk Pictor Plus IM-080 Rev. A Page 1 of 16 THIS SALES PACKAGE INCLUDES: Model: Fluorescein Angiography (VP2FA) IM-080 Description:
USER S MANUAL Volk Pictor Plus Fluorescein Angiography (FA) Module For Use with: Volk Pictor Plus IM-080 Rev. A Page 1 of 16 THIS SALES PACKAGE INCLUDES: Model: Fluorescein Angiography (VP2FA) IM-080 Description:
Pain Management System
 TM Pain Management System Model: ireliev Model #: ET-1313 Operating & Instruction Manual Read Before Using ireliev Pain Management System Intended Use The ireliev Pain Management System (Model # ET-1313)
WVP. Wireless Valve Programmer. Programmer for use with WVC Multi-Station Battery Powered Irrigation Controllers
 WVP Wireless Valve Programmer Programmer for use with WVC Multi-Station Battery Powered Irrigation Controllers Owner s Manual and Installation Instructions TABLE OF CONTENTS... Introduction...1 WVP Components...2
Thermo Plus Bluetooth-enabled Thermo-Hygro Monitor Model: RAR213HG USER MANUAL
 Weather@Home Thermo Plus Bluetooth-enabled Thermo-Hygro Monitor Model: RAR213HG USER MANUAL EN Weather@Home Thermo Plus Bluetooth-enabled Thermo-Hygro Monitor Model: RAR213HG Contents USER MANUAL Introduction-----------------------------------------------------------------3
NEO CAR AUDIO. Neo AUXiN AUX INPUT INTERFACE. Instruction Manual
 NEO CAR AUDIO Neo AUXiN AUX INPUT INTERFACE Instruction Manual IMPORTANT NOTE Neo AUXiN Dip switch positions MUST be set BEFORE any other step is taken. Otherwise, the kit will not operate properly. See
Table of Contents. Makita LD050P 1
 Table of Contents EN Instrument Set-up - - - - - - - - - - - - - - - - - - - - - - - Introduction- - - - - - - - - - - - - - - - - - - - - - - - - - - - - - - Overview - - - - - - - - - - - - - - - - -
USER MANUAL Universal Gateway U9921-GUV (P/N: 40994G-01)
") USER MANUAL Universal Gateway U9921-GUV (P/N: 40994G-01) 2012 DAVID CLARK COMPANY INCORPORATED Cautions and Warnings READ AND SAVE THESE INSTRUCTIONS. Follow the instructions in this installation manual.
USER MANUAL Universal Gateway U9921-GUV (P/N: 40994G-01) 2012 DAVID CLARK COMPANY INCORPORATED Cautions and Warnings READ AND SAVE THESE INSTRUCTIONS. Follow the instructions in this installation manual.
Operation and Maintenance Manual
 SEBU8832-14 (en-us) February 2018 Operation and Maintenance Manual Product Link PLE601, PL641, PL631, PL542, PL240, PL240B, PL241, PL141, PL131, PL161, and G0100 Systems PL6 1-UP (Machine Control & Guidance
Resusci Anne Advanced SkillTrainer
 EN Resusci Anne Advanced SkillTrainer Important Product Information www.laerdal.com Cautions and Warnings A Caution identifies conditions, hazards, or unsafe practices that can result in minor personal
Resusci Anne Advanced SkillTrainer
 Resusci Anne Advanced SkillTrainer Important Product Information English www.laerdal.com Cautions and Warnings A Caution identifies conditions, hazards, or unsafe practices that can result in minor personal
USER MANUAL Digital Wireless Gateway U9120-W4 (P/N: 44002G-01)
") USER MANUAL Digital Wireless Gateway U9120-W4 (P/N: 44002G-01) 19549P-82 (11-16) 2016 DAVID CLARK COMPANY INCORPORATED Cautions and Warnings READ AND SAVE THESE INSTRUCTIONS. Follow the instructions in
USER MANUAL Digital Wireless Gateway U9120-W4 (P/N: 44002G-01) 19549P-82 (11-16) 2016 DAVID CLARK COMPANY INCORPORATED Cautions and Warnings READ AND SAVE THESE INSTRUCTIONS. Follow the instructions in
The following symbol indicates that the device is MR-unsafe:
 The following symbol indicates that the device is MR-unsafe: MR Unsafe Do not use this equipment In the MRI scan room Patient must follow the doctor s instructions and should not perform a self-assessment
R PROFLAME Instruction Book Collection
 9.956.028 R00 584 PROFLAME Instruction Book Collection 4-17 18-29 584 PROFLAME System 30-39 Appendix: DIP SWITCH NUMBER (0=ON 1=OFF) 40-41 4-17 Fig. 1 The SIT is a device that allows, in conjunction with
SAFETY INFORMATION IMPORTANT FCC LICENSING INFORMATION
 This device complies with part 15 of the FCC Rules. Operation is subject to the following two conditions: (1) This device does not cause harmful interference, and (2) This device must accept any interference
Rotating Anode X-Ray Tube Housing Assembly. General Data
 Technical Data TD ROTANODE E7252X E7252FX E7252GX 0197 Rotating Anode X-Ray Tube Housing Assembly High speed rotating anode X-ray tube housing assembly for high energy radiographic and cine-fluoroscopic
BodyclockStimplusManual.qx8_Layout 1 17/08/ :53 Page 1. Body Clock Stimplus. Instructions for use
 BodyclockStimplusManual.qx8_Layout 1 17/08/2012 11:53 Page 1 Body Clock Stimplus TM Instructions for use BodyclockStimplusManual.qx8_Layout 1 17/08/2012 11:53 Page 2 Acupuncture is an ancient Chinese therapy
AUTOMATE Interior Sun Sensor
 AUTOMATE Interior Sun Sensor 433 MHz Internal sun sensor for automatic shade control. FEATURES: 3 Modes of operation: - Close Mode - Open / Close Mode - Shade Detect Mode 4 Light sensitivity levels INSTR.
802.11n, 2.4G 1T1R Wireless LAN PCI Express Half Mini Card
 802.11n, 2.4G 1T1R Wireless LAN PCI Express Half Mini Card WN6605LH Realtek RTL8191SE User s Manual Ben J. Chen 3/4/2010 Federal Communication Commission Interference Statement This equipment has been
USER MANUAL. Sens it SENS IT 2.4
 USER MANUAL www.sensit.io Sens it SENS IT 2.4 SUMMARY SAFETY INSTRUCTIONS 4 I. CONTENT OF THE PACK 4 II. PRESENTATION 5 III. HOW TO START 8 IV. TECHNICAL SPECIFICATIONS 9 V. WARNING STATEMENTS 10 VI. CREDITS
MPRF01 Wireless 5uA Inductive Proximity Sensor RF System
 System Description; The MPRF01 is a simple ready to use Wireless Inductive. No programming is required; just insert 2, (1.5V) AA batteries into the Transmitter module. The RF receiver module is connected
Driveway Alarm INSTALLATION MANUAL
 WIRELESS ACCESS CONTROLS Driveway Alarm INSTALLATION MANUAL Mounting post Transmitter Receiver Transformer Sensor Kit Includes: Transmitter Module Sensor Receiver Transformer Mounting post (3 pieces) Installation
Husqvarna Fleet Services Machine Sensor. Machine Sensor Please read these instructions carefully before using the device. Original instructions
 Husqvarna Fleet Services Machine Sensor Machine Sensor Please read these instructions carefully before using the device. Original instructions Safety and Regulatory Information IMPORTANT: A complete User
ENG en. Operating instructions. Iris Magneton MF Wellness therapy
 ENG en Operating instructions Iris Magneton MF Wellness therapy Edition 09 / 2012 These operating instructions constitute an accessory of the device. They must therefore be kept in a suitable place near
USER MANUAL MODEL: BM-162
 USER MANUAL MODEL: BM-162 Parents Unit: A. Name Power ON/OFF Key Music Key PTT Key Volume - Key Microphone Power & Low battery indicator LCD display Volume + Key Night Light and torch Key Speaker -Belt
User Manual. Product Name:tablet Model Name:TM800A740M Brand Name:NuVision. Manufacture:Shenzhen Vastking Electronic Co.,LTD.
 User Manual Product Name:tablet Model Name:TM800A740M Brand Name:NuVision Manufacture:Shenzhen Vastking Electronic Co.,LTD. FCC Warning This device complies with part 15 of the FCC
Model: WS-9066U-IT Instruction Manual DC: Wireless Weather Station with Moon Phase
 Model: WS-9066U-IT Instruction Manual DC: 051716 Wireless Weather Station with Moon Phase Contents Initial Setup... 2 Moon Phase... 2 Buttons... 2 LCD Features... 3 Settings Menu... 3 MIN/MAX Temperature
DE EN FR IT ES RU PL DA NL NO SV
 DE FR IT ES RU PL DA NL NO SV Table of Contents Instrument Set-up - - - - - - - - - - - - - - - - - - - - - - - Introduction- - - - - - - - - - - - - - - - - - - - - - - - - - - - - - - Overview - - -