WARNING To reduce risk of fire or electric shock, do not expose this amplifier to moisture, rain, or excessive humidity.
|
|
|
- Eugenia Mason
- 5 years ago
- Views:
Transcription
1

2 CAUTION To reduce risk of electric shock, do not remove any of the amplifier s cover plates or screws. There are no user serviceable parts inside. Contact qualified service personnel. WARNING To reduce risk of fire or electric shock, do not expose this amplifier to moisture, rain, or excessive humidity. The lightning flash with arrowhead, within an equilateral triangle, is intended to alert the user to the presence of uninsulated dangerous voltage within the product s enclosure that may be of sufficient magnitude to constitute a risk of electrical shock to persons. The exclamation point within an equilateral triangle is intended to alert the user to the presence of important operating maintenance (servicing) instructions in the literature accompanying the appliance. 2
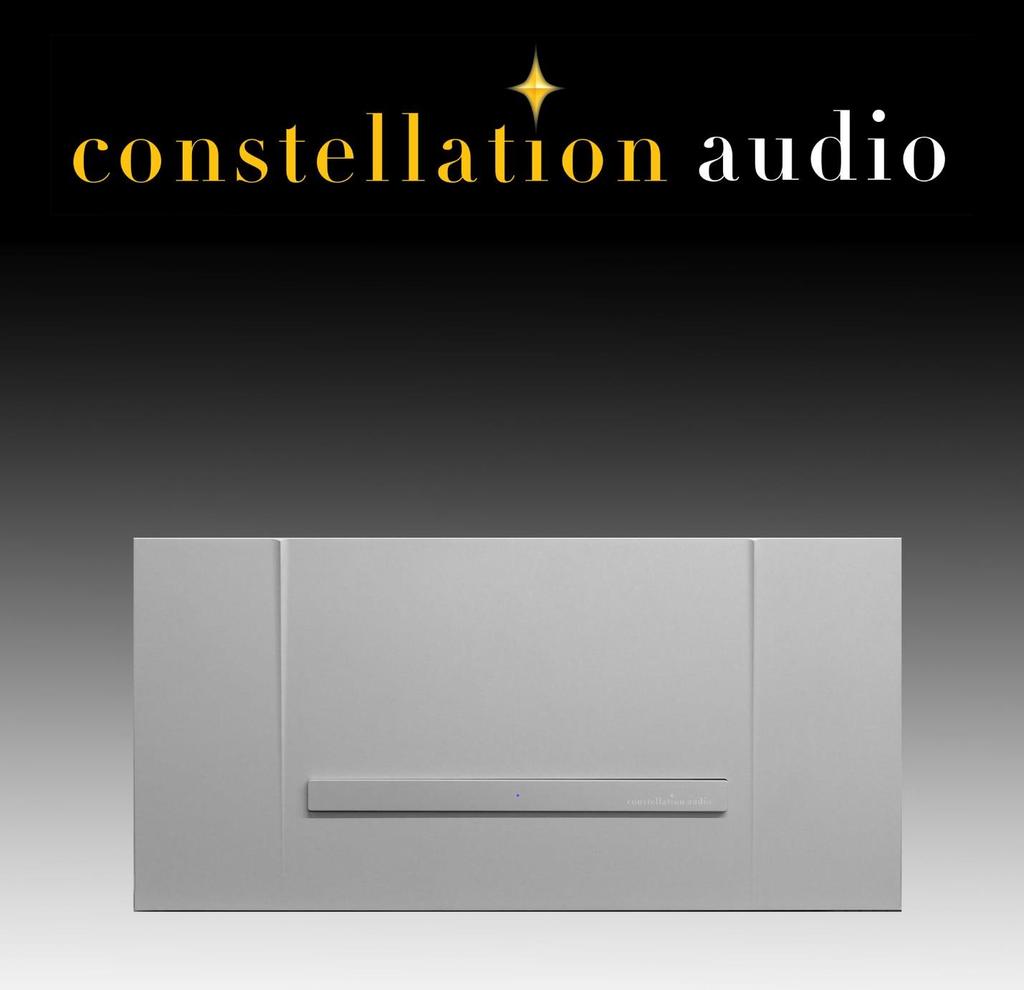
3 Thank you for purchasing the Constellation Audio Inspiration STEREO 1.0 or Inspiration MONO 1.0 amplifier. You are about to experience one of the finest amplifiers ever built. Because of their very high power output, these amplifiers demand careful and thoughtful installation in order to deliver the performance it is designed to achieve. This is especially true of the Inspiration MONO 1.0, which delivers double the power of the Inspiration STEREO 1.0. By reading through this brief manual and following the simple steps outlined within, you can ensure that your amplifier performs at its very best. Contents Page Topic 4 Before you install the amplifier Unpacking AC connection Locations Speakers In the event of malfunction 6 Connections BAL input Direct input RCA input Speaker-cable binding posts 15-amp IEC AC socket Trigger jack 8 Controls / displays / indicators Front power switch LED status indicator Master power switch Mute switch Input select switch 10 Operation Initial installation and power-up Normal operation 11 Maintenance 11 Troubleshooting 14 Specifications: Inspiration MONO Specifications: Inspiration STEREO For more information

4 Before you install the amplifier Unpacking At 55 pounds each, the Inspiration MONO 1.0 and Inspiration STEREO 1.0 are too heavy for one person to lift safely. Two strong people are required to lift each amplifier and to move it from place to place. Likewise, do not place these amplifiers on surfaces that cannot safely support their weight. Lightweight furniture and equipment racks should not be used to support these amplifiers. Lift each amplifier by hooking your fingers under the side edges, as indicated by the arrows in the photos at right. It s a good idea to wear soft gloves to protect your fingers and help avoid fingerprints on the amplifier. AC connection For best performance, each amplifier should be plugged into its own dedicated 15- or 20-amp AC outlet, with no other component but the amplifier connected to that AC circuit. It is especially desirable to provide a dedicated AC output if the amplifier is used with a speaker that has impedance dips down into the 2- or 3-ohm range at certain frequencies, a high-level signal at these frequencies can draw potential peaks well over 1,000 watts per channel with the Inspiration MONO 1.0. While it may be tempting to plug two Inspiration MONO 1.0s into a single AC circuit, we caution against it, especially if you have 15-amp AC circuits. A single 15-amp circuit provides only 1,800 watts of power, which isn t sufficient to allow two Inspiration MONO 1.0s to reach their peak output capability with low-impedance speakers. Not only will sound quality suffer, your listening sessions might be interrupted often when the Inspiration MONO 1.0s considerable power draw trips your home s circuit breaker. Do not plug the amplifier(s) into a power strip or AC line conditioner few such products are designed to handle the current that these amps can pull. When you connect or disconnect the AC cord, always grasp it by the plug, not by the cord itself. Pulling the plug out by the cord can damage the cord, the AC socket, and/or the amplifier. 4
5 Location The Inspiration MONO 1.0 and Inspiration STEREO 1.0 must be installed in an area with adequate ventilation. There should be at least 6 in/15 cm of clearance between the vents on the side of the amplifier(s) and the nearest wall or cabinet. Ensure that no curtains or shades can be lowered in a way that will block the amplifier s vents. If the amplifier is installed in a cabinet or in an equipment closet, ensure that the cabinet/closet has adequate ventilation. Installation in an unventilated cabinet or closet may cause the amplifier to overheat. These amplifiers require a room-temperature environment to operation properly. Ambient temperature should be about 70 F/21 C, plus or minus 10 F/5 C. Never install the amplifier in a place where it may be exposed to direct sunlight, and do not install it next to a room heater, radiator, air conditioner, etc. Ambient temperature can rise even more quickly with two Inspiration MONO 1.0s, so if you place both of them in an enclosed or tight space, make extra sure to provide plenty of ventilation and air flow. Make sure that the amplifier will not be exposed to moisture. Do not locate it in an area where it might be spilled on, and do not place it in a humid location (such as an unfinished basement). Installing the Inspiration MONO 1.0 or Inspiration STEREO 1.0 in a place where it will be exposed to direct sunlight or moisture, or where it will not have adequate ventilation, will void your warranty. Speakers The Inspiration MONO 1.0 and Inspiration STEREO 1.0 produce sufficient voltage and current to drive practically any loudspeaker made, regardless of the speaker s impedance, sensitivity, or power rating. However, the Inspiration STEREO 1.0 and, especially, the Inspiration MONO 1.0 have enough power to damage some loudspeakers if used carelessly. When you turn up the volume on your preamp, do it gradually. If you hear distortion, crackling noises, or mechanical thumps from the speaker, turn the volume down immediately. You can best appreciate the amplifier s performance by connecting it to a large set of full-range loudspeakers. It will sound excellent with small speakers, too, but if you connect it to a small set of speakers, avoid turning the volume on your preamp to maximum. Constellation Audio is not responsible for damage of any speaker connected to the Inspiration MONO 1.0 or Inspiration STEREO 1.0. In the event of malfunction Do not under any circumstances open the cabinet of the amplifier. There are no user-serviceable parts inside. Opening the cabinet can present a shock hazard even if the AC power is disconnected. Any alteration or modification of the amplifier s internal parts or circuit will immediately void your warranty. If your amplifier does not function correctly, refer to the Troubleshooting section at the end of this manual. If you are still unable to resolve the problem, contact your authorized Constellation Audio dealer. If any liquid is spilled on the amp, or if any metal object (such as a staple or a paper clip) is inadvertently forced in through the vents, immediately disconnect the AC power and contact your authorized Constellation Audio dealer. 5

.")
6 Connections 1. BAL input Use this XLR balanced input for connection to balancedoutput preamps of other brands. To select this input, set the input switch to BAL (upper position). To remove the XLR plug, push on the tab above the jack and pull the plug out. 2. DIRECT input Use this XLR balanced input only for connection to the Constellation Audio Inspiration PREAMP 1.0 or Virgo or Altair preamp. This connection is for Constellation Direct an audio interface that is, in essence, perfectly balanced. The positive- and negative-going halves of the signal will exhibit near-zero difference except for their polarity. To select this input, set the input switch to DIRECT (middle position). To remove the XLR plug, push on the tab above the jack and pull the plug out. Inspiration MONO 1.0 input jack layout 3. RCA input This input is provided as a convenience. You can use it if you elect to feed the amplifier with an unbalanced signal source. To select this input, set the input switch to RCA (lower position). However, to get the best performance from the Inspiration amplifiers, you must use an XLR input. Inspiration STEREO 1.0 input jack layout 6
 or in a bi-wired arrangement with separate cables going from one amp to the speaker s woofer")
 binding post and the unmarked connector to the negative (- or black)")
7 4. Speaker-cable binding posts On the Inspiration MONO 1.0, two sets of binding posts are provided for each amp s output. These can be used for standard cabling (with a two-conductor cable running from the amp to the speaker) or in a bi-wired arrangement with separate cables going from one amp to the speaker s woofer and midrange/tweeter drivers. Consult your speaker s manual for more information. On the Inspiration STEREO 1.0, one set of binding posts is provided for each channel. Inspiration MONO 1.0 binding post layout Connect the marked connector or cable conductor for the left speaker cable to the left positive (+ or red) binding post and the unmarked connector to the negative (- or black) binding post underneath. Inspiration STEREO 1.0 binding post layout Repeat with the right speaker cable. Make sure the speaker cables on both channels are connected identically marked cable conductor or connector to red, unmarked conductor or connector to black. Note that on the Inspiration MONO 1.0, the positive (+ or red) terminals are on the left side, seen from the rear) and the negative terminals (- or black) are on the right side. The binding posts accept spade lugs or banana plugs. Make certain that the spade lugs on your cables will fit the amplifier s binding posts do not force the spade lugs onto the posts if they do not fit. Do not use bare wire connections, because the amplifiers high power output might vaporize any stray wires that touch. The binding posts are designed to be tightened only by hand. Do not use tools to tighten the binding posts. To connect banana plugs, remove the threaded cap from the binding post entirely by twisting it counterclockwise, then insert the banana plugs into the sockets at the ends of the posts. Before you turn on the power, check at the terminals of the speakers and the amplifier to make sure the positive and negative leads of the speaker cables are separated and not touching. 7


8 5. 15-amp IEC AC socket Connect the supplied 15-amp AC cord here. You may also use an aftermarket power cord if you wish. 6. USB service input This input is exclusively for use by Constellation Audio and your Constellation Audio dealer. It is used for firmware updates to the amplifier. 7. Trigger input This 3.5mm jack accepts a 12-volt DC on/off trigger signal from preamps and third-party control systems. When a 12-volt DC trigger signal is input to the jack, the Inspiration STEREO 1.0 will turn on. When the trigger signal stops, the amplifier will turn off. Controls / displays / indicators 8. Front power/mute switch The bar running across the front of the amplifier is the power/mute switch. Press on the left end of the bar and hold it for 3 seconds to turn the amp on and off. Press and release the left side of the bar to activate and deactivate mute mode. 9. Status indicator LED This LED shows if the amp is on or off, and also indicates mute, warm-up, and cool-down modes. Here are the LED modes: SOLID RED: Standby mode. Amp is powered down but ready to use. FLASHING RED: Cool-down mode. Amp is powered off but cooling down. The power button cannot be used in this mode. This mode lasts 1 minute. FLASHING GREEN: Warm-up mode. Amp power is on but amp is warming up and cannot be used. This mode lasts 1 minute. SOLID BLUE: On mode. Amp power is on and the amplifier is fully functional. FLASHING BLUE: Mute mode. Amp is powered but will produce no sound. 8


9 10. Master power switch This switch disconnects the amplifier from AC power. If the switch is set to the Off position, the front power switch will not be active and the status indicator LED will not be illuminated. If the switch is set to the On position, the front power switch will become active and the LED will glow solid red, indicating standby mode. This switch also resets the amplifier s internal circuit breaker. If the circuit breaker trips, flip the switch off and on again to reset it. 11. Mute switch This switch puts the amplifier into mute mode. In this mode, the amplifier is fully powered up, but the sound is muted. Use this mode if you wish to mute the sound, of course, but also when you are checking the connections into and out of the amplifier. In the event of an accidental disconnection, using the mute mode will prevent unwanted bursts of sound from coming through the speakers. 12. Input select switch Use this switch to select which of the amplifier s inputs you wish to use. The BAL setting (upper position) selects the balanced input, which should be used with balancedoutput preamps not manufactured by Constellation Audio. The Direct setting (middle position) selects the Direct input, which should be used for connections to the Constellation Audio Virgo or Altair preamp. This setting and input form half of Constellation Direct an audio interface that is, in essence, perfectly balanced. The positive- and negative-going halves of the signal will exhibit near-zero difference except for their polarity. The RCA setting (lower position) selects the RCA input, used with preamps that do not offer balanced output. This connection is provided for convenience only; for best performance, use a preamp with balanced output. 9
10 Operation Initial installation and power-up STEP 1: Before making any connections, make sure the amplifier s master power switch is turned off. If the AC has not been connected, connect the amplifier(s) to the wall AC power socket using the supplied cord. STEP 2: If you are using Inspiration MONO 1.0s, connect a high-quality speaker cable from the left speaker to the left amplifier s binding posts, and repeat the process for the right speaker/channel. If you are using an Inspiration STEREO 1.0 amp, connect the speaker cable from the left channel binding posts to the left speaker, and repeat for the right channel/speaker. Be sure to connect the marked (often red) connector or cable to the positive (red or +) binding post on the amplifier, and the unmarked (often black) connector or cable to the negative (black or -) binding post on the amplifier. If you are using Inspiration MONO 1.0s, you may use either of the two positive (red or +) posts and either of the two negative (black or -) posts; just make sure that the red/+ post is connected to the red/+ cable and that the black/- post is connected to the black/- cable. Repeat for the right speaker. Make sure that the conductors of the cables do not touch; that there are no stray wires coming from the cables that might cause a short circuit; and that the amplifier and speakers do not come into contact with metal objects that might cause a short circuit. While the amplifier is internally protected against short circuits, it delivers enough current to vaporize small wires, so a fire hazard can result in the event of a short circuit. STEP 3: Connect a high-quality XLR balanced audio interconnect from the left channel of the preamp output to the left Inspiration MONO 1.0 s XLR input or the Inspiration STEREO 1.0 s left channel XLR input. Use the Direct input if you are using a Constellation Audio Inspiration Preamp or Virgo or Altair preamp; the BAL input if you are using a balanced XLR connection from a different brand of preamp, and the RCA input if your preamp offers only unbalanced RCA output. Repeat for the right channel. STEP 4: Using the input select switch near the amplifier s input jacks on the back panel, select the input to which you connected the interconnect cables. Set the switch to BAL (upper position) if using the regular balanced inputs, Direct (middle position) if using the Constellation Direct Direct inputs, or RCA (lower position) if using the unbalanced RCA inputs. STEP 5: Make sure the mute switch is set to Off (on both amps if you are using Inspiration MONO 1.0s). STEP 6: Turn on the master power switch on the back of the amplifier (both amps if you are using Inspiration MONO 1.0s), above the connection for the AC cord. The front LED status indicator on the amplifier(s) should glow red. If it does not, check your AC connection. STEP 7: To power up the amp, push the left side of the bar on the front panel for 3 seconds. The LED status indicator in the middle of the bar will start flashing green, which indicates that the amplifier is warming up. After 1 minute the indicator will turn solid blue and the amp will be active. If the preamp and a source are connected and playing, and the volume on the preamp is up, you should hear sound. STEP 8: To mute the amplifier, press and release the left side of the bar on the front panel. The LED status indicator will start flashing blue and the sound will stop. To unmute the amp, press and release the left side of the bar again. STEP 9: To turn the amplifier off, press and hold the left side of the bar on the front panel for 3 seconds. The LED status indicator will start to blink red, indicating that the amp is in cool-down mode. It will remain in this mode for 1 minute, and during this time, you will not be able to use the front power button. After 1 minute, the LED will glow solid red and you can power up the amp again. 10
11 Normal Operation Once the amplifier is installed and properly set up, it normally requires no user operation except for turning the amplifier on and off. Other than the power button on the front panel, the only control that you might want to use on a regular basis is the mute function, which can be activated from the front power button or the rear mute switch. However, this function is provided mainly as a convenience you would normally use the mute function on your preamp or the pause button on your source device to mute the sound from your audio system. Maintenance The Inspiration MONO 1.0 and Inspiration STEREO 1.0 require no regular maintenance. If the amplifier s surface becomes dusty, simply wipe it off with a soft dry cloth. Do not spray cleaners on the surface. To clean fingerprints from the surface of the amplifier, spray a small amount of mild window cleaner such as Windex onto a soft dry cloth, then use the cloth to remove the fingerprints. Do not spray the cleaner directly onto the amplifier. If dust collects inside any of the amplifier s vents, vacuum it out with a hand vac or shop vac. Use a brush attachment if available in order to avoid scratching the surface of the vents. If you do not have a brush attachment, do not touch the surface of the vent with the nozzle of the vacuum, in order to avoid scratching the surface. Troubleshooting Amplifier will not turn on 1. Check to see if the front status indicator LED is illuminated red. If it is not, try the following steps in order. If any one of the steps restores the power, there is no need to continue to the next steps. A. Make sure the master power switch on the rear of the amplifier is turned on. B. Check to make sure the AC cord is connected to the amplifier and to a wall outlet. C. Flip the master power switch off and on again. This will reset the amplifier s internal circuit breaker. D. Check the circuit breaker in the electrical box to make sure it has not been tripped. If it has, check to make sure a short circuit does not exist at the amplifier s speaker terminals or the speaker s input terminals. If no short circuit exists, flip the breaker on and off to reset it. E. If none of these conditions restores power, it is likely one of the amplifier s internal fuses is blown. Do not attempt to change the fuse yourself the amplifier requires the use of special high-voltage fuses that are not commonly available. Contact your Constellation Audio dealer for service. 2. If the front status indicator LED is illuminated red, push the left side of the front power switch bar and hold it for 3 seconds. The LED should begin flashing green. If it does, wait for 1 minute for the amplifier to warm up. When the LED turns blue, the amplifier is ready to use. If the LED glows red but does not change color when you push and hold the power switch, contact your Constellation Audio dealer. Amplifier is on but no sound is produced 1. Make sure the front status indicator LED is glowing blue, indicating that the amp is warmed up and in active mode. If the LED is glowing red, push it and wait 1 minute for the amp to warm up and the LED to glow blue. Sound should now be restored. 11
12 2. If the LED is flashing blue, the amplifier is in mute mode. Push the left side of the front power switch bar and release it. The LED should glow solid blue and sound should be restored. If not, check to make sure the rear mute switch is set to Off. 3. If the switch is glowing blue and you hear no audio, try the following steps in order. If any one of the steps restores the power, there is no need to continue to the next steps. A. Check to make sure your preamp and signal source are both turned on, and your preamp is not in mute mode. B. Make sure the desired source is selected on your preamp. C. Make sure the source device is putting out signal i.e., if it is a CD player, make sure that the CD is playing and not in pause mode. D. Check the connections between the amplifier(s) and the preamp, and between the preamp and the audio source device. If a cable is disconnected, reconnect it. If this does not restore sound, try substituting a different set of cables in order to make sure the original set was functioning properly. E. Check the connections between the amplifier(s) and the speakers. Make sure the speaker cables have not come loose. If it has, turn the power off on the amplifier(s), wait for the front LED to glow red, then re-install the cable. Sound comes from the wrong speaker If left-channel sounds are coming from the right or vice-versa (i.e., the violins in an orchestral recording come from the right speaker, not the left), check the cable connections between the amplifier(s) and the speakers, between the amplifier(s) and the preamp, and between the preamp and the source device. Make sure leftchannel interconnect cables are connected to the left channels of the source, preamp and amp, and right to the right channels. Make sure the left speaker is connected to the Inspiration STEREO 1.0 s left-channel binding posts, or to the Inspiration MONO 1.0 used for the left channel. Check the right speaker connection the same way. Sound comes from only one speaker 1. If you are using Inspiration MONO 1.0s, make sure both amps are plugged in and powered up. If you encounter difficulties, follow the troubleshooting steps under Amplifier will not turn on above. 2. Switch the preamp to a different input and play music from a different source device. If sound now comes from both speakers, check the connection between the source device and the preamp. 3. If you get sound from only one speaker no matter which preamp input you select, check the cables connecting the preamp to the Inspiration STEREO 1.0 (or the two Inspiration MONO 1.0s), and the amp(s) to the speakers. Make sure the speaker cables are firmly connected to the amplifier and the speaker, and that the cables have not been damaged. Then check to make sure the interconnect cables are connected correctly between the source component and the preamp, and between the preamp and the amplifier(s), and that all of the interconnect cables are in good condition. 4. If these steps do not restore sound to both speakers, turn the rear power switch off on the Inspiration MONO 1.0 connected to the speaker that is not working, or on the single Inspiration STEREO 1.0 amp. Leave the music playing, and allow it to continue to play until the sound dies out. This will discharge the power supply to avoid possible electrical shock or amplifier damage. If you are using Inspiration MONO 1.0s, connect the left speaker to the amplifier normally used for the right channel, and vice-versa. If you are using an Inspiration STEREO 1.0 amp, switch the speaker cables, connecting the left speaker to the Inspiration STEREO 1.0 s right channel and the right speaker to the Inspiration STEREO 1.0 s left channel. If the same speaker doesn t work if, say, the left speaker was silent before and it s still silent after you switch the cables you probably have a malfunction in that speaker. If the sound moves to the other speaker i.e., if only the left speaker was playing but now only the right speaker is playing contact your Constellation Audio dealer. Sound seems unfocused 1. Play a CD of typical pop vocals and sit in front of your speakers at an equal distance from both (at least 8 feet away from each speaker). If the vocals seem to come from between the speakers, they are connected 12
13 correctly. Alternatively, you can use the barking dog test from the Stereophile Test CD or a similar phase check test from another test CD. 2. If the vocals seem to come from all around you, make sure that the cables on both Inspiration MONO 1.0s or on the Inspiration STEREO 1.0 are connected properly, with the marked connectors or cables connected to the positive (red or +) binding post on the amplifier, and the unmarked connectors or cables connected to the negative (black or -) binding posts. 3. If you need to change the speaker cable connection, turn the amplifier off first. To avoid possible electrical shock or damage to the amplifier, you must discharge the energy stored in the power supply. To discharge the power supply, turn the power off with music playing. It may take up to a minute or so for the sound to die out. After the sound dies out, it is OK to change or adjust the cables. 13
14 Specifications: Inspiration MONO 1.0 Inputs Outputs Power output per channel, 8Ω (1 1% THD+N) Power output per channel, 4Ω (1 1% THD+N) Frequency response Gain 1 Constellation Direct XLR 1 standard balanced XLR 1 unbalanced RCA metal binding posts 400 watts 800 watts 10 Hz to 80 khz +0/-0.5 db 14 db Constellation Direct 26 db Balanced & RCA THD+N (1 up to 90% of rated power) <0.05% Output impedance 0.1Ω Damping factor (8Ω load) 80 Input impedance Signal-to-noise ratio Output noise Weight Dimensions (hwd) 20KΩ Constellation Direct 20KΩ XLR balanced 10KΩ RCA unbalanced >-95 db, A-weighted <70 µv, 500 khz BW watts 55 lbs/24.9 kg 8.5 x x in 216 x 432 x 483 mm 14
15 Specifications: Inspiration STEREO 1.0 Inputs Outputs Power output per channel, 8Ω (1 1% THD+N) Power output per channel, 4Ω (1 1% THD+N) Frequency response Gain 2 Constellation Direct XLR 2 standard balanced XLR 2 unbalanced RCA metal binding posts 200 watts 400 watts 10 Hz to 80 khz +0/-0.5 db 14 db Constellation Direct 26 db Balanced & RCA THD+N (1 up to 90% of rated power) <0.05% Output impedance 0.1Ω Damping factor (8Ω load) 80 Input impedance Signal-to-noise ratio Output noise Weight Dimensions (hwd) 20KΩ Constellation Direct 20KΩ XLR balanced 10KΩ RCA unbalanced >-95 db, A-weighted <70 µv, 500 khz BW watts 55 lbs/24.9 kg 8.5 x x in 216 x 432 x 483 mm 15
16 For more information Your Inspiration MONO 1.0 or Inspiration STEREO 1.0 amplifier should give you many years of trouble-free, maintenance-free service. If you encounter any problems you cannot solve or have technical questions, please contact your authorized Constellation Audio dealer. For more information about Constellation Audio products, please visit our website: 16
Before you install the Taurus
 Thank you for purchasing the Constellation Taurus power amplifier. You are now the owner of one of the finest amplifiers ever built. Please take a few minutes to read this manual before you use the amplifier.
CAUTION: NO USER SERVICEABLE PARTS INSIDE.
 Thank you for purchasing the Constellation Taurus power amplifier. You are now the owner of one of the finest amplifiers ever built. Please take a few minutes to read this manual before you use the amplifier.
MOMENTUM MONOBLOCK AMPLIFIER OWNER S MANUAL
 MOMENTUM MONOBLOCK AMPLIFIER OWNER S MANUAL A note from Dan D Agostino FOUNDER, CEO, AND CHIEF DESIGNER OF DAN D AGOSTINO MASTER AUDIO SYSTEMS I would like to thank you for purchasing the Momentum monoblock
M-300 Mono power amplifier User s guide
 M-300 Mono power amplifier User s guide M-300 Mono power amplifier User s guide Specifications: Contents: Power output: 8Ω: 290W, 0.01% THD SPECIFICATIONS Page 2 Input impedance: Gain: 4Ω: 580W, 0.01%
WARNING: Do not expose this amplifier to moisture or excessive humidity, and do not use it outdoors. Fire hazard may result.
 power amplifier 2 Legal notifications Dan D Agostino Master Audio Systems is a registered trademark of D Agostino LLC. The information in this owner s manual is subject to change without notice. Current
MOMENTUM STEREO AMPLIFIER OWNER S MANUAL
 MOMENTUM STEREO AMPLIFIER OWNER S MANUAL A note from Dan D Agostino FOUNDER, CEO, AND CHIEF DESIGNER OF DAN D AGOSTINO MASTER AUDIO SYSTEMS I would like to thank you for purchasing the Momentum Stereo
Professional Power Amplifier HORIZON SERIES USER MANUAL. Content
 Professional Power Amplifier HORIZON SERIES USER MANUAL Thank you for buying this W Audio product. To take full advantage of this product, please keep this manual and read the operating instructions carefully.
PROGRESSION MONOBLOCK & STEREO AMPLIFIERS OWNER S MANUAL
 PROGRESSION MONOBLOCK & STEREO AMPLIFIERS OWNER S MANUAL A note from Dan D Agostino FOUNDER AND CHIEF DESIGNER OF DAN D AGOSTINO MASTER AUDIO SYSTEMS Thank you for purchasing one of our Progression amplifiers.
plifier D-501 otion Am Tactile M
 Tactile Motion Amplifier D-501 IMPORTANT SAFETY INSTRUCTIONS WARNING: 1. Read and keep these instructions for future reference. 2. Do not use this apparatus near water. 3. Clean only with a dry cloth.
Opus 21 s80 Integrated Amplifier Owner's Manual
 Opus 21 s80 Integrated Amplifier Owner's Manual r e s o l u t i o n From all of us at Resolution Audio, thank you for choosing the Opus 21 s80 amplifier. We went to great lengths to design and produce
R-Series R235LS 2-Channel Power Amplifier with Local Source Switching
 R-Series R235LS 2-Channel Power Amplifier with Local Source Switching User s Manual On Off R235LS POWER A MPLIFIER IMPORTANT SAFEGUARDS WARNING TO REDUCE THE RISK OF FIRE OR ELECTRIC SHOCK, DO NOT EXPOSE
WARNING: Do not expose this amplifier to moisture or excessive humidity, and do not use it outdoors. Fire hazard may result.
 power amplifiers 2 Legal notifications Dan D Agostino Master Audio Systems is a registered trademark of D Agostino LLC. The information in this owner s manual is subject to change without notice. Current
A32. f u l l y b a l a n c e d p o w e r a m p l i f i e r. user guide
 A32 f u l l y b a l a n c e d p o w e r a m p l i f i e r user guide Welcome! Welcome to the Primare A32 Amplifier! The A32 is a modular power amplifier designed as the ideal output stage in a home theatre
léìë=on ëpm=fåíéöê~íéç=^ãéäáñáéê lïåéêdë=j~åì~ä êéëçäìíáçå
 léìë=on ëpm=fåíéöê~íéç=^ãéäáñáéê lïåéêdë=j~åì~ä êéëçäìíáçå From all of us at Resolution AV, thank you for choosing the Opus 21 s30 amplifier. We went to great lengths to design and produce an integrated
PROGRESSION MONOBLOCK AMPLIFIER OWNER S MANUAL
 PROGRESSION MONOBLOCK AMPLIFIER OWNER S MANUAL A note from Dan D Agostino FOUNDER AND CHIEF DESIGNER OF DAN D AGOSTINO MASTER AUDIO SYSTEMS Thank you for purchasing the Progression monoblock amplifiers.
Big Bang. B B O w n e r s M a n u a l. Power Amplifiers. SpeakerCraft BB2125 POWER ACTIVE PROTECTION L
 Big Bang Power Amplifiers SpeakerCraft BB2125 ACTIVE POWER PROTECTION L R B B 2 1 2 5 O w n e r s M a n u a l SAFETY INSTRUCTIONS APPLICABLE FOR USA, CANADA OR WHERE APPROVED FOR USAGE CAUTION: To reduce
Primare A33.2 Amplifier User Guide
 > Primare A33.2 Amplifier User Guide > Preface CAUTION RISK OF ELECTRIC SHOCK DO NOT OPEN CAUTION: To reduce the risk of electrical shock do not remove cover (or back). No user serviceable parts inside.
ECA COMMERCIAL AMPLIFIER OWNER S MANUAL ECA-70MIXAMP V / 70V / 4Ω Amplifier ECA-70MIXAMP-1-60 OUTPUT LEVEL POWER MASTER MIC 1
 OWNER S MANUAL ECA COMMERCIAL AMPLIFIER ECA-MIXAMP--6 V / V / Ω Amplifier TEMP PROT OUTPUT LEVEL ECA-MIXAMP--6 6 POWER MIC MIC MIC MIC AUX AUX BASS TREBLE 5 5 5 5 5 6 6 6 6 6 MASTER 5 6 ON OFF + - + -
2BSST POWER AMPLIFIER OWNER S MANUAL
 2BSST POWER AMPLIFIER OWNER S MANUAL IMPORTANT SAFETY INSTRUCTIONS The lightning flash with arrowhead symbol within an equilateral triangle, is intended to alert the user to the presence of un-insulated
A Channel Amplifier
 Installation Manual A2150 2 Channel Amplifier Table of Contents Installation Requirements and Recommendations 1 What s included 1 Speaker Wire Recommendations 1 Setup 2 Rack Mounting 2 Individually Protected
AV30MX-2 Operation Manual
 AV30MX-2 Operation Manual 1 Important safety instructions 1. Please read carefully prior to product installation or operation. 2. Read these instructions. 3. Keep these instructions. 4. Heed all warnings.
HTA125A/250A. Power Amplifiers. Installation & Use Manual
 HTA125A/250A Power Amplifiers Installation & Use Manual Specifications subject to change without notice. 2010 Bogen Communications, Inc. All rights reserved. 54-5832-04B 1011 NOTICE: Every effort was made
MoMentuM preamplifier owner s Manual
 Momentum preamplifier Owner s MANUAL A note from Dan D Agostino Founder, CEO, and Chief Designer of Dan D Agostino Master Audio Systems Thank you very much for purchasing the Momentum preamplifier. The
American Audio. User Instructions. American Audio 4295 Charter Strret Los Angeles Ca Revised 5/01
 American Audio User Instructions American Audio 4295 Charter Strret Los Angeles Ca. 90058 Revised 5/01 CAUTION Do not open - risk of electric shock CAUTION: TO REDUCE THE RISK OF ELECTRIC SHOCK, DO NOT
i3speakers LX503 MK2 User Manual
 i3speakers LX503 MK2 User Manual Index Introduction 5 Precautions 6 Safety requirements 6 Caution servicing 7 EC Declaration of Conformity 7 Waste of Electrical and Electronic Equipment (WEEE) 7 Chapter
MoMentuM preamplifier owner s Manual
 Momentum preamplifier Owner s MANUAL A note from Dan D Agostino FOUnDeR, CeO, AnD CHieF DeSiGneR OF DAn D AGOSTinO MASTeR AUDiO SYSTeMS Thank you very much for purchasing the Momentum preamplifier. The
SAGA PRO SERIES STEREO POWER AMPLIFIER OPERATION MANUAL
 SAGA PRO SERIES STEREO POWER AMPLIFIER OPERATION MANUAL INSTALLATION Use care in unpacking the amplifier, and be sure to save the carton and packing materials so that you can use them for moving, storing,
EPA152/252/502. User Manual.
 EPA152/252/502 User Manual www.audac.eu ADDITIONAL INFORMATION This manual is put together with much care, and is as complete as could be on the publication date. However, updates on the specifications,
CANARY AUDIO. EL34 Stereo Power Amplifier. Handcrafted in California CA-770 OWNER S MANUAL MADE IN USA
 CANARY AUDIO EL34 Stereo Power Amplifier Handcrafted in California CA-770 OWNER S MANUAL MADE IN USA Dear Customer: Please allow us to take this opportunity to thank you for purchasing this CANARY AUDIO
POWERED MIXER DIGITAL ECHO EFFECT ECHO LEVEL ECHO LEVEL ECHO LEVEL ECHO LEVEL ECHO VOL REPEAT MPM CHANNEL POWERED MIXER OWNER S MANUAL
 POWERED MIXER DIGITAL ECHO EFFECT ECHO LEVEL ECHO LEVEL ECHO LEVEL ECHO LEVEL ECHO VOL REPEAT MPM 480 4-CHANNEL POWERED MIXER OWNER S MANUAL MPM 480 4-CHANNEL POWERED MIXER Congratulations! You have just
OWNER S MANUAL CPS 1 / CPS 2 CONTRACTOR PRECISION SERIES
 OWNER S MANUAL CPS 1 / CPS 2 CONTRACTOR PRECISION SERIES CONTENTS Introduction................................................................... 9 Front Panel...................................................................
3050 Stereo Power Amplifier
 3050 Stereo Power Amplifier Owners Manual 10/26/2016 Boulder Amplifiers, Inc. 255 Taylor Ave. Louisville, CO 80027 (303) 449-8220 www.boulderamp.com Fault Conditions Boulderlink Appendix Remote Control
EPA104/254. User Manual.
 EPA104/254 User Manual www.audac.eu ADDITIONAL INFORMATION This manual is put together with much care, and is as complete as could be on the publication date. However, updates on the specifications, functionality
a u d i o p h i l e i n t e g r a t e d a m p l i f i e r user guide
 I22 a u d i o p h i l e i n t e g r a t e d a m p l i f i e r user guide Welcome! Welcome to the Primare I22! Your I22 is a high-quality integrated amplifier, designed as the ideal centrepiece of a home
DPA-1.2. Instruction Manual. 2 Channel Amplifier with Auto A/B Selector DPA-1.2 DPA-1.2 POWER SERIAL # LINE INPUT SENSING SPEAKER B OUT
 POWER Russound DPA-1.2 Instruction Manual 2 Channel Amplifier with Auto A/B Selector NEWMARKET, NH USA DPA-1.2 Russound 68835 Conforms to UL 6500 Certified to CSA C22.2 No1-94 DPA-1.2 Tested to Comply
Classic Series Public Address Amplifiers C10 & C20 Models
 Classic Series Public Address Amplifiers C10 & C20 Models Installation and Use Manual 2009 Bogen Communications, Inc. All rights reserved. Specifications subject to change without notice. 54-5978-01B 0901
MZ2 HEADPHONE AMPLIFIER, PREAMP, & STEREO AMPLIFIER USER GUIDE
 MZ2 HEADPHONE AMPLIFIER, PREAMP, & STEREO AMPLIFIER USER GUIDE Linear Tube Audio Takoma Park, MD, USA WARNING: For safety, the cover of this amplifier should be secured at all times. DC voltages as high
USER MANUAL MG-TA1000 POWER AMPLIFIER
 USER MANUAL MG-TA1000 POWER AMPLIFIER INDEX: INTRODUCTION SAFETY INSTRUCTIONS OPERATING PRECAUTIONS FEATURES OF PANAL CONTROLS FRONT & REAR PPANEL DISPLAY CONNECTING INPUTS SPEAKER CONNECTIONS INTRODUCTION:
a u d i o p h i l e d i g i t a l - t o - a n a l o g u e c o n v e r t e r user guide
 DAC30 a u d i o p h i l e d i g i t a l - t o - a n a l o g u e c o n v e r t e r user guide Welcome! Welcome to the Primare DAC30! Your DAC30 is a fully balanced audiophile digitalto-analogue converter,
Classic Series Public Address Amplifiers C10 & C20 Models
 Classic Series Public Address Amplifiers C10 & C20 Models Installation and Use Manual 2009 Bogen Communications, Inc. All rights reserved. Specifications subject to change without notice. 54-5978-01C 1106
PROLUDE AMPLIFICATION D750. User s manual for the tube preamplifier version
 PROLUDE AMPLIFICATION D750 User s manual for the tube preamplifier version 1 2 Table of contents 1 INTRODUCTION...1 4 1.1 SOME WORDS TO THE CUSTOMER...1 4 1.2 SOME WORDS ABOUT ME...1 4 2 SAFETY INSTRUCTIONS,
MC75 Tube Power Amplifier Owner s Manual
 McIntosh Laboratory, Inc. 2 Chambers Street Binghamton, New York MC75 Tube Power Amplifier Owner s Manual 13903-2699 Phone: 607-723-3512 www.mcintoshlabs.com 2 The lightning flash with arrowhead, within
CANARY AUDIO. Power Amplifier CA-309 OWNER S MANUAL. Handcrafted in California MADE IN USA
 CANARY AUDIO 300B Push-Pull Parallel Power Amplifier Mono Block Handcrafted in California CA-309 OWNER S MANUAL MADE IN USA Dear Customer: Please allow us to take this opportunity to thank you for purchasing
USER MANUAL VIVALDI MZ550A. Distribution Mixer Amplifier
 USER MANUAL VIVALDI MZ550A Distribution Mixer Amplifier 1. Security Precautions Carefully READ the instruction in this manual before use. Be sure to OBSERVE the INSTRUCTION in this manual regard convention
WX-1 & WX-3 OPERATING MANUAL AND USER GUIDE. Professional Power Amplifier. WX-1 and WX-3.indd :23:16
 WX-1 & WX-3 Professional Power Amplifier OPERATING MANUAL AND USER GUIDE 3 www.wharfedalepro.com WX-1 and WX-3.indd 1 2014-7-16 10:23:16 TABLE OF CONTENTS TABLE OF CONTENTS... 1 IMPORTANT WARNINGS & SAFETY
Model CC4041. CC Series Amplifier. Installation and Use Manual
 BASS 0 TREBLE 0-12 +12-12 +12 INPUT 1 INPUT 2 INPUT 3 INPUT 4 PEAK SIGNAL POWER POWER CC Series Amplifier Model CC4041 Installation and Use Manual 2012 Bogen Communications, Inc. All rights reserved. Specifications
a u d i o p h i l e p r e a m p l i f i e r user guide
 PRE32 a u d i o p h i l e p r e a m p l i f i e r user guide Welcome! Welcome to the Primare PRE32! Your PRE32 is a high-quality audiophile preamplifier, designed as the ideal centrepiece of a home hi-fi
Owner s Manual B 300 B 600 B 900 B 1200 B 1500 B 902 B 1202 B 1802 B300 B1802
 Owner s Manual B 300 B 600 B 900 B 1200 B 1500 B300 B 902 B 1202 B 1802 B1802 WARNING B 300 / B 600 / B 900 / B 1200 / B 1500 / B 902 / B 1202 / B 1802 Table of Contents Table of Contents Introduction
On-Line Cardio Theater Wireless Digital Transmitter Installation and Instruction Manual
 On-Line Cardio Theater Wireless Digital Transmitter Installation and Instruction Manual Full installation instructions accompany your Cardio Theater equipment order. This On-Line version of our Installation/Instruction
Professional Power Amplifier
 SERVICE FOR YOURCBU PRODUCT (International) For service, please contact the CBU distributor in your country through the dealer from whom you purchased this product. DO NOT ATTEMPT TO SERVICE THIS UNIT
CLASS D STEREO AMPLIFIER 60 WPC. Model: APA102 User Manual
 CLASS D STEREO AMPLIFIER 60 WPC Model: APA102 User Manual CAUTION RISK OF ELECTRICAL SHOCK DO NOT OPEN CAUTION: TO REDUCE THE RISK OF ELECTRIC SHOCK, DO NOT REMOVE THE COVER. NO USER SERVICABLE PARTS INSIDE.
REVAMP4120T Instruction manual
 REVAMP4120T Instruction manual REVAMP4120T Instruction manual 3 REVAMP4120T manual 4 CLASS-D POWER AMPLIFIER IMPORTANT SAFETY INSTRUCTIONS 1. Read these instructions 2. Keep these instructions 3. Pay
Owners Manual. DA-70 Series Professional Power Amplifiers.
 DA-70 Series Professional Power Amplifiers. Owners Manual Stewart Audio 14407 Cuesta Court Sonora, Ca 95370 Tel: 209.588.8111 Fax: 209.588.8113 www.stewartaudio.com WHEN THE PERFORMANCE DEPENDS ON IT Safety
1160 Stereo Power Amplifier
 1160 Stereo Power Amplifier 03/01/2018 Rev. 1.0 P/N: 91055 Boulder Amplifiers, Inc. 255 S. Taylor Ave. Louisville, CO 80027 (303) 449-8220 www.boulderamp.com About About Boulder Amplifiers, Inc. Boulder
INTEGRATED HYBRID TUBE AMPLIFIER VT Model HYBRID TUBE AMPLIFIER
 INTEGRATED HYBRID TUBE AMPLIFIER Model VT-40.2 HYBRID TUBE AMPLIFIER OWNER S MANUAL Safety Instructions The lightning flash with the arrowhead symbol within an equilateral triangle is intended to alert
a315 power amplifier Owner s Manual
 Wadia Digital, LLC. 2 Chambers Street Binghamton, New York 13903-2699 Phone: 607-723-3539 Fax: 607-724-0549 www.wadia.com a315 power amplifier Owner s Manual 2 The lightning flash with arrowhead, within
Primare A32 Amplifier User Guide
 > Primare A32 Amplifier User Guide i 0 Preface.pm7 1 > Preface COPYRIGHT AND ACKNOWLEDGMENTS Copyright 2005 Primare Systems AB. All rights reserved. Primare Systems AB Renvägen 1 SE-352 45 Växjö Sweden
POWER AMPLIFIER. Owner s Manual Mode d emploi Bedienungsanleitung Manual de instrucciónes CLIP SIGNAL TEMP PROTECTION POWER
 POWER AMPLIFIER Owner s Manual Mode d emploi Bedienungsanleitung Manual de instrucciónes TEMP PROTECTION POWER A CLIP SIGNAL B ON OFF M Introduction Thank you for purchasing a Yamaha C450/320/160 series
LA-SERIES LOOP AMPLIFIERS. Item ref: UK, UK User Manual
 LA-SERIES LOOP AMPLIFIERS Item ref: 952.864UK, 952.867UK User Manual Caution: Please read this manual carefully before operating Damage caused by misuse is not covered by the warranty SAFETY SYMBOL AND
INSTALLATION MANUAL ECA-70VMINI-60W ECA-70VMINI-60W L VOLUME SPEAKER OUTPUTS 12VDC IN + L+ L- GND R+ R- S GND GND Tx Rx
 INSTALLATION MANUAL ECA-70VMINI-60W ECA-70VMINI-60W L VOLUME R 12VDC IN BALANCED IN STEREO IN UNBALANCED IN SERVICE STATUS IR RS-232 + L+ L- GND R+ R- S GND GND Tx Rx SPEAKER OUTPUTS + page 2 CAUTION Risk
audionet AMP 1 V2 User s Manual Stereo - Amplifier
 audionet AMP 1 V2 Stereo - Amplifier User s Manual 1 2 Contents 1 Preface... 4 1.1 Included... 5 1.2 Transport... 5 2 Overview control elements... 6 2.1 Front panel... 6 3 Overview connections... 7 3.1
CAUTION : TO PREVENT ELECTRIC SHOCK, MATCH WIDE BLADE OF PLUG TO WIDE SLOT, FULLY INSERT.
 BSR-1 The Lightning flash with arrowhead symbol, with an equilateral triangle is intended to alert the user of the presence of uninsulated dangerous voltage within the product s enclosure that may be of
Classic Series Amplifiers C35, C60, & C100 Models
 Classic Series Amplifiers C35, C60, & C100 Models Installation and Use Manual 2009 Bogen Communications, Inc. All rights reserved. Specifications subject to change without notice. 54-5979-02E 1203 Notice:
STEREO POWER AMPLIFIER OWNER MANUAL PR-150 DESIGNED IN U.K. PDF created with FinePrint pdffactory trial version
 STEREO POWER AMPLIFIER OWNER MANUAL PR-150 DESIGNED IN U.K. INTRODUCTION Congratulations on your purchase of MA PR-150 Stereo Power Amplifier. The performance of PR-150 is perfect for any audio application,
The ART SLA-2 Studio Linear Amplifier
 TABLE OF CONTENTS The ART SLA-2 Studio Linear Amplifier Safety Precautions... 2-3 Introduction... 4 Installation... 5 AC Power Hookup... 5 Audio Connections... 5 Security Cover... 6 Controls and Indicators...
KXR. Owner, s Manual. One hundred KEYBOARD EXTENDED RANGE TYPE: PR 262 P/N
 THE SOUND THAT CREATES LEGENDS KEYBOARD EXTENDED RANGE KXR One hundred TYPE: PR 262 Owner, s Manual P/N 047761 KXR 100 Owner s Manual Congratulations on your purchase of the Fender KXR 100 keyboard amplifier.
UA ª 35T II Utility Amplifier OPERATING INSTRUCTIONS
 OPERATING INSTRUCTIONS Intended to alert the user to the presence of uninsulated "dangerous voltage" within the product's enclosure that may be of sufficient magnitude to constitute a risk of electric
Model CC4052. CC Series Amplifier. Installation and Use Manual
 CC Series Amplifier Model CC4052 Installation and Use Manual 2012 Bogen Communications, Inc. All rights reserved. Specifications subject to change without notice. 54-2216-01A 1303 NOTICE: Every effort
PROFESSIONAL STEREO AMPLIFIERS USER GUIDE
 PROFESSIONAL STEREO AMPLIFIERS USER GUIDE 967/9673 - September 00 - Version.0 ENGLISH Ti SERIES - Professional stereo amplifiers Page Ti SERIES - Professional stereo amplifiers ENGLISH - Safety information
3BSST 4BSST POWER AMPLIFIER OWNER S MANUAL UPDATED
 3BSST 4BSST POWER AMPLIFIER OWNER S MANUAL UPDATED 007-01-9 3Bsst & 4Bsst POWER AMPLIFIERS GENERAL INFORMATION Introduction Thank you for choosing an SST SERIES Stereo Power Amplifier. Bryston welcomes
Owner s Manual. MOON Series W5.3 SE. Stereo Power Amplifier
 Owner s Manual MOON Series W5.3 SE Stereo Power Amplifier Important Safety Instructions 1. Read these instructions. 2. Keep these instructions. 3. Heed all warnings. 4. Follow all instructions. 5. Do not
POWER AMPLIFIER. Owner s Manual POWER AMPLIFIER R 20 CLIP POWER TEMP PROTECTION 6 POWER. Keep This Manual For Future Reference.
 POWER AMPLIFIER Owner s Manual POWER AMPLIFIER POWER 20 5 L CLIP R 20 5 TEMP 25 0 25 0 PROTECTION 0 LEVEL 0 6 6 POWER 40 40 ON OFF L 0 db R 0 Keep This Manual For Future Reference. E WARNING: THIS APPARATUS
AV Series AV-25-2 AV-25 Owner s Manual February 2010
 AV Series AV-25-2 AV-25 Owner s Manual February 2010 www.stewartaudio.com Important Safety Instructions Before using your Stewart Audio Inc. Power Amplifier, please read this Owner s Manual carefully to
MIXER POWER AMPLIFIER BG-130
 OPERATING INSTRUCTIONS MIXER POWER AMPLIFIER BG-115 BG-130 TO REDUCE THE RISK OF ELECTRICAL SHOCK, DO NOT REMOVE COVER. NO USER SERVICEABLE PARTS INSIDE. REFER SERVICING TO QUALIFIED SERVICE PERSONNEL
KeyPre KP6 - Electronic Instrument Preamplifier
 ! USE ONLY WITH 250V FUSE KeyPre KP6 - Electronic Instrument Preamplifier USER S GUIDE 0 10dB 0 10dB 0 10dB 0 10dB 0dB 10dB 0 10dB AVEDIS AUDIO E L E C T R O N I C S AC INPUT 100-240VAC 50/60 Hz 1.1" 1.225"
RM4 MODULAR TUBE PREAMP OWNERS MANUAL
 A M P L I F I E R S RM4 MODULAR TUBE PREAMP OWNERS MANUAL Dear Randall Owner, Congratulations on the purchase of your new Randall Amplifier, and thank you for the support of our product line. Randall amps
DPA-1200 ORDERCODE D4180 DPA-2400 ORDERCODE D4181 DPA-3400 ORDERCODE D4182
 Digital DPA-1200 DPA-2400 DPA-3400 ORDERCODE D4180 ORDERCODE D4181 ORDERCODE D4182 Congratulations! You have bought a great, innovative product from DAP Audio. The Dap Audio Vintage Digital Power Series
ZM-6. Professional 19 Rack Mixer USER MANUAL. Content
 Professional 19 Rack Mixer ZM-6 USER MANUAL Thank you for buying an LD Systems audio product. Please read these operating instructions carefully before you use the product for the first time and keep them
Power Amplifier D2 D3 D4 D5 AUDAC PROFESSIONAL AUDIO EQUIPMENT. Dual Channel Power Amplifier D2 D3 D4 D5. User Manual & Installation Guide
 Power Amplifier D2 D3 D4 D5 AUDAC PROFESSIONAL AUDIO EQUIPMENT Dual Channel Power Amplifier D2 D3 D4 D5 User Manual & Installation Guide AUDAC PROFESSIONAL AUDIO EQUIPMENT User Manual & Installation Guide
User Manual. MA 240 Mixing amplifier
 User Manual MA 240 Mixing amplifier Safety instructions When using this electronic device, basic precautions should always be taken, including the following: 1 Read all instructions before using the product.
Owner s manual. SDA 2175 Semi Digital Amplifier
 Owner s manual SDA 2175 Semi Digital Amplifier 2 Table of Contents Operating Voltage 4 Unpacking the SDA 2175 4 Serial Number Registration 4 Introduction 5 Accessories 6 Front Panel 7 - Controls 7 Rear
USER MANUAL. GOLDMUND TELOS 2500 NextGen Universal Power Amplifier
 USER MANUAL GOLDMUND TELOS 2500 NextGen Universal Power Amplifier Thank you for purchasing the GOLDMUND TELOS 2500 NextGen. You have acquired the best Universal Power Amplifier ever made for professional
REVAMP4100 Instruction manual
 REVAMP4100 Instruction manual REVAMP4100 Instruction manual 3 REVAMP4100 manual 4 CLASS-D POWER AMPLIFIER IMPORTANT SAFETY INSTRUCTIONS 1. Read these instructions 2. Keep these instructions 3. Heed all
R850MC. 4-Zone, 8-Channel Power Amplifier Installation Manual
 R850MC 4-Zone, 8-Channel Power Amplifier Installation Manual SAFETY INSTRUCTIONS WARNING: TO REDUCE THE RISK OF FIRE OR ELECTRIC SHOCK, DO NOT EXPOSE THIS APPLIANCE TO RAIN OR MOISTURE. CAUTION: TO REDUCE
400M. Series. Owner s Manual. Mono Power Amplifier
 400M Mono Power Amplifier Series Owner s Manual 400M Neo Series Owner s Manual Important Safety Instructions 1. Read these instructions. 2. Keep these instructions. 3. Heed all warnings. 4. Follow all
AV Series AV30MX-2 AV30MX-2 Owner s Manual October 2010
 AV Series AV30MX-2 AV30MX-2 Owner s Manual October 2010 www.stewartaudio.com Important Safety Instructions Before using your Stewart Audio Inc. Power Amplifier, please read this Owner s Manual carefully
Important Safety Instructions ENGLISH - PAGES ESPAÑOL - PAGINAS FRANÇAIS - PAGES ITALIANO - PAGINE...
 ENGLISH - PAGES........... 6-8 Important Safety Instructions This symbol warns the user of dangerous voltage levels localized within the enclosure. This symbol advises the user to read all accompanying
INSTRUCTION MANUAL. MODEL: Vintage 60R. Vintage Series Guitar Amplifi er
 INSTRUCTION MANUAL MODEL: Vintage 60R Vintage Series Guitar Amplifi er 2 INTRODUCTION Thank you for choosing this Johnson amplifier. Please read this manual carefully and completely before operating your
GUITAR POWER AMPLIFIER U S E R ' S M A N U A L
 GUITAR POWER AMPLIFIER U S E R ' S M A N U A L May be covered by one or more of the following: U.S. Patents #4538297, 4647876, 4696044, 4745309, 4881047, 4893099, 5124657, 5263091, 5268527, 5319713 and
Boulder W Class A Stereo Power Amplifier
 Boulder 2060 600 W Class A Stereo Power Amplifier Owners Manual V1.0 10/10/97 TABLE OF CONTENTS GETTING STARTED Placement of the 2050 Power amplifier......................................... 1-1 Connecting
AV25-2 User Manual. 1 Important safety instructions
 AV25-2 User Manual 1 Important safety instructions 1. Please read carefully prior to product installation or operation. 2. Read these instructions. 3. Keep these instructions. 4. Heed all warnings. 5.
Monolith. Subwoofer System OWNERS MANUAL
 Monolith Subwoofer System OWNERS MANUAL CONTENTS Page No. 1) Safety instructions. 2) 3) 4) Connecting up your Monolith. Connecting up using the high level input. Connecting up using the low level input.
Operating Instructions
 FM Transmitter 2 Operating Instructions PLEASE READ ALL THE INSTRUCTIONS COMPLETELY BEFORE USE AND SAVE THIS MANUAL FOR FUTURE REFERENCE. Before Use Please read IMPORTANT SAFETY INSTRUCTIONS on pages 10-11
NU2. Dual UHF Wireless System. Item ref: UK, UK, UK, UK User Manual. Version 1.0
 NU2 Dual UHF Wireless System Item ref: 171.974UK, 171.975UK, 171.976UK, 171.977UK User Manual Version 1.0 Caution: Please read this manual carefully before operating Damage caused by misuse is not covered
PA240 ORDERCODE D6113
 PA240 ORDERCODE D6113 Congratulations! You have bought a great, innovative product from DAP Audio. The Dap Audio PA240 brings excitement to any venue. Whether you want simple plug-&-play action or a sophisticated
User Manual (English)
") Psvane TC5 Integrated KT120 Tube Amplifier User Manual (English) 1 P a g e Exclusively available at www.grantfidelity.com All copy rights reserved by Psvane Audio & Grant Fidelity page I Warnings: 1. Before
Psvane TC5 Integrated KT120 Tube Amplifier User Manual (English) 1 P a g e Exclusively available at www.grantfidelity.com All copy rights reserved by Psvane Audio & Grant Fidelity page I Warnings: 1. Before
15" 500W self-powered subwoofer
 15" 500W self-powered subwoofer USER GUIDE 10349 - Version 1 /01-2015 English SRSUB15A - 15" 500W self-powered subwoofer 1 - Safety information Important safety information This unit is intended for indoor
ENGLISH TERROR BASS 500/1000
 1 THANK YOU! Thank you for choosing Orange. You are now a member of the Legendary British Guitar Amplifier owners club! Since 1968 when the company was founded, Orange has been a pioneering force in the
875HT OWNER S MANUAL
 875HT OWNER S MANUAL 875HT EIGHT CHANNEL POWER AMPLIFIER Table of Contents Important Safety Instructions General Introduction Page 1 Introduction Description Shipping Box & Packing Materials Installation
Owner s Manual. Series 330A. Stereo Power Amplifier
 Owner s Manual Series 330A Stereo Power Amplifier Important Safety Instructions 1. Read these instructions. 2. Keep these instructions. 3. Heed all warnings. 4. Follow all instructions. 5. Do not use this