Reducing Noise in an image
|
|
|
- Elfrieda Spencer
- 5 years ago
- Views:
Transcription


1 Reducing Noise in an image - Open the image in Photoshop. - Go to the Filter menu then click on Noise and then the Reduce Noise button. - Zoom in on the preview image in the Reduce Noise window, so that you have a better view of the noise in the image. - Change the settings in order to reduce the noise level of the picture, the settings which should come up for you to change are Strength, Preserve Details, Reduce colour noise and Sharpen Details

2 - The noise in the image should then be reduced and the image should look smoother. As you can see in the before and after pictures below, the second picture looks a lot better quality.


3 SuperImposition 1. Open the two photos that you will be using to swap heads. For the simplicity of this tutorial, we ll refer to the two photos as follows: Body Photo: One photo that has the body you want to replace with a new head. Face Photo: The photo that has the face/head that you want to swap onto the Body Photo. 2. With the Face Photo selected, use the Lasso tool and draw a selection around the head. 3. Click CTRL+C to copy the head. 4. Paste the head onto the Body Photo by clicking CTRL+V. 5. Click CTRL+T to go into Transform mode. Move and resize the head to fit proportionately over the body. 6. Make sure the layer with the new head is active. Select the eraser tool and begin erasing the surrounding background around the new head. 7. Select the clone stamp tool. 8. Select the layer with the old head and begin to clone stamp out the areas of the old head underneath so that only the new head is visible. 9. Go to Image > Adjustments > Hue/Saturation and adjust the saturation sliders. Do this for both layers so that both images match better. If the brightness levels of both photos are drastically different, then go to Image > Adjustments > Brightness/Contrast and adjust the levels of the two layers so that they match better.

4 Patch an area The Patch tool lets you repair a selected area with pixels from another area or a pattern. Like the Healing Brush tool, the Patch tool matches the texture, lighting, and shading of the sampled pixels to the source pixels. You can also use the Patch tool to clone isolated areas of an image. The Patch tool works with 8-bits or 16-bits-per-channel images. 1. Select the Patch tool. 2. Do one of the following: Drag in the image to select the area you want to repair, and select Source in the options bar. Drag in the image to select the area from which you want to sample, and select Destination in the options bar. Note: You can also make a selection prior to selecting the Patch tool. To adjust the selection, do one of the following: Shift-drag in the image to add to the existing selection. Alt-drag (Windows) or Option-drag (Mac OS) in the image to subtract from the existing selection. Alt+Shift-drag (Windows) or Option+Shift-drag (Mac OS) in the image to select an area intersected by the existing selection. Position the pointer inside the selection, and do one of the following: If Source is selected in the options bar, drag the selection border to the area from which you want to sample. When you release the mouse button, the originally selected area is patched with the sampled pixels. If Destination is selected in the options bar, drag the selection border to the area you want to patch. When you release the mouse button, the newly selected area is patched with the sampled pixels.

5 Step by Step guide for the Warp Technique. Step 1: First select an image of your choice Step 2: Re name the layer, so it will become unlocked. By double clicking on the image layer and renaming it. You can also unlock the layer by right clicking on the layer and selecting the duplicate layer button. Step 3: Hold down the ctrl and t button, which will select the image. Step 4: Right click on the image and press the warp button. Step 5: The wrap button will put a grid across the image. Around the image it will have white spots around the grid. Step 6: This will enable you to change the shape of the image, by using these white spots button. So you can change the shape to what you want it to look like. You can see that the warp button has put a grid on the image. There are also some white dots around the shape, which enables you to change the shape of the image. Step 7: Also there is an option that is already made for you where you can change the shape of the image, into a different shape. Step 8: At the top there is an option next to the word warp, where there is a drop down menu where you can choose a shape for the image to change into. For example selecting the flag option, will make your image into a flag shape. If you don t like the way the flag option has put the image, you can change it by moving the white dots on the image grid to make it look the way you want it too.

6 Step 9: If you don t like the way it is shaped then you can change it to another option or just do it the manual way, like before. Then once you are happy with the image, press the enter button and it will be your image shape now. Before After

7 Blending and Sharpening Beginning Image: Step One: Sharpen When you sharpen a part of an image, it makes that part of the image stand out because it is in slightly more detail than the rest of the image. This sharpening the colouring outside of the pupil on this eye is a great way of drawing attention to it, because it is the main feature of this page. To get the sharpening tool, look to your task bar on the left hand side and click the blur/sharpen/smudge tool and click on sharpen. Your curser should then be replaced with a small circle.


8 Slowly move your curser over the parts you want to sharpen. If you over do it, then the image will look fake and in bad condition, and if you under-do it then your image will not change at all. After Sharpening: Step Two: Picking colours Sometimes, when you image looks too plain, it could be a good idea to add some to make the whole image more eye catching and interesting. To pick your colours that you are going to add to the photograph, look to the bottom left hand side corner of the screen and you should see this colour palette. Double click on one of the boxes and the box below should appear. Choose your first colour by dragging the colour metre up and down and by clicking on the shape of that colour that you want. In this case, I will choose a purple. Do exactly the same for the second colour, but only choose a different colour or shade. I chose a light grey.

9 Step Three Selecting: Now we need to choose and select which part of the image you will change colour. In my case, I will change the colour of the place I sharpened, which is the eye colour. To select this part, look to your task bar once again on the left hand side and click on the magnetic lasso tool. This tool will select the part that you want to change but sticks to the outside so that you don t go over the lines. Once you have done this, the part you have selected could be highlighted and surrounded by the flashing lines.

10 Step Four: Blending This is the part where you colour your image by blending/gradienting. Go to your taskbar, once again, on the left hand side and go to the filling tool and change it to gradient tool. At the top of the screen you can change how you are going to blend, for example which ways the colours go and how define you want the blending to be. Then drag your mouse on the selected part of your image to blend it. To finish the image off you can smudge the corners of the blend to make it more realistic. Finished Image:

11 Before After


12 De-saturation and Re-Colouring an Image This tool will make part of the image colour and the rest black and white which will make part of the image that you want stand out. Step 1 The fist step is to open the photo; you must do this then create a new layer and copy and paste the same image into this new layer. This will give you the image twice. The two layers use the folded tab button to create a new one. Step 2 Go into the top layer and go to the top menu bar Image go down to Adjustments and choose Desaturate, this will make the whole image black and white. This will change the layer that you are on to black and white.


13 This will leave you with a fully black and white image. Step 3 Once the photo is Desaturate you must then use a small erase and erase the desaturation by using it, use a small eraser edge and zoom in as this will give you a more defined and better result. This will reveal the other image below and give it colour. The Eraser tool, make sure that this is small so that you can be accurate.


14 Brightening your Sky 1. Find a picture of yours which you feel would be better with a sunnier sky. I chose this one. 2. You then need to remove the sky from the old picture. There are a few ways you can do this and you should use a variety of them to get the best result. The magic wand tool for the bulk The lasso tools and rubber for the small details Zooming in Ctrl and + 3. Once you have removed the old sky you can add your new sky to the picture. I used this one 4. You need to set up your layers to look like this. 5. This will make the angel on top, and the sunny sky shine through. Now if you cleared the old sky well enough it will look ok. If not zoom in and use the tools from before to tidy it up. 6. One more trick you can do is duplicate the angel layer, click it then right click > duplicate layer. Then on the new layer go to filter > blur > Gaussian blur and set it to about Leave it on top of your old angel and set the opacity to about 50%. This will just smooth the edges off a little bit.

15 How to Create Advanced Shadows in Photoshop CS3 Creating realistic shadows in Photoshop used to be a lot of work. You had to make and feather selections, play with blend modes and opacity and rotate and distort the duplicate layer. With Photoshop CS3 you still have to do the same steps but you can take a few short cuts. Instructions 1. Open your Photoshop document. Select the object you want to add the shadow to and copy it to a new layer (Command + J.) You can also drag the selection from another file. 2. Add a drop shadow. Click on the "Add Layer Style" icon in the Layers palette and choose "Drop Shadow" from the pulldown menu. Don't accept the default settings. Soften the edges and adjust the distance to look more like a real shadow. 3. Choose "Create Layer" from the Layer menu Layer Styles submenu. Don't worry if you are warned that some effects can't be reduced. Your drop shadow will separate from the original layer and become a separate layer of its own. 4. Use the Distort and Free Transform commands to bend the shadow into a realistic shadow shape. Move the shadow to align with the casting object and position it where it would be cast by the image light source. 5. Tweak the layer blend and opacity. The settings will be copied to the layer from the original layer style settings. While "Multiply" blend mode will usually work best, some of the other darken blends may work better with specific backgrounds


 Check the preview box shown on the image to the right.")

16 Changing Colour Balance To change the colour balance follow these simple steps: 1) Select the Layer menu. 2) Roll your cursor over the New Adjustment Layer which will open another menu 3) When you are in this menu, click on Colour Balance When you click on the colour balance option the colour balance dialog box will open up. 4) Check the preview box shown on the image to the right. This will allow you to see the adjustments to the image without having to finalize the process. 5) You can then adjust the colour levels by using the slider bar or entering the numerical values. Once you feel you have reached the right balance just click OK and the process will be complete. Before After

17 Changing hair colour 1- Choose a photo in which you would like to change the hair colour of 2- Press q, then selecting a suitable brush, paint over the hair, don t worry about not keeping to the edges, this can be sorted later 3- Once the hair is covered in the red overlay, press q again this will select the area. Then go to select- inverse, you should now have the hair area selected 4- Create a new layer and fill the selected area with a solid colour of what colour you want the hair to be 5- Now right click the hair layer and select Soft Light under the blending mode 6- Select the eraser tool on a large feathered size and correct any mistakes 7- Duplicate the hair layer to darker the shade, and once again you make need to correct this by using the eraser tool (65 to 100 feathered brush to blend it in)

. 2.")


18 Clipping Mask with text 1. Start Photoshop and open the image that you want to appear inside a piece of text (you can add multiple images later). 2. Select the text tool and write your text 3. Ensure in your layers menu that the text is on the bottom layer. To change the order of layers just drag them Hold down ALT and click in between the two layers and click. Your image should now appear in your text. 6. To work with multiple images, ensure each letter of your word and each image are on separate layers. You will need to add a clipping mask for each letter/image combination. 7. Right click on your layers and select flatten image to merge as one image.

19 Clone Stamp tool The Clone Stamp tool paints one part of an image over another part of the same image or over another part of any open document that has the same color mode. You can also paint part of one layer over another layer. The Clone Stamp tool is useful for duplicating objects or removing a defect in an image. 1. Select the Clone Stamp tool. 2. Choose a brush tip and set brush options for the blending mode, opacity, and flow in the options bar. 3. To specify how you want to align the sampled pixels and how to sample data from the layers in your document, set any of the following in the options bar: Aligned Samples pixels continuously, without losing the current sampling point, even if you release the mouse button. Deselect Aligned to continue to use the sampled pixels from the initial sampling point each time you stop and resume painting. Sample Samples data from the layers you specify. To sample from the active layer and visible layers below it, choose Current And Below. To sample only from the active layer, choose Current Layer. To sample from all visible layers, choose All Layers. To sample from all visible layers except adjustment layers, choose All Layers and click the Ignore Adjustment Layers icon to the right of the Sample pop-up menu. 4. Set the sampling point by positioning the pointer in any open image and Altclicking (Windows) or Option-clicking (Mac OS). 5. (Optional) In the Clone Source palette, click a clone source button and set an additional sampling point. You can set up to five different sampling sources. The Clone Source palette saves the sampled sources until you close the document. 6. (Optional) To select the sampled source you want, click a clone source button in the Clone Source palette. 7. (Optional) Do any of the following in the Clone Source palette: To scale or rotate the source that you re cloning, enter a value for W (width), H (height), or the rotation in degrees. To show an overlay of the source that you re cloning, select Show Overlay and specify the overlay options. Drag over the area of the image you want to correct.


20 Add a Border to a Picture in Photoshop 1. Start Photoshop and open the image that you want to add a border to. 2. To create a border around the entire picture, open the Select menu and choose Select All. To create a border around a certain section, use the Selection tool in the toolbar and select the area you want. 3. From the Select menu, choose Modify and then Border. In the dialog box, choose the pixel size of your border. 4. Locate the color palette on the left-hand side of the screen. Click on the top square and select a border color from the palette. Click OK. 5. Select Fill from the Edit menu. In the dialog box, choose the options to apply to the border. 6. Click OK to view the border. If the results aren't what you want, select Undo from the Edit menu to remove the fill, then try again.


21 Creating a product Combining tools Starting image: 1.) To begin, I pressed the Make new layer button and used the fill tool to fill the layer with the colour black. I then set this to Color in the layer options drop down menu. This made the image black and white.


22 2.) Then, I went to Layer > New adjustment layer > Brightness/Contrast. Here, I changed the settings so that the picture was darker. >>


23 3.) To create the electric glow, I created a new layer by clicking the create new layer button (.) Then, I selected the foreground colour as white. After this, I selected the pen tool. I made sure that I selected the Paths and Freeform pen tool setting.


24 4.) Before I could draw, I had to select the correct brush. I did this by pressing the b key. This brought up the brush menu. I selected Calligraphic brushes and chose a brush. In order to create a smoother line, I went to Window > Brushes and then selected Shape dynamics and made sure Control was set to pen pressure.


25 5.) Then, I drew the curves with the pen. These are quick and easy, all you need to do is hold down the mouse and drag. It doesn t matter if it s messy.


26 Then, right click on the lines and select Stroke path. Make sure you select brush and stimulate pressure.


27 6.) To create the electric feel, go to layer style and select outer glow. Here, I used the following settings, but you can also change them around to fit your image best. To create a more ethereal effect, I selected the Drop shadow tool as well. The settings I used were:


28 7.) Then, of course, I need to use the eraser tool to get rid of the parts of the electric glow on the angel. This doesn t have to be really precise. >>
 To make the electric glow stand out a bit more, I clicked on the layer in the Layers box and went to Layer > Duplicate layer. This made it much brighter.")
29 8.) The next step is to get rid of the lines. This can be done by reselecting the pen tool and right clicking on the lines and selecting delete path. >> 9.) To make the electric glow stand out a bit more, I clicked on the layer in the Layers box and went to Layer > Duplicate layer. This made it much brighter.


30 10.) I obviously needed to add the glow to the other side of the angel. So, I selected the original electric glow layer and duplicated it again. I then moved it to the other side of the angel. I selected the transform tool, made sure show transform tools was selected and used the tools to flip the image so it was mirrored with the other side.
 As a finishing touch, I used the round soft brush at size 300 to dot different colours on a new layer.")
31 Then, when this layer was placed on the wing, I duplicated it again to make it as bright as the other side. 11.) As a finishing touch, I used the round soft brush at size 300 to dot different colours on a new layer.


32 I set this layer to Overlay to create the following background effect:

33 12.) Other effects can be added such as text:


34 Create your own planet using crop, filters and image adjustment. 1. Ensure your image is straight. Choose the crop tool of PhotoShop and select a flat rectangular area of the photo. Move the cursor just outside of an edge of the marked area where the cursor changes into two arrows pointing left and up. Click the mouse button and you can rotate the cropped area. By moving the top border to the horizon of the photo you can exactly inspect the rotation. Move and rotate the crop window until the top border and your horizon is parallel, but don t activate the crop yet. Good. Now we have a selection that is horizontal. Now we want to make sure the left and the right border of the image fit together. Using the same trick we now look for areas on the right and the left where the buildings have the same height. Move the right and left borders as desired. Then finally move the top and bottom border in order to have the horizon/waterline roughly in the middle of the cropped photo. Double click the image and you are ready for the transformation! 2. Make the image into a square photo. Use the Photo > Image Size menu item to change the image size into a large square. Uncheck Constrain Properties and set the height value to the same value as your width value. 3. Now rotate the photo by 180 degrees and apply the Filter>Distort>Polar Coordinates filter (choose the Rectangular to Polar setting).

35 4. Make use the copy-brush to hide the stitch borders, rotate the photo to your liking, perform the usual photo editing of histograms curves, contrast and color and increase the sharpness if required.

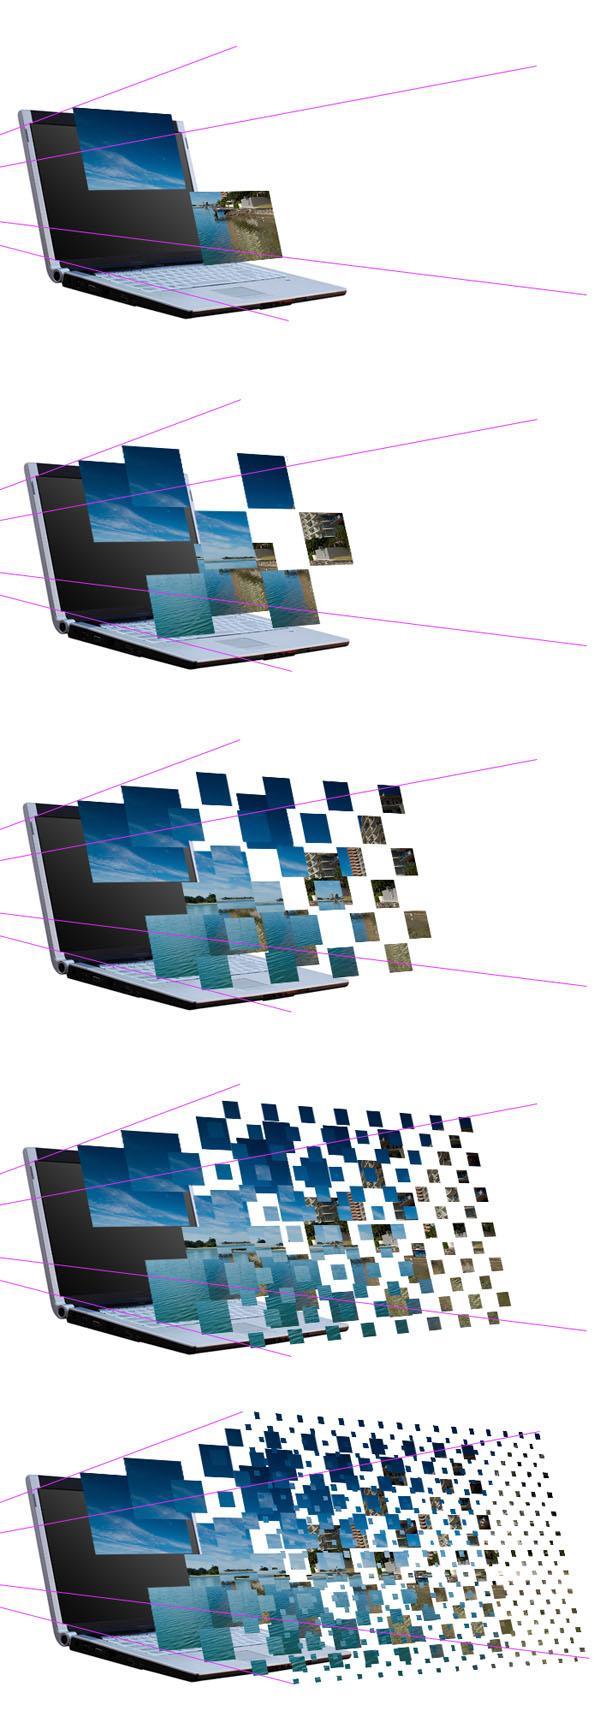
36 Design an Advert Here is the final image that we will be creating: Step 1: Open up a new document 1000px wide and 600px high. Then paste an image of a laptop into your document. Create a new layer set called laptop and put the layer containing your laptop image into this layer set.
37 Step 2: Now I want to create a vanishing point for the screen of the laptop. Many Photoshop users, including myself, don t yet have Photoshop CS2 or CS3, so this tutorial won t utilize the useful vanishing point filter available in these versions. Instead, we re going to manually create a fake vanishing point. Select the screen part of your laptop using the lasso tool. Then copy your selection, create a new photoshop document, and paste in the selection. Go to image>image size and double whatever your image size is. In this case the original screen was 204px wide, so I simply doubled this to 408px. Then paste this new larger screen back into your original document. Positioning it roughly where you think it looks good in terms of perspective. Step 3: Now select your line tool and a nice bright color for it and draw lines each corner of your large screen through to the matching corner of the original screen and past to a vanishing point. Do this with each corner of the laptop screen, until you have something like the image below:
 change the W (width) and H (height) percentages from 100% to 90%.")
38 Step 4: Now duplicate your larger laptop screen and select edit>free transform. Then in the menu near the top of your screen (see diagram below) change the W (width) and H (height) percentages from 100% to 90%. Move this resized image so that it matches up with the perspective lines that you created earlier. Be sure to place this resized screen layer behind the largest screen layer but above your original laptop photo layer. Repeat this process of duplicating/resizing/aligning using the resizing percentages of 80%, 70%, and 60% from your large screen layer. Remember that your original laptop photo is 50% of this large screen layer. This is how your image should look after you have created this new screens and lined them up correctly:

39 Step 5: Now create a new layer set called photo 1. Paste in the image that you want to manipulate. View a grid over your image and then use the free transform tool to resize your photo to fit nicely into the grid squares. Make sure that the photo fits into an even number of grid squares for it s height and width. In this example the photo is resized to be 8 grid squares wide and 6 high. Step 6:
40 Now duplicate your photo layer, as you want to retain a copy. Be sure to hide the duplicate layer and go back to your original. Select your single column marquee tool from your selection palette (it s under the Rectangle and Elliptical marquee tools). Using your grid click the grid line that marks the center point of your image and delete a central 1px column. Then switch to the single row marquee tool and do the same to delete a 1px line across the center of your image. You want these lines to be a little larger than 1px though, so grab your magic wand tool and click somewhere outside of your photo image. This will select all of the area surrounding the photo, but also the 1px lines cutting through it. Then go to select>modify>expand and expand the selection by 3px. Then hit delete to achieve an effect like the image below: Step 7: Now hide all of your duplicate laptop screens except the smallest one (the one that is 60% of the size of your largest). With your photo layer selected (the one you ve just cut up using the grid) go to edit>transform>distort and distort the photo so that it fits exactly over this smallest laptop screen image. To fit it well you make need to reduce the layer s opacity to allow the screen underneath to show though. The image below shows the transformed photo layer at 57% opacity, allowing some of the screen underneath to show through. Be sure to move this photo layer below the next largest laptop screen layer, so that it is mostly covered by it.
41 Step 8: Now go back to your original photo layer. Duplicate it again, and using the same technique as before with the single row/column marquee tools cut it into 2X2 squares using the grid. As the image is 8 squares wide and 6 high, this will result in 12 squares each 4 grid squares in size. Again, use your magic wand tool to select the area around the photo and the lines cutting through it, then expand your selection by 3px and hit delete. Then use the distort transform tool to fit your new image to the 2nd smallest laptop screen. Remember again to move this photo layer behind the next largest laptop screen layer. The image below shows the result of this, with the photo layer again at 57% to allow me to nicely fit it to the screen image beneath.

42 Step 9: Now repeat these steps, but make your squares half the size each time. So using the grid that will then be 1X1, 1/2X1/2, 1/4X1/4. To cut the photo into 1/2 and 1/4 grid square pieces I would recommend just using your judgement, but if you want to be really picky you can use rulers. Another tip is to duplicate the photo after cutting it into the squares, as this will save you having to repeat the slicing process right from the start each time.
43 Step 10: Here is the same image but with all duplicate laptop screen image layers hidden and all photo layer s with 100% opacity. Step 11: Now is the time-consuming part. Hide all of your photo layers except for your smallest photo layer. Use your magic wand tool set at 255 tolerance to select entire squares and delete them to leave a checkerboard effect. To do this simply go down each column deleting squares, being sure to leave a square remaining between each two that you delete. Then move onto the next column and repeat, but make sure that no squares you delete are next to an already deleted square, deleted squares should be diagonal to each other. The image below shows the various stages of doing this with each photo layer:
44

45 Step 12: You should still have your original photo layer, as it was duplicated for safe keeping near the start of the tutorial. Duplicate the layer again, and move it so that it is the first layer above your laptop image layer. Then go to edit>transform>distort and fit the photo nicely over the laptop screen. Then hide all of your vanishing point guidelines and make sure that all of your checkerboard photo layers are visible. Seeing as all these layers are within the same layer set select the layer set and drag it to make the graphic more central in your document. Step 13: Right click on one of your photo squares layers and click blending options. Apply the drop shadow settings shown below. Then once this has been applied right click on the drop shadow shown in your layers palette, select copy layer style and paste the layer style to all of your other photo squares layers. The outcome is shown below:


46 Step 14: Now create a new layer set below your laptop/photos layer set called background. Hide your laptop/photos layer set. Create a new layer and fill it with a white to light gray radial blur.

47 Step 15: Paste a metal texture onto a new layer above your radial gradient layer and reduce it s opacity to 20% for a subtle textured effect. Step 16:
48 Now create some bendy lines across your background using the pen tool. Be sure to have a white 1px brush selected and then once you have created your bendy pen line right click on it and select stroke path. Then simply duplicate your line layer until you have multiple white lines across your background. I merged all of my line layers together and reduced the merged layer opacity to 30% for a more subtle effect. And we re done! To finish things off I added some cool text. Click the image below if you want the full sized version.

49 Drawing paths using Photoshop CS3 Paths are used to change the path or direction of text. This helps if you wish to place text around a circle or a shape where it could become harder to use text boxes. Step one Open up a new work canvas. Step 2 Click on the pen tool to start drawing your path. Ensure however that the path icon on the top menu of the screen is enabled; otherwise a path will not be drawn.
50 Step 3 Draw your desired path shape that you want by clicking and dragging your mouse and this will then bend the line into a shape. Step 4 Click on the text tool to start to type your text onto the path. Ensure that the text icon is clicked onto the path you have drawn to ensure that the text follows the line otherwise it will just type onto a straight line. Step 5 Click on the A at the right hand side of the screen to change the colour of the text and the size and so on.


51 Editing Contrast in Photoshop Contrast is a very simple yet very helpful method of editing a photograph. Contrast in photography is basically the difference between light and dark. It is also a measure of the difference in brightness between light and dark areas in a photograph. It is very simple to edit the contrast of a photograph in Photoshop; 1. Open a photograph that you wish to increase or decrease the contrast. 2. Click the Layer tab to bring down its menu. 3. Click New Adjustment Layer. This will create another layer which is identical to the original layer this is because the new layer allows you to edit that layer with the original layer remaining intact in case you do not like the contrast adjustments. 4. Click on Brightness/Contrast. 5. Then a dialog box will appear. Check the Preview box which will allow you to see the adjustments before you save them. 6. There are two slider bars which allow you to change the brightness and the contrast of the image. The higher the contrast the darker the photograph will become and the lower you slide it the lighter the image will become.


52 Feathering Upload a photo you want to fade the edges of. Choose the eliptical marquee tool. Select feather at the top left panel and change to 5px. Copy the selected area, insert new layer and paste. Once the original layer has been deleted the selected image should remain with faded edges.


. 7. Select filter > distort > ocean ripple.")
53 Photoshop Tutorial 2 Filters and Layers 1. You can use filters from the filter gallery. Have a go with these for AO4! 2. You can also create customised filters. 3. Add new layers. 4. Use the magnetic lasso tool to select an area of a photo e.g. angel of the north. 5. Use Image > Adjustments to change photo filters. Dodge Tool 1. Select your image 2. Select dodge tool and resize to suit image. Before After Creating a water reflection 1. Select the part of the image you wish to create the reflection on. 2. Select Image > crop. 3. Select Image > Canvas size and adjust the height by 100%. (Remember to select the anchor to the top). 4. Right click on the layer window and select duplicate layer. 5. Flip the copy filter vertically. (Edit > Transform). 6. Select filter > stylize > wind. (You need to do this twice, from the left and from the right). 7. Select filter > distort > ocean ripple. Ensure the magnitude is set to 1. Click filter > ocean ripple if you want to effect to be more powerful. 8. See the next steps on the video for the final part of this tutorial.


.")

54 Get Digitised Using brushes, layers, masks and cloning Before After 1. Choose a suitable image. If they are not on a white background then you may wish to cut out your subject first for this technique to work to its fullest. For this tutorial you will already need to know about layers and masks and Cloning. As always the first step is to load your subject into Photoshop. 2. Once this is done create a new white layer under your subject image. Then add a mask to your subject image layer. You will also need to select the brush tool. 3. The first part of the effect is to punch square like holes through your subject. This can be done with the right brush shape on the layer mask. With the brush tool selected you need to open up the brush options as in the image below (click the small down arrow next to the brush size at the top of the page). Once this window opens you need to click the right arrow button at the top right of the options to open up a drop down menu. From the list select Drop Shadow Brushes. Select the faded square shape, set a size of about 15 for now and then close the window. 4. Next, open up the brushes window. If its not already open you can do so by Window > Brushes. In this window click on the word Scattering and make sure its highlighted and that its box is ticked. The options should change to appear similar to those below. What we will use these options for is to make the brush strokes more random and dispersed. Set the options to the following: Scatter 1000% Count 1 Count Jitter 31%. The preview screen at the bottom should give an idea of how the brush will now work.


55 5. Next I set the texture for the brush. Make sure Texture is highlighted and its box is ticked. Then adjust the settings to the following. Scale 52% Depth 51% Minimum Depth 0% Depth Jitter 0%. 6. The brush is now set to work as needed. Select the mask on your subject layer and set your brush colour to black. Next use the brush over the image to punch holes through your subject revealing the background. Repeat this with brushes of various sizes. 7. Time to add the pixels being sucked off the subject. This is done in a similar way but using the clone tool. The same brush effects can be added to this tool as well as the plain brush. We will need a clean copy of the original subject to work with. To do this, duplicate your subject layer and then remove the mask. Your subject should now be whole again. Once this is done create a new blank layer at the top of your layers stack. 8. Select the clone tool and open up the brush options as before. From the drop down menu make sure Drop Shadow Brushes is selected again. Once the settings have been made, close the window. 9. Open up the Brushes window again and as before set the Scattering options. These were set the same as before except this time the Count Jitter was set to 0%. 10. There is no need to add texture this time so we can get straight into the cloning. Select the top blank layer. Make sure sample is set to Current & Below. The trick is to sample random pieces of your subject then spray a few cloned squares above it and repeat. You will also want to clone some squares directly onto your subject to. This gives a great sense of randomness to the composition. Start off with a brush size suitable for larger squares. I used about 15 but this will change from image to image. 11. Repeat this process with different size brushes. The options should all stay the same so no need to change anything else. Once all the cloning is done hide the layer you cloned from by clicking the eye symbol next to it to show the complete effect. 12. Use the eraser tool to tidy up any squares to ensure the image looks like it is going to a point. Add a black solid fill layer and change the blend mode to soft light.

56 Final image

57 Give Your Photos a Retro Comic Book Effect 1. Increase the overall contrast. Go to IMAGE > ADJUSTMENTS > LEVELS Input level = 60 / 1.00 / Give it an illustrated look. FILTERS > ARTISTIC > FILM GRAIN GRAIN: 4, HIGHLIGHT AREA: 0, INTENSITY: Duplicate the layer and rename it Halftone or whatever you want to name it. 4. To Halftone go to: FILTER > PIXELATE > COLOR HALFTONE Set: MAX RADIUS: 4 Press OK. Go to: LAYERS PALETTE Set: BLENDING MODE to DARKEN 5. Select: Halftone layer. Click layer > Layer style > Stroke Set: STROKE LAYER STYLE to: WIDTH: 20px, POSITION: Inside, COLOR: #F5ECE1 TO ADD THE COMIC BOOK EFFECTS: ADD A NEW LAYER 6. Draw a rectangle at the top of the image. Set its STROKE to 3 PIXELS. Colour it orange. Draw another rectangle at the bottom of the image. Set its STROKE to 3 PIXELS. TO ADD A BORDER: 1. Create a new layer above the rectangles. Go to: EDIT > STROKE and set: WIDTH: 4px, COLOR: BLACK, LOCATION: CENTER Press OK and deselect it. 2. Go to: FILTER > BLUR > BLUR MORE 3. Add a distortion: FILTER > DISTORT > RIPPLE (About 20%) 4. Sharpen the image: FILTER > SHARPEN MORE TO ADD TEXT:

58 1. Download this free font. 2. Open the font and add the text. Alter the first letter using the STROKE, SHADOW and CONTRAST. Highlight some of the words in bold.
. 2. Right click on the background copy and duplicate the layer.")

59 How to add a plain coloured background on a main part of an image This shows you have to take the main part of an image out and put it onto a new layer so you can add a plain coloured background on to make it stand out more 1. Open the image you would like to do it with. (I am using an image of the Angel of the North). 2. Right click on the background copy and duplicate the layer. This is so you can edit it. 3. Click the Magnetic Lasso Tool. This enables you to go around the image so you can cut it out. 4. Then you can start going around the image with this tool by clicking around the edge. Sometimes the tool goes round it itself. This dotted line around the image shows where you have gone around it. 5. When you have gone round the entire image it has flashing dashes going around it.


60 6. When it has done that, right click and press layer via copy. And that highlighted image goes onto a new layer by itself. 7. On the right hand side click on the new layer which should be name layer 1. And press the eye on the other layer to hide it. 8. Press the fill tool and click a colour which you want for the background. 9. Click the background layer and the colour will change. 10. These images show the before and after of what it looks like.


61 How to apply a rainbow effect to a picture Begin by opening the image which you plan to add the effect to in Photoshop. Click on the hue and saturation option on the bottom right hand side as shown:


62 On the box which appears set the saturation to -100 which causes the colour to be taken from your image. Click on the insert a new layer button to insert a new layer. In the blending mode box select the option Colour.


63 Open the swatches pallet. In the swatches palette click the small button under the close option which looks like this: Change the option to CMYK EC.


64 In the swatches palette click the first colour which you would like to use as part of your rainbow by clicking on it. Select the brush tool on the left hand side of the screen. Use the brush options on the top of the screen or right click on the canvas to set the brush hardness to 0 and the brush to a suitable diameter. Draw across the image and keep selecting new colours until the image is covered. Always ensure the brush hardness is set to 0 when a new colour is selected.

65 Creating a Gold Effect on a image in Photoshop Through this tutorial, you will hopefully gather an understanding of creating a gold effect in images using Photoshop. We will be editing the above image by duplicating a layer and changing the different layers, levels and contrast. This will enhance parts of the image and make them look more appealing, and suit the needs of what this effect can be used for. Step One Firstly you open Photoshop, and choose a photo which you would like to develop and create the effect on. The size or quality of the image doesn t matter but a clear photo is always better to use this effect on. Step Two


, yellow (#e4ce51) and white")
66 Once you have opened the image on Photoshop you duplicate the layer twice, this is because when the photo opens it automatically is a locked image, therefore no changes can be made until the layer is duplicated. Step Three Select your new layer which is on the top and go to image, adjustments then gradient map. This allows you to make changes to the colour level in the image. The colours which need to be used are black (#000000), yellow (#e4ce51) and white (#ffffff) as this starts to give the image a gold looking effect.


67 You have to change the colours to make the gold effect work. This is the shade which I think looks the best therefore I will select ok. Step Four You then change the settings of your layer from screen to multiply, and on your second duplicated layer you change the opacity to 72. This allows some of the original image to come through behind the gold effect. You select the first layer which you duplicated and change the opacity to 72. This allows the original image to come through against the gold. Step Five Go to image, adjustments then hue/saturation as this brightens and darkens parts of the images, and allows you to change the levels of the hue, saturation and lightness to what suits the effect the best.


68 Step Six Once you have created the effect you like, you then change the image levels by going to image, adjustments and level. This brings up the darkness and lightness in the image as it highlights the main parts of the image. You can change these settings to change the images brightness and contrast. These settings don t matter it s up to you what parts of the image you would like to brighten. Step Seven Once you have finished changing the levels of your image, you can use the dodge tool this highlights parts of the image, which you think should stand out more. For example if it was a person, eyes, nose, hair etc. This is the dodge tool; it allows you to highlight parts of the image. Once you have finished these steps you should have a gold effect on your image, which works effectively with what you want to use your image for.

69 How to download brushes for Photoshop Photoshop comes with a small selection of brushes built in however you can improve this and have a better selection by downloading some more of the internet. To download brushes off the internet we will need to visit a website that offers free downloadable brushes. A good website for this is brusheezy ( it offers a large selection of downloadable brushes for free. Once we have opened up internet explorer and have reached the brusheezy website, you will want to press the brushes tab on the navigation bar. As you can see from the screenshot above, you can filter the results to show brushes for a particular version of Photoshop. Filtering the version of Photoshop you have is essential as brushes for Photoshop CS4 won t work with Photoshop CS3. So once we have filtered the version of Photoshop we will be presented with a list of brushes in the form of images on the page. Once you have seen a brush you like simply press on the picture of it and you will be directed to the information page for that brush. Once you have clicked on the brush you like you will see a page similar to the one shown above. You will then have the option to download the brush or preview it. If you press the preview button it will let you have a preview of the brush before downloading it. If you are happy with the brush and have checked the Photoshop version it supports simply press the Download File! button. You will then be presented with a download box, simply press the open button and wait for the file to download.


70 Now that the file has downloaded it should have automatically opened. The file that need that contains the brushes will be in the ABR format and will have a white square logo with a brush in the middle. Double click on the ABR file and it should automatically open Photoshop and import the brushes. Now that the file has opened Photoshop and has imported the brushes, simply go to the brushes menu Click this dropdown menu and click on the dropdown menu next to the word brush. You will then be presented with this dropdown box which shows all the brushes you have. The ones you have just downloaded should appear at the bottom of the list. Simply click on the brush and start using it. Click on the brush you downloaded and use it.
 on the layer. 8.")
.")


71 Photoshop Tutorial 1 Morphing 1 6. Insert a photo of a baseball in Photoshop. 7. Add a new layer and insert the watermelon (or other round shaped fruit) on the layer. 8. On the layers properties box change the opacity of the baseball. Morphing 2 1. Find two images you wish to morph (in this example we will use an elephant and lizard). 2. Use your magnetic lasso tool to select the elephants head. 3. Right click and select layer via copy. This will put it on its own layer. 4. Delete the elephant layer as now you have the head you don t need the rest! 5. Use the adjustment layer tool and select hue and saturation. 6. Set the hue and saturation. 7. Create a new layer to draw the skin on. 8. Use the clone tool and ALT to select the scaled skin and then brush this over the elephant head. Make sure all layers is selected at the top. 9. Use the dodge and burn tool to add shadows.


, position the pointer over the line in the Layers palette dividing the base")
, and click.")

72 Mask layers with clipping masks A clipping mask lets you use the content of a layer to mask the layers above it. The masking is determined by the content of the bottom or base layer. The non-transparent content of the base layer clips (reveals) the content of the layers above it in the clipping mask. All other content in the clipped layers is masked out. 1. Arrange the layers in the Layers palette so that the base layer with the mask is below the layers that you want to mask. 2. Do one of the following: Hold down Alt (Windows), position the pointer over the line in the Layers palette dividing the base layer and the first layer above it that you want to include in the clipping mask (the pointer changes to two overlapping circles ), and click. Select the first layer above the base layer in the Layers palette, and choose Layer > Create Clipping Mask. To add additional layers to the clipping mask, use either method in step 2, and work your way upward one level at a time in the Layers palette. Note: If you create a new layer between layers in a clipping mask, or drag an unclipped layer between layers in a clipping mask, the layer becomes part of the clipping mask. Layers in the clipping mask are assigned the opacity and mode attributes of the base layer.
Extreme Makeovers: Photoshop Retouching Techniques
 Extreme Makeovers: Table of Contents About the Workshop... 1 Workshop Objectives... 1 Getting Started... 1 Photoshop Workspace... 1 Retouching Tools... 2 General Steps... 2 Resolution and image size...
Adobe PhotoShop Elements
 Adobe PhotoShop Elements North Lake College DCCCD 2006 1 When you open Adobe PhotoShop Elements, you will see this welcome screen. You can open any of the specialized areas. We will talk about 4 of them:
Photoshop CC Editing Images
 Photoshop CC Editing Images Rotate a Canvas A canvas can be rotated 90 degrees Clockwise, 90 degrees Counter Clockwise, or rotated 180 degrees. Navigate to the Image Menu, select Image Rotation and then
Learning Photo Retouching techniques the simple way
 Learning Photo Retouching techniques the simple way Table of Contents About the Workshop... i Workshop Objectives... i Getting Started... 1 Photoshop Workspace... 1 Setting up the Preferences... 2 Retouching
Introduction to Photoshop
 Introduction to Photoshop Instructional Services at KU Libraries A Division of Information Services www.lib.ku.edu/instruction Abstract: This course covers the basics of Photoshop, including common tools
ADOBE PHOTOSHOP CS TUTORIAL
 ADOBE PHOTOSHOP CS TUTORIAL A D O B E P H O T O S H O P C S Adobe Photoshop CS is a popular image editing software that provides a work environment consistent with Adobe Illustrator, Adobe InDesign, Adobe
PHOTOSHOP & ILLUSTRATOR BOOTCAMP
 FALL 2014 - ELIZABETH LIN PHOTOSHOP & ILLUSTRATOR BOOTCAMP ILLUSTRATOR ALIGNMENT To access the alignment panel, go to Window -> Align. You should see a panel like the one below. This panel allows you to
Adobe Photoshop CC 2018 Tutorial
 Adobe Photoshop CC 2018 Tutorial GETTING STARTED Adobe Photoshop CC 2018 is a popular image editing software that provides a work environment consistent with Adobe Illustrator, Adobe InDesign, Adobe Photoshop,
Downloaded From : Working with Photoshop 7.0
 Adobe Photoshop 1. Introduction What is Adobe Photoshop? Adobe Photoshop is a web designing software used for giving effects and filters to an image to make it more appealing and attractive. Brought out
FLAMING HOT FIRE TEXT
 FLAMING HOT FIRE TEXT In this Photoshop text effects tutorial, we re going to learn how to create a fire text effect, engulfing our letters in burning hot flames. We ll be using Photoshop s powerful Liquify
Adobe Photoshop CS5 Tutorial
 Adobe Photoshop CS5 Tutorial GETTING STARTED Adobe Photoshop CS5 is a popular image editing software that provides a work environment consistent with Adobe Illustrator, Adobe InDesign, Adobe Photoshop
Using Adobe Photoshop
 Using Adobe Photoshop 6 One of the most useful features of applications like Photoshop is the ability to work with layers. allow you to have several pieces of images in the same file, which can be arranged
By Washan Najat Nawi
 By Washan Najat Nawi how to get started how to use the interface how to modify images with basic editing skills Adobe Photoshop: is a popular image-editing software. Two general usage of Photoshop Creating
Digital Design and Communication Teaching (DiDACT) University of Sheffield Department of Landscape. Adobe Photoshop CS5 INTRODUCTION WORKSHOPS
 University of Sheffield Department of Landscape. Adobe Photoshop CS5 INTRODUCTION WORKSHOPS") Adobe INTRODUCTION WORKSHOPS WORKSHOP 1 - what is Photoshop + what does it do? Outcomes: What is Photoshop? Opening, importing and creating images. Basic knowledge of Photoshop tools. Examples of work.
Adobe INTRODUCTION WORKSHOPS WORKSHOP 1 - what is Photoshop + what does it do? Outcomes: What is Photoshop? Opening, importing and creating images. Basic knowledge of Photoshop tools. Examples of work.
Photoshop CS2. Step by Step Instructions Using Layers. Adobe. About Layers:
 About Layers: Layers allow you to work on one element of an image without disturbing the others. Think of layers as sheets of acetate stacked one on top of the other. You can see through transparent areas
Learning Adobe Photoshop CS6
 Module 1 Contents Chapter 1: Introduction to Photoshop Loading Photoshop...1-1 The Tools Panel...1-2 Using the Tools...1-3 The Panel Group...1-5 Layers...1-6 Loading a Sample File...1-6 Looking at the
Using Photoshop Elements
 Using Photoshop Elements Created By: Rick Williams August 2004 Table of Contents Photoshop Element Tools...Page 1 Tool Descriptions... Page 3 Starting Photoshop Elements... Page 7 Resizing an Image...
Key Terms. Where is it Located Start > All Programs > Adobe Design Premium CS5> Adobe Photoshop CS5. Description
 Adobe Adobe Creative Suite (CS) is collection of video editing, graphic design, and web developing applications made by Adobe Systems. It includes Photoshop, InDesign, and Acrobat among other programs.
IMAGE CORRECTION. You can find this and more information with video tutorials at
 IMAGE CORRECTION You can find this and more information with video tutorials at http://www.adobe.com/support/photoshop/ P H O T O S H O P T O O L S CLONE STAMP TOOL The Clone Stamp tool paints one part
Tablet overrides: overrides current settings for opacity and size based on pen pressure.
 Photoshop 1 Painting Eye Dropper Tool Samples a color from an image source and makes it the foreground color. Brush Tool Paints brush strokes with anti-aliased (smooth) edges. Brush Presets Quickly access
GETTING STARTED. 0 P a g e B a s i c s o f A d o b e P h o t o s h o p A g a P r i v a t e I n s t i t u t e f o r c o m p u t e r s c i e n c e
 GETTING STARTED 0 P a g e B a s i c s o f A d o b e P h o t o s h o p Adobe Photoshop: is a popular image editing software that provides a work environment consistent with Adobe Illustrator, Adobe InDesign,
A quick note: We hope that you will find something from the Tips and Tricks that will add a little pizazz to your yearbook pages!
 A quick note: The following pages are tips and tricks for Basic Photoshop users. You may notice that some instructions indicate that non-awpc fonts were used, and that some colors were created using the
11 Advanced Layer Techniques
 11 Advanced Layer Techniques After you ve learned basic layer techniques, you can create more complex effects in your artwork using layer masks, path groups, filters, adjustment layers, and more style
Now we ve had a look at the basics of using layers, I thought we d have a look at a few ways that we can use them.
 Stone Creek Textiles stonecreektextiles.co.uk Layers Part 2 Now we ve had a look at the basics of using layers, I thought we d have a look at a few ways that we can use them. In Layers part 1 we had a
ADD A REALISTIC WATER REFLECTION
 ADD A REALISTIC WATER REFLECTION In this Photoshop photo effects tutorial, we re going to learn how to easily add a realistic water reflection to any photo. It s a very easy effect to create and you can
Module All You Ever Need to Know About The Displace Filter
 Module 02-05 All You Ever Need to Know About The Displace Filter 02-05 All You Ever Need to Know About The Displace Filter [00:00:00] In this video, we're going to talk about the Displace Filter in Photoshop.
Photoshop Elements Hints by Steve Miller
 2015 Elements 13 A brief tutorial for basic photo file processing To begin, click on the Elements 13 icon, click on Photo Editor in the first box that appears. We will not be discussing the Organizer portion
AGENDA. :: Homework Critiques (5 minutes each) :: Photoshop Lesson 3. A-1 Gorgeous! [ COMPOSITE DEMO ] :: 7mins. I. SELECTIONS [ Common Law ]:
![AGENDA. :: Homework Critiques (5 minutes each) :: Photoshop Lesson 3. A-1 Gorgeous! [ COMPOSITE DEMO ] :: 7mins. I. SELECTIONS [ Common Law ]:](/thumbs/93/112781712.jpg "AGENDA. :: Homework Critiques (5 minutes each) :: Photoshop Lesson 3. A-1 Gorgeous! [ COMPOSITE DEMO ] :: 7mins. I. SELECTIONS [ Common Law ]:") CLASS :: 09.24 2018 AGENDA :: Homework Critiques (5 minutes each) A-1 Gorgeous! Upload A-1 Project to Student Folder :: Photoshop Lesson 3 [ COMPOSITE DEMO ] :: 7mins. I. SELECTIONS [ Common Law ]: a.
CLASS :: 09.24 2018 AGENDA :: Homework Critiques (5 minutes each) A-1 Gorgeous! Upload A-1 Project to Student Folder :: Photoshop Lesson 3 [ COMPOSITE DEMO ] :: 7mins. I. SELECTIONS [ Common Law ]: a.
Retouching Portraits in Photoshop
 Retouching Portraits in Photoshop I Removing Blemishes When removing blemishes, acne or other imperfections on the skin, our goal is to maintain as much of the original skin texture as possible. That way,
Design a Halloween Pumpkin Wallpaper in Photoshop
 Design a Halloween Pumpkin Wallpaper in Photoshop By: Alvaro Guzman Halloween is near! So let's take a pumpkin image, carve it up, and light it for this coming holiday. You'll learn how to get this nice
Photoshop 1. click Create.
 Photoshop 1 Step 1: Create a new file Open Adobe Photoshop. Create a new file: File->New On the right side, create a new file of size 600x600 pixels at a resolution of 300 pixels per inch. Name the file
15 Photoshop Tips. Changing Photoshop rulers from inches to picas
 5 Photoshop Tips Changing Photoshop rulers from inches to picas What s the difference between inches and picas? a 6x inch RGB JPEG file is.9 MB a 6x pica RGB JPEG file is. MB a 6x inch RGB TIFF file is.
All Creative Suite Design documents are saved in the same way. Click the Save or Save As (if saving for the first time) command on the File menu to
 command on the File menu to") 1 The Application bar is new in the CS4 applications. It combines the menu bar with control buttons that allow you to perform tasks such as arranging multiple documents or changing the workspace view.
1 The Application bar is new in the CS4 applications. It combines the menu bar with control buttons that allow you to perform tasks such as arranging multiple documents or changing the workspace view.
GIMP (GNU Image Manipulation Program) MANUAL
 MANUAL") Selection Tools Icon Tool Name Function Select Rectangle Select Ellipse Select Hand-drawn area (lasso tool) Select Contiguous Region (magic wand) Selects a rectangular area, drawn from upper left (or lower
Selection Tools Icon Tool Name Function Select Rectangle Select Ellipse Select Hand-drawn area (lasso tool) Select Contiguous Region (magic wand) Selects a rectangular area, drawn from upper left (or lower
Rendering a perspective drawing using Adobe Photoshop
 Rendering a perspective drawing using Adobe Photoshop This hand-out will take you through the steps to render a perspective line drawing using Adobe Photoshop. The first important element in this process
XXXX - ILLUSTRATING FROM SKETCHES IN PHOTOSHOP 1 N/08/08
 INTRODUCTION TO GRAPHICS Illustrating from sketches in Photoshop Information Sheet No. XXXX Creating illustrations from existing photography is an excellent method to create bold and sharp works of art
Adobe Photoshop CS5 Layers and Masks
 Adobe Photoshop CS5 Layers and Masks Email: training@health.ufl.edu Web Page: http://training.health.ufl.edu Adobe Photoshop CS5: Layers and Masks 2.0 Hours The workshop will cover creating and manipulating
Reflection Project. Please start by resetting all tools in Photoshop.
 Reflection Project You will be creating a floor and wall for your advertisement. Before you begin on the Reflection Project, create a new composition. File New: Width 720 Pixels / Height 486 Pixels. Resolution
Lesson 16 Text, Layer Effects, & Filters
 Lesson 16 Text, Layer Effects, & Filters Digital Media I Susan M. Raymond West High School In this tutorial, you will: Create a Type Layer Add and Format Type within a Type Layer Apply Layer Effects Apply
Corel PHOTO-PAINT BERNINA Page 1 DL
 Corel PHOTO-PAINT 2018 BERNINA Page 1 Corel PHOTO-PAINT Corel PHOTO-PAINT is part of BERNINA Embroidery Software and gives users many tools for editing photos or bitmap artwork. Corel PHOTO- PAINT can
Digital Photography 1
 Digital Photography 1 Photoshop Lesson 3 Resizing and transforming images Name Date Create a new image 1. Choose File > New. 2. In the New dialog box, type a name for the image. 3. Choose document size
Photoshop CC 2018 Essential Skills
 Photoshop CC 2018 Essential Skills Adobe Photoshop Creative Cloud 2018 University Information Technology Services Learning Technology, Training, Audiovisual and Outreach Copyright 2018 KSU Division of
Adobe Photoshop CS5 ACE
 Adobe Photoshop CS5 ACE Number: A9A0-150 Passing Score: 800 Time Limit: 120 min File Version: 1.0 Sections 1. Selection Tools Exam A QUESTION 1 John creates a circular selection with Elliptical Marquee
How to Create a Curious Owl in Illustrator
 How to Create a Curious Owl in Illustrator Tutorial Details Program: Adobe Illustrator Difficulty: Intermediate Estimated Completion Time: 1.5 hours Take a look at what we're aiming for, an inquisitive
Photoshop: Manipulating Photos
 Photoshop: Manipulating Photos All Labs must be uploaded to the University s web server and permissions set properly. In this lab we will be manipulating photos using a very small subset of all of Photoshop
WORN, TORN PHOTO EDGES EFFECT
 Photo Effects: CC - Worn, Torn Photo Edges Effect WORN, TORN PHOTO EDGES EFFECT In this Photoshop tutorial, we ll learn how to take the normally sharp, straight edges of an image and make them look all
Introduction to Photoshop Elements
 John W. Jacobs Technology Center 450 Exton Square Parkway Exton, PA 19341 610.280.2666 ccljtc@ccls.org www.ccls.org Facebook.com/ChesterCountyLibrary Introduction to Photoshop Elements Chester County Library
Create a Beautiful Abstract Portrait in Photoshop - Psd Premium Tutorial
 Create a Beautiful Abstract Portrait in Photoshop - Psd Premium Tutorial By: Wojciech Pijecki In this tutorial we will combine several stock images to create an artistic, abstract portrait of a woman.
Step 1. Facebook Twitter Google+ Find us on Facebook. Vectortuts+ How to Create a Curious Owl in Illustrator CS4 Vectortuts+
 Joomla developers needed - Long term potential in India Copywriter Email Campaigns Wordpress Creative design Social media in UK More Freelance Jobs... Facebook Twitter Google+ Find us on Facebook Step
Photoshop CC: Essentials
 Photoshop CC: Essentials Summary Workspace Overview... 2 Exercise Files... 2 Selection Tools... 3 Select All, Deselect, And Reselect... 3 Adding, Subtracting, and Intersecting... 3 Working with Layers...
HOW TO CREATE A SUPER SHINY PENCIL ICON
 HOW TO CREATE A SUPER SHINY PENCIL ICON Tutorial from http://psd.tutsplus.com/ Compiled by INTRODUCTION The Pencil is one of the visual metaphors most used to express creativity. In this tutorial,
Enhanced Eyes. Here's the image I'll be working with (glamour eyes photo from Shutterstock): Here's what the eyes will look like when we're done:
: Here's what the eyes will look like when we're done:") Enhanced Eyes Here's the image I'll be working with (glamour eyes photo from Shutterstock): The original image. Here's what the eyes will look like when we're done: The final effect. Here's a close-up
Enhanced Eyes Here's the image I'll be working with (glamour eyes photo from Shutterstock): The original image. Here's what the eyes will look like when we're done: The final effect. Here's a close-up
Turning Photograph Into Cartoon-Style Picture. Digital Media I West High School Susan M. Raymond
 Turning Photograph Into Cartoon-Style Picture Digital Media I West High School Susan M. Raymond Part 1: Creating Outline Wondering how those guys on the internet turn photograph into a nice cartoon-style
Reveal the mystery of the mask
 Reveal the mystery of the mask Imagine you're participating in a group brainstorming session to generate new ideas for the design phase of a new project. The facilitator starts the brainstorming session
Your texture pattern may be slightly different, but should now resemble the sample shown here to the right.
 YOU RE BUSTED! For this project you are going to make a statue of your bust. First you will need to have a classmate take your picture, or use the built in computer camera. The statue you re going to make
Compositing. Compositing is the art of combining two or more distinct elements to create a sense of seamlessness or a feeling of belonging.
 Compositing Compositing is the art of combining two or more distinct elements to create a sense of seamlessness or a feeling of belonging. Selection Tools In the simplest terms, selections help us to cut
PHOTOSHOP DESIGN EFFECTS FOR INTERMEDIATE TO ADVANCED USERS
 PHOTOSHOP DESIGN EFFECTS FOR INTERMEDIATE TO ADVANCED USERS Copyright 2012, National Seminars Training Introduction This class is all about design effects in Adobe Photoshop. For example, let s say that
Contents. Introduction
 Contents Introduction 1. Overview 1-1. Glossary 8 1-2. Menus 11 File Menu 11 Edit Menu 15 Image Menu 19 Layer Menu 20 Select Menu 23 Filter Menu 25 View Menu 26 Window Menu 27 1-3. Tool Bar 28 Selection
AGENDA :: MULTIMEDIA TOOLS :: CLASS NOTES. :: Homework Critiques (5-7 minutes each) :: Photoshop Lesson 3. A-1 Gorgeous! [ COMPOSITE DEMO ] :: 7mins.
![AGENDA :: MULTIMEDIA TOOLS :: CLASS NOTES. :: Homework Critiques (5-7 minutes each) :: Photoshop Lesson 3. A-1 Gorgeous! [ COMPOSITE DEMO ] :: 7mins.](/thumbs/86/93336476.jpg "AGENDA :: MULTIMEDIA TOOLS :: CLASS NOTES. :: Homework Critiques (5-7 minutes each) :: Photoshop Lesson 3. A-1 Gorgeous! [ COMPOSITE DEMO ] :: 7mins.") CLASS :: 03 02.10 2017 AGENDA :: Homework Critiques (5-7 minutes each) A-1 Gorgeous! Upload A-1 Project to Student Folder :: Photoshop Lesson 3 [ COMPOSITE DEMO ] :: 7mins. I. SELECTIONS [ Common Law ]:
CLASS :: 03 02.10 2017 AGENDA :: Homework Critiques (5-7 minutes each) A-1 Gorgeous! Upload A-1 Project to Student Folder :: Photoshop Lesson 3 [ COMPOSITE DEMO ] :: 7mins. I. SELECTIONS [ Common Law ]:
Project 25 Page 1 ` JAZZ POSTCARD
 Project 25 Page 1 ` JAZZ POSTCARD Reset all tools! Create the Background 1. Create a new RGB document, 4.25 in. wide by 5.75 in. high at 100 dpi with a white background. 2. Click the foreground color swatch
Editing Using Photoshop CS5
 The Photoshop CS4 Editing Workspace - shown is the document (image) window, ToolBox, Info, Navigator, History, Adjustments and Layers Palettes, Windows Menus and Options Bar (on top). USING THE LAYERS
Movie Merchandising. Movie Poster. Open the Poster Background.psd file. Open the Cloud.jpg file.
 Movie Poster Open the Poster Background.psd file. Open the Cloud.jpg file. Movie Merchandising Choose Image>Adjustments>Desaturate to make it a grayscale image. Select the Move tool in the Toolbar and
Overview of Photoshop Elements workspace
 Overview of Photoshop Elements workspace When you open Photoshop Elements, the Welcome screen offers you two options (Figure 1): The Organize button opens the Organizer. In the Organizer you organize and
ArcSoft PhotoImpression Table of Contents:
 ArcSoft PhotoImpression Table of Contents: 1. Welcome to PhotoImpression 2. Highlights of PhotoImpression 3. System Requirements 4. Installing PhotoImpression 5. Working with PhotoImpression Getting Started
Introduction to Photoshop: Basic Editing & Prepare Images for the Web
 Introduction to Photoshop: Basic Editing & Prepare Images for the Web 1 LEARNING OBJECTIVES Basic tools in Photoshop & Use of Bridge Prepare images for print and web use TOPICS COVERED Photoshop Interface
Contents: Bibliography:
 ( 2 ) Contents: Sizing an Image...4 RAW File Conversion...4 Selection Tools...5 Colour Range...5 Quick Mask...6 Extract Tool...7 Adding a Layer Style...7 Adjustment Layer...8 Adding a gradient to an Adjustment
An Idiot's Guide to Photoshop. Part II Azamat Bohed E. TrueKolor.net
 An Idiot's Guide to Photoshop Part II Azamat Bohed E. TrueKolor.net Table of Contents 1.Introduction 3 2. Opening a Digital Image/Photo in Photoshop 3 3. Changing/removing the Background 4 3.1 Using the
Create A Starry Night Sky In Photoshop
 Create A Starry Night Sky In Photoshop Written by Steve Patterson. In this Photoshop effects tutorial, we ll learn how to easily add a star-filled sky to a night time photo. I ll be using Photoshop CS5
Unit 7 : Image Painting, Editing and Layers
 Unit 7 : Image Painting, Editing and Layers Introduction This Unit describes about various painting tools; such as selection, cropping and measuring tools, retouching, drawing and type tools, Navigation
Duplicate Layer 1 by dragging it and dropping it on top of the New Layer icon in the Layer s Palette. You should now have two layers rename the top la
 50 Face Project For this project, you are going to put your face on a coin. The object is to make it look as real as possible. Though you will probably be able to tell your project was computer generated,
Exploring Photoshop Tutorial
 Exploring Photoshop Tutorial Objective: In this tutorial we will create a poster composed of three distinct elements: a Bokeh, an image and title text. The Bokeh is an effect which is sometimes seen in
CS 547 Digital Imaging Lecture 3
 CS 547 Digital Imaging Lecture 3 Working with Selections Layer Basics Free Transform & Basic Type Selection Tools Rectangular Marquee tool Elliptical Marque Tool Shift Select perfect circle Alt Select
Glowing Surreal Planet Design. Final Image Preview
 Glowing Surreal Planet Design Final Image Preview. Step 1 First, go to the S:\ drive and locate the folder called Glowing Planet Design. Copy the City Skyline file and paste it in your Glowing Planet Design
Name the layer you rotated in step 3 Stripe and lower the opacity to 43%.
 Step 1 Open Photoshop and create a new file 1085 649 pixels. Fill the layer with a bright blue color (#0095db) by pressing Shift + F5. This will be the background for our pop art scene. Step 2 Let s create
PHOTOSHOP. Introduction to Adobe Photoshop
 PHOTOSHOP You will; 1. Learn about some of Photoshop s Tools. 2. Learn how Layers work. 3. Learn how the Auto Adjustments in Photoshop work. 4. Learn how to adjust Colours. 5. Learn how to measure Colours.
Chapter 4: Draw with the Pencil and Brush
 Page 1 of 15 Chapter 4: Draw with the Pencil and Brush Tools In Illustrator, you create and edit drawings by defining anchor points and the paths between them. Before you start drawing lines and curves,
Diploma in Photoshop
 Diploma in Photoshop Photoshop Selection Tools Selection Tools allow us to isolate areas of our image and apply adjustments to these selected areas only. A selection simply isolates one or more parts of
The original image. Let s get started! The final rainbow effect. The photo sits on the Background layer in the Layers panel.
 Add A Realistic Rainbow To A Photo In this Photoshop photo effects tutorial, we ll learn how to easily add a rainbow, and even a double rainbow, to a photo! As we ll see, Photoshop ships with a ready-made
Selective Editing in Camera Raw 5
 Selective Editing in Camera Raw 5 The editing tools that you saw in the last chapter are global editing tools. That is, they affect all parts of the image. So, when you choose to, for example, brighten
Adobe Photoshop. How To Get Started With Adobe InDesign CC: 10 Things Beginners Want To Know How To Do TO START: 1) ZOOM, MOVE, RETOUCH (05:11)
 ZOOM, MOVE, RETOUCH (05:11)") Adobe Photoshop How To Get Started With Adobe InDesign CC: 10 Things Beginners Want To Know How To Do Video By Terry White Tutorial Sheet by Juliet Davis TO START: Open the tutorial in YouTube, download
Adobe Photoshop How To Get Started With Adobe InDesign CC: 10 Things Beginners Want To Know How To Do Video By Terry White Tutorial Sheet by Juliet Davis TO START: Open the tutorial in YouTube, download
CREATE A BURNT EDGE EFFECT
 CREATE A BURNT EDGE EFFECT One of the all-time classic effects in Photoshop is the burnt edge, and there s lots of different ways to create it, but in this Adobe Photoshop tutorial, we re going to look
Challenge Image: Blur the Background
 Challenge Image: Blur the Background Challenge Image: Blur the Background In this lesson, we re going to work on a challenge image that was submitted by a Masters Academy member. The image features a little
ITNP80: Multimedia Adobe Photoshop Practical Weeks commencing 26 January and 2 February 2015.
 ITNP80: Multimedia Adobe Photoshop Practical Weeks commencing 26 January and 2 February 2015. The aims and objectives of this practical are four-fold: To give you some practical experience of some of the
A lthough it may not seem so at first
 Photoshop Selections by Jeff The Wizard of Draws Bucchino www.wizardofdraws.com A lthough it may not seem so at first glance, learning to use Photoshop is largely about making selections. Knowing how to
Photoshop: Manipulating Photos
 Photoshop: Manipulating Photos All Labs must be uploaded to the University s web server and permissions set properly. In this lab we will be manipulating photos using a very small subset of all of Photoshop
Creating Pastel Images and other effects in Photoshop
 Creating Pastel Images and other effects in Photoshop Martin Addison 2015 Creating pastel images Page 1 Martin Addison FRPS Using White Layers in Photoshop 1. Create a new empty Layer 2. Edit> Fill 3.
Overview: Getting to Know the Work Area Design and Print Module 1 of 20
 Adobe Train the Teacher modules written and edited by the T3 curriculum team. Janet Davis Abigail Rudner Steve Tatum Chris Faust Lesson overview: This module provides a basic overview of the workspace,
12. Creating a Product Mockup in Perspective
 12. Creating a Product Mockup in Perspective Lesson overview In this lesson, you ll learn how to do the following: Understand perspective drawing. Use grid presets. Adjust the perspective grid. Draw and
Project 8: Nice Close-Up
 ps7ie_p08_b.qxd 11/18/02 3:25 PM Page 74 ps7ie_p08_b.qxd 11/18/02 3:25 PM Page 75 Photoshop 7 Image Effects In this project, work with a picture that was taken at an angle for effect. Correct and crop
Colorizing A Photo With Multiple Colors In Photoshop
 Colorizing A Photo With Multiple Colors In Photoshop Written by Steve Patterson. In this Photoshop Effects tutorial, we re going to learn how to colorize a photo using multiple colors. It s an effect I
Teach Yourself Adobe Photoshop Topic 9: Photo Retouching Part 2
 http://www.gerrykruyer.com Teach Yourself Adobe Photoshop Topic 9: Photo Retouching Part 2 In the last week s lesson, you repaired damaged areas of an image, removed unwanted parts of an image, cloned
Organizing artwork on layers
 3 Layer Basics Both Adobe Photoshop and Adobe ImageReady let you isolate different parts of an image on layers. Each layer can then be edited as discrete artwork, allowing unlimited flexibility in composing
NMC Second Life Educator s Skills Series: How to Make a T-Shirt
 NMC Second Life Educator s Skills Series: How to Make a T-Shirt Creating a t-shirt is a great way to welcome guests or students to Second Life and create school/event spirit. This article of clothing could
Improve your photos and rescue old pictures
 PSPRO REVISTED Nov 5 2007 Page 1 of 7 Improve your photos and rescue old pictures This guide gives tips on how you can use Paint Shop5 and similar free graphic programmes to improve your photos. It doesn
Students will be able to create movement through the use of line or implied line and repetition.
 Title of Unit Digital Imaging Title of Lesson Self Portrait Montage in Photoshop Course Graphic Design 1 Instructor Heidi Stachulak hstachulak@hf233.org Objectives: Composition Students will be able to
The horse image used for this tutorial comes from Capgros at the Stock Exchange. The rest are mine.
 First off, sorry to those of you that are on the mailing list or RSS that get this twice. I m finally moved over to a dedicated server, and in doing so, this post was lost. So, I m republishing it. This
Working with Photoshop CS4
 Table of Contents Introduction: Tools and Palettes... 3 The History Palette Saving a Snapshot... 3 Getting Help with Photoshop... 4 Resolution and Image Size... 4 Changing the Image Size... 5 Tips for
Adobe Photoshop Notes. Adobe Photoshop CS3
 Adobe Photoshop Notes Adobe Photoshop CS3 Page 2 Introduction These notes have been put together for basic and advanced methods, features and language. I have also created notes on other Adobe products.
Simple Surreal Landscape
 Simple Surreal Landscape By Kirin Knapp Use some easy photo manipulation skills to make a surreal landscape scene. Here are all of the images we re going to use. Open a new file and make it oversized so
Texts and Resources: Assessments: Freefoto.com Group Photo Projects
 Effective Date: 2009-10 Name of Course: Digital Photography Grade Level: 9-12 Department: Industrial Technology and Engineering Length of Course: 30 cycles Instructional Time: 180 days Period Per Cycle: