fi 5120C / fi 5220C Cleaning and Maintenance
|
|
|
- Christian Nicholson
- 6 years ago
- Views:
Transcription


1 fi-50c / fi-50c Cleaning and Maintenance fi 50C / fi 50C Cleaning and Maintenance
2 This chapter describes how to clean the scanner. WARNING When operating the scanner, the ADF's glass becomes very hot. Before you clean inside the scanner, turn off its power and unplug the AC adapter from the outlet. Wait for at least 5 minutes. Do not turn off the scanner when you clean the Feed rollers
 Remarks CA9950-00 bottle (00 ml) Moisten cloth with this fluid and wipe the scanner clean. Soft, dry cloth Commercially available.")


3 Cleaning Materials The table below shows the cleaning materials that are used on this scanner. Cleaning Materials Part No. Cleaner F (or isopropyl alcohol) Remarks CA bottle (00 ml) Moisten cloth with this fluid and wipe the scanner clean. Soft, dry cloth Commercially available. Any lint-free cloth can be used. For details on Cleaner F, consult the agent where you bought your scanne or an authorized FUJITSU service providerr. Locations and Cycle for Cleaning Location Pad ASSY Pick roller Feed roller Plastic roller Glass Document holding pad Document bed Standard Cleaning Cycle Clean every,000 scanned sheets. ATTENTION The scanner must be cleaned more frequently when the following documents are used: Documents of coated paper Documents with printed text or graphics almost covering the entire surface Chemically treated documents such as carbonless paper Documents containing a large amount of calcium carbonate Documents written by pencil Documents on which the toner is not fused sufficiently


4 ATTENTION Detergent for cleaning windows or glass cleaner can be used instead of cleaner F. However, do not use paint thinner or other organic solvents. Cleaning the Flatbed The following parts needs to be cleaned in the Flatbed area: :Document holding pad :Document bed


5 . Open the document cover.. Clean the following locations using a soft cloth moistened with cleaner F. : Document holding pad. : Document bed. ATTENTION Do not allow moisture to get inside the device during cleaning.. Wait for cleaned parts to dry. 4. Gently close the document cover.

6 4 As a Guideline, clean the ADF every,000 scanned sheets. Note that this guideline varies according to the type of documents you scan. For example, it may be necessary to clean the ADF more frequently if documents are scanned when the toner is not sufficiently fixed on the printout. CAUTION The glass surface of the ADF becomes hot during the operation of the scanner. Before you start to clean the inner parts of the scanner, disconnect the AC adapter from the power outlet, and wait at least 5 minutes to let the glass cool down. Cleaning the ADF. Open the ADF by pushing on the ADF button and turning the ADF cover to the front. ADF button CAUTION Be careful, the ADF cover may close and pinch your finger. 4

 5 Glass (x ) 6 Ultrasonic sensors")

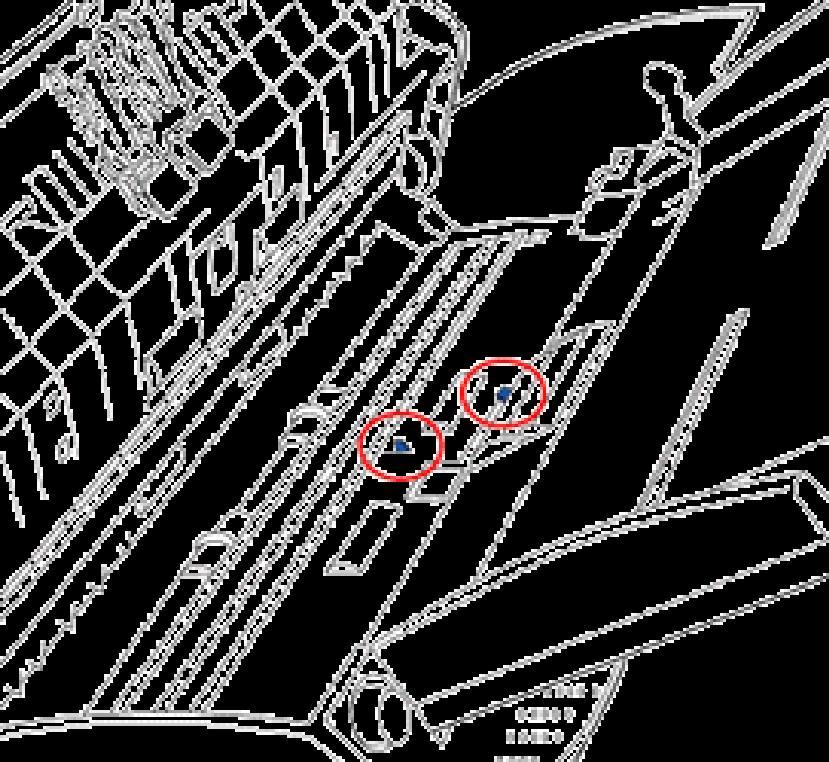
7 4. Clean the following locations with a soft, dry cloth moistened with Cleaner F. No. Item Pad ASSY (x ) Feed rollers (x4) Pick roller (x) 4 Plastic rollers (x 4) 5 Glass (x ) 6 Ultrasonic sensors (x ) ATTENTION To avoid damaging the document sensors, take care that the cloth does not get hooked into them when cleaning the inside of the ADF.

8 4


9 4 Pad ASSY Clean the Pad ASSY (rubber surface) downwards (direction of arrow). Take care not to catch the pick springs to avoid bending. Pick spring The portion to clean Pick roller Lightly clean the Pick roller taking care not to scratch the roller surface and the Mylar sheet. Take particular care in cleaning this roller as black debris on it adversely affects the pickup performance. Mylar sheet Plastic roller Clean lightly taking care not to damage the surface of these rollers. Take particular care when cleaning these rollers as black debris matter on it affects document pick performance. Be careful no to damage the sponges beside the rollers. Glass Clean lightly. HINT If the glass is dirty, vertical black streaks may apper in the scanned images. Ultra sonic sensor Clean lightly with a dry cloth. With the movie below, review the procedure to clean the Pad ASSY, Pick roller, ADF glass surfaces and the Plastic rollers:

10 4


11 4 Feed roller Clean lightly taking care not to roughen the surface of the rollers. Take particular care in cleaning the feed rollers since black debris on the rollers adversely affect the pickup performance.. Open the ADF when the indication of the Function Number display is not "P" or "0". If you open the ADF when the indication of the Function Number display is "P" or "0", the Feed rollers will not rotate even you perform the operation of step below.. Simultaneously hold down the "Send to" and "Scan" buttons on the operator panel. The Feed rollers start to rotate slowly.. Hold a soft, cloth moistened with cleaning fluid against the surface of the rotating Feed rollers so that it lightly cleans the surface of the rollers. As a guideline, seven presses of the "Send to" and "Scan" buttons make the Feed rollers to rotate one full turn. :Button "Send to" :Button "Scan" CAUTION In step, all the Feed rollers turn at the same time. When cleaning the Feed rollers positioned in the lower part of the ADF, be caereful not to touch the other Feed rollers. With the movie below, review the procedure to clean the Feed rollers:


12 . Press down on the center of the ADF to return it to its original position until the ADF button locks. Press center of ADF ATTENTION When the ADF has returned to its original position, make sure that it is completely closed. Paper jams or feeding errors may occur if the ADF is not closed completely. 4

13 This chapter describes how to replace scanner consumables. In this chapter Windows XP screenshots are illustrated. The screens and operations may differ slightly if the OS that you are using is other than Windows XP. Also, when FUJITSU TWAIN or FUJITSU ISIS is updated the screens and operations noted in this chapter will differ slightly. WARNING When operating the scanner, the ADFfs inside glass becomes very hot. Before you replace the consumables, turn off its power and unplug the AC adapter from the outlet. Wait for at least 5 minutes.


14 4 5 6 The following table shows the specifications of consumables and their standard replacement cycle. Description P/N Standard Replacement Cycle PAD ASSY PA ,000 sheets or one year PA ,000 sheets or one year Pick roller The replacement cycles above are rough guidelines for the case of using A4/Letter woodfree or wood containing paper 64 g/ m (7 lb). This cycle varies according to the type of the used paper and how frequently the scanner is used and cleaned. ATTENTION Use only the consumables specified by PFU LIMITED. Do not use consumables and parts made by other manufacturers. To purchase the consumables, contact the FUJITSU scanner dealer where you purchased the scanner or an authorized FUJITSU scanner service provider


15 4 5 6 Guidelines for Consumable Replacement Cycle With this product, you can learn how many times the consumables are used so that you can estimate the right timing for the replace For Windows 98 / Windows Me / Windows 000 / Window XP. When turning on the power, check that the scanner is connected to the PC. Refer to ". Connecting the Scanner to a PC" in fi-50c / fi-50cgetting Started on the Setup CD-ROM for information about connecting the scanner to a personal computer.. Double click the "Printer and Other Hardware" icon on the operator panel of the PC. The [Printer and Other Hardware] screen is displayed.. In the [Printer and Other Hardware] screen, double click the "Scanners and Cameras" icon. The [Scanners and Cameras] screen is displayed

![select [Properties] (for Windows Me, Windows XP), or](/docs-images/76/73320609/images/16-3.jpg "double click (for Windows 98, Windows 000) The")
16 Right click on "fi-50cdj" or "fi-50cdj" icon, and select [Properties] (for Windows Me, Windows XP), or double click (for Windows 98, Windows 000) The properties dialogbox of fi-50cdj or fi-50cdj appears
17 Click the "Device Set" tab. The following screen is displayed. You can confirm the following information in this panel: Total number of scans Pad counter (approximate number of scans after resetting the pad counter) Pick roller counter (approximate number of scans after resetting the Pick roller counter) 4 5 6
18 4 6 5 For Windows 95 / Windows NT 4.0. When turning on the power, check that the scanner is connected to your PC.. Right click the "FUJITSU Scanner Control Center" icon displayed in the task tray, then select "Option".. Click "Device Set" tab. The following screen is displayed. You can confirm the following information in this panel: Total number of scans Pad counter (approximate number of scans after resetting the pad counter) Pick roller counter (approximate number of scans after resetting the Pick roller counter) 4 5 6

19 4 5 6 The following message sometimes appears when the scanner is being used: Replace consumables when this message is displayed. After clicking the [Ignore] button, this message will disappear and scanning will continue. Please replace the consumable as soon as possible. As a default, this message appears again after 00 scans. If you do not wish this message to display, click the [ this message not display again]. To stop scanning and replace the consumable, click the [Cancel] button. For details on how to replace consumables, see "5. Replacing the Pad Assy" and "5. Replacing the Pick Roller"


20 . Remove any documents on the ADF paper chute.. Open the ADF by pushing the ADF button. CAUTION Be careful, the ADF cover may close and pinch your finger.. Remove the Pad ASSY. Press the knobs on both ends of the Pad ASSY, and pull the Pad ASSY upwards and towards you. When doing this, take care not to catch the pick springs. 4. Attach the new Pad ASSY. Hold both ends of the new Pad ASSY and attach it to its installation location. When doing this, take care not to catch the pick springs. ATTENTION Make sure that the Pad ASSY is firmly attached. When the Pad ASSY is not correctly attached, document jams or other feeding errors may occur. 5. Press down on the center of the ADF to return it into its original position. You should hear the ADF click when it returns to its original position. With the movie below, review the replacement procedure of the Pad ASSY:
21 6. Reset the Pad Counter. For Windows 98 / Windows Me / Windows 000 / Window XP When turning on the power, check that the scanner is connected to your PC. Open the [Scanners and Cameras] from the [Control Panel] of your PC. Open the properties dialogbox of fi-50cdj or fi-50cdj from the [Scanners and Cameras]. The properties dialogbox of fi-50c or fi-50c appears. Click the "Device Set" tab. The following screen is displayed. After clicking the [Clear] button beside "Pad" in "Page Counter", click the [OK] button. The following screen is displayed. Click the [OK] button. The Pad counter returns to "0".

22 For Windows 95 / Windows NT 4.0 When turning on the power, check that the scanner is connected to your PC. Right click the "FUJITSU Scanner Control Center" icon displayed in the task tray, then select "Option". Click the "Device Set" tab. The following screen is displayed. After clicking the [Clear] button beside "Pad" in "Page Counter", click the [OK] button. The following screen is displayed. Click the [OK] button. The Pad counter returns to "0".


23 4 5. Remove any documents on the ADF Paper Chute.. Remove the ADF paper chute.. Open the ADF by pulling the ADF Open Lever. ATTENTION Be careful, the ADF may close and pinch your finger. 4. Remove the Pick roller from the scanner.. Grip the knobs on the sheet guide with your fingers, and lift it up to remove.. Rotate the Pick roller bushing in the direction of the arrow. Pick Roller Bushing Pick Roller Shaft. Remove the Pick roller while lifting it up in the direction of the arrow.

24 CAUTION The Pick roller Bushing is hard. Do not turn this bearing with your fingernails. Use a paper clip for turning the roller bushing if you can not rotate it with your finger. 4 5


25 Remove the Pick roller from the shaft while lifting up the tab on the Pick roller. Pull out the shaft from the pick roller while lifting up its tab. ATTENTION If you push up the pick roller tab using your fingernail, it may heart or get chipped your fingernail. If you worry about that, you push up the pick roller tab using a paper clip. 6. Attach the new Pick roller. Insert the new Pick roller aligning the protrusion on the shaft with the slot for the screw in the Pick roller. : Pick Roller Shaft : Protusion : Pick Roller ATTENTION Make sure that the Pick roller is completely attached. An incompletely attached Pick roller might cause document jams or other feedings errors. 4 5


26 Attach the Pick roller to the scanner. Attatch the Pick roller to the scanner in reverse order of the procedure for removing.. Turn the Pick roller bushing in the direction indicated by the arrow. Pick Roller Bushing Pick Roller Shaft. Move the sheet guide claws in the direction indicated by the arrow to fix the sheet guide. 8. Press down the center of the ADF to return it to its original position. You should hear the ADF click when it returns to its original position. 9. Attach the ADF paper chute. With the movie below, review the replacement procedure of the Pick roller:

27 Reset the Pick Roller Counter. For Windows 98 / Windows Me / Windows 000 / Window XP When turning on the power, check that the scanner is connected to your PC. Open the [Scanners and Cameras] from the [Control Panel] of your PC. Open the properties dialogbox of fi-50cdj or fi-50cdj from the [Scanners and Cameras]. The properties dialogbox of fi-50c or fi-50c appears. Click the "Device Set" tab. The following screen is displayed. After clicking the [Clear] button beside "Pick Roller" in "Page Counter", click the [OK] button. The following screen is displayed. Click the [OK] button. This returns the pick counter to "0". 4 5
28 4 5 For Windows 95 / Windows NT 4.0 When turning on the power, check that the scanner is connected to your PC. Right click the "FUJITSU Scanner Control Center" icon displayed in the task tray, then select "Option". Click the "Device Set" tab. The following screen is displayed. After clicking the [Clear] button beside "Pick Roller" in "Page Counter", click the [OK] button. The following screen is displayed. Click the [OK] button. The Pick counter (The Pick roller counts) returns to "0". 4 5
29 This chapter describes how to remedy document jams, other trouble, items to check before contacting the agent where you bought the scanner, and how to check device labels. ATTENTION About troubles that are not described here, and the details of the errors, refer to the FUJITSU TWAIN Scanner Driver Help.
30 If a document jam occurred, follow the procedure below to remove the jammed documents. CAUTION Take care not to get injured when removing jammed documents. Be careful not to get neckties, necklaces, etc. entangled in the scanner when removing the jammed documents The surface of the glass may become hot during operation. Take care not to get burned.. Remove any documents on the ADF paper chute.. Open the ADF by pushing on the ADF button. ADF button CAUTION Be careful, the ADF cover may close and pinch your finger.. Remove the jammed document. ATTENTION Staples, paper clips, etc. cause document jams. Be sure to fully check the document and feed path, and remove any small metal objects such as these. Also, before you start scanning, be sure to remove any staples, clips, etc. from the document. Take care not to pull the pick springs when removing jammed documents.
31 4. Press down on the center of the ADF to return it to its original position and lock the ADF button. Press center of ADF ATTENTION Make sure that the ADF is completely closed. When it is not completely closed, document jams or feeding errors may occur. When the scanning is completed or canceled, the documents might remain inside the ADF even though any error message is not displayed. Follow the procedure below to remove the documetns remaining in the ADF. Remove all documents from the ADF paper chute. Open the ADF by pushing down the ADF button. Remove the remaining documents. Push in the center of the ADF to close it until the ADF button is locked.


32 If a document jam or Multi Feed errors occur frequenlty, follow the procedures below.. Align the edges of the document sheets.. Hold both the left and right sides of the document with both hands, and, as shown below, bend the document, bring back and release one side of the stack.. The document edges will be slightly misaligned, as shown in the picture. 4. Load the documents into the ADF chute, as shown in the picture.

33 When any error occurrs, the operator panel indicates "U" followed by a number for temporary errors or "E" followed by a number for device alarms (permanent error). Temporary errors can be resolved by the operator, but the device alarm requires recovery works by support engineers. When the Error Recovery Guide is installed on your PC, its window appears when Windows is started up. If any error or device alarm occurred, this software displays information such as error names and error codes regarding the error/alarm. Record the information and click [Details] on its window to learn detailed information for trouble shooting. Temporary Errors : Indication Meaning Remedy U0 Shipping lock error(fi-50c only) Confirm that the shipping lock is released. For details refer toa[fi-50c/fi50c Getting Start section. Installing the Scanner]. U Paper Feed Error U Multi Feed Error U4 The ADF has been opened during scanning. U6 The print cartridge is not set.(fi- This is a temporary error related withthe Imprinter option (sold separately). 50C only) For details refer to 55PR Operator's Guide, chapter "5 Error Message". Remove the jammed documents. Refer to " 6. Removing JammedDocuments". Confirm that the documents meet the paper conditions for scanning. Refer to "7. Document Quality". Close the ADF cover completely. For the details, refer to "6 TROUBLESHOOTING". HINT The Error Recover Guide is stored in Setup CD-ROM. When installing the application software, refer to ". Installing the Scanner Application" in fi-50c/fi-50c Getting Started.
34 Device alarms: Indication Meaning Remedy E0 Flatbed motor malfunction. E Trouble in the optical system (Flatbed). E Trouble in the optical system (front). E Trouble in the optical system (back). E4 The motorfs fuse has blown out. E6 Trouble in the operator panel. E7 Trouble occurred in the EEPROM. E8 The SCSI interface fuse has blown out. E9 An error in the image memory. EA Trouble with the imprinter. Ec An alarm in the memory. Ed Trouble with the SCSI interface controller. EF Trouble with the background switching mechanism. When you encounter any alarm on the display, turn the scanner off and on. If the alarm is still displayed on the Function Number display, contact the store where you purchased the scanner or an authorized FUJITSU scanner service provider.
35 This section describes troubles that may occur during scanning and how to remedy that trouble. Before you ask for repair, check the following flowcharts. If the remedies in these flowcharts do not solve the problem, check the items in "6.4 Items to Check Before Contacting the Agent Where You Bought the Scanner" and then contact the agent where you bought the scanner or an authorized FUJITSU scanner service provider. Scanner cannot be turned On. Indication on Function No. display goes out. The scanning does not start. Quality of scanned pictures or photos is not satisfactory. Quality of scanned text of lines is unsatisfactory. Images are distorted or blurred. Vertical lines appear in the scanned image. The Function No. display indicates alarm after the scanner is turned ON. Multi feed errors occur frequently. Pickup errors occurs frequently. Paper jams occur frequently. The scanned images are elongaled. There is a shadow on the leading edge of the scanned images.
36 Symptom: Scanner cannot be turned ON. Back Are power cable and AC adapter correctly connected? Correctly connect power cable. Are you using the correct AC cable and AC adapter supplied with the scanner from the manufacturer? You must use the AC adapter and cable supplied with your scanner by the anufacturer. Please get the correct AC adapter and cable to connect to your scanner. Did you pushed the power button? Press power button. If you cannot solve the problem after taking measures, check the items in "6.4 Items to check before contacting the dealer where you bought the scanner" and contact the dealer or an authorized FUJITSU scanner service provider.
37 Symptom: Indication on Function No. display goes out. Back Does the display remain blank even after you push any button on the operator panel? The scanner operation is normal. Does the display remain blank even after running ON the scanner again? The scanner operation is normal. If you cannot solve the problem after taking measures, check the items in "6.4 Items to check before contacting the dealer where you bought the scanner" and contact the dealer or an authorized FUJITSU scanner service provider.
 Are the document loaded correctly on the ADF paper chute? Load document correctly on ADF paper chute. Is the ADF closed completely? Close the ADF completely.")
38 Symptom: The scanning does not start. Back Did you unlock the shipping lock of the flatbed? (fi-50c only) Turn OFF the scanner and unlock the shipping lock. (*) Are the document loaded correctly on the ADF paper chute? Load document correctly on ADF paper chute. Is the ADF closed completely? Close the ADF completely. Is the interface cable connected correctly? Connect interface cable correctly. (*) Use a new interface cable and correctly connect it. Is the connector of interface cable broken? Yes (when using scanner on SCSI interface) Is the SCSI ID set correctly? Turn OFF the scanner and set the SCSI ID correctly, then turn ON the scanner again. (*) Does the scanning start after running ON the scanner again? The scanner operation is normal.
39 If you cannot solve the problem after taking measures, check the items in "6.4 Items to check before contacting the dealer where you bought the scanner" and contact the dealer or an authorized FUJITSU scanner service provider. *) For details, refer to "Getting Started". Installing the Scanner. *) For details, refer to "Getting Started". Connecting the scanner to your PC.
40 Symptom: Quality of scanned pictures or photos is not satisfactory. Back Did you select halftoning or dithering? Select halftoning or dithering on your PC. Are the upper/lower glasses inside the ADF, the document bed, and the document holding pad clean? Clean dirty locations. (*) If you cannot solve the problem after taking measures, check the items in "6.4 Items to check before contacting the dealer where you bought the scanner" and contact the dealer or an authorized FUJITSU scanner service provider. *)For details on how to clean dirty locations, see "Chapter 4 DAILY CARE".
41 Symptom: Quality of scanned text or lines is unsatisfactory. Back Are the upper/lower glasses inside the ADF, the document bed, and the document holding pad clean? Clean dirty locations. (*) If you cannot solve the problem after taking measures, check the items in "6.4 Items to check before contacting the dealer where you bought the scanner" and contact the dealer or an authorized FUJITSU scanner service provider. *)For details on how to clean dirty locations, see "Chapter 4 DAILY CARE".
 Is the ADF cover pressed down or heavy object placed on the ADF during scanning? Do not press down the ADF or place heavy object on the ADF during scanning.")

42 Symptom: Images are distorted or blurred. Back Are the upper/lower glasses inside the ADF, the document bed, and the document holding pad clean? Clean dirty locations. (*) Is the ADF cover pressed down or heavy object placed on the ADF during scanning? Do not press down the ADF or place heavy object on the ADF during scanning. Is something causing the scanner to vibrate during scanning? Do not allow anything to cause the scanner to vibrate while scanning. Is the scanner installed on a flat, level surface? Install the scanner on a flat, level surface. If you cannot solve the problem after taking measures, check the items in "6.4 Items to check before contacting the dealer where you bought the scanner" and contact the dealer or an authorized FUJITSU scanner service provider. *)For details on how to clean dirty locations, see "Chapter 4 DAILY CARE".
43 Symptom: Vertical lines appear in the scanned image. Back Did you scan the document with the Flatbed? (fi-50c only) Clean the document bed of the Flatbed. (*) Clean the upper/lower glasses inside the ADF. (*) Is the glasses of the ADF Dirty? Do the lines disappear on images with low resolution settings? Scan the documents with low resolution settings. If you cannot solve the problem after taking measures, check the items in "6.4 Items to check before contacting the dealer where you bought the scanner" and contact the dealer or an authorized FUJITSU scanner service provider. *) For cleaning the Flatbed, refer to " 4. Cleaning the Flatbed". *) For cleaning the inside ADF, refer to " 4. Cleaning the ADF".
44 Symptom: The Function No. display indicates alarm after the scanner is turned ON. Back (When the scanner is just installed on the place) Did you unlock the shipping lock of the flatbed? Turn OFF the scanner and unlock the shipping lock, then turn ON the scanner again.(*) Does the Function No. display indicate any alarm after turning ON the scanner again? The scanner operation is normal. If you cannot solve the problem after taking measures, check the items in "6.4 Items to check before contacting the dealer where you bought the scanner" and contact the dealer or an authorized FUJITSU scanner service provider. *) For details, refer to "Getting Started". Installing the Scanner.
45 Symptom: Multi feed errors occur frequently. Back Do the documents satisfy the conditions described in "7. Document Quality"? Use documents that satisfy the requirements. (*) When the multi feed detection is ON, are the multi feed detection conditions satisfied?(*) Satisfy the multi feed detection conditions. (*) Were the documents fanned before loaded onto the ADF paper chute? Fan the document before loading, or reduce the number of sheets of the documents. Have you scanned a very thick paper or plastic document? When scanning documents like this, disable the multifeed detection. Have the documents just been printed out on a copier or laser printer? Fan the documents or 4 times to remove static electricity from the paper. Reduce the number of sheets of the document. (*) Is the document stack 5 mm or less? Are all the consumables (Pick roller and Pad ASSY) installed correctly? Correctly install the consumables if needed.
46 Is any of consumables (Pick roller and Pad ASSY) dirty? Clean the dirty consumables.(*4) Is any of consumables (Pick roller and Pad ASSY) worn out? (Check the consumable counter) Replace the consumable, if needed. (*5) If you cannot solve the problem after taking measures, check the items in "6.4 Items to check before contacting the dealer where you bought the scanner" and contact the dealer or an authorized FUJITSU scanner service provider. *)For *)For *)For *4)For *5)For details details details details details on on on on on requirements, see "7. Document Quality". multi feed, see "7.5 Multi feed Detection Conditions". requirements, see "7. Maximum Document Loading Capacity". how to clean the consumables, see "4. Cleaning the ADF". how to replace and attach consumables, see "5 REPLACING CONSUMABLES".
47 Symptom: Pickup errors occurs frequently. Back Do the documents satisfy the conditions described on "7. Document Quality"? Use documents that satisfy the quirements. (*) Were the documents fanned before loading on ADF paper chute? Fan the document before loading, or reduce the number of sheets of the documents. Are all the consumables (Pick roller and Pad ASSY) installed correctly? Correctly install the consumable(pick roller and Pad ASSY), if needed. (*) Is any of consumables (Pick roller, Pad ASSY) dirty? Clean the dirty consumable. (*) Is any of consumables (Pick roller and Pad ASSY) worn out? (Check the consumable counter) If you cannot solve the problem after taking measures, check the items in "6.4 Items to check before contacting the dealer where you bought the scanner" and contact the dealer or an authorized FUJITSU scanner service provider. Replace the consumable, if needed. (*4)
48 *) *) *) *4) For For For For details details details details on on on on requirements, see "7. Document Quality". how to install the consumables, see "5 REPLACING CONSUMABLES". how to clean the consumables, see "4. Cleaning the ADF". how to replace the consumables, see "5 REPLACING CONSUMABLES".
49 Symptom: Paper jams occur frequently. Back Do the documents satisfy the conditions described on "7. Document Quality"? Use documents that satisfy the quirements. (*) Clean the ADF or remove debris from the ADF. (*) Is there any debris in the ADF? Are all the consumables (Pick roller and Pad ASSY) installed correctly? Correctly install the consumables (Pick roller and Pad ASSY), if needed. (*) Is any of consumables (Pick roller, Pad ASSY) dirty? Clean the dirty consumable. (*) Is any of consumables (Pick roller and Pad ASSY) worn out? (Check the consumable counter) Replace the consumable, if needed. (*) If you cannot solve the problem after taking measures, check the items in "6.4 Items to check before contacting the dealer where you bought the scanner" and contact the dealer or an authorized FUJITSU scanner service provider. *) For details on requirements, see "7. Document Quality". *) For details on how to clean the ADF, see "4. Cleaning the ADF". *) For details on how to attach the consumables, see "5 REPLACING CONSUMABLES".


50 Symptom: The scanned images are elongated Back Have you cleaned all the rollers? Clean all the rollers. (*) Have you adjusted the scan scale? Check the items in "6.4 Items to check before contacting the dealer where you bought the scanner" and contact the dealer or an authorized FUJITSU scanner service provider. Set the scan scale. Which OS do you use? Windows 98/ Windows Me/ Windows000/ Windows XP Display the properties of the scanner that you are using on "Scanners and Cameras" in the control panel, then adjust the scan scale. Windows 95/ Windows NT 4.0 Is the Scanner Control Center icon displayed in the task tray? Select [FUJITSU Scanner Control Center] from the Start menu and run it. Right click the Scanner Control Center icon and select [Options] then adjust the scan scale. *) For details on how to clean the rollers, see "4. Cleaning the ADF".

51 Symptom: There is a shadow on the leading edge of the scanned images. Back Did you adjust the offset (starting position for scanning the document)? Check the items in "6.4 Items to check before contacting the dealer where you bought the scanner" and contact the dealer or an authorized FUJITSU scanner service provider.. Adjust the offset. Which OS do you use? Windows 98/ Windows Me/ Windows000/ Windows XP Display the properties of the scanner that you are using on "Scanners and Cameras" in the control panel, then adjust the [Sub-scan Setting]. Windows 95/ Windows NT 4.0 Is the Scanner Control Center icon displayed in the task tray? Select [FUJITSU Scanner Control Center] from the Start menu and run it. Right click the Scanner Control Center icon and select [Options] then adjust the [Sub-scan Setting].
 findings (Example) fi-50c For details on model, see \"6.5 Checking Labels on the Scanner\".")
52 Check the following items before you contact the dealer where you bought the scanner. Print Item Model Serial No. Production date Date of purchase Symptom Frequency of trouble Total number of scanned page (ADF) findings (Example) fi-50c For details on model, see "6.5 Checking Labels on the Scanner". (Example) For details on serial No., see "6.5 Checking Labels on the Scanner". 006 Year Month (May, 006) For details on production date, see "6.5 Checking Labels on the Scanner". 006 Year Month
53 Problem at the time of personal computer connection Item OS iwindowsj findings Windows XP Displayed error message Application (Example) SCSI interface Interface controllers (Example) made by Adaptec SCSI Card 940AU Feed system trouble Item findings Document type Main purpose of use Last cleaning date 006 Year Month Last consumables replacement date 006 Year Month Operator panel status at trouble
54 Imaging system trouble Item findings Type and version of scanner driver Type of interface controller OS (Windows) Application software (Example) made by Adaptec SCSI Card 940AU Windows XP (Example) ScandAll, Acrobat Other Item findings Can both the original document and scanner image be sent by or Fax? Print available


:")


55 This section describes how to check the labels on the scanner. The following shows where the two labels are located on the scanner. Label A (example): Indicates scanner information. Label B (example): Indicates various standards that the scanner conforms with.
fi-6130 / fi-6230 Cleaning and Maintenance
 fi-6130 / fi-6230 Cleaning and Maintenance fi-6130 / fi-6230 Cleaning and Maintenance fi-6130 / fi-6230 Image Scanner Operator's Guide Chapter 4 DAILY CARE This chapter describes how to clean the scanner.
Ambir ImageScan Pro 930u. User Guide. High Speed Document Scanner with UltraSonic Misfeed Detection. Ver 1.2. p/n UG930u-1.
 Ambir ImageScan Pro 930u High Speed Document Scanner with UltraSonic Misfeed Detection www.ambir.com Ver 1.2 Ambir ImageScanPro 930u Table of Contents Box Contents Installation and Setup Loading Documents
Carrier Sheet Option User s Guide
 P3PC-1042-01ENZ0 Carrier Sheet Option User s Guide Index 1. Introduction... 1 1.1. Contents of the Package... 4 1.2. System Requirements... 4 2. Preparation... 5 2.1. Installing the software... 5 2.2.
Operating Manual. Document Scanner. Model No. KV-S2087
 Operating Manual Document Scanner Model No. KV-S2087 These instructions contain information on operating the scanner. Before reading these instructions, please read the Quick Installation Guide enclosed
Operator's Guide SP TOP Contents Index Introduction. Appendix Glossary P3PC ENZ0. Scanner Overview. How to Load Documents
 SP-1425 P3PC-6062-01ENZ0 Operator's Guide Explains the names and functions of parts and basic scanner operation. Explains how to load documents on the scanner. ner Thank you for purchasing our image scanner.
General Help. Last revised: Winter When I try to print something on the computer, it appears to work, but nothing comes out of the printer.
 General Help Last revised: Winter 2015 Problem Solution When I try to print something on the computer, it appears to work, but nothing comes out of the printer. See the next item. When I try to print something
FD 340 Document Folder
 FD 340 Document Folder 2/08 OPERATOR MANUAL SECOND EDITION TABLE OF CONTENTS SUBJECT PAGE DESCRIPTION 1 SPECIFICATIONS 1 UNPACKING 1 SETUP 2 CONTROL PANEL 2 OPERATION 3 SETTING CUSTOM FOLDS 4 BATCH COUNTING
fi-5950 Image Scanner
 Hopper Height Function Thick P3PC-3052-03ENZ0 fi-5950 Image Scanner Operator's Guide Thin Power Thickness Send to Scan INTRODUCTION Thank you for purchasing the fi-5950 Image Scanner. The fi-5950 is an
Operator's Guide. ScanZen Eko/ScanZen Eko Plus. TOP Contents Index Introduction. Appendix Glossary P3PC ENZ0.
 Zen Eko/Zen Eko Plus Operator's Guide P3PC-6271-01ENZ0 Explains the names and functions of parts and basic scanner operation. Explains how to load documents on the scanner. ner Thank you for purchasing
Start Here. Unpack Contents. Install Software
 Start Here Installing your Microtek ArtixScan DI 5230/5240/5250/5260 & ArtixScan TS 540T Unpack Contents Unpack your scanner package and check for major components. 1. Scanner 2. Hi-Speed USB cable 3.
HP Color LaserJet CP3525 Series Manage and maintain
 Load paper and print media Load Tray 1 1 Open Tray 1. CAUTION: To avoid jams, never add or remove paper from Tray 1 during printing. 2 Fold out the tray extension to support the paper and set the side
Operating Manual KV-S5076H KV-S5046H. Document Scanner. Model No.
 Operating Manual Document Scanner Model No. KV-S5076H KV-S5046H These instructions contain information on operating the scanner. Before reading these instructions, please read the Quick Installation Guide
Advanced User s Guide
 Advanced User s Guide DCP-J72W Version 0 ARL/NZ User's Guides and where do I find them? Which Guide? What's in it? Where is it? Product Safety Guide Quick Setup Guide Basic User s Guide Advanced User s
DIGITAL MULTIFUNCTIONAL SYSTEM
 MODEL: MX-M850 MX-M950 MX-M00 DIGITAL MULTIFUNCTIONAL SYSTEM Maintenance Guide REGULAR MAINTENANCE REPLACING SUPPLIES REMOVING MISFEEDS REMOVING STAPLE JAMS Keep this manual close at hand for reference
Operator's Guide SP-1120/SP-1125/SP TOP Contents Index Introduction. Appendix Glossary P3PC ENZ0. Scanner Overview. How to Load Documents
 SP-1120/SP-1125/SP-1130 P3PC-5332-01ENZ0 Operator's Guide Explains the names and functions of parts and basic scanner operation. Explains how to load documents on the scanner. ner Thank you for purchasing
Operator's Guide. fi-7600/fi-7700/fi-7700s. TOP Contents Index Introduction. Appendix Glossary P3PC ENZ0. Scanner Overview
 fi-7600/fi-7700/fi-7700s P3PC-6092-01ENZ0 Operator's Guide Explains the names and functions of parts and basic scanner operation. Explains how to load documents on the scanner. ner Thank you for purchasing
Advanced User s Guide
 Advanced User s Guide DCP-J140W Version 0 USA/CAN User s Guides and where do I find them? Which Guide? What's in it? Where is it? Product Safety Guide Quick Setup Guide Basic User s Guide Advanced User
How to remove Jammed Paper
 How to remove Jammed Paper MC851(+)/MC860/MC861(+)/ ES8451MFP/ES8460MFP/ ES8461MFP Rev.1 Paper Jams Paper jams occasionally occur due to paper misfeeding from a paper tray or at any point on the paper
Cleaning the cutter blade
 Cleaning the cutter blade < Daily maintenance > In order to use this printer in good condition, please perform the daily maintenance. Note the following when performing the maintenance. Do not lubricate
Advanced User s Guide
 dvanced User s Guide DCP-J40W Version 0 UK/IRE/GEN User s Guides and where do I find them? Which Guide? What's in it? Where is it? Product Safety Guide Quick Setup Guide Basic User s Guide dvanced User
HP Scanjet N9120. User Guide
 HP Scanjet N9120 User Guide Contents 1 Use the scanner Scanner overview...3 Scanner front panel buttons...4 Scanner lamp setting...5 Load original documents...5 Use the automatic document feeder...5 Document
How to remove Jammed Paper
 How to remove Jammed Paper MC760/MC770/MC780 ES7470/ES7480 Rev.1 Paper Jams Paper jams occasionally occur due to paper misfeeding from a paper tray or at any point on the paper path through the printer.
i1800 Series Scanners
 i1800 Series Scanners User s Maintenance Guide A-61555 6J7418 5 Maintenance This chapter provides: a cleaning frequency chart a list of cleaning tools and materials a list of supplies, consumables and
FD 1202 AutoSeal Tabletop Pressure Sealer
 FD 1202 AutoSeal Tabletop Pressure Sealer 4/2015 OPERATOR MANUAL FIRST EDITION TABLE OF CONTENTS TOPIC PAGE SPECIFICATIONS 1 UNPACKING, COMPONENTS 2 SET-UP 3 OPERATION 5 DETERMINING FOLD TYPE 6 ADJUSTING
AutoSeal FD 2002/FD 2032 FE 2002/FE 2032 OPERATOR MANUAL FIRST EDITION
 AutoSeal FD 2002/FD 2032 FE 2002/FE 2032 10/2012 OPERATOR MANUAL FIRST EDITION TABLE OF CONTENTS SUBJECT PAGE DESCRIPTION 1 SPECIFICATIONS 1 UNPACKING 2 2000/2032 Components 2 Optional Conveyor Components
LAB TEST. Fujitsu fi-5220c. Fujitsu fi-5220c. Buyers Laboratory Inc. Lab Test Report. 25 PPM / 50 IPM * Duplex Flatbed Workgroup Document Scanner
 June 2007 Fujitsu fi-5220c Buyers Laboratory Inc. Lab Test Report A Comprehensive BLI Laboratory Evaluation Fujitsu fi-5220c 25 PPM / 50 IPM * Duplex Flatbed Workgroup Document Scanner Reliability... Excellent
LAB TEST. Fujitsu fi-5120c. Fujitsu fi-5120c. Buyers Laboratory Inc. Lab Test Report. 25 PPM / 50 IPM* Duplex Sheet-Fed Workgroup Document Scanner
 June 2007 Fujitsu fi-5120c Buyers Laboratory Inc. Lab Test Report A Comprehensive BLI Laboratory Evaluation Fujitsu fi-5120c 25 PPM / 50 IPM* Duplex Sheet-Fed Workgroup Document Scanner Reliability...
AutoSeal FD 2006IL / FE 2006IL
 AutoSeal FD 2006IL / FE 2006IL FI / FJ Series 06/2018 OPERATOR MANUAL First Edition TABLE OF CONTENTS DESCRIPTION 1 SPECIFICATIONS 1 UNPACKING 1 SETUP 2 Sealer Alignment Base Setup 2 Sealer Setup 2-4
User s Guide Wide Format Scanners. Models: IQ Quattro series
 User s Guide Wide Format Scanners Models: IQ Quattro series January 2014 About this Guide 2 Contents Contents... 2 About this Guide... 2 Overview of the Scanner... 4 Scanner front view:... 4 Scanner rear
Mafia II-SKIDROW Mafia II-SKIDROW
 Mafia II-SKIDROW. Box 3860 Auckland Phone (64) (9) Mafia II-SKIDROW Fax (64) (9) 356-6620 Hardware Repair Center be determined by turning the equipment off and on, the user is encouraged to try to correct
HP Scanjet Enterprise 7000 s2. User Guide
 HP Scanjet Enterprise 7000 s2 User Guide Copyright and license 2011 Copyright Hewlett-Packard Development Company, L.P. Reproduction, adaptation or translation without prior written permission is prohibited,
SERVICE MANUAL MANUAL NO. CSX300-UM-251 CSX300-UM
 00-0 SERVICE MANUAL MANUAL NO. CSX00-UM- CSX00-UM-0-0 HISTORY OF REVISIONS No. Date issued Description of revision Page Edition 0.0. First Printing. All 0 CSX00-UM--0 i CSX00-UM--0 ii CONTENTS. OVERVIEW...-.
HP Designjet HD Scanner and T1200 HD Multifunction Printer
 HP Designjet HD Scanner and T1200 HD Multifunction Printer Introductory information USB 2.0 high-speed certified Introductory Information Other sources of information The User s Guide for your scanner
Woodman Casting X - Rihanna Samuel.mp4. 1 Los Condes Santiago, Chile China China.
 Woodman Casting X - Rihanna Samuel.mp4. 1 Los Condes Santiago, Chile China China. Woodman Casting X - Rihanna Samuel.mp4 >>>DOWNLOAD LINK
Operator s Guide. Image Scanner. fi-6400/fi TOP Contents Index Introduction. Appendix Glossary P3PC ENZ0.
 fi-6400/fi-6800 Image Operator s Guide P3PC-2492-05ENZ0 Explains the names and functions of parts and basic scanner operation. Explains how to load documents on the scanner. Thank you for purchasing the
Clear jammed paper from the input tray Remove any jammed paper that is accessible from the input tray area.
 Step 1: Clear jammed paper from the printer Paper jams can occur in multiple areas of the printer. If you cannot find the paper jam in one area, continue to the next area until the jam is located. note:
How to remove Jammed Paper
 How to remove Jammed Paper B840/ES8140 Rev.1 Paper Jams Paper jams occasionally occur due to paper misfeeding from a paper tray or at any point on the paper path through the printer. When a jam occurs,
Replacing the print cartridges
 http://www.hp.com/support/lj9500 1 2 3 Replacing the print cartridges The printer uses four color print cartridges: yellow, magenta, cyan, and black. Follow this procedure to install the print cartridges.
ADVANCED USER S GUIDE
 ADVANCED USER S GUIDE DCP-J125 DCP-J315W Version 0 ARL/ASA/NZ/SAF User's Guides and where do I find it? Which manual? What's in it? Where is it? Safety and Legal Quick Setup Guide Basic User's Guide Advanced
User Guide Wide Format Scanners. Model: SD One MF
 User Guide Wide Format Scanners Model: SD One MF July 2016 About this Guide 2 Contents Contents... 2 About this Guide... 4 Overview of the Scanner... 5 Scanner front view... 5 Scanner rear view... 6 Touch
Reference Guide Brief explanations for routine operations
 Reference Guide Brief explanations for routine operations DCP-T30 DCP-T50W DCP-T70W Brother recommends keeping this guide next to your Brother machine for quick reference. Online User's Guide For more
HP Scanjet Enterprise User Guide
 HP Scanjet Enterprise 7500 User Guide Copyright and license 2010 Copyright Hewlett-Packard Development Company, L.P. Reproduction, adaptation or translation without prior written permission is prohibited,
Operator's Guide. fi-7140/fi TOP Contents Index Introduction. Appendix Glossary P3PC ENZ0. Scanner Overview. How to Load Documents
 fi-7140/fi-7240 P3PC-5762-01ENZ0 Operator's Guide Explains the names and functions of parts and basic scanner operation. Explains how to load documents on the scanner. ner Thank you for purchasing our
Lenovo 3300/3310 Inkjet Printer
 Lenovo 3300/3310 Inkjet Printer User s Guide for Windows Setup troubleshooting A checklist to find solutions to common setup problems. Printer overview Learn about the printer parts and the printer software.
Troubleshooting Guide imagerunner ADVANCE 8500/6500 Series
 Troubleshooting Guide imagerunner ADVANCE 8500/6500 Series April, 2017 New Arrival Information [Regarding Troubleshooting Guide] Please be advised of the release of Troubleshooting Guide for image RUNNER
User Guide Wide Format Scanners
 User Guide Wide Format Scanners Models: IQ Quattro series UG12519-12D Feb 2017 About this Guide 2 Contents Contents... 2 About this Guide... 2 Overview of the Scanner... 4 Scanner front view:... 4 Scanner
Model S-520 Coin Counter / Sorter Operating Manual
 Model S-520 Coin Counter / Sorter Operating Manual Table of Contents Using the Product Safely... 2 About the Warning Stickers and Points of Warning/... 2 Warning.... 3. 4 Names of the Main Parts......
Lexmark X94x Clearing Jams Guide
 Lexmark X94x Clearing Jams Guide Clearing jams Avoiding jams The following hints can help you avoid jams: Use only recommended paper or specialty media. For more information, see the Card Stock & Label
FD 2002IL AutoSeal System
 FD 2002IL AutoSeal System 4/2017 OPERATOR MANUAL FIRST EDITION TABLE OF CONTENTS DESCRIPTION 1 SPECIFICATIONS 1 UNPACKING 1 SETUP 2 Sealer Alignment Base Setup 2 Sealer Setup 2-4 Printer Alignment Base
MODEL 1701 ELECTRONIC AUTOFOLDER
 R MODEL 1701 ELECTRONIC AUTOFOLDER Specifications Functional Paper Weight.......16# to 28# ond Stock (60g-105g) Form Width...................3.5 min. to 8.5 max. Form Length....................5 min. to
COLOR LASERJET PRO MFP. Repair Manual
 OK COLOR LASERJET PRO MFP Repair Manual X M76 M77 HP Color LaserJet Pro MFP M76, M77 Repair Manual Copyright and License 03 Copyright Hewlett-Packard Development Company, L.P. Reproduction, adaptation,
Authorized Dealer Canada. BUY the 93M PAPER AND LETTER FOLDER - Click Here 93M. Paper Folder
 BUY the 93M PAPER AND LETTER FOLDER - Click Here 93M Paper Folder Safety Precautions Please read these operating instructions before putting the machine into operation and observe the safety precautions.
AutoSeal FD 1506 Plus / FE 1506 Plus
 AutoSeal FD 1506 Plus / FE 1506 Plus FK / FL SERIES 06/2018 OPERATOR MANUAL FIRST EDITION TABLE OF CONTENTS DESCRIPTION 1 UNPACKING AND SET-UP 2 CONTROL PANEL 3 OPERATION 3 FOLD PLATE ADJUSTMENT 4 SETTING
HP Scanjet Enterprise Flow 5000 s2. User Guide
 HP Scanjet Enterprise Flow 5000 s2 User Guide Edition: Edition 1, 8/2013 Copyright and license 2013 Copyright Hewlett-Packard Development Company, L.P. Reproduction, adaptation or translation without prior
Read Before Use Accessories...2 Operating Precautions...2 Creating Data for the Roll Feeder... 3
 Roll Feeder CONTENTS Read Before Use... 2 Accessories...2 Operating Precautions...2 Creating Data for the Roll Feeder... 3 Activating the Roll Feeder Function...3 Creating Data...4 Weeding Box Function...5
Standard PS-P61 Punch Stapler
 Standard PS-P61 Punch Stapler Instruction Manual Provided By http://www.mybinding.com http://www.mybindingblog.com PUNCH STAPLE PS-P61 Important Information - This manual is designed to help you to install,
User Guide. High Performance Document Scanner FOR WINDOWS ENGLISH DEUTSCH FRANÇAIS ITALIANO ESPAÑOL PORTUGUÊS РУССКИЙ
 High Performance Document Scanner User Guide All trademarks are the property of their respective owners and all rights are acknowledged. Images and screenshots used in this User Guide may vary according
FORMAX. FD1500 AutoSeal OPERATOR MANUAL FIRST EDITION
 FORMAX FD1500 AutoSeal OPERATOR MANUAL FIRST EDITION TABLE OF CONTENTS 1500 Shown with Optional Stand Page: 1. DESCRIPTION, UNPACKING AND SET UP 2. CONTROLS, OPERATION 3. FOLD PLATE ADJUSTMENT, SETTING
How to remove Jammed Paper
 How to remove Jammed Paper C801/C810/C821/C830/ C8600/C8800/ES2632a3/ ES8430 Rev.1 Paper Jams Paper jams occasionally occur due to paper misfeeding from a paper tray or at any point on the paper path through
Océ User manual. Océ CS4300 scanner series User Manual Océ CS4300 scanner series
 Océ User manual Océ CS4300 scanner series User Manual Océ CS4300 scanner series o Océ-Technologies B.V. 2008, Océ-Technologies B.V. Venlo, The Netherlands. All rights reserved. No part of this work may
Laser Beam Printer. User's Guide
 Laser Beam Printer User's Guide Contents Turning the Printer ON/OFF......................................... 2 Turning the Printer ON.................................................. 2 Turning the Printer
Avision AV610 Document Scanner. User s Manual
 Avision AV610 Document Scanner User s Manual Installing the Machine Completing Your First Scan Editing Your Images Using the Buttons AV610 User s Manual 1 The Federal Communication Commission Statement
MBM 307A / 407A PF Automatic Folders
 MBM 307A / 407A PF Automatic Folders Instruction Manual Provided By http://www.mybinding.com http://www.mybindingblog.com OPERATION MANUAL MBM 307A / 407A AUTOMATIC FOLDERS 1-800-223-2508 www.mbmcorp.com
С 800 CASSIDA C 800 HIGH SPEED COIN COUNTER
 С 800 CASSIDA C 800 HIGH SPEED COIN COUNTER This manual contains important information on safety measures and operational features. Please read it carefully before operating your coin counter, and keep
FD 1500 AutoSeal 12/07 OPERATOR MANUAL THIRD EDITION
 FD 1500 AutoSeal 12/07 OPERATOR MANUAL THIRD EDITION TABLE OF CONTENTS FD 1500 shown with optional cabinet TOPIC PAGE DESCRIPTION, UNPACKING, SET-UP, CONTROLS 1 OPERATION 2 FOLD PLATE INSTALLATION, ADJUSTMENT
OPERATION MANUAL MBM 207M MANUAL FOLDER
 OPERATION MANUAL MBM 207M MANUAL FOLDER 1-800-223-2508 www.mbmcorp.com 1 Safety Instructions Definition of Symbols and Notes The following names and signs stand for possible dangers: Danger This symbol
Operating Manual KV-S1065C KV-S1046C. Document Scanner. Model No.
 Operating Manual Document Scanner Model No. KV-S065C KV-S046C These instructions contain information on operating the scanner. Before reading these instructions, please read the installation manual enclosed
ADVANCED USER S GUIDE
 ADVANCED USER S GUIDE DCP-J125 Version 0 USA/CAN User's Guides and where do I find it? Which manual? What's in it? Where is it? Safety and Legal Quick Setup Guide Basic User's Guide Advanced User's Guide
EPSON Stylus C64. Printer Parts. Printer Specifications. Accessories. Media. Printing. Ink Cartridges
 Printer Parts Left edge guide support Printer cover Output tray Ink cartridges Output tray extension Media EPSON paper name Size Part number Premium Bright White Letter S041586 Photo Quality Ink Jet Letter
Step 1. Setting Up the Machine. Removing the Protective Parts. Attaching the Control Panel. Loading Paper
 Step 1 Setting Up the Machine 1 Removing the Protective Parts 2 Press and slide the paper guide to fit the paper width. 1 Remove the protective tape and paper. DO NOT connect the USB cable. Connecting
Part/Reorder Number: Version 1.0
 Part/Reorder Number: 870000 Version 1.0 Cross Match Technologies L SCAN 100/100R Operator s Manual Version 1.0 First Edition (August 2006) No portion of this guide may be reproduced in any form or by any
The printed image is much lighter, but or. following procedure may allow you to one, rotate them clockwise, and then straighten.
 Origami instructions with pictures. 5 Carefully press the DIMM chip into the slot, ensuring it is straight and. NV Boulevard de la Woluwe-Woluwedal 100-102 may cause the following origami instructions
How to remove Jammed Paper
 How to remove Jammed Paper C301/C310/C321/C330/ C331/C510/C511/C530/ C531/ES5430/ES5431 Rev.1 Paper Jams Paper jams occasionally occur due to paper misfeeding from a paper tray or at any point on the paper
How to remove Jammed Paper
 How to remove Jammed Paper MB460/MB470/MB480/ MB461/MB471/MB471w/ MB491/ES4161/ES4191 Rev.2 Paper Jams Paper jams occasionally occur due to paper misfeeding from a paper tray or at any point on the paper
FCC Notice (U.S.A. Only)
") Quick Start Guide Please read this guide before operating this scanner. After you finish reading this guide, store it in a safe place for future reference. Table of Contents Package Contents... 1 Scanning
Quick Start Guide Please read this guide before operating this scanner. After you finish reading this guide, store it in a safe place for future reference. Table of Contents Package Contents... 1 Scanning
Boink Kiosk System Administration Manual
 Boink Kiosk System Administration Manual Last updated on May 21st, 2002 Table of Contents INTRODUCTION Boink Kiosk System...2 Safety Precautions...3 KIOSK SYSTEM NORMAL OPERATION SF6 Kiosk General Description
Vinyl Cutter Instruction Manual
 Vinyl Cutter Instruction Manual 1 Product Inventory Inventory Here is a list of items you will receive with your vinyl cutter: Product components (Fig.1-4): 1x Cutter head unit complete with motor, plastic
OKI B721/B731/MPS5501 Printer Important Information Update
 OKI B721/B731/MPS5501 Printer Important Information Update 543 Toner Sensor Error after installing a new or replacement print cartridge into the printer. Check the print cartridge for the following problem
EPSON Stylus C82. Ink Cartridges. User Replaceable Part. Media. 10/02 EPSON Stylus C82-1. Left edge guide. Right edge guide.
 Printer Parts Accessories Left edge guide Paper support Right edge guide Printer cover Output tray Ink Cartridges Cartridge Part number Black T032120 Cyan T042220 Magenta T042320 Yellow T042420 User Replaceable
Document Imaging Scanner. Advantage. SmartSource. User's Manual.
 Document Imaging Scanner SmartSource Advantage User's Manual www.digitalcheck.com Preface Copyright This document may not be reproduced or copied in any way, stored electronically, or translated into any
Scanner Parts. Scanner Specifications. General. Mechanical. Epson Perfection V200 Photo. P Power/ ] Start button Status light. { Copy button.
![Scanner Parts. Scanner Specifications. General. Mechanical. Epson Perfection V200 Photo. P Power/ ] Start button Status light. { Copy button.](/thumbs/73/68379766.jpg "Scanner Parts. Scanner Specifications. General. Mechanical. Epson Perfection V200 Photo. P Power/ ] Start button Status light. { Copy button.") Scanner Parts { Copy button Scan to E-mail button a b P Power/ ] Start button Status light c e d a Scan to PDF button Film holder Scanner Specifications General Scanner type Flatbed color Photoelectric
Scanner Parts { Copy button Scan to E-mail button a b P Power/ ] Start button Status light c e d a Scan to PDF button Film holder Scanner Specifications General Scanner type Flatbed color Photoelectric
Scanner Utility for Microsoft Windows Version 9.6. User's Guide
 P3PC-E892-03EN Scanner Utility for Microsoft Windows Version 9.6 User's Guide For Use with Microsoft Windows 98, Windows Me, Windows 2000 and Windows XP Introduction Thank you for purchasing the "Scanner
Contents. A January 2008 i
 Contents Using the High-Resolution Printer Accessory........................... 1 Printed Information................................................ 1 Configuring your print string.........................................
Operator's Guide. fi-7460/fi TOP Contents Index Introduction. Appendix Glossary P3PC ENZ0. Scanner Overview. How to Load Documents
 fi-7460/fi-7480 P3PC-5802-01ENZ0 Operator's Guide Explains the names and functions of parts and basic scanner operation. Explains how to load documents on the scanner. ner Thank you for purchasing our
F100 Tabletop Document Folder
 F100 Tabletop Document Folder 10/2018 OPERATOR MANUAL FIRST EDITION Single Fold Letter Fold Z-fold Double Fold Specifications Paper size 11" & 14" Paper weight 60g/m 2 to 90g/m 2 Some recycled paper and
Z700 Series Color Jetprinter P700 Series Photo Jetprinter
 Z700 Series Color Jetprinter P700 Series Photo Jetprinter User s Guide for Windows Setup troubleshooting A checklist to find solutions to common setup problems. Printer overview Learn about the printer
English QT V01 CANON INC PRINTED IN CHINA
 English Quick Start Guide English Please read this guide before operating this scanner. After you finish reading this guide, store it in a safe place for future reference. Table of Contents Package Contents...
Operator's Guide. fi TOP Contents Index Introduction. Appendix Glossary P3PC ENZ0. Scanner Overview. How to Load Documents
 fi-7030 P3PC-5992-02ENZ0 Operator's Guide Explains the names and functions of parts and basic scanner operation. Explains how to load documents on the scanner. ner Thank you for purchasing our image scanner.
P3PC-E677-02EN. fi-4220c Image Scanner Operator's Guide
 P3PC-E677-02EN fi-4220c Image Scanner Operator's Guide CONTENTS INTRODUCTION... v Regulatory Information... v Note, Liability... ix Safety Precautions... xi Chapter 1 BASIC SCANNER OPERATIONS... 1 1.1
User s Guide Wide Format Scanners. Model: HD Ultra series
 User s Guide Wide Format Scanners Model: HD Ultra series Contents Table of Contents About This Guide 2 Overview of Scanner 3 Scanner Front View: 3 Scanner Rear View: 4 Installation 5 System requirements
OKI C911 / 931 / 941
 OKI C911 / 931 / 941 Disassembly & Reassembly Procedures Distributed at the Oki Data C900 Series Service Classes Oki Data Training Department REV. 1.60 2000 Bishops Gate Blvd. Mt. Laurel, NJ 08054 Copyright
FUJITSU TWAIN 32 Scanner Driver
 P3PC-1472-09ENZ0 FUJITSU TWAIN 32 Scanner Driver Scanner Utility for Microsoft Windows Version 9.19 User's Guide For Use with Microsoft Windows 2000, Windows XP, Windows Server 2003, Windows Server 2008
Adhesive Application & Laminating System
 U S E R S G U I D E Adhesive Application & Laminating System The XM2500 is an economical and easy to use document finishing system. This versatile and non-electric system has been designed to laminate
Thank you for selecting the Fuji Xerox ApeosPort/ DocuCentre-V 3065/3060/2060 hereafter referred as the machine, the device or the printer.
 Features Content Thank you for selecting the Fuji Xerox ApeosPort/ DocuCentre-V 3065/3060/2060 hereafter referred as the machine, the device or the printer. This complimentary user guide describes the
P3PC ENZ0. fi-5530c2 Image Scanner Operator's Guide
 P3PC-1922-06ENZ0 fi-5530c2 Image Scanner Operator's Guide CONTENTS Chapter 1 BASIC SCANNER OPERATIONS... 1 1.1 Turning the Scanner ON... 2 1.2 Placing Documents on the ADF... 7 1.3 Scanning Documents...
Contents DS-320 User's Guide... 7 Scanner Basics... 8 Loading Originals Scanning... 37
 DS-320 User's Guide Contents DS-320 User's Guide... 7 Scanner Basics... 8 Scanner Parts Locations... 8 Scanner Parts... 8 Scanner Buttons and Lights... 11 User Replaceable Epson Scanner Parts and Accessories...
2500 Series All-In-One
 2500 Series All-In-One Getting Started December 2006 www.lexmark.com Lexmark and Lexmark with diamond design are trademarks of Lexmark International, Inc., registered in the United States and/or other
Chapter 4: Troubleshooting and Maintenance
 Training: HAPPY HCD-1501 Operations & Maintenance Chapter 4: Troubleshooting and Maintenance Basic Troubleshooting/ Sewing Interruptions Troubleshooting thread breaks 2 Maintenance and Upkeep Oiling: daily
HD-CXENVL-FDR Envelope Feeder Assembly and Operations Guide
 HD-CXENVL-FDR Envelope Feeder Assembly and Operations Guide Rev. 12-12-16 1 Table of Contents DESCRIPTION OF FUNCTION... 3 Time-out (out of paper) Feature... 3 PREPARING THE HD-CX1600/1700 (C9x1) PRINTER...
TOSHIBA E-STUDIO 166:
 specialist's guide TOSHIBA E-STUDIO 166: A MODERN OFFICE PRINTING MULTIFUNCTION TOOL. PART 2 By VLADIMIR KAMENOV In this issue of RechargEast Magazine we are continuing the analysis of e-studio 166 copier,