FC-2500 Quick Reference Guide
|
|
|
- Lenard Benson
- 5 years ago
- Views:
Transcription
1
2
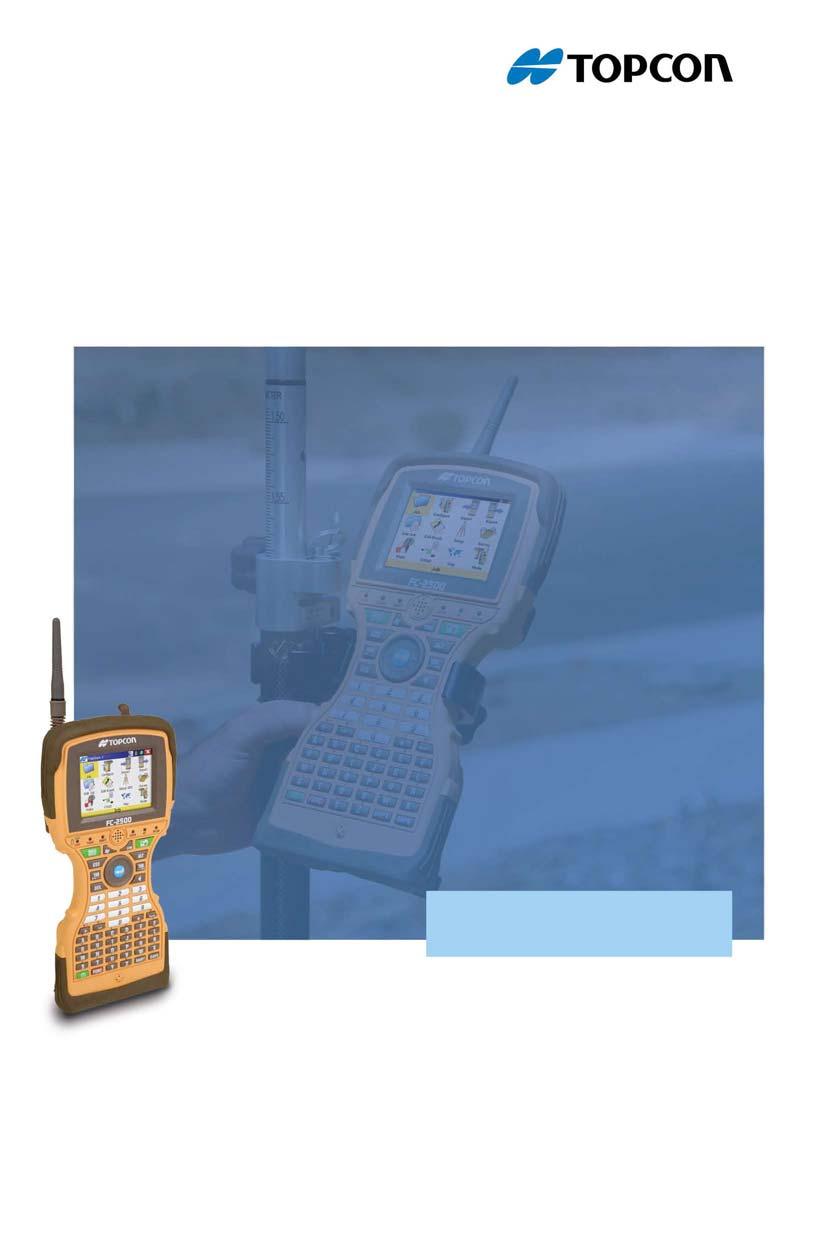
3 P O S I T I O N I N G S Y S T E M S FC-2500 Quick Reference Guide Part Number Rev A Copyright Topcon Positioning Systems, Inc. October, 2008 All contents in this manual are copyrighted by Topcon. All rights reserved. The information contained herein may not be used, accessed, copied, stored, displayed, sold, modified, published, or distributed, or otherwise reproduced without express written consent from Topcon. Topcon only sells GPS products into Precision Markets. Please go to for detailed market information.
4 ECO#3422
5 TOC Table of Contents Introduction The FC-2500 Digital Camera Components of the FC Positioning the FC Settings for the FC Getting Started Keypad Controls Camera Settings for the FC EyeSetup Menu The Viewfinder Taking a Photo Using the FC Taking Good Photos with the FC Composition Focus Exposure Color Temperature P/N i
6 Table of Contents Notes: ii FC-2500 Quick Reference Guide
. Figure 1-1.")
7 Chapter 1 Introduction The FC-2500 Digital Camera The FC-2500 is not your everyday digital camera. The same CMOS imaging technology found in many digital cameras is present in this powerful and rugged computer (Figure 1-1). Figure 1-1. The FC-2500 Hand-Held Computer Components of the FC-2500 The following are the components of the FC-2500 (Figure 1-2 on page 1-2): The FC-2500 is a 5 megapixel camera (4 megapixel processed). The FC-2500 has four illuminators that allows you to take pictures in low light conditions. The FC-2500 has two 635 nm red visible lasers that you can use to position objects and to align the FC P/N

8 Introduction Illuminators Camera Lasers Figure 1-2. Components of the FC-2500 Back View NOTE Please refer to your FC-2500 Operator s Manual for a comprehensive glossary of photography and terms, and detailed instructions on how to change the settings mentioned in this companion guide. The key to taking great pictures with the FC-2500 digital camera is learning how to properly use it. Before warming up, take the time to know the FC-2500 to make consistently great quality pictures. NOTICE For a detailed description of all FC-2500 components (including indicators and interface connections) please refer to your FC-2500 Operator s Manual. Positioning the FC-2500 The main difference between an off-the-shelf digital camera and the FC-2500 is how it is held. Whereas traditional cameras include a viewfinder and sometimes, an LCD display, the FC-2500 s display is the viewfinder that operates on a horizontal plane. Instead of holding the FC-2500 up to your eye, you hold it in front of you, about waist high (or whatever is comfortable). 1-2 FC-2500 Quick Reference Guide
9 Getting Started Settings for the FC-2500 Some settings in the FC-2500 can be changed easily while others are more complex and should be left to the programmer. Depending on your application, things such as resolution, key controls, and options to save may already be set up for you (preprogrammed). Getting Started Unlike conventional digital cameras, the FC-2500 does not have a menu system that allows users to directly change camera options, such as shutter speed and aperture. Because the FC-2500 is a computer capable of taking pictures, camera functionality is integrated into an application via eyeware. eyeware is an API that enables an application to communicate with the FC-2500 to take and store pictures. One component of eyeware enables you to do the following: Store different camera settings (shutter speed, aperture, etc.) Picture storage information Key press functions in configuration files that you can load from your application to take a picture. When you start eyeware, a configuration file is loaded. This activates the keys on the FC-2500 or you can use the buttons from your application to activate camera functions. You don t have to write an application to take pictures just yet. Preprogrammed applications within eyeware Setup allow you to take pictures until you are ready to take your own. NOTE For complete instructions on how to change and save your settings, refer to the FC-2500 Operator s Manual. P/N

10 Introduction Keypad Controls When using eyeware with a standard 55-key joystick keypad, use the default control buttons on the left when taking pictures.?? Keypads on the FC-2500 can vary. Consequently, not all the functions listed in Figure 1-3 or in Table 1-1 on page 1-4 may work as described. In addition, functions listed on certain keypads may require you to write an application interface. Figure 1-3. Key Press Character Map Table 1-1 describes the buttons on the FC-2500 and their functions. Table 1-1. FC-2500 Button Functions Icon Name Function Camera Takes a picture V L S A Viewfinder Toggle (Turns the viewfinder on and off) Lamp Toggle (Turns the lamp on and off) Shutter Toggle (Changes the shutter cycle) Aperture Toggle (Changes the aperture setting) 1-4 FC-2500 Quick Reference Guide
 Colon (:) (FUNC + O) Semicolon (;) (FUNC + P) Manual Focus Forward (Changes the focus setting forward) Manual Focus Back (Changes the focus setting backward) 4")
11 Camera Settings for the FC-2500 Table 1-1. FC-2500 Button Functions (Continued) Colon (:) (FUNC + O) Semicolon (;) (FUNC + P) Manual Focus Forward (Changes the focus setting forward) Manual Focus Back (Changes the focus setting backward) 4 Saves the current picture 1 Deletes the current picture TIP Create a custom keypad to work intuitively with your application. Camera Settings for the FC-2500 EyeSEE is the part of eyeware that allows you to create configuration files to change camera settings in your application and determine how eyeware works (Figure 1-4). Figure 1-4. eyesee Configuration Screen P/N
. Table 1-2.")
12 Introduction EyeSetup Menu To display the eyesetup menu, tap Start Programs eyeware eyesee setup. The eyesee Config screen displays. Table 1-2 on page 1-6 describes the menus on the eyesee Config screen (Figure 1-5, Figure 1-6 on page 1-7, and Figure 1-7 on page 1-7). Table 1-2. eyesetup Menu Menu Item Menu Option/Description Figure 1-5. eyesee Config Options Screen Aperture Settings FC-2500 has three aperture settings (Figure 1-5): Auto Large (F2.8) Small (F8.0) The aperture diameter is expressed in f-stops. The lower the number, the larger the aperture and the more light that passes through to the sensor. Spot Meter The viewfinder consists of nine equal sections when you press the Camera button (Figure 1-5). The FC-2500 uses the center section to measure the amount of available light and to adjust the exposure accordingly (this process is known as Spot Meter Exposure). NOTE: Spot Meter can be enabled/disabled as required for different scenarios. 1-6 FC-2500 Quick Reference Guide
.")
13 EyeSetup Menu Table 1-2. eyesetup Menu (Continued) Light Conditions Shutter Speed Figure 1-6. Camera Behavior Options Screen Enables you to configure the FC-2500 to compensate for different light conditions and environments (Figure 1-6). Select either Daylight, Cloudy, Tungsten, or Fluorescent. The speed at which the shutter operates (Figure 1-6 on page 1-7). All resolutions, except QSXGA mode uses a preset video capture mode. If you are taking pictures of fast moving objects, a higher shutter speed is recommended to prevent a blurred image. Figure 1-7. Capture Options Screen Resolution The FC-2500 has four available resolutions (Figure 1-7): 320x200 (HF) 640x480 (VGA) 1280x960 (SXVGA) 2048x1944 (QSXGA) P/N
14 Introduction The Viewfinder Press the Camera button for eyeware to: Display the viewfinder screen Automatically put the camera in focus Calculate the exposure setting By default, a red square or Region of Interest (ROI) displays in the center of the viewfinder and a status bar displays at the top. A blue exposure bar displays on the left side of the viewfinder. As the exposure changes, the blue exposure bar moves up for a brighter exposure or down for a darker exposure. When the correct exposure has been reached, the bar remains still and a green box displays. To readjust the focus, place the center of the subject within the ROI and press F4. The viewfinder automatically closes if a picture is not taken within 15 seconds.?? When the focusing process completes, a green square displays on the right side of the viewfinder. When the exposure has stabilized, a green square displays on the left side of the viewfinder (Figure 1-8). Figure 1-8. The Focusing Process 1-8 FC-2500 Quick Reference Guide
. Figure 1-9.")
. Figure 1-10.")
15 The Viewfinder If the camera is overexposed, a red square displays in the top left section of the viewfinder. In this case, the mirror finish of the license plate causes a glare (Figure 1-9 on page 1-9). Figure 1-9. An Overexposed Picture If the camera has reached an underexposure limit, a red square appears in the top left section of the viewfinder. In this case, the mirror finish of the license plate is causing a glare (Figure 1-10). Figure An Underexposed Picture P/N

16 Introduction Taking a Photo Using the FC-2500 If the viewfinder is active and both green squares are visible, press the Camera button to take a picture. If the viewfinder is not active, press the Camera button to activate the viewfinder, wait for two green squares to display, then press the Camera button again to take a picture. If you are successful in taking the picture, you can expect the following: the FC-2500 makes a beeping noise the picture displays in the viewfinder an update displays in the status bar Press 4 to save the picture or 1 to delete the picture. NOTICE If you are not successful in taking a picture, the FC-2500 makes a buzzing noise. By default, the eyeware engine saves the pictures as JPEG files in the My Documents folder. Hold the FC-2500 parallel to the ground to avoid a skewed perspective. The best way to hold the FC-2500 is in front of you, about waist high, with your arms comfortably bent (Figure 1-11 on page 1-10). Figure The Correct Way to Hold the FC FC-2500 Quick Reference Guide

17 Taking a Photo Using the FC-2500 Holding the FC-2500 out in front of you with one hand may cause your image to blur. Using a stationary object for support helps to reduce the blur (Figure 1-12). Figure Reduce Blur by Using a Stationary Support WARNING Remember! The Beep is your friend! Don t move until you hear the Beep! Taking Good Photos with the FC-2500 There are four basic elements to consider to take good photos. Composition Focus Exposure Color Temperature P/N
18 Introduction Composition Composition is how the subject is presented in the frame of the photograph. While basically artistic, composition is important because it affects the focus and exposure of the picture taken. Figure Top Half and Part of Rear is Cut Off To avoid the frustration of realizing you have cropped out the important details of a picture (Figure 1-13), do the following: Be certain that your main subject is in the center of the viewfinder. There should be about 10% of white space around the subject. Use the ROI square as a guide. If your ROI square falls on a bright spot or a dark spot, move slightly to find a neutral zone. Figure 1-14 shows an improved image of Figure 1-10 above. Figure Full Image of Truck CAUTION Some cropping will occur on the sides of your final image. Make sure that you capture your entire subject, then take a step back FC-2500 Quick Reference Guide

19 Taking a Photo Using the FC-2500 Focus Focus is the sharpness of the photograph. Images that are out of focus lose detail and can appear blurry. Poor focus can be the result of one of the following: not waiting for the green focus indicator incorrect manual adjustment of the focus motion blur The right focus determines whether your picture comes out blurry or crystal clear. NOTICE Things such as muscle fatigue, too much caffeine, and impatience can cause you to lose focus in your picture. To avoid blurry pictures do the following: Freeze! Do your best to stay completely still until you hear the BEEP! Use a tripod or brace your hands on a sturdy object like a table when photographing moving objects. The photograph shown in Figure 1-15 is out of focus. Details are not visibly clear. Out of Focus Figure Example of an Out of Focus Picture P/N
20 Introduction The photograph shown in Figure 1-16 shows motion blur. Chances are that the FC-2500 was not held still while taking the photograph. Motion Blur Figure Example of Motion Blur The photograph in Figure 1-17 is in focus. The edges are sharp. To achieve an excellent photograph you must have a steady hand and stand as still as possible. In Focus Figure Example of a Photograph That is in Focus 1-14 FC-2500 Quick Reference Guide
21 Taking a Photo Using the FC-2500 Depth of Field Depth of Field (DOF) is the distance wherein objects are in focus. To have objects both close and far from you in focus (known as a great depth of field), you need to set up the FC-2500 to use the small aperture setting of F8.0. The focus is equally distributed between foreground and background (Figure 1-18). Figure Great Depth of Field To have the subject in sharp focus while keeping the background out of focus (known as a shallow depth of field), you need to set up the FC-2500 to use the large aperture setting of F2.8. The focus is on the background (Figure 1-19 on page 1-16). P/N

22 Introduction Figure Shallow Depth of Field TIP If you have difficulty achieving the correct Depth of Field, move back from your subject and try again. Exposure Exposure controls the brightness of the photograph. Underexposure is a common problem indoors, and overexposure is a common problem outdoors. This section identifies and corrects any problems you may have with exposure. As with all cameras, getting the right exposure can be tricky, especially when dealing with bright light sources or a mix of light sources and shadows. Once you become familiar with how the FC-2500 reacts to certain environments, you can fine tune your settings appropriately. Do the following to avoid underexposure or overexposure: The main reason for incorrect exposure is using the wrong settings. Centering your ROI square on a light bulb, the sun, or any other source of light causes a severe overexposure and in turn, an underexposure in the surrounding areas. Centering your ROI square on a very dark area causes the rest of the photo to be overexposed FC-2500 Quick Reference Guide
23 Taking a Photo Using the FC-2500 Table 1-3 describes what setting you should use depending upon the light conditions of your picture. Table 1-3. Light Condition Settings Light Condition Setting Daylight Cloudy Tungsten Fluorescent Circumstance of Use Parking lots, on the water, extremely bright indoor locations Overcast or rainy weather, in the woods, in the shade Where regular household lamps are used, by candlelight. Public buildings where overhead lights are used. Indoor When indoors, select either Tungsten or Fluorescent in your Light Condition setting: Bright light from a window can make your picture appear too dark. The quality of indoor pictures taken during daylight hours can be greatly improved by providing as much ambient light as possible. Placing your subject in front of a bright window will leave them silhouetted against the bright light. In most cases, the light often appears too bright and your subject appears too dark. Take advantage of indirect, ambient light from lamps, overhead lights, or candles instead. P/N


24 Introduction Figure Underexposed with Insufficient Light to Show Details Figure Improved Image with Sufficient Light to Show Details TIP Change your illumination settings in eyesee setup. Please refer to your eye.ware Users Guide for instructions FC-2500 Quick Reference Guide
 by slightly moving the FC-2500 up and down or side to")
25 Taking a Photo Using the FC-2500 Outdoor When taking pictures outdoors, select Daylight or Cloudy in the Light Condition setting. When working in bright sunlight, avoid taking pictures if glare appears on the viewfinder (such as taking pictures of windshields or windows) by slightly moving the FC-2500 up and down or side to side until you find a good angle that produces little or no glare. Pay attention to the sun! If the sun is shining from the side or in front of you, you may end up with extreme dark and light areas. Standing with the sun behind you may eliminate extreme light and dark, but could produce glare on shiny objects. Try different locations around your subject to find the sweet spot. In extremely bright sun, you may need to block the screen with your hand for better visibility. The photograph in Figure 1-22 is overexposed. The detail in the wheel is lost and there are areas where the light is so bright that features are lost. Notice the seam of the door above the wheel. It seems to disappear. When this picture was taken, the sun was behind the FC Figure Example of an Overexposed Photograph P/N

26 Introduction Figure 1-23 shows a second example of an overexposed picture. The hood of the vehicle is overexposed and there are several bright spots hiding detail. When this picture was taken, a red box displayed on the upper left of the viewfinder indicating overexposure. If you examine this photograph, you will see that the sun is in front of the FC Figure The Hood is Overexposed The photograph in Figure 1-24 on page 1-21 is properly exposed. There is a small amount of glare in the tail light lens but the detail of the lens is visible. The wheel detail is visible FC-2500 Quick Reference Guide

27 Taking a Photo Using the FC-2500 Figure Example of a Photograph with the Right Exposure CAUTION Angling the FC-2500 to avoid glare or bright spots may result in a skewed perspective. Color Temperature Color temperature deals with the color characteristics of a light source. Not all sources of light are the same in this respect. A light source such as an ordinary light bulb has a low color temperature (more yellow/red light), while sunlight has a higher color temperature (more blue light). As a result, you must adjust the FC-2500 for indoor lighting versus daylight conditions. There are four color temperature settings to choose from: Daylight Cloudy Tungsten Fluorescent If your photos look similar to the photographs that follow, you should change your current lighting conditions. P/N
. The highlights on the eggs have a greenish tint to them. Overall, the photograph has a greenish tint.")
28 Introduction Daylight is usually the whitest light source. Fluorescent light typically produces a blue or green tint, while Tungsten lamps produce a red or orange tint. This photograph was taken in fluorescent light with the FC-2500 set to Daylight (Figure 1-25). The highlights on the eggs have a greenish tint to them. Overall, the photograph has a greenish tint. Figure Example of FC-2500 Set to Daylight The photograph in Figure 1-26 on page 1-23 is the opposite of the one shown above. It was taken in daylight with the FC-2500 set to Fluorescent. The result is an overall bluish tint FC-2500 Quick Reference Guide


29 Taking a Photo Using the FC-2500 Figure Example of FC-2500 Set to Fluorescent A surrealistic image resulted when taking a daylight photograph with the FC-2500 set to Tungsten in Figure Figure Example of FC-2500 Set to Tungsten The photograph in Figure 1-28 on page 1-24 was taken with the correct color temperature. Compare the chrome bumper on the vehicle with other photographs. P/N

30 Introduction Figure Example of Photo Taken with the Correct Color Temperature NOTE Practice makes perfect. The more comfortable you are with the FC-2500, the better your photographs will be FC-2500 Quick Reference Guide
31 Notes: Notes
32 Notes: Notes
33
34 Topcon Positioning Systems, Inc National Drive, Livermore, CA ISO 9001:2000 FM FC-2500 Quick Reference Guide P/N: Rev A 010/ Topcon Corporation All rights reserved. No unauthorized duplication.
DIGITAL PHOTOGRAPHY CAMERA MANUAL
 DIGITAL PHOTOGRAPHY CAMERA MANUAL TABLE OF CONTENTS KNOW YOUR CAMERA...1 SETTINGS SHUTTER SPEED...2 WHITE BALANCE...3 ISO SPEED...4 APERTURE...5 DEPTH OF FIELD...6 WORKING WITH LIGHT CAMERA SETUP...7 LIGHTING
These aren t just cameras
 Roger Easley 2016 These aren t just cameras These are computers. Your camera is a specialized computer Creates files of data Has memory Has a screen display Has menus of options for you to navigate Your
CAMERA BASICS. Stops of light
 CAMERA BASICS Stops of light A stop of light isn t a quantifiable measurement it s a relative measurement. A stop of light is defined as a doubling or halving of any quantity of light. The word stop is
However, it is always a good idea to get familiar with the exposure settings of your camera.
 296 Tips & tricks for digital photography Light Light is the element of photography. In other words, photos are simply light captured from the world around us. This is why bad lighting and exposure are
Photography Help Sheets
 Photography Help Sheets Phone: 01233 771915 Web: www.bigcatsanctuary.org Using your Digital SLR What is Exposure? Exposure is basically the process of recording light onto your digital sensor (or film).
A Beginner s Guide To Exposure
 A Beginner s Guide To Exposure What is exposure? A Beginner s Guide to Exposure What is exposure? According to Wikipedia: In photography, exposure is the amount of light per unit area (the image plane
Shooting Manual. Set your shooting mode to M
 Shooting Manual WHY Shooting Manual Set your shooting mode to M Shooting Manual 3 variables that determine your exposure: 1. ISO 2. Aperture 3. Shutter Speed Shooting Manual 1. ISO The camera s general
Photography 2. how to be a BETTER photographer
 Photography 2 how to be a BETTER photographer Layering In story-telling through Photo-Journalism, secondary elements add to your story-telling power. FOREGROUND ELEMENTS BACKGROUND ELEMENTS Angle Shooting
TAKING BETTER PHOTOS ON ANY DEVICE
 TAKING BETTER PHOTOS ON ANY DEVICE Sarah Dudik Public Information & Marketing HOW TO TAKE BETTER PHOTOGRAPHS The device you use isn t as important as how you are looking through it Any device can be used
LITESTAGE USER'S GUIDE
 LITESTAGE USER'S GUIDE Note: This is a general user's guide for all of the Litestage models. Equipment shown is not included on all models. For more information on additional equipment and accessories,
Chapter 6-Existing Light Photography
 Chapter 6-Existing Light Photography All of these images were taken with available light. Painting with light-using available light Photography that includes artificial light which naturally exists in
BASIC IMAGE RECORDING
 BASIC IMAGE RECORDING BASIC IMAGE RECORDING This section describes the basic procedure for recording an image. Recording an Image Aiming the Camera Use both hands to hold the camera still when shooting
PTC School of Photography. Beginning Course Class 2 - Exposure
 PTC School of Photography Beginning Course Class 2 - Exposure Today s Topics: What is Exposure Shutter Speed for Exposure Shutter Speed for Motion Aperture for Exposure Aperture for Depth of Field Exposure
èõ Changing Recording Modes Text Mode Continuous Shooting Mode Changing Flash Modes Flash Off Mode Auto Mode...
 3 ADVANCED SHOOTING Chapter ëêå@å@ èõ Changing Recording Modes... 52 Text Mode... 52 Continuous Shooting Mode... 53 Changing Flash Modes... 55 Flash Off Mode... 56 Auto Mode... 57 Forced Flash Mode...
FOCUS, EXPOSURE (& METERING) BVCC May 2018
 BVCC May 2018") FOCUS, EXPOSURE (& METERING) BVCC May 2018 SUMMARY Metering in digital cameras. Metering modes. Exposure, quick recap. Exposure settings and modes. Focus system(s) and camera controls. Challenges & Experiments.
FOCUS, EXPOSURE (& METERING) BVCC May 2018 SUMMARY Metering in digital cameras. Metering modes. Exposure, quick recap. Exposure settings and modes. Focus system(s) and camera controls. Challenges & Experiments.
Camera controls. Aperture Priority, Shutter Priority & Manual
 Camera controls Aperture Priority, Shutter Priority & Manual Aperture Priority In aperture priority mode, the camera automatically selects the shutter speed while you select the f-stop, f remember the
Suggested FL-36/50 Flash Setups By English Bob
 Suggested FL-36/50 Flash Setups By English Bob Over a period of time I've experimented extensively with the E system and its flash capabilities and put together suggested flash setups for various situations.
Introduction to camera usage. The universal manual controls of most cameras
 Introduction to camera usage A camera in its barest form is simply a light tight container that utilizes a lens with iris, a shutter that has variable speeds, and contains a sensitive piece of media, either
!"#$%&'!( The exposure is achieved by the proper combination of light intensity (aperture) and duration of light (shutter speed) entering the camera.!
 and duration of light (shutter speed) entering the camera.!") The term exposure refers to the amount of light required to properly expose an image to achieve the desired amount of detail in all areas of the image.! The exposure is achieved by the proper combination
The term exposure refers to the amount of light required to properly expose an image to achieve the desired amount of detail in all areas of the image.! The exposure is achieved by the proper combination
1. This paper contains 45 multiple-choice-questions (MCQ) in 6 pages. 2. All questions carry equal marks. 3. You can take 1 hour for answering.
 in 6 pages. 2. All questions carry equal marks. 3. You can take 1 hour for answering.") UNIVERSITY OF MORATUWA, SRI LANKA FACULTY OF ENGINEERING END OF SEMESTER EXAMINATION 2007/2008 (Held in Aug 2008) B.Sc. ENGINEERING LEVEL 2, JUNE TERM DE 2290 PHOTOGRAPHY Answer ALL questions in the answer
UNIVERSITY OF MORATUWA, SRI LANKA FACULTY OF ENGINEERING END OF SEMESTER EXAMINATION 2007/2008 (Held in Aug 2008) B.Sc. ENGINEERING LEVEL 2, JUNE TERM DE 2290 PHOTOGRAPHY Answer ALL questions in the answer
English PRO-642. Advanced Features: On-Screen Display
 English PRO-642 Advanced Features: On-Screen Display 1 Adjusting the Camera Settings The joystick has a middle button that you click to open the OSD menu. This button is also used to select an option that
Camera Exposure Modes
 What is Exposure? Exposure refers to how bright or dark your photo is. This is affected by the amount of light that is recorded by your camera s sensor. A properly exposed photo should typically resemble
Glossary of Terms (Basic Photography)
") Glossary of Terms (Basic ) Ambient Light The available light completely surrounding a subject. Light already existing in an indoor or outdoor setting that is not caused by any illumination supplied by
Glossary of Terms (Basic ) Ambient Light The available light completely surrounding a subject. Light already existing in an indoor or outdoor setting that is not caused by any illumination supplied by
Love Your Camera (Introduction to D-SLR)
") Love Your Camera (Introduction to D-SLR) Photography Workshops and Tours in New York City Phone: (646) 736-3231 Email: info@rememberforever.co Web: www.rememberforever.co Copyright 2009-2013 - Remember
Love Your Camera (Introduction to D-SLR) Photography Workshops and Tours in New York City Phone: (646) 736-3231 Email: info@rememberforever.co Web: www.rememberforever.co Copyright 2009-2013 - Remember
OUTDOOR PORTRAITURE WORKSHOP
 OUTDOOR PORTRAITURE WORKSHOP SECOND EDITION Copyright Bryan A. Thompson, 2012 bryan@rollaphoto.com Goals The goals of this workshop are to present various techniques for creating portraits in an outdoor
DIGITAL PHOTOGRAPHY FOR OBJECT DOCUMENTATION GOOD, BETTER, BEST
 DIGITAL PHOTOGRAPHY FOR OBJECT DOCUMENTATION GOOD, BETTER, BEST INTRODUCTION This document will introduce participants in the techniques and procedures of collection documentation without the necessity
Elements of Exposure
 Elements of Exposure Exposure refers to the amount of light and the duration of time that light is allowed to expose film or a digital-imaging sensor. Exposure is controlled by f-stop, shutter speed, and
aperture, shutter speed
 CUDGEGONG C A M E R A C L U B aperture, shutter speed and ISO exposure When you think of the craft or art of photography, you must immediately think of exposure. Exposure is a critical element that determines
Drive Mode. Details for each of these Drive Mode settings are discussed below.
 Chapter 4: Shooting Menu 67 When you highlight this option and press the Center button, a menu appears at the left of the screen as shown in Figure 4-20, with 9 choices represented by icons: Single Shooting,
PHOTOGRAPHER S GUIDE TO THE PANASONIC LUMIX LX7
 PHOTOGRAPHER S GUIDE TO THE PANASONIC LUMIX LX7 In Intelligent Auto, Creative Control, and Scene shooting modes, ISO is set to Auto and the ISO button has no effect for controlling this setting. You also
First Things First 1) Charge the Battery
 Charge the Battery") 1 First Things First 1) Charge the Battery 2) Turn Off Notification Sounds Recommended: Canon BP-828 Optional 3-4hr Battery Touch FUNC Touch MENU Touch Wrench Folder Scroll to Notification Sounds & Touch
1 First Things First 1) Charge the Battery 2) Turn Off Notification Sounds Recommended: Canon BP-828 Optional 3-4hr Battery Touch FUNC Touch MENU Touch Wrench Folder Scroll to Notification Sounds & Touch
One Week to Better Photography
 One Week to Better Photography Glossary Adobe Bridge Useful application packaged with Adobe Photoshop that previews, organizes and renames digital image files and creates digital contact sheets Adobe Photoshop
Beyond the Basic Camera Settings
 Beyond the Basic Camera Settings ISO: the measure of a digital camera s sensitivity to light APERTURE: the size of the opening in the lens when a picture is taken SHUTTER SPEED: the amount of time that
General Camera Settings
 Tips on Using Digital Cameras for Manuscript Photography Using Existing Light June 13, 2016 Wayne Torborg, Director of Digital Collections and Imaging, Hill Museum & Manuscript Library The Hill Museum
Basic Camera Craft. Roy Killen, GMAPS, EFIAP, MPSA. (c) 2016 Roy Killen Basic Camera Craft, Page 1
 2016 Roy Killen Basic Camera Craft, Page 1") Basic Camera Craft Roy Killen, GMAPS, EFIAP, MPSA (c) 2016 Roy Killen Basic Camera Craft, Page 1 Basic Camera Craft Whether you use a camera that cost $100 or one that cost $10,000, you need to be able
Basic Camera Craft Roy Killen, GMAPS, EFIAP, MPSA (c) 2016 Roy Killen Basic Camera Craft, Page 1 Basic Camera Craft Whether you use a camera that cost $100 or one that cost $10,000, you need to be able
Presented by Craig Stocks Arts by Craig Stocks Arts
 Presented by Craig Stocks Arts www.craigstocksarts.com 2010 by Craig Stocks Arts Basic camera settings for point and shoot cameras (resolution, quality) Resolution - how much can you enlarge a picture?
OTHER RECORDING FUNCTIONS
 OTHER RECORDING FUNCTIONS This chapter describes the other powerful features and functions that are available for recording. Exposure Compensation (EV Shift) Exposure compensation lets you change the exposure
1 / 9
 WWW.RICHIEHUG.COM 1 / 9 A Beginner's Guide to Digital Photography Version 1.2 By Richie Hug November 24, 2016. Most people owning a digital camera have never used other settings than just the AUTO mode.
Photomanual TGJ-3MI. By: Madi Glew
 Photomanual TGJ-3MI By: Madi Glew i Table of Contents Getting to know Your Camera... 1 Shutter Speed... 3 White Balance... 4 Depth of Field... 5 Aperture Settings... 7 ISO (Film Speed)... 9 3-Point Portrait
PHOTOGRAPHING THE ELEMENTS
 PHOTOGRAPHING THE ELEMENTS PHIL MORGAN FOR SOUTH WEST STORM CHASERS CONTENTS: The basics of exposure: Page 3 ISO: Page 3 Aperture (with examples): Pages 4-7 Shutter speed: Pages 8-9 Exposure overview:
User Manual ES9/ES8. Click a topic. Basic troubleshooting. Quick reference. Contents. Basic functions. Extended functions.
 This user manual includes detailed usage instructions for your camera. Please read this manual thoroughly. Click a topic User Manual ES9/ES8 Basic troubleshooting Quick reference Contents Basic functions
Understanding Your Camera 2: UUU200
 Understanding Your Camera 2: UUU200 Your 2 Understanding Camera Your Understanding Camera 2 Exposure & Metering Metering & Exposure Objective Objective After completing this class, the student will have
DSLR Essentials: Class Notes
 DSLR Essentials: Class Notes The digital SLR has seen a surge in popularity in recent years. Many are enjoying the superior photographic experiences provided by these feature packed cameras. Interchangeable
Name Digital Imaging I Chapters 9 12 Review Material
 Name Digital Imaging I Chapters 9 12 Review Material Chapter 9 Filters A filter is a glass or plastic lens attachment that you put on the front of your lens to protect the lens or alter the image as you
Lighting Techniques 18 The Color of Light 21 SAMPLE
 Advanced Evidence Photography Contents Table of Contents General Photographic Principles. 2 Camera Operation 2 Selecting a Lens 2 Focusing 3 Depth of Field 4 Controlling Exposure 6 Reciprocity 7 ISO Speed
Intro to Digital SLR and ILC Photography Week 1 The Camera Body
 Intro to Digital SLR and ILC Photography Week 1 The Camera Body Instructor: Roger Buchanan Class notes are available at www.thenerdworks.com Course Outline: Week 1 Camera Body; Week 2 Lenses; Week 3 Accessories,
gfm-app.com User Manual
 gfm-app.com User Manual 03.07.16 CONTENTS 1. MAIN CONTROLS Main interface 3 Control panel 3 Gesture controls 3-6 2. CAMERA FUNCTIONS Exposure 7 Focus 8 White balance 9 Zoom 10 Memory 11 3. AUTOMATED SEQUENCES
By Mark Schutzer Coast Division Meet June 2013 Copies of this presentation can be found at
 Model lph Photography h By Mark Schutzer Coast Division Meet June 2013 Copies of this presentation can be found at http://www.markschutzer.com com Model Photography Clinic Overview This clinic will discuss
Introduction to Digital Photography
 Introduction to Digital Photography with Nick Davison Photography is The mastering of the technical aspects of the camera combined with, The artistic vision and creative know how to produce an interesting
Take Control of Your Camera
 Take Control of Your Camera With all of the technology packed into our cameras, it is easy to hand over control & blame our equipment when our images don t meet our expectations.. In this workshop we will
Name Digital Imaging I History of Photography and Chapters 1 5 Review Material
 Name Digital Imaging I History of Photography and Chapters 1 5 Review Material History of Photography The two main countries involved in the discovery of photography were France and England. In 1727 Johann
by Don Dement DPCA 3 Dec 2012
 by Don Dement DPCA 3 Dec 2012 Basic tips for setup and handling Exposure modes and light metering Shooting to the right to minimize noise 11/17/2012 Don Dement 2012 2 Many DSLRs have caught up to compacts
By Mark Schutzer PCR Regional Convention, Fremont, CA April 2009 Copies of this presentation can be found at
 Model lph Photography h By Mark Schutzer PCR Regional Convention, Fremont, CA April 2009 Copies of this presentation can be found at http://www.markschutzer.com com Model Photography Clinic Overview This
ONE OF THE MOST IMPORTANT SETTINGS ON YOUR CAMERA!
 Chapter 4-Exposure ONE OF THE MOST IMPORTANT SETTINGS ON YOUR CAMERA! Exposure Basics The amount of light reaching the film or digital sensor. Each digital image requires a specific amount of light to
OTHER RECORDING FUNCTIONS
 OTHER RECORDING FUNCTIONS This chapter describes the other powerful features and functions that are available for recording. Exposure Compensation (EV Shift) Exposure compensation lets you change the exposure
ISO 200 1/500 sec. f/11 82mm lens
 4 ISO 200 1/500 sec. f/11 82mm lens The Creative Zone Taking Your Photography to the Next Level The Creative zone is the name given by Canon to the shooting modes that offer you the greatest amount of
BASIC IMAGE RECORDING
 BASIC IMAGE RECORDING BASIC IMAGE RECORDING This section describes the basic procedure for recording an image. Recording a Simple Snapshot The camera s Program AE Mode (P Mode) is for simple snapshots.
Fact sheet: Documenting artworks
 Fact sheet: Documenting artworks A key skill you need as an emerging visual artist is to take photographs of your artwork. An outline of how to use your camera and key considerations in taking photos follows.
Photographing Your Projects
 Photographing Your s Show your work at its best by John Blackford & Paul Anthony Part of the satisfaction of working wood is showing off your projects. And in this Internet age of social media, that often
Working with your Camera
 Topic 6 White Balance Learning Outcomes In this topic, you will learn about the role of white balance in your photography and what this means for you when working with colour on your DSLR. Light Light
ROAD TO THE BEST ALPR IMAGES
 ROAD TO THE BEST ALPR IMAGES INTRODUCTION Since automatic license plate recognition (ALPR) or automatic number plate recognition (ANPR) relies on optical character recognition (OCR) of images, it makes
User Manual ST65/ST67. Click a topic. Basic troubleshooting. Quick reference. Contents. Basic functions. Extended functions.
 This user manual includes detailed usage instructions for your camera. Please read this manual thoroughly. Click a topic User Manual ST65/ST67 Basic troubleshooting Quick reference Contents Basic functions
Dusk Photography. The Blue 15 minutes. Presented to Charlottesville Camera Club June 29, 2011 Deb Snelson 2011
 Dusk Photography The Blue 15 minutes Presented to Charlottesville Camera Club June 29, 2011 Deb Snelson 2011 It s All about When Gorgeous Blue sky Only lasts about 15 minutes Cannot be seen by the naked
Photography Basics. Exposure
 Photography Basics Exposure Impact Voice Transformation Creativity Narrative Composition Use of colour / tonality Depth of Field Use of Light Basics Focus Technical Exposure Courtesy of Bob Ryan Depth
Travel Photography & Advanced Photographic Techniques
 Travel Photography & Advanced Photographic Techniques Presented by Tallahassee Senior Center Volunteer Instructor: Dr. Mike Francis Email: drmikef@comcast.net Website: http://www.maf1.com/dcc 2006-2016
L I F E L O N G L E A R N I N G C O L L A B O R AT I V E - FA L L S N A P I X : P H O T O G R A P H Y
 L I F E L O N G L E A R N I N G C O L L A B O R AT I V E - F A L L 2 0 1 8 SNAPIX: PHOTOGRAPHY SNAPIX OVERVIEW Introductions Course Overview 2 classes on technical training 3 photo shoots Other classes
CHAPTER 7 - HISTOGRAMS
 CHAPTER 7 - HISTOGRAMS In the field, the histogram is the single most important tool you use to evaluate image exposure. With the histogram, you can be certain that your image has no important areas that
Photography for the Lighting Designer
 Photography for the Lighting Designer Lighting designers not only have the challenge of creating emotion, space, motion, and a pretty image but we also have the challenge of selling our services to the
How to combine images in Photoshop
 How to combine images in Photoshop In Photoshop, you can use multiple layers to combine images, but there are two other ways to create a single image from mulitple images. Create a panoramic image with
Unlimited Membership - $ The Unlimited Membership is an affordable way to get access to all of Open Media's community resouces.
 Introduction to Digital Photography Introduction: Your name, where you work, how did you hear about DOM, any relevant experience, why do you want to learn to shoot video with your DSLR camera? Purpose
FIM FUNDAMENTALS OF FILMMAKING CINEMATOGRAPHY
 Color Temperature and Filters SCHOOL OF FILMMAKING 1533 S. Main Street Winston-Salem, North Carolina 27127 FIM 1801 - FUNDAMENTALS OF FILMMAKING CINEMATOGRAPHY So what is color temperature and why is it
How to Photograph Your 3D Artwork. An Introduction
 How to Photograph Your 3D Artwork An Introduction 1 Why do Artists Photograph Their Artwork? Artists generally want photograph their work for some or all of the following - Digital Submission, Presentations,
Cover Story SOUMYA MAITRA. photographer, photoshop, or, even the model...it s all about The Light.
 Cover Story SOUMYA MAITRA IIt s t nott th the camera, iit s t nott th the llens, it it s nott th the photographer, photoshop, or, even the model...it s all about The Light. I N today s digital world, most
As can be seen in the example pictures below showing over exposure (too much light) to under exposure (too little light):
 to under exposure (too little light):") Hopefully after we are done with this you will resist any temptations you may have to use the automatic settings provided by your camera. Once you understand exposure, especially f-stops and shutter speeds,
Hopefully after we are done with this you will resist any temptations you may have to use the automatic settings provided by your camera. Once you understand exposure, especially f-stops and shutter speeds,
Get the Shot! Photography + Instagram Workshop September 21, 2013 BlogPodium. Saturday, 21 September, 13
 Get the Shot! Photography + Instagram Workshop September 21, 2013 BlogPodium Part One: Taking your camera off manual Technical details Common problems and how to fix them Practice Ways to make your photos
Aperture Priority Mode
 Chapter 3: Shooting Modes for Still Images 23 The Program Shift function is available only in Program mode; it works as follows. Once you have aimed the camera at your subject, the camera displays its
Film exposure speaks to the amount of light that strikes the film when you press the shutter button to make a picture. Correct exposure depends on
 Film Exposure Film exposure speaks to the amount of light that strikes the film when you press the shutter button to make a picture. Correct exposure depends on letting just enough light to enter the camera
Digital 1! Course Notes.
 Digital 1 Course Notes Anatomy of a DSLR Light' Enters' Camera 1. Lenshood: Used to control additional light entering the lens. 2. UV filter that is purchased separately from the lens. Screws onto the
This has given you a good introduction to the world of photography, however there are other important and fundamental camera functions and skills
 THE DSLR CAMERA Before we Begin For those of you who have studied photography the chances are that in most cases you have been using a digital compact camera. This has probably involved you turning the
BASIC CAMERA TECHNIQUES. (An Overview)
") BASIC CAMERA TECHNIQUES (An Overview) CONTENTS pg No. Digital Camera Basics - A primer 4 Pixels 4 Pixel Count Aspect Ratio White Balance Sensitivity Digital Zoom and Optical Zoom Setup mode 8 Focus modes
BASIC CAMERA TECHNIQUES (An Overview) CONTENTS pg No. Digital Camera Basics - A primer 4 Pixels 4 Pixel Count Aspect Ratio White Balance Sensitivity Digital Zoom and Optical Zoom Setup mode 8 Focus modes
Photographing Marquetry Revisited Again By Dave Peck
 Photographing Marquetry Revisited Again By Dave Peck This article was originally published in a fall 1996 issue of Marquetry Society of America. It was revised for the Spring 2009 issue of the American
Using Auto FP High-Speed Sync to Illuminate Fast Sports Action
 Using Auto FP High-Speed Sync to Illuminate Fast Sports Action by Today s sports photographer not only needs to capture the action, but oftentimes produce a unique feature image for a client. Using Nikon
Impact With Smartphone Photography. Smartphone Camera Handling. A Smartphone for Serious Photography?
 A Smartphone for Serious Photography? DSLR technically superior but photo quality depends on technical skill, creative vision Smartphone cameras can produce remarkable pictures always at ready After all
Introduction to 2-D Copy Work
 Introduction to 2-D Copy Work What is the purpose of creating digital copies of your analogue work? To use for digital editing To submit work electronically to professors or clients To share your work
SPOT METERING. Copyright Hairy Goat Ltd 2015 Ä
 How to fine tune your exposure with spot metering Metering is often something that leads to great confusion in newbie photographers (and often in more experienced ones, too). Basically, metering refers
Portraiture. Landscape. Still Life. Macro. Suggested Galleries: Wildlife. National Portrait Gallery. Architecture. Photographers Gallery.
 + + A - Level Photography provides students with opportunities to develop personal responses to ideas, observations, experiences, environments and cultures through practical, critical and contextual forms
The Essential Guide To Advanced EOS Features. Written by Nina Bailey. Especially for Canon EOS cameras
 The Essential Guide To Advanced EOS Features Written by Nina Bailey Especially for Canon EOS cameras Introduction 2 Written, designed and images by Nina Bailey www.eos-magazine.com/ebooks/es/ Produced
Creating Stitched Panoramas
 Creating Stitched Panoramas Here are the topics that we ll cover 1. What is a stitched panorama? 2. What equipment will I need? 3. What settings & techniques do I use? 4. How do I stitch my images together
Technical Guide Technical Guide
 Technical Guide Technical Guide Introduction This Technical Guide details the principal techniques used to create two of the more technically advanced photographs in the D800/D800E catalog. Enjoy this
FUNDAMENTALS OF DIGITAL PHOTOGRAPHY FOR FIRE INVESTIGATORS
 FUNDAMENTALS OF DIGITAL PHOTOGRAPHY FOR FIRE INVESTIGATORS Ryan M Cox, B.Sc. FPET, CFEI, CFI, CFPS Kodiak Fire & Safety Consulting, USA ABSTRACT A photograph is worth 1000 words is a saying that is believed
Eileen Donelan. What s in my Camera Bag? Minimum Camera Macro Lens Cable Release Tripod
 Close Up Photography Creating Artistic Floral Images Eileen Donelan Equipment Choices for Close Up Work What s in my Camera Bag? Minimum Camera Macro Lens Cable Release Tripod Additional Light Reflector
Using Your Camera's Settings: Program Mode, Shutter Speed, and More
 Using Your Camera's Settings: Program Mode, Shutter Speed, and More Here's how to get the most from Program mode and use an online digital SLR simulator to learn how shutter speed, aperture, and other
How to photograph small to medium 2-D artwork
 University of Colorado at Boulder Department of Art & Art History Lia Pileggi Lia.Pileggi@colorado.edu http://cuart.colorado.edu/resources/vrc/ How to photograph small to medium 2-D artwork Hanging your
ES90/ES91. Click a topic. Basic Troubleshooting. Quick reference. Contents. Basic functions. Extended functions. Shooting options.
 This user manual includes detailed usage instructions for your camera. Please read this manual thoroughly. Click a topic Basic Troubleshooting Quick reference Contents Basic functions Extended functions
Introduction... 3 Why use the SpyderCUBE... 4 Photographing the SpyderCUBE... 5 Selecting the White Point in your Software... 6 Setting the contrast
 User Guide Introduction... 3 Why use the SpyderCUBE... 4 Photographing the SpyderCUBE... 5 Selecting the White Point in your Software... 6 Setting the contrast range in your image... 9 Apply Settings to
Capturing Realistic HDR Images. Dave Curtin Nassau County Camera Club February 24 th, 2016
 Capturing Realistic HDR Images Dave Curtin Nassau County Camera Club February 24 th, 2016 Capturing Realistic HDR Images Topics: What is HDR? In Camera. Post-Processing. Sample Workflow. Q & A. Capturing
ACTION AND PEOPLE PHOTOGRAPHY
 ACTION AND PEOPLE PHOTOGRAPHY These notes are written to complement the material presented in the Nikon School of Photography Action and People Photography class. Helpful websites: Nikon USA Nikon Learn
TABLETOP WORKSHOP. Janet Steyer
 QUALITIES OF LIGHT There are 6 qualities of light. TABLETOP WORKSHOP Janet Steyer 03-19-05 The first 3 QUALITIES OF LIGHT can be measured. They can also be manipulated after a photograph is taken. You
This histogram represents the +½ stop exposure from the bracket illustrated on the first page.
 Washtenaw Community College Digital M edia Arts Photo http://courses.wccnet.edu/~donw Don W erthm ann GM300BB 973-3586 donw@wccnet.edu Exposure Strategies for Digital Capture Regardless of the media choice
Understanding White Balance
 You are here: Home > Tutorials > Understanding White Balance [ Normal View ] Understanding White Balance If you come from the world of films, you may remember using filters to correct for incandescent