How to photograph small to medium 2-D artwork
|
|
|
- Barry Wood
- 6 years ago
- Views:
Transcription
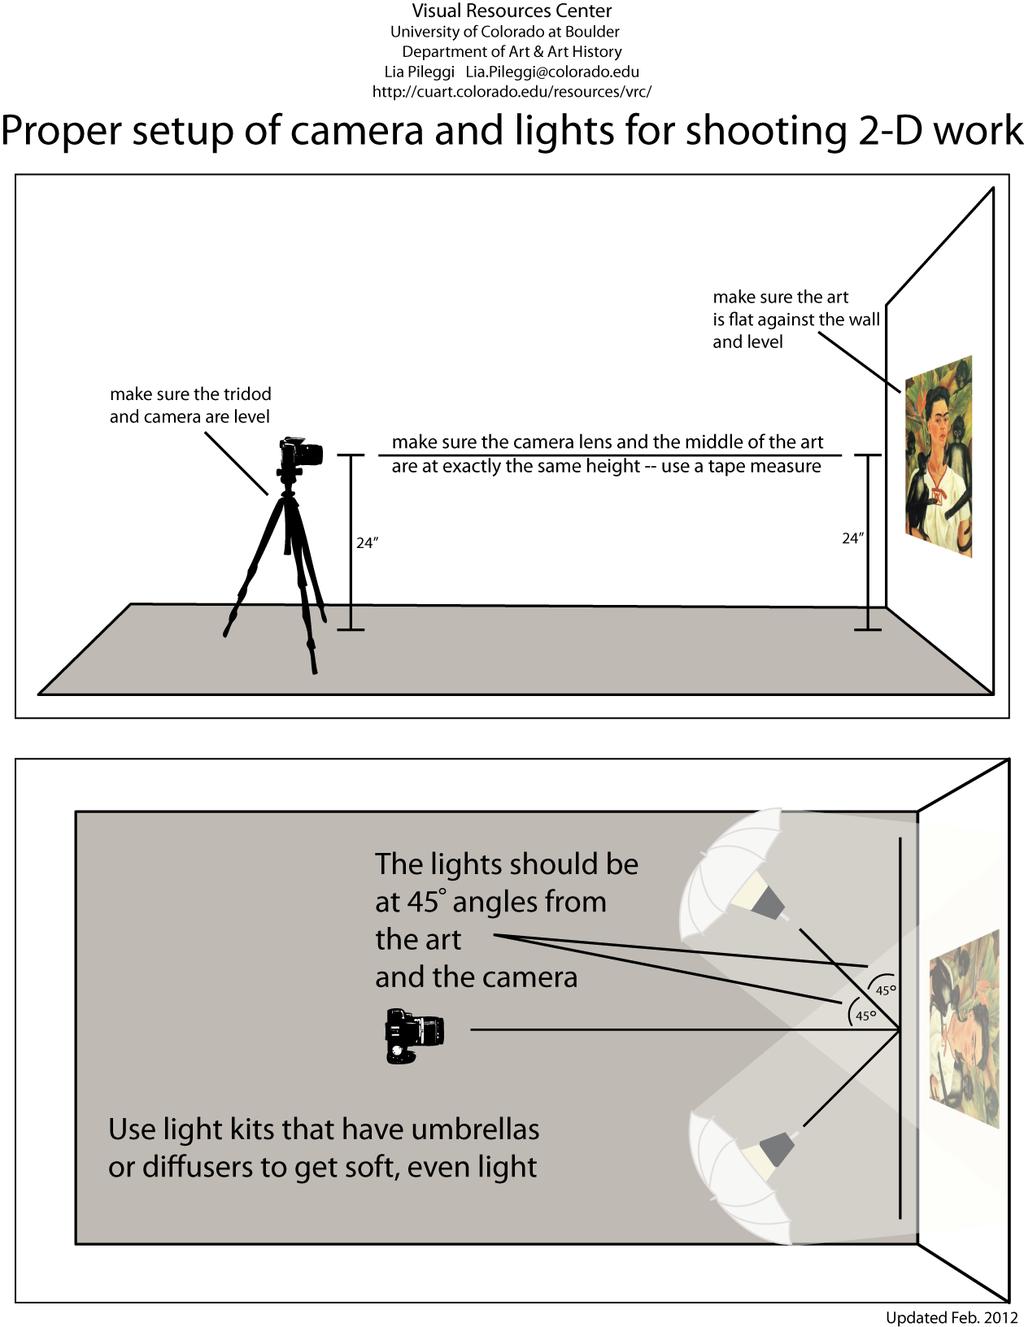
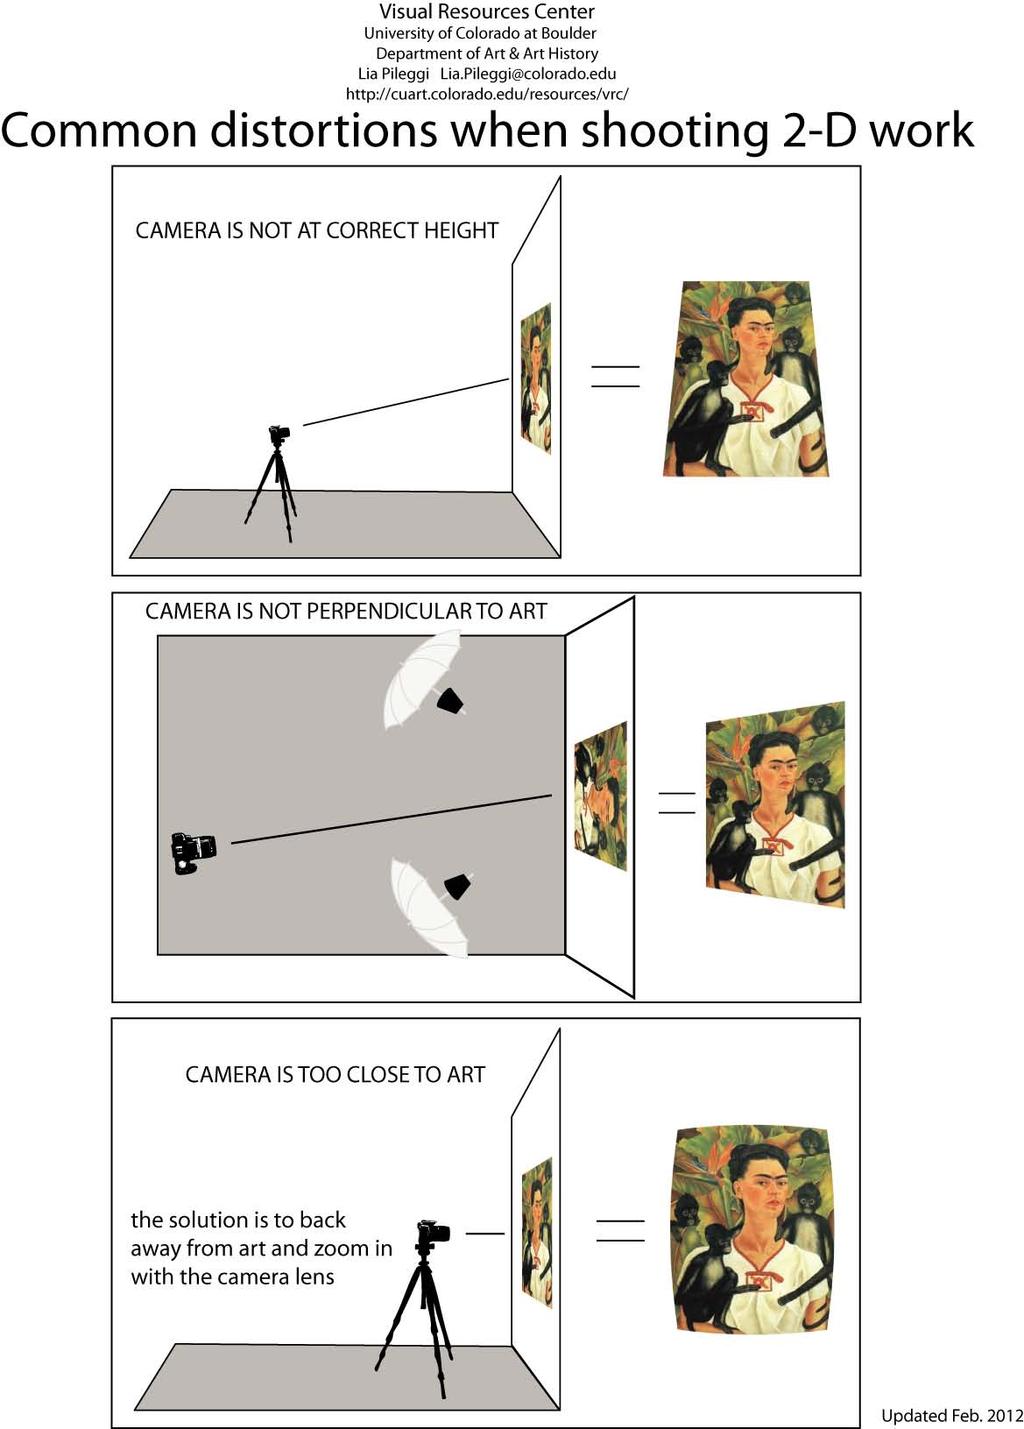
1 University of Colorado at Boulder Department of Art & Art History Lia Pileggi How to photograph small to medium 2-D artwork Hanging your art 1. Place or hang your art on a flat surface (like a wall) with a grey, black or white background 2. Make sure the art is level 3. Measure up from the floor to the middle of the art. Take note of that height, you will need it later Setting up the lighting kit 1. Set up the stands first, and then add the lighting heads 2. Place the umbrellas onto the lighting heads and then face the lights away from the art 3. The lights should be placed at 45 degree angles from the art, half way between the art and the camera, this will give even, diffused light (See the attached diagram) 4. Note: If you are shooting 3-D or highly textured art you will want a different lighting setup Camera Settings 1. Set the camera to shoot in RAW (this will give you the most digital information) 2. Set the ISO to 100 (this will reduce noise in the digital image) 3. Set the camera to aperture priority (this will keep the aperture locked) 4. Set the aperture to f/8 or higher (this will put more of the image in focus) 5. Set the white balance if shooting in jpeg or tiff (Tungsten, Fluorescent, Daylight, Custom, etc) 6. If you have mixed lighting you can create a custom white balance or just shoot in RAW 7. Set the camera to timer mode (this is to minimize camera shake) Setting up the camera 1. Set up the camera on a tripod, make sure the tripod and camera are level 2. After attaching the camera, bring the lens to the exact height of the middle of the art (this is the measurement you took when hanging the art) 3. Place the tripod at a distance where the art fills almost the entire view, yet you are not too close to get distortions (See the attached diagram) Shooting the work 1. Clean the camera lens with a lens cleaning cloth 2. Turn on the light kit 3. Get the entire image in the frame with a bit of background (you will crop it out later) 4. Focus your image (manually or with auto focus) 5. Press the button and let go of the camera, the timer function will open the shutter and take the shot 6. Bracket your shot by going up and down one stop with the shutter speed 7. Leave the tripod in place in case you need to come back and shoot more images Updated Feb. 2012
2
3
4 University of Colorado at Boulder Department of Art & Art History Lia Pileggi How to photograph small to medium 3-D artwork Positioning your art 1. For smaller sculptural work, place your art on a flat surface with a neutral colored background 2. Don t place your art too close to the background, give it some space 3. Note: If your art is small enough and you want even diffused light, use a tabletop soft-box Setting up the lighting kit 1. Set up the stands first, and then add the lighting heads 2. Place the umbrellas onto the lighting heads and then face the lights away from the art 3. At first place the lights at 45 degree angles from the art, half way between the art and the camera, this will give even, diffused light (See the attached diagram) 4. Then move around one of the lights to start creating shadows, once you have reached a desired shadow leave the light and begin shooting 5. Some pieces of art need three lights to create dimensionality. If needed, add a third light. Camera Settings 1. Set the camera to shoot in RAW (this will give you the most digital information) 2. Set the ISO to 100 (this will reduce noise in the digital image) 3. Set the camera to aperture priority (this will keep the aperture locked) 4. Set the aperture to f/8 or higher (this will put more of the image in focus) 5. Set the white balance if shooting in jpeg or tiff (Tungsten, Fluorescent, Daylight, Custom, etc) 6. If you have mixed lighting you can create a custom white balance 7. Set the camera to timer mode (this is to minimize camera shake) Setting up the camera 1. Set up the camera on a tripod, make sure the tripod and camera are level 2. Place the tripod at a distance where the art fills almost the entire view, yet you are not too close to get distortions (See the attached diagram) Shooting the work 1. Clean the camera lens with a lens cleaning cloth 2. Turn on the light kit 3. Get the entire image in the frame with a bit of background (you will crop it out later) 4. Focus your image (manually or with auto focus) 5. Press the button and let go of the camera, the timer function will open the shutter and take the shot 6. Bracket your shot by going up and down one stop with the shutter speed 7. Leave the tripod in place in case you need to come back and shoot more images 8. Make sure to capture your piece from multiple angles if needed Updated Sept. 2011
5 University of Colorado Boulder Department of Art and Art History Lia Pileggi Tips for photographing museum artwork 1. Make sure you have permission from the museum to photograph their contents. 2. See if the museum allows tripods (or monopods). 3. If you need to hand-hold your camera try raising the ISO up to 800. This will give you some more digital noise, but it will reduce camera shake. 4. Try experimenting with the aperture setting. The bigger your aperture, the faster the shutter speed will be (less shake), but less of the image will be in focus. Remember that a larger aperture is a smaller number (ex f/4.0). 5. If the piece of art is behind glass, use a polarizing filter to reduce glare, and try shooting the work at a 45 angle. Then fix the distortion of shooting at a 45 in Photoshop. 6. When taking the pictures, tuck your arms in close to your sides to give the camera the most stability as possible. Also try breathing out and then as you shoot the picture hold your breath. You can also try gently running you finger from front to back over the shutter button as opposed to pushing it, this will also minimize camera shake. 7. Also remember to take a quick shot of the museum ID tag so you can identify the piece of art later. Tips for photographing installations 1. Shooting installations requires capturing full views of the work as well as details. 2. Try shooting your full views with a wide-angle lens. Remember that distortions can occur at the edges of a wide-angle lens, so zoom in a bit with the lens when shooting. Always look at the image on the view-finder to see if you have noticeable distortions. 3. To capture the installation in focus you must keep you aperture closed down quite a bit. Try using only f/16 or higher and see what your results look like. Because you are using such a small aperture and lighting in installations are very often dim, a tripod is an absolute necessity. 4. Make sure to get shots from a variety of angles and positions. When people walk through or into an installation they often can experience the art from many different views, make sure your photos can document that aspect of an installation. 5. Be very aware of the backgrounds that may exist with in the space of the installation. Make sure to avoid elements that may distract from the piece, or be sure to include them if they are part of the piece. 6. While most installations can be shot with the current lighting, sometimes adding additional light can be helpful to highlight a certain area. If you are supplementing the current light with a lighting-kit, be sure to position the kit so it cannot be seen in the photo. 7. Make sure to get lots of detail shots of the installation, and be sure to still use a tripod. Updated Feb. 2012
6 University of Colorado at Boulder Department of Art & Art History Lia Pileggi Tips for photographing outdoor buildings or public art 1. It is best to shoot at dusk or dawn when photographing buildings or outdoor sculpture/public art. There is better lighting and fewer people to get in your shot. Only photograph during the day if there is a very specific lighting reason to do so, for example shadows are an important element. 2. Since you will be shooting in a low light situation (dusk or dawn), a tripod is absolutely necessary. 3. Be sure to get multiple shots from many angles. And be very aware of the background of your shot. Moving to the side one or two feet may give you a significantly better shot. 4. For larger building or public art pieces you may need a wide angle lens. Be sure to watch out for distortion at the edges of the frame. Zoom in a bit or stand closer to your subject and it may help with the corner distortions. 5. Your depth of field can vary quite a bit with outdoor photography. For large buildings where it is important to get the entire structure in focus, use a small aperture (f/22). For isolated sculptures where you want just the sculpture in focus and the background blurry use a larger aperture (f/5.6). 6. While almost all public buildings are legal to photograph, a few are not (especially in foreign countries). Do some research to find out if you are allowed to photograph your site of interest. 7. Be sure to bracket your shots. You may not get another chance to come back and shoot the subject again so be sure to have a variety of exposures from each shot to choose from later. 8. Also remember to take a shot of any kind of plaque or ID that may be posted near the building or art to help you identify it later. Updated Feb. 2012
DIGITAL PHOTOGRAPHY FOR OBJECT DOCUMENTATION GOOD, BETTER, BEST
 DIGITAL PHOTOGRAPHY FOR OBJECT DOCUMENTATION GOOD, BETTER, BEST INTRODUCTION This document will introduce participants in the techniques and procedures of collection documentation without the necessity
Chapter 6-Existing Light Photography
 Chapter 6-Existing Light Photography All of these images were taken with available light. Painting with light-using available light Photography that includes artificial light which naturally exists in
PHOTOGRAPHING THE LUNAR ECLIPSE
 1/29/18 PHOTOGRAPHING THE LUNAR ECLIPSE NICK SINNOTT CHICAGO PHOTOGRAPHY CLASSES PREPARATION TIMING AND FINDING LOCATION https://www.timeanddate.com/moon/phases/ - Dates of Lunar Phases 1 PREPARATION TIMING
TENT APPLICATION GUIDE
 TENT APPLICATION GUIDE ALZO 100 TENT KIT USER GUIDE 1. OVERVIEW 2. Tent Kit Lighting Theory 3. Background Paper vs. Cloth 4. ALZO 100 Tent Kit with Point and Shoot Cameras 5. Fixing color problems 6. Using
Fact sheet: Documenting artworks
 Fact sheet: Documenting artworks A key skill you need as an emerging visual artist is to take photographs of your artwork. An outline of how to use your camera and key considerations in taking photos follows.
How to Take a Great Booth Picture by Larry Berman
 1 How to Take a Great Booth Picture by Larry Berman The importance of a good booth picture How important is the booth photo? Besides the artwork images, the booth image can easily make or break an artist's
Present. Architecture
 Present Cary Photographic Artists Architecture A Mastering the Art of Photography Topic Developed by Sterling E. Stevens September 20, 2012 Note 1: All notes are on the final page Agenda Useful equipment
SEEING THE WORLD THROUGH A. April 6, 2013 FRIENDSHIP FORCE LENS
 SEEING THE WORLD THROUGH A April 6, 2013 FRIENDSHIP FORCE LENS WHY DO WE TAKE PICTURES WHEN WE TRAVEL? To capture memories the moment To share experiences To document where we have been To share where
Aperture & Shutter Speed Review
 Aperture & Shutter Speed Review Light Meters Your camera s light meter measures the available light in a scene. It does so by averaging all of the reflected light in the image to find 18% gray. By metering
KNOW YOUR CAMERA LEARNING ACTIVITY - WEEK 9
 LEARNING ACTIVITY - WEEK 9 KNOW YOUR CAMERA Tina Konradsen GRA1 QUESTION 1 After reading the appropriate section in your prescribed textbook From Snapshots to Great Shots, please answer the following questions:
ADELAIDE HILLS PHOTOGRAPHY CLUB COFFEE BREAK 22 APRIL 2015 MACRO PHOTOGRAPHY
 ADELAIDE HILLS PHOTOGRAPHY CLUB COFFEE BREAK 22 APRIL 2015 MACRO PHOTOGRAPHY WHAT IS MACRO? Depends on who you talk to. Most definitions regard macro as meaning life size on your image sensor. So, on a
DSLR Essentials: Class Notes
 DSLR Essentials: Class Notes The digital SLR has seen a surge in popularity in recent years. Many are enjoying the superior photographic experiences provided by these feature packed cameras. Interchangeable
capture food & drink Capture Your Holidays with Katrina Kennedy It wouldn t be the holidays without yummy cookies,
 Capture Your Holidays with Katrina Kennedy LESSON 5 capture food & drink All images and lesson content 2014 Katrina Kennedy. All rights reserved. LESSON 5 OBJECTIVES: At the end of this lesson you will
Topic 2 - A Closer Look At Exposure: ISO
 Getting more from your Camera Topic 2 - A Closer Look At Exposure: ISO Learning Outcomes In this lesson, we will revisit the concept of ISO and the role it plays in your photography and by the end of this
Creating Stitched Panoramas
 Creating Stitched Panoramas Here are the topics that we ll cover 1. What is a stitched panorama? 2. What equipment will I need? 3. What settings & techniques do I use? 4. How do I stitch my images together
Introduction to 2-D Copy Work
 Introduction to 2-D Copy Work What is the purpose of creating digital copies of your analogue work? To use for digital editing To submit work electronically to professors or clients To share your work
Photography Help Sheets
 Photography Help Sheets Phone: 01233 771915 Web: www.bigcatsanctuary.org Using your Digital SLR What is Exposure? Exposure is basically the process of recording light onto your digital sensor (or film).
Aperture & Shutter Speed Review
 Aperture & Shutter Speed Review Light Meters Your camera s light meter measures the available light in a scene. It does so by averaging all of the reflected light in the image to find 18% gray. By metering
Chapter 11-Shooting Action
 Chapter 11-Shooting Action Interpreting Action There are three basic ways of interpreting action in a still photograph: Stopping action (42) Blurring movement Combining both in the same image Any
Photographing Marquetry Revisited Again By Dave Peck
 Photographing Marquetry Revisited Again By Dave Peck This article was originally published in a fall 1996 issue of Marquetry Society of America. It was revised for the Spring 2009 issue of the American
DIGITAL PHOTOGRAPHY CAMERA MANUAL
 DIGITAL PHOTOGRAPHY CAMERA MANUAL TABLE OF CONTENTS KNOW YOUR CAMERA...1 SETTINGS SHUTTER SPEED...2 WHITE BALANCE...3 ISO SPEED...4 APERTURE...5 DEPTH OF FIELD...6 WORKING WITH LIGHT CAMERA SETUP...7 LIGHTING
The Fundamental Problem
 The What, Why & How WHAT IS IT? Technique of blending multiple different exposures of the same scene to create a single image with a greater dynamic range than can be achieved with a single exposure. Can
By Mark Schutzer Coast Division Meet June 2013 Copies of this presentation can be found at
 Model lph Photography h By Mark Schutzer Coast Division Meet June 2013 Copies of this presentation can be found at http://www.markschutzer.com com Model Photography Clinic Overview This clinic will discuss
How to Photograph Your 3D Artwork. An Introduction
 How to Photograph Your 3D Artwork An Introduction 1 Why do Artists Photograph Their Artwork? Artists generally want photograph their work for some or all of the following - Digital Submission, Presentations,
By Mark Schutzer PCR Regional Convention, Fremont, CA April 2009 Copies of this presentation can be found at
 Model lph Photography h By Mark Schutzer PCR Regional Convention, Fremont, CA April 2009 Copies of this presentation can be found at http://www.markschutzer.com com Model Photography Clinic Overview This
Tips for Digital Photographers
 Introduction to In my Tips for Digital Photographers outlining shutter speed and f-stop settings we discuss how these two settings are a basis for good creative photography. Shutter speed combined with
Aperture & Shutter Speed. Review
 Aperture & Shutter Speed Review Light Meters Your camera s light meter measures the available light in a scene. It does so by averaging all of the reflected light in the image to find 18% gray. By metering
Intro to Digital SLR and ILC Photography Week 1 The Camera Body
 Intro to Digital SLR and ILC Photography Week 1 The Camera Body Instructor: Roger Buchanan Class notes are available at www.thenerdworks.com Course Outline: Week 1 Camera Body; Week 2 Lenses; Week 3 Accessories,
Eastman Camera Club Feb. 21, 2008 PHOTOGRAPHING WATER. Taking pictures of lakes, rivers, streams, and waterfalls.
 Eastman Camera Club Feb. 21, 2008 PHOTOGRAPHING WATER Taking pictures of lakes, rivers, streams, and waterfalls. Some Questions to Consider When Photographing Water Artistic Questions Do you want to blur
Presented by Craig Stocks Arts by Craig Stocks Arts
 Presented by Craig Stocks Arts www.craigstocksarts.com 2010 by Craig Stocks Arts Basic camera settings for point and shoot cameras (resolution, quality) Resolution - how much can you enlarge a picture?
Tips for Digital Photographers
 Choosing and Introduction to and (f-stop) Two basic controls change how much light hits the sensor in your camera: shutter speed and f-stop. Shutter speed affects how long light is allowed into the camera
Beyond the Basic Camera Settings
 Beyond the Basic Camera Settings ISO: the measure of a digital camera s sensitivity to light APERTURE: the size of the opening in the lens when a picture is taken SHUTTER SPEED: the amount of time that
About Me. Randolph Community College Two year degree in Portrait and Studio Management Portraits, Wedding, Events Landscapes with boats - favorite
 About Me Randolph Community College Two year degree in Portrait and Studio Management Portraits, Wedding, Events Landscapes with boats - favorite Things Forgotten Check camera settings before each session
Sincerely, Blake Rudis
 1 Thanks a lot for your purchase! If you are reading this it shows that you truly care about your photos and are ready to take them to levels you could only dream of! I have been doing HDR for 5 years.
Autumn. Get Ready For Autumn. Technique eguide. Get Ready For
 Get Ready For Autumn Blink and you may have missed it, but our summer is behind us again and we re back into the short days and long nights of autumn. For photography however, the arrival of autumn means
Capturing God s Creation Through The Lens. Session 3 From Snap Shots to Great Shots January 20, 2013 Donald Jin
 Capturing God s Creation Through The Lens Session 3 From Snap Shots to Great Shots January 20, 2013 Donald Jin donjin@comcast.net Course Overview Jan 6 Setting The Foundation Jan 13 Building Your Craft
How to Photograph Fireworks
 How to Photograph Fireworks Whether you're celebrating Independence Day, Guy Fawkes Day, or Diwali, it's always tempting to take pictures of the fireworks exploding in air. After all, a good firework show
Taking Good Pictures: Part II Michael J. Glagola
 8-11-07 Michael J. Glagola 2007 1 Taking Good Pictures: Part II Michael J. Glagola mglagola@cox.net 703-830-6860 8-11-07 Michael J. Glagola 2007 2 Session Goals To provide: Basic and practical information
Presented to you today by the Fort Collins Digital Camera Club
 Presented to you today by the Fort Collins Digital Camera Club www.fcdcc.com Photography: February 19, 2011 Fort Collins Digital Camera Club 2 Film Photography: Photography using light sensitive chemicals
Photography. Taking better photos
 Photography Taking better photos Composition Composition is the arrangement of the visual elements of the photograph, such as Geometric elements, such as lines, shapes, and curves Contrasts of tone, color,
LITESTAGE USER'S GUIDE
 LITESTAGE USER'S GUIDE Note: This is a general user's guide for all of the Litestage models. Equipment shown is not included on all models. For more information on additional equipment and accessories,
VHT New Photographer Training
 VHT New Photographer Training VHT Photography General Requirements Apply to Signature and Premium Keep aperture between f8-f11 always ISO of 200 Shoot as jpg, Size Large and Quality Fine Always take additional
Troop 61 Self-Teaching Guide to Photography Merit Badge
 Troop 61 Self-Teaching Guide to Photography Merit Badge Scout Name: Date: Adapted from: Kodak Self-Teaching Guide to Picture-Taking Scout Name: Date: Init Date 1. Take and paste pictures into your booklet
Photography Basics. The Media Co-op. An introduction to taking great photographs - print edition
 Photography Basics An introduction to taking great photographs - print edition For anyone who has little or no photographic experience and wants to take photographs for journalistic, activist or documentary
Name Digital Imaging I Chapters 9 12 Review Material
 Name Digital Imaging I Chapters 9 12 Review Material Chapter 9 Filters A filter is a glass or plastic lens attachment that you put on the front of your lens to protect the lens or alter the image as you
Introduction to camera usage. The universal manual controls of most cameras
 Introduction to camera usage A camera in its barest form is simply a light tight container that utilizes a lens with iris, a shutter that has variable speeds, and contains a sensitive piece of media, either
CELL PHONE PHOTOGRAPHY
 CELL PHONE PHOTOGRAPHY Understanding of how current phone cameras are different due to advanced technology What this presentation will provide What features are available for control of your phone photography
capture outside Capture Your Holidays with Katrina Kennedy It s cold outside! I m sitting At the end of this lesson you will be able to:
 Capture Your Holidays with Katrina Kennedy LESSON 6 capture outside LESSON 6 OBJECTIVES: At the end of this lesson you will be able to: Photograph outdoor light displays. Expose correctly in a snowy scene.
Eileen Donelan. What s in my Camera Bag? Minimum Camera Macro Lens Cable Release Tripod
 Close Up Photography Creating Artistic Floral Images Eileen Donelan Equipment Choices for Close Up Work What s in my Camera Bag? Minimum Camera Macro Lens Cable Release Tripod Additional Light Reflector
Dozuki. How to Adjust Camera Settings. This guide demonstrates how to adjust camera settings. Written By: Dozuki System
 Dozuki How to Adjust Camera Settings This guide demonstrates how to adjust camera settings. Written By: Dozuki System 2017 www.dozuki.com/ Page 1 of 10 INTRODUCTION This guide demonstrates how to adjust
Capturing Realistic HDR Images. Dave Curtin Nassau County Camera Club February 24 th, 2016
 Capturing Realistic HDR Images Dave Curtin Nassau County Camera Club February 24 th, 2016 Capturing Realistic HDR Images Topics: What is HDR? In Camera. Post-Processing. Sample Workflow. Q & A. Capturing
The objectives of today s demo
 The objectives of today s demo Review the basics for digital photography Cameras Background Lighting Tips on improving your photography Review simple photo editing techniques to improve the pictures you
Table of Contents. 1. High-Resolution Images with the D800E Aperture and Complex Subjects Color Aliasing and Moiré...
 Technical Guide Introduction This Technical Guide details the principal techniques used to create two of the more technically advanced photographs in the D800/D800E brochure. Take this opportunity to admire
COURSE NAME: PHOTOGRAPHY AND AUDIO VISUAL PRODUCTION (VOCATIONAL) FOR UNDER GRADUATE (FIRST YEAR)
 FOR UNDER GRADUATE (FIRST YEAR)") COURSE NAME: PHOTOGRAPHY AND AUDIO VISUAL PRODUCTION (VOCATIONAL) FOR UNDER GRADUATE (FIRST YEAR) PAPER TITLE: BASIC PHOTOGRAPHIC UNIT - 4 : CAMERA CONTROLS - 3 TOPIC: FLASH, TRIPOD AND FIRING MECHANISMS
COURSE NAME: PHOTOGRAPHY AND AUDIO VISUAL PRODUCTION (VOCATIONAL) FOR UNDER GRADUATE (FIRST YEAR) PAPER TITLE: BASIC PHOTOGRAPHIC UNIT - 4 : CAMERA CONTROLS - 3 TOPIC: FLASH, TRIPOD AND FIRING MECHANISMS
Using Your Camera's Settings: Program Mode, Shutter Speed, and More
 Using Your Camera's Settings: Program Mode, Shutter Speed, and More Here's how to get the most from Program mode and use an online digital SLR simulator to learn how shutter speed, aperture, and other
OUTDOOR PORTRAITURE WORKSHOP
 OUTDOOR PORTRAITURE WORKSHOP SECOND EDITION Copyright Bryan A. Thompson, 2012 bryan@rollaphoto.com Goals The goals of this workshop are to present various techniques for creating portraits in an outdoor
Advanced Photography. Topic 3 - Exposure: Flash Photography Tricks
 Topic 3 - Exposure: Flash Photography Tricks Learning Outcomes In this lesson, we will learn about a number of ways (e.g. bouncing the light, the TTL mode, high-speed sync, using gels) in which we can
Quick Tips for Taking Better Portraits
 JANUARY 5, 2019 BEGINNER Quick Tips for Taking Better Portraits Suggested Lens choices, exposure settings and focus modes Featuring GARY SMALL D300, AF-S NIKKOR 24-85mm f/2.8-4d IF lens, 1/30 sec., f/2.8,
PHOTOGRAPHY CAMERA SETUP PAGE 1 CAMERA SETUP MODE
 PAGE 1 MODE I would like you to set the mode to Program Mode for taking photos for my assignments. The Program Mode lets us choose specific setups for your camera (explained below), and I would like you
Introduction to Digital Photography
 Introduction to Digital Photography with Nick Davison Photography is The mastering of the technical aspects of the camera combined with, The artistic vision and creative know how to produce an interesting
TAKING BETTER PHOTOS ON ANY DEVICE
 TAKING BETTER PHOTOS ON ANY DEVICE Sarah Dudik Public Information & Marketing HOW TO TAKE BETTER PHOTOGRAPHS The device you use isn t as important as how you are looking through it Any device can be used
Photographing Waterfalls
 Photographing Waterfalls Developed and presented by Harry O Connor oconnorhj@yahoo.com July 26, 2017* All photos by Harry O Connor * Based on May 2012 topic Introduction Waterfall photographs are landscapes
Foundations Portfolio Workshop
 Foundations Portfolio Workshop To Photograph Work Camera and Set Up 12.0 megapixel camera (or higher) adjust size settings to L (large) and format to either.jpeg or.cr2 (raw) (lowest to highest resolution)
Technical Guide Technical Guide
 Technical Guide Technical Guide Introduction This Technical Guide details the principal techniques used to create two of the more technically advanced photographs in the D800/D800E catalog. Enjoy this
One Week to Better Photography
 One Week to Better Photography Glossary Adobe Bridge Useful application packaged with Adobe Photoshop that previews, organizes and renames digital image files and creates digital contact sheets Adobe Photoshop
Impact With Smartphone Photography. Smartphone Camera Handling. A Smartphone for Serious Photography?
 A Smartphone for Serious Photography? DSLR technically superior but photo quality depends on technical skill, creative vision Smartphone cameras can produce remarkable pictures always at ready After all
Drive Mode. Details for each of these Drive Mode settings are discussed below.
 Chapter 4: Shooting Menu 67 When you highlight this option and press the Center button, a menu appears at the left of the screen as shown in Figure 4-20, with 9 choices represented by icons: Single Shooting,
HDR is a process for increasing the range of tonal values beyond what a single frame (either film or digital) can produce.
 can produce.") HDR HDR is a process for increasing the range of tonal values beyond what a single frame (either film or digital) can produce. It can be used to create more realistic views, or wild extravagant ones What
HDR HDR is a process for increasing the range of tonal values beyond what a single frame (either film or digital) can produce. It can be used to create more realistic views, or wild extravagant ones What
Buxton & District U3A Digital Photography Beginners Group
 U3A Group Lesson 7: Controlling exposure / focal length / perspective / composition for a better picture & Taking Pictures of people 3 December 2013 Programme Buxton & District 19 September Exploring your
Failure is a crucial part of the creative process. Authentic success arrives only after we have mastered failing better. George Bernard Shaw
 PHOTOGRAPHY 101 All photographers have their own vision, their own artistic sense of the world. Unless you re trying to satisfy a client in a work for hire situation, the pictures you make should please
INTRO TO HIGH DYNAMIC RANGE PHOTOGRAPHY
 INTRO TO HIGH DYNAMIC RANGE PHOTOGRAPHY INSTRUCTOR: ROGER BUCHANAN NOTES AVAILABLE VIA THENERDWORKS.COM WHY DO I NEED TO KNOW ABOUT HDR? DYNAMIC RANGE: THE RATIO BETWEEN THE BRIGHTEST AND DARKEST PARTS
Introduction... 1 Part I: Fast Track to Super Snaps Part II: Taking Creative Control Part III: After the Shot
 Contents at a Glance Introduction... 1 Part I: Fast Track to Super Snaps... 5 Chapter 1: Getting Up and Running...7 Chapter 2: Reviewing Five Essential Picture-Taking Options...39 Part II: Taking Creative
Photography Feb. 26 th March 8
 Photography Feb. 26 th March 8 Oh, we have a lot to do! Pinhole negative to positive and mounting. Aperture exercise understanding depth of field. Film photography if everything is completely done. Group
Lens Aperture. South Pasadena High School Final Exam Study Guide- 1 st Semester Photo ½. Study Guide Topics that will be on the Final Exam
 South Pasadena High School Final Exam Study Guide- 1 st Semester Photo ½ Study Guide Topics that will be on the Final Exam The Rule of Thirds Depth of Field Lens and its properties Aperture and F-Stop
Photomanual TGJ-3MI. By: Madi Glew
 Photomanual TGJ-3MI By: Madi Glew i Table of Contents Getting to know Your Camera... 1 Shutter Speed... 3 White Balance... 4 Depth of Field... 5 Aperture Settings... 7 ISO (Film Speed)... 9 3-Point Portrait
OBJECT PHOTOGRAPHY. iskills Workshop October 12, :30 6:30pm
 OBJECT PHOTOGRAPHY iskills Workshop October 12, 2017 4:30 6:30pm INTRODUCTION WORKSHOP OVERVIEW 1. Introduction to Object Photography 2. Brief orientation to the Canon Rebel 3. Automatic 4. Manual Mode
1. This paper contains 45 multiple-choice-questions (MCQ) in 6 pages. 2. All questions carry equal marks. 3. You can take 1 hour for answering.
 in 6 pages. 2. All questions carry equal marks. 3. You can take 1 hour for answering.") UNIVERSITY OF MORATUWA, SRI LANKA FACULTY OF ENGINEERING END OF SEMESTER EXAMINATION 2007/2008 (Held in Aug 2008) B.Sc. ENGINEERING LEVEL 2, JUNE TERM DE 2290 PHOTOGRAPHY Answer ALL questions in the answer
UNIVERSITY OF MORATUWA, SRI LANKA FACULTY OF ENGINEERING END OF SEMESTER EXAMINATION 2007/2008 (Held in Aug 2008) B.Sc. ENGINEERING LEVEL 2, JUNE TERM DE 2290 PHOTOGRAPHY Answer ALL questions in the answer
01 High-Key SIMPLE SOULFUL SENSATIONAL CHILDRENS PHOTOGRAPHY. Black-and-White Children s Portraiture
 SIMPLE SOULFUL SENSATIONAL CHILDRENS PHOTOGRAPHY SHOOTING BEAUTIFUL IMAGERY WITH NATURAL LIGHT 01 High-Key Black-and-White Children s Portraiture dennisguichardphotography High-impact Architectural Photography
Travel Photography & Advanced Photographic Techniques
 Travel Photography & Advanced Photographic Techniques Presented by Tallahassee Senior Center Volunteer Instructor: Dr. Mike Francis Email: drmikef@comcast.net Website: http://www.maf1.com/dcc 2006-2016
Landscape Photography
 Landscape Photography Francis J Pullen Photography 2015 Landscape photography requires a considered approach, and like fine wine or food, should not be rushed. You may even want scout out the desired location
OTHER RECORDING FUNCTIONS
 OTHER RECORDING FUNCTIONS This chapter describes the other powerful features and functions that are available for recording. Exposure Compensation (EV Shift) Exposure compensation lets you change the exposure
Working with your Camera
 Topic 5 Introduction to Shutter, Aperture and ISO Learning Outcomes In this topic, you will learn about the three main functions on a DSLR: Shutter, Aperture and ISO. We must also consider white balance
èõ Changing Recording Modes Text Mode Continuous Shooting Mode Changing Flash Modes Flash Off Mode Auto Mode...
 3 ADVANCED SHOOTING Chapter ëêå@å@ èõ Changing Recording Modes... 52 Text Mode... 52 Continuous Shooting Mode... 53 Changing Flash Modes... 55 Flash Off Mode... 56 Auto Mode... 57 Forced Flash Mode...
Module 1 Lighting. Lesson 1 Light, Your First Decision. What s the first thing you should think about when choosing a location?
 Module 1 Lighting Lesson 1 Light, Your First Decision What s the first thing you should think about when choosing a location? We want to be: -Centered Photographers Three priorities for choosing light
Seniors Photography Workshop
 Seniors Photography Workshop Some images stand out from the crowd & make viewers say WOW! Today we will look at how you can give your images that WOW Factor.. So let s think about what makes an
Photography 2. how to be a BETTER photographer
 Photography 2 how to be a BETTER photographer Layering In story-telling through Photo-Journalism, secondary elements add to your story-telling power. FOREGROUND ELEMENTS BACKGROUND ELEMENTS Angle Shooting
Techniques 02: Working with Light All images Paul Hazell
 CDME2031/3031 Visual Effects digital Photography Techniques 02: Working with Light All images Paul Hazell Faking lighting in Photoshop See Steve Caplins How to cheat in Photoshop page 138 to 171 for fake
TIPS FOR MOBILE PHOTOGRAPHY CHRIS SINGLEMANN LOYOLA UNIVERSITY MARYLAND VIDEOGRAPHER
 TIPS FOR MOBILE PHOTOGRAPHY CHRIS SINGLEMANN LOYOLA UNIVERSITY MARYLAND VIDEOGRAPHER The best camera is the one that s with you. Chase Jarvis PHONE PHOTOGRAPHY 101 TWO HANDS ON THE WHEEL PHONE For added
So far, I have discussed setting up the camera for
 Chapter 3: The Shooting Modes So far, I have discussed setting up the camera for quick shots, relying on features such as Auto mode for taking pictures with settings controlled mostly by the camera s automation.
CAMERA BASICS. Stops of light
 CAMERA BASICS Stops of light A stop of light isn t a quantifiable measurement it s a relative measurement. A stop of light is defined as a doubling or halving of any quantity of light. The word stop is
1 / 9
 WWW.RICHIEHUG.COM 1 / 9 A Beginner's Guide to Digital Photography Version 1.2 By Richie Hug November 24, 2016. Most people owning a digital camera have never used other settings than just the AUTO mode.
SHAW ACADEMY. Lesson 8 Course Notes. Diploma in Photography
 SHAW ACADEMY Lesson 8 Course Notes Diploma in Photography Manual Mode Stops of light: A stop in photography refers to a measure of light A stop is a doubling or halving of the amount of light in your scene
Get the Shot! Photography + Instagram Workshop September 21, 2013 BlogPodium. Saturday, 21 September, 13
 Get the Shot! Photography + Instagram Workshop September 21, 2013 BlogPodium Part One: Taking your camera off manual Technical details Common problems and how to fix them Practice Ways to make your photos
PHOTOGRAPHY Mohamed Nuzrath [MBCS]
![PHOTOGRAPHY Mohamed Nuzrath [MBCS]](/thumbs/80/82228500.jpg "PHOTOGRAPHY Mohamed Nuzrath [MBCS]") PHOTOGRAPHY Mohamed Nuzrath [MBCS] Coordinator HND IT / Senior Lecturer IT BCAS Kandy Campus Freelance Photographer Freelance Web/Software Developer PHOTOGRAPHY PHOTO - Light GRAPHY Drawing PHOTOGRAPHY
PHOTOGRAPHY Mohamed Nuzrath [MBCS] Coordinator HND IT / Senior Lecturer IT BCAS Kandy Campus Freelance Photographer Freelance Web/Software Developer PHOTOGRAPHY PHOTO - Light GRAPHY Drawing PHOTOGRAPHY
Photographing Art By Mark Pemberton March 26, 2009
 Photographing Art By Mark Pemberton March 26, 2009 Introduction Almost all artists need to photograph their artwork at some time or another. Usually this is for the purpose of creating a portfolio of their
As can be seen in the example pictures below showing over exposure (too much light) to under exposure (too little light):
 to under exposure (too little light):") Hopefully after we are done with this you will resist any temptations you may have to use the automatic settings provided by your camera. Once you understand exposure, especially f-stops and shutter speeds,
Hopefully after we are done with this you will resist any temptations you may have to use the automatic settings provided by your camera. Once you understand exposure, especially f-stops and shutter speeds,
Your first steps into manual mode. Your first steps into manual mode
 Your first steps into manual mode Your first steps into manual mode So what is manual mode? Manual mode gives the photographer complete access to manipulate ISO, Aperture, and Shutter Speed to create an
Digital camera modes explained: choose the best shooting mode for your subject
 Digital camera modes explained: choose the best shooting mode for your subject On most DSLRs, the Mode dial is split into three sections: Scene modes (for doing point-and-shoot photography in specific
OTHER RECORDING FUNCTIONS
 OTHER RECORDING FUNCTIONS This chapter describes the other powerful features and functions that are available for recording. Exposure Compensation (EV Shift) Exposure compensation lets you change the exposure
EXPOSURE TIPS. Camera shake causing blurry pictures
 EXPOSURE TIPS Camera shake causing blurry pictures Hold your camera steady Digital cameras are usually held away from the body to view the LCD screen to compose the picture. This is less steady than the