Thanks to the designers who helped with this Round Robin #2 Quilt:
|
|
|
- Melinda Melton
- 6 years ago
- Views:
Transcription


1 Thanks to the designers who helped with this Round Robin #2 Quilt: Joan Cali Quilter Molly- Molly s Cottage Reeze- Morning Glory Designs Ros- Ros Munda Beth - Eva Paige Quilt Designs Carrie- Cricket Studio Becky- Patchwork Posse Visit for yearly Round Robins, Tutorials and more!


2 Designed by Patchwork Posse Materials needed: Background fabric 10X 15 Scraps for mushrooms, flowers, and snails Embroidery thread Border: 2 strips 7 ½ X 1 ½ 2 strips 1 ½ X 12 ½ Trace pattern onto front of background fabric with pencil. Cut out applique pieces. Using embroidery thread stitch embellish applique. Trim background to 7 ½ X 10 ½ Sew 1 ½ X 12 ½ border. Sew 1 ½ X 7 ½ strips. Square up to 9 ½ X 12 ½ Embroidery help:
3
4


5 Round Robin Border 1 by CaliQuilter Materials: Two pieces of background fabric, 8 X 9 ½ Scraps of fabric for the leaves and flowers Embroidery Thread Two strips of fabric 1 ½ X 9 ½ for outer borders Instructions: Use templates to cut out 6 large circles, 6 medium circles, 6 small circles and 12 leaves. Use a contrasting color embroidery thread to stem stitch a small circle to a medium circle. Stem stitch that medium circle to a large circle. Repeat making six flowers. Put a photocopy of the pattern under your background fabric to help determine placement of the flowers and leaves. Stem stitch the flowers and leaves to the backgrounds. {hint: Use a product like AppliGlue or a small piece of Heat n Bond on the backs of the flowers and leaves to keep them in place while you sew them on.} Square up the backgrounds to 6 wide and 9 ½ tall. Sew border strips to the left side of border #1 and to the right side of border #2 to the right side of the center block. Post your photo on our Flickr page so we can admire your work! Pattern by Joan of CaliQuilter
6
7
 8 strips measuring 1.5 x 3.")
8 Patchwork Posse Round Robin #2 Border #2 by Molly's Cottage Hi there, I'm Molly from Molly's Cottage! I'm thrilled to bring you another fun border for the Whimsical Round Robin Quilt. Materials Needed 18 squares measuring 2.5 squares (I used charm squares cut into quarters) 8 strips measuring 1.5 x 3.25 (in my border, these are the green solid) 4 strips measuring 1.75 x 3.25 (pink polka dot) 4 rectangles measuring 2 x 3.25 (large scale floral) 2 rectangles of background fabric measuring 5.5 x bird silhouettes reverse one so your birds are facing opposite directions. I found a pleasing bird image online; you can draw one, or find one that is pleasing to you. Assembly Instructions 1. Using your 2.5 squares, layout a 9-patch block and sew together in a pleasing manner. Make one more 9-patch for 2 total. 2. Once sewn, cut block in half vertically. Turn your mat ¼ turn and cut block vertically again, so the block is now in quarters. Repeat for second block.


9 3. Arranging the pieces Each new, smaller block shown above will be the end building block of the borders. I situated mine so the smaller polka-dot square of the block will be pointing into the center of the quilt. 4. Attach a 1.5 strip, a 1.75 strip, another 1.5 strip, one of your sliced 9-patch blocks, then the 2 rectangle. You should have something like so...continue and make three more!


10 5. Connecting the pieces Take one 5.5 background rectangles and sew into place between two pieced strips. Repeat for the other border. Place your bird silhouettes into the centers of each background rectangle, making sure the bird is facing opposing directions, like so...attach your bird using your favorite method of applique. Feel free to embellish with embroidery if you like! 6. Attach your borders to the top and bottom of the quilt. Enjoy!

11 Morning Glory Designs By Reeze L. Hanson Seminole Pieced Border 3 The finished size of this border is 3 x The vertical length of the border is highly adjustable depending on the size of your quilt top. Simply add more rows if you need additional height or trim off length if it is too long. Don t worry about chopping off points if you need to. This is very forgiving. Start with selecting two main fabrics, two accent fabrics, and one background fabric. In my example the main fabrics are pink and green. The accent fabrics are purple and light blue. The background fabric is the white dot. Main Fabric 1: Main Fabric 2: Accent Fabric 1: Accent Fabric 2: Background Fabric: In the space at le write down your fabrics. It is easy to get confused if you don t have a chart to refer to in the ini al assembly step.
12 Cutting List: Cut (1) 2 strip of main fabric 1 x width of fabric (WOF) Cut (1) 2 strip of main fabric 2 x WOF Cut (2) 2 strips of accent fabric 1 x WOF Cut (2) 2 strips of accent fabric 2 x WOF Cut (4) 2 strips of background fabric x WOF Assembly: 1. Assemble Strip Set A by sewing an accent strip to both sides of a main fabric strip. Press seam allowances in the same direction. Then sew a background strip to both sides of the accent strips. Press in the same direction, ie all seams should be pressed upward. Strip Set A Strip Set B 2. Assemble Strip Set Be by sewing and accent fabric 2 strip to both sides of a main fabric 2 strip. Press these seam allowances downward (opposite of Set A). Add the 2 background strips and press all seams downward. 3. Square up the end of both strip sets. Cut twelve 2 slices from each strip set. When cutting, align your ruler with one of the seam lines on the strip set and NOT with the edge of the strip set. The seams are a more accurate line than the edge. Slice off a few extra slices in case you need additional length for your particular quilt top. 4. Assemble border by alternating slices from each strip set. You will be offsetting each slice by one block so pay close attention to this when you are sewing the slices together. 5. Snug the seams together so you get well matched corners. Be sure you keep the seam allowances from Strip A slices going up and Strip B slices going down. 6. Sew A and B slices together in pairs. You will need six pairs for EACH border, twelve pairs total.
13 7. Sew one pair to another pair to make sets of four strip sets as illustrated at right. You should have six sets of fours. 8. Sew three sets of fours together to make each border. Press the seam allowance in the same direction. Add a 2 x 7 strip of background fabric to the two ends of the border. 9. Turn the assembled border on its side. Lay it out on a cutting mat and straiten it so that the corners of each slice touch a line on the cutting mat. Re-press with starch. 10. Trim off the corners of each slice 1/4 above (red line) the uppermost point (dashed line) on the side of the border. This will leave a 1/4 seam allowance on the side of the strip. Cut both sides of the strip in this manner. 11. Trim off the top of the border 1/4 above (red line) the uppermost set of points (dashed line). At this point press the border carefully and use starch or sizing to keep its shape. 12. Check the length of the border to be sure it will fit the side of your quilt top. If you need to add an additional slice to lengthen the border now is the time to add that to the bottom of the border strip. 13. Once you have adjusted the length to fit, trim off the bottom of the border as you did with the top. 14. Sew the border to the side of the quilt top, being careful not to stretch the border. Press the seam allowance away from the border. Sew the second border to the other side of the quilt. Press and starch the quilt to keep it from losing its shape in the handling process.
 Cut Background Fabric~ 24 squares 3 X 3 Cut these in half from corner to corner. You will have 48 ~ ½ square triangles.")

14 Border #4 by Patchwork Posse *Cut 2 strips 34 X 2 *Sew to the top and bottom of your center block. *Make 12 pinwheel blocks following the instructions below: 1) Cut Background Fabric~ 24 squares 3 X 3 Cut these in half from corner to corner. You will have 48 ~ ½ square triangles. 2) Cut a total of 48-2 ½ X 4 ½ {I Cut 2 out of the same fabric.} 3) Stack the rectangles RIGHT SIDES UP and measure from the left side 2 1/2 and make a mark. Lay the ruler down, lining one edge on the mark and the other to the corner of the 4 ½. Cut along angle. Your rectangle will now have one square edge and one edge that is a point. 4) Lay out your blocks out and sew together. You will sew one background triangle to the short edge of the rectangle. Notice that the angle cut is on the outside. The matching arms will be across from each other.

15 Square up the pinwheels to 6 X 6 6) Sew 6 pinwheel blocks in a row. Repeat for another strip. 7) Sew 1 row to the top and 1 row to the bottom. Finished Size will be: 29 X 34 If you have any questions, please me--- I d love to help! Remember to post your photos in the flickr group ~ you ll be entered in the drawing!!
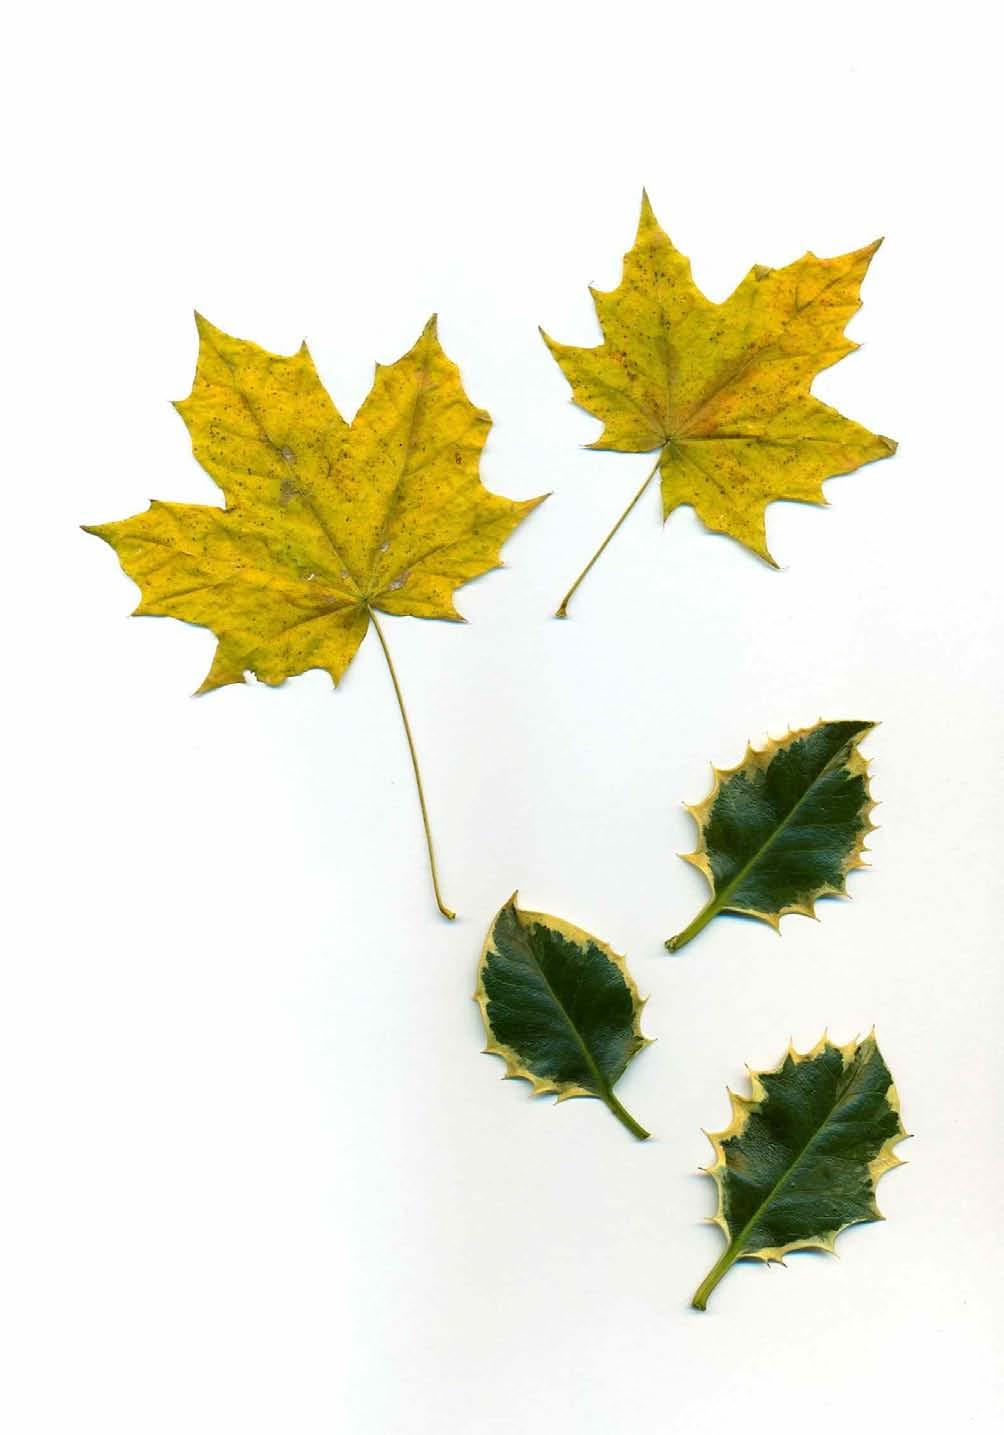
16 Patchwork Posse Border 5 Autumn Leaves Applique Rosa-Munda I live in the Chiltern Hills, west of London, in a very beautiful part of the UK. During the autumn I was out walking and collected these amazing leaves oak, sycamore, maple, beech, birch, holly and I'd like to share them with you. So I have included three pages of life sized leaves which you can use as your pattern templates. You can choose spring, summer or autumn leaf colours or something totally different if you prefer. Border 1 Cut 2 1 1/2 wide x 29 long deep coloured fabric Border 2 Cut 2 5 1/2 wide x 29 long neutral fabric this second border will be for your applique. You may need to trim the length of these borders a little to match the previous seminole border. Choose the leaves which appeal to you most (I found 7 worked well for me) and roughly cut away from the page. Place them on the neutral border and move around until you are happy with the arrangement. I suggest you take a quick photo of this arrangement to remind you of the leaf placement. Select your fabrics and using your preferred method of applique (I will be using fusible web and top-stitching with embroidery floss), sew these leaf shapes onto the border.

17
18 Quick How to s for Applique: *Cut out leaf shape. *Lay on right side of fabric and cut fabric leaf out. *Lay randomly on the border and glue in place--- use fabric glue or glue stick. *Stitch Draw on the leaves. Stitch at least 1/8 inside each leaf and go all the way around the shape. Stitch a line in the center and little lines for the leaf vanes. This will sort of pucker the leaf a bit and give them a bit of character.

19

20
21
22 Patchwork Posse Round Robin, Border #6 Beth Helfter, EvaPaige Quilt Designs My quilting philosophy is definitely one of if it isn t fun, why do it, and I m bringing my signature fun over fuss style to this border, using a basic technique I came up with years ago and love using in one form or another in lots of my designs. Hope you enjoy it too! Note: I asked Becky to give me a measurement to start with before I designed this border; I don t know about the rest of you, but I had some issues with the borders not always matching up due to differences in piecing techniques and seam allowances or maybe just my idiocy. In any case, I wanted to start off right for you. She told me we were at 47 wide, so I went with that. The border I created finishes at 47 ½ wide, which allows for a little leeway, and the blocks themselves are very forgiving, so if you have to trim the end ones once it is sewn, no one will ever notice. Trust me. The most important thing is to be sure the rightmost and leftmost 1 background strips line up with the 1 border we created in the last round. Here is the border you will be adding. Isn t it stunning? Cutting: 48 strips 3 x 8 from various fabrics 14 strips 1 ½ x 6 ½ from background fabric Piecing:

23 1. Using your 3 strips, lay one strip on another, right sides together, angling the top strip slightly as shown in Diagram 1, keeping the edge of the top strip no further from the edge of the bottom strip than ½. Sew a ¼ seam. Repeat to make 16 sets of two strips. I like to chain sew these all together and vary my angles a bit for a little more interest. Diagram 1 Keep distance less than ½ 2. Press top strip to one side, Now add another 3 strip using the same angling method to each block as shown in Diagram 2. You will end up with 16 wonky blocks made up of 3 strips of fabric. Diagram 2 3. Separate your wonky blocks into two piles of 8 blocks each. Trim the first pile to 5 ½ x 6 ½ with seams running vertically as shown in Diagram 3. Diagram 3


24 4. Trim the second pile of blocks to 5 ½ x 6 ½ with seams running horizontally as shown in Diagram 4. Diagram 4 5. Lay out two rows of blocks to look like the picture of the border on page 1, alternating the horizontal and vertical blocks and using the 1 ½ strips as a sort of sashing between them. Sew each border strip together (each strip will have 8 blocks and 7 sashing strips) and press seams all in one direction. Note: You can over- or under-think this step as much as you like. Some quilters will shuffle their blocks around 98 times before they are satisfied with the layout, others will just grab the next one on the pile and use it. Either way will work. 6. Sew your borders to the top and bottom of the quilt, being sure to match the rightmost and leftmost sashing strips with the 1 border from the previous round. The rest of your seams should match up as well to the pinwheel border (see photo), but if they don t quite, it really isn t going to

25 make your quilt less gorgeous. Again, this is a forgiving border. Trim border ends if necessary to make your quilt 47 wide. Here is what my quilt looks like so far. I m still searching for the right green for the leaves on the first border and haven t decided what to do in the bird space on the second border (I m contemplating more circular flowers with a long stem rather than bird because I am as a rule more flora than fauna), but I really like it so far! Lots of fun techniques I don t normally use, and I got to play with some cool new fabrics I d purchased at spring market last year. Thanks for letting me play and I hope you ll visit my blog, Quilting Hottie Haven, at


26 Patchwork Posse Round Robin ~ Border #7 By Carrie Graziano at crickets studio Hello! Welcome to border #7 in our very super fun round robin. I have so loved all the border rounds, and am delighted that I am joining Becky and you all on this round. I warn you, I love to talk, so these instructions may be a bit chatty!!! As Beth mentioned in the last round, all of our tops may be measuring slightly differently due to variations in sewing seam allowances, printing templates, etc. I designed this border to accommodate this, so no worries. Please read thru these instructions before beginning your borders. Always good to know what s ahead, right? So, here is the border (I don t have any fancy software and I really doubt you d want to see my hand-drawn sketches, sooo here s the side of my quilt top cute huh? The butterflies are for my daughter as this quilt will hang in her room. The crazy patches are my way of using up the many scraps I ve made during each round of borders. Here s what you need: Background fabric - 6 ½ x 6 ½ squares cut 4 Dark fabric scraps - 5 x 1 ½ strips cut 4 for butterfly bodies Lots of scraps/block trimmings of the fabrics and/or colors used in your round robin top thus far. Try to limit the background fabric here. Colors work best. Paper foundation (I used an old telephone book*) 8 squares 14 each *it s thin, easy to rip off and a good way to recycle Iron-on fusible web, embroidery thread & needle and other appliqué supplies, depending on how you like to appliqué. Let s get started! Crazy Patches: We ll piece the crazy patches first. You ll make 14 of them, 10 for the borders and 4 to use for the butterflies. Place a fabric scrap (or a trimming from a previous border) in the center of the paper foundation right side up. Lay another fabric scrap on top of that right side down. It doesn t have to line up perfectly. Sew a ¼ seam along the edge of the top fabric. Finger press open.


 from the four")
 from the untrimmed crazy")


27 Keep adding pieces as above rotating around your center. Here I added a leftover piece from an earlier border. Do this until the paper is filled up. Iron press. Trim 10 of the blocks to 6 ½ square and remove the paper foundations from the backs now. Set aside. Don t forget, we ll adjust the border to fit your quilt top later Butterfly patches: Remove the paper from the 4 untrimmed crazy patches. Using your favorite method of appliqué, cut out 4 butterfly bodies (template B) from the four 5 x 1 ½ strips of dark scraps. Now cut 8 butterfly wings (4 of template A and 4 of template A-Rev) from the untrimmed crazy patches. Appliqué to the 6 ½ square using the template diagram as a guide. Here is how I did mine using iron-on fusible web: (Yup, I did the wings as a whole using the fusible web to hold my seams flat). Embroider the butterflies antennae using embroidery floss. Assemble the borders: Look thru all your finished crazy patches and pick out 2 that you could trim (maybe there s a fabric that looks wonky or weird). These are our fixer patches, so set them aside for now. Measure the sides of your quilt top. Record this measurement here. Mine is 40 ½. Start sewing your borders into sets. Use this order: Butterfly block Crazy patch Crazy patch Crazy patch Crazy patch Butterfly block Set #1 Make 2 Set #2 Make 2


28 Measure set #1 & set #2 add together. Mine is 18 ½ + 18 ½ = = Subtract ½ for seam allowances. So, mine is 37 ½ = 36 ½. - = Subtract this from your quilt side measurement from above. Mine is 40 ½ - 36 ½ = 4. - = This is the magic number you need to finish your border to fit your quilt top! Trim the 2 fixer patches to 6 ½ x YOUR MAGIC NUMBER. Now finish your borders like this: Set #1 Fixer crazy patch Set #2 Make 2 Sew your borders to your quilt top making sure to match the seams by the butterfly blocks. Here is my quilt top with our new crazy butterfly borders. See the center patch in the border? Because they are crazy patches, it blends right in yay! Make 2 Fixer patch right there I actually made an extra patch that I am using for my signature block on the back of this quilt. Happy accident {smile}. Thanks for making this border with me. Check out my blog at to see how my quilt turns out and what else I am up to! ~ Carrie
29
30

31 Round Robin Border #8
32 Because the quilt needed some length I added some large long stemmed poppies, possies or just plain ol flowers. The centers are large enough so that you could add buttons, yo yo s or whatever else you would like. {depending on your quilter you might need to add those after quilting}. You will be making 18 flower blocks with 16 spaces in between them. These spacers allow you to add or subtract to make your row custom fit the quilt center. Cut: Sew: 18~ 5 inch X 5 inch squares from random colors. {these are the flowers} 72 ~ 2 inch X 2 inch squares of backgrounds {corners of flowers} 18~ 5 inch X 7 inch rectangles out of backgrounds {background for stems} 18~ 1 inch X 7 inch strips greens {flower stems} 9~ green leaves 16~ 3 inch X 11 ½ inch 1) Place a 2 inch X 2 inch square in the corner of the 5 inch square. Draw a line down the center and sew on this line. There are a lot, so if you want to eyeball the line that would be ok too! 2) Repeat step one until all the corners have squares sewn to them. This is speed piecing at it s finest! 3) Cut the corner off ¼ past the sewn line. 4) Fold back corners and iron flat. Repeat will all flower blocks. 5) Take the green stems { 1 inch X 7 inch} and place sort of in the center of the background 5 inch X 7 inch. Raw edge appliqué them to the back ground. {this is sewing 1/8 th inch from sides both sides} 6) Place a leaf on 9 of these and raw edge appliqué them down. You can choose their placement for more of a whimsy style. Some are high, low and on the left of right side of the stem. 7) Sew these stem pieces to the flowers. 8) Add a spacer in between each flower, alternating a flower with a leaf, then a flower without a leaf. When getting to the last 2 spaces measure the length of your quilt. You will need to adjust the spacers. I ended up with 60 inches and needed to take off ¼ inch off of 2 spacers. 9) Sew the borders to the top and bottom of your quilt. I really was at a loss at what to add next. I am perfectly happy with how mine turned out and auditioned a few additional borders, but nothing fit it. For me it is finished. If you would like to add another border, than please do. There are no rules on this if it needs it in your mind, then give it to it! Don t deny the quilt a border if it is asking for another one! Hint: I will sew a stay stitch along the pieced sides so they don t get all stretched when quilting it. Thanks for participating and sewing along with the Round Robin. This has been the 2 nd one and both are wonderful!! Thanks to all those who designed for us: Joanhttp:// Roshttp://rosa munda.blogspot.com/ Mollyhttp://mollyscottage.blogspot.com/ Bethhttp:// Reezehttp://katlovesquilts.blogspot.com/ Carriehttp://cricketsstudio.blogspot.com/ Follow along my sewing adventure and more Round Robins to come None of these patterns can be copied and sold They are the property of each designer. Contact them individually with questions and permissions.
Patchwork Posse Round Robin ~ Border #7
 Patchwork Posse Round Robin ~ Border #7 By Carrie Graziano at crickets studio http://cricketsstudio.blogspot.com Hello! Welcome to border #7 in our very super fun round robin. I have so loved all the border
Thanks to the designers who helped with this Round Robin #2 Quilt:
 Thanks to the designers who helped with this Round Robin #2 Quilt: Konda- Moose on the Porch Joy- Joy s Quilts Donna- In Stitches Designs Robin- Robin Quilts Angie- Quilting Melodies Molly- Molly s Cottage
THE FLOWER FAIRIES. The Red Boot Quilt Company
 THE FLOWER FAIRIES The Red Boot Quilt Company www.theredbootquiltcompany.com THE FLOWER FAIRIES Approx. Size 62in x 61in BEFORE THE FUN BEGINS Please read all instructions before you begin. Abbreviations.
BUTTERFLY GARDEN. The Red Boot Quilt Company
 BUTTERFLY GARDEN The Red Boot Quilt Company www.theredbootquiltcompany.com BUTTERFLY GARDEN Approx. Size 89 1/2in length x 92 1/2in width BEFORE THE FUN BEGINS Please read all instructions before you begin.
This is an original pattern not intended for sale.
 Hello Moda Bake Shop Friends!! It's Melissa Corry here popping over from Happy Quilting!!! I am super excited to share with you a final Summer Of Solids Quilt tutorial!!! I love making Red, Black, and
THE FLOWER FAIRIES. This is a free pattern provided by The Red Boot Quilt Company 2017 STRICTLY NOT FOR RESALE OR DISTRIBUTION
 THE FLOWER FAIRIES This is a free pattern provided by The Red Boot Quilt Company 2017 STRICTLY NOT FOR RESALE OR DISTRIBUTION The Red Boot Quilt Company The Red Boot Quilt Company THE FLOWER FAIRIES Approx.
 Flower Festival by Debbie Beckwith Graves 33" x 39" Featuring fabrics from the collection by Materials E30-BUNDLES-081 E60-1412-GRN E60-1414-ORG E60-1415-TURQ (backing) E60-1416-BLU (incl. binding) E60-1416-ORG
SCRAPPY DAISIES. The Red Boot Quilt Company
 SCRAPPY DAISIES The Red Boot Quilt Company www.theredbootquiltcompany.com SCRAPPY DAISIES Approx. Size 70 1/2in x 70 1/2in This is a free pattern provided by The Red Boot Quilt Company 2018 STRICTLY NOT
I Love Home Block of the Month INTRODUCTION
 INTRODUCTION The name of this BOM is I Love Home - I happen to be a homebody! While I travel a fair amount, I am always, always happy to be home again, surrounded by my favorite, familiar things. Before
SUNSHINE & DAISIES. The Red Boot Quilt Company
 SUNSHINE & DAISIES This is a free pattern provided by The Red Boot Quilt Company 2015 STRICTLY NOT FOR RESALE OR DISTRIBUTION The Red Boot Quilt Company www.theredbootquiltcompany.com SUNSHINE & DAISIES
Finished Size: 75"x 75"
 Finished Size: 75"x 75" Finished Size: 75"x 75" Block Size: 1"x1" and 6"x6" Quilters Basics Read instructions before beginning a project. All instructions include a ¼" seam allowance. Press as you go.
Sawtooth Star Ornament with Applique Center
 Sawtooth Star Ornament with Applique Center Sawtooth Star with Applique Center Ornament/2 To make one Sawtooth Star Ornament with Applique Center you will need: 8 square of White or light colored background
S TA C K, SLASH & SASH. Quilting. Quilting 10+ unique projects
 Quilting S TA C K, SLASH & SASH Quilting 10+ unique projects 141355 S TA C K, S L A S H & SASH Quilting Edited by Carolyn S. Vagts 2 Introduction is all about creating uniquely beautiful quilts. Create
Charmed. Finished Size 48 x 60 Finshed Block 9
 Charmed Finished Size 48 x 60 Finshed Block 9 Materials Needed: 3 1/2 yards of the brown floral (8786-9), for blocks and backing 1 1/4 yards of the brown stripe (8792-9) 1 1/4 yards of the pink butterfly
Daisies & Dots A Piece O Cake Pattern by Becky Goldsmith and Linda Jenkins featuring our Daisies & Dots fabric collection from Robert Kaufman.
 Daisies & Dots A Piece O Cake Pattern by Becky Goldsmith and Linda Jenkins featuring our Daisies & Dots fabric collection from Robert Kaufman. 2010 Piece O Cake Designs Finished size: 52 1/2" x 52 1/2"
SMILE AND STAND TALL By Suzan Pons
 SMILE AND STAND TALL By Suzan Pons Size: 44 x 50 Main Fabric: about 40 assorted strips of batik fabric 2 ½ inches x 44 inches Inner Border: about 10 inches of contrasting fabric, WOF Side borders are 1
Original Recipe. Flying in Squares Quilt by Melissa Corry
 Original Recipe Flying in Squares Quilt by Melissa Corry Hello Moda Bake Shop fans!!! I am so excited to be back today to share a "high flying" tutorial with you all ;) I'm Melissa Corry and I normally
LITTLE BEARS. The Red Boot Quilt Company
 LITTLE BEARS The Red Boot Quilt Company www.theredbootquiltcompany.com LITTLE BEARS Approx. Size 68 1/2in x 70 1/2in BEFORE THE FUN BEGINS Please read all instructions before you begin. Abbreviations.
A SPOOKY SLEEPOVER. This is a free pattern provided by The Red Boot Quilt Company The Red Boot Quilt Company
 A SPOOKY SLEEPOVER The Red Boot Quilt Company The Red Boot Quilt Company A SPOOKY SLEEPOVER Approx. Size 38 1/2in x 57 1/2in BEFORE THE FUN BEGINS Please read all instructions before you begin. Abbreviations.
DOTTI. The Red Boot Quilt Company
 DOTTI The Red Boot Quilt Company www.theredbootquiltcompany.com DOTTI Approx. Size 52 1/2in x 52 1/2in This is a free pattern provided by The Red Boot Quilt Company 2018 STRICTLY NOT FOR RESALE OR DISTRIBUTION
Original Recipe. Original Recipe can be found at
 Original Recipe Hi Moda Bake Shop Readers!! I'm Melissa Corry from Happy Quilting and I am so excited to be back here at the Moda Bake Shop to share my Read With Me quilt!! This fun twist on a standard
PRETTY IN PINK. The Red Boot Quilt Company. This is a free pattern provided by The Red Boot Quilt Company 2017 STRICTLY NOT FOR RESALE OR DISTRIBUTION
 PRETTY IN PINK This is a free pattern provided by The Red Boot Quilt Company 2017 STRICTLY NOT FOR RESALE OR DISTRIBUTION The Red Boot Quilt Company The Red Boot Quilt Company PRETTY IN PINK Approx. Size
SCRAPPY BEARS. The Red Boot Quilt Company
 SCRAPPY BEARS The Red Boot Quilt Company www.theredbootquiltcompany.com SCRAPPY BEARS Approx. size 27 1/2in x 27 1/2in This is a free pattern provided by The Red Boot Quilt Company 2018 STRICTLY NOT FOR
A SPOOKY SLEEPOVER. The Red Boot Quilt Company
 A SPOOKY SLEEPOVER The Red Boot Quilt Company www.theredbootquiltcompany.com A SPOOKY SLEEPOVER Approx. Size 38 1/2in x 57 1/2in BEFORE THE FUN BEGINS Please read all instructions before you begin. Abbreviations.
Original Recipe. Windy Days Quilt by Sarah Meyer
 Original Recipe Windy Days Quilt by Sarah Meyer Hi! I'm Sarah of SarahB Designs {sew.sarahbdesigns.net} and I'm so happy to bring you another fun Moda precut recipe! The classic pinwheel pattern is one
This quilt finishes at 66" x 82". So let's get right to what you need to do to make your own ;)
") Hi Moda Bake Shoppers!!! It's me, Melissa Corry from Happy Quilting and I am thrilled to be bringing you another fun and happy quilt tutorial today ;) I have been a huge fan of Vanessa Christenson's Ombre
Hi Moda Bake Shoppers!!! It's me, Melissa Corry from Happy Quilting and I am thrilled to be bringing you another fun and happy quilt tutorial today ;) I have been a huge fan of Vanessa Christenson's Ombre
Lone Star Quilt from a Jelly Roll. Written by Donna Jordan for Jordan Fabrics Finished Size: 58 x 74
 Lone Star Quilt from a Jelly Roll Written by Donna Jordan for Jordan Fabrics Finished Size: 58 x 74 Required Materials: 36 2 ½ Strips WOF Background and border: 3 ½ yards Binding: 5 /8 yard Backing: 3
Original Recipe. Take It All Tote by Melissa Corry
 Original Recipe Take It All Tote by Melissa Corry Hi everyone!! It's Melissa from Happy Quilting {happyquiltingmelissa.blogspot.com} and I am so excited to get to share another fun-filled tutorial with
Blessings Quilt Tutorial
 Blessings Quilt Tutorial Hi everyone! I love fall (even though I know what follows), and when I saw the cute little critters on Perfectly Seasoned by Sandy Gervais for Moda, I had to have them! And the
So once you get your 12 pieces sewn together, that s going to give you the width for your background fabric. And then I went ahead and sewed 8 half ch
 Hi, I m Jenny from the Missouri Star Quilt Company. Every time I do a trunk show, I show this wall hanging. I ve fallen in love with the Dresden, and I show a lot of different Dresden things, and this
Cat's Night Out. Prepare Templates: Prepare templates as directed on the Template Pages.
 Quilt by Lucy A. Fazely & Michael L. Burns Finished Quilt: 78" x 80-1/2" - Finished Block Size: 6" to 12" Nature's Studio fabrics by Classic Cottons - Style #3644 Fabric Requirements: Based on 44" wide
SPRING MANDALA Cushion
 SPRING MANDALA Cushion The Red Boot Quilt Company SPRING MANDALA Quilt The Red Boot Quilt Company www.theredbootquiltcompany.com SPRING MANDALA QUILT & CUSHION Approx. size Quilt 56 1/2in x 56 1/2in Cushion
here and a block, right here. You ll sew this block onto here and you ll put this whole strip across the middle, just like that.
 Hi, it s Jenny from the Missouri Star Quilt Company. Take a look at this great quilt behind me. This is my version of a spool quilt. I love spool quilts and I ve had one in my head for quite a few years
Christmas Stocking 1. The finished size is 17.5 long from top of folded cuff to toe, 21.5 unfolded, and 6.5 wide.
 Christmas Stocking 1 The finished size is 17.5 long from top of folded cuff to toe, 21.5 unfolded, and 6.5 wide. For each stocking you ll need: 2 outside pieces 2 lining pieces 2 cuff pieces 1 6 piece
Happy Winter Snowman Quilt
 1 Happy Winter Snowman Quilt This quilt is sure to become a classic addition to your décor at Christmas time. Rows of fun snowmen and loving hearts are highlighted against a deep blue winter sky. The quilt
THIS LITTLE PIGGY Mystery Block-of-the-Month MONTH #1
 THIS LITTLE PIGGY Mystery Block-of-the-Month MONTH #1 The Red Boot Quilt Company The Red Boot Quilt Company THIS LITTLE PIGGY BOM MONTH #1 Approx. size block 17 1/2in BEFORE THE FUN BEGINS Please read
Materials List: 8 fat quarters- this will give you a nice variety to choose from when sewing the blocks. You will need some variety in value lights,
 Materials List: 8 fat quarters- this will give you a nice variety to choose from when sewing the blocks. You will need some variety in value lights, darks and mediums. Leftovers will be sewn for the scrappy
Beetles, Bees, and Butterflies
 Beetles, Bees, and Butterflies A Whimsical Row Quilt Designed by Debbie Beckwith Graves 48 ½" x 53" Featuring fabrics from The Happy Garden collection by Courtesy MHS Licensing for Materials Navy Happy
Printing & Assembling Quilted Frog Download Patterns
 Printing & Assembling Quilted Frog Download Patterns To open & print the pattern you will need Adobe Reader. Adobe Reader is a program you can obtain free of charge at: http://get.adobe.com/reader/?promoid=buigo
Original Recipe. Christmas Traditions Advent Calendar
 Original Recipe Christmas Traditions Advent Calendar It's Christmas in July!!! Hi everyone, it's Melissa from Happy Quilting {happyquiltingmelissa.blogspot.com}. Don't you just love the Christmas season???
through all your theme fabrics. So I told you you needed four half yards: the dark, the two mediums, and the light. Now that you have the dark in your
 Hey everybody, it s Rob from Man Sewing. And I cannot believe I get to present this quilt to you today. That s right. This is the very first quilt I ever made. My first pattern I ever designed, originally
STEP 2 - NINE PATCH BLOCKS
 Hello Fellow Moda Bake Shop Friends. It's Melissa from Happy Quilting again and I am so excited to share this new quilt tutorial with you today ;) Last Market I was instantly drawn to the beautiful Ambleside
Not so Top Secret Project
 Not so Top Secret Project www.alyciaquilts.blogspot.com Finished size 57 x 66 Well Here it is Drawn out in EQ. Notice that it is a two color quilt. So there are many ways to do this. You can choose just
Diamonds are a Quilter s Best Friend 2018 Mystery Quilt
 2018 Mystery Quilt Layer Cake? Do you, like me, have a few layer cakes in your stash? Do you take them out and pet them every so often? Well, it s time to dig one out! This year s Mystery Quilt is based
Loves me Loves me not Designed and made by Suzan Pons
 Loves me Loves me not Designed and made by Suzan Pons 70 x 70 inches Fabric Requirements and Supplies Sashing & triangles: 1 ½ yards Background squares & borders: 3 ½ yards Bias binding: ½ yd. Flowers:
Folk-Art Dish Garden
 Folk-Art Dish Garden Designed by Kim Diehl Finished quilt size: 20½" x 24½" Finished center block size: 11½" x 15½" ~ 1 ~ Materials ⅝ yard of tan print #1 for background 1 chubby sixteenth (9" x 11") each
Happy Hot Dogs. 52 x 52 Quilt (8 ½ blocks)
") Happy Hot Dogs By 52 x 52 Quilt (8 ½ blocks) Cut 2 8 ½ strips white flower fabric, cut into 5 8 ½ squares Cut 1 8 ½ strip aqua flower fabric, cut into 4 8 ½ squares Cut 1 8 ½ strip white focal fabric,
Happy Hot Dogs By 52 x 52 Quilt (8 ½ blocks) Cut 2 8 ½ strips white flower fabric, cut into 5 8 ½ squares Cut 1 8 ½ strip aqua flower fabric, cut into 4 8 ½ squares Cut 1 8 ½ strip white focal fabric,
Select nine fabrics that go nicely together. 1 light, 4 medium, and 4 dark prints.
 Kathy s Version of the Disappearing Nine Patch Quilt 46 ½ x 64 ½ This version uses nine fabrics, is stripped pieced, and has side borders only. As simple as pie to make and yet so warm and cozy. Use the
EASY PET MATS. The Red Boot Quilt Company
 EASY PET MATS The Red Boot Quilt Company EASY PET MATS The Red Boot Quilt Company EASY PET MATS Approx. size 11 1/2in x 16 1/2in BEFORE THE FUN BEGINS This is a free pattern provided by The Red Boot Quilt
GHOSTS & GHOULS. This is a free pattern provided by The Red Boot Quilt Company 2017 STRICTLY NOT FOR RESALE OR DISTRIBUTION
 GHOSTS & GHOULS This is a free pattern provided by The Red Boot Quilt Company 2017 STRICTLY NOT FOR RESALE OR DISTRIBUTION The Red Boot Quilt Company GHOSTS & GHOULS Wall-hanging 40 1/2in square Trick
we re doing all of the background, then we stop. We put on the borders and then we come back and we ll finish out the eagle.
 I was so lucky to be standing on the upper deck of this cruise ship in Sitka, Alaska when this bald eagle flew right over the top of me and I had my camera with me. So of course I got very inspired and
So I m just going to line up my needle on the seam. And mine aren t perfect. And I don t die over it. I just do the best I can. And see you just keep
 Hi I m Jenny from the MSQC. I ve got a really fun project for you today. This is the zig zag runner. This is put together just using charm squares. You can use leftovers or a whole charm. You can make
our strips. So it made really good use of this roll up. So we hope you enjoyed this tutorial on the Stair Step block from the MSQC.
 Hi I m Jenny from the MSQC. And I ve got a really fun project for you today. Take a look at this quilt behind me. Isn t this gorgeous? I love these fabrics. I love the blues. It just makes me feel like
Note ook Doodle Pillow
 Note ook Doodle Pillow There s nothing better than a project with fun personality, customization and color! This notebook doodle pillow is the best thing next to drawing in the margins of homework, because
Spider Web Supply List & Pre-class Homework
 Spider Web Supply List & Pre-class Homework There are two variations of this quilt - the traditional version with dark webs and a light background and my version with light webs and split kite pieces that
So what we re going to do, we re going to prepare to put these together right sides. So right now the interfacing is on my cutting mat. And it is faci
 This has got to be one of the all time happiest quilts I have ever made. I mean look at these amazing colors, right? This, we are calling the Tutti Fruitti quilt and that s just because of the movement
Finished Size: 60 x70
 Finished Size: 60 x70 Finished Size: 60" x 70" Finished Block Size: 10" x 10" Cutting Label pieces as they are cut Quilters Basics Read instructions before beginning a project. All instructions include
PINWHEEL STAR WORKSHOP QUILT
 PINWHEEL STAR WORKSHOP QUILT Finished Size: 9" x 9" FABRIC REQUIREMENTS fat quarter or less of each fabric Fabric A - Medium (or dark) print for center star Fabric B - Dark (or medium) print for pinwheels,
Original Recipe. Snuggly Squares Baby Quilt by Melissa Corry
 Original Recipe Snuggly Squares Baby Quilt by Melissa Corry Hi, my name is Melissa Corry and this is my first Moda Bake Shop tutorial. To say I am excited would be a huge understatement! I am a huge fan
Hi, I m Jenny from the MSQC. And I am here today with Lisa Hirsch from the Kansas City Modern Quilt Guild. Jenny: Welcome Lisa.
 Hi, I m Jenny from the MSQC. And I am here today with Lisa Hirsch from the Kansas City Modern Quilt Guild. Jenny: Welcome Lisa. Lisa: Thanks for having me, Jenny. Jenny: It s really fun. So we have, in
1 Jelly Roll - Lakeside Gatherings 1 10" Layer Cake - Lakeside Gatherings 3/4 Yards Gray Checks ( ) 2 1/4 Yards Gray Anchor ( )
 2 1/4 Yards Gray Anchor ( )") Leaves a'flutter is a very masculine, fall quilt made from 21-10" Autumn Blaze blocks and one - 20" block with all of the leaves fluttering in different directions. The offset borders make the roomy 71
Leaves a'flutter is a very masculine, fall quilt made from 21-10" Autumn Blaze blocks and one - 20" block with all of the leaves fluttering in different directions. The offset borders make the roomy 71
ROMANTIC PILLOW CHEATING PATCHWORK Jenny Haskins 2001
 ROMANTIC PILLOW CHEATING PATCHWORK Jenny Haskins 2001 This little pillow is a great way to use those left over pieces of fabric you cannot bare to throw out. The secret to the beauty of this pillow is
Original Recipe. Bricks in Bloom by Tracey Jacobsen
 Original Recipe Bricks in Bloom by Tracey Jacobsen Last July, my brother and sister-in-law adopted my niece Molly. They received a phone call from their adoption agency on Friday, and went to pick up their
STEP 2 - FLYING GEESE UNITS
 Hi Moda Bake Shoppers!!! It's me, Melissa Corry from Happy Quilting and I am thrilled to be bringing you a Christmas in July tutorial today ;) I absolutely love everything Joanna at Fig Tree & Co designs
Scooter Strips Wall Hanging
 Scooter Strips Wall Hanging This wall hanging is a quirky take on the traditional log cabin quilt block. It uses fabric of different widths to make the central block off-centre. Adding border strips to
Pinwheel Patch Quilt Pattern JacquelynneSteves.com
 Pinwheel Patch Quilt Pattern Approximate finished size 63 x 81. All seam allowances are 1/4". Fabric Requirements: Brown texture tone-on-tone 1 ½ yds Purple floral ½ yd Blue/green multi stripe 1 yd Blue
Yin and Yang Triangle Block Tutorial By Kathy Yount
 Yin and Yang Triangle Block Tutorial By Kathy Yount Edited by Valerie Bradley My disclaimer: This is not a unique block, but I have no idea what it s called. So I named it the Yin and Yang Triangle Block
Blooming Flowers Quilt
 Blooming Flowers Quilt Created by Linda Wenturine A cute and trendy wall hanging... The Blooming Flowers Quilt features machine embroidery designs from the new BERNINA Exclusive Embroidery Collection Stitch
Requirements. Friendship Quilt Amanda Herring Designs 1
 Requirements Fabric Yardage Sku Fabric Name A FQ C7245-AQUA Hello Lovely - Dots, Aqua B FQ C7245-PINK Hello Lovely - Dots, Pink C 14 x 10 C7245-WHITE Hello Lovely - Dots, White D 14 x 10 C7240-AQUA Hello
Ladybug. Fly Away Home quilt designed by Leigh Headington. Finished quilt: " x " Finished block: 12" square
 Ladybug Fly Away Home quilt designed by Leigh Headington Finished quilt: 64 1 2" x 76 1 2" Finished block: 12" square Fabric Requirements 3/8 yard Dot-C1820 Red 1/4 yard Fun-C3851 Black 1/4 yard Fun-C3851
Fabric and Supplies. Featuring fabrics from the Ellie II collection by Sue Penn for.
 s r e h t a e F Elegant Featuring fabrics from the Ellie II collection by Sue Penn for Finished Quilt Size 50" x 50" Quilt design by Abigail Dolinger for Studioe Fabrics ay Black Colorw Fabric and Supplies
Original Recipe. Large Chrysalis Lattice Quilt by Amy Smart
 Original Recipe Large Chrysalis Lattice Quilt by Amy Smart Hello, fellow Moda Bake Shoppers! My name is Amy Smart and I enjoy sharing my quilting fetish/addiction at my blog Diary of a Quilter {diaryofaquilter.com}.
Winner Designs Get a Grip Half Hexie Templates
 Winner Designs Get a Grip Half Hexie Templates No Slipping ~ No Kidding! No more dreaded Y seams! Half Hexies 3 sizes The Half Hexie Get a Grip Template makes it easy to cut multiple layers quickly & accurately.
Finishes Size: 95" x 95" 2000, 2015, RJR Fabrics. All rights reserved. r
 Finishes Size: 9" x 9" 000, 0, RJR Fabrics. All rights reserved. r0.06- New Moon features a mariner s compass block alternated with a traditional pineapple block. Set side-by-side and with carefully shaded
Old Glory One Stamp. Alternate Piano Key Border. Morning Glory Designs by Reeze L. Hanson Quilts of Valor Pattern 65 x 79
 Old Glory One Stamp Alternate Piano Key Border Morning Glory Designs by Reeze L. Hanson Quilts of Valor Pattern 65 x 79 Instructions for cutting and piecing Quilt Panel and Border 1 1. Trim the quilt panel
HERE, KITTY KITTY Stitchery Pattern
 HERE, KITTY KITTY Stitchery Pattern This is a free pattern provided by The Red Boot Quilt Company 2017 STRICTLY NOT FOR RESALE OR DISTRIBUTION The Red Boot Quilt Company www.theredbootquiltcompany.com
Original Recipe. Original Recipe can be found at
 Original Recipe Hey, there! I'm so glad you've popped in to see what's cookin' at the Moda Bake Shop today! This is my first time here, so let me introduce myself. My name is Julie Cefalu and I share my
Block Lesson #11. Lesson Supplies UPDATED. Preparing the binding strips. Skill Builder BOM BLOCK LESSON #11 NOVEMBER 20, 2013
 UPDATED 1 BLOCK LESSON #11 NOVEMBER 20, 2013 Block Lesson #11 Skill Builder BOM In this lesson you will learn how to join your finished quilted and trimmed quilt blocks together with binding joints to
Royal Purple Blossoms
 Royal Purple Blossoms The cutwork and colors of this mat have a distinctly Oriental flair. Project Specifications Skill Level: Beginner Candle Mat Size: 17" diameter Fabric & Batting Fat quarter of light
Spring Time Birdie Bag
 Page 1 Spring Time Birdie Bag Mandy Murray Materials Page 2 45cm x 90cm White Waffle Weave Fabric 45cm x 90cm Pellon 45cm x 90cm Pre-Quilted Lining Fabric 4 x 15cm Co-ordinating Fabric for Bird Appliqué
Finishes 80" square. Available in two colorways.
 Finishes 80" square. Available in two colorways. Jinny eyer s Chelsea quilt is based on an asymmetrical log cabin block so the construction is straightforward. Strongly contrasting colors on the two halves
Every Blooming Thing By Jill Finley
 Every Blooming Thing By Jill Finley Finished Size: 39 x 42 This charming little quilt has some piecing to create the watering can and flower border, but the focal point here is the beautiful appliqued
featuring REVERIE COLLECTION AGF STUDIO
 featuring REVERIE FREE PATTERN COLLECTION BY AGF STUDIO QUILT DESIGNED BY AGF STUDIO FABRICS DESIGNED BY AGF STUDIO FUS-R-800 SPRAYED BLOOMS REVERIE FUS-R-801 + YOUR HEART REVERIE FUS-R-802 FLORAL FROLIC
Originally published in the book Fresh from the Garden
 Free Project for more basic quilting resources and patterns visit landauerpub.com Punkin Quilt Originally published in the book Fresh from the Garden by Dodi Lee Poulsen Photos, illustrations and text
Flora s Petals Embroidery Designed and Digitized by Janet Sansom
 Flora s Petals Embroidery Designed and Digitized by Janet Sansom Fabric: 1.7m white quilters muslin (150cm wide) 3.6 m backing fabric 112cm (44in) wide 20cm each of 2 pink (1 light and 1 darker) and 2
 Fling by Laura Jones 57" x 68" Featuring fabrics from the E60-1439-GRY E60-1440-PUR E60-1441-PUR E60-1442-GRN E60-1443-TURQ E60-1444-PUR E60-1444-GRY (includes binding) collection by Materials 1 Yard 1
Original Recipe can be found at
 Original Recipe When Lisa told me that Moda Bake Shop was doing a series of texty projects, I instantly knew what I wanted to make. My boys had been telling me for months that I needed to make it. A mock-up
" At Home Among the Gum Trees "
 " At Home Among the Gum Trees " This striking quilted wallhanging has a background of two different blocks a Courthouse Steps block and a Triangle block arranged alternatively. Their colours are pale fawns,
HERE, KITTY KITTY Stitchery Pattern
 HERE, KITTY KITTY Stitchery Pattern This is a free pattern provided by The Red Boot Quilt Company 2017 STRICTLY NOT FOR RESALE OR DISTRIBUTION The Red Boot Quilt Company The Red Boot Quilt Company HERE,
Spring Diaries Quilt ~ ~ ~ ~ ~ ~ ~ ~ ~ ~
 Spring Diaries Quilt ~ ~ ~ ~ ~ ~ ~ ~ ~ ~ This lovely quilt is perfect for any time of year in the spring and summer to echo the sunny seasons, or in autumn and winter to bring a welcome splash of warm
know you ve got your little three piece where they re all hooked together. I m going to take my next three piece, make sure that I don t have anything
 Hi, I m Jenny from the MSQC. I have a super fun project for you today. Take a look at these darling little Christmas stockings behind them. Christmas is coming. It s never too early to prepare and this
Linda Brown, Sue Dittler, Sandy Miller, Lucy Ricardo, and Carole Thommen
 Linda Brown, Sue Dittler, Sandy Miller, Lucy Ricardo, and Carole Thommen Edited by: Sharon Reilly Teena Livsey YO-YO s especially ornament balls By: Lucy Ricardo Supply list: Scraps of fabric 1 ½ circle
Individual Block Sizes: Teapot 6 x 9 Teacup 3 x 4-1/2 Broken Dishes 1-3/4 x 1-3/4
 +VERHQEWIEEVX] Size of Quilt (as shown): "h x -/" w (approx.) Individual Block Sizes: Teapot x 9 Teacup x -/ Broken Dishes -/ x -/ Fabric and Notions Needed: / yd background / yd for inner border and binding
Tuning My Heart Quilts by Debra Davis
 Tuning My Heart Quilts by Debra Davis - Tuning My Heart Quilts, LLC We Can Build A Snowman A Block of the Month Program by Debra Davis Tuning My Heart Quilts, LLC Block 10: Ain t it Thrilling Finished
Sand Surf and Sun. APQS Lethbridge a Ave North Lethbridge Alberta Canada
 Sand Surf and Sun APQS Lethbridge 1253 2a Ave North Lethbridge Alberta Canada 403-942-5333 www.finelyquilted.ca email: info@finelyquilted.ca 1 Fabric requirements: Background Squares 1.4 yards (1.2m) Sashing
Pure Joy! Finished Size: Approximately 38 ½ x 44 ½
 Pure Joy! Finished Size: Approximately 38 ½ x 44 ½ Easy strip-piecing and dimensional flowers make this darling baby quilt irresistible and a pure joy to make for someone special! The fabric used in the
If you haven t done so already, see Preliminary Cutting Instructions on page 4 of the Introduction for best use of your fabric.
 If you haven t done so already, see Preliminary Cutting Instructions on page 4 of the Introduction for best use of your fabric. Block 3 You will need: White (1) 10 square for appliqued or embroidered center
Scrappy Firework Quilts. by Edyta Sitar for Laundry Basket Quilts
 Free Project for more basic quilting resources and patterns visit landauerpub.com Sewing Box Originally published in the book Scrappy Firework Quilts by Edyta Sitar for Laundry Basket Quilts Photos, illustrations
Canadian Quilters Association Pattern: Quilting Tools Tote Bag
 Canadian Quilters Association Pattern: Quilting Tools Tote Bag Description: * Size: 24 x 28", storage for: 6 x 24" ruler and 18 x 24" cutting mat, and all other equipment. * Easy to carry to workshops
This little piece here I created is some of the scraps and then samples I was making for today s show. And these are wonderful for doing like
 Hey everybody, welcome back to Man Sewing. This is Rob and today on the show, I m going to teach you how I like to do my curve piecing. Now I can t take all the credit for this. Ricky Tims, a good friend