Darning plate 31. Sewing embroidery 31. Sewing zippers 30. Sewing buttonholes Blind hem 27. Threading the upper thread 18
|
|
|
- Sandra Griffith
- 6 years ago
- Views:
Transcription
1
 11 Free-arm sewing 1 1 Raising or lowering the presser foot 12 Spool pin 12 Removing and attaching")
2 r TABLE OF CONTENTS KNOW YOUR SEWING MACHINE Name of parts 45 Accessories 6-7 the to connect the machine to the power supply 8 How to use the foot control 8 Sewing light 8 Thread and needle chart 9 Changing the needle 10 To select a correct needle 10 Take off the accessory box (extension table) 11 Free-arm sewing 1 1 Raising or lowering the presser foot 12 Spool pin 12 Removing and attaching the presser foot 13 Straight stitch foot 14 Thread tension 15 Winding the bobbin 16 Threading the bobbin case 17 Threading the upper thread 18 Bring up the bobbin thread 19 Pattern selector 20 Stitch length dial, reverse stitch 21 BASIC SEWING Straight stitch and zigzag stitch 22 Begin sewing 22 Change sewing directions 22 Fastening seams 23 UTILITY STITCHING Triple stretch stitch 24 Triple straight stretch stitch 24 Triple zigzag stretch stitch 24 3-step zigzag stitch 25 Smocking stitch 25 Overlock stitch 26 Shell stitch 27 Blind hem 27 Sewing buttonholes Sewing zippers 30 Sewing embroidery 31 Darning plate 31 MACHINE CARE AND TROUBLE SHOOTING Cleaning the feed teeth 3 Cleaning the shuttle race 3 Trouble shooting; Causes and remedies 34-3E
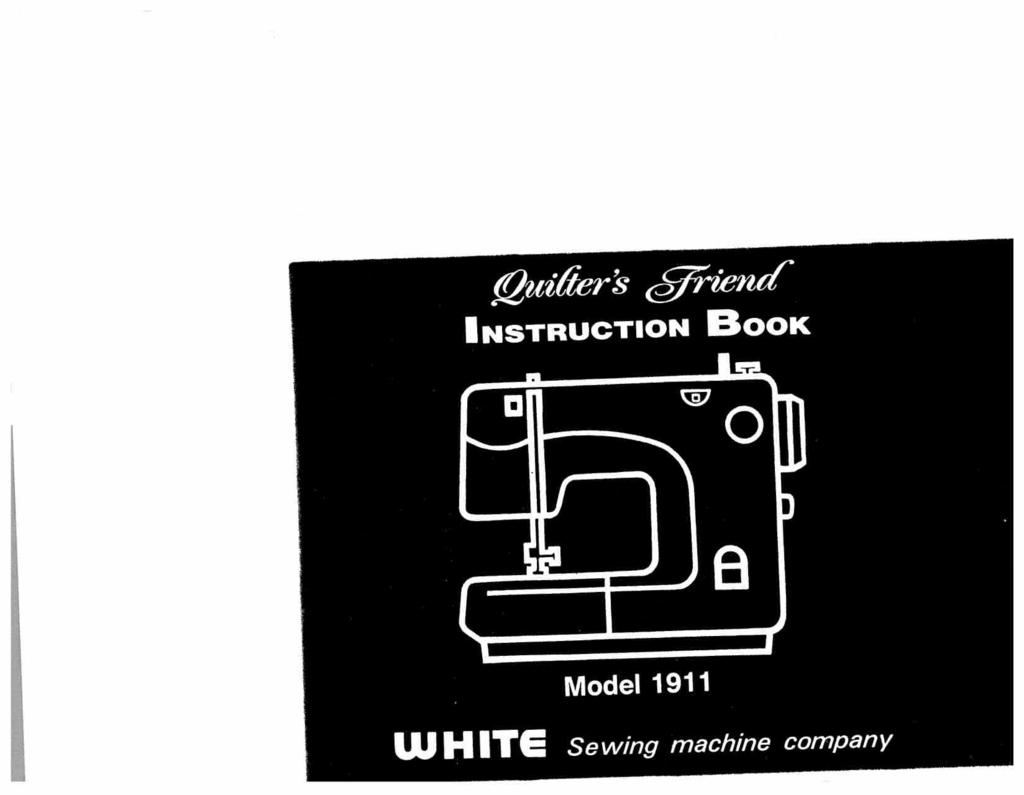
3 Oot Controller Model 4C-316s201sJ made by Matsusita Electric Co., for use with sewing machine Models 1911 POLARIZED PLUG CAUTION o reduce the risk of electric shock, this appliance has a polarized plug (one blade is wider ian the other). This plug will fit in a polarized outlet only one way. If the plug does not fit fully i the outlet, reverse the plug. If it still does not fit, contact a qualified electrician to install the roper outlet. Do not change the plug in any way. SEWING MACHINE Record in space provided below the Serial No. and Model No. of this appliance. The Serial No. is located Rear of arm. The Model No. is located Rear of arm. Serial No Model No. Retain these numbers for future reference. he sewing machine is for Household Use.

4 IMI- ORTANT SAFETY INSTRUCTIONS When using an electrical appliance, basic safety precautions should always be followed, including the following: Read all instructions before using (this appliance). DANGER To reduce the risk of electric shock: An appliance should never be left unattended when plugged in. Always unplug this appliance from the electric outlet imn after using and before cleaning. WARNING To reduce the risk of burns, fire, electric shock, or injury to persons: 1. Do not allow to be used as a toy. Close attention is necessary when this appliance is used by or near children. 2. Use this appliance only for its intended use as described in this manual. Use only attachments recommended by the man er as contained in this manual. 3. Never operate this appliance if it has a damaged cord or plug, if it is not working properly, if it has been dropped or dama mechanical adjustment. 4. Never operate the appliance with any air openings blocked. Keep ventilation openings of the sewing machine and foot co free from the accumulation of lint, dust, and loose cloth. 5. Never drop or insert any object into any opening. 6. Do not use outdoors. 7. Do not operate where aerosol (spray) products are being used or where oxygen is being administered. 8. To disconnect, turn all controls to the off ( 0 ) position, then remove plug from outlet. 9. Do not unplug by pulling on cord. To unplug, grasp the plug, not the cord. DANGER 1. Always unplug before replacing light bulb. Replace the bulb with same type rated 15 watts. 2. Do not reach for an appliance that has fallen into water. Unplug immediately. 3. Do not place or store appliance where it can fall or be pulled into a tub or sink. Do not place or drop into water other Ii
5 IVARNING 1. Keep fingers away from all moving parts. Special care is required around the sewing machine needle. 2. Always use proper needle plate. The wrong plate can cause the needle to break. 3. Do not use bent needles. 4. Do not pull or push fabric while stitching. It may deflect the needle causing it to break. 5. Switch the sewing machine off ( 0 ) when making any adjustments in the needle area, such as threading needle, changing nee dle, threading bobbin, or changing presser foot, etc. 6. Always unplug sewing machine from the electrical outlet when removing covers, lubricating, or when making any other user ser vicing adjustments mentioned in the instruction manual. 7. Never operate on a soft surface such as a bed or couch where the air openings may be blocked. SAVE THESE INSTRUCTIONS
6
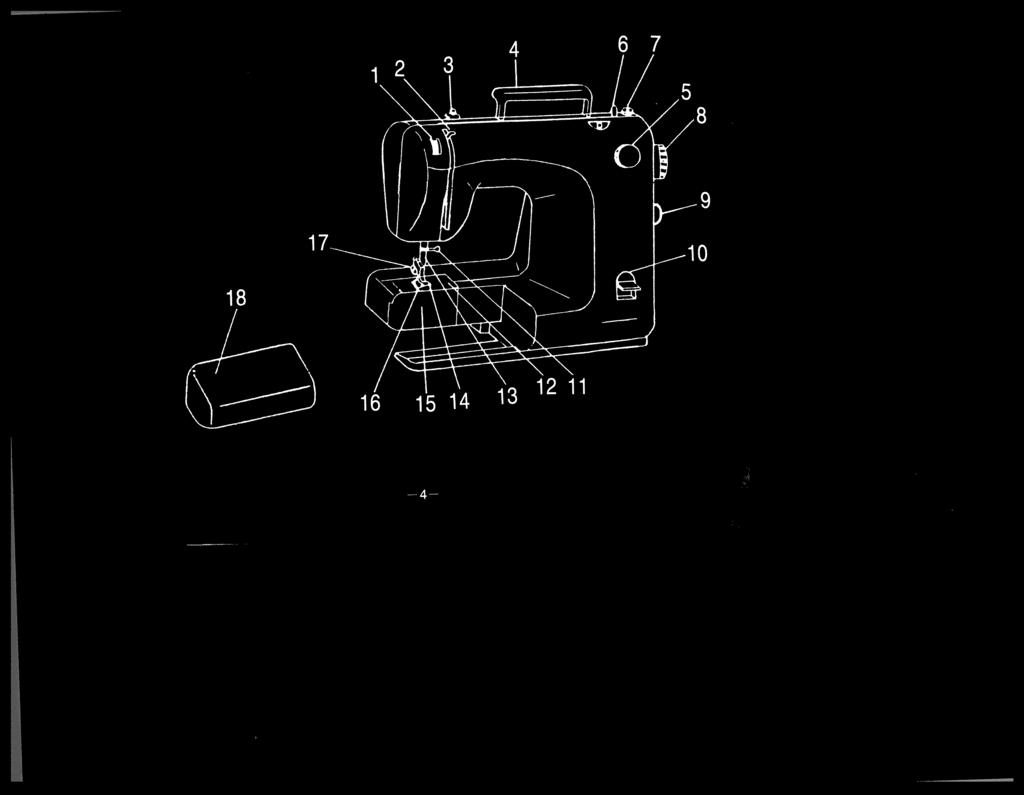
7 1. Thread tension dial 2. Thread take-up lever 3. Bobbin winder thread guide 4. Carrying handle 5. Pattern selector dial 6. Bobbin winder spindle 7. Bobbin winder stop 8. Hand wheel 9. Stitch length dial 10. Reverse lever 11. Needle clamp and screw 12. Needle 13. Needle plate 14. Presser foot 15. Shuttle cover 16. Feed teeth 17. Presser foot thumb screw 18. Accessory box, extension table
8 0) r\) a, (0 U r$ I -0 o 40 > C-) C, m Cl.) U) 0 m Cl)
9 1. Felt pads 2. Bobbins 3. Oil 4. Screw driver (small) 5. Screw driver (large) 6. Needle case 7, Seam ripper 8. ButtonhOle foot 9. Zipper toot 10. Brush ii. Spool pin 12. Sewing light holder (for replacing the bulb) 13. Staight stitch foot 14. Darning plate 7
10 HOW TO CONNECT THE MACHINE TO THE POWER SUPPLY 1. Push the machine plug into the machine. 2. Plug the machine to the power supply. Note: Before plugging in the machine, ensure that the voltage and number of cycles indicated, is conlormed to your electrical power supply. HOW TO USE THE SPEED CONTROLLER Sewing speed can be varied by the foot control. The harder you press on the foot control, the faster the machine runs. Note: By releasing the foot control, the machine stops running automatically. Before using the machine, practice controlling the speed with out threading. HOW TO REPLACE THE SEWING LIGHT BULB Before replacing a bulb, disconnect the machine from the power supply. To replace the sewing light bulb, use the bulb holder which you may find in the accessory storage. Push the holder from bottom until the lug over the bulb and twist the holder together with bulb counter-clockwise, until the bulb is taken out. To replace the new bulb, twist the holder together with bulb clockwise. 8 -
11 THREAD AND NEEDLE CHART FABRICS THREADS NEEDLE SIZE Fine Silk LIGHT Crepe de Chine, Voile Fine Cotton WEIGHT Lawn, Organdy, Georgette, Tricot Fine Synthetic Fine Cotton Covered Polyester 9 or Silk MEDIUM Linens. Cotton, Pique 50 to 80 Cotton WEIGHT Serge, Double Knits, Percale 50 to 60 Synthetic Denim. Tweed, Gabardine, Cotton Covered Polyester 50 Silk HEAVY 40 to 50 Cotton 11 or 14 Coating, Drapery and Upholstery 14 or 16 WEIGHT 40 to 50 Synthetic Fabric Cotton Covered Polyester Note: In general. tine threads and needles are used for sewing thin fabrics, and thicker threads and needles are used for sewing heavy fabrics. Always test thread and needle size on a small piece of fabric which will be used for actual sewing. Use the same thread for needle and bobbin. When sewing stretch, very fine fabrics and synthetics, use a stretch needle. The stretch needle prevents skipped stitches. When sewing very light weight fabric use stabilizer underneath as needed. -9
12 the CHANGING THE NEEDLE 1. Turn the hand wheel towards you until the needle is at the highest position. 2. Loosen the needle clamp screw by turning the screw towards you. Remove the needle from the clamp. 3. Place the new needle into the needle clamp with the flat side facing away from you. Push the needle up into needle clamp as far as possible. 4, Tighten the needle clamp screw firmly. SELECT THE CORRECT NEEDLE - A number indicating the size of needle is marked on the Shank shank. The higher the number, Blue tipped needle thicker the needle. BA BLUE TIPPED needle for knits is supplied with the machine. Do not use any needle which is bent or blunt. Always use a C good quality needle and change the needle often. 3 i1 1o-
13 TAKE OFF THE ACCESSORY BOX (EXTENSION TABLE) As illustrated pull the accessory box foward you. FREE-ARM SEWING This sewing machine can be used as a flat bed machine, or easily converts to free arm machine by removing the extension table. The free arm enables you to sew tubular projects more easily. Just slip the sleeve or pants leg on the free arm as shown. You will find many uses for this free arm feature such as: 1. Mend elbows and knees of garments easily. 2. Sew in sleeves easily. This is especially true when sewing smaller garments. 3. Applique, embroider or hem cuffs or pants legs. 4. Sewing elastic casings in skirts or pants. 11
14 RAISING OR LOWERING THE PRESSER FOOT 1. By raising or lowering the presser foot lift, the presser foot goes up and down respectively. 2. For additional clearance, the presser foot lift can be raised higher to place heavy or thick fabrices under the foot. SPOOL PIN 1. Take out spool pin from accessory box. 2. Insert the spool pin as illustafed in the direction of arrow into the spool pin base. 3. Put the thread on spool pin. 12
15 REMOVING AND ATtACHING THE PRESSER FOOT To Remove: 1. Turn the hand wheel towards you until the needle is at the highest position. Raise the presser foot by lifting the presser foot lift. 2. By lifting the lever on the back of the foot holder, the presser foot will drop off. Note: Do not force the presser foot to remove it. To Attach: 1. Place the presser foot so that the pin on the foot lies just under the groove of the foot holder. Lower the foot holder. 2. When the presser foot lift is raised, you ll find the presser foot is locked in place. 13
16 STRAIGHT STITCH FOOT Snap on the straight stitch foot when sewing fine fabrics with a straight stitch. Quilters find when piecing quilt tops they use the straight stitch foot for smooth accurate seams. Note: Be sure to replace the straight stitch foot with the zigzag foot when sewing any stitch other a straight stitch because the needle will hit the foot
17 How to adjust the bobbin thread tension THREAD TENSION Gener&ly, thread tension should be controlled by the thread tension dial. Bobbin thread tension has been adjusted at the factory and readjustment is rarely needed. Bobbin thread tension is just right when you can pull the thread from bobbin case easily with a little resistance. Top thread tension may be adjusted by tightening or loosening the thread tension dial, if necessary. Properly adjusted thread tension for straight sewing The needle thread and the bobbin thread should interlock in the center of two layers of fabric The upper thread is too tight The bobbin thread ap pears on the upper surface of the fabrics. Loosen the needle thread tension by moving the dial to the lower number The upper thread is too loose The needle thread ap pears on the underside of the fabrics. Tighten the needle thread tension by moving the dial to the higher number. There are several reasons you might reset your tension. The best tension for one fabric may not be correct for another. The required tension depends upon the stiffness of fabric, thickness of the fabric, numbers of layers of fabric being sewn, as well as the type of stitch you are making. It is better to test the stitching on a scrap of the fabric you are using before starting to make a garment. 15
18 WINDING THE BOBBIN 1 To keep the needle from moving up and down while winding a bobbin, release the clutch by turning the outer hand wheel toward you while holding the inner hand wheel firmly to keep it from turning. Fig.1.3/ 2. Draw thead from spool through bobbin winder tension disc as shown. Fig.2 3. Pull end of thread through hole in bobbin as shown. 4. Place bobbin onto bobbin winder shaft with end of thread coming from the top of the bobbin. Push bobbin winder shaft to the right until it clicks. Holding onto end of thread, start machine. When bobbin is slightly filled, snip off end of thread. 5. Wind thread until winder stops. Remove bobbin. Clip thread. 6. Tighten outer hand wheel. Ni 1 (2 4) N) 5 (L- 4 16
19 THREADING THE BOBBIN CASE Hold the bobbin between the thumb and forefinger of your right hand and pull off about 15 cm (6 inches> of thread. 1. Hold the bobbin case in your left hand as shown and place the filled bobbin into the bobbin case. Fig.1 2. Pull the thread into the slot in the edge of the bobbin case. Fig.2 3. Now pull the thread under the tension spring and into the thread eyelet. Fig.3 To insert the bobbin case and bobbin Ensure that about 15 cm (6 inches) of thread extends out of bobbin case. Hold the bobbin case so that long finger on the case points up. Open the latch of bobbin case. Slip the bobbin case over the center pin of hook and press in place until long finger of the bobbin case enters notch. Release latch and press down. 17

20 THREADING THE UPPER THREAD A Raise presser foot lift. B Raise take-up lever to the highest position by turning hand wheel towards you. Thread following numbers
21 eedie thread P\ BRING UP THE BOBBIN THREAD 1 Hold the end of the needle thread with your left hand. (I) 2. Turn the hand wheel slowly towards you with your right hand until the needle goes down and comes up. Then stop the hand wheel when the take-up lever is at its highest position. Lightly pull up the needle thread to pull up a loop of bobbin thread. 3. Pull about 15 cm (6 inches) of both threads away from you under the presser foot. needle thread bobbin thread 19
22 PATTERN SELECTOR 1 ( ) straight stitch 2 3 ( ) ( ) zigzag stitch triple zigzag (rick rack) stretch stitch pattern selection window pattern selector 4 ( ) triple straight (elastic) stretch stitch 5( overlock stitch 6( smocking stitch 7( 3-step zig zag 8( blind hem stitch automatic buttonhole sewing Turn pattern selector dial until picture of desired stitch appears in the pattern selection window. 20
23 STITCH LENGTH DIAL To change the length of the stitches; turn the dial so that the number for the required stitch length is at setting mark. The numbers indicate the approximate stitch lengths in mm. The lower the number, the shorter the stitch. REVERSE STITCH: Press down reverse lever and hold for reverse stitching. Fabric will immediately start feeding backwards. Release lever and machine will resume normal forward sewing. Very useful for fastening ends of seams and darts without having to tie threads, and for strengthening seams.
24 STRAIGHT STITCH AND ZIGZAG STITCH Presser foot zigzag foot Pattern selector ( ) (for straight stitch) Stitch length dial NW ) (narrow zigzag) (Mv w ) (medium zigzag) (./ N) (wide zigzag) Begin Sewing 1. Be sure both the threads are drawn back under the presser foot. 2. Put the take up lever in the highest position and the threads under the foot to the back and hold them with your left hand. 3. Lower the presser foot, and press the speed controller gently, then start sewing slowly. Sew a few reverse stitches by pushing reverse button for rein forcing the end of seams. Raise the needle to its highest position before turning the pattern selector dial and stitch width dial. To remove fabric easily, stop sewing with the take up lever in the highest position. zigzag foot -22
25 Changing sewing Directions 1. Stop the machine, and turn the hand wheel toward you to bring the needle down into the fabric, Raise the presser foot. 2. Pivot the fabric around the needle to change direction as desired. 3. Lower the presser foot and continue the sewing. Fastening Seams 1. For fastening the ends of seams, press down the reverse button and sew several reverse stitches. 2. To remove the fabric, raise the presser foot and draw the fabric away from you. 3. Cut threads on thread cutter at the rear of presser bar or with a pair of scissors. Leave about 15 cm (6 inches) of thread through the needle. 23

26 TRIPLE STRETCH STITCH When sewing stretch fabrics, use this reinforcing stitch to avoid thread breakage. This is also very suitable for seams that need great strength, e.g. crotch seams or pocket seams. TRIPLE STRAIGHT STRETCH STITCH TRIPLE ZIGZAG STRETCH STITCH Presser foot zigzag foot Pattern selector ( Stitch length dial 4 Presser foot zigzag foot Pattern selector ( jcenth dial 4 Note: Use a BLUE TIPPED needle. The blue tipped needle prevents skipped stitches, on knit fabrics. 24
27 3 STEP ZIGZAG STiTCH SMOCKING STITCH This stitch is very suitable for darning tears. It can also be used for reinforcing stretch materials and overcasting seam allowances. With a narrow strip of fabric directly under the line of gathering, stitch over the gathers. The design will be a series of small diamonds. When smocking a garment, the stitching should be done before the piece is sewn into the garment. Presser foot zigzag foot Pattern selector ( Stitch length dial Presser foot zigzag foot Pattern selector ( Lceth dial 4 Note: Use a BLUE TIPPED needle on knift fabric. The blue tipped needle prevents skipped stitches. 25
28 OVERLOCK STITCH With this seam it is possible to sew seams and over cast the edges in one step. Perfect for knits and ribbing. Presser foot zigzag foot Pattern selector ( Stitch length dial 4 Place the fabric under the presser foot so that the stitches are made at the seam line. Lower the presser foot and start sewing. Guide the material lightly. Sew on a piece of scrap fabric to check the machine setting. Trim away excess seam allowance close to stitching. Note: Use a BLUE TIPPED needle for knits. The blue tipped needle effectively prevents skipped stitches. 26
29 4 mm (1 /6 ) (Fig 2) SHELL STITCH Presser foot zigzag foot Pattern selector ( [ch length dial 1 to 2.5 When sewing this stitch, allow needle to just clear the right edge of the fabric when it zigzags. NOTE: For tricot and soft knits--you may need to increase your tension slightly to achieve the shell affect. BLIND HEM Presser foot zigzag foot Pattern selector ( Stitch length dial 3-4 Press hem in place Fold hem back to the right side as illustrated. Sew along edge of wrong side of hem so that zigzag stitch barely catches fold of fabric. 27
30 SEWING BUTTONHOLES The built-in buttonhole stitch makes it possible to sew buttonholes quickly and easily without turning the material. Presser foot buttonhole foot Pattern selector Li lii Stitch length dial 0.5 to 1 Raise the foot and the needle to its highest position. Snap on the buttonhole foot for sewing buttonholes. Mark the location and the desired length of buttonhole on the fabric using a pencil or tailor s chalk. U Note: To find the most suitable stitch length, it is better to sew a sample buttonhole on a piece of scrap fabric. When sewing very fine fabrics and synthetics, place a piece of stabilizer under the fabric to prevent distortion. Adjust the forward stitch lenght within the area of the LI mark on stitch length dial. 28
31 Place your fabric under the foot and put the needle down into the fabric. 2 Remove the button, put the top thread under the foot and to the rear, and lower the presser foot. Set the pattern selector at 11, and sew the left side until the red mark on the fixed part of the foot lines 3 up with the red line the button came to on the sliding part of the foot. 4 Raise the needle and set the pattern selectorto2 Sew 3 or 4 stitches to stitch the bar tack at the buttonhole end. Sew SEWiNG BUHONHOLES (continued) Always stitch a practice buttonhole on a scrap piece of your garment fabric then adjust stitch length as needed. Snap on the buttonhole foot with the red markings to the left. Pull the sliding portion all the way toward you so the red line on the fixed part of the foot lines up with the first red line on the sliding part. Place the button on top of the foot against the needle and make a note of the red line on the left that the button comes to. You will sew until the stitching reaches this line or in the case of thick buttons, to one line beyond the button to allow room to get the button through the buttonhole. Raise the needle and set the pattern selector to I. the right side of the buttonhole until the red line on the fixed part lines up with the first line on the left. (This is the end of the sliding of the foot.) Raise the needle Set the pattern selectorto24. Take 3 or 4 stitches to bartack the end of the buttonhole. Cut the buttonhole carefully with a seam ripper, taking care not to cut the stitching. Note: For heavier satin stitched buttonholes, stitch the buttonhole twice. 29

32 SEWING ZIPPERS Presser foot. zipper foot Pattern selector ) Lsthtch length dial Raise the foot and the needle to its highest position by turning the hand wheel towards you. Replace the foot with the zipper foot. 1. Pin or baste the zipper tape to the fabric and p ace it in position under the foot. Attach snap on zipper foot so that the needle is on the left side. When starting to sew, both needle and bobbin threads ends should be under the foot and toward the back. I 2. Sew on the right side of the zipper by guiding zipper teeth as close as possible to the needle. Before the foot reaches the slider on the zipper tape, raise the foot and open the zipper while keeping the needle in the fabric. Lower the foot and sew of the the rest of the seam. 3. To sew the left side of zipper change position of the foot to the left side of the needle. Sew in the same way as on the right side of zipper. Zipper foot Needle Zipper teeth Fabric Tape Zipper teeth 30 Fig.3

33 SEWING EMBROIDERY L_ Presser foot Pattern selector (jd ) zig zag Place the fabric in embroidery hoop. (Not included with the machine.) Place darning plate over needle plate (see below). Lower the presser foot lifter. Hold the embroidery hoop firmly with your hand. or While sewing the desired pattern, move the embroidery hoop slowly and do not allow your fingers to get near the needle. Set the needle thread tension a little looser so that the bobbin thread is not pulled through to the right side of fabric. (see page 15). 1t is recommended to mark the required embroidery pattern on the right side of the fabric with a pencil or tailor s chalk. DARNING PLATE There are a few times when you want to control the feeding of the fabric yourself. Raise needle to its highest position and raise presser foot, Place darning plate over needle plate aligning two pins of darning plate with holes of needle plate. You may then determine the movement of the fabric yourself. See above for embroidery. 31--

34 CLEANING THE FEED TEETH Unplug the machine from the power supply. It is important to keep the feed teeth clean for smooth sewing. Remove the needle and the presser foot. Unscrew the needle plate set screws with a screw driver to remove the needle plate from the machine. With a brush, clean out dust and lint clogged on the feed teeth. Replace the needle plate.
35 00 bobbin bobbin case CLEANING THE SHUTTLE RACE (Bobbin Area) Unplug the machine from the power supply. To remove shuttle: Raise needle to its highest position and remove bobbin case. Turn levers away from shuttle and lift out retaining ring and shuttle, by grasping center pin. Clean the under side of feed teeth with a small brush. Remove lint and thread from all parts of shuttle and wipe with a lightly oiled cloth. To reassemble. Hold shuttle by center pin and place carefully back into the shuttle race, forming perfect circle with shuttle driver. Replace retaining ring polished side out, making sure the bottom pin fits into notch. Lock retaining ring by turning levers back into position. Replace bobbin case with bobbin. shuttle driver lever lever shuttle retaining ring 33
36 TROUBLE SHOOTING: CAUSES AND REMEDIES NEEDLE THREAD BREAKS CAUSE REMEDY Needle not properly threaded Thread properly Thread tension too tight Loosen tension Something wrong with the needle Replace needle Thread is too heavy for needle Change Thread cneck spring is broicen Have a new spring fitted Needle not properly inserted Insert needle property Needle plate. shuttle or sewing foot damaged Replace BOBBiN THREAD BREAKS Bobbin thread tangled because of incorrectly wound bobbin Wind bobbin correctly Bobbin thread not under tension spring on bobbin case Thread bobbin case correctly SKIPPED STITCHES Needle not inserted property into needle bar Place needle property Needle bent or blunt Replace Needle worn Replace NEEDLE BREAKS Needle bent Replace Needle not properly inserted Insert needle property Fabric too heavy or too tightly woven Use larger size needle Pulling on The fabric Do not pull 34
37 TROUBLE SHOOTING: CAUSES AND REMEDIES THREAD FORMS LOOPS CAUSE REMEDY Thread tension not properly regulated Read instructions tor regulating needle-and bobbin thread tension Upper thread not properly threaded and/or bobbin thread Thread machine properly and/or wind bobbin thread correctly properly wound Thread size not suited to tabric See Size ot needle and thread Thread check spring not working properly Have spring replaced SHRINKING OR PUCKERING OF THE SEAM Tension too tight Read instructions for regulating needle-and bobbin thread tensions Fabric too lightweight to support stitch Place stabilizer under tacric IRREGULAR STITCHES Needle and bobbin threads ot poor quality Use top quaiity threads Bobbin thread unevenly wound Re-wind bobbin MACHINE DOES NOT RUN FREELY AND MAKES NOISE Machine needs oiling Please contact local dealer Dust and thread in shuttle Read instructions on how to clean shuttle race Drive belt tension too tight Contact local dealer - 35
When using an electrical appliance, basic safety precautions should always be followed, including the following:
 Instruction book IMPORTANT SAFETY INSTRUCTIONS This appliance is not intended for use by persons (including children) with reduced physical, sensory or mental capabilities, or lack of experience and knowledge,
This sewing machine is designed and manufactured for household use only. Read all instruction before using this sewing machine.
 Instruction book IMPORTANT SAFETY INSTRUCTIONS This sewing machine is not a toy. Do not allow children to play with this machine. The machine is not intended for use by children or mentally infirm persons
Janome. Janome 7312 Instruction Manual. Magnolia 7312 Owners Manual/ User Guide
 Janome Magnolia 732 Instruction Manual IMPORTANT SAFETY INSTRUCTIONS This sewing machine is not a toy. Do not allow children to play with this machine. The machine is not intended for use by children or
SAVE THESE INSTRUCTIONS
 INSTRUCTION MANUAL IMPORTANT SAFETY INSTRUCTIONS This appliance is not intended for use by persons (including children) with reduced physical, sensory or mental capabilities, or lack of experience and
pô1e -/C INSTRUCTION MANUAL FOR SEWING MACHINE WHITE
 pô1e -/C -- INSTRUCTION MANUAL I FOR SEWING MACHINE WHITE Retain these numbers for future reference. Model No. Serial No. The Model No. is located on Rating Plate. The Serial No. is located on Bed Plate.
11210 INSTRUCTION MANUAL
 11210 INSTRUCTION MANUAL Important Safety Instructions When using an electrical appliance, basic safety precautions should always be followed, including the following: Read all instructions before using
CAUTION- SAVE THESE INSTRUCTIONS This product is for household use, or equivalent.
 Never operate this sewing machine if it has a damaged cord or plug, if it is not working properly, if it has been dropped or damaged, dropped into water. Return this sewing machine to the nearest authorized
SAVE THESE INSTRUCTIONS
 INSTRUCTION BOOK IMPORTANT SAFETY INSTRUCTIONS When using an electrical appliance, basic safety precautions should always be followed, including the followings: Read all instructions before using this
IMPORTANT SAFETY INSTRUCTIONS
 INSTRUCTION BOOK IMPORTANT SAFETY INSTRUCTIONS When using an electrical appliance, basic safety precautions should always be followed, including the following: This sewing machine is designed and manufactured
SAVE THESE INSTRUCTIONS
 INSTRUCTION BOOK IMPORTANT SAFETY INSTRUCTIONS Your sewing machine is designed and constructed only for HOUSEHOLD use. Read all Instructions before using this appliance. DANGER To reduce the risk of electric
SAVE THESE INSTRUCTIONS
 USER S GUIDE E10 This houshold sewing machine is designed to comply with IEC/EN 60335-2-28 and UL1594 IMPORTANT SAFETY INSTRUCTIONS When using an electrical appliance, basic safety precautions should always
TABLE OF CONTENTS NAME OF MAIN COMPONENTS. 4-5 SETTONG UP YOUR MACHINE 6-8. The position of thread pole 6 Cone holders 6.
 z Cl) c C-) -I 0 z z C I- E ẕ I CD D CD p C) C m 0 m I a) C-) Controlling sewing speed 7 The position of thread pole 6 Cone holders 6 Connecting the foot control 7 Spool caps 6 SETTONG UP YOUR MACHINE
Instruction Manual Item No.: V~, 60Hz, 15W
 rm Free Ang! Sewi Sewing Machine MODEL: JW12 Montgomery Ward Customer Service 1112 7Th Avenue, Monroe, WI 53566 8:00 am to Midnight, Monday through Friday 1 888 557 3848 Instruction Manual Item No.: 724723
MAIN PARTS
 MAIN PARTS 7 8 9 10 11 12 13 1 2 3 17 4 5 6 01 02 03 04 05 12 23 34 45 56 13 24 35 46 57 14 25 36 47 58 15 16 26 27 37 38 48 49 59 60 06 07 08 09 10 17 18 28 29 39 40 50 51 61 62 19 30 41 52 63 20 21 31
SAVE THESE INSTRUCTIONS
 INSTRUCTION BOOK IMPORTANT SAFETY INSTRUCTIONS When using an electrical appliance, basic safety precautions should always be followed, including the followings: Read all instructions before using this
4300B. /".y, instructions. Z1GoZAG SEWING MACHINE # 4300B
 4300B,r /".y, k instructions Z1GoZAG SEWING MACHINE # 4300B TABLE OF CONTENTS Adjusting for Good Stitches... 24 Adjusting Pressure of Presser Foot... 10 Adjusting Tensions... 12-13 Blind Stitching... 19
INSTRUCTION MANUAL 2263
 INSTRUCTION MANUAL 2263 TABLE OF CONTENTS Congratulations on the purchase of your new SINGER sewing machine! May we recommend that before you start using your machine, you take time to discover the many
INTRODUCTION THANK YOU FOR CHOOSING OUR OVERLOCK MACHINE FOR YOUR SAFETY BEFORE YOU USE - 1 -
 INTRODUCTION THANK YOU FOR CHOOSING OUR OVERLOCK MACHINE This overlock machine can stitch dependable seams on all kinds of fabric, both light and heavy, including cotton, wool, rayon, tricot, jersey, and
Janome 204D Instruction Manual. MODEL 204D. 204D Owners Manual/ User Guide
 Janome 0D Instruction Manual Janome 0D serger Janome 0D Instruction Manual MODEL 0D 0D Owners Manual/ User Guide Janome 0D Instruction Manual IMPORTANT SAFETY INSTRUCTIONS Your sewing machine is designed
A. Preparing the fabric (not shown):
:") INSERTING ZIPPERS - CENTER INSERTION The zipper can be snapped on to the right or to the left side of the needle so that you can sew close to the zipper. When sewing on the right side of the zipper, attach
INSERTING ZIPPERS - CENTER INSERTION The zipper can be snapped on to the right or to the left side of the needle so that you can sew close to the zipper. When sewing on the right side of the zipper, attach
BEL0093 Sewing Machine
 4 BEL0093 Sewing Machine THE SCIENCE BEHIND SEWING BEL0093 Sewing Machine 5 4 8 10 9 21 11 12 1 2 14 19 13 23 7 6 5 21 3 17 18 22 15 6 BEL0093 Sewing Machine 16 22 Auto Low Foot Pedal Auto High THE SCIENCE
Janome Decor Excel Janome 5024 Instruction Manual. Instruction Manual INSTRUCTION BOOK Owners Manual/ User Guide
 Janome Decor Excel 02 Janome 02 Instruction Manual Instruction Manual INSTRUCTION BOOK IMPORTANT SAFETY INSTRUCTIONS When using an electrical appliance, basic safety precautions should always be followed,
STARTED! Get. Let s. Americana Series AMERICAN DENIM Model SA1100 Use This Guide First. Simplicity Sewing Machine Education Helpline:
 Let s Get STARTED! Americana Series AMERICAN DENIM Model SA1100 Use This Guide First To help you get started using your new sewing machine, this booklet shows you, step-by-step, how to thread your machine
TABLE OF CONTENTS ESSENTIAL PARTS UTILITY STITCHES GETTING READY TO SEW DECORATIVE STITCHING CARE OF YOUR MACHINE STITCH PATTERN BASIC SEWING
 Instruction Manual TABLE OF CONTENTS ESSENTIAL PARTS Names of Parts 6 Standard Accessories 7 Dust cover 7 Sewing table 8 Accessory box 8 Free arm Sewing 8 GETTING READY TO SEW Connecting the Power Supply
Operation Manual. Sewing Machine. Product Code: 888-X53/X54/X55/X56
 Operation Manual Sewing Machine Product Code: 888-X/X/X/X6 Please visit us at http://solutions.brother.com where you can get product support and answers to frequently asked questions (FAQs). IMPORTANT
EURO-PRO INSTRUCTION MANUAL 377/374/373/372/372H
 Another quality product from EURO-PRO TM INSTRUCTION MANUAL English Spanish French Model EURO-PRO Operating LLC, 94 Main Mill Street, Door 16, Plattsburgh, NY 12901 4400 Bois Franc,St. Laurent, QC,H4S
XL5050us_cover. Operation Manual. English XC Printed in China. XC XL5050 (NA03J061) Bk
 Bk") XL00us_cover Operation Manual English 88-8 XC67-0 Printed in China XC67-0 XL00 (NA0J06) Bk XL000us.book Page Tuesday, November, 00 9: AM IMPORTANT SAFETY INSTRUCTIONS When using this machine, basic safety
XL00us_cover Operation Manual English 88-8 XC67-0 Printed in China XC67-0 XL00 (NA0J06) Bk XL000us.book Page Tuesday, November, 00 9: AM IMPORTANT SAFETY INSTRUCTIONS When using this machine, basic safety
the needle, the user must take sufficient care to avoid injury and observe the sewing area continuously while sewing.
 / - nstruct0fl maflua 7 the needle, the user must take the light bulb is 15 watts. agent. by anyone but an authorized Pfaff D) The drive belt must never be adjusted B) When leaving the machine, chan C)
INSTRUCTION MANUAL. Attention. COMPUTER SEWING MACHINE HZL-L series
 COMPUTER SEWING MACHINE HZL-L series INSTRUCTION MANUAL EN Attention Please read this instruction manual before using the machine as it contains important operational and safety information. Keep this
INSTRUCTION BOOK BUPEFILDCK 634D. W H ITE Sewing machine company
 INSTRUCTION BOOK BUPEFILDCK 634D W H ITE Sewing machine company POLARIZED PLUG CAUTION To reduce the risk of electric shock, this appliance has a polarized plug (one blade is wider than the other). This
4830 & 4832 INSTRUCTION MANUAL
 INSTRUCTION MANUAL Table of contents Important safety instructions Getting to know your machine Principal parts Accessories Connecting the machine Running the machine Choosing and changing the needle Changing
SERVICE MANUAL AND PARTSLIST
 SERVICE MANUAL AND PARTSLIST Next 20 CONTENTS WHAT TO DO WHEN... 1~3 SERVICE ACCESS FACE COVER... 4 TOP COVER... 4 BASE COVER... 5 REAR COVER... 6 FRONT COVER... 7 MECHANICAL ADJUSTMENT NEEDLE THREAD TENSION...
WHITE SEWING MACHINE CORPORATION WHITE SEWING MACHINE PRODUCTS LTD. Toronto 16, Ontario, Canada
 V -a a; S a a a. a,.. I.. I S. Co Toronto 16, Ontario, Canada CLEVELAND 11, OHIO WHITE SEWING MACHINE PRODUCTS LTD. WHITE SEWING MACHINE CORPORATION tension adjustments, maintenance, or any of the operations
SAVE THESE INSTRUCTIONS This product is for household use, or equivalent.
 IMPORTANT SAFETY INSTRUCTIONS When using an electrical appliance, basic safety precautions should always be followed, including the following. Read all instructions before using this sewing machine. CAUTION-
SERVICE MANUAL PARTS LIST MODEL: NH40
 SERVICE MANUAL & PARTS LIST MODEL: NH40 CONTENTS What to do when... 1-3 SERVICE ACCESS Face Cover... 4 Bed Cover... 5 Free-arm Cover... 6 Front Cover... 7 Rear Cover... 8 MECHANICAL ADJUSTMENT Presser
GrandQuilter. Owner s manual
 GrandQuilter Owner s manual This household sewing machine is designed to comply with IEC/EN 60335-2-28 and UL1594 IMPORTANT SAFETY INSTRUCTIONS When using an electrical appliance, basic safety precautions
IMPORTANT SAFETY INSTRUCTIONS
 USER S GUIDE E10 This household sewing machine is designed to comply with IEC/EN 60335-2-28 and UL1594. IMPORTANT SAFETY INSTRUCTIONS When using an electrical appliance, basic safety precautions should
Silver Crest SNM 33 A1. List of contents
 List of contents Silver Crest SNM 33 A1 Guarantee...1 Service number...1 Important safety instructions / Appropriate use...2 Details of the Machine...3 Accessories...3 Fitting the snap-in sewing table...3
4764 hobbylock Operating Manual
 hobbylock 4764 Operating Manual This household sewing machine is designed to comply with IEC/EN 60335228 and UL1594 IMPORTANT SAFETY INSTRUCTIONS When using an electrical appliance, basic safety precautions
Survey of the machine
 I 7iy ( / the placing of the accessories, please refer to transportea. thread take-up spring Place the machine on the table and remove the the space around the needle. The machine is equipped with a number
SERVICE MANUAL MODEL: 13512, 14412, 15312
 SERVICE MANUAL MODEL: 13512, 14412, 15312 CONTENTS TROUBLESHOOTING... 1-3 SERVICE ACCESS (1) FACE COVER, BELT COVER... 4 SERVICE ACCESS (2) BASE PLATE... 5 SERVICE ACCESS (3) FRONT COVER... 6 SERVICE ACCESS
User s Guide. Prelude 350, 370 KEEPING THE WORLD SEWING
 User s Guide Prelude 350, 370 KEEPING THE WORLD SEWING This houshold sewing machine is designed to comply with IEC/EN 60335-2-28 and UL1594 IMPORTANT SAFETY INSTRUCTIONS When using an electrical appliance,
Table of Contents NAMES OF PARTS 7 GETTING READY TO SEW 10 DECORATIVE STITCHING 48 BASIC SEWING 28 PROGRAMMING PATTERNS AND LETTERS 55
 Instruction Manual Table of Contents NAMES OF PARTS 7 Names of Parts 7 Standard Accessories 8 Extension table 8 Sewing Table and Accessory box 9 Free-arm sewing 9 Stitch overview 9 GETTING READY TO SEW
NAMES OF PARTS. 1 Thread guide for bobbin winding 2 Take-up lever. 3 Upper thread tension dial. 4 Face cover. 5 Thread guide for upper threading
 6 Presser foot thumb screw 9 Spool pins (retractable) 8 Shuttle cover 5 Thread guide for upper threading 7 Presser foot 4 Face cover NAMES OF PARTS.r4r : VjN S* ;WWE7-17 16 15 MODEL 860.-.-.- --. :.---.-
SERVICING MANUAL 419S/423S
 SERVICING MANUAL 415 419S/423S TROUBLESHOOTING PROBLEM CAUSE REMEDY REFERENCE 1. SKIPPING 1. NEEDLE IS NOT INSERTED INSERT THE NEEDLE PROPERLY. STITCHES PROPERLY. 2. NEEDLE IS BENT OR WORN. CHANGE THE
Another quality product from. Instruction Manual. Model 9105
 Another quality product from Instruction Manual Model 9105 SYMBOL INSTRUCTIONS Raise needle Raise presser foot Lower presser foot When using an electrical appliance, basic safety should always be followed,
INSTRUCTION MANUAL C240
 INSTRUCTION MANUAL C240 This household sewing machine is designed to comply with IEC/EN 60335-2-28 and UL1594. IMPORTANT SAFETY INSTRUCTIONS When using an electrical appliance, basic safety precautions
Operating Manual. Huskylock 901
 Operating Manual Huskylock 901 OVERLOCK MACHINE Record in space provided below the Serial No. of this appliance. The Serial No. is located rear of arm. Serial No. Model No. 901 Retain these numbers for
IMPORTANT SAFETY INSTRUCTIONS
 IMPORTANT SAFETY INSTRUCTIONS IMPORTANT When using an electrical machine, basic safety precautions should always be followed, including the following: Please read the instruction manual carefully before
INSTRUCTION MANUAL 624?
 INSTRUCTION MANUAL 624? 6142 604 IMPORTANT SAFETY INSTRUCTIONS When using an electrical appliance, basic safety precautions should always be followed, including the following: Read all instructions before
CONTENTS LOCATE AND IDENTIFY THE PARTS... WIND THE BOBBIN... PREPARE YOUR TOP THREAD... STITCH SELECTOR / STITCH LENGTH/STITCH WIDTH CONTROLS...
 SERVICE MANUAL SEWING MACHINE MODEL 385. 15208400 OCTOBER, 2003 CONTENTS LOCATE AND IDENTIFY THE PARTS... WIND THE BOBBIN... PREPARE YOUR TOP THREAD... STITCH SELECTOR / STITCH LENGTH/STITCH WIDTH CONTROLS...
2. ACCESSORIES. Zigzag foot Straight foot. machine) Bobbins Denim needle 16 (1 pci. (3 pcs) Ordinary needles 14(2pcs.)
 Bobbins Denim needle 16 (1 pci. (3 pcs) Ordinary needles 14(2pcs.)") 0 0mr -a- 0-I WHITE SEWING MACHINE Record in space provided below the Serial No. and Model No. of this appliance. The Serial No. is located Rear of arm. The Model No. is located Rear of arm. Serial No.
0 0mr -a- 0-I WHITE SEWING MACHINE Record in space provided below the Serial No. and Model No. of this appliance. The Serial No. is located Rear of arm. The Model No. is located Rear of arm. Serial No.
INSTRUCTION MANUAL 9970
 INSTRUCTION MANUAL 9970 INSTRUCTION MANUAL This sewing machine is intended for household use. This sewing machine is not intended for use by young children or infirm persons without supervision. IMPORTANT
CONTENTS. Changing Light Bulb 28. Zigzag Width Control NAMES OF PARTS 2. ACCESSORIES 3 3. BEFORE SEWING 4. Detaching Extension Table 4
 E Changing Light Bulb 28 9. APPLIQUE WORK 23 12. TROUBLE CHART 27 Drop Feed Lever 12 Oiling 26 Adjusting Lower Thread 11 Adiusting Threao Tension 17 Cleaning 25 11. MAINTENANCE 25 7. SEWING ON BUTTONS
FREE ARM SEWING MACHINE
 INSTRUCTION MANUAL your creative assistant CELEBRITY 550 FREE ARM SEWING MACHINE Safety instructions Like any other electrical device, a sewing machine can cause serious, even life-threatening injuries.to
I N R U C T I 0 N S ZIG- ZAG SEWING MACHINE
 I N R U C T I 0 N S ZIG- ZAG SEWING MACHINE 52880 FRONT VIEW @ @! I - 1. Bobbin Winder 2. Special Stitch Control and Width Control 3. Stitch Length Control 4. Light Switch 5. Feed Dog Control 6. Nomenclature
After opening the box, check that the following accessories are enclosed. If any item is missing or damaged, contact your retailer.
 Enclosed Accessories After opening the box, check that the following accessories are enclosed. If any item is missing or damaged, contact your retailer. Accessories The following items should also be enclosed
User s Guide KEEPING THE WORLD SEWING
 User s Guide KEEPING THE WORLD SEWING This houshold sewing machine is designed to comply with IEC/EN 60335-2-28 and UL1594 IMPORTANT SAFETY INSTRUCTIONS When using an electrical appliance, basic safety
IMPORTANT SAFETY INSTRUCTIONS
 INSTRUCTION BOOK IMPORTANT SAFETY INSTRUCTIONS This appliance is not intended for use by persons (including children) with reduced physical, sensory or mental capabilities, or lack of experience and knowledge,
FEATURES AND PARTS Reverse Button. 1. Thread Take-up Lever. 10. Fly Wheel Clutch 20. Face Plate. 2. Pressure Release (Darning) 11.
 11.") p 19 18 17 15 20 1- Pattern Selector Dial 3. Top Plate Thread Guide 6. Handle 8. Zigzag Width Control Dial 9. Bobbin Winder 2. Pressure Release (Darning) 4. Tension Regulator 5. Top Plate 7. Needle Position
p 19 18 17 15 20 1- Pattern Selector Dial 3. Top Plate Thread Guide 6. Handle 8. Zigzag Width Control Dial 9. Bobbin Winder 2. Pressure Release (Darning) 4. Tension Regulator 5. Top Plate 7. Needle Position
Congratulations! * A Trademark of THE SINGER COMPANY Copyright 1987 SINGER SEWING MACHINE COMPANY All Rights Reserved Throughout The World
 \ Congratulations! As the owner of a SINGER* artisan zigzag sewing machine Model 20U, you are about to enter a wonderful new world of sewing! From the moment you begin to sew at your Model 20U, you will
hobbylock 4752 Instruction Manual
 hobbylock 4752 Instruction Manual Parts of the hobbylock 4752 Right needle thread tension (green) Setting screw for presser foot pressure Telescoping thread guide Thread guides Left needle thread tension
To register your machine warranty and receive Baby Lock product updates and offers, go to If you have questions with
 To register your machine warranty and receive Baby Lock product updates and offers, go to www.babylock.com/profile. If you have questions with registration, visit your Authorized Baby Lock Retailer. CONTENTS
This sewing machine is for Household Use
 z 0 -I C 0 0 zw0 0 C*) m -I z m m B C ) POLARIZED PLUG CAUTIOfJ To reduce the risk of electric shock, this appliance has a polarized plug (one blade is wider than the other). This plug will fit in a polarized
803, 806, 807 instruction book 800., 801, 802, Hobbymatic
 A 803, 806, 807 instruction book 800., 801, 802, Hobbymatic I 4 Fold out this page Contents Page Removing the carrying case cover 1 Foot control receptacle 1 Electrical connection 2 Foot control 2 Disengaging
After opening the box, check that the following accessories are enclosed. If any item is missing or damaged, contact your retailer.
 Enclosed Accessories After opening the box, check that the following accessories are enclosed. If any item is missing or damaged, contact your retailer. Accessories te (For U.S.A. only) Foot controller:
HZL-60 Series INSTRUCTION MANUAL. Attention
 HZL-60 Series INSTRUCTION MANUAL Attention Please read this instruction manual before using the machine as it contains important operational and safety information. Keep this manual accessible so that
The 787 Dreamstitcher Portable Serger
 The 787 Dreamstitcher Portable Serger INSTRUCTION MANUAL TABLE OF CONTENTS 1. KNOWING YOUR MACHINE Identification chart 2 Accessories 3 Setting up your machine 4 Preparation for threading 5-6 Lint tray,
Kenmore INSTRUCTIONS ZIG ZAG SEWING MACHINE MODEL 1430/1431/1625/1641/1940/1941
 Kenmore INSTRUCTIONS ZIG ZAG SEWING MACHINE MODEL 1430/1431/1625/1641/1940/1941 59982 TABLE OF CONTENTS..., = KNOWING YOUR SEWING MACHINE Identifying Parts... 2, 3 Installing Machine... 4, 5 Converting
INBTRIJTIN. /\Ijj EIJ] MODEL FOR SEWING MAçHINE
![INBTRIJTIN. /\Ijj EIJ] MODEL FOR SEWING MAçHINE](/thumbs/95/126505557.jpg "INBTRIJTIN. /\Ijj EIJ] MODEL FOR SEWING MAçHINE") INBTRIJTIN FOR SEWING MAçHINE /\Ijj EIJ] r MODEL 1405. When using an electrical sewing machine, basic safety precautions should always be followed, including the following A sewing machine should never
INBTRIJTIN FOR SEWING MAçHINE /\Ijj EIJ] r MODEL 1405. When using an electrical sewing machine, basic safety precautions should always be followed, including the following A sewing machine should never
N S T R U C T R O N S
 N S T R U C T R O N S I ZIG-ZAG SEWING MACHINE P/N 52882 INDEX Adjusting for Good Stitching... 26 Blind Stitching... 18, 19 Bobbin: Inserting & Threading... 8 Picking up Bobbin Thread... 10 Removing...
Sewing Machine Model SA200 INSTRUCTION MANUAL & REFERENCE GUIDE. Simplicity Sewing Machine Education Helpline:
 Sewing Machine Model SA200 INSTRUCTION MANUAL & REFERENCE GUIDE Simplicity Sewing Machine Education Helpline: 636-651-0030 IMPORTANT SAFETY INSTRUCTIONS When using the sewing machine, basic safety precautions
Instruction Book D1S D2S D3S. Memory Craft 7700 QCP
 Instruction Book DS DS DS APC Autom omatic Plate Co nverter Memory Craft 7700 QCP IMPORTANT SAFETY INSTRUCTIONS This appliance is not intended for use by persons (including children) with reduced physical,
SEWING MACHINE MODEL 385, 15358
 SERVICE MANUAL SEWING MACHINE MODEL 385, 15358 BER, 2006 CONTENTS LOCATE AND identify THE PARTS... WiND THE BOBBIN... PREPAREYOURTOPTHREAD... WHAT TO DO WHEN... 1 2 3 4-6 SERVICE ACCESS FACE COVER... BELT
Important safety instructions
 Important safety instructions IMPORTANT When using an electrical machine, basic safety precautions should always be followed, including the following: Please read the instruction manual carefully before
Brother PQ- Series Accessories
 Brother PQ- Series Accessories The PQ-series of high-speed straight stitch machines (1300, 1500 and 1500S) are designed to sew quickly and accurately with a wide variety of fabrics, even combinations of
User s Guide KEEPING THE WORLD SEWING
 User s Guide 605 KEEPING THE WORLD SEWING This houshold sewing machine is designed to comply with IEC/EN 60335-2-28 and UL1594 IMPORTANT SAFETY INSTRUCTIONS When using an electrical appliance, basic safety
Symbols used. Move the part in the direction of the arrow. Set the clearance as indicated. Move the part to its highest or lowest position.
 4.1999. This service manual was compiled for use when repairing the XL5300, 5200, 5100, 5030, 5020, 5010,PX300,200,100 Zigzag Stitch Sewing Machines. Use this manual, together with the Parts Catalog, when
S2_BrotherE_cover DIC181p K. ENGLISH 885-S06 XC Printed in China
 S_BrotherE_cover DIC8p K ENGLISH 885-S06 XC57-0 Printed in China S_brotherE_Cover.fm Page A Tuesday, March 0, 00 :6 PM Enclosed Accessories After opening the box, check that the following accessories are
S-85SCH
 4411-4423-4432-4443-4452 5511-5523-5532-5554 44S-85SCH Service Manual 104 73 14-26 2014-02-24 CONTENTS 1. Names of principal parts...2 2. Removing methods of external parts 2-1 Sewing table...3 2-2 Face
41P PFAFF HOBBY SERGER
 41P PFAFF HOBBY SERGER ow po On top of it. or damage to machine. threading and sewing. PERFORMANCE CHECKLIST 12 CHANGING NEEDLE 12 CARING FOR YOUR MACHINE 12 JOIN TWO PIECES OF FABRIC 12 DECORATIVE FLATLOCK
OPERATING INSTRUCTiON. fh EbEbyfl D
 71 OPERATING INSTRUCTiON fh EbEbyfl D F. Sewing problems and solutions 20 b. Thread tension adjustment (Normal hemming) 9 g. Roll hemming 12 h. Points to observe during sewing 13 b. Adjusting the stitch
Getting to Know: Model BL30A. A-Line Series. Baby Lock Consumer Helpline:
 Getting to Know: A-Line Series Model BL30A Baby Lock Consumer Helpline: 800-33-40 www.babylock.com Model BL30A Molly loves her DIY, individual style, and she always encourages you to add your own touch.
CONTENTS. LOCATE AND IDENTIFYTHE PARTS... WlNDTHE BOBBIN... PREPARE YOUR TOP THREAD... WHAT TO DO WH EN...
 SERVICE MANUAL SEWING MACHINE MODEL 385.11206300 MARCH, 2003 CONTENTS LOCATE AND IDENTIFYTHE PARTS... WlNDTHE BOBBIN... PREPARE YOUR TOP THREAD... WHAT TO DO WH EN... 1 2 3 4-6 SERVICE ACCESS FACE COVER...
This household sewing machine is designed to comply with IEC/EN and UL1594.
 Owner s manual This household sewing machine is designed to comply with IEC/EN 60335-2-28 and UL1594. IMPORTANT SAFETY INSTRUCTIONS When using an electrical appliance, basic safety precautions should always
INSTRUCTION BOOK MODEL 140 AND MODEL 160. L_i I. r_p
 L_i I r r_p Jr INSTRUCTION BOOK - -_ MODEL 140 AND MODEL 160 IMPORTANT SAFETY INSTRUCTIONS When using an electrical appliance, basic safety precautions should always be folowed, including the following:
Intro to the Sewing Machine
 Intro to the Sewing Machine 1. Bobbin Cover Opens to allow you to put the bobbin and bobbin case in the machine. 2. Stitch Plate Where the seam allowance guidelines are found. Each line is 1/8 apart, beginning
Owner s Manual For Sit Down
 Owner s Manual For Sit Down Feb 2015 Table of Contents Warranty...3 Your Light Fixture...4 Attaching the Belt Guard...4 Your Thread Stand...5 Control panel...6 Needle position...7 Speed Setting...8 What
IMPORTANT SAFETY INSTRUCTIONS
 IMPORTANT SAFETY INSTRUCTIONS Safety Instructions When using an electrical appliance, basic safety precautions should always be followed, including the following: 1 Read all instructions before using this
Practicing Basic Machine Operation Sample #1
 Practicing Basic Machine Operation Sample #1 Listed below are various tasks required in basic sewing machine operation. Demonstrate your ability to perform each task by creating a sample. The samples that
PARTS LIST MODEL: HDEJ1800
 First Edition: June 0 PARTS LIST 0 8 4 8 8 4 8 0 KEY PARTS NO. NO. DESCRIPTION 0400 Top cover (unit) 00 Top cover (unit) 0000 Top cover 4 40A04 Flip-top sewing instruction panel 000 Hinge rod (right) 00
HOW TO USE YOUR LONG SHUTTLE MANUAL SEWING MACHINE. 4çJ MODEL NO.768
 NO.768 MODEL 4çJ Ii SEWING MACHINE LONG SHUTTLE MANUAL HOW TO USE YOUR INDEX Zigzag Formation 18 Zigzag Sewing And Pattern Formation 17 Turning a Corner 14 Placement of Needle 4 Picking Up Bobbin Thread
You're reading an excerpt. Click here to read official TOYOTA SUPER JEANS user guide
 You can read the recommendations in the user guide, the technical guide or the installation guide for TOYOTA SUPER JEANS. You'll find the answers to all your questions on the TOYOTA SUPER JEANS in the
 COMPUTER SEWING MACHINE HZL-DX series INSTRUCTION MANUAL Attention Please read this instruction manual before using the machine as it contains important operational and safety information. Keep this manual
Montgomery Ward 1903
 Montgomery Ward 1903 .. " ~l _, ". ~. MO~L 1903. OPEN ARM Sl-RETCH STITCH SEWING MACHINE GETTING TO KNOW YOUR SEWING MACHINE 1. Bobbin Winder Stop 2. Bobbin Winder Spindle 9 8 7 6 5 4 3 2 3. Stitch Width
Operation Manual. Sewing Machine KNOWING YOUR SEWING MACHINE SEWING BASICS UTILITY STITCHES APPENDIX
 Operation Manual Sewing Machine Product Code: 885-V58/V59/V68/V69 KNOWING YOUR SEWING MACHINE SEWING BASICS UTILITY STITCHES APPENDIX Be sure to read this document before using the machine. We recommend
Owner s Manual For Sit Down
 Owner s Manual For Sit Down Table of Contents Warranty...3 Attaching your square tubing...4 Your Light Fixture...5 Your Thread Stand...6 What is the Tension Release Lever?...7 How Do I Adjust the Height
IMPORTANT SAFETY INSTRUCTIONS
 Instruction Book IMPORTANT SAFETY INSTRUCTIONS When using an electrical appliance, basic safety precautions should always be followed, including the following: Read all instructions before using this appliance.
INSTRUCTIONS FOR USING THE GREIST ZIGZAG / AUTOMATIC BUTTONHOLE ATTACHMENT Model #;s 6, 7, 8, 9 &10
 INSTRUCTIONS FOR USING THE GREIST ZIGZAG / AUTOMATIC BUTTONHOLE ATTACHMENT Model #;s 6, 7, 8, 9 &10 The possession of a Buttonhole Attachment is one luxury which is also an economy and sewing becomes a
CONTENTS LOCATE AND IDENTIFY THE PARTS... WIND THE BOBBIN... PREPARE YOUR TOP THREAD... STITCH SELECTOR / STITCH LENGTH/STITCH WIDTH CONTROLS...
 SERVICE MANUAL SEWING MACHINE MODEL 385. 15218400 OCTOBER, 2003 CONTENTS LOCATE AND IDENTIFY THE PARTS... WIND THE BOBBIN... PREPARE YOUR TOP THREAD... STITCH SELECTOR / STITCH LENGTH/STITCH WIDTH CONTROLS...