05-17 Mustang Fuel System Wire Upgrade Installation
|
|
|
- Baldric Goodman
- 5 years ago
- Views:
Transcription

1 PARTS LIST: -10AWG INLINE FUSE HOLDER WITH 30AMP BLADE FUSE -16FT 10AWG HIGH CURRENT PRIMARY WIRE -40AMP AUTOMOTIVE RELAY -1FT 10AWG GROUND WIRE -1FT 10AWG HIGH CURRENT PRIMARY WIRE OUTPUT TO FPDM -1FT 10AWG INPUT WIRE FROM FUEL INERTIA SWITCH -2 PIECES OF HEAT SHRINK TUBING -5 ZIPTIES TOOLS NEEDED: -WRENCH/SOCKET 8MM, 10MM -WIRE CUTTER/STRIPPER -CRIMP TOOL -PHILLIPS AND FLATHEAD SCREWDRIVErS

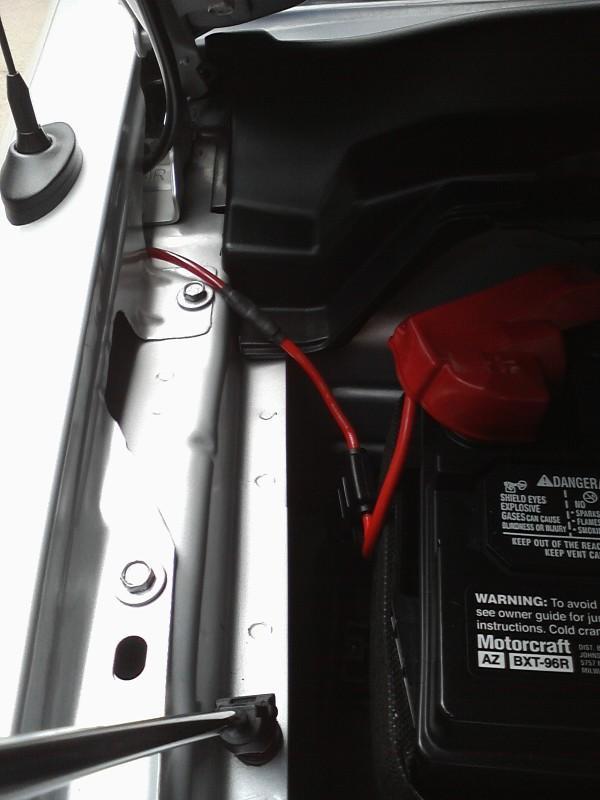
2 INSTALLATION: 1. YOU WILL NEED TO ACCESS BEHIND THE PASSENGER SIDE REAR FENDER TRIM. YOU CAN DO SO BY REMOVING THE TIRE OR CLOCKING THE STEERING ALL THE WAY TO THE RIGHT/LEFT TO ALLOW ACCESS TO REMOVE THE FENDER GUARD. IF YOU CHOSE TO CLOCK THE STEERING DO SO, THEN DISCONNECT THE NEGATIVE WIRE TERMINAL AT THE BATTERY. REMOVE THE FENDER GUARD. IT IS ATTACHED WITH PHILLIPS SCREWS AND FLAT PUSH PINS THAT CAN BE REMOVED WITH SCREWDRIVERS. 2. USING 8MM SOCKET REMOVE THE NUT ON THE BATTERY POSTIVE TERMINAL. LOCATE THE INLINE FUSE HOLDER ATTACHED TO THE 16FT OF PRIMARY WIRE AND INSTALL THE FUSED SIDE S RING TERMINAL ON TO THE BATTERY S POSITIVE POST AND REINSTALL NUT. ROUTE THE WIRE OUT AND REINSTALL THE RUBBER TERMINAL GUARD OVER THE POSITIVE TERMINAL.
3
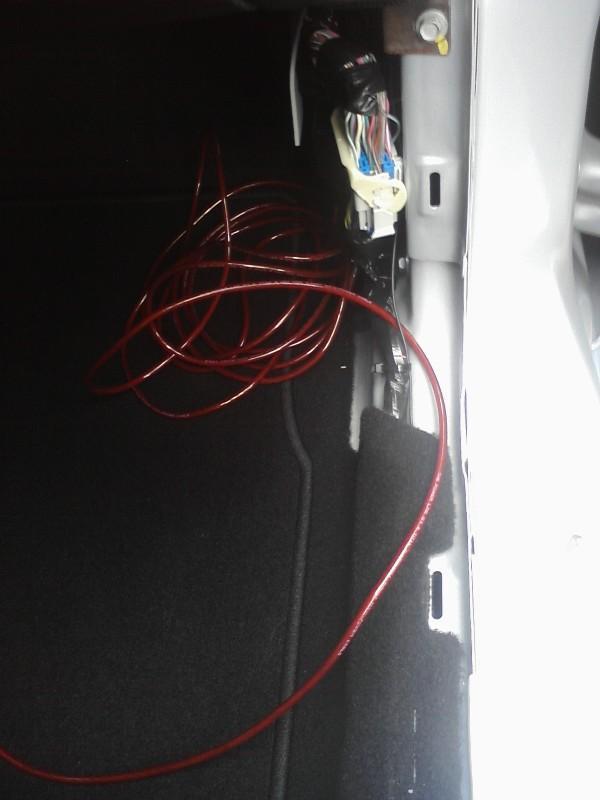
4 3. ROUTE THE OTHER END OF THE 16FT PRIMARY WIRE DIRECTLY OUTBOARD OF THE BATTERY THROUGH THE GAP DOWN INTO THE PASSENGER SIDE FENDER WELL (THIS IS THE EASIEST WAY YOU CAN ROUTE IT DOWN UNDER THE BATTERY AS WELL). LOCATE THE LARGE WIRING HARNESS GROMMET GOING INTO THE CABIN. USING A SCREWDRIVER PUNCH A HOLE THROUGH THE GROMMET AND FEED THE OTHER END OF THE WIRE WITH THE FEMALE BLADE CONNECTOR THROUGH THE GROMMET AND INTO THE CABIN. THE WIRE WILL COME UNDER THE DASH JUST ABOVE THE SMART JUNCTION BOX INSIDE THE CAR. FEED AS MUCH WIRE THROUGH AS YOU CAN TO MAKE IT FLUSH AND USE A ZIPTIE AS NECESSARY TO SECURE THE WIRE TO THE EXISITING WIRING HARNESS.YOU CAN NOW REINSTALL THE PLASTIC FENDER GUARD WITH THE SCREWS AND PUSH PINS.

5 4. MOVING ON TO INSIDE THE CAR. REMOVE THE DOOR JAM BOTTOM TRIM BY EVENLY PULLING UP TO POP OUT THE LOCKING TABS AND THEN REMOVE THE DOOR JAM SIDE TRIM BY THE SJB THE SAME WAY. ROUTE THE WIRE AS FLUSH AS POSSIBLE PAST HE SJB AND DOWN TO WHERE THE WIRING HARNESS RUNS JUST UNDER THE CARPET DOWN THE DOOR SILL. RUN THE WIRE WITH THE EXSISTING HARNESS UNDER THE CLIPS THAT HOLD THE CARPET IN PLACE BACK TOWARDS THE REAR SEAT.
6

7
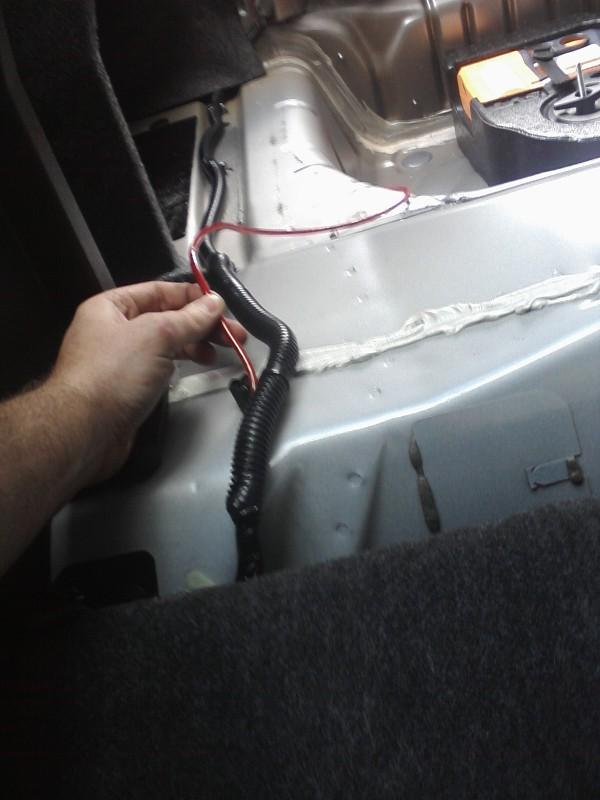
8 5. AT THIS POINT REMOVE THE REAR SEAT BOTTOM SECTION BY SLIGHTLY PULLING UP AND PUSHING THE 2 CLIPS TO RELEASE THE SEAT ON EITHER SIDE IN THE CENTER OF THE SEATS. FOR 2015 OR NEWER THE FPCM IS UNDER THE REAR SEAT ON THE DRIVER SIDE SO NO NEED TO GO IN THE TRUNK. JUST ROUT OVER TO THE FPCM. FOR HEAD INTO THE TRUNK AND REMOVE THE TRUNK CARPET AND REAR TRUNK TRIM. THE REAR TRIM IS HELD ON IN PLACE BY 2 PUSHPINS AND TWO PLASTIC SCREW CAPS. 6. RUN THE WIRE BEHIND THE REAR SEAT SIDE TRIM ALONG THE EXSISTING WIRE HARNESS INTO THE TRUNK AREA, USE A ZIPTIE TO SECURE THE WIRE AS NECESSARY. ONCE THE WIRING IS ALL RAN INTO THE TRUNK AREA GO AHEAD AND REINSTALL THE REAR SEAT BOTTOM AND LOCK THE CENTER TABS BACK DOWN.

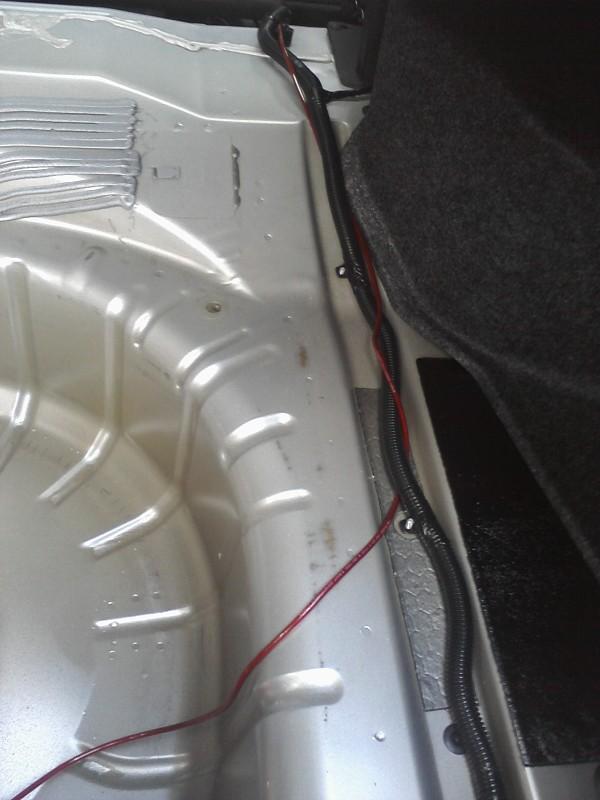
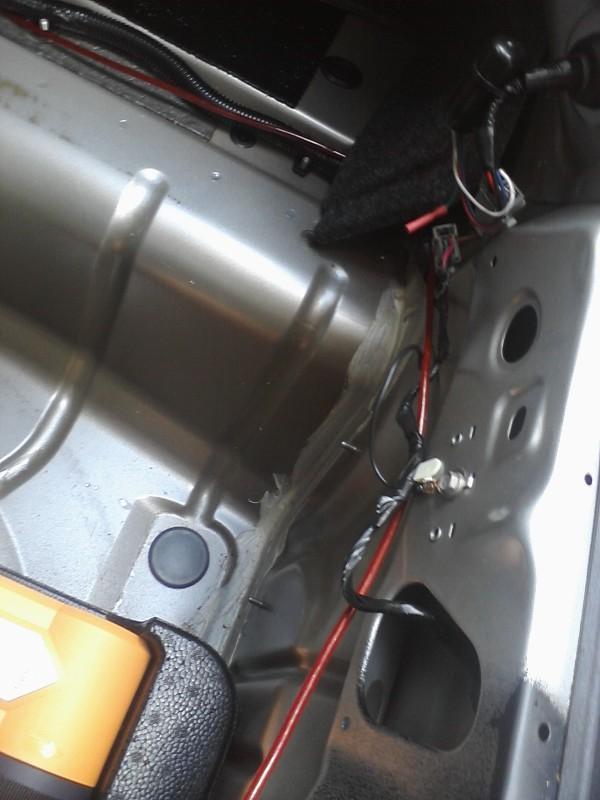
9 7. IN THE TRUNK CONTINUE TO RUN THE WIRE ALONG THE EXSISTING HARNES DOWN THE PASSENGER SIDE TO THE REAR OF THE CAR AND THEN OVER TO THE FPDM ON THE DRIVERS SIDE, USING A ZIPTIE TO SECURE THE WIRE AS NECESSARY.
10
11
12

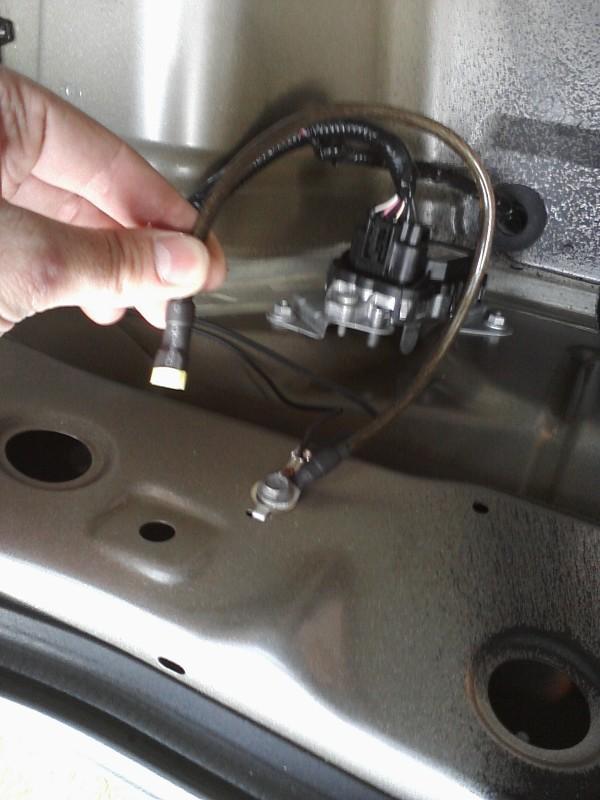
13 8. NEXT LOCATE THE CHASIS GROUND BOLT DIRECTLY ABOVE THE FPDM INBOARD OF THE TAILIGHT AND REMOVE THE 10MM BOLT. INSTALL THE RING TERMINAL END OF THE BLACK 1FT SECTION OF 10AWG GROUND WIRE AND REINSTALL THE 10MM BOLT. FOR YOU CAN USE THE FPCM MOUNTING BOLT UNDER THE REAR SEAT. 9. THE OTHER END OF THIS BLACK GROUND WIRE CONNECTS TO PIN 86 ON THE RELAY.
14
. USING WIRE CUTTERS CUT THE WIRE ABOUT 1-2 INCHES FROM THE FPDM PLUG.")
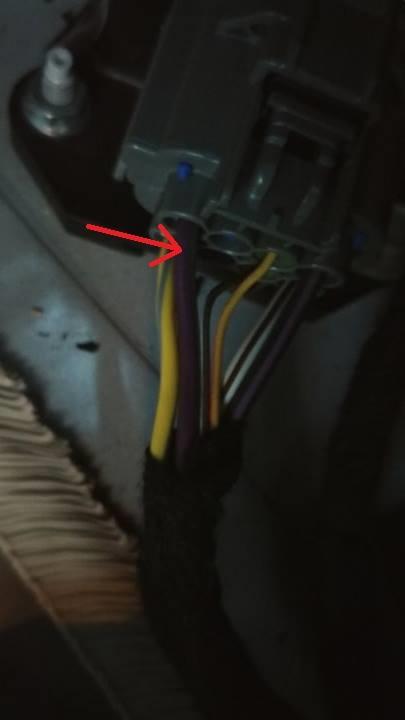
15 10. LOCATE THE FPDM PLUG AND REMOVE A FEW INCHES OF ELECTRICAL TAPE FROM AROUND THE HARNESS. FOR THE SOLID WHITE (sometimes yellow) WIRE ON THE FAR LEFT IS THE FUEL INERTIA WIRE. (ON A IT IS A PURPLE WIRE WITH GREEN STRIPE AND IT IS A PURPLE WIRE). USING WIRE CUTTERS CUT THE WIRE ABOUT 1-2 INCHES FROM THE FPDM PLUG. STRIP A HALF INCH OF SHEATHING OFF THE WIRE ON EACH SIDE. NOTE: IF YOU HAVE A DUAL FPDM SETUP THIS IS A RED WIRE ON THE SECOND FPDM IN THE SAME LOCATION, THIS IS YOUR POWER IN TO THE FPDM.
16 11. INSTALL ONE OF THE SUPPLIED PIECES OF HEAT SHRINK OVER THE EXPOSED WHITE WIRE ON THE FPDM/PLUG SIDE. LOCATE THE 1FT SECTION OF 10AWG PRIMARY WIRE, INSERT THE BLUE CRIMP CONNECTOR END OVER THE EXPOSED WHITE WIRE AND USING A CRIMPING TOOL MAKE THE CONNECTION, ENSURING THE TOOL CRIMPS THE WIRE INTO THE METAL TERMINAL INSIDE. SLIDE THE HEAT SHRINK OVER THE CONNECTOR AND SHRINK THE TUBING. THE OTHER END OF THIS WIRE PLUGS INTO PIN 87 ON THE RELAY. NOTE: IF YOU ARE USING A BAP, THIS 1FT SECTION OF RED 10AWG WIRE GOES FROM PIN 87 ON THE RELAY TO THE BAP INPUT, AND THE BAP OUTPUT GOES TO THE FPDM(S) (IF YOU HAVE 2 FPDMS WITH A SINGLE BAP THERE IS AN ADDITIONAL SPLIT WIRE HARNESS THAT GOES FROM THE BAP TO EACH FPDM) 12. USING THE 1FT SECTION OF 10AWG BLACK WIRE WITH THE BLUE CRIMP CONNECTOR ON IT MAKE THE CONNECTION TO THE EXPOSED WHITE WIRE ON THE HARNESS SIDE, THE SAME WAY. THE OTHER END OF THIS WIRE PLUGS INTO PIN 85 ON THE RELAY. 13. THE 10AWG RED WIRE COMING FROM THE BATTERY PLUGS INTO PIN 30 ON THE RELAY. (NOTE THE MIDDLE PIN ON THE RELAY IS NOT USED.)
17
 SECURE THE NEW WIRING TO THE FPDM HARNESS. (FOR THIS PICTURE I DID NOT CUT THE WHITE WIRE AS IT WAS A MOCK UP) 15. REINSTALL TRUNK REAR TRIM AND TRUNK CARPET.")
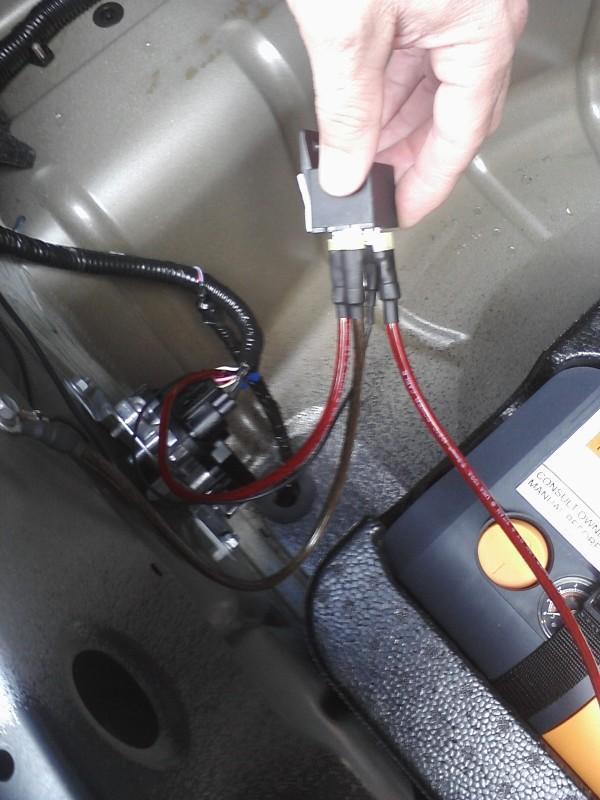
18 14. NOW MOUNT THE RELAY, YOU CAN USE USE 3M TAPE OR A SELF TAPPING SCREW. THERE ARE MULTIPLE PLACES TO MOUNT IT, YOU CAN EVEN USE AN EXSISTING FPDM MOUNT BOLT TO SECURE IT. USING THE REMAINING ZIPTIE(S) SECURE THE NEW WIRING TO THE FPDM HARNESS. (FOR THIS PICTURE I DID NOT CUT THE WHITE WIRE AS IT WAS A MOCK UP) 15. REINSTALL TRUNK REAR TRIM AND TRUNK CARPET. RECONNECT NEGATIVE BATTERY TERMINAL. TURN THE KEY TO THE ON POSITION AND LISTEN FOR THE RELAY AND FUEL PUMP TO COME ON, START THE CAR TO ENSURE PROPER WIRING AND FUEL SUPPLY. ALL DONE!
19 Relay Diagram Quick View
20 Relay Diagram Quick View, Alternate with BAP Inertia wire location FPDM in trunk.
21 FPCM wire location in trunk.

22 2015+ FPCM Inertia wire location under rear seat on drivers side.
23
Signal Mirror Installation Instructions
 Signal Mirror Installation Instructions 2005-2010 Chevy Corvette C6 THE safety accessory of the 21 st Century. P/N 210-0144-0 Rev. A3 (9/29/2011), BTV 2007 Muth Mirror Systems, LLC Page 3 of 10PplPage
TOYOTA TACOMA LED BED LIGHTS Preparation
 Preparation Part Number: PT948-35160 Kit Contents Item # Quantity Reqd. Description 1 1 Hardware Kit 2 1 Driver Side LED assembly 3 1 Passenger Side LED assembly 4 1 Main Wire Harness Hardware Bag Contents
GEN II Toyota Prius Back Door Opener Switch Replacement & License Plate Lights
 GEN II Toyota Prius Back Door Opener Switch Replacement & License Plate Lights Rubber Surface of Switch had Degraded to Tar-like Substance Vehicle Manufacture Date 10/06 OLD SWITCH IN GARNISH SWITCH REMOVED
Signal Mirror Installation Instructions
 Signal Mirror Installation Instructions Honda CRV 1997-2003 THE safety accessory of the 21 st Century. P/N 210-0032-0 Rev B2 (6-26-04), GG 2003 Muth Mirror Systems, LLC. Note: Professional Installation
INSTALLATION INSTRUCTIONS KK-K9-C12-K CHEVY IMPALA
 INSTALLATION INSTRUCTIONS KK-K9-C12-K 2000-2005 CHEVY IMPALA READ ALL INSTRUCTIONS PRIOR TO INSTALLATION TOOLS REQUIRED: Power Drill Drill bits1/4 and 5/32 7/l6 wrench and socket 15,18 and\or 19mm socket
GENUINE ACCESSORIES INSTALLATION INSTRUCTIONS. ITEM QTY DESCRIPTION Usage Chart
 PART NUMBER: 0000 8C R0 GENUINE ACCESSORIES INSTALLATION INSTRUCTIONS Rev. AAA *550-0554-000* APPLICABLE MODELS: 203 > CX-5 REQUIRED COMPONENTS: ITEM QTY DESCRIPTION Usage Chart MIRROR ASSEMBLY: Mirror
INSTALLATION. Preparation:
 INSTALLATION Preparation: Average Time Required: 2 to 3 hours Place a blanket down in the area which you will be working in. This will prevent scratches on the rear fascia / valance. Remove your License
Signal Mirror Installation Instructions
 Signal Mirror Installation Instructions 2006 2007 Honda Ridgeline THE safety accessory of the 21 st Century. P/N 210 0142 0 Rev. A (9/5/07), BTV 2007 Muth Company, LLC Professional Installation Recommended:
Bushwacker Jeep Flat Style Fender Flares Front Pair
 Bushwacker Jeep Flat Style Fender Flares Front Pair Note: These instructions involve cutting parts of your vehicle. Please read all instructions prior to starting. Installation Time: 3-4 Hours Tools Required:
Conflicts Note: Drop-in Bed liner
 Toyota Tundra 2015 LED Bed Lights Preparation Part Number: 00016-34089 Accessory Code: BU1000 Conflicts Note: Drop-in Bed liner Kit Contents Item # Quantity Reqd. Description 1 1 Hardware Kit 2 1 Driver
Signal Mirror Installation Instructions
 Signal Mirror Installation Instructions Ford Explorer 1996-2001, Ford Explorer SportTrac 2001, Ford Ranger 1996-2001, Mazda B-2500\B-3000\B-4000 1998-2001, Mercury Mountaineer 1997-2001 THE safety accessory
MM Strut Tower Brace, Cobra (MMSTB-7)
") The MM strut Tower Brace attaches to each strut tower and to the firewall. 3430 Sacramento Dr., Unit D San Luis Obispo, CA 93401 Telephone: 805/544-8748 Fax: 805/544-8645 www.maximummotorsports.com MM
The MM strut Tower Brace attaches to each strut tower and to the firewall. 3430 Sacramento Dr., Unit D San Luis Obispo, CA 93401 Telephone: 805/544-8748 Fax: 805/544-8645 www.maximummotorsports.com MM
* * APPLICABLE MODELS: 2014 > MAZDA 3
 PART NUMBER: 0000 8C L46 GENUINE ACCESSORIES INSTALLATION INSTRUCTIONS Rev. AAA *550-0604-000* APPLICABLE MODELS: 204 > MAZDA 3 REQUIRED COMPONENTS: ITEM QTY DESCRIPTION Usage Chart MIRROR ASSEMBLY: Mirror
Signal Mirror Installation Instructions
 Signal Mirror Installation Instructions 2004 2008 Ford F-150 XLT, FX4, & Lariat Pre-wired without side signals Pre-wired with side signals Without side directional lights, see page 2 With side directional
SUT-1000CLC ASSEMBLY REQUIREMENTS
 SUT-1000CLC Torque wrench, carpenters square, wire cutters, Phillips screwdriver, 7/16, 9/16, and 3/4 combination wrenches, ratchet, 9/16, 3/4, 13/16, and 7/8 sockets. ASSEMBLY REQUIREMENTS *Torque all
For the window switch piece, using a trim stick, pop the piece out below the wood trim:
 Facelift S8/A8 Removing Wood Trim Tools Needed: 1. Nylon Trim Stick 2. Philips Head Screwdriver 3. 5 and 6 mm allen heads 4. Small Torx screwdriver if removing emergency flasher switch Front and Rear Doors:
Mini Cooper Lock Actuator
 2001-2006 Mini Cooper Lock Actuator Replacement This guide is on how to remove the lock actuator from the cars door. Written By: Jem ifixit CC BY-NC-SA www.ifixit.com Page 1 of 13 INTRODUCTION In order
Elite Series Fender Flares
 Page 1 of 8 Installation Instructions I - Sheet Number I606RPG Rev.B Important Safety Information Tools Required Contents Elite Series Fender Flares Preparation Before Painting / Installation NOTE Actual
INSTALLATION INSTRUCTIONS K9-C20-32 & K9-C CHEVROLET 4 DOOR TAHOE, GMC YUKON, SUBURBAN and YULON XL
 INSTALLATION INSTRUCTIONS K9-C20-32 & K9-C21-32 2007-2014 CHEVROLET 4 DOOR TAHOE, GMC YUKON, SUBURBAN and YULON XL TOOLS REQUIRED: Power drill Drill bit set Standard & metric socket sets Phillips screwdriver
INSTALLATION MANUAL REAR PARKING ASSIST SENSORS
 MITSUBISHI MOTORS GENUINE ACCESSORIES PART NUMBER MZ380456EX APPLICABLE MODEL LANCER SEDAN INSTALLATION MANUAL REAR PARKING ASSIST SENSORS Thank you for purchasing MITSUBISHI genuine * REAR PARKING ASSIST
BrewsBySmith.com STC DIY Kit
 BrewsBySmith.com STC-1000 + DIY Kit Contact Information: Greg Smith www.brewsbysmith.com greg@boostbysmith.com I. Hardware Included: STC-1000 flashed with latest software (v1.06 currently) (if purchased)
BX2173 Installation Instructions Ford Focus (including the 2.3L engine) 2003 Ford Focus SVT
 2003 Ford Focus SVT") BX2173 Installation Instructions 2000-04 Ford Focus (including the 2.3L engine) 2003 Ford Focus SVT Serial No. The front fascia, coolant line bracket and anti-pollution devices are removed for baseplate
BX2173 Installation Instructions 2000-04 Ford Focus (including the 2.3L engine) 2003 Ford Focus SVT Serial No. The front fascia, coolant line bracket and anti-pollution devices are removed for baseplate
Signal Mirror Installation Instructions
 Signal Mirror Installation Instructions Toyota RAV4 1996-2000 THE safety accessory of the 21 st Century. P/N 210-0034-0 Rev B1 (11-19-02), GG 2002 Muth Co. LLC. Note: Professional Installation Recommended
TOYOTA TACOMA TRAILER WIRE HARNESS Preparation
 Preparation Part Number: PT725-35120 Kit Contents Item Quantity Reqd. Description # 1 1 Flasher Assembly (F/A) 2 1 Wire Harness 3 1 Sub Wire Harness 4 2 Plastic Tie (300mm) 5 4 Plastic Tie (200mm) 6 13
EP-60 END OF CAR JUNCTION BOX KIT and ASSEMBLY AND INSTALLATION INSTRUCTIONS
 EP-60 END OF CAR JUNCTION BOX KIT 786282 and 786438 ASSEMBLY AND INSTALLATION INSTRUCTIONS Figure 1 EP-60 End of Car Junction Box Kit Item No. Qty. Description P/N Kit No. 786282 Kit No. 786438 1 2 Screw,
Toyota FJ Cruiser 2006-Up Set Part # Revision A
 Toyota FJ Cruiser 2006-Up Set Part # 31924 Revision A 03-31-08 Step 1: Prior to Installation: A) Fit: Verify the fit of the flares to vehicle. (Some filing, sanding, or cutting may be necessary to ensure
Rugged Ridge Body Armor Guard Kit, 5 Pieces, Black (07-Current JK 4-door)
") Rugged Ridge Body Armor Guard Kit, 5 Pieces, Black (07-Current JK 4-door) Installation Time: 60 Minutes Tools Required: Notes: Phillips head screwdriver 3/8 socket or Flat head screwdriver 1/2 socket 7
Rugged Ridge Body Armor Guard Kit, 5 Pieces, Black (07-Current JK 4-door) Installation Time: 60 Minutes Tools Required: Notes: Phillips head screwdriver 3/8 socket or Flat head screwdriver 1/2 socket 7
TOYOTA COROLLA EC REARVIEW MIRROR Section I Installation Preparation
 Section I Installation Preparation Part Number: PT374-02030 Section I Installation Preparation Kit Contents Item # Quantity Reqd. Description 1 1 AD Mirror Assembly w/compass & Maplights 2 1 Hardware Bag
Signal Mirror Installation Instructions Honda Odyssey
 Signal Mirror Installation Instructions 2005-2009 Honda Odyssey THE safety accessory of the 21st Century. P/N 210-0122-0 Rev. A4 (6/9/09), BTV 2006 Muth Company, LLC PROFESSIONAL INSTALLATION RECOMMENDED
Install. instructions. B8 A4/S4 RS4 Blackout Mesh Style Grille. By: 7716 Wiles Rd.Coral Springs, FL
 Install instructions B8 A4/S4 RS4 Blackout Mesh Style Grille By: Preface: The best fitting grille on the market! Completely change the look of your Audi A4 or S4. This mesh style grille features a black
Mustang RTR Rear Diffuser Splitter Assembly Installation Instructions CDC#
 2010-2012 Mustang RTR Rear Diffuser Splitter Assembly Installation Instructions CDC# 1098-7006-01 About the Product: This product is designed by Classic Design Concepts, and installs using all factory
Installation instructions, accessories. TV receiver, digital
 Installation instructions, accessories Instruction No 30756561 Version 1.1 5 Part. No. 30756181, 30756569 TV receiver, digital Volvo Car Corporation TV receiver, digital- 30756561 - V1.1 Page 1 / 36 Equipment
Daytime Running Lights - Splice-in (10-12 All):
:") Time Necessary: Approximately 1 hour Tools Required: Heat Gun Installation Procedure: Daytime Running Lights - Splice-in (10-12 All): 1. It is recommended that the positive terminal be removed from the
Time Necessary: Approximately 1 hour Tools Required: Heat Gun Installation Procedure: Daytime Running Lights - Splice-in (10-12 All): 1. It is recommended that the positive terminal be removed from the
DIY S2000 Door Card Removal
 DIY S2000 Door Card Removal This Do-It-Yourself guide is intended to guide you through removing the door cards from your S2000. Tools Required: Phillips Head Screwdriver Trim tools (pry tool and a trim
1104. Clean up the door striker plates with a hand grinder using a wire brush and WD-40.
 Chapter 31 - Misc. Putting VW Back Together (Video Clip 31) 1104. Clean up the door striker plates with a hand grinder using a wire brush and WD-40. 1105. Install both door striker plates on the VW body
FENDER FLARE INSTALLATION
 TG-FF8T4178: Fit 2014-UP Toyota Tundra PRIOR TO INSTALLATION IMPORTANT Tyger only approves the installation according to our instructions with the hardware provided. WARNING Failure to complete the installation
BUSHTEC TRAILER HITCH FOR VICTORY VISION Trailer Hitch Installation Instructions READ ALL INSTRUCTIONS BEFORE YOU START
 BUSHTEC TRAILER HITCH FOR VICTORY VISION Trailer Hitch Installation Instructions READ ALL INSTRUCTIONS BEFORE YOU START ATTENTION INSTALLER: THESE INSTRUCTIONS MUST BE GIVEN TO THE END USER!!! VICTORY
K9 KIT INSTALLATION INSTRUCTIONS CROWN VIC with Fire Suppression System Model KK-K9-F7-K-FS
 K9 KIT INSTALLATION INSTRUCTIONS 2005-2011 CROWN VIC with Fire Suppression System Model KK-K9-F7-K-FS TOOLS REQUIRED: Power Drill (Cordless preferable) Drill Bit Set Standard Wrench and Socket Set Metric
Cover Page. Factory Radio Other Documents Available For This Vehicle:
 Factory Radio Other Documents Available For This Vehicle: No documents available at this time Adobe Acrobat Reader Printing Tips: 1) Select FLE then PRNT and select your printer. 2) n the print options
SALEM ICE CABIN 80A MINI-BREAKER INSTALLATION
 Introduction Some Ice (House) Cabin trailers may operate slowly and/or stop operating after five seconds of use. The cause is the main power for the dual polarity solenoid, which is supplied by a 10AWG
QUANTUM 2 TRAPEZOID 2509 Installation Instructions
 Installation Instructions #CH-T-2509-KIT #CH-T-2509-2FT #CH-T-2509-4FT #CH-T-2509-6FT #CH-T-2509-8FT Custom #CH-T-2509 Sections: Pg. 2 Fixture Kit Channel Preparation Pg. 6 Suspension Installation Version
SAFETY THIS PRODUCT IS FOR OFFROAD USE ONLY. ALL LIABILITY FOR INSTALLATION AND USE RESTS WITH THE OWNER.
 SAFETY Your safety and the safety of others is very important. In order to help you make informed decisions about safety, we have provided installation instructions and other information. These instructions
WATCH VIDEO INSTALL! HOW-TO INSTALL CV-TL-80S-EB. Page: Instructions for Installation on: Toyota Land Cruiser 80 Series
 Clearview Towing Mirrors (Electric Power Adjustable) CV-TL-80S-EB Instructions for Installation on: Toyota Land Cruiser 80 Series 1990-1997 Page: 1 OF 13 Clearview s premiere line of replacement towing
X5 License Plate PDC Retrofit (Part # ) dkl
 dkl") X5 License Plate PDC Retrofit (Part # 66 21 0 416 597) dkl Disclaimer: This article is only intended to be use as a guideline in addition to those instructions provided by BMW. As with all modifications,
X5 License Plate PDC Retrofit (Part # 66 21 0 416 597) dkl Disclaimer: This article is only intended to be use as a guideline in addition to those instructions provided by BMW. As with all modifications,
Flat Style Fender Flares Front Pair. Jeep. Included in Hardware Kit:
 Jeep Flat Style Fender Flares Front Pair STEP 1 PRIOR TO INSTALLATION A) Bushwacker only approves installing the fl ares according to these written instructions with the hardware provided. WARNING: Failure
All Terrain Flares 2014 Chevy Silverado
 Page 1/8 Components: 1. Front Flares (2) 2. Rear Flares (2) Tools required: - Utility knife - #2 Phillips driver - Socket wrench - 13 mm Socket - 6 mm Allen Wrench - T-15 Torx bit - Trim Removal Tool -
MM Strut Tower Brace, GT (MMSTB-5.1)
") 3430 Sacramento Dr., Unit D San Luis Obispo, CA 93401 Telephone: 805/544-8748 Fax: 805/544-8645 www.maximummotorsports.com MM Strut Tower Brace, 1996-97 GT (MMSTB-5.1) MMSTB-5.1 is for 1996-97 GT s with
3430 Sacramento Dr., Unit D San Luis Obispo, CA 93401 Telephone: 805/544-8748 Fax: 805/544-8645 www.maximummotorsports.com MM Strut Tower Brace, 1996-97 GT (MMSTB-5.1) MMSTB-5.1 is for 1996-97 GT s with
INSTALLATION INSTRUCTIONS KK-K9-F14-K K9 KIT FOR FORD EXPEDITION
 INSTALLATION INSTRUCTIONS KK-K9-F14-K-32 32 K9 KIT FOR 2003-2016 FORD EXPEDITION TOOLS REQUIRED: Power Drill Drill Bit Set Standard & Metric Socket Sets Phillips Screw Driver Open End Wrench Set Wire Cutters
QUALITY MANAGEMENT SYSTEM
 Not controlled in hard copy Rev. 1.0 Date: Page 1 of 18 Subject The following instructions provide a step-by-step procedure to replace the heating element for DEF/SCR/UREA/ADBLUE/DIESEL After Treatment
I Click on a link tab to jump to that page. Cover Page
 Publication, Duplication, or Retransmission Of This Document Not Expressly Authorized n Writing By The nstall Doctor s Prohibited. Protected By U.S. Copyright Laws. 1997,1998,1999,2000. Factory Radio Other
Bi-Color Signal Mirror Installation Instructions
 Bi-Color Signal Mirror Installation Instructions 2005-2009 Toyota Tacoma THE safety accessory of the 21 st Century. P/N 210-0141-0 Rev. A2 (3/30/09), BTV 2007 Muth Mirror Systems, LLC Page 3 of 13PplPage
I Click on a link tab to jump to that page. Cover Page
 Publication, Duplication, or Retransmission Of This Document Not Expressly Authorized n Writing By The nstall Doctor s Prohibited. Protected By U.S. Copyright Laws. 1997,1998,1999,2000. & nstall Factory
INSTALL/REMOVAL INSTRUCTIONS: WINDOW REGULATOR
 REMOVAL/INSTALL OF WINDOW REGULATOR (741-584) Ford Focus 2000-2007 General Tech Tips: Use painter s tape rather than duct tape to secure window. It will not damage paint or leave sticky residue. A plastic
INSTALLATION INSTRUCTIONS
 INSTALLATION INSTRUCTIONS Accessory Application Publications No. AII 33380 SIDE S 2007 S2000 Issue Date AUG 2006 PARTS LIST Left upper side strake 2 Grommets 2 Butyl O-rings 2 Washer-screws, 6 x 20 mm
TOYOTA TACOMA 2005 TRAILER WIRE HARNESS Preparation
 Preparation Part Number: 08921 04960 NOTE: Part number of this accessory may not be the same as the part number shown. Kit Contents Item # Quantity Reqd. Description 1 1 Converter Assembl y 2 1 Wire Harness
QUANTUM 2 CIRCLE 24 Installation Instructions
 Installation Instructions #CH-C-24-KIT #CH-C-24-2FT #CH-C-24-4FT #CH-C-24-6FT #CH-C-24-8FT Custom #CH-C-24 Sections: Pg. 2 Fixture Kit Channel Preparation Pg. 6 Suspension Installation Version 3 Page 1
SAFETY THIS PRODUCT IS FOR OFFROAD USE ONLY. ALL LIABILITY FOR INSTALLATION AND USE RESTS WITH THE OWNER.
 SAFETY Your safety and the safety of others is very important. In order to help you make informed decisions about safety, we have provided installation instructions and other information. These instructions
INSTALLATION INSTRUCTIONS
 INSTALLATION INSTRUCTIONS Accessory S P/N 08P00-TR0-100A Application 2013 CIVIC 4-DOOR Publications No. AII 13081 Issue Date NOV 2012 PARTS LIST 2 Grommets B Left front splash guard 2 Self-tapping screws,
Assembly Instructions
 Unite Panel System Hinge Door July 2016 #12 x / slotted hex washer head bolt Figure 1 threshold bracket frame Detail F threshold bracket threshold bracket (installed) #12 x / slotted hex washer head bolt
Ford Super Duty 4x4 CB Antenna Installation 2004 F250 4x4 XLT Sport Back to 2004 F250 Main Page
 Ford Super Duty 4x4 CB Antenna Installation 2004 F250 4x4 XLT Sport Back to 2004 F250 Main Page I wanted to install a CB in my truck but I didn't particularly like any of the typical antenna installation
Rugged Ridge 2 Receiver Hitch Kit (J21068)
") Rugged Ridge 2 Receiver Hitch Kit (J21068) Installation Time: 1-2 Hours Tools Required: ¾ Open End Wrench 18 mm Socket ¼ drive Pliers/Needle nose pliers/channel locks, etc. Torque wrench Phillips head
Rugged Ridge 2 Receiver Hitch Kit (J21068) Installation Time: 1-2 Hours Tools Required: ¾ Open End Wrench 18 mm Socket ¼ drive Pliers/Needle nose pliers/channel locks, etc. Torque wrench Phillips head
Finish Line Emergency Brake Boot INSTRUCTION SHEET. Part Number. Application: Corvette. Part Includes.
 Application: 1997-2004 Corvette Part Includes 1 - Emergency Brake Boot Finish Line Emergency Brake Boot Tools Needed T15 10mm PRE-INSTALLATION NOTES Read completely through instructions to familiarize
Rugged Ridge Front Bumper Winch Plate JK
 Rugged Ridge Front Bumper Winch Plate 13-17 JK Note: These instructions involve cutting parts of your vehicle. Please read all instructions prior to starting. Installation Time: 2-3 Hours Tools Required:
Please read BOTH these Installation Instructions and the General Instructions before attempting to install or operate this equipment.
 Please read BOTH these and the General Instructions before attempting to install or operate this equipment. 1. Blue Ox towing products and accessories are intended to be installed by Blue Ox Dealers who
WARNING. BX Kia Soul Installation Instructions. Bolt Torque Specifications. Bolt Torque Specifications
 Serial Number Please read BOTH these and the General Towing Instructions before attempting to install or operate this equipment. 1. Blue Ox towing products and accessories are intended to be installed
EmagiKit. Privacy Pod Plus. Quiet. Easy. Affordable. INSTRUCTIONS ASSEMBLY
 EmagiKit Privacy Pod Plus Quiet. Easy. Affordable. INSTRUCTIONS ASSEMBLY DIMENSIONS AND COMPONENTS 47 47 Ceiling Unit 2-B 2-L 2-R Glass Door Corner Trim Door Handle 90 Adjustable Height Work Surface 1-B
K9 KIT INSTALLATION INSTRUCTIONS CROWN VIC KK-K9-F7-K
 K9 KIT INSTALLATION INSTRUCTIONS 1998-2011 CROWN VIC KK-K9-F7-K TOOLS REQUIRED: Power Drill (Cordless preferable) Drill Bit Set Standard Wrench and Socket Set Metric Socket Set Screwdriver Set Torx Bit
Signal Mirror Installation Instructions Toyota Tacoma
 Signal Mirror Installation Instructions 2005-2015 Toyota Tacoma THE safety accessory of the 21 st Century. P/N 210-0115-0 Rev. A4 (3/11/15), BTV 2005 Muth Mirror Systems, LLC Page 3 of 12PplPage 3 of 12
Chrome Mustang Billet Interior Door Handles (05-09) - Installation Instructions
 - Installation Instructions") Chrome Mustang Billet Interior Door Handles (05-09) - Installation Instructions The below installation instructions work for the following products: Chrome Mustang Billet Interior Door Handles (05-09)
Chrome Mustang Billet Interior Door Handles (05-09) - Installation Instructions The below installation instructions work for the following products: Chrome Mustang Billet Interior Door Handles (05-09)
unit 3: GENErAL ElectriCAL SySTEM DiAGNOSiS
 Electrical/Electronic Systems unit 3: GENErAL ElectriCAL SySTEM DiAGNOSiS lesson 4: wire and connector repairs I. Connector repairs A. Connector repairs involve fixing damaged wires. Wires are marred due
ES# ECS MKV R32 Dead Pedal Kit Installation Instructions
 ECS MKV R32 Dead Pedal Kit ES#261054 Proper service and repair procedures are vital to the safe, reliable operation of all motor vehicles as well as the personal safety of those performing the repairs.
PRODUCT: DODGE PROMASTER MAX SYSTEM 530 / 560 RELEASE DATE: 02/24/15 REVISION DATE: 02/24/15 PART NUMBER: B
 Parts List 30 01 000 319 Wire,12 Ga Red w/white Stripe 7 02 000 653 Linestake, 2.5" Vinyl Coated 35 01 000 335 Wire,12 Ga Red 2 02 000 656 Bolt,7/16-14 x 4 1/2 Zinc Plate 30 01 000 421 Wire,6 Ga. Red (Max.
Wire Harness Installation Instructions For Installing:
 Wire Harness Installation Instructions For Installing: Part # 30714 1978-1981 Camaro Tail Light Harness Perfect Performance Products, LLC Painless Performance Products Division 2501 Ludelle Street Fort
CLUB-SPORT ROLL BAR: Volkswagen Mk4 Golf
 HPA Motorsports Inc. 604-888-7274 www.hpamotorsport.com CLUB-SPORT ROLL BAR: Volkswagen Mk4 Golf Congratulations on the purchase of your Club-Sport Roll Bar from HPA Motorsports! The engineering elements
FENDER FLARE INSTALLATION
 : 2011-2014 Ram 2500/3500 Fleetside 76.3 inch and 98.3 inch Bed. Tools Required 1. #2 Phillips Driver 2. Socket Wrench 3. 8mm Socket 4. 1/2 Wrench 5. Utility Knife 6. Awl or Similar Pointed Tool PRIOR
Bolt-On/Rugged Fender Flares Toyota Tundra (14-ON) Important: Please read instructions entirely before installing this product.
 Important: Please read instructions entirely before installing this product.") Important: Please read instructions entirely before installing this product. Hardware Included QTY Hardware Included QTY Bolt Kit Included QTY Extrusion 28.0 ft Short Screw 18 Nuts 42 Alcohol Wipe 4 Long
Important: Please read instructions entirely before installing this product. Hardware Included QTY Hardware Included QTY Bolt Kit Included QTY Extrusion 28.0 ft Short Screw 18 Nuts 42 Alcohol Wipe 4 Long
Suggested Instructions for: , , , C5 Emergency Brake Boot
 Suggested Instructions for: 608-348, 608-349, 614-653, 619-200 C5 Emergency Brake Boot Tools Ratchet, 10mm socket, extension #15 Torx screwdriver Needle nose pliers Masking Tape Very small flat head screwdriver
1/4 Rubber Spacer, 26 pcs. M5-.8 Machine Screw, 26 pcs 13. Female Wire Connector, 4 pcs
 97-06 Jeep Wrangler TJ Set Part #10920-07 Rev-3 12-15-08 A) B) C) D) E) F) G) STEP 1 - PRIOR TO INSTALLATION Bushwacker only approves installing the fl ares according to these written instructions with
GENUINE PARTS INSTALLATION INSTRUCTIONS
 GENUINE PARTS INSTALLATION INSTRUCTIONS DESCRIPTION: APPLICATION: PART NUMBER: REAR SPOILER KIT - CARBON FIBER INFINITI Q60 T99J1 5CH0B KIT CONTENTS: Item Qty. Part Description A 1 Spoiler Assembly B 4
BMW X5 OEM RUNNING BOARD PART#SBBW
 INSTALLATION INSTRUCTIONS 2014-2016 BMW X5 OEM RUNNING BOARD PART#SBBW-146-74 QTY HARDWARE 1 Driver Side OEM Running Board 1 Passenger Side OEM Running Board 8 Rivet Pin 1 Page Step 1: Verify all parts
Introduction. Rocky Mountain Westy Swing Away Carrier Kit Installation Instructions
 Rocky Mountain Westy Swing Away Carrier Kit Installation Instructions Introduction Thank you for purchasing the Rocky Mountain Westy Swing Away Carrier Kit. We pride ourselves in the products we develop
Exterior Door Handle - LH - Unpainted (05-14 All)
") Tools Required: Exterior Door Handle - LH - Unpainted (05-14 All) 1) 10mm and 7mm sockets 2) Socket wrench (small size recommended) 3) T30 Torx bit 4) Plastic pry/molding tool (below, A) 5) Thin plastic
Tools Required: Exterior Door Handle - LH - Unpainted (05-14 All) 1) 10mm and 7mm sockets 2) Socket wrench (small size recommended) 3) T30 Torx bit 4) Plastic pry/molding tool (below, A) 5) Thin plastic
compile system INSTALLATION GUIDE Updated January 2019
 INSTALLATION GUIDE Updated January 09 compile system Table of Contents Panels 0 Quick Connect Clips 0 Lock Clips 0 Panel Trims 0 Privacy Glass 0 Post Base Covers 04 Electrical 04 Power Distribution Harness
Installation Instructions Road King Classic Saddlebag Bezels
 Installation Instructions Road King Classic Saddlebag Bezels Thank you for your purchase of Bagger Audio Road King Classic Saddlebag Bezels for your Harley-Davidson motorcycle. We have carefully engineered
10" E-Series D-Series - Pair. kit includes (14) (4) (4) It is strongly recommended that this product be installed by a professional.
 (4) (4) It is strongly recommended that this product be installed by a professional.") 2014 GMC 1500 grille installation instructions 10" E-Series D-Series - Pair kit includes (14) (14) (4) 5 /16-18x 5 /8 Button Socket 5 /16-18 Low Profile Nylock Nut M6-1.0x30mm Button Head Socket (14) (4)
2014 GMC 1500 grille installation instructions 10" E-Series D-Series - Pair kit includes (14) (14) (4) 5 /16-18x 5 /8 Button Socket 5 /16-18 Low Profile Nylock Nut M6-1.0x30mm Button Head Socket (14) (4)
Splice-In Sequential Tail Lights Installation Guide (96-04)
") Splice-In Sequential Tail Lights Installation Guide (96-04) The below installation instructions work for the following products: Mustang Sequential Taillights Kit - Splice-in (96-04) Please read through
Splice-In Sequential Tail Lights Installation Guide (96-04) The below installation instructions work for the following products: Mustang Sequential Taillights Kit - Splice-in (96-04) Please read through
I Click on a link tab to jump to that page. Cover Page
 Publication, Duplication, or Retransmission Of This Document Not Expressly Authorized n Writing By The nstall Doctor s Prohibited. Protected By U.S. Copyright Laws. 1997,1998,1999,2000. & nstall Factory
IMPORTANT INSTALLATION INSTRUCTIONS ATTACHED
 IMPORTANT INSTALLATION INSTRUCTIONS ATTACHED For Full-Color Installation Instructions, Please Visit: VOLANT.COM and Search by Part Number Please be sure to review the enclosed instructions prior to beginning
THANK YOU FOR PURCHASING THE M/T METAL SERIES MODULAR JK FRONT BUMPER
 THANK YOU FOR PURCHASING THE M/T METAL SERIES MODULAR JK FRONT BUMPER Your safety and the safety of others is very important. Please read and understand all safety precautions before installing this or
FENDER FLARE INSTALLATION
 Customer Support TM FENDER FLARE INSTALLATION TG-FF8C4108 IMPORTANT TYGER only approves the installation according to our instructions with the hardware provided. WARNING Failure to complete the installation
IMPORTANT WARRANTY & INSTALLATION INSTRUCTIONS ATTACHED
 IMPORTANT WARRANTY & INSTALLATION INSTRUCTIONS ATTACHED Please Forward All Attached Information to Consumer Warranty Not Valid Unless Returned to Volant Performance STOP Please be sure to review the enclosed
5/16 Hex Head Bolt, 16 pcs. Plastic Push Retainer, 6 pcs. Alcohol Wipe, 2 pcs. Side Refl ex Reflector, 2 pcs
 STEP 1 PRIOR TO INSTALLATION A) Bushwacker only approves installing the fl ares according to these written instructions with the hardware provided. WARNING: Failure to install according to these instructions
MODULAR BUMPER INSTALLATION MANUAL
 MODULAR BUMPER INSTALLATION MANUAL Parts List* 1 Center section 1 Side extension, passenger / right 1 Side extension, driver / left 1 Side cap, passenger / right 1 Side cap, driver / left 1 Brush guard,
TRUE TECHNICAL SERVICE MANUAL - ALL MODELS. DOORS/DRAWERS/LIDS
 DOORS/DRAWERS/LIDS 55 56 NOTES DOORS/DRAWERS/LIDS Swing s 73 74 NOTES INSTALLATION OF A GDM-SWING DOOR Phillips Head Screwdriver (2) - 1/8" Drift Punches (forged) Top Bracket NOTE: It may be necessary
BX2520 Installation Instructions 2004 Mazda 3
 BX2520 Installation Instructions 2004 Mazda 3 Serial No. The headlight assembly, front fascia, horn bracket and windshield washer reservoir are removed for baseplate installation. Drilling is required.
General Prisoner Transport Install Instructions PT-2-INST
 General Prisoner Transport Install Instructions PT-2-INST 50 or 60 high x 80, 100 & 120 inch long / Double Compartment Inserts Also refer to PT-A-3XX instructions for vehicle specific mounting measurements
HARDWARE KIT # KKM or Rear Compartment: (Some hardware not used in all applications)
") PRISONER TRANSPORT INSTRUCTIONS for CHEVROLET EXPRESS VAN PT-C01-100-2A TOOLS REQUIRED: Standard and Metric Socket Sets Awe or Scribe Tape Measure Impact Gun (recommended) Pry-bar Caulk gun Drill & drill
PRISONER TRANSPORT INSTRUCTIONS for CHEVROLET EXPRESS VAN PT-C01-100-2A TOOLS REQUIRED: Standard and Metric Socket Sets Awe or Scribe Tape Measure Impact Gun (recommended) Pry-bar Caulk gun Drill & drill
WARNING. BX Ford Explorer With Adaptive Cruise Control & Eco Boost Installation Instructions
 Please read BOTH these and the General Instructions before attempting to install or operate this equipment. 1. Blue Ox towing products and accessories are intended to be installed by Blue Ox Dealers who
Bushwacker Jeep Flat Style Fender Flares Rear Pair (JK Wrangler 2dr)
") Bushwacker Jeep Flat Style Fender Flares Rear Pair (JK Wrangler 2dr) Note: These instructions involve cutting parts of your vehicle. Please read all instructions prior to starting. Installation Time: 3-4
Bushwacker Jeep Flat Style Fender Flares Rear Pair (JK Wrangler 2dr) Note: These instructions involve cutting parts of your vehicle. Please read all instructions prior to starting. Installation Time: 3-4
SDS TAP Retrofit Install Bartlett 3 Key Installation of TAP Control for Models Originally Built with the Bartlett 3 Key Control
 SDS TAP Retrofit Install Bartlett 3 Key Installation of TAP Control for Models Originally Built with the Bartlett 3 Key Control This SDS Industries TAP Retrofit kit and installation instructions are intended