Introduction to Combat and Ranged Attacks. Introduction. Anatomy of a Combat Unit
|
|
|
- Charles Waters
- 6 years ago
- Views:
Transcription
.")


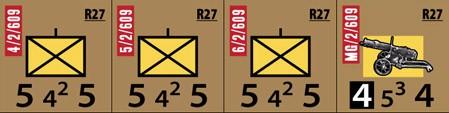
1 Most units have two step strengths, with their CS (especially) and RAS somewhat reduced on their reduced strength side. Reduced infantry units may attempt to recover to full strength by using the Recovery mechanic (covered later in this tutorial). The following illustration shows the same Soviet units on their full and reduced strength sides: Introduction to Combat and Ranged Attacks By Mark Mokszycki. Playtest game art by Michael Evans. The following tutorial is intended as a primer to give you an idea how Red Winter works. It does not cover all aspects of game play, nor does it cover the wide variety of strategies that might be employed by the Soviet and Finnish players. Additional tutorials will follow. Please note that all artwork in this tutorial is playtest art- not the final version. In fact, the counter artwork has already changed since the VASSAL module used for this tutorial was created (see preview towards the end of this document). Introduction Conflict in Red Winter comes in three flavors: Combats, Assaults, and Ranged Attacks. Combat may be performed only against adjacent units, and is never mandatory. Assaults (combat performed as part of movement) are the least common; they will not be covered in this tutorial. Suffice to say for now, Assaults are handled identically to normal combats except for a few small exceptions. This tutorial will focus mainly on Ranged Attacks, as these are potentially the most challenging for new players. Whereas Combat represents two-way firefights between (mostly) rifles and other small arms, Ranged Attacks are made at a distance of two or more hexes and include fire from mortars, artillery, tanks, and machine guns (MGs). Most infantry companies are capable of making Ranged Attacks at a range of 2 hexes due to the light machine guns (LMGs) inherent in each company (and, as a side note, the Soviet infantry has a real advantage in this department). Red Winter is a moderately complex game which simulates the fighting near Tolvajärvi, Finland, during the Russo-Finnish Winter War of The game is fast paced and interactive, with each player able to take his turn in about 5 minutes. The first in a proposed series of Winter War games, Red Winter is characterized by highly fluid frontlines, wild flanking maneuvers by night, Finnish night raids, and a low unit density across a wide and shifting front. The scale is grand tactical - mostly company sized units, 425 yards per map hex, 90 minutes per game turn. Anatomy of a Combat Unit Unit statistics denote (from left to right): Combat Strength (CS), Ranged Attack Strength (RAS), maximum Range in hexes, and Movement Allowance (MA). Historical ID is shown at upper left. Pictured below is Finnish Bicycle Battalion PPP7. represents a company of infantry (about 100 men). Each counter The units in the next column comprise a Soviet infantry battalion. The heavy machine gun unit represents 4 sections of guns (8 total guns). It s CS in black denotes that its strength is doubled when defending. It can project its RAS of 5 across a range of 3 hexes. Artillery can strike any hex on the map; their range is considered infinite within the parameters of our game scale. Artillery counters are kept off map. Their RAS in yellow denotes that they use indirect fire; they can fire over terrain and other units so long as a friendly unit acts as a spotter. This is unlike direct fire from weapons such as MGs and tanks, which require Line of Sight (LOS) to their target.


 and neither side holds a morale advantage.")
2 The LOS rules are simple; LOS is blocked by all terrain types other than frozen lake. It is also blocked by friendly units (for purposes of direct fire, but not for spotting). The time of day also affects LOS. Visibility is limited to 5 hexes during daylight turns, 1 hex at night, 2 hexes at dawn and dusk, and 3-4 hexes during the morning turns as the fog slowly burns off. This is shown for each game turn on the Turn Track for ease of reference. Gameplay Tutorial Now that you know the basics, let s get started. For this tutorial, we will use only a handful of units from each side, and only a small portion of the map. The game situation is shown at right. The Soviets (brown) are attempting to cross the ice of Lake Tolvajärvi and force their way into Tolvajärvi village, at left. It is December 10th (day three of the five day battle) and neither side holds a morale advantage. In addition to the units shown on the map, the Soviet player has two off map artillery units- the same ones shown on the previous page of this tutorial. Each game turn proceeds according to the following Play Sequence: I. II. III. IV. Soviet Reset Phase Soviet Action Phase Soviet Combat Phase Finnish Turn (repeat phases I-III for Finns) Note that while the Soviet player always goes first in our tutorial, the player order can (and will) change over the course of a campaign. During the Soviet Reset Phase, all Soviet mortars and artillery are flipped from their Fired side to their Ready side. We will assume this is done. During the Soviet Action Phase, each Soviet unit can choose one of the following actions: move, attempt recovery, or dig in. Reinforcements also enter the map during this phase. Movement, Stacking and Zone of Control Let s move some units. We ll start with the three Soviet infantry units in hexes K21 and K22. Moving each unit individually, the Soviets cross the ice and form a stack in hex I21. (Incidentally, the stacking limit is five units, no more than three of which can be infantry. In practice, stacking is usually much lower than five since counter density is so low and there is a lot of map to cover.) The infantry units pay 1.5 Movement Points (MPs) per frozen lake hex, per the Terrain Key above, so the move costs each unit a total
. The MG unit will sit tight.")


3 of 3 MPs. Soviet infantry has a Movement Allowance (MA) of 5, so this isn t a problem. A unit must halt its movement upon entering an enemy Zone of Control(eZOC). The six hexes adjacent to a combat unit constitute its Zone of Control (ZOC). The MG unit will sit tight. He could start improving his position by placing a Digging In marker, but in our case he d be better used to support the impending combat. He cannot do both- the Digging In marker would go away if he were to perform an attack. Combat and Support During the Soviet Combat Phase, our Soviet stack on the ice will attack the adjacent Finnish infantry unit. We have 15 points attacking 5, so the base combat odds would normally be 3:1. However, units attacking from the ice have their total Combat Strength halved, so our base odds are in fact only 1:1. We ll see if we can increase the Soviets odds by committing some offensive support to the combat. The Soviet player commits his two off map 76mm artillery units, as well as his mortars and heavy machine guns on Kotisaari Island. The MG unit qualifies for ranged support because it is within range (its max range is 3 hexes), it has Line of Sight (there are no intervening units or blocking terrain) and it is not adjacent to any enemies. The mortars are well within their maximum range of 12 hexes. The defender may also commit units to support the combat at this time. This is called defensive support. The Finns commit the MG in hex H20. The Finnish infantry in I23 are also within range with their light machine guns (range 2 hexes), but the infantry in I18 are just out of range. Note that range is always traced to an actual enemy unit or stack, regardless of whether the ranged support is being used offensively or defensively. Calculating the outcome of a Ranged Attack is a simple affair; roll two 6-sided dice, add the firing unit s RAS, and add +1 per infantry company in the target hex. A handful of other Die Roll Modifiers (DRMs) occasionally apply, but these are the main ones. The +1 per target infantry unit is a simple rule which conveniently discourages wanton stacking of units. Pile too many in the same hex and your opponent s artillery will pound you to dust! It doesn t matter which player s support is resolved first, as all results are considered simultaneous. We ll roll for the Soviet artillery first. Each unit rolls individually on the Ranged Attack Table (RAT); ranged fire is never combined. The Soviet player rolls a 7 and a 9. The firing units RAS of 5 is added to each result. A +1 DRM also applies for having one infantry company in the target hex. The modified die rolls are 13 and 15. Below: Terrain at Tolvajärvi. Consulting the RAT, we see that one roll has no effect, while the other causes Suppression in the target hex (but no step reductions). We place a Soviet Suppressed marker as a reminder. This will shift the impending combat 1 odds column in the Soviets favor. The Soviet player subtracts two points of ammo from his stock, and flips both artillery units to their Fired sides.


 attacking 5, for base odds of 1:1.")
4 Now the Soviet MG unit rolls. It rolls a 9, adding to this its RAS of 5. It receives a -1 DRM for being 3 hexes distant from the target, but the +1 DRM for one infantry unit in the target hex effectively cancels this out. The modified roll of 14 is just what is needed to place another Suppressed marker. The MG unit does not get flipped after firing; it is eligible to fire again during its own Combat Phase. Strategic note: Positioning of your units which utilize direct fire is important for this reason. The Soviet mortars roll an 8. They receive the usual +1 DRM for one infantry unit in the target hex, and also a +2 DRM for being within 6 hexes of the target hex. Design note: The Soviet mortar units are an amalgam of 82mm and 120mm mortar sections. Only at a range of 6 or fewer hexes is 82mm component usable, thus these units are more lethal when used accordingly. The modified roll is a 14, and a third Suppressed marker is placed on the target. The mortars are flipped to their Fired side. Now we ll resolve the Combat. We have 13 points (halved for the frozen lake) attacking 5, for base odds of 1:1. This is shifted two columns in the Soviets favor for the two Soviet support markers, producing final odds of 3:1. No other modifiers apply. The complete list of modifiers is shown on the final page of this tutorial (it won t fit comfortably into the two column format used here). Note that most combat modifiers are in the form of column shifts, meaning that the combat odds are shifted one or more columns to the left (defender s favor) or right (attacker s favor). The Soviet player rolls two 6-sided dice (there are no DRMs for combats; only column shifts) and rolls a 7. Now we ll resolve the Finnish defensive support. The MG in hex H20 has a RAS of 3. It gets a DRM of +3 for 3 infantry units in the target hex and another +2 DRM because the target hex is frozen lake. The Finnish player rolls a 9, modified to 17, resulting in successful Suppression plus a step reduction to the target hex! The Soviet player flips one of his infantry units to its reduced side. Rather than placing a Finnish Suppressed marker, the Finnish player simply removes one of the Soviet markers (the net column shift is all that s important). Below: The Finn at left is armed with a submachine gun, the Finn at right a captured Soviet 7.62mm Emmy light machine gun. The result is 0/1. This means the attacker takes no losses, and the defender takes 1 loss. Each loss can be taken either as a retreat hex or a step reduction, at the choice of the owning player. There are three important exceptions: No unit can retreat more hexes than its MA minus 2 (thus, Finns with a MA of 6 can retreat up to 4 hexes), the attacker must always take his first loss as a step reduction, and a defender suffering 3 or more losses must take the first as a step reduction. Don t worry about trying to remember these exceptions- they are displayed in red on the CRT as a friendly reminder. The Finnish infantry company in I23 fires its LMGs, rolling a 6, modified by a total of +7. The resulting 13 is a near miss. The Finnish player must now decide how to satisfy his one loss. This is a tough call. He could opt to keep his infantry unit intact by retreating to hex G20, G21 or H20 (retreats must be away from all attacking units, if possible) but then the Soviets could advance after combat into the vacated village hex. If he took the loss as a step reduction, his infantry unit would be weaker (CS reduced by 2), but he would strand the Soviet infantry on the ice, where it
.")
 days of the battle, the Soviets receive a penalty to their recovery rolls, simulating a lack of replacement troops as well as sinking morale.")


5 might be very vulnerable to a Finnish counterattack during the Finns' turn. After careful consideration, he opts for the latter and flips his unit to its reduced side. rolling a 6 or higher on a single 6-sided die. Units gain a bonus to the die roll for maintaining their distance from enemy units (see Recovery Table, below). This provides a simple yet realistic incentive for players to withdraw their reduced units to the rear and move forward fresh troops. During the fourth and fifth (final) days of the battle, the Soviets receive a penalty to their recovery rolls, simulating a lack of replacement troops as well as sinking morale. The result, in game terms, is a gradual but noticeable shift in the number of full strength Soviet units on the map. In the case of our Finns, only one unit, the reduced infantry company in I23, is eligible to attempt Recovery. The reduced infantry company in Tolvajärvi village is adjacent to enemy units, so it cannot recover. Reduced MG units can t recover. Checking the Recovery Table, we see there are no net modifiers, yielding a mere 1 in 6 chance of success. Therefore, the infantry unit s action would probably be better spent retreating to the rear (in order to gain a +1 DRM next turn) or joining the other Finns in an attack. The Finnish player considers his options- whether to move, dig in, or attempt Recovery with each unit- and he decides to move some units in order to set up a Combat against the Soviets on the ice. That Soviet mortar unit on Kotisaari Island also makes a very inviting target, but the only Finnish unit that could reach it is the infantry in I23, and those men will be vital to achieving a concentric attack on the Soviets on the ice. If positioned correctly, they might also force the Soviets to retreat through an ezoc, which mandates an additional step reduction. At the conclusion of the combat, all Suppressed markers are removed. Design note: That s right- the markers don t stay. Ranged attacks provide a use it or lose it benefit to combats against the targeted hex. Thus the attacker will need to follow up his support with a good old fashioned combat during the very same Combat Phase in order to exploit the benefit, or the suppressed hex will return to normal. No markers or resets of any kind are necessary for tracking suppression. Players will quickly become accustomed to counting Suppressed markers in their heads, although the provided markers are handy for new players or for pbem VASSAL play. Note also that ranged attacks need not be used to support combats. They can be used against any non-adjacent enemy in an attempt to inflict a step reduction, but they are most effective when used as support since the Suppressed result is the easiest result to achieve. Below: A portion of Tolvajärvi village, circa Finnish Turn Now it s the Finns turn. The Finnish player can skip the Finnish Reset Phase (there are no mortars or artillery to reset) and go straight to the Finnish Action Phase. Reduced infantry units may attempt to recover to full strength during their Action Phase in lieu of other actions. The Recovery mechanic requires
 but they don t want to get too far from the action- only far enough away to ensure the +1 recovery DRM next turn.")

. The MG in H20 stays put in order to support the combat. That s all for the Finnish Action Phase.")
6 The Finns in H21 decide to pull back in order to recover next turn. They pay +1 MP to exit ezoc, moving down the road to hex E25, paying only ½ MP per road hex. This move costs them a total of 4 MPs. They could move further (their MA of 6 would allow them 4 more road hexes) but they don t want to get too far from the action- only far enough away to ensure the +1 recovery DRM next turn. The infantry at I18 moves to H21, pay ½ MP per connected road hex for a total of 1.5 MPs. The infantry at I23 moves to J21. Finns are equipped with skis and pay only 1 MP per frozen lake hex, so this move costs only 2 MPs. The MG at I17 scoots up to I18 in order to support the impending combat; he could have moved closer in order to avoid the -1 DRM, but he doesn t want to give the Soviets an opening into the northern end of the village (we are only looking at an isolated slice of the front, after all). The MG in H20 stays put in order to support the combat. That s all for the Finnish Action Phase. Finns are already reduced, meaning that the MG fire eliminates them! Grumbling that his plans are now unhinged, the Finnish player places the unit in the Dead Pool box. He may be able to return it play later in the game via the expenditure of Replacement Points (not covered in this tutorial). Now we resolve the combat. We have 5 points attacking 13, for base odds of 1:3, but this is shifted 2 columns for the Finnish support. It also receives a whopping 4R column shift for Soviet Defender in Frozen Lake. Thus our combat is shifted a total of 6 columns, to final odds column of 5:1. Design note: The CRT is calibrated to woods as the norm, so units on the featureless lakes are comparatively easy to hit. You will also note that the column shift for Finns on frozen lake is 3R, not 4R. The Soviets wore brown uniforms and stuck out like sore thumbs against the snowy white backdrop of the lakes. The Finnish player rolls a 9; the combat result is 0/3 with a mandatory step reduction. The Soviet player reduces one of the full strength infantry units and retreats his units two hexes (back on to the island) to satisfy the remaining two losses. He need not retreat them to the same hex, so he places the two reduced units in K22 and the full strength unit in K21. This gives him better coverage should the Finns try to recapture the island. The Finns can advance after combat as many hexes as the defender retreated (in this case, 2 hexes) and there are pros and cons to such an advance. This would leave the Finns on the ice where they might suffer losses, but it would also mean that the reduced Soviets would not be eligible for recovery during their turn (since they would be in ezoc). The Finnish player opts not to advance. The combat is complete, and all Suppressed markers are removed (see illustration). Turn Analysis and What Comes Next The Soviets failed to gain a foothold in the village, but through their failed attempt has come a favorable turn of events- an eliminated company of Finns. The Turn Marker is now advanced on the Turn Track and we continue the game with the Soviet Reset Phase. The Soviet mortars and artillery are flipped and again eligible to fire. The Soviet player needs to quickly recover his units (slim chance of that happening in one turn) or else start digging in, lest the Finns seize the opportunity to gather forces and retake Kotisaari Island. The better option for the Soviets is probably to start digging in first, and attempt Recovery later. Now we move on to the Finnish Combat Phase. The Finns will conduct one combat, against hex I21. They will support it with their MGs at I18 and H20. The Soviets declare defensive support from the MGs at K20. Their mortars and artillery cannot provide support because they already fired during the Soviet Combat Phase (and they won t get flipped unit the next Soviet Reset Phase). Digging In The Finns MG units fire. Each unit has a RAS of 3, enjoys a +3 DRM for 3 infantry units in the target hex, and +2 DRM for Soviets on frozen lake. The Finnish player rolls an 8 and a 5, modified to a 16 and 14, and gets to place one Finnish Suppression marker. Note that the 16 was just a point shy of a step reduction. Units which are not in ezoc may place a Digging In marker in lieu of other actions. The following turn, the marker may be flipped to its Dug In side if these conditions are still met. Hexes with a Dug In marker receive a defensive bonus in Combat and vs. Ranged Fire. The Soviet MGs fire at the reduced Finnish unit on the ice at J22. They have a RAS of 5 and receive a +1 DRM for one infantry unit in target hex and +1 DRM for Finns on frozen lake. The Soviet player rolls a 10, modified to a 17, for a Suppressed + step reduction result. The target


7 This ends our little tutorial. We've covered the basic mechanics, and you now have an understanding of about 90% of the most common mechanics required to play the game. Mechanics which are used less frequently, such as Assaults, Finnish Night Raids, Anti-Tank Fire, and Replacements, will be covered in a future tutorial. I also hope to do a tutorial devoted to strategies and tactics in Red Winter. Below: A column of Soviet BA-10 armored cars advances. Above and below: Finns with Maxim machine guns. Questions or comments? Contact designer Mark Mokszycki at duckweedseattle@yahoo.com, or visit the Red Winter forums at consimworld.com and boardgamegeek.com. Please join us at the latter to view play by play game sessions, Winter War era photographs and maps, new artwork and game developments, and general discussion pertaining to Red Winter. Thanks for looking! Cheers, Mark Above: Destroyed Soviet T-26 tanks near Tolvajärvi. These are 1931 models with twin turrets.


8 Below: Sample of newest recent Red Winter counter art by Michael Evans from September 2009, current as of October 10, Counter art is not final at this time.


9
Table of Contents. GMT Games, LLC P.O. Box 1308, Hanford, CA
 RULE BOOK Table of Contents 1.0 Introduction... 2 2.0 Components and Terms... 2 3.0 Sequence of Play... 5 4.0 Movement... 5 5.0 Terrain... 5 6.0 Stacking... 7 7.0 Zone of Control... 7 8.0 Combat... 7 9.0
ARMY COMMANDER - GREAT WAR INDEX
 INDEX Section Introduction and Basic Concepts Page 1 1. The Game Turn 2 1.1 Orders 2 1.2 The Turn Sequence 2 2. Movement 3 2.1 Movement and Terrain Restrictions 3 2.2 Moving M status divisions 3 2.3 Moving
Game Turn 11 Soviet Reinforcements: 235 Rifle Div can enter at 3326 or 3426.
 General Errata Game Turn 11 Soviet Reinforcements: 235 Rifle Div can enter at 3326 or 3426. Game Turn 11 The turn sequence begins with the Axis Movement Phase, and the Axis player elects to be aggressive.
Part 4 Night Turns and Solitaire Play
 of the snow combined with light from the stars might have provided a bit of light. As if this wasn't enough to discourage troop movements by night, the nighttime temperatures plunged well below freezing!
Getting Started with Panzer Campaigns: Budapest 45
 Getting Started with Panzer Campaigns: Budapest 45 Welcome to Panzer Campaigns Budapest 45. In this, the seventeenth title in of the Panzer Campaigns series of operational combat in World War II, we are
PLAYBOOK Table of Contents GMT Games, LLC
 PLAYBOOK Table of Contents 17.0 Scenarios... 2 18.0 Designer s Notes... 24 19.0 Historical Notes... 40 20.0 Optional Rules and Variants... 45 21.0 Tips and Strategies... 50 22.0 Glossary of Finnish Terms...
Sequence of Play This rulebook is organized according to this Sequence of Play.
 Introduction...1 Sequence of Play...2 Campaign Set-Up...2 Start of Week...10 Pre-Combat...11 Combat...14 Post-Combat...19 End of Week...20 End of Campaign...22 Optional Rules...22 Credits...22 Sample Game...23
RANDOM MISSION CONTENTS TAKING OBJECTIVES WHICH MISSION? WHEN DO YOU WIN THERE ARE NO DRAWS PICK A MISSION RANDOM MISSIONS
 i The 1 st Brigade would be hard pressed to hold another attack, the S-3 informed Bannon in a workman like manner. Intelligence indicates that the Soviet forces in front of 1 st Brigade had lost heavily
A game by Wei Cheng Cheng. - Graphics: Olivier Revenu - Translation: Noël Haubry. Growling Tigers The Battle For
 BATTLES MAGAZINE #7 A game by Wei Cheng Cheng. - Graphics: Olivier Revenu - Translation: Noël Haubry Growling Tigers The Battle For Changde, 1943 is a two player wargame simulating the final stage of the
Command Phase. Setup. Action Phase. Status Phase. Turn Sequence. Winning the Game. 1. Determine Control Over Objectives
 Setup Action Phase Command Phase Status Phase Setup the map boards, map overlay pieces, markers and figures according to the Scenario. Players choose their nations. Green bases are American and grey are
Henry Bodenstedt s Game of the Franco-Prussian War
 Graveyard St. Privat Henry Bodenstedt s Game of the Franco-Prussian War Introduction and General Comments: The following rules describe Henry Bodenstedt s version of the Battle of Gravelotte-St.Privat
Red Parachutes. Extended Player Aid Sheet by Richard J. Vohlers. Includes advanced rules; optional rules in italics.
 Red Parachutes Extended Player Aid Sheet by Richard J. Vohlers Includes advanced rules; optional rules in italics. S = Soviet; G = German; B = Both; P = Phasing; NP = Non-phasing; OOS = Out of Supply;
22.0 Extended Examples of Play
 Last Hundred Yards ~ Playbook 11 22.0 Extended Examples of Play 22.1 Infantry and Mortars Situation: Early dawn, October 1944, southwest of Kohlscheid, Germany. A German outpost, dug-in on Hill 192, has
Solitaire Rules Deck construction Setup Terrain Enemy Forces Friendly Troops
 Solitaire Rules Deck construction In the solitaire game, you take on the role of the commander of one side and battle against the enemy s forces. Construct a deck, both for yourself and the opposing side,
Gazala: The Cauldron Table of Contents
 Gazala: The Cauldron Table of Contents 1.0 Introduction... 1 2.0 Components... 1 2.1 Game Scale... 1 2.2 Playing Pieces... 1 2.2.1 Action Chits (see 4.0)... 1 2.2.2 Tactical Chits (see 4.0)... 1 2.2.3
1.0 INTRODUCTION FORTRESSES COMPONENTS REPLACEMENTS GAME TERMS SEQUENCE OF PLAY VICTORY CONDITIONS
 RULES OF PLAY INDEX 1.0 INTRODUCTION... 2 2.0 COMPONENTS... 2 3.0 GAME TERMS... 3 4.0 SEQUENCE OF PLAY... 4 5.0 SET UP... 5 6.0 REINFORCEMENTS... 5 7.0 LOGISTICS AND INITIATIVE... 5 8.0 COMMAND... 5 9.0
Getting Started with Modern Campaigns: Danube Front 85
 Getting Started with Modern Campaigns: Danube Front 85 The Warsaw Pact forces have surged across the West German border. This game, the third in Germany and fifth of the Modern Campaigns series, represents
CEDAR CREEK BY LAURENT MARTIN Translation: Roger Kaplan
 CEDAR CREEK BY LAURENT MARTIN Translation: Roger Kaplan Cedar Creek 1864 simulates the Civil War battle that took place on October 19, 1864 and resulted in a Union victory. It uses many of the rules of
COMPONENT OVERVIEW Your copy of Modern Land Battles contains the following components. COUNTERS (54) ACTED COUNTERS (18) DAMAGE COUNTERS (24)
 ACTED COUNTERS (18) DAMAGE COUNTERS (24)") GAME OVERVIEW Modern Land Battles is a fast-paced card game depicting ground combat. You will command a force on a modern battlefield from the 1970 s to the modern day. The unique combat system ensures
GAME OVERVIEW Modern Land Battles is a fast-paced card game depicting ground combat. You will command a force on a modern battlefield from the 1970 s to the modern day. The unique combat system ensures
Clash of Giants The Campaigns of Tannenberg and The Marne, 1914
 RULEBOOK -UPDATED 12/25/01 Clash of Giants The Campaigns of Tannenberg and The Marne, 1914 Table of Contents 1.0 Introduction............... 2 2.0 Game Components........... 2 3.0 Game Setup...............
RULES OF PLAY Living Rules
 Ukraine 43 2nd Edition 2ND EDITION RULES OF PLAY Living Rules 7-4-5 TABLE OF CONTENTS. Introduction... 2 2. Contents... 2 3. Sequence of Play... 3 4. Stacking... 4 5. Movement... 4 6. Zones of Control...
Frontier/Modern Wargames Rules
 Equipment: Frontier/Modern Wargames Rules For use with a chessboard battlefield By Bob Cordery Based on Joseph Morschauser s original ideas The following equipment is needed to fight battles with these
command efficiency table
 sequence of play 0. PRE-GAME ORGANIZATION PHASE. 1. POSTURE DETERMINATION PHASE 2D6 + Cohesion. Highest total has initiative in this phase. Mark required stands or groups in movement posture. [6.01.01]
SERIES RULEBOOK. Game Design by Mark S. Miklos. Version: June 2017 TABLE OF CONTENTS. Great Battles of the American Revolution
 1 SERIES RULEOOK Game Design by Mark S. Miklos Version: June 2017 TALE OF CONTENTS 1. Introduction... 2 2. Components... 2 3. Game Scale and Terminology... 2 4. How To Win... 3 5. Sequence of Play Outline...
IWO JIMA RAGE AGAINST THE MARINES 1. INTRODUCTION 2. COMPONENTS 2.1 COUNTERS. Operations Special Issue #1
 1. INTRODUCTION Iwo Jima. The only battle of World War Two that saw the United States Marines suffer more casualties than they inflicted on the enemy. It was a battle that would define a war and would
Napoleon s Triumph. Rules of Play (draft) Table of Contents
 Table of Contents") Rules of Play (draft) Table of Contents 1. Game Equipment... 2 2. Introduction to Play... 2 3. Playing Pieces... 2 4. The Game Board... 2 5. Scenarios... 3 6. Setting up the Game... 3 7. Sequence of Play...
Rules of Play (draft) Table of Contents 1. Game Equipment... 2 2. Introduction to Play... 2 3. Playing Pieces... 2 4. The Game Board... 2 5. Scenarios... 3 6. Setting up the Game... 3 7. Sequence of Play...
TUTORIAL DOCUMENT. Contents. 2.0 GAME OBJECTIVE The Overall Objective of the game is to:
 TUTORIAL DOCUMENT Contents 1.0 INTRODUCTION 2.0 GAME OBJECTIVE 3.0 UNIT INFORMATION 4.0 CORE TURN BREAKDOWN 5.0 TURN DETAILS 5.1 AMERICAN MOVEMENT 5.2 US COMBAT 5.3 US MOBILE MOVEMENT 5.4 US MOBILE COMBAT
Getting Started with Panzer Campaigns: Stalingrad 42
 Getting Started with Panzer Campaigns: Stalingrad 42 Welcome to Panzer Campaigns Stalingrad 42. As winter began to close, the instruction came forward from OKH to von Paulus and the Sixth Army capture
The Glory that was GREECE. Tanagra 457 BC
 The Glory that was GREECE Tanagra 457 BC TCSM 2009 The Glory that Was Vol. I: Greece Rulebook version 1.0 1.0 Introduction The Glory that was is a series of games depicting several different battles from
The counters. BULL RUN VaeVictis 89 The first battle of the Civil War
 BULL RUN 1861 - VaeVictis 89 The first battle of the Civil War A game by Laurent MARTIN Bull Run, 1861 is a simulation of the First Battle of Bull Run (or the First Battle of Manassas for the Confederates),
2.0 game components support Units. color to make them easier to pick out. Each player has two types of game units: Combat Units Support units
 basic rules Somme 1918 - Bloody Spring is a wargame that simulates the German spring offensive of 1918 that was aimed at separating the British and French armies. Players will find themselves in the role
RESERVES RESERVES CONTENTS TAKING OBJECTIVES WHICH MISSION? WHEN DO YOU WIN PICK A MISSION RANDOM MISSION RANDOM MISSIONS
 i The Flames Of War More Missions pack is an optional expansion for tournaments and players looking for quick pick-up games. It contains new versions of the missions from the rulebook that use a different
Introduction. Your Commanders gain Experience with every battle, but they also gain Stress. Each Week, you must decide how hard to push your men.
 Introduction...1 Sequence of Play...2 Campaign Set-Up...2 Start of Week...9 Pre-Combat...10 Combat...12 Post-Combat...16 End of Week...17 End of Campaign...19 Optional ules...19 Credits...19 Sample Game...20
CONTENTS INTRODUCTION Compass Games, LLC. Don t fire unless fired upon, but if they mean to have a war, let it begin here.
 Revised 12-4-2018 Don t fire unless fired upon, but if they mean to have a war, let it begin here. - John Parker - INTRODUCTION By design, Commands & Colors Tricorne - American Revolution is not overly
Holland 44 Operation Market-Garden
 Holland 44: Operation Market-Garden Rev. May 2018 Holland 44 Operation Market-Garden 1 RULES OF PLAY Revised May, 2018 TABLE OF CONTENTS 1. Introduction... 2 19. Reinforcements and Entry Areas... 19 2.
Montelimar: Anvil of Fate Scenario 1 -Opening Blows - The Feint
 Montelimar: Anvil of Fate Scenario 1 -Opening Blows - The Feint Introduction This is an after action report of a play test game of Monlimar: Anvil of Fate. Please note that the Vassal module and graphics
Gettysburg 77 Errata. 1 of 5 RULES CORRECTIONS. Advanced Union Order of Appearance
 RULES CORRECTIONS 1) p.1 Object of Game Culp s hill is U40 not U41. 2) p. 7 Combat Qualifications Rule 3 is (.see 5) not ( see 6) 3) p.8 Retreat rule 2. Change to read: If the retreating unit is adjacent
BATTLE FOR GALICIA, 1914
 BATTLE FOR GALICIA, 1914 Oregon ConSim Games 2006 TABLE OF CONTENTS 1.0 INTRODUCTION 1.1 Preparation for Play 1.2 Abbreviations 1.3 Game Map and Half-Hexes 2.0 THE PLAYING PIECES 2.1 How to read the Units
Target: Leningrad Rules v1.0 1
 Target: Leningrad The Attack of Army Group North: June August, 1941 Table of Contents [1.0] INTRODUCTION...1 [2.0] GENERAL COURSE OF PLAY..1 [3.0] GAME EQUIPMENT...1 [4.0] SEQUENCE OF PLAY...2 [5.0] HOW
I-95 GAMERS. Domination Missions
 I-95 GAMERS Domination Missions I-95 GAMERS Domination Missions Design notes Domination special rules Domination Frontline Domination Blind Domination Blitzkrieg Domination Early war Blitzkrieg Domination
Battle of Prokhorovka
 Perform Action Move/Fire according to action chosen Fire machine Guns (tanks only) Fire all eligible machine guns Rally (infantry only) Leader stand may attempt to rally pinned units Rifle stand - 1 die
11.6 Victory Conditions...10
 TABLE OF CONTENTS Introduction...4 Glossary...4 Support...4 1.0 Components...4 1.1 Anatomy of a Combat Unit...4 1.2 Organization of Brigades and Regiments...5 2.0 Impulse System...5 2.1 Activation Roll...5
Campaign Introduction
 Campaign 1776 Introduction Campaign 1776 is a game that covers the American Revolutionary War. Just about every major battle of the war is covered in this game, plus several hypothetical and "what-if"
The Arduous Beginning
 The Arduous Beginning The Attack of Army Group Center: June August, 191 Table of Contents [1.0] INTRODUCTION...1 [2.0] GENERAL COURSE OF PLAY..1 [3.0] GAME EQUIPMENT...1 [.0] SEQUENCE OF PLAY...2 [5.0]
Maida 1806: Stuart vs. Reynier
 Table of contents. 1.0 Introduction... 2.0 Components... 3.0 Gameplay... 4.0 Leaders... 5.0 Infantry in Column... 6.0 Infantry in Line... 7.0 Square... 8.0 Skirmish order... 9.0 Cavalry... 10.0 Artillery...
Moscow WB-95 system. Game and System author: Wojciech Zalewski Cover: Arkadiusz Wróbel Map: Wojciech Zalewski Translation: Roman Mękicki
 Moscow 1941 WB-95 system Game and System author: Wojciech Zalewski Cover: Arkadiusz Wróbel Map: Wojciech Zalewski Translation: Roman Mękicki Playtest: Roman Mękicki, Bartłomiej Batkowski, Szymon Kucharski,
PROFILE. Jonathan Sherer 9/30/15 1
 Jonathan Sherer 9/30/15 1 PROFILE Each model in the game is represented by a profile. The profile is essentially a breakdown of the model s abilities and defines how the model functions in the game. The
CONTENTS. A WWII tactical and operational strongpoint defense game. PAGE 1 Introduction. PAGE 2 Setup minutes ages: players
 CONTENTS A WWII tactical and operational strongpoint defense game PAGE 1 Introduction PAGE 2 Setup PAGE 3 Counters and Cards PAGE 4 Playing the Game PAGE 5 Soviet Card Phase PAGE 9 Wehrmacht Card Phase
Bravery in the Sand. 1. Introduction. 2. Components. Units. Chits. Markers Markers
 1. Introduction Bravery in the Sand 2.1.2 Markers Bravery in the Sand is a two player game that covers the major part of the battle known as Operation Crusader in North Africa during World War Two. Covering
Axis & Allies Pacific FAQ
 Setup Axis & Allies Pacific FAQ December 11, 2003 Experienced players sometimes find that it s too easy for Japan to win. (Beginning players often decide that it s too hard for Japan to win it s all a
Portable Wargame. The. Rules. For use with a battlefield marked with a grid of hexes. Late 19 th Century Version. By Bob Cordery
 The Portable Wargame Rules Late 19 th Century Version For use with a battlefield marked with a grid of hexes By Bob Cordery Based on some of Joseph Morschauser s original ideas The Portable Wargame Rules
IV. TROOPS FAQ SPECIALIZED UNITS 2
 IV. TROOPS FAQ STANDARD UNITS 1 7 8 8 Infantry Move 0-1 and battle, or move 2 no battle May Take Ground on successful Close Assault Armor Move 0-3 and battle May Overrun on successful Close Assault Artillery
RULE BOOK. Table of Contents. Game Design by Ted Raicer
 1 Game Design by Ted Raicer RULE BOOK Table of Contents 1. Introduction... 2 2. Game Components... 2 3. Game Setup... 3 4. How to Win... 3 5. Sequence of Play... 3 6. Stacking... 4 7. Zones of Control...
Down In Flames WWI 9/7/2005
 Down In Flames WWI 9/7/2005 Introduction Down In Flames - WWI depicts the fun and flavor of World War I aerial dogfighting. You get to fly the colorful and agile aircraft of WWI as you make history in
Recon 1 Air Power Counter Attack Counter Attack Recon 1 Air Power Recon 1 Recon 1 Air Strike Air Power Air Power Air Strike Memoir 44 FAQ
 VIII. COMMAND FAQ Q. If someone can use a Recon 1 card as an Air Power, can the other player Counter Attack the effect or just the card? A. The rule is that a Counter Attack is only allowed to counter
The Tide At Sunrise. 1.0 Introduction. 2.0 Components
 Table of Contents The Tide At Sunrise... 2 1.0 Introduction... 2 2.0 Components... 2 2.1 Units... 2 2.2 Markers... 3 2.3 Game Map... 3 2.4 Game Scale... 3 3.0 Sequence of Play... 4 3.1 Detailed Sequence
Copyright 2013, Compass Games, LLC., All Rights Reserved
 OPERATION SKORPION - ROMMEL S FIRST STRIKE - Copyright 2013, Compass Games, LLC., All Rights Reserved TABLE OF CONTENTS 1.0 INTRODUCTION 2.0 GAME EQUIPMENT 3.0 PREPARE FOR PLAY 4.0 SEQUENCE OF PLAY 5.0
HEXBLITZ GENERAL INFORMATION
 GENERAL INFORMATION SCALES: The following time and ground scales are used in battles fought with 20mm or 15mm scale figures and models: Time scale: Each daylight turn represents approximately 2 hours of
SHILOH GETTING STARTED. Welcome to Civil War Battles Shiloh. It is April 1862 and on the shores of the
 SHILOH GETTING STARTED Welcome to Civil War Battles Shiloh. It is April 1862 and on the shores of the Tennessee River, at the site of a church from which the action will take its name, the fate of the
Getting Started with First World War Campaigns: France 14
 Getting Started with First World War Campaigns: France 14 Welcome to First World War Campaigns: France 14. In this, the first title in of the First World War Campaigns series of operational combat in World
would cost 3 MP not 5 MP. If you had to cross a river not using a defending unit. Terrain combat effects are cumulative.
 Design & Development: Grant Wylie and Mike Wylie Creative Director: Sean Cooke 2015 Worthington Publishing Visit worthingtonpublishing.com for a short introductory video explaining how to play and more
FAQ a n d Er ra t a - Version Updated January 27, 2011
 TM TM FAQ a n d Er ra t a - Version 1.2.1 Updated January 27, 2011 Battles of Westeros Errata Text in red indicates a change since the last update. Although the specific rules found in this FAQ have not
LATE 19 th CENTURY WARGAMES RULES Based on and developed by Bob Cordery from an original set of wargames rules written by Joseph Morschauser
 LATE 19 th CENTURY WARGAMES RULES Based on and developed by Bob Cordery from an original set of wargames rules written by Joseph Morschauser 1. PLAYING EQUIPMENT The following equipment is needed to fight
Under fire: If a unit or vehicle has been hit in the previous turn, whether the hit caused damage or not, that unit is under fire.
 Featherstone Like WW2 Rules These rules are very similar to the Featherstone/Bath mass combat rules you can find for Ancient and 18 th Century combat. They have been adapted for a massed skirmish game
UNITS Hidden Units Formed Units Fighter Commander
 COLONIAL ADVENTURE UNITS Each unit consists of 5 to 20 figures. Additionally units may contain leaders (maximum 2 per unit), musicians (maximum 1 per unit) and color bearers (maximum 1 per unit). Each
PROFILE. Jonathan Sherer 9/10/2015 1
 Jonathan Sherer 9/10/2015 1 PROFILE Each model in the game is represented by a profile. The profile is essentially a breakdown of the model s abilities and defines how the model functions in the game.
Nfejfwbm!Cbuumft!!! Mfhobop! 3:ui!Nbz!2287!
 NfejfwbmCbuumft Mfhobop 3:uiNbz2287 2008 1 Battles of the Middle Ages Battle of Legnano 1176 Rulebook version 1.0 1.0 Introduction Battles of the Middle Ages is an easy to learn wargaming system that tries
Field of Glory - Napoleonic Quick Start Rules
 Field of Glory - Napoleonic Quick Start Rules Welcome to today s training mission. This exercise is designed to familiarize you with the basics of the Field if Glory Napoleonic rules and to give you experience
A Thunderbolt + Apache Leader TDA
 C3i Magazine, Nr.3 (1994) A Thunderbolt + Apache Leader TDA by Jeff Petraska Thunderbolt+Apache Leader offers much more variety in terms of campaign strategy, operations strategy, and mission tactics than
DIGITAL. Manual. Copyright 2017 Lock n Load Publishing, LLC. All Rights Reserved
 DIGITAL Manual Copyright 2017 Lock n Load Publishing, LLC. All Rights Reserved Introduction on, Digital edition is a low-complexity, Second World War armored combat game, modeled after the Lock n Load
Combat Captain World War II Tactical Wargame Rules
 Combat Captain World War II Tactical Wargame Rules January 1, 2010 revision By David Raybin COMBAT CAPTAIN! World War II Tactical Wargame Rules ( JANUARY 1 Revision) 2010 David Raybin Introduction These
GMT Games, LLC P.O. Box 1308, Hanford, CA Game Design: Vance von Borries
 Game Design: Vance von Borries GMT Games, LLC P.O. Box 1308, Hanford, CA 93232-1308 www.gmtgames.com Rules of Play 2 Roads to Moscow ~ Rules of Play T a b l e o f C o n t e n t s 1.0 Introduction 1.1 Historical
Designed by Uwe Eickert, Gunter Eickert, John Butterfield. v58
 Designed by Uwe Eickert, Gunter Eickert, John Butterfield v 'Solo Mission - Search and Destroy' Setup and Layout To assist you in learning the Solo System for Awakening the Bear, set up Solo Mission listed
IMPERIAL ASSAULT-CORE GAME RULES REFERENCE GUIDE
 STOP! This Rules Reference Guide does not teach players how to play the game. Players should first read the Learn to Play booklet, then use this Rules Reference Guide as needed when playing the game. INTRODUCTION
Infantry Square Formation for RFF Variants
 Playtest Version 3, 02/16/11 Infantry Square Formation for RFF Variants Infantry can reduce their risk from a cavalry charge by changing formation into a square. During the American Civil War, squares
Angola! Rules of Play
 Angola! 1 Rules of Play 2 Angola! Table of Contents Errata 2 1 Introduction 3 1.1 Learning the Game 3 1.2 Definitions 3 1.3 Game Components 3 2 Game Overview 3 2.1 Factions 3 2.2 Playing the Game 3 2.3
ARMOR DIAGRAM ARMOR DIAGRAM. Mech Data. Mech Data BATTLEMECH RECORD SHEET BATTLEMECH RECORD SHEET. Weapons Inventory.
 BATTLEMECH RECORD SHEET Left Torso Head Right Torso ARMOR DIAGRAM Type: HER-2S Hermes II Tonnage: 40 Points: Walking: 6 Running: 9 Weapons Inventory Mech Data Type Location Damage Short Med. Long 1 Autocannon
D anube 20. the battles of Aspern-Essling &Wagram Napoleonic 20 #17
 D anube 20 the battles of Aspern-Essling &Wagram 1809 Napoleonic 20 #17 GAME DESIGN Kim Meints SERIES DEVELOPER Lance McMillan ARTISTS Tim Allen, Alan Emrich, Chris Magoun, Richard Starke 2012 Kim Meints
LITTLE BIGIIORH 2015 Legion Wargames, LLC
 TlI:J BATTL:J OF TlI2 LITTLE BIGIIORH 2015 Legion Wargames, LLC v1.3 IHDIAR WARS OF TH= AM=RICAR mst VOLUM= III 1. INTRODUCTION.fWJ\w '""' '"'" The Battle of the Little Bighorn, also known as Custer's
Vive l Empereur! STANDARD RULES. Third edition. Didier ROUY. Foreword
 Didier ROUY Vive l Empereur! STANDARD RULES Third edition Foreword "Vive l Empereur!" is a series of simulation games using a standard rules system and a set of exclusive rules specific to each battle.
Air Deck Rules and Use
 Air Deck Rules and Use Note: This is a first draft of the Air Deck rules. Any problems or suggestions can be posted in the forum thread or mailed to PanzerRunes on the Days of Wonder site. Suggestions
Rules Version 2.0 Dec. 18, Table of Contents
 Rules Version 2.0 Dec. 18, 2001 Table of Contents 1.0 Introduction... 2 2.0 Components... 2 2.1 The Maps... 2 2.2 The Counters... 2 2.3 The Die... 2 2.4 Definitions/Abbreviations... 3 2.5 Game Scale...
Components: Game Map. Unit Chart. Weather Effects. Terrain effects are listed in the rules. Turn Track
 Components: Game Map Unit Chart Weather Effects Terrain effects are listed in the rules. Turn Track Red Hex Line: Units may not move or attack across a red hex line. Fortress/Victory City: A fortified
Operation Shingle The Battle for the Beachhead January 22 nd - March 1 st 1944
 Operation Shingle The Battle for the Beachhead January 22 nd - March 1 st 1944 Table of Contents 1.0 Introduction 2.0 Components 3.0 Sequence of Play 4.0 Weather Phase 5.0 Supply Phase 6.0 Reinforcement
SCENARIO SELECTION. Start Panzer Battles Kursk, if you haven t already and you will be taken to the File Selection Dialog.
 Page 1 Welcome to Panzer Battles: Kursk Southern Flank. On July 4, 1943, Germany launched its summer offensive with an initial aim of destroying the Soviet salient around Kursk. After a week of fighting,
2.0 The Battlefield. 2.1 Terrain Hexes. 2.2 Terrain Types. 3.0 Command Cards (10 each) 3.1 Order Cards (7 each)
 3.1 Order Cards (7 each)") Advanced Vive l Empereur Introduction Advanced Vive l Empereur is a Histo Command Dice System Game and allows you to simulate on a grand-tactical level the battles of the Napoleonic era. The player is
Advanced Vive l Empereur Introduction Advanced Vive l Empereur is a Histo Command Dice System Game and allows you to simulate on a grand-tactical level the battles of the Napoleonic era. The player is
LATE 19 th CENTURY WARGAMES RULES Based on and developed by Bob Cordery from an original set of wargames rules written by Joseph Morschauser
 LATE 19 th CENTURY WARGAMES RULES Based on and developed by Bob Cordery from an original set of wargames rules written by Joseph Morschauser 1. PLAYING EQUIPMENT The following equipment is needed to fight
QUICK-START RULES QUICK-START RULES
 QUICK-START RULES Strap yourself into the ultimate suit of armor the BattleMech. Thirty feet tall and weighing up to a 100 tons, this humanoid engine of destruction is a walking arsenal, with enough firepower
RU L E S REFERENCE USING THIS RULES REFERENCE
 TM TM RU L E S REFERENCE USING THIS RULES REFERENCE This document is a reference for all Star Wars: Armada rules queries. Unlike the Learn to Play booklet, the Rules Reference booklet does not teach players
Pacific Battles: Malaya 1941
 Pacific Battles: Malaya 1941 CONTENTS 1.0 IntrodUctIon 2.0 GaMe components 3.0 HoW to Set UP the GaMe 4.0 SeQUence of PlaY 5.0 command MarKerS 6.0 reinforcements 7.0 logistics 8.0 SUPPreSSIon 9.0 reorganization
Range Example. CARDS Most Wanted The special rule for the Most Wanted objective card should read:
 Range Example FAQ Version 1.1.1 / Updated 7.24.2015 This document contains frequently asked questions, rule clarifications, and errata for Star Wars: Armada. All changes and additions made to this document
Getting Started Tutorial for Modern War
 Getting Started Tutorial for Modern War Welcome to the latest edition to the Squad Battles series of games, Modern War (MW). This title covers the two recent conflicts in Afghanistan and Iraq. You will
DESIGNED BY John prados
 US / GVN / Laotian Ground Unit DESIGNED BY John prados Front Maneuver Mode Type Back Combat Mode ID Size Development Lembit Tohver Game Graphics & Rules layout Craig Grando Playtesting Jamie Adams, Lou
ALAMO Thirteen Days of Glory A GAME BY FRANCK YEGHICHEYAN Translation: Roger Kaplan
 ALAMO Thirteen Days of Glory A GAME BY FRANCK YEGHICHEYAN Translation: Roger Kaplan Alamo is a solitaire game depicting the Sunday, March 6, 1836 climax of the thirteenday siege of the Alamo Mission that
Primo Victoria. A fantasy tabletop miniatures game Expanding upon Age of Sigmar Rules Compatible with Azyr Composition Points
 Primo Victoria A fantasy tabletop miniatures game Expanding upon Age of Sigmar Rules Compatible with Azyr Composition Points The Rules Creating Armies The first step that all players involved in the battle
If you like Golan Heights, you should try...
 If you like Golan Heights, you should try... Days of Battle: Golan Heights The Syrian Offensive: 6-10 October, 1973 Table of Contents [1.0] INTRODUCTION... 1 [2.0] GENERAL COURSE OF PLAY. 1 [3.0] GAME
Basic Introduction to Breakthrough
 Basic Introduction to Breakthrough Carlos Luna-Mota Version 0. Breakthrough is a clever abstract game invented by Dan Troyka in 000. In Breakthrough, two uniform armies confront each other on a checkerboard
PRELUDE: THE ADVANCE TO THE VOLGA... 2 by Michael A. Rinella. THE BATTLE IN STALINGRAD... 6 by David M. Glantz and Jonathan M.
 PRELUDE: THE ADVANCE TO THE VOLGA..................... 2 by Michael A. Rinella THE BATTLE IN STALINGRAD.................................. 6 by David M. Glantz and Jonathan M. House AFTERMATH:THE DEATH
1.0 INTRODUCTION 1.1 The Scale. 2.0 GAME COMPONENTS 2.1 The Die 2.2 The Map and Counters 3.0 IMPORTANT CONCEPTS BEFORE YOU BEGIN
 1.0 INTRODUCTION 1.1 The Scale 2.0 GAME COMPONENTS 2.1 The Die 2.2 The Map and Counters 3.0 IMPORTANT CONCEPTS BEFORE YOU BEGIN 4.0 SEQUENCE OF PLAY 4.1 Game Turn Sequence 4.2 Player Turn Sequence 5.0
THE LAST CRUSADE 1. Getting Started 2. The Cards 2.1 Terrain cards Supply Cost: Name: Historical information Text: Game effects:
 THE LAST CRUSADE The Last Crusade is a quick, yet realistic game of World War II combat, recreating the Allied campaign from the bocage of Normandy to the crossing of the Rhine and the capture of Germany's