ARMY COMMANDER - GREAT WAR INDEX
|
|
|
- Edwin Patrick
- 6 years ago
- Views:
Transcription
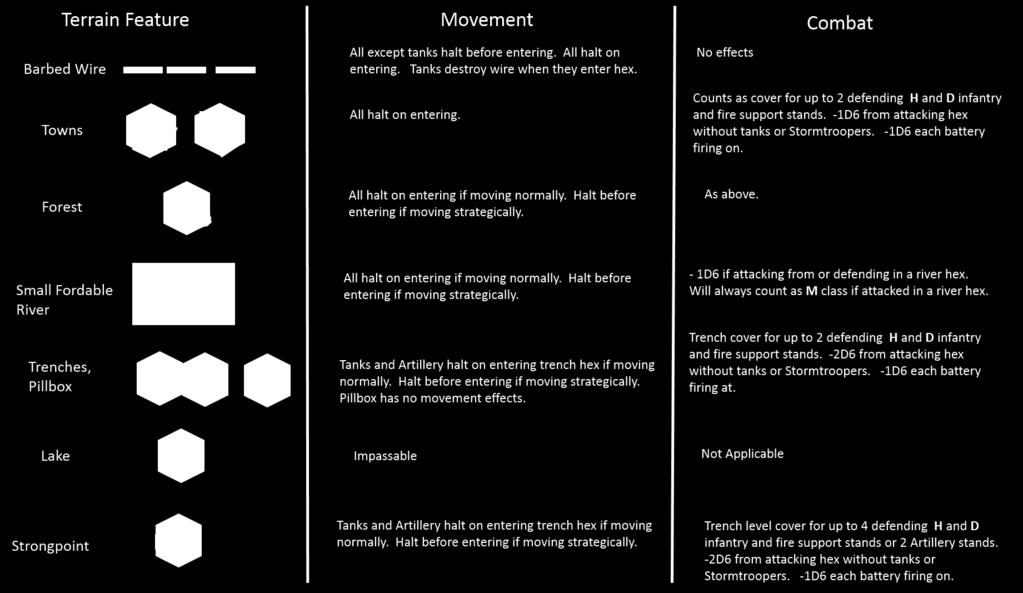
1 INDEX Section Introduction and Basic Concepts Page 1 1. The Game Turn Orders The Turn Sequence 2 2. Movement Movement and Terrain Restrictions Moving M status divisions Moving HQ stands Moving H and D status divisions Special Trench Movement Retreating Units Artillery Movement 4 3. Combat Combat Overview Initiating an Attack Support in Combat Support when Attacking Support when Defending Fire Support Stand Rules Tactical Factors [stands other than artillery] Tactical Factors [artillery] 6 4. Combat Results Fall back Pursuit 7 5. Artillery Rules Artillery Phase 8 6. Visibility and Spotting 8 7. Stormtroopers 8 8. HQs 9 9. Length of Game and Victory Conditions Night Moves and Night Recovery Optional Rules Pre Battle Bombardment Creeping Barrages Airpower 10 Summary Sheet 11 Terrain Effects Chart 12 Example of Play 13 Introduction and basic concepts The standard unit used in the game is a division. A division is generally made up of 12 infantry stands and a number of fire support stands [represented by machine gun and mortar stands, but would also include field guns directly supporting the infantry] and tank stands. These are all known as combat stands. The infantry stands are roughly equal to a battalion or around 1,000 men, 4 stands in a hex being roughly a brigade. This isn t meant to be prescriptive as there were enormous variations. There were 12 battalions in most divisions at the start of the war but only 9 per division in some armies from Page 1 of 13
2 I designed the rules using the excellent Kallistra figures, stands and four inch hex Great War terrain. These are 12mm figures mounted on 40mm by 20mm stands. Of course any scale figures and stands are usable as long as the required number fit into the size hex you are using. All combat stands have 2 strength points [SP] and a battle strength [BS] of 1. Four combat stands can be in a hex. Combat stands in the same division must stay within 2 hexes of one of their HQ stands to be fully effective. Every time 2 strength points are taken from a hex due to combat and artillery fire a combat stand is removed. There are also 2 HQ stands. HQ stands can be in a hex with any number of stands and may be in a hex alone so long as they are adjacent to a stands of their own division. Artillery batteries operate semi-independently and do not need to stay within 2 hexes of their HQ stands. Each division generally has 1 attached divisional battery and there are usually a number of corps level artillery assets available. Artillery can support combat, fire barrages and move at different stages of the round. See the artillery section [Page 7, Section 5] towards the end of the rules. Artillery has 3 or 4 strength points and counts as two stands for stacking purposes so can be in a hex with 2 other stands only. All stands can move, fight and fire in any direction, facing is not important. Divisions operate under general orders which determine what actions they can undertake each round. These orders are issued at the start of every round. Six sided dice are used throughout these rules, a single dice being referred to as 1D6, 2 dice as 2D6 etc. 1. The Game Turn The game is played in a series of rounds during which all divisions move one at a time. The round ends once they have all had a turn. The last phase of each round is the artillery round when artillery can fire any unused ammunition, or move if able. Four Day Rounds and a Night Round make up a day. 1.1 Orders At the start of each round the commander determines what orders a division is operating under: move [M], hold [H], dug in [D] or retreat [R]. A marker with these initials is placed face down with the GHQ stand of each battalion. They are revealed before the round starts. The status of a unit affects its ability to move and fire during the round. A Defensive unit can only be changed to Hold, and only a [H] unit can go [D]. 1.2 The Turn Sequence Both sides throw 2 D6 and the person with the highest number chooses which division to move first. The move of a single division is called a turn. A division in M status is the only kind of unit that can move out of the hexes it commences the round in. The chosen division moves and conducts combat with its stands. The stands attacked fight back. Whilst a division can only move and initiate combat once per round a division that is attacked by multiple divisions throughout the round fights back normally against all of them. Page 2 of 13
3 Once the division has finished its turn both sides throw again to determine who moves next. One side cannot move 3 divisions in a row so if they move twice in a row the next move is automatically the other sides. 2. Movement Unit Normal Strategic* All combat units 2 4 HQs 4 6 *cannot start, move or finish adjacent to an enemy stand. Cannot launch attacks [but will defend normally if attacked later in the round.] All stands in a division must be considered to be moving strategic if any stand of the division moves this way. 2.1 Movement and Terrain Restrictions The 6 hexes around a brigade are its Zone of Control [ZOC]. Movement always halts on entering an enemy ZOC. Halt on entering woods, fordable stream, town if moving normal. Halt before entering any of these if moving strategic [except towns, you can move into a town without halting if moving strategic but stop on entering]. All units except tanks halt before entering barbed wire and halt on entering, but move out normally. Tanks destroy barbed wire if they enter the hex containing it. All units halt before entering large river and halt on entering, but move out normally. Artillery and tanks halt on entering trench hexes. 2.2 Moving M status Divisions A Division with Moving orders is the only kind of unit that can move its combat stands freely with normal and strategic movement. 2.3 Moving HQ stands HQ stands can always move irrespective of the orders their division is operating under. HQ stands are not affected by most movement restrictions and can move 4 hexes in almost any terrain and through enemy zones of control. They cannot move through enemy stands and must halt on entering a large river. They must always finish their move adjacent to or in a hex with one of their own divisions combat stands. If in a hex by themselves they will move out of the way if an enemy combat stand attempts to enter the hex. They will join the nearest combat stand of their own division in this circumstance. 2.4 Moving D and H status Divisions Divisions on D or H orders can move combat stands which commence the turn in range of a HQ. These stands can only be moved into hexes which are already occupied by stands of the division. These can be combat stands, artillery or HQ stands. No stand may move further than 2H. No stand may cross an unoccupied hex to join another stand. Terrain and movement restrictions apply to this shuffling of Page 3 of 13
4 stands. HQ stands of D and H divisions are moved after every combat stand in the division has moved and can be moved into unoccupied hexes adjacent to stands of their division. 2.5 Special Trench Movement Divisions on H or D can move stands from an occupied trench hex into an adjacent unoccupied trench hex. No stand may move further than 2H and the only external hex that can be entered is a trench hex that was adjacent to one of the divisions stands at the start of its turn. H stands that move this way may initiate combat subject to the combat rules. ZOC movement restrictions apply. 2.6 Retreating Units A unit with a Retreat order moves before any other unit. It can move strategic distance even if it moves into an enemy ZOC. If a stand has to move adjacent to any enemy it loses a SP for each hex in an enemy ZOC. Retreating units are vulnerable to fire and combat. 2.7 Artillery Movement see artillery section at end of rules [Section 5, Page 7]. 3. Combat Unit Chart Strength Points [SP]. Battle Strength [BS] Ranged BS Adjacent Infantry 2 1 Fire Support [2 hexes] Divisional Artillery [6 Hexes] Corps Artillery [10 Hexes] Tanks 2 1 Combat Chart - Status of unit D6 result that produces a hit Moving or Holding unit attacking Hold or Dug 6 In. H unit attacked by H or M unit. 5, 6 M vs M attacking and defending. 6 or Double 5 H unit attacking M unit. M unit defending against H attacker. D Unit attacked by M or H 5,6 or Double 4 M, H or any Art vs Retreating 5,6 or Double Combat Overview Combat only occurs between adjacent hexes. No unit is ever required to attack even if adjacent. Combat is described as hex vs hex, with the total modified Battle Strength points of the stands in each hex being the number of six sided dice [D6s] thrown. Artillery and fire support are the only stands who conduct distant firing and this occurs either in a Combat Support role or, in the case of artillery, individually in the Artillery Phase [see 5.1]. A Moving division can initiate combat using two hexes of its own stands per attack against one hex of enemy stands. Three or more hexes cannot attack a single enemy hex. A moving division can launch more than one attack in a round but a single enemy hex can only be assaulted by a maximum of two adjacent hexes worth of stands from the division. Page 4 of 13
5 A Holding division can initiate a limited form of close combat with just one hex worth of stands against one hex of adjacent enemy stands. Dug In and Retreating divisions cannot initiate combat. Dug In units fight back if attacked but Retreating divisions take losses without responding. The status of a unit [M, H or D] affects the circumstances in which it can fight and what support weapons it can use. Infantry and Tank stands are combat stands. Only a hex containing a combat stand can initiate combat. Only stands within range of one of their HQ stands can initiate or participate in an attack. Stands of different friendly divisions can occupy the same hex, but may not conduct attacks in unison. However, they will defend together, the status of the defender being the worst category of all the stands in the hex. [From worst to best R, M, H, D] And all units can suffer losses and retreat results no matter who initiates an attack. Only one of the divisions can call in fire support or artillery, and this will be the one in the worst status. 3.2 Initiating an Attack Two hexes worth of combat stands from a Moving division can initiate an attack on one enemy occupied hex. Several attacks can be launched by the same division but only 2 hexes worth of attackers can attack 1 defending hex, it cannot be subject to several attacks in the same turn from the same division. The attack strength of the attacking hex or hexes is the combined battle strength of the combat stands [see Unit Chart above, Battle Strength column] plus whatever combat factors they get from artillery and fire support plus or minus items from the Tactical Factors table. The final figure is the number of dice they throw in their attack. Hits are determined by the combat chart above. A stand in close combat will always defend with at least 1D6. Stands in the same hex cannot split their attack against different hexes, they must all attack the same enemy hex. Only one hex of combat stands from a Holding division can initiate a combat attack against an enemy stand. It will fight as Moving vs the status of the unit attacked. Any close combat attack must include at least 1 infantry or tank stand in one of the attacking hexes. Fire support stands cannot initiate attacks on their own, neither can they fire unless supporting a combat. 3.3 Support in combat In all cases a stand can only initiate an attack, participate in an attack or call in support for an attack or defence from outside of its own Hex if it is within 2 hexes of one of its HQs. Being able to call in support enables you to add a number of dice equal to the Fighting Strength of the support stands Support When Attacking M stands initiating an attack can call in support from: fire support stands from their own division even if not in one of the 2 attacking hexes [the fire support cannot be in a hex which is involved in, or is supporting, a separate combat]. Their own divisional artillery and corps artillery in range. [2 guns max per division can be called in only 1 of which can be corps level]. Each battery can only support 1 attack per divisional turn. H stands initiating an attack can attack with the stands in the attacking hex plus mortars and artillery support from their own division only. Page 5 of 13
6 3.3.2 Support When Defending An H or D stand being attacked can call in support from: Fire support from its own division even if not located in the hex being attacked. Their own divisional artillery and corps artillery in range [2 guns max per division can be called in only 1 of which can be corps level]. M stands being attacked may respond with the strength of the stands in the attacked hex plus their divisional artillery and any divisional Fire Support stands in range. 3.4 Fire Support stand rules Fire Support stands in a hex that is directly attacking or defending are considered to be part of that combat and cannot support a different attack. In order to support a combat within its division a Fire Support stand must be within 2 hexes of a hex containing some of the enemy stands in the combat. All friendly stands in the combat must be within 2 Hexes of an HQ [this can however, be different HQs within the same division]. The total range that the fire support fires cannot exceed 2 hexes. - Fire Support stands in a hex without combat stands cannot initiate an attack or join an attack as combat stands, they can however add supporting fire to another hex containing attacking stands. - Fire support in a hex without a combat stand cannot advance into a hex vacated as a result of a combat even if they supported the combat. - Two Fire Support stands in the same hex can support different combats so long as their hex is not involved in a separate direct combat. - Fire Support alone in a hex will defend normally if attacked. 3.5 TACTICAL FACTORS. [Stands other than artillery] Only infantry and fire support can occupy and get cover from trench hexes and pillboxes. -1D6 from each hex of combat stands attacking a H hex with cover*. [maximum of 2 stands can be in the cover hex to get this benefit above that stands count as being in open.] -1D6 from each hex of combat stands attacking a D hex with cover or in the open. [maximum of 2 stands can be in the hex to get this benefit above that stands count as being in open.] -2D6 from each hex of combat stands attacking a H or D hex with trenches, strongpoints or pillboxes*. [maximum of 2 stands can be in the trench/pillbox hex to get this benefit, above that stands count as being in open. 4 stands/2 artillery can be in a strongpoint and get this benefit.] The above 3 tactical deductions do not apply if the attacking hex has a tank stand in it. +1D6 each hex containing a tank stand in 1916 battles [+1D6 maximum per hex no matter how many tank stands are in the hex] +1D6 each hex containing a tank stand from 1917 if the enemy is Moving, H attacking, or H or D in open hexes, or 3+ stands of H and D in a stand with cover/trenches [+1D6 maximum per hex no matter how many of tank stands are in the hex] TACTICAL FACTORS. [Artillery] -1D6 each battery firing on a H or D hex in cover, in trenches or in pillboxes [max 2 stands count as cover as above]. Other factors [effect all stands and are accumulative with Cover and Armour factors] -1D each hex in a river or crossing a bridge, or beach landing [firing from or in close combat] * A defending unit is one that is not initiating the attack. H stands that launch an attack on an adjacent stand do not get cover benefits. Cover is woods, town, light defensive works or other terrain as defined by the scenario. M stands never get cover benefits attacking or defending. Page 6 of 13
7 4. Combat Results Both sides throw the number of dice resulting from their combined Fighting Strength, Fire Support, Artillery and the additions and subtractions above. They cross reference this with the combat chart and the status of the relevant stands involved to determine the number of hits. The maximum losses a that can be taken by either side in a combat is 2 SP. With close combat losses can be shared around the 2 assaulting hexes at the attacker s discretion. If the attack is a combination of Close Combat and Distant Fire the losses must come off of the Close Combat stands. A single hit marker is put in a hex that has lost just 1 strength point. There cannot be 2 single hit markers in a hex. A stand must be removed if this occurs [eg if you move 2 stands each with a hit into the one hex remove both hit markers and one of the stands in the hex must be eliminated]. This occurs even if stands from 2 different divisions are in the same hex each with a single hit. The owning player determines which stand is eliminated. 4.1 Fall Back If one side causes more hits in close combat the other side is forced to fall back. In the case of an attacker this may mean 2 hexes worth of stands being thrown back. Hits are the total hits from the chart, not just losses. [e.g. an M unit attacking an H may throw two 6s causing 2 hits, and the H unit may throw two 5s and one 6 causing 3 hits. Both sides lose 2 SPs but the M unit withdraws as it suffered more hits]. A hex of stands cannot be defeated and forced to fall back if it eliminates all of the stands in the hex it is fighting even if it takes more losses. Stands in D status in cover [where they get the benefit of that cover] that are defeated in close combat may choose to take another SP loss and hold their position unless there is a tank stand in the attacking force in which case they must retreat. Stands fall back 1 or 2 hexes as desired by the retreating player. They may stack with a friendly division, but can retreat 3 hexes to avoid stacking with stands of another friendly division. They will retreat until they are clear of enemy ZOCs taking 1 extra SP loss for each ZOC they pass through. They can retreat laterally along a trench line rather than straight away from an enemy as long as this doesn t involve going through more than 1 enemy ZOC. They will take an extra SP loss for retreating laterally. Artillery forced to retreat can move their full move, including strategic movement if after the first hex of retreat they do not come adjacent an enemy and they finish more than 1 hex from an enemy. 4.2 Pursuit Holding and Moving stands that initiated an attack and won may occupy the hex of defeated or eliminated stands up to the stacking limit. If the attacker took more hits than the defender, but eliminated them, they will not advance. It the results were even and the defender was eliminated the attacker may advance. Page 7 of 13
8 5. Artillery Rules Each gun is referred to as a battery [although it is more accurately an artillery regiment]. Irrespective of its parent divisions status artillery batteries are not in any given status but act as in Hold status if fired on or in Close Combat. Artillery can never initiate close combat but will respond if attacked. Artillery are given two shots per round at the very start of the round. These are used as combat support fire. The firing status of artillery is always determined by the status of the division it is supporting. If the artillery is forced to retreat from combat before the shots are used the remaining shots are lost. The battery does not need any ammunition to defend itself in close combat, it does not use up any ammunition to fight in close combat and will fight even if out of ammunition. It does need ammunition to respond to distant fire. Any time a division gains the initiative its artillery may discard a single shot and move irrespective of the movement status of the division. If it has ammunition remaining it may still fire that round even if it conducted a strategic move. Once all the shots are gone the artillery cannot be moved again unless forced to retreat. 5.1 Artillery phase. After all the divisions on both sides have finished moving there is an artillery phase. Both sides throw for who moves first in this phase. Movement/firing is as follows. If the artillery has any shots left at the end of the round it can fire artillery barrages against any targets that can be spotted by stands that are within command radius of a HQ of their division. Corps artillery can be spotted for and summoned by any stand within range of a HQ of a division in its corps. All artillery in this phase fires as per M vs status of target. Artillery can fire on an adjacent hex. This is not considered to be close combat and the attacked unit will not fire back. Artillery in this phase can cause a maximum of 1 hit per shot per gun. If there is at least one shot remaining after firing in the artillery phase the artillery can discard its remaining shot/s and move. 6. Spotting and visibility Spotting range is 3 hexes in the open. 2 hexes into cover, trenches or at D stands. A spotting stand can see through friendly and enemy units to call in fire, but not through blocking terrain. Town, woods and hills are all blocking terrain. Artillery can fire over any terrain, even if adjacent to it, so long as there is a spotter who can see the target hex. 7. Stormtroopers Stormtroopers are a specialised type of German infantry used in the late war, they were heavily armed and specialised in rapid infiltration tactics. They are like a normal infantry stand but give movement benefits and in some scenarios combat benefits. Stands in a hex with storm troopers [but no artillery or tanks] are not stopped from moving by an enemy ZOC or barbed wire. A hex with Stormtroopers can move strategic through barbed wire and enemy ZOC but cannot attack in the same turn. They are still affected by other movement restrictions. A hex with stormtoopers still loses an extra SP if forced to retreat through enemy ZOC. Page 8 of 13
9 8. HQs Headquarters cannot be destroyed. If they are in a hex where the combat stands are destroyed the HQ will move automatically to the nearest stand containing stands from their division. Or to a hex adjacent to the nearest stand of their division. They will move out of the way if enemy combat stands enter a hex which they are in by themselves. 9. Length of Game and Victory Conditions Each day is generally 3 rounds. Each scenario will specify the number of days or rounds a game is played for and the victory conditions. These are usually terrain objectives to be held or gained. 10. Night Moves and Night Recovery During the night Strength Points are recovered which can be used to rebuild the strength of stands [point for point] and stands can be moved within the division boundaries. Lost artillery and tanks cannot be recovered. Unless specified differently in a scenario the recovery rate is 3 Strength Points per Division for the army. These SP can be used to recover lost stands in any division [2SP per stand] or to remove single hit points in hexes. E.g. an army with 6 divisions recovers 18 SP overnight, these could be used to rebuild 9 stands in one division or shared amongst any or all of the 6 divisions. Recovered stands are allocated as desired to hexes that are already occupied by the division or are adjacent to the hex occupied by a HQ. Recovered stands do not have to be at full strength. They can only be placed in hexes that are within 2 hexes of one of their HQ stands. Recovered stands can be placed with existing stands in their division that are in an enemy ZOC. If they are placed in a vacant hex adjacent to the HQ this must not be in an enemy ZOC unless it is in a trench hex and no more than 2 stands are placed into the trench hex. If HQs from opposing sides are next to a trench hex the owner of the trench gets priority in placing stands. If this cannot be decided roll a D6 each. Once stands have been recovered the stands in a division can be shuffled but only using those Hexes that the division already occupies. There are no movement restrictions for this reshuffling. Stands can move more than 2 hexes and can ignore terrain effects. However, they cannot cross vacant hexes to join isolated stands. Special trench movement is allowed as long as stands do not move into an enemy ZOC. Tanks cannot be shuffled into hexes containing barbed wire. The division can start the new day in any order status regardless of the order it finished the previous day in. Page 9 of 13
10 11. Optional Rules 11.1 Pre-Battle bombardments The attacking army can have an artillery phase prior to the first move. They can be given a number of rounds per gun as determined in the scenario and permissible targets can likewise be predetermined. E.g. you can target any trench and gun emplacement hexes in range, even ones that cannot be spotted Creeping Barrages To represent the better coordinated barrages that preceded attacks from 1917 onwards allow three guns [1 divisional and 2 corps artillery] to support attacks in the first turn of the battle. Increase corps artillery to 3 shots for the first round if using this rule Airpower An army may be given air power points which can be called in to perform artillery spotting. These are represented by single plane models. They can be placed anywhere on the board at the end of the artillery turn ready to spot next turn. They have a spotting range of 4 hexes in the open, 3 hexes into cover, trenches or at D stands Page 10 of 13
11 Summary Sheet Army Commander Great War Movement Unit Normal Strategic* All combat units 2 4 HQs 4 6 *cannot start, move or finish adjacent to enemy stand [but will defend normally if attacked later in the round. Unit Table Strength Points [SP]. Battle Strength [BS] Ranged BS Infantry 2 1 Fire Support [2 hexes] Divisional Artillery [6 Hexes] Corps Artillery [10 Hexes] Tanks 2 1 Combat Combat Chart - Status of unit D6 result that produces a hit Moving or Holding unit attacking Hold or Dug 6 In. H unit attacked by H or M unit. 5, 6 M vs M attacking and defending. 6 or Double 5 H unit attacking M unit. M unit defending against H attacker. D Unit attacked by M or H 5,6 or Double 4 M, H or any Art vs Retreating 5,6 or Double 4 The status of unit is determined by the core stands attacking, so artillery supporting M inf in an attack on an S stand will hit on 6 only. Artillery firing in the artillery phase do so as M vs relevant unit TACTICAL FACTORS. [Stands other than artillery] Only infantry and fire support can occupy and get cover from trench hexes and pillboxes. -1D6 from each hex of combat stands attacking a H hex with cover*. [maximum of 2 stands can be in the cover hex to get this benefit above that stands count as being in open.] -1D6 from each hex of combat stands attacking a D hex with cover or in the open. [maximum of 2 stands can be in the hex to get this benefit above that stands count as being in open.] -2D6 from each hex of combat stands attacking a H or D hex with trenches, strongpoints or pillboxes*. [maximum of 2 stands can be in the trench/pillbox hex to get this benefit, above that stands count as being in open. 4 stands/2 artillery can be in a strongpoint and get this benefit.] The above 3 tactical deductions do not apply if the attacking hex has a tank stand in it. +1D6 each hex containing a tank stand in 1916 battles [+1D6 maximum per hex no matter how many tank stands are in the hex] +1D6 each hex containing a tank stand from 1917 if the enemy is Moving, H attacking, or H or D in open hexes, or 3+ stands of H and D in a stand with cover/trenches [+1D6 maximum per hex no matter how many of tank stands are in the hex] TACTICAL FACTORS. [Artillery] -1D6 each battery firing on a H or D hex in cover, in trenches or in pillboxes [max 2 stands count as cover as above]. Other factors [effect all stands and are accumulative with Cover and Armour factors] -1D each hex in a river or crossing a bridge, or beach landing [firing from or in close combat] * A defending unit is one that is not initiating the attack. H stands that launch an attack on an adjacent stand do not get cover benefits. Cover is woods, town, light defensive works or other terrain as defined by the scenario. M stands never get cover benefits attacking or defending. Spotting Range 3 hexes in the open, 2 hexes into cover or at D stands. Page 11 of 13

12 Page 12 of 13

13 Move and Combat example A British division of 12 stands in 3 hexes supported by 2 Fire Support and Divisional and Corps artillery has the initiative. It is operating under Movement orders so can move freely. It chooses to attack the German trench line. Two hexes worth of stands can launch 1 attack. The 2 left hand British hexes have 8 infantry stands, each stand gets 1 point of Battle Strength. Each point of BS equals 1D6. However as the hexes are attacking a trench line they lose 2D6 per hex leaving a total of 4D6. They can call in both divisional fire support as they are within 2 hexes of the target hex. This adds another 1D6 each. The attacking infantry can also call in their Divisional and Corps artillery. The artillery lose 1D6 per gun as they are firing at a trench so add 2D6 in total. The total attacking strength is 8D6 hitting on rolls of 6 only as this is M vs H [see combat chart]. The defending Germans are in Hold status and can fight back against the attacking British. There are 2 stands in the hex being attacked [2D6], 2 fire support in range [2D6] and divisional artillery [2D6]. This give a total of 6D6 hitting on 5 and 6 [H attacked by M]. Both sides roll their dice. The British are lucky and get 2 sixes in their 8 dice. The Germans roll under the odds and only get 1 five. The side with the greater number of losses is defeated and has to retreat. The Germans lose a stand and fall back. The British places a 1 Hit marker in one of the 2 attacking hexes and move 4 infantry stands into the vacated trench hex. In Frame 2 the German Division moves. The Division is in H status so can only shuffle stands within the hexes already occupied by its stands or HQs. Three stands are moved out of hexes on the left to join Fire Support 1. No stand may move more than 2 hexes. The stand that was forced to retreat joins this hex also. Fire support 1 simultaneously moves left to join the HQ. Divisions in H status can launch limited attacks using one attacking hex and divisional resources. The British stands get no cover for the trench as they are Moving. The Germans have 4D6, plus 2D6 for fire support, and 2D6 for their dvisional artillery. 8D6 in total hitting on six or double five [H attacking M]. The British can respond to the attack with the 4 stands in the hex being attacked [4D6]. Their fire support is out of range [more than 2 hexes away from the attacking hex] so cannot join in. The divisional artillery can add 2D6. 6D6 hitting on 6 or double 5 [M defending against H]. The odds are with the Germans, if they win they can reclaim their trench line. The battle is on.. Page 13 of 13
Portable Wargame. The. Rules. For use with a battlefield marked with a grid of hexes. Late 19 th Century Version. By Bob Cordery
 The Portable Wargame Rules Late 19 th Century Version For use with a battlefield marked with a grid of hexes By Bob Cordery Based on some of Joseph Morschauser s original ideas The Portable Wargame Rules
HEXBLITZ GENERAL INFORMATION
 GENERAL INFORMATION SCALES: The following time and ground scales are used in battles fought with 20mm or 15mm scale figures and models: Time scale: Each daylight turn represents approximately 2 hours of
Game Turn 11 Soviet Reinforcements: 235 Rifle Div can enter at 3326 or 3426.
 General Errata Game Turn 11 Soviet Reinforcements: 235 Rifle Div can enter at 3326 or 3426. Game Turn 11 The turn sequence begins with the Axis Movement Phase, and the Axis player elects to be aggressive.
Frontier/Modern Wargames Rules
 Equipment: Frontier/Modern Wargames Rules For use with a chessboard battlefield By Bob Cordery Based on Joseph Morschauser s original ideas The following equipment is needed to fight battles with these
2.0 game components support Units. color to make them easier to pick out. Each player has two types of game units: Combat Units Support units
 basic rules Somme 1918 - Bloody Spring is a wargame that simulates the German spring offensive of 1918 that was aimed at separating the British and French armies. Players will find themselves in the role
LATE 19 th CENTURY WARGAMES RULES Based on and developed by Bob Cordery from an original set of wargames rules written by Joseph Morschauser
 LATE 19 th CENTURY WARGAMES RULES Based on and developed by Bob Cordery from an original set of wargames rules written by Joseph Morschauser 1. PLAYING EQUIPMENT The following equipment is needed to fight
1.0 INTRODUCTION FORTRESSES COMPONENTS REPLACEMENTS GAME TERMS SEQUENCE OF PLAY VICTORY CONDITIONS
 RULES OF PLAY INDEX 1.0 INTRODUCTION... 2 2.0 COMPONENTS... 2 3.0 GAME TERMS... 3 4.0 SEQUENCE OF PLAY... 4 5.0 SET UP... 5 6.0 REINFORCEMENTS... 5 7.0 LOGISTICS AND INITIATIVE... 5 8.0 COMMAND... 5 9.0
A game by Wei Cheng Cheng. - Graphics: Olivier Revenu - Translation: Noël Haubry. Growling Tigers The Battle For
 BATTLES MAGAZINE #7 A game by Wei Cheng Cheng. - Graphics: Olivier Revenu - Translation: Noël Haubry Growling Tigers The Battle For Changde, 1943 is a two player wargame simulating the final stage of the
Red Parachutes. Extended Player Aid Sheet by Richard J. Vohlers. Includes advanced rules; optional rules in italics.
 Red Parachutes Extended Player Aid Sheet by Richard J. Vohlers Includes advanced rules; optional rules in italics. S = Soviet; G = German; B = Both; P = Phasing; NP = Non-phasing; OOS = Out of Supply;
Henry Bodenstedt s Game of the Franco-Prussian War
 Graveyard St. Privat Henry Bodenstedt s Game of the Franco-Prussian War Introduction and General Comments: The following rules describe Henry Bodenstedt s version of the Battle of Gravelotte-St.Privat
Getting Started with Panzer Campaigns: Budapest 45
 Getting Started with Panzer Campaigns: Budapest 45 Welcome to Panzer Campaigns Budapest 45. In this, the seventeenth title in of the Panzer Campaigns series of operational combat in World War II, we are
LATE 19 th CENTURY WARGAMES RULES Based on and developed by Bob Cordery from an original set of wargames rules written by Joseph Morschauser
 LATE 19 th CENTURY WARGAMES RULES Based on and developed by Bob Cordery from an original set of wargames rules written by Joseph Morschauser 1. PLAYING EQUIPMENT The following equipment is needed to fight
Gazala: The Cauldron Table of Contents
 Gazala: The Cauldron Table of Contents 1.0 Introduction... 1 2.0 Components... 1 2.1 Game Scale... 1 2.2 Playing Pieces... 1 2.2.1 Action Chits (see 4.0)... 1 2.2.2 Tactical Chits (see 4.0)... 1 2.2.3
CEDAR CREEK BY LAURENT MARTIN Translation: Roger Kaplan
 CEDAR CREEK BY LAURENT MARTIN Translation: Roger Kaplan Cedar Creek 1864 simulates the Civil War battle that took place on October 19, 1864 and resulted in a Union victory. It uses many of the rules of
Solitaire Rules Deck construction Setup Terrain Enemy Forces Friendly Troops
 Solitaire Rules Deck construction In the solitaire game, you take on the role of the commander of one side and battle against the enemy s forces. Construct a deck, both for yourself and the opposing side,
Moscow WB-95 system. Game and System author: Wojciech Zalewski Cover: Arkadiusz Wróbel Map: Wojciech Zalewski Translation: Roman Mękicki
 Moscow 1941 WB-95 system Game and System author: Wojciech Zalewski Cover: Arkadiusz Wróbel Map: Wojciech Zalewski Translation: Roman Mękicki Playtest: Roman Mękicki, Bartłomiej Batkowski, Szymon Kucharski,
Napoleon s Triumph. Rules of Play (draft) Table of Contents
 Table of Contents") Rules of Play (draft) Table of Contents 1. Game Equipment... 2 2. Introduction to Play... 2 3. Playing Pieces... 2 4. The Game Board... 2 5. Scenarios... 3 6. Setting up the Game... 3 7. Sequence of Play...
Rules of Play (draft) Table of Contents 1. Game Equipment... 2 2. Introduction to Play... 2 3. Playing Pieces... 2 4. The Game Board... 2 5. Scenarios... 3 6. Setting up the Game... 3 7. Sequence of Play...
Command Phase. Setup. Action Phase. Status Phase. Turn Sequence. Winning the Game. 1. Determine Control Over Objectives
 Setup Action Phase Command Phase Status Phase Setup the map boards, map overlay pieces, markers and figures according to the Scenario. Players choose their nations. Green bases are American and grey are
Clash of Giants The Campaigns of Tannenberg and The Marne, 1914
 RULEBOOK -UPDATED 12/25/01 Clash of Giants The Campaigns of Tannenberg and The Marne, 1914 Table of Contents 1.0 Introduction............... 2 2.0 Game Components........... 2 3.0 Game Setup...............
Components: Game Map. Unit Chart. Weather Effects. Terrain effects are listed in the rules. Turn Track
 Components: Game Map Unit Chart Weather Effects Terrain effects are listed in the rules. Turn Track Red Hex Line: Units may not move or attack across a red hex line. Fortress/Victory City: A fortified
TUTORIAL DOCUMENT. Contents. 2.0 GAME OBJECTIVE The Overall Objective of the game is to:
 TUTORIAL DOCUMENT Contents 1.0 INTRODUCTION 2.0 GAME OBJECTIVE 3.0 UNIT INFORMATION 4.0 CORE TURN BREAKDOWN 5.0 TURN DETAILS 5.1 AMERICAN MOVEMENT 5.2 US COMBAT 5.3 US MOBILE MOVEMENT 5.4 US MOBILE COMBAT
CONTENTS. A WWII tactical and operational strongpoint defense game. PAGE 1 Introduction. PAGE 2 Setup minutes ages: players
 CONTENTS A WWII tactical and operational strongpoint defense game PAGE 1 Introduction PAGE 2 Setup PAGE 3 Counters and Cards PAGE 4 Playing the Game PAGE 5 Soviet Card Phase PAGE 9 Wehrmacht Card Phase
I-95 GAMERS. Domination Missions
 I-95 GAMERS Domination Missions I-95 GAMERS Domination Missions Design notes Domination special rules Domination Frontline Domination Blind Domination Blitzkrieg Domination Early war Blitzkrieg Domination
Stargrunt II Campaign Rules v0.2
 1. Introduction Stargrunt II Campaign Rules v0.2 This document is a set of company level campaign rules for Stargrunt II. The intention is to provide players with the ability to lead their forces throughout
2.0 The Battlefield. 2.1 Terrain Hexes. 2.2 Terrain Types. 3.0 Command Cards (10 each) 3.1 Order Cards (7 each)
 3.1 Order Cards (7 each)") Advanced Vive l Empereur Introduction Advanced Vive l Empereur is a Histo Command Dice System Game and allows you to simulate on a grand-tactical level the battles of the Napoleonic era. The player is
Advanced Vive l Empereur Introduction Advanced Vive l Empereur is a Histo Command Dice System Game and allows you to simulate on a grand-tactical level the battles of the Napoleonic era. The player is
RANDOM MISSION CONTENTS TAKING OBJECTIVES WHICH MISSION? WHEN DO YOU WIN THERE ARE NO DRAWS PICK A MISSION RANDOM MISSIONS
 i The 1 st Brigade would be hard pressed to hold another attack, the S-3 informed Bannon in a workman like manner. Intelligence indicates that the Soviet forces in front of 1 st Brigade had lost heavily
VIII Corps: The Somme 1916
 VIII Corps: The Somme 1916 A Card Wargame of World War I Neal Reid 2016 Published by Vexillia Limited www.vexillia.com Contents 1. Introduction 3 2. Historical Background 3 3. Game Overview 5 4. Setting
Muck and Bullets. A simulation of the battle of the Somme 1916
 Muck and Bullets A simulation of the battle of the Somme 1916 The nation must be taught to bear losses. No amount of skill on the part of the higher commanders, no training, however good, on the part of
Getting Started with Panzer Campaigns: Stalingrad 42
 Getting Started with Panzer Campaigns: Stalingrad 42 Welcome to Panzer Campaigns Stalingrad 42. As winter began to close, the instruction came forward from OKH to von Paulus and the Sixth Army capture
Gettysburg 77 Errata. 1 of 5 RULES CORRECTIONS. Advanced Union Order of Appearance
 RULES CORRECTIONS 1) p.1 Object of Game Culp s hill is U40 not U41. 2) p. 7 Combat Qualifications Rule 3 is (.see 5) not ( see 6) 3) p.8 Retreat rule 2. Change to read: If the retreating unit is adjacent
RESERVES RESERVES CONTENTS TAKING OBJECTIVES WHICH MISSION? WHEN DO YOU WIN PICK A MISSION RANDOM MISSION RANDOM MISSIONS
 i The Flames Of War More Missions pack is an optional expansion for tournaments and players looking for quick pick-up games. It contains new versions of the missions from the rulebook that use a different
Montelimar: Anvil of Fate Scenario 1 -Opening Blows - The Feint
 Montelimar: Anvil of Fate Scenario 1 -Opening Blows - The Feint Introduction This is an after action report of a play test game of Monlimar: Anvil of Fate. Please note that the Vassal module and graphics
Operation Shingle The Battle for the Beachhead January 22 nd - March 1 st 1944
 Operation Shingle The Battle for the Beachhead January 22 nd - March 1 st 1944 Table of Contents 1.0 Introduction 2.0 Components 3.0 Sequence of Play 4.0 Weather Phase 5.0 Supply Phase 6.0 Reinforcement
The counters. BULL RUN VaeVictis 89 The first battle of the Civil War
 BULL RUN 1861 - VaeVictis 89 The first battle of the Civil War A game by Laurent MARTIN Bull Run, 1861 is a simulation of the First Battle of Bull Run (or the First Battle of Manassas for the Confederates),
Battle of Prokhorovka
 Perform Action Move/Fire according to action chosen Fire machine Guns (tanks only) Fire all eligible machine guns Rally (infantry only) Leader stand may attempt to rally pinned units Rifle stand - 1 die
COMPONENT OVERVIEW Your copy of Modern Land Battles contains the following components. COUNTERS (54) ACTED COUNTERS (18) DAMAGE COUNTERS (24)
 ACTED COUNTERS (18) DAMAGE COUNTERS (24)") GAME OVERVIEW Modern Land Battles is a fast-paced card game depicting ground combat. You will command a force on a modern battlefield from the 1970 s to the modern day. The unique combat system ensures
GAME OVERVIEW Modern Land Battles is a fast-paced card game depicting ground combat. You will command a force on a modern battlefield from the 1970 s to the modern day. The unique combat system ensures
GREAT BATTLES OF ALEXANDER 4 th Edition Errata & Clarifications October, 2008
 GREAT BATTLES OF ALEXANDER 4 th Edition Errata & Clarifications October, 2008 GREAT BATTLES OF ALEXANDER Rulebook (2.25) Sample Persian Leader, Line Command Capability: Delete (Optional Rule) (4.21) 1
Field of Glory - Napoleonic Quick Start Rules
 Field of Glory - Napoleonic Quick Start Rules Welcome to today s training mission. This exercise is designed to familiarize you with the basics of the Field if Glory Napoleonic rules and to give you experience
Getting Started with Modern Campaigns: Danube Front 85
 Getting Started with Modern Campaigns: Danube Front 85 The Warsaw Pact forces have surged across the West German border. This game, the third in Germany and fifth of the Modern Campaigns series, represents
IWO JIMA RAGE AGAINST THE MARINES 1. INTRODUCTION 2. COMPONENTS 2.1 COUNTERS. Operations Special Issue #1
 1. INTRODUCTION Iwo Jima. The only battle of World War Two that saw the United States Marines suffer more casualties than they inflicted on the enemy. It was a battle that would define a war and would
and a view from the Confederate lines which gives a better impression of the contours:
 The Battle of Bull Run Feeling the need to get away from painting and preparation for a day and to play a quick game with stuff that I already have prepared, and coincidentally next in my project list,
Free Shipping for all USA orders!
 Free Shipping for all USA orders! The Game Board The game board shows New York City and surrounding land and water areas. Locations are on land areas. Game units are placed on locations during game play.
UNITS Hidden Units Formed Units Fighter Commander
 COLONIAL ADVENTURE UNITS Each unit consists of 5 to 20 figures. Additionally units may contain leaders (maximum 2 per unit), musicians (maximum 1 per unit) and color bearers (maximum 1 per unit). Each
Maida 1806: Stuart vs. Reynier
 Table of contents. 1.0 Introduction... 2.0 Components... 3.0 Gameplay... 4.0 Leaders... 5.0 Infantry in Column... 6.0 Infantry in Line... 7.0 Square... 8.0 Skirmish order... 9.0 Cavalry... 10.0 Artillery...
RULES OF PLAY Living Rules
 Ukraine 43 2nd Edition 2ND EDITION RULES OF PLAY Living Rules 7-4-5 TABLE OF CONTENTS. Introduction... 2 2. Contents... 2 3. Sequence of Play... 3 4. Stacking... 4 5. Movement... 4 6. Zones of Control...
Empires at War. 2. Win conditions Your main objective is destroy all unit cards of the opposing player. You can recognize unit
 Empires at War 1. About game Empires at War is a competitive card game set during I World War. Players create unique decks and take control over armies of conflicted nations. To win, you have to break
command efficiency table
 sequence of play 0. PRE-GAME ORGANIZATION PHASE. 1. POSTURE DETERMINATION PHASE 2D6 + Cohesion. Highest total has initiative in this phase. Mark required stands or groups in movement posture. [6.01.01]
Introduction. Nothing can be done contrary to what could or would be done in actual war. Revised Rules for the NAVAL WAR GAME (1905) Fred T.
 Fred T.") Design Parameters Introduction These rules have been developed so that it is possible to fight small World War II Ostfront battles between Axis and Soviet forces. The battles last about an hour or two
Design Parameters Introduction These rules have been developed so that it is possible to fight small World War II Ostfront battles between Axis and Soviet forces. The battles last about an hour or two
Sequence of Play This rulebook is organized according to this Sequence of Play.
 Introduction...1 Sequence of Play...2 Campaign Set-Up...2 Start of Week...10 Pre-Combat...11 Combat...14 Post-Combat...19 End of Week...20 End of Campaign...22 Optional Rules...22 Credits...22 Sample Game...23
Game Rules. The Great Battles of the Napoleonic Era. Giovanni Crippa. version October v.1.1. A game by: GIOGAMES
 The Great Battles of the Napoleonic Era Game Rules v.1.1 version 1.2 - October 2013 GIOGAMES A game by: Giovanni Crippa 23900 LECCO (Italy) Introduction Advanced Vive l Empereur is a game system that allows
CONTENTS INTRODUCTION Compass Games, LLC. Don t fire unless fired upon, but if they mean to have a war, let it begin here.
 Revised 12-4-2018 Don t fire unless fired upon, but if they mean to have a war, let it begin here. - John Parker - INTRODUCTION By design, Commands & Colors Tricorne - American Revolution is not overly
Campaign Introduction
 Campaign 1776 Introduction Campaign 1776 is a game that covers the American Revolutionary War. Just about every major battle of the war is covered in this game, plus several hypothetical and "what-if"
RULE BOOK. Table of Contents. Game Design by Ted Raicer
 1 Game Design by Ted Raicer RULE BOOK Table of Contents 1. Introduction... 2 2. Game Components... 2 3. Game Setup... 3 4. How to Win... 3 5. Sequence of Play... 3 6. Stacking... 4 7. Zones of Control...
ALAMO Thirteen Days of Glory A GAME BY FRANCK YEGHICHEYAN Translation: Roger Kaplan
 ALAMO Thirteen Days of Glory A GAME BY FRANCK YEGHICHEYAN Translation: Roger Kaplan Alamo is a solitaire game depicting the Sunday, March 6, 1836 climax of the thirteenday siege of the Alamo Mission that
A Marvellous Victory! Copyright. Trevor Raymond. November 2015 (Exodus 20:15 - Thou shall not steal.") Version 2
 Version 2") Page 1 of 30 A Marvellous Victory! Copyright. Trevor Raymond. November 2015 (Exodus 20:15 - Thou shall not steal.") Version 2 The first abstraction: A Marvellous Victory are an abstract set of wargame
Page 1 of 30 A Marvellous Victory! Copyright. Trevor Raymond. November 2015 (Exodus 20:15 - Thou shall not steal.") Version 2 The first abstraction: A Marvellous Victory are an abstract set of wargame
Version 1.0. ontents:
 Version 1.0 C ontents: 1.0 Introduction...2 2.0 Game Components...2 3.0 Abbreviations & Glossary...6 4.0 Campaign Game Set-Up...6 5.0 Sequence of Play...7 6.0 Stacking, Zones, Control & Area Status...8
Operational Combat Series: YUNNAN
 Yunnan Operational Combat Series: YUNNAN 2.0 Japanese Special Rules 3.1a Schedule: The YEF receive the following reinforcements turns: Operational Combat Series Game Number 04-06 supplemental 2.1 Reinforcements
would cost 3 MP not 5 MP. If you had to cross a river not using a defending unit. Terrain combat effects are cumulative.
 Design & Development: Grant Wylie and Mike Wylie Creative Director: Sean Cooke 2015 Worthington Publishing Visit worthingtonpublishing.com for a short introductory video explaining how to play and more
The Tide At Sunrise. 1.0 Introduction. 2.0 Components
 Table of Contents The Tide At Sunrise... 2 1.0 Introduction... 2 2.0 Components... 2 2.1 Units... 2 2.2 Markers... 3 2.3 Game Map... 3 2.4 Game Scale... 3 3.0 Sequence of Play... 4 3.1 Detailed Sequence
SERIES RULEBOOK. Game Design by Mark S. Miklos. Version: June 2017 TABLE OF CONTENTS. Great Battles of the American Revolution
 1 SERIES RULEOOK Game Design by Mark S. Miklos Version: June 2017 TALE OF CONTENTS 1. Introduction... 2 2. Components... 2 3. Game Scale and Terminology... 2 4. How To Win... 3 5. Sequence of Play Outline...
Aperitif Game for Gentlemen, By Pierre Laporte
 Belle Epoque Aperitif Game for Gentlemen, By Pierre Laporte Belle Epoque Aperitif Game for Miniature Battles in the Victorian Era and Early 20 th Century EQUIPEMENT NEEDED Small coloured counters, ordinary
EASY CIVIL WAR RULES by Don Lowry
 EASY CIVIL WAR RULES by Don Lowry I. BASICS: A. Stands: The miniatures are placed on stands, each of which represents a unit of troops or a general and his staff. Each stand should have a label on one
Introduction. A. What You Need. WWII Miniatures Skirmish Game. by Don Bailey
 WWII Miniatures Skirmish Game by Don Bailey Introduction Paper Tigers II expands on the original Paper Tigers rules adding depth and detail without adding a great amount of complexity. It is intended to
The Glory that was GREECE. Tanagra 457 BC
 The Glory that was GREECE Tanagra 457 BC TCSM 2009 The Glory that Was Vol. I: Greece Rulebook version 1.0 1.0 Introduction The Glory that was is a series of games depicting several different battles from
Flying Circus Air Combat During the Great War By David Schueler
 Flying Circus Air Combat During the Great War By David Schueler 1.0 Introduction Flying Circus is a quick and easy World War I air combat game, it is meant to cover air combat from 1915 through 1918. The
CONTENTS CONTENTS 1 INTRODUCTION 3 ACKNOWLEDGEMENTS 3 UNIT REPRESENTATION 4 WHAT DO TROOP STANDS REPRESENT? 4 RECOMMENDED TROOP STAND SIZES 4
 CONTENTS CONTENTS CONTENTS 1 INTRODUCTION 3 ACKNOWLEDGEMENTS 3 UNIT REPRESENTATION 4 WHAT DO TROOP STANDS REPRESENT? 4 RECOMMENDED TROOP STAND SIZES 4 BEFORE BATTLE COMMENCES 5 THE PRIMARY RULE OF WARGAMING
Brothers at Arms. 1 P a g e
 On the 12 th April 1861 America went to war with itself, North against South, Brother against Brother. A few months earlier Abraham Lincoln had won the race for President of the Union of States (US) and
Holland 44 Operation Market-Garden
 Holland 44: Operation Market-Garden Rev. May 2018 Holland 44 Operation Market-Garden 1 RULES OF PLAY Revised May, 2018 TABLE OF CONTENTS 1. Introduction... 2 19. Reinforcements and Entry Areas... 19 2.
Air Deck Rules and Use
 Air Deck Rules and Use Note: This is a first draft of the Air Deck rules. Any problems or suggestions can be posted in the forum thread or mailed to PanzerRunes on the Days of Wonder site. Suggestions
Recon 1 Air Power Counter Attack Counter Attack Recon 1 Air Power Recon 1 Recon 1 Air Strike Air Power Air Power Air Strike Memoir 44 FAQ
 VIII. COMMAND FAQ Q. If someone can use a Recon 1 card as an Air Power, can the other player Counter Attack the effect or just the card? A. The rule is that a Counter Attack is only allowed to counter
Bravery in the Sand. 1. Introduction. 2. Components. Units. Chits. Markers Markers
 1. Introduction Bravery in the Sand 2.1.2 Markers Bravery in the Sand is a two player game that covers the major part of the battle known as Operation Crusader in North Africa during World War Two. Covering
BOLT ACTION COMBAT PATROL
 THURSDAY :: MARCH 23 6:00 PM 11:45 PM BOLT ACTION COMBAT PATROL Do not lose this packet! It contains all necessary missions and results sheets required for you to participate in today s tournament. It
AXIS AND ALLIES 1914 OPTIONAL RULE: RESEARCH AND DEVELOPMENT
 AXIS AND ALLIES 1914 OPTIONAL RULE: RESEARCH AND DEVELOPMENT Using this rule, you may attempt to develop improved military technology. If you decide to use Research & Development, it becomes the new phase
Game Journal 53 First fight Smolensk Blitzkrieg. Rules : updated 17/May/2016(see /4.0 /9.2.4 /12.1/14.0/ TERRAIN EFFECT TABLE)
") Game Journal 53 First fight Smolensk Blitzkrieg Rules : updated 17/May/2016(see 2.2.2 /4.0 /9.2.4 /12.1/14.0/ TERRAIN EFFECT TABLE) 1.0 INTRODUCTION This game simulates fighting in Baltic States and Leningrad
Game Journal 53 First fight Smolensk Blitzkrieg Rules : updated 17/May/2016(see 2.2.2 /4.0 /9.2.4 /12.1/14.0/ TERRAIN EFFECT TABLE) 1.0 INTRODUCTION This game simulates fighting in Baltic States and Leningrad
Introduction to Combat and Ranged Attacks. Introduction. Anatomy of a Combat Unit
 Most units have two step strengths, with their CS (especially) and RAS somewhat reduced on their reduced strength side. Reduced infantry units may attempt to recover to full strength by using the Recovery
GMT Games, LLC P.O. Box 1308, Hanford, CA Game Design: Vance von Borries
 Game Design: Vance von Borries GMT Games, LLC P.O. Box 1308, Hanford, CA 93232-1308 www.gmtgames.com Rules of Play 2 Roads to Moscow ~ Rules of Play T a b l e o f C o n t e n t s 1.0 Introduction 1.1 Historical
Pacific Battles: Malaya 1941
 Pacific Battles: Malaya 1941 CONTENTS 1.0 IntrodUctIon 2.0 GaMe components 3.0 HoW to Set UP the GaMe 4.0 SeQUence of PlaY 5.0 command MarKerS 6.0 reinforcements 7.0 logistics 8.0 SUPPreSSIon 9.0 reorganization
Angola! Rules of Play
 Angola! 1 Rules of Play 2 Angola! Table of Contents Errata 2 1 Introduction 3 1.1 Learning the Game 3 1.2 Definitions 3 1.3 Game Components 3 2 Game Overview 3 2.1 Factions 3 2.2 Playing the Game 3 2.3
Rule Book. Table of Contents
 Rule Book Table of Contents 1.0 Introduction... 2 2.0 Components... 2 3.0 Sequence of Play... 3 4.0 Weather and Initiative... 3 5.0 Logistics... 4 6.0 Formations and HQs... 5 7.0 Activation... 6 8.0 Movement...
SHILOH GETTING STARTED. Welcome to Civil War Battles Shiloh. It is April 1862 and on the shores of the
 SHILOH GETTING STARTED Welcome to Civil War Battles Shiloh. It is April 1862 and on the shores of the Tennessee River, at the site of a church from which the action will take its name, the fate of the
Primo Victoria. A fantasy tabletop miniatures game Expanding upon Age of Sigmar Rules Compatible with Azyr Composition Points
 Primo Victoria A fantasy tabletop miniatures game Expanding upon Age of Sigmar Rules Compatible with Azyr Composition Points The Rules Creating Armies The first step that all players involved in the battle
Axis & Allies Europe FAQ
 Second Edition Rules Axis & Allies Europe FAQ November 17, 2005 Q. Did any rules change from the first to second editions of the rule book? A. Only two: 1. A destroyer taking part in an amphibious assault
IV. TROOPS FAQ SPECIALIZED UNITS 2
 IV. TROOPS FAQ STANDARD UNITS 1 7 8 8 Infantry Move 0-1 and battle, or move 2 no battle May Take Ground on successful Close Assault Armor Move 0-3 and battle May Overrun on successful Close Assault Artillery
D-Day. Omaha Beach. Rules of Play. Version D-Day at Omaha Beach 2.0
 D-Day At Omaha Beach Version 2.0 Rules of Play 1 Table of Contents 1. INTRODUCTION...3 2. GAME COMPONENTS...3 2.1 The Map...3 2.2 The Playing Pieces...4 2.3 The Cards...6 2.4 Charts and Tables...6 3. SETTING
Airborne Landings For WWII MicroArmour :The Game
 Airborne Landings For WWII MicroArmour :The Game by Leif Edmondson. The WWII rulebook presents some parachute landing rules in scenario #3 A Costly Setback and in the Modern MicroArmour rule book as well.
Damned Wobbly Gentlemen. Zuluwar 'Lite.'
 Damned Wobbly Gentlemen. Or Zuluwar 'Lite.' Version:2 12/01/09 by PDE Empress Miniatures 28mm Rules for Colonial skirmishes. The following rules are a set of simple fast play rules to get you started.
WELCOME TO THE FUTURE OF STRATEGY BOARD GAMES
 WELCOME TO THE FUTURE OF STRATEGY BOARD GAMES INSTRUCTION MANUAL THE STRATIX GAME BOARD No matter whom you are or where you come from, STRATIX can be played and enjoyed by anyone. STRATIX is based on military
The Price of Glory. Grand Tactical gaming of the Great War
 Introduction The Price of Glory Grand Tactical gaming of the Great War The Price of Glory is designed with 1/300 scale (6mm) figures in mind; while not necessarily the most visually attractive scale for
Game Journal 47 Fierce Fight! Stalingrad Blitzkrieg
 Game Journal 47 Fierce Fight! Stalingrad Blitzkrieg Different point from MLB is indicated by red. Combat Results Table Ax : number of step attacking lose - : No effect R : All defending units retreat one
BRONZE EAGLES Version II
 BRONZE EAGLES Version II Wargaming rules for the age of the Caesars David Child-Dennis 2010 davidchild@slingshot.co.nz David Child-Dennis 2010 1 Scales 1 figure equals 20 troops 1 mounted figure equals
RESTLESS REVOLUTIONARIES RULES FOR WARGAMING LATE 19 TH AND EARLY 20 TH CENTURY SOUTH AMERICAN WARS AND REVOLUTIONS by Bob Cordery
 CONTENTS RESTLESS REVOLUTIONARIES RULES FOR WARGAMING LATE 19 TH AND EARLY 20 TH CENTURY SOUTH AMERICAN WARS AND REVOLUTIONS by Bob Cordery CONTENTS 1 INTRODUCTION 2 BASIC RULES 3 The Primary Rule of Wargaming
KAWAGUCHI S GAMBLE: EDSON S RIDGE
 KAWAGUCHI S GAMBLE: EDSON S RIDGE Table Of Contents 1.0 Introduction... 2 2.0 Object... 2 3.0 The Map... 2 3.1 Scale...2 3.2 Areas...2 Map Details...2 3.3 Zones...3 3.4 Turn Record Track...3 3.5 Ammo Track...3
Introduction. Your Commanders gain Experience with every battle, but they also gain Stress. Each Week, you must decide how hard to push your men.
 Introduction...1 Sequence of Play...2 Campaign Set-Up...2 Start of Week...9 Pre-Combat...10 Combat...12 Post-Combat...16 End of Week...17 End of Campaign...19 Optional ules...19 Credits...19 Sample Game...20
Napoleon s Triumph. Rules of Play (draft) Table of Contents
 Table of Contents") Rules of Play (draft) Table of Contents 1. Parts List... 2 2. Introduction... 2 3. Playing Pieces... 2. The Game Board... 2 5. Scenarios... 3 6. Setting up the Game... 3 7. Order of Play... 3 8. Corps...
Rules of Play (draft) Table of Contents 1. Parts List... 2 2. Introduction... 2 3. Playing Pieces... 2. The Game Board... 2 5. Scenarios... 3 6. Setting up the Game... 3 7. Order of Play... 3 8. Corps...
9.3 Fresh/Spent HQs and Units Cadres AIR POWER Airfields Air Commitment Strategic Missions...
 Summary INTRODUCTION... 3 1.0 GLOSSARY... 3 2.0 GAME COMPONENTS... 5 2.1 Map... 5 2.2 Counters... 5 2.3 Charts and Tables... 9 3.0 SEQUENCE OF PLAY... 9 4.0 MOVEMENT... 10 4.1 General Rules... 10 4.2 Stacking...
Target: Leningrad Rules v1.0 1
 Target: Leningrad The Attack of Army Group North: June August, 1941 Table of Contents [1.0] INTRODUCTION...1 [2.0] GENERAL COURSE OF PLAY..1 [3.0] GAME EQUIPMENT...1 [4.0] SEQUENCE OF PLAY...2 [5.0] HOW
This getting started scenario guide uses a mini scenario to teach various game functions;
 Page 1 Page 2 Welcome to Battles of North Africa 1941. On December 9, 1940, the British Empire launched a raid to push the invading Italians out of Egypt. The planned five-day raid was to become a two-month
Unit List Hot Spot Fixed
 Getting Started This file contains instructions on how to get started with the Fulda Gap 85 software. If it is not already running, you should run the Main Program by clicking on the Main Program entry
Mythic Battles: Pantheon. Beta Rules. v2.8
 Mythic Battles: Pantheon Beta Rules v2.8 Notes: Anything with green highlighting is layout notes, and is NOT FOR PRINT. Anything with yellow highlighting is not yet finished. 1 Appearance There are many
11.6 Victory Conditions...10
 TABLE OF CONTENTS Introduction...4 Glossary...4 Support...4 1.0 Components...4 1.1 Anatomy of a Combat Unit...4 1.2 Organization of Brigades and Regiments...5 2.0 Impulse System...5 2.1 Activation Roll...5