Name the layer you rotated in step 3 Stripe and lower the opacity to 43%.
|
|
|
- Mariah Bates
- 5 years ago
- Views:
Transcription
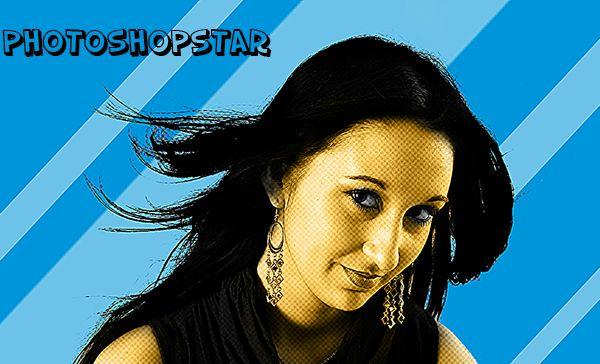
1 Step 1 Open Photoshop and create a new file pixels. Fill the layer with a bright blue color (#0095db) by pressing Shift + F5. This will be the background for our pop art scene.
2 Step 2 Let s create some nice diagonal stripes. Select the Rectangular Marquee Tool (M) and create a rectangle as shown below. Choose white as the foreground color and fill the selection with white by pressing Alt + Backspace.
 and elongate it (by dragging the top middle handles while holding the Alt key) as shown below.")
3 Step 3 Press Ctrl + T to enter Free Transform and rotate the white rectangle at an angle of 45 percent (hold shift while rotating) and elongate it (by dragging the top middle handles while holding the Alt key) as shown below. Step 4
 to resize and position the new stripes at various positions in the scene as")
4 Name the layer you rotated in step 3 Stripe and lower the opacity to 43%. Step 5 Duplicate the stripe layer a couple more times and use the Free Transform tool (Ctrl + T) to resize and position the new stripes at various positions in the scene as shown below. You can also play around with each stripe opacity to increase the randomness in the scene.
.")
5 Step 6 With the background done it s time to add the main element of our pop art scene : the girl! Open the file Girl in Photoshop and open the Color Range tool (Select > Color Range). Click once with the color picker on the white background your color range window should look like this:

6 Step 7 Press Ok to create a selection and close the Color Range window. Press Ctrl + Shift + I to invert the selection (we selected the white background with the color range tool
.")
7 because it was an easy selection by inverting it we select the girl). You will notice that there are still some areas of the girl that are not completely selected. Step 8 In order to select those spots first choose the Rectangular Marquee Tool (M). Hold shift and drag with the rectangular marquee tool over those spots indicated in step 7 to add

8 them to our selection. You should now have a complete selection of the girl. Step 9 Press Ctrl + C to copy the selection and go back to our document. Press Ctrl + V to paste the girl and use the Free Transform tool (Ctrl + T) to position her as shown below.
 and go to Filter > Filter Gallery to open the filter gallery. Once you re there select thehalftone pattern.")
9 Once you re done, desaturate the girl layer by going to Image > Adjustments > Desaturate. Step 10 Duplicate the girl layer (Ctrl + J) and go to Filter > Filter Gallery to open the filter gallery. Once you re there select thehalftone pattern. You will see that we achieved some sort of ghost effect don t worry, we ll correct it in the next step.

10 Step 11 Change the duplicated ghost layer blending mode to Soft Light and press Ctrl + I to invert the colors. Suddenly all falls into place doesn t it? We give our girl that nice halftone pattern found in old magazine photos and at the same time we increased the contrast of black and white colors.

11 Step 12 One thing I don t like about our selection is the white margins on the girl s hair they just don t look good. Let s correct that with an adjustment layer.

12 Group these two layers (the desaturated girl layer and the halftone layer) together by Shift clicking them and pressingctrl + G. Now create a Curves Adjustment Layer by going to Filter > New Adjustment Layer > Curves and clip it to the group we just created by Alt clicking in between the two in the layers palette (clipping means that the curves effect will only be applied to the group layer). Step 13 Use the settings shown below on the curves Adjustment layer to produce a strong darkening effect. We want to use this effect only on the portions of the white hair and not on

13 all the surface of the girl we will correct this in the next step. Step 14 As you can see the Curves Adjustment Layer came with a layer mask (the white thumbnail next to the layer thumbnail in the layers palette). In a layer mask black hides the layer

14 and white reveals. Press D to set the colors to default and click on the layer mask in the layers palette to make it active. Now press Ctrl + Backspace to fill it with black (and thus completely hide the effect). Step 15

15 Choose the standard round soft brush (open the brush presets window by going to Window > Brush Presets) and in the layer mask paint with white over the edges of the girl layer that are white to reveal the darkening effect only there. Step 16 We ve done a pretty good job so far but we can further improve this scene. Let s add a second color to our scene.
 and with the round soft brush paint over the girl s skin (face, shoulders and neck) but avoid the eyes.")
16 Create a new layer (Ctrl + Shift + Alt +N) and change the blending mode to Color. Choose a nice yellow color (#ffd67e) and with the round soft brush paint over the girl s skin (face, shoulders and neck) but avoid the eyes. Step 17 Create a new layer from all the visible layers by pressing Ctrl + Shift + Alt + E. Apply a sharpening effect by going

17 tofilter > Sharpen Unsharp Mask and using the settings shown below. Step 18 Import the Slapstick Comic font (if you have Windows 7 double click the font file and press install, otherwise Google how to install fonts for your specific operating system) and
18 choose the type tool (T). Type something in there (like the name of the person) I chose to type the name of the awesome website you re getting you re tutorials from and place the text as shown below. And We re Done!
19
Clipping Masks And Type Placing An Image In Text With Photoshop
 Clipping Masks And Type Placing An Image In Text With Photoshop Written by Steve Patterson. In a previous tutorial, we learned the basics and essentials of using clipping masks in Photoshop to hide unwanted
Sharpening is an essential final step before output. But sometimes, you don t want to
 Sharpening is an essential final step before output. But sometimes, you don t want to sharpen your entire image equally. Skin tones, clouds, noisy areas - it s best to apply less sharpening to these areas,
11 Advanced Layer Techniques
 11 Advanced Layer Techniques After you ve learned basic layer techniques, you can create more complex effects in your artwork using layer masks, path groups, filters, adjustment layers, and more style
Star Diffusion Tutorial
 Star Diffusion Tutorial Learn how to add a unique dreamy effect to your photos with this Star Diffusion Photoshop tutorial. This Photoshop effect creates diffusion in the shape of a four-point star and
The original image. As I said, we ll be looking at a few different variations on the effect. Here s the first one we ll be working towards:
 DIGITAL PIXEL EFFECT In this Photoshop tutorial, we re going to look at how to create a digital pixel effect, which is often used in ads that sell anything to do with digital. We re going to first pixelate
Step 1: Open A Photo To Place Inside Your Text
 Place A Photo Or Image In Text In Photoshop In this Photoshop tutorial, we re going to learn how to place a photo or image inside text, a very popular thing to do in Photoshop, and also a very easy thing
Introduction to Layers
 Introduction to Layers By Anna Castano A layer is an image or text that is piled on top of another. There are many things you can do with layer and it is easy to understand how it works. Through the introduction
EXTREME CONTRAST PHOTO EFFECT
 EXTREME CONTRAST PHOTO EFFECT In this Photoshop tutorial, we re going to learn how to use layers, layer blend modes, some noise, a little sharpening, and a simple adjustment layer to easily give a photo
Realistic Skin Smoothing
 TIP SHEET #7 Realistic Skin Smoothing I think it s fair to say when it comes to retouching techniques, the number of different ways to smooth skin is seemingly endless. From blurring techniques through
CREATE A BURNT EDGE EFFECT
 CREATE A BURNT EDGE EFFECT One of the all-time classic effects in Photoshop is the burnt edge, and there s lots of different ways to create it, but in this Adobe Photoshop tutorial, we re going to look
Project 8: Nice Close-Up
 ps7ie_p08_b.qxd 11/18/02 3:25 PM Page 74 ps7ie_p08_b.qxd 11/18/02 3:25 PM Page 75 Photoshop 7 Image Effects In this project, work with a picture that was taken at an angle for effect. Correct and crop
Extreme Makeovers: Photoshop Retouching Techniques
 Extreme Makeovers: Table of Contents About the Workshop... 1 Workshop Objectives... 1 Getting Started... 1 Photoshop Workspace... 1 Retouching Tools... 2 General Steps... 2 Resolution and image size...
Central Photography [INSTAGRAM EFFECTS]
![Central Photography [INSTAGRAM EFFECTS]](/thumbs/96/129260346.jpg "Central Photography [INSTAGRAM EFFECTS]") 1 1. Open Photoshop. 2. Go to File/New (Ctrl+N). 3. Name your file. 4. Set the Width to 11 inches. 2 5. Set the Height to 8.5 inches. 6. Set your Resolution to 200 pixels/inch. 7. Set your Background Contents
1 1. Open Photoshop. 2. Go to File/New (Ctrl+N). 3. Name your file. 4. Set the Width to 11 inches. 2 5. Set the Height to 8.5 inches. 6. Set your Resolution to 200 pixels/inch. 7. Set your Background Contents
4 PHOTOSHOP SPECIAL EFFECTS HACKS FROM SCOTT KELBY
 4 PHOTOSHOP SPECIAL EFFECTS HACKS FROM SCOTT KELBY You can do some pretty cool stuff in Photoshop, with most tiny tweaks taking no time at all. However, for some of us (myself included) it s hard to know
Retouching Portraits in Photoshop
 Retouching Portraits in Photoshop I Removing Blemishes When removing blemishes, acne or other imperfections on the skin, our goal is to maintain as much of the original skin texture as possible. That way,
In this Adobe Photoshop tutorial, we re going to look at a way to give a photo a more ghostly appearance.
 GHOSTING AN IMAGE In this Adobe Photoshop tutorial, we re going to look at a way to give a photo a more ghostly appearance. I m a fan of horror films, but I admit I m a bit shallow in that I usually just
INTRO TO LAYERS (PART 2)
") Adobe Photoshop Elements INTRO TO LAYERS (PART 2) By Dave Cross In Part 1, we talked about the main concept behind layers and why they re so important. Now we ll take it a step further and show how to
Adobe Photoshop Elements INTRO TO LAYERS (PART 2) By Dave Cross In Part 1, we talked about the main concept behind layers and why they re so important. Now we ll take it a step further and show how to
Using Adobe Photoshop
 Using Adobe Photoshop 6 One of the most useful features of applications like Photoshop is the ability to work with layers. allow you to have several pieces of images in the same file, which can be arranged
UNDERSTANDING LAYER MASKS IN PHOTOSHOP
 UNDERSTANDING LAYER MASKS IN PHOTOSHOP In this Adobe Photoshop tutorial, we re going to look at one of the most essential features in all of Photoshop - layer masks. We ll cover exactly what layer masks
COLORIZING IMAGES WITH GRADIENT MAPS
 COLORIZING IMAGES WITH GRADIENT MAPS In this Photoshop tutorial, we ll learn how to add complex colorizing effects to images using custom gradients! Specifically, we ll look at the Gradient Map image adjustment
Creating Pastel Images and other effects in Photoshop
 Creating Pastel Images and other effects in Photoshop Martin Addison 2015 Creating pastel images Page 1 Martin Addison FRPS Using White Layers in Photoshop 1. Create a new empty Layer 2. Edit> Fill 3.
Basic Digital Dark Room
 Basic Digital Dark Room When I took a good photograph I almost always trying to improve it using Photoshop: exposure, depth of field, black and white, duotones, blur and sharpness or even replace washed
Central Photography Photoshop Tutorial. Color Splash. 1. Open Photoshop. 2. Go to File>Open (Command O).
.") 1. Open Photoshop. 2. Go to File>Open (Command O). 1 3. Navigate to your file, select it and open it. 2 4. Fix your photo. If it s too light, darken it. If it s too dark, lighten it. To do that, add a
1. Open Photoshop. 2. Go to File>Open (Command O). 1 3. Navigate to your file, select it and open it. 2 4. Fix your photo. If it s too light, darken it. If it s too dark, lighten it. To do that, add a
ADDING FIREWORKS TO A PHOTO
 ADDING FIREWORKS TO A PHOTO In this Photoshop tutorial, we re going to learn how to add fireworks to a photo. What you ll need is a photo of fireworks and the photo you want to add the fireworks to (preferably
Reflection Project. Please start by resetting all tools in Photoshop.
 Reflection Project You will be creating a floor and wall for your advertisement. Before you begin on the Reflection Project, create a new composition. File New: Width 720 Pixels / Height 486 Pixels. Resolution
Introduction to Layers in Photoshop. Layers palette
 Layers: Are an essential element of Photoshop and a tool of every digital darkroom. Allow you to optimize one part of your photograph without affecting other parts. Allow an Undo of everything from minor
Now we ve had a look at the basics of using layers, I thought we d have a look at a few ways that we can use them.
 Stone Creek Textiles stonecreektextiles.co.uk Layers Part 2 Now we ve had a look at the basics of using layers, I thought we d have a look at a few ways that we can use them. In Layers part 1 we had a
Adding Fireworks To A Photo With Photoshop
 Adding Fireworks To A Photo With Photoshop Written by Steve Patterson. In this Photoshop Effects tutorial, we re going to learn how to add fireworks to a photo. What you ll need is a photo of fireworks
How to Create The Top 10 Design Trends of 2018
 Inspired by Philip VanDusen The techniques I m sharing in class were inspired by a great video called 15 Trends in Graphic Design for 2018 by Principal & COO of Verhall Brand Design, Philip VanDusen. This
u Selections, Channels, Masks, and Paths
 6 u Selections, Channels, Masks, and Paths No matter what type of Photoshop work you do, you will most likely have to make selections. Spot color corrections require selections. Compositing requires selections.
Enhanced Eyes. Here's the image I'll be working with (glamour eyes photo from Shutterstock): Here's what the eyes will look like when we're done:
: Here's what the eyes will look like when we're done:") Enhanced Eyes Here's the image I'll be working with (glamour eyes photo from Shutterstock): The original image. Here's what the eyes will look like when we're done: The final effect. Here's a close-up
Enhanced Eyes Here's the image I'll be working with (glamour eyes photo from Shutterstock): The original image. Here's what the eyes will look like when we're done: The final effect. Here's a close-up
By Washan Najat Nawi
 By Washan Najat Nawi how to get started how to use the interface how to modify images with basic editing skills Adobe Photoshop: is a popular image-editing software. Two general usage of Photoshop Creating
Easily Smooth And Soften Skin In A Photo With Photoshop
 Easily Smooth And Soften Skin In A Photo With Photoshop Written by Steve Patterson OPEN THE START FILE BY RIGHT CLICKING THE.JPG FILE AND CHOOSING OPEN WITH ADOBE PHOTOSHOP. SAVE AS: X_lastname_firstname_Smooth_Soft
SIMPLE POP ART EFFECT
 SIMPLE POP ART EFFECT In this Photoshop tutorial, we re going to see how to turn a photo into a simple 1950 s and 60 s pop art-style effect. If you can make a selection with the Lasso tool and you understand
The final wrap text in 3D result.
 WRAPPING TEXT IN 3D In this Photoshop tutorial, we re going to learn how to easily wrap text around a 3D object in Photoshop, without the need for any 3D software. We re going to be wrapping our text around
Create a Beautiful Abstract Portrait in Photoshop - Psd Premium Tutorial
 Create a Beautiful Abstract Portrait in Photoshop - Psd Premium Tutorial By: Wojciech Pijecki In this tutorial we will combine several stock images to create an artistic, abstract portrait of a woman.
photoshop filters kelly ludwig assistant professor
 photoshop filters kelly ludwig assistant professor sharpening images reducing noise correcting distortions in images practical filters There are over 100 filters that ship with Photoshop and they're all
Painting Special Effects on Photographs
 TUTORIAL 7 Painting Special Effects on Photographs In this tutorial you will learn how to transform a photo into a striking color composition with paintbrushes, masks, blending modes, color, and paper
WORN, TORN PHOTO EDGES EFFECT
 Photo Effects: CC - Worn, Torn Photo Edges Effect WORN, TORN PHOTO EDGES EFFECT In this Photoshop tutorial, we ll learn how to take the normally sharp, straight edges of an image and make them look all
Your texture pattern may be slightly different, but should now resemble the sample shown here to the right.
 YOU RE BUSTED! For this project you are going to make a statue of your bust. First you will need to have a classmate take your picture, or use the built in computer camera. The statue you re going to make
XXXX - MAKING A FLYER BOOKLET COVER 1 N/08/08
 INTRODUCTION TO GRAPHICS Making a flyer booklet cover Information Sheet No. XXXX Create a new document with these settings. Note that you will be using 300 dpi because this will be made for print. Keepit
You ve Been Framed! (Adobe Photoshop)
") You ve Been Framed! (Adobe Photoshop) Tip of the Week by Linda Sattgast on September 28, 2009 Do you have a great photo of someone special that you want to bring into sharp focus the special person, that
You ve Been Framed! (Adobe Photoshop) Tip of the Week by Linda Sattgast on September 28, 2009 Do you have a great photo of someone special that you want to bring into sharp focus the special person, that
Quick Mask Setting Up your Work Environment Setting Up the Quickmask Parameters
 Quick Mask Quickmask gets its name from the fact that as you create your selection area, Photoshop masks that area off, tinting it with a colored mask to show what has been selected. When you're finished
Introduction to Photoshop
 Introduction to Photoshop Photoshop Creative Cloud (CC) Start -> All Programs -> Classes -> Web Expressions -> Tutorials Google Photoshop CC tutorial Color Replacement Image -> Adjustments -> Replace
Learning Photo Retouching techniques the simple way
 Learning Photo Retouching techniques the simple way Table of Contents About the Workshop... i Workshop Objectives... i Getting Started... 1 Photoshop Workspace... 1 Setting up the Preferences... 2 Retouching
Adobe PhotoShop Elements
 Adobe PhotoShop Elements North Lake College DCCCD 2006 1 When you open Adobe PhotoShop Elements, you will see this welcome screen. You can open any of the specialized areas. We will talk about 4 of them:
Here is a 100% zoom close up. Name in Popsicles
 Here is a 100% zoom close up Name in Popsicles Step 1 Let s start by creating a new Photoshop document. Mine is 2560 1440 pixels. Fill the background with a color of your choice (it s not important at
TURN A PHOTO INTO A PATTERN OF COLORED DOTS (CS6)
") TURN A PHOTO INTO A PATTERN OF COLORED DOTS (CS6) In this photo effects tutorial, we ll learn how to turn a photo into a pattern of solid-colored dots! As we ll see, all it takes to create the effect is
TURN A PHOTO INTO A PATTERN OF COLORED DOTS (CS6) In this photo effects tutorial, we ll learn how to turn a photo into a pattern of solid-colored dots! As we ll see, all it takes to create the effect is
Web Graphics Chapter 7 Review
 Web Graphics Chapter 7 Review Name Date 1. The Add Layer Mask button is located on/in the. a. Toolbox b. Layers palette c. Mask palette d. History palette 2. How many color adjustments commands are available
METAL TEXT EFFECT. Step 1: Create A New Document. Step 2: Fill The Background With Black
 METAL TEXT EFFECT In this text effects tutorial, we ll learn how to easily create metal text, a popular effect widely used in video games and movie posters! It may seem like there s a lot of steps involved,
Lesson 16 Text, Layer Effects, & Filters
 Lesson 16 Text, Layer Effects, & Filters Digital Media I Susan M. Raymond West High School In this tutorial, you will: Create a Type Layer Add and Format Type within a Type Layer Apply Layer Effects Apply
A quick note: We hope that you will find something from the Tips and Tricks that will add a little pizazz to your yearbook pages!
 A quick note: The following pages are tips and tricks for Basic Photoshop users. You may notice that some instructions indicate that non-awpc fonts were used, and that some colors were created using the
Adobe Photoshop CS5 Layers and Masks
 Adobe Photoshop CS5 Layers and Masks Email: training@health.ufl.edu Web Page: http://training.health.ufl.edu Adobe Photoshop CS5: Layers and Masks 2.0 Hours The workshop will cover creating and manipulating
Combine Black-and-White and Color
 Combine Black-and-White and Color Contributor: Seán Duggan n Specialty: Fine Art Primary Tool Used: Smart Objects Combining color and black-and-white in the same image is a technique that has been around
Using Adobe Photoshop
 Using Adobe Photoshop 8 In the last section we looked at adjusting colours to improve your image. In this section we ll look at various ways of touching up your images to fix problems with the images or
Photoshop CC Editing Images
 Photoshop CC Editing Images Rotate a Canvas A canvas can be rotated 90 degrees Clockwise, 90 degrees Counter Clockwise, or rotated 180 degrees. Navigate to the Image Menu, select Image Rotation and then
HIGH KEY GLOW EFFECT IN PHOTOSHOP
 HIGH KEY GLOW EFFECT IN PHOTOSHOP In this Photoshop tutorial, we ll learn how to create a high key glow effect, which is a fancy way of saying we ll be applying a glow only to the highlights in an image.
Turn A Photo Into A Collage Of Polaroids With Photoshop
 http://www.photoshopessentials.com/photo-effects/polaroids/ Turn A Photo Into A Collage Of Polaroids With Photoshop Written by Steve Patterson. In this Photoshop Effects tutorial, we ll learn how to take
SAVING, LOADING AND REUSING LAYER STYLES
 SAVING, LOADING AND REUSING LAYER STYLES In this Photoshop tutorial, we re going to learn how to save, load and reuse layer styles! Layer styles are a great way to create fun and interesting photo effects
FLAMING HOT FIRE TEXT
 FLAMING HOT FIRE TEXT In this Photoshop text effects tutorial, we re going to learn how to create a fire text effect, engulfing our letters in burning hot flames. We ll be using Photoshop s powerful Liquify
The original image. The final effect. The Layers palette showing the original photo on the Background layer.
 Photo Effects: Gritty, Overprocessed Photo Effect GRITTY, Overprocessed Photo Effect In this Photoshop photo effects tutorial, we re going to look at how to give a photo a gritty, overprocessed look to
Recitation 2 Introduction to Photoshop
 Recitation 2 Introduction to Photoshop What is Adobe Photoshop? Adobe Photoshop is a tool for creating digital graphics either by starting with a scanned photograph or artwork or by creating the graphics
Contents: Bibliography:
 ( 2 ) Contents: Sizing an Image...4 RAW File Conversion...4 Selection Tools...5 Colour Range...5 Quick Mask...6 Extract Tool...7 Adding a Layer Style...7 Adjustment Layer...8 Adding a gradient to an Adjustment
Module All You Ever Need to Know About The Displace Filter
 Module 02-05 All You Ever Need to Know About The Displace Filter 02-05 All You Ever Need to Know About The Displace Filter [00:00:00] In this video, we're going to talk about the Displace Filter in Photoshop.
Challenge Image: Blur the Background
 Challenge Image: Blur the Background Challenge Image: Blur the Background In this lesson, we re going to work on a challenge image that was submitted by a Masters Academy member. The image features a little
Add Rays Of Sunlight To A Photo With Photoshop
 Add Rays Of Sunlight To A Photo With Photoshop Written by Steve Patterson. In this photo effects tutorial, we'll learn how to easily add rays of sunlight to an image, a great way to make an already beautiful
Digital Photography 1
 Digital Photography 1 Photoshop Lesson 3 Resizing and transforming images Name Date Create a new image 1. Choose File > New. 2. In the New dialog box, type a name for the image. 3. Choose document size
ADD A REALISTIC WATER REFLECTION
 ADD A REALISTIC WATER REFLECTION In this Photoshop photo effects tutorial, we re going to learn how to easily add a realistic water reflection to any photo. It s a very easy effect to create and you can
photo effects, part 1
 MiraclePhoto photo effects, part 1 These chapter intros are all named after either song titles, movies, or TV shows, and this chapter is named after the song Miracle Photo, by a band called Ruth (which
Here s the photo I ll be starting with: The original photo. Let s get started! The final result.
 How To Lighten And Brighten Eyes In this Photo Retouching tutorial, we ll learn a fast and easy way to lighten and brighten someone s eyes in a photo using nothing more than a simple adjustment layer,
Doing More with Photoshop
 Doing More with Photoshop Topic 7 Layer Masks Learning Outcomes In this lesson, we will take a look at layer masks in Photoshop. By the end of this lesson, you will have a good understanding of what layer
Make a Trendy Double Exposure Effect in Adobe Photoshop by Yulia Sokolova6 days ago
 Make a Trendy Double Exposure Effect in Adobe Photoshop by Yulia Sokolova6 days ago Difficulty:IntermediateLength:LongLanguages: Photo ManipulationAdobe PhotoshopPhoto EffectsDouble ExposureClipping Mask
The original image. The final rainbow effect.
 ADD A realistic rainbow to a photo In this Photoshop photo effects tutorial, we re going to learn how to easily add a rainbow, even a double rainbow, to a photo. Of course, as with most photo effects,
Create a Candy Cane. Create a new canvas with the size 8x10 inches at 300 pixel/inch. See image below Ctrl + N
 Create a Candy Cane The Basic Candy Cane Canvas and Shape 1. Create a new folder, name it Candy Cane your name. Create a new canvas with the size 8x10 inches at 300 pixel/inch. See image below Ctrl + N
Introduction to Photoshop Elements
 John W. Jacobs Technology Center 450 Exton Square Parkway Exton, PA 19341 610.280.2666 ccljtc@ccls.org www.ccls.org Facebook.com/ChesterCountyLibrary Introduction to Photoshop Elements Chester County Library
Colorful Glowing Mask Photoshop Tutorial Photoshop TUTfactory The best Photoshop tutorials in one place
 Step 1: To start, create new canvas sized at 994 1312 pixels, and fill it with black. Next, create a new layer, and go to Filter->Render->Clouds. Duplicate this layer, and then merge the two layers. Set
Adobe Photoshop CC 2018 Tutorial
 Adobe Photoshop CC 2018 Tutorial GETTING STARTED Adobe Photoshop CC 2018 is a popular image editing software that provides a work environment consistent with Adobe Illustrator, Adobe InDesign, Adobe Photoshop,
2ND EDITION COVERS GIMP 2.8 GIMP. creative techniques for photographers, artists, and designers. michael j. hammel THE ARTIST S GUIDE TO
 2ND EDITION COVERS GIMP 2.8 THE ARTIST S GUIDE TO GIMP creative techniques for photographers, artists, and designers michael j. hammel 6.1 Fire Girl This effect creates a ghostly figure wreathed in flame
VERY. Note: You ll need to use the Zoom Tools at the top of your PDF screen to really see my example illustrations.
 VERY This tutorial is written for those of you who ve found or been given some version of Photoshop, and you don t have a clue about how to use it. There are a lot of books out there which will instruct
Create a Dreamlike Photo Manipulation of an Emotional Girl with a Dramatic Lighting in Photoshop. By Andrea Garcia - February 12,
 Create a Dreamlike Photo Manipulation of an Emotional Girl with a Dramatic Lighting in Photoshop By Andrea Garcia - February 12, 2015 396 11 Create a Dreamlike Photo Manipulation of an Emotional Girl with
ADDING RAIN TO A PHOTO
 ADDING RAIN TO A PHOTO Most of us would prefer to avoid being caught in the rain if possible, especially if we have our cameras with us. But what if you re one of a large number of people who enjoy taking
Exploring Photoshop Tutorial
 Exploring Photoshop Tutorial Objective: In this tutorial we will create a poster composed of three distinct elements: a Bokeh, an image and title text. The Bokeh is an effect which is sometimes seen in
Teton Technique C H A P T E R 3
 C H A P T E R 3 Teton Technique TRY IT AT HOME: TetonTechnique.psd SIT BACK AND WATCH: TetonTechnique.mov Ladies and gentlemen, girls and boys of all ages, welcome to the Grand Teton National Park. But
The original image. Let s get started! The final rainbow effect. The photo sits on the Background layer in the Layers panel.
 Add A Realistic Rainbow To A Photo In this Photoshop photo effects tutorial, we ll learn how to easily add a rainbow, and even a double rainbow, to a photo! As we ll see, Photoshop ships with a ready-made
Using Adobe Photoshop
 Using Adobe Photoshop 8 In the last section we looked at adjusting colours to improve your image. In this section we ll look at various ways of touching up your images to fix problems with the images or
An Introduction to Layers, Masks and Channels in Photoshop
 An Introduction to Layers, Masks and Channels in Photoshop Roy Killen, GMAPS, EFIAP, GMPSA (c) 2017 Roy Killen Layers, Masks and Channels Page 1 Two approaches to image editing When images are edited in
ADDING A RAINBOW TO A PHOTOGRAPH
 ADDING A RAINBOW TO A PHOTOGRAPH This assignment will cover how to add a simple rainbow (or if you want to go crazy, a double rainbow) to any photograph. This will give us some great work with gradients,
SIMPLY TIFFANY STUDIOS SCRAPANEERS.COM
 Get Prepped Organize & Prepare The tips I want to share with you today will help you prepare tomorrow for Scanning Day and increase your scanning speed. Tip 1: Divide & Conquer Arrange your photos into
Digital Imaging and Photoshop Fun / Marianne Wallace
 Hand Coloring in Adobe Photoshop or Adobe Elements If you want total control over EVERY color in your image, this tutorial is for you! Every color is put on a separate layer so that you can edit each one
Diploma in Photoshop
 Diploma in Photoshop Photoshop Selection Tools Selection Tools allow us to isolate areas of our image and apply adjustments to these selected areas only. A selection simply isolates one or more parts of
GETTING STARTED. 0 P a g e B a s i c s o f A d o b e P h o t o s h o p A g a P r i v a t e I n s t i t u t e f o r c o m p u t e r s c i e n c e
 GETTING STARTED 0 P a g e B a s i c s o f A d o b e P h o t o s h o p Adobe Photoshop: is a popular image editing software that provides a work environment consistent with Adobe Illustrator, Adobe InDesign,
Introduction to Photoshop
 Introduction to Photoshop Instructional Services at KU Libraries A Division of Information Services www.lib.ku.edu/instruction Abstract: This course covers the basics of Photoshop, including common tools
Glowing Surreal Planet Design. Final Image Preview
 Glowing Surreal Planet Design Final Image Preview. Step 1 First, go to the S:\ drive and locate the folder called Glowing Planet Design. Copy the City Skyline file and paste it in your Glowing Planet Design
The original image. Let s get started! The final effect.
 Non-Destructive Infrared Glow Effect In this Photoshop tutorial, we ll learn how to quickly and easily add a dream-like infrared glow effect to an image, and we ll do it non-destructively using Smart Filters
Car Ad Photoshop Tutorial Miss Van Lenten Tools: Paint brush, Eraser, Quick Selection/Magic Wand, Quick Mask, Layer Mask
 Car Ad Photoshop Tutorial Miss Van Lenten Tools: Paint brush, Eraser, Quick Selection/Magic Wand, Quick Mask, Layer Mask Part One: Google image search for a car of your choosing. Make sure you go to tools
Reducing Noise in an image
 Reducing Noise in an image - Open the image in Photoshop. - Go to the Filter menu then click on Noise and then the Reduce Noise button. - Zoom in on the preview image in the Reduce Noise window, so that
How to blend, feather, and smooth
 How to blend, feather, and smooth Quite often, you need to select part of an image to modify it. When you select uniform geometric areas squares, circles, ovals, rectangles you don t need to worry too
Thank you for spending your evening with me! Truly enjoyed chatting and sharing image blending.. :)
") easymail Webmail :: Texture Blending Notes 1 of 2 9/4/2016 8:38 PM Subject From To Date Texture Blending Notes Denise Silva Denise Silva 2016-09-02 8:10 am Texture
easymail Webmail :: Texture Blending Notes 1 of 2 9/4/2016 8:38 PM Subject From To Date Texture Blending Notes Denise Silva Denise Silva 2016-09-02 8:10 am Texture
Professional Photograph Restoration 50 Points
 Professional Photograph Restoration 50 Points In this tutorial, we'll take an in-depth look at restoring an old torn photograph. Restoring old family photos is something that you can do for your relatives
Photoshop Backgrounds: Turn Any Photo Into A Background
 Photoshop Backgrounds: Turn Any Photo Into A Background Step 1: Duplicate The Background Layer As always, we want to avoid doing any work on our original image, so before we do anything else, we need to