Mag 3/6 System. Manual.
|
|
|
- Grace Wilkerson
- 5 years ago
- Views:
Transcription


1 Mag 3/6 System Manual
2 1: Introduction : Caution : FCC Compliance Statement.. 3 4: Tips for Reading this Manual : Preface : System Highlights : Receiver : Specifications : Receiver Operation : Icons : Main Page Icons : Secondary Page Icons : Calibration and Depth Forecast Page Icons : Setup Page Icons : Calibration : Depth Calibration : Roll Calibration : Operation : Depth Prediction : Transmitter Activation : Transmitter Settings : Receiver Settings : Radio Channel Selection : Pairing : Pitch Unit Selection : Depth Unit Selection : Time Setting : System Unlock : Visibility Control : Speed Control : Receiver Maintenance 28
3 8: Display : Specifications : Display Operations : Icons : Main Page Icons : Secondary Page Icons : Setup Page Icons : Down Hole Echo Mode Change : Radio Channel Selection : Pairing : Pitch Unit Selection : Distance Unit Selection : Visibility Control : Communication Mode : Display Maintenance : Transmitter : Introduction : Specifications : Digital Information : Transmitter Maintenance : Locating Methods : Three Point Locating : The Basics : Finding the Front Locate Point : Finding the Rear Locate Point : Finding the Locate Line and Transmitter : Tracking on the Fly : Bore-To : Single Point Locating : Battery and Charger : Warranty
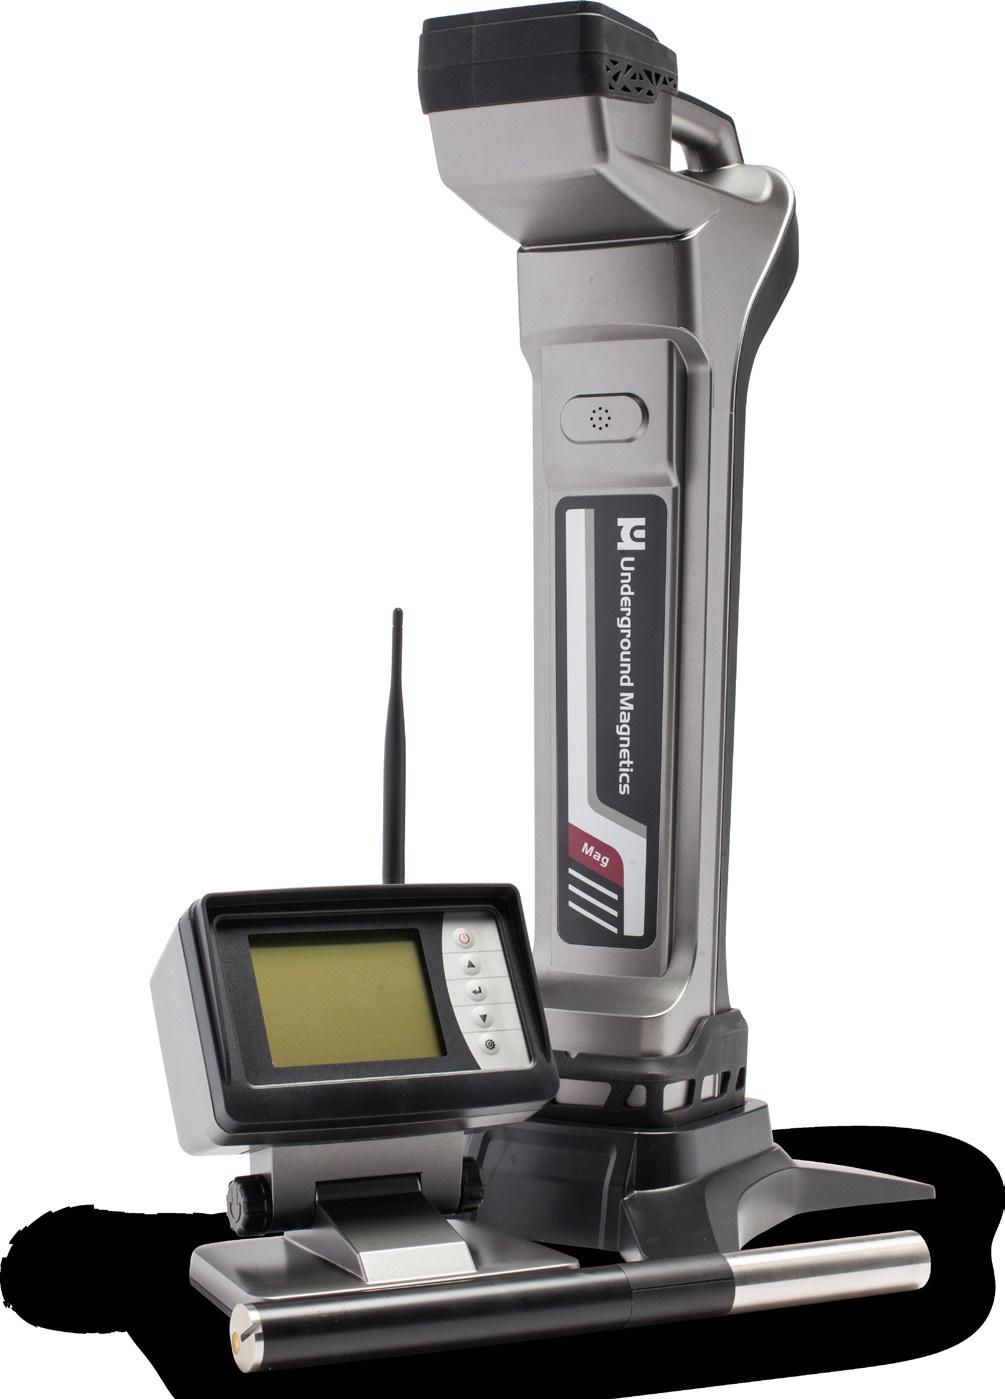
4 The MAG 3S and 6S are locating systems designed to assist horizontal directional drill machine operators in locating and tracking underground drill head locations and orientations. The systems consist of a transmitter, a receiver, and a remote display. The transmitter sends digital information of the transmitter s pitch, roll, temperature, and battery status through an FM modulated RF signal. The receiver receives this information and uses RF signal to identify the transmitter s status and location. The receiver transmits the locating information to a remote display through a radio telemetry system. A horizontal directional drill machine operator can use the information from the display to guide the drill head to the desired path. These locating systems also offer four channel license free radio telemetries between the receiver and remote display. The user can easily pair any two receivers and displays so that communications between the pair will not be interfered by other pairs. This manual is intended to provide information and instructions on how to use these locating systems properly. Underground Magnetics Inc. (UM) reserves the right to improve the locating systems and the Operator s Manual at any time without notice. Page 1
5 The operator must understand safety procedures and correct operation methods before operating the HDD and the locating system. HDD machines can cause property damage and personal injury upon striking underground power lines, gas lines, phone lines, television cables, fiber optic cables, or sewage lines. Make sure to confirm and mark all underground utilities before beginning operations. Do not use the locating system near flammable or explosive substances. Wear proper personal protective equipment including steel-toed boots, safety gloves, helmets, reflective vests, and safety goggles. Obey all local safety regulations. This locating system is only a tool to assist the operator to locate the drill head. It is the operator, not the Mag 6S locating system that is responsible for identifying the drill head location. UM is not responsible for any damage or loss caused by using the Mag 6S system. Operators should operate the Mag 6S system according to the manual. If there are any questions, please contact UM at support@undergroundmagnetics.com or call customer service at Page 2
6 This device complies with Part 15 of the FCC Rules. Operation is subject to the following two conditions: This device may not cause harmful interference, and This device must accept any interference received, including interference that may cause undesired operation. Changes or modifications not expressly approved by Underground Magnetics Inc. will void the user s authority to operate the equipment. Note: This product has been tested and found to comply with the limits for a Class B digital device, pursuant to Part 15 of the FCC Rules. These limits are designed to provide reasonable protection against harmful interference in a residential installation. This product generates, uses, and can radiate radio frequency energy and, if not installed and used in accordance with the instructions, may cause harmful interference to radio communications. However, there is no guarantee that interference will not occur in a particular installation. If this product does cause harmful interference to radio or television reception, which can be determined by turning the equipment off and on, the user is encouraged to try to correct the interference by one or more of the following measures: Reorient or relocate the receiving antenna. Increase the separation between the equipment and receiver. Connect the equipment into an outlet on a circuit different from that to which the receiver is connected. Consult the dealer or an experienced radio/tv technician for help. Page 3
7 Here are some points to keep in mind as you read through the Mag 3S & 6S Operator s Manual. Page References This question mark and textbox will tell you the page in the Operator s Manual where you can find more detailed information on the corresponding topic. Page X The following two pages contain a short preface. This will be a quick introduction to the steps in which you will most likely use your Mag 3S or 6S System. It will also contain page references for the later sections of the manual that contain more detailed information for the corresponding steps. The rest of the manual will contain detailed sections that follow the order of the Mag 3S or 6S Receiver and the Mag D3 or D6 menu screens. It is recommended to read the whole Operator s Manual first. Then use the separate Quick Start Guide, which is included with your system, as reference when needed. Page 4
8 When you receive your Mag 3S or 6S System the transmitter will have already been activated, preprogrammed at 19 khz, and paired and calibrated with the receiver. The receiver and display will have been paired and set to channel 1. 1 Turn on receiver by holding power button until the Mag logo is visible on screen. Page Walk bore-path and use depth forecasting to check for interference and select frequency. Install batteries into transmitter. Install battery cap with provided battery cap tool. Turn on display by holding power button until the Mag logo is visible on screen. Install transmitter into the housing. Page 15 Page 44 Page 28 Page 5
9 6 Check calibration by placing receiver 10ft away from housing, measured from inside edge of receiver to center of housing. Page 13 7 If distance on receiver s screen reads anything other than 10ft, perform calibration. Page 13 8 Begin drilling. 9 Locate FLP (Front Locate Point). Page Locate RLP (Rear Locate Point). Page Locate LL (Locate Line). Page 52 Repeat steps 9 through 11 as you continue to guide drill. Page 6


10 High precision and high anti-interference Faraday shield 3D antenna structure Industrial rated, gold-plated electronic modules High-performance DSP Dual locating system, functioning as two receivers independently tracking to provide better accuracy and reliability Up to 130ft depth range and up to 48 hours continuous usage Receiver: Mag 3S Display: Mag D3 Transmitter: Echo 1 Echo 1 19k Echo 1 30k Echo ST Page 7


11 High precision and high anti-interference Faraday shield 3D antenna structure Industrial rated, gold-plated electronic modules High-performance DSP Dual locating system, functioning as two receivers independently tracking to provide better accuracy and reliability Up to 190ft depth range and up to 160 hours continuous usage Receiver: Mag 6S Display: Mag D6 Transmitter: Echo 1 Echo 1 19k Echo 1 30k Echo 2S Echo 3 Echo ST Page 8


12 System frequency Water resistant 4kHz, 19kHz, 30kHz IP65 Temperature range -4 to 140 F Telemetry Rechargeable lithium battery Battery life 4 radio channels with range up to 3000 feet 12.5V Up to 50 hours Dimensions 27 x 5 x 12 Weight Mag 3S and 6S 6.5 pounds Power key: Up key: Down key: Confirm key: Setup key: Press and hold to turn on or off. Tap to turn backlight on or off. Move to previous cursor selection. Move to next cursor selection. Tap to confirm cursor selection. Press and hold to enter secondary page. Tap from main page to enter Bore-To mode. Tap to enter calibration page/ return to main page. Press and hold to enter setup page. Page 9
13 Transmitter model, frequency, and power Transmitter signal strength Signal to noise ratio bar and noise number Transmitter battery status Transmitter temperature (Flashing indicates transmitter is over-heating) Distance between transmitter and receiver Page 10


14 Roll indicator 24 clock positions Direction of nearest Locate Point Pitch Point: direction of transmitter Ball: representation of Locate Point Representation of receiver location Locate Line The Locate Line will be seen on screen when further away from the Locate Point. Once close enough, the ball will appear and can be used to fine-tune the left-right position of the LP. Page 48 Page 11
15 To enter the Secondary Page, press and hold Radio channel Receiver battery status Transmitter model, frequency, and power Page 12


16 A1: 10ft calibration A3: Depth prediction B1: Transmitter activation B2: Transmitter settings B3: Receiver settings B4: Radio channel selection B5: Receiver and display pairing B6: Roll calibration B7: Pitch unit selection B8: Time setting B9: System lock/unlock B10: Visibility control B11: System info B13: Distance unit selection B16: Speed Control Page 13


17 Warning: Even if the transmitter s roll, pitch, battery status and temperature are displayed correctly, calibration may not be reliable due to a distorted magnetic field. 1. Make sure that the transmitter is working properly. Place it in the housing. 2. Place housing containing the transmitter in a location away from interference. 3. Set transmitter and receiver 10ft apart from center of transmitter to inside edge of receiver s base, as shown. 4. Tap to enter Calibration and Depth Forecast Page 5. Tap once to enter Calibration Page, and twice more to begin 10ft calibration. 7. Calibration complete. 8. Tap to return to Main Page. Page 14


18 1. Place transmitter housing in a 12 o`clock position. 2. Press and hold to enter Setup page and tap to select B6 icon. 3. Tap to enter Roll Calibration Page and tap or until the point is in the 12 o clock position. Tap twice to start roll calibration and wait for calibration to complete. 4. Calibration complete. 5. Tap to return to Main Page. Page 15


19 1. Tap to enter calibration page and tap to select A3 icon. 3. Tap to return to Main Page. 2. Tap to enter Depth Forecast Page. Best-case, average, and worstcase depth forecast values are listed on the right while transmitter model and frequency are listed at the top. Tap to reset forecast. Note: The best-case depth forecast value is a conservative value and will be the main value used when determining interference. Page 16


20 (For dealer or factory use) (Process must be started within 10 minutes after batteries have been placed in the transmitter.) 1. Press and hold to enter Setup Page. 2. Tap to scroll through the page options until B1 is highlighted. Then tap to enter Transmitter Activation Page is the transmitter identification number and is the prompt code in the 4. Tap to return to Main Page. diagram. Send the transmitter identification number and the prompt code to the dealer. The dealer will give you an activation password. Use and to input a number and to move to the next number spot. Tap confirm. once done to Page 17


21 (Process must be started within 10 minutes after batteries have been placed in the transmitter.) 1. Press and hold to enter Setup Page and tap to select B2 icon. 3. Tap to return to Main Page. 2. Tap to enter Transmitter Settings Page. The receiver and Echo transmitter will automatically pair. Then tap or and to select frequency and power level. Tap to highlight Wake Up Mode and tap to enter. Then tap or to select desired mode. Instant (rotate the transmitter 4 degrees or change the pitch by 1 degree) 360 degrees (rotate the transmitter a full 360 several times). Always on Page 18

22 1. Press and hold to enter Setup Page. Tap to select B3 icon. 2. Tap to enter Receiver Settings Page. Tap or and to select transmitter model, frequency, and power. 3. Tap to return to Main Page. Page 19

23 1. Press and hold to enter Setup Page. Tap to select B4 icon. 2. Tap to enter Radio Channel Page. Use or to select radio channel. 3. Tap to return to Main Page. Page 20

 3. Pairing complete. 4.")
24 1. Press and hold to enter Setup Page. Tap to select B5 icon. 2. Tap to enter Pairing Page. Tap to start pairing. (It is required that these last two steps are performed on the display at the same time.) 3. Pairing complete. 4. Tap to return to Main Page. Page 21


25 1. Press and hold to enter Setup Page and tap to select B7 icon. Tap to enter Pitch Unit Selection Page. 2. Tap to switch pitch mode. 3. Tap to return to Main Page. Page 22


26 1. Press and hold to enter Setup Page. Tap to select B13 icon. 2. Tap to enter Distance Unit Selection Page. Tap or to select unit and format. 3. Tap to return to Main Page. Page 23


27 (For dealer or factory use) 2. Press and hold to enter Setup Page. Tap to select B8 icon. 3. Tap to enter Time Settings Page. Tap to select year, month, day, hour, or minute. Tap or to set time. 4. Tap to return to Main Page. Page 24

28 (For dealer or factory use) 1. Press and hold to enter Setup Page and tap to select B9 icon. Tap to enter System Unlock Page. 2. Tap or and to input password. 4. Tap to return to Main Page. Page 25

29 1. Press and hold to enter Setup Page and tap to select the B10 icon. Tap to enter Visibility Control. 2. Tap and to adjust. 3. Tap to return to Main Page. Note: By holding both and at the same time while turning the receiver on, the visibility control will reset to normal visibility. Page 26


30 2. Press and hold to enter Setup Page and tap to enter the Speed Control Page. 3. Tap and to adjust speed. 4. Tap to return to Main Page. Note: Adjusting the speed control allows operators to more easily fine tune the left-right bar and bore indicator for when at very deep depths. Page 27

31 The receiver uses rechargeable lithium batteries. The receiver will automatically shut off if no key is pressed for over a period of 20 minutes or if there is no information received from the transmitter. It is strongly recommended that the batteries are taken out of the receiver if it is not being used for a long period of time to avoid potential corrosion. The receiver is an electronic measurement device. Severe shock and impact can damage the housing and the electronics inside the housing. Keep the receiver away from excessive heat to avoid damages to the plastic housing and the electronics inside the housing. Do not soak the receiver in excessive amounts of water. Page 28


32 Radio frequency Water resistant Temperature range Telemetry Power Battery life Screen 915MHz IP65-4 to 140 F 4 radio channels with range up to 3000 feet Rechargeable lithium batteries Up to 50 hours Industrial rated LCD graphic display Dimensions 7.5 x 5 x 7.5 Weight Mag D3 and D6 3.3 pounds Power key: Up key: Down key: Confirm key: Setup key: Press and hold to turn on or off. Tap to select level of backlight. Move to previous cursor selection. Move to next cursor selection. Tap to confirm cursor selection. Press and hold to enter secondary page. Tap to return to main page. Press and hold to enter setup page. Page 29
 Transmitter battery status Distance between transmitter and receiver Transmitter")
33 Transmitter model and frequency Transmitter signal strength Signal to noise ratio bar and noise number Transmitter temperature (Flashing indicates transmitter is over-heating) Transmitter battery status Distance between transmitter and receiver Transmitter pitch Page 30

34 To enter the Secondary Page, press and hold Transmitter model, frequency, and power Display battery status Radio channel B4: Radio channel selection B5: Receiver and display pairing B7: Pitch unit selection B10: Visibility control B11: System info B12: Display communication mode B13: Distance unit selection B14: Down hole Echo mode change Page 31
35 (Mag 6S only: Echo 2S and Echo 3) 1. Press and hold to enter Setup Page. Tap to enter Down Hole Echo Mode Change Page. 2. Use or to select desired frequency and power levels. Tap to begin mode change process. Roll indicator Target dot Steps remaining Instructions Hold: hold this roll position until it counts down to 0 Page 32 Proceed: time left to proceed in process by rotating to new roll position in sequence

36 Rotate drill head until roll indicator points toward target dot. Instructions will change from the clockwise arrow to STOP. Hold this position until H counts down to 0. Rotate drill head to next position in sequence before P counts down to 0 or the sequence will be canceled. If the next step has the target dots in the same place as the previous step, rotate the drill head one entire rotation until the roll indicator lines up with the target dots again. Once all six steps of the sequence are complete, change the Transmitter Settings on the receiver to match the new frequency and power levels. Page 18 Page 33

37 1. Press and hold to enter Setup Page. Tap to enter Radio Channel Page. 2. Use to select radio channel. 3. Tap to return to Main Page. Page 34
 3. Pairing complete. 4.")
38 1. Press and hold to enter Setup Page and tap to select B5 icon. Tap to enter Radio Registration Page. 2. Tap to start pairing. (It is required that the following procedure is performed on the receiver at the same time) 3. Pairing complete. 4. Tap to return to Main Page. Page 35


39 1. Press and hold to enter Setup Page and tap to select B7 icon. Tap to enter Pitch Unit Selection Page. 2. Tap to switch pitch mode. 3. Tap to return to Main Page. Page 36
40 1. Press and hold to enter Setup Page. Tap to select B13 icon. 2. Tap to enter Distance Unit Selection Page. Tap or to select unit and format. 3. Tap to return to Main Page. Page 37


41 1. Press and hold to enter Setup Page and tap to select the B10 icon. Tap to enter Visibility Control Page. 2. Tap and to adjust. 3. Tap to return to Main Page. Note: By holding both and at the same time while turning the receiver on, the visibility control will reset to normal visibility. Page 38
42 1. Press and hold to enter Setup Page and tap to select B12 icon. Tap to enter Communication Mode Page. 2. The default communication mode will be wireless communication. 3. Press to switch to cable mode. 4. Tap to return to Main Page. Page 39
43 The display uses rechargeable lithium batteries. The display will automatically shut off if no key is pressed for over a period of 20 minutes or if there is no information received from the receiver. It is strongly recommended that the batteries are taken out of the display if it is not being used for a long period of time to avoid potential corrosion. The display is an electronic measurement device. Severe shock and impact can damage the housing and the electronics inside the housing. Keep the display away from excessive heat to avoid damages to the plastic housing and electronics inside the housing. Do not submerge the display in excessive amounts of water. Page 40

, normal C cell batteries will experience battery chatter.")
 Weight Dimensions 1.5lbs 1.")

44 The transmitter provides drill head temperature, clock position, pitch, battery status and locating signal. The transmitter transmits signals at 4 khz, 19 khz or 30 khz. The transmitter will enter a sleep mode after 15 minutes without rotation. It takes 10 seconds to wake up once the transmitter is rotated. Note: If drilling in adverse soil conditions (i.e. rock), normal C cell batteries will experience battery chatter. This can greatly reduce battery life. To prevent this, use your provided double C lithium cell battery instead. Echo 1 (Mag 3S and 6S) Weight Dimensions 1.5lbs 1.25 x 15 length Frequency Depth Range Power Roll Pitch C cell Echo Cell Kit Lithium* 4kHz/19kHz/30kHz 90ft/130ft/130ft 2 C cells, Echo Cell Kit, or Lithium Battery 3V, 12 hours of continuous usage 3V, 20 hours of continuous usage 3V, 48 hours of continuous usage 24 transmitter roll positions 0.1% resolution Temperature Under 185 F Page 41
45 Weight Dimensions Frequency Depth Range Power Roll Pitch Echo 2S (Mag 6S) Echo Cell Kit Lithium* 1.5lbs 1.25 x 15 length 4kHz/19kHz/30kHz 90ft/130ft/130ft Echo Cell Kit or Lithium Battery 3V, 20 hours of continuous usage 3V, 48 hours of continuous usage 24 transmitter roll positions 0.1% resolution Temperature Under 185 F High Power Modes Down Hole Mode Change 19kHz and30khz depth range of 160ft Operating time is 5 hours for Echo Cell Kit and 12 hours for lithium battery Able Page 32 Page 42
46 Weight Dimensions Frequency Depth Range Power Roll Pitch Echo Cell Kit Lithium* Echo 3 (Mag 6S) 2lbs 1.25 x 19 length 4kHz/19kHz/30kHz 90ft/130ft/130ft 2 Echo Cell Kits or 2 Lithium Battery Packs 3V, 50 hours of continuous usage 6V, 160 hours of continuous usage 24 transmitter roll positions 0.1% resolution Temperature Under 185 F Power + Mode Down Hole Mode Change 19kHz and30khz depth range of 190ft Operating time is 12 hours for Echo Cell Kit and 40 hours for lithium batteries Data update is slower but range is longer Able Page 32 Page 43
47 Echo 1 19kHz (Mag 3S and 6S) Weight Dimensions Frequency Depth Range Power Roll Pitch 1.5 pounds 1.25 x 15 length 19kHz 130 feet 2 C-cells 12 hours, Echo Cell Kit 20 hours, Lithium Battery Pack 48 hours 24 transmitter roll positions 0.1% resolution Temperature Under 185 F Echo 1 30kHz (Mag 3S and 6S) Weight Dimensions Frequency Depth Range Power Roll Pitch 1.5 pounds 1.25 x 15 length 30kHz 130 feet 2 C-cells 12 hours, Echo Cell Kit 20 hours, Lithium Battery Pack 48 hours 24 transmitter roll positions 0.1% resolution Temperature Under 185 F Weight Dimensions Frequency Depth Range Power Roll Pitch Echo ST (Mag 3S and 6S).5 pounds.94 x 6 length 30kHz 60 feet 1 3V lithium battery 24 transmitter roll positions 0.1% resolution Temperature Under 185 F Page 44
48 Pitch: From -100% to +100% with 0.1% resolution within the range of -45% to +45% and 1.0% resolution outside of that range. Roll: 24 transmitter roll positions Battery: Install batteries positive side down and install battery cap with provided battery cap tool. C cell: Battery full, 2/3 full, 1/3 full and flash warning Lithium: Will show battery full then flash warning Temperature: When the transmitter is overheating, temperature indication in the receiver s display flashes. If temperature reaches over 185 F (120 C), transmitter may be permanently damaged. If this happens, the dot temperature indicator on the front of transmitter will turn black. Do not place the transmitter near excessive temperature (over 185 F/120 C). Do not apply excessive pressure, shock or vibration on the transmitter. Take the battery out of the transmitter after use. Clean the spring and cap on the battery compartment when necessary. Regularly check the sealing ring on the battery cover. Replace if necessary. Page 45


 behind the transmitter and the")


49 One major advantage of the Mag 3S & 6S systems is their simplicity. Once the receiver and transmitter are paired, the operator is not required to push any buttons to pinpoint the location, direction or depth of the transmitter. The Mag 3S or 6S receiver locates the transmitter by pinpointing three specific locations along the transmitter s magnetic field. The front locate point (FLP) ahead of the transmitter, the rear locate point (RLP) behind the transmitter and the locate line (LL) above the transmitter. For the most accurate location and depth of the transmitter, both the FLP and the RLP should be located before locating the LL. The front and rear locate points, when lined up, indicate the exact direction of the transmitter. If the transmitter is level, the locate line will be located directly in-between the two points. Side view Page 46
50 The Locate Line does not equal the location of the transmitter. The Locate Line extends left and right of the transmitter. Think of the transmitter as an airplane. The FLP is the nose and the RLP is the tail. You can locate the LL left and right of the body, but that is not the center of the transmitter. This is why you must locate both the FLP and RLP before the LL to get the most accurate depth and location. Top view Page 47

51 Receiver view Actual position of receiver to transmitter In this scenario the transmitter is behind you and you are walking toward the FLP. Notice how the arrow that indicates the nearest locate point is slightly to the right and has a narrow base. Its position lets you know the FLP s right-left information relative to the receiver. The width of the base lets you know how close or far the FLP is from you. A skinnier base means you are further away, and completely filled in base means you re about to cross the FLP. Page 48
52 Walk forward until the base of the arrow is fully filled in. Bore Path Drill Rig Receiver view Actual position of receiver to transmitter Notice how the Locate Line was replaced with a ball. The ball represents the FLP and appears when you are near it. It will slide along the horizontal axis of the cross hairs to give you the FLP s right-left location. Where the cross hairs meet represents the receiver, the ball represents the FLP s position relative to the receiver, and the arrow represents the direction and nearness of the FLP, you can now see that you are about to cross over the FLP and that it is to your right. Page 49
53 Walk forward until the arrow shows two arrows on screen or flips. Then walk to the right to center the ball in the cross hairs. This is the exact location of the FLP. Notice the line that is now on top of the ball. This is for single point locating and will be addressed later. Bore Path Drill Rig Receiver view Actual position of receiver to transmitter Page 50


54 Steps to locate RLP 1. Move the receiver back toward the drill until the arrow flips as shown in the receiver view below. The ball will have disappeared, and the LL indicator will have replaced it. When the arrow flips and the LL indicator lines up with the horizontal axis, you have crossed the LL. Receiver view Actual position of receiver to transmitter Page 51
55 2. Continue to move back toward the drill. Watch the base of the arrow grow wider to indicate how close you are to the RLP. Once the base is completely full and the arrow either flips, or two arrows appear on the screen, you have crossed the RLP. 3. Fine tune the left-right position of the RLP by putting the ball in the cross hairs. This is the RLP. Receiver view Actual position of receiver to transmitter Page 52
56 Now that the FLP and RLP have been marked, you re ready to locate the transmitter. Steps to Locate LL 1. From the RLP walk toward the FLP. The ball will be replaced by the LL indicator, which will start to center as shown on the receiver view below. Actual position of receiver to transmitter Receiver view Actual position of receiver to transmitter 2. Once the LL is centered and the arrow flips, as shown below, you are directly over the head and you may mark the location and note depth. Page 53
57 Receiver view Actual position of receiver to transmitter Page 54
58 Tracking on the fly may be used once the bore path is established and level. This tracking method will increase locating speed and in turn the speed at which the bore can be completed. As long as the FLP remains on target, there is no need to find the RLP on every rod. If steering is required, a quick look at both the RLP and the FLP will ensure the transmitter is still on target. While tracking on the fly using 10 drill pipes the operator should walk forward from the last FLP approximately 10 and place the receiver down in line with the path created by the RLP and the FLP. While the drill operator is drilling toward the receiver, wait for the arrow to flip. You are within inches of the new FLP, put the ball in the cross hairs and mark the new FLP. Now simply walk back to the LL being careful to stay in line with your last FLP and mark the new location of the transmitter and record the depth. Refer to diagram on the next page. Page 55
59 10 Wait for FLP to come to you Note: Ignore the LL indicator until you are over the transmitter. It s only purpose when not over the transmitter is to show that you are not close enough to a locate point for the ball to appear. Do not use it to estimate the location of the transmitter when not over or very near to the drill head. Page 56


60 To switch the receiver to Bore-To mode, tap the from the main page. To return to Walkover mode, simply tap again. The display screen on both the receiver and the remote display will look like the screen to the right. Receiver Bore head/ Transmitter Depth over the head Right/left information Horizontal distance from transmitter to receiver Projected depth Projected Depth Projected depth tells you what depth the head will be at when it reaches the receiver if the operator maintains the indicated pitch. Page 57
61 The Bore-To feature on the Mag 6S is very powerful. Operators can expect to receive good right-left steering, pitch, and roll information as far out as 100ft. It is important to note that the depth is only a reference. As distance between the transmitter and receiver decreases, the accuracy increases. Never cross existing utilities while in the Bore-To mode. Expose and verify visually while crossing utilities. For best Bore-To results, the operator should locate up to the area that can t be walked over and mark both the FLP and RLP* before moving the receiver to the other side. Receiver should always face away from the drill rig Once on the other side, place the receiver directly in-line and proceed with drilling using the right-left steering bar to keep the bore path in-line. *It is best to place an object, like a traffic cone, at both the front and rear locate points so that a visual alignment can be viewed. Page 58

62 Single Point Locating is the newest and most efficient way to locate the drill head. Simply walk forward until the base of the arrow fills in completely and the ball appears on screen. Once the arrow flips, place the ball in the cross hairs. FLP FLP FLP LL LL LL RLP RLP RLP Notice that the ball has a line on top. This is the point in Single Point. The line points in the direction that the transmitter is pointing in. You now have the location of the FLP and the direction of the transmitter. Switch to Bore-To mode, walk a bore s length forward in line with the point and wait for the FLP to come to you. Continue moving forward and locating the FLP to locate with just a single point. Page 59
63 Mag receivers use lithium rechargeable batteries. This lithium rechargeable battery comes with a special charger. Any use of other lithium rechargeable battery or charger for the receiver may cause fire, explosion, leaking or other damages. Store the battery at the room temperatures; F (15-25 C). Extreme high or low temperatures will shorten the battery life. Do not submerge the battery in water or any other liquids. Do not throw the battery into fire. Do not disassemble the battery. Avoid any kind of damage to the battery. Please dispose of lithium properly. When charging the battery, the red light will shine. When charging is complete, a green light will shine. Underground Magnetics offers standard warranty on parts and labor for all Mag series locating systems and transmitters. Please contact our offices for more details on warranty periods. Page 60
64
1: Introduction : Caution : Tips for Reading this Manual : Preface : System Highlights : Receiver
 1: Introduction....1 1 2: Caution.... 2 2 3: Tips for Reading this Manual....3 3 4: Preface....4 4 5: System Highlights....6 6 6: Receiver..7 7 6.1: Specifications......7 7 6.2: Receiver Operation... 7
Instruction Manual. for Media Monkey. 1
 TM TM Instruction Manual for Media Monkey www.audioaperemote.com 1 Congratulations on acquiring your fine Audio Ape product Let s dive right in, getting up and running is a snap. Here are the components:
RF (RADIO FREQUENCY) WIRELESS PENDANT
 WIRELESS PENDANT") NOTE: The following information is an addition to the Operation section in the lift system owner s manual. It describes the RF wireless pendant for your lift system. You must read the lift system owner
NOTE: The following information is an addition to the Operation section in the lift system owner s manual. It describes the RF wireless pendant for your lift system. You must read the lift system owner
Model: WS-7014CH-IT Instruction Manual DC: WIRELESS FORECAST STATION
 Model: WS-7014CH-IT Instruction Manual DC: 081815 WIRELESS FORECAST STATION Date Time + WWVB Indoor Temperature, Humidity + Comfort Forecast + Tendency Outdoor Temperature ºF/ºC + Channel Indicator Base
Remote Control Outlets Operating Instructions
 Remote Control Outlets Operating Instructions - FOR INDOOR OR OUTDOOR USE - IMPORTANT SAFEGUARDS Signal Word Definitions NOTE: These are general definitions only; all may not pertain to the actual product
METAL DETECTOR INSTRUCTION GUIDE
 METAL DETECTOR INSTRUCTION GUIDE SET UP STEP 1. STEP 2. Your NATIONAL GEOGRAPHIC detector requires no assembly or tools. Simply remove the detector from the box. Press down the red UNLOCK button on both
R PROFLAME Instruction Book Collection
 9.956.028 R00 584 PROFLAME Instruction Book Collection 4-17 18-29 584 PROFLAME System 30-39 Appendix: DIP SWITCH NUMBER (0=ON 1=OFF) 40-41 4-17 Fig. 1 The SIT is a device that allows, in conjunction with
USER MANUAL Digital Wireless Gateway U9120-W4 (P/N: 44002G-01)
") USER MANUAL Digital Wireless Gateway U9120-W4 (P/N: 44002G-01) 19549P-82 (11-16) 2016 DAVID CLARK COMPANY INCORPORATED Cautions and Warnings READ AND SAVE THESE INSTRUCTIONS. Follow the instructions in
USER MANUAL Digital Wireless Gateway U9120-W4 (P/N: 44002G-01) 19549P-82 (11-16) 2016 DAVID CLARK COMPANY INCORPORATED Cautions and Warnings READ AND SAVE THESE INSTRUCTIONS. Follow the instructions in
Ambient Weather WS-0270 Wireless Indoor / Outdoor Thermometer with Indoor Humidity User Manual
 Ambient Weather WS-0270 Wireless Indoor / Outdoor Thermometer with Indoor Humidity User Manual Table of Contents 1 Introduction... 1 2 Getting Started... 1 2.1 Parts List... 2 2.2 Recommend Tools... 2
USER MANUAL. Sens it SENS IT 2.4
 USER MANUAL www.sensit.io Sens it SENS IT 2.4 SUMMARY SAFETY INSTRUCTIONS 4 I. CONTENT OF THE PACK 4 II. PRESENTATION 5 III. HOW TO START 8 IV. TECHNICAL SPECIFICATIONS 9 V. WARNING STATEMENTS 10 VI. CREDITS
Wireless Rain Station
 Wireless Rain Station For online video support: http://bit.ly/laxtechtalk Instructional Manual Model: T84237 DC:102017 Table of Contents 1 Button Function Explanation 8 NOW Rainfall Alert (silent) 2 Setup
Ambient Weather F007TP 8-Channel Wireless Probe Thermometer User Manual
 Ambient Weather F007TP 8-Channel Wireless Probe Thermometer User Manual Table of Contents 1 Introduction... 2 2 Getting Started... 2 2.1 Parts List... 2 2.2 Probe Thermometer Sensor Set Up... 2 3 Remote
Wireless Pressure Station with Backlight
 Wireless Pressure Station with Backlight FORECAST RELATIVE PRESSURE PRESSURE HISTORY inhg -24h -18h -12h -9h- 6h -3h0 h INDOOR For online video support: http://bit.ly/laxtechtalk Model: 308-1417BL DC:
Ambient Weather F007PF 8-Channel Wireless Water Thermometer User Manual
 Ambient Weather F007PF 8-Channel Wireless Water Thermometer User Manual Table of Contents 1 Introduction... 2 2 Getting Started... 2 Parts List... 2 2.1 Water Thermometer Sensor Set Up... 2 3 Glossary
Wireless Color Weather Station
 Wireless Color Weather Station INSTRUCTION MANUAL MODEL: C85845V3 DC: 120518 FIND MANUALS, FAQS, AND MORE UNDER THE SUPPORT TAB HERE: bit.ly/c85845v3 TABLE OF CONTENTS 3. Power Up 3. LCD Features 4. Buttons
Quick Start Guide. Antenna Alignment Tool AIMWLLR0-35. QSG rev 7 AIMWLLR0-35 [NRB-0200] QSG.indd 1
![Quick Start Guide. Antenna Alignment Tool AIMWLLR0-35. QSG rev 7 AIMWLLR0-35 [NRB-0200] QSG.indd 1](/thumbs/86/94268876.jpg "Quick Start Guide. Antenna Alignment Tool AIMWLLR0-35. QSG rev 7 AIMWLLR0-35 [NRB-0200] QSG.indd 1") Quick Start Guide Antenna Alignment Tool AIMWLLR0-35 QSG-00097 rev 7 AIMWLLR0-35 [NRB-0200] QSG.indd 1 Welcome This quick start guide is designed to familiarize you with the features and use of the NetComm
Quick Start Guide Antenna Alignment Tool AIMWLLR0-35 QSG-00097 rev 7 AIMWLLR0-35 [NRB-0200] QSG.indd 1 Welcome This quick start guide is designed to familiarize you with the features and use of the NetComm
Radio Micro Force Manual v1.1
 Radio Micro Force Manual v1.1 Preston Cinema Systems 1659 Eleventh Street Santa Monica CA 90404 tel 310-453-1852 fax 310-453-5672 www.prestoncinema.com Table of Contents 1. Description 2. Operation 3.
Wireless Pressure Station
 Wireless Pressure Station FORECAST RELATIVE PRESSURE PRESSURE HISTORY inhg -24h -18h -12h -9h- 6h -3h0 h INDOOR For online video support: http://bit.ly/laxtechtalk Model: 308-1417 DC: 111517 Table of Contents
WEATHER IN MOTION Model: BAR200 / BAR200U / BAR200A USER MANUAL
 WEATHER IN MOTION Model: BAR200 / BAR200U / BAR200A USER MANUAL Eu-declaration Of Conformity... 7 Fcc Statement... 8 Declaration Of Conformity... 8 EN CONTENTS Introdction... 2 Overview... 2 Front View...
User s Manual. Magical Learn & Go. Disney Visit the Disney website at DisneyPrincess.com 2010 VTech Printed in China
 User s Manual Magical Learn & Go 4-7 Years Disney Visit the Disney website at DisneyPrincess.com 2010 VTech Printed in China 91-002484-001-000 INTRODUCTION Thank you for purchasing the VTech Magical Learn
USER MANUAL MODEL: BM-162
 USER MANUAL MODEL: BM-162 Parents Unit: A. Name Power ON/OFF Key Music Key PTT Key Volume - Key Microphone Power & Low battery indicator LCD display Volume + Key Night Light and torch Key Speaker -Belt
Radio Controlled timekeeping. Receives 60KHz WWVB signal transmitted by NIST in Fort Collins, Colorado
 Congratulation on your purchase of an Atomix Radio Controlled clock. Radio Controlled technology allows for the most accurate time keeping available as well as automatic changes for Daylight Saving Time
Contents. Page English 1. French. Spanish. Reset of MIN/MAX records 915 MHz Reception Mounting Care and Maintenance Warranty Information
 Contents Language Page English 1 French Spanish WIRELESS 915 MHz TEMPERATURE STATION Instruction Manual TABLE OF CONTENTS Topic Page Inventory of Contents Features Setting Up Battery Installation Function
User's Guide. Pinless Moisture/Humidity Meter with IR Thermometer + Bluetooth. Model MO297
 User's Guide 99 Washington Street Melrose, MA 02176 Phone 781-665-1400 Toll Free 1-800-517-8431 Visit us at www.testequipmentdepot.com Pinless Moisture/Humidity Meter with IR Thermometer + Bluetooth Model
USER MANUAL Universal Gateway U9921-GUV (P/N: 40994G-01)
") USER MANUAL Universal Gateway U9921-GUV (P/N: 40994G-01) 2012 DAVID CLARK COMPANY INCORPORATED Cautions and Warnings READ AND SAVE THESE INSTRUCTIONS. Follow the instructions in this installation manual.
USER MANUAL Universal Gateway U9921-GUV (P/N: 40994G-01) 2012 DAVID CLARK COMPANY INCORPORATED Cautions and Warnings READ AND SAVE THESE INSTRUCTIONS. Follow the instructions in this installation manual.
CCR24T CCR24R. User s Guide WIRELESS TRANSMITTER SYSTEM WARRANTY SERVICE CARD WARRANTY CARD
 WARRANTY SERVICE CARD WARRANTY CARD PRODUCT NAME Wireless Transceiver System PERIOD MODEL NAME CCR24GEN YEAR PURCHASE DATE.. 200_ From the date of WARRANTY PERIOD.. 200_ purchase. CUSTOMER S ADDRESS :
Ambient Weather WS-40 Wireless Indoor / Outdoor Thermometer
 Ambient Weather WS-40 Wireless Indoor / Outdoor Thermometer Table of Contents 1. Introduction... 1 2. Getting Started... 1 2.1 Parts List... 1 2.2 Thermometer Sensor Set Up... 1 2.3 Display Console Set
WVP. Wireless Valve Programmer. Programmer for use with WVC Multi-Station Battery Powered Irrigation Controllers
 WVP Wireless Valve Programmer Programmer for use with WVC Multi-Station Battery Powered Irrigation Controllers Owner s Manual and Installation Instructions TABLE OF CONTENTS... Introduction...1 WVP Components...2
HORNET Remote Control Systems
 HORNET Remote Control Systems Up to 100metres Range 1 3 Button versions 12-30Vdc 0r 230Vac versions Reliable FM Technology Up to four 1000W Relay switches Waterproof Receiver (IP68) Momentary or Latching
Schlage Control Smart Locks
 Schlage Control Smart Locks with Engage technology User guide Schlage Control Smart Locks with Engage technology User Guide Contents 3 Warranty 4 Standard Operation 4 Operation from the Inside 4 Operation
User Manual Digital Wireless Rain Gauge
 Rain Gauge Specifications: User Manual Digital Wireless Rain Gauge - Outdoor rain gauge transmitter measures the rainfall and transmits the data to an indoor rain monitor base unit which shows the rainfall
Multi-Channel In-Out Thermometer with Cable Free Sensor and RF Clock
 Multi-Channel In-Out Thermometer with Cable Free Sensor and RF Clock MAIN FEATURES: MAIN UNIT GB MODEL: RMR182 USER'S MANUAL INTRODUCTION Congratulations on your purchase of the RMR182 Multi- Channel In-Out
Ambient Weather F007TH Wireless Thermo-Hygrometer User Manual
 Ambient Weather F007TH Wireless Thermo-Hygrometer User Manual Table of Contents 1 Introduction... 2 2 Getting Started... 2 2.1 Parts List... 2 2.2 Thermo-Hygrometer Sensor Set Up... 2 3 Remote Sensor Installation...
Model: WS-9066U-IT Instruction Manual DC: Wireless Weather Station with Moon Phase
 Model: WS-9066U-IT Instruction Manual DC: 051716 Wireless Weather Station with Moon Phase Contents Initial Setup... 2 Moon Phase... 2 Buttons... 2 LCD Features... 3 Settings Menu... 3 MIN/MAX Temperature
WIRELESS TEMPERATURE S TATION I NSTALLATION MANUAL
 Wireless Temp Page 1 Thursday, December 7, 2000 2:09 PM WIRELESS TEMPERATURE S TATION I NSTALLATION MANUAL The Wireless Temperature Station is for use with Wireless Vantage Pro TM. COMPONENTS The Wireless
Product Manual. Getting Started with Roadie 2.
 MOL NUMBER RD200 Product Manual Getting Started with Roadie 2. This manual is a quick start guide for Roadie 2. Please read the following instructions and conditions before using Roadie 2. For a more comprehensive
WPR400 Wireless Portable Reader
 P516-098 WPR400 Wireless Portable Reader User guide Para el idioma español, navegue hacia www.schlage.com/support. Pour la portion française, veuillez consulter le site www.schlage.com/support. Contents
Focus Iris Manual Ver 1.1
 Focus Iris Manual Ver 1.1 Preston Cinema Systems 1659 Eleventh Street Santa Monica CA 90404 tel 310 453 1852 fax 310 453 5672 www.prestoncinema.com Table of Contents 1. Description 2. Operation 3. Specifications
SwingTracker User Guide. Model: DKST02 User Guide
 SwingTracker User Guide Model: DKST02 User Guide PACKAGE CONTENTS What Comes in the Box USING YOUR SWINGTRACKER SENSOR Attach SwingTracker Sensor to your Bat Turn On your Sensor Pair your Sensor Remove
USER GUIDE GREG KOCH GRISTLE-TONE PICKUP SET FOR TELECASTER. Telecaster is a registered trademark of Fender Musical Instruments (FMIC)
") USER GUIDE GREG KOCH GRISTLE-TONE PICKUP SET FOR TELECASTER Telecaster is a registered trademark of Fender Musical Instruments (FMIC) Welcome Thank you for making Fishman products a part of your musical
USER GUIDE GREG KOCH GRISTLE-TONE PICKUP SET FOR TELECASTER Telecaster is a registered trademark of Fender Musical Instruments (FMIC) Welcome Thank you for making Fishman products a part of your musical
HY737 Walkie talkie for kids
 HY737 Walkie talkie for kids ANTENNA SWITCH, VOLUME KNOB RED STATUS LIGHT MIC SPEAKER WWW.THEIPAR.CC WILLIAMWANG18@OUTLOOK.COM FCC ID: 2AJEM-HY737 ANTENNA ANTENNA SWITCH, VOLUME KNOB BELT BUCKLE PUSH TO
RCR-24 中文 GB. Version 1
 RCR-24 中文 GB Version 1 GB Please note not all AC adapters are alike. The AC adapter that is included with this radio is designed to be used exclusively with this device. Do not use an AC adapter that differs
Thermo Bluetooth-enabled Thermometer. Model: EMR211 USER MANUAL CONTENTS
 Weather@Home Thermo Bluetooth-enabled Thermometer CONTENTS Model: EMR211 USER MANUAL Introduction... 2 Overview... 2 Front view... 2 Rear view... 2 Remote Sensor (THN132N)... 3 Getting started... 3 Insert
Learn & Go. User s Manual. c 2013 VTech Printed in China US
 Learn & Go User s Manual 2013 Viacom International Inc. All Rights Reserved. Nickelodeon, Nick Jr., Dora the Explorer and all related titles, logos and characters are trademarks of Viacom International
Thermo Plus Bluetooth-enabled Thermo-Hygro Monitor Model: RAR213HG USER MANUAL
 Weather@Home Thermo Plus Bluetooth-enabled Thermo-Hygro Monitor Model: RAR213HG USER MANUAL EN Weather@Home Thermo Plus Bluetooth-enabled Thermo-Hygro Monitor Model: RAR213HG Contents USER MANUAL Introduction-----------------------------------------------------------------3
Weather Forecast Station with Atomic Time Model: BAR206 / BAR206A
 Weather Forecast Station with Atomic Time Model: BAR206 / BAR206A EN USER MANUAL CONTENTS Overview... 2 Front View... 2 Back View... 2 Remote Sensor... 3 Getting Started... 3 Insert Batteries... 3 Remote
On-Line Cardio Theater Wireless Digital Transmitter Installation and Instruction Manual
 On-Line Cardio Theater Wireless Digital Transmitter Installation and Instruction Manual Full installation instructions accompany your Cardio Theater equipment order. This On-Line version of our Installation/Instruction
Radio Link Starter Kit
 Radio Link Starter Kit Installation Manual BARTLETT Instrument Co. 1032 Avenue H Fort Madison, IA 52627 319-372-8366 www.bartinst.com Table of Contents Radio Link Starter Kit Manual... 3 System Requirements...
Connevans.info. DeafEquipment.co.uk. This product may be purchased from Connevans Limited secure online store at
 Connevans.info Solutions to improve the quality of life Offering you choice Helping you choose This product may be purchased from Connevans Limited secure online store at www.deafequipment.co.uk DeafEquipment.co.uk
AM/FM ARMBAND RADIO WITH CLOCK AND ALARM SAB-55A USER MANUAL
 AM/FM ARMBAND RADIO WITH CLOCK AND ALARM SAB-55A USER MANUAL PLEASE READ THIS USER MANUAL COMPLETELY BEFORE OPERATING THIS UNIT AND RETAIN THIS BOOKLET FOR FUTURE REFERENCE. A IMPORTANT SAFETY INFORMATION
3301 INSTALLATION AND OPERATING INSTRUCTIONS
 DOWN Cover Closed MODE UP Cover Open DOWN MODE TIMER TIME SET UP 3301 INSTALLATION AND OPERATING INSTRUCTIONS INTRODUCTION This SKYTECH remote control system was developed to provide a safe, reliable,
Radio Link Starter Kit
 Radio Link Starter Kit Installation Manual BARTLETT Instrument Co. 1032 Avenue H Fort Madison, IA 52627 319-372-8366 www.bartinst.com Table of Contents Radio Link Starter Kit Manual... 3 System Requirements...
Ditch Witch 750 Tracker Specs Provided by FOREWORD
 750/752 Display - FOREWORD 1 Ditch Witch 750 Tracker Specs Provided by www.aaatesters.com FOREWORD This manual is an important part of your equipment. It provides safety information and operation instructions
Atomic Forecast Station with Moon Phase
 Atomic Forecast Station with Moon Phase For online video support: http://bit.ly/laxtechtalk Model: S84107 Instruction Manual DC: 080817 Welcome to the La Crosse Technology family! We hope you enjoy your
18 Indoor/Outdoor Atomic Wall Clock
 Model: WT-3181 Instruction Manual DC: 062915 18 Indoor/Outdoor Atomic Wall Clock Get Started Step 1: Remove the round battery cover from the back of the clock. Step 2: Insert 1 fresh AA, LR6 1.5 volt ALKALINE
SKY-6601 INSTALLATION AND OPERATING INSTRUCTIONS
 SKY-6601 INSTALLATI AND OPERATING INSTRUCTIS INTRODUCTI This SKYTECH remote control system was developed to provide a safe, reliable, and user-friendly remote control system for gas heating appliances.
Wireless TFT LCD Monitor
 Wireless TFT LCD Monitor Description Screen Ratio: 16 : 9 Resolution: 800*RGB*480 TV: PAL / NTCS Voltage: 10--28V Rated Capacity: 5W Brightness: 450cd/m2 Contrast: 450:1 Operate temperature: -20~65 Display
INSTRUCTION MANUAL LCS TX
 INSTRUCTION MANUAL LCS TX 4 Channel Transmitter LCS1 Single Channel Transmitter Cardio Theater Inc Service 1-800-776-6695 Sales 1-800-CARDIO-1 1 Introduction CONGRATULATIONS on your choice of this product
XD-V70 Wireless Receiver
 XD-V70 Wireless Receiver Pilot s Handbook Manuel de pilotage Pilotenhandbuch Pilotenhandboek Manual del Piloto 取扱説明書 See www.line6.com/manuals for Advance Guide Advanced Users Guide available @ www.line6.com/manuals
USER GUIDE GREG KOCH GRISTLE-TONE PICKUP SET FOR TELECASTER
 USER GUIDE GREG KOCH GRISTLE-TONE PICKUP SET FOR TELECASTER Telecaster is a registered trademark of Fender Musical Instruments Corporation (FMIC) fishman.com Welcome Thank you for making Fishman products
Driveway Alarm INSTALLATION MANUAL
 WIRELESS ACCESS CONTROLS Driveway Alarm INSTALLATION MANUAL Mounting post Transmitter Receiver Transformer Sensor Kit Includes: Transmitter Module Sensor Receiver Transformer Mounting post (3 pieces) Installation
Schwinn MPower Echelon Console + Power
 Schwinn MPower Echelon Console + Power 2013 Core Fitness, LLC, dba StairMaster. All rights reserved. and indicates a trademark or registered trademark. Core Fitness, LLC trademarks include Schwinn, A.C.,
WS-9006U Wireless Temperature Station
 WS-9006U Wireless Temperature Station Instruction Manual RF reception indicator Outdoor Temperature Indoor Temperature Time Outdoor Temperature Sensor TX43U MIN/MAX/+ Button CF / SET Button FEATURES: Four
SP GHz Digital Wireless Speakers. User s Manual. Please read before using the equipment. Please visit for details.
 SP1390 2.4GHz Digital Wireless Speakers User s Manual Please read before using the equipment. Please visit www.promowide.com for details. INTRODUCTION This 2.4G digital wireless speakers system uses latest
900 MHz Digital Wireless Indoor/Outdoor Speakers
 4015007 900 MHz Digital Wireless Indoor/Outdoor Speakers User s Manual This 900 MHz digital hybrid wireless speaker system uses the latest wireless technology that enables you to enjoy music and TV sound
System Requirements: D-Link Systems, Inc.
 System Requirements: Minimum System Requirements: CD-ROM Drive Computers with Windows, Macintosh, or Linux-based operating systems Installed Ether net Adapter Internet Explorer version 6.0 or Netscape
XD-V30 Digital Wireless System
 XD-V30 Digital Wireless System Pilot s Handbook Manuel de pilotage Pilotenhandbuch Pilotenhandboek Manual del Piloto 取扱説明書 See www.line6.com/manuals for Advance Guide 40-00-0286 Advanced Users Guide available
StealthLock is designed to install and program easily and offers: StealthLock is recommended for use on cabinets made from:
 Instruction Manual Thank you for purchasing StealthLock. StealthLock is an innovative solution for keyless invisible security. Using radio frequency technology, StealthLock allows you to secure almost
ON!Track smart tag AI T380. English. Printed: Doc-Nr: PUB / / 000 / 02
 ON!Track smart tag AI T380 English 1 Information about the documentation 1.1 About this documentation Read this documentation before initial operation or use. This is a prerequisite for safe, trouble-free
9RCT4334 Four Button. 2 3/4 X 1 3/8 X 9/16 (70mm x 35mm x 14mm) 2 3/4 x 2 1/8 x 1 (70mm x 55mm x 25mm)
 2 3/4 x 2 1/8 x 1 (70mm x 55mm x 25mm)") INSTALLATI 9RCR433/9RCT433 433MHz Transmitters & Receiver Description The 433MHz Series Transmitters and Receiver are ideal for the wireless activation and/or sequencing of automatic doors and remote access
INSTALLATI 9RCR433/9RCT433 433MHz Transmitters & Receiver Description The 433MHz Series Transmitters and Receiver are ideal for the wireless activation and/or sequencing of automatic doors and remote access
WS-7220U-IT 915 MHz Wireless Weather Station. Instruction Manual
 WS-7220U-IT 915 MHz Wireless Weather Station Instruction Manual 1 TABLE OF CONTENTS Introduction..3 Inventory of Contents 4 Quick Set Up 4 Detailed Set Up 4-5 Battery Installation....4-5 12 or 24 Hour
User s Manual. Twist & Learn Gorilla Pals VTech
 User s Manual Twist & Learn Gorilla Pals 2009 VTech 91-101800-000-000 INTRODUCTION Thank you for purchasing the VTech Jungle Gym Twist & Learn Gorilla Pals! The VTech Jungle Gym Twist & Learn Gorilla
TV Transmitter. User Guide Master
 TV Transmitter User Guide Master Content Before you start 3 Included in delivery 4 Components 4 Getting started 5 Connecting to power supply 5 Connecting to audio devices 6 Pairing the transmitter 7 Daily
Dual Alarm Clock Radio with Digital Tuning NRC-174. Instruction Manual Please read carefully before use and keep for future reference.
 Dual Alarm Clock Radio with Digital Tuning NRC-174 Instruction Manual Please read carefully before use and keep for future reference. Important Safety Information CAUTION RISK OF ELECTRIC SHOCK DO NOT
Blue Point Engineering Inc.
 Engineering Inc. ireless Radio Control of Puppets Setup Overview RF Control C Pointing the ay to Solutions! Hardware Setup Overview Page 1 Servo No.1 Servo No.2 Control Signal Line RX8ch1,2 Servo Board
INSTRUCTION MANUAL VHF FM TRANSCEIVER TK-6110 B (K,K2)
") INSTRUCTION MANUAL VHF FM TRANSCEIVER TK-6110 B62-1216-20 (K,K2) 09 08 07 06 05 04 03 02 THANK YOU! We are grateful you chose KENWOOD for your land mobile applications. We believe this easy-to-use transceiver
INSTRUCTION MANUAL VHF FM TRANSCEIVER TK-6110 B62-1216-20 (K,K2) 09 08 07 06 05 04 03 02 THANK YOU! We are grateful you chose KENWOOD for your land mobile applications. We believe this easy-to-use transceiver
SAFETY INFORMATION IMPORTANT FCC LICENSING INFORMATION
 This device complies with part 15 of the FCC Rules. Operation is subject to the following two conditions: (1) This device does not cause harmful interference, and (2) This device must accept any interference
User s Guide FM Transmitter
 TM 12-634 User s Guide FM Transmitter Please read this user s guide before using your new FM Transmitter. 12-634_en.indd 1 Package contents FM Transmitter USB Cable User s Guide Quick Start IMPORTANT SAFETY
Disclaimers. Important Notice
 Disclaimers Disclaimers Important Notice Copyright SolarEdge Inc. All rights reserved. No part of this document may be reproduced, stored in a retrieval system, or transmitted, in any form or by any means,
Keycards come with an imbedded RFID chip and antenna, there is no battery in the keycards. The keycards are encrypted and only
 Index Keycards 02 The following is a description of the type of Keycards and function 03 Programming and Initialization of the RFID Lock 04 Procedure for Initialization 05 Programming- Adding Keycards
Model: WS-8418U-IT Instruction Manual DC: ATOMIC WALL CLOCK With Moon Phase and IN/OUT Temperature
 Model: WS-8418U-IT Instruction Manual DC: 062915 ATOMIC WALL CLOCK With Moon Phase and IN/OUT Temperature Front Time, Alarm, + WWVB Icon Indoor Temp, Month, Date, + Moon Phase Outdoor Temp + Weekday Buttons
Wireless Z-Wave Control ZRP-100US Z-Wave Repeater USER MANUAL. Introduction
 Wireless Z-Wave Control ZRP-100US Z-Wave Repeater USER MANUAL Introduction Thank you for choosing ZRP-100 Z-Wave Repeater product! ZRP-100 is a Z-Wave repeater with best RF performance to repeat Z-Wave
CRUX II/BTGPS USER GUIDE. Model:D1598
 CRUX II/BTGPS USER GUIDE Model:D1598 0 Federal Communication Commission Interference Statement This equipment has been tested and found to comply with the limits for a Class B digital device, pursuant
Wireless SingStar Microphone Instruction Manual
 Wireless SingStar Microphone Instruction Manual 2008 Sony Computer Entertainment Europe. SingStar is a trademark or a registered trademark of Sony Computer Entertainment Europe. 2, PLAYSTATION and PlayStation
F AN-ASPIRATED W IRELESS T EMPERATURE/HUMIDITY S TATION
 F AN-ASPIRATED W IRELESS T EMPERATURE/HUMIDITY S TATION INSTALLATION MANUAL The Fan-Aspirated Wireless Temperature/Humidity Station, referred to in this manual as the Aspirated Temp/Hum Station, combines
AM/FM DUAL ALARM CLOCK RADIO WITH DIGITAL TUNING
 AM/FM DUAL ALARM CLOCK RADIO WITH DIGITAL TUNING USER MANUAL KT2051MBY THIS IS NOT A TOY! CAUTION: Electrically Operated Product Please use care when plugging AC adapter into AC outlet. WARNING TO PREVENT
Electronic Dog Trainer Owner s Manual
 Electronic Dog Trainer Owner s Manual DT Systems 2872 Walnut Hill Lane Dallas, Texas 75229 Tel: (214) 350-9446, (888) LUV-U-DOG Fax: (214) 350-7847 Website: http://www.dtsystems.com E-mail: customerservice@dtsystems.com
OEM KEYFOB TRANSMITTER DATA GUIDE
 CMD-KEYX-XXX OEM KEYFOB TRANSMITTER DATA GUIDE DESCRIPTION The Linx CMD-KEYX-XXX Remote Command keyfob is ideal for generalpurpose remote control and command applications. The unit has been precertified
X-Mag. High-Magnification Workstation User s Guide Revision A
 X-Mag High-Magnification Workstation User s Guide www.fsinspection.com 440831-001 Revision A Freedom Scientific, Inc., 11800 31st Court North, St. Petersburg, Florida 33716-1805, USA www.fsinspection.com
WIRELESS 915 MHz TEMPERATURE STATION Instruction Manual
 Contents Language Page English 1 French Spanish TABLE OF CONTENTS WIRELESS 915 MHz TEMPERATURE STATION Instruction Manual Topic Inventory of Contents Features Setting Up Battery Installation Function keys
RQT-xxx-RCVR Owner s Manual Quick Talk TM Wireless Voice Monitor & Alarm transmitter with factory installed MHz Keyfob Receiver
 RQT-xxx-RCVR Owner s Manual Quick Talk TM Wireless Voice Monitor & Alarm transmitter with factory installed 433.92 MHz Keyfob Receiver RQT-151-RCVR RQT-151M-RCVR RQT-451-RCVR RQT-152-RCVR RQT-152M-RCVR
S ENSORLINK INSTALLATION MANUAL
 S ENSORLINK INSTALLATION MANUAL The SensorLink Transmitter (#7610) and SensorLink Receiver (#7611) are designed to work with Davis Instruments Weather Monitor II and the Weather Wizard III to enable wireless
PetPal Training Systems. PetPal Canine Coach CC360 Electronic Dog Trainer Owner s Manual
 PetPal Training Systems TM PetPal Canine Coach CC360 Electronic Dog Trainer Owner s Manual 1 NOTICE! According to how you use your transmitter, the transmitting range might be much different. You will
Wireless Outdoor/Indoor Rechargeable Speaker System. User's Manual
 Wireless Outdoor/Indoor Rechargeable Speaker System User's Manual Contents 2 Specifications 3 Product Features 4 Introduction 5 Setting up Setting Up the Transmitter Locating the Transmitter Charging
MEQ15BT. INSTALLATION / OWNER'S MANUAL Wireless Smart EQ Processor FCC ID : GJW-SBT504 IC ID : 4038A-SBT504
 MEQ15BT Wireless Smart EQ Processor FCC ID : GJW-SBT504 IC ID : 4038A-SBT504 Preparation Please read the entire manual before installation. It is highly recommended that your Smart EQ be installed by a
Digital Wireless Weather System
 Digital Wireless Weather System Thermometer, Hygrometer and Heat Index with Remote Sensor Leading the Way in Accuracy 1458 Instruction Manual C H CHANNEL Congratulations on your purchase of the Taylor
Important safety instructions
 MMR-88 Version 1 Important safety instructions 1. 2. 3. 4. 5. 6. 7. 8. 9. Please read these instructions carefully. Please keep these instructions for future reference. Heed all warnings Follow all instructions
Always there to help you. Register your product and get support at AJ3400/37. Question? Contact Philips.
 Always there to help you Register your product and get support at www.philips.com/support Question? Contact Philips AJ3400/37 User manual Contents 1 Important 3 Safety 3 2 Your clock radio 4 What's in
Firmware version 1.05 supports all CMOS sensor based digital backs IQ150, IQ250 and A- series IQ250.
 RELEASE NOTE January, 2015 Firmware version 1.05 for IQ150, IQ250 and A-series IQ250 Firmware version 1.05 supports all CMOS sensor based digital backs IQ150, IQ250 and A- series IQ250. New functionality
IS76 Beacon with Ferrite Antenna Installation Manual
 IS76 Beacon with Ferrite Antenna Installation Manual V2 F.01U.278.518 2013.10 Document # F.01U.278.518 V2 IS76 Beacon with Ferrite Antenna: Installation Manual Edition: October 2013 Author: TeleAlarm TeleAlarm