Volume 8, Number 4 January 2017
|
|
|
- Tamsin Scott
- 5 years ago
- Views:
Transcription


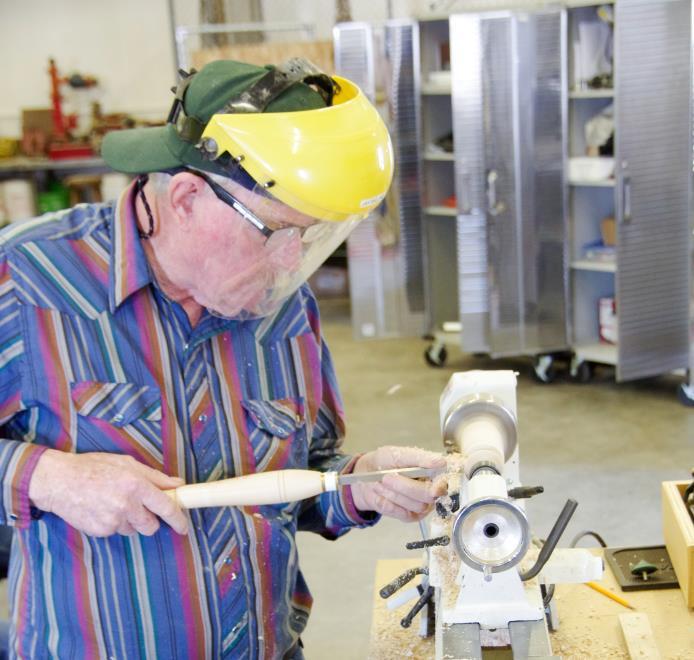
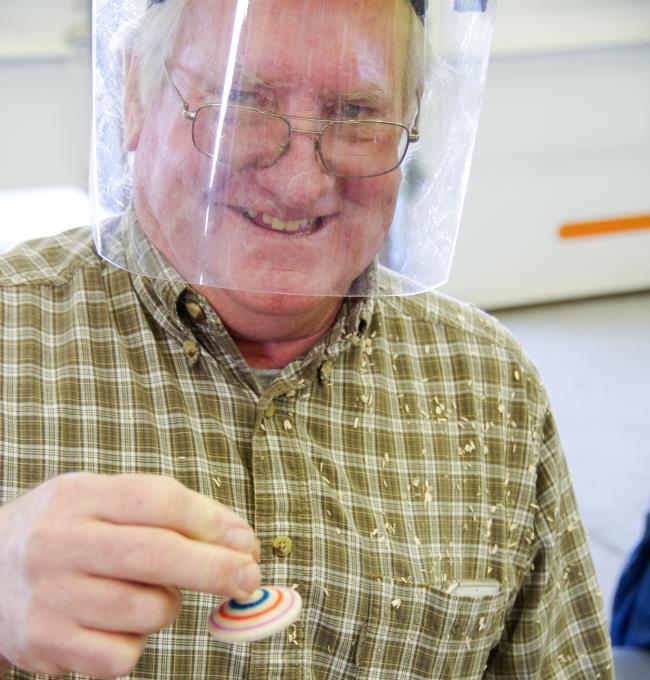
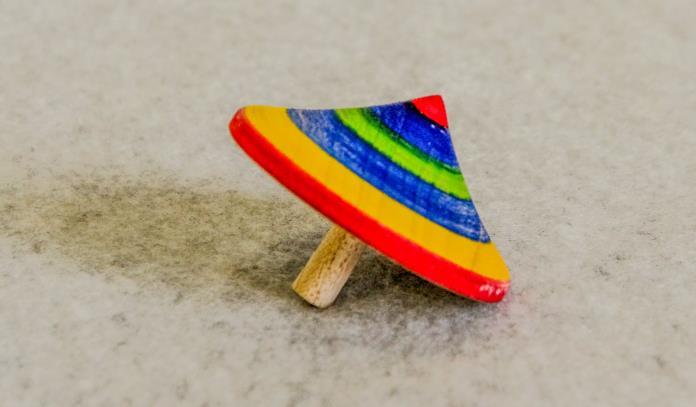
1 The following Demo Dates are still unfilled and are available for you: March 7 May 20 June 6 July 15 Volume 8, Number 4 January 2017 Turn a Top Dec 17 On Saturday Dec 17 a few of the club members got together for a little fun turning tops. It was a get together to have a little fun turning and decorating tops and then seeing if and how long they would spin.


2 We also had some egg nog, hot chocolate, and cookies in the spirit of the season.


3 Thank you to those who took the time to share a few laughs and comradery. Tom Krajacich Jan 3 rd Making a Segmenting Wedgie Sled NOTE: At the end of this article there will be the web site for the Jerry Bennett Segmentology video conducted by Dave Mueller that will give precise and detailed instructions on making a wedgie sled. It follows the steps that Tom used in his presentation. On Tuesday, Jan 3 rd Tom Krajacich gave us an EXCELLENT demonstration on making a wedgie sled. Tom was not feeling good and has been under the weather for some time, but he persevered and took us through the steps to make our segmenting life so much easier. He started out the presentation discussing the advantages of having a sled compared to making segmenting pieces without a sled. Without the sled it is more time consuming, less accurate and possibly less safe than using a sled. He discussed the necessary materials used to make a sled: MDF (or a material of your choosing), star knobs, washers, carriage bolts, a finish of your choice should you decide to finish the sled.


4 Then he discussed the equipment necessary to create the pieces of the sled: Table saw, plunge router, ¼ router bit and a 5/8 router bit and the usual drill press, power drill, etc. Since cutting the necessary pieces are very basic, he had the 12 x 14 and two 2 x 12 pieces of ¾ MDF pieces precut and the 2 x 12 pattern piece of ¼ plywood. Also, he had drilled the required ¼ holes in the pieces since precision is necessary and must be drilled using a drill press. However, he discussed the measurements used in marking where the holes were drilled. Once all of the necessary markings were completed, he attached the pattern plywood piece to the router with double sided tape. He then routed the ¼ slot for both arms. He took care to mark the arm swing on both sides so he did not route past the swing slot. After both slots were completed, he then used a 5/8 router bit and completed the recess to accommodate the carriage bolt heads so they were recessed on the bottom of the sled to allow free movement of the sled. Now that the basic sled was complete, he attached the triangular knobs used to hold the arms in place. The he showed the process of marking the slots to be routered which will allow the arms to be moved to accommodate the wedgie plates. Then came the mounting of the slot guide that fit in the slots on the table saw. Tom showed the process of


5 mounting the piece to the sled using the table saw fence and adjusting it to approximately 1/16 past the saw blade. This will allow truing the edge of the sled. He used double sided tape to attached the slot guide and then used five screws that were countersinked. This was one of the best demonstrations that we have had in the club. Kudos to Tom Krajacich for all the work involved in this demonstration. We thank you very much! This site takes you out to the Jerry Bennet Segmentology Site where there are four videos: _query=jerry+bennett This site take you directly to the video where Dave Mueller makes the Wedgie Sled: NE1CHsc4 The final step in construction was to make a kerf in the slot guide, drill a ¼ hole and install a screw in each end to provide for adjusting the slot guide to eliminate any movement of the wedgie sled which will affect the precise cutting of the segmenting pieces. Take and Turn returns in February When all of that was accomplished, he called on Bob Sobolik to make the truing cut. The sled created during this demonstration will be used on Jan 21 st to cut segmenting pieces.

6 Not a member of the American Association of Woodturners? You are missing the opportunity to get a great access to a myriad of woodturning information, videos, experiences of great woodturners. You can have a limited access to these resources by going to the following site and sign up as a Guest Member. It doesn t cost you anything to sign up as a Guest Member. Give it a try.. uestmemberlanding Place the ferrule on the piece of scrap and move the tailstock close and move the quill snug against the copper coupler. It will be held firmly so you can use the pipe cutter to split the coupler without any damage. Shop Tip Sam Sampedro Shop Tip Sam Sampedro Making Ferrules for Tool Handles Several times I have made turning tools and needed to make ferrules for the handles. I would purchase 1 copper couplers at a hardware and then had to cut them in half. I struggled cutting them in half due to being able to hold them without damaging or changing the perfect circle they were in. It finally came to me how to use my lathe to hold the copper coupler. Take a piece of scrap wood and put it in the jaws of your chuck. The other day I was turning a square bowl and I had a sudden design change (yup, I created a funnel). I had to remove the internal dovetail and replace the hole with a plug so I could turn it. My dilemma was: how was I going to put the bowl back on the lathe with it being centered and secured for truing and turning the plug? The answer came in the form of my bowl jaws used to finish the bottom of my turnings. I installed the bowl jaws and used the grips to center the bowl for turning. I then got two strips of ¼ inch plywood and drilled holes in each one by matching them with the screw holes that are used to adjust the diameter of the holders for the bowl size.
")

7 I then used the strips of plywood to secure the bowl with 2 ½ inch 6 mm Allen screws Editor s Comment: My thanks to the following individuals who helped with the content of this newsletter: (which match the Vicmarc bowl jaws holes) on two points of the bowl. Once I had turned and sanded the bottom of the bowl, I reversed the bowl and turned the inside. This method held the bowl more securely and safely than trying to use tape or some other means to secure it.

8 Club Officers President: Sam Sampedro Vice President: Roger Wayman Treasurer: Chuck Kuether Secretary: Dirk Johnson Directors: Tom Krajacich Wayne Petrini Paul Snyder Meeting Location: Great Falls Fire Training Station th Ave South Great Falls, MT The Good Wood Guys th Street North Great Falls, MT WOOD (9663) Please support The Good Wood Guys. They have been very generous and provide great support to our club! Meeting Day Meeting Time First Tuesday of the Month and Third Saturday of the Month (Unless otherwise noted in The club schedule) Tuesdays: 6:30 PM Saturdays: 12:30 PM


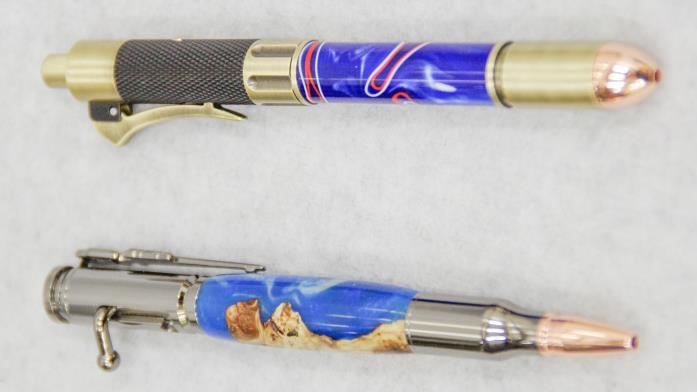
9 (Great Photos by Paul Snyder and Sam Sampedro) Chris Johnson Shift) (Bottle Stopper and Gear Chris Johnson Ken Quaschnik Chris Johnson


10 Paul Snyder Darrell Young Darrell Young Quentin Kubas


11 The following card is from The Johnson Family on the Flowers The club sent to Pat Johson s Funeral


12 Darrell Young David Stratton Sam Sampedro Jay Eklund Dave Stratton Kathy Stephens


13 Roger Wayman Sam Sampedro
14 January 21 st February 7 th February 18 th March 7 th March 18 th April 4 th April 15 th May 2 nd May 20 th June 6 th June 17 th July 5 th July 15 th August 1 st August 19 th Creating Rings for a Segmented Bowl This is a No Charge Event Meeting and Demo Dirk Johnson Sharpening Demo Sam Sampedro & Chuck Kuether Meeting and Demo Tool Making Workshop Make a Round Cutter EWT Meeting and Demo The Team of Chuck Kuether and David Stratton Demo Chris Johnson Meeting and Demo Jay Eklund Demo Meeting and Demo Demo Ed Austin Meeting and Demo (This is a Wednesday since July 4 th is on the first Tuesday) Demo Meeting (Club Elections) and Demo Demo Please Note: Tuesday Meetings start at 6:30 PM, Saturday Meetings start at 12:30 PM
15 January 18 th 6:30 PM Sam s House February 15 th 6:30 PM Sam s House March 15 th 6:30 PM Sam s House April 19 th 6:30 PM Sam s House May 17 th 6:30 PM Sam s House June 21 st 6:30 PM Sam s House July 19 th 6:30 PM Sam s House

16 Screw Chucks in Depth Project: Make a screw chuck Note: To view the graphics in full page size, hold down the control key and click on the picture. A screw chuck, sometimes called a single-screw faceplate, doesn t get a lot of publicity but it s a very useful item. Many production turners use them when turning platters and small bowls because a workpiece can be mounted or removed quickly. For other turners, a screw chuck can sometimes provide a solution to a puzzling chucking situation. This article provides an in-depth description of a screw chuck and the features that make it work well, or not so well. Included at the end are instructions for making your own that will work just as well, if not better, than what you can purchase. Overview Screw chucks can be purchased that screw onto the headstock spindle, but those available are typically 4 in diameter or smaller. The most popular type is the screw insert that comes with almost every scroll chuck on the market. The screw mounts at the center of the chuck and the front of the jaws act as the bearing surface. The one manufactured by Oneway is called a Woodworm. Shop-made screw chucks appear in many forms. They may be mounted on a faceplate, held by the jaws of a scroll chuck, or threaded directly onto the spindle. They range in size from very small, like 3/4 in diameter, to rather large, perhaps 8 in diameter. Small screw chucks are sometimes called threaded mandrels and are usually made for a specific application.

17 The bearing surface is the circular disk that surrounds the screw. It is important for the workpiece to seat firmly against this surface, for two reasons. One is to ensure that the workpiece will run true and the other is to provide a transfer of power from the screw chuck to the workpiece. The workpiece should have a flat surface to seat against the bearing surface. The screw is typically rather large with deep-cut threads. The end may be pointed or flat. It is assumed that a pilot hole will be provided for the screw so a point is not essential. A screw chuck can often be used to advantage when the workpiece is not large enough to accommodate the screws of a faceplate or when the screw holes might penetrate an important feature of the piece. Otherwise, a faceplate gives a stronger hold and has a greater capability for transferring torque to the workpiece. By snooping around the interweb, I ve learned that many turners have had problems or at least limited success with screw chucks. My intent here is to present the basic principles involved so that the capabilities and limitations of a screw chuck can be better understood. How it works. It s obvious how it works! The screw holds the piece and the lathe makes it go around. What more is there? Well, quite a bit, actually. For example, what supplies the torque (twisting force) to the workpiece? For the most part, it s not the screw. It s the frictional force between the workpiece and the bearing surface. All the screw does is to keep the piece centered and pull it against the bearing surface. The more tightly the screw holds the piece against the bearing surface, the greater the friction force will be.
18 The torque applied to the workpiece depends upon two things. One is the friction force; the other is the diameter of the contact area between the bearing surface and the workpiece. The larger the diameter, the greater the torque for a given frictional force. Because of this, a large-diameter bearing surface is more effective. Another factor that comes into play is how smooth or slick the bearing surface is. If it is slick and highly polished, it will look good but will provide less frictional force than one with a rougher surface. Ugly and rough is better than slick and pretty. One consequence of having a slick bearing surface is that the load on the screw will be greater. This is because the screw will have to pull the workpiece more tightly against the bearing surface in order to produce the friction force required to keep the workpiece spinning. At the limit, the wood surrounding the screw will give way. The piece will stop rotating and it may come off the lathe. We can now see that the Woodworm type of screw chuck has two disadvantages. One is that the bearing surface (the front of the chuck jaws) has a relatively small diameter. The other is that the jaws are slick. This adds to the load on the screw. The reason the screw is so large, I think, is to compensate for the small-diameter and slick bearing surface. For the most part, however, they work quite well. A shop-made screw chuck having a larger and rougher bearing surface does not need to have such a large screw. In slow motion... Suppose we mount a workpiece on a screw chuck and tighten it just enough to touch the bearing surface without being really tight. What will happen when we apply a turning tool to the piece and begin to make a cut? Because there is very little friction force between the piece and the bearing surface, the screw chuck will not be able to supply the necessary torque to make the piece spin against the cutting edge. Therefore, the piece will lag behind and rotate backwards relative to the bearing surface. This relative movement tightens the screw and pulls the piece more tightly against the bearing surface. This increases the friction force. However, until the
19 friction becomes strong enough to supply the required torque, the relative movement will continue and the screw will tighten even more. At some point, the friction will reach a level that is able to supply the torque, and relative movement between the piece and the bearing surface will stop. At this point the two will rotate together as one unit, which is good. If you take a heavier cut, the friction force may once again be inadequate and again the piece will move relative to the bearing surface. This tightens the screw even more, producing more friction until the two again rotate as one unit. Now let s pretend we get a catch. The tool starts digging into the wood. More and more torque is required to turn the workpiece as the cut deepens. The workpiece moves relative to the bearing surface, the screw gets tighter and tighter until finally the wood surrounding the screw strips out. At this point, the piece will stop turning while the screw chuck still spins. Will the piece come off the chuck? Not if we re using tailstock support! But we will have to repair the stripped-out threads before we can continue turning. Catches cause trouble and waste your time. I suggest you avoid them. So what does this mean? A piece mounted on a screw chuck will almost always tighten while being turned unless you put it on really tight at the beginning. Most of the time this is of no consequence and you don t even notice it until you go to remove the piece after the turning is done. But if the wood is degraded, as is often the case when turning spalted wood, the screw threads may strip out at rather low levels of torque. It follows that with such wood you should take very light cuts so as not to overstress the wood surrounding the screw as it tightens. When you use tailstock support and crank the live center against the piece, the pressure exerted by the live center presses the piece more tightly against the bearing surface. This increased pressure increases the friction force and makes the piece less likely to move. To put it differently, using tailstock support takes part of the load off the screw. A screw chuck should not be used for an end-grain workpiece because screws do not hold very well in end-grain wood. The key to getting the maximum holding power from a screw in end grain is first to drill a pilot hole and then to not over tighten the screw. But with a screw chuck, we only have indirect control over how much the screw
20 gets tightened, which it can do by itself without our being aware of it. So even though we do not over tighten initially, it may do so on its own. Impact Forces Suppose we mount a 5 square chunk of wood on a screw chuck and propose to make a square bowl or something similar out of it. We will be turning a lot of air out near the edge where the corners stick out. Each time the tool runs into a corner, it will make a small bump, an impact, as it enters the wood and begins cutting. If the lathe is running at 1,000 RPM, which is not really fast for a piece this size, these bumps will occur at the rate of about 4,000 bumps per minute which is about 67 bumps every second. Now think about an air-driven impact wrench being used to tighten a lug nut on the wheel of a car. A lot of fairly small bumps will get the lug nut really tight, in fact, too tight in many cases. The same thing happens with the square block of wood on the screw chuck. The impact forces will tighten the screw far beyond what you might at first think. And even if you don t turn square bowls, the protruding corners of a rough-cut blank or the protruding portion of an out-of-round workpiece amounts to the same thing. The impact forces may over tighten the screw to the point where it strips out of the blank. The bottom line is that you should take very light cuts in such a situation. This phenomenon is not limited to just a screw chuck. If you subject a workpiece mounted on a faceplate to heavy impact forces (hitting protruding corners or bumps on the workpiece), the piece can rotate relative to the faceplate and put the faceplate screws in a strain. In the worst case, the screws may break or pull out of the wood. Always be careful to take light cuts and make progress slowly when having to deal with impact forces, whether with a screw chuck, a faceplate, or even a scroll chuck. Construct a Shop-Made Screw Chuck
21 The first order of business is to decide how the screw chuck will be attached to the lathe. The best way is to use a small faceplate that you dedicate to this purpose. Second best is to mount it in the jaws of a scroll chuck. The next consideration is the material to be used for the disk that forms the bearing surface. A good grade plywood 3/4 thick will work, as will any good, sound hardwood. MDF (medium density fiberboard) can be used if the screw chuck is mounted on a faceplate, but do not use it for mounting in a scroll chuck because of its tendency to delaminate when under stress. The tenon may simply break off. The diameter you choose for the bearing surface should be in line with the size of the workpieces you intend to turn. A diameter of 4 is the norm because the disk will then fit comfortably on a 3 faceplate and will be good for workpieces up to 6 or 8. I see no advantage in making one with a diameter less than 3 unless it is to be used only on really small workpieces. If you anticipate turning plates or platters in the range of 12 in diameter, a bearing surface 6 in diameter may be a good choice. The screw: my preference is to use a hex head lag screw 1/4 in diameter and 1.25 long, available at a big box store or any good hardware. This allows for an extension beyond the bearing surface of 3/4 while leaving 1/2 inside the disk. Directions for making a screw chuck follow. Two separate procedures are given, one for a screw chuck mounted on a faceplate and another for a screw chuck that is mounted in a scroll chuck. Screw Chuck Mounted on a Faceplate 1. Use a jigsaw or bandsaw to cut a disk to use for the bearing surface. Cut it to a diameter slightly larger than what you want the final dimension to be. 2. Drill a hole at the center of the disk 3/4 in diameter and 1/4 deep. This hole will allow the head of the lag screw to rest below the surface. Also, the hole is large enough to allow a socket wrench to be used to tighten the screw as described farther down. A Forstner or spade bit will give a hole with a flat bottom, which is desirable.
22 3. Draw a circle, centered on the hole, the same diameter as the faceplate you are going to use. Install the faceplate inside this circle. 4. Screw the faceplate onto the headstock spindle. True up the edge of the disk. Make a small dimple at the center of the disk to help center the drill bit in the next step. 5. Install a Jacobs chuck in the tailstock. Use a 3/16 drill bit to drill a pilot hole for the screw all the way through the disk. Turn the face of the disk to slightly concave. 6. Remove the assembly from the lathe. Using a 7/16 socket wrench with an extension and working through the center hole of the faceplate, screw the lag screw into the hole until the head seats. Skip down to The final three steps and continue with Step 7. Screw Chuck that Mounts in a Scroll Chuck 1. Use a jigsaw or bandsaw to cut a disk from the material you are going to use for the bearing surface. Cut it to a diameter slightly larger than what you want the final dimension to be.

23 2. Cut out another disk whose diameter is just slightly larger than the tenon you will need in order to mount the screw chuck in your chuck jaws. Jam chuck this disk against the chuck jaws and true it up. Then drill holes for four screws for reinforcement. Use wood glue or epoxy with the screws to attach it to the larger disk. 3. Jam chuck the assembly against a flat plate. True up the smaller disk and form a tenon on it that will fit your chuck. 4. Working on the tenon side, use a drill press to drill a 3/4 hole to a depth such that the hole penetrates the larger disk 1/4. That is, the depth of the hole should be the thickness of the tenon disk plus 1/4. Use a Forstner or spade bit so the bottom of the hole will be flat. 5. Mount the piece in your scroll chuck. Make a small dimple at the center of the disk. Using a Jacobs chuck in the tailstock, drill a 3/16 pilot hole all the way through the disk. Turn the face o f the disk to slightly concave. Remove the assembly from the lathe. (See photo in Step 5 above.) 6. Using a 7/16 socket wrench, screw the lag screw into the hole until the head seats. Continue with step 7 below. The final three steps: 7. Check the extension of the screw beyond the bearing surface. It should be about 3/4. If it s too little, remove the screw and drill the 3/4 hole slightly deeper. If it extends too far, put a washer under the head of the screw. 8. Put the assembly back on the lathe. Rotate the lathe spindle by hand and look for any runout of the tip of the screw. If the runout is noticeable, tap the tip of the screw
 9. Remove the assembly from the lathe. Cover the screw head with epoxy.")
24 gently with a small hammer in an effort to reduce the runout. (It doesn t have to be perfect. Also, the screw threads can give the impression of runout even when there is none.) 9. Remove the assembly from the lathe. Cover the screw head with epoxy. Let the epoxy cure and your screw chuck will be ready to use.
Volume 9, Number 6 January 2018
 www.gfturners.org Volume 9, Number 6 January 2018 A Few Word s. I want to thank the following members who stepped up to provide demos during the year: Dirk Johnson Four Times Sam Sampedro Three Times Chuck
Volume 9, Number 2 September 2017
 www.gfturners.org Volume 9, Number 2 September 2017 Just a few Words 2017 Club Picnic On behalf of the club, we wish to thank Tamara & Dirk Johnson for hosting our picnic at their house. We appreciate
Volume 8, Number 9 June 2017
 www.gfturners.org Volume 8, Number 9 June 2017 He emphasized the used of the diamond pattern used to design the colors of the star segments. In the great handout he provided, the last page, which can be
Procedure for Longworth Chuck construction
 Procedure for Longworth Chuck construction Overall construction The Longworth chuck is composed of three major components. Connected to the lathe spindle is some device that fastens to the first of two
Handle Hardware Kit for Router Plane 05P38.10
 Handle Hardware Kit for Router Plane 05P38.10 Introduction With this kit, you can make a set of replacement handles for the Veritas Router Plane. The following instructions describe how to make one handle
OFFSET TURNINGS. By using an eccentric chuck, SHOPMADE CHUCK BUILD A FOR. David Mueller FEATURE. Build the chuck body
 FEATURE BUILD A SHOPMADE CHUCK FOR OFFSET TURNINGS David Mueller By using an eccentric chuck, you can add interest to turnings such as pendants and box lids. The workpiece is mounted out of alignment with
This is an excerpt from the book. Turning Bowls. by Richard Raffan. Copyright 2001 by The Taunton Press
 This is an excerpt from the book Turning Bowls by Richard Raffan Copyright 2001 by The Taunton Press www.taunton.com 4 ROUGH-TURNING CHAPTER THE PROFILE Ialways rough out bowls in two stages. First I turn
Woodturning Fundamentals American Association of Woodturners, January 2013
 Woodturning Fundamentals American Association of Woodturners, January 2013 Methods and Jigs for Reverse Turning Bowls By John Lucas There are many ways to hold bowls and hollow vessels so that you can
Face Once you've tapped the hole, cut the circles out on your band saw.
 Introduction An earlier article in More Woodturning on turning wine stoppers got me thinking about collet chucks. I wondered if I could make one entirely out of wood. I thought this would be just an exercise
MINI-LATHE QUICK CHANGE TOOL POST
 MINI-LATHE QUICK CHANGE TOOL POST Cutting and assembly details Machinists should familiarize themselves with the contents of this section before jumping in to the drawings. Many details are described here
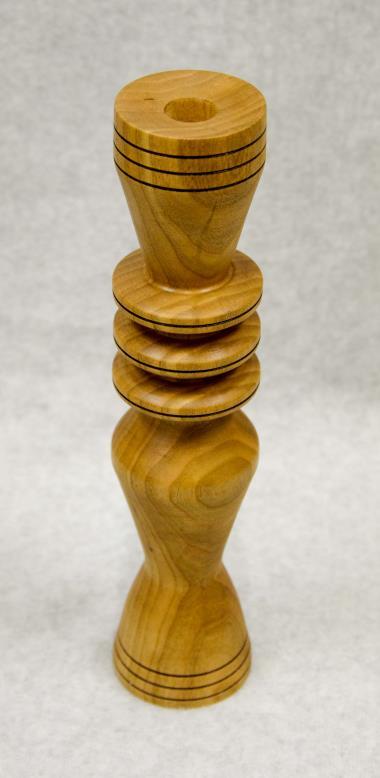
A candle stick addresses transferring and reproducing dimensions from a plan and breaking the project into steps.
 Activities Discussion These projects allow more skill development including making items to match a drawing, sizing projects to specific dimensions, and just trying fun stuff for the first time! A candle
DIY. Inertia Sanders. John Halstad
 Inertia Sanders DIY John Halstad Introduction Inertia sanders can help you prepare your turnings for ne nishes, are great for removing tool marks, leveling the nished surface, erasing left over sanding
How To Make A Longworth Chuck OCTOBER 17, 2010
 How To Make A Longworth Chuck OCTOBER 17, 2010 Ravenview 27 Comments In The Shop In The Shop, tutorials Need an easy way to finish the bottom of your woodturnings? Tired of continually screwing in and
Fig2: The Sliding Glue Block from the back.
 Ornament Stand Introduction It was one of those forehead smacking moments. I was taking the #2 jaws off my Stronghold chuck, to put on my homemade wooden two jaw chuck set-up. For some reason instead of
The following Instructions are for making an indexed Chuck to create bowls which have 3,4 or 5 equi distance bowls with a possible 6th within.
 The Off-Centre Chuck. Ornamental Turners Group Australia th Update 8 June 2010 The following Instructions are for making an indexed Chuck to create bowls which have 3,4 or 5 equi distance bowls with a
From "American Woodturner" the Journal of the American Association of Woodturners, April 2015, vol 30, no 2 - CUSTOM - TOOL HANDLES
 From "American Woodturner" the Journal of the American Association of Woodturners, April 2015, vol 30, no 2 - CUSTOM - TOOL HANDLES Carl Ford I have found most commercially available tool handles uncomfortable
Caution: Always use safety glasses or a full face shield when turning anything on a lathe.
 May 26, 2009 Making a 6 Peppermill Page 1 Acknowledgment is given to Jackie Johnson from Nashville, TN for providing the original instructions and method for this article. The design of this mill can be
MATERIALS & TOOLS REQUIRED INTRODUCTION. Before you start turning, read and understand this entire procedure.
 INTRODUCTION This set of instructions shows one method to turn mills.there are many other possible variations and techniques. NOTE: These instructions are specific to 'Chef Specialties' mechanism. For
Hinge Mortising Jig. One of the make it or break it parts of building a. 6 ShopNotes No. 74
 Hinge Mortising Jig A Mortise for a Hinge. Quick, clean, and accurate that s the only way to describe the mortise you get with a trim router and this hinge mortising jig. One of the make it or break it
router table sled 2012 August Home Publishing Co.
 router table sled 2012 August Home Publishing Co. best-built jigs & fixtures router Table Sled Packed with features, this sled makes it easy to rout perfect-fitting joints. A router table is a great tool
A Publication of the Mid Minnesota Association of Woodturners
 A Publication of the Mid Minnesota Association of Woodturners Volume 8, Issue 8 August 1, 2018 The Mid Minnesota Association of Woodturners (MMAW) is a member based not for profit organization, providing
Volume 8, Number 6 March 2017
 www.gfturners.org Volume 8, Number 6 March 2017 will have a firm date in the near future as to when they would like them delived. Sam Sampedro Feb 18 th YWCA Empty Bowl Program Please Note: Thanks to a
*****Note***** Contains March 2018 Minutes April, Buckeye Woodworkers & Woodturners Newsletter April 2018
 Contains March 2018 Minutes April, 2018 NO MEMBERS OR VISITORS SHALL ENTER OR EXIT THE CAMP VIA THE CHRISTMAN ROAD EN- TRANCE. MEMBERS MUST ENTER AND EXIT FROM MT.PLEASANT ROAD. BUCKEYE WOODWORKERS AND
Learning Objectives To be able to state the different safety precautions associated with the lathe. To be able to identify and state the function of t
 Learning Objectives To be able to state the different safety precautions associated with the lathe. To be able to identify and state the function of the different parts of the lathe. To be able to identify
Wagon Vise Retrofit Installation Instructions. American Craft Woodworks. Wagon Vise
 Wagon Vise Retrofit Installation Instructions American Craft Woodworks Wagon Vise Wagon Vise Retrofit Installation Instructions 2 Retrofit Installation Instructions Before you get started, please read
Essential BOX JOINT JIG
 Essential BOX JOINT JIG Home in on precise finger joints with this table saw sled. By Ken Burton The box (or finger) joint is a remarkably strong, interlocking corner joint that can be quickly made on
How is vacuum measured? Vacuum is measured in inches of mercury. Our atmosphere will support a column of mercury 30 inches tall.
 This document assumes the person attempting to make and use a vacuum chuck has a working knowledge of various power tools, hand tools, and wood lathes. There are NO safety warnings contained within. If
Easy Woodturning. "It's Our Turn!" Made In America
 Easy Woodturning owner S MANUAL "It's Our Turn!" Made In America Just like every product we have ever made, your Easy Chuck is 100% designed and manufactured in America by Easy Wood Tools. The Easy Chuck
Agricultural Mechanics and Technology Power Tool Safety Rules
 Agricultural Mechanics and Technology Power Tool Safety Rules Name: BAND SAW Use: Cutting curves, circles and irregular shapes. 1. Use clean SHARP blades. 2. The teeth should always point DOWN. 3. Adjust
How to Make a Hat Bending Jig
 How to Make a Hat Bending Jig MATERIALS One 2" x 8" x 11" long (Base Block) exact measurements are 7 ½" x 1 ½" x 11" (Pine is OK to use, I have used scrap Walnut for my benders) Four pieces of Oak 1" x
Turning Pendants with the Richard Joyner Eccentric Backer Plate
 Turning Pendants with the Richard Joyner Eccentric Backer Plate Vaughn McMillan August 2010 As the result of a great tool sharing effort by my friend Jonathan Shively at http://familywoodworking.org, I
Making a snap lid box By Jeffrey A Lavine
 Making a snap lid box By Jeffrey A Lavine Some call them boxes, some call them lidded bowls, others call them vessels or containers but whatever you call them they are both enjoyable and a challenge to
Turning a CrushGrind shaft grinder without using glue
 Turning a CrushGrind shaft grinder without using glue A step-by-step approach to removing the apprehension 1 Chris West Content Introduction 3 Robert Sorby CrushGrind Recess Cutting Tool 4 Required tools
Wooden Faceplates. Tapping on the Lathe
 Wooden Faceplates There are lots of turning jobs where spending some time on set-up makes the turning go quicker and easier. Making Wooden Faceplates is one way to make set-ups and jigs for turning. As
FLAT TO FABULOUS Make a Bowl from a Single Flat Board - Or How to Eat Salad off of Scrap Wood
 FLAT TO FABULOUS Make a Bowl from a Single Flat Board - Or How to Eat Salad off of Scrap Wood Let s face it: Woodworkers are frugal people. In fact, if you are anything like me, you have a hard time throwing
Volume 8, Number 7 April 2017
 www.gfturners.org Volume 8, Number 7 April 2017 2017 Club Tool Workshop It was apparent that the recent tool workshop was a success when 22 club members left with a tool. Most of the members that participated
Notes for Making Wood Rings With Stainless Steel Insert Centers
 Notes for Making Wood Rings With Stainless Steel Insert Centers Background These notes describe how to make a ring with a stainless steel (SS) insert and a wood exterior band. They also include information
e) Attach the faceplate/backing plate assembly to the spindle. PROCESS
 Attach the faceplate/backing plate assembly to the spindle. PROCESS") BOARD TURNING This is an exercise in turning which can open up new vistas and potentials for any turner. A form of segmented turning best described as "STACK LAMINATE TURNING", this is unique in that it
BOARD TURNING This is an exercise in turning which can open up new vistas and potentials for any turner. A form of segmented turning best described as "STACK LAMINATE TURNING", this is unique in that it
TurncrafterPlus. Variable Speed Mini Wood Lathe. User s Manual #TCLPLUS PRODUCT NO.
 TurncrafterPlus Variable Speed Mini Wood Lathe PRODUCT NO. #TCLPLUS User s Manual SPECIFICATIONS OF TURNCRAFTER PLUS MINI LATHE Model number:..............................................#tclplus Motor:......................................0V
1. Mount between centers round cut tenons on both ends (same diameter).
.") LONG NECK HOLLOWFORM Jim Terry Piedmont Triad Woodturners Association Turning this hollow form presents some interesting challenges in mounting and holding a turning. Both top and bottom are completely
LONG NECK HOLLOWFORM Jim Terry Piedmont Triad Woodturners Association Turning this hollow form presents some interesting challenges in mounting and holding a turning. Both top and bottom are completely
User s Manual. A highly versatile chuck featuring easy to attach and release jaws for midi- and full-sized woodworking lathes
 User s Manual Barracuda 5 Quick-Change Jaw System Chuck A highly versatile chuck featuring easy to attach and release jaws for midi- and full-sized woodworking lathes #CSCBARR5 IMPORTANT: Read this manual
Between Turns. August Upcoming Dates. Michigan Association of Woodturners A chapter of the American Association of Woodturners
 Between Turns C O N T A C T U S : President: Tom Mogford 810-629-6176 Vice President: Bill Magee 734-981-6117 Michigan Association of Woodturners A chapter of the American Association of Woodturners V
2. Roll disc against left-hand fence.
 TOP TIP Angled fence for routing discs Here s a router table fence that I devised to rout the edges of circular discs with bearing-less bits. Starting with a 3 4 12 21" piece of MDF, I used my framing
Turning a Five Sided Bowl
 Turning a Five Sided Bowl Cut and prepare the blank. This must be square and parallel to each side. The blank must also be small enough to fit the swing of your lathe, when turning off centre. First find
HOME WORKSHOP HANDBOOK Rugged BENCH GRINDER. By JOEL B. LONG
 6 HOME WORKSHOP HANDBOOK Rugged BENCH GRINDER W By JOEL B. LONG ITH this bench grinder you can keep your cutting tools sharp and do general offhand grinding, and can, with the aid of various attachments,
ULTIMATE ROUTER TABLE PLANS. By Dan Phalen
 ULTIMATE ROUTER TABLE PLANS By Dan Phalen January 2017 Ultimate Router Table Plans. Copyright 2012-2017 by Daniel Phalen. Published by Creston Hall Publishing Company. All rights reserved. No part of this
LOFT DOOR HANGER BARN DOORS & HARDWARE. Hardware Installation Instructions. Page
 LOFT DOOR HANGER Page 1 Specifications 2 7/16" 3/8" 1-1/2 1-3/4 Ø3 3 7/8" 11-1/16 Page 2 Parts and Tools Tools Needed Tape Measure Pencil Drill with 1/8, 1/4 and 3/8 bits, 1 spade bit and Phillips bit
Klamp Trak. Instructions (39052)
") Klamp Trak TM Instructions (39052) ITEM# KKS1020 - Klamp Trak TM Getting Started There are three main methods for installing Klamp Trak in your workshop. In all three methods, your goal will be to construct
Klamp Trak TM Instructions (39052) ITEM# KKS1020 - Klamp Trak TM Getting Started There are three main methods for installing Klamp Trak in your workshop. In all three methods, your goal will be to construct
Denise M. DeRose Handled Clamshell Handbag
 Denise M. DeRose Handled Clamshell Handbag Materials: Wood 2 discs between 6 and 9 in diameter -- 4/4, 6/4 or 8/4 1 piece of thin hardwood ¼ inch thick and 4 x 10 Wood for waste blocks Supplies Small piece
I use turning a magic wand as the example but much of the same applies to other relatively long, thin spindles such as conductor's batons.
 HOW I TURN LONG, THIN SPINDLES John K Jordan jordanjk@gmail.com Turning long, thin spindles can be a challenge. The shaft can flex, chatter, and vibrate causing lots of problems and perhaps even breaking.
Woodline USA Woodline Spacer Fence System
 Woodline USA Woodline Spacer Fence System MADE IN THE USA Includes: (1) ¼ Spacer Fence (1) 3/8 Spacer Fence (1) ½ Spacer Fence (1) Hardware Package (1) 3 Piece Brass bar set (2) Setup Blocks Visit Us Online
By Larry Brown & Charles Webb
 By Larry Brown & Charles Webb Page 1 of 16 SAFETY: Wood turning can be Hazardous so you should take precautions to minimize the risk of an accident. I always wear safety glasses when turning. On large
Shoulder Plane. dovetailed. fine tools. Make an heirloom tool and learn the secret to creating double dovetails in metal it s easier than you think.
 fine tools dovetailed Shoulder Plane Make an heirloom tool and learn the secret to creating double dovetails in metal it s easier than you think. I ve always been fascinated by old, metal hand planes.
Kendama. Earlier in my life, I was a juggling. A Toy. Arnold Ward. Dimensions
 Kendama A Toy Arnold Ward Earlier in my life, I was a juggling fanatic. I traveled to different cities that hosted juggling festivals where people shared tricks, bought props, took classes, and participated
Router Table. Construction
 Router Table A router table is an invaluable tool. The problem, however, is that ready-built router tables are usually relatively expensive and too narrow for many projects. This router table provides
Clock 35 - Toyland. Construction instructions for Clock 35
 This clock has been designed for children, it is a stand-alone unit and can be positioned on a shelf or cabinet out of the reach of very young hands who may be tempted to touch. The clock is shown in two
A Modest Historical Perspective of Box Turning
 A Modest Historical Perspective of Box Turning Modern box turners are a living part of a long tradition brought about by exceptionally talented craftsmen whose legacy are the rare and treasured turnings
MODEL T10809 WOOD LATHE CHUCK SET INSTRUCTIONS
 MODEL T10809 WOOD LATHE CHUCK SET INSTRUCTIONS For questions or help with this product contact Tech Support at (570) 546-9663 or techsupport@grizzly.com Introduction The T10809 3 3 4" Wood Lathe Chuck
WOOD TOY NEWS SANDING DRUMS & JIGS ISSUE
 WOOD TOY NEWS SANDING DRUMS & JIGS ISSUE toymakingplans.com June 11, 2014 Wednesday How to Make a Sanding Drum Jig for Smarter Toymaking. By Imants Udris Udie Our discussion begins based on the 5 piece
Hornsby Woodworking Men s Shed. Guide to the Shed s Woodworking Machines
 Guide to the Shed s Woodworking Machines SP00 Purpose The primary purpose of this document is to assist the induction of new members of the Hornsby Woodworking Men s Shed in the identification and understanding
7x --Tailstock Cam Lock
 7x --Tailstock Cam Lock By Magic Brian magicbrian40@yahoo.com Probably the most pleasing mod to have, but often not done through lack of milling facility s This version does NOT require a mill. MATERIALS
Installation and Assembly - Universal Articulating Swivel Double-Arm for 42" - 60" Plasma Screens
 Installation and Assembly - Universal Articulating Swivel Double-Arm for 42" - 60" Plasma Screens Models: PLAV 70-UNL, PLAV 70-UNL-S PLAV 70-UNLP, PLAV 70-UNLP-S R This product is UL Listed. It must be
VASE FLYING-WING A BARK-EDGED. Kevin Felderhoff. Wood selection. 36 American Woodturner August 2017
 A BARK-EDGED FLYING-WING VASE Kevin Felderhoff I enjoy turning endgrain pieces and have found that the most dramatic wood grain comes from logs or branches with irregular shapes far from round. The flying-wing
Peace River Woodturners
 Peace River Woodturners Volume 8 Issue 9 A chapter of the American Association of Woodturners September 2015 Norm s Sample bowl for his demonstration. In This Issue Norm explaining his demonstration of
PEPPERMILL CONSTRUCTION
 PEPPERMILL CONSTRUCTION I ve been asked a several times to put together a review of how I turn peppermills. They are a great project, perfect for gifts and a lot of fun to make. They don't require especially
Adjustable Box Joint Jig. Richard Hicks on 8/24/2015. Box or Finger Joints
 Adjustable Box Joint Jig Richard Hicks on 8/24/2015 Box or Finger Joints Adjustable Box Joint Jig Richard Hicks on 8/24/2015 Box Joints are also called Finger Joints Because they have interlocking fingers
The Simple Birdhouse Ornament
 The Simple Birdhouse Ornament There are a number of techniques for constructing birdhouse Christmas ornaments and the resulting ornaments vary from simple to very ornate and complicated. It has been my
Thank you! Bill Krier Editor WOOD magazine
 www.woodstore.net Thank you! Thank you for ordering a WOOD Downloadable Feature. We hope you enjoy being a part of this new online experience and that you have fun building your woodworking project. Please
Wooden Frame Type Instruction Manual
 Wooden Frame TypeInstruction Manual Thank you for selecting our product. Before starting installation, please read this manual thoroughly to ensure correct installation. Please keep this manual at hand
Clocking a TD-04 Turbo Compressor Housing. Appendix A : AWIC Silicone and Tubing Fitting
 Clocking a TD-04 Turbo Compressor Housing Appendix A : AWIC Silicone and Tubing Fitting Revision A: 7-13-2015 Tools: Metric Sockets (10, 12, 14, 17mm) 5mm Hex Key Large Internal Snap Ring Pliers 3/8 Socket
Using the Richard Joyner Off-Center Jig By Arnold Ward
 The Richard Joyner Off-Center Jig is a faceplate tool that provides a crea ve way to make small mul -axis turnings. The jig has 8 centers and 24 index posi ons. It is especially useful when precision between
Striking with the cheek of the hammer instead of the face. Using the claws of the hammer for work that is best done with a wrecking bar.
 The most important consideration is the squareness of the hammer head to the nail at the moment of impact. Sometimes in order to get a nail started, it is convenient to grip the handle closer to the head.
The Kruger Eccentric
 The Kruger Eccentric Instructions for Use of the Dual Taper Reel Seat Filler and Eccentric Reel Seat Recess Turning Mandrels Rick Kruger 503-860-6346 krugerr@easystreet.net The Dual Taper Reel Seat Filler
Christmas Bell Ornament
 Christmas Bell Ornament This is an easy Christmas ornament idea I cabbaged from a friend and skilled turner, Curt Fuller, from Utah. I kind of adapted it to my style but I still got the idea from him.
George Hatfield Demonstrates for CMW April 10, 2010 By Bob Gunther Photographs by Tina Collison
 George Hatfield Demonstrates for CMW April 10, 2010 By Bob Gunther Photographs by Tina Collison Overview: George Hatfield is from Sidney, Australia. He entered the woodturning field as an apprentice and
VARIABLE SPEED WOOD LATHE
 MODEL MC1100B VARIABLE SPEED WOOD LATHE INSTRUCTION MANUAL Please read and fully understand the instructions in this manual before operation. Keep this manual safe for future reference. Version: 2015.02.02
Jigsaw Puzzle Tray. Premium Plan. In this plan you ll find: America s leading woodworking authority
 America s leading woodworking authority Premium Plan In this plan you ll find: Step-by-step construction instruction. A complete bill of materials. Construction drawings and related photos. Tips to help
Basic Turning Spindle to Bowl
 Basic Turning Spindle to Bowl 7/23/12 8:23 AM Beads and coves all you can do, yes there are flat places and V cuts, but what are they but parts of a bead or a cove. That is all you can do on a lathe. One
Shop-Made Miter Clamps
 *Editor s note: In the photos showing the table saw, the blade guard has been removed for clarity. I try to be as self-sufficient as possible, so I like to manufacture my own tools whenever I can. I designed
Design Update /29/2006
 Design Update 3 -- 8/29/2006 Since our first design we ve made many minor changes to key areas of the prayer bench, especially the folding hinge geometry. The general design remains the same, though the
To Improve Your Woodturning
 To Improve Your Woodturning Things to make / buy / do before turning 1 Use measuring masking tape on tool rest 2 Outlet strip on lathe 3 Lighting - So many LED solutions! 4 Get taps to make lots of our
How to build a hockey stick bench
 How to build a hockey stick bench The hockey stick bench is a great piece of fully functional furniture that doesn t require a lot of sticks. Composite sticks are really strong, so even if you space them
CICAAW NEWSLETTER. Website CICAAW.org. What s Inside This Issue. Central Indiana Chapter of the American Association of Woodturners March 2018
 Central Indiana Chapter of the American Association of Woodturners March 2018 CICAAW NEWSLETTER Officers President: Jim Dupler jdupler01@comcast.net Vice President: Rich Parker 765-860-7036 rddlpark@yahoo.com
TOOL LIST FOR TAILGATE HIDDEN LATCH & LINK ASSY FOR FORD FLARESIDE TRUCKS
 TOOL LIST FOR TAILGATE HIDDEN LATCH & LINK ASSY FOR 53-87 FORD FLARESIDE TRUCKS Vise Grip Clamps C-clamps Sharpie Marker Ball Peen Hammer Center Punch 3/8 or 1/2 Drill 5/32, 7/32, 9/32, and 3/8 Drill Bits
VARIABLE SPEED WOOD LATHE. Model DB900 INSTRUCTION MANUAL
 VARIABLE SPEED WOOD LATHE Model DB900 INSTRUCTION MANUAL 1007 TABLE OF CONTENTS SECTION...PAGE Technical data.. 1 General safety rules....1-3 Specific safety rules for wood lathe.....3 Electrical information.4
O nament. Birdhouse. Birdhouse Christmas ornaments have become very
 Birdhouse O nament Photo by Al Parrish Dale Nish, one of the principal architects of the turning revival, shares some turning techniques. Birdhouse Christmas ornaments have become very popular the last
Chapter 22: Turning and Boring Processes. DeGarmo s Materials and Processes in Manufacturing
 Chapter 22: Turning and Boring Processes DeGarmo s Materials and Processes in Manufacturing 22.1 Introduction Turning is the process of machining external cylindrical and conical surfaces. Boring is a
HONDA RIDGELINE (KIT #601) Installation Instructions (to be used in addition to owners manual)
 Installation Instructions (to be used in addition to owners manual)") HONDA RIDGELINE (KIT #601) Installation Instructions (to be used in addition to owners manual) IMPORTANT NOTE: Read before beginning installation. These instructions replace all of Step 1 of the instructions
HONDA RIDGELINE (KIT #601) Installation Instructions (to be used in addition to owners manual) IMPORTANT NOTE: Read before beginning installation. These instructions replace all of Step 1 of the instructions
Goals and objectives: Process: Set up for spindle turning Practice basic tool cuts o Roughing out o Smoothing o Beads & Coves o Parting & sizing
 First Activities Getting acquainted with the lathe Goals and objectives: Set up for spindle turning Practice basic tool cuts o Roughing out o Smoothing o Beads & Coves o Parting & sizing Process: Mount
Making a Peppermill ( a boring activity) By Mike Lanahan
 By Mike Lanahan") Making a Peppermill ( a boring activity) By Mike Lanahan Ground Rules No need for note taking A Portable Document Format (pdf) copy of this presentation is available. Ask questions. It s your time. There
Making a Peppermill ( a boring activity) By Mike Lanahan Ground Rules No need for note taking A Portable Document Format (pdf) copy of this presentation is available. Ask questions. It s your time. There
Laying out the spiral lines
 Hollow spiral turnings seem to have a mysticism about them. The complexity of their appearance makes it seem as though only the highly skilled craftsman could possibly take up the challenge. Although they
Jaws. It s All in the
 It s All in the Jaws As a professional turner, I ve always looked for tools and methods of work that enable me to work quickly and efficiently without compromising my designs. In 1970 when I began to turn
Making a Windsor Stool
 Brian Clifford A Windsor Stool - page 1 Making a Windsor Stool The Windsor style The Windsor style is the name of a particular type of traditional English chair. Within this style there are a variety of
First Activity - Getting acquainted with the lathe
 First Activity - Getting acquainted with the lathe Goals and objectives: Set up for spindle turning Practice basic tool cuts o Roughing out o Smoothing o Beads & Coves o Parting & sizing Process: Mount
Making Boxes with Threaded Lids Using a Threading Jig
 My Way of Making Boxes with Threaded Lids Using a Threading Jig Smoky Mountains Woodturners March 18, 2014 Jared Bruckner Introduction Included in this Demo My procedure for preparing box blanks from wet
MM540 Installation Instructions IMPORTANT SAFETY INSTRUCTIONS - SAVE THESE INSTRUCTIONS
 MM50 Installation Instructions IMPORTANT SAFETY INSTRUCTIONS - SAVE THESE INSTRUCTIONS Please read this entire manual before you begin. Do not unpack any contents until you verify all requirements on PAGE.
Mark St. Leger CMW Demonstration: February 21, 2009 By Bob Gunther Photographs by Bob Cole, Bob Heltman
 Mark St. Leger CMW Demonstration: February 21, 2009 By Bob Gunther Photographs by Bob Cole, Bob Heltman Overview: Mark lives in the mountains of Southwest Virginia. His interest in woodturning began when
*****Note***** Contains January 2018 Minutes February, Buckeye Woodworkers & Woodturners Newsletter February 2018
 Contains January 2018 Minutes February, 2018 NO MEMBERS OR VISITORS SHALL ENTER OR EXIT THE CAMP VIA THE CHRISTMAN ROAD EN- TRANCE. MEMBERS MUST ENTER AND EXIT FROM MT.PLEASANT ROAD. BUCKEYE WOODWORKERS
Installation and Assembly - Universal Articulating Swivel Double-Arm for 42" - 60" Plasma Screens
 Installation and Assembly - Universal Articulating Swivel Double-Arm for 42" - 60" Plasma Screens Models: PLAV 70-UNL, PLAV 70-UNL-S PLAV 70-UNLP, PLAV 70-UNLP-S R This product is UL Listed. It must be
3" LATHE THREAD CUTTING ATTACHMENT
 3" LATHE THREAD CUTTING ATTACHMENT P/N 3 AN INTRODUCTION TO THREAD CUTTING IN THE REAL WORLD After designing and putting the enclosed screw cutting attachment into production, we sat down and started reading