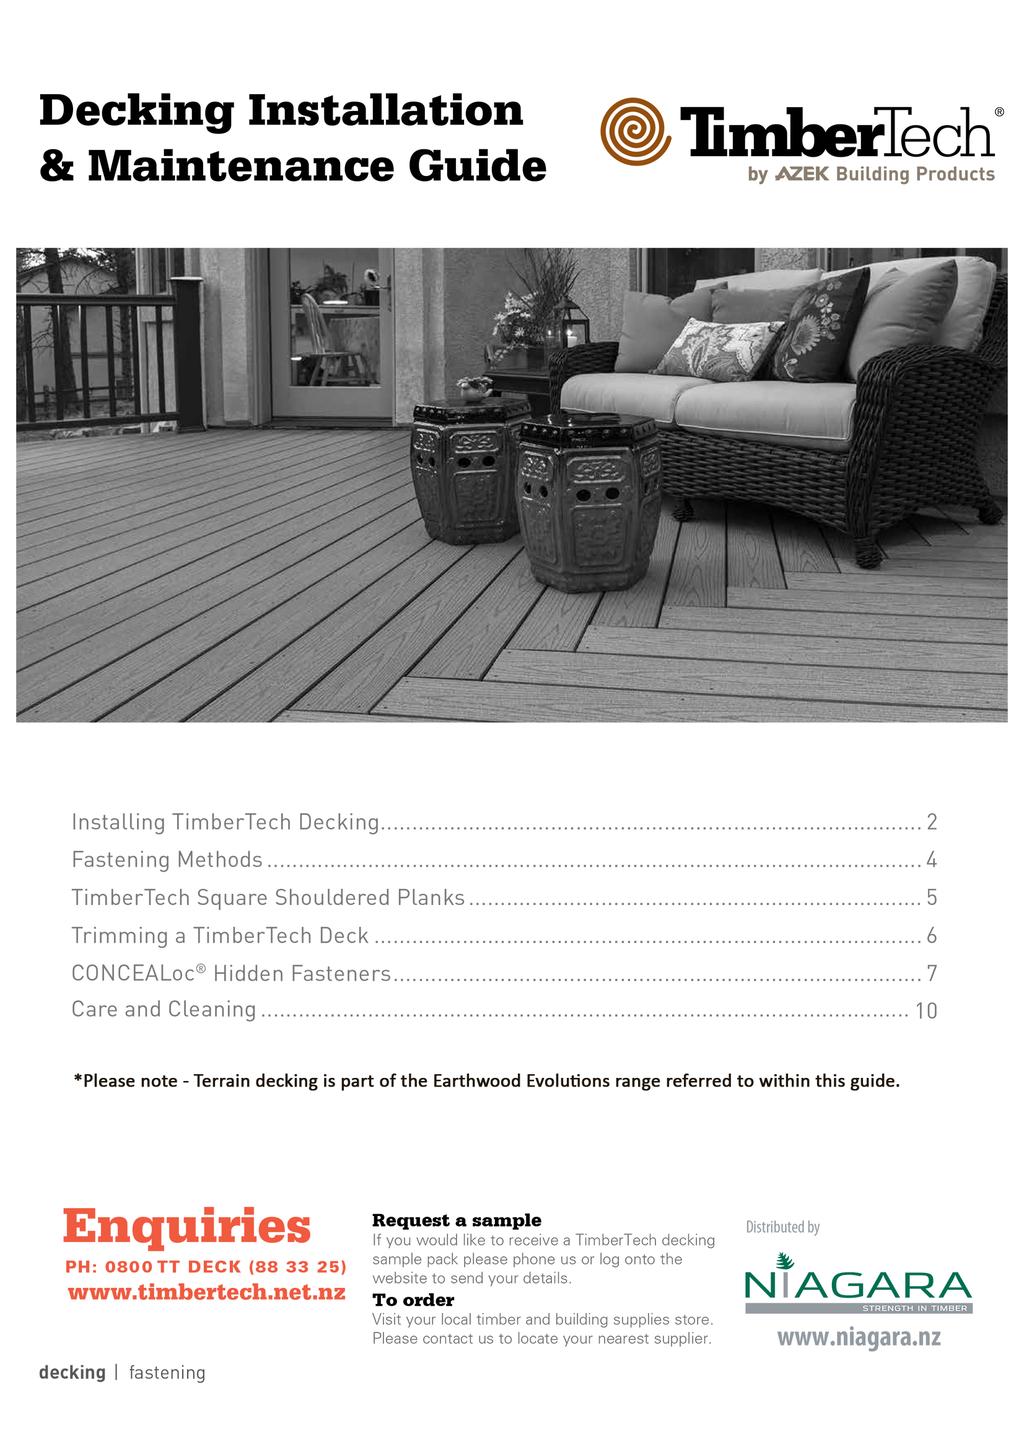
Installing TimberTech Decking
|
|
|
- Clement Miles
- 5 years ago
- Views:
Transcription

1
2 Installing TimberTech Decking TimberTech Deck should be installed using the same good building principals used to install wood or composite decking and in accordance with the local building codes and the installation guidelines included below. AZEK Building Products Inc. accepts no liability or responsibility for the improper installation of this product. TimberTech Deck may not be suitable for every application and it is the sole responsibility of the installer to be sure that TimberTech Deck is fit for the intended use. Since all installations are unique, it is also the installer s responsibility to determine specific requirements for each deck application. AZEK Building Products recommends that all applications be reviewed by a licensed architect, engineer or local building official before installation. To get more information visit TimberTech.com. Access Installation Resources 24/7. Installation guides and videos are available on our web site at Do you need help with your installation? We have an excellent customer service team that is here to help you with your installation questions. If you need help you can call customer service at or visit TimberTech.com/installation to view TimberTech installation videos. Tools Required TimberTech planks can be installed with a minimum number of readily available tools. However, many other tools are available that can provide even greater efficiency and ease of installation. All tools should be used per applicable manufacturers instructions. Some of the basic tool requirements: Cordless Driver Chalk Line Tape Measure Jig Saw Carpenter Square Spacing Tools Circular Saw Safety Glasses Drill Bits Use the jigsaw to cut around obstructions such as posts. A power miter saw can also be very helpful during installation. For a power miter or compound power miter saw a fine finish alternate top bevel blade is also recommended. When working with TimberTech products be sure to wear proper clothing and safety equipment. Safety glasses should be used during the entire installation process. STOP! Read this section before you start! Always make sure to visit TimberTech.com to ensure you are viewing the most current installation instructions, care and cleaning, technical information and more. Walking Surface TimberTech planks are intended to be installed embossed side up. The unembossed surface is not to be used as a walking surface. This applies to all TimberTech planks. Directional Notch TimberTech s surface on TwinFinish, ReliaBoard, DockSider, TwinFascia and TwinRiser boards are directional in manner. A notch has been added to one side of the planks. When installing planks, this marked edge must be laid to the same side for the entire installation for a consistent appearance. Similarly, TimberTech s TwinFascia board and TwinRiser have one long beveled edge on the front and back. To ensure a consistent appearance from board to board, the beveled edge must be laid to same side. If you rip a piece, be sure to note the location of the bevel. See individual plank installation instructions. Static Electricity The buildup or generation of static electricity is a naturally occurring phenomenon in many plastic based products such as carpeting, upholstery, and clothing, and can occur on alternative decking under certain environmental conditions. Cantilevering Terrain, Tropical, Legacy, TwinFinish, ReliaBoard, and DockSider can be cantilevered a maximum of 1. Reliaboard and Terrain can only be cantilevered on the ends. Safety Unlike traditional wood, TimberTech product is splinter-free. Color and Grain Patterns TimberTech decking is designed to mimic the look of real wood, and like real wood, there will be a slight difference in color and grain pattern from board to board. This is intentional and part of the manufacturing process, giving TimberTech decking the most realistic and wood-like appearance possible. This variation is purely aesthetic and does not or will not affect the performance of the product. TwinFinish, ReliaBoard, and DockSider are designed to naturally weather over time and the surface grain pattern will weather to a more consistent color. Most of the weathering process will be complete within the first year of the deck s life. Note TimberTech is NOT intended for use as columns, support posts, beams, joist stringers or other primary load-bearing members. TimberTech must be supported by a codecompliant substructure. While TimberTech products are great for deck re-planking (removing old deck surface planks and installing TimberTech on code-compliant substructure), TimberTech planks CANNOT be installed on top of existing deck planks. Routing TimberTech Decking SHOULD NOT be routed aside from routing a 2 wide groove in the side of solid planks for start/stop of CONCEALoc. Page 2
 glass can potentially harm TimberTech products.")


3 Installing TimberTech Decking Extreme Heat Warning Be aware of excessive heat on the surface of TimberTech products from external sources, such as but not limited to, fire or reflection of sunlight from energy-efficient window products. Low-emissivity (Low-E) glass can potentially harm TimberTech products. Low-E glass is designed to prevent passive heat gain within a structure and can cause unusual heat build-up on exterior surfaces. This extreme elevation of surface temperatures, which exceeds that of normal exposure, can possibly cause TimberTech products to melt, sag, warp, discolor, increase expansion/contraction, and accelerate weathering. Current or potential TimberTech customers that have concerns about possible damage by Low-E glass should contact the manufacturer of the product which contains Low-E glass for a solution to reduce or eliminate the effects of reflected sunlight. Color and Temperature Although TimberTech products are cooler to the touch than many other deck board products in similar colors, all decking products will get hot in the sun. Additionally, the darker the decking color, the hotter it will feel. Excessive Construction Debris It is important during construction, that the deck s surface stay clear from excessive build-up of dirt, sand, and dust from tile, concrete, landscape blocks, or any other masonry products. If these materials are not removed immediately, the deck surface will become difficult to clean and can potentially damage the deck s surface finish. TimberTech Decking should not be used as a work surface. If a build-up does occur please refer to the Care and Cleaning section in TimberTech s installation guide or website, Calculating Material Requirements To determine how much TimberTech decking material you will need, start by calculating the square footage of your deck surface by multiplying length by width. Once you know this number, divide it by the numbers provided below for 12 planks, 16 planks and 20 planks. Once you know the square footage number, divide it by 5.5 for 12 planks, 7.3 for 16 planks and 9.1 for 20 planks. When calculating the amount of decking you will need, it is recommended that you add roughly 10% to the total for a scrap factor. Working With TimberTech Planks Expansion and Contraction TimberTech deck planks will experience expansion and contraction with changes in temperature. Expansion and contraction are most significant where extreme temperature changes occur. Fastening the deck planks according to the gapping requirements noted in the following table accommodates for this movement. Changes in length are most significant during the installation process, and should be accounted for if working in extreme temperatures. A good example would be cutting your planks during a hot afternoon, letting them sit outside overnight in the cool air and then installing them the next morning. Chances are, you will notice a certain amount of contraction. The best way to minimize this problem is to fasten your planks as soon after cutting as possible. Gapping Requirements For All TimberTech Planks Side-to-side plank gapping must be minimum 1/8 to maximum 3/16. Allow 3/16 minimum gap where the planking meets any adjoining structure or post. Follow these butt joint gapping guidelines for all TimberTech planks: Butt Joint Gapping Requirements 32 F and below 33 F to 74 F 75 F and above 3/16" gap 1/8" gap 1/32" gap Installation Preparation Follow these guidelines for best deck installation: TimberTech Deck Boards are one-sided products. Deck Boards are to be installed with the grain side up for the walking surface. Fascia is to be installed grain side out. TimberTech Fascia is one-sided. Prior to installation, check to make sure all joists are level, structurally sound, and there are no nails or screws protruding. Ensure that all joists are crowned correctly and that all joists are level across the top as TimberTech Deck will conform to the surface contour of the substructure. Proper joist spacing is required for proper installation. Joist spacing should never exceed 16 on center. For a more rigid feel, 12 may be preferred. For best results, installing solid wood blocking between each joist, placed every 4-6 within the structure, can help reduce movement or twisting of the joists. Limiting joist movement can help reduce excessive gapping and also ensure more uniform finished surface of the TimberTech Deck Example: Length x Width = Total Square Footage Square Footage by 5.5 (12 ), 7.3 (16 ) or 9.1 (20 ) = Planks Needed (Round the number up) Planks Needed + 10% (Scrap Factor) = Final Number of Planks Needed (Round the number up) 16 BASIC INSTALLATION SUBSTRUCTURE 16 on center maximum joists. (12 on center for commercial applications) PICTURE FRAME INSTALLATION SUBSTRUCTURE 16 on center maximum joists plus additional support for picture frame structure (12 on center for commercial applications) DIAGONAL INSTALLATION SUBSTRUCTURE 12 on center maximum joists. More severe angles may require closer joist spacing. Page 3
4 Fastening Methods TimberTech Fascia and Riser Boards Using screws with proper installation of TimberTech Fascia provides the best long-term holding. TimberTech recommends the use of TimberTech TOPLoc Fascia Fasteners for best results. Refer to gapping requirements on page 3 for proper installation. For Use with TOPloc Fascia Fasteners: Using the TOPLoc Fascia Bit, pre-drill 2 from the top and bottom alternating a maximum of 12. It is recommended that screws are evenly spaced for the best look. 12" Set fascia in place being sure to follow proper gapping requirements. Drive TOPLoc fascia fastener 90 degrees with the fascia surface so that the screw head is flush with the surface. Do not completely torque down screw; screw should serve as a hanging mechanism to allow for expansion and contraction in the fascia. Continue fastening in pattern described being sure to work left to right or right to left. This will ensure flatness in the fascia. If preferred, TopLoc Fascia Fasteners may be installed 2 every 12", 2" from the top and bottom. TimberTech Square Shouldered Planks TimberTech recommends the use of TimberTech TopLoc Face Fasteners for square shouldered plank installations. Pre-drilling is required when within 1-1/2 of the ends of the plank and for temperatures below 45 degrees Fahrenheit to avoid splitting and screw shear. Alternate fasteners are stainless steel or high-quality coated composite deck screws.* Always be sure to check and cut the factory cut ends of all boards to ensure they are square. Terrain, Tropical, Legacy, TwinFinish, and ReliaBoard Planks: Use TOPLoc Face Fasteners or a minimum #8 x 2-1/2 stainless steel or other high-quality coated composite deck screws.* DockSider: Use TOPLoc Stainless Steel or a minimum #8 x 3 stainless steel or high-quality coated deck screws.* Fastener Mushrooming: This may occur when a non-composite deck screw is driven into the decking. It can be greatly reduced or eliminated by using a screw designed for composite lumber. When installing TimberTech decking, using TOPLoc reduces chance of mushrooming. If mushrooming occurs, we recommend pre-dimpling the plank by drilling a hole slightly smaller in diameter than the screw head and as deep as the screw head before driving the screen. *TimberTech does not recommend any fastener that is not explicitly stated in the TimberTech Decking Installation Guide. Use of any alternative fastener does not void the TimberTech warranty; however, if a decking failure is caused by using one of these alternative fastening methods, any corresponding claims will be denied Terrain Collection Reliaboard TwinFinish Tropical and Legacy Collections 5.50 Docksider Fasteners should be installed perpendicular to the deck surface and driven flush; do not overdrive or splitting will occur. Always double joists at butt seams. Do not toe screw deck planks as this will cause splitting. Page 4


5 TimberTech Square Shouldered Planks Terrain, Tropical, Legacy, Twin Finish, Reliaboard, and Docksider Important Information To get information on other TimberTech products, visit timbertech.com or ask your dealer for these installation guides: TimberTech planks are intended to be installed embossed side up. The unembossed surface is not to be used as a walking surface. This applies to all decking surfaces. The serrated bottom side of TwinFinish is great for accents like benches and flower boxes. In areas with obstructed airflow such as roofs and on-grade applications, a minimum of 1-1/2 sleeper system supported by and connected to the substructure over which the deck is built is required. To aid water run-off, the deck should slope 1/2 for every 8 away from the house. To further minimize expansion and contraction, proper ventilation and airflow should be considered. For best practices in climates with extreme temperature cycles, limiting the length of the deck plank and avoiding affixing to the rigid length of the joist in applications such as picture framing or parting boards can help avoid movement and screw shear. On-grade decks must have additional provisions for drainage beneath the deck structure. For best practices, decking should not be installed in applications where ventilation and airflow cannot be achieved. Standard Joist Spacing TwinFinish 90 Angle 30 Angle 45 Angle 100psf 20" 18" 16" ReliaBoard, Terrain, Legacy 100psf 16" 14" 12" DockSider 90 Angle 30 Angle 45 Angle 100psf 24" 24" 24 Special conditions will require an engineering inspection and/or reduced spans. Always consult local building codes. Square Shouldered Plank Installation Instructions Always be sure to check and cut the factory cut ends of all boards to ensure they are square. Install from the outside edge of the deck and work toward the house. Fasten no closer than 3/4 from the outside edge of each plank, using two screws per joist including end joints. For gapping requirements, see page 3. The ends of the planks must fall on a joist. Always double joists at butt seams. Do not toe screw deck planks as this will cause splitting. Always install fasteners perpendicular to plank surface and drive flush. Do not overdrive or splitting and mushrooming will occur. Pre-drilling is required when within 1-1/2 of the ends of the plank and for temperatures below 45 degrees Fahrenheit to avoid end splitting and screw shear. TOPLoc Face Fasteners are recommended for best results. Further instructions available in TOPLoc Package. 3/4 3/4 Directional Notch TwinFinish, ReliaBoard, DockSider, TwinFascia and TwinRiser Boards: The surfaces of these products are directional in manner. A notch has been added to one side of the planks. When installing planks, this marked edge must be laid to the same side for the entire installation for a consistent appearance. The TwinFascia board has one long edge beveled on the front and back. To ensure a consistent appearance from board to board when installing the TwinFascia, the beveled edge must be laid to the same side. If you rip a piece of TwinFascia be sure to note the location of the bevel on the ripped piece to ensure consistency. Identification Mark Bevel Bevel Page 5


6 Square Shouldered Planks/Trimming a TimberTech Deck Terrain, Tropical, Legacy, TwinFinish, Reliaboard, and Docksider Stair Installation TimberTech does not recommend installing planks on steps without a riser board. Stairs should be constructed per local code requirements. Ensure the stringer step is at least the depth of two full planks plus a 1/8 to 3/16 gap between planks. For gapping requirements, see page 3. Ensure there is at least one stringer for support in the middle of the stair span. TimberTech Stair Stringer Spacing Chart Board DockSider TwinFinish Tropical Legacy Reliaboard Terrain Maximum Spacing " 9 16 When used as a veneer General Stair Installation 16 O.C. Maximum Terrain Collection must be used as a veneer in a stair tread application. Please see figure to the right. Bracket & Nails 2x6 Stringer Terrain Stair Components Terrain Collection Front View Stringer Bracket Bracket Nails 2x8 Stringer 1.5 x2.0 Simpson Strong Tie A232 Galvanized Connecting Angles 1-1/2 Simpson Strong-Tie N10D5HDG (0.150 in diameter, in head diameter) galvanized nails Trimming a TimberTech Deck TimberTech Fascia Boards: For Fascia and Riser Installation, see Fastening Guidelines on page 4. TwinFascia Cedar and Grey 12 lengths 9/16 thick by 12 wide. Fascia Silver Maple, Brown Oak, Tigerwood, Mocha, Pecan, Ashwood, Rustic Elm, Sandy Birch, Stone Ash, Amazon Mist, Antigua Gold, Antique Palm, Caribbean Redwood 12 lengths 9/16 thick by 12 wide. TimberTech Stair Risers Use as a riser for stairs. Can also be used as a fascia board for a 2x8 rim joist. 12 lengths and 9/16 thick x 7-1/4 wide. TwinRiser Cedar and Grey Riser Silver Maple, Brown Oak, Tigerwood, Mocha, Pecan, Ashwood, Rustic Elm, Sandy Birch, Stone Ash, Amazon Mist, Antigua Gold, Antique Palm, Caribbean Redwood Page 6


7 CONCEALoc Hidden Fastener Important Information CONCEALoc Hidden Fasteners were designed exclusively to install TimberTech grooved and square shouldered planks. Always be sure to check and cut the factory cut ends of all boards to ensure they are square. In areas with obstructed airflow such as roofs and on-grade applications, a minimum of 1-1/2, sleeper system, is required. Sleeper system must be supported by and connected to the substructure over which the deck is built. To further minimize expansion and contraction, proper ventilation and airflow should be considered. On-grade decks must have additional provisions for drainage beneath the deck structure. For best practices, decking should not be installed in applications where ventilation and airflow cannot be achieved. Do not use CONCELoc Hidden Fasteners or L-Breakouts for stair installation. CONCEALoc Accessories 100-square-foot coverage box. Includes stainless steel screws. Bulk Bucket 1,000-square-foot coverage. Includes stainless steel screws. CONCEALoc Gun Pail 500-square-foot coverage for use with the fastener installation gun sold separately by TigerClaw. Includes quality coated pneumatic fasteners. Stainless steel fasteners for coastal applications available through TigerClaw. L-Bracket avoid face-screwing by using the L-Bracket on first and last boards or as a butt seam clip to ensure a fastener-free surface. CONCEALoc Router Bit cut a 2 wide groove on a solid plank for a perfect CONCEALoc fastener fit even allows for cutting an installed plank over a joist. CONCEALoc screw packs available through If using the CONCEALoc Gun Pail with the TigerClaw Installation Gun please refer to the retail packaging for further installation guidelines. CONCEALoc Hidden Fastener Installation Instructions 1 TOOLS NEEDED INSTALL THE FIRST PLANK Safety Glasses Pre-drill with 5/32 drill bit and fasten outer edge of the first plank at each framing support 1 from the edge using TOPLoc or a #8 x 2-1/2 stainless steel or other high-quality coated deck screws. For a complete fastener-free surface, the L-Bracket or Cortex can be used on first and last boards. (Except Terrain and ReliaBoard) For further instructions for the L-Bracket or Cortex, please refer to the instructions in the package. Router with Slot Cutting Blade (Optional) Drill 2 POSITION CONCEALoc FASTENERS Fully insert the CONCEALoc fastener into grooved edge of plank. Screw hole should be lined up with the center of support joist. Correct Off Center Not fully engaged Incorrect Incorrect Correct Page 7


 Joists at butt joints must be doubled up for proper fastener attachment.")
8 CONCEALoc Hidden Fastener 3 INSTALL CONCEALoc FASTENERS Install provided screw at 45 angle through the fastener and into the joist while applying pressure on the fastener. Install one fastener and screw at each joist. Make sure fastener is in full contact with edge of plank and the screw is holding the fastener down tight to the deck board. 4 COMPLETE INSTALLATION Place the next plank into position against the fasteners. Slightly raise the outer edge of the plank being installed and slide it onto the fastener until the plank contacts the spacer tab. When properly installed the inserted plank should be in contact with the bent-forward spacer tab at the left end of the clip. To achieve this use a scrap piece of decking at least 24 in length and use it as a tamping block to drive the plank further onto the clip and the screw will fully engage the plank to the spacer tab if not already in contact. Do not use a hammer or damage to the edge of the plank will occur. The last plank will need to have the outside edge attached using the method described in Step #1. It may be necessary to rip the last plank to fit. a. b. c. 5 HOW TO INSTALL AT BUTT JOINTS (UNLESS USING TIMBERTECH L-BRACKET) Joists at butt joints must be doubled up for proper fastener attachment. Install fasteners as detailed below. Note that the two clips on the right are shifted approximately 1/4 to the right of center on the joists. If this is not done the spacer tab may fall within the gap of the butt joist. Offset 1/4 From Center Page 8


9 CONCEALoc Hidden Fastener 6 HOW TO: INSTALL ON DIAGONAL When the deck is located in a corner of the house, start with small triangular piece of decking in the corner and work your way out. Offset the center 1/2 towards the long point of the joist, so screw will not exit the side of the joist when driven. Incorrect Correct: Shift over 1/2 7 HOW TO: REPLACE A PLANK Make two parallel cuts down the center of the board to be replaced, then remove the center piece. Using a small pry bar, remove the remaining pieces of decking from the tabs. Using a reciprocating saw, remove the tabs on the side of the board with the screw heads showing. Position new board into place, and carefully drive onto remaining tabs. Once the board is set into position, secure the loose edges with L-Bracket, Cortex, stainless steel, or high-quality coated deck screws. 8 HOW TO: USE CONCEALoc WITH SQUARE SHOULDERED PLANKS Create a 2 long groove on the edge of the plank at every joist. Do not groove the full length of square shouldered deck planks. Use TimberTech s CONCEALoc Groove Cutting Router Bit or a Freud model # or Bosch model #85610M 1/4 slot cutting bit. Flip the plank over and start the groove 3/8 off the bottom of the plank. Set the depth of the cut from 7/16 to 1/2 deep. 1/4 3/8 Depth 2 3/8 Note: Be sure to ID the side of the plank that has the directional notch; the planks with IDs should be installed to the same side. See Directional Notch on page 5. ReliaBoard cannot be grooved. It must ONLY be face-fastened. Grooving ReliaBoard will void the warranty. Do not use CONCEALoc Hidden Fasteners or L-Brackets for stair installations. Page 9

10

11
Decking Installation & Maintenance Guide
 Decking Installation & Maintenance Guide Installing TimberTech Decking... 2 Fastening Methods... 4 TimberTech Square Shouldered Planks... 5 Trimming a TimberTech Deck... 6 CONCEALoc Hidden Fasteners...
Decking Installation & Maintenance Guide
 Decking Installation & Maintenance Guide Installing TimberTech Decking... 2 Fastening Methods... 4 TimberTech Square Shouldered Planks... 5 Trimming a TimberTech Deck... 6 CONCEALoc Hidden Fasteners...
Installation Guide (888)
") BamDeck Installation Guide (888) 788-2254 The Collection Decking Systems BAMDECK 4G 5-7/16 Wide Plank Dims: 192 L x 5-7/16 W x 13/16 H BAMDECK 4G WIDE 8-1/4 Wide Plank Dims: 96 L x 8-1/4 W x 13/16 H BAMDECK
BamDeck Installation Guide (888) 788-2254 The Collection Decking Systems BAMDECK 4G 5-7/16 Wide Plank Dims: 192 L x 5-7/16 W x 13/16 H BAMDECK 4G WIDE 8-1/4 Wide Plank Dims: 96 L x 8-1/4 W x 13/16 H BAMDECK
Installation Guide (888)
") BamDeck Installation Guide (888) 788-2254 The Collection Decking Systems BAMDECK 3G 5-7/16 Wide Plank Dims: 96 L x 5-7/16 W x 13/16 H BAMDECK 3G 16FT. 5-7/16 Wide Plank Dims: 192 L x 5-1/2 W x 13/16 H
BamDeck Installation Guide (888) 788-2254 The Collection Decking Systems BAMDECK 3G 5-7/16 Wide Plank Dims: 96 L x 5-7/16 W x 13/16 H BAMDECK 3G 16FT. 5-7/16 Wide Plank Dims: 192 L x 5-1/2 W x 13/16 H
AZEK Porch Install Guide
 TRIM MOULDING DECK PORCH RAIL PAVERS AZEK Porch Install Guide Installation Guidelines...2 Tools Required...2 Installation Preparation...3 Fasteners...4 Expansion and Contraction...4 Installation Instructions...5-6
AZEK Deck Install Guide
 TRIM MOULDING DECK PORCH RAIL PAVERS AZEK Deck Install Guide Installation Guidelines...2 Tools Required...2 Installation Preparation...3 Working with AZEK Deck Boards...3 CONCEALoc Hidden Fasteners...6
TimberTech Composite Decking Installation & Maintenance
 TimberTech Composite Decking Installation & Maintenance Installing TimberTech Decking Contents 03 Introduction: Installing TimberTech Decking 04 Tools Required 04 Read Before You Start Dear Valued Customer...
COMPOSITE DECKING & FIXING SOLUTIONS
 TIMBERTECH COMPOSITE DECKING & FIXING SOLUTIONS www.timbertech.com.au 2 WHO WE ARE The Tough And True Deck Think wood made tougher. At TimberTech, we make decking that has the look and feel of traditional
Installing AZEK Evolutions Rail
 with Glass Infill Installing AZEK Evolutions Rail Installing Evolutions Rail Contemporary Style with Glass Infill... 2 Installing Evolutions Rail Contemporary Style Stairs with Glass Infill... 9 Notes...
AZEK Porch Install Guide
 AZEK Porch Install Guide Installation Guidelines...2 Tools Required...2 Installation Preparation...5 Fasteners...5 Expansion and Contraction...5 Installation Instructions... 6-7 Perimeter Details...9 Stair
NewTech - CleverDeck Composite Decking Installation Guidelines
 NewTech - CleverDeck Composite Decking Installation Guidelines Composite decking has unique characteristics and requires specific fixing requirements that differ from timber. We strongly recommend that
Installing AZEK Evolutions Rail
 Installing Evolutions Rail TM Contemporary Installing AZEK Evolutions Rail Installing Evolutions Rail Contemporary Style... 2 Installing CableRail by Feeney for Evolutions Rail Contemporary Style... 8
installation care & maintenance instructions lifecycledecking.com 25-year limited residential warranty 20-year limited commercial warranty
 installation care & maintenance instructions lifecycledecking.com 25-year limited residential warranty 20-year limited commercial warranty Installation Instructions As with any building project, use proper
INSTALLATION AND MAINTENANCE GUIDE 2010 SECTION 1 DECKING & DRYSPACE
 INSTALLATION AND MAINTENANCE GUIDE 2010 SECTION 1 DECKING & DRYSPACE CONTENTS DECKING AND DRYSPACE RAILING SYSTEMS DECKLITES Installing TimberTech 04 Tools Required 04 Read Before You Start 05 Material
INSTALLATION INSTRUCTIONS
 New installation instructions effective May 1, 2001 TimberTech Deck/Railing INSTALLATION INSTRUCTIONS ANDWARRANTY General Information TOOLS For all TimberTech Engineered Decking Systems products, standard
NyloDeck Installation Guidelines
 Page 1 of 5 NyloDeck Installation Guidelines Thank-you for choosing NyloDeck decking products, please take a few minutes and read the following installation guidelines along with the NyloDeck Care and
Natural & Tropical Premium PVC XLM Deck Planks and Accessories
 800-476-7900 877-476-70 FAX Natural & Tropical Premium PVC XLM Deck Planks and Accessories FEATURES OF THE TIMBERTECH PVC XLM DECK PLANK: * Premium PVC with flat grain surface pattern * No pre-drilling
INSTALLATION & MAINTENANCE GUIDE DECKING RAILING ACCESSORIES DRYSPACE CARE/CLEANING WARRANTY
 Effective July 1, 2007 INSTALLATION & MAINTENANCE GUIDE DECKING RAILING ACCESSORIES DRYSPACE CARE/CLEANING WARRANTY With proper installation and care TimberTech products are guaranteed to provide years
Installation Guide. Capped Cellular PVC Fencing. Table of Contents. Storage and Handling Tools Needed Fence Layout and Locating Posts
 Capped Cellular PVC Fencing Installation Guide Table of Contents Storage and Handling Tools Needed Fence Layout and Locating Posts Installation instructions 4 x 4 Over Sleeve Post - 3.5 Rail Privacy Shadowbox
Decking Installation Instructions IMPORTANT EVERGRAIN AND EVERGRAIN ENVISION PRODUCT INFORMATION CUTTING & DRILLING LUMBER SIZES & DIMENSIONS
 Decking Installation Instructions IMPORTANT EVERGRAIN AND EVERGRAIN ENVISION PRODUCT INFORMATION DECKING PRODUCTS BEGIN TO AGE AS SOON AS THEY ARE EXPOSED TO NATURE. BUILDINGS EXPERIENCE AGING FACTORS
DuraLife Porch Collection Installation Instructions
 DuraLife Porch Collection Installation Instructions Updated: 1/11 www.gaf.com 1 Getting Started... ilation and Drainage Plan the design of the porch it is the beginning of a successful project. DuraLife
Deck Designer Specification Kit For. TimberTech. All rights reserved copyright 2015 AZEK Building Products
 Deck Designer Specification Kit For TimberTech All rights reserved copyright 2015 AZEK Building Products Deck layout diagram Top view without planks Bottom view with planks Top view with planks Page 2
Indura Plank Installation Instructions
 Indura Plank Installation Instructions General Tips and Guidelines Carefully read and follow all installation instructions to ensure a successful installation. Improper installation may void your warranty.
Evolutions Rail Contemporary Style Installation Guide
 Evolutions Rail Contemporary Style Installation Guide Installing Evolutions Rail Contemporary Style with Glass Infill...2 Installing Evolutions Rail Contemporary Style Stairs with Glass Infill...9 Notes...15
Effective January 2008 TIMBERTECH INSTALLATION & MAINTENANCE GUIDE
 Effective January 2008 Decking Railing Accessories DrySpace Care/Cleaning Warranty TIMBERTECH INSTALLATION & MAINTENANCE GUIDE TimberTech makes it easy. With TimberTech, decks are easy to design, build,
Deck Designer Specification Kit For. TimberTech. All rights reserved copyright 2015 AZEK Building Products
 Deck Designer Specification Kit For TimberTech All rights reserved copyright 2015 AZEK Building Products Deck layout diagram Top view without planks Bottom view with planks Top view with planks Page 2
installation care & maintenance instructions moistureshield.com limited lifetime warranty
 installation care & maintenance instructions 866.729.2378 moistureshield.com limited lifetime warranty It s comforting to know that you re about to build a deck that gives you every possible advantage.
Deck Designer Specification Kit For. TimberTech. All rights reserved copyright 2015 AZEK Building Products
 Deck Designer Specification Kit For TimberTech All rights reserved copyright 2015 AZEK Building Products Deck layout diagram Top view without planks Bottom view with planks Top view with planks Page 2
Installation Instructions for. Before You Begin TOOLS REQUIRED
 Composite Railing System STEP-BY-STEP Installation Instructions for Spectrum Composite Railing Virtually maintenance free 20-year warranty EverNew Spectrum Railing system is designed to work with a number
Deck Designer Specification Kit For. TimberTech. All rights reserved copyright 2015 AZEK Building Products
 Deck Designer Specification Kit For TimberTech All rights reserved copyright 2015 AZEK Building Products Deck layout diagram Top view without planks Bottom view with planks Top view with planks Page 2
UltraDeck. Decking & Railing Installation Guide.
 UltraDeck Decking & Railing Installation Guide www.midwestmanufacturing.com Table of Contents: General Guidelines for Deck Installation 4 Plank Board Installation 6 QuickCap Installation 8 Cladding & Endcap
DECKING INSTALLATION GUIDE
 STAIR TREAD INSTALLATION GUIDE Step 7: Install the Remaining Treads Repeat steps 2 to 6 for the remaining stair treads. Step 8: Install the Fascia 1. Measure the riser height. 2. Rip the fascia to the
DECKING INSTALLATION INSTRUCTIONS PARAMOUNT, SYMMETRY, HORIZON, SANCTUARY, PROTECT ADVANTAGE, AND GOOD LIFE
 DECKING INSTALLATION INSTRUCTIONS PARAMOUNT, SYMMETRY, HORIZON, SANCTUARY, PROTECT ADVANTAGE, AND GOOD LIFE 1-800-573-8841 FIBERONDECKING.COM Table of Contents Safety Information....2 Warranty....2 Pre-Installation....3
Deck Designer Specification Kit For. TimberTech. All rights reserved copyright 2015 AZEK Building Products
 Deck Designer Specification Kit For TimberTech All rights reserved copyright 2015 AZEK Building Products Deck layout diagram Top view without planks Bottom view with planks Top view with planks Page 2
The following instructions will guide you through the installation of your new vinyl railing.
 Installation Guide St. James Vinyl T-Rail Tools Required Protective eye glasses 3/8 x 3 Concrete Anchors/Fasteners (for Tape measure concrete installations) Variable speed drill/screwdriver Philips Driver
EASY INSTALLATION GUIDE WPC DECKING.
 EASY INSTALLATION GUIDE WPC DECKING www.eva-last.com EASY INSTALLATION GUIDE Condensed / Quick glance Installation Instructions Thank you for your interest in our Eva-tech WPC product range. Whether you
COMPOSITE RAILING INSTALLATION
 COMPOSITE RAILING INSTALLATION Tools All you ll need is a hammer and screw gun, circular saw (carbidetipped blade with fewer than 20 teeth is recommended), level, tape measure, rasp and blue chalk line.
SAGIREV Installation Manual
 SAGIPER North America Inc 13179 156 Street Edmonton, AB Canada T5V 1V2 T: (780) 482-3445 F: 1 (888) 870-7069 www.sagipernorthamerica.com SAGIREV Installation Manual NOTE: This guide has been prepared and
U. M. ARMY Texas Conference. Wheel Chair Ramp Manual
 U. M. ARMY Texas Conference Wheel Chair Ramp Manual June 2014 U. M. ARMY Texas Conference Building & Repair Tips Wheelchair Ramps Complete a site survey to determine the design and layout of the ramp.
INSTALLATION GUIDE HEALTH & SAFETY NATURAL VARIANCES & WEATHERING. Ekodeck Should Not: Warnings
 INSTALLATION GUIDE INSTALLATION GUIDE To achieve a safe and long lasting Ekodeck installation, it is read the following guide in full. The installation guide is intended to be viewed along with the Ekodeck
RadianceRail Installation Guide
 RadianceRail Installation Guide Installing RadianceRail with Glass Infill... 2 Installing RadianceRail Stairs with Glass Infill... 9 Notes... 14 TimberTech Code Listings Once a product is tested by an
Deck Designer Specification Kit For. TimberTech. All rights reserved copyright 2015 AZEK Building Products
 Deck Designer Specification Kit For TimberTech All rights reserved copyright 2015 AZEK Building Products Deck layout diagram Top view without planks Bottom view with planks Top view with planks Page 2
PRIVACY INSTALLATION FOR: Standard 6 H x 8 W Privacy Fence 4 x 4 Post Sleeve & Brackets Dog Ear or Straight-Edge Pickets 1.75 x 3.
 PRIVACY INSTALLATION FOR: Standard 6 H x 8 W Privacy Fence 4 x 4 Post Sleeve & Brackets Dog Ear or Straight-Edge Pickets 1.75 x 3.5 Rail Storage and Handling Fence Preparation and Layout Locate and Set
SHADOWBOX INSTALLATION FOR: Standard 6 H x 8 W Shadowbox Fence 5 x 5 Routed Posts Dog Ear or Straight-Edge Pickets 1.75 x 3.5 Rail
 SHADOWBOX INSTALLATION FOR: Standard 6 H x 8 W Shadowbox Fence 5 x 5 Routed Posts Dog Ear or Straight-Edge Pickets 1.75 x 3.5 Rail Storage and Handling Fence Preparation and Layout Locate and Set Posts
INSTALLATION INSTRUCTIONS MILLENNIUM DECKING Before Installing Millennium Decking, please read these instructions in their entirety.
 INSTALLATION INSTRUCTIONS MILLENNIUM DECKING Before Installing Millennium Decking, please read these instructions in their entirety. Safety PRE-INSTALLATION Compliance with all applicable local, state
INSTALLATION GUIDE INSTALLATION GUIDE EKODECK SHOULD NOT: IMPORTANT INFORMATION
 INSTALLATION GUIDE INSTALLATION GUIDE EKODECK SHOULD NOT: To achieve a safe and long lasting Ekodeck installation, it is important to read the following guide in full. Be used as a structural or load bearing
CXT PRO RAILING INSTALLATION INSTRUCTIONS For Installations Using Aluminum and Glass Balusters Sold Separately
 CXT PRO RAILING INSTALLATION INSTRUCTIONS For Installations Using Aluminum and Glass Balusters Sold Separately CCRR-0171 PFS AA-652 Drill/power screwdriver Assorted drill bits Hammer Miter or circular
Deck Designer Specification Kit For. TimberTech. All rights reserved copyright 2015 AZEK Building Products
 Deck Designer Specification Kit For TimberTech All rights reserved copyright 2015 AZEK Building Products Deck layout diagram Top view without planks Bottom view with planks Top view with planks Page 2
The following instructions will guide you through the installation of your new vinyl railing stair kit.
 Installation Guide Vinyl Standard Stair Railing Tools Required Protective eye glasses Tape measure Variable speed drill/screwdriver Rotary hammer or hammer drill and masonry percussion bit recommended
Installation Guide. Deckorum. Composite Decking
 Installation Guide Deckorum Composite Decking 1. Introduction Welcome to Deckorum Installation Guide Please fully read the installation guide before commencing any installation works. This will provide
PREPARATION & TOOL CHECKLIST
 INSTRUCTION MANUAL RAILING PRODUCTS BEGIN TO AGE AS SOON AS THEY ARE EXPOSED TO NATURE. BUILDINGS EXPERIENCE AGING FACTORS DIFFERENTLY, SO IT IS DIFFICULT TO PREDICT HOW LONG RAILING PRODUCTS WILL LAST.
Deck Designer Specification Kit For. TimberTech. All rights reserved copyright 2015 AZEK Building Products
 Deck Designer Specification Kit For TimberTech All rights reserved copyright 2015 AZEK Building Products Deck layout diagram Top view without planks Bottom view with planks Top view with planks Page 2
XLM shown in Desert Bronze and RadianceRail shown in Mountain Cedar and Coastal White with DeckLites
 PRODUCT CATALOG TIMBERTECH XLM shown in Desert Bronze and RadianceRail shown in Mountain Cedar and Coastal White with DeckLites CREATEa place where there s not a care in the world TimberTech does more
Customer Service: Installation, Care and Maintenance
 Customer Service: 800-951-5117 Installation, Care and Maintenance Installation Instructions Easy step-by-step instructions for decking, railing and stairs. As with any building project, use proper eye
Deck Designer Specification Kit For. TimberTech. All rights reserved copyright 2015 AZEK Building Products
 Deck Designer Specification Kit For TimberTech All rights reserved copyright 2015 AZEK Building Products Deck layout diagram Top view without planks Bottom view with planks Top view with planks Page 2
P R O D U C T C A T A L O G
 P R O D U C T C A T A L O G TimberTech makes it easy. With an array of decking profiles, three railing systems and fencing, TimberTech makes it easy to maximize your outdoor living area. TimberTech products
Deck Designer Specification Kit For. TimberTech. All rights reserved copyright 2016 DIY Technologies
 Deck Designer Specification Kit For TimberTech All rights reserved copyright 2016 DIY Technologies Deck layout diagram Top view without planks Bottom view with planks Top view with planks Page 2 Deck Part
GREEN WORLD LUMBER GENUINE MAHOGANY DECKING INSTALLATION GUIDE
 GREEN WORLD LUMBER GENUINE MAHOGANY DECKING INSTALLATION GUIDE Genuine Mahogany is among the most durable natural wood decking available. When properly installed and maintained, you should have a beautiful
DECKING PRODUCT ITEM CTN. DESCRIPTION NO. QTY. PIECE FULL COLOR TERRAIN COLLECTION
 DECKING TERRAIN COLLECTION TCGV5412-12' Grooved 733253 64 $49.34 44.85 Brown Oak, Silver Maple TCGV5412-12' Grooved 815489 64 $42.21 38.38 Sandy Birch, Rustic Elm, Stone Ash TCGV5416-16' Grooved or Solid
PREPARATION & TOOL CHECK LIST
 INSTRUCTION MANUAL RAILING PRODUCTS BEGIN TO AGE AS SOON AS THEY ARE EXPOSED TO NATURE. BUILDINGS EXPERIENCE AGING FACTORS DIFFERENTLY, SO IT IS DIFFICULT TO PREDICT HOW LONG RAILING PRODUCTS WILL LAST.
Deck Designer Specification Kit For. TimberTech. All rights reserved copyright 2015 AZEK Building Products
 Deck Designer Specification Kit For TimberTech All rights reserved copyright 2015 AZEK Building Products Deck layout diagram Top view without planks Bottom view with planks Top view with planks Page 2
SIGMADEK BOARD TM SAFETY AND ASSEMBLY GUIDE
 SIGMADEK BOARD TM SAFETY AND ASSEMBLY GUIDE PLEASE, READ THE SAFETY AND ASSEMBLY GUIDE THOROUGHLY PRIOR TO ASSEMBLING YOUR SIGMADEK BOARD TM. WARNINGS 1. REFER TO ANY LOCAL BUILDING CODE FOR JURISDICTIONAL
Deck Designer Specification Kit. TimberTech Designer. All rights reserved copyright 2007 DIY Technologies
 Deck Designer Specification Kit TimberTech Designer All rights reserved copyright 2007 DIY Technologies Deck layout diagram Top view without planks Bottom view with planks Top view with planks Page 2 Deck
AZEK Trim & Moulding Install Guide
 AZEK Trim and Moulding AZEK Trim & Moulding Install Guide Storage & Handling, Cutting, Drilling, Routing... 2 Fastening, Expansion & Contraction... 3 Painting, Gluing... 4-5 Spanning, Water Table... 6
Extra Wide Heavy Duty Plastic Lockers Series Locker Installation Instructions
 Locker Installation Instructions Thank you for selecting Extra Wide Heavy Duty Plastic Lockers. We are confident that the quality and construction of the lockers will prove to be a good investment. These
Deck Designer Specification Kit For. TimberTech. All rights reserved copyright 2015 AZEK Building Products
 Deck Designer Specification Kit For TimberTech All rights reserved copyright 2015 AZEK Building Products Deck layout diagram Top view without planks Bottom view with planks Top view with planks Page 2
Installation Guide. 203 Chesterra Drive, Dahlonega, GA Toll-Free ~ Fax ~
 Congratulations and Thank You for your purchase! DryJoistEZ is an easy to install structural aluminum joist that also provides an under-deck drainage system that you install over your deck framing system
Deck Designer Specification Kit For. TimberTech. All rights reserved copyright 2015 AZEK Building Products
 Deck Designer Specification Kit For TimberTech All rights reserved copyright 2015 AZEK Building Products Deck layout diagram Top view without planks Bottom view with planks Top view with planks Page 2
INSTALLATION INSTRUCTIONS
 INSTALLATION INSTRUCTIONS 5-in x 84-in x 3/8-in 12.7 cm x 213.36 cm x 9.525 mm 10 planks 29 sq.ft. IMPORTANT INFORMATION Open cartons 2-3 days prior to the install and allow material to adjust to the relative
HOW TO INSTALL ELITE PANELED WAINSCOTING Using X-Rails with Either Raised, Flat or Beaded Panels
 HOW TO INSTALL ELITE PANELED WAINSCOTING Using X-Rails with Either Raised, Flat or Beaded Panels 1. First, remove the cover plates from all electrical outlets. All baseboards should also be removed; the
Dura-Lock Roof System
 DLR-14 Dura-Lock Roof System Assembly and Installation Instructions Read the instructions before starting the job. They explain the steps required to produce a finished product that will meet factory specifications.
TREX TRANSCEND RAILING
 RAILING NOTES:» RAILINGS ARE DESIGNED TO BE INSTALLED OVER THE DECKING FRAME OR ON INSIDE OF RIM JOIST. NOTCHING OF PRESSURE-TREATED POSTS OR POSTS INSTALLED ON OUTSIDE OF RIM JOIST IS NOT ALLOWED.» All
ATLANTIS RAIL Contact Information
 ATLANTIS RAIL Contact Information Customer Service (800) 541-6829 (508) 732-9191 Spectrum System Installation Instructions Atlantis Rail s Spectrum System is an easy to install, universal cable railing
Office Installation Guidelines
 UH Structures Inc. dba Ebtech Industrial 2241 Industrial Drive Connellsville, PA 15425-6181 Telephone: 724-628-6100 Fax: 1-412-774-2429 www.ebtechindustrial.com Office Installation Guidelines INTRODUCTION
TOLL FREE:(888) FAX:(941) ASSEMBLY of ProTEC CONCRETE STRUCTURAL INSULATED PANEL
 FAX:(941) ASSEMBLY of ProTEC CONCRETE STRUCTURAL INSULATED PANEL") ASSEMBLY of ProTEC CONCRETE STRUCTURAL INSULATED PANEL The ProTEC panels are manufactured with grooves on all four sides to accept the steel components. This grooving applies to the regular panel whose
ASSEMBLY of ProTEC CONCRETE STRUCTURAL INSULATED PANEL The ProTEC panels are manufactured with grooves on all four sides to accept the steel components. This grooving applies to the regular panel whose
Shapes Siding. Perfection Shingles. Chalk Line
 Snap a Chalk Line Shapes Siding Perfection Shingles Chalk Line To establish a straight reference line to guide the positioning of the starter strip and the first course of siding, snap a chalk line. starter
Deck Designer Specification Kit For. TimberTech. All rights reserved copyright 2015 AZEK Building Products
 Deck Designer Specification Kit For TimberTech All rights reserved copyright 2015 AZEK Building Products Deck layout diagram Top view without planks Bottom view with planks Top view with planks Page 2
Dave's Glossary of Construction Terms. by Dave Osborne (www.daveosborne.com)
") Dave's Glossary of Construction Terms by Dave Osborne (www.daveosborne.com) 5/4" A thickness of decking material between 1 x 6 and 2 x 6. Although it is called 5/4 x 6, it is actually 1" thick and 5 1/2"
Dave's Glossary of Construction Terms by Dave Osborne (www.daveosborne.com) 5/4" A thickness of decking material between 1 x 6 and 2 x 6. Although it is called 5/4 x 6, it is actually 1" thick and 5 1/2"
Installation Guide. deckorum Composite Decking
 Installation Guide deckorum Composite Decking 1. Introduction Welcome to Deckorum installation Guide Please fully read the installation guide before commencing any installation works. This will provide
Step 2 - Measure and install joist hangers every 16". See Figure "B" above. Fill every hole in each
 Adding a deck is one of the most useful projects a homeowner can do to improve their home. Each deck is different and presents it's own set of challenges, so contact us with unique questions if they are
PAINT & MISC. Notes. Table of Contents. Front Handrail Posts Front Handrails Closet Shelving Exterior Deck...
 118 PAINT & MISC. Table of Contents Front Handrail Posts... 119 Front Handrails... 122 Closet Shelving... 125 Exterior Deck... 127 Look for painter s tape on the hammer drill for where to set the depth.
CELLBOARD DECK CLIP FIXING INSTALLATION MANUAL CBWD14525
 CELLBOARD DECK CLIP FIXING INSTALLATION MANUAL CBWD14525 1 BEFORE YOU COMMENCE Please note that: The Product is subject to natural variation* in finish as part of the manufacturing process. The purchaser
CELLBOARD DECK CLIP FIXING INSTALLATION MANUAL CBWD14525
 CELLBOARD DECK CLIP FIXING INSTALLATION MANUAL CBWD14525 1 BEFORE YOU COMMENCE Please note that: The Product is subject to natural variation* in finish as part of the manufacturing process. The purchaser
Deck Designer Specification Kit For AZEK. All rights reserved copyright 2015 AZEK Building Products
 Deck Designer Specification Kit For AZEK All rights reserved copyright 2015 AZEK Building Products Deck layout diagram Top view without planks Bottom view with planks Top view with planks Page 2 Permit
Deck Designer Specification Kit For. TimberTech. All rights reserved copyright 2015 AZEK Building Products
 Deck Designer Specification Kit For TimberTech All rights reserved copyright 2015 AZEK Building Products Deck layout diagram Top view without planks Bottom view with planks Top view with planks Page 2
PVC Composite Railing & Stair Kit
 FREEDOM-WEB PVC Composite Railing & Stair Kit INSTALLATION INSTRUCTIONS Read all instructions prior to installing product. Refer to manufacturers safety instructions when operating any tools. To register
Fig. 1. Fig. 2. Fig. 3. Fig. 4. Fig. 5. Fig. 6
 INSTALLATION GUIDE Local building codes and principles should always be adhered to when installing Wolf Portrait Siding (the Product ). All installations are unique and the sole responsibility of the installer
Chapter 17 - Porch Trim
 Chapter 17 - Porch Trim Contents Chapter 17 - Porch Trim... 17-1 Timing & Prerequisites... 17-2 Trim on Porch Beams (Volunteer)... 17-4 Smart Trim on the Bottom of the Beam... 17-4 Smart Trim on the Inside
Metro Series Sauna. installation instructions
 Metro Series Sauna installation instructions Please immediately check for any hidden damage that may have occurred in shipping. If any damage is found you must notify the delivering carrier within seven
SHIPLOCK CLADDING PRODUCT GUIDE INSTALLATION TECHNICAL SPECIFICATIONS CARE & MAINTENANCE
 SHIPLOCK CLADDING PRODUCT GUIDE INSTALLATION TECHNICAL SPECIFICATIONS CARE & MAINTENANCE SHIPLOCK CLADDING CN-04E / CN-04W / CN-W008 Prior to the installation of any form of Cladding, it is recommended
Installation Instructions for Siding
 Smart-Shingle TM System "The new smart way to install cedar shingles." - This Old House Installation Instructions for Siding V3.2 INSTALLATION GUIDE MARKS Shingle-Strip 0 1 2 3 4 5 6 7 8 9 10 11 12 13
Deck Designer Specification Kit For AZEK. All rights reserved copyright 2015 AZEK Building Products
 Deck Designer Specification Kit For AZEK All rights reserved copyright 2015 AZEK Building Products Deck layout diagram Top view without planks Bottom view with planks Top view with planks Page 2 Permit
DECKS. Stairway illumination Positive attachment of ledger Lateral load connection required board (R507.2) required (R ) (R311.7.
 required (R ) (R311.7.") DECKS Max. riser height-7 ¾ Min. tread depth-10 Landings required at (R311.7.5.1) (R311.7.5.2) top and bottom of stairs (R311.7.6) Notched guardrail post NOT allowed Graspable handrail required Spacing
DECKS Max. riser height-7 ¾ Min. tread depth-10 Landings required at (R311.7.5.1) (R311.7.5.2) top and bottom of stairs (R311.7.6) Notched guardrail post NOT allowed Graspable handrail required Spacing
Tools Required. Bench Hardware. Bench Parts. Planter Hardware. Planter Parts. BENCH/PLANTER INSTALLATION GUIDELINES for
 Arbor Collection / Harvest Collection / Terra Collection Page 1 Please read all instructions completely before starting any part of the installation. Each AZEK and Kit comes complete with all hardware,
INSTALLATION INSTRUCTIONS
 INSTALLATION INSTRUCTIONS 5-in x 84-in x 3/8-in 12.7 cm x 213.36 cm x 9.525 mm 10 planks 29 sq.ft. IMPORTANT INFORMATION Open cartons 2 3 days prior to the install and allow material to adjust to the relative
Studio Face Xtreme 6020 Installation Instructions (Nickel , Black )
") Packing List Face Trim (4 Pieces) (3) Hanging Brackets (9) 3/16 x 1-1/4 Masonry Screws 9/64 Drill Bit Compatibility (2) Lower Brackets w Magnets (2) Lower Facing Plates (4) 2 Drywall Screws Trim Hardware
Packing List Face Trim (4 Pieces) (3) Hanging Brackets (9) 3/16 x 1-1/4 Masonry Screws 9/64 Drill Bit Compatibility (2) Lower Brackets w Magnets (2) Lower Facing Plates (4) 2 Drywall Screws Trim Hardware
WOODWORKS Walls. Installation Instructions WALL
 WALL Systems Between us, ideas become reality WOODWORKS Walls Installation Instructions 1. GENERAL 1.1. Product Description WoodWorks walls consist of 2' x 4', 2' x 8', 2' x 9' or 2' x 10' perforated and
Installation Guidelines
 Page 1 Tools You ll Need 4 ft. Carpenter s level Chalk line (to mark U channel locations) Cordless drill/nut driver Caulking gun Chop saw with a metal cutting blade on it (required to make accurate and