HDS Live Installation Manual
|
|
|
- Gwen Gordon
- 5 years ago
- Views:
Transcription


1 HDS Live Installation Manual ENGLISH
2
3 Preface Disclaimer As Navico is continuously improving this product, we retain the right to make changes to the product at any time which may not be reflected in this version of the manual. Please contact your nearest distributor if you require any further assistance. It is the owner s sole responsibility to install and use the equipment in a manner that will not cause accidents, personal injury or property damage. The user of this product is solely responsible for observing maritime safety practices. NAVICO HOLDING AS AND ITS SUBSIDIARIES, BRANCHES AND AFFILIATES DISCLAIM ALL LIABILITY FOR ANY USE OF THIS PRODUCT IN A WAY THAT MAY CAUSE ACCIDENTS, DAMAGE OR THAT MAY VIOLATE THE LAW. This manual represents the product as at the time of printing. Navico Holding AS and its subsidiaries, branches and affiliates reserve the right to make changes to specifications without notice. Governing language This statement, any instruction manuals, user guides and other information relating to the product (Documentation) may be translated to, or has been translated from, another language (Translation). In the event of any conflict between any Translation of the Documentation, the English language version of the Documentation will be the official version of the Documentation. Copyright Copyright 2018 Navico Holding AS. Warranty The warranty card is supplied as a separate document. In case of any queries, refer to the brand website of your unit or system: Preface HDS Live Installation Manual 3
4 Compliance statements Europe Navico declare under our sole responsibility that the product conforms with the requirements of: CE under RED 2014/53/EU The relevant declaration of conformity is available in the product's section at the following website: Countries of intended use in the EU AT - Austria BE - Belgium BG - Bulgaria CY - Cyprus CZ - Czech Republic DK - Denmark EE - Estonia FI - Finland FR - France DE - Germany GR - Greece HU - Hungary IS - Iceland IE - Ireland IT - Italy LV - Latvia LI - Liechtenstein LT - Lithuania LU - Luxembourg MT - Malta NL - Netherlands NO - Norway PL - Poland PT - Portugal RO - Romania SK - Slovak Republic SI - Slovenia ES - Spain SE - Sweden CH - Switzerland TR - Turkey UK - United Kingdom United States of America Navico declare under our sole responsibility that the product conforms with the requirements of: Part 15 of the FCC Rules. Operation is subject to the following two conditions: (1) this device may not cause harmful interference, and (2) this device must accept any interference received, including interference that may cause undesired operation 4 Preface HDS Live Installation Manual
5 Warning: The user is cautioned that any changes or modifications not expressly approved by the party responsible for compliance could void the user s authority to operate the equipment. Ú Note: This equipment generates, uses and can radiate radio frequency energy and, if not installed and used in accordance with the instructions, may cause harmful interference to radio communications. However, there is no guarantee that the interference will not occur in a particular installation. If this equipment does cause harmful interference to radio or television reception, which can be determined by turning the equipment off and on, the user is encouraged to try to correct the interference by one or more of the following measures: Reorient or relocate the receiving antenna Increase the separation between the equipment and receiver Connect the equipment into an outlet on a circuit different from that of the receiver is connected Consult the dealer or an experienced technician for help Industry Canada This device complies with Industry Canada s license-exempt RSSs. Operation is subject to the following two conditions: (1) This device may not cause interference; and (2) This device must accept any interference, including interference that may cause undesired operation of the device. Le présent appareil est conforme aux CNR d Industrie Canada applicables aux appareils radio exempts de licence. L exploitation est autorisée aux deux conditions suivantes: (1) l appareil ne doit pas produire de brouillage, et. (2) l utilisateur de l appareil doit accepter tout brouillage radioélectrique subi, même si le brouillage est susceptible d en compromettre le fonctionnemen. Industry Canada Statement: Under Industry Canada regulations, this radio transmitter may only operate using an antenna of a type and maximum (or lesser) gain approved for the transmitter by Industry Canada. To reduce potential radio interference to other users, the antenna type and its gain should be so chosen that the equivalent isotropically radiated power (e.i.r.p.) is not more than that necessary for successful communication. Preface HDS Live Installation Manual 5
6 Conformément à la réglementation d Industrie Canada, le présent émetteur radio peut fonctionner avec une antenne d un type et d un gain maximal (ou inférieur) approuvé pour l émetteur par Industrie Canada. Dans le but de réduire les risques de brouillage radioélectrique à l intention des autres utilisateurs, il faut choisir le type d antenne et son gain de sorte que la puissance isotrope rayonnée quivalente (p.i.r.e.) ne dépassepas l intensité nécessaire à l établissement d une communication satisfaisante. Australia and New Zealand Navico declare under our sole responsibility that the product conforms with the requirements of: level 2 devices of the Radiocommunications (Electromagnetic Compatibility) standard 2017 radiocommunications (Short Range Devices) Standards 2014 Internet usage Some features in this product use an internet connection to perform data downloads and uploads. Internet usage via a connected mobile/cell phone internet connection or a pay-per-mb type internet connection may require large data usage. Your service provider may charge you based on the amount of data you transfer. If you are unsure, contact your service provider to confirm rates and restrictions. Trademarks Navico is a registered trademark of Navico Holding AS. Lowrance is a registered trademark of Navico Holding AS. Bluetooth is a registered trademark of Bluetooth SIG, Inc. CZone is a trademark of Power Products LLC. Evinrude is a registered trademark of BRP US, Inc. HDMI and HDMI, the HDMI Logo, and High-Definition Multimedia Interface are trademarks or registered trademarks of HDMI Licensing LLC in the United States and other countries. Mercury is a registered trademark of Mercury. NMEA and NMEA 2000 are registered trademarks of the National Marine Electronics Association. 6 Preface HDS Live Installation Manual
7 Power-Pole is a registered trademark of JL Marine Systems, Inc. SD and microsd are trademarks or registered trademarks of SD-3C, LLC in the United States, other countries or both. SmartCraft VesselView is a registered trademark of Mercury. Suzuki is a registered trademark of Suzuki. Yamaha is a registered trademark of Yamaha. About this manual This manual is a reference guide for installing units. Some features may not be activated or available for screenshots in the manual. As a result, screenshots of menus and dialogs may not match the look of your unit. Important text that requires special attention from the reader is emphasized as follows: Ú Note: Used to draw the reader s attention to a comment or some important information. Warning: Used when it is necessary to warn personnel that they should proceed carefully to prevent risk of injury and/or damage to equipment/ personnel. Preface HDS Live Installation Manual 7
8 8 Preface HDS Live Installation Manual
9 Contents 11 Introduction 11 Parts included 12 Keys 14 Card reader 15 Connectors 16 Installation 16 Installation guidelines 17 U-bracket mounting 17 Panel mounting 18 Wiring 18 Connectors 18 Wiring guidelines 19 Power, NMEA 0183 and video input 22 USB devices 23 NMEA Ethernet device connection 26 HDMI input 27 Sonar CH1 - blue 9-pin connector 27 Sonar CH2 - black 9-pin connector 28 Software setup 28 First time startup 28 Software setup sequence 28 Turning the system on and off 28 The settings dialog 29 System settings 30 Alarms 31 Radar settings 36 Sonar settings 40 Autopilot settings 45 Fuel settings 47 Wireless settings 48 Network settings 52 3rd party support 52 SmartCraft VesselView integration Contents HDS Live Installation Manual 9
10 52 Suzuki engine integration 52 Yamaha engine integration 53 Evinrude engine integration 53 Power-Pole anchors 53 C-Zone 56 Accessories 57 Supported data 57 NMEA 2000 compliant PGN List 61 NMEA 0183 supported sentences 63 Technical specifications 63 HDS Live 66 Dimensional drawings 66 7" unit 66 9" unit 67 12" unit 67 16" unit 10 Contents HDS Live Installation Manual
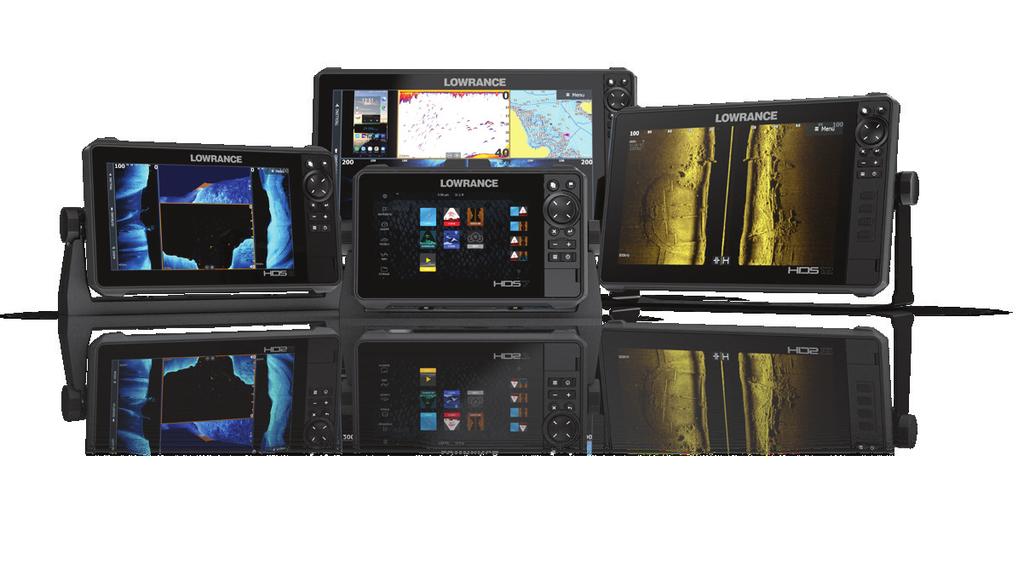
11 1 Introduction Parts included HDS Live A B1 B2 C D E F A B1 B2 C D E F HDS Live unit U-bracket kit (plastic), HDS-7 Live and HDS-9 Live U-bracket kit (metal), HDS-12 Live and HDS-16 Live Sun cover Power cable kit Gasket Documentation pack Introduction HDS Live Installation Manual 11
12 Keys The front panel keys A B D F G MOB C E H I A B C D Pages key Press once to activate the Home page. Repeat short presses to cycle the favorite buttons Press and hold is configurable. Refer to the operator manual for details Waypoint key Press to open the new waypoint dialog Press twice to save a waypoint Press and hold to access the find dialog Arrow keys Press arrows to move through menu items, to adjust a value, and to move the cursor on a panel Exit (X) key Press to exit a dialog, to return to previous menu level, to remove the cursor from the panel or to restore the cursor on the panel 12 Introduction HDS Live Installation Manual
13 E F G H I Enter key Press to select or save your settings Zoom keys and MOB key Zoom keys for panels and images Simultaneous pressing both keys saves a Man Overboard (MOB) waypoint at the current vessel position Menu key Press to display the menu for the active panel/overlay Press twice to display the settings dialog Press and hold to hide or show the menu Power key Press to turn the unit ON Press and hold to turn the unit OFF When ON, press once to display the System Controls dialog. Repeat short presses to cycle the backlight brightness Quick access keys (HDS-12 Live and HDS-16 Live units only) For configuration of the quick access keys refer to the operator manual. Introduction HDS Live Installation Manual 13
14 Card reader A memory card can be used for: Chart data Software updates Transfer of user data System backup Ú Note: Do not download, transfer or copy files to a chart card. Doing so can damage chart information on the chart card. The protective door should always be securely shut immediately after inserting or removing a card, in order to prevent possible water ingress. 14 Introduction HDS Live Installation Manual
15 Connectors HDS Live 7" unit 9" unit E D A B C E D D A B C 12" and 16" unit E D D F G A B C A B C D E F G Power, video input and NMEA 0183 connector Sonar CH1 - blue 9-pin connector Sonar CH2 - black 9-pin connector Ethernet connector (5-pin) NMEA 2000 connector HDMI output connector USB connector Introduction HDS Live Installation Manual 15
16 2 Installation Installation guidelines Choose the mounting location carefully, make sure that there are no hidden electrical wires or other parts behind the panel before you drill or cut. Ensure that any holes cut are in a safe position and will not weaken the boat s structure. If in doubt, consult a qualified boat builder, or marine electronics installer. Don t: Mount any part where it can be used as a hand hold Mount any part where it might be submerged Mount any part where it will interfere with the operation, launching, or retrieving of the boat Do: Test the unit in its intended location to ensure satisfactory wireless and GPS performance. Metal and carbon materials are known to impact the performance in a negative way. A well placed external GPS source and/or wireless module can be added to overcome poor performance Consider the optimum viewing angles Consider the overall width and height requirements Consider access to the card reader Leave sufficient clearance to connect all relevant cables Check that it is possible to route cables to the intended mounting location Ú Note: Where flush mounted, the enclosure should be dry and well ventilated. In small enclosures, it may be required to fit forced cooling. Warning: Inadequate ventilation and subsequent overheating of the unit may cause unreliable operation and reduced service life. Exposing the unit to conditions that exceeds the specifications could invalidate your warranty. Refer to the technical specifications in the "Technical specifications" on page Installation HDS Live Installation Manual
17 U-bracket mounting 1. Place the bracket in the desired mounting location. Ensure that the chosen location has enough height to accommodate the unit fitted in the bracket, and allows tilting of the unit. Also adequate space is required on both sides to allow tightening and loosening of the knobs. 2. Mark the screw locations using the bracket as a template, and drill pilot holes. Use fasteners suited to the mounting surface material. 3. Screw down the bracket. 4. Mount the unit to the bracket using the knobs. Hand tighten only. 3 4 Panel mounting Refer to the separate mounting template for panel mounting instructions. Installation HDS Live Installation Manual 17
18 3 Wiring Connectors Different models have different connectors. For available connectors and connector layout refer to "Connectors" on page 15. Wiring guidelines Don't: Make sharp bends in the cables Run cables in a way that allows water to flow down into the connectors Run the data cables adjacent to radar, transmitter, or large/high current carrying cables or high frequency signal cables. Run cables so they interfere with mechanical systems Run cables over sharp edges or burrs Do: Make drip and service loops Use cable-tie on all cables to keep them secure Solder/crimp and insulate all wiring connections if extending or shortening the cables. Extending cables should be done with suitable crimp connectors or solder and heat shrink. Keep joins as high as possible to minimize possibility of water immersion. Leave room adjacent to connectors to ease plugging and unplugging of cables Warning: Before starting the installation, be sure to turn electrical power off. If power is left on or turned on during the installation, fire, electrical shock, or other serious injury may occur. Be sure that the voltage of the power supply is compatible with the unit. Warning: The positive supply wire (red) should always be connected to (+) DC with a fuse or a circuit breaker (closest available to fuse rating). 18 Wiring HDS Live Installation Manual
19 Power, NMEA 0183 and video input Connector details Unit socket (female) Pin Purpose 1 Accessory wake up 2 Listener B (Rx_B) 3 Video in + 4 Talker B (Tx_B) 5 Drain 6 Talker A (Tx_A) V DC 8 DC negative 9 Video in - 10 Listener A (Rx_A) Ú Note: To use the video input functionality, an adapter cable has to be used (sold separately). Power The unit is designed to be powered by 12 V DC. It is protected against reverse polarity, under voltage and over voltage (for a limited duration). Wiring HDS Live Installation Manual 19
20 A fuse or circuit breaker should be fitted to the positive supply. For recommended fuse rating, refer to "Technical specifications" on page 63. NMEA 0183 The unit has a built in NMEA 0183 serial interface, providing both input and output. The port(s) uses the NMEA 0183 (serial balanced) standard, and can be configured in the software for different baud rates up to 38,400 baud. Talkers and listeners Only one talker (output device) can be connected to a serial input (RX) on the unit, in accordance with the NMEA0183 protocol. However, an output port (TX) on the unit may be connected to up to three listener (receiver) devices, dependent on the hardware capabilities of the receiver. Video input The unit can be connected to a composite video source, and display video images on its display. Ú Note: Camera cables are not supplied, and will need to be selected to suit termination - RCA at the unit, and typically BNC or RCA plug at the camera end. Ú Note: The video images will not be shared with another unit via the network. It is only possible to view video on the unit connected to the video source. Ú Note: Both NTSC and PAL formats are supported. Video input configuration Configurations to video input are made in the video panel, refer to the Operator Manual for more information. 20 Wiring HDS Live Installation Manual
21 Power and NMEA 0183 cable A B D C G F E H I Key Description Color A + 12 V DC Red B DC negative Black C Fuse -- D Accessory wake up Yellow E Talker A (Tx_A) Yellow F Talker B (Tx_B) Blue G Listener A (Rx_A) Orange H Listener B (Rx_B) Green I Ground (shield) -- Accessory wake up The accessory wake up wire may be used to control the power state of external equipment. Combine all accessory wake up wires on a common bus or to a single termination point. When connected in this manner, the connected equipment will turn on the moment the unit is powered up. Wiring HDS Live Installation Manual 21
22 B A A Key Purpose Color A Accessory wake up wire Yellow B Accessory wake up line Video adapter cable (sold separately) A B C Key A B C Description Video adapter cable (Connects to the unit socket) BNC connector (female) Power and NMEA 0183 cable USB devices The USB port(s) can be used to: 22 Wiring HDS Live Installation Manual
23 Connect a storage device for software updates, transfer of user data, and for system backup Charge a connected device. For maximum output power refer to the "Technical specifications" on page 63 Ú Note: USB cable length should not exceed 5 m when using regular cables. Lengths over 5 m may be possible with the use of an active USB cable. USB connector details Unit socket (female) Cable plug/device plug (male) The unit is equipped with standard USB type-a connector(s). NMEA 2000 The NMEA 2000 data port allows receiving and sharing of a multitude of data from various sources. Connector details Unit socket (male) Pin Purpose 1 Shield 2 NET-S (+12 V DC) 3 NET-C (DC negative) 4 NET-H Wiring HDS Live Installation Manual 23
24 Pin Purpose 5 NET-L Plan and install an NMEA 2000 network An NMEA 2000 network consists of a powered backbone from which drop cables connect to NMEA 2000 devices. The backbone needs to run within 6 m (20 ft) of the locations of all products to be connected, typically in a bow to stern layout. The following guidelines apply: The total length of the backbone should not exceed 100 meters (328 ft) A single drop cable has a maximum length of 6 meters (20 ft). The total length of all drop cables combined should not exceed 78 meters (256 ft) The backbone needs to have a terminator at each end of the backbone. The terminator can be a terminator plug or a unit with built-in terminator A A A C B E B D B C A B C D E NMEA 2000 device Drop-cable Terminator Power supply Backbone Powering the network The network requires its own 12 V DC power supply, protected by a 3 amp fuse. For smaller systems: connect power at any location in the backbone. For larger systems: connect power at a central point in the backbone to balance the voltage drop of the network. Make the 24 Wiring HDS Live Installation Manual
25 installation such that the load/current draw on each side of the power node is equal. Ú Note: 1 LEN (Load Equivalency Number) equals 50 ma current draw. Ú Note: Do not connect the NMEA 2000 power cable to the same terminals as the engine start batteries, autopilot computer, bow thruster or other high current devices. Ethernet device connection Connection of network devices can be made directly to the Ethernet port, or via a network expansion device to the Ethernet port. Ethernet connector details Unit socket (female) Pin Purpose 1 Transmit positive TX+ 2 Transmit negative TX- Wiring HDS Live Installation Manual 25
26 Pin Purpose 3 Receive positive RX+ 4 Receive negative RX- 5 Shield Ethernet devices The Ethernet ports can be used for transfer of data and synchronization of user created data. It is recommended that each MFD in the system is connected to the Ethernet network. No special setup is required for establishing an Ethernet network, it is all plug-and-play. Ethernet expansion device Connection of network devices can be made via an Ethernet expansion device. Additional expansion devices can be added to provide the required number of ports. HDMI input The unit can be connected to an external video source to display video images on its display. HDMI connector details Unit socket (female) Cable plug (male) The unit is equipped with standard HDMI (Type A) connector(s). The unit should be turned off prior to connecting or disconnecting an HDMI cable. Ú Note: While the HDMI standard does not state maximum cable length, signal may be compromised on long runs. Only use Navico or other high quality HDMI certified cables. 3rd party cables should be tested before installation. On runs over 10 m it may be required to add an HDMI amplifier or use HDMI-CAT6 adaptors. 26 Wiring HDS Live Installation Manual
27 Video input configuration Configurations to video input are made in the video panel, refer to the Operator Manual for more information. Sonar CH1 - blue 9-pin connector Supports: Sonar / CHIRP Sonar DownScan Active Imaging 3D transducer LiveSight Down/Forward transducer Ú Note: A 7-pin transducer cable can be connected to a 9-pin port using a 7-pin to 9-pin adaptor cable. However, if the transducer has a paddle wheel speed sensor, the water-speed data will not be displayed on the unit. Ú Note: Channel 1 can do SideScan via an Active Imaging 3D transducer. It cannot do SideScan from an Active Imaging, Active Imaging 3-in-1, TotalSCan, StructureScan or StructureScan HD transducer. Sonar CH2 - black 9-pin connector Supports: Sonar / CHIRP Sonar DownScan SideScan Active Imaging/Active imaging 3-in-1/TotalScan/StructureScan Ú Note: A 7-pin transducer cable can be connected to a 9-pin port using a 7-pin to 9-pin adaptor cable. However, if the transducer has a paddle wheel speed sensor, the water-speed data will not be displayed on the unit. Wiring HDS Live Installation Manual 27
28 4 Software setup First time startup When the unit is started for the first time, or after a factory default, the unit displays a series of dialogs. Respond to the dialog prompts to make fundamental settings. You can perform further setup and later change settings using the system settings dialogs. Software setup sequence 1 General settings - refer to "System settings" on page 29. Make general settings as desired 2 Advanced settings - refer to "Advanced" on page 29. Enable or disable features Review the advanced setting options and make changes as desired 3 Source selection - refer to "Network settings" on page 48. Make sure that the proper external data sources have been selected 4 Feature setup Configure specific features as described later in this chapter Turning the system on and off The system is turned on by pressing the Power key. Press and hold the Power key to turn the unit off. You can also turn the unit off from the System Controls dialog. If the Power key is released before the shut-down is completed, the power off process is cancelled. The settings dialog The software setup is done from the settings dialog. 28 Software setup HDS Live Installation Manual


29 System settings Boat settings Used to specify the physical attributes of the boat. Time Controls the local time zone offset, and the format of the time and date. Advanced Used for configuration of advanced settings and how your system displays various user interface information. Enabling or disabling features Use the feature option to enable or disable features that are not automatically enabled or disabled by the system. Software setup HDS Live Installation Manual 29


30 Alarms Settings List of all available alarm options in the system, with current settings. From this list you can activate, deactivate and change alarm limits. Siren enable The Siren enabled option must be set in order for the unit to activate the buzzer when an alarm condition arises. Its setting also determines the operation of the external alarm output. 30 Software setup HDS Live Installation Manual


31 Radar settings Installation settings The radar system requires radar sensor specific setting in order to adjust for a number of variables found in different installations. Ú Note: The installation settings available depends on the radar sensor. Radar source In a system with more than one radar sensor, the device to configure is selected from this menu. Ú Note: Radars that support dual radar mode are represented twice in the source list, with an A and B suffix. Software setup HDS Live Installation Manual 31

32 Radar status Displays scanner information and scanner features, primarily used for information and to assist with fault finding. Adjust antenna height Set the radar scanner height relative to the water surface. The Radar uses this value to calculate the correct STC settings. Select antenna length Select the proper antenna length. Adjust range offset The radar sweep should commence at your vessel (a radar range of zero). You may need to adjust the radar range offset to achieve this. If this is set incorrectly, a large dark circle in the center of the sweep might occur. You might notice straight objects such as straight sea walls or piers having curves or an indentation. Objects close to your vessel may appear pulled in or pushed out. Adjust the range offset as below when the vessel is about 45 to 90 m (50 to 100 yards) from a straight-walled jetty or similar feature that produces a straight line echo on the display. 1 Point the vessel towards the jetty 2 Adjust the range offset to make the jetty echo appear as a straight line on the display 32 Software setup HDS Live Installation Manual
33 X X Adjust bearing alignment This option is used to align the heading marker on the screen with the center line of the vessel. This will compensate for any slight misalignment of the scanner during installation. Misalignment that is not corrected for will compromise target tracking and can result in dangerous misinterpretation of potential navigation hazards. Any inaccuracy will be evident when using MARPA or chart overlay. 1 Point the vessel towards a stationary isolated object, or towards a far range AIS where the AIS icon matches the radar echo 2 Adjust the coarse and fine bearing alignment so that the heading line touches the end of the selected object Sidelobe suppression Occasionally false target returns can occur adjacent to strong target returns such as large ships or container ports. This occurs because not all of the transmitted radar energy can be focused into a single beam by the radar antenna, a small amount energy is transmitted in other directions. This energy is referred to as sidelobe energy and occurs in all radar systems. The returns caused by sidelobes tend to appear as arcs. Ú Note: This control should only be adjusted by experienced radar users. Target loss in harbor environments may occur if this control is not adjusted correctly. Software setup HDS Live Installation Manual 33
34 When the radar is mounted where there are metallic objects near the radar, sidelobe energy increases because the beam focus is degraded. The increased sidelobe returns can be eliminated using the sidelobe suppression control. By default, this control is set to auto and normally should not need to be adjusted. However, if there is significant metallic clutter around the radar, sidelobe suppression may need to be increased. To adjust the sidelobe suppression value: 1. Set radar range to between 1/2 nm to 1 nm and the sidelobe suppression to auto 2. Take the vessel to a location where sidelobe returns are likely to be seen. Typically, this would be near a large ship, container port, or metal bridge. 3. Traverse the area until the strongest sidelobe returns are seen. 4. Change auto sidelobe suppression to OFF, then select and adjust the sidelobe suppression control until the sidelobe returns are just eliminated. You may need to monitor 5-10 radar sweeps to be sure they have been eliminated. 5. Traverse the area again and readjust if sidelobes returns still occur. Sector blanking Radar installed in close proximity to a mast or structure could cause unwanted reflections or interference to appear on the radar image. Use the sector blanking feature to stop the radar from transmitting on up to four sectors in the image. Ú Note: Sectors are setup relative to the heading line of the radar. The bearing of the sector is measured from the center line of the sector. Ú Note: Sector blanking should be applied very carefully to avoid reducing the radar s usefulness in identifying valid and potentially dangerous targets. 34 Software setup HDS Live Installation Manual


35 Main radar PPI Radar overlay on a chart Adjust open array park angle The park angle is the final resting position of the antenna relative to the heading line of the radar when the radar is set to standby. The antenna will stop rotating at the desired offset. Tune The automatic tuning will work well in most installations. The manual tuning is used if it is required to adjust the result from an automatic tuning. Adjust local interference reject Interference from some onboard sources can interfere with the Broadband radar. One symptom of this could be a large target on the screen that remains in the same relative bearing even if the vessel changes direction. Halo light Controls the levels of the Halo Radar blue accent lighting. The accent lighting can only be adjusted when the radar is in standby mode. Ú Note: The blue accent pedestal lighting might not be approved for use in your boating location. Check your local boating regulations before turning the blue accent lights ON. Reset radar to factory defaults Clears all user and installer settings applied to the selected radar source, and restores factory settings. Software setup HDS Live Installation Manual 35

36 Ú Note: Use this option with caution. Take note of current settings first, especially those set by the operator if radar has already been in active service. Sonar settings Internal sonar Used for making the internal sonar available for selection in the sonar panel menu. When de-activated, the internal sonar will not be listed as a sonar source for any unit on the network. De-activate this option on units which do not have a transducer connected. Network sonar Select to see or share sonar data from this unit with other units connected to the Ethernet network. Network sonar mode The network sonar mode setting selects whether only one or multiple sonar sources can be selected at the same time. Ú Note: Changing the mode requires that all connected sources are restarted. Structure depth offset Setting for Structure transducers. 36 Software setup HDS Live Installation Manual
37 All transducers measure water depth from the transducer to the bottom. As a result, water depth readings do not account for the distance from the transducer to the lowest point of the boat in the water or from the transducer to the water surface. B A To show the depth from the lowest point of the vessel to the bottom, set the offset equal to the vertical distance between the transducer and the lowest part of the vessel, A (negative value). To show the depth from the water surface to the bottom, set the offset equal to the vertical distance between the transducer and the water surface, B (positive value) For depth below transducer, set the offset to 0. Use temp data from Selects from which source the temperature data is shared on the NMEA 2000 network. Installation Use this dialog to setup and configure available sources. Software setup HDS Live Installation Manual 37

38 Source Select this option to display a list of sources available for setup. The settings you make in the rest of the dialog pertain to the source selected. Source name Select this option to set a descriptive name for the selected transducer. Depth offset All transducers measure water depth from the transducer to the bottom. As a result, water depth readings do not account for the distance from the transducer to the lowest point of the boat in the water or from the transducer to the water surface. B A 38 Software setup HDS Live Installation Manual
39 To show the depth from the lowest point of the vessel to the bottom, set the offset equal to the vertical distance between the transducer and the lowest part of the vessel, A (negative value). To show the depth from the water surface to the bottom, set the offset equal to the vertical distance between the transducer and the water surface, B (positive value) For depth below transducer, set the offset to 0. Water speed calibration Water speed calibration is used to adjust the speed value from the paddle wheel to match the actual boat speed through the water. Actual speed can be determined from GPS speed over ground (SOG) or by timing the boat over a known distance. Water speed calibration should be performed in calm conditions, with minimal wind and current movement. Increase this value above 100 % if the paddle wheel is under reading, and decrease this value if it is over reading. For example, if the average water speed reads 8.5 knots (9.8 MPH) and SOG records 10 knots (11.5 MPH) the calibration value needs to be increased to 117 %. To calculate the adjustment, divide the SOG by the paddlewheel speed, and multiply the product by 100. Calibration range: %. Default is 100 %. Water speed averaging Averages water speed by measuring your speed at a selected interval of time. Water speed intervals range from one to thirty seconds. For example if you select five seconds, your displayed water speed will be based on averaging over 5 seconds of sampling. Calibration range: 1-30 seconds. Default is 1 second. Water temperature calibration Temperature calibration is used to adjust the water temperature value from the sonar transducer. It may be required to correct for localized influences to the measured temperature. Calibration range: Default is 0. Ú Note: Water temperature calibration only appears if the transducer is temperature capable. Software setup HDS Live Installation Manual 39
40 Transducer type Ú Note: The transducer type is automatically set for transducers that support Transducer ID (XID) and is not user selectable. Transducer type is used for selecting the transducer model connected to the sonar module. The transducer selected will determine what frequencies the user can select during sonar operation. In some transducers with built-in temperature sensors, the temperature reading may be inaccurate or not available at all if the wrong transducer is selected. Transducer temperature sensors are one of two impedances - 5k or 10k. Where both options are given for the same model transducer, refer to paperwork supplied with transducer to determine impedance. Autopilot settings For the trolling motor autopilot, no special setup is required. See the operator manual for further details. The NAC-1 autopilot computer (outboard motor autopilot) requires setup as described in the following sections. Ú Note: The word rudder is sometimes used in menus and dialogs. In this context, the outboard motor acts as a rudder. Autopilot data sources Provides automatic and manual data source selection for the outboard autopilot. Commissioning Used to calibrate your boat s steering (cable steer or hydraulic steering) with the NAC-1. Ú Note: The autopilot must be commissioned prior to first use and any time after autopilot default settings have been restored. Cablesteer rudder calibration 1. Select Commissioning. 2. Select Rudder feedback calibration. 3. Follow the onscreen instructions. 40 Software setup HDS Live Installation Manual
41 Ú Note: When centering the motor during the calibration process, ensure that the motor is centered visually. The rudder feedback calibration dialog may show the motor is centered (00 value) when the motor is not centered. After centering the motor visually, press OK and the rudder center calibration setting is set to centered (00 value). 4. Select Rudder test. 5. If the calibration does not pass the rudder test: - Confirm motor is moving. - Confirm rudder feedback reading moves accordingly. - Check NAC-1 drive cable. - Confirm motor can be manually moved smoothly in each direction. - Check for other mechanical issues. - Check wiring connections. - Repeat rudder calibration steps. Hydraulic system calibration Virtual rudder feedback (VRF) calibration is used for vessels with hydraulic steering. 1. Select Commissioning. 2. Select VRF calibration. 3. Follow the onscreen instructions. Ú Note: When the autopilot attempts to turn the motor during the calibration process, ensure motor movement is noticeable and that it is turning in the correct direction before selecting Yes on the Virtual Rudder Feedback Calibration dialog. When No is selected in the dialog, the NAC-1 reverses direction and increases power the next time it turns the motor during the calibration process. Ú Note: You may have to select No more than once to ensure the pump provides enough power to turn the motor at high boat speeds. Steering response Used to increase or decrease the steering sensitivity. A low response level reduces the rudder activity and provides a more loose steering. A high response level increases the rudder activity and provides Software setup HDS Live Installation Manual 41
42 more tight steering. A too high response level will cause the boat to make S movements. Troubleshooting The following are possible symptoms or * messages displayed by the MFD. If the problem persists after trying the recommended action, contact support. No active autopilot control unit Probable cause: The NAC-1 computer has lost contact with the active control unit. Recommended action: Check the cable connections from the NAC-1 and MFD to the CAN bus network. No autopilot computer Probable cause: The MFD has lost contact with the NAC-1 Computer. Recommended action: Make sure the NAC-1 computer is powered. Check connections from the NAC-1 to the CAN bus network. AP Position data missing* Probable cause: Missing or invalid position data. Recommended action: Check the GPS cable connections to CAN network. Check the GPS antenna location. Check that the correct position source is selected. (Run a new source selection.) AP Speed data missing (SOG)* Probable cause: Missing or invalid speed data. Recommended action: Check the GPS cable connections to the CAN network. Check the GPS antenna location. Check that the correct position source is selected. (Run a new source selection.) AP Depth data missing* Probable cause: Missing or invalid depth data. Recommended action: Check the depth transducer. 42 Software setup HDS Live Installation Manual
43 Check transducer cable connections to the MFD or to the CAN network. Check that the correct depth source is selected. (Run a new source selection.) AP Heading data missing* Probable cause: Missing or invalid heading data. Recommended action: Check the compass cable connections to the CAN network. Check that the correct heading source is selected. (Run a new source selection.) AP Nav data missing* Probable cause: Missing or invalid NAV data. Recommended action: Check for valid data on the MFD screen. Check the source selection setting. AP Rudder data missing (For Helm-1/ cable steer only)* Probable cause: Rudder feedback signal missing due to a broken wire or connection. Misaligned potentiometer in the Helm-1. Recommended action: Check cable and connector. Check the alignment as per the installation instructions. AP Off course* Probable cause: The boat s heading is outside the fixed off course limit of 20 deg. (Automatic reset when inside limit). The boat speed is too low. The response setting is too low. Recommended action: Check the steering response setting and increase the steering response setting. Increase the boat speed if possible, or steer by hand. AP clutch overload (For Helm-1/ cable steer only)* Probable cause: The clutch in Helm-1 is drawing too much current. Software setup HDS Live Installation Manual 43
44 Recommended action: Disconnect the Helm-1 and verify that the alarm disappears. Check resistance of the clutch coil equals 16 ohms (pin 1 and 2 in connector). No rudder response (For Helm-1/cable steer only)* Probable cause: No response to rudder commands. Recommended action: Check the cable connections between NAC-1 and Helm-1. Check the Rudder FB potentiometer in Helm-1. Check the Helm-1 drive motor. Rudder drive overload* Probable cause: The drive unit shuts down due to an excessive load or a short circuit. Recommended action: Check the drive unit and drive unit installation. Look for mechanical obstructions. Check the manual steering. High drive temp* Probable cause: The NAC-1 drive output circuit is overheated due to excessive load. Recommended action: Switch the Autopilot to Standby. Check the drive unit (see Rudder drive overload ). Drive inhibit* Probable cause: There is an internal NAC-1 failure causing the drive output circuit to shut down. Recommended action: Contact support. Low CAN bus voltage Probable cause: The CAN bus voltage is less than 9V. Recommended action: Check cabling. Check battery condition. Check charging voltage. 44 Software setup HDS Live Installation Manual


45 Fuel settings The fuel utility monitors a vessel's fuel consumption. This information is totaled to indicate trip and seasonal fuel usage, and is used to calculate fuel economy for display on instrument pages and the data bar. To use the utility, a Navico Fuel Flow sensor, or a NMEA 2000 engine adaptor cable/gateway with Navico Fuel Data Storage device must be fitted to the vessel. The Navico Fuel Flow sensor, does not require the use of a separate Fuel Storage device. Refer to the engine manufacturer or dealer for information on whether or not your engine provides a data output, and what adaptor is available to connect to NMEA Once the physical connection is made, ensure source selection is completed. Multiple engine installations using Fuel Flow sensors, or Fuel Data Storage devices, require setup of related engine location in the Device list. For general source selection information, refer to "Network settings" on page 48. Vessel setup The Vessel setup dialog must be used to select the number of engines, the number of tanks and vessel s total fuel capacity across all tanks. Fuel flow configuration After the number of engines is set, it is required to set which fuel flow sensor is connected to which engine. Under Device list on the Software setup HDS Live Installation Manual 45

46 Network page, view the Device Configuration dialog for each sensor, and set the Location to match the engine the device is connected to. Unconfigure - defaults the device which clears all user settings. Reset Fuel Flow - restores only the Fuel K-Value setting, if set in Calibrate. Only Navico devices can be reset. Calibrate Calibration may be required to accurately match measured flow with actual fuel flow. Access calibration from the Refuel dialog. Calibration is only possible on Navico s Fuel Flow sensor. 1. Start with a full tank and run the engine as it would normally be operated. 2. After at least several liters (a few gallons) have been used, the tank should be fully refilled, and the Set to full option selected. 3. Select the Calibrate option. 4. Set the actual amount used based on amount of fuel added to the tank. 5. Select OK to save settings. The Fuel K-Value should now show a new value. Ú Note: To calibrate multiple engines repeat the steps above, one engine at a time. Alternatively, run all engines simultaneously, and divide the Actual amount used by the number of engines. This assumes reasonably even fuel consumption on all engines. Ú Note: The Calibrate option is only available when Set to full is selected, and a Fuel Flow is connected and set up as a source. Ú Note: A maximum of 8 engines is supported using Fuel Flow sensors. 46 Software setup HDS Live Installation Manual

47 Fuel Level With the use of a Navico Fluid Level device connected to a suitable tank level sensor, it is possible to measure the amount of fuel remaining in any equipped tank. The number of tanks must be set in Vessel Setup dialog, initiated from the Fuel setting options page, to allow discrete tank assignment of the Fluid Level devices. Select Device list on the Network page, and view the Device Configuration dialog for each sensor, and set the Tank location, Fluid type, and Tank size. For setting up the Instrument bar or a gauge on the Instrument page with Fluid Level device data, refer to the Operator Manual. Ú Note: A maximum of 5 tanks is supported using Fluid Level devices. Ú Note: Tank data that is output by a compatible engine gateway can also be displayed, however tank configuration for such a data source is not possible from this unit. Wireless settings Provides configuration and setup options for the wireless functionality. Refer to the Operator Manual for details about wireless setup and connectivity. Software setup HDS Live Installation Manual 47

48 Network settings Network info Lists basic network information. Device name Assigning a name is useful in systems using more than one device of the same type and size. Auto configure The auto configure option looks for all sources connected to the device. If more than one source is available for each data type, selection is made from an internal priority list. Ú Note: This option provides the best configuration of available data sources for the majority of installations. Data sources Data sources provide live data to the system. When a device is connected to more than one source providing the same data, the user can choose the preferred source. Before commencing with source selection make sure all external devices and networks are connected and turned on. Manual selection is generally only required where there is more than one source for the same data, and the automatically selected source is not the one desired. 48 Software setup HDS Live Installation Manual

49 Damping If data appears erratic or too sensitive, damping may be applied to make the information appear more stable. With damping set to off, the data is presented in raw form with no damping applied. Device list Selecting a device in this list will bring up additional details and options for the device. All devices allow allocation of an instance number in the configure option. Set unique instance numbers on any identical devices on the network to allow the unit to distinguish between them. The data option shows all data being output by the device. Some devices will show additional options specific to the device. Ú Note: Setting the instance number on a 3rd party product is typically not possible. Diagnostics Provides information useful for identifying an issue with the network. NMEA 2000 Provides information on NMEA 2000-bus activity. Ú Note: The following information may not always indicate an issue that can be simply resolved with minor adjustment to network layout or connected devices and their activity on the network. However, Rx and Tx errors are most likely indicating issues with the physical network, which may be resolved by Software setup HDS Live Installation Manual 49


50 correcting termination, reducing backbone or drop lengths, or reducing the number of network nodes (devices). UDB Provides information on Ethernet activity. NMEA 2000 setup Receive waypoint Select this option to allow another device capable of creating and exporting waypoints via NMEA 2000 to transfer directly to this unit. Send waypoint Select this option to allow this unit to send waypoints to another device via NMEA Ú Note: The system can only transmit or receive one waypoint at a time on creation of that waypoint. For bulk import or export of waypoints see the operator manual. Backlight synchronization Select this option to allow display brightness synchronization across display units connected to the same network. NMEA 0183 setup The NMEA 0183 port(s) must be set to suit the speed of connected devices, and can be configured to output only the sentences required by listening devices. 50 Software setup HDS Live Installation Manual
51 Receive waypoint Select this option to allow a device capable of creating and exporting waypoints via NMEA 0183 to transfer directly to this unit. Serial ports Specifies the baud rate and protocol for the NMEA 0183 interface. The baud rate should be set to correspond with devices connected to the NMEA 0183 input and output. Serial Output Selection determines whether the data is output via Tx lines, and will enable editing of the output sentences list. Serial output sentences This list allows control over which sentences need to be transmitted to other devices from the NMEA 0183 port. Due to the limited bandwidth of NMEA 0183 it is desirable to only enable the data that is required. The less sentences that are selected, the higher the output rate of the enabled sentences. Commonly used sentences are enabled by default. Ethernet/Wireless The NMEA 0183 data stream is output and made available to tablet devices and PCs, via the internal wireless or Ethernet. The dialogue provides IP and port data typically required for configuring the application on the third party device. Ú Note: Other MFDs cannot decode this information back to NMEA 0183, to use the data as a source. To share data a physical NMEA 2000 or NMEA 0183 connection is still required. Software setup HDS Live Installation Manual 51
52 5 3rd party support SmartCraft VesselView integration When a compatible Mercury Marine VesselView product or VesselView Link is present on the NMEA 2000 network, the engines can be monitored and controlled from the unit. When the feature is also enabled in the advanced settings features dialog: A Mercury icon is added to the home page - select it to display the engine instrument panel. A Mercury settings dialog is added - use this dialog to change engine settings. Mercury and Vessel Control buttons are added to the control bar: - Selecting the Mercury button displays engine and vessel data. - Selecting the Vessel button opens the engine controller. When the features are enabled, the display may prompt the user for some basic configuration information. For more information, refer to the VesselView manual or engine supplier. Suzuki engine integration If a Suzuki C-10 gauge is available on the NMEA 2000 network, the engines can be monitored from the unit. When the feature is also enabled in the advanced settings features dialog: A Suzuki icon is added to the home page - select it to display the engine instrument panel. For more information, refer to the engine manual or engine supplier. Yamaha engine integration If a compatible Yamaha gateway is connected to the NMEA 2000 network, the engines can be monitored from the unit. When the feature is also enabled in the advanced settings features dialog: 52 3rd party support HDS Live Installation Manual
53 A Yamaha icon is added to the home page - select it to display the engine instrument panel. If the Yamaha system supports Troll Control, a Troll button is added to the Control Bar. Select this button to enable/disable troll control and control the trolling speed. For more information refer to the engine manual or the engine supplier. Evinrude engine integration If an Evinrude engine control head is available on the NMEA 2000 network, the Evinrude engines can be monitored and controlled from the unit. When the feature is also enabled in the advanced settings features dialog: An Evinrude icon is added to the home page - select it to display the engine instrument panel. An Evinrude settings dialog is added - use this dialog to change engine settings. An Evinrude button is added to the control bar - selecting this button opens the engine controller. Use the engine controller to control the engines. A maximum of two control heads and four engines is supported. For more information, refer to the engine manual or engine supplier. Power-Pole anchors Power-Pole anchors, which can be controlled by the C-Monster Control System installed on your boat, can be controlled from the unit. To control the Power-Poles, you pair the Power-Poles with the unit using Bluetooth wireless technology available in both products. C-Zone CZone connection to NMEA 2000 When interfacing to CZone network it is recommended to use a BEP Network interface bridge to join the two network backbones together. 3rd party support HDS Live Installation Manual 53
 for the network has been reached or the maximum")
54 NETWORK Network 1 Network 2 NETWORK INTERFACE CZONE The CZone / NMEA 2000 Network interface bridge isolates the power of the two networks, but allows data to be freely shared between both sides. The Interface Bridge can also be used for expansion of the NMEA 2000 network, when the maximum node limit (node = any device connected to network) for the network has been reached or the maximum cable length of 150 m will be exceeded. Once an Interface Bridge has been fitted, a further 40 nodes and additional cable length can be added. The Network Interface is available from your BEP dealer. For more information please refer to the BEP web site NMEA2000 CZONE CZone setup In order to communicate with the CZone modules connected to the network, the unit must be assigned a unique CZone Display Dipswitch setting. The functionality of the CZone system is determined by the CZone Config File which is stored on all CZone modules and the HDS Live. The file is created using the CZone Configuration Tool, a specialized PC application available from BEP Marine Ltd, and associated CZone distributors. For more information, refer to the documentation provided with your CZone system. Assigning the dipswitch setting Every product capable of controlling and viewing CZone devices must be assigned a virtual dipswitch setting. This setting is unique for each device. Typically it is set after the configuration file already 54 3rd party support HDS Live Installation Manual
Pser G uide oduct Manual
 ADC-T2000 Hub User Product Guide Manual Hub Product Manual 1 Set Up Required Standard home router with active Internet connection Z-Wave devices to be installed Indicator Lights White Flashing: no internet
FCC Certification Notice: IC Certification
 Users Manual VP4450 FCC Certification This device complies with Part 15 of the FCC Rules. Operation is subject to the following two conditions: (1) This device may not cause harmful interference, and (2)
RFC1000-CE Cloud Relay. MadgeTech Cloud Services Data Logger Hub. Product User Guide
 RFC1000-CE Cloud Relay MadgeTech Cloud Services Data Logger Hub Product User Guide Product User Guide Table of Contents Product Overview... 3 Getting Started... 3 Setting Up the RFC1000-CE Cloud Relay...
v Pairing Instructions for: GENERAL MOTORS REPLACEMENT FLIP KEYS
 v1.0618 Pairing Instructions for: GENERAL MOTORS REPLACEMENT FLIP KEYS PAIRING INSTRUCTIONS To successfully perform these pairing instructions, an original, working key must be present. If an original,
PowerView Remote Control Guide
 FRONT: OPEN Group 3 Group 4 Group 2 Group 5 LEFT ARROW Sends the middle rail DOWN on Top-Down/Bottom-Up or Duolite products Group 1 Group 6 RIGHT ARROW Sends the middle rail UP on Top-Down/Bottom-Up or
StreamStick by NAV-TV is a USB-powered, HI-FI Bluetooth 4.0 audio streaming module for automotive and home use. Make ANY stereo (equipped with AUX
 StreamStick by NAV-TV is a USB-powered, HI-FI Bluetooth 4.0 audio streaming module for automotive and home use. Make ANY stereo (equipped with AUX input) a Bluetooth-audio receiver! Using the StreamStick
RFC1000. Wireless Transceiver for the RFOT, Therm A lert and RF2000A data loggers. Product User Guide
 RFC1000 Wireless Transceiver for the RFOT, Therm A lert and RF2000A data loggers Product User Guide Product User Guide Table of Contents Product Overview... 3 Software Installation... 4 Activating & Deploying
Axon Signal Unit Installation Manual
 Introduction The Axon Signal Unit (ASU) is part of a communications platform that interacts with an emergency vehicle s light bar. When the light bar activates, all properly equipped Axon Flex systems
NSPL-500. AIS/VHF antenna splitter. User Manual ENGLISH.
 NSPL-500 AIS/VHF antenna splitter User Manual ENGLISH www.bandg.com www.simrad-yachting.com www.lowrance.com Preface As Navico is continuously improving this product, we retain the right to make changes
Car AVN User Manual. Model Name : LC7F
 Car AVN User Manual Model Name : LC7F 1. Overview and Specifications (1) Overview 1) The Infotainment system provides Infotainment in your car, using the latest technology. See your dealer to have the
StreetSounds STS-170-MMST Mobile Master. User Guide
 StreetSounds STS-170-MMST Mobile Master User Guide V1.4 June 3, 2018 1 CONTENTS 1 Introduction... 3 1.1 Mobi Front Panel... 3 1.2 Mobi Rear Panel... 4 1.3 Operating the Mobi... 4 2 FCC Statements... 6
User Manual for 24 GHz Blind-Spot Radar Sensor
 User Manual for 24 GHz Blind-Spot Radar Sensor SRR2-A Department: 1 of 13 AUTHORS Name Organisation Section Frank Gruson Continental, Frequency Management WW Issue Document Date of Issue Document Owner
ihealth Wireless Body Analysis Scale OWNER S MANUAL
 ihealth Wireless Body Analysis Scale OWNER S MANUAL TABLE OF CONTENTS INTENDED USE... 2 IMPORTANT NOTE FOR USERS... 2 CONTRAINDICATION... 2 OFFLINE MEMORY... 3 SPECIFICATIONS... 3 GENERAL SAFETY AND PRECAUTIONS...
INSTALLATION MANUAL ES-SUB-WIRELESS-KIT ES-SUB-WIRELESS-RCVR
 INSTALLATION MANUAL ES-SUB-WIRELESS-KIT ES-SUB-WIRELESS-RCVR FCC STATEMENT This equipment has been tested and found to comply with the limits for a Class B digital device, pursuant to Part 15 of the FCC
EE1941/EN1941/EN One-Way Binary RF Module Installation and Operation Manual
 EE1941/EN1941/EN1941-60 One-Way Binary RF Module Installation and Operation Manual 1 Overview EchoStream RF modules are designed to be easily interfaced with your electronic remote application controller
STREETSOUNDS STS-170-FMST USER GUIDE V1.0. Fixed Master STS-170-FMST. User Guide V1.1 August 25,2018
 Fixed Master STS-170-FMST User Guide V1.1 August 25,2018 1 1 TABLE OF CONTENTS 2 Introduction... 3 3 Outdoor Unit (ODU)... 3 4 Indoor Unit (IDU)... 4 5 Optonal High Gain Antenna Assembly... 5 6 Pole Mount...
EE1941XS/EN1941XS One-Way Serial RF Module Installation and Operation Manual
 EE1941XS/EN1941XS One-Way Serial RF Module Installation and Operation Manual 1 Overview EchoStream RF modules are designed to be easily interfaced with your electronic remote application controller (RAC).
Transponder Reader TWN4 MultiTech 3 Quick Start Guide
 Transponder Reader TWN4 MultiTech 3 Quick Start Guide Rev. 1.0 1. Introduction The transponder reader TWN4 is a device for reading and writing RFID transponders. There are different versions of TWN4 devices
User guide. SmartTags. NT3/SmartTagsST25a
 User guide SmartTags NT3/SmartTagsST25a Contents Introduction...3 What are SmartTags?... 3 Getting started... 4 Turning on the NFC function... 4 NFC detection area... 4 Smart Connect... 4 Using SmartTags...
SeaTalk-SeaTalkng converter. Handbook
 SeaTalk-SeaTalkng converter Handbook Trademarks and registered trademarks Autohelm, hsb 2, RayTech Navigator, Sail Pilot, SeaTalk, SeaTalk NG, SeaTalk HS and Sportpilot are registered trademarks of Raymarine
802.11a/n/b/g/ac WLAN Module AMB7220
 AboCom 802.11a/n/b/g/ac WLAN Module AMB7220 User s Manual FCC Certification Federal Communication Commission Interference Statement This equipment has been tested and found to comply with the limits for
Polycom VoxBox Bluetooth/USB Speakerphone
 SETUP SHEET Polycom VoxBox Bluetooth/USB Speakerphone 1725-49004-001C Package Contents Micro USB Cable 1.21 m 4 ft Carrying Case Security USB Cable 3 m 10 ft L-Wrench Optional Accessories Security USB
OPERATION MANUAL WARNING
 TM OPERATION MANUAL WARNING TO REDUCE THE RISK OF INJURY OR PRODUCT DAMAGE, READ OPERATION MANUAL PRIOR TO OPERATING PRODUCT. PATENT PENDING - COPYRIGHT 2014 - APPION INC. - ALL RIGHTS RESERVED Introduction
USB WiFi for Projector
 USB WiFi for Projector User s Manual Brand:acer lmodel:uwa2 Rev. 1.01 FCC statement This equipment has been tested and found to comply with the limits for a Class B digital device, pursuant to Part 15
260X190mm/105 克铜版纸 / 黑白印刷
 260X190mm/105 克铜版纸 / 黑白印刷 5172301 1 FEATURES A-Control Panel A1-Bass Volume Adjustment A2-Volume Adjustment A3-Audio Input Jack A4-Audio Output Jack for linking multiple chairs A5-Wire mode / Bluetooth
Link Mobile Gateway User Guide A ProVIEW System Component
 A ProVIEW System Component Omni-ID office locations: US UK China India Southeast Asia Germany 1. CONTENTS 1. Introduction... 3 About this Document... 3 Related Products... 3 Regulatory Approvals... 4 Certifications...
Icon Description UP ( ) 1 BACK ( ) 4 PAGE ( )
 1 BACK ( ) 4 PAGE ( )") EN 1 1 BACK ( ) Press to return to the previous page or cancel an operation. When recording, press to pause recording. Press it again to stop recording. 2 LAP/OK ( ) In Menu, press to enter or confirm
EN 1 1 BACK ( ) Press to return to the previous page or cancel an operation. When recording, press to pause recording. Press it again to stop recording. 2 LAP/OK ( ) In Menu, press to enter or confirm
USER S INSTRUCTIONS SCOLA FM SYSTEM SCOLA CLASSMATE
 USER S INSTRUCTIONS SCOLA FM SYSTEM SCOLA CLASSMATE The SCOLA CLASSMATE and accessories shown in these user s instructions may differ from the ones you have. We furthermore reserve the right to make any
Regulatory Compliance Addendum for the Multi-Mode Wireless LAN Unit (WLU-2100)
") Regulatory Compliance Addendum for the Multi-Mode Wireless LAN Unit (WLU-2100) 822-2210-001 CPN 963-4891-001 Rev - NOTICE: The contents of this document are proprietary to Rockwell Collins, Inc. and shall
Regulatory Compliance Addendum for the Multi-Mode Wireless LAN Unit (WLU-2100) 822-2210-001 CPN 963-4891-001 Rev - NOTICE: The contents of this document are proprietary to Rockwell Collins, Inc. and shall
SATELLITE RADIO OWNER'S MANUAL. Type III Radio
 SATELLITE OWNER'S MANUAL Type III Radio Table of Contents Congratulations!... 3 Operational Statement... 3 FCC Statement... 4 Activating Your Subscription... 5 Type III Radio... 6 Overview of Controls...
Blue Node. User Manual
 Blue Node User Manual CONTACT US LX Suite 101, 4 Cornwallis St, Eveleigh, 2015 National Innovation Centre Australian Technology Park Sydney, Australia +612 9209 4133 IoTCores.com.au LX IoT Cores Blue Node
HIGH PERFORMANCE MARITIME. em-trak R100 PRODUCTS. AIS Dual Channel Receiver. Product Manual. High Performance Maritime Products
 em-trak R100 MARITIME PRODUCTS HIGH PERFORMANCE AIS Dual Channel Receiver Product Manual High Performance Maritime Products www.em-trak.com 201-0138:2 Contents 1 - Notices...1 1.1 - Safety warnings...1
Need Help? SA /
 1 FEATURES A-Control Panel A1-Vibration adjustment A2-Bass Volume Adjustment A3-Volume Adjustment A4-Audio Input Jack A5-Audio Output Jack for linking multiple chairs A6-Wire mode / Bluetooth mode Switch
USER S INSTRUCTIONS SCOLA FM SYSTEM SCOLA CLASSMATE
 USER S INSTRUCTIONS SCOLA FM SYSTEM SCOLA CLASSMATE The SCOLA CLASSMATE and accessories shown in these user s instructions may differ from the ones you have. We furthermore reserve the right to make any
Simulator. Demo mode. Simulator source files. 102 Simulator HDS Gen3 Operator Manual
 13 Simulator The simulation feature lets you see how the unit works in a stationary position and without being connected to sensors or other devices. Demo mode In this mode the unit automatically runs
Shields. Outdoor Shields Owner s Manual. Avoidance Solutions.
 Shields Avoidance Solutions Outdoor Shields Owner s Manual www.invisiblefence.com Important Precautions Invisible Fence Brand systems have protected over two million pets. However, there are some precautions
Tork EasyCube. User Manual.
 Tork EasyCube User Manual www.torkusa.com 1 Introduction - Tork EasyCube Tork EasyCube delivers actionable washroom insights through a web user interface. The service consists of Tork dispensers equipped
Murata Bluetooth mesh Node. Installation Guide
 Murata Bluetooth mesh ode Installation Guide Shipped Components Murata Bluetooth mesh ode (BCC2ZZ1PR) ocknut Page 1 Caution Installation and maintenance must be done in accordance with local, state and
Manual. Simrad BSM-2 Broadband Sounder Module EN, DE, ES, FR, IT. A brand by Navico - Leader in Marine Electronics
 Manual Simrad BSM-2 Broadband Sounder Module EN, DE, ES, FR, IT A brand by Navico - Leader in Marine Electronics Disclaimer As Navico is continuously improving this product, we retain the right to make
SwingTracker User Guide. Model: DKST02 User Guide
 SwingTracker User Guide Model: DKST02 User Guide PACKAGE CONTENTS What Comes in the Box USING YOUR SWINGTRACKER SENSOR Attach SwingTracker Sensor to your Bat Turn On your Sensor Pair your Sensor Remove
Illuminati Wireless Light and Color Meter Model IM100. User Manual
 Illuminati Wireless Light and Color Meter Model IM100 User Manual About the IM100 The Illuminati IM100 is the world s first Bluetooth-enabled wireless light and color meter. Use it with your smartphone
or call
 Email service@acecasual.com or call 1 FEATURES A-Control Panel A1-Vibration adjustment A2-Bass Volume Adjustment A3-Volume Adjustment A4-Audio Input Jack A5-Audio Output Jack for linking multiple chairs
FOR AVLEX ONLY MT-24A. User Guide. 2.4 GHz Digital Stationary Transmitter
 2.4 GHz Digital Stationary Transmitter User Guide All rights reserved. MN 017/05 Do not copy or forward without prior approvals MIPRO. Specifications and design subject to change without notice. 2 CE5
DOWNLOAD KASA ADD TO KASA INSTALL AND POWER UP SAFETY FIRST
 WELCOME TO KASA Let s get started with your new Wi-Fi Smart Dimmer. Kasa SAFETY FIRST Read and follow all safety precautions in the Kasa app. Ensure power is off at the circuit breaker before removing
READ ME FIRST QUICK INSTALL GUIDE. Wireless Controller Kit XWS Package Contents:
 READ ME FIRST QUICK INSTALL GUIDE Wireless Controller Kit XWS-1310 Package Contents: XWC-1000 Wireless Controller Rack Mount Kit Power Cord XAP-310 Access Points XFS-1054P PoE Switch BEFORE YOU BEGIN INSTALLATION
Roll Rite Automated Tarp System Remote Control Owner s Guide
 Roll Rite Automated Tarp System Remote Control Owner s Guide On behalf of Roll Rite, we wish to thank you for your purchase of our Automated Tarp Systems Our Mission Roll Rite designs and manufactures
LoRa Module Datasheet
 LoRa Module Datasheet Part Number: MLORA100 rev 001 Zenseio LLC Updated: August 2016 Table of Contents Table of Contents Functional description LORA MODULE OVERVIEW FEATURES BLOCK DIAGRAM Interfaces PIN
Interface Manual Tank Level Float Stick System
 1 Interface Manual Tank Level Float Stick System SignalFire Model: Sentinel-FS-3BIS The SignalFire Sentinel Float Stick Node is an Intrinsically Safe device with the following features: - Standard SignalFire
Wireless Compliance Statements
 Wireless Compliance Statements Visual Coaching Device 13485 P1015323-001-A DECEMBER 2015 Document ID Document Title Abstract Manufacturer P1015323-001-A Wireless Compliance Statements Visual Coaching Device
800 Series Transmitters Owner s Manual
 800 Series Transmitters Owner s Manual www.invisiblefence.com www.invisiblefence.com Important Precautions Invisible Fence Brand pet containment systems have contained over two million pets. However, there
Installation NOTICE. SpeedNet Cell Edge Gateway software can be downloaded at sandc.com/en/
 S&C SpeedNet Cell Edge Gateway Table of Contents Section Page Introduction Section Page Shipping and Handling Qualified Persons............................. Read this Instruction Sheet......................
1100DH High Power Wireless Receiver
 00DH High Power Wireless Receiver INSTALLATION GUIDE Description The 00DH High Power Wireless Receiver provides two-way, supervised communication using 900 MHz frequencyhopping spread-spectrum technology.
SRT LAN Radar sensor X-band up-mast Installation Manual
 SRT LAN Radar sensor X-band up-mast Installation Manual ENGLISH www.navico.com/commercial Preface Disclaimer As Navico is continuously improving this product, we retain the right to make changes to the
Lazerpoint RF RX-92 Full-Function Receiver Installation Instructions
 Lazerpoint RF RX-92 Full-Function Receiver Installation Instructions Section 1 General Description Camden Lazerpoint Radio Controls comprise the following models: CM-TX-9 Wall switch ready transmitter
User s Manual Wireless Keyboard/Mouse & NANO Receiver MD-5110/MM-5110 & DG-5110
 User s Manual Wireless Keyboard/Mouse & NANO Receiver MD-5110/MM-5110 & DG-5110 Page 1 of 7 FCC Statement This equipment has been tested and found to comply with the limits for a Class B digital device,
User Guide. Do not copy or forward without prior approvals MIPRO. Specifications and design subject to change without notice.
 User Guide ACT-70H / ACT-71Ha ACT-71H / ACT-72H All rights reserved. MN 016/01 Do not copy or forward without prior approvals MIPRO. Specifications and design subject to change without notice. 2 CE5 2
Schlage Control Smart Locks
 Schlage Control Smart Locks with Engage technology User guide Schlage Control Smart Locks with Engage technology User Guide Contents 3 Warranty 4 Standard Operation 4 Operation from the Inside 4 Operation
System overview. be connected: Components that can. 1. OKIMAT IPS OM Massage motor. 7. Optional: Junction cable
 System overview Notice! Electrical components should be connected or disconnected only when the powerr supply cord is unplugged. Notice! There is a delay after the supply voltage is applied before the
CARE +MAINTENANCE Cleaning Important Safety Instructions Water Drop Heat Battery Charging Repair
 CARE +MAINTENANCE Cleaning 1. Wipe with a dry cloth. 2. Rinse with fresh water after exposure to soap, chlorine or seawater. 3. Do not use solvents, chemicals, cleaning solutions, alcohol, ammonia or abrasives.
EA200 uhf EA200 vhf User Guide
 EA200 uhf EA200 vhf User Guide 1 2 TABLE OF CONTENTS RF Safety & FCC... 4 Safety & Information... 5 Electromagnetic Interference Compliance... 6 Industry Canada Compliance... 7 Computer Software Copyrights...
Vehicle IoT Gateway VG34 DATASHEET OVERVIEW HIGHLIGHTS
 Vehicle IoT Gateway VG34 DATASHEET OVERVIEW The VG34 Vehicle IoT Gateway is an advanced sensor platform for fleets, providing operators with real-time location and analytics, sensor data, WiFi hotspot
ACUII-06 User Manual (NAS)
") 1(14) ACUII-06 User Manual (NAS) Content 2(14) 1 General... 3 1.1 history... 3 1.2 Abbreviations... 3 1.3 References... 3 2 Introduction... 4 3 Technical Description... 5 3.1 Connectors... 5 3.1.1 WLAN
1(14) ACUII-06 User Manual (NAS) Content 2(14) 1 General... 3 1.1 history... 3 1.2 Abbreviations... 3 1.3 References... 3 2 Introduction... 4 3 Technical Description... 5 3.1 Connectors... 5 3.1.1 WLAN
DJT RC Transmitter Module 2.4 GHz Two-Way Series
 Manual Rev.0.1-5.05.201 2 made by David LABURTHE dlaburthe@free. fr DJT RC Transmitter Module 2.4 GHz Two-Way Series U S E R ' S G U I D E FrSky Electronic Co., Ltd - No. 1, Huize Road, Wuxi, 21 4081,
General Safety and Precautions 1. Read all of the information in the owner s manual and other included product information in the packaging before
 General Safety and Precautions 1. Read all of the information in the owner s manual and other included product information in the packaging before operating the product. 2. Prolonged exposure to alarm
NAIS-500 Class B AIS Transceiver. User Manual ENGLISH.
 NAIS-500 Class B AIS Transceiver User Manual ENGLISH www.bandg.com www.simrad-yachting.com www.lowrance.com Preface As Navico is continuously improving this product, we retain the right to make changes
LOUIS VUITTON 1. Louis Vuitton Echo, locate your Horizon luggage in airports Battery indicator light. Light sensor to detect opening
 L E A F L E T - Louis Vuitton Echo, locate your Horizon luggage in airports Battery indicator light Light sensor to detect opening ON/OFF switch Micro-USB port for charger 3. Open LV PASS. Go to Connected
AIS 300 Installation Instructions
 Use these instructions to install the Garmin AIS 300 Automatic Identification System (AIS) Class B receiver device. Compare the contents of this package with the packing list on the box. If any pieces
User Manual. Z01-A19NAE26- Wireless LED Bulb Z02-Hub Sengled Hub. LED + Smart Control
 User Manual Z01-A19NAE26- Wireless LED Bulb Z02-Hub Sengled Hub LED + Smart Control EN System Features: Control Element lighting from anywhere at anytime Schedule scenes based on timing, brightness and
Disclaimers. Important Notice
 Disclaimers Disclaimers Important Notice Copyright SolarEdge Inc. All rights reserved. No part of this document may be reproduced, stored in a retrieval system, or transmitted, in any form or by any means,
DCH-G020 mydlink Connected Home Hub
 DCH-G020 mydlink Connected Home Hub User s Manual Version 01.0 Oct. 15 th, 2014 Manual Page 1 10/16/2014 1. PRODUCT DESCRIPTION The DCH-G020 is a Connected Home Z-Wave Gateway used to control a variety
APM 6998 WiFi Module Manual
 Host Revision Information APM 6998 WiFi Module Manual Host Hardware Revision Host Module Driver Version Module Hardware Revision T3x Rev D1 v8.1.4.4 001E Host PCB Design Guidelines The following guidelines
Installation and Operation Manual
 NAVMAN Tracker 5507/ 5607 Installation and Operation Manual Chartplot ters w w w. n a v m a n. c o m IMPORTANT SAFETY INFORMATION Please read carefully before installation and use. DANGER! WARNING! CAUTION
Regulatory Information FCC Information
 EN ES FR About the Documents The documents include instructions for using and managing the product. Pictures, charts, images and all other information hereinafter are for description and explanation only.
P/N: TMPRO3PLUS SERVICE AND WARRANTY
 SERVICE AND WARRANTY Should your unit ever require service, please do not return the product to your dealer. Please call the number below for special instructions on shipping and handling. Please call
EE1941/EN1941 One-Way Binary RF Module Installation and Operation Manual D
 EE1941/EN1941 One-Way Binary RF Module nstallation and Operation Manual - 06287D 1 Overview EchoStream RF modules are designed to be easily interfaced with your electronic remote application controller
Antenna for AutoAnchor 710
 Antenna for AutoAnchor 710 Installation Instructions AA710 Console AA702A Antenna Base Station AA727 Antenna The AA727 antenna is designed for use with the AA710 remote radio control system only. It will
TRM101 Wireless Data Transceiver Module User Manual
 File information: File type Model Product code Product name UHF TRM101 Wireless Data Transceiver Module Total 7 pages TRM101 Wireless Data Transceiver Module User Manual (Version:V1.0) Author: Jinzhou
APC 2M-14 Quick Installation Guide
 APC 2M-14 Quick Installation Guide Revision 1.4 20 October 2011 Copyright 2011 Deliberant www.deliberant.com Copyright 2011 Deliberant This user s guide and the software described in it are copyrighted
USER INSTRUCTIONS FM+DEX
 USER INSTRUCTIONS FM+DEX PACKAGE CONTENTS FM+DEX Charger Jack-to-jack cable Neck loop antenna (two lengths) Clip Click-on module User instructions 2 CONTENTS YOUR NEW FM+DEX...4 Intended use.... 4 Description
Installation and Quick Reference Guide. Disclaimer and warranty 2. Contents of this box 2. Brief background to AIS 3.
 AI3000 AIS Receiver ai3000vf rev 6b Installation and Quick Reference Guide Contents Page Number Disclaimer and warranty 2 Contents of this box 2 Brief background to AIS 3 Introduction 3 Installing the
Explorer 657. Fishfinder and Chartplotter Installation and Operation Manual.
 Explorer 657 Fishfinder and Chartplotter Installation and Operation Manual www.northstarnav.com IMPORTANT SAFETY INFORMATION Please read carefully before installation and use. DANGER! WARNING! CAUTION
sher-price.com T4841
 www.fi sher-price.com T4841 IMPORTANT! DANGER To prevent electric shock, do not immerse in water; wipe clean with damp cloth. WARNING To prevent strangulation with power cord, never place transmitter within
User Manual. MITSUMI WiFi Module MODEL DWM-W081
 Page 1 of 7 User Manual MITSUMI WiFi Module MODEL DWM-W081 The purpose of this manual is to explain correct way how to integrate module DWM-W081 to the end product. It includes procedures that shall assist
FOR TRAINING PURPOSES ONLY DATED MATERIAL. Aperio Hub AH20/AH30 Installation Instructions. ASSA ABLOY, the global leader in door opening solutions
 perio Hub H20/H30 Installation Instructions Covers WL-260 3 May 2011 SS LOY, the global leader in door opening solutions 1 H20/H30 - Table of Contents 2 H20/H30 - FCC and Industry Canada Statements 3 H20/H30
Telensa. BS4 installation instructions. Installation Manual for the BS4 Basestation. Title: Date: 08 May 2017 Document ref: 2LT053 03
 Title: Installation Manual for the BS4 Basestation Date: 08 May 2017 Document ref: 2LT053 03 Telensa BS4 installation instructions 2LT053 03 08 May 2017 Page 1 of 9 Contents OPERATIONAL SAFETY NOTICES...
Explorer 725 / 705. VHF Marine Radio Quickstart Guide.
 Explorer 725 / 705 VHF Marine Radio Quickstart Guide www.northstarnav.com This Quickstart Guide is to be used with the Northstar Explorer 721 VHF Radio Installation and Operation Manual. The Explorer 721
PA421B PA821B. Front Panels. Included Components. Features. Model Variations. Antenna Combiner
 Antenna Combiner WARNING: This product contains a chemical known to the State of California to cause cancer and birth defects or other reproductive harm. General Description Shure antenna combiners actively
On-Line Cardio Theater Wireless Digital Transmitter Installation and Instruction Manual
 On-Line Cardio Theater Wireless Digital Transmitter Installation and Instruction Manual Full installation instructions accompany your Cardio Theater equipment order. This On-Line version of our Installation/Instruction
BT11 Hardware Installation Guide
 Overview The Mist BT11 delivers a BLE Array AP with internal antennas that are used for BLE based location. 1 Understanding the Product Included in the box: BT11 Mounting bracket with mounting hardware
Wireless Control User s Guide. Inside the Box You should find the following items in the box: Monnit Wireless Control Unit Antenna
 Inside the Box You should find the following items in the box: Monnit Wireless Control Unit Antenna Monnit Wireless Control Quick Start Wireless Control User s Guide Create an imonnit user account and
MOVADO.COM/SMARTSUPPORT
 LANGUAGES ENGLISH... 3 FRANÇAIS... 4 ESPAÑOL... 5 REGULATORY INFORMATION... 6 MOVADO CONNECT POWERED BY ANDROID WEAR DOWNLOAD THE APP & GET STARTED AT MOVADO.COM/SMARTSUPPORT 3 MOVADO CONNECT POWERED BY
Regulatory Compliance Statement
 Regulatory Compliance Statement EU Declaration of Conformity The declaration of conformity may be consulted at www.kobo.com/userguides SAR Limits The exposure standard for wireless devices employs a unit
NV-WA40W. Installation and User Guide
 NV-WA40W Installation and User Guide Introduction The NV-WA40W-AMP is a versatile 40-watt in wall zone amplifier perfectly suited to a variety of tasks. Its design allows two line level sources to be permanently
Regulatory Compliance and Important Safety Information
 Regulatory Compliance and Important Safety Information Regulatory Certification/Approval Marks for your device can be found in Settings > About Kobo Glo HD EU Declaration of Conformity A copy of the EU
Setup Guide. support.spruceirrigation.com.
 FCC Compliance Statement This device complies with Part 15 of the FCC Rules. Operation is subject to the following two conditions: (1) this device may not cause harmful interference, and (2) this device
6505 MICRO. Amplifier. Operating Manual.
 6505 MICRO Amplifier Operating Manual www.peavey.com FCC/ICES Compliancy Statement This device complies with Part 15 of the FCC rules and Industry Canada license-exempt RSS Standard(s). Operation is subject
TC-LINK -200 Wireless 12 Channel Analog Input Sensor Node
 LORD QUICK START GUIDE TC-LINK -200 Wireless 12 Channel Analog Input Sensor Node The TC-Link -200 is a 12-channel wireless sensor used for the precise measurement of thermocouples. Calibration is not required.
HOBO RX Wireless Sensor Network HOBO RXW Repeater (RXW-RPTR-xxx) Manual
 Manual") Test Equipment Depot - 800.517.8431-99 Washington Street Melrose, MA 02176 - TestEquipmentDepot.com HOBO RX Wireless Sensor Network HOBO RXW Repeater (RXW-RPTR-xxx) Manual The HOBO RXW Repeater is designed
Test Equipment Depot - 800.517.8431-99 Washington Street Melrose, MA 02176 - TestEquipmentDepot.com HOBO RX Wireless Sensor Network HOBO RXW Repeater (RXW-RPTR-xxx) Manual The HOBO RXW Repeater is designed
EA_Gas Module Installation Instructions
 June 2011 IL42-5015B EA_Gas Module Installation Instructions Introduction The EA_Gas Module is designed for use with most residential diaphragm meters. Modules for residential meters are available in three
Thank you for buying this AIS antenna splitter.
 Thank you for buying this AIS antenna splitter. This product has been engineered to offer you the highest level of performance and durability and we hope that it will provide many years of reliable service.