TABLE OF CONTENTS PAGE
|
|
|
- Monica Hines
- 5 years ago
- Views:
Transcription

1
2 TABLE OF CONTENTS PAGE 1.0 INTRODUCTION WARNINGS 2 DUTY CYCLE PHYSICAL DESCRIPTION 3 HIGH VOLTAGE PULSER/TUBEHEAD 3 HOUSING 3 HANDLE 3 BATTERY PACK 3 BATTERY CHARGER 3 REAR VIEW 3 CONTROLS 4 CABLE CONNECTOR DIAGRAM DESCRIPTION OF OPERATION 6 BLOCK DIAGRAM OPERATING INSTRUCTIONS 7 OPERATING PRECAUTIONS 8 EXCLUSION ZONE 8 NAVIGATING THE MENU 9 MAIN MENU 10 SET COUNTS/PULSES 11 PULSE COUNT EXCEED DUTY CYCLE 12 SET DELAY TIME 14 SET MULTIPLE PULSE TRAINS 15 MULTIPLE PULSE TRAINS EXCEED DUTY CYCLE 16 PULSE COUNTER/LIFETIME PULSE COUNT 17 BACKLIGHT ON/OFF 18 PULSE/COUNTS MODE CHANGE 19 VOID WARRANTY INDICATOR 20 GENERATOR IDENTIFICATION NUMBERS 21 ERROR MESSAGES 22 SUGGESTED PULSE SETTINGS MAINTENANCE TROUBLE-SHOOTING INSTRUCTIONS FOR REPAIR 24 STORAGE, TRANSPORT, DISPOSAL WARRANTY 24 MANUFACTURER 24 RETURN REPAIR INSTRUCTIONS DESIGNATION SPECIFICATIONS 25 PHYSICAL DIMENSIONS 25 X-RAY OUTPUT 25 ELECTRICAL & THERMAL CHARACTERISTICS SPARE PARTS 26 1
3 1.0 INTRODUCTION The XR150 produces high levels of radiation and must be operated by qualified personnel who have read the WARNINGS and OPERATING INSTRUCTIONS sections of the manual before operating the device. The XR150 is an industrial type open beam x-ray generator intended to radiograph inanimate objects. The XR150 is a pulsed x-ray device that produces x-ray pulses of very short duration (30 nanoseconds). The energy produced by the XR150 is up to 150kVp, which makes it possible to radiograph up to one half (0.5) inch (1.27 cm) of steel. XR150 standard accessories are two keys, two 12V (or 10.8V) battery packs, and one battery charger. Remote cable, carrying case are also common accessories. 2.0 WARNINGS The XR150 is a pulsed X-ray generator that emits hazardous ionizing radiation when pulsing. The XR150 should only be operated by authorized personnel who are properly trained to safely operate the generator. The XR150 must be registered with proper authorities prior to use and should not be used to intentionally expose humans. Develop and closely follow a safe operating system for using the XR150. The safe operating system must ensure that no one is exposed to radiation above the permissible limits which are 2 mr (0.02 msv) per hour for a member of the public. The safe operating system must ensure the XR150 is used within federal and state guidelines. All operators and users of the XR150 x-ray machine must wear a personal radiation monitoring device, such as a TLD (thermoluminescent dosimeter), film badge, and/or a pocket dosimeter consistent with the appropriate federal, territorial or provincial standards (note: an electronic dosimeter will not detect the XR150 radiation pulses). If an operator or bystander is exposed to an unacceptable level of radiation contact your Radiation Safety Officer and/or appropriate health care provider. Due to the short pulse width of the XR150, survey meters of the Geiger-Mueller and scintillator type do not accurately detect the radiation emitted from the x-ray source. Survey meters should be of the ionization type and should be used in the integration mode. Survey meters must not be used in the rate mode because the XR150 does not produce constant radiation. The XR150 produces very high rates of radiation for very short periods of time resulting in either unrealistically high readings or no readings for a survey meter in rate mode. The XR150 has no explosion proof rating and should not be used in an explosive atmosphere. The Spark Gap is vented to the air and could be a source of ignition. DUTY CYCLE WARNING The XR150 is a light duty machine that is not made to pulse continuously. The maximum duty cycle for the XR150 is 100 counts (300 pulses) every four minutes (1500 counts/4500 pulses per hour). Exceeding the duty cycle will shorten the life of the tube and head. 2


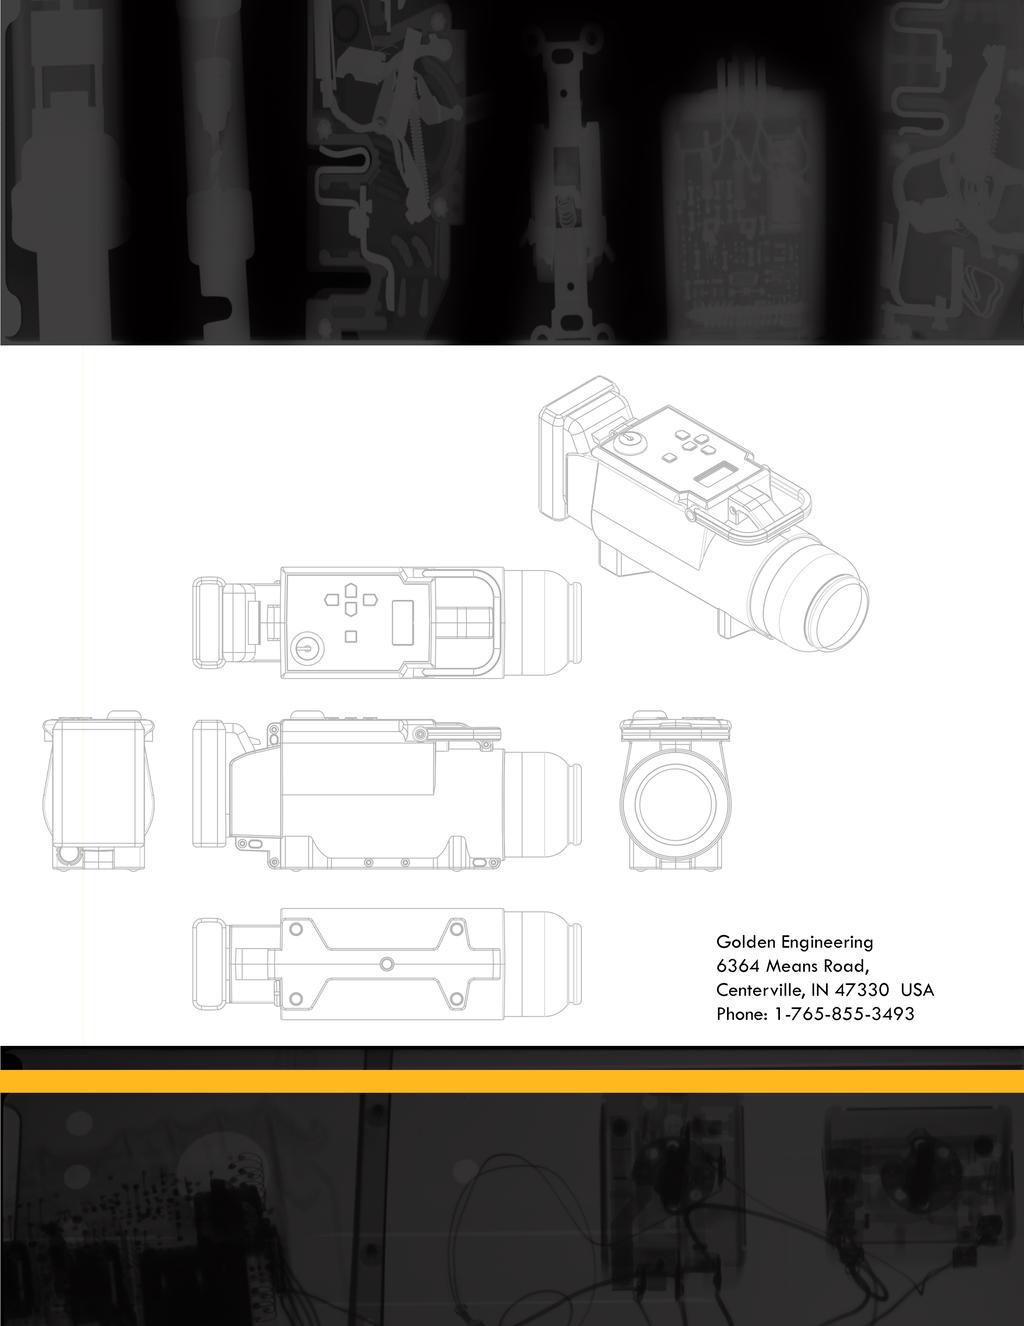
4 3.0 PHYSICAL DESCRIPTION KEY TOUCH PAD HANDLE BATTERY BEAM ANGLE LABEL HEAD RADIATION WARNING LABEL HOUSING HIGH VOLTAGE PULSER/TUBEHEAD The XR150 high voltage head which contains the cold cathode type X-ray tube, spark gap, high voltage capacitor, transformer, and 40 degree collimator. HOUSING The XR150 housing encloses the electronics and most of the high voltage head. The housing includes the touchpad interface, key switch, battery terminal block, cable connector, ¼-20 threaded tripod insert, and several tie off points that accommodate a variety of fasteners. HANDLE Handle is attached to the left and right side of the housing adjacent to the LCD. The handle can be removed using a T10 Torx driver. BATTERY PACK The standard battery pack is a DeWalt DCB127 Lithium Ion battery pack. In the USA the DCB127 battery is rated as a 12V battery. Outside the USA the DCB127 battery maybe rated as a 10.8V or 12V battery pack. BATTERY CHARGER The standard battery charger is the DeWalt DCB107 charger. DCB115 fast charger or DCB109 Car Charger are optional. Battery charge time is less than one hour with the standard charger. See battery charger manual for additional instructions and warnings. REAR VIEW TEMPERATURE SENSOR NEGATIVE - REMOTE CABLE CONNECTOR POSITIVE + BATTERY TERMINAL BLOCK 3
: 16-character LCD.")
5 CONTROLS LCD X-RAY PULSING LIGHTS DELAY SWITCH POWER ON LIGHT ENTER / EMERGENCY STOP DIRECTIONAL ARROWS KEY X-RAY PULSING LIGHTS: Blink after time delay button or remote cable button is pressed AND between multiple pulse trains. Stay on continuously while the XR150 pulses. Blink at a slower rate between multiple pulse trains. LIQUID CRYSTAL DISPLAY (LCD): 16-character LCD. Home screen displays counts/pulses (C or P), number of pulse trains (if multiple pulse trains are entered), safety time delay (D), and time delay between pulse trains (if multiple pulse trains are entered). See NAVIGATING THE MENU section for menu options. DELAY SWITCH: Initiates time delay mode count down when left and right arrows pressed simultaneously. POWER ON LIGHT: Illuminates when battery voltage is applied to control module. ENTER/ EMERGENCY STOP SWITCH: ENTER used when menu options are selected. EMERGENCY STOP stops the unit during delay count down mode or between multiple pulse trains. DIRECTIONAL ARROWS: Left, Right, Up, Down used to navigate through LCD and menu options. 4

6 XR150 REAR VIEW/CABLE CONNECTOR PIN # DESCRIPTION 1 +5 VOLTS 100 ma MAXIMUM 2 REMOTE SWITCH 3 REMOTE SWITCH - NO DELAY 4 X-RAY ON SIGNAL 5 COMMON 0 VOLTS REMOTE CONNECTOR: LEMO EPG.0B.305.HLN MATING CABLE PLUG: LEMO FGG.0B.305.CLAD 56Z PIN 2 PIN 5 Remote switch inputs are activated when grounded. 5
7 4.0 DESCRIPTION OF OPERATION The block diagram below illustrates how the XR150 functions. The following sequence of events takes place each time the XR150 is fired: 1. User initiates operation of the machine. 2. The control section sends a signal to the converter section to begin oscillating. 3. Once oscillating, the converter section changes the 12 volts DC to 22Khz AC. 4. The transformer charges the High Voltage Capacitor to about 8000 volts. 5. The spark gap arcs after the High Voltage Capacitor reaches proper voltage. 6. The pulse detector signals the control block that the unit has pulsed. 7. As the High Voltage Switch is closed, a high voltage transient of approximately 150,000 volts and 30 nanoseconds in duration is applied across the x-ray tube generating x-rays. The closing of the High Voltage Switch produces an audible pulsing sound. The XR150 cannot produce x-rays without the pulsing sound so it serves as an additional warning the XR150 is functioning. This unit generates x-rays through high voltage bombardment of a tungsten target. The XR150 does not contain radioactive materials. All the high voltage is contained within the aluminum canister and as long as the canister is not punctured the operator is not exposed to dangerous voltages. BLOCK DIAGRAM X-RAY TUBE SPARK GAP HIGH VOLTAGE CAPACITOR PULSE DETECTOR CONVERTER USER INTERFACE CONTROLLER BATTERY 6
8 5.0 OPERATING INSTRUCTIONS The following are basic operation instructions to take an X-ray image using the XR150. Certain applications may require modifications to these basic procedures. DETERMINE PULSE INITIATION METHOD: DR, REMOTE CABLE, TIME DELAY DR REMOTE CABLE TIME DELAY Attach Battery Attach Battery Attach Battery Connect System Attach Remote Cable Position XR150* Position XR150* Turn on XR150 using key and turning clockwise 1/4 turn Position XR150* Turn on XR150 using key and turning clockwise 1/4 turn Turn on XR150 using key and turning clockwise 1/4 turn Set Pulse Count Set pulse count to 100 Set Pulse Count Set Delay Time Retreat to imaging system controller (computer)** Retreat length of cable behind the XR150** Press left and right buttons simultaneously to initiate time delay Follow imaging system instructions to set pulses and initiate pulse train Press and hold cable button down to initiate and complete pulse train Retreat safe distance behind XR150** View Image Retreive image plate or film cassette Retreive image plate or film cassette Turn off XR150 View Image View Image Turn off XR150 Turn off XR150 7
9 *XR150 should be positioned directly in front of the object to be X-rayed and the imager placed directly behind the object to be X-rayed. Imager should be placed as close to the object as possible. Distance between XR150 and imager is usually 24 to 72 inches (30 to 180 cm). During operation XR150 should be stabilized on a flat surface, a tripod, or a custom fixture suitable for holding the 5 pound (2.2 Kg) XR150. XR150 OBJECT IMAGER 24 to 72 inches (30 to 180 cm) **OPERATING PRECAUTIONS: The operator should always stand at least 10 feet (3m) behind the X-ray unit and clear all personnel at least 10 feet (3m) behind the unit or at least 100 feet (30m) from the front of the unit before pulsing. The exclusion zone (below) should be a controlled area free of all personnel while X-ray pulses. 20 (6m) 10 (3m) 10 (3m) 10 (3m) X-ray Beam 100 (30m) 20 (6m) Figure 4: Exclusion Zone 8
10 NAVIGATING THE MENU Initial Display (2 seconds) Second display (2 seconds) Home 9
11 MAIN MENU Home screen displays Counts (C) & Delay Time (D) (Home Screen with multiple pulse trains, see page 15) Settings = Header (Title Screen) for the main menu Set CT = Set Counts (pulses) Set DT = Set Delay time (In delay mode only, safety time before initial pulse) Set PTr = Set Multiple Pulse Trains Home = Back to Home Screen ResetPC = Reset Pulse Counter Life PC = Lifetime Pulse Counter RIGHT arrow to settings Press ENTER to main menu Press DOWN arrow to scroll through menu options 10

12 SET COUNTS/PULSES Press ENTER to Set Counts (Pulses) RIGHT/LEFT arrow selects the digit UP/DOWN arrow scrolls through digits RIGHT arrow Select Save/ Press Enter Back to home Note: Press Enter and return to Home before pulsing the XR150. The XR150 will not pulse if software is not back to Home screen. 11
13 PULSE COUNT EXCEEDS DUTY CYCLE XR150 Duty Cycle is 100 counts (300 pulses) every 4 minutes. Exceeding the duty cycle on a continual basis will shorten the life of various components in the high voltage head. It is recommened to stay within the duty cycle, however, there may be emergency situations that operators need to exceed the duty cycle. If the duty cycle has been exceeded Golden Engineering may not honor the warranty (depending on how many times the duty cycle has been exceeded and the highest pulse count fired at one time). If the operator enters a pulse count higher than the duty cycle (100 counts/300 pulses) the software will indicate Counts > 100 / 4 min which means pulse count has exceeded the duty cycle. The LCD will prompt the operator to split the total count into multiple pulse trains. If operator selects Y the total counts will be separated to pulse trains of 25 counts (75 pulses) with a 60-second rest between pulse trains. If operator selects N the LCD will display Settings Void Warranty Continue. Press ENTER to continue with pulse count that exceeds the duty cycle. Select N to go back to Set CT screen. 12

14 Press ENTER to select no Press ENTER to select continue Displays pulse count and delay time Displays Settings Void Warranty 13
15 SET DELAY TIME (Safety delay between time prior to pulsing in delay mode) Press ENTER Set Delay Time LEFT/RIGHT arrow to select, UP/DOWN arrow to Scroll Select Save/Press ENTER Press LEFT/RIGHT arrows simultaneously to start delay Press the EMERGENCY STOP/ENTER button to cancel the safety delay countdown. 14
16 SET MULTIPLE PULSE TRAINS Press ENTER to set Pulse Trains Select and Scroll Press RIGHT after selectting PT Select time between Pulse Trains 25 counts per pulse train Select Save/Press ENTER 25 pulses per pulse train 5 Pulse Trains 130 second rest between pulse trains 30 second delay before first pulse train Home (in Counts) Home in Pulses 15
17 MULTIPLE PULSE TRAINS EXCEED DUTY CYCLE If multiple pulse train combination exceeds 100 counts in 4 minutes the LCD will warn that settings exceed duty cycle and ask if operator wants to continue. The software will allow operator to continue, but they must acknowledge that they are exceeding duty cycle and could void the warranty. Example below incidates 6 pulse trains of 25 counts with a rest of 10 seconds between pulse trains. Unit would have been within the duty cycle had the operator entered at least 60 seconds between pulse trains of 25 counts, decreased to 4 pulse trains of 25 counts, or decrease the number of pulse counts from 25 to
18 RESET PULSE COUNTER Pulse counter is similar to a trip odometer on an automobile. The counter can be reset to 0 to track the number of pulses since it was reset. Operator can use this feature to track number of pulses since the last tube replacement, number of pulses used on a specific job, or any other event the operator wants to track. Press ENTER Hold UP arrow for one (1) second to reset to 0 LIFETIME PULSE COUNT Lifetime pulse count tracks the total number of pulses the unit has fired. Please note the number displayed on the LCD is total number of PULSES the unit fired, NOT the total number of COUNTS. The XR150 fires three pulses for each count entered so the 12,549 Lifetime pulses that appear on LCD below equals 4183 lifetime COUNTS the XR150 has fired. Press ENTER Displays total in pulses (not counts) 17
19 HOME RIGHT MENU Bcklght = Backlight P/Count = Pulses or Counts Press RIGHT Arrow on Home BACKLIGHT ON/OFF Press ENTER to change backlight Press ENTER to enable backlight Press ENTER to disable backlight 18
20 PULSE/COUNTS MODE The PULSE/COUNT feature allows operators to change the setting to PULSE which will fire one pulse per number displayed on the LCD. The output dose of the XR150 is 1 mr per pulse. The output dose of other Golden X-ray models (Inspector Model 200, XR200, and XRS-3) is 3 mr per pulse. Due to the differences in output dose the standard version of the XR150 software historically pulsed 3 times per COUNT entered on the LCD. The output dose of the XR150 is 3 mr per COUNT (3 pulses) equaling to the same dose as other models. XR150 default setting is COUNT. Press ENTER to change modes Select 3 Press ENTER to select Counts Mode Select 1 Press ENTER to select Pulse Mode 19
21 HOME LEFT MENU Warranty Void = Number of times generator has been fired with warranty void setting Maxed DC = Number of times generator has reached the maximum duty cycle Press LEFT arrow on home Press LEFT arrow again to get to MAX DC Press RIGHT arrow to go back to Warranty Void 20
22 GENERATOR IDENTIFICATION Hold the enter button down while turning on the X-ray until the program version appears on LCD. This menu displays the software version for 2 seconds, the serial number of the generator for 2 seconds, and the serial number of the high voltage head for 2 seconds before going to the home screen. Hold ENTER button down while turning on the power Serial number of XR150 Serial number of XR150 head HOME 21


23 ERROR MESSAGES Occurs when XR150 powers up and battery voltage is less than 10V. Indicates battery low charge, but could fire up to 150 counts (450 pulses) Battery voltage is too low to pulse XR150. Charge the battery. Could occur at the start of a pulse train or during a pulse train. Power unit off and back on. If error message continues there is problem with electronics. Current not detected. No current flow going to the head. Occurs at beginning of pulse train. Check 20 amp fuse on the oscillator board. If fuse is ok problem could be in head or electronics. Replace boards or send back for repair. Pulse rate is slower than 1 pulse per second. Either low battery, problem with transformer, or electronics. Charge battery, or replace oscillator board. Current not detected. No current flow going to the head. Occurs at beginning of pulse train. Check 20 amp fuse on the oscillator board. If fuse is ok problem could be in head or electronics. Replace board or send back for repair. Displayed if duty cycle is reached (100 counts in 4 minutes). 22


24 SUGGESTED PULSE SETTINGS The chart below lists approximate pulses necessary to penetrate various materials. Settings vary depending on imaging system used. Refer to imaging system instructions for more information. MATERIAL COUNT (PULSE) SETTING 24 inches between x-ray & imager CARDBOARD / LIGHT WOOD / PLASTIC 10 LIGHT METAL 20 STEEL 1/4 50 STEEL ½ 90 If the radiograph is too dark, the film is underexposed. If the radiograph is too light the film is overexposed. Underexposure can be corrected by increasing the number of pulses and/or decreasing the distance between the imaging medium and the XR150. Overexposure can be corrected by reducing the number of pulses and/or increasing the distance between the imaging medium and XR150. Underexposed Overexposed Correct exposures (pulse setting) 6.0 MAINTENANCE X-RAY DOSE MEASUREMENT Using a dosimeter, the average X-ray dose for new tube can be established. With the dosimeter located 1 foot from the front of the case and in line with the center of the beam angle label, the reading for 10 COUNTS should be 27 mr to 40 mr. The leakage sheet illustrates the X-ray dose and maximum allowable radiation leakage levels for each X-ray unit. A completed copy of this form accompanies each X-ray. 7.0 TROUBLESHOOTING SYMPTOM TEST ACTION No power on light Check battery voltage Replace or charge battery Power on lights, but X-ray does not pulse. Power on lights, X-ray pulsing light does not illuminate, X-ray does not pulse 23 Low Battery Please Charge Check the battery voltage. Check the 2amp fuse. Check the battery voltage. Appears if battery is below 9V Charge or replace the battery. Replace the fuse if necessary. Replace the X-ray pulsing light Charge the battery
25 X-ray pulses, but no image or black image. Lighter than expected X-ray image. Unit stops pulsing in the middle of a pulse train and LCD displays 00. Unit makes loud popping noise while pulsing. Oil leaking from unit. Test X-ray output. Check Pulse/Count Mode. Make sure X-ray is in expected mode. If X-ray is in pulse mode but operator thinks generator is in counts mode will get 1/3 the expected dose. Check the battery voltage. Check 20 amp fuse. Send back for tube replacement if no X-ray output dose. Change to counts mode if XR150 is in pulse mode. Charge battery if necessary. Replace the fuse if blown. Stop immediately and return for repair. Return for repair. 8.0 INSTRUCTIONS FOR REPAIR INSTRUCTIONS FOR TRANSPORTATION, STORAGE, AND DISPOSAL The XR150 is shipped in a rigid case or strong fiberboard box with custom foam insert. When transporting remove the battery pack and transport in a rigid case or fiberboard box with sufficient cushioning. Store the XR150 in a dry environment within temperature ranges mentioned in the specifications. For disposal remove the tube and follow all applicable environmental laws. Alternatively, the XR150 may be returned to Golden Engineering for proper disposal. 9.0 WARRANTY Golden Engineering, Inc. warrants XR150 X-ray unit made and sold by it or its authorized representatives to be free of defects in materials and workmanship for a period of twelve (12) months from the date of shipment to the end user. Warranty does not cover maintenance required due to life. To make a claim under this limited warranty, customer must ship the entire unit (or the component believed to be defective) to Golden Engineering, post-paid. Golden Engineering, Inc. assumes no liability for units or components shipped until they are actually in the custody of Golden Engineering, Inc. Provided Golden Engineering, Inc. in its sole discretion, is satisfied that the failure is not the result of excessive use, abuse, misuse, accident, modification or improper disassembly or repair, Golden Engineering will provide parts and labor required to repair the unit. Golden Engineering reserves the right to use reconditioned and remanufactured components that meet original specifications. The unit or component will be returned and shipped to customer at customer s expense. THIS EXPRESS LIMITED WARRANTY IS IN LIEU OF ALL OTHER WARRANTIES AND GUARANTEES, EITHER EXPRESS OR IMPLIED OR CREATED BY OPERATION OF LAW. XR150 Manufacturer European Representative Golden Engineering, Inc. Certification Experts Europe PO Box 185 Nieuwstad 100 Centerville, IN USA 1381 CE Weesp Phone: The Netherlands Fax: Web: 24
26 RETURNING UNIT FOR REPAIR Complete the repair form at and include a copy of the printed form with the repair. If you do not have internet access prior to sending repair then include a letter containing a brief description of the problem, contact name, phone number, and return address. Remove battery before shipping the unit. Accessories are not necessary with units shipped back for repair. Be sure the unit is securely packaged for shipment and wrap in plastic bag if there is an oil leak. Ship to address: Golden Engineering 6364 Means Road, Centerville, IN USA Phone: service@goldenengineering.com Serial Number: Delivery Date: 10.0 DESIGNATION Manufacturer Address Country of Origin Model Serial Number Production Date Weight Voltage Ampère 6364 Means Rd, Centerville, IN USA XR Kg 12 V 9 A 11.0 SPECIFICATIONS PHYSICAL DIMENSIONS LENGTH inches (2697 mm) with battery WIDTH 3.03 inches (770 mm) HEIGHT 4.07 inches (1003 mm) WEIGHT 4.9 pounds (2.2 Kg) with battery X-RAY OUTPUT X-ray dose per pulse 2.3 mr to 4 mr/count measured (12 inches in front of unit) Counts per battery charge 2000 Counts per second 4 (12 pulses) Expected tube life (glass tube) 50,000 counts 25
27 X-ray source size Maximum Photon Energy X-ray pulse width Battery voltage Battery type Battery recharge time Current draw Current flow 1/8 in. (3mm) 150 KVP 30 nanoseconds ELECTRICAL AND THERMAL CHARACTERISTICS 12 volts or 10.8 volts Lithium Ion One Hour Max 9 12 volts 0.1 ma Temperature range 0 to 120 degrees F (-18 to 50 degrees C) Airborne Noise Emissions Maximum duty cycle High temperature / High use duty cycle Warm-up 80 db at 10 cm 100 counts every 4 minutes (1500 counts per hour) Above 90 Degrees OR continual use rest 30 seconds every 50 pulses and 4 minutes every 200 pulses None required 12.0 SPARE PARTS AND ACCESSORIES FOR THE XR150 ITEM PART NUMBER Thumbwheel Key Flat key DeWalt Battery 12V DCB DeWalt Battery Charger (110V) DCB DeWalt Battery Charger (220V) Remote Cable Carrying case (holds X-ray, 2 batteries, charger, cable)
28
OPERATOR'S MANUAL MARCH Golden Engineering...-- Portable X-ray Technology
 OPERATOR'S MANUAL MARCH 2018 - Golden Engineering...-- Portable X-ray Technology TABLE OF CONTENTS PAGE 1.0 INTRODUCTION 2 2.0 WARNINGS 2 DUTY CYCLE 2 3.0 PHYSICAL DESCRIPTION 3 HIGH VOLTAGE PULSER/TUBEHEAD
OPERATOR'S MANUAL JUNE 2017
 OPERATOR'S MANUAL JUNE 2017 TABLE OF CONTENTS PAGE 1.0 INTRODUCTION 2 2.0 WARNINGS 2 DUTY CYCLE 2 STORAGE 2 3.0 PHYSICAL DESCRIPTION 3 HIGH VOLTAGE PULSER/TUBEHEAD 3 BASE 3 BATTERY PACK 3 BATTERY CHARGER
1.0 INTRODUCTION WARNINGS 2 DUTY CYCLE 2 STORAGE PHYSICAL DESCRIPTION 3 HIGH VOLTAGE PULSER/TUBEHEAD 3 BASE 3 BATTERY PACK 3
 JUNE 2017 TABLE OF CONTENTS PAGE 1.0 INTRODUCTION 2 2.0 WARNINGS 2 DUTY CYCLE 2 STORAGE 2 3.0 PHYSICAL DESCRIPTION 3 HIGH VOLTAGE PULSER/TUBEHEAD 3 BASE 3 BATTERY PACK 3 BATTERY CHARGER 3 CONTROL MODULE
TABLE OF CONTENTS PAGE 1.0 INTRODUCTION
 TABLE OF CONTENTS PAGE 1.0 INTRODUCTION 2 2.0 WARNINGS 2 ELEVATION WARNING 2 DUTY CYCLE 2 3.0 PHYSICAL DESCRIPTION 3 HIGH VOLTAGE PULSER/TUBEHEAD 3 BASE 3 BATTERY PACK 3 BATTERY CHARGER 3 CONTROLS 4 CABLE
1.0 INTRODUCTION WARNINGS PHYSICAL DESCRIPTION CONTROL MODULE DESCRIPTION OF OPERATION OPERATING INSTRUCTIONS 7
 TABLE OF CONTENTS PAGE 1.0 INTRODUCTION 2 2.0 WARNINGS 2 DUTY CYCLE 2 STORAGE 2 3.0 PHYSICAL DESCRIPTION 3 HIGH VOLTAGE PULSER/TUBEHEAD 3 BASE 3 BATTERY PACK 3 BATTERY CHARGER 3 3.5 CONTROL MODULE 4 CABLE
ELECTRONIC CONTROL CONCEPTS 160 Partition Street Saugerties, NY or local phone
 ELECTRONIC CONTROL CONCEPTS 160 Partition Street Saugerties, NY 12477 (800)VIP-XRAY (845)247-9028 Fax or 800-847-9729 local phone 845-246-9013 http://www.eccxray.com sales@eccxray.com INSTRUCTION MANUAL
DM-46 Instruction Manual
 Auto Meter Products Inc. Test Equipment DM-46 Instruction Manual Automotive Multimeter and Inductive Amp Probe The DM-46 is the auto industry s answer to pocket portability in a 20 2650-1552-00 3/8/11
PI-10 Broadband Power Indicator
 PI-10 Broadband Power Indicator HIGH RF VOLTAGES MAY BE PRESENT AT THE PORTS OF THIS UNIT. All operating personnel should use extreme caution in handling these voltages and be thoroughly familiar with
OVA-50 Optical Variable Attenuator User s Manual
 OVA-50 Optical Variable Attenuator User s Manual Shineway Technologies, Inc. All rights reserved. Safety Instructions The WARNING sign denotes a hazard. It calls attention to a procedure, practice, or
PI-150 Broadband Power Indicator
 PI-150 Broadband Power Indicator HIGH RF VOLTAGES MAY BE PRESENT AT THE PORTS OF THIS UNIT. All operating personnel should use extreme caution in handling these voltages and be thoroughly familiar with
Model: Smart Stat III INSTALLATION AND OPERATION INSTRUCTIONS
 Model: Smart Stat III INSTALLATION AND OPERATION INSTRUCTIONS INTRODUCTION IF YOU CANNOT READ OR UNDERSTAND THESE INSTALLATION INSTRUCTIONS DO NOT ATTEMPT TO INSTALL OR OPERATE This remote control system
LUDLUM MODEL 182 RADON FLASK COUNTER. June 2011 Serial Number PR and Succeeding Serial Numbers
 LUDLUM MODEL 182 RADON FLASK COUNTER June 2011 Serial Number PR206794 and Succeeding Serial Numbers LUDLUM MODEL 182 RADON FLASK COUNTER June 2011 Serial Number PR206794 and Succeeding Serial Numbers LUDLUM
AMP-12 OPERATOR S MANUAL
 AMP-12 OPERATOR S MANUAL Version 1.0 Copyright 2002 by Vatell Corporation Vatell Corporation P.O. Box 66 Christiansburg, VA 24068 Phone: (540) 961-3576 Fax: (540) 953-3010 WARNING: Read instructions carefully
AMP-13 OPERATOR S MANUAL
 AMP-13 OPERATOR S MANUAL Version 2.0 Copyright 2008 by Vatell Corporation Vatell Corporation P.O. Box 66 Christiansburg, VA 24068 Phone: (540) 961-3576 Fax: (540) 953-3010 WARNING: Read instructions carefully
GT-1050A 2 GHz to 50 GHz Microwave Power Amplifier
 Established 1981 Advanced Test Equipment Rentals www.atecorp.com 800-404-ATEC (2832) Giga-tronics GT-1050A Microwave Power Amplifier GT-1050A 2 GHz to 50 GHz Microwave Power Amplifier Operation Manual
Pipe Laser Model No Instruction Manual
 Pipe Laser Model No. 40-6690 Instruction Manual Congratulations on your choice of this Pipe Laser. We suggest you read this instruction manual thoroughly before using the pipe laser. Save this instruction
COMBILOG ANTENNA MODEL AC MHz. rev: 0202
 COMBILOG ANTENNA 30-2000 MHz MODEL AC-220 rev: 0202 WARRANTY All equipment manufactured by Com-Power Corporation is warranted against defects in material and workmanship for a period of two (2) years from
INSTRUCTION MANUAL INF Fax: (503)
") INSTRUCTION MANUAL INF151 1-800-547-5740 Fax: (503) 643-6322 www.ueiautomotive.com email: info@ueitest.com Introduction Congratulations on your purchase of the INF151 infrared thermometer. Like all UEi
INSTRUCTION MANUAL INF151 1-800-547-5740 Fax: (503) 643-6322 www.ueiautomotive.com email: info@ueitest.com Introduction Congratulations on your purchase of the INF151 infrared thermometer. Like all UEi
DM-46 Instruction Manual
 Test Equipment Auto Meter Products Inc. 413 West Elm Street Sycamore, IL 60178 Service (815) 899-0801 Toll Free (866) 883-TEST (8378) www.autometer.com/test DM-46 Instruction Manual Automotive Multimeter
OPERATION & SERVICE MANUAL FOR FC 110 AC POWER SOURCE
 OPERATION & SERVICE MANUAL FOR FC 100 SERIES AC POWER SOURCE FC 110 AC POWER SOURCE VERSION 1.3, April 2001. copyright reserved. DWG No. FC00001 TABLE OF CONTENTS CHAPTER 1 INTRODUCTION... 1 1.1 GENERAL...
QuadroMAX. Installation Manual. QM Series. LED Outdoor Lighting Fixtures REV: 3/22/16
 QuadroMAX LED Outdoor Lighting Fixtures Installation Manual QM Series REV: 3/22/16 BEFORE YOU BEGIN Read these instructions completely and carefully. WARNING Risk of fire or electric shock. Luminaire wiring
INSTRUCTION MANUAL For LINE IMPEDANCE STABILIZATION NETWORK. Model LI khz to 10 MHz
 Page 1 of 10 INSTRUCTION MANUAL For LINE IMPEDANCE STABILIZATION NETWORK Model LI-4100 10 khz to 10 MHz Page 2 of 10 Table of Contents 1.0 Introduction... 3 2.0 Product Description... 4 3.0 Product Specifications...
EdvoCycler & MegaCycler
 Operation Manual: EdvoCycler & MegaCycler Cat. #541 and #542 Features: 25 x 0.2 ml Tube Block (EdvoCycler) 49 x 0.2 ml Tube Block (MegaCycler) Heated Oil-Free Lid with Magnetic Latch Vivid 7 Line LCD Display
f i r e - p a r t s. c o m
 Model: CON 1001-1 INSTALLATION AND OPERATING INSTRUCTIONS SINGLE-FUNCTION WIRELESS REMOTE CONTROL SYSTEM FOR OPERATING VALVES WITH ON/OFF LATCHING SOLENOIDS IF YOU CANNOT READ OR UNDERSTAND THESE INSTALLATION
LUDLUM MODEL 421 AND PMT BASE WITH PREAMPLIFIER/BIAS SUPPLY. October 2014 Serial Number and Succeeding Serial Numbers
 LUDLUM MODEL 421 AND 421-3 PMT BASE WITH PREAMPLIFIER/BIAS SUPPLY October 2014 Serial Number 200000 and Succeeding Serial Numbers LUDLUM MODEL 421 AND 421-3 PMT BASE WITH PREAMPLIFIER/BIAS SUPPLY October
SERIES. Owners Manual & Installation Guide. Limited Warranty: 2-Channel High Speed Digital Stereo Amplifier
 Limited Warranty: RE Audio warrants all manufactured electronic products to be free from defects in material and workmanship for a period not to exceed ONE YEAR from the date of purchase. 2-Channel High
Ricochet Alphasonic Level Transmitter Model LA15/20 Owner s Manual
 Warranty, Service & Repair To register your product with the manufacturer, fill out the enclosed warranty card and return it immediately to: Flowline Inc. 500 Humbolt Street Los Alamitos, CA 9. If for
Operating Instructions
 3000 Operating Instructions Contents Introduction 1 Operating Instructions 2-4 Demonstrations 5-6 Storing/Handling/Cleaning 7 Safety Precautions 7-8 Specifications 8 FCC Compliance Statement 9-10 Limited
Professional UHF Rechargeable Wireless Microphone System POWER ON/OFF BATTERY CHARGE. Green Light (Full) Better Music Builder DOWN VOLUME
 Better Music Builder DOWN VOLUME") Green Light (Full) KARAOKE Professional UHF Rechargeable Wireless Microphone System VM-93C Operating Instructions UHF Frequency 64 Selectable POWER ON/OFF CHARGE Better Music Builder VM-93C CHARGER UHF
Green Light (Full) KARAOKE Professional UHF Rechargeable Wireless Microphone System VM-93C Operating Instructions UHF Frequency 64 Selectable POWER ON/OFF CHARGE Better Music Builder VM-93C CHARGER UHF
SL300 Snow Depth Sensor USL300 SNOW DEPTH SENSOR. Revision User Manual
 USL300 SNOW DEPTH SENSOR Revision 1.1.2 User Manual 1 Table of Contents 1. Introduction... 3 2. Operation... 3 2.1. Electrostatic Transducer... 4 2.2. SL300 Analog Board... 4 2.3. SL300 Digital Circuit
PULSE OXIMETRY SIMULATOR
 PULSE OXIMETRY SIMULATOR SPO-2000 SYSTEM USER MANUAL BC BIOMEDICAL SPO-2000 SYSTEM TABLE OF CONTENTS WARNINGS, CAUTIONS, NOTICES... ii DESCRIPTION... 1 LAYOUT... 2 KEYS... 3 LED INDICATORS... 4 OPERATIONS...
Using the USB Output Port to Charge a Device
 Table of Contents ----------------------------------- 2 Features ----------------------------------------------- 3 Controls and Functions ---------------------------------- 4 ER210 Power Sources -----------------------------------
LED PowerBlinder 4 ORDERCODE 41320
 LED PowerBlinder 4 ORDERCODE 41320 Congratulations! You have bought a great, innovative product from Showtec. The Showtec LED PowerBlinder brings excitement to any venue. Whether you want simple plug-&-play
Model: 5010 INSTALLATION AND OPERATING INSTRUCTIONS
 Model: 5010 INSTALLATI AND OPERATING INSTRUCTIS INTRODUCTI IF YOU CANNOT READ OR UNDERSTAND THESE INSTALLATI INSTRUCTIS DO NOT ATTEMPT TO INSTALL OR OPERATE This SKYTECH remote control system was developed
Field Hub Installation Guide. P/N Rev. C 05/15
 Field Hub Installation Guide P/N016-0171-380 Rev. C 05/15 E21714 Copyright 2015 Disclaimer While every effort has been made to ensure the accuracy of this document, Raven Industries assumes no responsibility
Microwave Meter. Instruction Manual
 Microwave Meter 840046 Instruction Manual Microwave Meter 840046 Copyright 2009 by Sper Scientific ALL RIGHTS RESERVED Printed in the USA The contents of this manual may not be reproduced or transmitted
Model 7000 Low Noise Differential Preamplifier
 Model 7000 Low Noise Differential Preamplifier Operating Manual Service and Warranty Krohn-Hite Instruments are designed and manufactured in accordance with sound engineering practices and should give
5001 INSTALLATION AND OPERATING INSTRUCTIONS
 5001 INSTALLATI AND OPERATING INSTRUCTIS IF YOU CANNOT READ OR UNDERSTAND THESE INSTALLATI INSTRUCTIS DO NOT ATTEMPT TO INSTALL OR OPERATE INTRODUCTI This SKYTECH remote control system was developed to
Model Hz to 10MHz Precision Phasemeter. Operating Manual
 Model 6610 1Hz to 10MHz Precision Phasemeter Operating Manual Service and Warranty Krohn-Hite Instruments are designed and manufactured in accordance with sound engineering practices and should give long
KX120.2 / KX150.2 / KX200.2
 KX120.2 / KX150.2 / KX200.2 Congratulations! You have just purchased the latest in amplifier technology to carry the famous KICKER name. Your KICKER KX series amplifier is designed and built to give you
QUANTUM Qflash T2 / X2 OPERATING INSTRUCTIONS
 QUANTUM Qflash T2 / X2 OPERATING INSTRUCTIONS 1.0 DESIGNATIONS T2 AND X2 1. Removable Reflector, two positions Normal and Wide angle. 2. Flash-tube 2A. Modeling Lamp (for Model X2 only) 3. Bounce Head,
411LA Broadband Power Amplifier
 411LA Broadband Power Amplifier HIGH RF VOLTAGES MAY BE PRESENT AT THE OUTPUT OF THIS UNIT. All operating personnel should use extreme caution in handling these voltages and be thoroughly familiar with
Radiant 3000F Video Light (Cat. No. 6052)
") Fantasea Line Radiant 3000F Video Light (Cat. No. 6052) Instruction Manual 1 TABLE OF CONTENTS TABLE OF CONTENTS... 2 DISCLAIMER... 3 INTRODUCTION... 3 GENERAL INFORMATION... 3 SPECIFICATIONS... 4 INCLUDED
Fantasea Line Radiant 3000F Video Light (Cat. No. 6052) Instruction Manual 1 TABLE OF CONTENTS TABLE OF CONTENTS... 2 DISCLAIMER... 3 INTRODUCTION... 3 GENERAL INFORMATION... 3 SPECIFICATIONS... 4 INCLUDED
NCS-C150 INSTRUCTION MANUAL Rev D. Collcomm Inc. d.b.a. NCS. Shipping Address 2310 Pendley Road Cumming, Georgia 30041
 NCS-C150 INSTRUCTION MANUAL Rev D Collcomm Inc. d.b.a. NCS Shipping Address 2310 Pendley Road Cumming, Georgia 30041 Mailing Address 1595 Peachtree Parkway Suite 204-123 Cumming, Georgia 30041 Toll Free
INSTRUCTION MANUAL. MODEL: Vintage 60R. Vintage Series Guitar Amplifi er
 INSTRUCTION MANUAL MODEL: Vintage 60R Vintage Series Guitar Amplifi er 2 INTRODUCTION Thank you for choosing this Johnson amplifier. Please read this manual carefully and completely before operating your
Manual Carton Closing Staplers
 Operator s Manual Manual Carton Closing Staplers SHB00-A Item No. 6400 -/8" Crown Carton Closing Stapler 5/8" and /4" (5mm and 8mm) Ask for Genuine INTERCHANGE A58 and A4 Staples SHB50-C Item No. 640 -/4"
WS-29 DUAL CHANNEL WIRELESS BELTPACK
 WS-29 DUAL CHANNEL WIRELESS BELTPACK USER MANUAL Issue March 2011 ASL Intercom BV DESIGNED AND MANUFACTURED BY: ASL INTERCOM BV ZONNEBAAN 42 3542 EG UTRECHT THE NETHERLANDS PHONE: +31 (0)30 2411901 FAX:
2015 RIGOL TECHNOLOGIES, INC.
 Service Guide DG000 Series Dual-channel Function/Arbitrary Waveform Generator Oct. 205 TECHNOLOGIES, INC. Guaranty and Declaration Copyright 203 TECHNOLOGIES, INC. All Rights Reserved. Trademark Information
SANPERA I. Player`s Handbook
 SANPERA I SANPERA I Player`s Handbook TM SANPERA I Welcome Thank you for purchasing the SanperaTM I foot controller for your VYPYR amplifier. We are certain you will enjoy having the control of your VYPYR
ER200 COMPACT EMERGENCY CRANK DIGITAL WEATHER ALERT RADIO OWNER S MANUAL
 ER200 COMPACT EMERGENCY CRANK DIGITAL WEATHER ALERT RADIO OWNER S MANUAL Table of Contents -------------------------------------- 2 Features ----------------------------------------------- 3 Controls and
A510S Operation Manual
 A510S Operation Manual REV 1.1 1 Table of Contents 1 General Information 1-1 Description 1-2 Potential Operational Hazards 1-3 Technical Specifications 1-4 Instrument Overview 1-5 Function Summary 2 How
NCS-C150 INSTRUCTION MANUAL Rev A. Collcomm Inc. Shipping Address 2310 Pendley Road Cumming, Georgia 30041
 NCS-C150 INSTRUCTION MANUAL Rev A Collcomm Inc. d.b.a. NCS Shipping Address 2310 Pendley Road Cumming, Georgia 30041 Mailing Address 1595 Peachtree Parkway Suite 204-123 Cumming, Georgia 30041 Toll Free
ELECTROSURGICAL UNIT ANALYZER
 ELECTROSURGICAL UNIT ANALYZER ESU-2000A USER MANUAL BC BIOMEDICAL ESU-2000A TABLE OF CONTENTS WARNINGS, CAUTIONS, NOTICES... ii DESCRIPTION... 1 OVERVIEW... 2 OPERATING INSTRUCTIONS... 3 MANUAL REVISIONS...
ENGLISH Spider Stage 1 x 1 m / 2 x 1 m
 MANUAL ENGLISH Spider Stage 1 x 1 m / 2 x 1 m V3 Highlite International B.V. Vestastraat 2 6468 EX Kerkrade the Netherlands Table of contents Warning... 2 Safety Instructions... 2 Operating Determinations...
TECHNICAL SPECIFICATIONS for 300KV CONSTANT POTENTIAL X RAY EQUIPMENT (for industrial applications) S. No. PARTICULARS BHEL SPECIFICATIONS
 S. No. PARTICULARS BHEL SPECIFICATIONS") TECHNICAL SPECIFICATIONS for 300KV CONSTANT POTENTIAL X RAY EQUIPMENT (for industrial applications) BIDDER s OFFER S. No. PARTICULARS BHEL SPECIFICATIONS 1.0 Area of Application The 300kV Constant potential
TECHNICAL SPECIFICATIONS for 300KV CONSTANT POTENTIAL X RAY EQUIPMENT (for industrial applications) BIDDER s OFFER S. No. PARTICULARS BHEL SPECIFICATIONS 1.0 Area of Application The 300kV Constant potential
Atomscope PORTABLE VETERINARY X-RAY EQUIPMENT INSTRUCTION MANUAL. Version 1.0
 Atomscope PORTABLE VETERINARY X-RAY EQUIPMENT INSTRUCTION MANUAL Version 1.0 Thank you for purchasing our HFX90V portable veterinary x-ray unit. We are confident that you will be pleased with the radiographs
1-CYLINDER TORNADO LIFT INSTALLATION MANUAL
 1-CYLINDER TORNADO LIFT INSTALLATION MANUAL Model: TORNADO LIFT 2K 2018 Edition PROVIDED FOR ASSEMBLY Foot Pads 12 sq. Square Tube Legs (optional) Cross Beams Side Beams 2.5 Dia. Cylinders (with hoses
Log Periodic Antenna
 Page 1 of 10 Log Periodic Antenna ALFM 80120 88 MHz to 108 MHz (Extendible to 80 to 120 MHz) Page 2 of 10 Table of Contents 1.0 Introduction... 3 2.0 Product Specifications... 4 3.0 Important Safety Precautions...
Introduction. Specifications. Features. Controls. Model 103
 Index Page # Model 103 2 Introduction 2 Specifications 2 Features 2 Controls 2 Hints and Tips 3 Input Sensitivity (typical) 3 RF Signal Strength Bargraph 3 Frequency Display Resolution 3 Model 104 4 Introduction
LPU-2127 User Manual
 LPU-2127 User Manual Doc #9004169 Rev A1, 04/15 Table of Contents Introduction... iii Warranty and Warranty Restrictions... iv Chapter 1: Specifications and Options... 1 Dimensions...1 Specifications...
Broadband Power Amplifier
 601L Broadband Power Amplifier HIGH RF VOLTAGES MAY BE PRESENT AT THE OUTPUT OF THIS UNIT. All operating personnel should use extreme caution in handling these voltages and be thoroughly familiar with
AC-TX Volt/100 Volt Transformer Panel for VR61 and VR62 Loudspeakers and the CLA37 Column Loudspeaker AC-TX128
 70 Volt/100 Volt Transformer Panel for VR61 and VR62 Loudspeakers and the CLA37 Column Loudspeaker 70 Volt/100 Volt Transformer Panel for VR21 and VR51 Loudspeakers INSTRUCTION MANUAL 1. SAFETY INSTRUCTIONS
LINCO MEASUREMENT MODEL CP-2B MASTER METER PROVER COUNTER INSTRUCTION MANUAL
 LINCO MEASUREMENT MODEL CP-2B MASTER METER PROVER COUNTER INSTRUCTION MANUAL ENGINEERED AUTOMATED SYSTEMS DESIGNERS ENGINEERS MANUFACTURERS SALES REPRESENTATIVES 4580 W. HWY 80 P.O. BOX 4096 MIDLAND, TEXAS
Broadband Step-Up Transformer. User Manual
 Broadband Step-Up Transformer User Manual 990-1930 09/2004 Introduction Introduction About this unit The APC Step-Up Transformer provides 220 V power from 60 VAC Broadband cable systems. Safety Electrical
UVA/B Light Meter. Instruction Manual. UVA/B Light Meter Copyright 2009 by Sper Scientific ALL RIGHTS RESERVED. Printed in the USA
 UVA/B Light Meter 850009 Copyright 2009 by Sper Scientific ALL RIGHTS RESERVED UVA/B Light Meter 850009 Instruction Manual Printed in the USA The contents of this manual may not be reproduced or transmitted
INSTRUCTION MANUAL. March 11, 2003, Revision 3
 INSTRUCTION MANUAL Model 701A Stimulator March 11, 2003, Revision 3 Copyright 2003 Aurora Scientific Inc. Aurora Scientific Inc. 360 Industrial Parkway S., Unit 4 Aurora, Ontario, Canada L4G 3V7 Tel: 1-905-727-5161
MedRx Avant Polar HIT AH-I-MPHITS-5 Effective 11/07/11
 INSTALLATION MANUAL 2 Contents Getting To Know Your AVANT POLAR HIT TM... 4 Setting up the System... 6 Software Installation... 7 Driver Installation Windows 7... 10 Driver Installation Windows XP... 13
A Channel Amplifier
 Installation Manual A2150 2 Channel Amplifier Table of Contents Installation Requirements and Recommendations 1 What s included 1 Speaker Wire Recommendations 1 Setup 2 Rack Mounting 2 Individually Protected
Directed Energy, Inc Oakridge Dr., Suite 100, Fort Collins, CO
 PCO-7121 Laser Diode Driver Module Operation Manual Directed Energy, Inc. 1609 Oakridge Dr., Suite 100, Fort Collins, CO 80525 sales@ixyscolorado.com www.ixyscolorado.com Contents Contents... 3 Safety...
41P Portable Calibrator User Manual
 Trig-Tek 41P Portable Calibrator User Manual Publication No. 980961 Rev. A Astronics Test Systems Inc. 4 Goodyear, Irvine, CA 92618 Tel: (800) 722-2528, (949) 859-8999; Fax: (949) 859-7139 atsinfo@astronics.com
1410T/LCD-A INSTALLATION AND OPERATING INSTRUCTIONS
 1410T/LCD-A INSTALLATION AND OPERATING INSTRUCTIONS IF YOU CANNOT READ OR UNDERSTAND THESE INSTALLATION INSTRUCTIONS, DO NOT ATT TO INSTALL OR OPERATE INTRODUCTION This SKYTECH remote control system was
32 CHANNEL SELECTABLE CH MHZ DOWN VOLUME
 KARAOKE Professional UHF Wireless Microphone System VM-92U Operating Instructions UHF Frequency 64 Selectable Better Music Builder UHF MIC WIRELESS SYSTEM VM-92U 32 CHANNEL SELECTABLE 248 13.10 CH MHZ
CD770 DIGITAL MULTIMETER INSTRUCTION MANUAL
 CD770 DIGITAL MULTIMETER INSTRUCTION MANUAL Table of Contents 1 SAFETY PRECAUTIONS Before use, read the following safety precautions.- 1-1 Explanation of Warning Symbols 001 1-2 Warning Messages for Safe
HTA125A/250A. Power Amplifiers. Installation & Use Manual
 HTA125A/250A Power Amplifiers Installation & Use Manual Specifications subject to change without notice. 2010 Bogen Communications, Inc. All rights reserved. 54-5832-04B 1011 NOTICE: Every effort was made
Overboard Recovery Communications Apparatus (ORCA ) RX-102 Receiver User s Manual
 RX-102 Receiver User s Manual") Overboard Recovery Communications Apparatus (ORCA ) RX-102 Receiver User s Manual This page intentionally left blank 3 For technical support, contact BriarTek at 703-548-7892 or through our website at
Overboard Recovery Communications Apparatus (ORCA ) RX-102 Receiver User s Manual This page intentionally left blank 3 For technical support, contact BriarTek at 703-548-7892 or through our website at
Balishutters. INSTALLATION guide FOR L-FRAME MOUNT INSTALL OPTIONS B OR C
 Balishutters INSTALLATION guide FOR L-FRAME MOUNT INSTALL OPTIONS B OR C Tools needed for installation Drill Phillips bit 1/8" drill bit 4. Hammer (preferably hard plastic) 5. Level 6. Phillips-head screwdriver
WRM-10 TM TRANSFORMER WINDING RESISTANCE METER
 WRM-10 TM TRANSFORMER WINDING RESISTANCE METER USER S MANUAL Vanguard Instruments Company, Inc. 1520 S. Hellman Ave. Ontario, California 91761, USA TEL: (909) 923-9390 FAX: (909) 923-9391 June 2009 Revision
Glass Electrode Meter
 Glass Electrode Meter INSTRUCTION MANUAL FOR Glass Electrode R/C Meter MODEL 2700 Serial # Date PO Box 850 Carlsborg, WA 98324 U.S.A. 360-683-8300 800-426-1306 FAX: 360-683-3525 http://www.a-msystems.com
Random & Sinusoidal Jitter Injector. Main Unit Operation Manual
 Random & Sinusoidal Jitter Injector RJI12G Main Unit Operation Manual Rev 1.0 September 2012 Introduction... 2 Safety Instruction... 2 1. General... 4 1 1 Features... 4 1 2 Functions & Characteristics...
SI-125 Power Amplifier Manual 6205 Kestrel Road; Mississauga, Ontario; Canada; L5T 2A1 November 2016, Rev 0.5
 SI-125 Power Amplifier Manual 6205 Kestrel Road; Mississauga, Ontario; Canada; L5T 2A1 November 2016, Rev 0.5 Phone: (905) 564-0801 Fax: (905) 564-0806 www.telecor.com E:\T2-108\T2-M108-ABC\T2-M108-B.doc/AD
Rock Sounders. Weatherproof Wireless 900MHz Speaker System. User Guide. Model no.: GDI-AQRCK400 / AQRCK41
 Rock Sounders Weatherproof Wireless 900MHz Speaker System User Guide Model no.: GDI-AQRCK400 / AQRCK41 Please read before using the equipment IMPORTANT: Please read your User s Guide before using your
VZ-EA2 Product Manual
 VZ-EA2 Product Manual IMPORTANT SAFETY INFORMATION 1. Read this entire manual before assembling and using the VirZOOM. VirZOOM can only be used safely if it is assembled, maintained and used properly.
Instruction Manual. Manual de instrucciones. Guide d utilisation ET PMET Rev 808
 Instruction Manual Manual de instrucciones Guide d utilisation ET2025 PMET2025-8 Rev 808 www.arrowfastener.com GENERAL SAFETY RULES WARNING! Read all instructions. Failure to follow all instructions listed
FCC ID: SAGA1-L8 IC: 2802A-SAGAL8 CE0470
 FCC ID: SAGA1-L8 IC: 2802A-SAGAL8 CE0470 WARRANTY INMOTION Controls, Inc. guarantees that this product meets its published specification at the time of shipment from the factory. Under proper installation,
6-CYLINDER TORNADO LIFT INSTALLATION MANUAL
 6-CYLINDER TORNADO LIFT INSTALLATION MANUAL Model: TORNADO LIFT 18K 2018 Edition PROVIDED FOR ASSEMBLY (4) Foot Pads 16 sq. (4) Square Tube Legs (optional) (2) Cross Beams (2) Side Beams 2.5 Dia. Cylinders
2100L Broadband Power Amplifier
 2100L Broadband Power Amplifier HIGH RF VOLTAGES MAY BE PRESENT AT THE OUTPUT OF THIS UNIT. All operating personnel should use extreme caution in handling these voltages and be thoroughly familiar with
Radiant Pro 2500 Video Light (Cat. No. 6047)
") Fantasea Line Radiant Pro 2500 Video Light (Cat. No. 6047) Instruction Manual 1 TABLE OF CONTENTS TABLE OF CONTENTS... 2 DISCLAIMER... 3 INTRODUCTION... 3 GENERAL INFORMATION... 3 SPECIFICATIONS... 4 INCLUDED
Fantasea Line Radiant Pro 2500 Video Light (Cat. No. 6047) Instruction Manual 1 TABLE OF CONTENTS TABLE OF CONTENTS... 2 DISCLAIMER... 3 INTRODUCTION... 3 GENERAL INFORMATION... 3 SPECIFICATIONS... 4 INCLUDED
Comfort 10S Wall Hardwire Installation and Operations Manual
 Comfort 10S Wall Hardwire Installation and Operations Manual 10/24/2012 REQUIRED TOOLS STARHEAD SCREWDRIVERS DRILL & BIT FLAT HEAD SCREWDRIVERS ALLEN KEY PENCIL MEASURING TAPE LEVEL ELECTRICAL REQUIREMENTS:
Opus 21 s80 Integrated Amplifier Owner's Manual
 Opus 21 s80 Integrated Amplifier Owner's Manual r e s o l u t i o n From all of us at Resolution Audio, thank you for choosing the Opus 21 s80 amplifier. We went to great lengths to design and produce
40 Amp Digital Bidirectional PWM Motor Controller with Regenerative Braking BIDIR-340-DR
 40 Amp Digital Bidirectional PWM Motor Controller with Regenerative Braking BIDIR-340-DR The BIDIR-340-DR is a fully solid-state motor controller that allows you to control the speed and direction of a
HIGH PERFORMANCE MARINE AUDIO HTX SERIES HTX-1, HTX-2, HTX-4, HTX-6 OWNER'S MANUAL. wetsounds.com
 HIGH PERFORMANCE MARINE AUDIO HTX SERIES HTX-1, HTX-2, HTX-4, HTX-6 OWNER'S MANUAL wetsounds.com CONGRATULATIONS! Thank you for purchasing the Wet Sounds Hydro-Tech TM X (HTX) series amplifier. Wet Sounds
HT Watt 6 Channel Class D amplifier OWNER S MANUAL
 HT-6 900 Watt 6 Channel Class D amplifier OWNER S MANUAL Congratulations! Thank you for purchasing the Wet Sounds Hydro-Tech TM series amplifier. Wet Sounds represents the ultimate in high performance
CBCT TM CIRCUIT BREAKER COIL TESTER
 CBCT TM CIRCUIT BREAKER COIL TESTER USER S MANUAL Vanguard Instruments Company, Inc. 1520 S. Hellman Ave. Ontario, California 91761, USA TEL: (909) 923-9390 FAX: (909) 923-9391 August 2010 Revision 1 SAFETY
S E L E C T I O N. Arm Curl. User manual
 S E L E C T I O N T H E S T R E N G T H E V O L U T I O N User manual The identification plate of the and manufacturer, affixed behind the seat, gives the following details: A Name and address of the manufacturer
Trouble Free Hardware
 Backs and Support OWNER MANUAL Trouble Free Hardware TFB Hardware Trouble Free Owner s Manual Customer Satisfaction 1.0 Stealth Products strives for 100% customer satisfaction. Your complete satisfaction
PCO-7114 Laser Diode Driver Module Operation Manual
 PCO-7114 Laser Diode Driver Module Operation Manual Directed Energy, Inc. 1609 Oakridge Dr., Suite 100, Fort Collins, CO 80525, (970) 493-1901 sales@ixyscolorado.com www.ixyscolorado.com Manual Document
4. CONNECTIONS. Make sure all connections to and in your Universal Rectifier are tight.
 OPERATING AND MAINTENANCE INSTRUCTIONS FOR CONSTANT CURRENT RECTIFIERS USING SATURABLE CORE REACTORS I. WARNING Operating personnel should observe the following before attempting to operate or adjust the
Laser User Manual. Therapy Unit INTRODUCTION
 INTRODUCTION The Laserex Laser 3000 is a highly versatile and compact laser therapy device that, under the guidance of a qualified Veterinarian, provides a simple method of treatment, delivering relief
LT3000 ULTRASONIC LEVEL TRANSMITTER
 LT3000 ULTRASONIC LEVEL TRANSMITTER Owner s Manual Specifications Installation Calibration Troubleshooting Warranty Drawings Distributed By: iprocessmart.com 14262 Doolittle Drive San Leandro, CA 94577
INTEGRATED VACUUM TUBE AMPLIFIER LM-508IA
 INTEGRATED VACUUM TUBE AMPLIFIER LM-508IA Table of Contents Thanks for choosing our Line Magnetic LM-508IA Integrated Amplifier as an important part of your music system and please read the manual carefully