Printing special inks - White, Varnish and Primer
|
|
|
- Heather Daniels
- 6 years ago
- Views:
Transcription

.")
1 Tutorial Printing special inks - White, Varnish and Primer Software version: Asanti 3.0 Document version: March 27, 2017 This tutorial demonstrates how to print jobs with special inks like white, primer and varnish. Obviously the ink set of the printer needs to contain such inks. Enabling an ink set with a special ink needs to be done with the configuration wizard (Help > Configuration wizard). Varnish inksets are only available on certain types of printers. This tutorial uses different printers and ink sets to illustrate the different applications. Download the Asanti Sample Files via the Asanti Client (Help > Asanti Online > Download Sample Files). Part I: Printing with white ink This first part contains exercises which teach you how jobs can be printed with white inks 1. Printing white from image In this exercise you will learn how to print white from objects present in the input file. 1. File Menu > New layout job 2. Select the job set-up > Media inspector > Generic media 3. Set the Media Size to at least to 650x500 mm. 4. Select the for Application-Quality: High Definition 5. Expand and enable the White application in the Job Set-Up inspector. 6. Select for Application-White: From Image (Asanti) and Pre-white 7. Notice that the Calibrated Printing Mode (CPM) should have a section On White, which means that the ICC profile was made with white of the ink set underneath the CMYK colors. Depending on the Quality, CPM s may or may not contain settings for On White and White printing. Typically, CPM s for High Definition quality will contain White printing information. Asanti uses a different ICC profile for Pre-white as for Post-white, automatically the correct profile of the CPM will be selected depending on the application mode (Pre- or Post -White) 8. In the Image panel click + and browse for Asanti-stickers - Pos-Neg-White.pdf, click open. Page 1


2 9. Select the Colors Inspector. 10. Click in the White color: Notice that the white color will be printed with White ink. In Asanti, vectors and alpha channels from the input documents can be assigned to the white ink of the printing press if these objects are drawn in a spot color. Several spot colors are automatically mapped to White. You can find them in the Color Books (Ctrl+Alt+6) > Special Color > White category. 11. Click on the Create Previews button and wait until the color accurate previews are ready. A little faint green square in the lower right corner of the image thumbnails, indicates that the preview creation is still going on. The previews are ready when the green square disappears from the thumbnail. 12. In the image panel click on the first page of the Asanti-stickers-Pos-Neg-White.pdf, and select Edit with preview from the context menu. 13. Open the inks palette from the window menu \ palettes (or Ctrl+Alt+I). 14. In the Inks palette, double click on the white ink channel and enable the As Mask view, to view the white layer with a customizable color (e.g. Green) and an opacity level to inspect the content and positioning of the white layer. Asanti initially shows the white layer as the actual printed result, so when viewed from the printed side: Pre-white will show the white below the CMYK colors. Post white will show the white on top of the CMYK colors. When enabling masked view the white layer will always be on top of all colors (even if the application is pre-white) 15. In the Inks palette, toggle the different separations with the eye icons in the inks pallet, to investigate where white ink will be printed. Clicking Alt + eye icon for the white channel, will disable the CMYK separations. Page 2
.")

3 16. While in the preview window you can use the arrows in the Toolbox (or your keyboard), to verify the different pages. The first page contains a single white rectangular box underneath all the text. The second page contains all the text only in white ink. (No CMYK colors printed on top). The third page contains all the text only in white ink except the Agfa logo which is printed in CMYK on top of the white. 17. Go to page 1, enable the Normal view for the white channel and enable the Show on top of all layers option. You can now see the effect of the white ink, being printed on top of the CMYK Colors. This simulates how the job would be printed in post white mode. 18. Close the Preview window. 19. Select all images (Crtl+A) in the image panel 20. Select 'Auto-Layout Images' in the Layout menu (Ctrl+N). 21. Click the Auto Layout Images button 22. In the right bottom of the layout editor click Submit job. 23. Select Print files: Make and send to printer. 24. Click Submit. 25. Depending on the printer, the print file for white is representated differently: On Jeti printers, the white print data is included in the PBM file. The GUI shows this in the job info pallet as White from Rip. Page 3
.")

4 On Anapurna printers, 2 separate RTL files will be created: one for the color print data and one for the white print data (contains a W in the filename). On Jeti Tauro, the white print data is included in the PEC file. The GUI shows white as a layer in the print task, the ordering of the layers corresponds to application of white as selected in the Layout Editor Page 4
 and Post-White.")


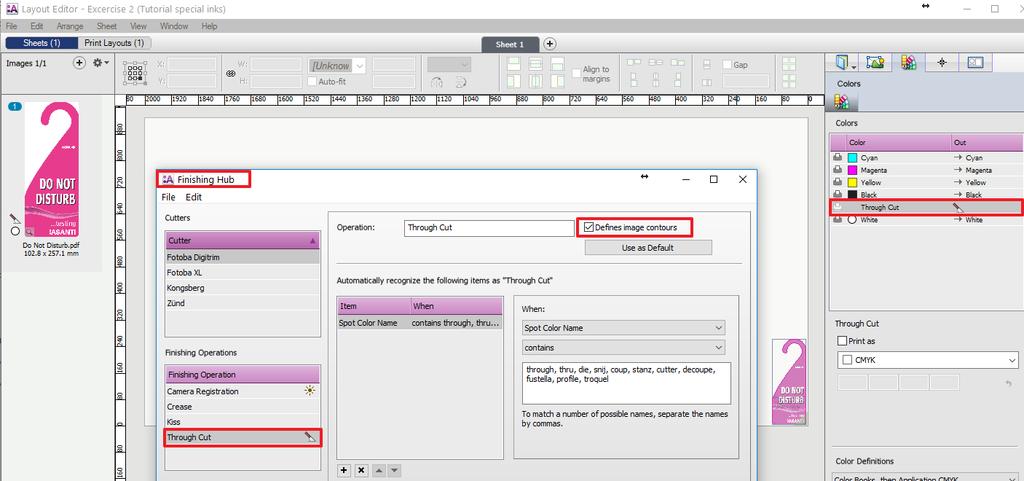
5 2. Printing post white to fill entire image In this exercise you will learn how to print post white with files that don t have objects for white in the input file. Asanti will create a white layer for the entire image: 1. File Menu > New layout job. 2. In the Job Set-Up inspector, select for Application-White: Fill Entire Image (Asanti) and Post-White. Enable the Spread (15px) option and leave the white opacity to 100%. Asanti will now generate a white layer choked 15 pixels within the entire image. Choking means the white object size is reduced with the specified amount of pixels while spreading means the white is enlarged. Choking/Spreading isn t possible if Variable image mask is selected or when the printer generates white. The result of Choking/Spreading can only be seen in the raster result of the main flow, not in the raster preview! 3. In the Image panel click + and browse for Do Not Disturb.pdf, click open. 4. In the finishing tab of the layout inspector set the bleed to 0 (so that the spread effect can be seen) 5. Click on the Create Previews button. 6. In the image panel click on Do not disturb.pdf and select Edit with preview from the context menu, notice the preview is completely white, as it is a post white job which shows white when viewed from the printed side. 7. Double click on the white ink channel and enable the As Mask view. Notice that the complete image is covered with 100% white ink. Clicking Alt + eye icon of the white ink, the other colors will be disabled. 8. Close the preview window. 9. Drag the Do Not Disturb.pdf to the Sheet. 10. Click the Submit Job button, and select Make and Hold. 11. To see the effect of choking open the rendered result by double clicking on the lable underneath the main flow result image. 12. Close the raster preview to finish the exercise. Note that not the complete image box is covered with white but only the doorhanger shape. This is caused by the finishing operation, due to the through Cut spotcolor, this spot color path is used as contour for the image (see screenshot on next page). In case there is no cut color in the file then Fill entire image will create white underneath the image box. Page 5
6 Page 6

 and change the white opacity to 50%. Asanti will now generate a white layer underneath every object that contains data. 3.")
7 3. Printing white to fill solid image mask. In this exercise you will learn how to print white with files that don t have objects for white in the input file, and for which Asanti needs to create white image data underneath every pixel that is not empty and not surrounded by a solid pixel. 1. File Menu > New layout job. 2. In the Job Set-Up inspector, select for Application-White: Solid Image Mask (Asanti) and Pre-White. Set the Choke option to 15 pixels (with Edit option) and change the white opacity to 50%. Asanti will now generate a white layer underneath every object that contains data. 3. In the Image panel click + and browse for Miller Lite Logo.jpg, click open. 4. Click on the Create Previews button. 5. In the image panel click on Miller Lite Logo.jpg and select Edit with preview from the context menu. Notice that the white layer now has an ink-coverage of 50%, and all pixels which are surrounded by image content, have white applied underneath. Solid Image masks creates also white underneath zero (white) image pixels only if they are surrounded by a nonzero image pixel. In case you don t want to get white underneath such zero pixels, use the Solid pixel mask mode to create white (see next exercise). 6. Close the preview window. 7. Drag the Miller Lite Logo.jpg to the Sheet. 8. Click the Submit Job button, and select Make and hold. 9. To see the effect of choking and solid image mask open the rendered result by double clicking on the lable underneath the main flow result image. 10. Close the raster preview to finish the exercise. Page 7


8 4. Printing white to underneath non-zero pixels. In this exercise you will learn how to print white with files that don t have objects for white in the input file, and for which Asanti needs to create white image data underneath every pixel that is not empty (non-zero), empty pixels even surrounded with a solid pixel will not get white underneath. 1. Duplicate Exercise-3 and rename it to Exercise-4 2. In the Job Set-Up inspector, select for Application-White: Solid pixel white Mask, disable choke and set the opacity to 100%. 3. Click Apply changes and update the Preview. 4. In the image panel click on Miller Lite Logo.jpg and select Edit with preview from the context menu. 5. Double click on the white ink channel and enable the As Mask view. Notice that only image parts which have a colored pixel underneath are covered with 100% white ink. 6. Close the preview window. 7. Click the Submit Job button, and select Make and hold to finish the exercise. Page 8
.")
9 Part II: Printing with Varnish inks This part of the tutorial demonstrates how to print jobs with varnish ink, and can only be executed if your printer supports varnish. Varnish ink needs to be included in the ink set. Enabling an ink set with Varnish needs to be done with the configuration wizard (Help > Configuration wizard). Varnish ink sets are only available on certain types of printers. Download the Asanti Sample Files via the Asanti Client (Help > Asanti Online > Download Sample Files). 5. Printing varnish from image In this exercise you will learn how to print varnish from objects present in the input file. 1. File Menu > New layout job. 2. Select the job set-up > Media inspector > Generic media 3. Set the Media Size to at least to 650x500 mm (other media sizes can be used if they fit on the printer). 4. Select High Quality or any other quality for which a suitable CPM is present. 5. Select and expand the Varnish option and make sure that From Image (Asanti) is selected. In case there is only 1 CPM (by default), the layout editor will automatically pick the correct CPM. Notice the Varnish printing mode and ink density percentage. By default Asanti does not contain CPM s made with varnish during creation. Such CPM s can be made with the Media Hub and can be recognized by the suffix V in the CPM name. The Suffix V means that both the "On Media" and "On White" calibration sets (incl. Profile) have been made with varnish on top. For jobs where you want to print without varnish (or apply varnish as a spot varnish - to emphasize a certain area), CPM s without V are the most appropriate. For jobs where the varnish will cover the complete job and where colors need to be corrected for the varnish effect, a CPM s with V are the most appropriate. 6. In the Image panel click + and browse for Asanti-sticker-varnishes.pdf Page 9


10 7. Notice the yellow circle next to the image indicating that a varnish color is present in the file. 8. Select the Colors Inspector and notice that the spot colors barniz and gum are mapped to the Varnish color. Various spot colors are automatically recognized as Varnish colors. This will be shown later in this Tutorial. 9. To map the spot color Jeti-varnish to Varnish of the inkset, click on the Jeti-varnish spot color and change the Print as option from CMYK to Varnish. Or simply drag the jeti-varnish on the Varnish color. 10. Click on the Apply Changes button. 11. Click on the Generate Previews button and wait until the color accurate preview is ready. 12. In the image panel click on Asanti-sticker-varnishes.pdf and select Edit with preview from the context menu. Open the inks pallet (Ctrl+Alt+I). Asanti initially shows the varnish layer as a white invisible layer on top of the normal colors. 13. Double click on the varnish ink channel and enable the As masking view, to view the varnish layer with a customizable color (e.g. Red) and an opacity level to inspect the content and positioning of the varnish layer. 14. Toggle the different separations by clicking the eye icons in the inks pallet, to investigate where varnish ink will be printed. By clicking Alt + an eye icon, the other separations will be disabled. Note that allthough the varnish may be covered with a solid (100%) value, in the printfile this value will be scaled to the ink density value as defined in the CPM! 15. Close the preview. Page 10


11 16. Drag the Asanti-sticker-varnishes.pdf to the sheet and submit with Make and send to printer. 17. On the digital press front end, you can manage the varnish settings. Source should be Varnish from RIP. Mode can be either Colour, then Varnish or Varnish Only 6. Adding a variable pixel mask varnish layer to an Asanti job Similar as for white Asanti can fill an entire image with varnish with a certain percentage eventually with choke and spread settings, as well as Solid Image masks or solid pixel masks. In this exercise you will learn how to generate a more creative varnish layer using the variable image Mask option. 1. File Menu > New layout job. 2. Select the job set-up > Media inspector > Generic media 3. Set the Media Size to at least to 650x500 mm (other media sizes can be used if they fit on the printer). 4. Select High Quality or any other quality for which a suitable CPM is present. 5. Select and expand the Varnish option and make sure that Variable Pixel Mask (Asanti) is selected. In case there is only 1 CPM (by default), the layout editor will automatically pick the correct CPM. Notice the Varnish printing mode and ink density percentage. 6. In the Image panel click + and browse for pancakes.pdf 7. Notice the yellow circle next to the image indicating that a varnish color will be part of the job. 8. Click on the Generate Previews button and wait until the color accurate preview is ready. 9. In the image panel click on Asanti-sticker-varnishes.pdf and select Edit with preview from the context menu. Open the inks pallet (Ctrl+Alt+I). Asanti initially shows the varnish layer as a white invisible layer on top of the normal colors. 10. Double click on the varnish ink channel and enable the As masking view, to view the varnish layer with a customizable color (e.g. Red) and an opacity level to inspect the content and positioning of the varnish layer. Page 11

12 11. Toggle the different separations by clicking the eye icons in the inks pallet, to investigate where varnish ink will be printed. By clicking Alt + an eye icon, the other separations will be disabled. Note that the varnish layer now contains a grayscale image of input image, so it emphasyses the darker colors of the image and leaves the highlighht colors almost uncovered with varnish. 12. Close the preview window. 13. Click the Submit Job button, and select Make and hold to finish the exercise. 7. Adding custom spot color names to the varnish special category In this exercise you will learn how to add spot color names to the varnish special color category. This will enable automatic mapping of these spot colors to the varnish ink. 1. Open the System Overview (Ctrl-1) and click on the Color Books resource of your printer. You could also open this resource from within the layout editor by selecting Window > Resources > Color Books (Crt+Alt+6). 2. Click on the Special Colors button an select the Varnish category. 3. Click on the padlock icon to unlock the settings and add jeti-varnish to the list. 4. Save the changes by clicking on the padlock icon once more. Page 12


13 Now that Jeti-Varnish is part of the varnish category, you can redo exercise 5. You ll notice that the Jeti-Varnish spot color is now automatically mapped to the varnish ink. 5. To un-map a color from an automatically mapped ink, simply drag the spot color to an empty area of the Colors panel. 8. Generating varnish with the Apogee SpotCreator plugin of Acrobat. In this exercise you will learn how to generate varnish content for images or PDF s that don t contain a varnish spotcolor. Make sure to have Acrobat Pro 10 (or later) with the Apogee plug-ins installed. The plug-ins will be installed together with the Asanti Client. 1. Create a similar job as exercise-5 2. Ensure that the varnish application is enabled. 3. In the Image panel click + and browse for Asanti-sticker- 01.pdf, click open. 4. Notice that there is no yellow circle next to the image, so the image contains no varnish. 5. Check the colors inspector and notice that varnish is part of the ink set. 6. Context click the PDF and select Edit Externally > Original Image. Page 13
 to (6) in the screenshot. 8.")
 and close the PDF in acrobat (10).")

14 This will open the PDF in Acrobat. With the Apogee SpotCreator tool we can cover objects (line art, text or images separately), or custom created areas with a spot color. 7. Open the Apogee SpotCreator and click the Manage Spots tool, click the Add button to create a new spot color, see also actions (1) to (6) in the screenshot. 8. Use the tool to select line art objects (Ctrl-Click to select multiple objects), and select the Varnish Spot color from the dropdown list, see also actions (7) to (9) in the screenshot. 9. After you covered the objects with varnish, click the save icon (don t use save as ) and close the PDF in acrobat (10). In the Asanti Layout editor an icon indicates that the image has been edited externally. 10. Select Edit Externally > Update After Edit from the context menu. Notice a yellow circle appears next to the image which indicates that there now is a varnish spot color inside the file. 11. Click on the Generate Previews button and wait until the color accurate previews are ready. 12. In the image panel double click on the Asanti-sticker.pdf to open the Preview. 13. Open the inks pallet (Ctrl+Alt+I) and inspect the varnish ink similar as in exercise Drag the Asanti-sticker-01.pdf to the sheet and select Make and Hold. Page 14
 is selected. 3. In the Image panel click + and browse for Asanti Box.pdf, click open. 4.")

15 9. Creating Varnish on printers: In this exercise you will learn how Asanti can be used to trigger varnish creation on the printer itself. 1. Create a similar job as exercise-4 2. Select and expand the Varnish option and make sure Fill Varnish (on Printer) is selected. 3. In the Image panel click + and browse for Asanti Box.pdf, click open. 4. Notice that there is a no yellow circle next to the image, so Asanti will not show the varnish layer even if you would create a preview. The varnish layer needs to be created on the printer. 5. Place the image on the sheet and submit with make and send to printer. 6. On the digital press front end, you need to manage the varnish settings. Source should be Fill Varnish Ink Mode can be either Colour, then Varnish or Varnish Only. Currently Asanti does not trigger these settings automatically on the Jeti front end. Alternatively Jeti engines are also capable of creating masked varnish layer, which will jet a varnish ink on top of every pixel that has a CMYK different from On Asanti this option can be selected as Mask Varnish (on Printer). Part III printing with primer Primer can be part of the inkset for certain printers. In case the primer cannot be generated by the engine itself you can use Asanti to create the necessary printlayer for primer. The procedure and results are the same as creating layers for white or Varnish inks. Depending on the capabilities of the printer the options to create primer are as shown in this screenshot : Page 15
1. Setup Output mode. 2. Using a Fixed tile size
 Tutorial Tiling Software version: Asanti 2.0 Document version: June 23, 2015 This tutorial demonstrates how to use tiling with Asanti. Tiling can only be executed on a system where Acrobat Pro X or later
1. Setup Output mode. 2. Using a Fixed tile size
 Tutorial Tiling Software version: Asanti 1.0 Document version: February 17, 2014 This tutorial demonstrates how to use tiling with Asanti. Tiling can only be executed on a system where Acrobat Pro X or
Creating Sandwich White jobs for Tauro
 Tutorial Creating Sandwich White jobs for Tauro Software version: Asanti 2.0 Document version: September 7, 2016 This tutorial demonstrates how to create sandwich white jobs for different applications
1. Creating a derived CPM
 Tutorial Creating a new derived CPM Software version: Asanti 3.0 Document version: July 31, 2017 This tutorial is based upon basic knowledge on CPM s, please consult the online tutorial Calibrated Printing
Creating a job with Fotoba marks
 Tutorial Creating a job with Fotoba marks Software version: Asanti 3.0 Document version: April 26, 2017 This tutorial demonstrates how to output a job with Fotoba marks. Download the Asanti Sample Files
ONYX White Paper DESIGNING WITH WHITE & SPECIALTY INK
 ONYX White Paper DESIGNING WITH WHITE & SPECIALTY INK ONYX White Paper Designing with Specialty Ink OCT 2012 This document is intended to assist in the setup for files with specialty ink data in a digital
Canvas Wrapping. 1. Mirror wrap. Tutorial
 Tutorial Canvas Wrapping Software version: Asanti 2.0 Document version: June 23, 2015 This tutorial demonstrates how to create a canvas wrap. Download the Asanti Sample Files via the Asanti Client (Help
Designing with White and Specialty Ink
 ONYX WHITE PAPER 03/29/2013 Designing with White and Specialty Ink This document is intended to assist in the setup for files with specialty ink data in a digital print environment. This covers designing
Digital Imaging - Photoshop
 Digital Imaging - Photoshop A digital image is a computer representation of a photograph. It is composed of a grid of tiny squares called pixels (picture elements). Each pixel has a position on the grid
Part 2: Spot Color Lessons
 Why White? The importance of white in color printing is often overlooked. The foundation of color printing is based on applying Cyan, Magenta, Yellow and Black (CMYK) onto white paper. The paper s white
Using Adobe Photoshop
 Using Adobe Photoshop 4 Colour is important in most art forms. For example, a painter needs to know how to select and mix colours to produce the right tones in a picture. A Photographer needs to understand
Key Terms. Where is it Located Start > All Programs > Adobe Design Premium CS5> Adobe Photoshop CS5. Description
 Adobe Adobe Creative Suite (CS) is collection of video editing, graphic design, and web developing applications made by Adobe Systems. It includes Photoshop, InDesign, and Acrobat among other programs.
1. Creating a derived CPM
 Tutorial Creating a new derived CPM Software version: Asanti 3.0 Document version: March 28, 2019 This tutorial is based upon basic knowledge on CPM s, please consult the online tutorial Calibrated Printing
SAVING, LOADING AND REUSING LAYER STYLES
 SAVING, LOADING AND REUSING LAYER STYLES In this Photoshop tutorial, we re going to learn how to save, load and reuse layer styles! Layer styles are a great way to create fun and interesting photo effects
Color and More. Color basics
 Color and More In this lesson, you'll evaluate an image in terms of its overall tonal range (lightness, darkness, and contrast), its overall balance of color, and its overall appearance for areas that
Stone Creek Textiles. Layers! part 1
 Stone Creek Textiles Layers! part 1 This tutorial is all about working with layers. This, to my mind, is one of the two critical areas to master in order to work creatively with Photoshop Elements. So,
PHOTOSHOP PUZZLE EFFECT
 PHOTOSHOP PUZZLE EFFECT In this Photoshop tutorial, we re going to look at how to easily create a puzzle effect, allowing us to turn any photo into a jigsaw puzzle! Or at least, we ll be creating the illusion
Adobe Photoshop CS5 Layers and Masks
 Adobe Photoshop CS5 Layers and Masks Email: training@health.ufl.edu Web Page: http://training.health.ufl.edu Adobe Photoshop CS5: Layers and Masks 2.0 Hours The workshop will cover creating and manipulating
Colorizing A Photo With Multiple Colors In Photoshop
 Colorizing A Photo With Multiple Colors In Photoshop Written by Steve Patterson. In this Photoshop Effects tutorial, we re going to learn how to colorize a photo using multiple colors. It s an effect I
Customized Foam for Tools
 Table of contents Make sure that you have the latest version before using this document. o o o o o o o Overview of services offered and steps to follow (p.3) 1. Service : Cutting of foam for tools 2. Service
Reveal the mystery of the mask
 Reveal the mystery of the mask Imagine you're participating in a group brainstorming session to generate new ideas for the design phase of a new project. The facilitator starts the brainstorming session
HOW TO CREATE A SUPER SHINY PENCIL ICON
 HOW TO CREATE A SUPER SHINY PENCIL ICON Tutorial from http://psd.tutsplus.com/ Compiled by INTRODUCTION The Pencil is one of the visual metaphors most used to express creativity. In this tutorial,
The original image. Let s get started! The final rainbow effect. The photo sits on the Background layer in the Layers panel.
 Add A Realistic Rainbow To A Photo In this Photoshop photo effects tutorial, we ll learn how to easily add a rainbow, and even a double rainbow, to a photo! As we ll see, Photoshop ships with a ready-made
The original image. The final rainbow effect.
 ADD A realistic rainbow to a photo In this Photoshop photo effects tutorial, we re going to learn how to easily add a rainbow, even a double rainbow, to a photo. Of course, as with most photo effects,
Step 1: Open A Photo To Place Inside Your Text
 Place A Photo Or Image In Text In Photoshop In this Photoshop tutorial, we re going to learn how to place a photo or image inside text, a very popular thing to do in Photoshop, and also a very easy thing
Introduction to Layers
 Introduction to Layers By Anna Castano A layer is an image or text that is piled on top of another. There are many things you can do with layer and it is easy to understand how it works. Through the introduction
PHOTOSHOP. Introduction to Adobe Photoshop
 PHOTOSHOP You will; 1. Learn about some of Photoshop s Tools. 2. Learn how Layers work. 3. Learn how the Auto Adjustments in Photoshop work. 4. Learn how to adjust Colours. 5. Learn how to measure Colours.
Introduction.
 Introduction At Photobooks Express, it s our aim to go that extra mile to deliver excellent service, products and quality. Our fresh, dynamic and flexible culture enables us to stand above the rest and
Contents. Introduction
 Contents Introduction 1. Overview 1-1. Glossary 8 1-2. Menus 11 File Menu 11 Edit Menu 15 Image Menu 19 Layer Menu 20 Select Menu 23 Filter Menu 25 View Menu 26 Window Menu 27 1-3. Tool Bar 28 Selection
Adobe Photoshop Notes. Adobe Photoshop CS3
 Adobe Photoshop Notes Adobe Photoshop CS3 Page 2 Introduction These notes have been put together for basic and advanced methods, features and language. I have also created notes on other Adobe products.
ARCHICAD Introduction Tutorial
 Starting a New Project ARCHICAD Introduction Tutorial 1. Double-click the Archicad Icon from the desktop 2. Click on the Grey Warning/Information box when it appears on the screen. 3. Click on the Create
Tiling. 1. Overlapping tiles with fixed number of tiles. Tutorial
 Tutorial Tiling Software version: Asanti 3.0 Document version: April 3, 2017 This tutorial demonstrates how to use tiling within Asanti. Download the Asanti Sample Files via the Asanti Client (Help > Asanti
ADOBE 9A Adobe Photoshop CS3 ACE.
 ADOBE Adobe Photoshop CS3 ACE http://killexams.com/exam-detail/ A. Group the layers. B. Merge the layers. C. Link the layers. D. Align the layers. QUESTION: 112 You want to arrange 20 photographs on a
CONTENT INTRODUCTION BASIC CONCEPTS Creating an element of a black-and white line drawing DRAWING STROKES...
 USER MANUAL CONTENT INTRODUCTION... 3 1 BASIC CONCEPTS... 3 2 QUICK START... 7 2.1 Creating an element of a black-and white line drawing... 7 3 DRAWING STROKES... 15 3.1 Creating a group of strokes...
The original image. As I said, we ll be looking at a few different variations on the effect. Here s the first one we ll be working towards:
 DIGITAL PIXEL EFFECT In this Photoshop tutorial, we re going to look at how to create a digital pixel effect, which is often used in ads that sell anything to do with digital. We re going to first pixelate
Table of contents. Table of contents 2 Introduction 4 Overview 4
 Tiling v1.2 TABLE OF CONTENTS Table of contents Table of contents 2 Introduction 4 Overview 4 Global setup 6 Poster size 6 Format 6 Width and Height 7 Margins 8 Frame 8 Scale 9 Tile setup 9 Tile size 10
Exploring Photoshop Tutorial
 Exploring Photoshop Tutorial Objective: In this tutorial we will create a poster composed of three distinct elements: a Bokeh, an image and title text. The Bokeh is an effect which is sometimes seen in
Photoshop: a Beginner s course. by: Charina Ong Centre for Development of Teaching and Learning National University of Singapore
 Photoshop: a Beginner s course by: Charina Ong Centre for Development of Teaching and Learning National University of Singapore Table of Contents About the Workshop... 1 Prerequisites... 1 Workshop Objectives...
Latex Knowledge Center. Cookbook - HP Latex Print and Cut Solution
 Latex Knowledge Center Cookbook - HP Latex Print and Cut Solution January 2018 Table of contents Table of contents... 2 Overview... 4 1.1 Who can benefit from reading this document?... 4 The HP Latex Print
Digital Design and Communication Teaching (DiDACT) University of Sheffield Department of Landscape. Adobe Photoshop CS5 INTRODUCTION WORKSHOPS
 University of Sheffield Department of Landscape. Adobe Photoshop CS5 INTRODUCTION WORKSHOPS") Adobe INTRODUCTION WORKSHOPS WORKSHOP 1 - what is Photoshop + what does it do? Outcomes: What is Photoshop? Opening, importing and creating images. Basic knowledge of Photoshop tools. Examples of work.
Adobe INTRODUCTION WORKSHOPS WORKSHOP 1 - what is Photoshop + what does it do? Outcomes: What is Photoshop? Opening, importing and creating images. Basic knowledge of Photoshop tools. Examples of work.
Infographics: Display Data for Easy Interpretation
 Infographics: Display Data for Easy Interpretation Course objectives: Create new infographics Customise layouts Edit content using text, images, media, charts and maps Publish, Present and Print Student
11 Advanced Layer Techniques
 11 Advanced Layer Techniques After you ve learned basic layer techniques, you can create more complex effects in your artwork using layer masks, path groups, filters, adjustment layers, and more style
TURN A PHOTO INTO A PATTERN OF COLORED DOTS (CS6)
") TURN A PHOTO INTO A PATTERN OF COLORED DOTS (CS6) In this photo effects tutorial, we ll learn how to turn a photo into a pattern of solid-colored dots! As we ll see, all it takes to create the effect is
TURN A PHOTO INTO A PATTERN OF COLORED DOTS (CS6) In this photo effects tutorial, we ll learn how to turn a photo into a pattern of solid-colored dots! As we ll see, all it takes to create the effect is
Photoshop CS2. Step by Step Instructions Using Layers. Adobe. About Layers:
 About Layers: Layers allow you to work on one element of an image without disturbing the others. Think of layers as sheets of acetate stacked one on top of the other. You can see through transparent areas
COLORIZE A PHOTO WITH MULTIPLE COLORS
 COLORIZE A PHOTO WITH MULTIPLE COLORS In this Photoshop photo effects tutorial, we re going to learn how to colorize a photo using multiple colors. It s an effect I ve seen used quite a bit in ads for
Managing images with NewZapp
 Managing images with NewZapp This guide is for anyone using the NewZapp Fixed editor as opposed to the Drag and Drop editor. The Image Manager is where images are uploaded and stored in your NewZapp account
PHOTOSHOP STUDY GUIDE FOR CHAPTER A, B TEST
 1 PHOTOSHOP STUDY GUIDE FOR CHAPTER A, B TEST 1. Adobe CS5 is a graphic arts package that offers Photoshop, Illustrator, Indesign and Flash and Dreamweaver. They are integrated programs used as an industry
Roland VersaWorks. Creating Profiles with VersaWorks 3
 Roland VersaWorks Creating Profiles with VersaWorks 3 Profiling a Media with Roland VersaWorks This document describes the procedure for creating media profiles in VersaWorks. VersaWorks provides profiling
Adobe Photoshop CC 2018 Tutorial
 Adobe Photoshop CC 2018 Tutorial GETTING STARTED Adobe Photoshop CC 2018 is a popular image editing software that provides a work environment consistent with Adobe Illustrator, Adobe InDesign, Adobe Photoshop,
FILE ASSEMBLY GUIDE. ~ File Assembly Guidelines ~
 To reduce your costs in prepress and turn-around time for proofs, Standard Printing Company recommends using the following information as a guide for correct file assembly: Acceptable File Formats QuarkXpress
LESSON 04: ORGANIZE IT FOR PSE USERS COMPANION BOOK. Digital Scrapbook Academy. April 2018: Lesson 04 Organize It for Elements Users
 Digital Scrapbook Academy April 2018: Lesson 04 LESSON 04: ORGANIZE IT FOR PSE USERS COMPANION BOOK Page 1 of 15 Table of Contents Table of Contents 2 Welcome to Lesson 04 for Elements Users 3 1: Add Photos,
Adobe Photoshop CS5 Tutorial
 Adobe Photoshop CS5 Tutorial GETTING STARTED Adobe Photoshop CS5 is a popular image editing software that provides a work environment consistent with Adobe Illustrator, Adobe InDesign, Adobe Photoshop
Creative Cut-Outs. 1Go to File>New>Blank File to create a new document and enter. Projects EXTRAS: GET MORE ONLINE!
 ALL IMAGES MIKE RODRIGUEZ Creative Cut-Outs By Mike Rodriguez Are you interested in applying some of your rapidly developing layer skills? In the May/June issue, we covered the basics of layers (Layers
Importing and processing gel images
 BioNumerics Tutorial: Importing and processing gel images 1 Aim Comprehensive tools for the processing of electrophoresis fingerprints, both from slab gels and capillary sequencers are incorporated into
ITNP80: Multimedia Adobe Photoshop Practical Weeks commencing 26 January and 2 February 2015.
 ITNP80: Multimedia Adobe Photoshop Practical Weeks commencing 26 January and 2 February 2015. The aims and objectives of this practical are four-fold: To give you some practical experience of some of the
 Introduction At Photobookshop, it s our aim to go that extra mile to deliver excellent service, products and quality. Our fresh, dynamic and flexible culture enables us to stand above the rest and produce
1. INTRODUCTION. What you will need:
 CONTENTS 1. INTRODUCTION... 2 2. EXPORT FROM TSR WORKSHOP... 3 3. TEXTURE... 5 3.1. Preparation... 5 3.2. Multiplier... 8 3.2.1. Grayscale Equalization... 11 3.2.2. Adding Texture to the Bottoms of Skirts
Photo One Digital Photo Shoots and Edits
 Photo One Digital Photo Shoots and Edits You will submit photo shoots, unedited and you will submit selected edited images. The shoots will be explained first and the edits will be explained later on this
The original photo. The final result.
 giving a photo painted edges In this Adobe Photoshop tutorial, we re going to combine a couple of different effects. First, we ll give the photo easy-tocreate painted edges, and then we ll make it look
Creating Photo Borders With Photoshop Brushes
 Creating Photo Borders With Photoshop Brushes Written by Steve Patterson. In this Photoshop photo effects tutorial, we ll learn how to create interesting photo border effects using Photoshop s brushes.
METAL TEXT EFFECT. Step 1: Create A New Document. Step 2: Fill The Background With Black
 METAL TEXT EFFECT In this text effects tutorial, we ll learn how to easily create metal text, a popular effect widely used in video games and movie posters! It may seem like there s a lot of steps involved,
IT154 Midterm Study Guide
 IT154 Midterm Study Guide These are facts about the Adobe Photoshop CS4 application. If you know these facts, you should be able to do well on your midterm. Photoshop CS4 is part of the Adobe Creative
ImagesPlus Basic Interface Operation
 ImagesPlus Basic Interface Operation The basic interface operation menu options are located on the File, View, Open Images, Open Operators, and Help main menus. File Menu New The New command creates a
ADOBE PHOTOSHOP CS TUTORIAL
 ADOBE PHOTOSHOP CS TUTORIAL A D O B E P H O T O S H O P C S Adobe Photoshop CS is a popular image editing software that provides a work environment consistent with Adobe Illustrator, Adobe InDesign, Adobe
Photo Within A Photo - Photoshop
 Photo Within A Photo - Photoshop Here s the image I ll be starting with: The original image. And here s what the final "photo within a photo" effect will look like: The final result. Let s get started!
Lesson 16 Text, Layer Effects, & Filters
 Lesson 16 Text, Layer Effects, & Filters Digital Media I Susan M. Raymond West High School In this tutorial, you will: Create a Type Layer Add and Format Type within a Type Layer Apply Layer Effects Apply
CREATE A BURNT EDGE EFFECT
 CREATE A BURNT EDGE EFFECT One of the all-time classic effects in Photoshop is the burnt edge, and there s lots of different ways to create it, but in this Adobe Photoshop tutorial, we re going to look
Figure 9.10 This shows the File Scripts menu, where there is now a new script item called Delete All Empty layers.
 Layers Layers play an essential role in all aspects of Photoshop work. Whether you are designing a Web page layout or editing a photograph, working with layers lets you keep the various elements in a design
SHAPE CLUSTER PHOTO DISPLAY
 SHAPE CLUSTER PHOTO DISPLAY In this Photoshop tutorial, we ll learn how to display a single photo as a cluster of shapes, similar to larger wall cluster displays where several photos, usually in different
Getting Started Guide
 SOLIDWORKS Getting Started Guide SOLIDWORKS Electrical FIRST Robotics Edition Alexander Ouellet 1/2/2015 Table of Contents INTRODUCTION... 1 What is SOLIDWORKS Electrical?... Error! Bookmark not defined.
Version 4.2 For WINDOWS
 SIGMA Photo Pro User Guide Companion Processing Software for SIGMA Digital Cameras Version 4.2 For WINDOWS I M P O R T A N T : Please Read Before You Start Thank you very much for purchasing this SIGMA
NMC Second Life Educator s Skills Series: How to Make a T-Shirt
 NMC Second Life Educator s Skills Series: How to Make a T-Shirt Creating a t-shirt is a great way to welcome guests or students to Second Life and create school/event spirit. This article of clothing could
Notice. UJF-3042Mk II / UJF-6042Mk II Clear Ink Print Guide
 UJF-3042Mk II / UJF-6042Mk II Clear Ink Print Guide This Guide explains how to obtain various kinds of printing effects by using LH-100 clear ink (LH100-CL-BA), LUS-120 clear ink (LUS12-CL-BA) with the
Photoshop CS part 2. Workshop Objective. Getting Started Quit all open applications Single click Adobe Photoshop from the Dock
 pg. 1 Photoshop CS part 2 Photoshop is the premier digital photo editor application used for photo retouching, creating web images, film/video compositing, and other pixel/vector-based imagery. Workshop
LESSON 02: GET STRONGER FOR PS USERS COMPANION BOOK. Digital Scrapbook Academy. February 2018: Lesson 02 Get Stronger for Photoshop Users
 Digital Scrapbook Academy February 2018: Lesson 02 LESSON 02: GET STRONGER FOR PS USERS COMPANION BOOK Page 1 of 19 Table of Contents Table of Contents 2 Welcome to Lesson 02 for Photoshop Users 4 1: Add
A Guide to Designing with Clear Dry Ink. easy!
 C L E A R D R Y I N K A Guide to Designing with Clear Dry Ink easy! C L E A R D R Y I N K easy! Guide to Designing with Clear Dry Ink 3 Clear Dry Ink Overview 4 Spot Spot over a photograph Spot over text
6 MASKS AND CHANNELS. Lesson overview
 6 MASKS AND CHANNELS Lesson overview In this lesson, you ll learn how to do the following: Create a mask to remove a subject from a background. Refine a mask to include complex edges. Create a quick mask
Color Vectorization in KNK Studio 1
 Color Vectorization in KNK Studio 1 By Sandy McCauley June 2, 2008 As of Spring 2008, Klic-N-Kut Studio now contains color vectorization and the tutorials in the printed manual are no longer applicable.
Using Adobe Photoshop
 Using Adobe Photoshop 6 One of the most useful features of applications like Photoshop is the ability to work with layers. allow you to have several pieces of images in the same file, which can be arranged
COMPUTING CURRICULUM TOOLKIT
 COMPUTING CURRICULUM TOOLKIT Pong Tutorial Beginners Guide to Fusion 2.5 Learn the basics of Logic and Loops Use Graphics Library to add existing Objects to a game Add Scores and Lives to a game Use Collisions
Toothbrush Holder Project 2D Machining
 Toothbrush Holder Project 2D Machining Prerequisite Toothbrush Holder drawn and saved as a DXF file in SolidWorks Focus of the Lesson On completion of this exercise you will have: Used the Techsoft 2D
The Magazine for Photographers November 2016
 The Magazine for Photographers The Magazine for Photographers CONTENTS NOVEMBER 4 Panning and Zooming in Lightroom 16 Photoshop Tool Presets 23 Step by Step: Pencil Shading Effect 32 Batch Renaming 46
MY BERNINA EMBROIDERY MASTERY BOOK SERIES SOFTWARE BERNINA EMBROIDERY SOFTWARE 8.1. WORKBOOK 4 Application Programs
 MY BERNINA EMBROIDERY MASTERY BOOK SERIES SOFTWARE BERNINA EMBROIDERY SOFTWARE 8.1 WORKBOOK 4 Application Programs 2017 BERNINA of America. 02/012017 Table of Contents Introduction... 3 Exercises Quilter...
12. Creating a Product Mockup in Perspective
 12. Creating a Product Mockup in Perspective Lesson overview In this lesson, you ll learn how to do the following: Understand perspective drawing. Use grid presets. Adjust the perspective grid. Draw and
Version 9 Tutorial and User Guide
 Version 9 Tutorial and User Guide 800-989-4243 214-340-9436 support@vertigraph.com www.vertigraph.com 1 Table of Contents A. Overview... 4 B. About the SiteWorx/OS Window... 4 C. File Types Raster, Vector
Digital Photo Guide. Version 8
 Digital Photo Guide Version 8 Simsol Photo Guide 1 Simsol s Digital Photo Guide Contents Simsol s Digital Photo Guide Contents 1 Setting Up Your Camera to Take a Good Photo 2 Importing Digital Photos into
ADDING RAIN TO A PHOTO
 ADDING RAIN TO A PHOTO Most of us would prefer to avoid being caught in the rain if possible, especially if we have our cameras with us. But what if you re one of a large number of people who enjoy taking
FLAMING HOT FIRE TEXT
 FLAMING HOT FIRE TEXT In this Photoshop text effects tutorial, we re going to learn how to create a fire text effect, engulfing our letters in burning hot flames. We ll be using Photoshop s powerful Liquify
Here s the image I ll be working with:
 FOCUS WITH LIGHT - The Lighting Effects FILTER In this Photoshop tutorial, we ll learn how to add focus to an image with light using Photoshop s Lighting Effects filter. We ll see how easy it is to add
digitization station DIGITAL SCRAPBOOKING 120 West 14th Street
 digitization station DIGITAL SCRAPBOOKING 120 West 14th Street www.nvcl.ca techconnect@cnv.org DIGITAL SCRAPBOOKING With MyMemories Suite 6 The MyMemories Digital Scrapbooking software allows you to create
2. Creating and using tiles in Cyberboard
 2. Creating and using tiles in Cyberboard I decided to add some more detail to the first hexed grip map that I produced (Demo1) using the Cyberboard Design program. To do this I opened program by clicking
Adobe PhotoShop Elements 3.0 Quick Start Tutorial
 Adobe PhotoShop Elements 3.0 Quick Start Tutorial Introduction When you open Photoshop Elements, you are greeted by the welcome screen which offers you several choices: 1. Product Overview Provides a quick
Drawing with precision
 Drawing with precision Welcome to Corel DESIGNER, a comprehensive vector-based drawing application for creating technical graphics. Precision is essential in creating technical graphics. This tutorial
What's New in Mirage 4?
 What's New in Mirage 4? Thank you for your interest in the new Mirage Version, featuring all the latest improvements. The following provides a brief overview of the new functions and improvements in comparison
Epson vdot Plugin Install and Reference Guide
 Epson vdot Plugin Install and Reference Guide For use with Navigator RIPs on Windows 2000, 2003 and XP Revision log RIP 6.0 Epson vdot 4.02 Part Number 101-0009-017 Copyright 2002-2005 by Xitron, Inc.
Table of Contents. Importing ICC Profiles...2. Exporting ICC Profiles...2. Creating an ICC Profile...2. Understanding Ink limits...
 Table of Contents Importing ICC Profiles...2 Exporting ICC Profiles...2 Creating an ICC Profile...2 Understanding Ink limits...2 Understanding GCR...3 GCR Options...3 Understanding Advanced Options...4
Retouching Portraits in Photoshop
 Retouching Portraits in Photoshop I Removing Blemishes When removing blemishes, acne or other imperfections on the skin, our goal is to maintain as much of the original skin texture as possible. That way,
FastARTIST 1.5/FastRIP 9.0 New Features Quick Reference Guide
 FastARTIST 1.5/FastRIP 9.0 New Features Quick Reference Guide November 1, 2006 Ver 1.9 As of October 2006, all FastARTIST users are eligible for the free 1.5 upgrade. This upgrade also includes FastRIP
WORN, TORN PHOTO EDGES EFFECT
 Photo Effects: CC - Worn, Torn Photo Edges Effect WORN, TORN PHOTO EDGES EFFECT In this Photoshop tutorial, we ll learn how to take the normally sharp, straight edges of an image and make them look all
Photoshop Backgrounds: Turn Any Photo Into A Background
 Photoshop Backgrounds: Turn Any Photo Into A Background Step 1: Duplicate The Background Layer As always, we want to avoid doing any work on our original image, so before we do anything else, we need to