MusicLab RealStrat Version 3 User's Manual
|
|
|
- Elisabeth Megan Scott
- 5 years ago
- Views:
Transcription


1 MusicLab RealStrat Version 3 User's Manual Copyright by MusicLab, Inc.
2 Table of Contents About the program... 6 Installing RealStrat... 8 Installing RealStrat PC version... 8 Installing RealStrat Mac version... 8 Launching RealStrat... 9 Virtual Fretboard Virtual Keyboard RealStrat Global Modes MIDI KEYBOARD Global Mode User Keyboard Layout Performance Modes Solo Mode Controls Velocity Switch Effects Permanent Effects Pedal Switch Effects Modulation Switch Effects Key Switch Effects MIDI Controller pane (Solo Mode) Hold button in Solo mode Harmony Mode Chords Mode Controls Bass & Chord Mode Controls Bass & Pick Mode Controls Velocity Switch FXs (Harmony, Chords, Bass&Chord, Bass&Pick) MIDI Controllers pane (Chords, Bass&Chord, Bass&Pick) Silent mode (Chords, Bass&Chord, Bass&Pick) Main Controls
3 Left Menu bar Output panel Tune panel Setup panel Right Menu bar Timing panel Mixer panel FX Mixer panel Wah-Wah panel Common RealStrat Effect Table and Description MIDI controller additional FXs Additional FXs found in Chords, Bass&Chords, Bass&Pick modes Chord Map User Chords Chord Editor PATTERN Global Mode Using MusicLab Rhythm Pattern Library and Pattern Manager Pattern Manager Pattern Manager Window Finding Pattern in MusicLab Pattern Library Auditioning Pattern Controlling pattern playback Transferring Pattern to host's MIDI Track Using Rhythm Patterns in a MIDI Track Controlling pattern playback Creating Custom Styles for Pattern Library Organizing Existing Patterns in Custom Styles Creating Custom Patterns RealStrat Stroke Map Parameter Automation MIDI CC and VST Map MIDI CC Automation, value -> parameter map JOYSTICK Global Mode
4 Overview Which guitar controller? Connecting Guitar Hero controller to RealStrat Guitar controller Layout Buttons functionality Basic Techniques: Advanced Techniques: Joystick Performance Modes ColorTabs mode (manual chord changes) Chord Tab ColorTabs Mode Playing Techniques Frets Function. Switching Chords Strum Bar Function. Playing Rhythm Strum bar Playing Techniques Strum Bass&Strum Picking String Sequence Creating String Sequence Strum bar Function settings Strum bar Function remote selection Chord Tab Editor. Creating Chord Tab Assigning chords to Fret schemes Editing Chord Tab Saving Chord Tab Universal Chord Tab SmartStrums mode (automatic chord changes) Chords Frets Function. Articulating Chords Position/String layers control: Velocity (dynamics) control: Strum Bar Function. Playing Rhythm SmartStrings mode (automatic chord changes) Chords Basic Playing techniques
5 Producing Hammer-On/Pull-Off Diatonic Scale for Hammer-Ons/Pull-Offs Assigning Diatonic Scale Additional Techniques/Effects/Sounds Star Power button FXs (SmartStrings mode) Star Power button FXs (ColorTabs, SmartStrums modes) Whammy bar FXs Directional pad FXs Star Power bonus FXs On Hold bonus FXs (SmartStrings mode) Joystick Global Mode Settings panel Guitar Strokes and Effects available in Joystick mode Joystick Button Map MIDI GUITAR Global Mode DIRECT Global mode Importing/Exporting Global Settings (Appendix) MusicLab Universal Chord Tab Concept Chord Function Universal Chord Tab Basic Universal Chord Tab Practicing Chord Progressions Chord Progressions Full Universal Chord Tab Editing Universal Chord Tab Contacting MusicLab
6 About the program RealStrat is a sample-based virtual instrument with an innovative approach to guitar sound modeling and guitar techniques emulated on a standard MIDI keyboard. RealStrat provides incredible playability based on the unique performance modes and easy-to-use keyboard layout as well as the advanced key/pedal/velocity switch system allowing a keyboardist to perform guitar parts with a whole new level of realistic expression. RealStrat covers practically all sounds, articulations, and techniques a professional guitarist can produce on his Strat, including mute, bridge mute, harmonics, pinch harmonics, slap, unison bend, strumming, picking, chord choking, scraping, etc... High quality dry samples recorded directly from Stratocaster pick-ups let you easily create any desired guitar sound using your favorite amplifier simulator. RealStrat innovations include: Multi-channel layering technology, incorporating a custom library of specially recorded samples taken from every fret of all 6 strings of a real guitar. The unique Floating Fret Position technology, which imitates change of fret position of a guitarist's hand on the neck. This gives you the possibility of playing on up to 140 guitar frets using just 46 keys of a standard keyboard! Sound Humanize technology allowing to wholly remove 'machine gun' effect on note repetition (tremolo, strumming, etc ). Our original Guitar Touch technology letting you easily imitate basic guitar techniques (strumming, plucking, sliding, bending, muting, etc..), using standard MIDI keyboard and MIDI controllers, such as Pitch Bender, Modulation Wheel, Sustain Pedal, and Aftertouch. Guitar Rhythm Pattern technology providing powerful Pattern Manager completed with huge MusicLab Guitar Pattern Library for easily creating guitar accompaniment tracks. All you have to do is to find the appropriate rhythm pattern(s) in the Pattern Manager tree view, copy it to the needed number of measures, start your sequencer and use MIDI keyboard to play chord changes, or alternatively add chords to a MIDI track via sequencer's editor. The unique Struminator technology letting you use alternative MIDI controller (standard Guitar Hero game controller by Activision Inc.) for creating authentic guitar accompaniment parts with ease and fun. These technologies allow to closely emulate live guitar sound and performance, letting you create guitar parts with a whole new level of realistic expression. 6
7 7
8 Installing RealStrat Installing RealStrat PC version Double-click RealStrat Installer file and follow the on-screen instructions. At the end of installation process RealStrat Bank Manager will open and extract sound bank optimized for particular sample rate which allows using Quick Load mode realized in RealStrat. In RealStrat Bank Manager dialog check the appropriate sample rate box you normally use in your audio work. Click Apply button to start sound bank extracting. Close Bank Manager when sound bank installation is completed. Note, that higher sample rate value will install larger target sound bank. Important! If Bank Manager window doesn t open automatically during installation process you have to run it manually from Start menu->program Files->MusicLab->RealStrat, or alternatively go to RealStrat installation folder (by default: C:\Program Files\MusicLab\RealStrat) and double click StgMan.exe file. Note that if you want to change sample rate for your audio work you have to run RealStrat Bank Manager and create sound bank optimized for the new sample rate value. In case your VST plugins folder is not registered correctly RealStrat installer will not automatically install RealStrat.dll in the correct folder. So to let your VST host find RealStrat you have to manually copy RealStrat.dll from RealStrat installation folder to your VSTplugins directory. If your Windows is 64bit, please note of installation folders: 32bit: C:\Program Files (X86)\MusicLab\RealStrat 64bit: C:\Program Files\MusicLab\RealStrat Installing RealStrat Mac version Double-click RealStrat Installer icon and follow the on-screen instructions. At the end of installation process RealStrat Bank Manager will open and extract sound bank optimized for particular sample rate which allows using Quick Load mode realized in RealStrat. In RealStrat Bank Manager dialog check the appropriate sample rate box you normally use in your audio work. Click Apply button to start sound bank extracting. Close Bank Manager when sound bank installation is completed. Note, that higher sample rate value will install larger target sound bank. Important! If Bank Manager window doesn t open automatically during installation process you have to run it manually - open RealStrat installation folder (by default: HD->Applications- >RealStrat) and double click StgMan icon. Note, that if you want to change sample rate for your audio work you have to run RealStrat Bank Manager and create sound bank optimized for the new sample rate value. 8
9 Launching RealStrat Launching RealStrat as a VST/AU instrument: 1. Open your DAW (host application). 2. Create Software Instrument track. 3. Add RealStrat to the track. 4. Open the RealStrat window by double-clicking the RealStrat button/icon. Launching RealStrat as a standalone version: In Start Menu go to Programs/MusicLab/RealStrat folder and click on the RealStrat icon (PC). Run HD:/Applications/RealStrat/RealStrat app (Mac). 9
10 Virtual Fretboard In RealStrat we have realized the Floating Fret Position principle, which imitates change of fret position of a guitarist's hand on the neck. This gives a unique possibility of playing on up to 140 guitar frets using just 46 keys of a standard keyboard! This, along with the fact that we have sampled 22 frets of all six strings for all of our RealStrat sounds, allows you to emulate a guitar performance with maximum sonic accuracy. In the center of the RealStrat window is the virtual Fretboard, one of the important elements of the plug-in, which allows you to visualize and control the Floating Fret Position while playing the guitar part. The Fretboard has a number of functions: 1. Preview - allows audio previewing the loaded guitar patch by simply clicking on strings. 2. Display notes - shows the performed notes (with names) in accordance with visual representation on the fretboard and real sound (you see the notes displayed on string and fret of exactly the same sound samples currently playing). 3. Fret Position Auto control (the Auto button is pressed) - realizes automatic fret position change in Solo and Harmony modes, which moves the Capo strip along the Fretboard depending on the sequence of performed notes. 4. Fret Position Manual control (the Auto button is released) - allows manually changing fret position by right clicking on any fret. A Capo strip will appear on the fretboard, which will prevent playing samples from any fret lower on the neck than the Capo position (except for the 6th string). Virtual Keyboard In the lower part of RealStrat window you see a virtual keyboard that visualizes RealStrat keyboard layout (Main and Repeat zones), indicates activated Key Switches in Solo mode, and shows all MIDI notes incoming to RealStrat or played on virtual fretboard with a mouse: Additionally, virtual keyboard duplicates the external MIDI keyboard input, so everything you can play by MIDI can be produced on virtual keyboard with a mouse. Shift-clicking will hold down the pressed key allowing to preview chords/key Switch FXs. 10
11 RealStrat Global Modes RealStrat 3 provides 5 Global Modes implementing different MIDI input methods: 1. MIDI Keyboard - MIDI keyboard/midi track input 2. Pattern automatic accompaniment using rhythm patterns from MusicLab Guitar Pattern Library 3. Joystick Guitar Hero game controller input (Struminator technology) 4. MIDI Guitar normal guitar input via guitar MIDI interface (6 strings to 6 MIDI channels) 5. Direct works as plain sampler with multi-channel MIDI access to all internal sounds/noises individually with all intelligent features turned off. MIDI KEYBOARD Global Mode User Keyboard Layout When connected to RealStrat MIDI input the external keyboard is divided into 3 zones: Main zone (E1 - B4), left (C0 - D#1) and right (C5 C7) Repeat zones. Main zone Repeat zone In Solo mode Main zone extends to C1-D5. Main zone serves for playing melodic parts (Solo and Harmony modes) and entering chords (Chords, Bass & Chord, Bass & Pick modes; Joystick SmartStrums, SmartStrings modes). Any key of the Repeat zone repeats notes and chords played in the Main zone. This way of keyboard mapping allows you to play guitar parts with 2 hands - you play various notes or chords in the Main zone with one hand and repeat them by pressing the pre-mapped keys in Repeat zone with the other hand without changing its position. This is very important for carefully preserving rhythm pattern accuracy and groove feel. Using such a performance technique you can easily imitate the most characteristic details of guitar performance, such as tremolo, strumming, bass and strum, picking on your keyboard making them sound naturally as if they were played on a real guitar. Repeat Key zone functions: 11

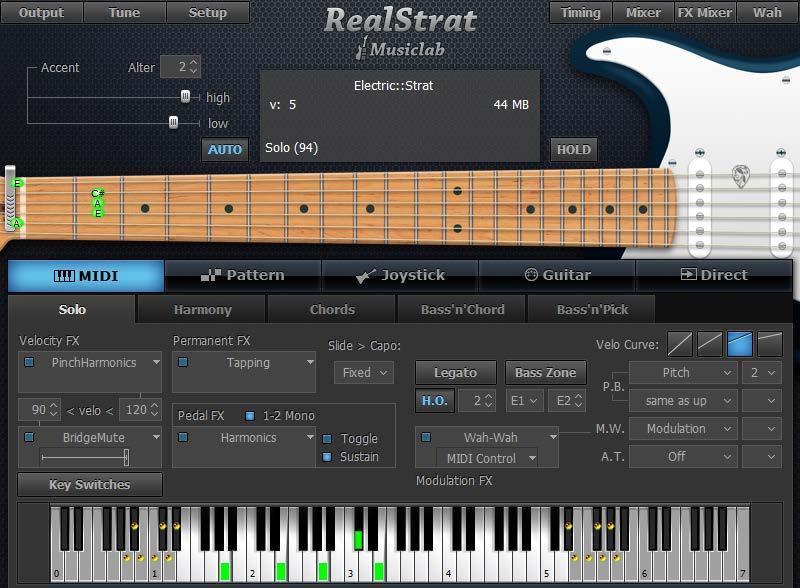
12 In Solo, Harmony, Chords, and Bass & Chord modes you can repeat notes and chords played in the Main zone (any white key repeats the full sound, while black key repeats the muted sound). Also with the keys of Repeat zone you can alternate up/down/muted strokes to produce strumming and tremolo techniques (C, E, G trigger up stroke; D, F, A - down stroke; C#, F#, A# - muted up stroke; D#, G# - muted down stroke) with both single notes and intervals/chords. In Bass & Chord mode you can trigger Bass I (Root) and Bass II (alternative bass) notes as well as upper string strums In Bass & Pick mode Repeat keys trigger individual voices (strings) of a chord taken in the Main zone. In Solo mode Repeat keys, when activated in Key Switch panel, can also be used as Key Switches to switch on various FXs. Performance Modes RealStrat MIDI Keyboard Global Mode includes 5 separate guitar performance modes, each of which is a separate performance tool meant for imitating special guitar performance style: 1. Solo - polyphonic mode for performing melodic parts. 2. Harmony - monophonic mode for performing parallel interval melodic parts. 3. Chords - chord mode for performing accompaniment strumming parts. 4. Bass & Chord - chord mode for performing bass and strum parts. 5. Bass & Pick - chord mode for performing picking/plucking parts. The performance modes are selected by clicking on a respective tab in MIDI Keyboard Global mode window: Solo Mode Click Solo tab to switch on the Solo performance mode. Solo mode window 12
) allow you to repeat notes taken on the Main zone (white keys repeat full sound; black keys repeat muted sound of the same notes).")
13 Muted sound Muted sound Full sound C1 Full sound In this mode the Main zone (E1 D5) of the keyboard works as a normal polyphonic keyboard, while both Repeat Key zones (left (C0 - D#1) and right (D#5 C7)) allow you to repeat notes taken on the Main zone (white keys repeat full sound; black keys repeat muted sound of the same notes). Controls RealStrat Solo mode provides you with multiple permanent and switchable controls allowing you to easily add various specific guitar articulations and effects to your performance. Velocity Switch Effects Melody zone Repeat keys On the left lower part of Solo panel you see Velocity Switch FX section including two FX boxes: Using the Velocity Switch FX controls, two FXs can be dynamically engaged depending on the velocity of the MIDI notes played. For low velocity notes, set the numeric box on the left side to the threshold at which notes played at a lower velocity will trigger the FX selected in the lower FX selector. For high velocity notes, set the numeric box on the right side to the threshold at which notes played at a higher velocity will trigger the FX selected in the upper FX selector. As notes are played below or above the two thresholds, the two FX selector boxes will change to a light grey color to indicate they are being engaged. As with all FX selectors, each of the two Velocity Switch FX selector boxes have a FX Enable LED button so you can enable one, both or neither. Permanent Effects Permanent FX Box - allows selection of Effect in the pull-down menu and activate it by clicking on FX Enable LED button in the upper left corner. 13
14 Slide > Capo - controls the movement of the capo along the fretboard while performing either a Slide or Hammer-On effect. You can select any of 3 modes in a Slide>Capo combo box: Fixed - Capo is not affected. All notes will be played to the right of Capo position moving from string to string (except for the notes on the 6th string which the capo does not affect). Ignore - Capo is not affected. Slides ignore Capo position; notes will be performed along the string moving to another string only in case of reaching first or last fret. Move - Capo moves with Slide or H.O. (Hammer-on) notes along the fretboard. Legato - enables producing notes played legato within semi-tone or whole-tone from each other without triggering attacks and being in mono mode (next will mute previous). The effect is as if the notes were played on the same guitar string when only the first note is picked and the following notes are played by the left hand alone. H.O. - enables Hammer-On Effect with automatic Pull-Off on key release, affected note range is specified (in semi-tones) in numeric box. Bass Zone - splits the Main Zone of keyboard into two parts to allow individual performance techniques for each part. The Bass Zone button is toggled on and off. There are two additional combo boxes to set the lower note (E1, D1 or C1) and the upper note (ranging from E1 to E4) of the zone. Bass zone notes have a stronger velocity curve and are NOT affected by: Mute keys - this allows performing mutes and repetitions on the notes played outside Bass zone without cutting bass notes. Velocity Switch FX - this allows applying velocity switches only to notes played outside Bass zone while playing bass notes without the velocity switch. Left combo box works independently of Bass zone button and allows Drop D and Drop C tuning in Solo mode by selecting the D1 or C1 as the lower note for the 6th string. Pedal Switch Effects You can trigger various RealStrat Effects selected in Pedal Switch FX box by pressing normal Sustain Pedal controller. Pedal Switch FX box has five different controls: 1-2 Mono LED (On/Off) FX Enable LED (On/Off) FX Selection pull-down menu Toggle LED (On/Off) Sustain LED (On/Off) 14
15 1-2 Mono: On - sustains all notes except for the notes played at a semi-tone or whole-tone interval (step-wise melodic run): the next note 1-2 steps apart mutes the previous one as if played on the same guitar string, while the thirds and larger intervals are being sustained. Off - pedal sustains all notes played non-legato, and legato (in the case Hammer-On and Legato FXs are off). FX Enable LED indicates if the Pedal FX is enabled or not. When LED is On, the FX is enabled when the Sustain Pedal is pressed. FX Selection pull-down menu selects which FX is controlled by the Sustain Pedal. Toggle: On - indicates that the FX is toggled on and off each time the Sustain Pedal is pressed. Off - indicates that the FX is only enabled when the Sustain Pedal is kept pressed. When the Sustain Pedal is not pressed, the FX is not enabled. Sustain: On - indicates that the Sustain Pedal both turns on the FX as well as sustains notes. Off - indicates that the Sustain Pedal controls only the FX, and no notes are sustained. Modulation Switch Effects You can switch on various RealStrat Effects selected in Modulation Switch FX box by simply moving normal Modulation Wheel of your MIDI keyboard. Releasing Modulation Wheel to 0 position turns the Effect off. Note, when Modulation FX box is activated effect assigned in M.W. box at the right will not work. 15

16 Key Switch Effects RealStrat numerous guitar Effects can be triggered in Solo mode using the advanced Key Switch system allowing to assign various FXs on Repeat Zone keys as well as easily create and use custom presets in RealStrat Key Switch panel. To open Key Switch panel click on Key Switches button on the left lower part of Solo mode window: Key Switch panel You see two columns of FX boxes corresponding to Left and Right Repeat Zone keys (C0-D#1 for the Left zone, D#5-G6 for the Right zone). Select Effect for a key in pull-down menu and click FX Enable LED button in the left part of FX box to activate it. Now pressing the correspondent key of Repeat zone will turn on selected FX, and change the box color to a light grey to indicate that FX is turned on. Note, that activating FX Enable LED of any key switch will also be displayed on the RealStrat virtual keyboard. Moreover triggering FX will also change color of a virtual keyboard key to a light blue, giving you full visual control. Three small buttons (clickable on/off) at the left of each FX box allow additional control of the Key Switch and FX: T button ( toggle ): On - indicates that the FX is toggled on and off each time the key switch is pressed (releasing the key is ignored). Off - indicates that the FX is only enabled while the key is kept pressed (releasing the key turns the FX off). 16
 adds sustain function to FX, similar using the Sustain Pedal.")
17 K button ( key through ) - when activated allows to switch FX and let the key switch simultaneously function as normal Repeat key (white for Full sound, black for Muted sound). S button ( sustain ) adds sustain function to FX, similar using the Sustain Pedal. Note, Right Key Switches (Right Repeat zone) are toggles by default, while Left Key Switches (Left Repeat zone) are not. You can save all setting made in Key Switch panel as user presets for future use. To create a preset, click on Preset combo box to activate Edit mode, type in the preset name, and press Enter on computer keyboard. Preset will be saved within RealStrat and added to Preset list. To delete preset simply click on Delete icon at the right. MIDI Controller pane (Solo Mode) Velo curve - select the output velocity curve for your performance by pressing one of 4 buttons. You can assign various guitar effects to standard MIDI controllers: P.B. Up (Pitch Bender, upper combo box) - Off, Pitch, Slide, VeloAdd, MonoBend, Sustainer (triggers Sustainer FX simultaneously with pitch shifting). P.B. Down (Pitch Bender, lower combo box) - same as Up, Pitch, Slide, VeloAdd, MonoBend, Sustainer (triggers Sustainer FX simultaneously with pitch shifting). M.W. (Modulation Wheel) - Pitch, Slide, Modulation. A.T. (After Touch) - Pitch, Modulation, Sustainer, FeedBacker. In the combo box to the right adjust the maximum range of pitch shifting/sliding (in semi-tones). Modulation envelope is adjusted in Tune panel (Left Menu bar in the upper left corner of RealStrat window). Hold button in Solo mode In Solo mode the Hold button works differently from the other modes, where it actually substitutes the Sustain Pedal. In Solo mode when Hold button is on, any pressed and held key can be used for sustaining the following notes. 17
, Power Chord 1 (5th + 4th up), Power Chord 2 (4th + 5th up), 2 octaves (up).")
18 Harmony Mode Harmony mode window In this monophonic mode any key of the Main zone triggers an interval/chord based on the played note, previously chosen from following options: 4th down, 5th up, Octave (up), Power Chord 1 (5th + 4th up), Power Chord 2 (4th + 5th up), 2 octaves (up). The keys of both Repeat zones (left and right) allow you to repeat the interval taken in the Main zone (white keys repeat full sound, while black keys repeat muted sound of the same notes). Muted sound Muted sound Full sound C1 Full sound Melody zone Repeat keys 18

19 Chords Mode Chords mode window In this mode RealStrat detects the chord played in the Main zone of the keyboard (the root note and the name of the chord appear on the black info screen), builds a guitar version of the chord considering the selected Chord position and current position of a Capo strip on the Fretboard, and finally plays it using a down strum technique. Any key of Repeat zone repeats the whole chord played in the Main zone: black keys play muted strums, while white keys play strums when the chord is still held and muted strums when the keys in the Main zone are released. Up and down strums are triggered by neighboring keys for both white and black keys of the Repeat zones, like C1 - up strum, D1 - down strum, C6 down strum, B5 - up strum and so on. Muted strum Muted strum Strum C1 Chord detect (down strum play) Strum Repeat keys 19

20 Controls Chord position - selects the melodic position range for the built chords. I - the highest note is between E3 and G#3 II III IV - the highest note is between G3 and B3 - the highest note is between A#3 and D4 - the highest note is between C#4 and F4 Kbd- the melodic position range of the built chord depends on the octave position of the chord taken in the Main zone of the keyboard (with borders between E and E of the next octave). User Chords - opens Chord Editor. Upper/Lower Strings - allow disabling upper and/or lower strings in chords, so you can pare your strums down to any five, four, three, two or just a single string by selecting the first available string# in upper/lower numeric boxes (e.g. selecting 2/5 will disable the 1st and 6th strings in the strums). Chord/Bass - switches on the X/Y chord detect mode letting you construct major/minor triad chords with any desirable note in the Bass, e.g. A/G (A major chord over G bass) for G-A-C#-E voicing, D/F# (D major chord inversion with F# bass note) for F#-A-D voicing, F/G (F major chord over G bass) for G-A-C-F voicing, etc Bass & Chord Mode Bass & Chord mode window In this mode RealStrat detects the chord taken in the Main zone of the keyboard, builds its guitar version and plays its Root note (Bass I) only. The Repeat zone keys now have the following functions: C5 triggers Bass I (Root note). 20
.")
21 D5 triggers Bass II (Alternative bass, usually the 5th degree of the chord). The rest of the keys in both right and left Repeat zones trigger up and down strums of the upper strings of the chord, black keys perform muted strums of the same strings). Muted strum Muted strum Strum I II C1 Controls Chord detect (bass play) Bass Repeat keys Strum Chord position - selects the melodic position range for the built chords. User Chords - opens Chord Editor Number of Strings - specifies the number of sounding strings in chords triggered by Repeat zone keys. Chord/Bass - switches on the X/Y chord detect mode letting you construct major/minor triad chords with any desirable note in the Bass. Alter Bass - automatically alternates between Bass I and Bass II when the same chord is taken in the Main zone. Bass Mono - mutes Bass I note when the next Bass II is played. 21
22 Bass & Pick Mode Bass & Pick mode window In this mode RealStrat identifies the chord taken in the Main zone, builds its guitar version and plays only its Root note (Bass I). The Repeat zone keys trigger each voice of the chord separately, just as if you'd play it string-bystring on real guitar in the following way: C5 triggers Bass I (Root note) D5 triggers Bass II (alternative bass) E5 triggers 4th string F5 triggers 3rd string G5 triggers 2nd string A5 triggers 1st string The other keys function as chosen in the Add-on string keys combo box. The keys of the left Repeat zone strum 4 upper voices of the chord (black keys perform muted strums). Muted strum Add-on keys Strum I II C1 Chord detect (bass play) Bass String keys 22

23 Controls Chord position - selects the melodic position range for the built chords. User Chords opens Chord Editor Add-on string keys: Unison - doubles some strings for making single-string tremolo performance easy: C#5 - Bass II, D# 5-4th string, F#5-2nd string, G#5, A#5, B5, C6-1st string. Chromatic - sets the Add-on string keys to play notes one semi-tone down from their respective string voices: C#5 - a semi-tone down from Bass II, D#5 a semi-tone down from 4th string, F#5 - a semi-tone down from 2nd string, G#5 - a semi-tone down from 1st string; however A#5 - C6 add a semi-tone each to the sound of 1st string. Mute - all add-on keys trigger Muted chord. Chord/Bass - switches on the X/Y chord detect mode letting you construct major/minor triad chords with any desirable note in the Bass. Alter Bass - automatically alternates between Bass I and Bass II when the same chord is taken in the Main zone. Bass Mono - mutes Bass I note when the next Bass II is played. 23

24 Velocity Switch FXs (Harmony, Chords, Bass&Chord, Bass&Pick) There are a number of guitar effects automatically triggered by note velocity values employed in RealStrat: Slow Strum on Higher Velo - in all chordal modes you can set a velocity value, after which the program will perform slow strum when playing a chord in the Main zone. Slow Strum on Lower Velo - in the same way you can set a velocity value below which the program will perform slow strum when playing a chord in the Main zone. Slide up - slides up to taken note(s). Slide down (Fall) - slides down from taken note(s). You can set the following independent parameters for each effect: Velo (input velocity threshold). Time (effect duration). Steps (range in semi-tones). 24
 - Pitch, Slide, VeloAdd. M.W. (Modulation Wheel) - Pitch, Slide, Modulation. A.T. (After Touch) - Pitch, Modulation.")

25 MIDI Controllers pane (Chords, Bass&Chord, Bass&Pick) Velo curve select the output velocity curve for your performance by pressing one of 4 buttons You can assign various guitar effects to standard MIDI controllers: P.B (Pitch Bender) - Pitch, Slide, VeloAdd. M.W. (Modulation Wheel) - Pitch, Slide, Modulation. A.T. (After Touch) - Pitch, Modulation. In the combo box to the right adjust the range of the effect (in semi-tones). Modulation envelope is adjusted in Tune panel (Left Menu bar in the upper left corner of RealStrat window). Pedal you can use Sustain Pedal to switch various effects on: o Sustain - normal sustain mode. o ChuckaFull - switches on ChuckaFull FX. o ChuckaMutes - switches on ChuckaMutes FX. o ChuckaMute Sust - switches on ChuckaMutes FX, simultaneously sustains the sound. o Open Strings Lock - switches on Open Strings Lock FX (open strings used in the current chord will stay in voicings of the next chords, until the FX is Off). o 4 Wah-Wah modes - each mode parameters can be modified individually in Wah- Wah setup panel (Right Menu bar in the upper right corner of RealStrat window). Silent mode (Chords, Bass&Chord, Bass&Pick) All chordal modes allow to use silent mode by activating Silent mode button. When Silent mode is on, the keys in the Main zone don t make any sound, they just define the chords; all strumming and picking is done with keys in the Repeat and Pattern zones. You can use this option any time you want to control chord definition and strumming/picking independently. 25
 - adjust output volume. EQ - adjust internal equalizer parameters: High (+/- 10db). Low (+/- 10db).")
: Depth (0-100%). Freq (0.2 8.0 Hz).")
26 Main Controls Left Menu bar In the Left Menu bar you can get access to 3 panels to make global settings: Output panel, Tune panel, and Setup panel. Output panel Volume (+10/-30db) - adjust output volume. EQ - adjust internal equalizer parameters: High (+/- 10db). Low (+/- 10db). Tune panel Pitch - adjust the master pitch: Coarse (+/-12 semitones). Fine (+/-100 cents). Modulation - adjust the modulation envelope affected by Modulation controller (MIDI CC#1): Depth (0-100%). Freq ( Hz). Sync LED button (on/off) - when activated the modulation rate will be synched with host s tempo. Duration combo box - select note duration value in pull-down menu to match modulation rate you need. 26
 - select sharps or flats for the chord names. P.B. and M.W.")
27 Setup panel Keyboard range (C0- C7) - set the range of your keyboard. Chord Detect time (0-50ms) - set the suitable delay for detecting chords taken in chord modes. Display chords (#/b) - select sharps or flats for the chord names. P.B. and M.W. on pressed keys - when activated allows to polyphonically use Pitch Bend, Modulation Wheel, and Aftertouch controllers with Sustain Pedal, i.e. the controllers will affect only on actually pressed note(s), while other note(s) being sustained with a Pedal but physically released will stay untouched. When turned off all controllers work normally. Q.Load - pressing Quick Load button allows to quickly load samples and drastically save RAM. Reset - resets all modified parameters in all modes to their factory values. Output mode select between Audio, MIDI, Both options. Using MIDI Out functionality, the actual MIDI output, including arpeggios, patterns, and strums generated by notes you play in the "Repeat Zones", can be played back through any other synth or sampler. Most (but not all) DAWs that support MIDI input from a virtual synth support recording its MIDI output as well. Here are a few reasons you might want to take advantage of MIDI Output functionality: 1. To double the RealStrat sound with another synth/sampler 2. To replace your guitar part with another sound altogether 3. To generate a MIDI file that's readable by your notation program The "Audio/MIDI/Both" options are important, and as follows: Audio: You'll hear the RealStrat samples only, just as you would if you weren't sending MIDI Out to your synth. MIDI: You'll hear only the synth being driven by the MIDI output from RealStrat. The RealStrat samples will not sound. Both: You'll hear both the RealStrat samples and the synth being driven by the MIDI output from RealStrat. Select "MIDI" or "Both" to take advantage of MIDI Out functionality. 27
 as well as delay for more than one note played simultaneously in Solo and Bass & Pick modes.")
 - adjusts how long the note sounds after releasing the key (MIDI note end).")
28 Right Menu bar In the Right Menu bar you can get access to Timing panel, 2 Mixer panels, and Wah-Wah Effect setting: Timing panel Strum time (20-60ms) - adjusts the time between the notes played in the strumming chords (Harmony, Chords, and Bass & Chord modes) as well as delay for more than one note played simultaneously in Solo and Bass & Pick modes. Attack time (0-100%) - allows shortening/lengthening the attack of a sound. The shortest (0%) gives smaller latency, but sounds less natural. Release time (50-200%) - adjusts how long the note sounds after releasing the key (MIDI note end). Mixer panel 2 Mixer sections allow adjusting the volume of various noise effects and additional sounds that form the modeled guitar sound. Noises: Fret - volume and on/off of a fret noise. Release - volume and on/off of a release noise. Pick - volume and on/off of additional pick noise. Sounds: Mute - volume of muted sound triggered by Repeat zone keys and used as FX. Slow Strum - volume of Slow Strum sound (Velocity switch FX in chordal modes). Switch FX - volume of all additional sounds (Key/Pedal switch FXs in Solo mode). 28

, adjust Filter quality (Qual), lowest frequency (Freq), highest")
29 FX Mixer panel FX Mixer panel lets you adjust volume for all FX sounds/noises individually. Wah-Wah panel Wah-Wah panel allows switching on Wah-Wah Effect, as well as selecting any of 4 Wah-Wah modes available in RealStrat and adjust parameters for each mode. Press FX Enable LED in the upper left corner to switch on the Wah-Wah Effect. Select Wah-Wah mode in a combo box: MIDI CC - Wah frequency center is controlled by MIDI CC (set the needed CC# in numeric box), adjust Filter quality (Qual), lowest frequency (Freq), highest frequency (Freq (max)). Auto Positive - Automatic Wah effect with positive filter envelope, adjust effect Depth, Frequency and filter Quality. Auto Negative - Automatic Wah effect with negative filter envelope, adjust effect Depth, Frequency and filter Quality. Modulation - you can adjust filter Quality (db), lower Frequency (Hz), modulation Depth (%), modulation Phase ( ), modulation Rate (Hz, as well as sync the rate to host s tempo and select note duration in pull-down menu), select Trigger mode with on/off clickable LED. Common Hold (on/off) - actually substitutes the Sustain Pedal in all modes, except for the Solo. In Solo mode when Hold button is on, any pressed and held key in the Main zone can be used for sustaining the following notes. 29
30 Auto (on/off) - toggles between Auto and Manual mode of Floating Fret Position. Auto works only in melodic modes (Solo, Harmony). Manual mode allows changing the fret position by rightclicking on the Fretboard. Accent High (0-127) - adjusts the velocity threshold between hard and hardest performance dynamics. Accent Low (0-127) - adjusts the velocity threshold between soft and hard performance dynamics. Alter samples (1-5) - provides 5 positions of randomly alternating samples while performing repetitive notes (position 1 provides up to 3 different samples, while position 5 provides up to 10 different samples). 30
31 RealStrat Effect Table and Description Tapping Mute Bridge Mute Harmonics Pinch Harmonics Slap+Slap Noises Scrapes Legato (1-2 Steps) HammerOn (Legato) Slide (Legato) Repetition (NoteOff) Tremolo Tremolo 1-beat Trill Trill 1-shot Slide Up SlideUp (trigger) Slide Down (Fall) SlideDown (trigger) Bend Reverse Bend Unison Bend Hold (1-2 Steps Mono) Interval Fret Position PickPosition String select Wah-Wah Violining Sustainer (trigger) FeedBacker (trigger) Chucka FullRange Chucka MuteKeys Chucka VeloLayers Mode Toggle velo> velo< MonoBend (Lower note bend) VeloAdd (Velocity +/- control) Open Strings Lock** Slow Strum** Effect, Key/Pedal/Mod.Wheel switch Effect, Key/Pedal/Mod.Wheel/Velocity Switch Effect, Key/Pedal/Mod.Wheel/Velocity Switch Effect, Key/Pedal/Mod.Wheel/Velocity Switch Effect, Key/Pedal/Mod.Wheel/Velocity Switch Effect, Key/Pedal/Velocity Switch Effect, Key/Pedal/Mod.Wheel/Velocity Switch Effect, Key/Pedal/Mod.Wheel Switch Effect, Key/Pedal/Mod.Wheel/Velocity Switch Effect, Key/Pedal/Velocity Switch Key/Pedal/Velocity Switch Effect, Key/Pedal/Velocity Switch Effect, Key/Pedal/Velocity Switch Effect, Key/Pedal/Velocity Switch Effect, Key/Pedal/Velocity Switch Key/Pedal/Mod.Wheel/Velocity Switch*, P.Bender Key Switch Key/Pedal/Mod.Wheel/Velocity Switch*, P.Bender Key Switch Key/Pedal/Velocity Switch Key/Pedal/Velocity Switch Key/Pedal/Mod.Wheel/Velocity Switch Effect, Key Switch Effect, Key/Pedal/ Mod.Wheel/Velocity Switch Mouse*, Key/Pedal Switch Mouse*, Key/Pedal Switch Key Switch Effect*, Key/Pedal*/Mod.Wheel Switch Effect, Key/Pedal/Mod.Wheel Switch Key/Pedal Switch, P.Bender Key/Pedal/Mod.Wheel Switch, P.Bender, AfterTouch Effect, Key/Pedal* Switch Effect, Key/Pedal* Switch Effect, Key/Pedal/Mod.Wheel/Velocity Switch Key/Pedal/Mod.Wheel Switch Key/Pedal/Velocity Switch Key/Pedal/Velocity Switch P.Bender, Mod.Wheel P.Bender Pedal Switch Velocity Switch All FXs are available in Solo mode except for the marked: * - available in Chords, Bass&Chord, Bass&Pick modes as well. ** - available only in Chords, Bass&Chord, Bass&Pick modes. 31
32 Tapping FX reduces initial sound attack and allows to produce legato Hammer-Ons/Pull-Offs both lower and higher the held note within 24 semitone range. Works in monophonic mode with initial note and Hammer-Ons/Pull-Offs played on the same string. Mute FX - left-hand muted sound for notes in the Main zone. Note that the volume of the Mute FX is controlled by Mixer > Sounds > Mute slider. BridgeMute FX - sound muted near the guitar bridge for notes in the Main zone. It is a similar effect to Mute FX, however produces a slightly different sound. Note that the volume of the BridgeMute FX is controlled by FxMixer > Bridge Mute slider. Harmonics FX - chromatic Artificial Harmonic sound for notes in the Main zone. Note that the volume of the Harmonics FX is controlled by FxMixer > Hrmnx slider. PinchHarmonics FX - non-chromatic Pinch Harmonic sound for notes in the Main zone. Note that the volume of the PinchHarmonics FX is controlled by FxMixer > Pinch Hrmnx slider. Slap FX - slap sound and noises for notes played in the Main zone. Notes played from E1 through D#2 are left-hand fret smacks. Notes played from E2 through A4 are a short slap sound when played with low velocity and a long slap sound when played with a fast velocity. Notes played from A#4 through D5 are right-hand pickup smacks. Note that the volume of the Slap FX is controlled by FxMixer > Slap slider. Scrapes FX - 46 different string scrapes, each controlled by the different notes in the Main zone ranging from E1 to C#5. Note that the volume of the Scrapes FX is controlled by FxMixer > Scrapes slider. HammerOn (Legato) FX produces Hammer-On/Pull-Off articulation. Hammer-On and Pull-Off guitar effects enable the playing of grace notes, mordents, trills with a single pick (and single initial attack). With Hammer-On enabled, press and hold a single key. When a second key is played, it plays without the initial attack and stops the first note. While continuing to hold the first key, release the second key and the first note is played again without the initial attack. When the second key is played higher than the second key, this is typically called a hammer-on. If the second key is lower than the first key, this is typically called a pull-off. The Hammer-On effect has a numeric box allowing the user to select in semi-tones the greatest distance between the first and second note played to be triggered with the Hammer-On/Pull-Off effect. Slide (Legato) FX produces sliding articulation between two notes played legato (glissando with initial attack on the first note only). The Slide FX numeric box controls the maximum number of semi-tones between two notes that the slide FX will occur. The Slide FX slider controls the speed of the slide. Repetition (NoteOff) FX automatically plays additional same note(s) on key(s) release allowing to produce semi-automatic tremolo with easy dynamics control. Tremolo FX plays the note(s) repeatedly with the base speed provided by the Tempo setting (is synched with host s tempo). Multiples above the Tempo setting are controlled by the Tremolo FX pull-down menu with choices of 4th, 4T (triplet), 8th, 8T, 16th, 16T, 32nd, 32T, 64th, and 64T note durations. Note that while Tremolo FX is enabled any secondary notes played are sustained for as long as the first note is played. Tremolo 1-beat FX works similar Tremolo FX but plays number of notes fitting in one beat of a measure before sustaining. The speed is controlled by the Tempo setting (is synched with host s tempo). Trill FX plays a continuous trill for as long as the note(s) is held. The Trill FX numeric box specifies (in semi-tones above the note(s) played) the interval of the trill. The speed of the trill is controlled by the Tempo setting and the Trill FX pull-down menu with choices of 4th, 4T (triplet), 8th, 8T, 16th, 16T, 32nd, 32T, 64th, and 64T note durations. 32
33 Trill 1-shot FX plays a mordent ahead of the note(s) played. The Trill 1-shot FX numeric box specifies (in semi-tones above the note(s) played) the interval of the mordent. The speed of the mordent is controlled by the Tempo setting and the Trill 1-shot FX pull-down menu with choices of 4th, 4T (triplet), 8th, 8T, 16th, 16T, 32nd, 32T, 64th, and 64T note durations. SlideUp FX articulates automatic slide up TO the note(s) played. The SlideUp FX numeric box specifies (in semi-tones) the interval to start the slide from. The SlideUp FX slider controls the speed of the slide. SlideUp (trigger) FX triggers automatic slide up FROM the sustaining note(s). Velocity of trigger key affects slide dynamics. SlideDown FX articulates automatic slide down FROM the note(s) played. The SlideDown FX numeric box specifies (in semi-tones) the destination interval for the slide. The SlideDown FX slider controls the speed of the slide. SlideDown (trigger) FX triggers automatic slide down FROM the sustaining note(s). Velocity of trigger key affects slide dynamics. Bend FX articulates automatic bend up TO the note(s) played. The Bend FX numeric box specifies (in either 1 or 2 semi-tones) the interval to start the bend from. The Bend FX slider controls the speed of the bend. ReverseBend FX articulates automatic pre-bend and release down to the note(s) played. The ReverseBend FX numeric box specifies (in either 1 or 2 semi-tones) the interval to start reverse bend from. The ReverseBend FX slider controls the speed of the bend. UnisonBend FX articulates two notes played, one being the played on the Main zone, and the second one starting from one or two semi-tones below is bent up to the note played. The UnisonBend FX numeric box controls if the second bent note starts from one or two semi-tones below. The UnisonBend FX slider controls the speed of the bend. Hold FX provides sustain effect similar to the Sustain Pedal. Interval FX plays additional note(s) to the one played in the Main zone. Interval FX pull-down menu options are: mono, 4th down, 5th up, Octave up, Power (5th + 4th up), Power2 (5th + 4th up), 2 Octaves up, Power Oct (two power chords in octave) and Power 2 Oct (two power chords 2 in octave). Note that when Interval FX is enabled, the keyboard is in monophonic mode and only a single key can be played at a time. FretPosition FX controls the Capo along the fretboard. The FretPosition FX pull-down menu option of D#5 C6 allows the Capo to be controlled by the 10 Right Repeat keys starting from D#5, up to C6 selecting the 18th fret. The FretPosition FX pull-down menu option of Open" forces the Capo to remain open. The remaining pull-down menu options select one of the 18 frets (frets numbers marked with *, or ** correspond to the frets marked on the RealStrat fretboard). PickPosition FX controls the position of the pick on the strings to provide different sound (farther or closer to the bridge). The PickPosition numeric box ranges from -7 to +7. The Pick Position can also be changed via the main RealStrat window by clicking and dragging the pick between the pickups on the high E-string. String Select Fx allows to manually select the needed string, which lets you play as many notes on the selected string as possible for the string range. Wah-Wah FX provides a traditional guitar wah-wah pedal effect. The Wah-Wah FX pull-down menu options for control are: MIDI-Control, Auto Positive, Auto Negative and Modulation. Wah- Wah FX parameters can be modified in the Wah-Wah panel accessible from Right Menu bar in the upper right corner of the RealStrat window. 33
34 Violining FX provides a volume swell with a smooth attack. The Violining FX slider controls the swell time. Sustainer (trigger) FX triggers a sustainer effect for any notes currently being played in the Main zone. The sound swells with every key press and can sustain as long as you trigger the effect. FeedBacker (trigger) FX triggers a harmonic feedback for the note(s) being played in the Main zone (for the last in time pressed note in case of a chord). The FeedBacker FX pull-down menu provides the following harmonic selections: 8 (octave), 5 (octave and a fifth), 8 (two octaves), 5 (2 two octaves and a fifth), 8'' (three octaves), and 5 (three octaves and a fifth). ChuckaFull FX provides muted chords in 4ths (so called, chucks) played in the Main zone which emulates chucka-chucka guitar technique. Main zone is in mono mode with each key triggering individual chord/fret. With notes played from E3 and higher, ChuckaFull FX chords will move higher with each increased semi-tone along the fretboard. Right Repeat zone keys repeat the chords played in Main zone and can alternate between two string groups: D#5 through F#5 trigger lower strings (5-4-3 strings), and G5 and higher trigger upper strings (3-2-1 strings). Left Repeat keys (D#1 and lower) repeat the last layer produced in Right Repeat zone. ChuckaMuteKeys FX provides muted chords in 4ths with Black Repeat (Mute) keys (Main zone and white keys of Repeat zone continue to work normally). Right Repeat zone Mute keys can alternate between two string groups: D#5 through F#5 trigger lower strings (5-4-3 strings), A#5 and higher trigger upper strings (3-2-1 strings), and Left Mute keys (D#1, C#1, etc..) repeat the last layer produced in Right Repeat zone. ChuckaVeloLayers FX provides muted chords in 4ths played in the Main zone similar to ChuckaFull FX, however can produce 3 velocity controlled string groups by any key of the whole range. Low velocity strokes trigger string layer, middle velocity strokes trigger strings layer, while high velocity strokes trigger string layer (the higher velocity value - the higher string group is triggered). Mode Toggle FX toggles from Solo mode to Chords, Bass&Chord, or Bass&Pick mode, and back to Solo. Velo > FX activates higher Velocity Switch FX selected in Higher Velocity Switch box. Velo < FX activates lower Velocity Switch FX selected in Lower Velocity Switch box. MIDI controller additional FXs MonoBend FX (Pitch Bender and Modulation Wheel) applies pitch bending: a) only to the lowest of simultaneously played notes, b) only to the first bent and held note, allowing to emulate guitar specific single-string bending techniques: Unison Bend, Bend/Release combined with sustained note(s), etc Example 1 - assign MonoBend to P.Bender, press and hold 2-3 notes in Main zone, them move P.Bender - only the lower note will be bent (if you then move P.Bender back while holding all played notes only the first note will be affected). Example 2 - assign MonoBend to P.Bender, play a note, move P.Bender to bend the note, then holding the first note bent play the second note higher or lower the first one - next note(s) will play their real pitch (if you then move P.Bender back while holding all played notes, only the first previously bent note will be affected). VeloAdd FX (Pitch Bender) allows continuous adding/reducing velocity value (+/-) to the played notes. Slide FX (Pitch Bender and Modulation Wheel) allows manual articulation of Up/Down slides from/to played note(s). 34
35 Additional FXs found in Chords, Bass&Chords, Bass&Pick modes Slow Strum on Higher Velo (Velocity Switch FX) - in all chordal modes you can set a velocity value, after which slow strum will be performed when playing a chord in the Main zone. Slow Strum on Lower Velo (Velocity Switch FX) - in the same way you can set a velocity value below which slow strum will be perform when playing a chord in the Main zone. Slide up (Velocity Switch FX) produces automatic slide up TO the played note/chord. Slide down (Velocity Switch FX) produces automatic slide down (Fall) FROM the played chord. Open Strings Lock (Pedal Switch FX) - in case open strings are used in a chord (such as A Open, E Open) they will be engaged (locked) while other strings will play the notes of the further chords. When Open Strings Lock FX is turned on the further chords played with upper note higher than E3 will automatically move chord position up along the fretboard. Note, that if Modulation FX box is activated, the effect selected in M.W. (Modulation Wheel) box will not work. 35
36 Chord Map RealStrat can detect 30 chord types. The following chart lists the available chord types and the degrees unnecessary for chord detection that you can omit while entering chords. Chord type Can be omitted ma V, III 6 - add9 - sus4 - sus2-6/9 V maj7 V, V+III maj9 V maj7(b5) - maj7(#5) - m V m6 - m(add9) - m7 V m(maj7) V m7(b5) III, m9 V m7(11) VII, V 7 V, III+V 7sus4-7(b5) - 7(#5) - 9 V 9sus4 V 7(b9) V 7(#9) V 9(b5) - 7(add13) V dim7 III, VII, III+VII aug - All chords except ma6, min6, min7(11), ma6/9 are detected in all inversions and note combinations. 36
37 C C6 Cadd9 Csus4 Csus2 C6/9 Cmaj7 Cmaj9 Cmaj7(b5) Cmaj7(#5) Cm Cm6 Cm(add9) Cm7 Cm(maj7) Cm7(b5) Cm9 Cm7(11) C7 C7sus4 C7(b5) C7(#5) C9 C9sus4 37
38 C7(b9) C7(#9) C9(b5) C7(add13) Cdim7 Caug 1-note chord detect system also included: C7 Cm Cm7 - obligatory - can be omitted 38

39 User Chords Chord Editor implemented in version 3 allows to easily change any factory chord to any fingering you want, and save edited chords within User Chord banks for future use. Being in any chordal mode click User Chords button to open Chord Editor window: Chord Editor Chord Editor window Select chord you want to edit by pressing keys on external MIDI keyboard, or by selecting Root/Type/Bass/Position in chord select boxes Editing chords Click on fret to change/insert a note Click Compare button to compare edited and initial chord Click Add/Apply button to add edited chord to current bank Click Delete button to remove the selected chord from current Bank. 39
 / b) Right-click fretboard and strum strings with a")
40 /Note, that any User Chord lowest note will be used as Bass I Stroke for Pattern, Bass&Pick, and Bass&Chord layouts, regardless of Root note in the chord name/ Auditioning chords a) Press button with speaker icon /Small button at the right with a dot symbol activates Auto audition mode (any loaded or selected chord will be played automatically) / b) Right-click fretboard and strum strings with a mouse. Saving User Chord Bank Press Save button, or rename bank and press Enter to save chord bank to Chord Library. Delete Bank from Library by pressing Delete icon. All user chord names will be displayed with * symbol in the Info bar. User Chords view In the right part of Editor window you see the list of all user chords of all Banks you've created (except for current Bank selected in Bank view at the left), which allows you to compare edited chord fingerings from different Banks, as well as copy any user chord from one Bank to another by simply selecting chord in User Chord view list and pressing Add button. Note, the Bank you select in User Chord Bank combo box will be used for all modes working with chords. Exporting/Importing User Chord Banks You can export/import single Chord Banks as well as the whole User Chord Library by clicking button with triangle icon and selecting the appropriate item in pop up menu: If you want any Bank to load as default every time you run the plug-in, load the bank and check Set as default item in popup menu. 40

41 PATTERN Global Mode Using MusicLab Rhythm Pattern Library and Pattern Manager MusicLab Rhythm Pattern Library is a unique collection of 1250 guitar accompaniment rhythm patterns classified by various musical categories, such as meter, music style, guitar technique, rhythmic feel, tempo range. Using the prerecorded rhythm patterns of MusicLab Pattern Library you can quickly create professionally sounding guitar accompaniment tracks for your songs. Then all you have to do is to choose the appropriate pattern(s) in RealStrat Pattern Manager, copy them to your host sequencer's MIDI track, start sequencer and play chord changes on a MIDI keyboard, or alternatively enter chords to a MIDI track using sequencer's editor. Pattern Manager RealStrat is equipped with powerful multi-functional built-in Pattern Manager allowing to easily audition rhythm patterns of MusicLab Pattern Library, quickly find the ones matching your musical needs, as well as drag'n'drop/export the chosen patterns directly to the host's MIDI track to use with your song. Pattern Manager Window Click Pattern button to switch on the Pattern Global mode and get access to Rhythm Pattern Library and Pattern Manager. Pattern mode window Within Pattern Global mode you can select any of Performance modes (Solo, Harmony, Chords, Bass&Chord, or Bass&Pick) by pressing the appropriate performance mode button. Note, that you can use rhythm patterns with all performance modes, the mode selection depends on what harmonic part you want to play with the rhythm patterns: Select Chords, Bass&Chord, Bass&Pick modes for automatically constructed guitar chords Select Harmony mode to perform intervals with strumming patterns Select Solo mode to perform your own chords with strumming or picking patterns 41


42 Click the arrow button in the upper left corner to open Pattern Library tree view. Finding Pattern in MusicLab Pattern Library Rhythm patterns are organized within Pattern Library tree view by Category folders and Style subfolders including sets of MIDI patterns. The name of each folder/subfolder contains short musical information helping you to quickly find patterns matching your song. For instance: Category name - Basic Strumming: - includes a number of guitar strumming Styles Style name - 4'4_Basic_S_8th_90-250: - contains Basic style rhythm patterns in 4'4 meter (_4'4_Basic_) featuring strumming technique (_S_) and 8th note rhythm feel (_8th_), usable within the bpm tempo range (_90-250). Library Tree view. Style folder 42

43 To read the details about ML Pattern library right-click on Pattern Library root folder, and select View Info item in popup menu. To read the additional information about Styles included with the Category right-click on Category folder and select View Info item in popup menu: Selecting Category and Style To find the appropriate pattern set in Pattern Library tree view choose Category folder and doubleclick the folder name to get access to the included Styles. Click the appropriate Style name to load the available pattern set to Pattern List pane. Pattern List All patterns of ML Pattern Library have unique names containing brief information as well, so you can easily identify them when using outside the Style folder. For instance: Pattern name - S13_Basic_4'4 - indicates strumming technique used (S), pattern number (13_), and Style name (Basic_4'4) Selecting pattern Click on pattern name in the list to select it - pattern rhythmic contents will appear in Pattern view and it is ready to play. Pattern view graphically presents measures/beats as well as guitar 'Strokes' used in the current rhythm pattern. Differently colored 'Piano Roll' type bars and their vertical position allow to easily identify the stroke types: green bars present Full strums, red ones present Muted strums, blue ones 43
 Press chord on your MIDI keyboard to trigger pattern playback that will be visualized by")

44 present Slow strums, light green bars present Top strums, brown ones present individual 'string' picks (up strums bars of the same stroke type are in higher position than down strums): Strumming Pattern Auditioning Pattern Picking Pattern Host sequencer in stop mode (or RealStrat in standalone run) Press chord on your MIDI keyboard to trigger pattern playback that will be visualized by position cursor moving along the Pattern view. Pattern will perform your chord(s) until you release the keys. Pattern stops when you release the keys and starts from the beginning when you press chord again. Pattern will continue playing if you change chords legato way (if at least one key is constantly pressed). Press Latch button or MIDI Sustain Pedal to turn pattern playback to 'Latch' mode - in that case pattern will continue playing the last chord even if you release all chord keys. Host sequencer in playback mode Start your host sequencer. Now pattern will 'silently' follow host's playback until you press chord on a MIDI keyboard (or alternatively insert chord changes to MIDI track). Releasing chord keys mutes the performance. Pressing chord again will continue pattern playing in synch with your host s tempo/beats. Press Latch button or Sustain Pedal to turn pattern playback to 'Latch' mode - in that case pattern will continue playing the last chord even if you release all chord keys. Note, that using sequencer in playback mode allows you to easily choose pattern(s) for your song by previously entering chords to a MIDI track and selecting patterns in Pattern Manager 'on the fly' along with the song. 44
45 Controlling pattern playback Dynamics control Pattern Manager has powerful real time velocity control options allowing to drastically change pattern performance: Velo add - add/reduce velocity Chord - check to apply velocity of trigger chord to pattern dynamics (+/- velocity) P.B. - check to assign +/- velocity to Pitch Bender controller for continuous dynamics changes Random (velocity) - check to switch randomization on Click Pattern Settings button (the one at the right w/three dots picture) to adjust randomization parameters: min box - minimum deviation range max box - maximum deviation range strength (%) - sensitivity of randomization, at 100% all pattern notes will be randomized Tempo Control Pattern Manager takes tempo value from the host sequencer, but you can make it twice lower or higher by simply selecting the appropriate item in Tempo combo box: Transferring Pattern to host's MIDI Track If you want to use more than one rhythm pattern for your song you have to copy the chosen patterns from Pattern Manager to MIDI track of your host sequencer. There are two ways to do that: Drag'n'Drop Pattern The simplest way to copy pattern to MIDI track is to drag'n'drop the selected pattern directly from Pattern view. To do this click on Pattern view and drag the pattern to the needed measure of a MIDI track. 45
.")
46 You can automatically multiply pattern by the appropriate number of cycles if you previously set the desired number of repetitions in D n D Repeat box found on Pattern Settings panel: Note. Velo add and Random parameters will be also applied to the exported pattern (MIDI file). Import Pattern to MIDI Track If your host doesn't support drag'n'drop MIDI data you can previously drag out pattern from Pattern view directly to Windows it will be exported as a Standard MIDI file, and then import it to your sequencer. In Mac version: right-click on Pattern view and select 'Export to Desktop' in pop up menu. Alternatively you can import pattern right from RealStrat installation folder (by default: C:/Program Files/MusicLab/RealStrat/Loops/Pattern Library), but in that case you get single original pattern and you have to multiply it manually in a MIDI track of your host. Using Rhythm Patterns in a MIDI Track When the appropriate rhythm patterns for your song parts are successfully found in Pattern Manager and copied to the host's MIDI track, press Track button to cancel pattern loaded in Pattern Manager (it will be grayed out) and work with pattern on MIDI track only. There are two ways of creating guitar part with the help of rhythm patterns playing from MIDI track to RealStrat: real-time and non real-time methods. 1. Non real-time method Create MIDI track for chords, output it to RealStrat, and enter chord changes for you guitar part (step record chords from your MIDI keyboard or manually enter notes via sequencer s editor) Start your sequencer to listen to the ready part. 2. Real-time method Create MIDI track for chords, output it to RealStrat Start sequencer and play/record chord changes to RealStrat from your MIDI keyboard Real-time method is more intuitive and allows to control pattern playback adding various expressive adjustments to the performance. 46
47 Controlling pattern playback You can control pattern playing from MIDI track with the help of chords played on a MIDI keyboard by pressing and releasing keys, using Latch button (or Sustain Pedal), and also by triggering Slow Strum (Velocity Switch FX). Latch Mode (Sustain Pedal) With Latch button disabled pattern will play only while you are holding the chord on your MIDI keyboard, and it will be muted when you release the keys. This allows you to play guitar pattern here and there along with the song. With Latch button (or Sustain Pedal) pressed pattern will continue playing even if you release the keys. Slow Strum Use Slow Strum velocity switch FX to add syncopes and accents to pattern playback: Temporarily mute pattern by triggering Slow Strum (the time window can be adjusted by 'SlowZone' Automation parameter) Completely stop pattern by triggering Slow Strum and quickly releasing the keys (to stop Slow Strum sound press the Mute key (Black) of the left Repeat zone). To continue pattern playback press the chord again. Note. With Latch button (Sustain Pedal) pressed you can't completely stop pattern by triggering Slow Strum and releasing the keys. 47

48 Creating Custom Styles for Pattern Library Organizing Existing Patterns in Custom Styles You can create your own pattern sets by copying the favorite patterns taken from the ML Pattern Library and organizing them as custom Styles within Library tree view for future use: Select pattern you are going to copy to your new Style - it will appear in Pattern view Right-click on a Category folder or Style subfolder of the Tree view and select Add Style in pop up menu. Name the newly created empty folder (the Pattern List pane will be empty) Press 'Add' button under Pattern List pane to copy the current pattern to your new Style folder Find and audition other patterns, and copy them one by one to the new Style using the same method You can also delete/rename Style folders by right-clicking on it and selecting the appropriate item in popup menu. Creating Custom Patterns RealStrat rhythm patterns are single track Standard MIDI files (SMF format 0) recorded with special Stroke Map notes, so advanced users can edit the existing patterns or create their own patterns from scratch in the host's MIDI track, and then save/export them as SMF directly to Pattern Library folder for future use (C:\Program Files\MusicLab\RealStrat\Loops). Guitar Stroke Map incorporated in RealStrat allows to use up to 22 MIDI notes in the lowest octave range (from C#-2 to A#-1) for emulating a number of guitar techniques (Strokes) within a MIDI rhythm pattern. So you can use the Stroke Map notes for creating your own rhythm patterns including various guitar 'Strokes', such as chord strums (up/down), slow strums (up/down), individual string picks, bass note pick, muted strums (up/down), chord slides (using chromatic strums), etc. 48

49 Strumming Pattern in MIDI track 49
50 RealStrat Stroke Map Note # Note name Stroke name 22 A#-1 "Slow Upstrum" 21 A -1 "Slow Downstrum" 20 G#-1 "Muted Upstrum" 19 G -1 "Muted Downstrum" 18 F#-1 "Full Upstrum" 17 F -1 "Full Downstrum" 16 E -1 "Full Downstrum 1 semi-tone lower" 15 D#-1 "Full Downstrum 2 semi-tones lower" 14 D -1 "Full Downstrum 3 semi-tones lower" 13 C#-1 "1st string" 12 C -1 "2nd string" 11 B -2 "3rd string" 10 A#-2 "4th string" 09 A -2 "Bass I" 08 G#-2 "Bass II" 07 G -2 "Muted Top Upstrum" 06 F#-2 "Muted Top Downstrum" 05 F -2 "Top Upstrum" 04 E -2 "Top Downstrum" 03 D#-2 "Top Downstrum 1 semi-tone lower" 02 D -2 "Top Downstrum 2 semi-tones lower" 01 C#-2 "Top Downstrum 3 semi-tones lower" Top strum - strum on the 3-4 higher strings (Bass strings omitted) 50
51 Parameter Automation MIDI CC and VST Map RealStrat MIDI CC # VST name Output Volume 7 Volume EQ, High 29 EQ-High EQ, Low 30 EQ-Low MIDI Out, select Outmode Tune Pitch, Coarse 12 PtchCrse Pitch, Fine Tune 13 PtchFine Modulation, Depth 14 ModDepth Modulation, Freq 15 ModFreq Mixer Mixer_Muted_sound, Volume 20 MxMuted Mixer_Slow_Strum, Volume 21 MxSlStrm Mixer_Switch_FX, Volume 22 MxKeyFx Mixer_FretNoise, on/off, 23 MxFrtN_ Mixer_FretNoise, Volume 24 MxFrtNse Mixer_ReleaseNoise, on/off 25 MxRelN_ Mixer_ReleaseNoise, Volume 26 MxRelNse Mixer_Pick/Noise, on/off 27 MxPckN_ Mixer_Pick/Noise, Volume 28 MxPckNse Wah-Wah Wah-Wah, On/Off 47 WahOnOff Wah-Wah_mode, select 46 WahMode Common Alter_sample, mode 52 AltSmple Accent_High_Threshold 51 VelTrshH Accent_Low Threshold 53 VelTrshL Performance_Mode, select 54 Mode Pattern mode on/off 16 PattrnOn Release_Time 55 RlseTime Attack_Time 49 AtckTime Strum_Time 56 StrmTime Pick_Position, select 50 PickPos Fret_Position, select 78 FretPos Auto_Fret_Position, on/off 79 AutoFret Hold, on/off 64 Hold Controllers Pitch_BenderUp, Mode 57 PBupMode Pitch_BenderDown, Mode 48 PBdnMode PBender_to_Slide, Range 58 PBSldRng 51
52 PBender_to_Pitch, Range 59 PBPtcRng Modulation_Wheel, Mode 60 WhMode ModWheel_to_Slide, Range 61 WhSldRng ModWheel_to_Pitch, Range 62 WhPtcRng Aftertouch, Mode 75 AtchMode Aftertouch_to_Pitch, Range 76 AtchRng Velocity_Curve, select 77 VelCurve Velocity Switch FX (non-solo) Velo_Switch_Slide_mode, select 85 VelSlide VelSw_SlideUp, Velo 86 SldUpVel VelSw_SlideUp, Steps 87 SldUpStp VelSw_SlideUp, Time 88 SldUpTim VelSw_SlideDown, Velo 89 SldDnVel VelSw_SlideDown, Steps 90 SldDnStp VelSw_SlideDown, Time 102 SldDnTim Slow_Strum_on_high_velo, select 112 SlStrmHi Slow_Strum_HighVel, Velo 113 SlStrHVe Slow_Strum_HighVel, Speed 114 SlStrHSp Slow_Strum_on_low_velo, select 115 SlStrLow Slow_Strum_LowVel, Velo 116 SlStrLVe Slow_Strum_LowVel, Speed 117 SlStrLSp Mode Controls Silent Mode, on/off 110 Silent Chord Position, select 111 ChordPos Chords/Bass, on/off 80 ChrdBass Alter_Bass, on/off 118 ChdAltBs Bass_Mono, on/off 119 ChdMnoBs Chords_Strings, Upper, select 6 ChdStrU Chords_Strings, Lower, select 3 ChdStrL Bass&Chord_mode_Strings#, select 9 BnCStr# Harmony_Mode_Interval, select 31 HrmIntr1 Solo_FX_HammerOn, select 35 SolFxHO Solo_FX_HammerOn, Steps 36 HOSteps Solo_Legato, on/off 18 Legato Solo_BassZone, on/off 40 BassZone Solo_BassZone, rangehigh 41 BasRngUp Solo_BassZone, rangelow 44 BasRngDn Slow Strum time zone (Pattern) 120 Slowzone Pattern, Track mode on/off 17 TrackMod 52
53 MIDI CC Automation, value -> parameter map CC#3, ChdStrL CC#12, PtchCrse CC#41, BassRang > > > E > > > F > > > F# > > > G > > > G# > > > A1 CC#6, ChdStrU > > A# > > > B > > > C > > > C# > > > D > > > D# > > > E2 CC#9, BnCStr# > > F > > > F# > > > G > > > G# > > > A2 CC#31, HrmIntrl > > A# > 4th down > > B > 5th up > > C > Octave > > C# > Power > > D > Power > > D# > 2 Octave > > E3 CC#36, HOSteps CC#13, PtchFine > F > > 0-(+100c) > F# > > > G > > 0-(-100c) > G# > 4 CC#46, WahMode > A > > MidiCC > A# > > Auto(Pos) > B > > Auto(Neg) > C > > Modulation > C# > 9 CC#52, AltSmple > D > > > D# > > > E > > > > 5 CC#48, PBdnMode CC#58, PBSldRng CC#60, WhMode > As up > > Off > Off > > Slide > Slide > > Pitch > Pitch > > Modulation > VeloAdd > > MonoBend > MonoBend > 6 CC#62, WhPtcRng > Sustainer > > 12 CC#50, PickPos > > > > > > > > 9 53
54 > > > > > > > -3 CC#59, PBPtcRng > > > > > > > > > > > > > > > > > > > 1/ > > > 1/ > > > 1/ > > 4 CC#75, AtchMode > > > Off CC#54, Mode > > Pitch > Solo > > Modulation > Harmony > 1/ > Sustainer > Chords > 1/ > Feedbacker > BassChord > 1/8 CC#76, AtchRng > BassPick CC#61, WhSldRng > > Direct > > 1 CC#57, PBupMode > > 1/ > Off > > 1/ > Slide > > 1/ > Pitch > 5 CC#77, VelCurve > VeloAdd > > > MonoBend > > > Sustainer > > > > > > > 12 CC#78, FretPos CC#85, VelSlide CC#90, SldDnStp > > off > > > up > > > down > > 3 CC#87, SldUpStp > > > > > > > > > > > > > > > > > > > > > > > > > > > 9 CC#111, ChordPos > > > I > > > II > > > III > > IV > > Kbrd > 18 54

55 JOYSTICK Global Mode Overview Joystick Global mode window The most popular guitar accompaniment technique is chord strumming. All virtual instruments, including the guitar ones, are intended to use with keyboard controllers. Unfortunately physical aspects of piano playing technique do not allow to naturally emulate right hand up/down movements of guitarist, which makes it extremely difficult to perform authentic guitar strumming rhythms on a keyboard. On the other part even the entry-level guitarist can easily master basic strumming on his guitar, though facing another difficulty - time-consuming course of learning myriad of chord fingerings, as well as painful physical training to properly press strings with the left hand fingers. Fortunately with our unique Struminator technology implemented in RealGuitar/Strat/LPC 3.0 Joystick mode, allowing using alternative guitar-shaped MIDI controller for chord strumming, the problem's gone. It successfully combines the convenience of RealStrat chording system with the ease of normal guitar right hand strumming technique. Joystick mode utilizes two-hand playing principle very close to guitar playing technique: Switching chords/strings with left hand (pressing and holding down Fret buttons) Strumming chords/strings with the right hand (pressing Strum bar down/up) Articulating chords/strings (releasing Frets to cut off a chord/note as it is playing) Playing Muted chords/notes (pressing Strum bar with all Frets released) Which guitar controller? PlayStation 3 Guitar Hero World Tour/Guitar Hero 5 guitar controller is the best fully functional device to use both on Mac and PC (used on our Demo videos). Note, no game console needed, only USB wireless receiver. Other PS3 Guitar Hero guitar models will work as well, but they differ in Star Power (BACK) button appearance, and doesn't have Slider bar. Star Power (BACK) button is multi-functional in Joystick mode layout, so its shape, location, and pressing force is important for the playability of the controller. 55
56 All in all any Guitar Hero controller model allows to perform basic techniques with Fret buttons and Strum Bar, though limited in functionality. Connecting Guitar Hero controller to RealStrat After installing RealStrat 3: Plug the USB wireless receiver/dongle of the guitar controller into USB and connect it with the controller Run your DAW and check if Game controller input appears among its MIDI IN devices Run RealStrat 3 instrument in the DAW Create MIDI track and output it to RealStrat 3 Select Omni MIDI input for this track to get MIDI both from guitar controller and your MIDI keyboard. In case your DAW doesn t support MIDI Omni input you have to create two MIDI tracks outputted to the same RealStrat instance, one for game controller input and second for MIDI keyboard input In RealStrat 3 window press Joystick button to switch on the Joystick mode To check the correct connection: pressing Fret buttons on the guitar controller should light up the appropriate virtual Fret buttons, as well as lifting/lowering the controller fretboard should change value displayed in the Tilt box: 56
57 Guitar controller Layout Star Power (BACK) button Strum Bar Tilt Frets Start buttons Slider Bar Whammy Bar Directional Pad Tilt Buttons functionality Basic Techniques: Frets (Fret buttons) Press/release to switch/articulate chords (ColorTabs, SmartStrums modes), strings (SmartStrings mode) Tap to trigger switchable Harmonics FX Control chord position/string layers, or dynamics (SmartStrums mode) Strum bar Press down/up to trigger strums/mutes/string picks Hold to switch on Harmonics FX for Fret taps Hold to switch on Hammer-On/Pull-Off for legato Fret taps (SmartStrings mode) Tilt sensors (lifting/lowering the fretboard) Control dynamics (add/reduce output velocity of all Strokes/FXs) Switch on the assignable Star Power on Tilt FXs (SmartStrings mode) Switch on Modulation on Hold FX (SmartStrings mode) 57
58 Advanced Techniques: Whammy bar Press to produce pitch bending, or Press to switch on the assignable Strokes/FXs Star Power (BACK) button Press to trigger assignable Strokes/FXs Produce Accent (add velocity) for any assigned Stroke/FX Hold to switch on Harmonics FX for Fret taps/strum bar assignable Strokes Press w/o Frets to trigger Mutes or Scrapes Slider bar (sensor pads) Touch/slide to trigger individual strings Directional pad Press to the right or left to switch on Harmonics FX for Fret taps, or to navigate through String Sequences list (ColorTabs, SmartStrums modes) START buttons (remote control) While holding down Frets press START button for: a) selecting Chord Position (1+2) + Start => Position I (2+3) + Start => Position II (3+4) + Start => Position III (4+5) + Start => Position IV b) selecting Strum bar Function (ColorTabs, SmartStrum modes) 1 + Start => Strum 2 + Start => Bass&Strum 3 + Start => Picking Start => Picking Start => Picking 3 58
 and playing rhythm with the Strum bar.")

59 Joystick Performance Modes Press Joystick button to switch on the Joystick Global mode: Joystick mode includes three basic Playing Modes: ColorTabs, SmartStrums, and SmartStrings utilizing different methods of switching chords (manual or automatic) and playing rhythm with the Strum bar. ColorTabs mode (manual chord changes) Chord Tab Press ColorTabs tab to switch on the ColorTabs mode ColorTabs mode window In the lower part of ColorTabs window you see a set of chord cells presenting various Fret schemes with a chord name on each cell. In fact the cells are chord fingerings allowing to switch chords by pressing various Fret button combinations. Each set is saved as individual Chord Tab within the internal Chord Tab Library. Load Chord Tab from the Tabs list (the default Tab is loaded on switching on the ColorTabs mode): 59

60 ColorTabs Mode Playing Techniques Frets Function. Switching Chords In this mode Fret buttons are used to switch and articulate chords. To switch a chord press Fret buttons combination on guitar controller corresponding to the needed chord cell, and then press Strum bar to play the chord. Release Frets to mute the sound. Follow fret schemes displayed on chord cells to switch between chords available in the current Chord Tab. Strum Bar Function. Playing Rhythm Pressing Strum bar down/up lets you perform chord switched with Fret buttons using various guitar techniques: Strum, Bass&Strum, and Picking. Select the playing technique in Strum bar Function menu: Strum bar Playing Techniques Strum Pressing Strum bar Down/Up triggers DownStrum/UpStrum of the chord switched by Frets. Pressing Strum bar Down/Up with all Frets released triggers Muted Strums Down/Up of the last played chord. Bass&Strum Strum bar Down triggers Bass I once on chord change and/or after you release all Fret buttons, and will continue triggering DownStrums of the same chord until you change the chord or release Fret buttons. Activating Alt.Bass button allows to automatically alternate between Bass I and Bass II with each Strum bar Down. Strum bar Up triggers UpStrums all the time. Picking With Picking function Strum bar works differently, according to its name. Strum bar Down triggers Bass I of the current chord all the time. Activating Alt.Bass button allows to automatically alternate between Bass I and Bass II. Strum bar Ups sequentially trigger individual strings (chord voices) in the order specified by selected String Sequence. Click on Sequence combo box to select String Sequence in the popup list: 60


61 Selecting String Sequence String Sequence String Sequence is a special tab presenting the order of strings you can pick step-by-step with every Strum bar Up stroke. For instance: sequence will trigger 3rd string-> 1st string-> 2nd string picking pattern. Continuous Strum bar Ups will cycle String Sequence until you press Strum bar Down which will trigger Bass I note and reset String Sequence to the first step. Creating String Sequence String Sequence is a plain text data included in Sequences.txt file (found in the installation directory): You can open/save this file in any text editor and easily edit/create your own picking patterns by simply typing the needed string numbers in a row separated by - : You may use Bass I and Bass II picks in a Sequence by entering B1, B2 symbols, as well as 2 or more simultaneous string picks within single step by entering string numbers in square brackets with + character between them: 3-[1+2] sequence will trigger 3rd string->1+2 strings picking pattern. If you name the Sequence you ll see its name instead of row of numbers in the Sequences popup list. To do this simply type the name in braces at the right, e.g.: {Easy arpeggio} will show up in the menu list as Easy arpeggio. 61

62 Strum bar Function settings Note, that each of 5 Strum bar Function selections, Strum, Bass&Strum, Picking1, Picking2, Picking3 has independent settings, automatically saved within the engine on going to another function or mode, and are saved within the DAW project as well. Strum bar Function remote selection You can remotely select Strum bar Playing Technique directly from the guitar controller by holding different Frets and pressing START button: 1 + START -> Strum 2 + START -> Bass&Strum 3 + START -> Picking START -> Picking START -> Picking 3 Chord Tab Editor. Creating Chord Tab Press Edit button (the one with a pencil picture) to open Chord Tab Editor window showing 31 cells with all possible Fret combinations: Chord Tab Editor Assigning chords to Fret schemes Click on the chord cell with the needed Fret scheme to select it. Select Root note, chord type, /Bass note, Chord Position in the appropriate chord boxes, and full chord name will appear on the cell: 62


63 Assign as many chords as you need for the song (up to 31 available) Editing Chord Tab Tab Editor allows to copy/paste, clear, disable single chords, re-order, transpose and change position for all chords from the right-click context menu: /Note, that disabled cells will be greyed out and displayed only in Tab Editor/ Saving Chord Tab Click on Tabs combo box, type in the name and press Enter to save your Tab (or simply press Save icon). To delete Chord Tab press Delete button: Save, Delete buttons You can import/export single Chord Tab or the whole Tab Library using File button (the one with triangle icon): 63
 mode fans we have developed a Universal Chord Tab letting you perform guitar accompaniments to countless simple songs in ANY key within the single Chord")
64 Transposing Chord Tab (automated) To transpose all chords of the TAB simply press/enter the appropriate MIDI note in Repeat zone (C through B): C => 0 C# => +1 D => +2 D# => +3 etc. Universal Chord Tab For Joystick (Struminator) mode fans we have developed a Universal Chord Tab letting you perform guitar accompaniments to countless simple songs in ANY key within the single Chord Tab, using just 5 Fret buttons of guitar controller for chord changes. In addition to Strum bar guitar performance techniques implemented in RealStrat 3 the Universal Chord Tab turns Guitar Hero game controller into a new harmonic musical instrument for performing song backgrounds, as well as a powerful song-writing tool for your future masterpieces. For details refer to the Appendix section, MusicLab Universal Chord Tab. 64

65 SmartStrums mode (automatic chord changes) Press SmartStrums tab to switch on the SmartStrums mode: Chords SmartStrums mode window Insert chords in a MIDI track and chord changes will automatically sent to RealStrat engine along with the song, so you simply play rhythm with Strum bar and articulate current chord with Fret buttons. You may need to shift chord track or single chords ahead to anticipate chord changes when playing rhythm. If you want to use /Bass chords in a song enter Bass note octave or more lower basic chord notes to let chord detect engine interpret such a chord as /Bass chord. Frets Function. Articulating Chords In addition to articulating (sustain/release) chords Fret buttons may control either Chord Position/String layers, or Velocity (dynamics) of articulated chords at your choice. Position/String layers control: Fret 1 Fret 2 Frets (1+2) Frets (2+3) Fret 3 Frets (3+4) Fret 4 Frets (4+5) Fret 5 = Position I, lower strings = Position I, upper strings = Position I, full chord = Position II, full chord = Position II, upper strings = Position III, full chord = Position III, upper strings = Position IV, full chord = Position IV, upper strings Lower and upper strings strums can be triggered by Strum bar with Strum function only. 65
66 Velocity (dynamics) control: Any single Fret articulates full chord in current chord position Fret 5 adds velocity, while Frets 3, 2, and 1 proportionally reduce velocity of played chords Strum Bar Function. Playing Rhythm. In SmartStrums mode Strum bar works exactly the same way as in ColorTabs mode. Refer to ColorTabs mode, Strum bar Function. Playing Rhythm Chapter. 66

67 SmartStrings mode (automatic chord changes) Press SmartStrings tab to switch on the SmartStrings mode: Chords SmartStrings mode window Insert chord changes in a MIDI track and they will be automatically sent to RealStrat engine along with the song. Basic Playing techniques Press Frets to select strings you want to play (Frets from left through right correspond to Bass I-4th- 3rd-2nd-1st strings). Play selected string(s) by pressing Strum bar. Holding any Fret allows to sustain next played strings, while releasing the initial Fret will cut off all sustaining notes. Pressing Strum Bar with released Frets triggers muted sound of previously played note(s) Producing Hammer-On/Pull-Off SmartStrings mode not only allows you to play chord notes (voices) by triggering different strings with Strum bar, but diatonic (non-chordal) notes as well using Hammer-On/Pull-Off techniques. Click Hammer-On on Hold LED to activate it: To produce Hammer-On: Press and hold Fret to select a string Press Strum bar to trigger selected string(s) While holding down Strum bar and Fret, tap the right neighbor Fret to trigger Hammer-On While holding down Strum bar, release the newly tapped Fret to trigger Pull-Off to the initial chord note To produce Pull-Off: Press and hold Fret to select a string Press Strum bar to trigger selected string(s) While holding down Strum bar and Fret, tap the left neighbor Fret button to trigger Pull-Off 67
 notes which are the nearest to the initial chord note (upper for Hammer-On and lower for Pull-Off).")
68 While holding down Strum bar release the newly tapped Fret to trigger Hammer-On to the initial chord note Diatonic Scale for Hammer-Ons/Pull-Offs Hammer-Ons and Pull-Offs trigger diatonic (non-chordal) notes which are the nearest to the initial chord note (upper for Hammer-On and lower for Pull-Off). To let the engine know non-chordal notes you must previously assign the appropriate major or minor diatonic scale for the whole song or for the groups of chords if needed. E.g. you have C-Dm-G7 chord sequence. Assigning C major scale for the chord group you ll get the following Hammer-Ons for each chord note: C chord: C->D, E->F, G->A Dm chord: D->E, F->G, A->C G7 chord: G->A, B->C, D->E, F->G Pull-Offs will use the same diatonic notes but lower the initial chord notes Assigning Diatonic Scale There are two ways to assign diatonic scale, Manual and Automatic: 1. Manually select Root note and scale type for the entire song in the Scale combo boxes: 2. If you need various scales within the song you can use MIDI CC Automation to change root note and scale type in the needed measure(s) of the song Automating Root note selection: MIDI CC#91 values to Root note (C through B, by tens) 1-9 = C = C#(Db) = D = D#(Eb) etc.. Automating scale type selection: MIDI CC#92 values to scale type (by tens) 1-9 = major = minor 68

69 Additional Techniques/Effects/Sounds While main buttons, Frets and Strum bar allow to easily articulate chords and chord notes, and produce basic playing techniques, you can use other buttons and controls implemented in Guitar Hero controller to improve the performance by adding a number of effects and sounds. Star Power button FXs (SmartStrings mode) Star Power (global): Slide Up - triggers automatic slide up TO the played note(s) Slide Down - triggers automatic slide down FROM the played note(s) Bend - triggers automatic bend up TO the played note(s) Reverse Bend - triggers automatic bend down TO the played note(s) Unison Bend - triggers automatic Unison Bend TO the played note(s) Slow Strum - triggers Slow Strum of the current chord Star Power on Tilt: hi - triggers the selected FX with the fretboard position higher the value set in Tilt numeric box lo - triggers the selected FX with the fretboard position lower the value set in Tilt numeric box Star Power on Hold: When activated lets you tap Harmonics with Frets while holding Star Power (BACK) button pressed. 69

 lets you play Slow Strum Down/Up with Strum bar Lower Strings - holding Star Power (BACK) lets you play Lower String Strum Down/Up with Strum bar Timing Controls: You can adjust Slow")
70 Star Power button FXs (ColorTabs, SmartStrums modes) Star Power: As Strum bar - duplicates Strum Bar, letting you produce Accent stroke Slow Strum - triggers Slow Strum Bass I - triggers Bass I of current chord Lower Strings - triggers lower string strum of current chord Slide 1 - triggers automatic 1-step slide up to current chord Slide 2 - triggers automatic 2-step slide up to current chord Bass I + String 1 - triggers Bass I and string 1 simultaneously Star Power on Hold: Off - disabled Harmonics - holding Star Power (BACK) lets you tap Harmonics with Frets Slow Strum - holding Star Power (BACK) lets you play Slow Strum Down/Up with Strum bar Lower Strings - holding Star Power (BACK) lets you play Lower String Strum Down/Up with Strum bar Timing Controls: You can adjust Slow Strum time and Slide time for Strokes assigned on Star Power (BACK) button with the appropriate control: 70

71 Whammy bar FXs Off - disabled Pitch Up 1 - Pitch bend up to semitone Pitch Up 2 - Pitch bend up to 2 semitones Pitch Down 1 - Pitch bend down to semitone Pitch Down 2 - Pitch bend down to 2 semitones Modulation - switches on Modulation CC Harmonics - switches on Harmonics FX playable by Fret taps Slow Strum - switches on Slow Strum FX playable by Strum bar Accent - switches on the Accent stroke playable by Strum bar (set Accent velocity value in Settings panel) Directional pad FXs Harmonics (all modes) - pressing Directional pad to the left or right switches on Harmonics FX playable by Fret taps Sequence Select (ColorTabs, SmartStrums modes) - pressing Directional pad to the right or left navigates through String Sequences list (available only for Strum bar Picking function) Star Power bonus FXs Scrapes on kick (all modes) - allows to trigger Scrapes FX with Star Power (BACK) button when no Frets are pressed Change Position (SmartStrings mode) - lets you play Stroke with Star Power (BACK) button and simultaneously change chord position up or down depending on what Fret is being pressed: o Position Up with 5th Fret (Orange) pressed 71
72 o Position Down with 1st Fret (Green) pressed On the chord change Position returns to initial value. On Hold bonus FXs (SmartStrings mode) Modulation on Hold - lifting/lowering the guitar fretboard while holding down the Strum bar switches on/off Modulation CC for the sustaining note(s). Hammer-On on Hold - allows to tap Hammer-Ons/Pull-Offs with Fret buttons while holding down the Strum bar. 72

73 Joystick Global Mode Settings panel Being in any of Joystick modes click Settings button to open Joystick mode Global Settings panel: Controller: Hand: Joystick Settings panel Click combo box to select active game controller as an input Press L or R button to switch between Left or Right Handed guitar position: R - playing Strum bar with the right hand L - playing Strum bar with the left hand (Strum bar Down/Up strokes reversed) Randomization section: Randomize dynamics - click to switch velocity randomization on/off min/max - set randomization range, minimum and maximum deviation values strength (%) - sensitivity of randomization Velocity section: Velo Curve - select the output velocity curve Increase by - add/reduce output velocity Accent add - set velocity value that will be added to the Stroke/FX produced by Star Power (BACK) button, or switched on with Whammy bar Accent function Tilt section: Tilt sensors implemented in Guitar Hero controller are used in Joystick mode as dynamics control option, adding velocity on lifting the fretboard while reducing velocity on lowering it. Play chords with the Strum bar and calibrate your Tilt control by moving the fretboard up and down and setting guitar position values in the Max, Middle, Min boxes you consider the best for highest, normal, and lowest dynamics thresholds. 73
74 Other Controls: Scrapes on Star Power kick - allows to trigger Scrapes by pressing Star Power (BACK) button when all Frets are released Strumbar Hold - allows to trigger Harmonics/Pinch Harmonics (if assigned) by tapping Fret buttons while holding down the Strum bar Use Slider bar - switches on the Slider bar sensors functioning 74
75 Guitar Strokes and Effects available in Joystick mode Strum Down/Up - Strum bar down/up Muted Strum Down/Up - Strum bar down/up with no Frets pressed Slow Strum Down/Up - Star Power, Strum bar (Star Power on Hold, Whammy bar switch) Lower Strings Strum Down/Up - Star Power, Strum bar (Star Power on Hold switch); Fret 1 + Strum bar (SmartStrums mode) Upper Strings Strum Down/Up - Frets 2, 3, 4, or 5 + Strum bar (SmartStrums mode) Individual String picks - Strum bar Picking function; Frets + Strum bar (SmartStrings mode) Bass I - Strum bar Picking/Bass&Strum functions, Star Power (assignable); Fret 1 + Strum bar (SmartStrings mode) Hammer-On/Pull-Off - tap neighbor Fret legato while holding down the Strum Bar (SmartStrings mode) Automatic Slide Up (chord, string) - Star Power, assignable FX Automatic Bend Up, Unison Bend - Star Power, assignable FX (SmartStrings mode) Manual Bend 1, 2 steps (chord, string) - Whammy bar, assignable Modulation CC (chord, string) - Whammy bar switch, assignable FX; Tilt Modulation on Hold switch, assignable FX (SmartStrings mode) Harmonics/Pinch Harmonics FX - tap Frets while holding Star Power/Directional pad/whammy bar/strum bar, assignable FX Scrapes FX - Star Power (BACK) with no Frets pressed, assignable FX 75
76 Joystick Button Map Note # Note name Button name 127 G 8 1 Fret (Green) 126 F#8 2 Fret (Red) 125 F 8 3 Fret (Yellow) 124 E 8 4 Fret (Blue) 123 D#8 5 Fret (Orange) 122 D 8 Strum Bar Up 121 C#8 Strum Bar Down 120 C 8 Star Power (BACK) button 119 B 7 START button 118 A#7 Directional Pad (left) 117 A7 Directional Pad (right) 116 G#7 1 Slider Bar 115 G 7 2 Slider Bar 114 F#7 3 Slider Bar 113 F 7 4 Slider Bar 112 E 7 5 Slider Bar 76
77 All buttons activity (pressing/holding/releasing) is recorded/read as normal MIDI notes in the upper octave according to the Joystick Button Map. Moving Whammy bar is recorded/read as Pitch Wheel MIDI data. Tilt data (fretboard position change) is automatically applied to velocity value of MIDI notes producing Strokes and FXs (Strum bar, StarPower button, Fret taps, Slider bar). In SmartStrings mode when Star Power on Tilt FXs, and/or Modulation on Hold FX are activated Tilt data used for switching the FX on/off is additionally recorded/read as MIDI CC#93 data. Buttons-to-MIDI mapping gives you the opportunity to easily edit the recorded part in Piano Roll view of your DAW. Sonar users can import RealStrat 3 instrument definition file (RealStrat3.ins) included in the installation folder to see button names in Piano Roll view. For MIDI examples refer to Joystick Demo Songs Tutorial pack. 77

78 MIDI GUITAR Global Mode If you prefer to use normal guitar via MIDI interface instead of MIDI keyboard you can switch to MIDI Guitar Global mode by pressing MIDI Guitar button. MIDI Guitar mode has multi-channel MIDI input: 1-6 MIDI channels for 1-6 guitar strings accordingly, with each string/channel having independent pitch bend control, though Modulation, Aftertouch MIDI controllers, and all other FXs are common for all strings. MIDI Guitar mode allows you to step record the guitar part with a pencil tool in your DAW on individual track/midi channel for each string. Note, that notes in a track going out of the appropriate string range will be played on the nearest string. MIDI Guitar Global mode works as Solo performance mode only. DIRECT Global mode Press Direct button to switch RealStrat to Direct Global mode. Direct mode window This mode turns RealStrat into plain guitar sampler, allowing you to trigger all internal sounds and noises directly with all intellectual features turned off, having previously selected the appropriate MIDI channel for the track. 78
 containing overall settings, which allows to easily export all changed data as a single file and import it when needed.")
79 Importing/Exporting Global Settings You can save all modifications you ve made to Global Preset (external *.rgsong file) containing overall settings, which allows to easily export all changed data as a single file and import it when needed. Click on MusicLab logo to save/load the Global Settings: Note, all current settings are saved within a project doc of your DAW as well. If you want the current settings load every time you run RealStrat, select Save As Default item in the popup menu. To return factory default settings press Reset button in SetUp panel and select Save As Default. 79
80 (Appendix) MusicLab Universal Chord Tab For Joystick (Struminator) mode fans we have developed a Universal Chord Tab letting you perform guitar accompaniments to countless simple songs in ANY key within the single Chord Tab, using just 5 Fret buttons of guitar controller for chord changes. In addition to Strum bar guitar performance techniques implemented in RealGuitar/Strat/LPC 3 the Universal Chord Tab turns Guitar Hero game controller into a new harmonic musical instrument for performing song backgrounds, as well as a powerful song-writing tool for your future masterpieces. Concept Chord Function If you think of chords as a musical family of chords derived from the notes of a key (scale degrees) tied to one another by harmonic function, as opposed to individual sets of notes indicated by Root note and chord type in the name, we recommend that you use Roman numerals instead of their letter names. For example, in the key of C, the chord function for an F chord is IV, similarly, the chord function for a G chord is V, for Dm is ii, for Em is iii, etc. Uppercase Roman numbers are used to indicate major chords and lowercase numbers to indicate minor chords. C major scale diatonic chords C Dm Em F G Am Bm7b5 I ii ii IV V vi vii Numeric system allows to name much more than seven diatonic chords. You can built major chords on minor chord degrees (and vice versa) by changing uppercase/lowercase numerals, indicate various chord types by typing appropriate symbols after the numeral, and even use chromatic degrees as a Root by typing #/b symbol before the numeral: CM7 Cm D E7 Fm F#m7b5 Gm7 A Bb IM7 i II III7 iv #iv7b5 v7 VI bvii, etc. Thinking of chords as chord functions lets you easier read chord progressions, memorize them, transpose to different keys, as well as better understand harmonic structure of the songs (which often appears to be surprisingly common for many quite dissimilar ones!). 80

81 Universal Chord Tab MusicLab Universal Chord Tab covers C major key diatonic chords, as well as a number of other relative and modulation chords that can fit the harmonic structure of majority of popular songs. You can use Universal Chord Tab as is, or consider it as basis for editing/creating your own Universal Tab. Basic Universal Chord Tab Let s start with the Basic Universal Tab including just 12 chords. Connect your guitar controller to computer, run RealStrat 3, turn on Joystick/ColorTabs mode, and load Universal Basic tab by clicking on Tab combo box: Basic Universal Chord Tab On the picture below 12 chords of the Basic Universal Tab are shown under Roman numerals (Functions). Uppercase numerals pertain to major chords, while lowercase Roman numerals to minor chords with Root notes found on diatonic degrees of C major scale. Chord fingerings are displayed with O symbols for 1 through 5 Fret buttons that should be pressed to switch a chord. Middle Fret (#3) corresponds to C chord, which is I chord (Tonic) of C major key. -I- -ii- -II- -iii- -III7- -IV- -iv- (C) (C7) (Dm) (D) (Em) (E7) (F) (Fm) 1 - O - O O - O - O - O 3 O O O O O O O O O O -V- -vi- -VI7- -vii- (G) (Am) (A7) (Bm7b5) 1 O - O O O O O O O O /Numbers 1 through 5 correspond to left through right Fret buttons: 1 > O Green 2 > O Red 3 > O Yellow 4 > O Blue 5 > O Orange/ 81
82 Practicing Chord Progressions In order to use Universal Chord Tab successfully for playing song accompaniments with Guitar Hero controller, you have to memorize chord fingerings (beginning from Universal Basic Tab) and learn to play rhythm pattern with the Strum bar. For playing techniques details refer to Joystick Global mode/colortabs mode/playing Techniques section of the Manual, and video examples included in Joystick Demo Songs pack/colortabs folder (you can download Joystick Demo Songs pack...). For startup we have included a number of common chord progressions. Playing the progressions will help you in sight-reading Joystick Tabs, memorizing chord fingerings, and quickly finding the appropriate Fret button(s) when moving from one chord to another. Read chord changes thinking of their harmonic functions (Roman numerals), but not of their letter names. For example, middle Fret chord (C) is I chord (Tonic), Fret 1 (G) is V chord (Dominant), Fret 5 (F) is IV chord (Subdominant), while Fret 2 (Am) is relative minor chord (vi chord), Fret 4 (Dm) is ii chord (Predominant), and so on... Note also, that unlike literal chord names the relative harmonic functions (and thereafter Roman numerals) apply for any key, so you can transpose the whole Tab to any interval, using Transpose option, and easily play transposed chord sequences thinking of Fret buttons as I-IV-I, ii-v-i, I-V-vi-IV functions, etc. Here on the pictorial diagram you can see the Fret - Chord - Function relationship for 9 chords used in the following chord progressions: (iii)em A 7 (VI 7 ) (vi)am (ii)dm G(V) C(I) F(IV) (vii)bm 7 b5 E 7 (III 7 ) 82
83 Chord Progressions Fingering Tips: Learn to finger a chord a tiny bit ahead of strumming Try using the same finger(s) for common Fret(s) in two sequential chords Major key (C major) (C) (F) (G) (C) (C) (Am) (F) (G) (C) (G) (Am) (F) I - IV V - I I - vi IV - V I V - vi IV O O - O O O - 3 O - - O O O O O O (C) (Em) (F) (G) (C) (Em) (Am) (F) (C) (Dm) (Em) (F) I iii IV - V I iii vi IV I ii iii IV 1 - O - O - O O O O O O O O O O O O O (Em) (F) (G) (C) (Dm) (Em) (Am) (G) (F) (G) (C) (E7) iii IV V - I ii iii vi - V IV V I III7 1 O - O - - O - O - O O O O O O 4 O O O O 5 - O O - - O (C) (E7) (Am) (C7) (F) (Fm) (C) (G) (F) (G) (Am) (D) I III7 vi - I7 IV iv I - V IV V vi - II O O - O O O O - O O O 3 O O - O - - O O O 5 - O - - O O - - O
 (F) (C) (G) (Am) (C) (D) (F) (Am) (F) (C) (E7) vi IV I - V vi I II - IV vi IV I - III7 1 - - - O - - - - - - - - 2 O - - - O - O - O - - O 3 - - O - - O - - - - O O 4 - - - - - - O - - - - O 5 -")
84 Minor key (A minor) Note, that A minor key is a relative key to C major having identical diatonic chords, so in order to prevent confusion we keep using C major scale numerals for A minor key chords. (Am) (F) (C) (G) (Am) (C) (D) (F) (Am) (F) (C) (E7) vi IV I - V vi I II - IV vi IV I - III O O O - O - O - - O O - - O O O O O 5 - O O - O - O (Am) (G) (F) (E7) (Am) (Dm) (G) (C) (Bm7b5)(E7) (Am) (F) vi V IV III7 vi ii V I vii III7 vi IV 1 - O O O - - O O O O O O O O O O - O O O O O O - O (F) (E7) (Am) D (Am) (Em) (F) (G) (Am) (D) (Am) (Em) IV III7 vi II vi iii IV V vi II vi iii O - O O 2 - O O O O O O O O O - O - O O - O 5 O O O Full Universal Chord Tab When you get familiar with Basic Universal Chord Tab, you may need more chords in the Tab. Try the Advanced Universal Tab (24 chords, including 7, m7, maj7, 7sus4 chords): Advanced Universal Chord Tab 84
 with Root notes found on diatonic and some chromatic degrees of C major scale.")
85 Expert users can try our Full Universal Tab (31 chords), which is a real challenge, but gives you much more harmonic freedom: Full Universal Chord Tab On the picture below all 31 chords of Full Universal Tab are grouped under Roman numerals (Functions) with Root notes found on diatonic and some chromatic degrees of C major scale. Note, that m7b5 (half-diminished) chords in the minor groups fit the harmonic function of the group even not having the same Root note. -I- -ii- -II- (C) (CM7) (C6) (C7)(Csus) (Dm) (Dm7) (D) (D7) O O O - O O O 3 O O O O O - O - O O O O O O iii- -III- -IV- -iv- -#iv- (Em)(Em7) (E7sus)(E7) (F) (FM7) (F7) (Fm) (Dm7b5)(F#m7b5) 1 O O O O O O O O O 3 - O - O - - O O O O O - O O - - O O O O O O O O O -V- -v- -vi- -VI- -bvii- -vii- (G) (G7)(G7sus)(Gm7)(Em7b5) (Am)(Am7) (A7) (BbM7)(Bb9)(Bm7b5)(Bm7) 1 O O O O O - O O O O O O O O O - O O O O O O O O O O - - O O O - O 5 - O O O O O O O Basic diatonic chords are marked with red. Fingering Tip: Press Frets 1+2 with index finger for Dm7b5 (iv), F#m7b5 (#iv), Gm7 (v), Bb9 (bvii) chords 85
MusicLab RealRick Version 1 User's Manual
 MusicLab RealRick Version 1 User's Manual Copyright 2000-2014 by MusicLab, Inc. Table of Contents About the program... 6 Installing RealRick... 8 Installing RealRick PC version... 8 Installing RealRick
MusicLab RealLPC Version 1 User's Manual
 MusicLab RealLPC Version 1 User's Manual Copyright 2000-2009 by MusicLab, Inc. Table of Contents About the program... 4 Installing RealLPC... 6 Installing RealLPC PC version... 6 Installing RealLPC Mac
REALGUITAR 5 USER'S MANUAL
 REALGUITAR 5 USER'S MANUAL COPYRIGHT 2000-2017 BY MUSICLAB, INC. TABLE OF CONTENTS ABOUT THE PROGRAM... 5 WHAT S NEW IN REALGUITAR 5... 6 INSTALLING REALGUITAR... 7 Installing RealGuitar PC version...
Ample China Pipa User Manual
 Ample China Pipa User Manual Ample Sound Co.,Ltd @ Beijing 1 Contents 1 INSTALLATION & ACTIVATION... 7 1.1 INSTALLATION ON MAC... 7 1.2 INSTALL SAMPLE LIBRARY ON MAC... 9 1.3 INSTALLATION ON WINDOWS...
Ample Guitar (6 in 1) Manual
 Manual") Ample Guitar (6 in 1) Manual Beijing Ample Sound Technology Co. Ltd 1 Contents 1 INSTALLATION AND ACTIVATION... 7 1.1 INSTALLATION ON MAC... 7 1.2 INSTALLATION ON WINDOWS... 9 1.3 FULL FEATURES TRIAL &
Ample Guitar (6 in 1) Manual Beijing Ample Sound Technology Co. Ltd 1 Contents 1 INSTALLATION AND ACTIVATION... 7 1.1 INSTALLATION ON MAC... 7 1.2 INSTALLATION ON WINDOWS... 9 1.3 FULL FEATURES TRIAL &
Ample Guitar (8 in 1) Manual
 Manual") Beijing Ample Sound Technology Co. Ltd 1 Contents 1 INSTALLATION AND ACTIVATION... 7 1.1 INSTALLATION ON MAC... 7 1.2 INSTALLATION ON WINDOWS... 9 1.3 FULL FEATURES TRIAL & ACTIVATION... 14 2 PARAMETERS
Beijing Ample Sound Technology Co. Ltd 1 Contents 1 INSTALLATION AND ACTIVATION... 7 1.1 INSTALLATION ON MAC... 7 1.2 INSTALLATION ON WINDOWS... 9 1.3 FULL FEATURES TRIAL & ACTIVATION... 14 2 PARAMETERS
RealGuitar 4 New Features
 RealGuitar 4 New Features Copyright 2015 by MusicLab, Inc. Table of Contents Song Global Mode... 3 Working with Patterns... 4 Pattern Library Browser... 4 Style Filter... 4 Pattern Track... 5 Inserting
Ample Bass Manual. Ample Bass Manual. Beijing Ample Sound Technology Co. Ltd
 Ample Bass Manual Beijing Ample Sound Technology Co. Ltd 1 Contents 1 INSTALLATION & ACTIVATION... 5 1.1 INSTALLATION ON MAC... 5 1.2 INSTALLATION ON WINDOWS... 7 1.3 ACTIVATION... 12 2 PARAMETERS SETTING...
TABLE OF CONTENTS 1. MAIN PAGE 2. EDIT PAGE 3. LOOP EDIT ADVANCED PAGE 4. FX PAGE - LAYER FX 5. FX PAGE - GLOBAL FX 6. RHYTHM PAGE 7.
 Owner s Manual OWNER S MANUAL 2 TABLE OF CONTENTS 1. MAIN PAGE 2. EDIT PAGE 3. LOOP EDIT ADVANCED PAGE 4. FX PAGE - LAYER FX 5. FX PAGE - GLOBAL FX 6. RHYTHM PAGE 7. ARPEGGIATOR 8. MACROS 9. PRESETS 10.
encoded and locked Powered-By-Kontakt libraries are loaded through the Libraries window.
 User`s manual Features Features 2.85 Gb ncw compression format 3 348 samples, 24 bit, 44.1 KHz Up to 12 velocity layers, 20 frets on each string with round-robin algorithm FINGERED, SLAP and PALM-MUTE
Main Panel Manual Ample Guitar 12
 Main Panel Manual Ample Guitar 12 Beijing Ample Sound Technology Co. Ltd 1 Contents 1 INSTRUMENT PANEL... 4 1.1 OVERVIEW OF INSTRUMENT PANEL... 4 1.2 SAMPLE LIBRARY... 4 1.3 PRESET... 5 1.4 ALTERNATE TUNER...
SAMPLE LIBRARY FOR KONTAKT
 SAMPLE LIBRARY FOR KONTAKT Congratulations, and thank-you for your support! Indiginus Renegade is an electric guitar sample library with a bit of an attitude. Features like slides, hammer-ons, bends, trills,
Ample Guitar (8 in 1) Manual
 Manual") Ample Guitar (8 in 1) Manual Beijing Ample Sound Technology Co. Ltd 1 Contents 1 INSTALLATION & ACTIVATION... 9 1.1 INSTALLATION ON MAC... 9 1.2 INSTALLATION ON WINDOWS... 12 1.3 ACTIVATION... 18 2 SETTINGS
Ample Guitar (8 in 1) Manual Beijing Ample Sound Technology Co. Ltd 1 Contents 1 INSTALLATION & ACTIVATION... 9 1.1 INSTALLATION ON MAC... 9 1.2 INSTALLATION ON WINDOWS... 12 1.3 ACTIVATION... 18 2 SETTINGS
Solo Mode. Strum Mode
 Indiginus Renegade Acoustic Guitar has been designed to help you create realistic acoustic guitar parts easily, using both key velocity switching as well as momentary key switches to control articulations
Solo Mode. Chords Mode
 Indiginus The Mandolin has been designed to help you create realistic mandolin parts easily, using both key velocity switching as well as momentary key switches to control articulations and chords. The
Main Panel Manual Ample Bass A
 Main Panel Manual Ample Bass A Beijing Ample Sound Technology Co. Ltd 1 Contents 1 INSTRUMENT PANEL... 4 1.1 OVERVIEW OF INSTRUMENT PANEL... 4 1.2 PRESET... 4 1.3 ALTERNATE TUNER... 5 2 MAIN PANEL... 6
Wicked Select User Manual
 Wicked Select User Manual Wicked Select Lyrical Distortion is proud to present Wicked Select, a Gretsch Brian Setzer Nashville electric guitar, recorded direct via Countryman Type 85 Active Direct Box,
REPLIKA SOUND GUITAR LIBRARY : ELECTRIC GUITAR v7 FEATURE GUIDE
 REPLIKA SOUND GUITAR LIBRARY : ELECTRIC GUITAR v7 FEATURE GUIDE 1 TABLE OF CONTENTS Important (Requirements) 3 MIDI Requirements 3 Pack Contents 3 Main Interface 4 Articulation Key Switches 5 Articulation
Riffer Panel Manual. Bass Riffer Manual. Beijing Ample Sound Technology Co. Ltd
 Bass Riffer Manual Beijing Ample Sound Technology Co. Ltd 1 Contents 1 RIFFER... 4 1.1 OVERVIEW OF RIFFER PANEL... 4 1.2 OPERATION... 5 1.2.1 Operation and Key Commands... 5 1.2.2 Right-Click Menu... 5
REPLIKA SOUND GUITAR LIBRARY : BASS GUITAR v7 FEATURE GUIDE
 REPLIKA SOUND GUITAR LIBRARY : BASS GUITAR v7 FEATURE GUIDE 1 TABLE OF CONTENTS Important (Requirements) 3 Library Size 3 Pack Contents 3 Main Interface 4 Articulation Key Switches 5 Articulation Descriptions
Main Panel Manual Ample China Pipa
 Ample China Pipa Beijing Ample Sound Technology Co. Ltd 1 Contents 1 INSTRUMENT PANEL... 4 1.1 OVERVIEW OF INSTRUMENT PANEL... 4 1.2 SAVE/LOAD PRESET... 4 1.3 CAPO LOGIC MODE... 5 1.4 SAMPLE LIBRARY SWITCH...
Riffer Panel Manual. Riffer Panel Manual. Beijing Ample Sound Technology Co. Ltd
 Beijing Ample Sound Technology Co. Ltd 1 Contents 1 RIFFER... 4 1.1 OVERVIEW OF RIFFER PANEL... 4 1.2 OPERATION... 5 1.2.1 Operation and Key Commands... 5 1.2.2 Right-Click Menu... 5 1.2.3 Riff Play Toggle...
Wavelore American Zither Version 2.0 About the Instrument
 Wavelore American Zither Version 2.0 About the Instrument The Wavelore American Zither was sampled across a range of three-and-a-half octaves (A#2-E6, sampled every third semitone) and is programmed with
Presents. Dan Tranh. for NI KONTAKT 4+ Go to Index: 2
 Presents Dan Tranh for NI KONTAKT 4+ 1 Index Index 2 About the Dan Tranh 3 The three different Instrument Types 4 General Stuff 5 About the Presets 6 The Instrument Panel 7 The Main Page 7 The Articulation
Shreddage 3 Stratus FREE Product Manual
 Shreddage 3 Stratus FREE Product Manual An Impact Soundworks Instrument for Kontakt Player 5.7+ Introduction Our goal with this library is to give ALL Kontakt users an excellent, realistic, and FREE virtual
Electric Guitar Foundation Level 1
 Electric Guitar Foundation Level 1 & INSTRUMENT The student should adopt the correct playing position including, how to hold the instrument and place both hands in the correct position. The student should
MUSIC THEORY GLOSSARY
 MUSIC THEORY GLOSSARY Accelerando Is a term used for gradually accelerating or getting faster as you play a piece of music. Allegro Is a term used to describe a tempo that is at a lively speed. Andante
What s New. Updated Feature List February 21, Your Rock Guitar Model Revision 1.3
 What s New Updated Feature List February 21, 2011 Your Rock Guitar Model 1000 - Revision 1.3 Table of Contents Rock Band 3 Pro Mode Playing Alongside RB3 Pro Mode Fret Select Checking Firmware/Librarian/Preset
ChordPolyPad Midi Chords Player iphone, ipad Laurent Colson
 ChordPolyPad 1 ChordPolyPad Midi Chords Player iphone, ipad Laurent Colson 1. ipad overview... 2 2. iphone overview... 3 3. Preset manager... 4 4. Save preset... 5 5. Midi... 6 6. Midi setup... 7 7. Pads...
GD-6 Acoustic Guitar User Guide
 GD-6 Acoustic Guitar User Guide 1 / 13 Welcome to Acousticsamples Thank you for using the GD-6 Acoustic Guitar library. We hope you enjoy playing the instrument and wish it supports your musical ideas
PG-8X 2.0. Users Manual
 PG-8X 2.0 Users Manual by MLVST (Martin Lueders) 2016 Introduction The PG- 8X is a virtual synthesizer, inspired by the Roland JX-8P with the PG-800 programmer. The synth architecture is a standard 2-
KIRNU - CREAM MOBILE Kirnu Interactive
 KIRNU - CREAM MOBILE Kirnu Interactive www.kirnuarp.com 1 Top elements Song selection MIDI in/out channel Status Messages Loading/Saving track presets Panic button MIDI learn Global section Track section
Helm Manual. v Developed by: Matt Tytel
 Helm Manual v0.9.0 Developed by: Matt Tytel Table of Contents General Usage... 5 Default Values... 5 Midi Learn... 5 Turn a Module On and Of... 5 Audio Modules... 6 OSCILLATORS... 7 1. Waveform selector...
Lyrical DIrect User manual;
 Lyrical DIrect User manual; Description Lyrical Distortion is proud to present Lyrical Direct, a 1994 PRS Custom 22 electric guitar, recorded direct via Countryman Type 85 Active Direct Box, Great River
VK-1 Viking Synthesizer
 VK-1 Viking Synthesizer 1.0.2 User Manual 2 Overview VK-1 is an emulation of a famous monophonic analog synthesizer. It has three continuously variable wave oscillators, two ladder filters with a Dual
Bass Slapper. User Guide
 Bass Slapper User Guide Waves Bass Slapper User Guide Contents Welcome... 3 Introduction... 3 Acknowledgment... 3 What is Slap Bass?... 4 The Sample Library... 4 Components... 5 Functional Block/Flow Diagram...
Owner s Manual. Page 1 of 23
 Page 1 of 23 Installation Instructions Table of Contents 1. Getting Started! Installation via Connect! Activation with Native Instruments Service Center 2. Pulse Engines Page! Pulse Engine Layers! Pulse
Quick Start. Overview Blamsoft, Inc. All rights reserved.
 1.0.1 User Manual 2 Quick Start Viking Synth is an Audio Unit Extension Instrument that works as a plug-in inside host apps. To start using Viking Synth, open up your favorite host that supports Audio
UKU User Guide 1 / 14
 UKU User Guide 1 / 14 Welcome to Acousticsamples Thank you for using the UKU library. We hope you enjoy playing the instrument and wish it supports your musical ideas or even better: inspire new ones.
If you have just purchased Solid State Symphony, thank-you very much!
 If you have just purchased Solid State Symphony, thank-you very much! Before you do anything else- Please BACK UP YOUR DOWNLOAD! Preferably on DVD, but please make sure that it s someplace that can t be
Shreddage 3 Stratus Product Manual
 Shreddage 3 Stratus Product Manual An Impact Soundworks Instrument for Kontakt Player 5.7 Introduction Shreddage 3 Stratus is the first chapter in a new universe of Impact Soundworks guitar and bass instruments.
Fingerpick Manual. Main Page
 Fingerpick Manual Congratulations on your purchase of Realitone s Fingerpick! Ready to get started? It s easy enough, just play the notes on the blue keys, or play codes on the upper octave green keys.
MIDI realtime parameters and effects
 19 MIDI realtime parameters and effects Introduction For each MIDI track, you can set up a number of track parameters and MIDI effects. These affect how the MIDI data is played back, transforming MIDI
- Updated for OSR 2.0
 - Updated for OSR 2.0 Cutting (v. 2.0) Jan Lepold OSR - MANUAL: 3 MANUAL UPDATE 2.0: RUNS BUILDER 2.0 article Please read the article on page 11 to understand how the newer RUNS BUILDER 2.0 is working
2017 Yonac Inc. Owner s Manual
 2017 Yonac Inc. Owner s Manual Congratulations and Thank You for choosing KASPAR Supersynthesizer. As one of the pioneers of ios music, Yonac are proud to introduce our latest generation synthesis and
ETHERA EVI MANUAL VERSION 1.0
 ETHERA EVI MANUAL VERSION 1.0 INTRODUCTION Thank you for purchasing our Zero-G ETHERA EVI Electro Virtual Instrument. ETHERA EVI has been created to fit the needs of the modern composer and sound designer.
StringWERK. e-instruments lab GmbH Bremer Straße Hamburg Germany
 e-instruments lab GmbH Bremer Straße 18 21073 Hamburg Germany www.e-instruments.com All information in this document is subject to change without notice and does not represent a commitment onthe part of
BLOQ FOR KONTAKT 5 - USER MANUAL 1.0 by Sharooz Raoofi
 BLOQ FOR KONTAKT 5 - USER MANUAL 1.0 by Sharooz Raoofi IMPORTANT: Bloq does not include Kontakt 5. You will need to own or purchase the full software from Native Instruments. http://www.native-instruments.com/en/products/komplete/samplers/kontakt-5/
R E F E R E N C E M A N U A L ETHERA VERSION 2.0
 REFERENCE MANUAL ETHERA VERSION 2.0 INTRODUCTION Thank you for purchasing our Zero-G ETHERA - Cinematic Vocal Instrument. ETHERA is created to fit the needs of the modern composer and sound designer. ETHERA
Falcon Singles - Oud for Falcon
 Falcon Singles - Oud for Falcon 2016 Simon Stockhausen Installation As there is no default location for 3rd party sound libraries for Falcon, you can just install the folder Oud which you extracted from
Chord Track Explained
 Studio One 4.0 Chord Track Explained Unofficial Guide to Using the Chord Track Jeff Pettit 5/24/2018 Version 1.0 Unofficial Guide to Using the Chord Track Table of Contents Introducing Studio One Chord
Kameleono. User Guide Ver 1.2.3
 Kameleono Ver 1.2.3 Table of Contents Overview... 4 MIDI Processing Chart...5 Kameleono Inputs...5 Kameleono Core... 5 Kameleono Output...5 Getting Started...6 Installing... 6 Manual installation on Windows...6
Presents. fiddle! for NI Kontakt 5.5+ Go to Index: 2
 Presents fiddle! for NI Kontakt 5.5+ 1 Index Index 2 About the fiddle! 3 Features 5 General Stuff 6 About the Presets 8 About the Default 9 About the Key Switches 9 The Instrument Panel 10 The Front Page
CLA VINET USER GUIDE
 USER GUIDE TABLE OF CONTENTS CHAPTER 1 INTRODUCTION...3 1.1 PRODUCT OVERVIEW... 4 1.2 CONCEPTS AND TERMINOLOGY... 4 1.3 COMPONENTS... 5 1.4 FUNCTIONAL BLOCK/FLOW DIAGRAM... 6 1.5 STARTING CLAVINET... 6
Version A u t o T h e o r y
 Version 4.0 1 A u t o T h e o r y Table of Contents Connecting your Keyboard and DAW... 3 Global Parameters... 4 Key / Scale... 4 Mapping... 4 Chord Generator... 5 Outputs & Keyboard Layout... 5 MIDI Effects
Inspiring Guitars VERSION 1.0
 Inspiring Guitars VERSION 1.0 USER MANUAL 1. INTRODUCTION: Thank you for purchasing the Zero-G Inspiring Guitars library. The library consists of eight patches covering a wide range of music styles and
ILYA EFIMOV CONTRABASS balalaika User`s Manual
 ILYA EFIMOV CONTRABASS balalaika User`s Manual Installation Installation 1. Please go to the download links you received after purchase and download all of the files. 2. Make sure you put all downloaded
WELCOME TO SHIMMER SHAKE STRIKE 2 SETUP TIPS 2 SNAPSHOTS 3
 WELCOME TO SHIMMER SHAKE STRIKE 2 SETUP TIPS 2 SNAPSHOTS 3 INSTRUMENT FEATURES 4 OVERVIEW 4 MAIN PANEL 4 SYNCHRONIZATION 5 SYNC: ON/OFF 5 TRIGGER: HOST/KEYS 5 PLAY BUTTON 6 HALF SPEED 6 PLAYBACK CONTROLS
USER MANUAL. Thank you for purchasing Kalimba Shakti De, a virtual instrument by SoundCues for Native Instruments Kontakt 4.24+!
 USER MANUAL Thank you for purchasing Kalimba Shakti De, a virtual instrument by SoundCues for Native Instruments Kontakt 4.24+! Download & Installation Upon your purchase of Kalimba Shakti De, you will
Manual. Powered by RPCX
 Powered by RPCX Manual WELCOME In the Rob Papen world of synthesis there was one type of synthesizer missing A synthesizer that presents all its controls and features in a single window. The current Rob
CONTENTS JamUp User Manual
 JamUp User Manual CONTENTS JamUp User Manual Introduction 3 Quick Start 3 Headphone Practice Recording Live Tips General Setups 4 Amp and Effect 5 Overview Signal Path Control Panel Signal Path Order Select
REPLIKA SOUND GUITAR LIBRARY : BASS GUITAR v7 USER MANUAL
 REPLIKA SOUND GUITAR LIBRARY : BASS GUITAR v7 USER MANUAL 1 TABLE OF CONTENTS Introduction 3 Important (Requirements) 4 MIDI Requirements 4 Pack Contents 4 Installation 5 Main Interface 6 Articulation
Acoustic Guitar Collection Userʼs Guide StrumMaker III update 10/20/ Indiginus. with StrumMaker III. by Indiginus for Kontakt 3
 Acoustic Guitar Collection Userʼs Guide StrumMaker III update 10/20/10 2010 Indiginus with StrumMaker III by Indiginus for Kontakt 3 Installation Just drag the AGC folder to your sample drive (or wherever
Help Manual - ipad. Table of Contents. 1. Quick Start Controls Overlay. 2. Social Media. 3. Guitar Tunes Library
 Table of Contents Help Manual - ipad 1. Quick Start Controls Overlay 2. Social Media 3. Guitar Tunes Library 4. Purchasing and Downloading Content to Play 5. Settings Window 6. Player Controls 7. Tempo
COMPLETE GUITAR COURSE
 COMPLETE GUITAR COURSE Stage One Week 1 Complete Chapter List- Program length: 28:17 00:00 Course overview and how to get started 01:50 The journey begins guitar tablature 02:37 How to read tab.pdf 02:46
Power User Guide MO6 / MO8: Recording Performances to the Sequencer
 Power User Guide MO6 / MO8: Recording Performances to the Sequencer The Performance mode offers you the ability to combine up to 4 Voices mapped to the keyboard at one time. Significantly you can play
Presents Dan Bau. for NI Kontakt 5.5+ Go to Index: 2
 Presents Dan Bau for NI Kontakt 5.5+ 1 Index Index 2 About the Dan Bau 3 Features 5 General Stuff 6 About the Presets 7 The Instrument Panel 8 The Main Page 8 The Pitch Bend Page 10 The Vibrato Page 11
COMPLETE GUITAR COURSE
 COMPLETE GUITAR COURSE Level 1 Week 1 00:00 Course overview and how to get started 01:50 The journey begins guitar tablature 02:37 How to read tab.pdf 02:46 Frets explained 03:23 How to play an A-minor
WK-7500 WK-6500 CTK-7000 CTK-6000 BS A
 WK-7500 WK-6500 CTK-7000 CTK-6000 Windows and Windows Vista are registered trademarks of Microsoft Corporation in the United States and other countries. Mac OS is a registered trademark of Apple Inc. in
JUNO-106. PLUG-OUT Software Synthesizer Owner s Manual 01A. Copyright 2017 ROLAND CORPORATION
 JUNO-106 PLUG-OUT Software Synthesizer Owner s Manual Copyright 2017 ROLAND CORPORATION 01A Introduction When using the JUNO-106 for the first time, you must specify the MIDI Input/Output setting in the
Choosing your own song for Vocals Initial Grade 8
 Choosing your own song for Vocals Initial 8 All techniques are cumulative but it is not expected that songs will contain everything in the list; this is intended to be a general guide to the type of techniques
Project Two - Building a complete song
 Project Two - Building a complete song Objective - Our first project involved building an eight bar piece of music and arranging it for three backing instruments. In this second project we will consider
Main Screen Description
 Dear User: Thank you for purchasing the istrobosoft tuning app for your mobile device. We hope you enjoy this software and its feature-set as we are constantly expanding its capability and stability. With
SP 5600 portable grand keyboard
 SP 5600 portable grand keyboard user manual Musikhaus Thomann Thomann GmbH Hans-Thomann-Straße 1 96138 Burgebrach Germany Telephone: +49 (0) 9546 9223-0 E-mail: info@thomann.de Internet: www.thomann.de
Square I User Manual
 Square I User Manual Copyright 2001 rgcaudio Software. All rights reserved. VST is a trademark of Steinberg Soft- und Hardware GmbH Manual original location: http://web.archive.org/web/20050210093127/www.rgcaudio.com/manuals/s1/
Mono/Fury. VST Software Synthesizer. Version by Björn Full Bucket Music
 Mono/Fury VST Software Synthesizer Version 1.0 2010-2012 by Björn Arlt @ Full Bucket Music http://www.fullbucket.de/music VST is a trademark of Steinberg Media Technologies GmbH Mono/Poly is a registered
SurferEQ 2. User Manual. SurferEQ v Sound Radix, All Rights Reserved
 1 SurferEQ 2 User Manual 2 RADICALLY MUSICAL, CREATIVE TIMBRE SHAPER SurferEQ is a ground-breaking pitch-tracking equalizer plug-in that tracks a monophonic instrument or vocal and moves the selected bands
Front Porch Banjo 2. ~ part of the ~ A Kontakt 5+ Sample Library. USER MANUAL APRIL 2013 v1.0
 Front Porch Banjo 2 ~ part of the ~ A Kontakt 5+ Sample Library USER MANUAL APRIL 2013 v1.0 1 Table of Contents Overview of Front Porch Banjo 2 3 At a Glance The Keyboard Maps 5 The Main Instrument 7 Slides
INSANITY SAMPLES. Presents
 INSANITY SAMPLES Presents A 3 oscillator super synth modelled on a mixture of analogue beasts. Designed to tap into both the classic analogue sound, whilst stepping out into the modern age with a multitude
Getting Started. Loading
 User Guide Getting Started Thank you for purchasing K-Sounds Classical Nylon Guitar for the Kronos! We believe you will love the realism and expressiveness of this sound set. Classical Nylon Guitar features
Congratulations on purchasing Molten MIDI 5 by Molten Voltage
 OWNER S MANUAL Congratulations on purchasing Molten MIDI 5 by Molten Voltage Molten MIDI 5 is designed to control the Digitech Whammy 5. When configured for Whammy & Clock output, Molten MIDI 5 also sends
Presents. fiddle! - V2. for NI Kontakt 5.5+ Go to Index: 2
 Presents fiddle! - V2 for NI Kontakt 5.5+ 1 Index Index 2 About the fiddle! - V2 3 The Ornaments 5 Features 7 General Stuff 8 About the Presets 10 About the Default 11 About the Key Switches 11 The Instrument
G-Stomper VA-Beast Synthesizer V VA-Beast Synthesizer... 3
 G-Stomper Studio G-Stomper Rhythm G-Stomper VA-Beast User Manual App Version: 5.7 Date: 14/03/2018 Author: planet-h.com Official Website: https://www.planet-h.com/ Contents 8 VA-Beast Synthesizer... 3
SOLID STATE SYMPHONY
 SOLID STATE SYMPHONY Congratulations, and thank-you for your support! Solid State Symphony is a kind of orchestra simulator that was created, for the most part, by using analogue synthesizers. In this
Copyright LinPlug Virtual Instruments GmbH, 2002 All rights reserved. User Guide
 Copyright LinPlug Virtual Instruments GmbH, 2002 All rights reserved User Guide daorgan 2.0 VSTi Drawbar Organ Copyright LinPlug Virtual Instruments GmbH, 2002 All rights reserved Instrument by Sounds
Presents Bluegrass Banjo V3. for NI Kontakt 4+ Go to Index: 2
 Presents Bluegrass Banjo V3 for NI Kontakt 4+ Go to Inde: 2 1 Inde Inde 2 About the Banjo 3 Features 4 General Stuff 5 About the Presets 6 The Instrument Panel 7 The Articulation Page About the String
Getting Started. After unzipping the product download file, you will find two banks, each in its own folder. Bank contents are as follows:
 User Guide Getting Started Thank you for purchasing K-Sounds Classical Nylon Guitar for the M3! We believe you will love the realism and expressiveness of this sound set. Classical Nylon Guitar features
Blues Guitar E E E E E A E E E A E E A A E E A A E E A A E E B A E B B A E B B B E E
 Blues music uses a 3 Chord Progression - I IV V Chord numbering example in the key of C: C = I, D = II, E = III, F = IV, G = V, A = VI, B = VII Examples of different scales A D E B E F C F G D G A E A
AUDIOMODERN ABUSER BASIC MANUAL
 BASIC MANUAL THANK YOU FOR BUYING the ABUSER. Please feel free to contact us at audiomodern@mail.com HOW TO INSTALL To install, unzip and drag the instrument-folder to any hard drive. Launch Kontakt and
Matthias Klag, Michael Ruf Cristina Bachmann, Heiko Bischoff, Christina Kaboth, Insa Mingers, Matthias Obrecht, Sabine Pfeifer, Benjamin Schütte,
 Matthias Klag, Michael Ruf Cristina Bachmann, Heiko Bischoff, Christina Kaboth, Insa Mingers, Matthias Obrecht, Sabine Pfeifer, Benjamin Schütte, Marita Sladek This PDF provides improved access for vision-impaired
An Impact Soundworks Sample Library
 An Impact Soundworks Sample Library Designed and Produced by Andrew Aversa Performed by Juan Medrano Artwork by Constructive Stumblings Instrument v3.21 Shreddage Engine 3.21 OVERVIEW Welcome to Shreddage
RED31. VSTI Plug-in. Manual
 RED31 VSTI Plug-in Manual rfmusic.net Rahman Fotouhi Sarab, Iran website: rfmusic.net email: info@rfmusic.net Version 1.0.0 released in March 2016 Copyright 2016 by rfmusic.net The information in this
Sugar Bytes THESYS User Manual
 Sugar Bytes THESYS User Manual 1 About this Manual...6 What is Thesys?...6 Getting Started...6 Setting up Thesys...7 Getting Some Sound...7 Loading Presets...8 Routing to Another Instrument...8 Midi File
REALIVOX LADIES MANUAL THE MAIN PAGE
 REALIVOX LADIES MANUAL Congratulations on your purchase of Realivox Ladies! There are five different singers you can use by themselves, or in combination with each other. We ve tried to make this instrument
SYSTEM-100 PLUG-OUT Software Synthesizer Owner s Manual
 SYSTEM-100 PLUG-OUT Software Synthesizer Owner s Manual Copyright 2015 ROLAND CORPORATION All rights reserved. No part of this publication may be reproduced in any form without the written permission of
SP 5600 portable grand keyboard
 SP 5600 portable grand keyboard user manual Musikhaus Thomann Thomann GmbH Hans-Thomann-Straße 1 96138 Burgebrach Germany Telephone: +49 (0) 9546 9223-0 E-mail: info@thomann.de Internet: www.thomann.de
Matthias Klag, Michael Ruf Cristina Bachmann, Heiko Bischoff, Christina Kaboth, Insa Mingers, Matthias Obrecht, Sabine Pfeifer, Benjamin Schütte,
 Operation Manual Matthias Klag, Michael Ruf Cristina Bachmann, Heiko Bischoff, Christina Kaboth, Insa Mingers, Matthias Obrecht, Sabine Pfeifer, Benjamin Schütte, Marita Sladek This PDF provides improved
An Impact Soundworks Sample Library
 OVERVIEW An Impact Soundworks Sample Library Designed and Produced by Andrew Aversa Performed by Jules Conroy (FamilyJules7x) Instrument v1.14 Shreddage Engine 3.20 Shreddage 2 SRP adds a brand-new 7-string
Produced For BestService, Munich
 Credits: Recording, Editing, Programming, Design: Chris Hein Additional Editing: Ricarda Hein (Mrs. Melodyne) Script- and Interface-Programming : Klaus Baetz Main Beta-Tester: Przemyslaw Kopczyk, Wolfgang
the qyooo Polyphonic Synthesizer Version by Björn Full Bucket Music https://www.fullbucket.de/music
 the qyooo Polyphonic Synthesizer Version 1.1 2016-2018 by Björn Arlt @ Full Bucket Music https://www.fullbucket.de/music Additional Presets by Krezie Sounds http://www.kreziesounds.com/ VST is a trademark