SWITCHER / LOOPER PEDAL BOARD
|
|
|
- Erin Hardy
- 5 years ago
- Views:
Transcription
1 SWITCHER / LOOPER PEDAL BOARD Features: - Easy Setup - Clean cable routing - Rugged Lightweight Aluminum Design - Accel Power Source 8 Power Supply Mounting Holes - Universal Power Supply Mounting Bracket for other manufacturer s Power Supplies (Sold Separately) - Universal Power Supply Mounting with 3M Dual Lock. - Links to other Modular XTA series Accel Pedal Boards. - Dimensions: (56cm) L x (37cm) W x 2.90 (7.37cm) H - Instant recall (no latency). - True bypass design. - 8 loops in total, 7 series loops and 1 separate loop. - 2 dedicated foot switches (latch type). - Individual Tuner/Mute switch. - Master bypass access. - Store up to 80 presets, 4 presets per banks, 20 banks. - Programmable Live/Rehearsal mode: (Active Bank Setup Mode ABS ). - Factory Reset. - Intuitive operation. USER S MANUAL Read this manual before using your FX22 Command Center Pedal Board in order to ensure proper and safe operation.
2 Contents Introduction, Pedal Board Setup (Power Supply Mounting, Hookand Loop & 3M Dual lock Mounting, Cable Routing) Switcher Looper Set up:... 5 Switcher Looper Functionality Overview,... 5 (1) BANK DN... 6 (2) BANK UP... 6 (3) A B C D... 6 (4) TUNER / Mute... 6 (5) NUMERICAL (LCD) DISPLAY... 6 (6) Master Bypass Access... 6 (7) LOOP on/off indicator... 6 (8) FS1/FS2 (Footswitch indicators)... 6 (9) INPUT... 6 (10) TUNER... 6 (11) (S1,R1), (S2,R2) (S7,R7)... 7 (12) OUTPUT... 7 (13) DC Jack... 7 (14) LOOP (15) FOOTSWITCH Jacks... 7 Primary Functions:... 8 Secondary Functions:... 9 Restoring Factory Presets:, Specifications, Signal Flow Chart Operational Flow Chart Typical Setup Configuration Diagrams ,13 Glossary Warranty Read all Warnings and Cautions before operating your FX22 Command Center 1. Keep these instructions The safety and operating instructions should be retained for future reference. 2. All warnings, cautions and instructions should be adhered too for safe operation of your FX22 Command Center. 3. Follow all operating and use instructions for safe operation of this unit. 4. WARNING!!! To reduce the risk of fire or electric shock, do not expose this device to rain or moisture. The unit should not be exposed to liquids of any kind. Any objects or containers filled with liquids, such as drinks or beverages shall not be placed on top of the unit. 5. Clean only with a dry cloth. 6. Protect the power cord from being walked on or pinched. Especially near the plugs, convenience receptacles, and at the point where they exit from the unit. 7. Follow all instructions and recommendations regarding attachments/ accessories specified by the manufacturer. 8. Only use this unit as prescribed and specified by the manufacturer to power effects pedals. 9. Caution: Unplug the unit during lightning storms or when unused for long periods of time. 10. Refer all servicing to qualified personnel. Service is required when this device has been damaged in any way such as; if any liquid or foreign objects have gotten inside the unit; if it has been exposed to rain or moisture; has been dropped; or does not otherwise operate normally. 2

3 Introduction The Accel FX22 Command Center Switcher combines two great products together for a clean and easy to setup pedal board. This pedal board is primarily designed to switch multiple guitar effects pedals at the same time along with some amp switching functions using a single footswitch. Different combinations of effects pedals and different switchable amp settings can be stored on different patches allowing the player to easily change between multiple effects loops and switchable amp settings with the ease of a single footswitch. When using your Accel programmable switcher pedal board it is important to understand which mode you are currently in. There are two primary modes, Program Mode and Recall Mode. Remembering this is foundational and will keep you from attempting to program a function when in recall mode or attempting to recall a loop when in program mode. At the end of the manual, there is a Glossary to help clear up any terms the user may not understand. Once the switcher is hooked up properly, the user should be able to go through this manual in about a half an hour or so and understand all the switchers functions. Be sure to keep the manual for reference, especially as a reminder for the lesser used functions. An instructional video is also available online at accelaudio.com that mirrors this manual teaching all the functions in an abbreviated form. Step 1: Mount your power supply. FX22 Command Center Pedal Board Setup There are 3 power supply mounting methods that are available depending on your power supply of choice and your preferred mounting method. (Route AC input cables through any one of the four 1 ¼ strain reliefs) Accel FX Power Source 8 and FX power Source 10M screw mount options. Universal Power Supply mounting method A. (3M Dual Lock using parallel strips) When two pieces of Dual Lock fasteners are pressed together, the mushroom heads interlock with one another, with an audible snap. When you have parallel strips of your 3M dual lock mounted to one end of your power supply surface and the other strips to your pedal board, do not try to pull your power supply straight off! It will be very difficult. Pull your power supply off at an angle or use a pry bar. 3
 Step 2: Attach adhesive backed Hook and Loop and 3M Dual Lock Strips: (If you mounted your power supply using hardware, be sure you")
4 Universal Power Supply mounting method B. (Universal mounting bracket and 6-32 hardware sold separately) Step 2: Attach adhesive backed Hook and Loop and 3M Dual Lock Strips: (If you mounted your power supply using hardware, be sure you leave open area around the screw heads in case you need to remove your power supply in the future!) We recommend alternating your strips of hook and loop and 3M Dual lock strips as shown in fig. 1 below. If you are thinking about using two strips of 3M dual lock for one row of pedals, we recommend you test this idea by mounting your power supply under your pedal board with two strips of 3M dual lock. If you choose to go with all 3M dual lock, you will need to purchase extra 3M dual lock separately. For some people it will take a small pry type tool to remove a pedal in the center of your board. While this is definitely a more secure mounting, when it comes to repositioning or swapping out pedals it is not very practical. Using a combination of Hook and Loop and 3M Dual lock provides far superior pedal mounting than the standard 2 strip hook and loop method used in the past on most pedal boards, while providing a practical way to reposition or swap out your pedals. Caution: If you are using an Accel power supply or plan on purchasing a FX Pedal Board Universal Power Supply mounting bracket. Make sure you cut out around the holes you plan to use for power supply mounting. 3M Dual Lock Mounting Instructions: (Read before using this product!) Mounting Instructions: Note: When using 3M Dual Lock Reclosable Fasteners. To obtain optimum bond to any surface, apply above 68 F (20 C). All surfaces must be clean, dry, and free of oil, grease, dust etc. Remove protective liner and press firmly onto the substrate for full surface contact. Adhesive bond strength increases with time, as the adhesive flows into the structure of the substrate. Handling strength is achieved immediately. At room temperature, approximately 50% of ultimate bond strength is achieved in the first 20 minutes, 90% after about 24 hours and 100% after about 72 hours. Since the grip strength of 3M dual lock is much stronger than a standard hook and loop product (Velcro) the bonding strength of the adhesive is required to be much stronger. So be sure of the location where you want to mount it. It will be very difficult to remove once full strength is achieved. Caution: When applying hook and loop and 3M strips to your pedal, make sure you are applying them in the correct position so you will be mating the hook and loop strip on your pedal to the hook and loop strip on the pedal board and likewise the 3M Dual lock on your pedal to the hook and loop strip on your pedal board (hook and loop won t mate to 3M dual lock and vise-versa. 4
 Connect the effects pedals to the Accel programmable switch as shown under one of the Typical Configuration Drawings in this user s manual, (pages 12 and 13).")
5 Step 3: Cable Path feed through examples directly down to Switcher Looper. Switcher Looper Set up: 1) Connect the effects pedals to the Accel programmable switch as shown under one of the Typical Configuration Drawings in this user s manual, (pages 12 and 13). Make sure to use a 9V input at least 350mA. 2) Reference the Over View section (pages 5 7) for component and feature identification. 3) Power up switcher. For this unit to function properly use only a 9V power supply between mA. (Warning: Use only a 9V power supply. Do not use more than a 9V power supply, this will over heat the switcher and will not be covered under warranty) Switcher Looper Overview 5
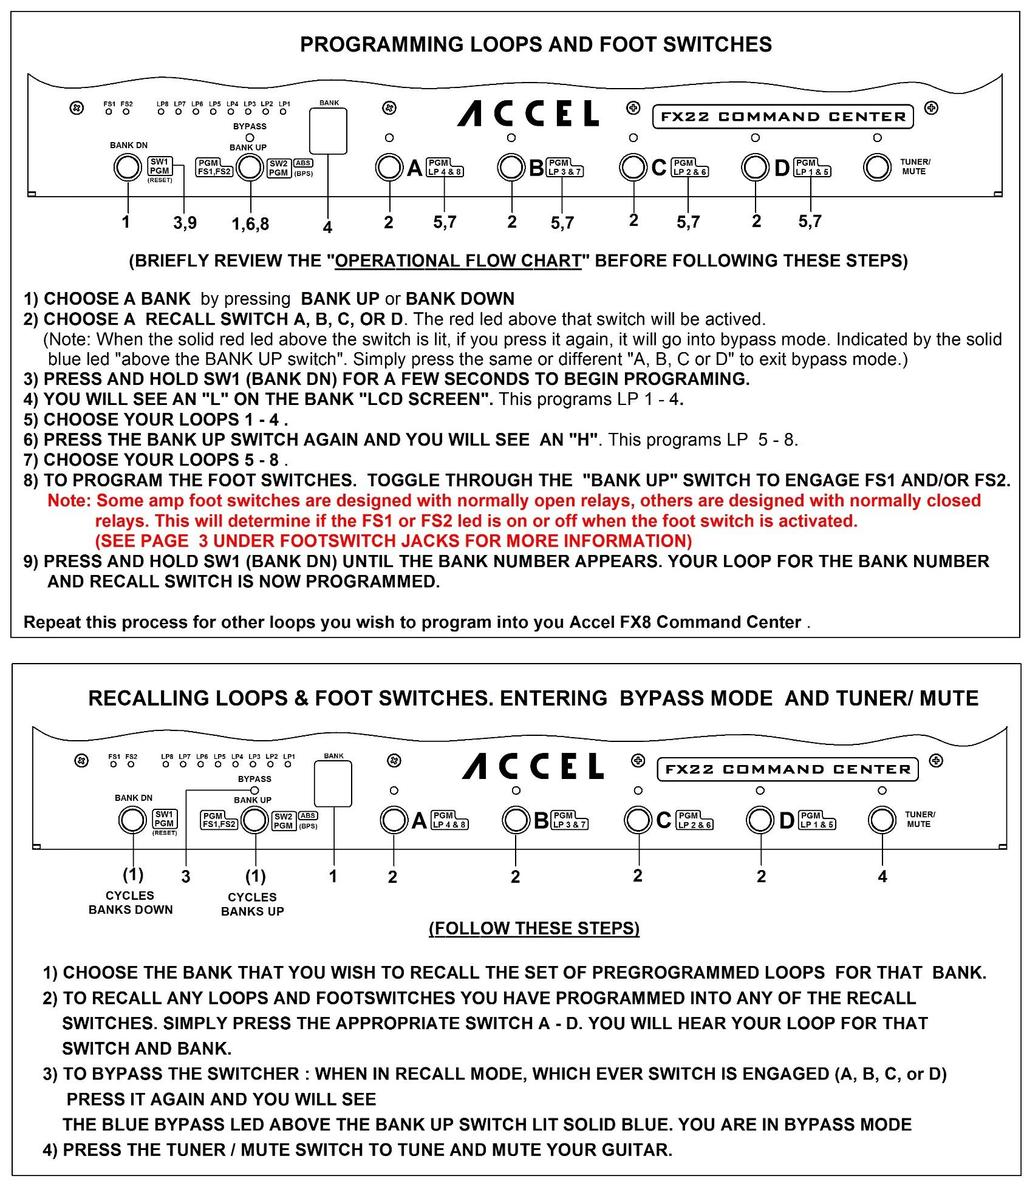
6 (1) BANK DN BANK DOWN switch 1(SW1); In Recall Mode, press this switch to decrease the bank number. In Program Mode, hit this switch to shift the programming between loop1~4 ( L in LCD Display ) and loop5~8 ( H in LCD Display). To toggle between Recall Mode and Program Mode hold this switch down for a couple seconds. Check for more details in the Programming Loops and Foot switches section (page 4). (2) BANK UP BANK UP switch (SW2); In Recall Mode, press this switch to increase the bank number. In Program Mode, press this switch to program the amp footswitches (FS1/FS2). Holding down this switch will toggle between Recall Mode and Active Bank Setup Mode (ABS), for more complete of the active bank setup mode (page 5). (3) A B C D In Recall Mode: Preset switches A B C or D recall previously programmed loops for those switches. (Pressing the same preset switch again will Bypass the switcher, as indicated by the blue led above the bank up switch). In Program Mode, A engages loop4 or loop8, B for loop3 or loop7, C for loop2 or loop6, D for loop1 or loop5. (4) TUNER / Mute When this switch is engaged, the OUTPUT jack will be muted and the TUNER jack connects to INPUT jack. (5) NUMERICAL (LCD) DISPLAY In Recall Mode: The numerical display indicates the active BANK. In Program Mode: L indicates loop1~4 are ready to be programmed, H indicates loop5~8 are ready to be programmed. In Active Bank Setup (ABS) Mode: A blinking Blue LED above Bank Up indicates the ABS program mode has been activate. (See the ABS Section on page 5 for programming the ABS Function). (6) Master Bypass Access To bypass the effects looped into the switcher, simply press any active recall switch A, B, C, D (the active switch will be indicated by a solid red LED above the switch). When this switch is pressed again, that switches LED will turn off. A blue LED above the BANK UP switch will turn solid blue. This will indicate that the switcher is in Bypass Mode. Select any switch A-D to exit bypass mode and enter back into recall mode. (You cannot program the switcher in bypass mode). 6
7 (7) LOOP on/off indicator The indicator is on when a loop is engaged. (8) FS1/FS2 (Footswitch indicators) The indicator is on when FS1/FS2 is open, off when FS1/FS2 is latched. (9) INPUT Connects to Guitar. A plug (adapter) is shipped installed in this INPUT location, since there is now a guitar input on the side of the FX22. The plug allows for the Guitar input on the side of the FX22 to make a proper connection to the guitar in (INPUT) circuit. The plug can be removed if the user wishes to plug into the guitar in (INPUT) under the FX22. (10) TUNER Connects to tuner. (11) SEND & RETURN 1-7 Loop pairs, connects SEND (S*) to guitar pedal input, RETURN(R*) to guitar pedal output. (12) OUTPUT OUTPUT jack of the switcher, the input signal reaches this jack via loop1~7. (13) DC Jack 5.5 x 2.1 mm type, use negative center DC 9V / mA power supply (this unit will not function properly under 350mA s). (14) LOOP8 Loop8 is a separate loop, FX LOOP IN8 is the input of this loop, SEND8 sends the signal and RTN8 returns it, FX LOOP OUT8 is the output of loop8. SEND8 also functions as latching N.C (Normally Closed) switch which works as footswitch to control amplifier channel while FX LOOP OUT8 also functions as latching N.O (Normally Open) footswitch. This is nice to have when you are using your amp to achieve your overdriven or distortion tones instead of a pedal, since most modulation and time based effects in general sound more natural when applied to the signal after it has been overdriven. However if you are using pedals for your overdrive you can simply place your time based and modulation effects after your overdrive pedal. In which case you can use Loop 8 in front of the amp as shown in Configuration 1 on page 12 (15) FOOTSWITCH Jacks There are two footswitch jacks FS1 and FS2 which can switch the amplifier channel, The TIP and RING of FS1/ FS2 are normally closed (indicators are off), the indicators will be on when FS1/FS2 is open. FS1 is a stereo (TRS) jack, the ring of FS1 jack connects to the TIP of FS2, FS1 allows a stereo cable connection between the FX8 Command center and amplifiers which has a stereo footswitch jack 7
8 Primary Functions: 8

9 Secondary Functions: 9
 Current Drain... max.")
10 Restoring Factory Presets: Specifications Dimensions (L) x60(w)x52(h) mm Weight g Power Supply... DC9V (Negative Center) Current Drain... max. 350mA Signal Flow Chart 10
11 Operational Flow Chart 11
12 Typical Setup Configuration Diagrams 12
13 13
14 Glossary Active Bank Set Up Mode (ABS): Defines a chosen range of banks. The full range is 1-10, the number 0 being 10. You can narrow this range through the utilizing the ABS function. (See page 5) Active Bank Pool Setup (BPS): Defines Bank Pool to be used (red or green). Red bank pool consists of 10 banks and Green bank pool consists of 10 banks. (See page 5) Active Bank Pool Setup (BPS). Bank: A bank holds 4 preprogrammed preset A/B/C/D switches in each bank. You have a total of 10 banks accessible when in recall mode. Your choice of either 10 red or 10 Red with a dot. (Red without a dot is the factory default set of banks). (BANK DN) (BANK UP): Cycles up or down through banks. BANK POOL: A defined set of red (with and without a dot). (Red bank pool without a dot, is the factory set default). (See page 5) Active Bank Pool Setup (BPS). Loops: In reference to a pedal being inserted (looped) into the signal path. Via the Send (S*) and Return (R*) jacks on the back side of the unit. After programming the loops in, they are recalled by using the 4 preprogrammed preset A/B/C/D switches that are relative to the bank being used. Bypass: The signal bypasses the switcher. After any preset switch A,B,C or D has been activated (signaled by a lit solid red LED above the switch) Press the same switch again. You will see a solid blue LED above the BANK UP (Bypass) switch. You will then be in bypass mode. Modes: Program Mode: Primary Programming Functions; These text are shown with Black text in a white background. They are relative to the programming of Loops, Banks, Foot Switches. Also Programs Active Bank Setup Mode ABS to define only the number of banks you wish to use. (See Page 5) Less Used Programming Functions: These text are shown in parenthesis ( ). These are relative to the programming of Active Bank Pool Setup (BPS), if you wish to define Bank Pools (Red with or witout a dot) for use. You can only use one at a time (page 5). Also Factory Reset (Reset). (page 6) Recall Mode: (White text on unit refers to Recall Mode functions) Recall Mode: Recalls Loops, Banks, Foot Switches, that have been programmed in. Recall Mode Functions: Programmable Switches: (SW1 PGM) Switch1 Program Mode (SW2 PGM) Switch2 Program Mode Presets : In reference your switches A, B, C, or D that have been preset through process of programming your loops. Often referred to preset switches. Warranty Limited 1 Year Warranty This warranty covers any defects in your new Accel FX22 Power Supply. This is a 1 year warranty for the original registered purchaser. Accel will fix or replace any defective units within the first 1 years from the purchase date. Fixing or replacing the unit will be at Accels discretion. Any problem that is caused by abuse, misuse, or an act of God (such as a flood) are not covered. In order to be eligible for service under this warranty you must return the enclosed warranty registration card within 30 days of purchasing the aid. If something goes wrong with your Accel FX22 Command Center, send it postage paid with a brief written description of the problem to: Accel Technologies LLC; East Santa Ana Canyon Rd. #17057 Anaheim, CA This warranty gives you specific legal rights, and you may also have other rights which vary from state to state. Accel Technologies, LLC. P.O. BOX Anaheim, CA U.S.A. support@accelaudio.com 14
Spider IV 15. Pilot s Handbook Manuel de pilotage Pilotenhandbuch Pilotenhandboek Manual del Piloto 取扱説明書
 Spider IV 15 Pilot s Handbook Manuel de pilotage Pilotenhandbuch Pilotenhandboek Manual del Piloto 取扱説明書 Get free lessons and tones! Join Spider Online! www.line6.com/spideronline 40-00-0187 Pilot s Handbook
Warning For your protection, please read the following:
 DECLARATION OF CONFORMITY Manufacturer s Name: Manufacturer s Address: declares that the product: Product name: Product option: DigiTech 8760 S. Sandy Parkway Sandy, Utah 84070, USA HardWire CM-2 All (requires
GCX. Guitar Audio Switcher OWNER S MANUAL
 GCX Guitar Audio Switcher OWNER S MANUAL Please visit our web site at: www.voodoolab.com Copyright 1998 by Digital Music Corporation. This publication is protected by copyright and all rights are reserved.
Spider Valve. Pilot s Guide Manuel de pilotage Pilotenhandbuch Pilotenhandboek Manual del Piloto 取扱説明書
 Spider Valve MKII Pilot s Guide Manuel de pilotage Pilotenhandbuch Pilotenhandboek Manual del Piloto 取扱説明書 40-00-0233 Pilot s Handbook available @ www.line6.com/manuals Rev D Important Safety Instructions
Spider. Pilot s Handbook Manuel de pilotage Pilotenhandbuch Pilotenhandboek Manual del Piloto 取扱説明書
 Spider IV Pilot s Handbook Manuel de pilotage Pilotenhandbuch Pilotenhandboek Manual del Piloto 取扱説明書 Get free lessons and tones! Join Spider Online! www.line6.com/spideronline 40-00-0186 Pilot s Handbook
1695T Black Magick. User Manual
 1695T Black Magick User Manual All contents c Absara Audio LLC 2014 1. Important Safety Information The triangle surrounding an exclamation mark alerts users to the presence of important warnings or information.
K-Switch User Manual v1.1
 K-Switch User Manual v1.1 Features and Functionality Overview 8 Switches: 4 Virtual Footswitches for controlling amplifier functions 4 Effect Loops for inserting effect units into a signal chain. Virtual
Important Safety Information
 USER MANUAL Important Safety Information Before using Zuma R300, please be sure to read all operating instructions carefully. Read, follow, and keep these instructions. Heed all warnings. Do not expose
A-16D A-Net Distributor
 A-16D A-Net Distributor For use with the Personal Monitor Mixing System Information in this document is subject to change. All rights reserved. Copyright 2003 Aviom, Inc. Printed in USA Document Rev. 1.03
Warning. Service Office or Harman Music Group 8760 South Sandy Parkway Sandy, Utah USA Ph: (801) Fax: (801)
 Fax: (801)") DECLARATION OF CONFORMITY Manufacturer s Name: DigiTech Manufacturer s Address: 8760 S. Sandy Parkway Sandy, Utah 84070, USA declares that the product: Product name: Tone Driver Product option: all (requires
DECLARATION OF CONFORMITY Manufacturer s Name: DigiTech Manufacturer s Address: 8760 S. Sandy Parkway Sandy, Utah 84070, USA declares that the product: Product name: Tone Driver Product option: all (requires
M13 Stompbox Modeler
 M13 Stompbox Modeler Pilot s Handbook Manuel de pilotage Pilotenhandbuch Pilotenhandboek Manual del Piloto An in-depth exploration of the advanced technologies and pulsing tonal pleasures of M13 Stompbox
AMP SELECTOR Owner s Manual
 AMP SELECTOR Owner s Manual Version 1.0 VOODOO LAB AMP SELECTOR User s Manual Introduction The Voodoo Lab Amp Selector is the ultimate stand-alone tool for switching your guitar into multiple amplifiers.
Your Cyborg Digital Reverb pedal has been designed to comply with the following Standards and Directives as set forth by the European Union:
 Your Cyborg Digital Reverb pedal has been designed to comply with the following Standards and Directives as set forth by the European Union: Council Directive(s): 89/336/EEC Electromagnetic Compatibility
Reaction Chromatic Tuner Instruction Manual
 Reaction Chromatic Tuner Instruction Manual Compliance Your Reaction Chromatic Tuner pedal has been tested and complies with the following Standards and Directives as set forth by the European Union: Council
V50D ELECTRIC GUITAR AMPLIFIER WITH DIGITAL DELAY AND CHORUS. User s Manual
 V50D ELECTRIC GUITAR AMPLIFIER WITH DIGITAL DELAY AND CHORUS User s Manual R Velocity is a registered trademark of GHS Corporation Battle Creek MI, USA May be covered by one or more of the following: U.S.
USER MANUAL. MALEKKO HEAVY INDUSTRY CORPORATION malekkoheavyindustry.com Rev A
 USER MANUAL MALEKKO HEAVY INDUSTRY CORPORATION malekkoheavyindustry.com Rev A Sneak Attack is a digitally controlled analog VCA pedal that can also be manually triggered or used in a tremolo mode. The
Important Safety Information
 OWNER'S MANUAL Important Safety Information 1. Read these instructions. 2. Keep these instructions. 3. Heed all warnings. 4. Follow all instructions. 5. Do not use this apparatus near water. 6. Clean only
1668RT Jupiter. User Manual
 1668RT Jupiter User Manual All contents c Absara Audio LLC 2015 1. Important Safety Information The triangle surrounding an exclamation mark alerts users to the presence of important warnings or information.
Pilot s Handbook Manuel de pilotage Pilotenhandbuch Pilotenhandboek Manual del Piloto 取扱説明書. See for Advance Guide
 M13 Stompbox Modeler Pilot s Handbook Manuel de pilotage Pilotenhandbuch Pilotenhandboek Manual del Piloto 取扱説明書 See www.line6.com/manuals for Advance Guide 40-00-0167 Advanced Users Guide available @
As a discerning guitarist, you know the road to great tone begins with great components.
 OWNERS MANUAL Dear Customer, Thank you for your purchase of a Guild. amplifier from Premier Builders As a discerning guitarist, you know the road to great tone begins with great components. Our Classic
Grunge. Distortion. Owner s Manual
 Grunge Distortion Owner s Manual DECLARATION OF CONFORMITY Manufacturer s Name: DigiTech Manufacturer s Address: 8760 S. Sandy Parkway Sandy, Utah 84070, USA declares that the product: Product name: DigiTech
Features, Benefits, and Operation
 Features, Benefits, and Operation 2013 Decibel Eleven Features, Benefits, and Operation Contents Introduction... 2 Features... 2 Top Panel Controls... 3 Operation Basics... 4 Connections... 5 Rear Panel
Professional Tube Amplifier PRO-18 User Manual
 Professional Tube Amplifier PRO-18 User Manual WWW.NACEAMPS.COM 1 PRO-18 USER MANUAL REV A TABLE OF CONTENTS CHAPTER 1 IMPORTANT SAFETY INSTRUCTIONS... 3 CHAPTER 2 FIRST TIME OUT OF THE BOX SETUP AND PLAY...
Z44R. Multi-purpose Rack Mixer. Item ref: User Manual
 Z44R Multi-purpose Rack Mixer Item ref: 953.020 User Manual 2 balanced microphone inputs Lo-cut rumble filters 3-band EQ per Mic channel Switchable 48V phantom power 2 x A/B selectable stereo line inputs
Reaction Distortion 1 Instruction Manual
 Reaction Distortion 1 Instruction Manual May be covered by one or more of the following: U.S. Patents #4538297, 4647876, 4696044, 4745309, 4881047, 4893099, 5124657, 5263091, 5268527, 5319713, 5333201,
Antidote. Manual. Model: ZA-35.
 Antidote Manual Model: ZA-35 www.drzamps.com This symbol warns the user of dangerous voltage levels localized within the enclosure. This symbol advises the user to read all accompanying literature for
HARMONY SINGER 2. Battery-Powered Vocal Effects Stompbox with Guitar-Controlled Harmony, Reverb and Tone. User Manual
 HARMONY SINGER 2 Battery-Powered Vocal Effects Stompbox with Guitar-Controlled Harmony, Reverb and Tone User Manual 2 Harmony Singer 2 User Manual Important Safety Instructions Terminals marked with this
WELCOME TO ZUMA R300 ULTRA-LOW NOISE WORLD TOUR READY
 WELCOME TO ZUMA R300 ULTRA-LOW NOISE WORLD TOUR READY Strymon power supplies are the highest horsepower, most technologically advanced effects pedal power supplies of their kind. Zuma R300 delivers clean,
On-Line Cardio Theater Wireless Digital Transmitter Installation and Instruction Manual
 On-Line Cardio Theater Wireless Digital Transmitter Installation and Instruction Manual Full installation instructions accompany your Cardio Theater equipment order. This On-Line version of our Installation/Instruction
Reaction Super Charger Instruction Manual
 Reaction Super Charger Instruction Manual May be covered by one or more of the following: U.S. Patents #4538297, 4647876, 4696044, 4745309, 4881047, 4893099, 5124657, 5263091, 5268527, 5319713, 5333201,
Your Classic Wah pedal has been tested and complies with the following Standards and Directives as set forth by the European Union:
 Your Classic Wah pedal has been tested and complies with the following Standards and Directives as set forth by the European Union: Council Directive(s): 89/336/EEC Electromagnetic Compatibility Standard(s):
Guitar Silencer Instruction Manual
 Guitar Silencer Instruction Manual This pedal is: Compliance Your Guitar Silencer pedal has been tested and complies with the following Standards and Directives as set forth by the European Union: Council
V160R ELECTRIC GUITAR AMPLIFIER WITH A TUBE PREAMP, REVERB AND BUILT-IN CHROMATIC TUNER. User s Manual
 TM V160R ELECTRIC GUITAR AMPLIFIER WITH A TUBE PREAMP, REVERB AND BUILT-IN CHROMATIC TUNER User s Manual TM Vendetta is a trademark of GHS Corporation Battle Creek MI, USA May be covered by one or more
Warning DECLARATION OF CONFORMITY. For your protection, please read the following:
 DECLARATION OF CONFORMITY Manufacturer s Name: DigiTech Manufacturer s Address: 8760 S. Sandy Parkway Sandy, Utah 84070, USA declares that the product: Product name: Bass Multi Chorus Product option: all
Warning DECLARATION OF CONFORMITY. For your protection, please read the following:
 DECLARATION OF CONFORMITY Manufacturer s Name: DigiTech Manufacturer s Address: 8760 S. Sandy Parkway Sandy, Utah 84070, USA declares that the product: Product name: Synth Wah Product option: all (requires
Sacred Fire Compressor Instruction Manual
 Sacred Fire Compressor Instruction Manual This pedal is: May be covered by one or more of the following: U.S. Patents #4538297, 4647876, 4696044, 4745309, 4881047, 4893099, 5124657, 5263091, 5268527, 5319713,
Classic Series Public Address Amplifiers C10 & C20 Models
 Classic Series Public Address Amplifiers C10 & C20 Models Installation and Use Manual 2009 Bogen Communications, Inc. All rights reserved. Specifications subject to change without notice. 54-5978-01B 0901
OC 10 Crocodile Tail Loop Setup Utilising Tuner Out And One Loop
 KEY All Red Lines Are Cables Taking Signal Into OC10 SETUP 1 All Green Lines Are Cables Taking Signal Out Of OC10 OC 10 Crocodile Tail Loop Setup Utilising Tuner Out And One Loop The above setup is using
IMPORTANT SAFETY INSTRUCTIONS
 Version 2.0 Table of contents IMPORTANT SAFETY INSTRUCTIONS 2 EMC/EMI & CERTIFICATE OF CONFORMITY 2 PACKAGE CONTENT 3 STRUCTURE 4 SIGNAL S PATH DIAGRAM 5 BANKS, PRESETS AND MODIFIERS 6 PRESET SELECTION
User Guide. Wideband 4-channel Auto Gain-Control Antenna Divider
 User Guide AD-708 Wideband 4-channel Auto Gain-Control Antenna Divider All rights reserved. Do not copy or forward without prior approvals MIPRO. Specifications and design subject to change without notice.
AV30MX-2 Operation Manual
 AV30MX-2 Operation Manual 1 Important safety instructions 1. Please read carefully prior to product installation or operation. 2. Read these instructions. 3. Keep these instructions. 4. Heed all warnings.
Reaction HUSH Instruction Manual
 Reaction HUSH Instruction Manual May be covered by one or more of the following: U.S. Patents #4538297, 4647876, 4696044, 4745309, 4881047, 4893099, 5124657, 5263091, 5268527, 5319713, 5333201, 5402498
IMPORTANT SAFETY INSTRUCTIONS
 WR-2 GB Version 1 IMPORTANT SAFETY INSTRUCTIONS 1. 2. 3. 4. 5. 6. 7. 8. 9. Read these instructions. Keep these instructions. Heed all warnings. Follow all instructions. Do not use this apparatus near water.
RM4 MODULAR TUBE PREAMP OWNERS MANUAL
 A M P L I F I E R S RM4 MODULAR TUBE PREAMP OWNERS MANUAL Dear Randall Owner, Congratulations on the purchase of your new Randall Amplifier, and thank you for the support of our product line. Randall amps
SPECIAL 6. 6-Watt Vacuum Tube Guitar Amplifier. User Manual
 SPECIAL 6 6-Watt Vacuum Tube Guitar Amplifier User Manual Table of Contents Table of Contents... 3 Product Safety Information...4 Panel Functions... 5 Technical Specifications... 8 Important Safety Instructions
Sensor 22/35/50 OWNERS MANUAL
 Sensor 22/35/50 OWNERS MANUAL Dear Customer, Thank you for your purchase of a Guild. amplifier from Premier Builders As a discerning guitarist, you know the road to great tone begins with great components.
Big Bang. B B O w n e r s M a n u a l. Power Amplifiers. SpeakerCraft BB2125 POWER ACTIVE PROTECTION L
 Big Bang Power Amplifiers SpeakerCraft BB2125 ACTIVE POWER PROTECTION L R B B 2 1 2 5 O w n e r s M a n u a l SAFETY INSTRUCTIONS APPLICABLE FOR USA, CANADA OR WHERE APPROVED FOR USAGE CAUTION: To reduce
A Channel Amplifier
 Installation Manual A2150 2 Channel Amplifier Table of Contents Installation Requirements and Recommendations 1 What s included 1 Speaker Wire Recommendations 1 Setup 2 Rack Mounting 2 Individually Protected
Z-LUX. Manual. Model: ZA-38.
 Z-LUX Manual Model: ZA-38 www.drzamps.com This symbol warns the user of dangerous voltage levels localized within the enclosure. This symbol advises the user to read all accompanying literature for safely
A W Table-Top Amplifier. with Built-in Bluetooth streaming
 A0361 100W Table-Top Amplifier with Built-in Bluetooth streaming 17 The A0361 Table-Top Amplifier can be used with Channel Vision s CAT5 audio hubs to provide a powerful 100 Watt Amplifier, 50Watts per
plifier D-501 otion Am Tactile M
 Tactile Motion Amplifier D-501 IMPORTANT SAFETY INSTRUCTIONS WARNING: 1. Read and keep these instructions for future reference. 2. Do not use this apparatus near water. 3. Clean only with a dry cloth.
Page 1 of 6 Systems Inc.
 Page 1 of 6 This symbol indicates that dangerous voltage constituting a risk of electric shock is present within this unit. This symbol indicates that there are important operating and maintenance instructions
Warning DECLARATION OF CONFORMITY. For your protection, please read the following:
 DECLARATION OF CONFORMITY Manufacturer s Name: DigiTech Manufacturer s Address: 8760 S. Sandy Parkway Sandy, Utah 84070, USA declares that the product: Product name: Bass Squeeze Product option: all (requires
DECLARATION OF CONFORMITY
 DECLARATION OF CONFORMITY Manufacturer s Name: Harman Music Group Manufacturer s Address: 8760 S. Sandy Parkway Sandy, Utah 84070, USA declares that the product: Product name: CR-7 Product option: All
CANARY AUDIO. Power Amplifier CA-309 OWNER S MANUAL. Handcrafted in California MADE IN USA
 CANARY AUDIO 300B Push-Pull Parallel Power Amplifier Mono Block Handcrafted in California CA-309 OWNER S MANUAL MADE IN USA Dear Customer: Please allow us to take this opportunity to thank you for purchasing
R-Series R235LS 2-Channel Power Amplifier with Local Source Switching
 R-Series R235LS 2-Channel Power Amplifier with Local Source Switching User s Manual On Off R235LS POWER A MPLIFIER IMPORTANT SAFEGUARDS WARNING TO REDUCE THE RISK OF FIRE OR ELECTRIC SHOCK, DO NOT EXPOSE
Unity Tuner Instruction Manual
 Unity Tuner Instruction Manual This pedal is: Compliance Your Unity Tuner pedal has been tested and complies with the following Standards and Directives as set forth by the European Union: Council Directive(s):
CR31. Companion. Instruction Manual
 CR31 Companion Instruction Manual 910-244700-001 IMPORTANT SAFETY INSTRUCTION PLEASE READ CAREFULLY ALL THE FOLLOWING IMPORTANT SAFEGUARDS THAT ARE APPLICABLE TO YOUR EQUIPMENT 1. Read Instructions - All
Your Utopia Volume/Expression pedal has been tested and complies with the following Standards and Directives as set forth by the European Union:
 Instruction Manual May be covered by one or more of the following: U.S. Patents #4538297, 4647876, 4696044, 4745309, 4881047, 4893099, 5124657, 5263091, 5268527, 5319713, 5333201, 5402498 and 5493617.
IMPORTANT SAFETY INSTRUCTIONS
 Addendum IMPORTANT SAFETY INSTRUCTIONS Read these instructions. Keep these instructions. Heed all warnings. Follow all instructions. Do not use this apparatus near water. Mains powered apparatus shall
As a discerning guitarist, you know the road to great tone begins with great components.
 OWNER S MANUAL Dear Customer, Thank you for your purchase of a Guild. amplifier from Premier Builders As a discerning guitarist, you know the road to great tone begins with great components. Our Classic
As a discerning guitarist, you know the road to great tone begins with great components.
 OWNERS MANUAL Dear Customer, Thank you for your purchase of a Two-Rock amplifier from Premier Builders Guild. As a discerning guitarist, you know the road to great tone begins with great components. Our
Deep Blue Chorus Instruction Manual
 Deep Blue Chorus Instruction Manual May be covered by one or more of the following: U.S. Patents #4538297, 4647876, 4696044, 4745309, 4881047, 4893099, 5124657, 5263091, 5268527, 5319713, 5333201, 5402498
A WORLD OF LISTENING WARNING: TO PREVENT FIRE OR ELECTRIC SHOCK HAZARD, DO NOT EXPOSE THIS PRODUCT TO RAIN OR MOISTURE.
 DDR-3 FM RDS/DAB digital radio A WORLD OF LISTENING THE LIGHTNING FLASH AND ARROW- HEAD WITHIN THE TRIANGLE IS A WARNING SIGN ALERTING YOU OF DANGEROUS VOLTAGE INSIDE THE RADIO. WARNING: TO PREVENT FIRE
Pilot s Handbook Manuel de pilotage Pilotenhandbuch Pilotenhandboek Manual del Piloto 取扱説明書. See for Advance Guide
 M9 Stompbox Modeler Pilot s Handbook Manuel de pilotage Pilotenhandbuch Pilotenhandboek Manual del Piloto 取扱説明書 See www.line6.com/manuals for Advance Guide 40-00-2008 Advanced Users Guide available @ www.line6.com/manuals
SPB-8 Features. Using the SPB-8/E. Introduction
 SPB-8 Features The Pedal Board is a solid, nonslip base for pedal effects that lets you leave everything powered up and patched together as you like it Toroidal transformer for ultra low-noise performance
FLAMINGO.1 OPERATOR'S MANUAL. Version
 FLAMINGO.1 OPERATOR'S MANUAL Version 1.1 20090110 LTD. 2117 East 5th Street Superior, WI 54880 USA tel: 715-398-3627 fax: 715-398-3279 www.cranesong.com 2004, 2005, 2006, 2009 Crane Song, LTD. Subject
Instruction Manual Please read carefully before use and keep for future reference.
 Easy-Read Dual Alarm Clock with Daily Repeat, Bluetooth, and USB Charge Port NRC-181 Instruction Manual Please read carefully before use and keep for future reference. Important Safety Information CAUTION
Active Transmitter Combiner 8:1 AC 3200-II. Instruction manual
 Active Transmitter Combiner 8:1 AC 3200-II Instruction manual Contents Contents Important safety instructions... 2 The AC 3200-II active transmitter combiner 8:1... 4 Delivery includes... 4 Connection
Classic Series Public Address Amplifiers C10 & C20 Models
 Classic Series Public Address Amplifiers C10 & C20 Models Installation and Use Manual 2009 Bogen Communications, Inc. All rights reserved. Specifications subject to change without notice. 54-5978-01C 1106
DT25 Guitar Amplifier Pilot s Guide Manuel de pilotage Pilotenhandbuch Pilotenhandboek Manual del Piloto 取扱説明書
 DT25 Guitar Amplifier Pilot s Guide Manuel de pilotage Pilotenhandbuch Pilotenhandboek Manual del Piloto 取扱説明書 40-00-0311 Pilot s Handbook available @ www.line6.com/manuals Rev C Important Safety Instructions
PR-D9CL. GB Version 1
 PR-D9CL GB Version 1 Table of contents Important safety instructions... 2-3 Controls... 4-6 Operating your radio Search tuning AM / FM... 8 Manual tuning AM / FM / Setting up the tuning step increment...
ECA COMMERCIAL AMPLIFIER OWNER S MANUAL ECA-70MIXAMP V / 70V / 4Ω Amplifier ECA-70MIXAMP-1-60 OUTPUT LEVEL POWER MASTER MIC 1
 OWNER S MANUAL ECA COMMERCIAL AMPLIFIER ECA-MIXAMP--6 V / V / Ω Amplifier TEMP PROT OUTPUT LEVEL ECA-MIXAMP--6 6 POWER MIC MIC MIC MIC AUX AUX BASS TREBLE 5 5 5 5 5 6 6 6 6 6 MASTER 5 6 ON OFF + - + -
User Manual. Flooring Removal Machine (Patent Pending) Maintenance and Operating Instructions
 Maintenance and Operating Instructions") User Manual Flooring Removal Machine (Patent Pending) Maintenance and Operating Instructions Copyright 2012 by Carpet Concepts LLC. All Rights Reserved. For technical questions or replacement parts please
User Manual Flooring Removal Machine (Patent Pending) Maintenance and Operating Instructions Copyright 2012 by Carpet Concepts LLC. All Rights Reserved. For technical questions or replacement parts please
Classic Series Amplifiers C35, C60, & C100 Models
 Classic Series Amplifiers C35, C60, & C100 Models Installation and Use Manual 2009 Bogen Communications, Inc. All rights reserved. Specifications subject to change without notice. 54-5979-02E 1203 Notice:
HTA125A/250A. Power Amplifiers. Installation & Use Manual
 HTA125A/250A Power Amplifiers Installation & Use Manual Specifications subject to change without notice. 2010 Bogen Communications, Inc. All rights reserved. 54-5832-04B 1011 NOTICE: Every effort was made
DELUXE MEMORY MAN w/ TAP TEMPO TAP TEMPO ANALOG DELAY with FX LOOP, MODULATION and EXPRESSION PEDAL CONTROL
 DELUXE MEMORY MAN w/ TAP TEMPO TAP TEMPO ANALOG DELAY with FX LOOP, MODULATION and EXPRESSION PEDAL CONTROL Congratulations on your purchase of the Electro-Harmonix Deluxe Memory Man w/ Tap Tempo (DMMTT).
M-300 Mono power amplifier User s guide
 M-300 Mono power amplifier User s guide M-300 Mono power amplifier User s guide Specifications: Contents: Power output: 8Ω: 290W, 0.01% THD SPECIFICATIONS Page 2 Input impedance: Gain: 4Ω: 580W, 0.01%
PREMIUMAUDIOVIDEOLIGHTINGANDPOWERPRODUCTS
 FACTOR ELECTRONICS PREMIUMAUDIOVIDEOLIGHTINGANDPOWERPRODUCTS VT-1 / VT-4 Professional Tuners With RBDS Owners Manual Owners Manual IMPORTANT NOTE: THIS OWNER'S MANUAL IS PROVIDED AS AN INSTALLATION AND
U S E R S M A N U A L
 U S E R S M A N U A L! Note! Read this manual thoroughly before operating this unit. Failure to heed any warnings contained herein could potentially result in damage to your equipment. May be covered by
Safety Precautions. Important Safety Instructions
 Thank you for purchasing this digital piano. For optimal operation and security, please read this manual carefully and keep it for future reference. Safety Precautions The lightning flash with arrowhead
10 WATT GUITAR COMBO
 10 WATT GUITAR COMBO Caution: To reduce the hazard of electrical shock, do not remove cover or back. No user serviceable parts inside. Please refer all servicing to qualified personnel. WARNING: To reduce
Your Rocktron Bass100 Bass Amplifier has been tested and complies with the following Standards and Directives as set forth by the European Union:
 Instruction Manual Your Rocktron Bass100 Bass Amplifier has been tested and complies with the following Standards and Directives as set forth by the European Union: Standard(s): IEC60065 Professional Audio/Video
INSTRUCTION MANUAL. MODEL: Vintage 60R. Vintage Series Guitar Amplifi er
 INSTRUCTION MANUAL MODEL: Vintage 60R Vintage Series Guitar Amplifi er 2 INTRODUCTION Thank you for choosing this Johnson amplifier. Please read this manual carefully and completely before operating your
IMPORTANT SAFETY INSTRUCTIONS
 WR-1 Version 1 IMPORTANT SAFETY INSTRUCTIONS 1. 2. 3. 4. 5. 6. 7. 8. 9. Read these instructions. Keep these instructions. Heed all warnings. Follow all instructions. Do not use this apparatus near water.
MIC MECHANIC 2. Ultra-Simple Battery-Powered Vocal Effects Stompbox with Echo, Reverb and Pitch Correction. User Manual
 MIC MECHANIC 2 Ultra-Simple Battery-Powered Vocal Effects Stompbox with Echo, Reverb and Pitch Correction User Manual 2 MIC MECHANIC 2 User Manual Important Safety Instructions Terminals marked with this
Twinline Effects Loop Router User Guide True to the Music
 www.radialeng.com Twinline Effects Loop Router User Guide 1588 Kebet Way, Port Coquitlam British Columbia, Canada, V3C 5M5 Tel: 604-942-1001 Fax: 604-942-1010 Email: info@radialeng.com Radial Twinline
Your Rocktron VersaTune has been designed to comply with the following Standards and Directives as set forth by the European Union:
 Your Rocktron VersaTune has been designed to comply with the following Standards and Directives as set forth by the European Union: Council Directive(s): 89/336/EEC, 73/23/EEC, 76/769/EC, 1994/62/EC, 2000/
XD-V30 Digital Wireless System
 XD-V30 Digital Wireless System Pilot s Handbook Manuel de pilotage Pilotenhandbuch Pilotenhandboek Manual del Piloto 取扱説明書 See www.line6.com/manuals for Advance Guide 40-00-0286 Advanced Users Guide available
Always there to help you. Register your product and get support at AJB4300. Question? Contact Philips.
 Always there to help you Register your product and get support at www.philips.com/support Question? Contact Philips AJB4300 User manual Contents 1 Important 2 Safety 2 2 Your FM/DAB+ clock radio 3 Introduction
PR-D5 中文 GB. Version 1
 PR-D5 中文 GB Version 1 1. 2. 3. Important safety instructions Read and understand all safety and operating instructions before the radio is operated. Retain instruction: The safety and operating instructions
Important safety instructions
 MMR-88 Version 1 Important safety instructions 1. 2. 3. 4. 5. 6. 7. 8. 9. Please read these instructions carefully. Please keep these instructions for future reference. Heed all warnings Follow all instructions
Operating Instructions
 FM Transmitter 2 Operating Instructions PLEASE READ ALL THE INSTRUCTIONS COMPLETELY BEFORE USE AND SAVE THIS MANUAL FOR FUTURE REFERENCE. Before Use Please read IMPORTANT SAFETY INSTRUCTIONS on pages 10-11
2BSST POWER AMPLIFIER OWNER S MANUAL
 2BSST POWER AMPLIFIER OWNER S MANUAL IMPORTANT SAFETY INSTRUCTIONS The lightning flash with arrowhead symbol within an equilateral triangle, is intended to alert the user to the presence of un-insulated
Always there to help you. Register your product and get support at AJ3400. Question? Contact Philips.
 Always there to help you Register your product and get support at www.philips.com/support Question? Contact Philips AJ3400 User manual Contents 1 Important 3 2 Your clock radio 4 What's in the box 4 3
EQ-AMP60 60W Mixer Amplifier
 EQ-AMP60 60W Mixer Amplifier Instruction Manual 4091 AMTC Center Drive Clearwater, FL 33764-6976 (727)531-3105 (727)531-3965 www.amtc.com Features 1. MIC 1 input with front- and rear-panel connectors 2.
Cottonmouth Fuzz Instruction Manual
 Cottonmouth Fuzz Instruction Manual This pedal is: May be covered by one or more of the following: U.S. Patents #4538297, 4647876, 4696044, 4745309, 4881047, 4893099, 5124657, 5263091, 5268527, 5319713,
RU210. Dual Multi-UHF Wireless System. Item ref: UK, UK User Manual. Version 1.0
 RU210 Dual Multi-UHF Wireless System Item ref: 171.970UK, 171.971UK User Manual Version 1.0 Caution: Please read this manual carefully before operating Damage caused by misuse is not covered by the warranty
BK-GR-2. Product Information Guide
 BK-GR-2 Product Information Guide Safety Information WARNING! Read these instructions. Keep these instructions. Heed all warnings. Follow all instructions. Unplug the amplifier from the audio source and
Mini-Z. Manual. Model: ZA-21.
 Mini-Z Manual Model: ZA-21 www.drzamps.com This symbol warns the user of dangerous voltage levels localized within the enclosure. This symbol advises the user to read all accompanying literature for safely