Rules & Scenarios Compass Games
|
|
|
- James Kelley
- 6 years ago
- Views:
Transcription


1 Rules & Scenarios Compass Games


2 1.0 Introduction 2.0 Object of Play 3.0 Components 3.1 Rules 3.2 Map 3.3 Counters 3.4 Example Counters 3.5 Squadron Composition Displays 3.6 Definitions Of Terms 3.7 Set Up 4.0 Sequence Of Play 5.0 Forces 5.1 New Forces 5.2 New Leaders 5.3 Reorganization 6.0 Movement 6.1 General Movement 6.2 Ports 6.3 Frigate Effort 6.4 Leaders & Assignment 6.5 Search 6.6 Squadrons 7.0 Combat 7.1 Combat Resolution 7.2 Weather Gauge 7.3 Battle Lines 7.4 Leaders & Combat 7.5 Joint Command 7.6 Disengagement Questions, Comments, and Support If any game components are missing or damaged you may contact Compass Games by at compassgames.com, or by mail at the address given in the box on the right. Please include a self-addressed and stamped envelope if you have questions. Help or questions on game play may also be posted online in the Sovereign of the Seas game folder on consimworld.com or at boardgamegeek.com. 8.0 Area Control & Victory Points 8.1 Area Control 8.2 Area Victory Points 8.3 Losses Victory Points 8.4 The War On Commerce 8.5 Victory 9.0 Return To Port & Damage Repair 9.1 Return To Port 9.2 Damage Repair Flow Charts 10.0 Scenarios 10.1 The Seven Years War, The Maritime War, The Napoleonic Wars, The Short Campaign, The Long Campaign, Optional Rules 12.0 Design Notes 13.0 Credits Sovereign of the Seas Edition 1.0 Compass Games LLC New Directions in Gaming Compass Games, LLC., PO Box 271, Cromwell, CT 06416, USA. Copyright 2017 Compass Games LLC, All Rights Reserved No portion of this product, may be reproduced for distribution except for fair-use reviews by any means without the express written permission of Compass Games LLC.

3 No captain can do very wrong if he places his ship alongside that of the enemy. Vice Admiral, Horatio Nelson, 1st Viscount Nelson, 1st Duke of Bronté KB 1.0 Introduction SOVEREIGN OF THE SEAS is an uncomplicated war game centered on the naval aspects of the series of wars between England and the various European powers between 1756 and 1805 for dominance of the world s oceans. The game depicts this conflict at a strategic level, with most operational and tactical details represented by fast and easy-to-play systems, rather than intricate mechanisms. The intent of the game is to provide a broad overview of the historical events while being fun to play. SOVEREIGN OF THE SEAS owes its original inspiration to the game concepts of WAR AT SEA, designed by Jon Edwards and Don Greenwood and published by The Avalon Hill Game Company, a game which covered the war in the Atlantic in World War Two. SOVEREIGN OF THE SEAS borrows a number of these concepts from this earlier game as a starting point, such as area movement, individual capital ships, battle line resolutions, and rolling sixes to hit, and then diverges significantly to reflect the sailing warship era situation. 2.0 Object of Play The object of the game for the English player is to destroy the naval forces of the European Powers player and prevent them from obtaining control of vital sea areas around the world. The object of the game for the European Powers player is to escape the forces of the English player and obtain temporary sea control of vital areas to support the continental and colonial objectives of various European nations. Both players must obtain their objectives by deploying their naval resources into the sea areas on the map, earning victory points at the end of each turn of the scenario being played for areas under their control, and for opposing units destroyed. For the purposes of the game rules, the players will be termed the English player and the European Powers player. 3.0 Components 3.1 Rules The booklet you are reading constitutes the rules for the play of SOVEREIGN OF THE SEAS. In general, the rules are sequenced similarly to the order of events played during a turn. If you have questions, or wish to check for corrections to any errors that may have been discovered since publication, please go to the web page of the publisher of the game 3.2 Map The map sheet depicts the seas surrounding the world, the coastlines of major land masses and islands. These seas are subdivided into areas, each of which is named. Additionally, some of these areas have printed above the name of the area a number which represents the victory point value of that area. Areas without such a number have no victory point value. Solid border lines and land masses separate these areas from one another.


4 In general, movement will be between adjacent areas. On the coast of some land masses, islands, or spots where very small islands would be, are ports, from which units deploy and to which they return at the end of each turn. These ports are marked with an anchor symbol. Ports are controlled by England or the European Powers or are neutral and may be used by either player and are represented by Port boxes on the map where playing pieces are placed instead of on the world map. These boxes are considered to be the same as if those playing pieces were on the world map portion. A rating number for each Port is printed in the box for that port but not next to the port on the map playing area. As the entire world is represented on a flat map, it is possible to move off the east side of the map and appear on the west side and to move off the west side and appear on the east side. When doing this, follow the normal movement rules for moving between areas and move directly to the area on the other side that is directly opposite the area being departed. 3.3 Counters The die cut counters supplied with the game represent combat forces or indicators for various game functions. Counters are termed as units or markers. Each unit type counter represents one Ship Of The Line capital vessel. These are in class types indicated by their number of guns rating, such as 136 or 80 or 64. These unit counters are two sided with the front side representing the owning player and the back side displaying only the national flag of the owning nation in order to conceal the vessel s identity and provide fog of war. The other counters are all termed markers in the rules. Markers are used to represent frigates and other cruiser type vessels, leaders, area & port control, victory points, Squadron locations, damage, etc. 3.4 Example Counters 3.41 Ship Of The Line Units These are the main forces for each player. Each counter has the name of the ship, the rating (the nominal number of guns carried), and then the scenario(s) in which the unit is available indicated by a 1 and/or 2 and/ or 3 separated by slashes (/) if the unit is available for the 1st (10.1), 2nd (10.2) and/or 3rd (10.3) scenarios or campaign segments and by a dash (-) if the unit is not available. Lastly, the two numbers are the attack value of the unit (left) and the defense value (right). These units should be placed in their respective national pools Squadron Markers These are named on one side with only a single color on the other side to indicate which player owns them so they can be played on the map but remain undisclosed until turned over. Blocked Border Wind Direction Border No Wind Border Sea Name Light Seas: Have Victory Points Dark Seas: No Victory Points Nations England France (Royale) France (Revolutionary) Spain Netherlands Russia Port* Victory Points *Arrows on Ports point to map edge where that port s box is 4


5 Frigate Leader Name Scenario Rating 3.43 Turn & Victory Point Markers These are also just named and colored to identify the owing player Battle, Disabled, & Damage Markers These markers indicate battle-engaged Squadrons or either a disabled unit or the damage taken by a unit Leader & Frigate Effort Markers Leader markers have three lines, the first being the name of the leader; the second indicating when that leader is available for a scenario and/or campaign standpoint in the same way as was described for indicating unit availability in rule 3.41; and on the third line having a single number rating for the leader. Frigate Effort markers indicate what they are and their national color on one side while on the reverse just having their national color Sea Control Markers & Port Control Markers Sea Control markers are used by the European Powers player to indicate sea areas that come under control while Port Control markers indicate the name of the port and are available in a number of colors to indicate which nation currently controls the port Long Voyage & On Station Markers These markers are used with the optional rule 11.A that concerns extended time spent at sea. 3.48: French Royale & Revolution Because of the French Revolution, there are two possible flags of identification for some ships and markers for vessels, leaders, and such things as Squadron markers that are available over both periods. Use the correct ones (only) for the scenario being played. That is, for the Seven Years War and Maritime War scenarios, as well as the parts of campaigns that cover these periods, use the Royal flag counters with the field of yellow stars background. For the Napoleonic Wars scenario as well as the parts of campaigns that cover that period, use the Napoleonic flag counters with the blue, white, and red tri-color background. Under no circumstances may a ship or marker for the same item both be used at the same time. Historical Note: During the Royal periods, French ships most often flew the pure white flag and only occasionally, the white flag with the Fleur-de-lis on it. Graphically, however, the pure white flag does not show well and thus for ease of identification, we have chosen to use the Royale Fleur-de-lis standard instead. 3.5 Squadron Composition Displays The Squadron Composition Displays constitute the play aids for the game, along with a set of six-sided dice and a single sheet with a condensed version of the Sequence Of Play for reference. Each player s Composition Display sheet is of thick card stock on which are printed the 5
6 names of the main elements (Squadrons) into which their forces may be divided. These displays will be used by each player to organize many of their units and markers. It is required that all units and some markers be assigned to these Squadrons or they must remain in port, as there are no independent units in this game. 3.6 Definitions Of Terms Battle Lines A Battle Line is the units (Ships Of The Line) represented by the die cut counter playing pieces of one or more Squadrons in a single area that represent the forces that are to stand in lines of battle for extended gunfire combat. Navies The major navies are composed of Squadrons in a structure depicted on the Squadron Composition Displays. The English player controls the English forces. The European Powers player controls the forces of all the European nations. Markers Markers are used to deal with other game functions such as ship command groupings, leaders, frigates, tracking victory points, etc. National Pools Each player has a number of National Pools. For the English player there will be one for English units (Ships Of The Line, or SOLs) and one for English Leaders. For the European Powers player there will be one for each European nations (France, Spain, Holland) units and for each European nations leaders. A National Pool is simply a pile of the die cut counter playing pieces of the type and group for that pool that are placed together and either upside down or in an opaque container (such as a coffee mug) so that counters can be picked as required from the pile of that National Pool in a random way. Ports Ports exist on the land zones adjacent to some Sea Areas and on islands within some Sea Areas. Ports are subject to ownership by one or the other player as represented by their nations. Some ports may change ownership automatically between scenarios and some ports may change ownership by being captured. Others are always owned by one player or the other and never change ownership. The start of movement for all Squadrons is always from a Port to an adjacent Sea Area as the first move, but this move does not count as a movement point, it is automatic. All combat takes place in the Sea Areas and then, after Victory Point determinations are completed, all remaining forces (units and markers) must be returned to one or more of their respective national or neutral Ports Sea Areas The map is divided into named Sea Areas with borders through the oceans which, along with adjacent land zones (some of which contain Ports) indicate the limits of each sea area. Some Sea Areas controlled during the Area Control & Victory Point Phase for each turn determine the number of victory points won by the European Powers player for area control. See rule 9.0 Senior Leader The highest rated leader in a Squadron is the senior leader. If one or more of the friendly leaders are of the same highest rating, the owning player must pick one of those equally highly rated leaders as the senior. Squadrons Squadrons represent the only command structure in the game. Squadrons are deployed independently, whether in the same Sea Area as another Squadron or elsewhere. However, friendly Squadrons moving into the same area combine for combat in that area. The Squadron marker serves as an on-the-map container for those Units in its command structure. Units The capital ships of the navies are represented as large counters and referred to as Units or Unit-type forces. Each Unit-type counter represents one Ship Of The Line or SOL. 3.7 Set Up The English player should sit on the East side of the map. The European Powers player should sit on the opposite side. Each player should place their Squadron Composition Display sheets to the right of the map as they face it. Next pick a scenario or campaign that is to be played. Separate counters into national pools and by entry turn year number. Units and Leaders should each be placed in separate pools by nation, face down. Counters that will start the game in play will be placed in accordance with the rules for Set Up in this section, and in Areas, Ports, Frigates, & Squadrons found below in the Movement rules in section 6. Finally, refer to the Scenarios section (rule 10) for specifics on New Forces and on setting up each particular scenario or campaign. Units that are to be placed on the Squadron Composition Displays should be placed first, simultaneously by both players, with the units placed face down to conceal their identities. The box lid & bottom may be used by players to screen this set up from the view of their opponent if they so wish. Units and markers placed on the map are also placed face down, to conceal their identity from the opposing player. Units and markers are always kept face down throughout the game except when they are turned face up to resolve combat or when the owning player wishes to examine his own units. Next, the turn marker is placed on turn one of the Turn Track, the victory point x1 & x10 markers are placed on the zero box of the Victory Point Track, and the area control markers are placed on the map. Area control at the start of each scenario and campaign will vary, so specifics for each are included in the Scenarios section (rule 10). Finally, Squadron markers for all nations in play at the start of the scenario must be placed in ports where they will start the game. At least one Squadron must be placed in each home nation port; that is the English player must place at least one Squadron in Portsmouth and one in Nore. Other Squadrons may be placed in any 6

7 other port controlled by that nation as per the scenario or scenario segment of the campaign being played. Squadrons must contain at least one unit and one leader or they may not be placed in play. Players should alternate placing Squadron markers starting with the European Powers player, and when one player runs out, the other just finishes placing the rest. 4.0 Sequence Of Play Each of the turns of the game is composed of the following sequence of events, termed Phases. Some Phases are also broken down into a sequence of Segments. The English player controls the English counters, normally referred to as forces, while the European Powers player controls the French, Spanish, and Dutch forces. At the end of each turn move the Turn marker to the next box on the Turn Track. A. Forces Phase: This phase is composed of a number of segments which must be played in the following order: 1. Demobilize Down To Base Forces Level 2. Pick Base Forces If Below Level 3. Pick New Forces 4. Reorganize Squadrons Each player will have created a number of national pools of units and composed those units that will be available for the scenario, as well as similar national pools of leaders. The new forces are then units and leaders picked randomly that become available at the start of each turn at a rate indicated by the scenario and the rules for new forces. These are then distributed to Squadrons as the player wishes within the Squadron composition limits by placing them on the correct national Squadron Composition. Place all new forces face down so that they are not visible to the opposing player. Similarly, any new leaders that are to come into play appear at this time. As with forces, these leader markers will have been placed in national pools as per set up requirements for the scenario and any that are to be placed into play are picked randomly from these pools. Finally, the owning player may freely (without breaking the limitations of any other rules) reallocate units contained within particular Squadrons or to other Squadrons whose Squadron markers are in the same port, and leaders between any Squadrons, to represent command reorganization. B. Movement Phase This phase is composed of two segments. First the players place frigate markers as per the Frigate rules. Then the players alternate moving one Squadron marker, English player moving first, until one player either runs out of Squadron markers to move or passes, indicating being done moving. The other player may then move any of their remaining Squadron markers without alternating until they also are done moving. In turns where more than one of the Europe player nations is active, the Europe player must move two (2) Squadrons at an alternation rather than one (1). Move each separately, and they are not required to take the same paths or move to the same destinations. Units have no specific movement allowance. Instead, they move as part of their Squadron of units and so long as moving with the movement arrows between areas they may move as many areas as wanted by their controlling player. However, to move across an area boundary that is indicated as not having an arrow or against the direction of an existing arrow does require movement points, which are equal to the leadership rating of the leader of the Squadron. Unlike in other WAR AT SEA family games, movement is not required to end when entering an opposing occupied area. Instead, when entering an area that is opposing occupied a temporary stop is only required if that area also contains one or more opposing Squadrons, and if after a search procedure is completed there is no battle to resolve, the moving Squadron may continue movement. Search resolution is thus considered to be a part of the Movement phase and is completed as required one area at a time as a The Sequence of Play 7
8 Squadron is moved. At the completion of all movement, the Combat Phase begins. C. Combat Phase: Combat is resolved one area at a time for all forces in each area that contains forces of both players. The order of combat resolution is determined by the English player. This can be important with respect to the fate of forces that are disabled in combat or have successfully disengaged, since they may not retreat through (though they may retreat out of) opposing controlled areas to return to port, so care in picking the order of resolution is required. The resolution of combat within each area follows this sequence: 1. Weather Gauge Resolution Segment 2. Battle Line Resolution Segment 3. Disengagement Resolution Segment Forces that are still engaged at the conclusion of the Disengagement Resolution Segment must repeat the Battle Line Resolution, and Disengagement Resolution segments in that order as often as required until all forces involved are disengaged or destroyed and the Squadron forces of only one player remain in the area. The Combat Phase may then be started for the next area. D. Area Control, Port Control, & Victory Points Phase At the end of the Combat Phase, control of each area is, in general, determined by which player has forces remaining in the area. This is used to determine victory points for area control and other factors. Rules dealing with control of areas are found in 8.0, the Area Control & Victory Points rules section. Be sure to change the control marker for the area to reflect the new controlling player. Then, if any attempts to capture ports are to be made, resolve these attempts. Finally, add victory points for the appropriate player by moving the marker(s) on the Victory Point Track. E. Return To Port Phase After all Victory Point determinations are completed, all remaining forces, markers and units, are returned to port. Forces must return to their respective national ports or a neutral port. After all forces are dealt with and no more forces remain in sea areas, play moves to the Repairs Phase. F. Repairs Phase During this phase, any damaged units are repaired by the owning player to the limits of the repair ability of the friendly ports in which the forces are located. Repairs may not be conducted in neutral ports. The completion of repairs ends the turn, and the next turn is begun, or, at the end of the last turn of the scenario or campaign, the game ends. 5.0 Forces As indicated previously, the New Forces phase is composed of a number of segments which must be played in the following order: 1. Demobilize Down To Base Forces Level 2. Pick Base Forces If Below Level 3. Pick New Forces 4. Reorganize Squadrons First, each player will have indicated by the scenario a base number of units and leaders that are to be available at the start of the scenario or scenario segment of a campaign. After separating the forces that will be involved due to the scenario and nation, these are placed in separate pools by nation and then by leader and unit for each player. The players should then randomly pick up to the scenario indicated base number. Then randomly pick the amount indicated as New Forces. In subsequent turns this base number is picked intentionally and retained (rather than randomly) as a base of existing units and leaders between turns from those that have survived the turn. In this way the player may in effect pick a core starting supply of units and leaders and may, as the game progresses, place better units and leaders as they become available into that retained-between-turns base. Each turn the players will, for each nation, be allowed to keep in play between turns the number of leaders and units indicated to be the base for that scenario (if that many survive the previous turn), and each turn at the end of the turn any number in excess of that base number must be returned to the national pools (demobilize down). If there are not enough left due to losses to retain the number indicated by the base, then that missing amount is lost to the base for retention between those particular turns, but the base numbers and the new forces numbers remain unchanged for subsequent turns and the difference must be made up in the next turn by picking randomly from the national pool to get to the correct total value of both base and new. Also note that players may intentionally demobilize down to below their base numbers, that is basically scrapping ships and putting leaders ashore, so as to randomly pick back up to their base numbers in hopes of better results, all the way up to going down to no remaining base units and/or leaders, if they wish. 5.1 New Forces New forces are those units and leaders that are not retained in play from previous turns. In SOVEREIGN OF THE SEAS this happens for both players every turn. As part of the set up indicated by the specifics of the scenario to be played, each player will have created a number of national pools of units and composed those units that will be available for the scenario, as well as similar national pools of leaders. The new forces are then units and leaders picked randomly that become available at the start of each turn at a rate indicated 8
9 by the scenario and the rules for new forces. These are picked at random from the specific national pools as indicated by the scenario and are then distributed to Squadrons as the player wishes within the Squadron composition limits by placing them on the correct national Squadron Composition. Place all new forces face down so that they are not visible to the opposing player. 5.2 New Leaders Similarly, any new leaders that are to come into play appear at this time. As with forces, these leader markers must be placed in national pools as per set up requirements for the scenario and any that are to be placed into play are picked randomly from these pools. 5.3 Reorganization Finally, the owning player may freely (without breaking the limitations of any other rules) reallocate units contained within particular Squadrons or to other Squadrons whose Squadron markers are in the same port, move empty Squadrons to different ports, and shift leaders between any ports and squadrons, to represent command reorganization. Note that, unlike in some other games using similar systems, such as GRAND FLEET, during this section of the sequence of play forces in play from the previous turn may not be moved between ports. As a result, to have already on-the-map units or markers end up where you want them for the next turn, you must return them to the port they will stage out of at the end of the previous turn. In some instances, this may require restaging over more than a single turn. At this time, players should also create stacks of their units within each Squadron section on the Squadron Composition Display sheets. These stacks should be in the intended order of line of battle for those units within the stack, which will come into play during combat resolution. At the end of any such reorganization, begin the Movement Phase. 6.0 Movement 6.1 General Movement The map is divided into 44 sea areas with borders through the oceans to indicate their limits, along with adjacent land zones as limits. Ports exist on the land border zones of some sea areas or on islands, or both. Forces may not enter land areas except to enter a port. Movement must be through a line of contiguous adjacent areas via sea side borders only. Additionally, movement must stop temporarily to conduct a search when entering an area if (but only if) that area contains opposing Squadron(s). The players units are moved in groups as Squadrons, thus the only marker that needs to be moved on the map for all of the units in a Squadron is the marker for that Squadron, while the actual units for the Squadron remain in the box of that particular Squadron on the Squadron Composition Display. Additionally, and most centrally, Squadrons may not move unless they have a leader for the Squadron assigned to them and placed in the box on the display to indicate the assignment. In effect, leaders move Squadrons rather than Squadrons moving alone. The movement ability of a Squadron is equal to the rating of the highest level leader assigned to that Squadron. When multiple leaders are assigned to a single Squadron, there is no cumulative effect. Each area will have indicators between it and all adjacent areas that are either arrows pointing toward the adjacent area or into the current area (that is, away from the adjacent area) or a dotted boundary separating areas. These symbols indicate the prevailing wind between areas. The rating of the senior leader with a Squadron is its movement allowance in points. To move a Squadron between one area and another in the direction of an arrow symbol costs zero (0) movement points. To move the Squadron between one area and another against the arrow symbol (that is, across the point rather than across the base) costs two (2) movement points. To move across a dotted boundary, indicating no prevailing wind between the areas, costs one (1) movement point. The dashed boundary on the north edge of the map is not crossable. The start of movement for a Squadron is always from a port to an adjacent sea area as the first move and this movement is never counted against the total movement allowance of a leader for a Squadron as it is always considered to be with the wind direction arrow though none is printed on the map for this purpose. Note that all ports are only adjacent to one sea area, and movement from the port must begin into that adjacent sea area. Note also that at the end of movement a Squadron may end that movement in a friendly or neutral port and the movement from that final sea area to the friendly or neutral port in that area is also an automatic move and never requires movement points. This also applies during the Return to Port phase. When a moving Squadron marker enters an area containing a Squadron marker under the control of the opposing player, a temporary stop of movement is required so as to conduct a search procedure. At the conclusion of the procedure the result will allow the player controlling the moving Squadron to continue to move the Squadron or require that the Squadron stop movement in that area for a later resolution of a combat. When a moving Squadron enters an area already containing a friendly Squadron that is not marked to participate in a battle, and the moving Squadron will end its movement in that area, the two Squadrons are immediately combined into a single Squadron under the command of the higher rated leader on the Squadron Composition Display and the other Squadron marker is removed from play for the turn. If the senior leaders 9
 remove that control marker at the end of the")


10 of the two Squadrons are equal, the player picks which Squadron will remain in play and its leader is considered senior. If no friendly force moves to and ends in an area that was controlled in the previous turn (as indicated by a control marker being present in the area) remove that control marker at the end of the Movement Phase, rather than waiting until the next Area Control, Ports Control, & Victory Points Phase. 6.2 Ports Ports are either controlled by one player or the other, or are neutral. On the map each port is indicated in the area of its location and a color code is applied for indicating the ownership of ports that remain under the control of a particular player in all scenarios and cannot be captured. Other ports that can change ownership do not have a color code on the area map, but instead have a two sided marker that is color coded to indicate by the side currently face up who controls the port. Additionally, there are port boxes on the map with the name of the port, the port numeric value for repairs and other purposes, and color coding dealing with national control. These can be used for the placement of markers that are to be in the indicated port to reduce clutter on the map. Note that there are two different forms of these port boxes. One set are for ports that never change hands and these are color coded in the same way as their counterparts in the map play areas. The other set are for ports that can change control and these have an initial controlling player for each of these ports indicated by the color code for each scenario (or scenario segment of a campaign game) and at the start of play the correct marker for each changeable port should be placed in the box for that port with the correct ownership color face up. Then, if the port changes ownership during the scenario, the marker can be flipped to indicate the national color of the current owning player. Note that the port of Brest is considered to be in the Bay Of Biscay area (only) Port limits Ports are limited in the number of Squadrons that they may host, that is, how many Squadrons may start in them or return to them. This limit is the same as the repair number printed on the map associated with each port. Note that this limit counts individual Squadrons that contain units, but Squadron markers without units or not to be deployed are not considered to be in the port and hence are not counted against the limit. For Neutral ports this number is a maximum per player Neutral Ports There are 4 permanently neutral ports and units of either side may use them to return to port. They will not, however, be able to provide repair for any units of any side in the basic rules. Additionally, during the next movement phase, any units that returned to a neutral port must leave that port and may not return to a neutral port again at the end of the current player turn, that is, units that start movement in a neutral port may not return at the end of movement to a neutral port. Note that at various times in various scenarios particular nations are considered to be neutrals in that they have not yet entered the war for that scenario or campaign. While a nation is so considered to be neutral its ports are considered to be neutral ports and act as such by the rules noted above. Once a nation enters the war as per the scenario rules, starting at that turn year, the ports of that nation are no longer considered neutral. Any opposing forces that do not leave a no-longer-neutral port during that first turn of no-longer-being-neutral are considered destroyed and removed as if lost in combat at the end of the unit-owning-player-turn for that initial turn of entry into the war. Finally in some scenarios and scenario segments of campaigns various ports in North America that normally can change ownership start as neutrals or by scenario rule become neutral during the game. Once these ports are neutral they no longer can change ownership and they remain neutral for the rest of the scenario or campaign Capturing Ports Only the ports which have changeable control markers can be captured. To attempt to capture such a port from the opposing player, the attacking player must have the only forces present at sea in the area, that is a Squadron at sea in the sea area which contains the port, and that squadron must contain at least two (2) units and a leader. Thus ports are captured after area control is determined but prior to assigning victory points and returning to port at the end of each turn. If controlling the area in which the port is located, or being the only player with forces at sea in the area, the player may attempt to take control of one port of the currently controlling player s choice per turn from that area. To resolve this control attempt, the player currently controlling the port rolls a die and adds the roll to the strength of the port that the opposing player indicates is being attacked. The player that is attacking the port rolls a die and adds the roll to the value of the highest rated friendly leader of the friendly Squadron in the area. The player with the higher total wins control of the port. If the totals are equal, the port remains in the control of the player that started the turn controlling it. If control 10

11 has changed, flip the national color marker in the port s box to indicate the color of the new controlling player. Any opposing leaders in a port that is captured are also considered captured while any opposing units in the port are considered to be immediately sunk. Captured leaders return to play after being out of play for one turn, just as if they had been injured in combat (see rule 7.4) New France A: Quebec City is unique in that to be captured, the English player must first have captured the other French port in the area, Louisburg. When Quebec has been captured, New France is considered to have fallen to the English player and remains English for all further turns of the scenario or campaign being played; that is, it cannot be recaptured New France B: Louisburg is also unique in that if it is captured, the English player is considered to have destroyed it, and it is not available on any later turns for any player regardless of the scenario or Campaign being played French East India Company: Pondicherry is unique in that to be captured, the English player must control the sea area it borders on (the Bay Of Bengal) for two (2) turns, instead of the normal one (1). 6.3 Frigates 6.31 General Each scenario starts with an indicated number of frigate markers for each participating nation. This number of markers remains constant for that scenario or scenario segment of a campaign. Frigate markers come into play in a number of rules such as search and the war on commerce. Frigate markers are never lost in combat and may be re-used each turn during that scenario or scenario segment Placement At the start of the movement phase of each turn prior to the movement of any Squadrons or other markers, players may place their Frigate markers that are available for the turn. Players alternate placing one frigate marker at a time, with the English player placing first by simply putting one frigate marker in any sea area on the map. These markers are placed face up and are used to indicate a high level of activity of frigates and other cruisers which would not be something that the other side would be unaware of during the course of a year. The European Powers player places the frigate markers available for the turn of the scenario or scenario segment of a campaign for all the European nations. In all cases each frigate marker is considered to be equal to every other frigate marker. Frigates do not engage in movement or combat per se but will influence search and the war on commerce. There is no limit to the number of frigate markers that may be placed in a particular sea area by one or both players. 6.4 Leaders & Assignment As indicated in the general movement rules, the rating of the highest rated leader acts as the movement allowance of the Squadron to which they are assigned. Additionally, each leader must be assigned to a single Squadron and must be stacked with the units directly under their command. Leaders are considered to be physically aboard the unit in the stack they are placed Name Scenario Rating on top of, when placed on the Squadron Composition Display. Leaders not so placed (on top of a unit in a stack in the Squadron Composition Display) have no effect on play (in effect, they stay ashore, and in later play may be placed in any home port of their nation). Extra leaders may travel with a Squadron placed on top of other units in the stack to be considered to be with that unit and may from that position influence combat. There is no limit on the number of extra leaders that may travel with a Squadron. However, there is a limit to the number of ships that may be directly under the control of a single leader. No leader may control for movement or combat more than 16 units. The senior leader of a Squadron that has more than 16 units hence must have subordinate leaders and these must be indicated by having separate stacks of units within the same Squadron box on the Squadron Composition Display. Do this by placing the senior leader face up while all subordinate leaders are placed face down and placing the sailing and combat order of the stacks by placing them from start at the left to end at the right in a row in the Squadron s box of the display. 6.5 Search A Squadron, as it enters an area containing an opposing Squadron marker, must stop at least temporarily and conduct a search procedure, unless other Squadrons are already in a battle in the area in which case the entering squadron may try to join the already indicated battle, and if it fails it must either enter a friendly or neutral port in the area or continue moving out of the area, even if it exceeds its normal movement ability, in which case this movement must end at the nearest such port. If a squadron starts in a port in an area and moves to sea in that area, it may then just remain in that area and is then allowed to do a search just as if it had just moved into the area. Each player has a two counter set of search resolution marker counters. One is labeled FIGHT while the other is labeled AVOID. To conduct the search, each player secretly picks one of these two markers and when both players have picked, they are revealed to the other player. If both players have picked AVOID, no search succeeds and the moving player may stop voluntarily in 11

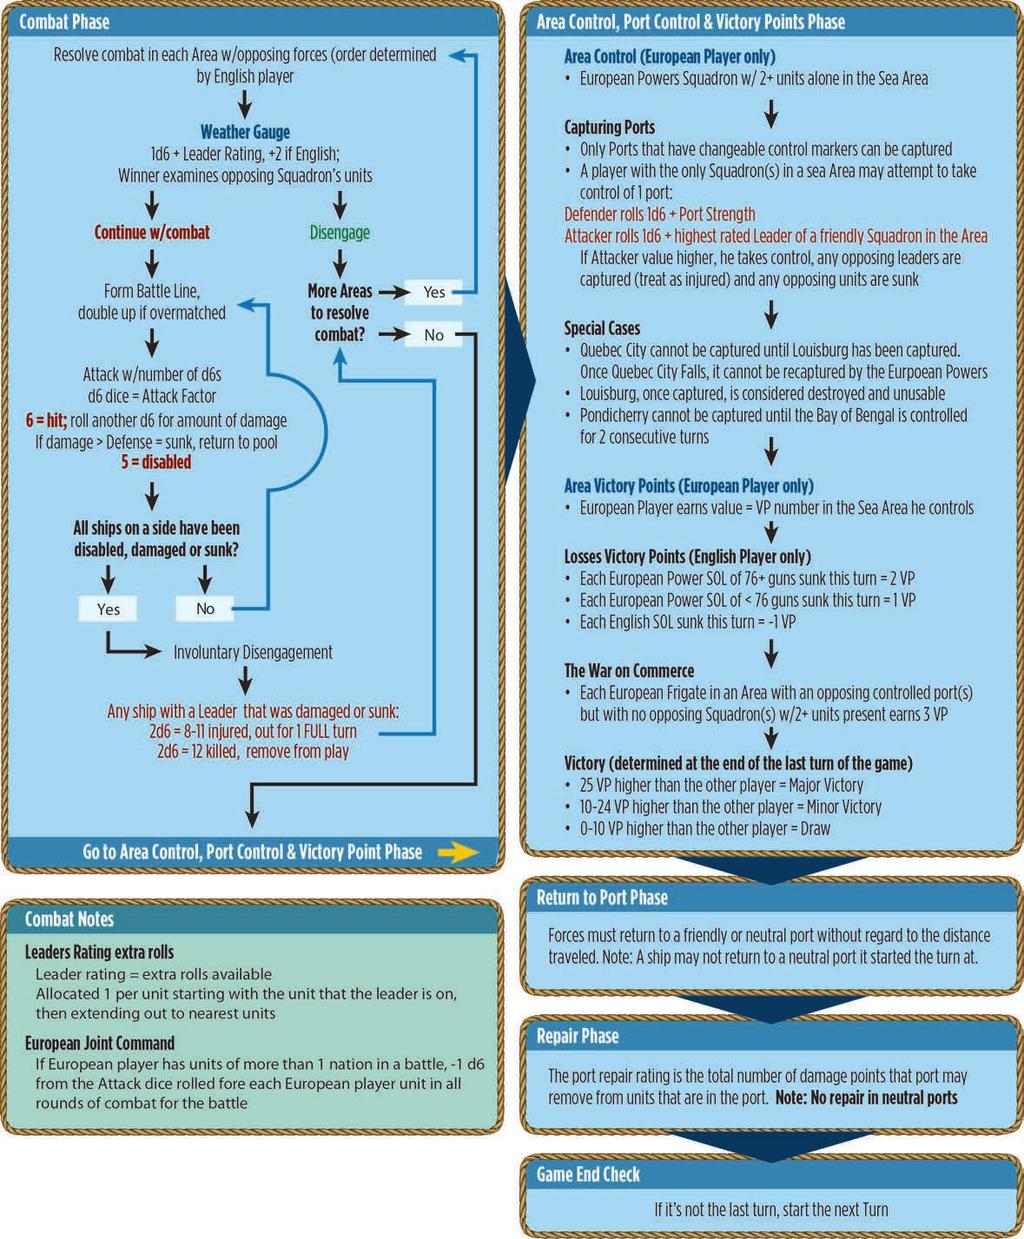
12 the area by entering a friendly or neutral port in the area, but may not remain in the area at sea, so must otherwise simply continue to move, even if it exceeds its normal movement ability, in which case this movement must end at the nearest such port. If both players have picked FIGHT, movement for that Squadron stops immediately in that area and the two Squadron markers are stacked with a Battle marker. Combat may occur between these Squadrons during the combat phase. If one player picks AVOID and the other player picks FIGHT, each player totals the leadership rating of their senior leader in the Squadron plus one (1) for each unit in the their Squadron plus three (3) for each of their frigate markers in the area plus the result of a single die roll for the player that picked FIGHT and the total of three (3) dice rolls for the player that picked AVOID. The player with the higher total wins and whatever their indicated search result was applies. For ties, roll again. Note that if the result of a search is an AVOID, the moving Squadron may not end its movement for the phase at sea in that area. That Squadron may move into a friendly or neutral port in that area to end its movement or it must move on to another area to end its movement, even if this exceeds its normal movement ability, in which case this movement must end in the nearest such port. If one or more other friendly Squadrons enter an area after a search has already found an opposing Squadron and a Battle marker has been placed, do not do further searches. Instead the owning player must determine if each newly entering Squadron can join with the already present friendly Squadron indicated to be involved in a battle. To determine if that extra Squadron can combine with the Squadron that found the opposing Squadron for the upcoming battle, roll a die for the new friendly Squadron and add the senior leader values of both the friendly Squadron now under the Battle marker and the friendly Squadron trying to combine for the combat. If the total is 7 or more, the two Squadrons find each other and can both participate in the combat as a combined Squadron under the command of the higher leader (or player s choice, if equal). On the Squadron Composition Display move the elements of the Squadron to be absorbed to the box of the Squadron of the senior leader and remove the marker of the now empty squadron from play for the rest of the turn. If there is a third, fourth, or further additional friendly Squadron, each repeats this procedure to see if they also manage to join up to participate. Squadrons that do not combine cannot participate in that combat and must either enter port in the area or continue moving to another area as if they had gotten an Avoid result. The only other case is a Squadron entering an area with a friendly Squadron already there at sea, but no opposing Squadron(s) present. In this case no search is required. The moving Squadron may automatically combine with the other friendly Squadron or it may move into a friendly or neutral port in the area or it may continue to move on to another area, again, even if this exceeds its normal movement ability, in which case this movement must end in the nearest such port. 6.6 Squadrons Squadrons represent the only command structure in SOVEREIGN OF THE SEAS. They can be deployed separately, or more than one can be deployed to the same area. Squadron markers also represent all of the forces for that Squadron on the Squadron Composition Displays. Moving the marker is, in effect, the same as moving all of the forces in the Squadron, but saves the physical effort of such repeated movements by having just one counter to move. A Squadron marker that does not contain at least one unit and one leader may be placed into play on the map and moved as an Empty Squadron, or a decoy Empty Squadron Markers A Squadron marker all of whose units are lost or that has never had any units assigned to it may start a turn in any port of its nation. At the start of each turn simply place such an empty Squadron marker in port along with placing Squadron markers for Squadrons that do contain units. These are considered to be the same thing; that is, false information that the opposing player will gather along with actual information as to where Squadrons with real forces have moved. No leaders are assigned to empty Squadrons. They are moved just as if there were normal Squadrons with units and a two (2) rated leader for all movement and search purposes (and markers associated with their movement from optional rules are placed on them just as if they were filled Squadrons). They are revealed as empty and removed from play for the turn if a searching opposing Squadron does not pick avoid as its search choice. At the end of the turn, all empty Squadron markers still at sea are returned to port and are available for use in following turns either containing units or again as empty. 7.0 Combat 7.1 Combat Resolution The combat of opposing Squadrons in the same area that have had a successful search and found each other is mandatory and is done as a series of combats in each area, resolving one area at a time. First the resolution of the Weather Gauge must be determined as it allows the possibility of one side avoiding combat. This is followed by the resolution of combat by the units and leaders of the involved Squadrons from the Composition Displays. 7.2 Weather Gauge To determine which player has the weather gauge each player rolls a die and adds it to the rating of their single most high rated leader in the area that leads a Squadron that will participate in the combat (if a tie, use either). The English player then adds two (2) to the total to represent 12
 1st: Souverain (top of stack) 2nd: Superb 3rd: Téméraire 4th: Zodiaque 5th: Thésée 6th: Soleil Royal 2nd 3rd 4th 5th 6th 1st Overmatch Units British Line (stack) 1st: Mars (top")
13 Battle Lines [7.3] French Line (stack) 1st: Souverain (top of stack) 2nd: Superb 3rd: Téméraire 4th: Zodiaque 5th: Thésée 6th: Soleil Royal 2nd 3rd 4th 5th 6th 1st Overmatch Units British Line (stack) 1st: Mars (top of stack) 2nd: Culloden 3rd: Burford 4th: Dorsetshire 5th: Norwich 6th: Chatham Overmatch Units (start back at 1) 1st/2nd row: St. Albans 2nd/2nd row: Lancaster superior seamanship. The player with the higher resulting total wins the weather gauge. If there is a tie, repeat the procedure until one of the other wins. The player that wins the weather gauge may examine the composition of the opposing Squadron(s) and leaders that are about to engage in the battle. After examining the opposing forces, at the option of the player that won the weather gauge, that player may decide to move directly to battle or may disengage instead of continuing into the battle. If disengaging before any combat is resolved that player must move all friendly Squadrons in that area into a friendly or neutral port in that area or to an adjacent area that has no opposing Squadrons. A disengaging player is considered to have lost any battles in the area for area control considerations. 7.3 Battle Lines To resolve combat for opposing Squadrons, each player lines up their units using the top to bottom of the stack from their Composition sheet for the Squadrons involved in the combat. The line starts with the upper left stack on the Squadron composition display with stacks to the right and then similarly with any stacks in the next row further down the display. Units are lined up counter to opposing counter as 2 lines. If there is overlap, that is one side has more units than the other side, the side with the greater number of units may start overmatching the side with the lesser number, starting at the beginning of the line as indicated by the top unit of the initial (or only) Squadron. Overmatch units must be placed one extra against each opposing unit, starting from the beginning of the opposing line, until all extra units are placed. If there is more than one level of overlap, repeat it in the same way until all units are placed Results Once the Battle lines have been set up, a round of gunfire combat begins. Each player rolls a number of dice for each unit equal to the attack factor of that unit against the opposing opposite unit. In instances where attackers are doubled up (or more) against an opposing unit due to overlap, the total of the attack factors for the units is used. In all instances, the defender is the front (not a doubled up) unit. If a die result is a 6, that is a hit and damage will be rolled for each 6 result against each target unit. If the result is a 5, that is a disabled result, and that unit will drop out of the Battle Line and may not participate in further combat that turn. Disabled units are sent back to the nearest (by movement points or number of areas if the movement points are equal) friendly port immediately after finishing the combat resolution round, regardless of their damage level (or the nearest Neutral port if he unit has more than 13

14 one damage point and a Neutral port is closer than a friendly port, or, if more than one friendly port is the same distance, go to either or any combination of them). Roll again for each 6 hit and the result of the roll is the number of damage points taken by the target. Mark with damage markers each damaged unit to represent its damage taken. Similarly mark each disabled unit with a disabled marker for return to a friendly or neutral port at the end of the current round of combat as indicated just above. Units that accumulate damage greater than their defense value are sunk and should be noted to be removed at the end of the current round of combat. However, for each round of gunfire combat, no results take effect until after all units have fired and results from their firing been assigned. At that point the round ends and players determine if disengagement occurs. If it does, the battle is ended. If not, another round of Gunfire combat is conducted. This continues until either one or both sides disengage, or no forces for one side remain. In either case, the side with remaining forces or that did not disengage wins the battle. Unlike in other WAR AT SEA family games, sunk units, after being counted for Victory Points, are returned to their national pools, as new construction or rebuilt units, as for this game sunk seldom represents actually sinking Damage Undamaged units and damaged units that have not been disabled must continue to fight in ensuing rounds of battle, however they do so with modification of their unit values due to their damage. Each point of damage reduces a unit s attack value by one point for subsequent rounds of combat. However, no unit may be reduced to less than one attack value point remaining Reforming Battle Lines If no disengagement occurs, to form new opposing Battle Lines after a round of combat, first remove any damaged units and place them at the end of the line, in the order of least number of damage points to most number of damage points, that is, the unit with the least damage right after the last undamaged unit. In instances of the same damage, the owning player may pick the order of those units with the same damage total. Then simply close the order for the remaining units after those sunk or disabled have been removed, thus maintaining the same line of battle sequence, and then re-determine any new resulting overlap. Damaged units may not overlap from the front of the opposing line, but instead overlap from the end of the opposing line. Thus, in cases of a very outnumbered opponent, it is possible that undamaged units might overlap the front of the opposing line while damaged units overlap the back of the opposing line, potentially producing even a doubled overlap at the center of the opposing line. 7.4 Leaders & Combat Leaders may have direct influence on combat for the unit they are on and possibly other units. The rating of a leader is the number of extra die rolls the leader provides for each combat round. These extra die rolls are applied one per unit starting with the unit the leader is on and extending out to the number of units of the leader rating to the nearest units. Thus, a leader with a rating of 2 would give one extra die roll to the unit it is on and one extra to either the unit ahead of it (if there is one) or the unit behind it (if there is one). No unit may carry more than one leader and this combat effect of extra die may not apply from more than one leader to a single unit. Thus, if there are two leaders that are so placed on units in a stack that both could apply the extra die roll in combat to a unit, only one may do so. The other may apply its combat die leadership bonus to a unit in the other direction in the stack if this does not break the nearest unit rule, but if it does the extra die roll is simply lost Whenever a unit with a leader is involved in a combat resolution and the ship the leader is aboard is damaged or sunk (not if disabled), at the end of the combat round roll two dice (d6) and total the results. On a 2-7, there is no effect. On an 8-11, the leader is injured. Move the leader marker from the area to the turn track and place it to return after one full turn out of play. Thus, a leader injured in the 1793 turn would be placed on the 1795 spot to return to play in that turn. On a result of 12 the leader is killed. Remove such leaders from play and do not return them to their National pool as they will remain out of play for the remainder of the game. If the unit the leader was on is disabled, after checking for the fate of the leader if the unit was also damaged, the leader leaves the combat area with that unit and is not considered in further combat rounds in that area for that turn. 7.5 Joint Command If the European player has units of more than one nation in a battle (for example, units of both France and Spain), subtract one die from the number rolled for each European player unit in all rounds of combat for that battle. 7.6 Disengagement Disengagement is involuntary and represents the demoralization of the losing side of a battle. If at the end of a round of combat all of the units of one side in an area have been sunk, damaged, and/or sent back to port as disabled, then a disengagement occurs. Basically, as soon as one side has no remaining undamaged units left, the combat ends and the other side puts the Battle marker on surviving Squadron to indicate having won 14

15 the battle. No further combat rounds are played for that battle in that area. Note that this disengagement may not occur in the middle of the resolution of a round of gunfire combat, but only after all involved units have fired and all damage has been assessed. Also note that it is very possible for a unit to be both damaged and disabled, hence being forced out of the battle and back to port with damage. When a disengagement is forced, the losing squadron is considered disbanded and any surviving damaged units of the player that has lost are treated as if they had been disabled and moved directly to the nearest friendly or neutral port as indicated in If it should occur that at the end of a round of battle both sides have no remaining undamaged units, that is both sides have been forced to disengage, both sides follow the disengagement rules and neither is considered to have won the battle. From an area control standpoint, should this occur the area is considered to remain uncontrolled. 8.0 Area Control & Victory Points 8.1 Area Control To be considered to control a sea area during Area Control, Port Control, & Victory Points Phase, the European Powers player must be the only player with a Squadron (Frigate Effort markers do not count) remaining at sea in the area. Units in port in an area never count toward control of the area. In all cases that Squadron must contain at least two (2) units still within it to control the sea area, though these units may be damaged and no remaining leader is required. Generally this means that the European Powers player will have to either have had no competition for the area and have such a Squadron present or have won any battle for the area by sinking or sending home or to port as disabled all opposing forces and after combat still having a friendly Squadron present. Finally, if no forces of sufficient type and quantity are present, then that area is considered uncontrolled. Sea control markers for the European player should be placed to indicate the state of controlled areas. 8.2 Area Victory Points Some sea areas are indicated to be worth victory points by having a large victory point number in the area. Only the European Powers player earns victory points for area control. After the conclusion of the Combat Phase, determine this number and advance the European player victory point markers on the Victory Point Track by the total for the European Powers player controlled areas for the turn. The English player never earns points for area control. Note that many areas have no indicated control points and as such they are not judged for control for any purpose. 8.3 Losses Victory Points Unlike in other games of the WAR AT SEA family, in SOVEREIGN OF THE SEAS victory points are earned by the English player (only) for destroying opposing forces, though both players lose points for losing their own forces. During the Area Control & Victory Points Phase after completing the calculation of victory points for Area Control, next count and mark on the Victory Point Track amounts for European Powers forces sunk during the turn just completed. For each opposing SOL type unit sunk of 74 guns rating or greater, count two (2) victory points. For each of less than 74 guns rating, count one (1) victory point. Then subtract one (1) victory point from the English player total for each of their units sunk in the turn, regardless of the gun rating. After accounting for sunk units and marking totals with the player s Victory Point markers on the track, return the units to their national pools for use in the next turn. 8.4 The War On Commerce European Powers Frigate Effort markers directly earn victory points if they have been placed to be able to attack opposing commerce in an area. After determining area control at the end of a turn and prior to returning to port, check to see if any European Powers Frigate Effort markers are in an area that has opposing controlled ports but has no opposing Squadrons. Frigate markers are considered to be operating successfully against opposing merchants in such an area if there is no opposing Squadron present. For each such European Powers Frigate Effort marker, the owning player earns 3 victory points, which should be marked with the European Powers player s Victory Point markers on the VP track. If an opposing Squadron is present in the area and that Squadron has two (2) or more units remaining in it (even if damaged) on the Squadron Composition Display, no points may be earned for the war on commerce by frigates in that area, but if the opposing Squadron has fewer units, the European Powers Frigate Effort marker still earns victory points. 8.5 Victory The total from the Victory Point track at the end of the last turn of the game determines which player wins. If the total is 50 or more points higher for one player or the other, that player wins a major victory. If the total is points higher for one player or the other, that player wins a minor victory. For differences less than 25 points, the game is considered to be a draw. 9.0 Return To Port & Damage Repair 9.1 Return To Port After all Victory Point determinations are completed, all remaining forces, markers and units, are returned to port. Forces must return to their national ports, an active friendly nation port, or a neutral port. After all forces are dealt with and no more forces remain in sea areas, play moves to the Repairs Phase. No Leader 15


16 markers are needed with a Squadron for it to return to port. The port returned to may be any port of the nation of the returning Squadron or a neutral, and without regard to distance traveled to return to that port. Note that if units are returned to the port of an active friendly nation, those units may be freely combined into the Squadron(s) of that other nation in the following turn without regard to national distinctions. 9.2 Damage Repair Damage points assigned to units may be repaired to some extent and over time. Each player has a repair capability number printed on the map for each of their national ports. This number is the maximum total number of damage points that port may remove from units of its nationality or another active friendly nationality that are in that port during the Damage Repair Phase. Players simply remove damage from units of their choice in each such port to the indicated point limit. For example, if there are 3 units, each with 4 damage, in a port with a capability of 8, then 2 units may be fully repaired and 1 left with 4 damage; or 2 may receive 3 repairs and 1 receive 2 repairs, etc. The owning player may repair all of the damage of a particular unit or only part of a unit s damage. A unit is never required to be assigned to a squadron and sailed every movement phase, so a unit that remains damaged after as much repair as possible is done can simply be left in that port to be further repaired on subsequent turns, or it may be sailed with some damage as yet unrepaired by assigning it to a squadron that is to be moved. Damage to units may not be repaired in neutral ports. Sovereign of the Seas 9.3 Flow Charts In order to aid players in following the sequence of play and choosing options as they occur, flow charts for the game are provided. In the case of uncertainty or contradiction, the textual rules take precedence over the flow charts. 16
17 17

18 11.0 Optional Rules These rules are extras that complicate play, but can make the game somewhat more historically reflective. They may be used individually or in combinations as agreed to by both players before the start of play. Additionally, some of the rules will obviously provide an advantage to one side or the other, so they may be added to balance out unequal players and make for a better game. 11.A Sea Time Spending long periods at sea either on station or on an extended cruise could help crews by giving them vital experience but could hurt the readiness of the forces due to the wear and tear of such operations on the ships of the Squadron. To reflect this there are markers available for the English player for On Station and for both players for Extended Cruise. 11.A1 On Station For an English Squadron, if that Squadron is to be moved no more than two (2) areas, the English player may, after moving the Squadron, place an On Station marker on the Squadron. Such a marked Squadron adds 3 to its search total for any searches in its area that turn but also rolls a single die to determine wear and tear damage. The result of the roll is the total number of damage points that must be assigned to units in the Squadron. These points may be assigned in any manner desired by the English player that is broken up between units evenly or unevenly. The marker is removed during the return to port phase. 11.A2 Long Voyages For any Squadron that is moving 8 or more areas, place a Long Voyage marker on the Squadron as it enters its eighth area of movement. If the same Squadron moves 16 or more areas, place a second marker on the Squadron as it enters its sixteenth area of movement. If the same Squadron moves 24 or more areas, place a third marker on the Squadron as it enters its twenty-fourth area of movement. After movement for the Squadron is completed, roll one die per Long Voyage marker that the Squadron has obtained. The result of the roll is the total number of damage points that must be assigned to units in the Squadron. These points may be assigned in any manner desired by the owning player that is broken up between units evenly or unevenly. Any Long Voyage (not Damage) markers are removed during the return to port phase. 11.B Weather This rule produces a large increase in the luck factor of the game but is actually somewhat consistent with the sorts of effects that weather could have on campaigns. Whenever a Squadron attempts to leave a port a die must be rolled for it. The value of the highest numbered leader with the Squadron is added to the die roll. On a modified result of 5 or more the Squadron moves to sea 18
19 normally and there is no weather effect. On a modified result of 3 or 4 the Squadron must stay in port and may not be moved at all that turn. On a modified result of 1 or 2, serious storm damage occurs. Roll a single die for each unit in the Squadron. A result of 1-4 is the storm damage assigned to that unit. This damage is in all ways identical to damage as it would have been taken in combat. A result of 5-6 is not damage to that unit. Additionally, the Squadron may not leave port that turn. 11.C Revolution The French Revolution caused major change in the command structure of all French forces, including the French Navy. In particular, senior leadership that was associated with the old aristocracy was often discarded or even executed. To represent this, the European Powers player rolls a die for revolution effects at the start of the turn beginning with turn 1793 and through turn The die roll result is the number of leaders randomly removed from the French leader s pool. These removed leaders are placed aside as a separate group and starting at the beginning of the 1796 turn each turn one is randomly picked and returned to the French leader pool. 11.D Alternate Delayed Repair For simplicity, repair is assumed to have occurred sometime during the ongoing turn, since events of the turn would have occurred over a long time period. However, players may want to delay repair to reflect long term problems and complicate the game slightly. To try this, only units that have remained in the repairing port for the entire turn may be repaired during the Repair Phase for the current turn. 11.E Bidding In some situations, both players may wish to play the same side due to a perception of an advantage for that side. Should that happen, before determining which player will play which side, both players should secretly note on a sheet of paper how many victory points they will bid to play the desired side. After this is done, both players reveal their bids, and the player with the higher bid plays the side of their choice, with the other player taking the other side. However, the bid losing player is granted a starting victory point level before the game begins equal to the number bid by the winning player. In event of a tie, flip a coin with the winner picking a side first and no extra victory points earned. 11.F Handicapping If players are of unequal skill or experience in play or with the game, play may be balanced by giving to the weaker player a starting number of victory points as a handicap. Determining the level of a handicap is always difficult, but an attempt should be made to reflect the differences between the players and any optional rules in use as fairly as possible. Additionally, some players may, after playing the game a number of times, discern what they consider to be an imbalance toward one side or the other. Should this occur, simply modify the starting level of the side perceived to be at a disadvantage to start the game with a number of victory points, rather than starting at zero, that reflects what is considered by the players to compensate for their view of the imbalance. 11.G Fog Of War SOVEREIGN OF THE SEAS in its standard rules is, like GRAND FLEET and SETTING SUN, RISING SUN, much more oriented toward fog of war aspects than the other earlier games of this family. If players are going to play the game solo, or wish to reduce this fog of war aspect, instead of playing the game with unit and maker counters face down until the stage of laying out forces to resolve combats, and using the Squadron markers to further disguise the contents and identity of forces, players may simply play with counters face up and subject to examination by the opposing player at any time. This reduces considerably the historical uncertainty of the maritime situations in the Age of Sail, but it also makes the game much more chess like by allowing additional pre-calculation of potential combats. Additionally, playing in this fashion allows for solitaire play of the game, should the player be working on the game solo. 11.H Automatic Campaign Victory In the standard game, victory in a campaign is only determined at the end of the last turn. However, to increase tension, automatic victory may be used in Campaigns only (not in regular scenarios). Automatic victory occurs at the end of any turn when a player has a score of 100 or more, thus ending the game before the end of the last turn. 11.I The Northern Alliances About once per war the Russians, Danes, and/or Swedes in the Baltic Sea appeared to the English to be a threat that they needed to consider and on occasion do something about. To represent this, each scenario or each new scenario section of a campaign, the European Powers player rolls a die at the start of each turn. For the 1756 and 1778 scenarios or campaign segments this starts with the first turn. For the 1793 scenario or campaign segment this starts with the 1800 turn. On a result of six (6) for that turn and that turn only, the Baltic Sea area earns 4 victory points for the European Powers player if at the end of that turn the area is not occupied by an English Squadron containing at least 12 SOL units and no Squadrons at all of any level of units of any European Powers player nation. The first time this six is rolled for a scenario or campaign segment this procedure is followed, but at that point rolling for the occurrence of the Northern Alliance is halted for the rest of that scenario or campaign segment. That is, this victory point opportunity may only occur one time per scenario or campaign segment. 19
20 11.J Nelson s Year Off If the Nelson marker is in play and there is a combat including Nelson in the area in which at least 75% (3 out of 4, rounding down) of the opposing units in that area are sunk or captured, the Nelson marker is removed from play for the rest of that turn and is kept out of play for the following turn, to return on the turn after that. Simply place the marker on the correct year for its return and then put it back into play when that year starts as an already picked and active leader marker 11.K Spanish Early Entry Spain sides with France for the entire 7 Years War scenario and for the full campaign game starting with the 7 Years War period. For this optional rule Spain and its ports and forces are completely under control of the European Powers player for the entire game. 11.L Boarding And Capture Though opposing vessels were frequently boarded and captured in battle during this period, surprisingly few ended up back in service with their new owners and of those that did, very few remained in service very long, mainly due to the captured vessels being hard to fit into the bureaucratic requirements of the shipbuilding and certification sections of the nation of the new owners. In the standard rules, a sunk result reflects totally out of action, scuttled, scrapped, and captured in addition to actually sunk. To reflect possible capture and recommissioning under new ownership separately, if a combat result is a 5 or a 6 which will disable or damage a unit, before doing that roll again for that unit with two dice and if the totaled result is 11 or 12, instead of returning to port, the unit is captured. Place it aside. If any other result, continue with normal resolution. During the following Victory Point phase the capturing player earns 2x the normal English player earned victory points for the unit, regardless of who captured the unit. An extra new forces unit (not for the base) is then added for the next turn to the oncoming new forces of the capturing player to be used in that next turn only. The capturing player picks a unit from the unused forces of the capturing nation with the same attack and defense values or as close to them as possible, disregarding the gun rating of the captured unit if need be, and using forces not normally available for the scenario or scenario segment of a campaign as the first choices and those for the scenario as the second choice. If an opposing leader was on the unit that was captured, that leader is considered to have been captured as well if he survives the combat and is placed on the turn track to return to play as paroled to the normal owning player after sitting out for a turn, just as if the leader had been injured, regardless of if the leader actually was injured. 11.M Permanently Sunk In SOVEREIGN OF THE SEAS a Sunk result is not intended to represent an actual sinking much of the time, but rather a heavily damaged form of disabled, hence sunk units return to availability via being returned to their national pools. To represent actual sinking without any subsequent constructional recovery, use this optional rule. After using the combat system normally and having computed and scored the victory points for Sunk units for the turn, and prior to returning those units to their national pools, first roll a single die for each such Sunk unit. On a result of 1-5, return the unit to its national pool normally. On a result of 6, the unit is considered permanently sunk. Score victory points for sinking it and for its loss again so it has scored twice in all respects and then put it aside so it no longer returns to play for the scenario or the campaign segment being played. The unit(s) do return to play for subsequent campaign segments if a campaign is being played, or for subsequent replays of the scenarios in which they are normally in play. 11.N Simplified Combat Resolution This rule lets combat resolve by gun & leader superiority instead of buckets of dice. 1 hit per ship involved plus difference of totaled guns and leaders for additional hits against the lower side. Assign hits to ships by single die roll against each opposing ship in the battle line starting at the front with a 5 or 6 no hits but all other numbers the number of hits against the ship being rolled for until all total hits for that side are used. If not all used by end of first roll against each unit in the line, start over again at the front of the line including units already indicated as sunk or disabled. Doing this procedure represents one round of combat. Repeat if required by the normal rules. 11.O Russians There are a number of Russian ship units and leader markers. These can come into play starting on the 1795 turn as new forces but do not count against any of the other forces limits for the English player. At the start of each turn place all of these Russian forces in a separate pool (including those that might have been in play on previous turns, unless they have been eliminated). To determine the Russian forces for each turn, roll a single die and add six to the result. Then pick randomly that number of ships from the 18 Russian ship unit counters and randomly pick 2 of the 5 Russian leader markers. These may be placed with any English squadrons as one or two groups, each with at least one leader. In all respects they are treated as if they were English units, however, they may never be moved to an area that is not adjacent to the European land mass. This effectively limits them (and the English squadron(s) to which they are assigned) to the Baltic Sea, the North Sea, the Bay of Biscay, the Iberian Basin, the Eastern Med, the Western Med, and the Black Sea areas. Russian forces are used in this way for the 1795, 1796, & 1797 turns. Starting in turn 1798 the English player must roll a die to see if they 20


21 will be available for the turn. If the die roll for 1798 is 3 or less, the Russian units are removed from play for the rest of the game. For the 1799 turn if the roll is 4 or less the Russians are removed. For 1800 if the roll is 5 or less the Russians are removed. From 1801 to the end of the game, Russian units are no longer used without needing to complete a die roll Design Notes Like pretty much all of my game designs these days, this one started with a topic I was interested in and found no existing game covering, so I figured I would put together something for myself to mess about with, and then it grew. SOVEREIGN OF THE SEAS is a continuation of my long term interest in the general concepts behind the classic old Avalon Hill game WAR AT SEA. I have always admired its simplicity and playability while still giving players the general flow of the history of the topic at a very strategic level. WAR AT SEA covered the Atlantic Ocean and Mediterranean Sea for the Second World War and was a John Edwards design. Later Avalon Hill published a second game in the family, though a more complex one due to the requirement to add in amphibious assaults and aircraft carrier operations, as VICTORY IN THE PACIFIC to bring the design structures to the Second World War in the Pacific. But at that point, Avalon Hill moved on and never published another game in the family. I have always thought this was a shame. It seemed to me that the core ideas, that is opposing lines of warships for combat resolution with named vessels to give tactical flavour to a very strategic game that concentrated on area sea control and opposing fleet actions was very much in the Mahan mold and would fit well to earlier naval situations, perhaps even better than it did to the Second World War. And eventually, this got me going on using those core ideas for a World War One strategic naval game that became GRAND FLEET, published back in So, we were now back to 1916, and from there it seemed natural to push the family back a little bit more to the Russo-Japanese War of , resulting in the publication of SETTING SUN, RISING SUN in But well before it was published I had started to think about if the concepts could work for a game going back to the start of the ideas of the Line of Battle and the Battleship itself, that is, the Age Of Sail. What you hold in your hands now is the result of that question. Needless to say, there are considerable differences between the design for the Second World War, and one for the Age Of Sail. As another Mahanian concept topic and game, control of areas of sea and the conflict of fleets in lines of battle remain the core, but there were some obvious serious changes needed too. Movement, in particular, since sail powered square rigged ships had no real fuel restrictions to their range. But, they also had to contend with prevailing winds. This lead to a movement system that allows infinite movement, but introduces reasonable restrictions that makes for practical limits. Ships were also much easier and faster to build during this period, but again practical considerations tended to prevent over building, and rules had to be developed to reflect this. Design on this game started in 2010 and it was about 6 years before it ended up in print, an indication of how far from the start of the family this design became. And this is not the end, for me anyway, of WAR AT SEA family games. I have one more just going into late design now which, without the encouragement of Bill at Compass Games I likely would not have dove into. DAWN OF EMPIRE takes the family to the Spanish American War of 1898 in the Atlantic and Caribbean. It will be another year or two to get it developed and tested, but that will not be as long as it sounds, and then we will have filled in the last major naval war between 1756 and And in the meantime, I hope you enjoy playing SOVEREIGN OF THE SEAS Credits Design & Development: Stephen Newberg Rules Editing: Eric Feifer, Charles McLellan, Ed Pundyk Flow Charting: Fen Yan Graphics & Layout: Brien J Miller Play Testing: Art Brochet, Roger Clewley, Stephen Graham, Bill Gustafson, Michael Junkin, Brian Moore, Bryon Salanoir, Ian Weir, Jay White, Mark Woloshen, & The W.I.T. Group (they may be getting older, but they are also getting better!) Vassal Module: Charles McLellan Cover Painting Stephen Newberg H.M.S. Temeraire by Oliver Hurst Used with Kind Permission North Oyster, British Columbia, Canada, September,


22 Compass Games
GLOSSARY USING THIS REFERENCE THE GOLDEN RULES ACTION CARDS ACTIVATING SYSTEMS
 TM TM USING THIS REFERENCE This document is intended as a reference for all rules queries. It is recommended that players begin playing Star Wars: Rebellion by reading the Learn to Play booklet in its
16.0 OPTIONAL RULES These rules may be introduced to add variety to your games. WWII on the High Seas
 16.0 OPTIONAL RULES These rules may be introduced to add variety to your games. 16.1 Linked Games This rule links several battles to determine the overall winner. Set-up and play each battle as normal.
Introduction. Victory. Solitaire Decisions. Campaigns
 Introduction...2 Campaigns...2 Victory...2 Solitaire Decisions...2 Components...3 Force Counters...4 Force Descriptions...5 Ship Forces...5 Set-Up...7 Sequence of Play...7 Battle...11 Battle Set-Up...11
RU L E S REFERENCE USING THIS RULES REFERENCE
 TM TM RU L E S REFERENCE USING THIS RULES REFERENCE This document is a reference for all Star Wars: Armada rules queries. Unlike the Learn to Play booklet, the Rules Reference booklet does not teach players
Buck Rogers Battle For The 25 th Century 1. 4 Turn Phases Complete each phase in order Definitions
 Buck Rogers Battle For The 25 th Century 1 OBJECT 1) Control 15 Territorial Zones at the end of any turn 2) Control the last Leader on the board at any time 3) Convince everyone else to surrender 4) Control
Musket Diplomacy. Contents
 Musket Diplomacy Contents 1. Introduction... 2 2. The Map... 2 3. Playing Pieces... 2 4. State Display & Player Aid Cards... 2 5. Sequence of Play... 3 1. Diplomacy Segment a. Alliances b. Event Cards
CONTENTS INTRODUCTION Compass Games, LLC. Don t fire unless fired upon, but if they mean to have a war, let it begin here.
 Revised 12-4-2018 Don t fire unless fired upon, but if they mean to have a war, let it begin here. - John Parker - INTRODUCTION By design, Commands & Colors Tricorne - American Revolution is not overly
Sample file TABLE OF CONTENTS
 CHAPTER 1 - THE BASICS 4 The Ship Data Card 5 Setup 6 Selecting and Organizing Forces 6 Flagships 6 Operating Independently 7 Deploy Forces 7 Turn Order 8 Movement Phase Overview 9 Shooting Phase Overview
Axis & Allies Pacific FAQ
 Setup Axis & Allies Pacific FAQ December 11, 2003 Experienced players sometimes find that it s too easy for Japan to win. (Beginning players often decide that it s too hard for Japan to win it s all a
Napoleon s Triumph. Rules of Play (draft) Table of Contents
 Table of Contents") Rules of Play (draft) Table of Contents 1. Game Equipment... 2 2. Introduction to Play... 2 3. Playing Pieces... 2 4. The Game Board... 2 5. Scenarios... 3 6. Setting up the Game... 3 7. Sequence of Play...
Rules of Play (draft) Table of Contents 1. Game Equipment... 2 2. Introduction to Play... 2 3. Playing Pieces... 2 4. The Game Board... 2 5. Scenarios... 3 6. Setting up the Game... 3 7. Sequence of Play...
ARMY COMMANDER - GREAT WAR INDEX
 INDEX Section Introduction and Basic Concepts Page 1 1. The Game Turn 2 1.1 Orders 2 1.2 The Turn Sequence 2 2. Movement 3 2.1 Movement and Terrain Restrictions 3 2.2 Moving M status divisions 3 2.3 Moving
Rules: Axis and Allies 1942
 Page 1 of 22 Page 2 of 22 Rules: Axis and Allies 1942 NOTE: Although mostly the same as the tabletop rules, these rules have been modified to reflect the online version of the game. The rules themselves
Details of Play Each player counts out a number of his/her armies for initial deployment, according to the number of players in the game.
 RISK Risk is a fascinating game of strategy in which a player can conquer the world. Once you are familiar with the rules, it is not a difficult game to play, but there are a number of unusual features
The Rules of the Game
 The Rules of the Game 1 A Brief History of the World is played over six epochs. During an epoch each player will lead an empire. This empire will establish itself, expand into other lands and make an impact
When placed on Towers, Player Marker L-Hexes show ownership of that Tower and indicate the Level of that Tower. At Level 1, orient the L-Hex
 Tower Defense Players: 1-4. Playtime: 60-90 Minutes (approximately 10 minutes per Wave). Recommended Age: 10+ Genre: Turn-based strategy. Resource management. Tile-based. Campaign scenarios. Sandbox mode.
Game components. Common components: 1 dice tower. 24 progress tokens. 40 commodity tokens 8 of each type
 Follow the lead of the famous navigator and discoverer Amerigo Vespucci. New lands are waiting to be discovered and to provide a new homeland rich with valuable resources ffor its settlers. Good planning
Range Example. Cards Most Wanted The special rule for the Most Wanted objective card should read:
 Range Example FAQ Version 1.2 / Updated 9.30.2015 This document contains frequently asked questions, rule clarifications, and errata for Star Wars: Armada. All changes and additions made to this document
Free Shipping for all USA orders!
 Free Shipping for all USA orders! The Game Board The game board shows New York City and surrounding land and water areas. Locations are on land areas. Game units are placed on locations during game play.
Fleet Engagement. Mission Objective. Winning. Mission Special Rules. Set Up. Game Length
 Fleet Engagement Mission Objective Your forces have found the enemy and they are yours! Man battle stations, clear for action!!! Mission Special Rules None Set Up velocity up to three times their thrust
CARCASSONNE. A tile-laying game for 2-5 players aged 10 and up.
 CARCASSONNE A tile-laying game for 2-5 players aged 10 and up. Contents 80 Sea Tiles (including 1 starting tile with Captain s Wheel icon and a dark back), which picture islands, trade routes, sea zones,
Down In Flames WWI 9/7/2005
 Down In Flames WWI 9/7/2005 Introduction Down In Flames - WWI depicts the fun and flavor of World War I aerial dogfighting. You get to fly the colorful and agile aircraft of WWI as you make history in
CONFEDERACY GAME OVERVIEW. Components 60 Troop tiles 20 double sided Order/Wound Tokens 2 player aids 6 dice This ruleset
 MODERN #1 CONFEDERACY GAME OVERVIEW Pocket Battles is a series of fast and portable wargames. Each game comes with two armies that can be lined up one versus the other, or against any other army in the
Portable Wargame. The. Rules. For use with a battlefield marked with a grid of hexes. Late 19 th Century Version. By Bob Cordery
 The Portable Wargame Rules Late 19 th Century Version For use with a battlefield marked with a grid of hexes By Bob Cordery Based on some of Joseph Morschauser s original ideas The Portable Wargame Rules
Maida 1806: Stuart vs. Reynier
 Table of contents. 1.0 Introduction... 2.0 Components... 3.0 Gameplay... 4.0 Leaders... 5.0 Infantry in Column... 6.0 Infantry in Line... 7.0 Square... 8.0 Skirmish order... 9.0 Cavalry... 10.0 Artillery...
War on the High Seas
 War on the High Seas By Martin Knight 20 The game is set in the year of 1750 around the time that world trade was plagued by piracy, dangerous ocean voyages and fierce wars. Can you a small time merchant
Frontier/Modern Wargames Rules
 Equipment: Frontier/Modern Wargames Rules For use with a chessboard battlefield By Bob Cordery Based on Joseph Morschauser s original ideas The following equipment is needed to fight battles with these
Star Trek Fleet Captains FAQ version
 If you are missing your command posts, look under the ship insert (not the entire insert, just the insert the Ships are in) Where can I get replacements for damaged, missing or broken cards/ships: http://
DOMINATION PLAYER A PLAYER B
 DOMINATION The battlefield will provide a distinct tactical advantage for whoever holds it for many years to come. Victory can be achieved by forcing the enemy back and securing the key points on the battlefield,
The Glory that was GREECE. Tanagra 457 BC
 The Glory that was GREECE Tanagra 457 BC TCSM 2009 The Glory that Was Vol. I: Greece Rulebook version 1.0 1.0 Introduction The Glory that was is a series of games depicting several different battles from
Set-Up Perform these 4 steps to prepare for play:
 Introduction Modern Naval Battles - Global Warfare is a fast-paced card game depicting naval warfare between 2 to 6 players. Each player is placed in command of a fleet of the most powerful military vessels
DELOS NAVAL RULES. W. L. Greene Revision 1.3, February 14, 2011
 DELOS NAVAL RULES W. L. Greene Revision 1.3, February 14, 2011 Table of Contents I. INTRODUCTION... 1 II. SCALE AND BASING... 1 III. ORGANIZATION AND SCENARIO SETUP...1 IV. TURN SEQUENCE... 1 V. COMMAND...
Range Example. CARDS Most Wanted The special rule for the Most Wanted objective card should read:
 Range Example FAQ Version 1.1.1 / Updated 7.24.2015 This document contains frequently asked questions, rule clarifications, and errata for Star Wars: Armada. All changes and additions made to this document
TUTORIAL DOCUMENT. Contents. 2.0 GAME OBJECTIVE The Overall Objective of the game is to:
 TUTORIAL DOCUMENT Contents 1.0 INTRODUCTION 2.0 GAME OBJECTIVE 3.0 UNIT INFORMATION 4.0 CORE TURN BREAKDOWN 5.0 TURN DETAILS 5.1 AMERICAN MOVEMENT 5.2 US COMBAT 5.3 US MOBILE MOVEMENT 5.4 US MOBILE COMBAT
COMPONENT OVERVIEW Your copy of Modern Land Battles contains the following components. COUNTERS (54) ACTED COUNTERS (18) DAMAGE COUNTERS (24)
 ACTED COUNTERS (18) DAMAGE COUNTERS (24)") GAME OVERVIEW Modern Land Battles is a fast-paced card game depicting ground combat. You will command a force on a modern battlefield from the 1970 s to the modern day. The unique combat system ensures
GAME OVERVIEW Modern Land Battles is a fast-paced card game depicting ground combat. You will command a force on a modern battlefield from the 1970 s to the modern day. The unique combat system ensures
SPACE EMPIRES Scenario Book SCENARIO BOOK. GMT Games, LLC. P.O. Box 1308 Hanford, CA GMT Games, LLC
 SPACE EMPIRES Scenario Book 1 SCENARIO BOOK GMT Games, LLC P.O. Box 1308 Hanford, CA 93232 1308 www.gmtgames.com 2 SPACE EMPIRES Scenario Book TABLE OF CONTENTS Introduction to Scenarios... 2 2 Player
The winner rules the Spanish Main until the next encounter!
 Game play is a suspenseful sea duel between the pirate ship and the Spanish galleon and, true to all the historically-based pirate adventures, any one of several outcomes is possible. Will the Seahawk
Struggle of Empires Game design by Martin Wallace. Artwork by Peter Dennis.
 Struggle of Empires Game design by Martin Wallace. Artwork by Peter Dennis. Overview Struggle of Empires recreates the military, economic, and political rivalries of the major European powers of the eighteenth
SPACE EMPIRES Rules of Play RULE BOOK. Version 1.2. GMT Games, LLC P.O. Box 1308 Hanford, CA , 2017 GMT Games, LLC
 SPACE EMPIRES Rules of Play RULE BOOK Version. GMT Games, LLC P.O. Box 08 Hanford, CA 9 08 www.gmtgames.com SPACE EMPIRES Rules of Play TABLE OF CONTENTS.0 Introduction.....0 Playing Pieces.....0 Sequence
All text is Copyright to Tim Edwards 2017
 CONTENTS Introduction 2 Dice Play 3 Attacking 7 Overview 2 Movement 4 Occupying the same square 13 Components 2 Special manoeuvres 6 Winning the game 14 Set up 3 Running aground 7 Print and play boards
Solitaire Rules Deck construction Setup Terrain Enemy Forces Friendly Troops
 Solitaire Rules Deck construction In the solitaire game, you take on the role of the commander of one side and battle against the enemy s forces. Construct a deck, both for yourself and the opposing side,
SERIES RULEBOOK. Game Design by Mark S. Miklos. Version: June 2017 TABLE OF CONTENTS. Great Battles of the American Revolution
 1 SERIES RULEOOK Game Design by Mark S. Miklos Version: June 2017 TALE OF CONTENTS 1. Introduction... 2 2. Components... 2 3. Game Scale and Terminology... 2 4. How To Win... 3 5. Sequence of Play Outline...
AXIS AND ALLIES 1914 OPTIONAL RULE: RESEARCH AND DEVELOPMENT
 AXIS AND ALLIES 1914 OPTIONAL RULE: RESEARCH AND DEVELOPMENT Using this rule, you may attempt to develop improved military technology. If you decide to use Research & Development, it becomes the new phase
Caesar Augustus. Introduction. Caesar Augustus Copyright Edward Seager A board game by Edward Seager
 Caesar Augustus A board game by Edward Seager Introduction Caesar Augustus is a historical game of strategy set in the Roman Civil War period for 2-5 players. You will take the role of a Roman general,
Summary of changes in this version VERSION / EFFECTIVE
 TM TM Tournament FAQ Summary of changes in this version VERSION 2.1.1 / EFFECTIVE 4.2.2016 Movement, Page 3 Card Clarifications, Pages 5-7 All changes and additions made to this document since the previous
v.1.1 Colonial Summary A game by Christophe Pont - Rules revisited by Paolo D Ulisse
 Summary 0. Introduction...2 0.1. Object of the game...2 1. Game components...2 1.1. The Board...2 1.2. The Market place...3 1.3. The Loan display...3 1.4. A player s Nation board...3 2. Terminology...3
Stargrunt II Campaign Rules v0.2
 1. Introduction Stargrunt II Campaign Rules v0.2 This document is a set of company level campaign rules for Stargrunt II. The intention is to provide players with the ability to lead their forces throughout
Fleet Engagement. Mission Objective. Winning. Mission Special Rules. Set Up. Game Length
 Fleet Engagement Mission Objective Your forces have found the enemy and they are yours! Man battle stations, clear for action!!! Mission Special Rules None Set Up velocity up to three times their thrust
Of Dungeons Deep! Table of Contents. (1) Components (2) Setup (3) Goal. (4) Game Play (5) The Dungeon (6) Ending & Scoring
 Components (2) Setup (3) Goal. (4) Game Play (5) The Dungeon (6) Ending & Scoring") Of Dungeons Deep! Table of Contents (1) Components (2) Setup (3) Goal (4) Game Play (5) The Dungeon (6) Ending & Scoring (1) Components 32 Hero Cards 16 Henchmen Cards 28 Dungeon Cards 7 Six Sided Dice
Of Dungeons Deep! Table of Contents (1) Components (2) Setup (3) Goal (4) Game Play (5) The Dungeon (6) Ending & Scoring (1) Components 32 Hero Cards 16 Henchmen Cards 28 Dungeon Cards 7 Six Sided Dice
2.0 game components support Units. color to make them easier to pick out. Each player has two types of game units: Combat Units Support units
 basic rules Somme 1918 - Bloody Spring is a wargame that simulates the German spring offensive of 1918 that was aimed at separating the British and French armies. Players will find themselves in the role
Command Phase. Setup. Action Phase. Status Phase. Turn Sequence. Winning the Game. 1. Determine Control Over Objectives
 Setup Action Phase Command Phase Status Phase Setup the map boards, map overlay pieces, markers and figures according to the Scenario. Players choose their nations. Green bases are American and grey are
dreadnoughts & battlewagons folio STANDARD RULES
 dreadnoughts & battlewagons folio STANDARD RULES 1.0 INTRODUCTION 1.1 Map & Time Scale 2.0 COMPONENTS 2.1 Inventory 2.2 Map 2.3 Counter Types & Colors 2.4 Ships 2.5 Counting Range 2.6 Effective Range 2.7
I-95 GAMERS. Domination Missions
 I-95 GAMERS Domination Missions I-95 GAMERS Domination Missions Design notes Domination special rules Domination Frontline Domination Blind Domination Blitzkrieg Domination Early war Blitzkrieg Domination
Empires at War. 2. Win conditions Your main objective is destroy all unit cards of the opposing player. You can recognize unit
 Empires at War 1. About game Empires at War is a competitive card game set during I World War. Players create unique decks and take control over armies of conflicted nations. To win, you have to break
NOT YET LOST Rule Book
 NOT YET LOST Rule Book 1. SETUP 1.1. Place one Pionier on the SW Approach end space 1.2. Place one Police on the W, NW, NE, E, and SE Approaches assembly space 1.3. Place one Barricade at the 1 space of
For 2 to 6 players / Ages 10 to adult
 For 2 to 6 players / Ages 10 to adult Rules 1959,1963,1975,1980,1990,1993 Parker Brothers, Division of Tonka Corporation, Beverly, MA 01915. Printed in U.S.A TABLE OF CONTENTS Introduction & Strategy Hints...
Mythic Battles: Pantheon. Beta Rules. v2.8
 Mythic Battles: Pantheon Beta Rules v2.8 Notes: Anything with green highlighting is layout notes, and is NOT FOR PRINT. Anything with yellow highlighting is not yet finished. 1 Appearance There are many
SCENARIO LIST. (In no particular order) SEIZE GROUND. - As per page #91 of the Warhammer 40,000 Rulebook -
 SEIZE GROUND. - As per page #91 of the Warhammer 40,000 Rulebook -") The following is the complete list of scenarios that may be played at the 2011 Ultimate Warhammer 40K tournament. Four of these will be used by all players in the first four rounds of the tournament (pre-determined
The following is the complete list of scenarios that may be played at the 2011 Ultimate Warhammer 40K tournament. Four of these will be used by all players in the first four rounds of the tournament (pre-determined
Sequence of Play This rulebook is organized according to this Sequence of Play.
 Introduction...1 Sequence of Play...2 Campaign Set-Up...2 Start of Week...10 Pre-Combat...11 Combat...14 Post-Combat...19 End of Week...20 End of Campaign...22 Optional Rules...22 Credits...22 Sample Game...23
COMPONENTS. 2 Special Square tiles. 12 Command Board tiles 4 double-sided Special Square tiles
 Following decades of battles, warring factions realized that it was essential to support warships in combat. Therefore, specialized ships began to appear during battle: the Technical Ships. The first vessel
MATERIALS. match SETUP. Hero Attack Hero Life Vanguard Power Flank Power Rear Power Order Power Leader Power Leader Attack Leader Life
 Pixel Tactics is a head-to-head tactical battle for two players. Each player will create a battle team called a unit, which consists of a leader and up to eight heroes, and these two units will meet on
Axis & Allies Europe FAQ
 Second Edition Rules Axis & Allies Europe FAQ November 17, 2005 Q. Did any rules change from the first to second editions of the rule book? A. Only two: 1. A destroyer taking part in an amphibious assault
Larsson's A&A50 House Rules
 Larsson's A&A50 House Rules 2009-03-17 House Rule 1 Black Sea - Official optional rule In order to maintain its neutrality, Turkey closed the narrow straights linking the Black Sea and the Mediterranean,
Kingdoms of the Middle Sea A game for the piecepack by Phillip Lerche
 Kingdoms of the Middle Sea A game for the piecepack by Phillip Lerche Version 1.1, March 15, 2003 2-4 Players, 60-120 minutes Author and copyright by Phillip Lerche Equipment to play One piecepack (see
Second Star To The Left And Straight On Till Morning - Spreadsheet Driven Exploration Of Pacific Asian Geography-
 Scott Lightfoot Toledo School For The Arts Second Star To The Left And Straight On Till Morning - Spreadsheet Driven Exploration Of Pacific Asian Geography- Purposes: To enhance the student s general knowledge
Bravery in the Sand. 1. Introduction. 2. Components. Units. Chits. Markers Markers
 1. Introduction Bravery in the Sand 2.1.2 Markers Bravery in the Sand is a two player game that covers the major part of the battle known as Operation Crusader in North Africa during World War Two. Covering
001 \ FORTRESS AMERICA
 TM TM 00 \ FORTRESS AMERICA ONE NATION, UNDER SIEGE! IN THE ST CENTURY, THE UNITED STATES OF AMERICA UNVEILED A NEW SYSTEM OF SATELLITES AND POWERFUL LASERS THAT PROVIDED NOT ONLY A FLAWLESS DEFENSE AGAINST
Clash of Giants The Campaigns of Tannenberg and The Marne, 1914
 RULEBOOK -UPDATED 12/25/01 Clash of Giants The Campaigns of Tannenberg and The Marne, 1914 Table of Contents 1.0 Introduction............... 2 2.0 Game Components........... 2 3.0 Game Setup...............
Angola! Rules of Play
 Angola! 1 Rules of Play 2 Angola! Table of Contents Errata 2 1 Introduction 3 1.1 Learning the Game 3 1.2 Definitions 3 1.3 Game Components 3 2 Game Overview 3 2.1 Factions 3 2.2 Playing the Game 3 2.3
Version 2 (March 2018)
") 6 Version 2 (March 2018) Table of Contents 1 Introduction... 2 2 Game Components... 2 3 Game Setup... 5 4 Game Play Overview... 5 4.1 The Campaign Sequence... 6 4.2 Player Actions... 6 4.3 Sea Zones...
6 Version 2 (March 2018) Table of Contents 1 Introduction... 2 2 Game Components... 2 3 Game Setup... 5 4 Game Play Overview... 5 4.1 The Campaign Sequence... 6 4.2 Player Actions... 6 4.3 Sea Zones...
Play with good sportsmanship and have fun!
 Rules of the High Seas Here are some game concepts important to the Pirates Constructible Strategy Game (CSG) rules: Six-sided dice are abbreviated d6. Ability text (found on the fronts of cards) overrules
IWO JIMA RAGE AGAINST THE MARINES 1. INTRODUCTION 2. COMPONENTS 2.1 COUNTERS. Operations Special Issue #1
 1. INTRODUCTION Iwo Jima. The only battle of World War Two that saw the United States Marines suffer more casualties than they inflicted on the enemy. It was a battle that would define a war and would
CONTENTS TABLE OF BOX CONTENT SECTION SECTION SECTION SECTION SECTION SECTION SECTION
 BOX CONTENT 300 CARDS *20 Starter Cards [Grey Border] 4 Evasive Maneuvers 4 Tricorder 4 Phasers 4 Diagnostic Check 4 Starfleet Academy *54 Basic Characters [Yellow Border] 24 Ensign 16 Lieutenant 14 Commander
DOMINATION PLAYER A PLAYER B
 The battlefield will provide a distinct tactical advantage for whoever holds it for many years to come. Victory can be achieved by forcing the enemy back and securing the key points on the battlefield,
would cost 3 MP not 5 MP. If you had to cross a river not using a defending unit. Terrain combat effects are cumulative.
 Design & Development: Grant Wylie and Mike Wylie Creative Director: Sean Cooke 2015 Worthington Publishing Visit worthingtonpublishing.com for a short introductory video explaining how to play and more
These rules are intended to cover all game elements from the following sets. Pirates of the Spanish Main
 These rules are intended to cover all game elements from the following sets. Pirates of the Spanish Main Pirates of the Mysterious Islands Pirates of the Crimson Coast Pirates of the Frozen North Pirates
3rd Edition. Game Overview...2 Component Overview...2 Set-Up...6 Sequence of Play...8 Victory...9 Details of How to Play...9 Assigning Hostiles...
 3rd Edition Game Overview...2 Component Overview...2 Set-Up...6 Sequence of Play...8 Victory...9 Details of How to Play...9 Assigning Hostiles...23 Hostile Turn...23 Campaigns...26 Optional Rules...28
BATTLEFIELD TERRAIN STC RYZA-PATTERN RUINS
 BATTLEFIELD TERRAIN In this section you will find expanded terrain rules for the STC Ryza-pattern Ruins included in Moon Base Klaisus. You do not need to use these rules to enjoy a battle using the models,
PROFILE. Jonathan Sherer 9/10/2015 1
 Jonathan Sherer 9/10/2015 1 PROFILE Each model in the game is represented by a profile. The profile is essentially a breakdown of the model s abilities and defines how the model functions in the game.
Sphacteria, 425 B.C. A game by Frédéric Bey, translation by Craig Ambler
 Sphacteria, 425 B.C. A game by Frédéric Bey, translation by Craig Ambler Sphacteria is an historical strategic game for two players which recreates the battles both land and sea for the control of Pylos
ARMOR DIAGRAM ARMOR DIAGRAM. Mech Data. Mech Data BATTLEMECH RECORD SHEET BATTLEMECH RECORD SHEET. Weapons Inventory.
 BATTLEMECH RECORD SHEET Left Torso Head Right Torso ARMOR DIAGRAM Type: HER-2S Hermes II Tonnage: 40 Points: Walking: 6 Running: 9 Weapons Inventory Mech Data Type Location Damage Short Med. Long 1 Autocannon
PROFILE. Jonathan Sherer 9/30/15 1
 Jonathan Sherer 9/30/15 1 PROFILE Each model in the game is represented by a profile. The profile is essentially a breakdown of the model s abilities and defines how the model functions in the game. The
LATE 19 th CENTURY WARGAMES RULES Based on and developed by Bob Cordery from an original set of wargames rules written by Joseph Morschauser
 LATE 19 th CENTURY WARGAMES RULES Based on and developed by Bob Cordery from an original set of wargames rules written by Joseph Morschauser 1. PLAYING EQUIPMENT The following equipment is needed to fight
Barbarossa: The War in the East, Second Edition "The Child's Game of Barbarossa" v 1.0
 Barbarossa: The War in the East, 1941-1945 Second Edition "The Child's Game of Barbarossa" v 1.0 Game Overview Barbarossa is a simple simulation representing the battles on the Eastern Front between the
Explanation of terms. BRITANNIA II SOLITAIRE RULES by Moritz Eggert Version 1.1, March 15,
 Britannia II Solitaire Rules page 1 of 12 BRITANNIA II SOLITAIRE RULES by Moritz Eggert Version 1.1, March 15, 2006-03-15 The following rules should enable you to replace any nation on the board by an
Primo Victoria. A fantasy tabletop miniatures game Expanding upon Age of Sigmar Rules Compatible with Azyr Composition Points
 Primo Victoria A fantasy tabletop miniatures game Expanding upon Age of Sigmar Rules Compatible with Azyr Composition Points The Rules Creating Armies The first step that all players involved in the battle
30-45 Mins Ages Players BY JEREMY KALGREEN AND CHRIS VOLPE RULEBOOK
 30-45 Mins Ages 14+ 2-4 Players BY JEREMY KALGREEN AND CHRIS VOLPE RULEBOOK In the far future, robots have been designed to fight for the enjoyment of humanity. Bullets, lasers, bombs, drills, and various
Looking for the Franklin Expedition
 Looking for the Franklin Expedition In 1845, Sir John Franklin led an expedition on behalf of the ritish Royal Navy to find and explore the last portion of the Northwest Passage, regardless of the cost.
NIGHTMARE FOREST Dead Run
 NIGHTMARE FOREST Dead Run You were out enjoying a night camping with your friends in the woods near The City. Settled around a warm and cozy campfire a good time was being had by everyone. That was when
Goal of the Game. For 2-4 Players
 RULEBOOK 1 For 2-4 Players As Jarl of a Viking clan, your followers have certain expectations: prosperity, security and glory. In return they follow you on raids of keep and villages and territories. They
CEDAR CREEK BY LAURENT MARTIN Translation: Roger Kaplan
 CEDAR CREEK BY LAURENT MARTIN Translation: Roger Kaplan Cedar Creek 1864 simulates the Civil War battle that took place on October 19, 1864 and resulted in a Union victory. It uses many of the rules of
Looking for the Franklin Expedition
 Looking for the Franklin Expedition In 1845, Sir John Franklin led an expedition on behalf of the ritish Royal Navy to find and explore the last portion of the Northwest Passage, regardless of the cost.
Section 8 Operational Movement
 Section 8: Operational Movement V8.00 Operational Movement V8.10 General Rules of Movement V8.11 Operational Movement, sometimes called Strategic Movement, is the travel of warp capable objects from one
Comprehensive Rules Document v1.1
 Comprehensive Rules Document v1.1 Contents 1. Game Concepts 100. General 101. The Golden Rule 102. Players 103. Starting the Game 104. Ending The Game 105. Kairu 106. Cards 107. Characters 108. Abilities
Nfejfwbm!Cbuumft!!! Mfhobop! 3:ui!Nbz!2287!
 NfejfwbmCbuumft Mfhobop 3:uiNbz2287 2008 1 Battles of the Middle Ages Battle of Legnano 1176 Rulebook version 1.0 1.0 Introduction Battles of the Middle Ages is an easy to learn wargaming system that tries
OVERVIEW + CONTENTS. 12 Network Boosters (3 per player color) 12 Virus tokens (3 per player color) 16 Informants (4 per player color)
 12 Virus tokens (3 per player color) 16 Informants (4 per player color)") The tech-future which mankind has been working towards is finally upon us! Sadly, the tech-future is not all we thought it was cracked up to be; technology couldn t save us from ourselves and there are
The tech-future which mankind has been working towards is finally upon us! Sadly, the tech-future is not all we thought it was cracked up to be; technology couldn t save us from ourselves and there are
NavTac: Coronel & Falklands World War I Naval Miniatures Rules Game
 NavTac: Coronel & Falklands World War I Naval Miniatures Rules Game Tactical Naval Combat in the Great War NavTac: Coronel & Falklands is Minden s World War I tactical naval combat game, using 1/3000 scale
FIRE FROM THE SKIES. Leonard R. Heinz
 FIRE FROM THE SKIES 1. INTRODUCTION 1.1. "Fire from the Skies" ("FFTS," for short) is a naval warfare simulation portraying naval air warfare in World War II. The simulation presents aspects of this warfare
Set Up. Developed by Alan Emrich and Josh Neiman
 From the far reaches of our galaxy, an alien race has come to Planet Earth with the intent to wipe out the entire human race. As cities crumble and fall to the onslaught, a few civilizations bravely gather
Preparing the Warband for Battle
 Preparing the Warband for Battle Deployment: Dividing the Warband Each player should divide his warriors into three Battle Groups, and three Detachments as follows: (Battle groups consist of 0-4 models