HotGlass 8B9B Instruction & Service Manual
|
|
|
- Eileen Malone
- 5 years ago
- Views:
Transcription


1 HotGlass 8B9B Instruction & Service Manual

2 Introduction Thank you for choosing a HotGlass kiln! We have designed it to give you many years of reliable service. Please read this manual. It will help you gain the most enjoyment from your HotGlass kiln. It will show you how to avoid damaging the kiln and will answer many questions. If your kiln is digital, your instruction packet will include a separate digital controller manual. Please save both manuals. Inspect the kiln. When you receive your kiln, check the carton for damage (crushed, holes, etc.). Check the kiln for both interior and exterior damage. If the kiln is damaged, you can refuse the shipment and have it returned, or accept the shipment after having the driver note the damage on the Bill of Lading. Then call at 888-4HOTGLASS. Check the Bill of Lading to insure that you received the correct number of packages. Note any shortages on the Bill of Lading, and have the driver sign the copy. If there were no signs of visible kiln damage and you discover it after the driver has left, notify the shipper immediately. Needless worries. Tremendous stresses are generated within the kiln. The insulating firebricks actually expand and contract with each firing. Do not be concerned if small cracks appear in the bricks. This is normal. These are surface cracks that close tightly when the heated brick expands. During firing, you will hear an intermittent, distinct clicking. In a digital kiln, this is the sound of the relay sending power to the heating elements. In a manual kiln, it is the infinite control switch cycling on and off. Do not be concerned with this sound. The Electrical data plate. Important information about your kiln is recorded on its electrical data plate. Please include this information when ordering parts or calling your dealer or the factory about your kiln. Contents Setting Up the Kiln Electrical Installation Seating the Elements Where to Locate the Kiln Basic Operation Accessories Important Guidelines Loading the Kiln Venting the Kiln Glass Fusing & Slumping How to Cut Glass Fusing Compatibility of Glass The Annealing Range Cleaning and Gluing the Glass Load Glass Into the Kiln Firing the Glass Annealing Flame-Worked Glass Beads Enameling on Metal How to Load the Kiln Preparation of the Copper Decorating the Copper Firing Enamel Ceramics Pyrometric Cones Viewing the Cones During Firing Orton Cone Chart Firing Overglaze Firing Low Fire Greenware Firing Low Fire Glaze Firing Porcelain Greenware Firing Porcelain Glaze Firing Stoneware Greenware or Glaze Glaze Testing Silver & Gold Clay Drying Time Loading the Kiln Venting the Kiln Rate, Temperature and Hold Cooling Time Combining Silver Clay With Other Materials Firing Mistakes Silver Clay Glass Ceramics Kiln Maintenance Trouble-Shooter Replacing the Thermocouple Replacing a Relay or Transformer Replacing a Switch or Pyrometer Replacing the Temperature Controller Reseating a Bulging Element Replacing An Element , by IM-211/6-02 2/

3 Safety Overfiring The warranty on your kiln does not cover damage from overfiring, regardless of the circumstances. It is the operator s responsibility to make sure the kiln turns off at the proper time. Read the Manual! Read each page of this manual in detail before operating your kiln. Warranty does not cover damage caused by failure to follow instructions. Food or Drink Surfaces Some decorative materials may be unsafe and toxic when used for surfaces that will be in contact with food or drink. When you make food or drink containers, select a glaze or glass that has been formulated, tested and labeled as approved for surfaces that will be in contact with food or drink. Follow the glaze or glass manufacturer s instructions exactly, without any variations. Mastering Cone 6 Glazes, by John Hesselberth and Ron Roy, covers food safe stoneware glazes in great detail. We recommend this book to every potter. Important Safety Rules An electric kiln is extremely safe to operate provided you follow these basic safety rules: Unplug kiln when not in use. Do not touch hot sides. Keep unsupervised children away. Before connecting power, place the kiln on the firebrick blocks furnished with the kiln. Place kiln, with its firebrick blocks, on a non-combustible surface. Do not install closer than 12 from any wall or combustible surface. The kiln top and bottom must be in place before firing the kiln. Fire only in a well ventilated, covered and protected area. Keep cordset away from hot sides of kiln. DANGEROUS VOLTAGE: Do not touch heating elements with anything. Disconnect kiln before servicing. Do not leave kiln unattended while firing. Wear safety glasses when cutting glass. Wear firing safety glasses when looking into a hot kiln. Keep food away from your work area. Never fire tempered glass inside a kiln. It could explode. Avoid firing toxic materials inside the kiln, such as styrofoam (used as a core for silver clay hollow beads). /3


4 Setting Up the Kiln Electrical Installation You must plug your kiln into a circuit that no other appliance uses while the kiln is firing. Turn off the circuit breaker or unscrew the fuse for the circuit that your kiln will be plugged into. Check to see if other appliances shut off too. If that circuit powers appliances that must remain on while the kiln is firing, plug your kiln into a different circuit. Note: 120 volt kilns: avoid extension cords if possible. If you must use one, never use one smaller than 12 gauge and longer than 20 feet. Never plug it into a ceiling outlet! Voltage fluctuation can vary firing time from as little as half to more than twice the average time. If the voltage is too low, the kiln may never reach full temperature. The receptacle must have a separate safety grounding wire. This protects you from serious electrical shock. Changing the cord plug will void your warranty! The Kiln Stand Find a fireproof surface for your HotGlass. We recommend a large ceramic shelf. You will find four insulating firebricks packed with your HotGlass. Place these under the kiln. Caution: The blocks MUST be under the kiln during firing. They help dissipate heat from under the kiln. Seating the Elements Shipping may dislodge the elements of your kiln. Please perform the kitchen knife test to make sure the elements are seated in their grooves. Kitchen Knife Test Caution: Always unplug kiln before touching an element with anything. Note: Touch only a cold element never a hot one with a plastic object such as a comb. Plastic will melt on and ruin a hot element. Press the elements into their grooves by running a blunt kitchen knife, plastic comb or similar blunt object completely around each groove. Do this before the first firing, because it may not be evident to the eye whether the coil is in its groove. If the element doesn t lie flat in the bottom of its groove, you needn t be concerned as long as the element fits all the way back into each corner and doesn t bulge outside the groove. Before the kiln is fired there is no danger of breaking the elements. After firing, however, the elements must be reseated if they bulge out of the groove. See Reseating a Bulging Element, page 18. Where to Locate the Kiln 1 Place your kiln in a well ventilated, covered and protected area such as the garage, basement, utility or hobby room. Note: Some people keep their kiln outside on a covered patio. This is okay so long as the kiln is not subjected to excessive humidity or rain. 2 Remove gasoline, paint, and other flammable materials from the kiln room. 3 Provide a minimum of 12 inches clearance between kiln and the closest wall. 4 Never allow the room temperature of your firing room to exceed F. Measure the temperature about 3 feet from the kiln. If necessary, use fans to lower room temperature. 5 Keep the kiln away from curtains or other combustible materials. 6 Position kiln on a level, fire-proof surface. We recommend an 18 x 18 piece of sheet metal or a large ceramic kiln shelf. 7 Keep unsupervised children away. 8 Keep the power supply cord away from the kiln case. There is little danger of serious burn from accidental contact if you exercise the same caution you would use with an electric iron. 4/


5 Basic Operation Accessories Ceramic Shelves & Posts Shelves and posts are fireclay that has been fired to a higher temperature than will be encountered in your kiln. Ware is placed on the shelves. Shelves can be stacked using posts. Glass Separator & Kiln Wash Glass separator and kiln wash are mixtures of finely ground minerals that will not melt and fuse together at high temperatures. They prevent glass and ceramic glaze from sticking to shelves and the firebrick bottom. The main difference between glass separator and kiln wash is that the separator is ground more finely to leave a smooth back to glass pieces laid on the shelf. As powders, glass separator and kiln wash have an unlimited shelf life. Do not breathe the powder when mixing. Note: CAUTION: If glass separator or kiln wash contact a heating element, that element will burn out in the next firing. NEVER apply glass separator or kiln wash to the walls of the firing chamber or to the kiln top. Haik Brush The haik brush is used to apply glass separator to the kiln shelf in a smooth, thin layer. The smoother the glass separator, the smoother the underside of the glass. Alumina Hydrate Delicate silver or gold clay shapes may need extra support during firing to prevent warping. Place these shapes in a thin layer of alumina hydrate inside a small ceramic bisque bowl. Do not breathe alumina hydrate. Stilts Stilts are points embedded in a ceramic base. The points separate enameling and glazed ceramics from the shelf and firebrick bottom. Enameling Racks Enameling is the art of firing glass onto metal. The metal shapes are loaded onto a high temperature wire rack. The enameled pieces and wire rack are loaded into a hot kiln, fired for just a few minutes, and removed red hot. To load and unload the rack safely, use an enameling fork. The heating element under power is dangerous. Do not touch the element with anything! Turn the kiln switch off before inserting the enameling fork into the firing chamber. Wear firing safety glasses and protective gloves. Safety Glasses Wear clear safety glasses when cutting or chipping glass. Wear firing safety glasses when looking into a hot kiln, such as when checking the progress of glass. Important Guidelines The Clicking Noise Do not be concerned if your kiln makes a clicking sound during firing. Digital kilns contain a relay, which sends power to the element. The relay clicks as it cycles on and off to maintain the correct temperature. Manual kilns use an infinite control switch that clicks as it cycles on and off. Manual Kilns: The Infinite Control Switch The manual kilns use an infinite control switch. A bimetallic timer inside the switch cycles on and off to regulate heating. The higher the switch setting, the longer the element stays on during each cycle. On High, the element stays on continuously. This is why the clicking noise stops after the switch is turned to High. The pilot light serves as the pointer mark for the infinite control switch knob. The pyrometer shows temperature. Check Thermocouple You will find a rod, called the thermocouple, extending into the firing chamber. Both manual and digital kilns use a thermocouple. The digital controller senses temperature by reading a small voltage from the thermocouple. If the tip of this rod is pushed out of the firing chamber, the kiln will as- /5
 Use a soft brush nozzle on a vacuum cleaner.")


6 sume that the firing chamber is cold. On digital kilns, this will result in an over-fire. When loading the kiln, check that the rod extends into the firing chamber by 1 or more. Vacuum the Kiln Clean the kiln interior before firing glass, enameling, or ceramic glaze. (Cleaning is not necessary when firing silver or gold clay.) Use a soft brush nozzle on a vacuum cleaner. Vacuum the element grooves to remove debris, which could damage the element. Removing Hot Ware To remove hot ware from the kiln, turn off the kiln. Tilt the kiln upward about 1 by lifting the electrical box. Carefully slide an enameling fork under the shelf or enameling rack. Place the hot shelf/rack onto a large ceramic kiln shelf in front of the kiln. Wear thick work gloves. Firing Log Book Record the following information in a firing log book: Date Digital: Firing speed and Hold or Ramp/Hold program Starting time Total firing time Type of pieces Firing results As you gain experience, you will find a wealth of information in your firing records. Low Temperature Holds (Digital Kilns) A low temperature hold (i.e F) is more difficult to maintain than higher temperature holds ( F). At low temperatures, turning on the heating element affects firing temperature to a larger degree than at high temperatures. When holding at a low temperature, heat the kiln slowly. Otherwise the temperature may overshoot the hold temperature before the element turns off. Avoid Contaminating the Heating Element Contact with silica or silica bearing compounds, such as kiln wash, glass separator, alumina hydrate, glass, enameling powder, and ceramic glaze, will ruin the heating element. Note: If glaze or glass drips onto a firebrick wall, dig out the glaze with a screwdriver. Otherwise it may melt into a brick groove during the next firing and ruin the element. The Effect of Silver Residue on Glass Firing silver clay leaves traces of silver in the firebricks. Sometimes there is enough silver residue in the kiln to affect glass colors. For instance, green might turn yellow. Note: Before firing an important glass piece in a kiln used for silver clay, perform color tests. Fire small samples of each glass color on a base sheet of clear glass. See pages 7-9. Loading the Kiln Place Ware on the Kiln Bottom or on a Protective Shelf Ceramics can be fired directly on the firebrick bottom or on a shelf. Fire glass only on a shelf or mold, never directly on the brick bottom. Types of shelves and containers: Fireclay Shelf Ceramic fireclay shelves, available from Sundance, protect the firing chamber bottom and provide a smooth surface. Use a ceramic shelf in your kiln to fire ceramics, glass, and china painting. Insulating Firebrick Piece Insulating firebricks are porous, light-weight, and can be shaped to support delicate silver clay designs. Carve the firebrick with a knife or hacksaw. Ceramic Bowl You can purchase an unglazed, small ceramic bisque bowl from a ceramic supply store. The bowl will last through many firings. Use it to hold alumina hydrate for silver clay pieces. You can also shape hot glass by slumping it into the bowl. Applying Glass Separator or Kiln Wash The kiln shelf, kiln bottom, and sagging mold must be coated with glass separator to keep glass or ceramic glaze from sticking to them. A coat of glass separator or kiln wash will usually last through several firings. When the shelf coating begins to crack or chip, apply a fresh coat. When recoating a shelf, remove most of the old coating with grit cloth (available from Sundance.This is an abra- Separator lasts through several glass firings. Apply new separator when the old coat begins to flake. 6/
 Caution: Keep separator away from the elements.")
 Each time you dip your brush into the separator mixture, swirl the brush around the bottom of the container.")


7 sive-coated mesh that allows residue to pass through. You could also use coarse sandpaper. Removing the old coating gives you a smooth surface to start with. Then recoat the shelf using the following directions. (Both glass separator and kiln wash will be referred to as separator. ) Caution: Keep separator away from the elements. 1 Mix the separator with water following the directions on the bag. Stir. 2 Use a haik brush or a soft paint brush to apply the separator to the shelf. (The haik brush is easier to use because it lays down a more even coating.) Each time you dip your brush into the separator mixture, swirl the brush around the bottom of the container. This is because the separator settles quickly. Use two or three thin coats changing the direction of the brush stroke 90 with each coat. 3 Dry the shelf before firing. To speed drying, place the shelf on 3 - ½ posts inside the kiln. Heat at full rate to 300 F/148 C and hold for minutes. Then turn off the kiln and leave the shelf inside. 4 After the separator has dried and your shelf is cool, you can smoothen the separator further by rubbing your hand lightly over the shelf. The smoother the separator, the smoother the back side of the glass. A coat of glass separator will usually last several firings. The lower the fusing temperature, the more firings you can get from one application of separator. Using Posts Ceramic posts support ceramic fireclay shelves. When firing glass, place 3 - ½ posts under the ceramic shelf on the firebrick bottom. This aids air circulation around the shelf. You can fire two or more ceramic shelves in yourhotglass. When you load multiple shelves, use a slower firing rate. This aids heat distribution. Always fire glass on a shelf. Ceramics can be fired on the brick bottom as well as on shelves. Venting the Kiln Some types of ware, such as ceramics, contain impurities that burn off during firing. These impurities must be released from the kiln at the beginning of the firing. Otherwise they can affect the quality of the ware. To vent the kiln, place a ½ post under the top. Glass Fusing & Slumping You will probably fire mostly stained glass, but you can also fire standard float (window) glass. Some types of float glass devitrify (form a dull, frosty surface) when fused. Caution: Never fire tempered glass. It could explode if heated inside a kiln. Basic Glass Tools Reservoir Glass Cutter uses a reservoir of oil to lubricate the cutter wheel. Running Pliers are for cutting large pieces of glass. Breaking Pliers are for cutting small strips. Grozing Pliers shape the glass by chipping away the edges. They are often used when the score line doesn t break clean. Note that rough edges will become smooth when fired to fusing temperature. How to Cut Glass Note: IMPORTANT! Wear safety glasses when cutting or chipping glass. 1 Lay the glass on a clean surface. Mark off the cut with a grease pencil or felt-tip pen. A small mark on each end of the glass will do. Lay a wooden straight edge over the glass and line it up with the marks you just made. /7


8 2 Hold the straight edge firmly and score the glass with the glass cutter. Press just hard enough so that the scoring noise sounds steady and unbroken. 3 Place the straight edge under the glass so that an edge is lined up with the score line you just made. Press down on the glass. It will break cleanly. Fusing Compatibility of Glass When glass changes temperature, it expands and contracts. The rate at which glass changes size is called the coefficient of thermal expansion. If you fuse two glass pieces together and one changes size faster or slower than the other, the fused piece may crack even several months after fusing. When different glasses have a close enough coefficient of expansion to fuse successfully, they re called fusing compatible. Buy glass labeled fusing compatible. Or fuse glass that has been cut from the same sheet, which guarantees compatibility. Fusing Compatibility Test 1 To test glass for compatibility, fuse small ½ square sample pieces of different glasses onto a larger base piece of clear transparent. The base should extend beyond the small sample pieces by half an inch on each side. Include, among the sample squares, a piece cut from the clear transparent base. 2 Heat the glass to a temperature that completely rounds the edges of the small sample pieces. 3 After the glass cools, place a polarizing filter under the glass and another filter over the glass. Look at the glass with light shining through it (hold it over a lamp). Turn one of the filters until the filters are at their darkest. Results of the Test If you see a halo around the edges of the small glass samples, the glass is not compatible. If you see no halo, the glass is fusing compatible. Why did we include a sample square cut from the base transparent glass? It tests for annealing. A halo around that piece means the glass was not annealed properly. Perform the test again, this time cooling more slowly through the annealing range. The Annealing Range Each type of glass has a temperature range that it must pass through slowly when it cools. This is called the annealing range. This slow cooling gives hot glass time to release the stress of cooling. If you cool the glass too fast through the annealing range, it will break. The larger and thicker the glass, the slower it must pass through its annealing range. You cannot over-anneal, so err on the side of caution if you aren t sure how long to anneal. Small projects such as earrings rarely need annealing time as they cool. Cleaning and Gluing the Glass Grease, dirt, and fingerprints etch permanently into the glass during firing. Clean the glass with glass cleaner (the type without silicones), rubbing alcohol, or even plain water just before assembling the pieces on the kiln shelf. Use white glue, such as Elmer s diluted 1:1 with water, to hold the glass pieces together after you place them on the kiln shelf. Use the glue sparingly. Glue is especially important when fusing wire into the glass. The glue prevents the glass or wire from moving out of place before they fuse. The glue disappears during firing. Avoid using glue on the coated side of dichroic glass. If you lay dichroic glass carefully onto the piece, glue is unnecessary, so avoid it altogether if you do not know which side of the dichroic is coated. Load Glass Into the Kiln Air should circulate between the shelf and the bottom of the kiln, so place three or four 1/2 posts in the kiln. Lay the shelf over the posts. Firing the Glass Firing speed varies depending on the size and thickness of the glass project. The thicker and larger the project, the slower you must fire it. Otherwise the glass may crack. Small jewelry pieces, such as earrings, can usually fire at full speed. Viewing the Glass During Firing Watch the glass by moving the top over just enough to where you can see inside the kiln. Look for several seconds at a time. Wear firng safety glasses and protective gloves. Note: When you move the top, do not slide it, or dust particles could land on the glass. Gently lift it 8/


9 To look at the glass during firing, move the top slightly. Look inside the kiln for a second or two. Wear firing safety glasses and gloves. slightly. With every firing, be sure you are near the kiln before the expected shut-off time. Digital Kilns The first time you fire a particular brand or type of glass, program the controller for a higher temperature than the estimated fusing temperature. Shut the kiln off when the glass fuses the way you want. Make a note of the shut-off temperature. For future firings, program the kiln for that rate and temperature. Manual Kilns Shut the kiln off when the glass fuses the way you want. Make a note of the shut-off temperature shown on the pyrometer. For future firings, begin watching the glass below the final temperature. Annealing the Glass The annealing range for most glasses is between 950 /510 C and 700 F/371 C. Cool slowly through this range. Leave the top closed, rather than vented, during cooling. This will slow the cooling enough for most projects. Digital Kilns: If you need even slower cooling, program a separate segment for cooling. See the kiln s digital controller manual. Manual Kilns: If you need even slower cooling, turn the kiln on again for about 30 minutes while the glass anneals. Use a medium switch setting. Note: For safest cooling, leave the ware inside the kiln until the kiln reaches room temperature. If you remove the ware too soon, the sudden temperature change can crack the piece. Rapid Cooling of Small Pieces To remove small pieces, such as glass jewelry, before they have cooled completely, remove the shelf also. Leave the pieces on the shelf until they reach room temperature. The heat in the shelf will help prevent them from cooling too quickly. To remove hot ware from the kiln, turn off the kiln. Tilt the kiln upward about 1 by lifting the electrical box. Carefully slide an enameling fork under the shelf. Place the hot shelf onto a large ceramic kiln shelf in front of the kiln. Wear protective gloves. Annealing Flame-Worked Glass Beads Glass is sensitive to breakage as it cools through the annealing range. This is approximately 950 F/510 C through 700 F/371 C. The larger the piece, the slower it must cool. To safely cool flame-worked glass beads, anneal them in your kiln using the optional Bead Collar. 1 Place the Bead Collar between the kiln & the sep arate bottom. Your collar is different than pictured 2 Digital Kilns: Program the controller in Ramp-Hold for the following two segments. (See the separate digital controller manual.) If your bead making session will be longer than three hours, program a longer hold time in segment 1. Rate Temp. Segment F/ C F/ C Hold / / / / Fire the kiln. When it reaches 1000 F/537 C, it will maintain that temperature for three hours. Manual Kilns: Fire the kiln with the switch on High. At 900 F/482 C, lower the switch setting to Med. Then keep adjusting the switch to maintain a temperature of 1000 F/537 C. 3 At 1000 F/537 C, the kiln is ready to receive the bead mandrels loaded with hot beads. Allow a freshly finished bead to cool slightly before inserting. This is to prevent the bead from flattening on one side when it is placed inside the kiln. Open the fiber flap bead door. Insert the mandrels as you complete the bead. The end of the bead mandrel will extend outside the kiln. 4 Digital Kilns: When you have finished the batch of beads, perform a Skip Segment. This will end the temperature hold and begin segment 2. The kiln will slowly cool through the annealing range. Manual Kilns: Turn the kiln off and let it cool slowly. After the kiln shuts off, leave the beads in place. Do not remove them until the kiln has reached room temperature. /9


10 Enameling on Metal How to Load the Kiln 1 Remove the top. Place several ½ posts on the floor of the kiln. 2 Lay a wire enameling rack on top of the posts. If the enameled piece is bare on the back, place the piece directly onto the rack. If the back side of the piece is enameled, support the piece with a stilt on top of the rack. 3 Lower the top onto the kiln and fire. (See firing instructions, page 11.) 4 To remove the piece, turn off the power. Tilt the kiln upward about 1 by lifting the electrical box. Slide in an enameling fork and remove the enameling rack. 5 Lower the kiln. Turn the power back on if you wish to enamel another piece. Preparation of the Copper Enamels come in transparent or opaque. They can be purchased directly from Thompson Enamel, P.O. Box 310, Newport, Kentucky Their Lead Free Enamels come ready to use: no enamel washing is needed. Start with one of the many pre-shaped copper forms available, or shape and trim the copper to your own design. 1 Heat the copper on an enameling rack to about 1400 F/760 C to burn off oil or grease. Heat the copper to just until smoke from oil or grease stops coming off the metal and its color has changed to a purple-red-pale green iridescence that moves across the copper. This indicates that the grease has vaporized. Do not fire the copper any longer than this point. Otherwise excess fire scale will form, making the next cleaning step difficult. 2 After the copper cools, brush any loose scale from the copper. Use a brush or paper towel, being sure that you do not put any grease or oil onto the copper, such as fingerprints. Clean the copper with a 3M Scotch-Brite pad. This pad does such a good job that in most cases no further cleaning will be required. Additional copper cleaning products are available in the Thompson Enamel Catalog, including Sparex No. 2. It is best to clean the copper just before you decorate it. If you wait too long to decorate after cleaning, the copper could get dirty again. Decorating the Copper Counter Enameling Most enameled pieces should be counter enameled on the back side. This gives the piece a much more finished look, it eliminates a great deal of fire-scale cleaning, and it controls the chipping and cracking that can result from the different rates of expansion and contraction in copper and enamel after the enamel has been fired. Counter or backing enamel, a mixture that gives a mottled effect, can be used for counter enameling. Or you can use regular enamel. Counter enamel is applied by the sifting method described next. When firing counter enamel, underfire it so that the fire scale on the front of the piece isn t too difficult to remove. You can purchase a masking preparation from your supplier to help prevent fire scale. You must place the piece on a stilt when firing the other (front) side of the piece. The stilt prevents the back of the counter enameled piece from sticking to the enameling rack. Applying Enamels Apply enamel over a clean sheet of paper so you can pour the excess back into the bottle for reuse. Transparent enamels should be applied in several thin coats. Transparent enamels can be mixed with fairly good results. If opaque enamels are mixed, however, a grainy effect results. The two basic methods of applying enamels are sifting and spatula. Sifting Enamel Spray or brush Thompson holding agent onto the copper. Then sift a 1/32 layer of enamel onto the copper. Use a #60 mesh sifter. If the coat is too thin, you can easily add another 10/


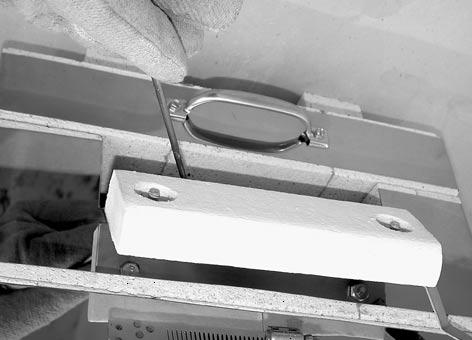
11 coat after firing. But a coat that is too thick will bubble and crack. The enamel must dry completely before firing. Spatula or Inlaid Method You can use this method to decorate a small area with many different colors. Using a diluted solution of Thompson holding agent, dampen the enamels just to the saturation point, and maintain this moisture while working with the enamels. Apply the enamels onto the copper with a small spatula, and spread them out with a spreader to a coat of about 1/32 thick. Lines of contact can be formed by the spatula blade. Then spray the enamels with the holding agent to keep the grains of enamel in place. Allow the enamel to dry completely before firing. Firing Enamel 1 Heat the kiln to 1450 F/787 C for most enameling. Digital kilns: Use a Single Segment. Please see your digital controller instruction manual. Rate Temp. Segment F/ C F/ C Hold / / Note: Hold time should be the length of time you will be firing enameling pieces. In the above example, hold time is one hour. Manual Kilns: Fire the kiln with the switch on High. At 1300 F/700 C, lower the switch setting to Med. When the temperature reaches 1450 F/787 C, keep adjusting the switch to maintain that temperature. 2 Lay the copper shape on an enameling rack. If the part that touches the rack is enameled, place a stilt under the copper. Some bowls or other shapes have enameled sides that might run during firing. These should be fired with a stilt even if the piece has a plain bottom. Use an enameling fork to place the rack into the kiln. Note: Firing should take about three minutes and requires undivided attention! 3 Look at your piece every 15 seconds by tilting the kiln by the switch box about 1. 4 When the copper piece appears a rosy red and the enamel is smooth, turn off the power to the kiln. Lift the kiln about 1 and remove the enameling rack with an enameling fork. Lower the kiln. Turn the power on if you want to make more enameling pieces. 5 Place the rack on a steel pad or ceramic shelf and let it cool completely. 6 After counter enameling, you will need to clean the fire scale off the front of the piece. A 3M Scotch Brite pad works well for this. Then clean it with Thompson Sparex No. 2. Ceramics Pyrometric Cones Pyrometric cones are small pyramids of clay and mineral oxide that soften and bend when exposed to heat. They indicate when ceramic ware has fired to maturity. Pyrometric cones come in 1 1/8" and 2 ½ lengths. Use the 2 ½ cones. Cones mounted on the kiln shelf must be slanted 8 from vertical. They will not bend accurately if they are slanted to the wrong angle. Self-supporting large cones have the correct slant built into the base. Standard cones must be mounted in a clay or wire plaque. The chart on page 12 shows the temperatures of pyrometric cones. Digital Kilns: Program your controller to the cone recommended for the ceramic ware that you are firing. Use Cone-Fire mode. Manual Kilns: For small ceramic pieces, such as figurines, fire at a rate of about 400 F/222 C per hour. Ceramic jewelry can be fired even faster. Fire to An under-fired cone. the temperature shown in the 108 F column of the Temperature Equivalents chart for the cone number you are firing. (See next page.) Before deciding on the firing speed of important pieces, test fire samples. Viewing the Cones During Firing Move the kiln top ½ - 1 to see the cone on the shelf. (Be sure to wear firing safety glasses and heat-resistant gloves.) Turn the kiln off when the cone bends to 6 o clock. (See top photo above.) A self-supporting cone fired to maturity. Do not be concerned if the tip is slightly higher or lower than shown. A puddled over-fired cone. /11
12 F Temperature Equivalents For Orton Self-Supporting Pyrometric Cones Cone Self-Supporting Cones Pre-Fire Number Color Heated at: 27 F 108 F 270 F Per Hour* Per Hour* Per Hour* Green Fuschia Orange Yellow White Pink Light Blue Violet Gray Green Fuschia Orange Dark Red Dark Red Dark Red Dark Red Dark Red 05 1/ Dark Red Dark Red Dark Red Dark Red Dark Red Dark Red Dark Red Dark Red Dark Red Gray Green 5 1/ White Fuchsia Orange Yellow White Pink *Rate of temperature increase during last minutes of firing. Tables by courtesy of the Edward Orton, Jr. Ceramic Foundation. Firing Overglaze Overglaze is decoration applied over fired glaze or polished porcelain bisque. Overglazes include china paints, gold, and luster, which fire from 022 to 014. Load overglazed ware the same way you would load ceramic glaze. Use stilts and make sure ware is not touching other ware. Ware must be completely dry before firing. China paints will crack or peel if applied heavily. Apply several light coats instead, firing between each, until you get the shade you want. Not all china paint colors reach maximum color saturation at the same temperature even when fired on the same ware. So you must know which colors you should fire first at higher temperatures to prevent burning out the original colors in later firings. For example, reds mature at a lower temperature than other colors and are fired after the other colors have been fired. Reds and yellows should not be fired side by side. Colors also mature at a lower temperature on ceramic pieces than on porcelain or hard china. Check the overglaze manufacturer s literature for the cone to use with each color and type of ware. Vent the kiln during the first hour of firing by placing a ½ post under the kiln top. Allow kiln to cool to room temperature before opening the kiln. Firing Low Fire Greenware Low-fire greenware has a firing range from cone 06 to 02. The greenware must be bone dry before firing. Otherwise, it will crack or even explode in the kiln. Check for dryness by touching to cheek or inside of wrist. Moist ware will be cold. Low-fire greenware may be stacked so that it touches each other. It can be loaded without stilts. Load pieces directly on the firebrick bottom. Ware should be fired in the position in which it will be used when finished, except for large pieces with flat, vertical surfaces such as wall plaques and clocks. These should be fired flat to prevent warping. Pieces to be used together should be fired in place, such as a box with its lid, to ensure a good fit. Low-fire greenware firing is simple. Just be certain the greenware is fired to the pyrometric cone recommended by the clay supplier. If the greenware is not fired hot enough, the piece will absorb moisture after it has been glaze-fired causing the glazed surface to crack. This is called crazing, and is most often due to underfired greenware. To help eliminate crazing, fire greenware at least one cone hotter than glaze, and even hotter if glaze can still be applied easily to the hard bisque. While glaze may be applied to greenware and fired once, separate firings produce better quality, so we do not recommend single firing of greenware and glaze. Vent the kiln during the first hour of firing by placing a ½ post under the top. Allow kiln to cool to room temperature before opening. 12/
13 Firing Low Fire Glaze Low fire glazed ware must not touch each other, the floor, or a shelf in your kiln during firing. If this happens they will permanently bond together by melted glaze and be ruined. Clean the firing chamber before each glaze firing. Wipe surfaces with a clean, damp cloth or vacuum with the soft brush nozzle attachment of a vacuum cleaner. Use stilts to support low-fire glazed ware during firing. The shelf tops and kiln floor MUST be kiln washed with all purpose, high fire kiln wash for protection from glaze drops. Glazed pieces must be thoroughly dry before firing and should not be fired with greenware unless both mature at the same cone. Check to make sure that first, no two pieces of glazed ware are touching each other, the kiln walls, the floor or the shelf; and second, that the underside of the kiln shelf is clean before you place it over glazed pieces. Any dust falling on your ware will cause pinholes. You can prevent glazed pieces from sticking to the shelf or kiln bottom by dry footing. To dry foot a piece, remove all glaze from the portion of the piece that will rest on the shelf. Using a wet sponge or a piece of grit cloth, clean off the glaze from the bottom of the ware and slightly above the base so that it will not run down and touch the base. Dry footing should not be used for low-fire glazed pieces that will be placed in water while used or cleaned. During the first hour of firing, vent the kiln by placing a ½ post under the top. Wait until the kiln has cooled to room temperature before opening the kiln. Remove the stilts from the ware after firing by breaking the thin film of glaze holding them. Handle with caution; the glaze is sharp where the points touch. Remove the sharp stilt edges by rubbing with a stilt stone or electric grinder. Firing Porcelain Greenware Loading porcelain greenware is similar to loading glazed ware, since both will stick to anything during firing. Greenware must be completely dry before firing, including the joints on pieces that are attached. If a piece is broken before firing, mend the break but do not attempt to fire it until the mend is also bone dry. Damp greenware or damp mended areas will form bumps on the fired ware. Stilts CANNOT be used to support porcelain greenware. They would embed into the porcelain. To protect porcelain from sticking to the shelves or kiln floor, apply a coat of high fire kiln wash to the shelf tops and brick bottom. Then place your ware directly on the kiln washed surfaces. Note: Never use ceramic kiln wash in a kiln that will ever be fired to porcelain temperatures, as the ceramic kiln wash will harden at high temperatures and be impossible to remove. Pieces of ware that are to be used together must be fired together, such as a box and its lid. Dry all purpose, high fire kiln wash can be used to separate these pieces during firing. Wet kiln wash would be too difficult to remove. Pieces likely to warp in firing should be supported by rolls of porcelain clay shaped to fit the objects at points of strain. Apply dry silica or high fire kiln wash to the points of contact to prevent sticking. Before firing, the support rolls must also be dry. Since a kiln is slightly hotter near its sidewalls, the side of the ware next to the walls will tend to shrink more than the opposite side. This can be used to your advantage with porcelain figurines that tend to warp during firing. Turn the inclined side of the figure away from the elements so the heat can help hold the piece straight. Make sure cones on the shelf are clearly visible. At porcelain temperatures, they are difficult to see. Vent the kiln during the first hour of firing by placing a ½ post under the top. Wait until kiln cools to room temperature before opening it. Firing Porcelain Glaze Porcelain pieces that have been fired together in the greenware firing cannot be fired together in the glaze firing. Both pieces must be dry footed. Since shrinkage has already occurred in the greenware firing, the pieces will still fit even when fired separately in the porcelain glaze firing. Stilts must not be used to support porcelain. Porcelain softens during firing, and stilts would embed into porcelain. Make sure your shelves and kiln bottom have a good coat of kiln wash before firing porcelain. If a piece of ware had to be supported in the porcelain bisque fire, it will stand alone in the glaze fire. The lower temperature will prevent sagging. Vent the kiln during the first hour of firing by placing a ½ post under the top. Wait until kiln cools to room temperature before opening the kiln. Firing Stoneware Greenware or Glaze Stoneware is made from vitrifiable clays with a firing range of cones It has a wide range of colors and textures and is popular with the potter because of its excellent throwing qualities. Usually the greenware is fired below maturity, and on the second firing, the clay and glaze mature together to form an integrated body-glaze surface. Like porcelain greenware, stoneware is placed directly upon the kiln-washed shelves in the greenware firing. Glazed stoneware must not touch any other ware and must be dry footed before you place it on a kiln-washed shelf or kiln bottom. Never stilt stoneware during either firing. Glaze Testing Make batches of uniform clay shapes, such as circles or triangles. Each shape should have a smooth section and textured section. Glaze the test shapes. Prop them up vertically inside a dish and fire them. Keep detailed records in a glaze notebook. Save the test samples. They will be valuable later. /13


14 Silver & Gold Clay With silver clay, it is possible to shape intricate, free-form silver jewelry in minutes even as a beginner. (The clay is also available in gold; for simplicity we will refer to both metals as silver clay. ) At the time of printing, the silver clay brands available were Art Clay Silver and Precious Metal Clay. Silver clay looks and feels like modeling clay. It is formed with simple tools such as a tooth pick, small knife, and razor blade. Its surface is pliable and accepts impressions from objects such as leaves, coins, and coarse fabrics. After the silver clay is formed, it is fired in a kiln. The recommended temperature and hold time are included with the silver clay. Forming and firing silver clay is simple. There is nothing mysterious about making silver clay jewelry. The clay is made of micron-size silver (or gold) particles held in an organic binder. During firing, the binder burns away. The silver particles then fuse together forming real silver. Since the binder disappears, there is a certain amount of shrinkage during firing. Shrinkage varies depending on the type of silver clay you use. Drying Time Pieces need to be dry. Otherwise they may warp during firing. To be on the safe side, give the silver clay plenty of time to dry. As you gain experience, you will know just how much drying time each type of piece needs. You can speed drying with a hair dryer. Loading the Kiln Silver clay pieces that have a flat side can be placed inside the kiln directly onto a shelf. Use a soft ceramic fiber shelf. It cushions the clay silver. Silver clay pieces can be close together, but they must not touch. Place the soft ceramic fiber shelf directly onto the firing chamber bottom. Do not coat the ceramic fiber shelf with kiln wash or glass separator. You can also place the silver clay on a piece of ceramic fiber batting. Alumina Hydrate Rounded, hollow, or other delicate shapes may need support to prevent collapsing. You can lay these pieces onto a mound of alumina hydrate. Place the clay silver on a ceramic fiber shelf, which has a soft surface. If the piece needs only shallow support of ¼ depth or less, pour the alumina hydrate onto a ceramic fireclay shelf. Support the fireclay shelf on3-½ posts to aid heat flow under the shelf. If the silver clay shape needs deeper support, pour the alumina hydrate into an unglazed ceramic bisque bowl. These are available at ceramic supply stores. Place the ceramic bowl directly onto the kiln bottom. NEVER use a glazed bowl to hold the alumina hydrate. If the glaze runs, it will embed into the firebrick bottom. Caution: Avoid breathing alumina hydrate dust. Alumina hydrate can destroy the heating element on contact. If it spills onto the firing chamber, remove with a vacuum cleaner. Venting the Kiln Silver clay by itself needs no venting. Load the kiln, lower the lid, and leave it closed until the clay silver is ready to remove. The kiln needs venting if you fire ceramics with the clay silver, or if you make hollow objects that contain a core of organic materials. In those cases, vent the lid during the first hour of firing by placing a ½ post under the kiln top. Paper maché and paper clay are good core materials. Do not use wax or styrofoam as a core. They emit harmful fumes. Rate, Temperature and Hold Each brand of silver clay fires to a specific temperature and hold time. This information is available from your silver clay supplier. Note: Hold time is the lenth of time that the recommended temperature is maintained in the kiln. Do not fire longer than the recommended hold, or the silver will begin to overfire. Besides selecting a temperature and hold time on your kiln s digital controller, you will also need a firing rate. (See the separate digital controller instruction booklet.) Select a Full Power rate if you are firing silver clay alone. If you fire glass or ceramics with the silver clay, select a rate best suited for the glass or ceramics. Note: Do not place silver clay into a kiln that is already hot unless the clay is completely dry. The kiln should be no hotter than 500 F/260 C when inserting the silver clay. 14/

15 After the kiln begins firing, leave the top closed. Do not lift the top until it is time to remove the clay. Visual inspection of the clay during firing is unnecessary. If you are firing glass with the silver clay, on the other hand, you will need to check the fusing progress of the glass by moving the kiln top ½ or more and looking inside. Look for just a second or two. As you gain experience, you will be able to program the correct temperature for the silver clay and glass combination, eliminating the need to visually check the glass. Manual Kilns: Select the type of silver clay that has the shortest hold time. You will need to adjust the switch during hold to correct the temperature as it drifts. Cooling Time After the clay silver has fired to completion, you can lift the top an inch to speed cooling. If you are firing stones, glass, or other materials with the silver clay, it will be safer to allow the kiln to cool slowly with top down. Remove the piece when the kiln reaches room temperature. Combining Silver Clay With Other Materials There are two ways to fire silver clay with other materials such as glass: Fire the silver clay first by itself. After you have cleaned and polished the silver clay, fire it a second time with glass. Fire the silver clay and other materials, such as a stone, together in a single firing. Glass is often fired with the silver clay in a single firing. Many types of glass, however, will melt at silver clay temperatures. If you are going to combine glass and silver clay in a single firing, test a small sample of the glass. To do this, fire the glass during a silver clay firing, keeping the glass separate from the silver clay piece. (This way you won t ruin the silver clay piece.) Place the pieces on a ceramic fireclay shelf. You must coat the shelf with glass separator, or otherwise the glass sample with embed into the shelf. If the glass sample survives the firing, you can fire that type of glass with silver clay in a single firing. Note, however, that different types of glass fire to different temperatures. Every time you fire a different type of glass, be sure to test. Firing Mistakes Silver Clay Cracks that appear in fired silver clay may be due to too much water in the silver clay before it was fired. Another cause is careless handling of a dried piece before firing. To repair, fill the crack with silver clay and fire again. Brittle Silver clay will not reach full strength if underfired. You may be able to save the piece by firing again to the correct temperature and hold. Too Much Shrinkage When silver clay is overfired, it shrinks too much and loses detail. You may need to replace the thermocouple on the digital kiln if the temperature is inaccurate. Glass Glass Cracking is caused by heating or cooling too fast or fusing incompatible glass. Not enough glass separator on the shelf can also cause glass cracking. Most problems in fusing are caused by rushing the firing. The glass must change temperature slowly during the critical temperature range of F. This critical range applies to both heating and cooling. The second critical temperature range is annealing, which is the cooling range of F average. Cool the glass slowly during this range so the stress in the glass will have time to dissipate. If you become impatient after the glass has fused and you tilt the kiln for a few seconds to peek inside, you may hear a ping, which is the sound of glass cracking. Avoid the temptation to open the kiln. Wait until the kiln has cooled to room temperature. Some artists schedule their fusing so that it is completed before they go to bed. That way they will be asleep while the glass cools and they won t be tempted to open the kiln while it is still hot. After each firing, examine the shelf. Recoat if the kiln wash is chipped. When glass sticks to a bare section of shelf, the glass will crack. Glass Bubbles are often caused by heating the kiln too fast. Air, grease or dirt trapped between layers of glass can cause bubbles. Other causes are uneven glass volume, and moisture or air trapped between the glass and shelf. Make sure the shelf is completely dry before firing. If you have applied fresh glass separator, leave the shelf in the kiln at 300 F for 30 minutes before placing glass on it. One way to eliminate bubbles is to hold the temperature at 100 F below fusing temperature for 20 minutes. This gives the shelf time to heat up to match the temperature of the glass. Glass Separator Sticks To Glass when fired too hot. Instead of firing to a full fuse temperature, try firing 50 F cooler and holding at that temperature for twenty minutes. /15


16 Ceramics Overglaze Breaking in Overglaze Firing can be caused by poorly fired bisque. A slow bisque fire is always better for ware that is to be china painted. The greenware should be completely dry before being placed in the kiln. Standing plates on edge or using a plate holder gives good heat circulation and will help in preventing plate breakage. Peeling China Paint can be caused by applying the paint too heavily. Loss of Color in China Paints is usually a result of overfiring, or thinning your paint with too much medium when applying. Faded Colors in Overglaze Decals is the result of either underfiring or overfiring. If pinks and reds are drab, refire to a hotter cone. When used with a china paint background, apply and fire the decals first, then china paint and fire again. Check the recommendations of decal supplier. If decal was underfired, refire to proper firing cone. If decal was overfired, the design may be repainted in china paints and refired. Weakening of Luster Colors can be due to overfiring. Powdering of Luster Colors can be caused by too heavy an application. Bisque Warped Ware can be caused by distorting upon removal of the piece from the mold, firing too close to the elements, or firing a piece in an unnatural position. To prevent porcelain cups or bowls from warping when firing the greenware, edge the top of a cup with pinches of dry silica or DRY all purpose, high fire kiln wash and place a second cup on top of the first cup, lip to lip, with handles going in opposite directions. Porcelain greenware plates may require firing in plate saggers to prevent warping during firing. Glaze Crazing is usually caused by underfired bisque. Bisque should be fired to the highest temperature at which it will still take glaze. Crazed ware may be refired to the proper cone. CAUTION: China paints and other overglazes will burn off when fired to 06. Crazing Immediately on Removing from the kiln can be caused by not firing the ware hot enough. Refire to the proper cone. Crazing in spots can be caused by not having mixed the glaze thoroughly before using. Porcelain Bumps in porcelain are usually caused by wet greenware and overfired porcelain bisque. Lack of Translucency in porcelain can be caused by the ware being poured too thick and underfired. Cracks in porcelain bisque are often the result of a strain on the greenware while drying. Do not force-dry greenware. Cracks may be mended with one of the new magic menders available from your supplier. Kiln Maintenance Trouble-Shooter Kiln Does Not Turn On, Display is Blank Make sure the circuit breaker is in the on position. Digital Kilns: If the breaker is on, check the kiln s fuse. It is located on the kiln s switch box. Remove the fuse by pressing on the fuse holder and turning counter-clockwise half a turn. Check the fuse by placing the probes of an ohmmeter on the ends of the fuse. If the ohmeter reads less than one ohm (digital meter) or reads 0 ohms (analog meter), the fuse is bad. Replacement fuse: AGC ½ A 250V AC Note: If you do not have an ohmmeter, visually inspect the fuse. You will see a thin strand of unbroken wire in a good fuse. The wire usually appears broken in a burned fuse, like the filament in a light bulb. Circuit Breaker Trips If the circuit breaker trips after the kiln has fired for awhile, make sure no other appliances are operating on the same circuit as the kiln. The breaker may need replacing. If the circuit breaker trips immediately after the kiln is turned on, the kiln may have a short circuit. Unplug the kiln. Open the kiln switch box and look for a loose wire touching the case. Temperature is Inaccurate Make sure the thermocouple is pushed 1 or more into the firing chamber. If the temperature is inaccurate even though the thermocouple extends into the firing chamber at least 1, replace the thermocouple. 16/


 and pull the wires out.")


 1 UNPLUG kiln. 2 Remove the screws on the sides of the switch box that hold it to the kiln.")

17 Replacing the Thermocouple 1 UNPLUG the kiln. 2 Remove the screws on the sides of the switch box that hold it to the kiln. Gently lift the box away from the kiln. 3 Remove the two screws securing the thermocouple ceramic block. Pull thermocouple from its firebrick hole. Loosen the screws holding the thermocouple to the ceramic block. 4 Slide the new thermocouple into the thermocouple hole. The thermocouple should protrude into the firing chamber 1 or more. To adjust the thermocouple length, change the gap between the thermocouple and the ceramic block. Then securely tighten the 4 screws in the ceramic block. 5 Fasten the ceramic block to the heat shield with the two screws removed in step 3. 6 Digital Kilns: Remove the controller faceplate from the front of the switch box. Manual Kilns: Remove the pyrometer from the front of the switch box. 7 Digital Kilns: Remove the 2 thermocouple wires attached to the back of the controller. They are held in place by button or lever type connectors. To remove the wires, lift the levers (or press down on the connector buttons) and pull the wires out. Manual Kilns: Remove the 2 thermocouple wires from the back of the pyrometer. 8 Strip ½ of insulation from the ends of the new thermocouple wires. Be sure the wire ends are separated where the insulation has been stripped. If bare ends touch, the thermocouple will not work properly. 9 Attach the wires to the back of the controller or pyrometer. One wire is yellow, the other red. Make sure the wires connect to the correct terminals, which are color coded. Reinstall the controller or pyrometer to the switch box. 10 Position the thermocouple wires so they are away from the hot sides of the kiln case and other electrical wires. (Placing thermocouple wires next to or looped around other wires could cause erratic controller readings.) 11 Check that no wires touch the kiln case or element connectors. Wires touching element connectors or kiln case will burn. Reinstall switch box. Replacing a Relay Or Transformer (Digital Kilns Only) 1 UNPLUG kiln. 2 Remove the screws on the sides of the switch box that hold it to the kiln. Gently lift the box away from the kiln. 3 The transformer and relay are bolted to the inside of the switch box. Hold the new part next to the one you are replacing, aligned in the same direction. Remove and transfer one wire at a time from the old part to the new one. Make sure each connection is tight. 4 Replace push-on connectors and wires damaged by heat. If wire connectors do not fit snugly on terminals, gently squeeze the end of the terminal with pliers. 5 Remove the old part from switch box. Install the replacement. Note: If you are replacing the transformer, examine the new one to make sure the primary is properly wired for your kiln s voltage. (See the kiln s wiring diagram.) 6 Check to see that wires are not touching kiln case or the element connectors. Wires touching element connectors or the kiln case will burn out. Move switch box into place and reinstall switch box screws. /17

 Remove the single nut from the front of the defective switch.")

 1 UNPLUG kiln.")

 to heat the bulging element.")

18 Replacing a Switch Or Pyrometer (Manual Kilns Only) 1 UNPLUG kiln. 2 Remove the screws on the sides of the switch box that hold it to the kiln. Gently lift the box away from the kiln. 3 Switch: Pull off the switch knob with fingertips. Hold the new switch at the side of the switch box in the same position as the defective switch, aligned in the same direction. Remove and transfer one wire at a time from the old switch to the new one. Make sure each connection is tight. Replace push-on connectors and wires damaged by heat. If wire connectors do not fit snugly on terminals, gently squeeze the end of the terminal with pliers. (See photo, page 17.) Remove the single nut from the front of the defective switch. Remove the switch and put the new one in place making sure it is right side up. Reinstall the shaft nut checking to be sure it is not backwards. Tighten the switch so that it will not turn during operation. Pyrometer: Remove the thermocouple wires from the pyrometer and the four nuts holding the pyrometer in place. Install the new pyrometer. The red wire attaches to the negative terminal, the yellow to the positive. 3 Check to see that wires are not touching kiln case or the element connectors. Wires touching element connectors or the kiln case will burn out. Move switch box into place and reinstall switch box screws. Replacing the Temperature Controller (Digital Kilns Only) 1 UNPLUG kiln. 2 Remove the 4 corner screws holding the controller faceplate to the switch box. Carefully lift out faceplate. 3 Disconnect all the wires from the back of the board. You will find two plugs and two single wires. 4 Connect the wires to the new board. Reinstall faceplate. Reseating a Bulging Element To push a bulging element back into the groove, first heat the element. Once an element has been fired, it becomes brittle and will break if it is bent while cold. Follow this procedure to heat the element: 1 UNPLUG the kiln. Use a small propane torch (available at a building supply store) to heat the bulging element. Stop heating when the element glows dull red. 2 With a pair of long nosed pliers, shrink the bulging portion of the element by pressing the individual turns in the coils together slightly. Take a little from each turn so that no two turns will be pressed tightly enough to touch. 3 As the element shrinks, work it back toward the groove and into place. Work rapidly, and at the first sign of stiffness in the coils, stop bending and reheat the element. The elements do not have to be red to be bent safely, as the stiffening can be felt through the pliers. These two photos show how to shorten and lengthen an element. Use needle nose pliers to shorten; snap-ring pliers to lengthen. 4 To lengthen the element to fit into the corners, reverse the above procedure and expand the distance between coils by using snap-ring pliers. Use caution, as your warranty covers elements that fail only in service under normal use and not from being broken while cold. 5 When you have the coils positioned above the dropped recess in the grooves, press the element into the groove with a blunt kitchen knife. Note: Do not use a plastic object, such as a comb, to press the hot element into the groove. Melted plastic ruins elements. 18/


19 Replacing An Element Replacement elements are stretched to the proper length at the factory. However, a little stretching or compressing may be necessary for a perfect fit. It is safe to bend and stretch new elements before they have been fired, but once fired and allowed to cool, elements become brittle and will break if bent. 1 UNPLUG the kiln and allow to cool to room temperature. Remove the top. Lift the kiln off the bottom and place the kiln on a table. 2 Remove the screws on the sides of the switch box that hold it to the kiln. Gently lift the box away from the kiln. 3 Remove the screws in the element connectors that hold the element lead wires to the element you are replacing. 4 On the same connectors, loosen the screws that hold the element and throw old connectors away. Always use the new connectors furnished with the new element. 5 Remove and save the porcelain insulators that were behind element connectors. 6 Remove the old element carefully to prevent breaking the lip of the element grooves. If the old element burned out due to contact with foreign materials, there will probably be a melted, glazed spot in the element groove. Glazed spots left in the grooves may ruin the new element, so dig out any of these spots. The small hole left in the groove will not affect the new element. Small pieces of firebrick in the grooves should be removed with a vacuum cleaner. 7 Thread the new element into the upper element hole. 8 The element must fit all the way into the back of each corner. Making a bend in the element at the corner will help hold the Hold the element connector with locking pliers when removing and installing the connector. Inserting the new element into the firebrick hole. element in place during firing. Start by pushing the element into the first corner. Hold the element against the back of the corner with a screwdriver or pliers. Then gently pull the free end of the element toward you. The element will bend where the screwdriver presses against it. Note: Remember, if you do not push the element fully to the back side of each corner, the element will not stay in the grooves when fired! 9 If the element is slightly too long when you reach the Bending the element at the corner. Use a screwdriver or pliers to hold the element while you pull it. If the element is too long, squeeze the coils together slightly. second firebrick hole, you can compress the element with long-nose pliers. If the element is several inches too long, it was not pushed all the way to the back of each corner and should be rethreaded. If the element is too short to reach the firebrick hole, unthread some of the element. Gently stretch it in your hands. Avoid stretching only a short portion of the element. It is better to distribute the stretch over a longer section. 10 Press element down into the lower part of the groove with a plastic comb or wooden tongue depressor. 11 Reinstall the porcelain insulators. Push them flush against the heat shield. They protect the element from contact with the stainless steel kiln case and heat shield, so they must not work their way out after the element connector is tightened into place. 12 Sandpaper the eyelet of the element lead wires until bright and clean of all oxidation. (Install new lead wires if insulation on old ones is brittle.) Use the brass screw to connect lead wire eyelets to the new element connectors. Before tightening screw, adjust eyelet to where it will be tilted away from heat shield when connector is attached to element. Then hold connector with locking pliers and tighten brass screw securely with a 1 4 nutdriver. 13 Pull end of element tight and install new element connectors snugly against porcelain insulators to prevent insulators from slipping away from brick wall. Use stainless screw in the element connector to hold the element. (The brass screw holds the lead wire eyelet.) Hold connector with locking pliers as you tighten the screw with the 1 4 nutdriver. Tighten the screw to 30 inch pounds (about turns past the point of firm resistance). /19

20 Tighten the element connectors according to step #14. Then cut off the element ends. 14 Cut off twisted end of element even with side of element connectors. Leaving the excess element sticking out past element connector could ruin your new element! (The element could short against something in the switch box.) 15 As you move the switch box back into place, check to see that no wire touches an element connector. Wires must also not touch kiln s case inside the switch box. Wires will burn if they touch the case or element connectors. Reinstall screws in switch box and tighten.
Paragon Caldera & FireFly Instruction & Service Manual
 Paragon Caldera & FireFly Instruction & Service Manual Recommended books at www.paragonweb.com Click Products near the top of the home page. Then click Books & DVDs from the drop menu. Printed in USA Free
Delphi Ceramic Kiln Instruction Manual
 Delphi Ceramic Kiln Instruction Manual INTRODUCTION Thank you for purchasing a Delphi kiln. We are confident that the kiln will give you many years of relaxation and creative enjoyment. The warranty on
PROMETHEUS PRO7/PRG. Multi-Functional Kiln Instruction Guide
 PROMETHEUS PRO7/PRG Multi-Functional Kiln Instruction Guide CONTENTS (1) Technical Specifications (2) When You Receive the Kiln Inspect the kiln Save the Shipping Box (3) Important Safety Rules (4) Setting
LOADING THE KILN. Leave a 1 inch space between abutting shelves in the centre so that you can see from top to bottom.
 LOADING THE KILN BISQUE FIRING: User program 2. Firing schedule is in the front of the glaze book. Make sure there are 2 half shelves or a full shelf in the bottom of the kiln set on 1 posts.place three
Create with Clay: THE BASICS
 Create with Clay: THE BASICS Where do you get ceramic supplies? Your local ceramic supply store will be your best bet. They will have everything you need and are much cheaper than art supply stores that
Rio Grande PMC Kilns # & # Instruction Handbook
 Rio Grande PMC Kilns #703-117 & #703-118 Instruction Handbook Table of Contents Topic Page Safety Precautions 2 Setting Up the Kiln 3 Basic Operation 4 Important Guidelines 5 Controller Programming 7 General
Bumple Glass. Selecting the Screen. Preparing the Screen
 Experimenting with firing glass onto a steel screen, I discovered that firing the glass to a full fuse would cause the glass to form a uniform pattern of small round bumps where the softened glass slumped
CERAMICS VOCABULARY. FIRE - To bake in a kiln. Firing is a term used for cooking the clay.
 CERAMICS VOCABULARY BAT - A slab or platform on which clay is handled; a circular device attached to the wheel-head. BISQUE - Unglazed clay, fired once at a low temperature. BISQUE FIRING - The process
Rio Grande. RG-720 Instruction Manual. Temperature Display. display is in F.
 Rio Grande RG-720 Instruction Manual F Temperature Display Temperature display is in F. C Temperature display is in C. See page 7 for instructions on selecting F and C. Time Display : Separates hours from
CERAMIC TERMS & INFORMATION Ceramics 1 & 2 Waverly-Shell Rock Sr. High School Mr. Adelmund
 Name CERAMIC TERMS & INFORMATION Ceramics 1 & 2 Waverly-Shell Rock Sr. High School Mr. Adelmund Bat: A disk or slab of plaster, wood or plastic on which pottery is formed or dried. Bisque: Pottery that
Kiln Basics. How NOT to burn your school down!
 Kiln Basics How NOT to burn your school down! Do not open up or look into a kiln while firing. The peep holes are for cooling, looking directly at red hot anything will cause eye damage. You should wear
STEPS and Stages of the Clay
 STEPS and Stages of the Clay Slip - Clay that is watered down - smooth and runny. It attaches handles and decorations.. Wedging Used for eliminating lumps and air bubbles, drying the clay. Wedging makes
CERAMICS 1 Midterm Study Guide
 CERAMICS 1 Midterm Study Guide SEMESTER 1 The exam is broken into 3 specific areas with a collection of questions that involves the following areas: TYPES and STAGES of CLAY, CONSTRUCTION, and FIRING These
COMPOSITES LAB MANUAL
 COMPOSITES LAB MANUAL Version 1 Lab 3: Surface Preparation, Wet Layup, and Vacuum Bagging The original version of this manual was a one student senior design project written by Katherine White, the Composite
UNIT 6 HAND CONSTRUCTION WITH STONEWARE
 Refer to requirements Unit 6 on page 2 Requirements: Basic Information: Hand Construction with Stoneware: (1) Stoneware is more or less vitreous depending on the temperature to which it is fired. (2) Hobbyist
Porcelite is ideal for objects requiring high resolution details. It s capable of printing at 25 micron layer thickness.
 fa is a UV-curable porcelain resin suitable for 3D printers that utilize SLA, DLP or CLIP technologies with UV wavelengths between 350-405 nm. Porcelite is ideal for objects requiring high resolution details.
The Exclamation Point alerts you to particular cautions, hazards and information.
 SAFETY Read and understand this installation and operating manual as well as the controls manual before operating your kiln. If you have any questions please contact Evenheat Kiln at 989-856-2281 or at
FIREBOX OPERATING MANUAL
 FIREBOX OPERATING MANUAL 6441 SE JOHNSON CREEK BLVD. PORTLAND, OR 97206 (503) 774--6000 SKUTT@SKUTT.COM W W W. G L A S S K I L N S. C O M Revised 11/28/06 2 TABLE OF CONTENTS FireBox 8 Operating Manual
Glaser Ceramics Fired-On Images Transfer Paper MS (Multi-Surface) Instructions for Glazed Clay Bisque, Factory Glazed Ware and Fusible Glass
 Instructions for Glazed Clay Bisque, Factory Glazed Ware and Fusible Glass") Glaser Ceramics Fired-On Images Transfer Paper MS (Multi-Surface) Instructions for Glazed Clay Bisque, Factory Glazed Ware and Fusible Glass STEP 1 - Acquiring Images:. Photographs, drawings, invitations
Glaser Ceramics Fired-On Images Transfer Paper MS (Multi-Surface) Instructions for Glazed Clay Bisque, Factory Glazed Ware and Fusible Glass STEP 1 - Acquiring Images:. Photographs, drawings, invitations
The Exclamation Point alerts you to particular cautions, hazards and information.
 SAFETY Read and understand this installation and operating manual as well as the controls manual before operating your kiln. If you have any questions please contact Evenheat Kiln at 989-856-2281 or at
The Exclamation Point alerts you to particular cautions, hazards and information.
 SAFETY Read and understand this installation and operating manual as well as the controls manual before operating your kiln. If you have any questions please contact Evenheat Kiln at 989-856-2281 or at
Joe Finch Clay Kiln. Method: Make catenary arch former (65cm wide, 65cm high and 85cm long)
") Joe Finch Clay Kiln As with any kiln care must be taken in the construction, sighting and firing of this kiln. For the first firing (if you are firing to biscuit or glaze) you must take the first 700c
Joe Finch Clay Kiln As with any kiln care must be taken in the construction, sighting and firing of this kiln. For the first firing (if you are firing to biscuit or glaze) you must take the first 700c
Pottery 1: Final Exam Study Guide
 Pottery 1: Final Exam Study Guide Elements of Art (Ingredients) The basic foundation/building blocks of art. 1. Line 2. Color 3. Value 4. Texture 5. Form 6. Shape 7. Space Principles of Art (recipe) How
How to use a Touch Up Bottle & Brush
 How to use a Touch Up Bottle & Brush Tech Tips General Definitions Base Color (Basecoat): A color coat requiring a clear coat. Base Color provides color and appearance, while the clear coat provides gloss
OPERATING MANUAL MODELS P & K
 OPERATING MANUAL MODELS P & K CAUTION The KILN-SITTER control is a valuable tool to help you achieve consistent result when firing your kiln. It is engineered to give you years of trouble-free performance
MANUAL. Important! Remove all protective plastic which may be covering any part of the oven or its accessories.
 MANUAL Your new Arrow Springs oven was designed so that it could be used on the worktable next to you while doing one or more of the following: making beads, fusing, enameling, silver clay, ceramics, jewelry
Safety Procedures Visual Arts
 Safety Procedures Visual Arts Plano Independent School District Janice Truitt, Visual Arts Coordinator Fine Arts Department Plano Independent School District 1 General Safety Procedures: Exposure to hazardous
SpeedFire ElectricMini 1600 Instructions First Time Firing
 Sharing your passion for making jewelry. Products. Service. Know-how. First Time Firing The SpeedFire ElectricMini (SFEM ) 1600 is made from ceramic fiberboard that is fortified with organic materials.
SLIP-CASTING. Learning the basics
 SLIP-CASTING Learning the basics To find out more, visit: http://virginiadecolombani.wordpress.com/ INDEX 02. What is slip-casting? 03. Slip-casting manifesto 04. Making a ptototype 05. Planning mould
Small Dragonflies. Availability. COE 96* Casting Schedule
 Small Dragonflies The Small Dragonflies with Wing Slumper mold has been one of the most popular designs. Why not devote a project sheet just to making, shaping, and tacking these designs. Start by cleaning
Page 1 EXHIBITORS ASSOCIATION JUDGING PROGRAM
 EXHIBITORS ASSOCIATION JUDGING PROGRAM Page 1 CLASSIFICATIONS 1. Novice: Someone over the age of 17 that has done ceramics for less than 6 months. 2. Hobbyist: Someone that has done ceramics more than
Engineered Hardwood Flooring Installation Instructions
 Engineered Hardwood Flooring Installation Instructions 1 Important Information before You Begin 1.1 Installer/Owner Responsibility Carefully inspect all materials before installation. Materials installed
UNIT 11: PAINTING, STAINING, AND FINISHING
 KEY CONCEPTS 1. Equipment needed 2. Primary kinds of Paint: Interior/Exterior 3. Primary kinds of Stain: Interior/Exterior 4. Proper application techniques: Paint/Stain/Finish 5. Equipment care and clean
INSTALLATION INSTRUCTIONS FRAMELESS CONTINUOUS HINGE SHOWER ENCLOSURE QCI5233
 INSTALLATION INSTRUCTIONS FRAMELESS CONTINUOUS HINGE SHOWER ENCLOSURE QCI5233 QCI5233 Rev 0 Page 1 Certified 06/20/2016 INSTALLATION NOTES: Unpack your unit carefully and inspect for freight damage. Lay
OPERATING MANUAL MODELS LT-3 & LT-3K
 OPERATING MANUAL MODELS LT-3 & LT-3K CAUTION The KILN-SITTER control is a valuable tool to help you achieve consistent result when firing your kiln. It is engineered to give you years of trouble-free performance
Quality Marine Equipment Since Antifouling Paint For Metal Under The Waterline SPRAY. Application Instructions.
 Quality Marine Equipment Since 1981 Antifouling Paint For Metal Under The Waterline SPRAY Application Instructions www.antifoulingpaint.net Thank you for selecting Velox Plus Antifouling Paint to protect
Taking the mystery out of working with Acrylic By S. Taylor Hedges
 Taking the mystery out of working with Acrylic By S. Taylor Hedges Sandra Taylor Studio One Cat Squared Working with Acrylic Paint Definitions: Glaze thin transparent layers of color that enable the artist
Gift Boxes with Crinklized Dichroic
 Courtesy of: Colour de Verre This project was created using Colour de Verre s box molds and a new product by CBS Castings By Sandberg, their Crinklized Dichroic glass. Not only does the glass have the
Install Instructions for Solano Jurastone #4012 Mantel
 Install Instructions for Solano Jurastone #4012 Mantel Please read this manual before installing the suite. This manual should remain with the homeowner. Updated 12/03/12 NOTE the installation requirements
Loose Lay Luxury Vinyl Plank
 Loose Lay Luxury Vinyl Plank FLEX COLLECTION Installation & maintenance * PLEASE READ CAREFULLY * Installation, maintenance & warranty guideline for loose lay luxury vinyl products. Adherence to This guideline
Repairs. Chapter 10 Repairs 10. 1
 10 Repairs Chapter 10 Repairs 10. 1 Repairs As an installer, you will probably be called upon to repair damage to a resilient floor. Here are some of the most common problems and the recommended repairs
Soldering and Desoldering Instruction
 Soldering and Desoldering Instruction Soldering is defined as "the joining of metals by a fusion of alloys which have relatively low melting points". In other words, you use a metal that has a low melting
Building the Gothic Church
 Building the Gothic Church Mold #54 does not contain all of the blocks to build this church. You will need extra regular blocks (1/2" x 1/2" x 1") and square blocks (1/2" x 1/2" x 1/2"). These blocks can
E3 UV-30 Resist Film Instructions
 E3 UV-30 Resist Film Instructions For more information or to view instructions in color, visit www.sherrihaab.com Sherri Haab Designs 2016 Supplies needed: Metal plate to etch (copper, brass or silver)
4-H Model Building. Monroe County. Grades 3-12
 4-H Model Building Monroe County Grades 3-12 PURPOSE Positive development of our young people through the stimulation of their personal interest and natural skills through the assembly, techniques of construction,
INSTALLATION INSTRUCTIONS FRAMELESS CONTINUOUS HINGE SHOWER ENCLOSURE QCI5232
 INSTALLATION INSTRUCTIONS FRAMELESS CONTINUOUS HINGE SHOWER ENCLOSURE QCI5232 QCI5232 Rev 0 Page 1 Certified 06/20/2016 INSTALLATION NOTES: Unpack your unit carefully and inspect for freight damage. Lay
SOLDERING MANUAL A simple, yet easy to follow manual for your basic soldering needs. Copyright 2017 TortugaPro. All Rights Reserved
 A simple, yet easy to follow manual for your basic soldering needs Copyright 2017 TortugaPro. All Rights Reserved Purpose Soldering is not limited to electrical and electronics work. It is a skill that
Eerie Halloween by Nunn Design
 Eerie Halloween by Nunn Design Approximate finished length: 20 inches Beads and other products needed for necklaces: 1 - Pewter Itsy Square Bezel Pendant with Flat Loop by Nunn Design - Antique Gold -
BRUSH APPLICATION INSTRUCTIONS
 QUALITY MARINE EQUIPMENT SINCE 1981 Antifouling Paint For Metal Under The Waterline BRUSH APPLICATION INSTRUCTIONS www.antifoulingpaint.net TABLE OF CONTENTS Humidity & Drying Metal Surfaces... 1 Coverage
The Exclamation Point alerts you to particular cautions, hazards and information.
 SAFETY Read and understand this installation and operating manual as well as the controls manual before operating your kiln. If you have any questions please contact Evenheat Kiln at 989-856-2281 or at
Building the Bell Tower
 Building the Bell Tower Mold #55 does not contain all of the blocks to build this tower. You will need extra regular blocks (1/2" x 1/2" x 1") and square blocks (1/2" x 1/2" x 1/2"). These blocks can be
Kitchen Stainer to filter Vitrolite
 Vitrolite is a photocurable polymer resin for use in SLA or DLP printers. After firing, Vitrolite is a glass ceramic with high strength, low porosity/high density and thermal shock tolerance. Vitrolite
Frameless Inline Door With Return QCI5263
 INSTALLATION INSTRUCTIONS Frameless Inline Door With Return QCI5263 WALL MOUNT HINGES FRAMELESS DOOR / PANEL / RETURN PANEL QCI5263 REV. 0 Page 1 Certified 06/17/2016 Parts List with wall mount hinges
SCULPTURE SUPPLY CANADA TECHNICAL BULLETIN
 TECHNICAL BULLETIN Work Surface Always work on a non-stick Teflon or Silicone baking sheet. Do not use a metal cooking sheet unless it has a teflon coating. If you re working with a heat gun, make sure
Turkey Football Panel
 Turkey Football Panel PROJECT TITLE: Turkey Football Turkey Football Panel A Stained Glass Project DESIGNED BY: Jeanne Baruth for Diamond Tech SKILL LEVEL: (Adult 1-5 1 being the easiest, 5 being difficult)
Basic Vocabulary Clay Mold Ceramics Pottery Earthenware
 Clay Introduction Basic Vocabulary Clay: Particles of decomposed rock combined with water to create a plastic malleable body which is then fired in a kiln to fuse the particles back into a stone-like state.
CONGRATULATIONS! We sincerely wish you many years of creative and rewarding use of your CRESS FIREMATE R kiln.
 CONGRATULATIONS! Congratulations on being the owner of a CRESS FIREMATE R ceramic kiln! This kiln is a safe, reliable, and very popular automatic kiln, which gives you a fast energy efficient firing. Because
Hollow metal clay forms are typically built over organic cores like. Coreless Construction: Rethinking the Metal Clay
 PROJECT INTERMEDIATE METAL CLAY Coreless Construction: Rethinking the Metal Clay Build this four-sided pendant using forethought and a 3-D template. by Cindy Ambrose FCT-MWON0216_ART17 Hollow metal clay
Commercial Kilns Operating Manual
 Commercial Kilns Operating Manual Building the Finest Kilns for Your Creative Spirit! www.greatkilns.com Division of Haugen Mfg. P. O. Box 1347, 4225 Thurmon Tanner Road Flowery Branch, GA 30542 Sales
Installing the Stuller Portable Controller STULLER. Step 1: Position the portable Stuller controller
 STULLER SINCE 1970 Stuller 302 rue Louis XIV Lafayette, Louisiana 70508-7700 800-877-7777 info@stuller.com Installing the Stuller Portable Controller Important Guidelines 1 Do NOT cut or bend the thermocouple.
FRAMED PANEL / DOOR / PANEL CONTINUOUS HINGE SHOWER ENCLOSURE INSTALLATION INSTRUCTIONS
 FRAMED / DOOR / CONTINUOUS HINGE SHOWER ENCLOSURE INSTALLATION INSTRUCTIONS QCI5229 Rev 0 6 INSTALLATION NOTES: Unpack your unit carefully and inspect for freight damage. Lay out and identify all parts
Cress Ceramic Kiln - FXC30FH. User Guide
 Cress Ceramic Kiln - FXC30FH User Guide 1 CONGRATULATIONS! Congratulations on being the owner of a CRESS ceramic kiln model FXC30FH! This kiln is a safe, reliable, and popular front loading kiln, which
1/4 Sheet Palm Sander
 OWNER S MANUAL Model Number: PS160CA-3 1/4 Sheet Palm Sander TM Registration Card Inside CAUTION! To reduce the risk of fire, electric shock and personal injury, read and understand the owner s manual
Quality Marine Equipment Since Antifouling Paint For Metal Under The Waterline ROLLER. Application Instructions.
 Quality Marine Equipment Since 1981 Antifouling Paint For Metal Under The Waterline ROLLER Application Instructions www.antifoulingpaint.net THANK YOU! Thank you for selecting Velox Plus Antifouling Paint
HOW TO SELECT & USE A ROLLER
 HOW TO SELECT & USE A ROLLER www.paintaids.co.nz 1 select the right roller The two most important things for a great paint finish are: a good quality paint, and the right roller sleeve to match the paint
HOW TO MAKE GOLDSTONE STRINGER
 Devardi Glass And The Hothead Torch. :*:. Tutorial Series. :*:. HOW TO MAKE GOLDSTONE STRINGER Learn To Encase Luster and Opaque Rods and Then Pull Stringer TUTORIAL OVERVIEW In this tutorial you will
David Reekie - Mould making and Glass Casting Methods
 David Reekie - Mould making and Glass Casting Methods David says of his work that "through surreal uses of situation and perception. I have tried to illustra aspects of human behaviour. often I used ironic.
Thanks for shopping with Improvements! 7 ft. Wall Christmas Tree w/ Stand Item #419359
 Thanks for shopping with Improvements! 7 ft. Wall Christmas Tree w/ Stand Item #419359 IMPORTANT: RETAIN FOR FUTURE REFERENCE. READ CAREFULLY. PARTS LIST: NOTES: (1) Tree Section A (1) Tree Section B (1)
UNIT 3 OVERGLAZE. Requirements: Basic Information:
 (Refer to requirements Unit 1-4 on page 2) Requirements: Overglazes: Basic Information: (1) Are usually applied over a glaze. (2) May also be applied over polished Porcelain bisque. (3) Are mostly used
Photo: Leslie Bruning - Bruning Sculpture Studio. Castalite
 Photo: Leslie Bruning - Bruning Sculpture Studio Castalite Castalite Castalite is a UV-curable ceramic shell resin suitable for 3D printers that utilize SLA, DLP or CLIP technologies with UV wavelengths
Metal clay. Skill Set. Whether you want to learn how to bezel-set a cabochon, Step Up Your. earring project.
 PROJECT INTERMEDIATE METAL CLAY Step Up Your Metal clay Skill Set Improve your craft à la carte in this technique-packed earring project. by Deb Fitz FCT-CRON0216_ART48 Whether you want to learn how to
Stained Glass Mission-Style Frame A stained glass project
 Stained Glass Mission-Style Frame A stained glass project Stained Glass Mission-Style Frame A Stained Glass Project PROJECT TITLE: Stained Glass Mission-Style Frame SKILL LEVEL: (Adult 1-5: 1 being the
Tabletop Epoxy Resin Instruction Guide
 Table Top Epoxy Full Instructional Guide WARNING! You should read through ALL of these instructions BEFORE starting. These instructions are intended for Bar Tops, Table Tops, Artwork and Countertop applications.
Unit No. 6150, 7150 Deluxe Framed Sliding Tub/Shower Enclosure
 INSTALLATION INSTRUCTIONS Unit No. 6150, 7150 Deluxe Framed Sliding Tub/Shower Enclosure QCI0023 Rev. 1 Page 1 of 8 Certified 8/20/10 MAINTENANCE: Two primary materials are used to manufacture your new
Processing guide for IMAGIN
 Processing guide for IMAGIN 2006 Updated information on products, product availability and processing guidelines are regularly updated on the AGC Flat Glass Europe website: www.yourglass.com p 1 / 1 Table
Technical Information
 Technical Information Handling, Inspecting and Fabricating Pilkington Activ Self-Cleaning Glass Pilkington Activ Self-Cleaning Glass has a thin, clear, permanent, pyrolytic Titanium Oxide coating on one
Extruded sheet (FF) #3 Other Methods of Cutting. Technical information. This brief gives advice for:
 #3 Other Methods of Cutting. Technical information. This brief gives advice for:") Technical information Extruded sheet (FF) WARNING: This product can expose you to chemicals including Ethyl acrylate, CAS 140-88-5, which are known to the State of California to cause cancer. For more
Technical information Extruded sheet (FF) WARNING: This product can expose you to chemicals including Ethyl acrylate, CAS 140-88-5, which are known to the State of California to cause cancer. For more
Shutter Installation Instructions
 Shutter Installation Instructions ITEMS YOU WILL NEED: Tape measure Framing square Screw gun Circular saw Caulk gun PL premium adhesive Exterior grade screws 1 ¾" Safety glasses Putty knife Window and
Freehand Back-Filling: Polymer Clay and Resin Tutorial
 Page 1 of 9 Eugena Topina, 2016 Freehand Back-Filling: Polymer Clay and Resin Tutorial This tutorial is offered for your personal use only. Please do not distribute. Back-filling is a simple and very versatile
Art-Drawing-Painting. 3-D or 3 dimensional when all 3 dimensions: length, height, and width can be touched and felt.
 ART Art-Drawing-Painting *Sculpture words (Additional vocabulary follows the main list) *Crafts and Ceramics (Vocabulary specific to crafts and ceramics follow this main list) Essential Vocabulary Secondary
ALL-STAR GRINDER G-8 MANUAL
 ALL-STAR GRINDER G-8 MANUAL IMPORTANT SAFETY INSTRUCTIONS READ ALL INSTRUCTIONS FOR PERSONAL SAFETY THIS MACHINE MUST BE PROPERLY GROUNDED The power cord of this machine is equipped with a three-prong
ET911 INSTRUCTIONS CRESS MFG CO., INC CONVAIR DR CARSON CITY, NV / FAX IMPORTANT
 ET911 INSTRUCTIONS CRESS MFG CO., INC. 4736 CONVAIR DR CARSON CITY, NV 89706 800-423-4584 / 775-884-2777 FAX 775-884-2991 IMPORTANT UNPACK SHIPMENT IMMEDIATELY When this shipment was given to the carrier,
1 SELECT suitable material. It takes time to cut a cab. Don t waste it on rubbish.
 7 July 09 CUTTING A STANDARD CABOCHON A Standard Cabochon or CAB is an oval or round stone with one flat side and the other side having an even curved dome shape. Top of Cab It will have a narrow bevel
C Paint. Product Information Sheets
 T A T G O E C Paint Product Information Sheets Cottage Paint- 8oz jar Available in many pre-tinted colors -see chart. Used for painting furniture and cabinetry. Water based Clay paint that is easily distressed
675 Quick N Stall Neo Angle Framed Hinge Shower Enclosure
 INSTALLATION INSTRUCTIONS 675 Quick N Stall Neo Angle Framed Hinge Shower Enclosure Call Technical Dept @ 1-800-452-2726 QCI1003 Page 1 of 9 Certified 10/01/09 INSTALLATION NOTES: Unpack your unit carefully
Foundry Procedures. Page 1 of 7 R. G. Sparber Copyleft protects this document. Furnace Set Up
 Foundry Procedures Furnace Set Up 1. Check weather report and only proceed if there is no chance of rain 2. lay out tarp on patio 3. place 3 fire bricks to support furnace 4. put down bottom of furnace
A Precision 2000 Mixed Media Project
 Día de los Muertos (Day of the Dead) Panel A Precision 2000 Mixed Media Project PROJECT TITLE: Día de los Muertos (Day of the Dead) Panel DESIGNED BY: Andy Spencer SKILL LEVEL: (Adult 1-5: 1 being the
Installation Guide. Pionite Decorative Surfaces One Pionite Road, Auburn, Maine PIONITE ( )
") Installation Guide A Subsidiary of Panolam Surface Systems SMPBRO00-012 6/14 Pionite decorative laminates are designed for finished interior surfaces which require high impact, wear and stain resistance
Installation Guide A Subsidiary of Panolam Surface Systems SMPBRO00-012 6/14 Pionite decorative laminates are designed for finished interior surfaces which require high impact, wear and stain resistance
PolyCarb has good resistance to many chemicals. Some chemicals may harm the PolyCarb sheets. Contact us when in doubt about any chemical.
 Polycarbonate Panels This manual provides the basic information for working with and installing PolyCarb sheets. Due to their hollow core, prior preparation is needed before the actual installation, with
Installation Instructions
 www.marlite.com Effective Date 03/01/2018 ARTIZAN FRP, SYMMETRIX FRP, ENVUE FRP, STANDARD FRP Installation Instructions Statements expressed in this technical bulletin are recommendations for the application
Sketchpaint. Ideal for turning any smooth surface into a whiteboard. Ready to use in 5 days
 Sketchpaint Ideal for turning any smooth surface into a whiteboard SketchPaint - A whiteboard straight out of a tin! White Gloss or Transparent Finish Simple application Tin size available: 3m² or 6m²
ATD AMP Variable Speed Reciprocating Saw Owner s Manual
 ATD-10535 7 AMP Variable Speed Reciprocating Saw Owner s Manual Manufactured in China To ATD Tools, Inc. Specifications TECHNICAL SPECIFICATIONS Voltage: 120V Frequency: 60Hz Power input: 7 Amps No load
Make ceramic picture frames
 for the classroom Make ceramic picture frames This butterfly had thinned yellow, jade, and purple dabbed over the surface with a fan brush. Thinned jade was splattered with a stiff fan brush. Clear glaze
CONCEPT MODELS INSTRUCTIONS FOR UP DC-10 WING CAR El Toro Way Stockton, CA Web Address:
 CONCEPT MODELS Web Address: http://www.con-sys.com 8810 El Toro Way Stockton, CA 95210 INSTRUCTIONS FOR UP DC-10 WING CAR 2 CONCEPT MODELS PARTS DC-10 WING CAR Item No. Part No. DESCRIPTION QTY. 1 2003-1
Hubble Space Telescope Paper Model Directions Downloads, patterns, and other information at:
 Hubble Space Telescope Paper Model Directions Downloads, patterns, and other information at: www.hubblesite.org/go/model Materials: model pattern printed onto cardstock/coverstock instructions printed
Vinyl Installation Guide and Tips
 Vinyl Installation Guide and Tips Tools Needed: Squeegee; Grease Pencil (white or blue only!); 2" & 1/4" Masking Tape Prepare your surface and vinyl as outlined on back cover prior to employing this technique
Wednesday, November 17, 2010 CLAY REVIEW
 CLAY REVIEW What is clay? Clay is a naturally occurring material composed primarily of fine-grained minerals, which show plasticity through a variable range of water content, and which can be hardened
Contemporary Serpentine Ware
 colourdeverre.com, and downloading, printing, and reviewing Serpentine Basics. The formers should be spaced 1 (2.5 cm) apart. Balance the glass rods across the formers. Contemporary Serpentine Ware This
FRAMED SLIDING DOOR FOR TUB OR SHOWER ENCLOSURE 6150A-7150A
 FRAMED SLIDING DOOR FOR TUB OR SHOWER ENCLOSURE 6150A-7150A F AB GLASS AND MIRROR www.fabglassandmirror.com Call: +1 888-474-2221 Fax: (614)-334-4919 Office Timing: 8:30-18:00 EST info@fabglassandmirror.com
UGC Product Information Seminar
 Unique Glass Colors UGC Product Information Seminar Presented by Instructors and Owners of UGC Margot Clark and Dr. SJ (Saulius Jankauskas) We welcome you to the world of glass fusing using UGC Products.