Instruction installation
|
|
|
- Theodore Wells
- 5 years ago
- Views:
Transcription
1 Instruction installation 1.There are 2 to 4 mounting clips and angle brackets shipped with each shade ordered depending on the width of the shade. a. Wall mount: Attach the angle brackets onto the wall surface two (2) inches above the window (using the #8-3/4" Phillips screws). Then attach a mounting clip to each angle bracket using a #6-1/4" se-tapping Phillips screw. (see Figure I) b. Direct mount to valance header. Angle Bracket is not necessary. Screw mounting clips directly into the valance header approximately 3/4 inches from the wall surface using the #8-3/4" Phillips screws. (see Figure 2) 2.The first and the last mounting dips should be positioned approximately 3 4 inches away from the end of the bead rail (see Figure 4). Position the remaining mounting clip(s) evenly between the first and last chip if the width of the shade assembly is over 30 inches. 3.Lock the head rail into the mounting clips by inserting one side of the rail and twisting the other side. (see Figure 3) 4. Lower the middle and bottom travel rails to their hang position. The tension cords are routed out of the bottom rail with a cord cleat pre-tied to both ends. (see Figure 4) 5. At both ends of the head rail, measure down a distance of Shade Height Ordered + 1.5". At this location screw the pre-tied cord cleat onto the wall surface using the #5-1" slotted screw. (see Figure 4) 6. Operate the middle and bottom travel rail by hand. They should move smoothly and be able to stop at any desired location when hand is released. Figure I Figure 2 Figure 4 TROUBLE SHOOTING 1. To ensure that the shade raises evenly, use the handles) provided. If both travel rails are gang to be raised, raise the middle rail first, then the bottom rail. 2. If the travel rails are difficult to move or they am not stop at any desired position when hand is released, a minor adjustment needs to be done at the tension cord(s). Re-tie the tension cord(s) at either side of the shade. Pull cords out of the bottom rail will increase tension, send cords in will decrease tension. Slightly increase tension if the middle and bottom rails can not stop at an expected location. Decrease tension if the rails are difficult to travel.
2 file:///i /wwwshadeparts/vb%20parts%20web/vb%20parts%20web/shaderepairparts4/publisher/publisher/rvdiv/diagram.htm (1 of 3) [9/4/2007 9:32:48 AM]
3 file:///i /wwwshadeparts/vb%20parts%20web/vb%20parts%20web/shaderepairparts4/publisher/publisher/rvdiv/diagram.htm (2 of 3) [9/4/2007 9:32:48 AM]


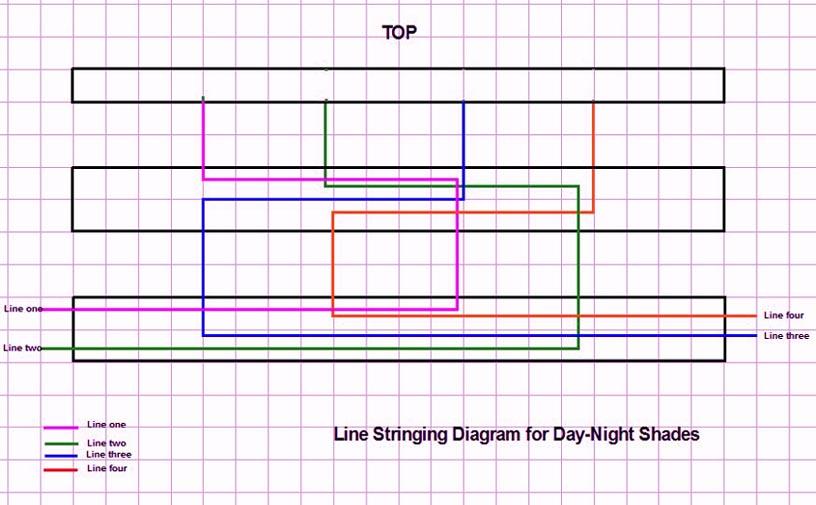
4 Starting at top rail, thread sting through holes as illustrated on diagram If the cords are not broken, you do not have to remove it. Cut the old cord from the spring and weld the ends of the new cord together using a lighter or match. Roll the joined cords between your fingers to create a smooth weld. Pull the old cord out new cord follow. Venetian Blind Repair Shop Address: 1704 E 29th St. Vancouver, WA Phone: file:///i /wwwshadeparts/vb%20parts%20web/vb%20parts%20web/shaderepairparts4/publisher/publisher/rvdiv/diagram.htm (3 of 3) [9/4/2007 9:32:48 AM]
5 These directions are for Day-Night RV Shade Restringing the blind is not difficult however you will need to remove the blind from its mounting base. There are a number of different retainer styles, so you will need to examine yours to see what method is required to detach the blind. Remove the shade assembly from the installation brackets: Raise the shade all the way to compress the fabric. Loosen the tab screw on the back of each mounting bracket. Tilt the back of the headrail down to remove the rail from the brackets (Figure 1). Place the shade assembly on a clean work surface. Note: If you have a steel bracket without the tab screw, the shade may be removed utilizing the same tilting action shown. (If they do not include the stringing needle then get one as well). Figure 1: Loosen the tab screw and tilt the back of the headrail down to remove the shade assembly from the installation brackets. Some blinds are held up by a spring steel clip maybe an inch long. One side will have a lip on it, the other side does not. That lip is the key. What I did was take a heavy screwdriver and tried to wedge it between that lip and the top of the blind until it released allowing the blind to drop out. Did the same thing with the other end clip. Once the blind is removed, rest it on a hard surface. Cut the strings from both hold-downs then proceed to remove the plastic end caps on all rails with a flat head screwdriver. Remove the bottom and top rails from the blind by sliding them off then slide the bottom section of the pleated shade from the center rail. The rails slide off horizontally, and may get hung up on a knob rivet, so be firm, it will eventually slide off. Once the blind is disassembled, proceed as follows. In the top rail, the cord will be attached to a spring on each side. The cord coming from the left will run down through the left side of the night material. The cord coming from the right will run down through the right side of the night portion of the shade. The cords will cross in the center rail, so that the cord that runs down the left hand portion of the night shade, will cross over and run down through the right hand side of the day shade. Do the same for the right hand side of the night shade. It will cross over in the center rail and run down through the left hand side of the day shade. Now the cord coming down through the right side of the day portion will once again cross in the bottom rail and exit out of the left hand side of the shade through the end cap, use a threader needle to thread the cords through the holes. Inspect the holes for any burrs or sharp edges as they may damage the cord. After threading the blind, assemble the top rail including plastic end caps. Remember to stay within the ridges of the PVC. Insert center end caps. Thread the cord through the bottom end caps. There is a right and a left end cap; please check before threading. After inserting end caps, measure and cut cords to required length. After required length has been cut, see illustration on how to tie on the spring tension spool. REMEMBER: Reset the drop of your shade by tying the cord retainers where you need them to be and adjust the tension as needed by wrapping the cord around the cord retainers. My experience suggests adjusting the blind to have sufficient tension to stay in place and no more. This will give you the ability to increase tension should the spring weaken with age and it also places less tension on the strings If the string rubs against the blind mounting hardware it will fray and eventually break.
How to Install Custom Real Wood and Faux Wood Blinds
 Before you begin your installation: READ ALL INSTALLATION INSTRUCTIONS! Make sure that you have all tools and hardware needed for installation. Check the installation surface (wall, ceiling, or window
HONEYCOMB SHADES with Continuous Cord Loop
 HONEYCOMB SHADES with Continuous Cord Loop GETTING STARTED BRACKET INFORMATION A few simple tools are required: The brackets you received with your product are REQUIRED for proper installation. Brackets
Installation And Care Instructions. Vertical Honeycomb Shades
 Installation And Care Instructions Vertical Honeycomb Shades Rev 5/2013 Table Of Contents Getting Started... 3 Parts Overview... 4 Materials Required... 5 Tools Required... 6 Outside Mount Installation...
WOVEN WOOD SHADES Corded, Continuous Cord Loop or Upended
 WOVEN WOOD SHADES Corded, Continuous Cord Loop or Upended GETTING STARTED HARDWARE INFORMATION A few simple tools are required: The hardware you received with your product are REQUIRED for proper installation.
ROMAN AND. Roller Lift System Continuous Cord Loop GETTING STARTED BRACKET INFORMATION INSIDE MOUNT. A few simple tools are required:
 ROMAN AND WOVEN WOOD SHADES Roller Lift System Continuous Cord Loop GETTING STARTED BRACKET INFORMATION A few simple tools are required: The brackets you received with your product are REQUIRED for proper
INSTALLATION AND CARE INSTRUCTIONS
 INSTALLATION AND CARE INSTRUCTIONS Vertical Applications Honeycomb Shades 52 C8-10-3401 Rev 2/14 CONTENTS Introduction...2 Before You Begin...3 Vertical Application Parts Overview...4 Materials Required...5
METAL BLINDS. Deluxe GETTING STARTED OPTIONAL HARDWARE. A few simple tools are required: STANDARD HARDWARE
 METAL BLINDS Deluxe GETTING STARTED OPTIONAL HARDWARE A few simple tools are required: Steel Tape Measure Pencil Level Hold Down Brackets with Screws Extension Bracket Power Drill and Drill Bits Flathead
Insolroll Clutch Operated Shades Installation Instructions Installation Instructions
 All clutch operated shades are shipped fully assembled and ready for installation. Mounting screws are not provided. Screws for chain guide installation to meet the child safety standards are provided.
HONEYCOMB SHADES. Cordless INSIDE MOUNT. A few simple tools are required: STANDARD HARDWARE OPTIONAL HARDWARE
 HONEYCOMB SHADES Cordless GETTING STARTED BRACKET INFORMATION A few simple tools are required: Steel Tape Measure Pencil Level (for outside mount) The brackets you received with your product are REQUIRED
INSTALLATION AND CARE INSTRUCTIONS
 INSTALLATION AND CARE INSTRUCTIONS Vertical Applications Honeycomb Shades CONTENTS Introduction...2 Before You Begin...3 Vertical Application Parts Overview...4 Materials Required...5 Tools Required...6
Cellular SlumberShade
 Cellular SlumberShade with energy saving blackout sidetracks Installation Instructions 152110 1/6/2011 BASICS A few simple tools are required: - Measuring tape - Power drill, drill bits - Hex head and/or
Vertical Honeycomb Shades
 Step by Step Installation Instructions Vertical Honeycomb Shades Customer Service 800.248.8888 or visit us online at smithandnoble.com Thank you for purchasing from Smith+Noble. Your new shades have been
FLEXCELL HONEYCOMB BLINDS
 FLEXCELL HONEYCOMB BLINDS GETTING STARTED BRACKET INFORMATION A few simple tools are required: The brackets you received with your product are REQUIRED for proper installation. s should be installed at
TASK: Replace Control Mechanism/Drive End for G71 Supervue/Everglide Vertical headrail
 1. Locate the clear plastic louver stems where louvers are attached. 2. Rotate louvers open. Slide a hard plastic card between the louver and the long side of the louver stem. Push the card and louver
PLEATED SHADE ARCH INSIDE MOUNT GETTING STARTED. A few simple tools are required: STANDARD HARDWARE
 HONEYCOMB AND PLEATED SHADE ARCH GETTING STARTED INSIDE MOUNT A few simple tools are required: HALF ARCH INSTALLATION Your half arch has been shipped in the closed osition. When fanned, the rails will
INSTALLATION AND CARE INSTRUCTIONS
 INSTALLATION AND CARE INSTRUCTIONS Skylight Manually Operated Honeycomb Shades 20 C8-10-1806 2/15 1 INTRODUCTION Thank you for purchasing our product. Your new shade has been custom built for you from
STEP BY STEP INSTALLATION INSTRUCTIONS. Sheer Shadings. Cordless Control
 STEP BY STEP INSTALLATION INSTRUCTIONS Sheer Shadings Cordless Control Everything You Need A Smooth Set-Up We want you to love your new window coverings and that includes having a smooth installation experience.
SAM. Model: STV-C65 LCD Mobile Visualized Stand Instruction Manual. Weight Capacity: 1251bs / 56.7kg Suits LCD Flat Panel Display: 42"-55" Page 20
 SAM Model: STV-C65 LCD Mobile Visualized Stand Instruction Manual Weight Capacity: 1251bs / 56.7kg Suits LCD Flat Panel Display: 42"-55" 20 Step 6 LCD Mobile Lift Stand Model: STV-C65 Cable management
Luxe Linen Honeycomb Shades
 Step by Step Installation Instructions Luxe Linen Honeycomb Shades Customer Service 800.248.8888 or visit us online at smithandnoble.com Table of Contents Getting Started...3 THANK YOU for purchasing from
Trackstar Manual Folding Shade Installation Instructions
 Trackstar Manual Folding Shade Installation Instructions Tracklock or Cord and Pulley Lifting System Thank you for purchasing your new Trackstar folding shade. It has been custom-made from the highest
Venetian Blind 25mm Installation Guide Inside Fit option
 Venetian Blind 25mm Installation Guide Inside Fit option Parts 1. Installation bracket (Same bracket used for inside and face fitting) 2. Installation Screw (1 per bracket, Square head) Step 1 Bracket
Installation Instructions
 Installation Instructions Transitional Shades Standard Transitional Shades (Small and Large Cassette) Board Mounted Transitional Shades Accu-Rise Transitional Shades Sure-Lift Transitional Shades Sundown
Installation Operation Care
 Installation Operation Care Provenance Woven Wood Shades Standard Cordlock CONTENTS Getting Started: Product View... 1 Tools and Fasteners Needed... 2 Installation: Installation Overview... 3 Mount the
Installation Instructions
 Transitional Shades Installation Instructions Traditional, 2-On-1 Headrail & Sundown Shades Couplitaire Modernaire Visionaire *Click on any page to return to the Table of Contents* Allure Transitional,
Basic Spring Motor Roller Shades
 Basic Spring Motor Roller Shades ATTENTION!!! READ CAREFULLY! This shade has a reliable long-lasting Spring Motor. The Spring Motor must have proper tension in order to function as intended. Handling in
WHISPER Cellular EasyRise Shades. Installation Operation Care
 WHISPER Cellular EasyRise Shades Installation Operation Care 05/2013 CONTENTS Getting Started: Product View... 1 Tools and Fasteners Needed... 2 Installation: Installation Overview... 3 Mounting Types
The Phoenix. Professional Quilting Frame. Copyright January 1, 2016 Jim M. Bagley, GraceWood, Inc (Reproduction Prohibited) Version 2.
 Version 2.") The Phoenix Professional Quilting Frame Copyright January 1, 2016 Jim M. Bagley, GraceWood, Inc (Reproduction Prohibited) Version 2.1 1 The Phoenix Professional Quilting Frame Parts List Box 1...3 Box
The Phoenix Professional Quilting Frame Copyright January 1, 2016 Jim M. Bagley, GraceWood, Inc (Reproduction Prohibited) Version 2.1 1 The Phoenix Professional Quilting Frame Parts List Box 1...3 Box
TASK: Correct Uneven Continuous Loop with Dust Cover Cellular and Pleated
 The internal components can move if the bottomrail is bumped when the shade is in the lowered position. 1. Use a carpenter s level to make sure the brackets, window and mounting surface are level. 2. Raise
Installation and Assembly: In-wall Mount for 32" to 71" Flat Panel Screens
 Installation and Assembly: In-wall Mount for 32" to 71" Flat Panel Screens Model# IM760P, IM760P-S IM760PU, IM760PU-S Screen size range 32" to 71" (81 to 180 cm) 32" to 60" (81 to 152 cm) IM760P IM760P-S
Motorized or Crank Operated Fortress Zipper Track Shade with Housing and Side Track Installation Instructions
 Motorized or Crank Operated Fortress Zipper Track Shade with Housing and Side Track Installation Instructions Tools Needed Drill 3/8 Metal Drill Bit ¼ Masonry Drill Bit Measuring Tape Pencil 4 Level Phillips
STEP BY STEP INSTALLATION INSTRUCTIONS. Sheer Shadings. Retractable Cord
 STEP BY STEP INSTALLATION INSTRUCTIONS Sheer Shadings Retractable Cord Everything You Need A Smooth Set-Up We want you to love your new window coverings and that includes having a smooth installation experience.
INSTALLATION GUIDE 2009-CURRENT HUMMER H3T PRODUCT CODE:
 INSTALLATION GUIDE 2009-CURRENT HUMMER H3T PRODUCT CODE: 268 June 22, 2010 TOOLS NEEDED COMPONENTS INCLUDED P2 Tip 3/8" Drill Rubber Gasket(s) x 2 Bracket(s) x 2 1/2" Drill Bit Bulkhead Flange #2 Phillips
Continuum Frame Assembly Instructions
 Continuum Frame Assembly Instructions Copyright January 1, 2017 Jim M. Bagley, GraceWood, Inc (Reproduction Prohibited) Version 2.2 Table of Contents Continuum Frame Table of Contents... i Warranty...ii
Installation, Operation and Care Instructions. Continuous Cord Loop Operating System
 Installation, Operation and Care Instructions Continuous Cord Loop Operating System CONTENTS Getting Started: Product View... 1 Tools and Fasteners Needed... 2 Installation: Installation Overview... 3
Installation Instructions Parasol Cellular Shades
 Installation Instructions Parasol Cellular Shades SlideArch CONTENTS Getting Started: Product View...1 Tools and Fasteners Needed...2 Installation: Installation Overview... Mount the Installation s Inside
INSTALLATION INSTRUCTIONS TOOLS YOU WILL NEED GETTING STARTED
 INSTALLATION INSTRUCTIONS HONEYCOMB SHADES TOP-DOWN, MOVABLE ARCH Thank you for your purchase. This shade has been custom built for you from the highest quality materials. To avoid errors and save valuable
Installation, Operation and Care Instructions. Retractable Cord Operating System
 Installation, Operation and Care Instructions Retractable Cord Operating System CONTENTS Getting Started: Product View... 1 Tools and Fasteners Needed... 2 Installation: Installation Overview... 3 Mount
Cordless Operable Sidelights
 Installation Instructions Parasol Cellular Shades Cordless Operable Sidelights CONTENTS Getting Started: Product View...1 Tools and Fasteners Needed...2 Installation: Installation Overview... Mount the
Electric Skein Winder
 Electric Skein Winder Assembly and Use Package Contents 1 - Triangular Body (w/ motor) 1 - Cross Arm 1 - Left Foot (w/ yarn guide) 1 - Right Foot 1 - Adjustable Finger (w/ yarn clip) 3 - Adjustable Fingers
Solar & Roller Shades
 STEP BY STEP INSTALLATION INSTRUCTIONS Solar & Roller Shades Cordless Control with Mounting Bar or Cordless Control with Cassette Table of Contents Step 1 - Getting Started.... 3 Everything You Need A
Solar & Roller Shades
 STEP BY STEP INSTALLATION INSTRUCTIONS Solar & Roller Shades Cordless Control with Mounting Bar or Cordless Control with Cassette Everything You Need A Smooth Set-Up We want you to love your new window
Installation Operation Care
 Installation Operation Care Provenance Woven Wood Shades Standard Cordlock CONTENTS Getting Started: Product View...1 Tools and Fasteners Needed...2 Installation: Installation Overview...3 Mount the Standard
Be sure to oil your machine as instructed below. To avoid spotting on garments being embroidered, oil the machine sparingly.
 OILING THE MACHINE Oiling is important for maintaining the machine performance over an extended period of time. Turn the power off when lubricating the embroidery machine. Be sure to oil your machine as
Copyright 2009, Seymour Products LLC, All rights reserved. GET THE SCREEN, KEEP THE SOUND
 GET THE SCREEN, KEEP THE SOUND There are three boxes inside the outer box. The tube contains the screen, the large box contains the frame pieces, and the small box contains the small items. The corner
Installation Operation Care
 Installation Operation Care Alustra Woven Textures Traditional Roman Shades Cordlock Lifting System CONTENTS Getting Started: Product View... 1 Tools and Fasteners Needed... 2 Mounting Types and Window
CONTINUOUS CORD LOOP SYSTEM
 CONTINUOUS CORD LOOP SYSTEM OPERATING & INSTALLATION INSTRUCTIONS Standard & Heavy-Duty Systems Revised 8/2018 Getting Started A few simple tools are required: Measuring tape Power Drill, drill bits Hex
Cellular Shades SLUMBERSHADE. with energy saving blackout sidetracks. Installation & Care Instructions
 Cellular Shades SLUMBERSHADE with energy saving blackout sidetracks Installation & Care Instructions 152725 B 9/14/2017 GETTING STARTED A few simple tools are required: - Measuring tape - Power drill,
Installation Operation Care
 Installation Operation Care Provenance Woven Wood Shades Standard Cordlock CONTENTS Getting Started: Product View...1 Tools and Fasteners Needed...2 Installation: Installation Overview...3 Mount the Standard
Quick Fit Installation Guide Retractable Screen - Single Door
 Quick Fit Installation Guide Retractable Screen - Single Door 1 REMOVE KIT PARTS FROM SHIPPING TUBE 15 Mounting screws 1 Housing end cap screw 2 Handles 1 Housing end cap 1 Bushing 1 Pull bar end cap 2
RAMPAGE P R O D U C T S. INSTALLATION INSTRUCTIONS BRONCO ZIPPER FASTRACK TOP PART #984xx BRONCO TOOLS REQUIRED
 RAMPAGE P R O D U C T S 84 (+/- 1/4 ) INSTALLATION INSTRUCTIONS BRONCO ZIPPER FASTRACK TOP PART #984xx BRONCO 1966-1977 TOOLS REQUIRED 3/8 WRENCH 7/16 WRENCH ½ WRENCH #2 PHILLIPS SCREWDRIVER 1/8 DRILL
Assembly Instructions 10 X 10 Aluminum Frame Building
 Assembly Instructions 10 X 10 Aluminum Frame Building 27 97 9 8 47 36 74 52 10 10 X 10 Square Building W/ Dome Includes: The Steel Entry Door with a Dead Bolt Lock assembly and Aluminum Door Frame. Metal
Installation and Assembly: In-wall Mount for 32" to 71" Flat Panel Displays
 Installation and Assembly: In-wall Mount for 32" to 71" Flat Panel Displays Model# Display size range IM760P, IM760P-S 32" to 71" (81 to 180 cm) IM760PU, IM760PU-S 32" to 65" (81 to 165 cm) This product
Perfect Fit blinds. Preparation. Measuring Instructions. Step 1 - Measure glass size. Step 2 - Measure window depth
 Preparation Before you begin, ensure there is a 6mm clearance all around the outside of your window beading to allow enough room for the Perfect Fit framework. Also check that the seals of your window
Installation Operation Care. Solera Soft Shades EasyRise, UltraGlide, and LiteRise Lifting System
 Installation Operation Care Solera Soft Shades EasyRise, UltraGlide, and LiteRise Lifting System CONTENTS GETTING STARTED Product Views...1 Tools and Fasteners Needed...3 INSTALLATION Installation Overview...4
Baby Grande or Grande Crank Shade with Cables and Housing Installation Instructions
 Baby Grande or Grande Crank Shade with Cables and Housing Installation Instructions Tools Needed Drill 3/8 Metal Drill Bit Screwdriver (Flat & Phillips) Measuring Tape Pencil 4 Level Plumb Line ¼ Masonry
INSTALLATION INSTRUCTIONS for the JOMY RETRACTABLE LADDER. If there are any questions, please call (800)
") INSTALLATION INSTRUCTIONS for the JOMY RETRACTABLE LADDER If there are any questions, please call (800) 255-2591 INSTALLATION INSTRUCTIONS WARNING! Ladder Sections Lock When Closed. Do Not Install or Close
INSTALLATION INSTRUCTIONS for the JOMY RETRACTABLE LADDER If there are any questions, please call (800) 255-2591 INSTALLATION INSTRUCTIONS WARNING! Ladder Sections Lock When Closed. Do Not Install or Close
How to fit a blind FREE
 How to fit a blind FREE How to fit a blind This guide shows you how to select and fit new blinds to your windows. This is a fairly easy DIY task and shouldn t take much more than an hour or so. Before
MOTORIZED STANDARD SHADE WITH CABLES Installation Instructions
 Tools Needed Drill Measuring Tape Pencil 2 Level Plumb Line ¼ Masonry Drill Bit Hammer Linesmans Pliers Cable Cutters Phillips & Flat-Head Screw Driver 11/32 Socket or Open End Wrench 5/32 Allen Wrench
Replacing the Reciprocator on the SWF Compact Series Machine (601C and 1201C)
") Follow the instructions below to replace the reciprocator in the SWF Compact series machines. The tools required can be found in the tool kit that came with the machine. Preparation 1. First, place the
Follow the instructions below to replace the reciprocator in the SWF Compact series machines. The tools required can be found in the tool kit that came with the machine. Preparation 1. First, place the
Wallboard or plastic Pre-drill holes and use hollow wall anchors or toggle bolts to install your shade in wallboard or plastic.
 Woven Wood Shades Installation Instructions Email: customerservice@blindster.com Call us: (888) 256-8672 Mon - Fri 8am - 7pm (CT) Congratulations on purchasing Woven Wood Shades from Blindster. This window
year5 Luxaflex Guarantee Guarantee, Installation and Operating Instructions Luxaflex Duette & Plissé Blinds Freehanging Models
 year5 Luxaflex Guarantee Guarantee, Installation and Operating Instructions Luxaflex Duette & Plissé Blinds Freehanging Models Guarantee, Installation and Operating Instructions Luxaflex Duette & Plissé
Deluxe Exterior Solar Shades
 Deluxe Exterior Solar Shades Installation Instructions Email: customerservice@blindster.com Call us: (888) 256-8672 Mon - Fri 8am - 7pm (CT) Thank you for purchasing Deluxe Exterior Solar Shades from Blindster.
Installation Operation Care
 Installation Operation Care Designer Roller and Designer Screen Shades Standard and Cassette Cordless Lifting System CONTENTS Getting Started: Product Views... 1 Tools and Fasteners Needed... 3 Installation
The Bowflex Revolution XP Home Gym Assembly Instructions. P/N: Rev ( /0 )
") P/N: 001-7057 Rev ( /0 ) The Bowflex Revolution XP Home Gym Assembly Instructions 2 Table of Contents Before You Start... 2 Tools You Will Need / Hardware Contents... 3 Box Contents... 6 Assembling Your
P/N: 001-7057 Rev ( /0 ) The Bowflex Revolution XP Home Gym Assembly Instructions 2 Table of Contents Before You Start... 2 Tools You Will Need / Hardware Contents... 3 Box Contents... 6 Assembling Your
FlexFrame - Storage Components and Skins
 FlexFrame - Storage Components and Skins 1/4 Square Drive Ball-Point Hex-Bit Socket 1/8 Short Hex, 1-1/2 Overall Length McMaster Part # 54075A44 Table of Contents Topic Page Storage Components 2 General
MPA-9000 Universal Ceiling Projector Mount Kit
 I N S T R U C T I O N M A N U A L Universal Ceiling Projector Mount Kit The Universal Ceiling Projector Mount provides a unique, simplified method of ceiling mounting your inverted projector. This low
Quick Fit Installation Guide Retractable Screen - Double Door
 Quick Fit Installation Guide Retractable Screen - Double Door 1 REMOVE KIT PARTS FROM SHIPPING TUBE 2 Slide bolts 2 Rail receiver Clips 15 Mounting screws 1 Housing end cap screw 2 Handles 1 Housing end
ASSEMBLY AND ADJUSTMENT
 EPPA MONITOR ARM EPPA Rev A 10/17 Model EPPA-XXX ASSEMBLY AND ADJUSTMENT EPPA MONITOR ARM PARTS AND TOOLS PLEASE REVIEW these instructions before beginning the assembly and adjustment procedures. Check
Horizontal Shadings. Installation & Operating Instructions
 Horizontal Shadings Installation & Operating Instructions TABLE OF CONTENTS Getting Started: Mounting Types...3 Installation Components...3 Tools and Fasteners Needed...4 Product View...5 Installation:
Baby Grande or Grande Crank Shade with Cables and Housing Installation Instructions
 Baby Grande or Grande Crank Shade with Cables and Housing Installation Instructions Tools Needed Drill 3/8 Metal Drill Bit Screwdriver (Flat & Phillips) Measuring Tape Pencil 4 Level Plumb Line ¼ Masonry
F l a t S c r e e n A R M S I n s t a l l a t i o n
 ITEM NUMBERS (1) #TOACAORG16 (2) #TOACAORG20 (3) #TOACATRP24 (4) #TOACATRP30 (5) #TOACATRPDS (6) #TOACATRPSS TOOLS REQUIRED (1) 3/8 Wrench (not provided) (2) Phillips head screwdriver (not provided) (1)
Kwik-Lock. Installation Instructions. Attention Dealers: Please give this owners manual to the customer when the product is delivered.
 Serving the Truck & Trailer Industry Since 1944 Installation Instructions Attention Dealers: Please give this owners manual to the customer when the product is delivered. Call 800-535-9545 www.aeroindustries.com
Installation Operation Care
 Installation Operation Care Designer Banded Shades Cassette with Custom Clutch and UltraGlide CONTENTS Getting Started Product View Custom Clutch... 1 Product View UltraGlide... 2 Tools and Fasteners Needed...
Tools Needed Hardware Provided (per shade) Hardware Needed
 Hardware Needed") Baby Grande or Grande Motorized (XQ5 Premium) Shade with Cables and Housing Installation Instructions Tools Needed Hardware Provided (per shade) Hardware Needed Drill 3/8 Metal Drill Bit Measuring Tape
Baby Grande or Grande Motorized (XQ5 Premium) Shade with Cables and Housing Installation Instructions Tools Needed Hardware Provided (per shade) Hardware Needed Drill 3/8 Metal Drill Bit Measuring Tape
CABANA / PAVILION ASSEMBLY ALUMINUM FRAME MODELS
 Assembled cabanas are large & heavy. Assemble at place of use. CABANA / PAVILION ASSEMBLY ALUMINUM FRAME MODELS Step 1 CAUTION: To avoid damage to the finish of your Cabana frame, prepare a smooth, non-scratch
HONEYCOMB & PLEATED Standard Shades Top Down Bottom Up
 HONEYCOMB & PLEATED Standard Shades Top Down Bottom Up INSTALLATION INSTRUCTIONS Rev. 8/2018 BASICS A few simple tools are required: Measuring tape Power drill, drill bits Hex head and/or Phillips driver
Tortoise Switch Machines, Mounted Horizontally
 Tortoise Switch Machines, Mounted Horizontally by David King Have you ever used the Tortoise Switch Machines manufactured by Circuitron. These are a wonderful stall motor slow motion switch machine that
OXYGEN INSTALLATION. Revision date
 12345 1 Hardware List 12345 Flat head wood screw #9 x 7/8 long with #2 Phillips drive, silver Used to attach surfaces and end panels Hex set screw ½-13 x 2 long with 1/4 hex drive, black Used on Legs Hex
MAIN PARTS
 MAIN PARTS 7 8 9 10 11 12 13 1 2 3 17 4 5 6 01 02 03 04 05 12 23 34 45 56 13 24 35 46 57 14 25 36 47 58 15 16 26 27 37 38 48 49 59 60 06 07 08 09 10 17 18 28 29 39 40 50 51 61 62 19 30 41 52 63 20 21 31
Pleated Shades with Continuous Cord Loop Option
 Pleated Shades with Continuous Cord Loop Option Installation Instructions Email: customerservice@blindster.com Call us: (888) 256-8672 Mon - Fri 8am - 7pm (CT) Thank you for purchasing a Pleated Shade
The Queen Quilter Professional Quilters Kit Frame
 The Queen Quilter Professional Quilters Kit Frame Assembly Instructions Table of Contents: Before you begin......................... Pg. 2 Wood parts............................. Pg. 3 Hardware..............................
WOLF PUP LOOM TM & WOLF PUP LT LOOM TM
 WOLF PUP LOOM TM & WOLF PUP LT LOOM TM Assembly Instructions FL3000 FL3006 FL3009 WOLF PUP WOLF PUP LT Find out more at schachtspindle.com Schacht Spindle Company 6101 Ben Place Boulder, CO 80301 p. 303.442.3212
New Roman Shades WARNING. Installation Operation Care. Retractable Cord Lifting System
 CHILD SAFETY Warning WARNING For more safety information call 1-888-501-8364 in the U.S. or 1-866-662-0666 in Canada. Young children can wrap cords around their necks and STRANGLE. Always keep cords out
INSTALLATION INSTRUCTIONS
 INSTALLATION INSTRUCTIONS Furniture Solutions: 68 Shipstation with Storage Shelf Model Numbers: PB001 (D9001, D9010N, D9021, D9030, D9032/D9033, D9098, RC4054) Introduction This document provides the Pitney
Venetian Blinds. Made to Measure Blinds UK Installation Guide
 Drill Bits / Fixings * For your health and safety wear suitable eye protection when drilling at all times. Drills & Tips: Use an undersize drill bit on your first hole to see what type of fixing you will
Baby Grande with Crank, Housing, and Side Rails Installation Instructions
 Baby Grande with Crank, Housing, and Side Rails Installation Instructions Tools Needed Hardware Provided (per shade) Hardware Needed Drill 3/8 Metal Drill Bit ¼ Masonry Drill Bit Measuring Tape Pencil
MM540 Installation Instructions IMPORTANT SAFETY INSTRUCTIONS - SAVE THESE INSTRUCTIONS
 MM50 Installation Instructions IMPORTANT SAFETY INSTRUCTIONS - SAVE THESE INSTRUCTIONS Please read this entire manual before you begin. Do not unpack any contents until you verify all requirements on PAGE.
ADJUST-A-VIEW HALF CIRCLE INSTALLATION INSTRUCTIONS
 Omega Mfg. Corporation Two Rivers, WI (800) 874-9594 www.adjustaview.com Proudly Serving Customers Since 1976 Page 1 of 7 MATERIAL LIST ADJUST-A-VIEW User Instructions ADJUST-A-VIEW Installation Instructions
Installation and Assembly - Universal Articulating Swivel Double-Arm for 42" - 60" Plasma Screens
 Installation and Assembly - Universal Articulating Swivel Double-Arm for 42" - 60" Plasma Screens Models: PLAV 70-UNL, PLAV 70-UNL-S PLAV 70-UNLP, PLAV 70-UNLP-S R This product is UL Listed. It must be
STEP BY STEP INSTALLATION INSTRUCTIONS. Pleated Shades. Easy Lift Cordless
 STEP BY STEP INSTALLATION INSTRUCTIONS Pleated Shades Easy Lift Cordless Everything You Need Table of Contents Step 1 - Getting Started................................... 3 Overview - Cordless Control...................................
DUETTE LITERISE SHADES INSTALLATION OPERATION CARE
 DUETTE LITERISE SHADES INSTALLATION OPERATION CARE PRODUCT VIEW Installation Brackets Headrail with Fabric-Covered Valance End Cap Middle Rail Bottom Up Shade Bottom Rail Handle Duolite Not Shown: Top
Assembly Instructions for Model: MF110
 Assembly Instructions for Model: MF110 Thank you for choosing a Sanus Systems VisionMount wall mount. The MF110 is designed to mount LCD flat panels with VESA (Video Electronics Standards Association)
HIT-30 ALUMINUM DOOR SERIES OWNERS MANUAL
 HIT-30 ALUMINUM DOOR SERIES OWNERS MANUAL INSTALL LOCKS LATCHES LEVERS / PADDLES INDICATORS STRIKES Every Installation Is A Self-Portrait Of The Person Who Did It! Autograph Your Work With Excellence!
For additional assistance call
 The following pages will help guide you through the process of assembling your new 48 custom prize wheel. Choose an assembly area with plenty of room to lay your pieces on the floor and also a bench or
User Instructions Multiline Otter Scoreboard Caddy Assembly
 List of parts: User Instructions Multiline Otter Scoreboard Caddy Assembly Single Caddy Double Caddy 1 1 Base assembly with attached wheels 2 4 1 1 2 4 4 8 10 20 12 Uprights (60 or 74 aluminum extrusion)
STEINBERGER TRANSTREM (TYPE 2) TECHNICAL DOCUMENT
 TECHNICAL DOCUMENT") STEINBERGER TRANSTREM (TYPE 2) TECHNICAL DOCUMENT These instructions apply to newer style TransTrems only (non-threaded ball type or modified threaded ball type). For purposes of discussion, these TransTrems
STEINBERGER TRANSTREM (TYPE 2) TECHNICAL DOCUMENT These instructions apply to newer style TransTrems only (non-threaded ball type or modified threaded ball type). For purposes of discussion, these TransTrems
STEP BY STEP INSTALLATION INSTRUCTIONS. Honeycomb Shades. Standard Control, Top Down/Bottom Up & Standard 2-on-1
 STEP BY STEP INSTALLATION INSTRUCTIONS Honeycomb Shades Standard Control, Top Down/Bottom Up & Standard 2-on-1 Table of Contents Everything You Need Step 1 - Getting Started....3 Overview - Standard Control,
Legacy Woodworking Machinery a division of Phantom Engineering. The Legacy CNC. Assembly Manual
 Legacy Woodworking Machinery a division of Phantom Engineering The Legacy CNC Assembly Manual New Orientation of the Legacy Step one: Re-orientation of the machine Remove the X-axis screw and supports.
DualView Honeycomb Shades
 STEP BY STEP INSTALLATION INSTRUCTIONS DualView Honeycomb Shades Cordless Control smithandnoble.com 800.248.8888 Table of Contents Everything You Need Step 1 - Getting Started...3 Overview - Standard Cordless...4
INOVO 2-LITE SLIDING PATIO DOOR
 INOVO 2-LITE SLIDING PATIO DOOR ASSEMBLY AND INSTALLATION INSTRUCTIONS IMPORTANT: READ THE INSTRUCTIONS AND FAMILIARIZE YOURSELF WITH THE DOOR PARTS AND PIECES BEFORE BEGINNING ASSEMBLY AND INSTALLATION.