iphone 6 Chargeport REPAIR GUIDE Version Edition
|
|
|
- Randell Booth
- 5 years ago
- Views:
Transcription

1 iphone 6 Chargeport REPAIR GUIDE Version Edition

2 IPHONE 6 CHARGEPORT REPAIR GUIDE LCD AND DIGITIZER REPLACEMENT RiAna Soto Repair Training Specialist rsoto@cellairis.com

3 FOR EVERY REPAIR MAKE SURE TO COMPLETE, INITIAL, AND HAVE CUSTOMER SIGN THE CELLAIRIS REPAIR LIABILITY WAIVER FORM
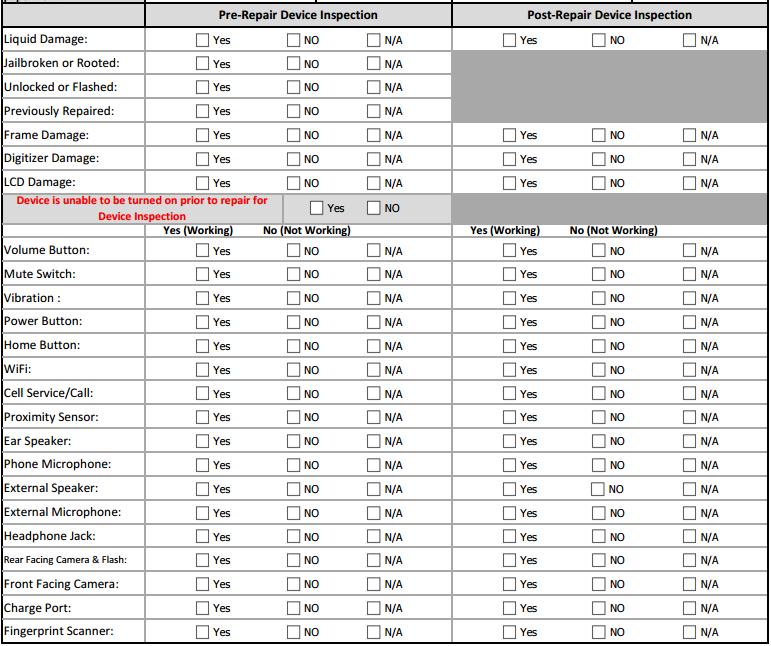


4 PRE-REPAIR DEVICE CHECK-IN

5 TOOLS NEEDED Philips screwdriver Spudger Tweezers Isesamo Pentalobe screwdriver Magnetic Mat IPhone 6 replacement Chargeport

6 HEAT-GUN PRECAUTIONS Always operate the heat gun on the lowest setting. Keep face, hands, hair, and clothing away from the air stream. The air nozzle also becomes extremely hot. Never grab the heat gun by the nozzle. Never operate the heat gun by laying it on its side on a table. It should be firmly grasped in one hand at all times during usage. Never operate near flammable or explosive liquids and vapors. Cleaning supplies and the 3M #94 Primer are of concern. Make sure fumes are absent from the work area before operating the heat gun The heat gun nozzle should never get closer than 2 to the object being heated. Keep heat gun moving. Never stay in one spot.


7 ADDITIONAL PRECAUTIONS Magnetic Pad: During the repair, you will be utilizing a magnetic pad to organize the plethora of differing screws that you will be pulling out of the iphone 6S. Below is a list of several internal components of the iphone 6S that should never be placed on the pad, or you risk damaging the hardware or erasing client data: LCD/Digitizer Assembly Cameras Motherboard Battery Speaker
8 ADDITIONAL PRECAUTIONS Power on/off: To avoid any damage to the hardware during the repair, it is best to have the device powered off until you can get to and disconnect the battery. Battery: Never unplug any flex cables unless the battery has been completely disconnected to avoid frying your hardware. Do not plug the battery back until all cables have been reconnected. Release Screws: Apply pressure on the screw and twist counterclockwise to initially loosen it, then lighten the pressure and continue twisting until the screw is gently released. Make sure you have properly sized screwdrivers available for the repair. Pin Connectors: extremely fragile and must be plugged or unplugged with extreme caution. Battery connector: held down by light adhesive and solder. If not cautious it will come off the motherboard. Very time consuming to be repaired. Do not break it in the first place. Motherboard: small surface mount components can be easily damaged if they are nicked by the spudger. Always take your time and never touch the surface of the motherboard.

9 LET S START!
 pentalobe screws using the pentalobe screwdriver.")
10 STEP 1 Disassemble the device Tools: Pentalobe screwdriver Remove the bottom two (2) pentalobe screws using the pentalobe screwdriver. Rotate counterclockwise.


11 STEP 2 Tools: Isesamo Take the isesamo tool and slide the tip with round edge in between the digitizer and frame of the iphone. Start on the bottom left side of the iphone because there is an indention in that area to get underneath the screen. Take your time as you slide the isesamo tool around the frame of the phone. Flex the isesamo in a left to right upward motion to pry phone open as you go around frame. Phone will open from bottom to top.


 screws holding it down then disconnect.")
12 STEP 3 Tools: Philips screwdriver, spudger Disassemble the device Tips: Keep organization of the screws especially on the EMI shield some our different sizes and need to be put back in the correct space. Once the screen is pried open next step is to disconnect the battery connector but first you must remove metal bracket covering the battery. Use the Philips screwdriver and remove the two (2) screws holding it down then disconnect. After that we will unscrew all five (5) Philips screws on the EMI shield. Battery EMI shield Battery heat plate


13 STEP 4 Tools: Spudger, fingers Disassemble the device After the EMI Shield is removed you will see the Digitizer/LCD, proximity sensor, and home button cable disconnect those four (4) using the spudger. The old assembly will now be separated from back housing. We will only be working with old assembly now. Tips: As you lift up these cables using the spudger be cautious not to be rough gently pry up with either side of spudger. Last thing you want to do is break a pin connector on logic board. Those pins are soldered on so not an easy fix!


14 STEP 5 Disassemble the device Tools: spudger After the screen is disconnected we can put it to the side because we will be working solely with the back housing portion of the phone. Disconnect chargeport cable from board. Disconnect the antenna cable up off motherboard be Gentle!
 Philips screws holding down the loud")


15 STEP 6 Tools: spudger, Philips Now we will remove the four (4) Philips screws holding down the loud speaker. Before you can completely pull loud speaker out you will have to pull the antenna clip off using your fingers or spudger. Next push up on the bottom part of the loud speaker to slide it out of the phone.


16 STEP 7 Tools: spudger, Philips Since the loud speaker is out we can remove the two (2) screws holding down the vibrator. Then remove vibrator. Remove the screws surrounding the chargeport. The top two (2) screws of the chargeport also hold down the retaining bracket so we want to pull that off and put to the side. We will put it back on after we put replacement part on.


17 STEP 8 Tools: Philips screwdriver, spudger Next, remove the screw holding the microphone brace down. The black piece connected to the screw will be put back on after the new component is put in. Make sure to remember the position it is in before taking it out. After that is out the remaining (6) screws


18 STEP 9 Tools: Philips screwdriver, spudger Now that all the screws and components covering the flex cable are gone we will pull Tip: Do not screw plate too tight and flip screen over after being tightened and test home button functionality to make sure it is working good. this component which is all one piece out. You can use the flat side of spudger or your fingers to lift the cable up that is being held down by adhesive. I start at the top near flex connector.


19 STEP 10 Tools: Philips screwdriver, spudger, Fingers Tips: Do Not screw the metal bracket to tight it can muffle the sound or the gold prongs won t line up properly. The bottom portion were the actual chargeport is might need some finesse by wiggling from left to right slightly. This will help release it from the socket. The microphone is also still connected down there so use your spudger to help separate it from the frame. The rest should be as simple as pulling up and out maybe use a plastic pry tool or plastic card to help loosen adhesive.


20 STEP 11 The replacement part will come with adhesive Tools: Philips screwdriver, spudger, Fingers Tips: Do Not screw the metal bracket to tight it can muffle the sound or the gold prongs won t line up properly. that you will peel off before you replace it. (peel the blue tape off) To reassemble the replacement part start with the audio jack and slide into position until you feel it snap into place. Once that is positioned bend the microphone gold prong so adhesive side is sticking to the frame while simultaneously sliding the chargeport into position (refer to picture).


21 STEP 12 Now that the chargeport and audio jack are Tools: Philips screwdriver, spudger, Fingers Tips: Do Not screw the metal bracket to tight it can muffle the sound or the gold prongs won t line up properly. positioned lay the rest of the cable down making sure all open holes are still open for screws to go in. Then place the loud speaker in first before screwing any of the screws in because some overlap holes for the screws. Put the vibrator back to position. Put the retaining bracket back over top of the chargeport.

22 STEP 13 Tools: Philips screwdriver, spudger, Fingers Now that every component is put back on the chargeport we can screw the remaining screws into there designated areas. Reconnect the antenna. Connect chargeport flex cable. Connect Digi/LCD. Connect battery then power on to test replacement part. Once plugged into charger should immediately work and notice charging symbol. Once you notice it s working go ahead and lay screen back down.


23 STEP 14 Reassemble the device Final step is to screw the two (2) pentalobe screws into the bottom of the phone with the pentalobe screwdriver. At this point power on device and run a post test to check functionality and make any notes on customer check-in device sheet. Do Post test actions. Tools: Pentalobe screwdriver
24 STEP 15 Troubleshooting If you notice the charger won t snap all the way into the connector most likely the charging port isn t all the way in. This will result in you opening the phone back up and adjusting the port push all the way in. If it does not charger at all make sure the flex cable is connected to motherboard properly. Now, if the replacement part doesn t work at all possibly be defective try a new part.

25 C O N T A C T REPAIR TRAINING Riana Soto x400 rsoto@cellairis.com
Iphone 5 Glass/Lcd REPAIR GUIDE. Version Edition
 Iphone 5 Glass/Lcd REPAIR GUIDE Version 1 2016 Edition IPhone 5 Glass/LCd REPAIR GUIDE RiAna Soto Repair Training Specialist rsoto@cellairis.com FOR EVERY REPAIR MAKE SURE TO COMPLETE, INITIAL, AND HAVE
IPhone 7 Plus Digitizer/LCD REPAIR GUIDE. Version Edition
 IPhone 7 Plus Digitizer/LCD REPAIR GUIDE Version 1 2016 Edition IPhone 7 Plus Digitizer/LCD REPAIR GUIDE LCD AND DIGITIZER REPLACEMENT RiAna Soto Repair Training Specialist rsoto@cellairis.com FOR EVERY
IPad mini REPAIR GUIDE. Version Edition
 IPad mini REPAIR GUIDE Version 1 2016 Edition IPad Mini REPAIR GUIDE LCD AND DIGITIZER REPLACEMENT RiAna Soto Repair Training Specialist rsoto@cellairis.com FOR EVERY REPAIR MAKE SURE TO COMPLETE, INITIAL,
Written By: Walter Galan
 iphone 4 Vibrate Ring Switch Replacement Replace the metal portion of the vibrate/ring switch on your iphone 4. Written By: Walter Galan ifixit CC BY-NC-SA www.ifixit.com Page 1 of 21 INTRODUCTION Use
iphone 4S Dismantling Instructions
 iphone 4S Dismantling Instructions These instructions will show you how to open the iphone to replace the digitizer, LCD screen and other internal parts. Opening your iphone will void your warrantee, and
Written By: Walter Galan
 iphone 4S Logic Board Replacement Replace a dead logic board in your iphone 4S. Written By: Walter Galan ifixit CC BY-NC-SA www.ifixit.com Page 1 of 22 INTRODUCTION Use this guide to replace your iphone's
Written By: Andrew Optimus Goldberg
 Replace the screen your GSM/AT&T iphone 4. Written By: Andrew Optimus Goldberg ifixit CC BY-NC-SA www.ifixit.com Page 1 of 25 INTRODUCTION [video: http://www.youtube.com/watch?v=obpfpfx5abw] Use this guide
Written By: Adam O'Camb
 iphone XR Display Assembly Replacement Replace a cracked or faulty LCD screen in your iphone XR. Written By: Adam O'Camb ifixit CC BY-NC-SA www.ifixit.com Page 1 of 23 INTRODUCTION If your iphone XR screen
Written By: Arthur Shi
 Remove and replace a broken or malfunctioning motherboard for the Google Pixel XL. Written By: Arthur Shi ifixit CC BY-NC-SA www.ifixit.com Page 1 of 21 INTRODUCTION If you're having issues with the overall
Written By: Walter Galan
 iphone 4 Logic Board Replacement Replace a dead logic board in your iphone 4. Written By: Walter Galan ifixit CC BY-NC-SA www.ifixit.com Page 1 of 16 INTRODUCTION Use this guide to replace your iphone
Repairing iphone 4 LCD Backlight Dim spot issue
 Repairing iphone 4 LCD Backlight Dim spot issue found a way to fix a liquid damaged iphone screen back light issue Written By: Pranav Singh ifixit CC BY-NC-SA www.ifixit.com Page 1 of 26 INTRODUCTION found
Written By: Arthur Shi
 iphone 8 Taptic Engine Replacement Replace the Taptic Engine in an iphone 8. Written By: Arthur Shi ifixit CC BY-NC-SA www.ifixit.com Page 1 of 18 INTRODUCTION The Taptic Engine produces your iphone's
Written By: Walter Galan
 Replace the small antenna attached to the headphone jack of your iphone 4S. Written By: Walter Galan ifixit CC BY-NC-SA www.ifixit.com Page 1 of 23 INTRODUCTION Use this guide to replace your iphone's
Written By: Jeff Suovanen
 iphone 8 Plus Taptic Engine Replacement Replace the Taptic Engine (haptic vibration motor) in an iphone 8 Plus. Written By: Jeff Suovanen ifixit CC BY-NC-SA www.ifixit.com Page 1 of 20 INTRODUCTION The
Written By: Jeff Suovanen
 iphone 8 Battery Replacement Replace the battery in your iphone 8 if it has failed, swollen, or no longer holds sufficient charge. Written By: Jeff Suovanen ifixit CC BY-NC-SA www.ifixit.com Page 1 of
Written By: Jeff Suovanen
 iphone X Lower Speaker Replacement Remove or replace the primary loudspeaker on the bottom edge of the iphone X. Written By: Jeff Suovanen ifixit CC BY-NC-SA www.ifixit.com Page 1 of 22 INTRODUCTION The
Written By: Jeff Suovanen
 iphone 8 Plus Antenna Flex Cable Remove or replace the small antenna interconnect cable in the iphone 8 Plus. Written By: Jeff Suovanen ifixit CC BY-NC-SA www.ifixit.com Page 1 of 18 INTRODUCTION Use this
Written By: Jeff Suovanen
 iphone XS Max Lower Speaker Replacement Remove or replace the main loudspeaker on the bottom edge of the iphone XS Max. Written By: Jeff Suovanen ifixit CC BY-NC-SA www.ifixit.com Page 1 of 23 INTRODUCTION
Written By: Scott Havard
 Prerequisite for removing barometric vent in an iphone 7 Plus Written By: Scott Havard ifixit CC BY-NC-SA www.ifixit.com Page 1 of 15 INTRODUCTION Prerequisite guide for removing the barometric vent in
Written By: Walter Galan
 Replace the logic board in your ipad 3 Wi-Fi. Written By: Walter Galan ifixit CC BY-NC-SA www.ifixit.com Page 1 of 29 INTRODUCTION Use this guide to replace the logic board. TOOLS: iopener (1) Phillips
Written By: Brett Hartt
 Replace the battery in your ipad 3 4G. Written By: Brett Hartt ifixit CC BY-NC-SA www.ifixit.com Page 1 of 36 INTRODUCTION When your ipad can't stay awake for longer than a few hours, it is time to replace
Written By: Walter Galan
 Replace the Logic Board in your ipad 4 Wi-Fi. Written By: Walter Galan ifixit CC BY-NC-SA www.ifixit.com Page 1 of 32 INTRODUCTION Use this guide to replace the logic board. TOOLS: iopener (1) Phillips
HTC Evo 4G Motherboard Replacement
 HTC Evo 4G Motherboard Replacement Motherboard replacement. Written By: Walter Galan ifixit CC BY-NC-SA www.ifixit.com Page 1 of 12 INTRODUCTION Restore life to your HTC Evo 4G by replacing the motherboard.
Written By: Brett Hartt
 Replacing the Wi-Fi antenna in the third generation ipad Written By: Brett Hartt ifixit CC BY-NC-SA www.ifixit.com Page 1 of 31 INTRODUCTION Wireless internet is awesome. A third generation ipad without
Written By: Walter Galan
 ipad 3 Wi-Fi Dock Connector Replacement Replace the dock connector in your ipad 3 Wi-Fi. Written By: Walter Galan ifixit CC BY-NC-SA www.ifixit.com Page 1 of 29 INTRODUCTION Use this guide to replace the
ipad 2 GSM Right Cellular Data Antenna Replacement
 ipad 2 GSM Right Cellular Data Antenna Replacement Replace the right cellular data antenna in your ipad 2 GSM. Written By: Brett Hartt ifixit CC BY-NC-SA www.ifixit.com Page 1 of 43 INTRODUCTION Use this
Written By: Evan Noronha
 Replace the logic board in an ipad Air LTE. Written By: Evan Noronha ifixit CC BY-NC-SA www.ifixit.com Page 1 of 50 INTRODUCTION Follow the steps in this guide to replace the logic board in an ipad Air
Written By: slimchance2001
 Written By: slimchance2001 ifixit CC BY-NC-SA www.ifixit.com Page 1 of 10 INTRODUCTION Like a lot of LG devices I wasn't able to find a teardown guide for general knowledge, and if i needed to replace
ipad 3 4G Home Button Control Board Replacement
 ipad 3 4G Home Button Control Board Replacement Replace the home button control board in your ipad 3. Written By: Brett Hartt ifixit CC BY-NC-SA www.ifixit.com Page 1 of 28 INTRODUCTION This guide will
Amazon Kindle Fire - Disassemble Guide
 Amazon Kindle Fire - Disassemble Guide TTT-9007 Small Phillips Screwdriver TTT-9010 Plastic Opening Tools TTT-9013 Spudger Heat Gun / Blow Dryer This guide will show you how to disassemble the Amazon Kindle
ipad 3 4G Home Button Assembly Replacement
 ipad 3 4G Home Button Assembly Replacement Replace the home button assembly in your ipad 3 4G. Written By: Brett Hartt ifixit CC BY-NC-SA www.ifixit.com Page 1 of 29 INTRODUCTION Use this guide to replace
Mac mini Model A1283 Speaker Replacement
 Mac mini Model A1283 Speaker Replacement Written By: Walter Galan ifixit CC BY-NC-SA www.ifixit.com Page 1 of 14 INTRODUCTION Restore sound to your mini by replacing the speaker. TOOLS: Jimmy (1) Phillips
Written By: Walter Galan
 ipad 4 CDMA SIM Board Replacement Replace the SIM Board in your ipad 4 CDMA. Written By: Walter Galan ifixit CC BY-NC-SA www.ifixit.com Page 1 of 33 INTRODUCTION Use this guide to replace the SIM Board.
Asus ZenFone 2 Display Replacement
 Asus ZenFone 2 Display Replacement Replace your display if it isn't functioning correctly or if it is cracked or broken. Written By: Jessica Nguyen ifixit CC BY-NC-SA www.ifixit.com Page 1 of 14 INTRODUCTION
Written By: Chad Facciolo
 HTC One Mini 2 Charging Port Replacement These instructions will show you how to replace your charging port. Written By: Chad Facciolo ifixit CC BY-NC-SA www.ifixit.com Page 1 of 11 INTRODUCTION The charging
Written By: Adam O'Camb
 iphone 8 Plus Battery Replacement Replace the battery in an iphone 8 Plus. Written By: Adam O'Camb ifixit CC BY-NC-SA www.ifixit.com Page 1 of 20 INTRODUCTION Use this guide to revive your iphone 8 Plus
MacBook Pro 15" Unibody 2.53 GHz Mid 2009 Front Display Glass Replacement
 MacBook Pro 15" Unibody 2.53 GHz Mid 2009 Front Display Glass Replacement Replacing the front display glass. Written By: Andrew Bookholt ifixit CC BY-NC-SA www.ifixit.com Page 1 of 25 INTRODUCTION Use
Mac mini Model A1176 Speaker Replacement
 Mac mini Model A1176 Speaker Replacement Written By: Walter Galan ifixit CC BY-NC-SA www.ifixit.com Page 1 of 16 INTRODUCTION Restore sound to your mini by replacing the speaker. TOOLS: Jimmy (1) Phillips
Written By: Sam Lionheart
 Replace the SIM Board in your ipad 4 GSM. Written By: Sam Lionheart ifixit CC BY-NC-SA www.ifixit.com Page 1 of 29 INTRODUCTION Use this guide to replace the SIM Board. TOOLS: SIM Card Eject Tool (1) iopener
Written By: Brett Hartt
 ipad 3 4G LCD Replacement Removing the LCD Written By: Brett Hartt ifixit CC BY-NC-SA www.ifixit.com Page 1 of 25 INTRODUCTION The third generation ipad loses a lot of luster when its gorgeous retina display
Mac mini (PowerPC) Lower Case Replacement. Written By: irobot. ifixit CC BY-NC-SA Page 1 of 10
 Lower Case Replacement. Written By: irobot. ifixit CC BY-NC-SA Page 1 of 10") Mac mini (PowerPC) Lower Case Replacement Written By: irobot ifixit CC BY-NC-SA www.ifixit.com Page 1 of 10 INTRODUCTION The bottom case of the Mac mini. TOOLS: Jimmy (1) Anti-Static Wrist Strap (1) Phillips
Mac mini (PowerPC) Lower Case Replacement Written By: irobot ifixit CC BY-NC-SA www.ifixit.com Page 1 of 10 INTRODUCTION The bottom case of the Mac mini. TOOLS: Jimmy (1) Anti-Static Wrist Strap (1) Phillips
ipad 2 GSM Home Button Assembly Replacement
 ipad 2 GSM Home Button Assembly Replacement This guide will show you how to replace the home button assembly in your ipad 2. Written By: Scott Head ifixit CC BY-NC-SA www.ifixit.com Page 1 of 29 INTRODUCTION
Mac mini Model A1283 PRAM Battery Replacement
 Mac mini Model A1283 PRAM Battery Replacement Written By: Walter Galan ifixit CC BY-NC-SA www.ifixit.com Page 1 of 10 INTRODUCTION The time and date, as well as other settings, are kept by the PRAM battery
Written By: Walter Galan
 Xbox 360 CPU Heat Sink Replacement CPU heat sink replacement. Written By: Walter Galan ifixit CC BY-NC-SA www.ifixit.com Page 1 of 27 INTRODUCTION Use this guide to remove the CPU heat sink from your Xbox
Powerbook G3 Lombard (1999) USB Repair Manual
 USB Repair Manual") Powerbook G3 Lombard (1999) USB Repair Manual Copyright 2003 Powerbookmedic.com. All rights reserved. Any portion of this manual may not be copied, reproduced, or distributed without the express written
Powerbook G3 Lombard (1999) USB Repair Manual Copyright 2003 Powerbookmedic.com. All rights reserved. Any portion of this manual may not be copied, reproduced, or distributed without the express written
MacBook Pro 15" Unibody Mid 2009 Front Display Glass Replacement
 MacBook Pro 15" Unibody Mid 2009 Front Display Glass Replacement Replacing the front display glass. Escrito por: Andrew Bookholt ifixit CC BY-NC-SA es.ifixit.com Página 1 de 24 INTRODUCCIÓN Use this guide
Removing and Replacing the Y-truck
 Service Documentation Removing and Replacing the Y-truck To remove and replace the Y-truck you will need the following tools: 4mm Allen wrench 12mm stamped flat wrench #2 Phillips screwdriver (magnetic
ipad 2 Wi-Fi EMC 2415 Front Panel Replacement
 ipad 2 Wi-Fi EMC 2415 Front Panel Replacement Replace the Front Panel in your ipad 2 Wi-FI EMC 2415. Written By: Walter Galan ifixit CC BY-NC-SA www.ifixit.com Page 1 of 31 INTRODUCTION Note: this is a
Written By: Ben Eisenman
 iphone 3GS Front Panel Replacement Replace a cracked front panel on an iphone 3GS. Written By: Ben Eisenman ifixit CC BY-NC-SA www.ifixit.com Page 1 of 18 INTRODUCTION Use this guide to separate and replace
Harmony Remote Repair
 Harmony Remote Repair harmonyremoterepair.com How to install your new Harmony One Front Cover/Touch Screen Important! Before you begin working on your Harmony One, you must discharge any static electricity
Mac mini Model A1176 Optical Drive
 Mac mini Model A1176 Optical Drive Replacement Written By: Walter Galan ifixit CC BY-NC-SA www.ifixit.com Page 1 of 14 INTRODUCTION Upgrade or replace the combo or SuperDrive. TOOLS: Jimmy (1) Phillips
Mac mini Model A1176 PRAM Battery Replacement
 Mac mini Model A1176 PRAM Battery Replacement Written By: Walter Galan ifixit CC BY-NC-SA www.ifixit.com Page 1 of 12 INTRODUCTION The time and date, as well as other settings, are kept by the PRAM battery
Written By: Walter Galan
 ipad 2 CDMA Camera Bracket Replacement Replace the camera bracket in your ipad 2 CDMA. Written By: Walter Galan ifixit CC BY-NC-SA www.ifixit.com Page 1 of 29 INTRODUCTION Use this guide to replace the
iphone 1st Generation Battery Replacement Written By: irobot ifixit CC BY-NC-SA Page 1 of 15
 Written By: irobot ifixit CC BY-NC-SA www.ifixit.com Page 1 of 15 INTRODUCTION Battery not lasting long? Swap it out (requires soldering). TOOLS: Probe and Pick Set (1) Desoldering Braid (1) SIM Card Eject
MacBook Pro 13" Unibody Mid 2012 Display Replacement
 MacBook Pro 13" Unibody Mid 2012 Display Replacement Replace a broken display assembly on your Mid 2012 MacBook Pro 13" Unibody. Written By: Andrew Optimus Goldberg ifixit CC BY-NC-SA www.ifixit.com Page
Samsung Galaxy S7 Display Replacement
 Samsung Galaxy S7 Display Replacement Changing the samsung galaxy s7 screen but in same time try save the old screen so you can sell it Written By: Brian ifixit CC BY-NC-SA www.ifixit.com Page 1 of 10
Mac mini Model A1283 Internal Frame
 Mac mini Model A1283 Internal Frame Replacement Written By: Walter Galan ifixit CC BY-NC-SA www.ifixit.com Page 1 of 9 INTRODUCTION Remove your internal frame to access most of your mini's internals. TOOLS:
Roomba 500 Series Servicing and Repair Guide. Chapter 3: How to Open Up Roomba
 Roomba 500 Series Servicing and Repair Guide Chapter 3: How to Open Up Roomba 1 This repair guide explains how to perform general disassembly on the Roomba 500 series robot vacuum. It is suggested to consult
Motorola E815 / E816 Disassembly / Assembly Guide. Ver. 1.1 By Chubbs_WA
 Motorola E815 / E816 Disassembly / Assembly Guide Ver. 1.1 By Chubbs_WA April 10, 2007 Table of Contents Disassembly Tools needed 3 Disassembly for dummies 4 Just a note 5 Disassembly of keypad housing
Mac mini Model A1283 RAM Replacement
 Mac mini Model A1283 RAM Replacement Written By: Walter Galan ifixit CC BY-NC-SA www.ifixit.com Page 1 of 10 INTRODUCTION Accessing the RAM requires the removal of the internal frame. TOOLS: Jimmy (1)
irobot Roomba 980 Motherboard Replacement
 You will be able to remove the device's motherboard and replace it in case it is damaged. Written By: Ernesto Rodriguez Romero ifixit CC BY-NC-SA www.ifixit.com Page 1 of 13 INTRODUCTION Replacing the
INSTALL/REMOVAL INSTRUCTIONS: WINDOW REGULATOR
 REMOVAL/INSTALL OF WINDOW REGULATOR (741-584) Ford Focus 2000-2007 General Tech Tips: Use painter s tape rather than duct tape to secure window. It will not damage paint or leave sticky residue. A plastic
Repairing Microsoft Wedge Touch Mouse Battery Cover Retaining Clip
 Repairing Microsoft Wedge Touch Mouse Battery Cover Retaining Clip Disassembly, repair and reassembly of Wedge Touch mouse when the battery cover will not stay closed. Also is a good guide to repair other
LG G2 Motherboard Replacement
 Use this guide to successfully replace the motherboard of the LG G2. Written By: Jair ifixit CC BY-NC-SA www.ifixit.com Page 1 of 10 INTRODUCTION This guide will walk you through the process of how to
FIELD REPLACEABLE UNIT DOCUMENTATION
 GENERAL INFORMATION Tools Required for Proper Disassembly and Reassembly: 1. Phillips Screwdriver (Size0&1) 2. 4mm Flat head Screwdriver 3. Case Separator 4. ESD Wrist Strap 5. ESD mats 6. Tweezers Before
Mac mini Model A1176 SSD Installation
 Mac mini Model A1176 SSD Installation Installing an SSD in the Mac Mini A1176 Written By: Dozuki System 2017 guides.crucial.com Page 1 of 13 INTRODUCTION Upgrade your hard drive for more storage capacity.
Sony Cyber-shot DSC-T1 Motherboard
 Sony Cyber-shot DSC-T1 Motherboard Replacement This guide explains how to remove the motherboard from the Sony Cyber-shot DSC-T1. Escrito por: ideleted ifixit CC BY-NC-SA es.ifixit.com Página 1 de 11 INTRODUCCIÓN
DO NOT PULL ON THE SHEATH.
 Removing and Replacing the Head Cover To remove and replace the head cover you will need the following tools: #2 Phillips screwdriver (magnetic tip preferred) Removing the Head Cover 1. Ready the machine
ELECRAFT Application Note
 ELECRAFT Application Note Front Panel Microphone Circuit Modification Revision A, November 12, 2008 Copyright 2008, Elecraft, Inc., All Rights Reserved Background Some K3 owners have noted distorted transmit
HTC One Mini 2 Battery Replacement
 HTC One Mini 2 Battery Replacement Replace the battery in your HTC One Mini 2 Geschreven door: Jeron Hogan ifixit CC BY-NC-SA nl.ifixit.com Pagina 1 van 10 GEREEDSCHAPPEN: 64 Bit Driver Kit (1) ifixit
Mac mini Model A1176 Optical Drive
 Mac mini Model A1176 Optical Drive Replacement Escrito por: Walter Galan ifixit CC BY-NC-SA es.ifixit.com Página 1 de 14 INTRODUCCIÓN Upgrade or replace the combo or SuperDrive. HERRAMIENTAS: Jimmy (1)
HP Envy M6-1205DX Screen Replacement
 HP Envy M6-1205DX Screen Replacement This guide will show you how to replace your computer's screen. Written By: Alex Wasilewski ifixit CC BY-NC-SA www.ifixit.com Page 1 of 16 INTRODUCTION We will be showing
Canon EOS 5D Mark III Main Board
 Canon EOS 5D Mark III Main Board Replacement This guide should help you get to the brains of your favorite workhorse Canon camera. Written By: Matthew Zeller ifixit CC BY-NC-SA www.ifixit.com Page 1 of
Written By: Joseph O'Connor
 PlayStation 3 Super Slim Fan Replacement PS3 keeps overheating? This guide will walk you through replacing your PS3's fan. Written By: Joseph O'Connor ifixit CC BY-NC-SA www.ifixit.com Page 1 of 13 INTRODUCTION
Escrito por: Kevin Hua
 Microsoft Surface Battery Pack Replacement Replace the battery pack of your Microsoft Surface. Escrito por: Kevin Hua ifixit CC BY-NC-SA es.ifixit.com Página 1 de 8 INTRODUCCIÓN This repair guide will
MacBook Unibody Model A1278 Hard Drive
 MacBook Unibody Model A1278 Hard Drive Cable Replacement Written By: Walter Galan ifixit CC BY-NC-SA www.ifixit.com Page 1 of 13 INTRODUCTION This guide will show you how to remove the hard drive cable
Xbox 360 Eject Button Replacement
 Xbox 360 Eject Button Replacement Eject button replacement. Written By: Walter Galan ifixit CC BY-NC-SA www.ifixit.com Page 1 of 17 INTRODUCTION This guide will help you replace a damaged or broken eject
TI-84 Plus Silver Edition Individual Key Replacement
 TI-84 Plus Silver Edition Individual Key Replacement This guide will show you how to replace an individual key on your TI-84 Plus Silver Edition. Written By: Kale McKinney ifixit CC BY-NC-SA www.ifixit.com
UPLIFT Height Adjustable Standing Desk 3-Leg (T-Frame) DIRECTIONS FOR ASSEMBLY AND USE
 DIRECTIONS FOR ASSEMBLY AND USE") UPLIFT Height Adjustable Standing Desk 3-Leg (T-Frame) DIRECTIONS FOR ASSEMBLY AND USE CAUTION MAKE SURE NO OBSTACLES ARE IN THE DESK S PATH AND ALL CORDS ARE OF APPROPRIATE LENGTH FOR DESK TRAVEL. FAILURE
UPLIFT Height Adjustable Standing Desk 3-Leg (T-Frame) DIRECTIONS FOR ASSEMBLY AND USE CAUTION MAKE SURE NO OBSTACLES ARE IN THE DESK S PATH AND ALL CORDS ARE OF APPROPRIATE LENGTH FOR DESK TRAVEL. FAILURE
Mac mini (PowerPC) Hard Drive Replacement
 Hard Drive Replacement") Mac mini (PowerPC) Hard Drive Replacement Written By: irobot INTRODUCTION Upgrade your storage with a new hard drive. TOOLS: 1.5" Thin Putty Knife (1) Phillips #00 Screwdriver (1) Phillips #1 Screwdriver
Mac mini (PowerPC) Hard Drive Replacement Written By: irobot INTRODUCTION Upgrade your storage with a new hard drive. TOOLS: 1.5" Thin Putty Knife (1) Phillips #00 Screwdriver (1) Phillips #1 Screwdriver
Xbox 360 E Motherboard Replacement
 Xbox 360 E Motherboard Replacement Replace the entire motherboard in your Xbox 360 E. Written By: Bryce ifixit CC BY-NC-SA www.ifixit.com Page 1 of 17 INTRODUCTION Use this guide if the connections in
Installing Your New Creature From The Black Lagoon Tail Light DMD Panel MOD
 Installing Your New Creature From The Black Lagoon Tail Light DMD Panel MOD A few things before we start: The wooden speaker panel provided in this MOD was manufactured using a Precision CNC machine and
Tools needed: Phillips screwdriver, flat blade screwdriver, rubber cement, clean hands.
 Installing the New Face for the Volvo 740 Turbo Vacuum/Boost Gauge INTRODUCTION: These instructions will guide you through the installation of this new face for your existing vacuum/boost gauge. It is
MacBook Pro 15" Unibody Late 2008 and Early 2009 Front Display Glass Replacement
 MacBook Pro 15" Unibody Late 2008 and Early 2009 Front Display Glass Replacement Front display glass replacement. Scritto Da: Walter Galan ifixit CC BY-NC-SA it.ifixit.com Pagina 1 di 21 INTRODUZIONE Use
Written By: Philip Le Riche
 Disassembling Canon PowerShot SX200 IS This guide covers the complete disassembly into component parts. Written By: Philip Le Riche ifixit CC BY-NC-SA www.ifixit.com Page 1 of 15 INTRODUCTION A faulty
Tools Required For Servicing: Needle Nose Pliers
 Danger Caution Danger of Life Do not attempt to perform service on a hot heat gun. Always allow unit to cool completely and disconnect from power source before performing any service on the heat gun. Fire
Gateway NV53A24u LCD Screen Replacement
 Gateway NV53A24u LCD Screen Replacement A quick guide to replacing the LCD screen on a Gateway NV53A24u. Written By: Michael Miller ifixit CC BY-NC-SA www.ifixit.com Page 1 of 11 INTRODUCTION We're going
AUDI A8 D3 REPLACING THE OUTSIDE DRIVER DOOR HANDLE
 AUDI A8 D3 REPLACING THE OUTSIDE DRIVER DOOR HANDLE The keyless entry system in the D3 is a great feature. If you have the car key fob in your pocket, putting your hand under the door handle will unlock
Alcatel One Touch Ultra 995 Teardown
 Alcatel One Touch Ultra 995 Teardown How to disassemble the Alcatel One Touch Ultra 995 to access the phones inner parts. Written By: BurnieG ifixit CC BY-NC-SA www.ifixit.com Page 1 of 9 INTRODUCTION
The Useless Machine. DIY Soldering Edition. Instruction Guide v0004
 The Useless Machine DIY Soldering Edition Instruction Guide v0004 TM For the best outcome, follow each step in order. We recommend reading this guide entirely before you get started. Tools required: Soldering
Apple Wireless Keyboard (A1255) Teardown. Written By: mayer. ifixit CC BY-NC-SA Page 1 of 11
 Teardown. Written By: mayer. ifixit CC BY-NC-SA Page 1 of 11") Apple Wireless Keyboard (A1255) Teardown Written By: mayer ifixit CC BY-NC-SA www.ifixit.com Page 1 of 11 INTRODUCTION I bought this keyboard off ebay broken just to tear it down for posterity. I found
Apple Wireless Keyboard (A1255) Teardown Written By: mayer ifixit CC BY-NC-SA www.ifixit.com Page 1 of 11 INTRODUCTION I bought this keyboard off ebay broken just to tear it down for posterity. I found
Volvo 240/260 New Face Overlay Installation Models By Dave Barton
 Volvo 240/260 New Face Overlay Installation 1975-80 Models By Dave Barton These custom faces are the product of years of research and experimentation. They are printed with a special printer using waterproof
Asus Zen AiO Pro Z240IC Ethernet/LAN Port Replacement
 Asus Zen AiO Pro Z240IC Ethernet/LAN Port Replacement How to replace the Ethernet/LAN board and port on the Asus Zen AiO Pro Z240IC. Written By: Sahil Sharma ifixit CC BY-NC-SA www.ifixit.com Page 1 of
Open Air. Kit includes: Drawer Full Indicator board assembly, (2) retainers, and (4) screws. PREPARATION
 retainers, and (4) screws. PREPARATION") Open Air Installation Video You will need: 8-inch #2 Phillips screwdriver Needle-nose pliers DFI INSTALLATION GUIDE For installation videos, visit the Customer Service playlist at www.youtube.com/user/thelitterrobot
Open Air Installation Video You will need: 8-inch #2 Phillips screwdriver Needle-nose pliers DFI INSTALLATION GUIDE For installation videos, visit the Customer Service playlist at www.youtube.com/user/thelitterrobot
SCION FR-S REAR SPOILER Preparation
 Preparation Part Number: PT938-18130-XX Kit Contents Item # Quantity Reqd. Description 1 1 Spoiler 2 2 Strut 3 1 Hardware Bag Hardware Bag Contents Item # Quantity Reqd. Description 1 2 M6 x 1 Nut with
HP PSC 2410 Photosmart All In One Printer Scanner Lamp Replacement
 HP PSC 2410 Photosmart All In One Printer Scanner Lamp Replacement Replace the scanner lamp on your printer's scanner. Written By: Mackenzie Billings ifixit CC BY-NC-SA www.ifixit.com Page 1 of 9 INTRODUCTION
7878 K940. Checkpoint Antenna. Kit Instructions. Issue B
 7878 K940 Checkpoint Antenna Kit Instructions Issue B Revision Record Issue Date Remarks A July 7, 2009 First issue B Nov2013 Revised the Checkpoint installation procedures for 7878 and 7874 scanners Added
The build should take around 2 to 3 hours. However, by leaving yourself more time you can go at a relaxed pace and be sure not to miss anything.
 Before We Start Before we jump into building your Picade, make sure you have everything to hand. I know you're eager to jump right into the construction, but we need to get set up properly first! 1. Prepare
Written By: justin chadwick
 Nintendo DS Lite Buttons Replacement How to remove and replace the Nintendo DS Lite Buttons. Written By: justin chadwick ifixit CC BY-NC-SA www.ifixit.com Page 1 of 10 INTRODUCTION This guide has been
Removing Nintendo DS Lite Logic Board Screws
 Removing Nintendo DS Lite Logic Board Screws Removing the Logic Board Screws, in preparation for other work. Written By: bushing ifixit CC BY-NC-SA www.ifixit.com Page 1 of 9 INTRODUCTION This guide has