Tools Required: - Utility knife - 11/16 Deep socket - Ratchet - 11/16 Crescent wrench - Ratchet Extension - 1/4 socket - Electrical tape
|
|
|
- Luke Sims
- 5 years ago
- Views:
Transcription


 washers - Eight (#8 Size) screws *shorty")
1 DESTROYER FRONT BUMPER INSTALL JL STEP 1 : GATHER YOUR TOOLS AND LAY OUT YOUR PARTS... Tools Required: - Utility knife - 11/16 Deep socket - Ratchet - 11/16 Crescent wrench - Ratchet Extension - 1/4 socket - Electrical tape Hardware Provided: - Eight (7/16-14 x 1.25 ) mounting bolts - Eight (7/16-14) flange nuts - Four (7/16 ) washers - Eight (#8 Size) screws *shorty bumper to show hardware* 7/ 16 JL18FBDSINS - REV 2 03/02/18 Page 1
 to access the bumper mount bolts.")
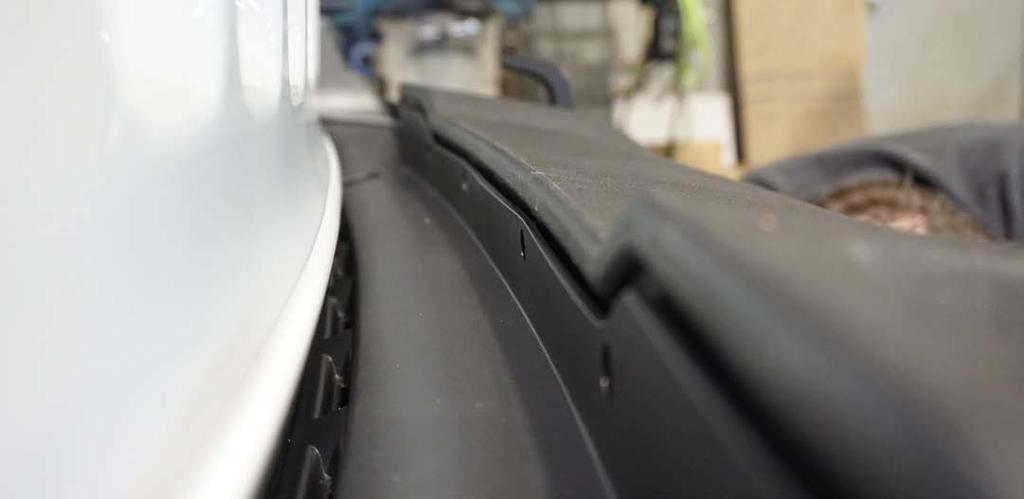
2 You can now remove the trim strip (2 vertical clips, 4 horizontal, 2 screws) to access the bumper mount bolts. You can now remove the trim strip (2 vertical clips, 4 horizontal, 2 screws) to access the bumper mount bolts. JL18FBDSINS - REV 2 03/02/18 Page 2


 to access the")

3 There will be 2 screws holding the trim strip to the vehicle body, one on each side. These can be accessed by reaching through the wheel well. You can now remove the trim strip (2 vertical clips, 4 horizontal, 2 screws) to access the bumper mount bolts. Also remove the factory skid plate. Start with the two 6mm screws on the bottom (one on either side) JL18FBDSINS - REV 2 03/02/18 Page 3
 clips in")


4 The skidplate is held to the vehicle with eight (8) clips in the front, and the two bolts you just removed, on the bottom. Also remove the crash bar, there are two bolts holding it on. After the bolts are removed, you will shift the crash bar slightly up, then pull towards you to remove the tabs out of the opening. Undo the harness plug that connects the foglights to the vehicle. JL18FBDSINS - REV 2 03/02/18 Page 4


5 The bumper is secured to the vehicle with four (4) bolts on both sides. Remove these and the bumper should come of the vehicle. The bolts that hold the bumper together are held in place using locking tooth washers, you can either pry them up with a screwdriver, or cut them off using a sharp chisel or similar tool. We placed the chisel perpendicular to the surface and gave it one nice hard hit. After this, you should be able to grab the edge pith a pair of pliers. JL18FBDSINS - REV 2 03/02/18 Page 5


6 Next, remove the labeled T-25 screws from the bumper, this will allow you to access the foglight, located underneath. Once the plastic trim piece is off, remove the three T-20 screws (circled) that hold the foglight housing in place. The next step will show you how to remove the light from the housing. JL18FBDSINS - REV 2 03/02/18 Page 6


7 Next you will remove the factory foglight from the stock housing. Do this by pressing together the sides of the mounting snap pins. Next, push the light into the new housing, with the long adjustment screw inserting into the farther panel. The pins should slide into the openings fairly easily. STEP 2 : Lay the Destroyer bumper so the top is facing away from you, so you can insert the factory foglights. JL18FBDSINS - REV 2 03/02/18 Page 7


8 STEP 3 : Line up the holes and attach the lights with the (8) provided 1/4-20 X 0.75 Hex head hardware. STEP 5 : LOCATE THE MOUNTING HOLES AND LIFT UP THE BUMPER TO ALIGN THE MOUNTING HOLES ON THE BUMPER AND THE VEHICLE FRAME. STEP : GENTLY SLIDE THE BUMPER OVER THE FRAME MOUNTS AND SLOWLY MOVE IT FORWARD, LETTING IT REST ON TOP OF THE FRAME. STEP 7 : HOLD A BOLT BETWEEN YOUR FINGERS AND HOOK YOUR HAND, REACHING BEHIND THE MOUNT PLATE TO START THE OUTSIDE CORNER BOLTS. EACH MOUNT WILL HAVE 4 BOLTS. JL18FBDSINS - REV 2 03/02/18 Page 8


9 STEP 8 : STICKY SIDE IN GRAB A PIECE OF TAPE AND STICK IT TO THE INSIDE OF THE WRENCH, TO ENSURE THE NUT FITS SNUGLY AND DOES NOT FALL OUT. STEP 9 : PLACE A NUT INTO THE WRENCH, THEN PLACE THE WRENCH INTO THE ACCESS SLOT. ALIGN THE NUT WITH THE TOP CORNER BOLT. STEP 10 : ALIGN THE NUT WITH TOP CORNER BOLT YOU INSERTED EARLIER, THEN HAND-TIGHTEN IT. REPEAT STEPS 7+8 ON THE OPPOSITE CORNER BOLT. STEP 11 : - CONTINUE TO USE THE TAPE+WRENCH TO HAND-TIGHTEN THE REST OF THE MOUNTING BOLTS. - REACH YOUR HAND THROUGH THE BACK OPENINGS TO FEEL FOR THE BOLTS. JL18FBDSINS - REV 2 03/02/18 Page 9


10 STEP 12 : - MAKE SURE THE BUMPER IS CENTERED, WITH THE OUTER EDGES MATCHING UP TO THE GRILLE. -VERTICAL ADJUSTMENTS CAN BE DONE AT THIS TIME, WITH ABOUT 1 OF TRAVEL AVAILABLE STEP 13 : - ONCE ALL THE BOLTS ARE HAND- TIGHT, THE TAPE CAN BE REMOVED AND THE WRENCH AND SOCKET CAN BE USED TO TIGHTEN THEM THE REST OF THE WAY. *IF YOU RE NOT USING A WINCH, SKIP STEPS STEP 14 : - PLACE THE WINCH AND FAIRLEAD OVER THE BULLGUARD AND DOWN ONTO THE BUMPER. STEP 15 : - LINE UP THE HOLES IN THE WINCH WITH THE SLOTTED HOLES ON TOP OF THE BUMPER. YOU SHOULD BE ABLE TO SEE DIRECTLY THROUGH THE HOLES. JL18FBDSINS - REV 2 03/02/18 Page 10


11 STEP 16 : - INSERT THE FOUR WINCH MOUNT BOLTS INTO THE OPENINGS AND TIGHTEN THEM DOWN TO SECURE YOUR WINCH IN PLACE. STEP 17 : - THIS CONCLUDES THE DESTROYER SERIES FRONT BUMPER INSTALLATION, YOUR PRODUCT SHOULD BE MOUNTED AND READY TO USE. - FOR SKIDPLATE USERS, FOLLOW ACCESSORY DIRECTIONS. JL18FBDSINS - REV 2 03/02/18 Page 11
12 JL18FBDSINS - REV 2 03/02/18 Page 12


13 JLU Wrangler Destroyer Series Front Bumper Shipping Slip FULLWIDTH ADD STINGER *only available on shorty* MIDWIDTH SHORTY BUMPER SIZE ADD BULLBAR Hardware Kit (Contents may vary) JL Wrangler Bezels Skidplate JL18FBDSINS - REV 2 03/02/18 Page 13
14 Destroyer Front Bumper Shipping Slip *please check contents when opening/assembling package 7/16 Washers (x8) 7/16 Flange Nuts (x8) 7/16 (14) x 1.5 Hex Bolts (x8) Assembled By : Date : JL18FBDSINS - REV 2 03/02/18 Page 14
15 1/4-20 Hex Nut (x8) 1/4-20 x 0.75 Hex Bolt (x8) 1/4 Washers (x16) 3/8 Washers (x12) JL18FBDSINS - REV 2 03/02/18 Page 15
16 Destroyer Front Skidplate Shipping Slip *please check contents when opening/assembling package 3/8 x1.5 Buttonhead (x2) 7/16 Washers (x4) 3/8 Nuts (x2) 5/16 x0.75 Buttonhead (x4) Assembled By : Date : 5/16 Washers (x4) JL18FBDSINS - REV 2 03/02/18 Page 16
STEP 1 : DESTROYER FRONT BUMPER INSTALL GATHER YOUR TOOLS AND LAY OUT YOUR PARTS... *shorty bumper to show hardware* Tools Required:
 DESTROYER FRONT BUMPER INSTALL JL STEP 1 : GATHER YOUR TOOLS AND LAY OUT YOUR PARTS... Tools Required: - Utility knife - 11/16 Deep socket - Ratchet - 11/16 Crescent wrench - Ratchet Extension - 1/4 socket
SIGNATURE FRONT BUMPER INSTALL
 SIGNATURE FRONT BUMPER INSTALL JL **PLEASE READ THROUGH THE INSTRUCTIONS BEFORE BEGINNING ANY PART OF THE INSTALLATION PROCESS** 1. You can now remove the trim strip (2 vertical clips, 4 horizontal, 2
JK JEEP MIDWIDTH FRONT BUMPER
 SIGNATURE SERIES JK JEEP MIDWIDTH FRONT BUMPER INSTALLATION INSTRUCTIONS **PLEASE READ THROUGH THE INSTRUCTIONS BEFORE BEGINNING ANY PART OF THE INSTALLATION PROCESS** 1. Begin the installation of your
Rugged Ridge Front Bumper Winch Plate JK
 Rugged Ridge Front Bumper Winch Plate 13-17 JK Note: These instructions involve cutting parts of your vehicle. Please read all instructions prior to starting. Installation Time: 2-3 Hours Tools Required:
INSTALLATION INSTRUCTIONS 1PC FRONT BUMPER JEEP JK WRANGLER
 INSTALLATION INSTRUCTIONS PARTS LIST: 1 1PC Bumper 2 8mm x 25mm Hex Bolts 1 Bull Nose Hoop 2 8mm x 16mm Hex Bolts 1 Fairlead Mounting Bracket 6 8mm x 24mm x 2mm Flat Washers 8 12mm x 35mm Hex Bolts 4 8mm
Chevy Colorado. INSTALLATION GUIDE Front Bumper
 Chevy Colorado INSTALLATION GUIDE Front Bumper FIG 1A First, we ll start by removing the small allen bolts from the inside fender wells that hold the stock front bumper in place. FIG 1B You will also need
Rough Country JK Modular Winch Mount Bumper With Light End Caps
 Rough Country JK Modular Winch Mount Bumper With Light End Caps Note: These instructions involve cutting parts of your vehicle. Please read all instructions prior to starting. Note: This installation also
INSTALLATION MANUAL FRONT. See pages 2 and 3 of this manual for configuration options. Level of Difficulty. Product Photo (center section only)
") INSTALLATION MANUAL FRONT Level of Difficulty Moderate Product Photo (center section only) All hardware listed below will be provided with the bumpers center section. Additional hardware will be supplied
INSTALLATION MANUAL FRONT Level of Difficulty Moderate Product Photo (center section only) All hardware listed below will be provided with the bumpers center section. Additional hardware will be supplied
INSTALLATION INSTRUCTIONS
 Do not attempt to install this product on any vehicle other than the one it is designed for and listed above! Parts List 10 3/8 X 1 1/4 Hex Bolt 10 3/8 Lock Washer 4 3/8 Hex Nut 4 3/8 Flat Washer 2 3169)
INSTALLATION INSTRUCTIONS DODGE RAM 2 & 4WD 1500 PART # P5058
 INSTALLATION INSTRUCTIONS 2009-13 DODGE RAM 2 & 4WD 1500 PART # P5058 PARTS LIST: Qty Description Qty Description 1 Grille Guard 12 12-1.75mm Hex Nuts 2 Upper Frame Mounting s (for trucks without tow hooks
THANK YOU FOR PURCHASING THE M/T METAL SERIES MODULAR JK FRONT BUMPER
 THANK YOU FOR PURCHASING THE M/T METAL SERIES MODULAR JK FRONT BUMPER Your safety and the safety of others is very important. Please read and understand all safety precautions before installing this or
MODULAR BUMPER INSTALLATION MANUAL
 MODULAR BUMPER INSTALLATION MANUAL Parts List* 1 Center section 1 Side extension, passenger / right 1 Side extension, driver / left 1 Side cap, passenger / right 1 Side cap, driver / left 1 Brush guard,
INSTALLATION INSTRUCTIONS
 INSTALLATION INSTRUCTIONS Trans4mer Grille Guard/Winch Mount Kit 645 For Chevrolet Silverado 500HD & 3500 This WARN Trans4mer system can be customized to give your Chevy Silverado a wide variety of looks,
2016 Current Toyota Tacoma HoneyBadger Front Bumper Installation Instructions
 2016 Current Toyota Tacoma HoneyBadger Front Bumper Installation Instructions PREPARATION 1. Disconnect the negative terminal on the battery. Park the vehicle on level ground and set the emergency brake.
Fig A 2. Using a 10mm Socket, remove the two bolts referenced in (Fig B). Save these bolts for reuse. Fig B ADDICTIVE DESERT DESIGNS.
. Save these bolts for reuse. Fig B ADDICTIVE DESERT DESIGNS.") Preparation: Disconnect the negative battery terminal. Park the vehicle on level ground and set the emergency brake. We recommend reading through the installation instructions in whole before performing
Preparation: Disconnect the negative battery terminal. Park the vehicle on level ground and set the emergency brake. We recommend reading through the installation instructions in whole before performing
Ford Raptor Venom Front Bumper Installation Instructions
 PREPARATION 2010 2014 Ford Raptor Venom Front Bumper Installation Instructions 1. Disconnect the negative terminal on the battery. Park the vehicle on level ground and set the emergency brake. 2. We recommend
INSTALLATION INSTRUCTIONS GRILLE GUARD 09-ON DODGE RAM PART #
 INSTALLATION INSTRUCTIONS GRILLE GUARD 09-ON DODGE RAM PART # PARTS LIST: Qty Description Qty Description 1 Grille Guard 8 12-1.75mm x 35mm Hex Bolts 2 Brackets (for trucks without 22 12mm x 30.1mm OD
2015 Current GMC Canyon HoneyBadger Front Bumper Installation Instructions
 2015 Current GMC Canyon HoneyBadger Front Bumper Installation Instructions PREPARATION 1. Disconnect the negative terminal on the battery. Park the vehicle on level ground and set the emergency brake.
INSTALLATION INSTRUCTIONS GRILLE GUARD RAM 1500 PART # 5058/5058-2
 INSTALLATION INSTRUCTIONS GRILLE GUARD PART # 5058/5058-2 PARTS LIST: Qty Description Qty Description 1 Grille Guard 8 12-1.75mm x 35mm Hex Bolts 2 Upper Frame Mounting s (for trucks without tow hooks
BX2173 Installation Instructions Ford Focus (including the 2.3L engine) 2003 Ford Focus SVT
 2003 Ford Focus SVT") BX2173 Installation Instructions 2000-04 Ford Focus (including the 2.3L engine) 2003 Ford Focus SVT Serial No. The front fascia, coolant line bracket and anti-pollution devices are removed for baseplate
BX2173 Installation Instructions 2000-04 Ford Focus (including the 2.3L engine) 2003 Ford Focus SVT Serial No. The front fascia, coolant line bracket and anti-pollution devices are removed for baseplate
INSTALLATION INSTRUCTIONS
 INSTALLATION INSTRUCTIONS Trans4mer Grille Guard/Winch Mount For Chevrolet Silverado 1500HD & 2500 Kit 68162 This WARN Trans4mer system can be customized to give your Chevy Silverado a wide variety of
Ford F150 Front Bumper
 2009-2011 Ford F150 Front Bumper Warning! Read the instructions completely before beginning the installation. Before tightening bolts, drilling or cutting where required, check to make sure that there
RBP-1215B-RX DODGE RAM QUAD CAB RX3
 RBP-1215B-RX3 2002-2017 DODGE RAM 15-3500 QUAD CAB RX3 Passenger side RX-3 Side Step Drill Template Passenger side rear Modular Bracket (6) L Support Brackets Driver side rear Modular Bracket Driver side
INSTALLATION INSTRUCTIONS 3000 SERIES STEP GUARD (CENTER GRILLE GUARD & BRUSH GUARDS) CHEVROLET SILVERADO 2500 & /4WD PART # 3168 (MB-MC)
 CHEVROLET SILVERADO 2500 & /4WD PART # 3168 (MB-MC)") INSTALLATION INSTRUCTIONS 3000 SERIES STEP GUARD (CENTER GRILLE GUARD & BRUSH GUARDS) CHEVROLET SILVERADO 2500 & 3500 2/4WD PART # 3168 (MB-MC) PACKING LIST 2 ¼ X ¾ BUTTON HEAD BOLTS 8 5/16 X 3/4 BUTTON
INSTALLATION INSTRUCTIONS 3000 SERIES STEP GUARD (CENTER GRILLE GUARD & BRUSH GUARDS) CHEVROLET SILVERADO 2500 & 3500 2/4WD PART # 3168 (MB-MC) PACKING LIST 2 ¼ X ¾ BUTTON HEAD BOLTS 8 5/16 X 3/4 BUTTON
INSTALLATION INSTRUCTIONS ATV PLOW Mount Kit: PN Application: HONDA RANCHER
 INSTALLATION INSTRUCTIONS ATV PLOW Mount Kit: PN 63290 Application: 2000+ HONDA RANCHER Your safety, and the safety of others, is very important. To help you make informed decisions about safety, we have
ADDICTIVE DESERT DESIGNS
 Preparation: Disconnect the negative battery terminal. Park the vehicle on level ground and set the emergency brake. We recommend reading through the installation instructions in whole before performing
Hardware Provided: - Eight (#8 Size) screws - Eight 1/2 (13) x 4 Hex Bolts - One 1 spindle Hex nut/washer
 screws - Eight 1/2 (13) x 4 Hex Bolts - One 1 spindle Hex nut/washer") DESTROYER REAR BUMPER +TIRE CARRIER STEP 1 : GATHER YOUR TOOLS AND LAY OUT YOUR PARTS... Tools Required: - 16mm socket - 3/ 4 socket - 1 / 4 socket - ratchet - ratchet Extension - 3/4 wrench - tape measure
DESTROYER REAR BUMPER +TIRE CARRIER STEP 1 : GATHER YOUR TOOLS AND LAY OUT YOUR PARTS... Tools Required: - 16mm socket - 3/ 4 socket - 1 / 4 socket - ratchet - ratchet Extension - 3/4 wrench - tape measure
INSTRUCTION BOOKLET #C20
 INSTRUCTION BOOKLET #C0 WARNING! ALL MURPHY/WALLBED SYSTEMS CONTAIN STORED ENERGY. FAILURE TO USE AND FOLLOW THESE INSTRUCTIONS DURING THE INSTALLATION PROCESS COULD RESULT IN SEVERE PERSONAL INJURY TO
INSTALLATION INSTRUCTIONS
 INSTALLATION INSTRUCTIONS For Wallbed models: Do-It-Yourself BOOKLET #C90 WARNING! ALL MURPY/WALLBED SYSTEMS CONTAIN STORED ENERGY. FAILURE TO USE AND FOLLOW THESE INSTRUCTIONS DURING THE INSTALLATION
WARNING. BX Ford Explorer With Adaptive Cruise Control & Eco Boost Installation Instructions
 Please read BOTH these and the General Instructions before attempting to install or operate this equipment. 1. Blue Ox towing products and accessories are intended to be installed by Blue Ox Dealers who
2015 GMC Yukon. Upper Class Grille Insert
 Upper Class Grille Insert TOOLS REQUIRED: Flat Head Screwdriver Long Flat Head Screwdriver Phillips Screwdriver 7mm Socket 10mm Socket Ratchet & Extensions 3/16 Drill Bit Power Drill Cutting Wheel or Saw
Please read BOTH these Installation Instructions and the General Instructions prior to installing or operating this equipment.
 Attachment Tab Height: 19-1/2 Attachment Tab Width: 19 Serial Number Please read BOTH these and the General Instructions prior to installing or operating this equipment. 1. Blue Ox towing products and
SAFETY THIS PRODUCT IS FOR OFFROAD USE ONLY. ALL LIABILITY FOR INSTALLATION AND USE RESTS WITH THE OWNER.
 SAFETY Your safety and the safety of others is very important. In order to help you make informed decisions about safety, we have provided installation instructions and other information. These instructions
INSTALLATION INSTRUCTIONS WINCH MOUNTING PLATE Part Number: Application: 2007 JEEP JK WRANGLER
 INSTALLATION INSTRUCTIONS WINCH MOUNTING PLATE Part Number: 74247 Application: 2007 JEEP JK WRANGLER Your safety, and the safety of others, is very important. To help you make informed decisions about
10" E-Series D-Series - Pair. kit includes (14) (4) (4) It is strongly recommended that this product be installed by a professional.
 (4) (4) It is strongly recommended that this product be installed by a professional.") 2014 GMC 1500 grille installation instructions 10" E-Series D-Series - Pair kit includes (14) (14) (4) 5 /16-18x 5 /8 Button Socket 5 /16-18 Low Profile Nylock Nut M6-1.0x30mm Button Head Socket (14) (4)
2014 GMC 1500 grille installation instructions 10" E-Series D-Series - Pair kit includes (14) (14) (4) 5 /16-18x 5 /8 Button Socket 5 /16-18 Low Profile Nylock Nut M6-1.0x30mm Button Head Socket (14) (4)
Driver/Left Top. Support Bracket
 PARTS LIST: 1 Grille Guard 8 10mm Lock Washers 1 Driver/Left Frame Bracket 8 10mm Hex Nuts 1 Passenger/Right Frame Bracket 2 8-1.25mm x 25mm Button Head Bolts 1 Driver/Left Bottom Support Bracket 2 8mm
INSTALLATION INSTRUCTIONS ATV PLOW Mount Kit: PN Application: Sportsman 400, Magnum 425
 INSTALLATION INSTRUCTIONS ATV PLOW Mount Kit: PN 37845 Application: 1996-97 Sportsman 400, 1997-98 Magnum 425 Your safety, and the safety of others, is very important. To help you make informed decisions
Bushwacker Jeep Flat Style Fender Flares Rear Pair (JK Wrangler 2dr)
") Bushwacker Jeep Flat Style Fender Flares Rear Pair (JK Wrangler 2dr) Note: These instructions involve cutting parts of your vehicle. Please read all instructions prior to starting. Installation Time: 3-4
Bushwacker Jeep Flat Style Fender Flares Rear Pair (JK Wrangler 2dr) Note: These instructions involve cutting parts of your vehicle. Please read all instructions prior to starting. Installation Time: 3-4
FRONT BUMPER INSTALLATION INSTRUCTIONS Toyota 4Runner
 Aluminess Products Inc 9402 Wheatlands Ct. #A Santee, CA 92071 619-449-9930 FRONT BUMPER INSTALLATION INSTRUCTIONS 2003-2009 Toyota 4Runner Please read before beginning Stainless steel hardware may bind
(2) Plastic Plugs (2) Frame Bracket. Spacers. License Plate Bracket. (2) 12mm Single Bolt Plates. (2) 12mm Double Bolt Plates
 Plastic Plugs (2) Frame Bracket. Spacers. License Plate Bracket. (2) 12mm Single Bolt Plates. (2) 12mm Double Bolt Plates") LDB-CSIL26-FB PARTS LIST: 1 LD1 Bumper Assembly 10 12mm Hex Nuts 1 Driver/left Frame Mounting 6 10-1.5mm x 35mm Hex Bolts 1 Passenger/right Frame Mounting 12 10mm x 27mm OD x 3mm Flat Washers 2 Spacers
LDB-CSIL26-FB PARTS LIST: 1 LD1 Bumper Assembly 10 12mm Hex Nuts 1 Driver/left Frame Mounting 6 10-1.5mm x 35mm Hex Bolts 1 Passenger/right Frame Mounting 12 10mm x 27mm OD x 3mm Flat Washers 2 Spacers
INSTALLATION GUIDE PREMIUM FRONT BUMPER. AEV30103AE Last Updated: 09/08/14 US PATENTS: D683281, D CHINESE PATENT: ZL
 PREMIUM FRONT BUMPER US PATENTS: D683281, D697842 CHINESE PATENT: ZL 2012 3 0026081.4 AEV30103AE Last Updated: 09/08/14 INSTALLATION GUIDE PLEASE READ BEFORE YOU START TO GUARANTEE A QUALITY INSTALLATION,
User Instructions Multiline Otter Scoreboard Caddy Assembly
 List of parts: User Instructions Multiline Otter Scoreboard Caddy Assembly Single Caddy Double Caddy 1 1 Base assembly with attached wheels 2 4 1 1 2 4 4 8 10 20 12 Uprights (60 or 74 aluminum extrusion)
ADDICTIVE DESERT DESIGNS
 Preparation: Disconnect the negative battery terminal. Park the vehicle on level ground and set the emergency brake. We recommend reading through the installation instructions in whole before performing
INSTALLATION INSTRUCTIONS
 INSTALLATION INSTRUCTIONS SPORTSMAN WINCH MOUNT GRILLE GUARD APPLICATION: 2016-2018 Toyota Tacoma PART NUMBER: 40-93885, 45-93880, 46-23885 ITEM QUANTITY DESCRIPTION TOOLS NEEDED 1 1 WINCH TRAY 15MM SOCKET
Installation Instructions Jeep JL Front Grumper Product Number: GR4600 Application: 18+ JEEP JL
 ! IMPORTANT SAFETY GUIDE Your safety and the safety of others is very important. In order to help you make informed decisions about safety, we have provided the following warnings, safety precautions,
Please read BOTH these Installation Instructions and the General Instructions before attempting to install or operate this equipment.
 Please read BOTH these and the General Instructions before attempting to install or operate this equipment. 1. Blue Ox towing products and accessories are intended to be installed by Blue Ox Dealers who
Page 1 of 5 Instructions for Fitting Lower Grille to S Type Jaguar. Part Code 9048
 Page 1 of 5 Instructions for Fitting Lower Grille to S Type Jaguar. Part Code 9048 To fit this grille you will need: Torch, 10mm spanner, 10mm socket with extension, T30 torx bits, Screwdrivers, Pliers,
7878 K940. Checkpoint Antenna. Kit Instructions. Issue B
 7878 K940 Checkpoint Antenna Kit Instructions Issue B Revision Record Issue Date Remarks A July 7, 2009 First issue B Nov2013 Revised the Checkpoint installation procedures for 7878 and 7874 scanners Added
INSTALLATION INSTRUCTIONS ATV SNOW PLOW WARN KIT PN: KAWASAKI KIT PN: KAF Application: Kawasaki Prairie
 INSTALLATION INSTRUCTIONS ATV SNOW PLOW WARN KIT PN: 37838 KAWASAKI KIT PN: KAF90-220 Application: Kawasaki Prairie 1997-2002 Your safety, and the safety of others, is very important. To help you make
2015 Current Ford F150/Raptor Adaptive Cruise Control Module Relocation Bracket Installation Instructions
 2015 Current Ford F150/Raptor Adaptive Cruise Control Module Relocation Bracket Installation Instructions PREPARATION 1. Disconnect the negative terminal on the battery. Park the vehicle on level ground
IMPORTANT: WILL NOT FIT COUNTRYMAN MODELS
 Part #1410-0102-07 2 3 1 IMPORTANT: WILL NOT FIT COUNTRYMAN MODELS Apply masking tape around the bottom grille opening and across the bottom of the upper facto ry grille.. Open the hood and remove the
F l a t S c r e e n A R M S I n s t a l l a t i o n
 ITEM NUMBERS (1) #TOACAORG16 (2) #TOACAORG20 (3) #TOACATRP24 (4) #TOACATRP30 (5) #TOACATRPDS (6) #TOACATRPSS TOOLS REQUIRED (1) 3/8 Wrench (not provided) (2) Phillips head screwdriver (not provided) (1)
LOFT DOOR HANGER BARN DOORS & HARDWARE. Hardware Installation Instructions. Page
 LOFT DOOR HANGER Page 1 Specifications 2 7/16" 3/8" 1-1/2 1-3/4 Ø3 3 7/8" 11-1/16 Page 2 Parts and Tools Tools Needed Tape Measure Pencil Drill with 1/8, 1/4 and 3/8 bits, 1 spade bit and Phillips bit
GlideRite Retractable Cover System For HotSpring & Tiger River Spas (except Classic & pre-2000 Landmark Spas)
") List of Contents Quantity Description 12 #10 x 1 ½ Flat Head Phillips Screw (see pg. 2) 2 #10 x ½ Pan Head Phillips Screw (see pg. 2) 8 ¼ x 2 ½ Lag Bolt (see pg. 2) 7 ¼ 20 x 5 / 8 Hex Head Bolt (see pg.
List of Contents Quantity Description 12 #10 x 1 ½ Flat Head Phillips Screw (see pg. 2) 2 #10 x ½ Pan Head Phillips Screw (see pg. 2) 8 ¼ x 2 ½ Lag Bolt (see pg. 2) 7 ¼ 20 x 5 / 8 Hex Head Bolt (see pg.
Bushwacker Jeep Flat Style Fender Flares Front Pair
 Bushwacker Jeep Flat Style Fender Flares Front Pair Note: These instructions involve cutting parts of your vehicle. Please read all instructions prior to starting. Installation Time: 3-4 Hours Tools Required:
INSTALLATION INSTRUCTIONS
 TEL:1-866-XANATOS INSTALLATION INSTRUCTIONS FOR 07-13 CHEVY SILVERADO 1500 PART#RU-CHSI07-B PARTS LIST: 1 Main Body 28 12mm x 37mm OD x 3mm Large Flat Washers 1 Driver/Left Brush Guard 8 12-1.75mm x 40mm
JK Spartacus Stamped Front Bumper
 Page 1/14 OMIX-ADA TECHNICAL SUPPORT PHONE: M-F 8am - 5pm EST 1-800-449-6649 EMAIL: techsupport@omix-ada.com FOR WARRANTY INFORMATION VISIT: www.omix-ada.com Page 2/14 Part #11544.01 11544.09 11543.13
Rugged Ridge Engine Transmission Skid Plate JK
 Installation Time: 1-2 Hours Tools Required: Rugged Ridge Engine Transmission Skid Plate 2012-2017 JK Sockets: 16mm, 17mm, 18mm deep well Socket Wrench Wrenches: 16mm, 18mm Torque Wrench Drill ½ Drill
CAB END BEDTRAX (SIDE VIEW)
") Supplied Hardware: (8-14) 1/4-20 Allen head bolts, (12-18) UHMW mount blocks, (4) D-ring tie downs Tools Needed: Allen head wrench GET TO IT. INSTALLATION INSTRUCTIONS STEP 1. INSERT (2) MOUNT BLOCKS INTO
Supplied Hardware: (8-14) 1/4-20 Allen head bolts, (12-18) UHMW mount blocks, (4) D-ring tie downs Tools Needed: Allen head wrench GET TO IT. INSTALLATION INSTRUCTIONS STEP 1. INSERT (2) MOUNT BLOCKS INTO
Calf-Tel Pen System Assembly Instructions
 Calf-Tel Pen System Assembly Instructions (Instructions work for 4, 6, and the 7 Pen Systems) 1 ASSEMBLY OF PEN FRONT AND WALLS START THE ASSEMBLY BY LINING UP THE TWO UNI-DIRECTIONAL ARROWS IN THE TOP,
BX2520 Installation Instructions 2004 Mazda 3
 BX2520 Installation Instructions 2004 Mazda 3 Serial No. The headlight assembly, front fascia, horn bracket and windshield washer reservoir are removed for baseplate installation. Drilling is required.
2010+ Dodge Ram 2500/3500 Front Bumper Install Instructions
 2010+ Dodge Ram 2500/3500 Front Bumper Install Instructions Warning! Read the instructions completely before beginning the installation. Before tightening bolts, drilling or cutting where required, check
Installation Manual for the Rockmeister Roof Ladder
 Installation Manual for the Rockmeister Roof Ladder Exclusively for Mercedes-Benz Geländewagen W460, W461 & W463 with single rear door NOTE: W460 & W461 models have a different Frame Bracket than the W463.
Rusty s JL Winch Mount RR-WM55-JL INSTALLATION INSTRUCTIONS
 Rusty s JL 2018+ Winch Mount RR-WM55-JL INSTALLATION INSTRUCTIONS Introduction: Rusty s recommends that this installation be performed by a certified automotive technician or a person with professional
INTERCOOLER UPGRADE INSTALLATION INSTRUCTIONS PART NUMBER D APPLICATION: F87 M2
 INTERCOOLER UPGRADE INSTALLATION INSTRUCTIONS PART NUMBER D330-0026 APPLICATION: 2016-17 F87 M2 Congratulations for being selective enough to use a Dinan Intercooler Upgrade Kit. We have spent many hours
Applications: Section 1: Getting Started Tools Needed: BEFORE
 Installation of KBD Body Kits Porsche GT 3 Look/Style 2 Piece Polyurethane Front Bumper & Lip Applications: Porsche 996: 1999-2001 Porsche Boxster 986: 1997-2004 Page 1 Tools Needed: Philips Head Screwdriver
JK FRONT DAGGER FRAME CHOP BUMPER INSTALLATION INSTRUCTIONS
 JK FRONT DAGGER FRAME CHOP BUMPER INSTALLATION INSTRUCTIONS TOOLS NEEDED 18mm socket or wrench Paint marker 10mm wrench & socket Tape measure Sawzall, or die grinder 15mm socket HARDWARE 4-1/2 X 5.5 Grade
IMPORTANT: PLEASE RETAIN THIS INSTRUCTION MANUAL FOR FUTURE REFERENCE
 IMPORTANT: PLEASE RETAIN THIS INSTRUCTION MANUAL FOR FUTURE REFERENCE 005-07 Cadillac STS Classic 3D Z, Classic Dual Weave, Classic Mesh & Classic Black Mesh Grilles B 7 HR 3 STS Classic 3D Z Grille Part
Kai Installation Instructions
 Kai Installation Instructions Before Beginning Installation Read through the entire instruction thoroughly A minimum of 2 people are required for this assembly These instructions reflect typical assemblies;
Mounting a BalanceBox 400 to a brick wall
 Unpack the BalanceBox 400 and remove the Wall frame cover and its bag of screws. Slide the cover out at the top. NOTE: the cover is NOT included with the BalanceBox 400H LOCK SCREW HOLE MOBILE STAND MOUNTING
2017 Current Ford Raptor ADD Pro Front Bumper Installation Instructions
 2017 Current Ford Raptor ADD Pro Front Bumper Installation Instructions PREPARATION 1. Disconnect the negative terminal on the battery. Park the vehicle on level ground and set the emergency brake. 2.
BX3615. Subaru Impreza WRX (Include STI) Subaru 2012 Impreza Premium 2010 Outback Sport Installation Instructions Attachment Tab Height: 15
 Subaru 2012 Impreza Premium 2010 Outback Sport Installation Instructions Attachment Tab Height: 15") 1. Blue Ox towing products and accessories are intended to be installed by Blue Ox Dealers who are familiar with our products and have the equipment and knowledge necessary to do fit work. If needed, Blue
1. Blue Ox towing products and accessories are intended to be installed by Blue Ox Dealers who are familiar with our products and have the equipment and knowledge necessary to do fit work. If needed, Blue
Please read BOTH these Installation Instructions and the General Towing Instructions before attempting to install or operate this equipment.
 Serial Number 2012 Hyundai Accent (No Foglights) Please read BOTH these and the General Towing Instructions before attempting to install or operate this equipment. 1. Blue Ox towing products and accessories
INSTRUCTIONS INSTRUCCIONES CONSIGNES
 AUTOMOTIVE PRODUCTS, INC. INSTRUCTIONS INSTRUCCIONES CONSIGNES APPLICATION: 2007 13 CHEVY SILVERADO 1500 (except Classic ) MAX WINCH TRAY: HDX 46-22275 SPORTSMAN WINCH MOUNT GRILLE GUARD: 45-92270, 40-92275
Race Splitter Upgrade Kit Installation Instructions
 Race Splitter Upgrade Kit Installation Instructions Eric Hazen Rev. 1 Overview: Detailed instructions on installing the FT86 Speed Factory Race Splitter Upgrade Kit on a BRZ; FR-S grills are different
WARNING Kia Spectra 5 Installation Instructions BX2713. Serial Number
 Please read BOTH these and the General Instructions before attempting to install or operate this equipment. 1. Blue Ox towing products and accessories are intended to be installed by Blue Ox Dealers who
Signal Mirror Installation Instructions
 Signal Mirror Installation Instructions 2006 2007 Honda Ridgeline THE safety accessory of the 21 st Century. P/N 210 0142 0 Rev. A (9/5/07), BTV 2007 Muth Company, LLC Professional Installation Recommended:
WARNING. BX Ford Explorer With Adaptive Cruise Control & Eco Boost Installation Instructions. Bolt Torque Specifications
 Please read BOTH these and the General Instructions before attempting to install or operate this equipment.. Blue Ox towing products and accessories are intended to be installed by Blue Ox Dealers who
Please read BOTH these Installation Instructions and the General Instructions prior to installing or operating this equipment.
 2012-14 Chevy Captiva Sport Attachment Tab Height: 21-1/2 Serial Number Attachment Tab Width: 18-1/2 Please read BOTH these and the General Instructions prior to installing or operating this equipment.
Please read BOTH these Installation Instructions and the General Towing Instructions before attempting to install or operate this equipment.
 Serial Number Please read BOTH these and the General Towing Instructions before attempting to install or operate this equipment. 1. Blue Ox towing products and accessories are intended to be installed
Fig A ADDICTIVE DESERT DESIGNS. Preparation: Removal:
 Preparation: Disconnect the negative battery terminal. Park the vehicle on level ground and set the emergency brake. We recommend reading through the installation instructions in whole before performing
SUT-1000CLC ASSEMBLY REQUIREMENTS
 SUT-1000CLC Torque wrench, carpenters square, wire cutters, Phillips screwdriver, 7/16, 9/16, and 3/4 combination wrenches, ratchet, 9/16, 3/4, 13/16, and 7/8 sockets. ASSEMBLY REQUIREMENTS *Torque all
INSTALLATION INSTRUCTIONS ELEVATION FRONT BUMPER CHEVY SILVERADO
 INSTALLATION INSTRUCTIONS ELEVATION FRONT BUMPER PARTS LIST: 1 Heavy Duty Bumper Assembly 6 12-1.75mm x 50mm Hex Bolts 1 Driver Mounting Bracket 30 12mm x 37mm OD x 3mm Flat Washers 1 Passenger Mounting
Assembly Instructions
 Unite Panel System Hinge Door July 2016 #12 x / slotted hex washer head bolt Figure 1 threshold bracket frame Detail F threshold bracket threshold bracket (installed) #12 x / slotted hex washer head bolt
Simply lift up on the flexible cover to remove it from the radiator support panel and factory grille, exposing the upper mounting hardware.
 2 Simply lift up on the flexible cover to remove it from the radiator support panel and factory grille, exposing the upper mounting hardware. Apply masking tape to the top of the bumper cover underneath
Signal Mirror Installation Instructions
 Signal Mirror Installation Instructions 2005-2010 Chevy Corvette C6 THE safety accessory of the 21 st Century. P/N 210-0144-0 Rev. A3 (9/29/2011), BTV 2007 Muth Mirror Systems, LLC Page 3 of 10PplPage
JK FRONT FENDER FLARE INSTALLATION INSTRUCTIONS
 JK FRONT FENDER FLARE INSTALLATION INSTRUCTIONS TOOLS NEEDED 3/16 Allen Wrench 1/2 Socket or wrench 10mm Socket Flat head screwdriver HARDWARE 5/16 x 3/4 button heads (14) 5/16 x 1 button heads (8) 5/16
(2) 25mm x 20mm x 5mm Adhesive Backed Foam Pads. 100mm x 50mm x 1.0mm Adhesive Backed Foam. (2) Spacer Plates. Passenger/Right Side Frame Mounting
 25mm x 20mm x 5mm Adhesive Backed Foam Pads. 100mm x 50mm x 1.0mm Adhesive Backed Foam. (2) Spacer Plates. Passenger/Right Side Frame Mounting") PARTS LIST: 1 Grille Guard 10 12mm Lock Washers 1 Driver/Left Frame Mounting 16 12mm x 32mm OD x 3mm Flat Washers 1 Passenger/Right Frame Mounting 8 12mm Hex Nuts 1 Driver/Left Side Top Support 2 10-1.50mm
PARTS LIST: 1 Grille Guard 10 12mm Lock Washers 1 Driver/Left Frame Mounting 16 12mm x 32mm OD x 3mm Flat Washers 1 Passenger/Right Frame Mounting 8 12mm Hex Nuts 1 Driver/Left Side Top Support 2 10-1.50mm
INSTALLATION INSTRUCTIONS ATV PLOW Mount Kit: Application: 2002 and newer Yamaha Grizzly 660
 INSTALLATION INSTRUCTIONS ATV PLOW Mount Kit: 64669 Application: 2002 and newer Yamaha Grizzly 660 Your safety, and the safety of others, is very important. To help you make informed decisions about safety,
CORVETTE CORVETTE REV: Made in USA U.S. PATENT #6,808,223; #6,845,547; #7,140,075; #7,059,655 and other patents pending.
 CORVETTE 2005-2006 CORVETTE 2005-2007 REV: 7-2-07 Made in USA U.S. PATENT #6,808,223; #6,845,547; #7,140,075; #7,059,655 and other patents pending. Page 1 of 12 CORVETTE C6 2005-2007 THIS KIT INCLUDES:
General Features. Low Profile. The SMART BOXX stands only 1.5 off of the bed of your truck so cargo space is maximized
 General Features Low Profile. The SMART BOXX stands only 1.5 off of the bed of your truck so cargo space is maximized Two Sizes Short Box :74 L X 47 W X 7 T and Long Box 92 L X 47 W X 7 T All Aluminium
RH-412 STEEL DOORS INSTALLATION INSTRUCTIONS
 RH-412 STEEL DOORS INSTALLATION INSTRUCTIONS By following the steps outlined below, the assembly, installation and adjustment of the steel doors, will be a simple process. Let s start with the Driver Side.
Bi-Color Signal Mirror Installation Instructions
 Bi-Color Signal Mirror Installation Instructions 2005-2009 Toyota Tacoma THE safety accessory of the 21 st Century. P/N 210-0141-0 Rev. A2 (3/30/09), BTV 2007 Muth Mirror Systems, LLC Page 3 of 13PplPage
WARNING. Baseplates Chevy SSR Installation Instructions BX1665. Serial Number
 Baseplates BX1665 Please read BOTH these and the General Instructions before attempting to install or operate this equipment. Serial Number 1. Blue Ox towing products and accessories are intended to be
INSTALLATION INSTRUCTIONS RH 412 STEEL DOORS
 By following the steps outlined below, the assembly, installation and adjustment of the steel doors, will be a simple process. Let s start with the Driver Side. Note: Having the hood open makes the job
Side Mount INSTRUCTION BOOKLET #C122 BED STYLE: PARK CITY
 Side Mount BED STYLE: PARK CITY INSTRUCTION BOOKLET #C1 WARNING! ALL MURPHY/WALLBED SYSTEMS CONTAIN STORED ENERGY. FAILURE TO USE AND FOLLOW THESE INSTRUCTIONS DURING THE INSTALLATION PROCESS COULD RESULT
 For Wallbed models: KING SIZE INSTRUCTION BOOKLET #C1 Watch step by step installation instructions at: https://www.wallbedsbywilding.com/wallbed-installation-studio-series/ WARNING! ALL MURPHY/WALLBED
Install. instructions. B8 A4/S4 RS4 Blackout Mesh Style Grille. By: 7716 Wiles Rd.Coral Springs, FL
 Install instructions B8 A4/S4 RS4 Blackout Mesh Style Grille By: Preface: The best fitting grille on the market! Completely change the look of your Audi A4 or S4. This mesh style grille features a black
Please read BOTH these Installation Instructions and the General Towing Instructions before attempting to install or operate this equipment.
 Serial Number BX3231 2005-08 Pontiac G6 GT Please read BOTH these and the General Towing Instructions before attempting to install or operate this equipment. 1. Blue Ox towing products and accessories