Pacifica Pool House. Assembly Manual. Toll Free: Hours: 9-5 Monday-Friday EST. Package ships as shown. Suncast Corporation
|
|
|
- Judith Kelly
- 5 years ago
- Views:
Transcription


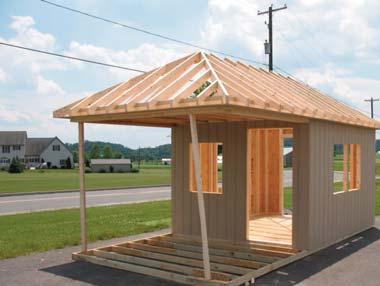
1 Pacifica Pool House Assembly Manual Toll Free: Hours: 9-5 Monday-Friday EST Package ships as shown
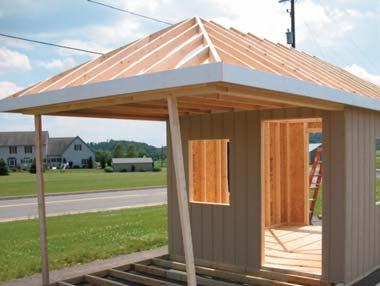
2 Simpson Hurricane Straps Double Insulated Raised-Panel Door in back wall (71 x71 Total opening) 1 x6 Fascia 12 Wide Raised Panel Shutters 4-30 x 36 Aluminum Slider Windows with Screens The Pool House is not your typical shed; its combination of indoor and outdoor living space fits a wide variety of uses. In addition to being a picturesque addition to a pool side, this building could serve as a garden building, gift shop, office, studio, guesthouse, den, playhouse, or simply for storage. Features include 2x4 construction, steep hip roof, 3 insulated raised-panel steel house doors, 4 slider windows with screens and shutters, 4 flower boxes, and an extra large porch area finished with maintenance free materials. Flexible construction options allow unit to be built so doors and windows best fit the property. The Pool House specifications Shingles (supplied by customer) Steep 7/12 Pitch Hip Roof 8 x9 Loft Inside Optional Weather Vane Optional Belvedere Cupola with Copper Roof Double Plywood Gussets 7 6 High Interior Walls 10 7 Interior Peak Height 11 1 Exterior Peak Height 2x4 Rafter 16 O.C. (Hip Rafters are 2x6) 2x4 Double Top Wall Plate 1/2 OSB Sheathing / 2 Vinyl Clad 4x4 Posts and Railings 8 x9 10 Outside Porch Dimensions 3 Railings 29 High 7 6 x8 10 Inside Porch Dimensions Vinyl Spindles & Braces 7/16 Smart Panel Wood Siding 9 10 Composite Decking Flexible Placement of Opening 20 3 Insulated Raised-Panel Doors with 11-Lite Windows and 2 House Lock Sets Black Antique Hinges and Hardware Treated Bottom Wall Plate (for installation without floor) 2x4 Treated Joists 16 o.c. 5/8 Plywood Floor 2x4 Sidewalls 16 O.C Flower Boxes

3 Pacifica Pool House Assembly Manual revised 08/21/08 Please read through the entire manual before starting! Note: It is very important that you have a level site for the structure. If you have purchased the optional floor, a level crushed-stone pad is recommended. When using tools and ladders, always follow manufacturer s recommended safety guidelines! Tools Needed: Level Screw Gun Hammer Tape Measure Skill Saw Speed Square Chalk Line Pencil 5/16 Drill Bit Tin Snips Caulking Gun Other Items Needed: Approximately 5 gallons of paint Approximately 12 Bundles of shingles Heavy duty Silicone Caulk/Sealer When your kit arrives, it should look like this. Inspect the package for any damage that may have occurred during shipping - dented corners, punctured plastic, etc. If the package is damaged, alert HomePlace Structures immediately at


4 Hardware & Fasteners The following fasteners are included with your kit. However, you will find the assembly process to proceed much faster when using air powered tools and fasteners. When replacing hand fasteners with air powered fasteners, always use a fastener equivalent. 3 Galvanized Nails Color Code: Fluorescent Green 2-1/2 Galvanized Nails Color Code: Pink 2 Galvanized Nails Color Code: Orange 2 Trim Nails Color Code: Fluorescent Yellow 1-1/2 Red Shutter Screws Color Code: Dark Blue 2 Black Hinge Screw Color Code: Black 1 Pan Head Window Screws Color Code: Light Blue 1 Roofing Nails Color Code: Purple 1-1/2 White Washer Head Flower Box Screw Color Code: Dark Green page 04
5


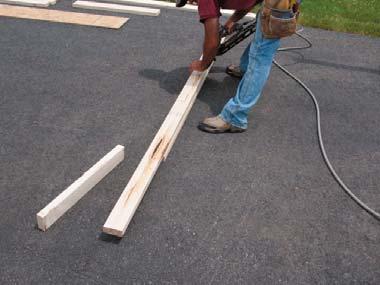
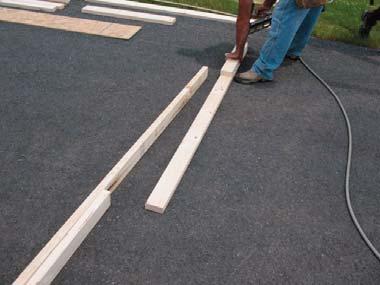
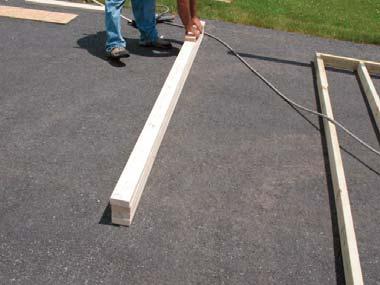
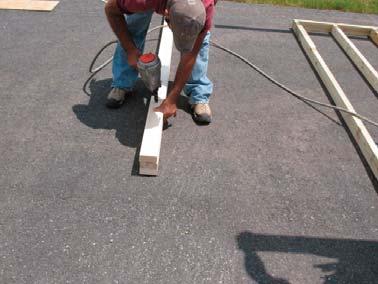
6 Bottom Wall Plate Lay out for Units without floor Note: If you purchased the optional floor, please proceed to page 8. Step 1: Remove plastic wrap and cut bands. Step 2: Unpackage kit and remove layers to get access the 6 pressure treated bottom plates. Step 3: Measure and lay out square pad 116 x240 and snap lines as shown. Make sure lay out is square, see step 7. Step 4: Lay out 6 pressure treated bottom plates as shown. page 06


7 See next step... Step 5: Mark and cut bottom plates to fit. Step 6: It is recommended to put a layer of clear silicone sealer under bottom plates. Step 7: Make sure bottom plate layout is square. It is square when diagonal measurements are equal. Step 8: Fasten bottom plates to surface using concrete screws, tapcons, or fastener equivalent. Bottom plate layout is complete. page 07


8 Floor Assembly See drawings on page 5 for correct layout. Step 1: Remove plastic wrap and cut bands. Step 2: Lay out pressure treated 2 x4 band boards, square joists at one end, and mark off floor joists using floor diagram shown on page 5. page 08


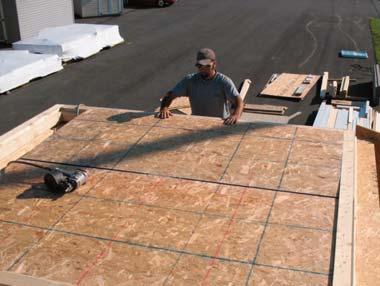
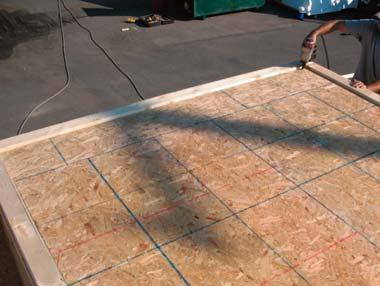
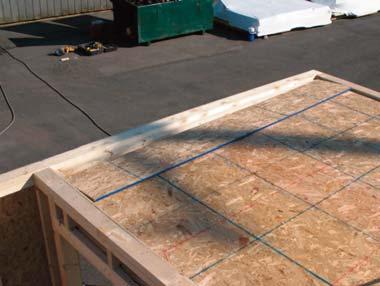
9 Step 3: Lay out floor as shown. Step 4: Use OSB cleats scab pieces to attach short floor joists to long floor joists, keeping all pieces flush at top. Use at least twelve 2 galvanized nails per OSB piece. Step 5: Attach floor joists together at appropriate measurements using two 3 nails per joist. Note: Make sure to keep joists flush at top and at edges of corners. Step 6: Attach outside band board joists together as shown. Step 7: Make sure floor is square. Floor is square when diagonal measurements are equal (approximately 266 1/2. Step 8: Layout plywood floor sections as shown. Make sure floor is level before proceeding to step 10. Step 9: Fasten plywood sections to floor joists using 2-1/4 galvanized nails spaced 8 apart. Notes: It is important to properly align plywood along center of floor joists at splices and flush along edges. Also make sure to align the grain on the 4 x4 flooring pieces with the grain on the 4 x8 pieces. page 09
10


, square ends,")


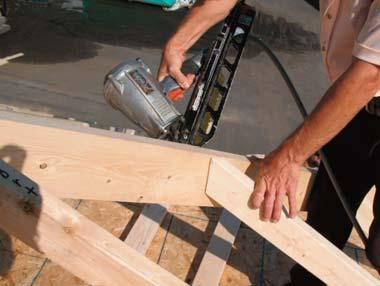
11 Rear Wall Layout & Assembly See drawings on previous page for correct layout. Step 10: Lay out top and bottom wall plates (top wall plate is a double 2x4 plate), square ends, measure and mark at 16 on center as shown. Step 11: Lay out 84-2 x4 wall studs and fasten to top and bottom plates at marks using two 3 nails per stud as shown. Fasten one top plate to studs before attaching the second top plate. Note: It is very important to align studs flush with edge of wall plate. page 11


12 Step 12: Remove three 4 x90 siding sheets and lay out on wall as shown. Step 13: Start siding with overlap at corner. Step 14: Siding edge should center on wall stud. Fasten siding to walls using 2-1/4 galvanized nails spaced 8 apart. Step 15: Install next siding piece as shown, keeping groove reveal consistent with standard openings on sheet. Repeat to end of wall. Step 16: Mark and cut off excess siding as shown. Step 17: Lift and set wall as shown. Step 18: Fasten bottom wall plate to floor using 3 nails every 8. Fasten siding into floor framing using 2-1/4 galvanized nails spaced 8 apart.
13


14 Front Wall Layout & Assembly See drawings on previous page for correct layout. Step 19: Lay out top and bottom wall plates and mark positions of wall studs repeating previous steps. Step 20: Lay out wall studs per marks on wall plates. Step 21: Nail wall together using 3 nails as shown. Step 22: Lay out three siding sheets as shown. page 14


15 Step 23: Attach siding repeating previous steps, making sure that siding splices fall on wall studs. Step 24: Mark and cut off excess siding at corners. Step 25: Lift and set wall repeating steps from back wall. Fasten bottom plate to floor and siding to floor repeating previous steps. page 15
16


17 End Wall Layout & Assembly Step 26: Lay out end wall, repeating steps on front and back walls, using the measurements shown in drawings. Note: All measurements should be taken from edge of front wall stud, do not measure from edge of siding. It is very important for door to be framed correctly. Step 27: Nail wall together using 3 nails. Step 28: Set wall, align with front and back wall, and fasten to floors and adjoining walls as shown. Step 29: Cut out bottom plate at door opening. page 17
18


19 End Wall Layout & Assembly Step 30: Lay out, assemble, and set opposite end wall using correct wall layout diagram provided. Note: Do not cut out bottom wall plate inside this door opening. This is bottom plate is necessary in order to install the porch floor boards. page 19


20 Porch Header Build Out Step 31: Install two additional 2x4s for porch header using 3 nails. Make sure to keep boards flush at sides. Step 32: Repeat on opposite side. Step 33: Prop up porch header using extra 2x4s. page 20


21 Step 34: Assemble end header by fastening alternating 7 2x4s and 25 2x4s together using 3 nails. Step 35: Align and install end porch header using 3 nails. page 21


22 End Wall Siding Installation Step 36: Locate two siding pieces 3 x8 and two siding pieces 10-7/8 x 4. Step 37: Make several marks 1/2 from inside of door opening on both sides of the door opening. Step 38: Measure from edge of wall to 1/2 mark on door and cut siding to fit. Step 39: Align siding with marks 1/2 from door opening and flush with top of wall; attach along the top only. Note: The rest of the siding will be nailed in later steps. page 22


23 Step 40: Repeat previous steps for siding piece on opposite side of door. Remember to only nail the siding along the top edge. Step 41: Install 4 x10⁻⁷/8 siding piece keeping top edge flush with top of wall plate. Note: This should leave a 3/4 reveal from bottom edge of siding to bottom edge of door frame. Step 42: Measure and cut remaining 10-7/8 siding strip and install. Step 43: Before nailing rest of siding, make sure that door opening is square. Door is square when corner to corner diagonal measurements are equal. Step 44: When door is squared, nail off siding every 8-12 using 1-1/2 nails. Make sure to keep siding flush along outside of wall. page 23


24 Porch Wall Siding Installation Step 45: Make marks along door frame 1/2 from inside of frame. Step 46: Measure to 1/2 mark and cut siding piece to fit. Step 47: There are 5 total siding pieces needed for this wall configuration. Step 48: Notch out siding to fit around porch header. Step 49: Notch out siding to fit around floor joist. Step 50: Align siding with marks and flush with top of wall plate. Attach along top edge Note: Make sure to only fasten siding along top at this time. page 24


25 Step 51: Attach full sheet of siding on opposite side of door, making sure to keep a 1/2 reveal from edge of siding to edge of door frame. Step 52: Cut and install 4 x9-7/8 siding piece to fit above door. Step 53: Install last siding piece after cutting to fit (if necessary) and notching around porch header and floor joist. Step 54: Make sure door opening is square. Step 55: Nail rest of siding after making sure door is square. page 25


26 Cut Out Window Openings Step 56: Put a nail in each corner of window (4 total) out through siding. Step 57: Use nails to snap 4 lines to mark window outline. Step 58: Use a skill saw to cut out window opening. Repeat steps for each window. Porch Header Siding Installation Note: This unit was changed after the original photo shoot was complete. The siding should come down flush with bottom of 2x4 header. Siding should be flush along top and bottom edges of 2x4 headers Step 59: Align siding flush at top and bottom of headers and attach around perimeter of headers as shown. Note: Siding strips are 5-7/8 x4. page 26


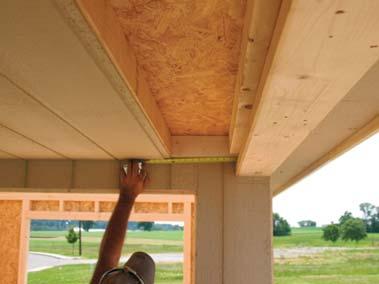
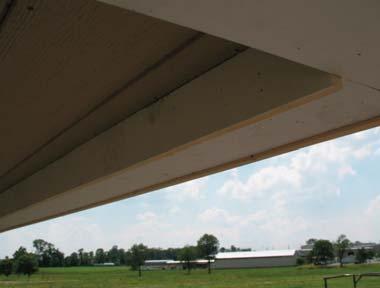
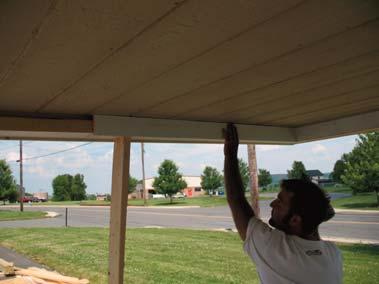
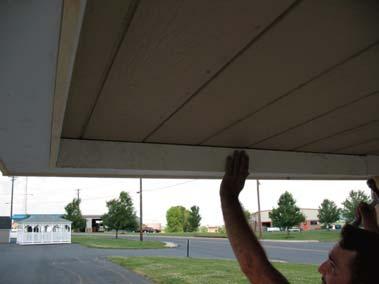
27 Soffit Strip Installation Step 60: Measure down 4-3/4 from top of wall, mark and snap lines around entire perimeter of building. Step 61 : Align bottom of 1x3 soffit strip with line and attach to perimeter using 3 nails. Some strips will need to be cut in order to fit. page 27
28


29 Loft Framing Assembly Step 62: Measure down 4-3/4 from top of wall, mark and snap lines around entire interior of porch. Step 63: Lay out loft using the drawings on page?? and assemble using 3 nails. Step 64: Cut two stabilizer pieces and attach inside loft at splice in frame. page 29


30 Loft Installation Step 65: Lift loft above and pull down into place. Note: Your loft may fit tightly at corners. If necessary, use a hammer to force loft inside porch interior. Step 66: Attach loft to framing using 3 nails. page 30


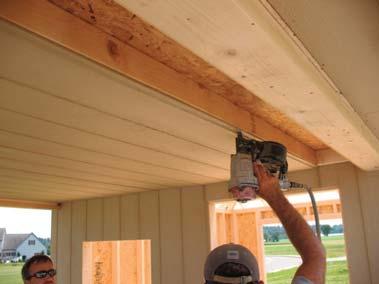
31 Soffit Installation Step 67: Align soffit corner pieces as shown and attach to soffit 1x3 using 1-1/2 nails. Repeat for each corner. 80 Step 68: Install remaining soffit pieces, cutting pieces to fit when necessary. Note: The first soffit strip adjacent to the corner strip on the back end wall is pre-cut 80 long. page 31


32 Loft OSB Installation Step 69: Locate OSB sheets for loft as shown. Step 70: Set OSB sheets in place and install using 1-1/2 nails. page 32
33


34 Rafter Assembly & Installation Step 71: Each rafter set consists of two rafters and two gussets, with the exception of both end rafters which include only one gusset. Incorrect, birds mouth should be at bottom end of rafter. Note: There are two marked rafters which are 7/8 shorter than the standard rafter. Do not use these rafters at this time. Two end rafters have one gusset Step 72: First assemble two end rafters by fastening one rafter gusset to rafters using twelve 6d nails as shown. Assemble remaining rafters by fastening a rafter gusset to each side of rafter as shown. Step 73: Lay out and mark placement of rafters using the drawings shown on previous page. Step 74: Install end rafter making sure to keep rafter gusset facing toward interior of building. Align end of rafter with edge of soffit and attach soffit to rafter using 1-1/2 nails. Toenail rafter into top of wall using 3 nails. page 34


35 Step 75: Install remaining rafters as shown. Step 76: Locate the two marked center end rafters. Install rafters as shown following diagram on previous page. page 35


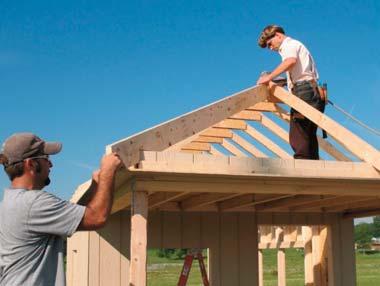
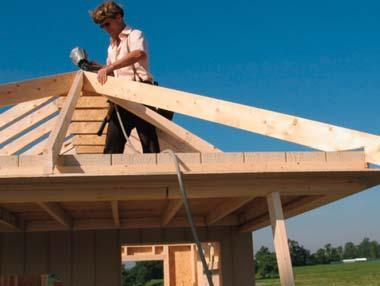
36 Step 77: Locate four 2x6 corner rafters and install as shown. Step 78: Install remaining corner rafters as shown. page 36


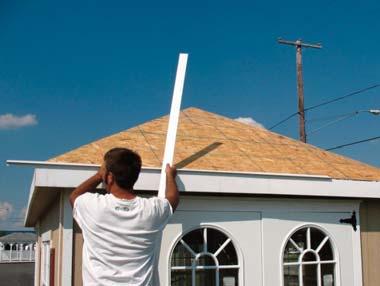
37 Face Board Installation Step 79: Paint building desired color (paint purchased separately). Note: Trim pieces included are primed white, paint; the trim color suit your taste. It is easiest to paint trim prior to installing. Step 80: Locate 1x6 face boards. Note: The long sides of the building require one face board 6 long and two boards 8 long. Step : 81: Begin Begin with with the the?? 6 board. Align board with top of of rafters and attach to to the center of of the fourthrafter rafter from the corner as shown. Attach all trim with trim nails. Step 82: Install remaining 8 boards as shown, running boards out past end of roof line. Step 83: Repeat steps on opposite side of building.


38 Step 84: Cut the excess face boards to be flush at corner as shown. Step 85: Install face boards on end walls as shown. Note: Face board splice should fall on center rafter. page 38


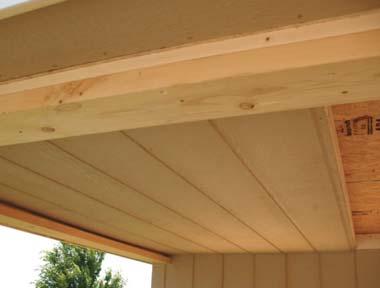
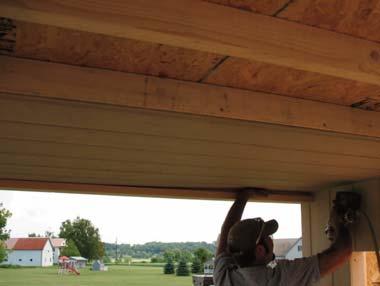
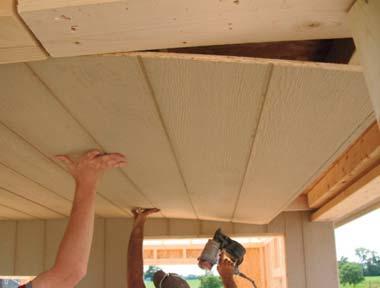
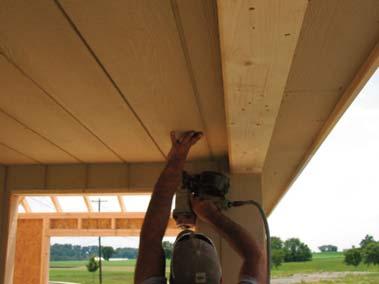
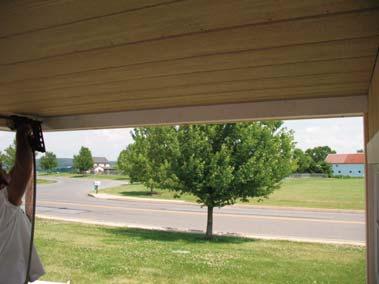
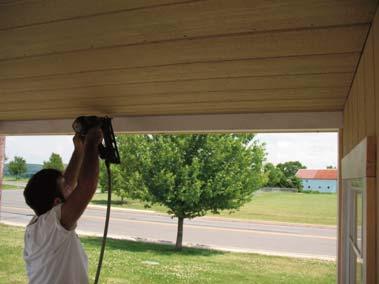
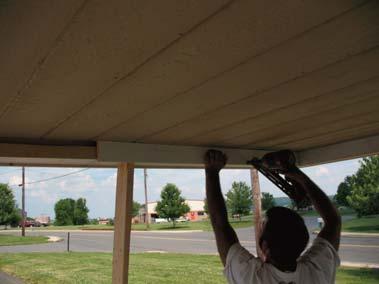
39 Porch Ceiling Installation Step 86: Install siding pieces on porch ceiling using 1-1/2 nails as shown. page 39


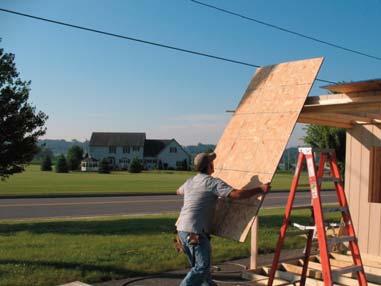
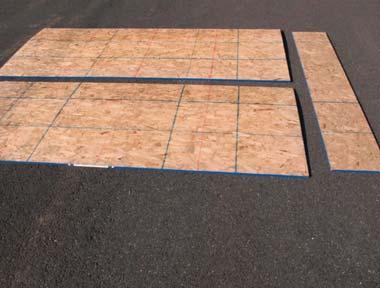
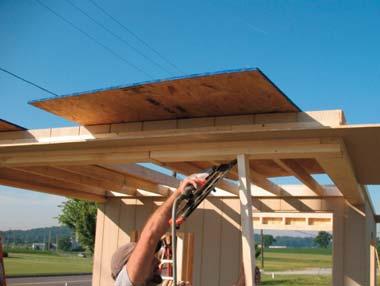
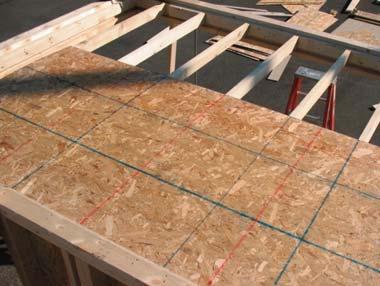
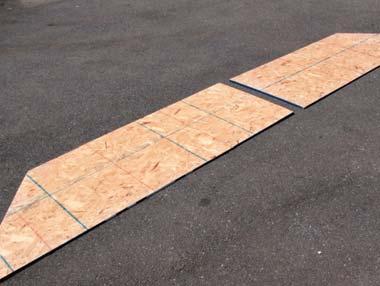
40 OSB Roof Sheeting Installation Step 87: Layout sheets of OSB roof material for first row. The bottom row consists of two corner sheets, one full 4 x8 sheet, and one 27-7/8 x4 sheet. Step 88: Install corner sheet of OSB keeping sheet centered on rafter at edge and resting against top of faceboard. Step 89: Fasten roof sheet to rafter using 2-1/4 nails spaced 8 apart. Step 90: Install full sheet of OSB making sure rafters are spaced correctly. Note: Before fastening top of OSB sheeting mark every 16. Step 91 : Install remaining OSB sheets for bottom row. page 40


41 Step 92: Install OSB sheets on end walls as shown. Step 93 : Install top row of OSB sheets on long side of building as shown. page 41


42 Floor Board Installation Step 94: Layout several boards on porch floor. Step 95: Overhang the first floor board by 1/2. Step 96: Attach board to floor joists using two 2-1/2 screws per joist. There is one board narrower than the others, place this board in the center of the floor. Step 97: Push boards tightly together and install. Note: It is very important that boards are fitted tight in order for the last board to have a 1/2 overhang. page 42


43 Window & Window Trim Installation Step 98: Install windows as shown using 1 pan head screws. It is strongly recommended to seal behind window flanges with clear silicone caulk. Step 99: Locate trim pieces for window. Step 100: Install bottom window trim piece keeping end of trim flush with edge of window. Step 101: Install side trim pieces keeping them flush with top of window and bottom of bottom trim piece. Step 102: Install top trim piece keeping it centered above window. page 43


44 Porch 2x6 Installation Step 103: Align 90-1/2 2x6 flush with edge of siding and with end of 2x4 porch header. Attach 2x6 to 2x4 header using 3 nails. Step 104: Install remaining 2x6 s around perimeter of porch as shown. page 44


45 Porch Trim Installation Step 105: Install 90-5/8 1x6 trim piece as shown. Step 106: Continue installing 1x6 trim around perimeter of porch as shown. Step 107: Install 1x6 corner trim keeping it flush with edge of siding. Step 108: Install 1x4 corner trim piece as shown. page 45


46 Step 109: Install 1x4 trim around perimeter of porch header as shown. Step 110: Install 1x4 trim around interior perimeter of porch header. page 46


47 Single Door Trim Installation Step 111: Locate the 2x4 door trim pieces. Material List: /8 2x4 side pieces x4 top piece Step 112: Install side trim piece keeping it spaced 1/2 from side of door frame and 3/4 up past bottom edge of door frame. Step 113: Install opposite side trim piece, keeping it spaced 36 from other trim piece. Step 114: Center top trim piece above door and install. page 47


48 Double Door Trim Installation Step 115: Locate the 2x4 door trim pieces. Material List: /2 2x4 side pieces /4 2x4 top piece x3 piece Step 116: Install side trim piece keeping it spaced 1/2 from side of door frame and 3/4 past bottom edge of door frame. Step 117: Repeat previous steps making sure door trim is spaced 71-3/4 apart. Step 118: Attach 1x3x81 flat on top of 2x4 trim piece as shown. Step 119: Install top door trim piece and properly align as shown. page 48


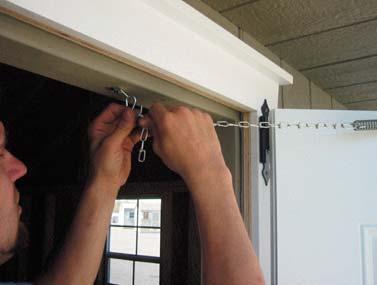
49 Installation of Window Shutters Step 120: Install window shutters using 1-1/2 red screws as shown. Note: Shutters can be painted to suit your taste. Corner Trim Installation Step 121: Install 1x4 corner trim as shown. page 49


50 Flower Box Assembly & Installation Fasteners Used for Flower Box & Installation: Galvanized Trim Nails Step 122: Layout flower box pieces as shown. Step 123: Attach back of flower box to side using galvanized trim nails as shown. Note: Make sure to keep edges flush. Step 124: Attach bottom of flower box to back and side. Step 125: Continue previous steps for remaining pieces. Step 126: Fasten decorative top trim pieces as shown. Paint flower boxes desired color before installing. Step 127: Fasten flower boxes beneath windows using 1-1/2 screws as shown. page 50

51


52 Post & Railing Installation Step 128: Install L-brackets at bottom of posts as shown. Note: There is a notch on one side of the post so post fits around bracket. top trim piece top rail top mounting bracket spindles bottom trim piece bottom rail bottom mounting brackets Each railing section consists of the following: 1 bottom rail, 1 top rail, spindles for section, 2 top mounting brackets, 2 top trim pieces, 2 bottom mounting brackets, 2 bottom trim pieces, and screws. Step 129: Place bottom rail on two props 3-1/2 wide. Step 130: Center bottom mounting bracket on 1x6 trim piece. page 52


53 Step 131: Use a pencil to mark location of bottom mounting bracket. Step 132: Attach bottom mounting bracket using screws included. Step 133: Snap bottom trim piece over mounting bracket as shown. Step 134: Slide bottom rail into mounting bracket. Step 135: Slide bottom trim piece onto bottom rail. Step 136: Mark location of post on floor using diagram from page?. Step 137: Mark location of post on header. Step 138: Slide post into place. Note: If you have trouble getting post to fit in place, add a shim under 2x4 prop to lift porch roof higher. page 53


54 Step 139: Make sure post spacing at top is correct. Step 140: Attach post to porch header on all four sides using 2-1/2 white screws. Step 141: Make sure post spacing at bottom is correct. Step 142: Attach post bracket to floor using 2-1/2 white screws. Step 143: Center bottom bracket on post and attach. Step 144: Snap trim piece in place. Step 145: Insert spindles in bottom rail as shown. Step 146: Slide top mounting brackets onto each end of top rail. Step 147: Insert spindles into top rail and push top rail down. page 54


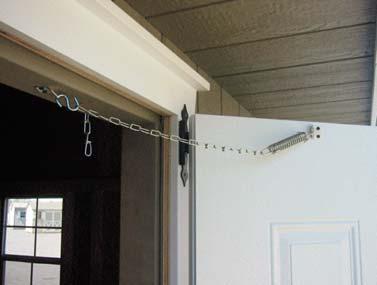
55 Step 148: Attach top brackets. Step 149: Snap in top trim pieces. Step 150: Repeat previous steps for remaining post and railing sections. Step 151: Install corner braces as shown using 3 screws. Single Door Installation Step 152: Install single door keeping door tight against hinge side and 1/4 reveal at top. Use 2 black screws as shown. Note: Make sure door is not down tight against floor. page 55


56 Double Door Installation Step 153: Lay out doors putting door with latch hole cutout on the right. Step 154: Starting with left door, install doors keeping door tight against side and 1/4 reveal at top. Use 2 black hinge screws to attach hinge to building. Step 155: Install opposite door repeating previous steps as shown. Note: It is important to keep the reveal at top of door consistent the whole way across top of doors. If the reveal is not consistent, it means the building isn t perfectly square or the foundation isn t level. You may need to shim up one corner of the building to get a consistent reveal. Step 156: Mark location of interior door latch by tapping latch into top and bottom headers as shown. Step 157: Drill out 5/16 hole for top and bottom latch as shown. Step 158: Install door latch following directions included with latch. page 56


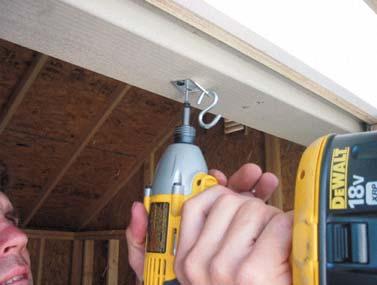
57 Rafter Tie Installation Step 159: Use remaining wall studs as rafter ties. Install rafter ties with 3-1/2 nails as shown. Note: Space rafter ties evenly throughout building. Hurricane Clip Installation Step 160: Install hurricane clips on each rafter as shown. page 57


58 Door Stop Installation Step 161: Install door stop on both doors as shown. Drip Edge Installation Step 162: Install drip edge around perimeter of building. page 58


59 Optional Ramp Installation Step 163: Lay out 6 treated ramp pieces as shown Note: If you did not purchase the optional floor, the ramp is not included. Step 164: Find center of only one 2x4 treated ramp piece and cut in half for ramp bottom brace. Step 165: Layout ramp pieces and make sure edges are precisely straight as shown. Step 166: Measure in 12 from each end as shown. Step 167: Fasten cut bottom braces to bottom of ramp using 3 nails as shown. Step 168: Fasten bottom door kick strip beneath door using 2-1/4 galvanized nails as shown. 169: Cut out a 1-1/2 x1-1/2 notch in both ends of ramp as shown. Step 170: Slide ramp in place.

60 Congratulations your Pool House is now ready for shingle application. Note: This unit requires approximately 16 bundles of shingles. Install shingles following shingle manufacturer s recommendations. Toll Free: Hours: 9-5 Monday-Friday EST Amish Handcrafted Gazebos, Garden Buildings, Garages, Playhouses, Arbors, Pergolas & Playsets


61 Optional Cupola Installation Front Step 1: Take 2 scrap wood pieces approximately 24 long and fasten tightly together with one screw, so boards pivot when applying pressure. Step 2: Measuring from end of building, find center of roof and mark. Step 3: Straddle the roof with each board, making sure each board is flat against the roof. Mark boards with pencil for cutting template. Note: Mark front and back board. Step 4: Find center of cupola and mark lightly with pencil. Step 5: Align marks on bottom board with edges of top board and make a cut line from each corner to center line. Step 6: Cut out roof line by starting at corners and cutting to center. Repeat steps 4-6 on opposite side of cupola. Note: When marking opposite side of cupola base, make sure that front and back board match with previous side. Step 7: Position cupola on center of roof and fasten to roof using 3 inch screws. Fill holes with silicone caulk to prevent roof from leaking. Note: To utilize venting for cupola, cut out an 8 x8 hole in center of roof, prior to installing cupola. Attach a screen piece over hole to keep out insects. Step 8: Place cupola roof on top of base. Note: Remove shrink wrap from copper after step 9 to protect copper from oils on skin. Step 9: Attach roof to base using screws attached to roof. Toll Free: Hours: 9-5 Monday-Friday EST Amish Handcrafted Gazebos, Garden Buildings, Garages, Playhouses, Arbors, Pergolas & Playsets
Keystone Garage Assembly Manual
 Keystone Garage Assembly Manual 14x24 Garage Kit ships as shown Toll Free: 866.768.8465 Hours: 9-5 Monday-Friday EST 13 8 deep AMISH ORIGINAL KEYSTONE 14x24 GARAGE s p e c i f i c a t i o n s Optional
Assembly Instructions
 10' and 12' Octagon Cedar Gazebo Assembly Instructions Toll Free: 866.768.8465 Hours: 9-5 Monday-Friday EST www.homeplacestructures.com Package ships as shown revised 06/20/09 Cedar Gazebo Assembly Instructions
Octagon Vinyl Gazebo Assembly Instructions For 10 & 12 Models
 Octagon Vinyl Gazebo Assembly Instructions For 10 & 12 Models Toll Free: 866.768.8465 Hours: 9-5 Monday-Friday EST www.homeplacestructures.com Package ships as shown revised 04/29/09 Vinyl Gazebo Assembly
Octagon Vinyl Gazebo Assembly Instructions
 Octagon Vinyl Gazebo Assembly Instructions For 10 & 12 Models Toll Free: 866.768.8465 Hours: 9-5 Monday-Friday EST www.homeplacestructures.com Package ships as shown revised 04/29/09 Vinyl Gazebo Assembly
10 Octagon Cedar Gazebo Assembly Instructions
 10 Octagon Cedar Gazebo Assembly Instructions Toll Free: 866.768.8465 Hours: 9-5 Monday-Friday EST www.homeplacestructures.com Package ships as shown revised 06/22/09 10 Cedar Gazebo Assembly Instructions
Country Cabin. Assembly Manual. HomePlace Structures
 Country Cabin Assembly Manual Country Cabin Assembly Manual revised 3/20/10 Dear Customer, Thank you for your purchase of our Country Cabin. The craftsmanship and detail in this building is unmatched.
Best Barns USA Assembly Book
 Best Barns USA Assembly Book Revised September 12, 2017 the Denver 12' x 16' Manufactured by Reynolds Building Systems, Inc. 205 Arlington Drive Greenville, PA 16125 This manual is copyrighted. Under the
Best Barns USA. the Brookhaven 10' x 16' Assembly Book. revised March 23, 2016
 Best Barns USA Assembly Book revised March 23, 2016 the Brookhaven 10' x 16' Manufactured by Reynolds Building Systems, Inc. 205 Arlington Drive Greenville, PA 16125 724-646-3775 This manual is copyrighted.
Best Barns USA Assembly Book
 Best Barns USA Assembly Book Revised September 19, 2017 the Millcreek 12'x 20' Manufactured by Reynolds Building Systems, Inc 205 Arlington Drive Greenville, PA 16125 This manual is copyrighted Under the
Best Barns USA Assembly Book
 Best Barns USA Assembly Book Revised September 12, 2017 the Easton 12'x 16' Manufactured by Reynolds Building Systems, Inc. 205 Arlington Drive - Greenville, PA 16125 This manual is copyrighted. Under
Best Barns USA Assembly Book
 Best Barns USA Assembly Book Revised December 6, 2013 the Denver-R 12' x 20' Manufactured by Reynolds Building Systems, Inc. 205 Arlington Drive Greenville, PA 16125 724-646-3775 This manual is copyrighted.
Best Barns USA. Assembly Book. 12'x 16' the Millcreek. Revised September 19, 2017
 Assembly Book Best Barns USA Revised September 19, 2017 the Millcreek 12'x 16' Manufactured by Reynolds Building Systems, Inc 205 Arlington Drive Greenville, PA 16125 This manual is copyrighted Under the
Gambrel Barn with Overhang Manual
 Tools Needed: -Cordless Drill (12V or higher) -#2 Square Drive Bit -Hammer -6 Step Ladder -Tape Measure -Square utility knife w/ blade & hook blade -Speed Square Little Cottage Co. PO Box 455 Berlin, OH
Best Barns USA Assembly Book
 Best Barns USA Assembly Book Revised February 4, 2016 the Millcreek-R 12'x 20' Manufactured by Reynolds Building Systems, Inc. 205 Arlington Drive Greenville, PA 16125 724-646-3775 This manual is copyrighted.
Best Barns USA Assembly Book
 Best Barns USA Assembly Book Revised October 11, 2018 the Woodville 10' x 16' Manufactured by Reynolds Building Systems, Inc. 205 Arlington Drive Greenville, PA 16125 This manual is copyrighted. Under
Best Barns USA Assembly Book
 Best Barns USA Assembly Book Revised February 4, 2016 the Millcreek-R 12'x 16' Manufactured by Reynolds Building Systems, Inc. 205 Arlington Drive Greenville, PA 16125 724-646-3775 This manual is copyrighted.
Best Barns USA Assembly Book
 Best Barns USA Assembly Book Revised August 17, 2017 the Roanoke 16'x32' Building w/ full loft Manufactured by Reynolds Building Systems, Inc 205 Arlington Drive Greenville, PA 16125 This manual is copyrighted
The Festival Assembly Instructions
 The Festival Assembly Instructions Toll Free: 866.768.8465 Hours: 9-5 Monday-Friday EST www.homeplacestructures.com Package ships as shown CONTACT INFORMATION: HomePlace Structures 301 Commerce Drive New
Best Barns USA Assembly Book
 Best Barns USA Assembly Book Revised November 27, 2013 the Easton - R 12'x 20' Manufactured by Reynolds Building Systems, Inc. 205 Arlington Drive Greenville, PA 16125 724-646-3775 This manual is copyrighted.
Best Barns USA Assembly Book
 Best Barns USA Assembly Book Revised September 13, 2017 the Belmont Building Size 12' x 16' Manufactured by Reynolds Building Systems, Inc. 205 Arlington Drive Greenville, PA 16125 This manual is copyrighted.
Assembly Book. the Brandon Building Size 12' x 20' Revised September 13, 2017
 Assembly Book Revised September 13, 2017 the Brandon Building Size 12' x 20' Manufactured by Reynolds Building Systems, Inc. 205 Arlington Drive Greenville, PA 16125 This manual is copyrighted. Under the
Best Barns USA Assembly Book
 Best Barns USA Assembly Book Revised November 19, 2015 the Glenwood Building Size 12' x 20' Manufactured by Reynolds Building Systems, Inc. 205 Arlington Drive Greenville, PA 16125 724-646-3775 This manual
Best Barns USA Assembly Book
 Best Barns USA Assembly Book Revised November 20, 2013 the Easton - R 12'x 16' Manufactured by Reynolds Building Systems, Inc. 205 Arlington Drive Greenville, PA 16125 724-646-3775 This manual is copyrighted.
the Greenbriar 12' x 20' Best Barns USA Assembly Book Revised April
 Best Barns USA Assembly Book Revised April 28 2015 the Greenbriar 12' x 20' Manufactured by Reynolds Building Systems, Inc. 205 Arlington Drive Greenville, PA 16125 724-646-3775 This manual is copyrighted.
Best Barns USA Assembly Book
 Best Barns USA Assembly Book Revised September 12, 2017 the Arlington Building Size 12' x 16' Manufactured by Reynolds Building Systems, Inc. 205 Arlington Drive Greenville, PA 16125 This manual is copyrighted.
Best Barns USA Assembly Book
 Best Barns USA Assembly Book Revised September 19, 2016 the Meadowbrook-R 16' x 10' Manufactured by Reynolds Building Systems, Inc. 205 Arlington Drive Greenville, PA 16125 724-646-3775 This manual is
Best Barns USA Assembly Book
 Best Barns USA Assembly Book Revised September 19, 2017 the Woodville 10' x 12' Manufactured by Reynolds Building Systems, Inc. 205 Arlington Drive Greenville, PA 16125 This manual is copyrighted. Under
Vinyl Gazebo Instructions
 P a g e 1 Vinyl Gazebo Instructions 10 Vinyl Gazebo Shown Thank you for the purchase of your New Gazebo. Depending on the size of your Gazebo, installation can usually be completed in 1 to 2 days. These
Best Barns USA Assembly Book
 Best Barns USA Assembly Book Revised June 14, 2017 the Glenwood Building Size 12' x 16' Manufactured by Reynolds Building Systems, Inc. 205 Arlington Drive - Greenville, PA 16125 This manual is copyrighted.
KIT ASSEMBLY INSTRUCTIONS
 KIT ASSEMBLY INSTRUCTIONS We have designed these instructions as a stepby step procedure to simplify the assembly process. Nevertheless, we do recommend including someone with carpentry expertise on your
Best Barns USA Assembly Book
 Best Barns USA Assembly Book Revised November 19, 2015 the Arlington-R Building Size 12' x 24' Manufactured by Reynolds Building Systems, Inc. 205 Arlington Drive Greenville, PA 16125 724-646-3775 This
Best Barns USA Assembly Book
 Best Barns USA Assembly Book Revised September 12, 2017 the Arlington Building Size 12' x 20' Manufactured by Reynolds Building Systems, Inc. 205 Arlington Drive Greenville, PA 16125 This manual is copyrighted.
Best Barns USA Assembly Book
 Best Barns USA Assembly Book Revised June 14, 2017 the Glenwood Building Size 12' x 24' Manufactured by Reynolds Building Systems, Inc. 205 Arlington Drive - Greenville, PA 16125 This manual is copyrighted.
Assembly Book. the Fairview. Building Size 12'x12' Revised July 25, 2012
 Assembly Book Revised July 25, 2012 the Fairview Building Size 12'x12' Manufactured by Reynolds Building Systems, Inc. 205 Arlington Drive Greenville, PA 16125 724-646-3775 This manual is copyrighted.
Best Barns USA Assembly Book
 Best Barns USA Assembly Book Revised March 6, 2017 the Arlington Building Size 12' x 24' Manufactured by Reynolds Building Systems, Inc. 205 Arlington Drive - Greenville, PA 16125 This manual is copyrighted.
Best Barns USA Assembly Book
 Best Barns USA Assembly Book Revised November 19, 2015 the Arlington-R Building Size 12' x 20' Manufactured by Reynolds Building Systems, Inc. 205 Arlington Drive Greenville, PA 16125 724-646-3775 This
Best Barns USA. Regency Deluxe. 8' x 12' Assembly Book. revised February 15, 2017
 Best Barns USA Assembly Book revised February 15, 2017 Regency Deluxe 8' x 12' Manufactured by Reynolds Building Systems, Inc. 205 Arlington Drive, Greenville, PA 16125 This manual is copyrighted. Under
Assembly Book. the Brandon. Building Size 12'x12' or 12'x16' Revised September 13, 2017
 Assembly Book Revised September 13, 2017 the Brandon Building Size 12'x12' or 12'x16' Manufactured by Reynolds Building Systems, Inc. 205 Arlington Drive Greenville, PA 16125 This manual is copyrighted.
Best Barns USA Assembly Book
 Best Barns USA Assembly Book Revised June 14, 2017 the Belmont-R Building Size 12' x 24' Manufactured by Reynolds Building Systems, Inc. 205 Arlington Drive - Greenville, PA 16125 This manual is copyrighted.
Best Barns USA Assembly Book
 Best Barns USA Assembly Book Revised July 27, 2012 the North Dakota with pocket doors 12' x 20' Manufactured by Reynolds Building Systems, Inc. 205 Arlington Drive Greenville, PA 16125 724-646-3775 This
Best Barns USA Assembly Book
 Best Barns USA Assembly Book Revised September 19, 2016 the Meadowbrook-R 12' x 10' Manufactured by Reynolds Building Systems, Inc. 205 Arlington Drive Greenville, PA 16125 724-646-3775 This manual is
8x12 SpaceMaker Garden Shed Assembly Manual
 8x12 SpaceMaker Garden Shed Assembly Manual Version #6 Revised June / 2007 Thank you for purchasing a 8x12 SpaceMaker Garden Shed. Please take the time to identify all the parts prior to assembly. Safety
Best Barns USA Assembly Book
 Best Barns USA Assembly Book Revised February 17, 2015 the Meadowbrook-R 12' x 10' Manufactured by Reynolds Building Systems, Inc. 205 Arlington Drive Greenville, PA 16125 724-646-3775 This manual is copyrighted.
With Illustrations, Drawings & Step By Step Details. Click Here To Download 12,000 Shed Plans. 1 P a g e H O W B U I L D S H E D.
 With Illustrations, Drawings & Step By Step Details Click Here To Download 12,000 Shed Plans 1 P a g e H O W B U I L D S H E D. C O M Table of Contents OVERVIEW... 3 MATERIALS & CUTTING LISTS... 4 DRAWINGS,
Best Barns USA Assembly Book Revised November 3, 2016
 Best Barns USA Assembly Book Revised November 3, 2016 the Aspen II 12' x 8' Manufactured by Reynolds Building Systems, Inc. 205 Arlington Drive, Greenville, PA 16125 This manual is copyrighted. Under the
Assembly Book. Northwood Deluxe. 10'x10' Revised on May 20, 2014
 Assembly Book Revised on May 20, 2014 Northwood Deluxe 10'x10' Manufactured by Reynolds Building Systems, Inc. 205 Arlington Drive Greenville, PA 16125 724-646-3775 This manual is copyrighted. Under the
the Greenbriar 12' x 16' Best Barns USA Assembly Book Revised June 4, 2013
 Best Barns USA Assembly Book Revised June 4, 2013 the Greenbriar 12' x 16' Manufactured by Reynolds Building Systems, Inc. 205 Arlington Drive Greenville, PA 16125 724-646-3775 This manual is copyrighted.
STOP! Call Us First! DO NOT RETURN TO STORE.
 16575 STOP! Call Us First! DO NOT RETURN TO STORE. For immediate help with assembly or product information call our toll free number: 1-800-844-9273 or email: customerservice@backyardproductsllc.com Our
Assembly Book. Northwood Deluxe. 14'x10' Revised on August 28, 2015
 Assembly Book Revised on August 28, 2015 Northwood Deluxe 14'x10' Manufactured by Reynolds Building Systems, Inc. 205 Arlington Drive Greenville, PA 16125 724-646-3775 This manual is copyrighted. Under
Best Barns USA Assembly Book Revised October 24, 2017
 Best Barns USA Assembly Book Revised October 24, 2017 Garage Door by Owner the Tahoe 12'x 16' Manufactured by Reynolds Building Systems, Inc. 205 Arlington Drive Greenville, PA 16125 This manual is copyrighted.
Best Barns USA Assembly Book
 Best Barns USA Assembly Book Revised September 13, 2017 the North Dakota with pocket doors 12' x 20' Manufactured by Reynolds Building Systems, Inc. 205 Arlington Drive Greenville, PA 16125 This manual
Manufactured by Reynolds Building Systems, Inc.
 up EZ Sheds Assembly Book the Ashbury January 19, 2008 8' x 12' Manufactured by Reynolds Building Systems, Inc. 205 Arlington Drive Greenville, PA 16125 724-646-3775 This manual is copyrighted. Under the
BUILDING THE BASIC SHED. Step A: Build the Foundation & Floor Frame
 BUILDING THE BASIC SHED Step A: Build the Foundation & Floor Frame 1. Excavate the building site and add a 4" layer of compactible gravel. If desired, add an extension to the base for the optional wood
STOP! Call Us First! DO NOT RETURN TO STORE.
 16632 STOP! Call Us First! DO NOT RETURN TO STORE. For immediate help with assembly or product information call our toll free number: 1-800-844-9273 or email: customerservice@backyardproductsllc.com Our
Classic Saltbox Manual
 Tools Needed: -Cordless Drill (12V or higher) -#2 Square Drive Bit -Hammer -6 Step Ladder -Tape Measure -Utility knife w/ blade & hook blade -Speed Square -5/16 Wood Drill bit Little Cottage Co. PO Box
Best Barns USA. the Danbury - R 8' x 12' Assembly Book. Revised September 30, 2016
 Best Barns USA Assembly Book Revised September 30, 2016 the Danbury - R 8' x 12' Manufactured by Reynolds Building Systems, Inc. 205 Arlington Drive Greenville, PA 16125 724-646-3775 This manual is copyrighted.
the Greenbriar 12' x 20' Best Barns USA Assembly Book Revised May 31, 2013
 Best Barns USA Assembly Book Revised May 31, 2013 the Greenbriar 12' x 20' Manufactured by Reynolds Building Systems, Inc. 205 Arlington Drive Greenville, PA 16125 724-646-3775 This manual is copyrighted.
HOW TO BUILD A 12X8 SHED
 HOW TO BUILD A 12X8 SHED With Illustrations, Drawings & Step By Step Details Note: This is a sample plan from RyanShedPlans. All other plans in our collection goes indepth with more details, more instructions,
Best Barns USA Assembly Book
 Best Barns USA Assembly Book Revised September 19, 2017 Garage Door by Owner the Tahoe 12'x 20' Manufactured by Reynolds Building Systems, Inc. 205 Arlington Drive Greenville, PA 16125 This manual is copyrighted.
Shed Assembly Instructions
 Shed Kit Contents The shed kit includes all the parts needed to assemble your shed except for tools and fasteners such as screws and nails. The various pieces are pre-cut and many are marked to indicate
Best Barns USA Assembly Book
 Best Barns USA Assembly Book Revised July 6, 2015 Garage Door by Owner Tahoe-R 12'x 20' Manufactured by Reynolds Building Systems, Inc. 205 Arlington Drive Greenville, PA 16125 724-646-3775 This manual
AMISHGAZEBOSHOP.COM VINYL GAZEBO KIT CONTENTS
 VINYL GAZEBO KIT CONTENTS Hardware for assembling your gazebo (provided): 2 1/2" screws Use to fasten joist together fasten posts to outside joist fasten rafters to rafter header fasten benches & cupola
Cape Cod Manual. Little Cottage Co. PO Box 455 Berlin, OH Little Cottage Co.
 Tools Needed: -Cordless Drill (12v or higher) -#2 Square drive bit -Hammer -6 Step Ladder -Tape Measure -Square utility knife with blade & hook blade -Speed Square Little Cottage Co. PO Box 455 Berlin,
Materials. Description Quantity/Size Material Foundation Drainage material. 1.4 cu. yd. Compactible gravel
 This 8 12-ft. shed features a simple gable roof, double doors, and side and rear windows for natural lighting. With full-height walls and doors, there's ample room for storing large items or creating a
With Illustrations, Blueprints & Step By Step Details Brought To You By ShedPlansz.Com Click Here To Get More Shed Plans
 12 X 8 Shed Plans With Illustrations, Blueprints & Step By Step Details Brought To You By ShedPlansz.Com Click Here To Get More Shed Plans Blueprints And Diagrams Instructions For Building The Shed
Best Barns USA Assembly Book
 Best Barns USA Assembly Book Revised August 15, 2017 the Richmond 16'x28' Building w/ full loft Manufactured by Reynolds Building Systems, Inc 205 Arlington Drive Greenville, PA 16125 This manual is copyrighted
Precut Value Shed Manual Gambrel Barn
 Tools Needed: -Cordless Drill (12V or higher) -#2 Square Drive Bit -Hammer -6 Step Ladder -Tape Measure -Square utility knife w/ blade & hook blade -Speed Square Little Cottage Co. PO Box 455 Berlin, OH
Best Barns USA Assembly Book
 Best Barns USA Assembly Book Revised September 13, 2017 the North Dakota with pocket doors Manufactured by Reynolds Building Systems, Inc. 205 Arlington Drive Greenville, PA 16125 Building Size 12'x12'
Best Barns USA Assembly Book
 Best Barns USA Assembly Book Revised August 15, 2017 the Richmond 16'x32' Building w/ Full Loft Manufactured by Reynolds Building Systems, Inc 205 Arlington Drive Greenville, PA 16125 This manual is copyrighted
Item #BUILD SHED. build your shed today HOW TO BUILD A SHED. Copyright windows.
 WWW.SHED-WINDOWS.COM build your shed today Item #BUILD SHED HOW TO BUILD A SHED www.shed-windows.com 1 These shed plans will show you how to build a 10 x14 storage shed using T1 11 for sheathing and asphalt
Best Barns USA. the Danbury 8' x 12' Assembly Book. Revised February 17, 2017
 Best Barns USA Assembly Book Revised February 17, 2017 the Danbury 8' x 12' Manufactured by Reynolds Building Systems, Inc. 205 Arlington Drive, Greenville, PA 16125 This manual is copyrighted. Under the
Building An Outdoor Playhouse
 Building An Outdoor Playhouse If you want to give the children in your family their own retreat and improve your do-it-yourself skills at the same time, this playhouse is the perfect project for you. Not
Best Barns USA Assembly Book
 Best Barns USA Assembly Book Revised August 15, 2017 the Richmond 16'x20' Building w/ Full Loft Manufactured by Reynolds Building Systems, Inc 205 Arlington Drive Greenville, PA 16125 This manual is copyrighted
Best Barns USA Assembly Book
 Best Barns USA Assembly Book Revised August 15, 2017 the Richmond 16'x24' Building w/ Full Loft Manufactured by Reynolds Building Systems, Inc 205 Arlington Drive Greenville, PA 16125 This manual is copyrighted
8x4 SpaceSaver Garden Shed Assembly Manual
 8x4 SpaceSaver Garden Shed Assembly Manual Revision #8 July 5, 2010 Thank you for purchasing an 8x4 SpaceSaver Garden Shed. Please take the time to identify all the parts prior to assembly. Safety Points
8x12 Santa Rosa Assembly Manual
 8x12 Santa Rosa Assembly Manual Revision #15 October 31st, 2016 Thank you for purchasing an 8x12 Santa Rosa Garden Shed from Outdoor Living Today. Please take the time to identify all the parts prior to
Boxed Shed. QUAKER or A-FRAME SIZES: 6 x 8 6 x 10 T1-11Siding
 Boxed Shed QUAKER or A-FRAME SIZES: 6 x 8 6 x 10 T1-11Siding Required Equipment; * Power Drill with square head bit * Hammer, Square, Gloves & an Allen wrench * Step Ladder Screws Supplied; * 2 for roof
12x8 Cabana Garden Shed Assembly Manual
 12x8 Cabana Garden Shed Assembly Manual Revision #15 Feb 13th, 2015 Thank you for purchasing our 12x8 Cabana Garden Shed. Please take the time to identify all the parts prior to assembly. Safety Points
Assembly Book. 10' x 12' the Cambridge II. revised June 13, 2014
 Assembly Book revised June 13, 2014 the Cambridge II 10' x 12' Manufactured by Reynolds Building Systems, Inc. 205 Arlington Drive Greenville, PA 16125 724-646-3775 This manual is copyrighted. Under the
With Illustrations, Drawings & Step By Step Details. Click Here To Download 12,000 Shed Plans. 1 P a g e Download 12,000 More Shed Plans
 With Illustrations, Drawings & Step By Step Details Click Here To Download 12,000 Shed Plans 1 P a g e Download 12,000 More Shed Plans Table of Contents OVERVIEW... 3 MATERIALS & CUTTING LISTS... 4 DRAWINGS,
Best Barns. 10' x 12' the Elm R. Assembly Book. revised September 29, 2016
 Best Barns Assembly Book revised September 29, 2016 the Elm R 10' x 12' Manufactured by Reynolds Building Systems, Inc. 205 Arlington Drive - Greenville, PA 16125 This manual is copyrighted. Under the
Star Barn Manual. Tools Needed:
 Tools Needed: -Cordless Drill (12V or higher) -#2 Square Drive Bit -Hammer -6 Step Ladder -Tape Measure -Square utility knife w/ blade & hook blade -Speed Square Little Cottage Co. PO Box 455 Berlin, OH
SAMPLE INSTRUCTIONS. Best Barns USA Assembly Book. the Belmont with pocket doors. Building Size 12'x16' or 12'x20' Revised January 10, 2012
 Best Barns USA Assembly Book Revised January 10, 2012 SAMPLE INSTRUCTIONS the Belmont with pocket doors Building Size 12'x16' or 12'x20' Manufactured by Reynolds Building Systems, Inc. 205 Arlington Drive
Best Barns. 10' x 16' the Elm R. Assembly Book. revised September 29, 2016
 Best Barns Assembly Book revised September 29, 2016 the Elm R 10' x 16' Manufactured by Reynolds Building Systems, Inc. 205 Arlington Drive - Greenville, PA 16125 This manual is copyrighted. Under the
Assembly Book. 10' x 16' the Cambridge II. revised July 15, 2014
 Assembly Book revised July 15, 2014 the Cambridge II 10' x 16' Manufactured by Reynolds Building Systems, Inc. 205 Arlington Drive Greenville, PA 16125 724-646-3775 This manual is copyrighted. Under the
Best Barns. the Cypress R 10' x 16' Assembly Book. revised February 19, 2016
 Best Barns Assembly Book revised February 19, 2016 the Cypress R 10' x 16' Manufactured by Reynolds Building Systems, Inc. 205 Arlington Drive Greenville, PA 16125 724-646-3775 This manual is copyrighted.
6x6 Maximizer Storage Shed Assembly Manual Version #9 Feb 26th, 2015
 6x6 Maximizer Storage Shed Assembly Manual Version #9 Feb 26th, 2015 Thank you for purchasing a 6x6 Maximizer Storage Shed. Please take the time to identify all the parts prior to assembly. Please Note-
8 x 10 Timber-frame Garden Shed
 8 x 10 Timber-frame Garden Shed Includes: Step-By-Step Instructions, Complete Details & Materials Lists Timber-framing is a traditional building method that uses a simple framework of heavy timber posts
8x4 SpaceSaver Garden Shed Bevel Model Assembly Manual Revision #18 March 9th, 2017
 8x4 SpaceSaver Garden Shed Bevel Model Assembly Manual Revision #18 March 9th, 2017 Thank you for purchasing an 8x4 SpaceSaver Garden Shed. Please take the time to identify all the parts prior to assembly.
VINYL CLASSIC FREESTANDING PERGOLA ASSEMBLY INSTRUCTIONS
 P a g e 1 VINYL CLASSIC FREESTANDING PERGOLA ASSEMBLY INSTRUCTIONS Shown: 8' x 12' Vinyl Classic Pergola with 12" Top and Main Runner Spacing The design of this pergola is based on all posts being installed
Grand Garden Chalet 6X3 Assembly Manual
 Revision #11 June 15, 2010 Grand Garden Chalet 6X3 Assembly Manual Thank you for purchasing a Grand Garden Chalet. Please take the time to identify all the parts prior to assembly. Please use Safety Eyewear
8x12 Santa Rosa Assembly Manual
 8x12 Santa Rosa Assembly Manual Version #10 Revised June 17, 2009 Thank you for purchasing an 8x12 Santa Rosa Garden Shed from Outdoor Living Today. Please take the time to identify all the parts prior
Shed Building 2.0. Custom 8 by 8 by 8 Shed Plans Designed for Sheds of Hope
 Page 1 Shed Building 2.0 Custom 8 by 8 by 8 Shed Plans Designed for Sheds of Hope Door - Left - Widest to the Left Center a 54 wide door opening Door - Right Shed provided by Local Churches for Sheds of
With Illustrations, Drawings & Step By Step Details. Click Here To Download 12,000 Shed Plans. 1 P a g e Download 12,000 More Shed Plans
 With Illustrations, Drawings & Step By Step Details Click Here To Download 12,000 Shed Plans 1 P a g e Download 12,000 More Shed Plans Table of Contents OVERVIEW... 3 MATERIALS & CUTTING LISTS... 4 DRAWINGS,
9x9 Penthouse Garden Shed Assembly Manual
 9x9 Penthouse Garden Shed Assembly Manual Thank you for purchasing a 9x9 Penthouse Garden Shed. Please take the time to identify all the parts prior to assembly. Version #18 Sept. 13th, 2017 Safety Points
Best Barns. 10' x 12' the Cypress R. Assembly Book. revised September 29, 2016
 Best Barns Assembly Book revised September 29, 2016 the Cypress R 10' x 12' Manufactured by Reynolds Building Systems, Inc. 205 Arlington Drive - Greenville, PA 16125 This manual is copyrighted. Under
E-Z BUILD SHED GUIDE 12' 12' 12' 16' 12' 20'
 E-Z BUILD SHED GUIDE 12' 12' 12' 16' 12' 20' BUILD You can construct your own E-Z frame shed with the help of this step by step guide. North American softwood dimensional lumber sizes: Nominal Actual in
the Lakewood 12' x 24' Sentry Buildings Assembly Book November 22, 2017
 Sentry Buildings Assembly Book November 22, 2017 the Lakewood Manufactured by Reynolds Building Systems, Inc 205 Arlington Drive Greenville, PA 16125 12' x 24' This manual is copyrighted Under the copyright
Pine Log Cabin and Cape Cod Playhouse
 Pine Log Cabin and Cape Cod Playhouse Assembly Manual Pine Log Cabin Assembly Manual revised 7/15/02 Dear Customer, Thank you for your purchase of our Pine Log Cabin Playhouse. The craftsmanship and detail
STOP! Call Us First! DO NOT RETURN TO STORE.
 16549 STOP! Call Us First! DO NOT RETURN TO STORE. For immediate help with assembly or product information call our toll free number: 1-800-844-9273 or email: customerservice@backyardproductsllc.com Our