3. SIGNIFICANCE AND USE 3.1 These test methods provide a quantitative measure of the tack property of a pressure sensitive adhesive.
|
|
|
- Candice Gaines
- 5 years ago
- Views:
Transcription
1 Call Letters PSTC-16 Date of Issuance 10/00 Revised 10/03 Revised 05/07 Loop Tack 1. SCOPE 1.1 This test method is intended to determine the tack properties of a pressure sensitive adhesive. This test method is applicable to those adhesives that form a bond of measurable strength rapidly upon contact with another surface. Tack force may be measured as the force required to separate the adhesive from the adherend at the interface shortly after they have been brought into contact under a load equal only to the weight of the pressure sensitive article (e.g., tape, label, sticker, etc.) on a one square inch contact area. 1.2 The following test methods are included: Test Method A (using tensile tester) Test Method B (using loop tack tester) 1.3 The values stated in Newtons per 10 mm of width are to be regarded as the standard. The values given in parentheses are for information purposes only. 2. SUMMARY OF TEST METHODS 2.1 These methods involve allowing a loop of pressure sensitive adhesive with its backing to be brought into controlled contact with a 24 mm x 24 mm (one square inch) surface of stainless steel, with the only force applied being the weight of the pressure sensitive article itself. The pressure sensitive article is then removed from the substrate, with the force to remove the pressure sensitive article from the adherend measured by a recording instrument. 2.2 Test Method A (using a tensile tester) applies when a tensile tester is used to measure loop tack and involves the use of a loop prepared from a 175 mm (7 ) specimen strip. 2.3 Test Method B (using a loop tack tester) applies when a loop tack tester is used to measure loop tack and involves the use of a loop prepared from a 125 mm (5 ) specimen strip. 3. SIGNIFICANCE AND USE 3.1 These test methods provide a quantitative measure of the tack property of a pressure sensitive adhesive. 3.2 These test methods are designed to measure the tack property of the adhesive mass. The tack of a given adhesive may vary depending on the backing (generally a stiffer backing leads to higher values). 3.3 These test methods are suitable for quality control, quality assurance and research purposes. 3.4 Test Method A (using a tensile tester) makes use of a specimen strip 175 mm (7 ) in length. 3.5 Test Method B (using a loop tack tester) makes use of a specimen strip 125 mm (5 ) in length. That is the only specimen strip that fits properly in the loop tack tester. 3.6 If the adhesive is not already coated onto a backing, these test methods incorporate the use of a clear nominal 50 micron (2 mil) PET film backing for specimen preparation. Use of other backing materials will change performance of the specimen to be tested. A Summary of Changes section appears at the end of this test method. 16-1
2 3.7 If the sample is a double-coated product, laminate a piece of nominal 50 micron (2 mil) PET to the side not being tested. If the product is an unsupported product, laminate a piece of nominal 50 micron (2 mil) PET to the non-liner side. TEST METHOD A (USING TENSILE TESTER) 4. APPARATUS - See Appendix B 4.1 Tensile tester - A constant rate of extension type. 4.2 Test fixture (Figure 3-5) - To be mounted into the jaws of the tensile tester. A panel held by the test fixture allows for a 625 sq mm (one square inch) contact area of the pressure sensitive adhesive article. Alternately, the test fixture may include a raised area that allows a 625 sq mm (one square inch) contact area of the pressure sensitive article. 4.3 Apparatus for cutting Die cutter - A 24 mm x 175 mm (1 x 7 ) rectangular mallet-type die cutter with mallet, or use a clicking press cutter with corresponding die of equivalent dimension, for sample preparation If a fixed dimension die is unavailable, substitute a 24 mm (1 ) steel bar with a double razor knife or other apparatus suitable for cutting the specimen into the specified dimensions to prepare the 24 mm (1 ) wide specimen strips. 4.4 Absorbent lint-free cleaning wipes - Materials produced from entirely virgin raw materials and containing less than 0.25% by weight of solvent-leachable materials. 4.5 Masking tape - 24 mm (1 ) wide microns (2 mil) polyester film (PET) - To be used as a support medium in evaluating unsupported adhesives such as transfer tapes, laminating adhesives, or other film free adhesives. 4.7 Reagents - Appropriate reagents include acetone, methyl ethyl ketone, diacetone alcohol, n-heptane and toluene, reagent or analytical grade, or an ethanol cleaner for water-based adhesives. 5. SAMPLE PREPARATION 5.1 Cut sample into 24 mm x 175 mm (1 x 7 ) specimen strips in the machine direction of the pressure sensitive article. Use of strips with other lengths may change the results. Cut at least three specimen strips for each adhesive to be tested. 5.2 Condition specimens to be tested for at least 24 hours in the testing room at 23 ± 2 C (73.4 ± 3.6 F) and a relative humidity of 50 ± 5% prior to conducting the test. 6. PROCEDURE TEST METHOD A (USING TENSILE TESTER) 6.1 Ensure the tensile tester is calibrated according to instructions supplied by the manufacturer. 6.2 Set instrument crosshead speed at 300 mm (12 inches) per minute. 6.3 Place the test fixture in the lower grip of the tensile tester. It is important that the test fixture be level and straight in the lower grip. (See Figure 2 and 4.) Set gaps for the crosshead using the minimum and maximum gap setting on the extension cycle. Set gaps 24 mm ± 1 mm (1 ± 0.05 ) (critical) and 100 mm ± 3 mm (4 ± 0.1 ) (optional) from the bottom of the upper grips to the face of the stainless steel portion of the test fixture when the test fixture is locked in the lower grips. 6.4 Clean the stainless steel portion of the test fixture (the area the pressure sensitive article will contact) of large amounts of residue using an appropriate reagent from section 4.7. Next clean the panel as per method in Appendix C. Allow 2 minutes to elapse after cleaning to ensure complete evaporation of the cleaning solvent. User must ensure that the cleaning method used removes all residues from the test fixture. 16-2
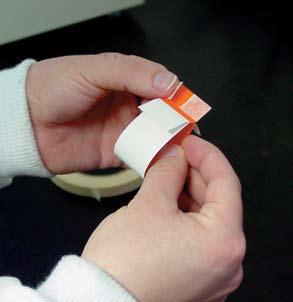
3 6.5 Completely remove the release liner (if the pressure sensitive article normally includes a release liner) from the specimen. 6.6 Bend the specimen completely back on itself, being careful not to crease it. The specimen forms a teardrop-shaped loop with the adhesive surface facing out (Figures 1 and 6). 6.7 Fasten the ends of the loop together, using a strip of masking tape 24 mm (1 inch) wide. The masking tape covers the ends of the loop, preventing contamination of the grips of the tensile tester. 6.8 Insert the tape end of the specimen loop into the upper grips so that the bottom edge of the masking tape is even with the bottom edges of the grips. 6.9 Activate the tensile tester so that the crosshead moves downward. The mid-section of the specimen loop must contact the center of the stainless steel portion of the test fixture. When the crosshead reaches its minimum position, it will immediately switch direction and move upward. When the crosshead is at its minimum position, the specimen loop will completely cover the 1 square inch (645 square mm) area of the stainless steel portion of the test fixture without excessive hang-over of the edges. NOTE: If tensile tester does not have automatic cycling, cycling must be done manually Record the maximum force required to remove the specimen loop from the stainless steel portion of the test fixture as well as the mode of failure Record the failure mode as adhesive failure, cohesive failure or adhesive transfer Repeat the procedure at least two additional times for each adhesive to be tested (for a minimum of three replicates). Use a fresh specimen strip for each test When testing is complete, clean the stainless steel portion of the test fixture with approved reagent. Cover with surface protective tape when not in use to protect surface from scratches. TEST METHOD B (USING LOOP TACK TESTER) 7. APPARATUS 7.1 Loop tack tester (Figure 5). 7.2 Stainless steel test panels - 24 mm x 150 mm (1 x 6 ), stainless steel as specified in ASTM Specification A 666. See PSTC-101 section Apparatus for cutting Die cutter - A 24 mm x 125 mm (1 x 5 ) rectangular mallet-type die cutter with mallet for sample preparation If a fixed dimension die is unavailable, substitute a 24 mm (1 ) steel bar with a double razor knife or other apparatus suitable for cutting the specimen into the specified dimensions to prepare the 24 mm (1 ) wide specimen strips. 7.4 Absorbent lint-free cleaning wipes - Materials produced from entirely virgin raw materials and containing less than 0.25% by weight of solvent-leachable materials. 7.5 Masking tape - 12 mm (0.5 ) wide. 7.6 A nominal 50 micron (2 mil) PET film - To be used as support medium in evaluating unsupported adhesives such as transfer tapes, laminating adhesives, or other free film adhesives. 7.7 Reagents - Appropriate reagents include acetone, methyl ethyl ketone, diacetone alcohol, n-heptane and toluene, reagent or analytical grade, or an ethanol cleaner for water-based adhesives. 16-3
4 8. SAMPLE PREPARATION 8.1 Cut sample into 24 mm x 125 mm (1 x 5 ) specimen strips in the machine direction of the pressure sensitive article. Use of strips of other lengths may change results and will not fit properly in the loop tack tester. Cut at least three specimen strips for each adhesive to be tested. NOTE: If transfer or unsupported adhesives are to be tested, these are to be laminated to a nominal 50 micron (2 mil) PET film, used as an adhesive support, prior to cutting the samples into the 24 mm x 125 mm (1 x 5 ) specimen strips. 8.2 Condition specimens to be tested for at least 24 hours in the testing room at 23 ± 2 C (73.4 ± 3.6 F) and a relative humidity of 50 ± 5% prior to conducting the test. 9. PROCEDURE 9.1 Ensure that the loop tack tester is leveled. 9.2 Clean the stainless steel panel of large amounts of residue using an appropriate reagent from section 4.7. Next clean the panel as per method in Appendix C. Use a separate piece of cleaning wipe each time. Repeat for a total of three washes after the test panel appears clean. Allow two minutes to elapse after cleaning to ensure complete evaporation of the cleaning solvent. User must ensure that cleaning method used removes all residue from the old test fixture. 9.3 Insert the test panel and tighten the four clamp screws. 9.4 Completely remove the release liner (if the pressure sensitive article normally includes a release liner) from the specimen. 9.5 Bend the specimen completely back on itself, being careful not to crease it. The specimen forms a teardrop-shaped loop with the adhesive surface facing out (Figures 1 and 6). 9.6 Fasten the ends of the specimen loop together, using a strip of masking tape 12 mm (0.5 inch) wide. 9.7 Insert the specimen loop into the specimen jaw until it touches the guide pins near the center of the jaw. Inserting the specimen loop in this way ensures that it is positioned properly. Ensure that the grip is in its upward most position. 9.8 Zero the force gauge according to instructions provided by the manufacturer. 9.9 Activate the loop tack tester. The upper assembly will complete one full cycle and automatically shut off when the force gauge again reaches its starting position This cycle will first move the upper assembly downward, bringing the specimen loop into contact with the test surface, forming a bond The assembly will then move upward and the force gauge measures the force required to break the bond The cycle will end when the assembly returns to its original starting position Record the maximum force required to remove the specimen loop from the stainless steel panel as well as the mode of failure Record the failure mode as adhesive failure, cohesive failure or adhesive transfer Repeat procedure at least two additional times for each adhesive to be tested (for a minimum of three replicates). Use a fresh specimen strip for each test When testing is complete, clean the stainless steel panel with approved reagent from section 4.7. Cover with surface protection tape when not in use to protect the surface from scratches. 16-4
5 10. CALCULATION 10.1 Calculate the average peak reading in Newtons/10 mm (pounds/inch) using at least three specimens for each adhesive. 11. REPORT 11.1 Report the following: Test Method A or B Identification of the adhesive Reagent(s) and method used for cleaning the stainless steel portion of the test fixture Conditioning time for prepared specimens Adhesive type and coating thickness in mm (mils) Backing material used for the adhesive Release liner used, if any Temperature and humidity conditions Average peak reading in Newtons/10 mm (pounds/inch) Visual failure mode as adhesive failure, cohesive failure or adhesive transfer Length of the specimen strip in mm (inches). 12. KEYWORDS 12.1 Adhesive; loop tack; pressure sensitive article; tack. SUMMARY OF CHANGES Made consistent metric references of 24 mm and 48 mm for standard 1" and 2" tape rolls. 16-5

6 Figure 1. Specimen loop - Test Method A. Figure 2. Loop tack sample during test. 16-6


7 Figure 3. Loop tack tensile fixture - rotated view. Figure 4. Tensile fixture mounted in tensile tester. Figure 5. Loop fixture mounted in loop tack tester. 16-7


8 Figure 6. Creating loop specimen. 16-8
Standard Test Methods for Loop Tack 1
 Designation: D 6195 03 Standard Test Methods for Loop Tack 1 This standard is issued under the fixed designation D 6195; the number immediately following the designation indicates the year of original
Peel Adhesion of Pressure Sensitive Tape
 Harmonized International Standard Peel Adhesion of Pressure Sensitive Tape Call Letters Date of Issuance Revised Revised Revised PSTC 101 10/00 10/03 05/07 11/13 1. SCOPE 1.1 These methods cover the measurement
GB/T Translated English of Chinese Standard: GB/T NATIONAL STANDARD OF THE
 Translated English of Chinese Standard: GB/T4851-2014 www.chinesestandard.net Sales@ChineseStandard.net GB NATIONAL STANDARD OF THE PEOPLE S REPUBLIC OF CHINA ICS 83.180 Z 38 GB/T 4851-2014 Replacing GB
Standard Practice for Preparation of Bar and Rod Specimens for Adhesion Tests 1
 Designation: D 2094 00 Standard Practice for Preparation of Bar and Rod Specimens for Adhesion Tests 1 This standard is issued under the fixed designation D 2094; the number immediately following the designation
CHEMINSTRUMENTS LABORATORY DRAWDOWN COATER LC-100 OPERATING INSTRUCTION
 CHEMINSTRUMENTS LABORATORY DRAWDOWN COATER LC-100 OPERATING INSTRUCTION PRODUCT DESCRIPTION...2 UNPACKING...3 ASSEMBLY...4 Key Components...4 Set Up...5 OPERATION...5 MAINTANCE...7 WARRANTY...8 1 PRODUCT
Application of 3M Pressure Sensitive Films to 3M Panagraphics Substrates
 Instruction Bulletin 5.30 Release B, Effective October 2006 See bulletin change summary on last page Application of 3M Pressure Sensitive Films to 3M Panagraphics Substrates Preparation Points to Consider
3M Impact Protection Profile Installation System Instructions
 3M Impact Protection Profile Installation System Instructions IMPORTANT: READ INSTRUCTIONS FOR USE BEFORE OPERATING Intended Use: The 3M Impact Protection Profile Installation System is for installing
Bath Accessory Installation
 Bath Accessory Installation Step 1 - Clean surface using a clean dry cloth or use rubbing alcohol to remove any residue (wax, grease, solvents). Allow to dry one hour. Caution! DO NOT use any household
Adhesive Application & Laminating System
 U S E R S G U I D E Application & Laminating System The XM1255 is an economical and easy to use document finishing system. This versatile and non-electric system has been designed to laminate or apply
Proposal for new standard. Determination of interface friction between painted parts. Orientation. p. 1 (15) Draft1, Revised
 Draft1, Revised") p. 1 (15) Draft1, Revised 2018-03-29 Proposal for new standard Determination of interface friction between painted parts. Orientation This standard specifies the method and conditions to evaluate interface
p. 1 (15) Draft1, Revised 2018-03-29 Proposal for new standard Determination of interface friction between painted parts. Orientation This standard specifies the method and conditions to evaluate interface
Adhesive Application & Laminating System
 U S E R S G U I D E Adhesive Application & Laminating System The XM2500 is an economical and easy to use document finishing system. This versatile and non-electric system has been designed to laminate
Fluid Sealing Association
 Fluid Sealing Association STANDARD FSA-MG-501-02 STANDARD TEST METHOD FOR INWARD BUCKLING OF SPIRAL-WOUND GASKETS 994 Old Eagle School Road, Suite 1019 Wayne, Pennsylvania 19087-1866 Phone: (610) 971-4850
Double Coated Tapes with Adhesive 300MP B 9690F LE
 3 Double Coated Tapes with Adhesive 300MP Technical Data October, 2002 Product Description These 3M Double Coated Tapes feature a thin polyester film for dimensional stability and improved handling with
ORAFLEX Cushion. for Flexible Packaging. Flexographic Mounting Tapes - Bringing life to your prints. Cushion Mounting Tapes
 Flexographic Mounting Tapes - Bringing life to your prints Cushion Cushion Mounting Tapes for Flexible Packaging Engineered to Perform Better ORAFOL Europe GmbH - Experience and Expertise ORAFOL Europe
LAND AND CONDUCTOR REPAIR (DVD-97ABC)
") This test consists of twenty multiple-choice questions. All questions are from the video: Land and Conductor Repair (DVD-97ABC). Each question has only one most correct answer. Circle the letter corresponding
This test consists of twenty multiple-choice questions. All questions are from the video: Land and Conductor Repair (DVD-97ABC). Each question has only one most correct answer. Circle the letter corresponding
Xyron Professional 2500 Laminating System
 Xyron Professional 2500 Laminating System Instruction Manual Provided By http://www.mybinding.com http://www.mybindingblog.com U S E R S G U I D E 2500 Adhesive Application & Laminating System The XM2500
Adhesive Application & Laminating System
 U S E R S G U I D E 1255 Adhesive Application & Laminating System The XM1255 is an economical and easy to use document finishing system. This versatile and non-electric system has been designed to laminate
CIRRUS AIRPLANE MAINTENANCE MANUAL MODELS SR22 AND SR22T CHAPTER 56-30: DOOR GENERAL. Door 56-30: DOOR. 1. General
 CIRRUS AIRPLANE MAINTENANCE MANUAL Door CHAPTER 56-30: DOOR GENERAL 56-30: DOOR 1. General The cabin door windows are manufactured of acrylic and adhesive bonded to the door structure. Replacement is accomplished
Technical Data April Product Facestock Adhesive Liner. 3M Sheet Label.002 in. Bright Silver 350 Acrylic 90# Polyctd.
 3 Sheet Label Material 7903 7905 7908 7909T 7903FL 7908FL Technical Data April 2017 Product Description 3M Sheet Label Materials are durable, high performance materials that offer excellent thermal stability,
Masking: Each mirrored sheet is well protected by a durable paint backing and
 STORAGE Horizontal storage: If mirror sheets are stored flat, care must be taken to avoid warping, slipping and scratching. If different sizes are stored together the largest panels should at the bottom
Test Panel Information Sheet
 Test Panel Information Sheet ChemInstruments realizes that test panels change over time and these changes can cause questions concerning accuracy and repeatability in test results. Our dedication to detail
Read and understand the requirements of this procedure Assist students with installation as needed
 1. PROCEDURE OVERVIEW This procedure is to be used for installation of bonded strain gages on reinforcing bars. It includes necessary materials and a recommended practice for surface preparation, installation,
Test Method Materials
 ENGINEERING STANDARDS Test Method Materials ám907-1p Tape Adhesion Test for Paint Finishes 1 Scope Note: Nothing in this test method supersedes applicable laws and regulations unless a specific exemption
Installing 3M DI-NOC Architectural Finishes on Doors
 Installation Guide Revision C, September 2017 Introduction The purpose of this installation guide is to establish a 3M-recommended procedure for installing 3M DI-NOC Architectural Finishes (the Product
Curium 19H Installation Instructions & Parts List
 Curium 19H Installation Instructions & Parts List Illustration Curium 19H Right Hand Page 1 of 15 01/07/2016 Revision 2.1 IMPORTANT This shower screen / enclosure must be installed by suitably qualified
NORMATIVE REFERENCES
 American National Standards Institute NORMATIVE REFERENCES ANSI C135.30 1988 (expired 1993) Zinc-Coated Ferrous Ground Rod Electrodes for Overhead or Underground Lines American Society for Testing and
Elcometer 121. Paint Inspection Gauge
 English Elcometer 121 Paint Inspection Gauge Operating Instructions English The Elcometer 121 Paint Inspection Gauge has been tested in accordance with EU regulations governing Electromagnetic compliance
Curium 19.4H Installation Instructions & Parts List
 Curium 19.4H Installation Instructions & Parts List Illustration Curium 19.4H Right Hand Page 1 of 21 30/06/2016 Revision 1.0 IMPORTANT This shower screen / enclosure must be installed by suitably qualified
Daige Quikmount 4 Operating Guide
 Daige Quikmount 4 Operating Guide Save time and money... If you read this operating guide, follow each step exactly, then you will laminate or mount successfully. If you don t read it, or do not follow
TOYOTA PRIUS BODY SIDE MOLDING Preparation
 Preparation Part Number: PT938-47160-XX Kit Contents Item # Quantity Reqd. Description 1 1 Molding, LH Front Door 2 1 Molding, LH Rear Door 3 1 Molding, RH Front Door 4 1 Molding, RH Rear Door Hardware
Scotchmate Thin Reclosable Fasteners
 3 Scotchmate Product Information June, 2006 Product Description 3M Scotchmate Reclosable Fasteners offer advanced closure alternatives to zippers, screws, snaps, hooks and more. They offer greater design
Mechanical Vice Grips. Mechanical Wedge Action Grips
 Mechanical Vice Grips 734B 750 N (150 lbf) 768C 10 kn (2000lbf) Thwing-Albert s Mechanical Vice Grips are designed for measuring materials up to 10 kn. They are ideal for general tensile strength testing
ANCHOR PLATE ATTACHMENT STEEL STUD FRAMING OR FURRING CONSTRUCTION WITH ACCESS FROM PANEL SIDE ONLY
 ANCHOR PLATE ATTACHMENT STEEL STUD FRAMING OR FURRING CONSTRUCTION WITH ACCESS FROM PANEL SIDE ONLY INSTALLATION MATERIALS No. 8 Phillips Head Tek Screws Glazier's horseshoe shaped shims 1/16 inch, 1/8
NORMATIVE REFERENCES
 American National Standards Institute NORMATIVE REFERENCES ANSI C135.30 1988 (expired 1993) Zinc-Coated Ferrous Ground Rod Electrodes for Overhead or Underground Lines American Society for Testing and
Figure 1 Photograph of a strain gage on a helical wire
 1. PROCEDURE OVERVIEW This procedure is to be used for installation of bonded strain gages on prestressing strand. It includes necessary materials and a recommend practice for surface preparation, installation,
September 10, 2009 Page 1 PRODUCT DESCRIPTION PRODUCT FEATURES
 September 10, 2009 Page 1 PRODUCT FEATURES BASIC USES/RELATED USES Interior decorative tile. Architectural tile for decorative wall surfaces, backsplashes and other applications. Custom architectural and
3M Scotchmate Reclosable Fasteners
 3 Scotchmate Reclosable Fasteners Technical Data March, 2008 Product Description 3M Scotchmate Reclosable Fasteners offer advanced closure alternatives to zippers, screws, snaps, hooks, bolts and more.
3/ /
 SUNGLAZE system is designed for both rafter and purlin construction options. Recommended minimum roof slope for Sunglaze applications is 5 o. Where lower slopes are necessary, we recommend rafter construction.
Termination Procedure
 Connector Piece Parts Contact/Connector Head Twist On Nut MX MX Boot Procedure Chart Procedure Tool Required Tool Part Number Cable Preparation & Fiber Cleaning Jacket Stripper 86710-0004 Cable Preparation
Tech Notes. GEL COAT FLEXIBILITY The Flex Strip Test. INTERPLASTIC CORPORATION Thermoset Resins Divison ISSUE 1
 INTERPLASTIC CORPORATION Thermoset Resins Divison ISSUE Tech Notes GEL COAT FLEXIBILITY The Flex Strip Test Issue Date: /4/00 Document ID: TN-TS-0A 00 Interplastic Corporation Gel Coat Flexibility: The
Installation Instructions
 Aspex Digitally Printed Wall Art PL PREMIUM HEAVY DUTY ADHESIVE ASPEX WALL ART DOUBLE SIDED FOAM TAPE Installation of Aspex Digitally Printed Wall Art with Foam Tape and PL Premium Adhesive. Maximum size
Model: 3-IN-1/1067x1.5 Model: 3-IN-1/1320x1.5
 SHEARER/PRESS BRAKE/ SLIP ROLL Model: 3-IN-1/1067x1.5 Model: 3-IN-1/1320x1.5 OPERATION MANUAL 1. USES This machine is used for shearing and bending low carbon plate (mild steel) or the other metal materials
SPECIFICATION FOR HIGH STRENGTH STRUCTURAL BOLTS
 UDC 621.882.211 [669.14.018.291] IS : 3757-1985 (Reaffirmed 2003) Edition 3.2 (1989-07) Indian Standard SPECIFICATION FOR HIGH STRENGTH STRUCTURAL BOLTS ( Second Revision ) (Incorporating Amendment Nos.
Clearview Railing System Installation Instructions
 Clearview Railing System Installation Instructions Disclaimer: AGS Stainless, Inc. has its Clearview Railing Systems designed by a professional engineer to meet the requirements of the latest national
MIL-STD B (SH) UPDATE
 UPDATE") MIL-STD-2042-5B (SH) UPDATE Method 5A1 Insert Equipment and materials (to be added to table 5A1-I) Pliers 3.2.2.2 Cable and fiber preparation for Fiber Systems International backshells. Step 1: Ensure
MIL-STD-2042-5B (SH) UPDATE Method 5A1 Insert Equipment and materials (to be added to table 5A1-I) Pliers 3.2.2.2 Cable and fiber preparation for Fiber Systems International backshells. Step 1: Ensure
Piece Of Mind The last time you will see your product is when it leaves the factory floor
 Piece Of Mind The last time you will see your product is when it leaves the factory floor Teal Tape & Plastics We are located half-way between Nashville and Chattanooga, Tennessee in the Coffee County
TOYOTA CAMRY & CAMRY HV BODY SIDE MOLDING Preparation
 Preparation Part Number: PT938-03120-XX Kit Contents 1 1 Molding, LH Front Door 2 1 Molding, LH Rear Door 3 1 Molding, RH Front Door 4 1 Molding, RH Rear Door Hardware Bag Contents 1 2 Additional Items
Bepop PET Label White/Silver Technical Data Rev. 5
 Bepop / Technical Rev. 5 Product name Product overview Subject machine types SL-S53N SL-S54N This is a film for creating labels that uses (polyethylene terephthalate) as the material. It is suitable for
Gallium 03 Installation Instructions & Parts List
 Gallium 03 Installation Instructions & Parts List Illustration Gallium 03, H1 Handle Left Hand: Open Out 04/05/2016 Revision 1.1 Page 1 of 19 IMPORTANT This shower screen / enclosure must be installed
Processing Guidelines ORAFOL Films for Aircraft Applications
 Page 1 of 11 Description This document describes the application and removal procedures for ORAFOL films for aircraft applications, in particular ORAJET 3967AC and ORACAL 970AC ORAFOL offers a wide range
TOYOTA YARIS 3 DOOR BODY SIDE MOLDING Preparation
 Preparation Part Number: PT938-52110-XX Kit Contents 1 1 Molding, LH Front Door 2 1 Molding, LH Rear Panel 3 1 Molding, RH Front Door 4 1 Molding, RH Rear Panel Hardware Bag Contents 1 2 Additional Items
Applying Fret Space Numbers and/or the Label Set to a Fretted Fingerboard
 Jixis TM Graphical Music Systems Applying Fret Space Numbers and/or the Label Set to a Fretted Fingerboard The Jixis system was designed so that you would not need to apply the Jixis labels directly to
CLEANING THE GALVO MIRRORS
 CLEANING THE GALVO MIRRORS Formlabs Customer Support can provide additional information on mirror cleaning and in some cases, provide the customer with the appropriate cleaning supplies. Tools: 2.5mm hex
IGPG Car Wash Round Robin Test Procedure
 1. Scope The intension of this round robin test is to investigate whether the car wash test described in ISO 20566 and used to validate the abrasion performance of exterior car body parts is suitable as
Application Notes! RIGID MATERIALS. Rigid material standards. Printing on Rigid Materials with the Gerber Solara ion & Gerber CAT UV
 Printing on Rigid Materials with the Gerber Solara ion & Gerber CAT UV This document instructs on the proper use of rigid materials when printing on the flat bed of the Gerber Solara ion & Gerber CAT UV.
The use of retaining pins is not required when using Armaflex 520 Adhesive.
 INSTALLATION INSTRUCTIONS AP Armaflex & AP Armaflex FS Black Duct Liner (non-self adhesive) 2/18/11 Installation Instructions for Rectangular Duct Using Armaflex 520 Adhesive Temperature The temperature
Die Cutting an Introduction
 Die-cutting Exam expectations Die-cutting is a regular topic in the examination paper. Although the question only attracts a small numbers of marks it is an area which few candidates score. Die Cutting
SUPER BLUE INSTRUCTIONS FOR INSTALLING
 Featuring STRIPENET REV. 09/01 PAGE 1 Super Blue, Super Blue 2 and StripeNet are registered trademarks of PRI. All other company and product names mentioned in this document are trademarks of their respective
Installation and Care Instructions: Rear Windshield - CFMOTO UForce 800
 Installation and Care Instructions: Rear Windshield - CFMOTO UForce 800 *** DO NOT REMOVE PROTECTIVE LAYER FROM THE WINDSHIELD AT THIS TIME. THIS SHOULD BE YOUR LAST AND FINAL INSTALLATION STEP AS WINDSHIELD
MirroFlex Technical Sheet
 ATI- Information Revision 1 Effective Date: 8/1/08 MirroFlex Technical Sheet What is MirroFlex? MirroFlex is a decorated thermoplastic available in sheet and roll form. The decorative surface is fused
Dubnium 11 Installation Instructions & Parts List
 Dubnium 11 Installation Instructions & Parts List Illustration Dubnium, H1 Handle Right Hand: Open Out Page 1 of 25 IMPORTANT This shower screen / enclosure must be installed by suitably qualified individuals.
INSTRUCTION MANUAL. Force Transducer Output Tube Repair Kit
 INSTRUCTION MANUAL Model 400-TR Force Transducer Output Tube Repair Kit June 4, 2004, Revision 5 Copyright 2004 Aurora Scientific Inc. Aurora Scientific Inc. 360 Industrial Pkwy. S., Unit 4 Aurora, Ontario,
Gluing windows with SABA Glasstack 760
 Info sheet 208 Gluing windows with SABA Glasstack 760 Version 2008-05-08 EN, replaces all prior versions Page 2 of 9 Info sheet 208 Gluing windows with SABA Glasstack 760, version 2008-05-08 EN 1. Introduction
Brady B-595 Indoor/Outdoor Vinyl Tape for the GlobalMark Printer
 Brady B-595 Indoor/Outdoor Vinyl Tape for the GlobalMark Printer Beginning March 1, 2010, Brady s leading outdoor grade vinyl for the GlobalMark Printer is being replaced by a new B-595 vinyl. This new
All Terrain Flares 2014 Chevy Silverado
 Page 1/8 Components: 1. Front Flares (2) 2. Rear Flares (2) Tools required: - Utility knife - #2 Phillips driver - Socket wrench - 13 mm Socket - 6 mm Allen Wrench - T-15 Torx bit - Trim Removal Tool -
Radon 07 Installation Instructions & Parts List
 Radon 07 Installation Instructions & Parts List Illustration Radon 07, H1 Handle Right Hand: Open Out 14/06/2016 Revision 1.1 Page 1 of 21 IMPORTANT This shower screen / enclosure must be installed by
Application Tooling Specification Sheet
 HAND CRIMP TOOL Application Tooling Specification Sheet TYPE 4D Order No. 63825-8100 FEATURES A full cycle ratcheting hand tool ensures complete crimps Ergonomic soft grip handles for comfortable crimping
3M Electrically Conductive Double-Sided Nonwoven Tape 9750
 Technical Data October 2013 3M Electrically Conductive Double-Sided Nonwoven Tape 9750 Product Description 3M Electrically Conductive Double-Sided Nonwoven Tape 9750 is an isotropically electrical conductive
Fortress Fe Posts must always be secured to the deck framing. Fortress Fe Posts should never be attached to only the deck boards.
 Installation Instructions for Fortress Horizontal Cable Panel System with UB-05 Brackets and Fe Posts It is the responsibility of the installer to meet all code and safety requirements, and to obtain all
Barofor Round System (polyester coated) Panels, Posts, Accessories
 Panels, Posts, Accessories") 1 Scope This Technical Data Sheet specifies the requirements for the Barofor Round System. The complete system exists of: Panels Posts Accessories such as fixation system and posts caps. Panels and posts
1 Scope This Technical Data Sheet specifies the requirements for the Barofor Round System. The complete system exists of: Panels Posts Accessories such as fixation system and posts caps. Panels and posts
1.9 round ADA compliant railing for Residential & Commercial applications
 ORDER BY 2 PM FOR SAME DAY SHIPPING S/O SKU: 516-036 Vendor No: 60083341 S/O SKU: 516-036 1.9 round ADA compliant railing for Residential & Commercial applications EZ ADA Non-welded pipe railing system
Application Tooling Specification Sheet
 HAND CRIMP TOOL FEATURES Application Tooling Specification Sheet TYPE 4D Order No. 63811-8700 A full cycle ratcheting hand tool ensures complete crimps Ergonomic soft grip handles for comfortable crimping
8 x 10 Sandwich Panel
 *Before starting, please read entire manual *Changes can be made in order for this manual to work for you 8 x 10 Sandwich Panel Follow all applicable sections of the attached Manufacturing Plan. Objectives:
1. Initial Precautions 2. Technical Precautions and Suggestions 3. General Information and Cure Stages 4. Understanding and Controlling Cure Time
 How to apply Arctic Silver Premium Thermal Adhesive 1. Initial Precautions 2. Technical Precautions and Suggestions 3. General Information and Cure Stages 4. Understanding and Controlling Cure Time 5.
Cardo DOOR & RETURN SHOWER ENCLOSURE INSTALLATION PLEASE READ THESE INSTRUCTIONS CAREFULLY.
 Cardo DOOR & RETURN SHOWER ENCLOSURE INSTALLATION PLEASE READ THESE INSTRUCTIONS CAREFULLY. IT IS RECOMMENDED TO USE A TRAINED SHOWER INSTALLER FOR THIS SHOWER TO OBTAIN THE BEST INSTALLATION. D Square
Celebrating. 65 Years
 Celebrating 65 Years Contents Beveling Equipment Clamps - Internal Clamps - External Auxiliary Equipment Pipe Lifting Welding Qualification Pipe Bending Beveling Equipment On Band Type Beveling Machine:
Standard Test Method for Rubber Deterioration Surface Cracking 1
 Designation: D 58 99 Standard Test Method for Rubber Deterioration Surface Cracking This standard is issued under the fixed designation D 58; the number immediately following the designation indicates
Compression test of fiberboard shipping containers
 T 804 om-97 OFFICIAL TEST METHOD 1981 REVISED 1989 REVISED 1997 1997 TAPPI The information and data contained in this document were prepared by a technical committee of the Association. The committee and
Bolt-On/Rugged Fender Flares Chevy CK PICKUP (88-98) Please read instructions entirely before installing this product.
 Please read instructions entirely before installing this product.") Please read instructions entirely before installing this product. Hardware Included QTY Hardware Included QTY Bolt Kit Included QTY EXTRUSION 25ft SMALL CLIPS 14 ALLEN KEY BOLT 42 ALCOHOL TOWELETTE 4 SCREWS
Please read instructions entirely before installing this product. Hardware Included QTY Hardware Included QTY Bolt Kit Included QTY EXTRUSION 25ft SMALL CLIPS 14 ALLEN KEY BOLT 42 ALCOHOL TOWELETTE 4 SCREWS
INSTALLATION INSTRUCTIONS
 INSTALLATION INSTRUCTIONS Accessory MOON P/N 08R01-TR0-100 Application 2013 CIVIC 4-DOOR Publications No. AII 13080 Issue Date NOV 2012 Put this information in the glove box with the vehicle owner s manual.
onlinecomponents.com
 Figure 1 PRO CRIMPER III Hand Crimping Tool Assembly 58603 1 consists of Die Assembly 58603 2 and PRO CRIMPER III Hand Tool Frame 354940 1. The die assembly consists of crimping dies and a locator assembly.
PanelKeeper GL1500 Kit
 Rudy's ** Removable side panel cover retainer system ** PanelKeeper GL1500 Kit Installs in about 10 minutes per side - No tools required! Both sides included Prevents loss of detachable panels Stop losing
MODEL H " BYRD SHELIX CUTTERHEAD INSTRUCTIONS
 MODEL H9291 12" BYRD SHELIX CUTTERHEAD INSTRUCTIONS The Model H9291 12" Byrd Shelix cutterhead is designed to replace the straight-knife cutterhead on the Grizzly jointer Model G0609. The total procedure
PLEASE READ INSTRUCTIONS THOROUGHLY BEFORE PROCEEDING
 Part No. 8870 -or Part No. 9100-9110 Front Fender Flares Flat Panel Design 07-09 Jeep JK, 2/4 Dr. PLEASE READ INSTRUCTIONS THOROUGHLY BEFORE PROCEEDING We have provided complete instructions and specific
PAGE 1/6 ISSUE Jul SERIES Micro-SPDT PART NUMBER R516 XXX 10X R 516 _ 1 0 _
 PAGE 1/6 ISSUE Jul-24-2017 SERIES Micro-SPDT PART NUMBER R516 XXX 10X R516 series: the RAMSES concept merges with the SLIM LINE technology, breaking up the frequency limits of SMT switches : - FULL SMT
INSTALLATION GUIDE Hisense Laser TV Display Screen
 INSTALLATION GUIDE Hisense Laser TV Display Screen Before you install this product, read this guide completely and make sure you understand all of the content. ES-G1811M2-1 ENGLISH Product Description
3M Dual Lock Reclosable Fastener
 1-800-773-0062 www.marianinc.com 3 Dual Lock Reclosable Fasteners SJ3550CF (Type 250) SJ3551CF(Type 400) SJ3552CF(Type 170) Dual Lock Reclosable Fastener Black with a clear acrylic adhesive Product Information
Procedure for Testing Direct Tension Indicators (DTI) Assemblies
 Assemblies") Procedure for Testing Direct Tension Indicators (DTI) Assemblies 1. Scope: This test is to ensure that the bolt will be at or above the specified minimum bolt tension after installation when the direct
Procedure for Testing Direct Tension Indicators (DTI) Assemblies 1. Scope: This test is to ensure that the bolt will be at or above the specified minimum bolt tension after installation when the direct
Installation Instructions
 MUSTANG RTR SIDE ROCKER SPLITTER KIT Part # 1011-7000-01 Application: 2010-2014 Mustang Installation Instructions Before installing your RTR components, rear through the entire installation process and
HERNON MANUFACTURING, INC.
 SAG1:0517_2.1 For many years, some of the world s leading manufacturers of loudspeakers and speaker components have relied on HERNON MANUFACTURING, INC. s superior quality adhesives and precision dispensing
TOYOTA RAV DOOR SILL PROTECTOR Preparation
 Preparation Part Number: PU060-42141-P1 Kit Contents 1 2 Door Sill (w/logo) 2 2 Rear Door Sill (w/graphic) Hardware Bag Contents Additional Items Required For Installation 1 2 3 Conflicts Note: Recommended
Installation Instructions for New Construction. Installation Instructions for New Construction
 Installation Instructions for New Construction Installation Instructions for New Construction Step 1: Receipt and Inspection of Material Step 2: Banding Preparation Step 3: Parallel Band Installation Step
Loose Tube Cable End Preparation for Splicing For Series 11D, 1GD, 12D, 1AD, 1DD, 1CD, 11, 1G, 12, 12L, 1A, 1D, 1C, 1NY, 13, 1H, HZD and HZA
 Loose Tube Cable End Preparation for Splicing For Series 11D, 1GD, 12D, 1AD, 1DD, 1CD, 11, 1G, 12, 12L, 1A, 1D, 1C, 1NY, 13, 1H, HZD and HZA NOTE: These installation instructions have been written for
Bolt-On/Rugged Fender Flares Ford F150 (15-ON) Please read instructions entirely before installing this product.
 Please read instructions entirely before installing this product.") Please read instructions entirely before installing this product. Hardware Included QTY Hardware Included QTY Bolt Kit Included QTY EXTRUSION 29ft RETAINING CLIP 4 ALLEN KEY BOLT 42 ALCOHOL TOWELETTE 4
Please read instructions entirely before installing this product. Hardware Included QTY Hardware Included QTY Bolt Kit Included QTY EXTRUSION 29ft RETAINING CLIP 4 ALLEN KEY BOLT 42 ALCOHOL TOWELETTE 4
Revision 1 TECHNICAL SHEET
 TECHNICAL SHEET What is FlexLam? FlexLam is a decorated thermoplastic available in sheet and roll form. The decorative surface is fused to its substrate utilizing several proprietary techniques that create
Application Tooling Specification Sheet
 HAND CRIMP TOOL Application Tooling Specification Sheet TYPE 4D Order No. 63819-0900 FEATURES A full cycle ratcheting hand tool ensures complete crimps Ergonomic soft grip handles for comfortable crimping
Polyester Overlaminating Film
 Polyester Overlaminating Film Page 1 of 5 Technical Data September 1, 2000 Supersedes: new Construction (Calipers are nominal values.) Facestock Adhesive Liner 1.3 mil (33 micron) Matte clear polyester
Vinyl Installation Guide and Tips
 Vinyl Installation Guide and Tips Tools Needed: Squeegee; Grease Pencil (white or blue only!); 2" & 1/4" Masking Tape Prepare your surface and vinyl as outlined on back cover prior to employing this technique
Z-Clip Attachment Guide for Resin Panels
 Z-Clip Attachment Guide for Resin Panels About the Panels Sensitile resin panels are proprietary polymer/resin materials, manufactured exclusively at Sensitile s Michigan facility. These panels are a layered
Section 914. JOINT AND WATERPROOFING MATERIALS
 914.01 Section 914. JOINT AND WATERPROOFING MATERIALS 914.01. General Requirements. Joint and waterproofing material for use in concrete construction must meet the requirements of this section. 914.02.