Explorer Roof Rack Fitting Instructions: Roll Cage Mounted models only
|
|
|
- Clifton Gibson
- 5 years ago
- Views:
Transcription
1 Explorer Roof Rack Fitting Instructions: Roll Cage Mounted models only These instructions cover the fitting of the following rack models: RRL229 0FRC/0LRC/0SRC/0NRC - Defender 90 HT/SW Roll Cage Mounted Racks RRL232 0FRC/0LRC/0SRC/0NRC - Defender 110 HT/SW Roll Cage Mounted Racks RRL245 0FRC/0LRC/0SRC/0NRC - Defender 110 CC Roll Cage Mounted Racks If your rack model is not listed above then please contact us and we can send the correct instructions via or in a hard copy if required. Section 1 - Rack assembly and preparation prior to fitting Section 2 - Mounting the rack assembly onto the vehicle Section 3 - Fitting of the marine plywood floor (optional extra) Section 4 - Roof rack maintenance General Fitting advice: All washers have a smooth side and a sharp side which comes about in their manufacturing process. We recommend that washers are always installed with the smooth side against the powder coat and the sharp side against the head of the bolt. This allows for washer to slide on the powder coat without causing damage when tightened. Section 1 - Rack assembly and preparation prior to fitting Open the box and unpack the roof rack and its fitting kits. At this point, it is recommended that all the main components are checked against the table provided below. Should any parts or fixings be missing at this stage, or during installation, please contact your stockist. Product code/parts required RRL229 0FRC RRL229 0LRC RRL229 0SRC RRL229 0NRC RRL232 0FRC RRL232 0LRC RRL232 0SRC RRL232 0NRC RRL245 0FRC RRL245 0LRC RRL245 0SRC RRL245 0NRC Front Cage Mount Cross Rail Roll Cage Clamp - Double Roll Cage Clamp - Single Clamp to Rack Bracket Self Adhesive Rubber M8 x 25mm Cap Head Bolt (SS) M8 x 20mm Cap Head Bolt (SS) M8 x 16mm Cap Head Bolt (SS) M8 Nyloc Nut (SS) M8 Flat Washer (SS) M8 Spring Washer (SS) Page 1 of 6

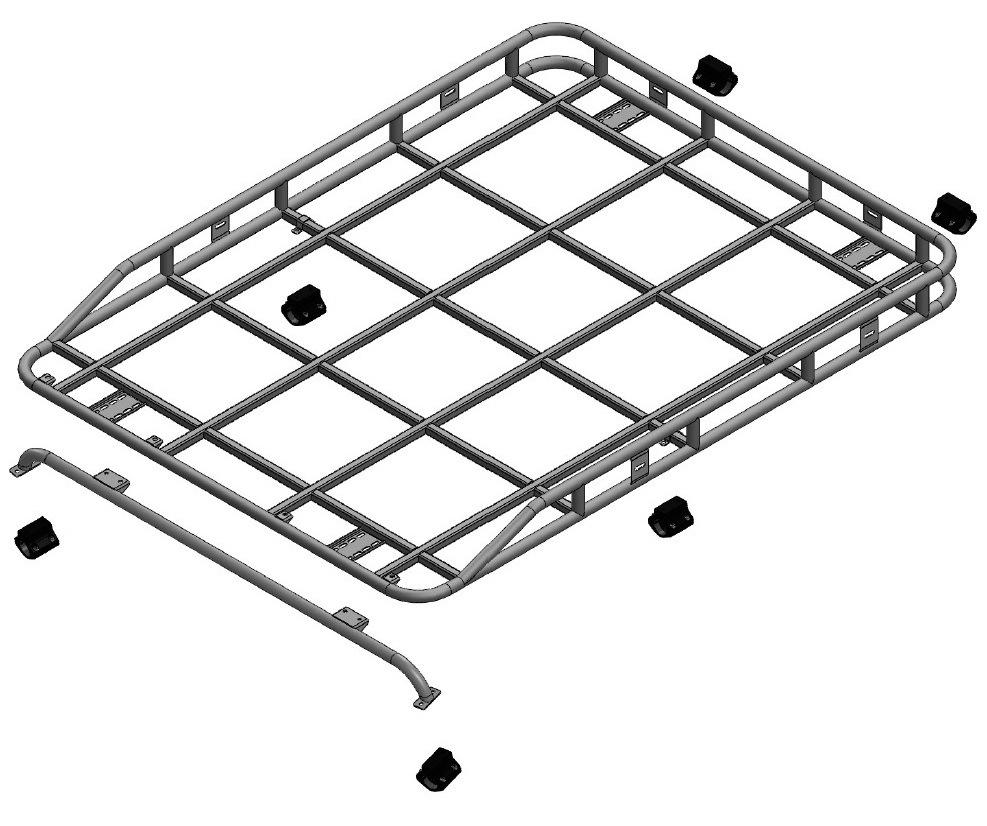
. 1.4 - The aluminium clamps and stainless brackets need to have the self adhesive rubbers applied to them at this stage. 1.5 - Using M8 x 25mm cap head bolts, flat washers and spring washers provided 2 x double clamps can be attached to either end of the front cross rail.")


2 1.2 - Remove the plastic bubble wrap from around the rack taking care not to scratch the powder coat in the process. We would recommend laying the rack the correct way up inside the lid of the box when unwrapped to prevent any scratches from occurring Unwrap the roll cage cross rail, aluminium clamps and stainless steel brackets from their plastic bubble wrap and lay in the base of the cardboard box (L232 shown below) The aluminium clamps and stainless brackets need to have the self adhesive rubbers applied to them at this stage Using M8 x 25mm cap head bolts, flat washers and spring washers provided 2 x double clamps can be attached to either end of the front cross rail. These should not be tightened fully Using M8 x 25mm cap head bolts, flat washers and spring washers provided 2 x double clamps can be attached to the rearmost brackets of the rack. These should not be tightened fully. Please note that the rack fixings are the same front to rear and side to side so you can choose which way the rack is mounted depending upon your rail configuration. Section 2 - Mounting the rack assembly onto the vehicle The rack is now in a position to be lifted onto the vehicle. If you are mounting any accessories to the rack such as spotlights or working lights then it may be easier to do this whilst the rack is on the floor. Page 2 of 6


3 2.1 - Lifting the rack onto the vehicle will take between 2-4 people depending on which size is being fitted. Take care to ensure the rack is high enough not to scratch the roof as it is carried into position When in the desired position lower rack onto the roll cage and check for the correct alignment front to rear and left to right on the vehicle. The brackets fix to slotted holes so it may be necessary to take reference measurements and choose different slots to ensure the rack is mounted correctly With the front and rear clamps in position, the upper sections of the remaining clamps (2 x single supplied with L232 only, please see images below) should now be fitted to the rack using the M8 x 25mm cap head bolts, flat washers, spring washers and stainless mounting brackets provided Using the M8 x 16mm countersunk bolts and spring washers provided, attach the lower section of each clamp to the upper section. Copper grease should be applied to the threads to aid fitment. These should not be tightened fully at this stage All bolts can now be gradually tightened to 25Nm ensuring that the rack sits position does not change whilst working around the vehicle. Section 3 - Fitting of the marine plywood floor (optional extra) Page 3 of 6
4 3.0 - If fitting a floor to the rack, please carry out the steps below. If not, the rack is now fitted and ready for use so please proceed to Section Unpack the floor and its associated fitting kit; check the contents against the table at the end of these instructions. If anything is missing please contact your stockist before you proceed with the installation The bolts between the rack and the clamps and rack and cross rail should now be removed to allow the rack to be lifted from the vehicle. Remove the rack from the vehicle With the rack on the floor, the floor can now be fastened to the rack in all of the positions using the stainless hardware provide Lift the rack back onto the pre-positioned mountings on the vehicle and bolt back into position using the access holes in the floor. The rack is now fitted and ready for use. Section 4 - Roof rack maintenance The rack should be kept clean and the fasteners greased regularly - if this is not carried out then you may find it difficult to remove the rack from the vehicle if required at some point. The rack should also be inspected for damage if in regular use. Industrial coatings are no different to the paint on your car they need cleaning and maintaining. Accumulated dirt may affect the design life of the system, and any mechanical damage almost certainly will. Therefore regular inspections should take place and minor damage must be touched up. The rack is powder coated with zinc primer followed by a topcoat so does provide a hardwearing surface. Should you damage the surface and expose bare metal this needs to be repaired to prevent rust spreading under the powder coat. Damaged areas must be clean and free of grease or rust. Dry sand the area with 600-grade paper until the metal is exposed. The area must be completely free of dust and cleaned with a nonaggressive solvent before proceeding. Spray zinc based primer onto the area and allow it to dry fully. An acrylic or polyurethane topcoat of matching colour (RAL9005 Black Satin) should then be applied and allowed to dry. Page 4 of 6

5 Page 5 of 6 1 Enterprise Court
6 Page 6 of 6 1 Enterprise Court
Land Rover Defender 90/110/ th Anniversary Style Front Cage Fitting Instructions
 Land Rover Defender 90/110/130 60 th Anniversary Style Front Cage Fitting Instructions Cambridge House Unwrap the roll cage and unpack the individual fitting kits. At this point it is recommended that
BMW E46 Coupe 3dr MP Bolt in (BMW Race Days Only) Roll Cage (B045) Fitting Instructions
 Roll Cage (B045) Fitting Instructions") BMW E46 Coupe 3dr MP Bolt in (BMW Race Days Only) Roll Cage (B045) Fitting Instructions Unwrap the mounting points/ends of the roll cage and unpack the individual fitting kits. Try to leave wrapping on
BMW E46 Coupe 3dr MP Bolt in (BMW Race Days Only) Roll Cage (B045) Fitting Instructions Unwrap the mounting points/ends of the roll cage and unpack the individual fitting kits. Try to leave wrapping on
Land Rover Defender 110 Station Wagon External Front-Internal Mid Roll Cage (L148) Fitting Instructions
 Fitting Instructions") Land Rover Defender 110 Station Wagon External Front-Internal Mid Roll Cage (L148) Fitting Instructions Unwrap the roll cage and unpack the individual fitting kits. At this point it is recommended that
Land Rover Defender 110 Station Wagon External Front-Internal Mid Roll Cage (L148) Fitting Instructions Unwrap the roll cage and unpack the individual fitting kits. At this point it is recommended that
Land Rover Defender 110 Station Wagon (L172) Fitting Instructions
 Fitting Instructions") Land Rover Defender 110 Station Wagon (L172) Fitting Instructions 1 Enterprise Court Unwrap the roll cage and unpack the individual fitting kits. At this point it is recommended that all components are
Land Rover Defender 110 Station Wagon (L172) Fitting Instructions 1 Enterprise Court Unwrap the roll cage and unpack the individual fitting kits. At this point it is recommended that all components are
43107 Rhino Jerry Can Holder Rhino Jerry Can Holder - Horizontal
 Important: Please read these instructions carefully prior to installation. Check the contents of kit before commencing fitment and report any discrepancies. Clean the alloy tray prior to installation.
Oval Vinyl Gazebo. Assembly Manual
 Oval Vinyl Gazebo Assembly Manual Gazebo Assembly Thank you for your purchase of this Gazebo. This manual is designed to simplify the assembly process, however we strongly recommend having an experienced
Southeast Toyota Tacoma 4-Door Roof Rack DEALER INSTALLED
 Parts list 1- Right side rail assembly 1- Left side rail assembly 2- Cross bars 4- Protective gaskets 4- Screws M5 x 13mm long 8- Riv-nuts ¼ -20 8- Screws ¼ -20 x 3/4 Tools needed for installation Safety
Balustrade Systems / Installation Instructions
 A. PARTS AND SUPPLIES NEEDED FOR INSTALLATION Hardware included for each 10 section of rail: 2 3 x 1-1/2 L-brackets 4 1-3/4 x 3/16 Blue hex-head screws for anchoring the L-brackets to the newel cap, column
Bolt-On/Rugged Fender Flares Toyota Tundra (14-ON) Important: Please read instructions entirely before installing this product.
 Important: Please read instructions entirely before installing this product.") Important: Please read instructions entirely before installing this product. Hardware Included QTY Hardware Included QTY Bolt Kit Included QTY Extrusion 28.0 ft Short Screw 18 Nuts 42 Alcohol Wipe 4 Long
Important: Please read instructions entirely before installing this product. Hardware Included QTY Hardware Included QTY Bolt Kit Included QTY Extrusion 28.0 ft Short Screw 18 Nuts 42 Alcohol Wipe 4 Long
INSTALL LOAD BED TRACKS
 Universal LOAD BED TRAY & Load BArs TRBU001 / KRLBUNI1 INSTALL TIME: 2.5 Hours READ ME FIRST: Thank you for purchasing a Front Runner Slimline II Load Bed Rack or Load Bar Kit. Your Kit will contain the
TELESCOPIC GATE MANUFACTURING AND INSTALLATION MANUAL.
 TELESCOPIC GATE MANUFACTURING AND INSTALLATION MANUAL. Telescopic gates have been manufactured for many years essentially in the same way they are largely today. In recent years hardware suppliers have
Pickup Box Utility Rack Package Installation (Instruction ID: )
") 017 Chevrolet Colorado Pickup - WD (VIN S) Canyon, Colorado Accessory Installation Manual N America Document ID: 3966961 Pickup Box Utility Rack Package Installation (Instruction ID:3144879) Installation
017 Chevrolet Colorado Pickup - WD (VIN S) Canyon, Colorado Accessory Installation Manual N America Document ID: 3966961 Pickup Box Utility Rack Package Installation (Instruction ID:3144879) Installation
US RACK, Inc Falcon Drive, Madera, CA
 US RACK, Inc. - 2850 Falcon Drive, Madera, CA 93637-559-661-3050 INSTRUCTIONS for MOTORCYCLE RACK with Cradling Wheel Chocks WARNING: Do NOT attempt to install or use this rack without following all instructions.
INSTALLATION INSTRUCTIONS / DODGE RAM CREW CAB 2500/3500
 INSTALLATION INSTRUCTIONS 225019 / 225019-2 2010 DODGE RAM CREW CAB 2500/3500 PARTS LIST: Qty Description Qty Description 1 Driver/Left Side Bar 4 Plastic Square Retainer 1 Side Bar 2 12mm x 120mm Hex
VIEWPOINT ALUMINUM RUNNING BOARD TOYOTA RAV4
 PARTS LIST: VIEWPOINT ALUMINUM RUNNING BOARD 1 Driver/Left Running Board 4 10-1.5mm x 50mm T-Bolt 1 Passenger/Right Running Board 12 10mm Plastic Retainers 1 Driver/Left Bracket 2 10-1.50mm x 40mm Hex
Art Rack Assembly Instructions:
 Art Rack Assembly Instructions: ** PIECES ARE POWDER COATED Do not lay pieces on top of each other or on a hard, rough surface if possible. All bolts will pass from outside towards inside of the cage.
JEEP JK ( 5 DOOR ) SLIMLINE II - FULL TRAY EXTREME RACK KIT
 SLIMLINE II - FULL TRAY EXTREME RACK KIT") JEEP JK ( 5 DOOR ) SLIMLINE II - FULL TRAY EXTREME RACK KIT FAJK002 / KRJW014T INSTALL TIME: 5 Hours NOTE: Your Jeep JK (5 Door) Extreme Roof Rack Kit consists of four boxes. (1) the Tray, (2) the Roll
JEEP JK ( 5 DOOR ) SLIMLINE II - FULL TRAY EXTREME RACK KIT FAJK002 / KRJW014T INSTALL TIME: 5 Hours NOTE: Your Jeep JK (5 Door) Extreme Roof Rack Kit consists of four boxes. (1) the Tray, (2) the Roll
Desk/Wall-Mount Rack
 Desk/Wall-Mount Rack Patent(s) Pending Installation Instructions Post P/N: 119-1752 119-1781 119-1782 119-4014 Frame P/N: 119-1591 119-1754 119-1755 Kit Contents (2) Frames (4) Posts Assembly Hardware
INSTALLATION INSTRUCTIONS PART#:17GT23MSS\17GT23MA MODULAR GRILL GUARD FOR CHEVY SILVERADO 1/2 TON 99-02
 INSTALLATION INSTRUCTIONS PART#:17GT23MSS\17GT23MA MODULAR GRILL GUARD FOR CHEVY SILVERADO 1/2 TON 99-02 1 guard, center section 1 brush guard, left side 1 brush guard, right side 1 wire guard insert,
INSTALLATION INSTRUCTIONS GRILLE GUARD CHEVY TAHOE / AVALANCHE 1500/ SUBURBAN 1500 PART # /502795
 (W) INSTALLATION INSTRUCTIONS GRILLE GUARD PART # 502794/502795 PARTS LIST: 1 Grille Guard 2 12-1.75mm x 140mm Hex Bolts 2 Frame Mounting Brackets 8 12-1.75mm x 30mm Hex Bolts 2 Lower Support Brackets
Isuzu D-Max Part Numbers Black Polished
 SB007 Sports Bar Fitting Instructions Isuzu D-Max 0 Part Numbers - 55000 - Black - 5000 - Polished Installation Time: 0 min (Approximately) PLEASE KEEP INSTRUCTIONS IN GLOVE BOX FOR FURTHER USE RECOMMENDED
JEEP JK ( 5 DOOR ) SLIMLINE II - FULL TRAY EXTREME RACK KIT
 SLIMLINE II - FULL TRAY EXTREME RACK KIT") JEEP JK ( 5 DOOR ) SLIMLINE II - FULL TRAY EXTREME RACK KIT FAJK001 / KRJW014T INSTALL TIME: 2.5 Hours NOTE: Your Jeep JK (5 Door) Extreme Roof Rack Kit consists of four boxes. (1) the Tray, (2) the Roll
JEEP JK ( 5 DOOR ) SLIMLINE II - FULL TRAY EXTREME RACK KIT FAJK001 / KRJW014T INSTALL TIME: 2.5 Hours NOTE: Your Jeep JK (5 Door) Extreme Roof Rack Kit consists of four boxes. (1) the Tray, (2) the Roll
Ford F150 Front Bumper
 2009-2011 Ford F150 Front Bumper Warning! Read the instructions completely before beginning the installation. Before tightening bolts, drilling or cutting where required, check to make sure that there
RH-412 STEEL DOORS INSTALLATION INSTRUCTIONS
 RH-412 STEEL DOORS INSTALLATION INSTRUCTIONS By following the steps outlined below, the assembly, installation and adjustment of the steel doors, will be a simple process. Let s start with the Driver Side.
INSTALLATION INSTRUCTIONS
 NOTE: Bolts should remain hand tight until all bolts are installed. STEP 1 Installing the door base (both sides). 1. Locate the outer, roll cage, mounting bolt (passenger side is shown in the illustration).
INSTALLATION INSTRUCTIONS RH 412 STEEL DOORS
 By following the steps outlined below, the assembly, installation and adjustment of the steel doors, will be a simple process. Let s start with the Driver Side. Note: Having the hood open makes the job
TIRE RACK INSTALLATION INSTRUCTIONS Dodge Sprinter
 Aluminess Products Inc 9402 Wheatlands Ct. #A Santee, CA 92071 619-449-9930 TIRE RACK INSTALLATION INSTRUCTIONS 07-11 Dodge Sprinter Please read before beginning Stainless steel hardware may bind together
Volkswagen T5 Transporter FAVT001 / KRVK004T / KRVK005T
 Volkswagen T5 Transporter 2003-2015 FAVT001 / KRVK004T / KRVK005T INSTALL TIME: 1 Hour READ ME FIRST: Thank you for purchasing a Front Runner Slimline II Rack. This Roof Rack consists of a kit that contains:
The Queen Quilter Professional Quilters Kit Frame
 The Queen Quilter Professional Quilters Kit Frame Assembly Instructions Table of Contents: Before you begin......................... Pg. 2 Wood parts............................. Pg. 3 Hardware..............................
======================================================================================== ( DR / DR) JK WRANGLER MOD RACK
 JK WRANGLER MOD RACK") (10984 4DR / 10982 2DR) JK WRANGLER MOD RACK INSTALLATION SHEET Important Notes: Some brands of windshield light brackets and snorkels may not be compatible with the 10984 MOD Rack System. Body lifts are
(10984 4DR / 10982 2DR) JK WRANGLER MOD RACK INSTALLATION SHEET Important Notes: Some brands of windshield light brackets and snorkels may not be compatible with the 10984 MOD Rack System. Body lifts are
TYGER ARMORTM. Parts List BEFORE INSTALLATION WARNING. Customer Support TG-AM2C /8. x1 Driver/Left Side Armor
 TYGER ARMORTM TG-AM2C20028 Customer Support Parts List x1 Driver/Left Side Armor BEFORE INSTALLATION READ INSTRUCTIONS CAREFULLY BEFORE STARTING INSTALLATION. REMOVE CONTENTS FROM BOX AND VERIFY ALL PARTS
All Terrain Flares 2014 Chevy Silverado
 Page 1/8 Components: 1. Front Flares (2) 2. Rear Flares (2) Tools required: - Utility knife - #2 Phillips driver - Socket wrench - 13 mm Socket - 6 mm Allen Wrench - T-15 Torx bit - Trim Removal Tool -
Passenger/Right Front Mounting Bracket
 PARTS LIST: 1 Driver side running board 1 8mm Insert Installation Tool 1 Passenger side running board 4 10-1.50mm x 35mm Hex Bolt 1 Driver 10 10mm x 24mm OD x 2.2mm Flat Washer 1 Passenger 6 10mm Lock
INSTALLATION STEPS MAXIMUS-3.COM
 JK WRANGLER MAXIMUS-3 JK ROOF RACK/PLATFORM MAXIMUS-3 RHINO RACK ROOF PLATFORM/RACK IS NOT COMPATIBLE WITH JK 2-DOORS. THIS PRODUCT IS NOT DESIGNED TO WORK WITH JK SOFT TOP ROOF. INSTALLATION GUIDES Please
INSTALLATION INSTRUCTIONS 3"/4 BENT END SIDEBARS FORD F-150 SUPERCREW PART # DZ /DZ
 INSTALLATION INSTRUCTIONS 09-12 FORD F-150 SUPERCREW PART # DZ 372697/DZ 372699 PARTS LIST: 1 Driver/Left Sidebar 4 1/2 Lock Washers 1 Sidebar 4 12mm x 32mm OD x 3mm Flat Washers 1 Driver/Left Mounting
JK Brawler Rockers. *Includes ONE of the Hardware Kits (not both)
") INSTALLATION INSTRUCTIONS INST-17-08-200_A JK Brawler Rockers IMPORTANT: Thank you for purchasing this Poison Spyder product. Please read through this entire document before proceeding with installation.
INSTALLATION INSTRUCTIONS INST-17-08-200_A JK Brawler Rockers IMPORTANT: Thank you for purchasing this Poison Spyder product. Please read through this entire document before proceeding with installation.
INSTALLATION GUIDE NS Double Clamp Ladder Rack NV200 / City Express ( Aluminum )
") INSTALLATION GUIDE 1530-NS Double Clamp Ladder Rack NV200 / City Express ( Aluminum ) QUICK START GUIDE Phase 1 - Assembly q 1.1 Setup... q 1.2 Ladder Rack Assembly... 3-5 5-13 Phase 2 - Installation q
INSTALLATION GUIDE 1530-NS Double Clamp Ladder Rack NV200 / City Express ( Aluminum ) QUICK START GUIDE Phase 1 - Assembly q 1.1 Setup... q 1.2 Ladder Rack Assembly... 3-5 5-13 Phase 2 - Installation q
Bolt-On/Rugged Fender Flares Chevy CK PICKUP (88-98) Please read instructions entirely before installing this product.
 Please read instructions entirely before installing this product.") Please read instructions entirely before installing this product. Hardware Included QTY Hardware Included QTY Bolt Kit Included QTY EXTRUSION 25ft SMALL CLIPS 14 ALLEN KEY BOLT 42 ALCOHOL TOWELETTE 4 SCREWS
Please read instructions entirely before installing this product. Hardware Included QTY Hardware Included QTY Bolt Kit Included QTY EXTRUSION 25ft SMALL CLIPS 14 ALLEN KEY BOLT 42 ALCOHOL TOWELETTE 4 SCREWS
FITTING INSTRUCTIONS TOYOTA FORTUNER CURRENT MSA4X4.COM.AU GEAR FOR LIFE
 FITTING INSTRUCTIONS 1 1 TOYOTA FORTUNER 2015 - CURRENT MSA4X4.COM.AU GEAR FOR LIFE 2 CONTENTS 2 CONTENTS 3 CONGRATULATIONS 4 GETTING STARTED: 5 IMPORTANT INFORMATION 6 FITTER S QUICK INSTALLATION GUIDE
Slide the stock rubber tank mount caps onto the ends of the CS-1 tank mount:
 RYCA CS-1 BODY PARTS INSTALLATION GUIDE [The CS-1 installation guides should be used as supplements to the videos found on our Youtube Channel. There is no strict order to the build process, but it is
INSTALLATION INSTRUCTIONS PART#:17A096400MSS\17A096400MA MODULAR GRILL GUARD FOR TOYOTA TACOMA 05-09
 INSTALLATION INSTRUCTIONS PART#:17A096400MSS\17A096400MA MODULAR GRILL GUARD FOR TOYOTA TACOMA 05-09 1 guard, center section 1 brush guard, left side 1 brush guard, right side 1 wire guard insert, left
INSTALLATION MANUAL FRONT. See pages 2 and 3 of this manual for configuration options. Level of Difficulty. Product Photo (center section only)
") INSTALLATION MANUAL FRONT Level of Difficulty Moderate Product Photo (center section only) All hardware listed below will be provided with the bumpers center section. Additional hardware will be supplied
INSTALLATION MANUAL FRONT Level of Difficulty Moderate Product Photo (center section only) All hardware listed below will be provided with the bumpers center section. Additional hardware will be supplied
Fortress Fe Posts must always be secured to the deck framing. Fortress Fe Posts should never be attached to only the deck boards.
 Installation Instructions for Fortress Horizontal Cable Panel System with UB-05 Brackets and Fe Posts It is the responsibility of the installer to meet all code and safety requirements, and to obtain all
55000/55010 Installation Instructions
 A. Install 55015 B. Bolt roof rails, 55020/55025, to front hoop. C. Assemble 55026 D. To install without drilling into bumper. E. If mounting directly to bumper. A. 55015 Installation Instructions 55000/55010
Foot Rail. Volkswagen T5 / T6 Caravelle / Transporter START HERE! READ ME FIRST
 Foot Rail Volkswagen T / T Caravelle / Transporter ENG FAVT00 START HERE! READ ME FIRST Don t be a hero and muscle through this without first reading these fitting instructions! Improper installation of
Foot Rail. Nissan Navara_Frontier D23 DC START HERE! READ ME FIRST
 Foot Rail Nissan Navara_Frontier D3 DC ENG FANN00 START HERE! READ ME FIRST Don t be a hero and muscle through this without first reading these fitting instructions! Improper installation of this gear
RTS509 Rhino Heavy Duty Track Mount System - MITSUBISHI TRITON ML
 RTS509 Rhino Heavy Duty Track Mount System - MITSUBISHI TRITON ML Important: Please read these instructions carefully prior to installation. Please refer to your fitting instruction to ensure that the
INSTALLATION INSTRUCTIONS 3 ROUND & 4 OVAL SIDEBAR (90-DEG BENT END) DODGE RAM MEGA CAB PART NUMBER SB1214S SB1214B
 DODGE RAM MEGA CAB PART NUMBER SB1214S SB1214B") INSTALLATION INSTRUCTIONS PART NUMBER SB1214S SB1214B PARTS LIST: Qty Description Qty Description 1 Driver/Left Sidebar 4 12mm x 32mm OD x 3mm Flat Washers 1 Passenger/Right Sidebar 4 12mm Lock Washers
INSTALLATION INSTRUCTIONS PART NUMBER SB1214S SB1214B PARTS LIST: Qty Description Qty Description 1 Driver/Left Sidebar 4 12mm x 32mm OD x 3mm Flat Washers 1 Passenger/Right Sidebar 4 12mm Lock Washers
CAB END BEDTRAX (SIDE VIEW)
") Supplied Hardware: (8-14) 1/4-20 Allen head bolts, (12-18) UHMW mount blocks, (4) D-ring tie downs Tools Needed: Allen head wrench GET TO IT. INSTALLATION INSTRUCTIONS STEP 1. INSERT (2) MOUNT BLOCKS INTO
Supplied Hardware: (8-14) 1/4-20 Allen head bolts, (12-18) UHMW mount blocks, (4) D-ring tie downs Tools Needed: Allen head wrench GET TO IT. INSTALLATION INSTRUCTIONS STEP 1. INSERT (2) MOUNT BLOCKS INTO
Please read these instructions all the way through before starting, since the order of work is important.
 Due to the many differing vehicles to which Safety Devices roll cages can be fitted, these instructions are of a general nature and not specific to your vehicle. Important Note Roll bars and/or front cages
Toyota FJ Cruiser 2006-Up Set Part # Revision A
 Toyota FJ Cruiser 2006-Up Set Part # 31924 Revision A 03-31-08 Step 1: Prior to Installation: A) Fit: Verify the fit of the flares to vehicle. (Some filing, sanding, or cutting may be necessary to ensure
(W) INSTALLATION INSTRUCTIONS 3" ROUND & 4" OVAL SIDEBAR (90-DEG BENT END) DODGE RAM 1500 QUAD CAB PART #DZ /DZ /DZ /DZ
 INSTALLATION INSTRUCTIONS 3 ROUND & 4 OVAL SIDEBAR (90-DEG BENT END) DODGE RAM 1500 QUAD CAB PART #DZ /DZ /DZ /DZ") (W) INSTALLATION INSTRUCTIONS 3" ROUND & 4" OVAL SIDEBAR (90-DEG BENT END) PART #DZ 372231/DZ 372233/DZ 372237/DZ 372239 PARTS LIST: 3" ROUND & 4" OVAL SIDEBAR (90-DEG BENT END) Qty Description Qty Description
(W) INSTALLATION INSTRUCTIONS 3" ROUND & 4" OVAL SIDEBAR (90-DEG BENT END) PART #DZ 372231/DZ 372233/DZ 372237/DZ 372239 PARTS LIST: 3" ROUND & 4" OVAL SIDEBAR (90-DEG BENT END) Qty Description Qty Description
JEEP JK ( 3 DOOR ) SLIMLINE II - FULL TRAY EXTREME RACK KIT
 SLIMLINE II - FULL TRAY EXTREME RACK KIT") JEEP JK ( 3 DOOR ) SLIMLINE II - FULL TRAY EXTREME RACK KIT FAJK005 / KRJW016T INSTALL TIME: 5 Hours NOTE: Your Jeep JK (3 Door) Extreme Roof Rack Kit consists of four boxes. (1) the Tray, (2) the Roll
JEEP JK ( 3 DOOR ) SLIMLINE II - FULL TRAY EXTREME RACK KIT FAJK005 / KRJW016T INSTALL TIME: 5 Hours NOTE: Your Jeep JK (3 Door) Extreme Roof Rack Kit consists of four boxes. (1) the Tray, (2) the Roll
INSTALLATION INSTRUCTIONS
 INSTALLATION INSTRUCTIONS Trans4mer Gen II Mount System For 2011-2012 Dodge Ram HD 4500/5500 Bracket Kit 90160 Your safety, and the safety of others, is very important. To help you make informed decisions
INSTALLATION INSTRUCTIONS
 AUTOMOTIVE PRODUCTS, INSTALLATION INSTRUCTIONS PLATINUM 4 OVAL STEP BAR (90 BENT END) APPLICATION: 2010-2015 Dodge Ram 2500/3500 Mega Cab PART NUMBER: 21-3570, 21-3575, 23-3570, 23-3575, 25-3570, 25-3575,
Installation and Care Instructions: Rear Windshield - CFMOTO UForce 800
 Installation and Care Instructions: Rear Windshield - CFMOTO UForce 800 *** DO NOT REMOVE PROTECTIVE LAYER FROM THE WINDSHIELD AT THIS TIME. THIS SHOULD BE YOUR LAST AND FINAL INSTALLATION STEP AS WINDSHIELD
Holden Colorado Isuzu DMAX - RIDB1
 Holden Colorado Isuzu DMAX - RIDB1 Fit Time: 1.5 Hours IMPORTANT INFORMATION Maximum carrying capacity: Suitable Pioneers On Road Cargo Allowance Off Road Cargo Allowance Static Allowance Roof Allowance
Bolt-On/Rugged Fender Flares Ford F150 (15-ON) Please read instructions entirely before installing this product.
 Please read instructions entirely before installing this product.") Please read instructions entirely before installing this product. Hardware Included QTY Hardware Included QTY Bolt Kit Included QTY EXTRUSION 29ft RETAINING CLIP 4 ALLEN KEY BOLT 42 ALCOHOL TOWELETTE 4
Please read instructions entirely before installing this product. Hardware Included QTY Hardware Included QTY Bolt Kit Included QTY EXTRUSION 29ft RETAINING CLIP 4 ALLEN KEY BOLT 42 ALCOHOL TOWELETTE 4
MODULAR BUMPER INSTALLATION MANUAL
 MODULAR BUMPER INSTALLATION MANUAL Parts List* 1 Center section 1 Side extension, passenger / right 1 Side extension, driver / left 1 Side cap, passenger / right 1 Side cap, driver / left 1 Brush guard,
JK Crusher Corners. *Includes ONE of the Hardware Kits (not both)
") INSTALLATION INSTRUCTIONS INST-18-05-020_A JK Crusher Corners IMPORTANT: Thank you for purchasing this Poison Spyder product. Please read through this entire document before proceeding with installation.
INSTALLATION INSTRUCTIONS INST-18-05-020_A JK Crusher Corners IMPORTANT: Thank you for purchasing this Poison Spyder product. Please read through this entire document before proceeding with installation.
FENDER FLARE. KIT CONTAINS Qty Part Description Qty Part Description TOOLS REQUIRED
 ` FENDER FLARE Part No: FFD3001S TO AVOID BEING SCRATCHED, PLEASE PROTECT THE SURFACE OF THE FENDER FLARE CAREFULLY. REMOVE CONTENTS FROM BOX. VERIFY ALL PARTS ARE PRESENT. 60-180 min Cutting Not Required
Contractors Rack Assembly and Installation Instructions
 Part # 18601 & 16601 Contractors Rack Assembly and Installation Instructions 4751 Littlejohn St. Unit A, Baldwin Park, CA 91706 Page 1 of 12 11/13/08 Thank you for purchasing the Paramount Restyling Contractors
2010+ Dodge Ram 2500/3500 Front Bumper Install Instructions
 2010+ Dodge Ram 2500/3500 Front Bumper Install Instructions Warning! Read the instructions completely before beginning the installation. Before tightening bolts, drilling or cutting where required, check
INSTALLATION GUIDE. 5" Balustrade System
 5" Balustrade System PARTS LIST ITEM QTY A PORCH POST INSTALLATION KIT (PPK6) (SEE STEP 3C) 5 1/2" x 5 1/2" Trim Collar 2 2" Wide x 1 1/2" x 2" Angle Bracket 4 MATERIALS NEEDED INSTALLATION GUIDE #14 x
FENDER FLARE INSTALLATION
 Customer Support TM FENDER FLARE INSTALLATION TG-FF8C4108 IMPORTANT TYGER only approves the installation according to our instructions with the hardware provided. WARNING Failure to complete the installation
JEEP JK ( 3 DOOR ) SLIMLINE II - FULL TRAY EXTREME RACK KIT
 SLIMLINE II - FULL TRAY EXTREME RACK KIT") JEEP JK ( 3 DOOR ) SLIMLINE II - FULL TRAY EXTREME RACK KIT FAJK004 / KRJW016T INSTALL TIME: 2 Hours NOTE: Your Jeep JK (3 Door) Extreme Roof Rack Kit consists of four boxes. (1) the Tray, (2) the Roll
JEEP JK ( 3 DOOR ) SLIMLINE II - FULL TRAY EXTREME RACK KIT FAJK004 / KRJW016T INSTALL TIME: 2 Hours NOTE: Your Jeep JK (3 Door) Extreme Roof Rack Kit consists of four boxes. (1) the Tray, (2) the Roll
JK Rear Crusher Flares
 INSTALLATION INSTRUCTIONS INST-17-05-010_A JK Rear Crusher Flares IMPORTANT: Thank you for purchasing this Poison Spyder product. Please read through this entire document before proceeding with installation.
YJ DeFenders. These installation instructions apply to the following Poison Spyder products:
 INSTALLATION INSTRUCTIONS INST-13-02-070_A YJ DeFenders IMPORTANT: Thank you for purchasing this Poison Spyder product. Please read through this entire document before proceeding with installation. If
INSTALLATION INSTRUCTIONS
 TEL:1-866-XANATOS INSTALLATION INSTRUCTIONS PART#: 17A110200MSS\17A110200MA MODULAR GRILL GUARD FOR NISSAN FRONTIER 05-10//PATHFINDER 05-07 1 guard, center section 1 brush guard, left side 1 brush guard,
WK2 Rear Tie Downs. Install Instructions. Begin Trim Removal IMPORTANT
 Page REF QTY DESCRIPTION REF QTY DESCRIPTION A B C D E 4 4 Tie-Down Bracket Tie-Down Fixture M6 x 0mm.9 Bolts (Zinc) M6 x 30mm.9 Bolts (Zinc) M6 Wedge-Lock Washer F - - Flanged Nut 4g Anti-Seize Pouch
Section 11 CABLE & ROD SYSTEMS, SIGN FIXING & SIGN STANDOFFS. Web. acrylicdesign.ie .
 Section 11 CABLE & ROD SYSTEMS, SIGN FIXING & SIGN STANDOFFS Web. acrylicdesign.ie Email. sales@acrylicdesign.ie Acrylic Design 2004-2015 Mobile Cable System Components Single panel clamp Stand Off for
INSTALLATION INSTRUCTIONS GRILLE GUARD 09-ON DODGE RAM PART #
 INSTALLATION INSTRUCTIONS GRILLE GUARD 09-ON DODGE RAM PART # PARTS LIST: Qty Description Qty Description 1 Grille Guard 8 12-1.75mm x 35mm Hex Bolts 2 Brackets (for trucks without 22 12mm x 30.1mm OD
Installation Instructions TMW Antenna Tower Mount for 4ft (1.2m) Antennas.
 Antennas.") Description The following pages show the steps required to assembly and fit the antenna mount to a vertical tower pipe of diameter 48 to 115 mm (1.9 to 4.5"). This mount provides ±20 azimuth or ±15 elevation
Description The following pages show the steps required to assembly and fit the antenna mount to a vertical tower pipe of diameter 48 to 115 mm (1.9 to 4.5"). This mount provides ±20 azimuth or ±15 elevation
Assembly of Deluxe and Ultimate Trays supplied as flat packs
 Nov 16, 2011 Assembly of Deluxe and Ultimate Trays supplied as flat packs This instruction is for assembling the Bocar Deluxe and Ultimate Ute trays supplied as flat packs. In general, the assembling trays
Straight Stringer Installation Instructions
 Straight Stringer Installation Instructions Floor-to-Wall Installation F L I G H T P L A N Unpack: What s included? Your Stringer Tread Screws (8) per tread (1) Torque Wrench (1) Socket (for the brackets
Before you start Warnings Never use scourers, abrasives or chemical cleaner. IMPORTANT, RETAIN FOR FUTURE REFERENCE READ CAREFULLY See enclosed instru
 Product size: L150*W90*H72 cm The frame of this product is manufactured from mild steel coated with a weather resistant paint. Steel has a natural tendency to rust over time and, whilst we expect you to
LOCKN LOAD FIRST TIME INSTALLATION
 LOCKN LOAD TM TRACK MOUNTING KIT MITSUBISHI TRITON MQ DUAL CAB 2015+ 2 BAR TRACK HEAVY DUTY ROOF RACK SYSTEM MAX VEHICLE ROOF LOAD RATING: 100KG TOTAL LOAD EQUALS WEIGHT OF ROOF RACKS + ACCESSORIES + CARGO
CNC Router Parts PRO Machine Kit Cable Track Installation Instructions
 1 1 X CABLE TRACK TRAYS & BRACKETS The cable track on the side of the system is supported by a metal tray (or multiple trays for longer systems such as a PRO4896). These trays hang from brackets on the
AGILITY. ROTA WEB CLIMBER 3.3m PROD. CODE SIZE AGE RANGE F/ FALL HEIGHT HEAVIEST PART TOTAL WEIGHT ROTAWEB33. 8 TO mm 73kg 115kg
 AGILITY ROTA WEB CLIMBER.m PROD. CODE SIZE AGE RANGE F/ FALL HEIGHT HEAVIEST PART TOTAL WEIGHT Dia. m x.m High 8 TO 4 00mm 7kg 5kg SPECIFICATION Centre Upright: Made from 6" diameter aluminium tube to
May 14, Installation Manual
 May 14, 2012 Installation Manual Contents MAG TRACKER Components...1 Mount Installation...7 Module Installation & Grounding...11 Maintenance...14 Warranty......14 Contact Information......14 May 14, 2012
Adjustable Roof Racks Installation Guide v1.2
 Adjustable Roof Racks Installation Guide v1.2 Thank you for purchasing Coast to Coast s Adjustable Roof Rack. In this document you will find a list of all components and a detailed guide on how to correctly
WK2 Rear Tie Downs. Install Instructions. Begin Trim Removal IMPORTANT
 Page REF QTY DESCRIPTION REF QTY DESCRIPTION A B C D E 4 4 Tie-Down Bracket Tie-Down Fixture M6 x 0mm.9 Bolts (Zinc) M6 x 30mm.9 Bolts (Zinc) M6 Wedge-Lock Washer F - - Flanged Nut 4g Anti-Seize Pouch
Toyota Prado 150 / LEXUS GX460 SLIMLINE II RACK ( 1255MM X 1964mm)
") Toyota Prado 150 / LEXUS GX460 SLIMLINE II RACK ( 1255MM X 1964mm) FATP001 / KRTP011T / KRLE007T INSTALL TIME: 1 Hour READ ME FIRST: Thank you for purchasing a Front Runner Slimline II Rack. This Roof
Toyota Prado 150 / LEXUS GX460 SLIMLINE II RACK ( 1255MM X 1964mm) FATP001 / KRTP011T / KRLE007T INSTALL TIME: 1 Hour READ ME FIRST: Thank you for purchasing a Front Runner Slimline II Rack. This Roof
All Terrain Flares 09+ Ford F150
 Page 1/5 Components: 1. Front Flares (2) 2. Front Flare Inner Pieces (2) 3. Rear Flares (2) Tools required: - Utility knife - Electric Drill - 1/4 Drill Bit - #2 Phillips driver - Socket wrench Hardware
INSTALLATION INSTRUCTIONS
 INSTALLATION INSTRUCTIONS R5 STEP BOARD APPLICATION: 2009-2017 Dodge Ram 1500 Quad / Crew Cab 2010-2017 Dodge Ram 2500/3500 Crew Cab PART NUMBER: 28-51040, 28-51045, 28-51050, 28-51055 ITEM QUANTITY DESCRIPTION
Before returning this product to the store of purchase
 Before returning this product to the store of purchase Contact Dee Zee if you experience the following problems: Missing Parts Installation Problems/Questions Warranty Questions 1.800.779.2102 Hours of
INSTALLATION INSTRUCTIONS PART#:17A045200MSS\17A045200MA MODULAR GRILL GUARD FOR FORD SUPER DUTY F250/F
 INSTALLATION INSTRUCTIONS PART#:17A045200MSS\17A045200MA MODULAR GRILL GUARD FOR FORD SUPER DUTY F250/F350 08-09 1 guard, center section 1 brush guard, left side 1 brush guard, right side 1 wire guard
Cedar Picnic Table - Model 24 Assembly Manual
 Revision #3 June 27th, 2017 Thank you for purchasing a Cedar Picnic Table. Please take the time to identify all the parts prior to assembly. Please use Safety Eye wear and Gloves while Assembling. Be sure
FORD RANGER Onwards SLIMLINE II RACK (1255MM x 1358MM)
") FORD RANGER - 2012 Onwards SLIMLINE II RACK (1255MM x 1358MM) FAFR001 / KRFM010T INSTALL TIME: 60 mins READ ME FIRST: Thank you for purchasing a Front Runner Slimline II Rack. This Roof Rack consists of
FORD RANGER - 2012 Onwards SLIMLINE II RACK (1255MM x 1358MM) FAFR001 / KRFM010T INSTALL TIME: 60 mins READ ME FIRST: Thank you for purchasing a Front Runner Slimline II Rack. This Roof Rack consists of
(2) 12mm x 40mm Bolt Plate (long) pictured w/plastic retainer. (6) 12mm x 40mm Bolt Plate (short) Support Bracket Driver/left Front
 12mm x 40mm Bolt Plate (long) pictured w/plastic retainer. (6) 12mm x 40mm Bolt Plate (short) Support Bracket Driver/left Front") PARTS LIST: 1 Driver/left Running Board w-1 Backing 8 12mm Plastic Retainers 1 Passenger/right Running Board w-1 Backing 8 12mm x 32mm x 3mm Flat Washers 2 2 inch tall rubber backing (SX & Limited only)
PARTS LIST: 1 Driver/left Running Board w-1 Backing 8 12mm Plastic Retainers 1 Passenger/right Running Board w-1 Backing 8 12mm x 32mm x 3mm Flat Washers 2 2 inch tall rubber backing (SX & Limited only)
RLT500 - Rhino Track Leg Kit
 RLT500 - Rhino Track Leg Kit Important: Please read these instructions carefully prior to installation. Please refer to your fitting instruction to ensure that the roof racks are installed in the correct
TO O L K IT. Public Bike Repair
 TO O L K IT Public Bike Repair The Dero Tool Kit includes all the necessary tools to perform most routine maintenance and adjustments on most bikes. All the tools are securely fastened with stainless steel
ASSEMBLY INSTRUCTIONS for : Version 4
 ASSEMBLY INSTRUCTIONS for : Version 4 Hardware Pack 80080 Hardware List Hardware Pack Cont' (a) (j) Qty 4 - Qty 32-1/2" x 2-1/4" Button Head Bolt 5/16" Nylock Nut (b) (k) Qty 4 - Qty 4-1/2" Nylock Jam
Installation Instructions: Bumper (Part # SB76850) XJ Jeep Cherokee XRC Rear Bumper
 XJ Jeep Cherokee XRC Rear Bumper") NOTE: Carefully read entire instructions thoroughly before attempting to install this part. Parts Included Qty 93-7789 XJ XRC 1 93-7807 Bumper Mount Bracket: Drvr 1 93-7811 Bumper Mount Bracket: Pass 1
NOTE: Carefully read entire instructions thoroughly before attempting to install this part. Parts Included Qty 93-7789 XJ XRC 1 93-7807 Bumper Mount Bracket: Drvr 1 93-7811 Bumper Mount Bracket: Pass 1
Suited to vehicle/s SIDE RAIL 2 DOOR (SWB) SIDE RAIL 4 DOOR (LWB) WARNING
 SIDE RAIL 4 DOOR (LWB) WARNING") Part Number Product Description Suited to vehicle/s Fitting Kit Number 4450200 SIDE RAIL 2 DOOR (SWB) 6172268 4450210 SIDE RAIL 4 DOOR (LWB) 6172253 ALSO, NOTE THE FOLLOWING: WARNING This product must
Part Number Product Description Suited to vehicle/s Fitting Kit Number 4450200 SIDE RAIL 2 DOOR (SWB) 6172268 4450210 SIDE RAIL 4 DOOR (LWB) 6172253 ALSO, NOTE THE FOLLOWING: WARNING This product must
PRESENT, FORD TRANSIT, 148 WHEEL BASE ROCKER GUARDS
 4031 2013-PRESENT, FORD TRANSIT, 148 WHEEL BASE ROCKER GUARDS Version 1.0 General Notes For the most up to date and current instructions, please visit our website at www.vancompass.com Please read all
INSTALLATION INSTRUCTIONS UTV LIGHT BAR KIT Part Number: and Application: All UTV s*
 INSTALLATION INSTRUCTIONS UTV LIGHT BAR KIT Part Number: 83970 and 84360 Application: All UTV s* * does not include Arctic Cat vehicles Your safety, and the safety of others, is very important. To help
Toyota Extend-A-Fender Fender Flares Set of 4
 Toyota Extend-A-Fender Fender Flares Set of 4 STEP 1 PRIOR TO INSTALLATION A) Bushwacker only approves installing the fl ares according to these written instructions with the hardware provided. WARNING:
17MAY18 U.S. RACK, Inc Falcon Drive, Madera, CA
 17MAY18 U.S. RACK, Inc. - 2850 Falcon Drive, Madera, CA 93637-559-661-3050 INSTRUCTIONS for FIFTH WHEEL RACK Model 2010-4AD WARNING: Do NOT attempt to install or use this rack without following all instructions.
Pocket Door Kit PD1 / PD2 Installation Instructions. Kit Contents.
 Pocket Door Kit PD1 / PD2 Installation Instructions Kit Contents. 1, Create Rough Opening In Stud Wall Construct rough opening ensuring all sides are square and level. Rough opening should be; Height =