INSTALLATION GUIDE. Galaxy II
|
|
|
- Leonard Lang
- 6 years ago
- Views:
Transcription


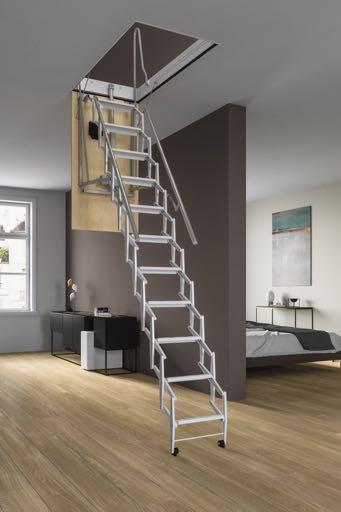
1 INSTALLATION GUIDE Galaxy II
2 IMPORTANT - READ THIS FIRST Inspect stair for any damage prior to installation. Stair is NOT to be installed while home is under construction and used as a construction stair. Failure to follow these guidelines can result in damage to the stair and will void the warranty. If you have any problems or concerns with stair, call SP Partners LLC immediately at Page 1 May 2017


 Steel")

 Hex head bolts and")
")
3 Tools / Materials Required Drill, tape measure, crescent wrench, wood shims, ladder, lumber with same dimensions as joists, keyhole saw or utility knife to cut ceiling material. Parts Included (4) Steel hangers with locking nuts Remote control with battery (2) Extra treads (8) Hex head bolts and lock nuts (for installing extra treads) Allen key for emergency door release Page 2 May 2017

4 Read instructions carefully and completely before beginning installation. * Installer should be experienced in the construction or modification of structural framing supports. Improper installation can result in stair collapse and bodily injury. * Determine location of electrical lines or plumbing before cutting ceiling. Table A Model # Rough Opening Dimension Stair Frame Dimension Tread Width Floor-to-Ceiling Height Range # of Treads Stair Projection (Page 4) Landing Space (Page 4) RR /2 X X 53 1/ to Over 8-4 to 9-2 Over 9-2 to RR X /2 X 59 1/ to Over 8-4 to Over 9-2 to Locating The Stair Determine whether the chosen location allows sufficient projection and landing space for your unit. See Figure 1 and 2 below and TABLE A above. Projection Landing Space Figure 1 Figure 2 Page 3 May 2017

5 Preparing The Rough Opening * Mark out the rough opening size for your unit according to TABLE A. Note that the finished metal trim extends beyond the rough opening about 1 1/4 when the unit is installed. Allow clearance for this on all four sides. * Cut the rough opening through the ceiling material. Metal Trim Framing The Opening If your attic framing consists of prefabricated trusses, DO NOT CUT WITHOUT CONSULTING AN ENGINEER AND OBTAINING APPROVAL. * In framing the rough opening, one or more joists (beams) may need to be cut, depending on orientation of the ladder (parallel or perpendicular to the joists.) In either case joists to be cut must be supported on both sides of the opening before cutting. * Cut and securely nail headers (blocking) of the same joist dimensions to the joists as shown in Figures 3 and 4. Be sure to nail all cut joists to headers. When installing perpendicular to joists as in Figure 4, it is advisable to double up the headers for more strength and rigidity. Headers Headers Parallel to joists Perpendicular to joists Figure 3 Figure 4 Page 4 May 2017
 2.")


6 Perform this step BEFORE installing the stair in the ceiling since you will need to remotely open door from below to allow helpers to exit the attic. Programming The Remote 1. Locate the DIP switch code on the power cord of the control box. The code is also available on the control box. (Figure 5) 2. Open the battery cover on the remote and duplicate the 6-digit DIP switch setting on the power cord. (Figure 6) 3. Insert battery and close cover. Figure 5 Figure 6 Installing The Stair * There should be adequate light in the attic to work safely. * Be sure the attic stair door is closed and securely latched. * Due to its weight, two additional helpers should be used to raise stair into opening. Figure 7 * Person in attic should have steel hangers and nuts ready. * Have two additional helpers lift stair into the opening from below until the tops of the threaded rods clear the top of the joists. * Slide joist hangers over rods and thread nuts down without tightening fully. With all hangers in place, helpers can let go of stair. See Figure 7. * Square the stair frame to opening while maintaining an even gap all around between frame and joists. * Tighten nuts in stages all around but DO NOT OVER TIGHTEN as this may distort the metal trim. Shim as necessary to keep stair square. * Door can now be opened from below. Page 5 May 2017

7 Opening Stair and Adjusting Stair Height Determine the correct number of treads for your floor-to-ceiling height. See Table A on page 4. If none of the additional treads supplied are required, use remote to fully open stair to floor. To do so, press and hold the down arrow for 3 seconds and then release. Stair will fully open and stop automatically. If an additional treads are required: 1. Press and hold down button for 3 seconds to start stair. When stair is roughly half way down, hit down button again to stop stair. 2. Detach bottom tread by removing four nuts and bolts holding tread to the one above. 3. Add 1 or 2 treads (as required) using additional nuts and bolts supplied. Do not overtighten as this may inhibit the smooth operation of the stair. 4. Re-attach bottom tread. 5. Lower stair with remote until firmly on floor. 6. To close stair, press and hold the up arrow on the remote for 3 seconds and let go. The stair will fully close and stop automatically. Manual Stair Operation In the event of a power outage, the stair can be operated manually. In order to do so, the motor must first be unlocked by using the allen key supplied with the unit. A step ladder will be needed for this process. Please read this section carefully before attempting to open door. THE DOOR MUST BE SUPPORTED AT ALL TIMES DURING THE UNLOCKING OPERATION AND GUIDED TO A FULLY OPEN POSITION BY HAND. THERE ARE NO SPRINGS OR OTHER MECHANISMS TO HOLD THE WEIGHT OF THE DOOR. FULL MANUAL OPERATION (For opening and closing during power outage) 1. With the door fully supported from below, insert the allen key into the receptacle on the door and turn counterclockwise until fully unlocked. 2. Lower door by hand until fully open. 3. With door fully open, grasp bottom tread and pull outward and down. There will be slight resistance and you will hear a whirring sound, which is normal. (This is the motor gear turning) Lower stair fully to floor. 3. To fold stair onto door, lift and push until the stair is fully folded. 4. Again, using step ladder, close door fully and support from below. Re-insert the allen key into the receptacle on the door and turn clockwise until it can no longer be turned. Door may drop slightly when let go since the motor and door will need to be reset. To reset the motor (and door) when power is restored, fully open stair with remote. Next, press and hold both the up and down buttons simultaneously. Stair and door will fully close automatically and motor will be reset. PARTIAL MANUAL OPERATION (For opening during power outage and then closing when power is restored) To open manually, perform steps 1 and 2 as above. To close when power returns: 1. Re-insert the allen key into the receptacle on the door and turn clockwise until it can no longer be turned. 2. Press and hold both the up and down arrows on the remote simultaneously until door is fully closed. This action also resets the motor automatically. Page 6 May 2017
8 Congratulations! You are now ready to begin using your Rainbow Attic Stair. As with any product, be sure to follow instructions for safe, efficient and trouble free operation for years to come. ** Children should never be allowed to operate or climb any attic stair ** LIMITED WARANTY SP Partners, LLC warrants that the unit will be free from any defects in material and workmanship for one year from purchase date provided that the stair is installed in compliance with the preceding instructions and operated and maintained in accordance with these instructions and applicable warnings. This warranty specifically excludes any and all non-defect damage, any and all damage, injuries and losses arising from improper installation of this product, unreasonable use to include exceeding the specified weight limitations, and any and all labor charges incurred for removing or reinstalling a repaired stair unit or any of its components. During the warranty period stated, should the stair unit or any of its components exhibit a manufacturing defect please first call SP Partners, LLC at before dismantling the product in order to determine the extent of the defect and what course of action needs to be taken to correct the problem. A proof of purchase will be required in all cases. ADDITIONAL EXCLUSIONS SP Partners, LLCs above-stated express limited warranty is being made in lieu of all implied warranties of any kind, including those as provided by the Uniform Commercial Code for merchantability of the product and for fitness of the product for a particular purpose. All such implied warranties, including those of merchantability and/or fitness for a particular purpose, are excluded and disclaimed. Furthermore, all claims for consequential damages and for incidental damages that may arise from a breach of the above-mentioned express warranty are also excluded. In no event shall SP Partners, LLC be liable for any breach of warranty and/or for any negligence and/or for any strict liability which would exceed in damage amount the cost of the stair unit. No representative or person is authorized to assume for SP Partners, LLC, any responsibility which would be either an alternative to or in addition to the express product warranty as stated above. This warranty gives you certain specific legal rights as were set forth above and any other rights that may vary from state to state. If any portion of this express warranty is deemed to be unenforceable at any time hereafter, any such provision shall be severed from this agreement, but all other terms, conditions and provisions shall remain in full force and effect. SP Partners, LLC Telephone: Website: rainbowatticstair@bellsouth.net
By SP Partners, LLC. INSTALLATION GUIDE. ProTech-12
 By SP Partners, LLC www.rainbowatticstair.com INSTALLATION GUIDE ProTech-12 IMPORTANT READ THIS FIRST Inspect stair for any damage prior to installation. Stair is NOT to be installed while home is under
By SP Partners, LLC. INSTALLATION GUIDE. ProTech
 By SP Partners, LLC www.rainbowatticstair.com INSTALLATION GUIDE ProTech By SP Partners, LLC www.rainbowatticstair.com INSTALLATION GUIDE ProTech IMPORTANT - READ THIS FIRST Inspect stair for any damage
By SP Partners, LLC. INSTALLATION GUIDE. Star
 By SP Partners, LLC www.rainbowatticstair.com INSTALLATION GUIDE Star By SP Partners, LLC www.rainbowatticstair.com INSTALLATION GUIDE Star IMPORTANT - READ THIS FIRST Inspect stair for any damage prior
WallAccess - No Door
 By SP Partners, LLC www.rainbowatticstair.com INSTALLATION GUIDE WallAccess - No Door June 2012 IMPORTANT READ THIS FIRST Inspect stair for any damage prior to installation. Stair is NOT to be installed
By SP Partners, LLC INSTALLATION GUIDE
 By SP Partners, LLC www.rainbowatticstair.com INSTALLATION GUIDE Galaxy IMPORTANT READ THIS FIRST Inspect stair for any damage prior to installation. Stair is NOT to be installed while home is under construction
Installation Procedures For Corvette Basic/C-6 SNS 28
 Installation Procedures For 2005-2013 Corvette Basic/C-6 SNS 28 Warning: Please read directions completely before starting. If you have any questions please contact BMPP before beginning your installation.
Tilting, Swiveling & Rotating Flat Panel Wall Mount
 Tilting, Swiveling & Rotating Flat Panel Wall Mount Model: VXA980TC +5 to -5 +5 to -5 Supports most 0-80 Flat Panel TVs Maximum Weight Capacity: 32 lbs. Supports VESA Sizes up to 600x500 For technical
Installation Procedures For 2013 Mustang V-6 and 5.0
 Installation Procedures For 2013 Mustang V-6 and 5.0 Warning: Please read directions completely before starting. If you have any questions please contact BMPP before beginning your installation.. Also
Please Do Not Return This Product To The Store!
 MODEL NOS. T81 TABLE TENNIS TABLE OWNER'S MANUAL 1. Read this manual carefully before starting assembly. Read each step completely before beginning each step.. Some smaller parts may be shipped inside
INSTALLATION INSTRUCTIONS
 INSTALLATION INSTRUCTIONS Premier Mounts Tilting Wall Mount Model: TWM-085 For use with Panasonic 85 Flat Panel NORTH AMERICA 3130 East Miraloma Avenue Anaheim, CA 92806 USA USA and Canada Phone: 1.800.368.9700
HUSTLER 7' & 8' POOL TABLE ASSEMBLY INSTRUCTIONS
 HUSTLER 7' & 8' POOL TABLE ASSEMBLY INSTRUCTIONS Please Do Not Hesitate to Contact Our Consumer Hotline at 800-759-0977 with Any Questions That May Arise During Assembly or Use of This Product! NG2515PB/NG2520PB
Installation Manual Roof Zone Ladder Rack
 Installation Manual Roof Zone Ladder Rack 102113,E1346 Installation Time: About 90 minutes. Depending on truck and Do-it-Yourself experience level Tools Required: Electric Drill with 1/2 Chuck 1/2 & 7/32
Please Do Not Return This Product To The Store!
 MODEL NOS. T8512 TOURNAMENT SERIES 3 TABLE TENNIS TABLE OWNER'S MANUAL 1. Read this manual carefully before starting assembly. Read each step completely before beginning each step. 2. Some smaller parts
Installation Procedures Maserati Gran Turismo Sport SNS 85
 Installation Procedures 2012-2017 Maserati Gran Turismo Sport SNS 85 Warning: Please read directions completely before starting. If you have any questions please contact BMPP before beginning your installation.
BOUNCE TABLE TENNIS TABLE & ACCESSORIES ASSEMBLY INSTRUCTIONS
 BOUNCE TABLE TENNIS TABLE & ACCESSORIES ASSEMBLY INSTRUCTIONS NG2325 THANK YOU! Thank you for your purchase of our product. We work around the clock and around the globe to ensure that our products maintain
NOVA-EXT Versatile Projector Mount Model: NOVA-EXT
 INSTALLATION MANUAL NOVA-EXT Versatile Projector Mount Model: NOVA-EXT NORTH AMERICA 3130 East Miraloma Avenue Anaheim, CA 92806 USA USA and Canada Phone: 800-368-9700 Fax: 800-832-4888 Other Locations
Installation Procedures Jaguar XF SNS 92
 Installation Procedures 2016-2017 Jaguar XF SNS 92 Warning: Please read directions completely before starting. If you have any questions please contact BMPP before beginning your installation. Also please
Installation Procedures Dodge Charger R/T Scat Pak, SRT/Hellcat. SNS 66a
 Installation Procedures 2015-2017 Dodge Charger R/T Scat Pak, SRT/Hellcat SNS 66a Warning: Please read directions completely before starting. If you have any questions please contact BMPP before beginning
Tilting Flat Panel Wall Mount Installation Guide
 Tilting Flat Panel Wall Mount Installation Guide Model: A580TM Easy installation Built-in level for easy positioning Safety bolts lock the TV on the mount Easy to adjust tilt angles: +5 to -15 degrees
00108/00110 INSTRUCTION MANUAL
 00108/00110 INSTRUCTION MANUAL Removable and Adjustable Mudflap System IMPORTANT! Please Read this Instruction Booklet prior to assembly of your Rock Tamer Kit. IMPORTANT! Exhaust Systems Note: Any modifications
PRIMO 56" FOOSBALL TABLE ASSEMBLY INSTRUCTIONS
 PRIMO 56" FOOSBALL TABLE ASSEMBLY INSTRUCTIONS NG1035 THANK YOU! Thank you for purchasing this product. We work around the clock and around the globe to ensure that our products maintain the highest possible
Assembly Instructions
 Thank You For Purchasing The Best Overhead Storage Rack Assembly Instructions Overhead Storage Rack 8 x 4 8 x 3 8 x 2 6 x 4 6 x 3 6 x 2 4 x 4 Two 8 x4 Racks Pictured P.O. Box 714, El Cerrito, CA 94530
THANK YOU FOR PURCHASING OUR STUDIO RTA CREATION STATION
 THANK YOU FOR PURCHASING OUR STUDIO RTA MODEL# 20672 IF YOU REQUIRE ANY ASSISTANCE WITH ASSEMBLY, PARTS, OR INFORMATION ON OTHER PRODUCTS, PLEASE VISIT OUR WEBSITE: www.studiorta.com OR CALL OR WRITE THE
PAM-200 Universal Projector Mount
 INSTALLATION MANUAL PAM-200 Universal Projector Mount Sony Electronics 16540 West Bernardo Drive San Diego, CA 92127 www.sony.com IN-PAM200.R0 Table of Contents Parts List...- 3 - Installation Tools...-
Installation Procedures 2015 Corvette C-7 Z06 With Carbon Fiber Kit SNS 50a
 Installation Procedures 2015 Corvette C-7 Z06 With Carbon Fiber Kit SNS 50a Warning: Please read directions completely before starting. If you have any questions please contact BMPP before beginning your
HT281 Dat e Code: 2 - HT WJ Purchase Date: PLEASE RETAIN THIS INSTRUCTION MANUAL FOR FUTURE REFERENCE. All Rights Reserved
 We strive to ensure that our products are of the highest quality and free of manufacturing defects or missing parts. However, if you have any problems with your new product, D O NOT RETURN IT TO THE STORE,
HARVIL 3-in-1 FLIP TABLE ASSEMBLY INSTRUCTIONS
 HARVIL 3-in-1 FLIP TABLE ASSEMBLY INSTRUCTIONS CONTACT INFORMATION We work around the clock and around the globe to ensure that Harvil products maintain the highest possible quality. However, in the rare
OPERATORS MANUAL WEEKENDER STEEL LADDER RACK
 OPERATORS MANUAL WEEKENDER STEEL LADDER RACK WWW.WEATHERGUARD.COM MODELS 1450 & 1475 1475 Shown INSTALLATION TIME Approximate installation time: 60 minutes (depending on truck equipment installation experience
OWNER'S MANUAL. Please Do Not Return This Product To The Store!
 MODEL NO. T8190SA TABLE TENNIS TABLE OWNER'S MANUAL 1. Read this manual carefully before starting assembly. Read each step completely before beginning each step.. Some smaller parts may be shipped inside
Vista SCREEN. and Double Door Link Kit. Installation Manual for. For Double Doors (French Doors) Quick and Easy to Size and Install
 Quick and Easy to Size and Install") and Double Door Link Kit Installation Manual for Vista SCREEN TM Quick and Easy to Size and Install For Double Doors (French Doors) Durable. Reliable. Attractive. For door openings up to 72 13 /16 (1,849
and Double Door Link Kit Installation Manual for Vista SCREEN TM Quick and Easy to Size and Install For Double Doors (French Doors) Durable. Reliable. Attractive. For door openings up to 72 13 /16 (1,849
RESIDENTIAL MOTORIZED STORAGE UNIT
 BY V-BRO PRODUCTS RESIDENTIAL MOTORIZED STORAGE UNIT Model: GGR220 INSTALLATION AND OPERATING INSTRUCTIONS Distributed Exclusively by V-BRO PRODUCTS For technical questions and replacement parts, please
Installation Procedures 2018 Mustang GT & EcoBoost SNS 135
 Installation Procedures 2018 Mustang GT & EcoBoost SNS 135 Warning: Please read directions completely before starting. If you have any questions, please contact BMPP before beginning your installation.
Please Do Not Return This Product To The Store!
 MODEL NO. T8176 QUICK SERVE 3000 TABLE TENNIS TABLE OWNER'S MANUAL 1. Read this manual carefully before starting assembly. Read each step completely before beginning each step. 2. Some smaller parts may
Vista SCREEN. Installation Manual for. For left hinged doors. Quick and Easy to Size and Install
 Installation Manual for Vista SCREEN For left hinged doors Quick and Easy to Size and Install Durable. Reliable. Attractive. For door openings up to 36 (914mm) wide and 81 3 /16 (2,062mm) high QC03-0512L
Check us out on-line! Installation Instructions
 Installation Instructions 2 OPTIONAL ACCESSORIES Order Quantum Rack Accessories Online at www.dawsbetterbuilt.com Cargo Lock Kit Secure Your Load Cargo Locks can easily be installed and adjusted left or
Installation Procedures 2015 Roush Mustang Stage 1 & 2. SNS 62b
 Installation Procedures 2015 Roush Mustang Stage 1 & 2 SNS 62b Warning: Please read directions completely before starting. If you have any questions please contact BMPP before beginning your installation.
SERIES M MIXER MASTS
 SERIES M MIXER MASTS T AB L E O F C O N T E N T S V e n d o r D a t a Material Data Sheet 4-in. Mixer Mast Specification 3-in. Mixer Mast Specification 2 - in. M i x e r M a s t S p e c i f i c a t i o
340 & 350 SERIES BATH ENCLOSURES
 INSTALLATION INSTRUCTIONS 340 & 350 SERIES BATH ENCLOSURES 800-643-1514 www.alumaxbath.com Copyright Alumax Bath Enclosures 2010. All rights reserved. LIMITED WARRANTY AND REMEDY ALUMAX BATH ENCLOSURES
340 & 350 SERIES DELUXE FRAMELESS BYPASS
 BATH ENCLOSURES An Alcoa Company Tel: 800-643-1514 Fax: 870-234-3181 www.alumaxbath.com INSTALLATION INSTRUCTIONS 340 & 350 SERIES DELUXE FRAMELESS BYPASS BATH ENCLOSURES Copyright Alumax Bath Enclosures
8' HOT SHOT SKEEBALL TABLE ASSEMBLY INSTRUCTIONS
 8' HOT SHOT SKEEBALL TABLE ASSEMBLY INSTRUCTIONS NG2015 THANK YOU! Thank you for purchasing this product. We work around the clock and around the globe to ensure that our products maintain the highest
M ACS Instructions
 APPLICABLE MODELS: Nissan Frontier 2005 and up short bed with Utili-Trak mounting rails PACKAGE CONTENTS 00-0060-M-01-1205 ACS Instructions Leitner Designs 25675 Taladro Circle Unit E Mission Viejo, CA
KNEEWALL APPLICATION
 INSTALLATION SUGGESTIONS KNEEWALL APPLICATION LIMITED WARRANTY L.J. Smith, Inc. issues the following Limited Warranty: The product(s) furnished hereunder are warranted to be free from defects in material
INSTALLATION INSTRUCTIONS
 INSTALLATION INSTRUCTIONS Polaris Universal Projector Mount Model: NORTH AMERICA 1321 S. State College Blvd. Fullerton, CA 92831 USA USA and Canada Phone: 1.800.368.9700 Fax: 1.800.832.4888 Other Locations
Installation Procedures Dodge Challenger SXT, R/T, Scat Pak, SRT & Hellcat SNS 1a
 Installation Procedures 2015-2017 Dodge Challenger SXT, R/T, Scat Pak, SRT & Hellcat SNS 1a Warning: Please read directions completely before starting. If you have any questions, please contact BMPP before
PRC-LA Installation Guide
 1321 S. State College Blvd., Fullerton, CA 92831 USA Weight Limit Maximum Flat Panel Weight: Warning Statements 50 lbs. THE WALL STRUCTURE MUST BE CAPABLE OF SUPPORTING AT LEAST FOUR TIMES THE WEIGHT OF
INSTALLATION SUGGESTIONS LEVEL APPLICATION LIMITED WARRANTY
 INSTALLATION SUGGESTIONS LEVEL APPLICATION LIMITED WARRANTY L.J. Smith, Inc. issues the following Limited Warranty: The product(s) furnished hereunder are warranted to be free from defects in material
AM500-U Installation Guide
 1321 S. State College Blvd., Fullerton, CA 92831 USA Included Components Maximum Flat Panel Weight: 500 lb. / 226.79 kg. Wall Mount Bracket (Qty 2) Cross Bar 5/16 Flat Washers (Qty 6) Universal Spacers
ECM Installation Guide Installationsanleitung, Guía de Instalacíon, Guida de Installazione, Guide d Installation, Installatie gids
 Elliptical Ceiling Mount for 37 to 63 Flat Panels Model: ECM-3000 Warranty, Garantie, Garantía, Garanzia, Garantie, Waarborg: http://www.mounts.com/warranty 9531-000-001-0X Rev.0 www.mounts.com North America
INSTALLATION INSTRUCTIONS
 INSTALLATION INSTRUCTIONS FLIP Flip-Down LCD Mount NORTH AMERICA 3130 East Miraloma Avenue Anaheim, CA 92806 USA USA and Canada Phone: 800-368-9700 Fax: 800-832-4888 EUROPE Swallow House, Shilton Industrial
INSTALLATION GUIDE CABINETRY
 INSTALLATION GUIDE CABINETRY The instructions given here serve as general guidelines on how to install full-access cabinets in a reasonably simple installation. Many cabinet designs and installations may
Manual Carton Closing Staplers
 Operator s Manual Manual Carton Closing Staplers SHB00-A Item No. 6400 -/8" Crown Carton Closing Stapler 5/8" and /4" (5mm and 8mm) Ask for Genuine INTERCHANGE A58 and A4 Staples SHB50-C Item No. 640 -/4"
Ready-To-Assemble VersaRail INSTALLATION INSTRUCTIONS
 Ready-To-Assemble VersaRail INSTALLATION INSTRUCTIONS Read all instructions prior to installing product. Refer to manufacturers safety instructions when operating any tools. To register your product, please
INSTALLATION INSTRUCTIONS
 INSTALLATION INSTRUCTIONS CTM-MS1 Flat Panel Display Mount (26 to 37 ) NORTH AMERICA 3130 East Miraloma Avenue Anaheim, CA 92806 USA USA and Canada Phone: 800-368-9700 Fax: 800-832-4888 Other Locations
Tauten Tab Tension Screen User Manual
 Tauten Tab Tension Screen User Manual Thank you for choosing a Tauten Series Tab Tension screen by Cirrus Screens. Please read through this user manual and understand all instructions before installing
O W N E R S M A N U A L
 O W N E R S M A N U A L TABLE TENNIS TABLE MODEL NO. T1 Please Do Not Return This Product to the Store! Contact Escalade Sports customer service department at: Phone: 1-66-73-3 Toll-Free! Fax: 1-66-73-333
INSTALLATION INSTRUCTIONS
 INSTALLATION INSTRUCTIONS Universal Swingout Arm for 37 to 47 Flat Panels Model: AM80 NORTH AMERICA 3130 East Miraloma Avenue Anaheim, CA 92806 USA USA and Canada Phone: 1-800-368-9700 Fax: 1-800-832-4888
Models 2230 and 2240
 Models 2230 and 2240 Overview... 2 Tools Needed... 2 Hardware...3 Assembly... 4-13 Installation... 14 Drawer Removal... 15 Operation... 15 Maintenance... 15 Accessories... 16 Limited Warranty... 16 Perform
Installation Instructions PP-FCMA
 Installation Instructions PP-FCMA Step 1 Carefully remove a 24 (610mm)x48 (1120mm) or two 24 (610mm)x24 (610mm) suspended ceiling tiles. Step 2 Install the four (4) each ¼ x3 eye bolts securely into the
Security Products & Services...That Never Sleep. Sur-Lock. I/O 2000L Family of Exit Control Alarm Locks. Installation Instructions
 Security Products & Services...That Never Sleep Sur-Lock I/O 2000L Family of Exit Control Alarm Locks Installation Instructions IMPORTANT It is important that you read and follow these instructions carefully.
Summit Classic Deluxe Tripod 16 Leg Kit PN WARNING
 ! Summit Classic Deluxe Tripod 16 Leg Kit PN 81521 WARNING You must fully read, understand and follow these warnings and instructions (written and video)! Failure to follow these instructions may cause
HARVIL 9 FOOT DARK CHERRY SHUFFLEBOARD TABLE HARVIL 12 FOOT DARK CHERRY SHUFFLEBOARD TABLE ASSEMBLY INSTRUCTIONS
 HARVIL 9 FOOT DARK CHERRY SHUFFLEBOARD TABLE HARVIL 12 FOOT DARK CHERRY SHUFFLEBOARD TABLE ASSEMBLY INSTRUCTIONS CONTACT INFORMATION We work around the clock and around the globe to ensure that Harvil
15 Planer Stand. Model Due to continuing improvements, actual product may differ slightly from the product described herein.
 15 Planer Stand Model 96316 Assembly And Operation Instructions Due to continuing improvements, actual product may differ slightly from the product described herein. 3491 Mission Oaks Blvd., Camarillo,
C872 Series ADJUSTABLE HEIGHT. Version 3
 C872 Series ADJUSTABLE HEIGHT GOAL SYSTEM Version 3 Thank you and congratulations for purchasing a Ryval Hoops Goal - the finest basketball goal system on the market today! You will discover that Ryval
THANK YOU FOR PURCHASING OUR STUDIO RTA PROJECT STATION
 THANK YOU FOR PURCHASING OUR STUDIO RTA MODEL# 50040 BLACK/MAPLE, 50042 PEWTER/CHERRY IF YOU REQUIRE ANY ASSISTANCE WITH ASSEMBLY, PARTS, OR INFORMATION ON OTHER PRODUCTS, PLEASE VISIT OUR WEBSITE: www.studiorta.com
Model 6360/6361. Ambulance Cot Fastener INSTALLATION/OPERATION INSTRUCTIONS. IMPORTANT Keep manual on file at all times.
 IMPORTANT Keep manual on file at all times. Model 6360/6361 Ambulance Cot Fastener INSTALLATION/OPERATION INSTRUCTIONS For Parts or Technical Assistance 1 800 784 4336 Table of Contents Introduction..............................................................................
( ) CanPRO. Recommended Handle Turns: Can Size Diameter Handle Turns #2 3" 3 Revolutions #5 5" 5 Revolutions #10 6" 6 Revolutions.
 CanPRO. Recommended Handle Turns: Can Size Diameter Handle Turns #2 3 3 Revolutions #5 5 5 Revolutions #10 6 6 Revolutions.") 56050 - ( ) CanPRO OPERATING INSTRUCTIONS Important 1. To get the best operation and life from your machine, please read and comply with these instructions. 2. Clean machine thoroughly before and after
56050 - ( ) CanPRO OPERATING INSTRUCTIONS Important 1. To get the best operation and life from your machine, please read and comply with these instructions. 2. Clean machine thoroughly before and after
LC200DS2 Double Stud Dual Articulating Wall Mount for Flat Panel Screens up to 32" with up to 200mm x 200mm VESA Mounting Patterns
 LC200DS2 Double Stud Dual Articulating Wall Mount for Flat Panel Screens up to 32" with up to 200mm x 200mm VESA Mounting Patterns Multi-position triple pivoting arms allows you to position the monitor
Installation Instructions SRC OFF ROAD ROOF RACK Wrangler,97-06 Wrangler,04-06 Unlimited Part # s 76711,76713,76715)
") NOTE: Please read this information entirely before installing. To obtain correct installation, we recommend you follow these step-by-step instructions carefully. Please take care when installing this product
NOTE: Please read this information entirely before installing. To obtain correct installation, we recommend you follow these step-by-step instructions carefully. Please take care when installing this product
RESIDENTIAL MOTORIZED STORAGE UNIT
 888-GATOR-08 www.garagegator.com BY V-BRO PRODUCTS RESIDENTIAL MOTORIZED STORAGE UNIT Model:GG8220 INSTALLATION, OPERATING, AND SAFETY INSTRUCTIONS Distributed Exclusively by: V- BRO PRODUCTS, LLC www.garagegator.com
Assembly Instructions and Parts Manual JPSF-1 Fence and JPSR Rail Set #
 Assembly Instructions and Parts Manual JPSF-1 Fence and JPSR Rail Set #1002493 JET 427 New Sanford Road LaVergne, Tennessee 37086 Part No. M-708482 Ph.: 800-274-6848 Revision C3 02/2014 www.jettools.com
WARNING. Summit Deluxe Tripod Stand PN DO NOT EXCEED THIS LIMIT! (* Includes all gear) Stand minimum and maximum tree size: 8-20 diameter
 Stand minimum and maximum tree size: 8-20 diameter") Summit Deluxe Tripod Stand PN 82058 2012 Summit Treestands, LLC 715 Summit Dr. Decatur, AL 35601 (256) 353-0634 info@summitstands.com! WARNING You MUST also view the enclosed DVD BEFORE using your new
Summit Deluxe Tripod Stand PN 82058 2012 Summit Treestands, LLC 715 Summit Dr. Decatur, AL 35601 (256) 353-0634 info@summitstands.com! WARNING You MUST also view the enclosed DVD BEFORE using your new
INSTALLATION INSTRUCTIONS
 CJ FULL WIDTH CONVERSION KIT The Poison Spyder Customs Full Width Axle Conversion Kit is designed to mount full width axle assemblies underneath 76 to 86 Jeep CJ s (CJ-5, CJ-7 & CJ-8). The kit is designed
VersaRail Gate Kit. freedomproduct.com. To register your product, please visit: INSTALLATION INSTRUCTIONS
 VersaRail Gate Kit INSTALLATION INSTRUCTIONS Read all instructions prior to installing product. Refer to manufacturers safety instructions when operating any tools. To register your product, please visit:
Owner s Manual ODYSSEY BENCH MODEL. O4100B shown REV E. Southern Avenue, Phoenix, AZ USA Workhorseproducts.
 Owner s Manual ODYSSEY BENCH MODEL O4100B shown 67-1375 REV 218 3730 E. Southern Avenue, Phoenix, AZ 85040 USA 800-778-8779 Workhorseproducts.com 1 Table of Contents I. Introduction & Safety Information.
MANCHESTER VANITY BASE
 MANCHESTER VANITY BASE INSTALLATION INSTRUCTIONS Questions? Call our customer service department at 1-855-995-5578, 8:30 a.m. - 5 p.m., EST, Monday - Friday or e-mail: contactus@magickwoods.com. Models:
ATTENTION: PLEASE READ AND UNDERSTAND ALL INSTRUCTIONS AND WARNINGS BEFORE ASSEMBLING, INSTALLING OR USING THIS PRODUCT.
 PLAN YOUR VAN (TIPS FOR FASTER INSTALLATION) Installing your Transit bulkhead is very clear cut following these instructions. Before cutting or drilling in the floor, verify the location of you gas tank,
MM340 Installation Instructions IMPORTANT SAFETY INSTRUCTIONS - SAVE THESE INSTRUCTIONS
 MM30 Installation Instructions IMPORTANT SAFETY INSTRUCTIONS - SAVE THESE INSTRUCTIONS Please read this entire manual before you begin. Do not unpack any contents until you verify all requirements on PAGE.
ATTENTION: PLEASE READ AND UNDERSTAND ALL INSTRUCTIONS AND WARNINGS BEFORE ASSEMBLING, INSTALLING OR USING THIS PRODUCT.
 INSTALLATION MANUAL Models 96111-3-02 & 96511-3-02 Bulkheads for 2014 and Later Ford Transit Connect Vans ATTENTION: PLEASE READ AND UNDERSTAND ALL INSTRUCTIONS AND WARNINGS BEFORE ASSEMBLING, INSTALLING
Two Man Tripod. Summit Deluxe INSTRUCTIONS WARNING PN WEIGHT LIMITS. DO NOT EXCEED THIS LIMIT! (* Includes all gear)
") ! INSTRUCTIONS WARNING You must fully read, understand and follow these warnings and instructions (written and video)! Failure to follow these instructions may cause serious injury or death!! You MUST
! INSTRUCTIONS WARNING You must fully read, understand and follow these warnings and instructions (written and video)! Failure to follow these instructions may cause serious injury or death!! You MUST
DROPTRAC INSTALLATION INSTRUCTIONS
 DROPTRAC INSTALLATION INSTRUCTIONS SLIDING FLOOR GUIDE SLIDING WALL GUIDE BIPARTING WALL GUIDE BIPARTING FLOOR GUIDE DOOR COMPANY 413 HOWARD BLVD. NEWPORT, NC 28570 1.888.833.3667 FAX 252.223.1116 WWW.FRANKDOOR.COM
DOOR SECURITY AND REPAIR KIT
 DOOR SECURITY AND REPAIR KIT MODEL #S SET-SLP-X0552 SET-STD-X0552 SET-UNI-X0002 SET-ULT-X0002 R Questions? Call customer service at -888-582-2294 or visit www.armorconcepts.com PACKAGE CONTENTS A B C E
HARVIL 7 FOOT POOL TABLE WITH TABLE TENNIS TOP ASSEMBLY INSTRUCTIONS
 HARVIL 7 FOOT POOL TABLE WITH TABLE TENNIS TOP ASSEMBLY INSTRUCTIONS CONTACT INFORMATION We work around the clock and around the globe to ensure that Harvil products maintain the highest possible quality.
INSTALLATION INSTRUCTIONS
 CREATING POSITIVE CUSTOMER EXPERIENCES INSTALLATION INSTRUCTIONS PDS-PLUS Universal Projector Mount Model: NORTH AMERICA 3130 East Miraloma Avenue Anaheim, CA 92806 USA USA and Canada Phone: 1.800.368.9700
FP-4855 Flat Panel Television Stand ASSEMBLY INSTRUCTIONS
 FP-4855 Flat Panel Television Stand ASSEMBLY INSTRUCTIONS Patent Pending Italian Designed A Product of China Do not discard these instructions M-1_051607v3 Bell O International Corp. will not be responsible
Stand Aid User Manual REF: 1914
 Stand Aid User Manual REF: 1914 The Chattanooga Group Alliance TM Stand Aid is a manual standing aid to allow patients to assist themselves in preparation for transport. Patients qualified to use the Stand
SIDE FOLDING POST ADJUSTMENTS
 SIDE FOLDING POST ADJUSTMENTS TABLE OF CONTENTS WARNINGS AND SAFETY INFORMATION 3 TOOLS REQUIRED 4 GENERAL NOTES 5 POST IDENTIFICATION 6 POST TO CURTAIN CONNECTIONS 8 P01/P03 LOCK PLATE HEIGHT ADJUSTMENT
USER GUIDE Crystal - Hardware Mount
 USER GUIDE Crystal - Hardware Mount Height 30.7" (78 cm) Minimum Opening 29.5" (75 cm) Maximum Opening 39.75" (101cm) IMPORTANT: Qdos wants to keep your children safe and for that we need you to do your
SURE SHOT DUAL ELECTRONIC BASKETBALL GAME ASSEMBLY INSTRUCTIONS
 SURE SHOT DUAL ELECTRONIC BASKETBALL GAME ASSEMBLY INSTRUCTIONS NG33BL THANK YOU! Thank you for purchasing this product. We work around the clock and around the globe to ensure that our products maintain
Summit Classic Deluxe Tripod 12 Leg Kit PN WARNING
 Summit Classic Deluxe Tripod 12 Leg Kit PN 81519 You must fully read, understand and follow these warnings and instructions (written and video) Failure to follow these instructions may cause serious injury
Owner s Manual & Safety Instructions
 Owner s Manual & Safety Instructions Save This Manual Keep this manual for the safety warnings and precautions, assembly, operating, inspection, maintenance and cleaning procedures. Write the product s
MODEL M1023 QUICK CHANGE COLLET ATTACHMENT INSTRUCTION MANUAL. Phone: On-Line Technical Support:
 MODEL M1023 QUICK CHANGE COLLET ATTACHMENT INSTRUCTION MANUAL Phone: 1-360-734-3482 On-Line Technical Support: tech-support@shopfox.biz #6727BL COPYRIGHT JANUARY, 2005 BY WOODSTOCK INTERNATIONAL, INC.
BASE & WALL CABINET SETUP GUIDE BY SUNSTONE
 BASE & WALL CABINET SETUP GUIDE BY SUNSTONE Read all instructions before you install cabinet. Very important to follow each step in order as detailed in this Instruction Guide!!! To installer or person
ASSEMBLY INSTRUCTIONS
 AVSC-2123 Audio Video System ASSEMBLY INSTRUCTIONS PATENT PENDING FOR YOUR SAFETY, PLEASE FOLLOW THESE PRECAUTIONS:! ALWAYS REMOVE THE TV AND OTHER EQUIPMENT FROM THE FURNITURE PRIOR TO MOVING THE ASSEMBLED
Single-Sliding Header Mount INSTALLATION INSTRUCTIONS
 1-800-701-4782 Single-Sliding Header Mount INSTALLATION INSTRUCTIONS GATEWAY SO# OPENING SIZE: W x H PULLEY SYSTEM: YES / NO Upon receiving your Gateway Door, inspect packaging and contents for freight
MM540 Installation Instructions IMPORTANT SAFETY INSTRUCTIONS - SAVE THESE INSTRUCTIONS
 MM50 Installation Instructions IMPORTANT SAFETY INSTRUCTIONS - SAVE THESE INSTRUCTIONS Please read this entire manual before you begin. Do not unpack any contents until you verify all requirements on PAGE.
Installation Instructions
 Installation Instructions Sure Step (Part # DN260-S4B/ DN260-S4S Part # DN270-S4B/ DN270-S4S) 2009-2010 Dodge Ram1500 Crew Cab & Quad Cab 2010 Ram 2500/3500 Crew Cab For Technical Support/Warranty Information
Assembly Instructions and Parts Manual JPSF-1 Fence and JPSR Rail Set
 Assembly Instructions and Parts Manual JPSF-1 Fence and JPSR Rail Set WALTER MEIER (Manufacturing) Inc. 427 New Sanford Road LaVergne, Tennessee 37086 Part No. M-708482 Ph.: 800-274-6848 Revision C2 02/2013
BMW F 800 GS // F 700/650 GS Skid Plate INSTALLATION INSTRUCTIONS
 made in USA BMW F 00 GS // F 00/0 GS Skid Plate INSTALLATION INSTRUCTIONS Dear Rider, Thank you for choosing AltRider! Whether a seasoned world adventurer or a first time ADV-Newbie, we welcome you to
Installation Guide. Model VLS-TM1540. Universal Tilt/Pivot Wall Mount for use with Flat Panel Displays
 Installation Guide www.revenaproducts.com 4915 SW Griffith Drive Suite 302 Beaverton, OR 97005 Model VLS-TM1540 Universal Tilt/Pivot Wall Mount for use with 15-40 Flat Panel Displays Installation Guide
INCLUDES BENCH MODELS:
 SHOOTING BENCH OWNERS MANUAL & USAGE INSTRUCTIONS INCLUDES BENCH MODELS: AR02-B The Deluxe Shooting Bench AR03-B The Swivel Action Shooting Bench AR02-B DELUXE SHOOTING BENCH WARNING: Do not use without