** KEY TIP See Web Site Print large details that are specific to your installation **
|
|
|
- Evangeline Collins
- 6 years ago
- Views:
Transcription
1 Sundance Supply, LLC Base & Cap System Installation ** KEY TIP See Web Site Print large details that are specific to your installation ** (Also see printing on the film that covers the sheet, for proper placement.) To order Polycarbonate and Base & Cap see > Note: We do not sell ridge or wall flashing, shop local. Store poly out of sun or film will stick. Install 8, 10, 16 or 25mm polycarbonate on structures with horizontal purlins & girts or attach to vertically running rafters & posts. Minimum 1/12 (5º) roof slope required. - Cover a greenhouse, pool enclosure, large skylight or metal building frame. Easy-To-Install. Attach Base to purlins or rafters, lay on Polycarbonate & attach Cap. Leak Proof. Aluminum Cap seals tight on polycarbonate. Cap Screws set quickly. Cap screws seal tight. Versatile. Specify Polycarbonate thickness & Cap Screw length will accommodate. Strong. Aluminum Base profile will span over and attach to purlins, see load chart p 3. Roof Access Notes: Access to roof for Base, Cap, screw & flashing sealant achieved via a step ladder positioned in empty roof bay to left or right of already installed poly. Install of 1st & last sheet done by placing ladder outside structure. Work from upper step so you can reach over sheet. 4 foot wide sheets are easier to reach over to set screws and are best for roof applications. Start at one end of the structure, work towards other end. Do all steps as you go and it will not be necessary to gain access to the roof again. Clean sheet with a hose. Do often. Access to the ridge to install and/or seal the flashing may also be achieved by placing 2ʼ x 3ʼ sheets of plywood, with Non-Slip Rug Padding glued to the back, over the installed polycarbonate. Select 3M #90 spray glue for best results. Advance planning to proceed as described in the previous paragraph may result in an easier installation. Your situation and skill level will dictate the best way to proceed. ( 1 )
2 General Install Note: Sheet must be supported on all 4 edges with a min. of 1/2" of sheet bearing on Base or frame. When using sheets that are cut along the width, and no longer have a rib at the edge, position sheet so first rib is supported by a minimum of 1/2". For high winds see P 12. Position sheet so UV protected side faces sun (unless 2-UV) and remove film from Both Sides of sheet prior to installation. Screw counting and attaching procedure for screws attached along perimeter of roof & walls, thru Corners and thru Flashing. For Horizontal Purlin & Girt or Rafter & Stud Framing: #10 x 2" wood or #12 x 1-1/2" self-drilling metal screws with 3/4" sealing washers are used when screwing through 8mm, 10mm & 16mm polycarbonate. #10 x 2-1/2" wood or #12 x 2" self-drilling metal screws with 3/4" sealing washers are used when attaching through 25mm polycarbonate. Roof - See page 6 for screws in body of sheet Do Not place silicone under sealing washer 1 screw per ft. along top edge of roof. Screws go thru ridge flashing, into purlin or blocking below. Use 1 screw per foot along the lower edge of sheet, positioned between Base & Cap. Aluminum Corner Trim (use 1 screw 2" from ends and every 12" along each leg of Corner). Walls - See page 6 for screws in body of sheet Do Not place silicone under sealing washer Aluminum Corner Trim (use 1 screw 2" from ends and every 12" along each leg of Corner). On side or front walls, use 1 screw per foot along the top & bottom edge of sheet, position between Base & Cap. Screw goes through sheet and into girts or top & bottom plates. On gable ends, with Corner Trim at top of sheet, place 1 screw per foot along the bottom edge of sheet, position between Base & Cap. Screw goes through sheet and into girts or bottom plates. Aluminum Corner Trim (use 1 screw 2" from ends and every 12" along each leg of Corner). Around Doors, Windows, Fans & Shutters 1 screw every 12" around perimeter of these items as needed. Cover cut edges with U-Profile. Note: Screws provided to attach Base to Frame and Cap to Base. Screws to hold on U-Profile also provided. Base screws attached to roof purlins and wall girts (or rafters & studs) as laid out in your design. Cap screws positioned 1-1-2" from ends and about every 12" on-center. Installation Tools & Supplies: - Marking Pen (lay out cuts on film covering poly, note on sheet which detail side toward Sun) - Saw Horses & Planks (for laying sheet on when cutting) - Circular Saw and fine tooth plywood blade for cutting polycarbonate, or - Jig Saw with Fine Blade (option to using a circ. saw for polycarbonate, best for curved cuts) - Utility Knife & Sharp Blades (change often when cutting 8mm polycarb. for quick, safe cuts) - Fine Tooth Key Hole Saw (for cutting fan opening in sheet if jig saw not available) - Power Miter Box with fine tooth blade (for cutting extrusions) - Hacksaw (optional method of cutting extrusions) - Vacuum or Blower (for cleaning polycarbonate chips from center of sheet) - Straight Edge (for cutting polycarbonate when using a utility knife) - Spring Clamps w/rubber tips (for holding straight edge when cutting sheet) - Cordless Drill w/ adjusting chuck for driving screws to proper tightness - Medium Power Electric Drill for pre-drilling aluminum - Caulking Gun - Magnetic Hex Head Drivers ¼ & 5/16 Plus 1/16", 3/16", 1/4" steel cutting drill bits. Standard twist type. Satin Spar Varnish or Verithane: Coat surface poly. rests against to protect wood. ( 2 )
3 Method #1 - Install Over Roof Purlins or Wall Girts. Read before install. Recommended Purlin/Girt Spacing to Support Load, 48" wide Sheet, lbs. per sq. ft. Purlin/Girt Spacing Bending Radius 8mm NA NA NA 20 lbs. 35 lbs. 40 lbs. 8 feet 10mm NA NA 20 lbs. 35 lbs. 50 lbs. 60 lbs. 8 feet 16 & 25mm 3-Wall 20 lbs. 30 lbs. 35 lbs. 60 lbs. 75 lbs. 95 lbs. 9 feet - - Purlin Spacing 90" 75" 63" 54" 48" 36" 16mm X-Wall NA NA 20 lbs. 35 lbs. 45 lbs. 80 lbs mm X-Wall 20 lbs. 35 lbs. 45 lbs. 60 lbs. 80 lbs. 105 lbs Do Not Bend Load in lbs./sq. ft. Roof slope over 7/12 snow tends to slide off. Spacing may be relaxed. No specs available A. Place 1st panel A (in some cases cut to size) on roof purlins or wall girts. Dimension from outside of structure to center of 1st or last Base 48-1/2". First and last is less if sheet to overhang gable end. Intermediate Base 49" on-center. Then cover with Corner (see "B" above). B. Place Base C adjacent to panel & fasten with base screws to roof purlins or wall girts. Use two if purlin 2 wide or wider, for greater resistance against uplift, in extreme wind areas. Place 1 apart for maximum strength. Predrill holes in Base ¾ from end and every 12 on-center. (Select a standard point, twist type drill - 3/16 for Tan 1-5/8 Wood Screws & 1.25 Self Drillers, 3/16 for 1.5 Self Drillers, (used on metal frames). Leave about 1/8" between edge of sheet & vertical post in center of Base. Sheet should extend 1/2 past lower edge of roof Base, allowing for placement of U-Profile (drawings on following pages will show specifics for various details). Note: Do Not place silicone under or over Cap Screws - Do Not predrill for 3/8" U-Profile screws, they are self-drillers ( 3 )
4 At gable end, on the vertical surface, extend Base to top of frame, Corner Trim covers top of sheet.aluminum tape covers sheet end under Corner, not U-Profile. A rib of polycarb. sheet must bear a minimum of 1/2" on Base for proper support. C. Place the next panel D in the open side of Base Extrusion. D. Fasten Cap E to Base (over 2 panels) using driver bit (provided) in portable drill. Cap screws positioned 1-1-2" from ends & every 12" on-center (see p. 12 if over 90 mph wind). Predrill 3/16" hole in Cap as required. Set clutch for snug fit, using care to not strip screw head or threads. Position drill perpendicular to screw for proper alignment of screw. Continue with other sheets. E. Fasten Corner Trim and U-Profiles according to appropriate drawing/s presented in this manual. Also see notes on screw counting and attaching on page 2. Please note all Base & Cap and small screws to hold U at lower edge of roof are included with your order. U-Profile is used at lower edge of roof sheets, top and bottom of side walls (freestanding structures) or front wall (attached structures), bottom of gable end walls and around doors, fans & shutters. Corner Trim used where roof meets gable end and on wall corners. Method #2 - Install Over Roof Rafter & Wall Studs. Read before install. Recommended Rafter/Stud Spacing to Support Load, 48" wide Sheet, lbs. per sq. ft. Blocking Placement Poly. Rafter/Stud Spacing 35 lb. load 45 lb. load 60 lb. load 80 lb. load 100 lb. load 8mm 48-3/4" to 49" every 2.5 ft. every 2.25 ft. every 2 ft. NA NA 10mm " every 3 ft. every 2.75 ft. every 2.25 ft. NA NA 16&25mm 3-wall " every 3.5 ft. every 3.25 ft. every 3 ft. every 2 ft. NA 16mm X-Wall " every 5 ft. every 4.5 ft. every 3.75 ft. every 2.75 ft. every 2 ft. 25mm X-Wall " every 6.25 ft. every 5.25 ft. every 4.5 ft. every 3.5 ft. every 3 ft. Load lbs./sq. ft. Roof slope over 7/12 snow tends to slide off. Spacing may be relaxed. No specs. Horizontal blocking (above) required for load support. In humidity situations set 1/4" back from outer surface of frame, place spacer in middle of blocking, condensation will move past blocking. Or place vertical members between rafters or studs to support sheet. With intermediate vertical members horizontal blocking is minimized, vertical member supports mid-sheet load. Only one Spacer in middle of sheet, at blocking 4 ft. sheet, two spaced even on 6 ft. sheet. Note: Do Not place silicone under or over Cap Screws - Do Not predrill for 3/8" U-Profile screws, they are self-drillers ( 4 )
5 A. Place 1st panel (in some cases cut to size) on roof rafters or wall studs. Dimension from outside of structure to center of 1st or last Base (rafter or stud) is 48-1/2". Then cover with Corner (see page 10). First and last Base position is less if polycarbonate sheet to overhang gable end. B. Place Base adjacent to panel (over roof rafters or wall stud) & fasten with base screws to roof rafter or wall stud. Predrill holes in Base ¾ from end and every 12 on-center. (Select a standard point, twist type drill - 3/16 for Tan 1-5/8 wood & 1.25 Self Drillers, 3/16 for 1.5 Self Drillers (for metal frames). Leave about 1/8" between edge of sheet & vertical post in center of Base. Sheet should extend 1/2 past lower edge of roof Base, allowing for placement of U- Profile (drawings on following pages will show specifics for various detail). At gable end extend Base to top of frame, Corner Trim covers top of sheet. Aluminum tape covers sheet end under Corner, not U-Profile. Note: A rib of polycarbonate sheet must bear a minimum of 1/2" on the Base for proper support. ( With vertical running rafters & studs Intermediate Base positioning is 49" on-center.) C. Place the next panel in the open side of Base Extrusion. D. Fasten Cap to Base (over the 2 panels) using #2 phillips bit in portable drill. Cap screws are positioned 1-1-2" from ends and about every 12" on-center. Predrill 3/16" hole in Cap as required. Set clutch for snug fit, using care to not strip screw head or threads. Position drill perpendicular to screw for proper alignment of screw. Continue with other sheets. E. Fasten Corner Trim and U-Profiles according to appropriate drawing/s presented in this manual. Also see notes on screw counting and attaching on page 2. Please note all Base & Cap and small screws to hold U at lower edge of roof are included with your order. U-Profile is used at lower edge of roof sheets, top and bottom of side walls (freestanding structures) or front wall (attached structures), bottom of gable end walls and around doors, fans & shutters. Corner Trim used where roof meets gable end and on wall corners. Note: Base and Cap screw positioning decreased in high wind areas (see p. 12 if over 90 mph wind). General Install Note, for installing polycarbonate: Local building dept. can provide snow & wind loads for your areas The ability to support a specific snow load is a factor of frame strength and polycarbonate sheet rigidity. Wind load requirements are usually met by following standard screw placement guidelines as shown in the Installation Details. Cap receives screws at ends of each piece and every 1 ft. on center. When fastening Corner Trim or through polycarbonate (adjacent to U-Profile), screws with 3/4" sealing washers are to be set at corners of glazed areas and every 1 ft. on-center. For placement of screws in body of the sheet see Polycarbonate Positioning & Attachment (p 6). Difficulty getting the bldg. dept. to approve plans? Stress the frame is designed to support the load. Polycarbonate is a skin material only. If needed, suggest extra purlins or blocking to decrease unsupported panel size by 50%. Screw pattern can be increased for extreme high wind areas. See Structural Load on page 12. ( 5 )
6 (6)
7 Ridge Flashing Install: Flashings are typically fabricated in 8 ft. sections. 1) Easiest method of install is to set and screw down a section of Flashing that covers first sheet of polycarb (on double slope roof - both sides). With Type A Flashing cut notches for Cap, page 8. On Type B Flashings the Caps butt to leading edge of the Flashing. Set screws so flashing presses against polycarb, place a bead of sealant at this point and stop there. Lay next sheet. Screw down Flashing & place bead of sealant along the edge of Flashing that comes in contact with poly, and also where Cap contacts Flashing. Continue installing more poly and Flashing. Overlap seams in Flashing min of 4". This method provides a watertight installation, but care must be taken to lay a smooth bead of sealant on a cleaned surface. 2) More difficult, but cleaner looking, tighter install involves installing flashing after all sheets set. See Lean-To Ridge and Freestanding Ridge details. This requires access to ridge with all poly in place. As mentioned Roof Access Notes, page 1, this can be tricky, best performed by individuals accustom to working on roofs. If working on an attached greenhouse you may be able to gain access to this detail from the roof of the adjoining structure. When installing A Type Flashing, first lay in place, mark where Flashing overlaps Cap at sheet seams. Notch to fit the Cap. When installed, Flashing will rest flat on the poly and Cap. Overlap seams a minimum of 4". On Type B simply butt Cap to sealing flange. Do not cut flashing to length, as this will create a slight curl at the cut & an uneven overlap. If the overlap ends up being 4 ft., ok. Purchase flashing from sheet metal fabricator, or off shelf at lumber yards. (If purchasing a metal building frame, you may get their ridge flashing). Do a simple scale drawing that shows dimensions, angle, etc. At edge of Type A Flashing that covers the polycarbonate we suggest a 1/2" long bend (flange). Draw so that the leg(s) of the flashing are tilted down 5 from the actual pitch of your roof. This will create a small amount of pressure against the polycarbonate sheet, useful in achieving a watertight installation. On Type B Flashing leading edge do a 1/2" hem and 45º bend, creating a sealant flange. Sheet metal should be a minimum of.019" aluminum or 30 gauge steel. Aluminum is easy to fasten through, easy to cut, but is a little flimsy and care is required in handling. Steel is more sturdy, harder to cut and requires pre drilling prior to fastening. Availability at your local sheet metal shop may be the limiting factor. Look in the Yellow Pages under Sheet Metal Work. Some shops, especially those that cater to glass installation contractors, inventory anodized sheet metal in the thickness you will be looking for. In high wind areas use Big Stretch, not silicone, to bond tip of Ridge Flashing to poly Sealant Selection & Application: Silicone used below eave, along Lean-To & Freestanding Ridge Flashing and interface between U-Profile and Existing Wall, see p 10. Also close end of Cap, p 14. See Install Details page online for more details and greater explanation. Use 100%, silicone. 1/4" bead best. Clean all joints with isopropyl (rubbing) alcohol, let dry prior to applying sealant. If splicing Cap or Corner place 1/4" bead of silicone over joint. First clean joints with rubbing alcohol and let dry. Gently tool bead flat with saliva covered finger. Joints at interface of Trim Components should be clean & securely fastened. Make sure U-Profile is butted tightly so bugs do not get in. Allow sealant to dry 24 hrs. before cleaning the poly and metal. Dow 999-A Clear Silicone is available through Sundance Supply, LLC. Calculate running ft. of silicone required for project. One tube will do 25 feet of a 1/4 bead. In high wind areas use Big Stretch, not silicone, to bond tip of Ridge Flashing to poly. See Install Details page online for Big Stretch Product Data Sheet. ( 7 )


8 Ridge Flashing Notch Sealant Cap (at sheet seams) Screws with washers go through ridge flashing every 12 on-center. Drawing shows install on roof purlin. If using rafters a beveled ledger board is required. Type A Flashing: Type B Flashing: If using rafters drawing shows blocking. In high winds or expansion use Big Stretch. ( 8 )
9 More Eave Details Online Above similar for rafter style framing. Metal bldg. style Wall & Roof Corner below. Detail shows vertical blocking, at corner between girts. (9)
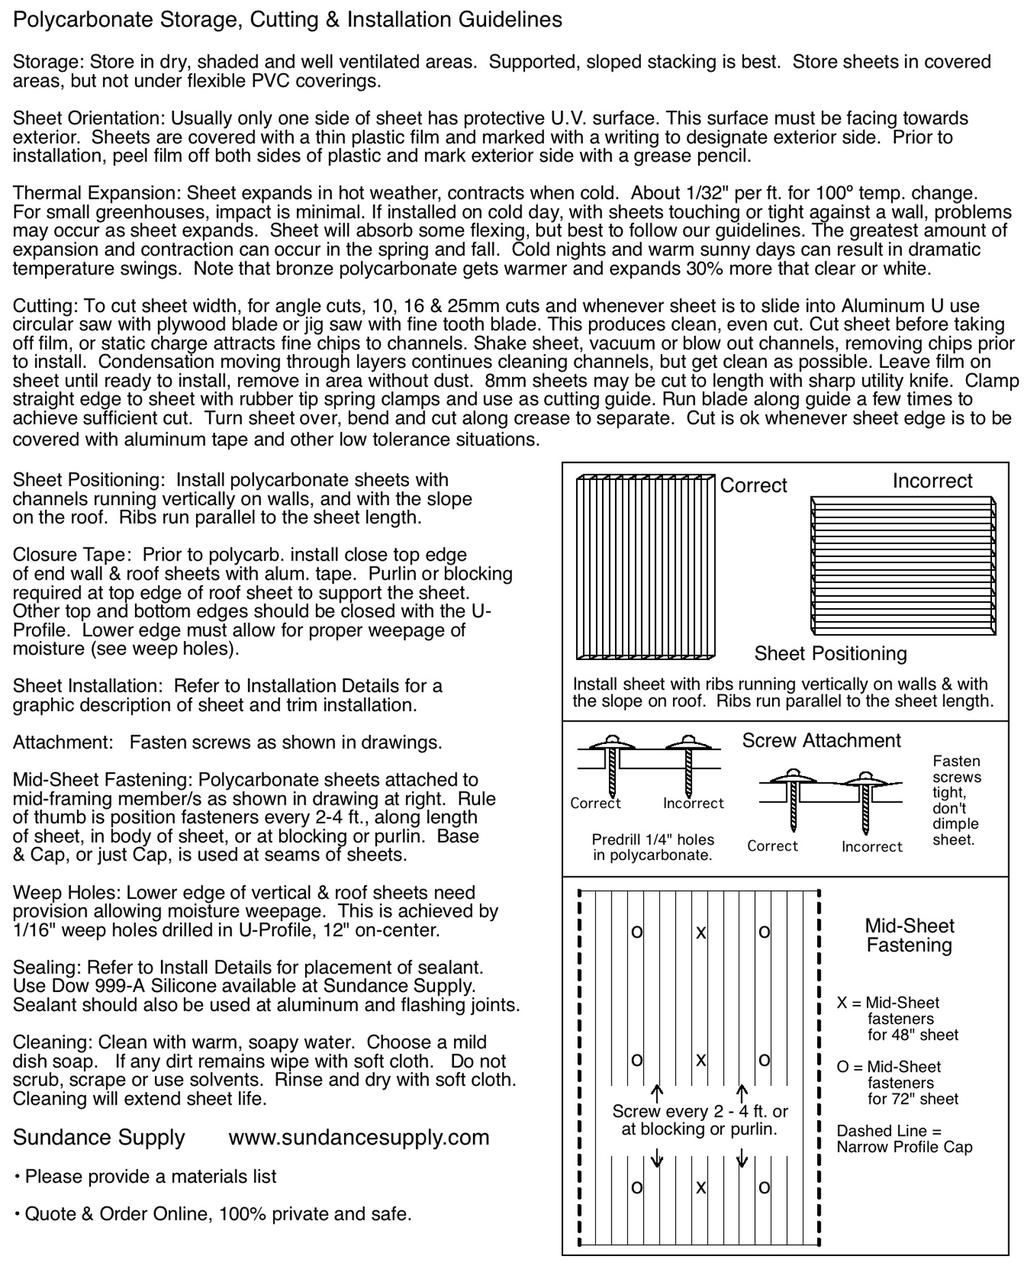
10 Typical Details: Your application may differ, but these are the basics. Roof Corner and Wall Corner detail similar for purlin & girt or rafter & stud style framing. On purlin & girt style framing detail shows blocking placed between either purlin or girt. Lower Edge drawing shows install on wall girt or bottom plate, purlin & girt or rafter & stud style framing. U-Profile can also be used to close polycarbonate edges at top and end of walls. Gable install similar for purlin & girt or rafter & stud style framing. ( 10 )
11 Roof Valley & Poly. to Existing Roofing: Adhesive Roll Flashing (shown above & to the right) has 15 mil Butyl Adhesive (facing down) and a Aluminum backing (that faces the sun). For wider than 3" areas simply overlay, or use 6 wide tape. Make sure polycarbonate is securely fastened to the structure with the screws we sell. Surfaces must be clean and free of moisture and contamination. Do Not Stretch during application. Peel off a few inches of release liner. Apply exactly the first time and do not stretch. Press down firmly at the center and work towards the edge, removing bubbles. Edges must have no openings, tunnels or fish mouths. ( 11 )
12 Structural Loads & Special Screw Positioning for High Wind Areas. Structural Loads are stresses to structure from external or internal forces. Dead loads are gravity loads that are constant throughout the structure's life. These include equipment such as fans, heaters and plants suspended from the frame. Live loads are temporary, such as snow loads and wind loads. Snow loads are determined by factors influencing snow & ice accumulation on structure. Snow loads vary considerably by geographic location. Ask your local bldg. dept. for snow load in your area. ( 12 inches of light, fluffy snow or 2 to 4 inches of heavy, wet snow = about 5 lbs per sq. ft.) Wind loads come from any direction, usually hit side walls perpendicular, most stress at edges. Figures are in lbs. per sq. ft Wind 85 mph 90 mph 100 mph 120 mph 130 mph 140 mph 150 mph 160 mph Above wind load figures provided by SABIC Innovative Plastics, the Lexan manufacturer. Wind speeds up to 90 mph: Screws with 3/4" sealing washers are set at corners of glazed areas and every 1 ft. on-center. Base & Cap System : Screws provided with system to attach Base to frame and Cap to Base. The Base, Cap and Corner receive screws at ends of each Trim piece and every 1 ft. on center. In winds of 110 mph+ decrease distance between screws to every 10". In winds of 125 mph+ place screws every 8 inches. In winds 135 to 150 mph place screws every 6 inches. In winds over 110 mph always consult with engineer to receive a stamp and bldg. dept. approval. For placement of screws in body sheet see Polycarb. Position & Attach, page 6. Increase quantity of screws in mid sheet, horizontally across sheet, to every 12" for wind speeds mph. 10" for wind speeds mph. Combination loads are common. For example, a snowstorm may include high winds. If bldg. dept. says design for a 45 lb. snow load & a 90 mph wind, snow will effect the roof with a 45 lb. load and wind will effect roof as well. To safely design your roof framing, take the 45 lb. snow load, and add for positive loading effect the wind may have on the roof. Your bldg. dept. can provide the combine load. ( 12 )
13 The expansion and contraction of polycarbonate can create noise, follow instructions below. ON SHEETS LESS THAN 10 FT. - TAPE IS NOT REQUIRED Purchase poly sheets 10 ft. or longer and Order Form sends an that presents foam tape option to help eliminate noise due to expansion and contraction of poly. Our 3/8 polyurethane foam tape gets applied as shown below for Base & Cap System. Note: PVC will outgas and attack the poly. Only use our tape, provided free with your order. In Base there is a 1/2" channel to put tape in. Use care to not overlap 1/4" shelf to right and left of channel. See below. ( 13 )


14 Notes: To seal ends of Cap fill with silicone. Not crucial in vertical applications, unless subject to direct rain. We highly recommend Dow 999 Plastic Compatible Silicone Shown below is silicone bead where two Caps butt join each other. ( 14 )
15 Install Policy: Sundance Supply goes to great lengths to provide complete install guidelines for polycarbonate and the Base & Cap System. Often customers do not follow install instructions and problems occur such as leakage, noise, excessive flexing of the sheet, etc. By placing an online, or fax order, customer agrees to policies via electronic or physical signature. In doing so, in regards to install, customer agrees to follow install guidelines and details or be fully responsible for adverse consequences due to not following instructions. If problems occur with materials at install, Contact Sundance Immediately at Proceeding with your own solution could easily create more problems and may actually void the polycarbonate warranty. Always avoid direct contact with PVC films or tapes. Terminology: Blocking & Purlins: These terms can have different meanings in different areas of the country and in different trades. To ensure successful framing and installation of polycarbonate, using our Base & Cap System, it is wise that we agree upon One Definition. Below is how our details and printed material uses these terms. Blocking is a small (horizontally running) framing member that is positioned "Between" rafters or studs, and is on the same plane. Purlins are long (horizontally running) framing members that are "Placed on the Outer Surface" of rafters, trusses, posts or other main frame elements. The Base extrusion has sufficient strength to carry the load, acting as a structural support member, supporting the poly at sheet joining locations. Always refer to load charts for proper spacing of purlins. Girts are simply purlin like items that are on the walls. Purlins are technically on the roof.!!!! ( 15 )
16 Base & Cap System - Screw Usage Avoid leaks, failures and expensive call backs. - It is extremely important to use proper screw in the proper location. - Always pre-drill holes in Base, Cap & Corner for screw placement. Self-drilling screws are Never meant to drill thru these components. - Self drill screws pass thru components, fastening both to the frame. - Screws with 3/4 washers are only meant to go thru the edges and body of the polycarbonate sheet and Corner Trim. - 3/8 Self Drill Screws for U-Profile, zip thru U, into poly, cinching the two together. Do not pre-drill the U. Screws every 8 at eave, 12 lower edge of walls. - Golden Rule: Do not assume you know where screws go. Refer to install drawing specific to the detail you are addressing and see descriptions below. Failure to do so may result in improper installations and possibly void warranty. Screws in Bags with Labels - Please follow instructions #6-3/8 Self Drill Screws - Phillips Drive - Pan Head - For U-Profiles - LABEL: 3/8 S Steel Screws to Secure U-Profile to Sheet as Job Requires #10 Self Tapping Screws - Phillips/Square Drive - Pan Head - For Cap - LABEL: Screws for Securing Cap Extrusion Base & Cap System #10 x 1-5/8 Wood Screws with a Phillips/Square Head - For Base - LABEL: Screws for Securing Base Extrusion Wood Frame #10 x 1.25 Self Drilling Screws with a Hex Head - For Base - LABEL: Screws for Securing Base Extrusion Metal Frame (8 &10mm) #10 x 1.5 Self Drilling Screws with a Hex Head - For Base - LABEL: Screws for Securing Base Extrusion Metal Frame (16 &25mm) Bags of Painted Screws with Assembled Washers & Bags of Unpainted Screws & Washers for Pressure Treated & Metal Frames - These Only go thru top and bottom of Poly Sheet, along outside edges of first and last Poly Sheet, and thru both surfaces of Corner Trim (typically every 1 ft. on-center) and in Body of Poly as noted on page 6 of Base & Cap Install Guide. Please note, in areas with winds over 90 mph the screw spacing must be decreased see page 12. (16)
Aluminum Base & Cap System Installation Guide See - Print large details specific to your installation
 Aluminum Base & Cap System Installation Guide See - http://www.baseandcap.com Print large details specific to your installation. Minimum 1/12 (5º) roof slope required for polycarbonate. Install 8, 10,
Cap & Trim Framing Guide
 Cap & Trim Framing Guide Note: We do not sell framing or ridge flashing material, shop local. Introduction: Focus is on wood framing, but frames can also be fabricated from steel or aluminum. Layout is
40mm Thermoclick. Type II Class 1 Clear Satin Anodize - 201R1 (Mid Grade Commercial)
") http://www.sundancesupply.com 40mm Thermoclick Type II Class 1 Clear Satin Anodize - 201R1 (Mid Grade Commercial) U-Profile 12' Lengths $39 Out System offers a complete set of extrusions and accessories
http://www.sundancesupply.com 40mm Thermoclick Type II Class 1 Clear Satin Anodize - 201R1 (Mid Grade Commercial) U-Profile 12' Lengths $39 Out System offers a complete set of extrusions and accessories
Tuff-Rib Install Guide
 Install Guide bestbuymetalroof.com Page 2 of 27 Page 3 of 27 1. Page 4 2. a. Installation Guide b. Panel Squaring Pages 5, 6 Pages 7, 8 3. Pages 9, 10 4. a. Fascia (optional) b. Eave / 1.5x3.5 Angle c.
PolyCarb has good resistance to many chemicals. Some chemicals may harm the PolyCarb sheets. Contact us when in doubt about any chemical.
 Polycarbonate Panels This manual provides the basic information for working with and installing PolyCarb sheets. Due to their hollow core, prior preparation is needed before the actual installation, with
Wave Profile Installation Guide
 Wave Profile Installation Guide American Pa o Covers Plus Proudly Builds With Tools & Hardware Wave Profile Installation Guide Tape Measure Square Level Felt tipped Marker and/or grease pencil 3/8" Nut
Corrugated Installation and Technical Guide
 Corrugated Installation and Technical Guide AmeriLux International, in partnership with Menards, offers high quality polycarbonate, pvc and fiberglass panels which feature the latest in product technology.
Five Star Panel Installation Instructions
 Five Star Panel Installation Instructions How to Store Five Star Panels You will need to store FIVE STAR PANELS in dry place to prevent staining, deterioration and possibly void all warranties. Stand the
Building With Polycarbonate 101
 Building With Polycarbonate 101 Presented by The Polycarbonate Store A division of Charley s Greenhouse & Garden We make building easy! Multi-Wall Polycarbonate Insulated for lower heating cost Nearly
Dura-Lock Roof System
 DLR-14 Dura-Lock Roof System Assembly and Installation Instructions Read the instructions before starting the job. They explain the steps required to produce a finished product that will meet factory specifications.
Pocket Door Installation Instructions
 Installation Instructions Before getting started: Read instructions thoroughly. Be sure that you have the necessary tools and materials before starting the installation. Consult your local building code
Panel Installation Instructions
 EXTREMELY IMPORTANT INFORMATION PLEASE READ ENTIRE PACKET! Warranty Is Void If Panels Not Installed According to Instructions 1. WARNINGS & SPECIAL NOTES 1.1 Keep panels 24 from Heaters and shield Radiant
GLOSSARY OF TERMS SECTION 8
 GLOSSARY OF TERMS SECTION 8 Anchor Bolt Angle Base Plate Bay Blocking CCB Centerline Chord Cladding Clip Closure Strip An A-307 steel bolt embedded in the concrete footing to anchor the base plate of the
Panel Installation Instructions
 EXTREMELY IMPORTANT INFORMATION PLEASE READ ENTIRE PACKET! Warranty Is Void If Panels Not Installed According to Instructions 1. WARNINGS & SPECIAL NOTES 1.1 Keep panels 24 from Heaters and shield Radiant
Series Sloped glazed Curtain wall. Installation Instructions
 Series 5600 Sloped glazed Curtain wall Installation Instructions Part NO. Y308 February 2013 SECTION TABLE OF CONTENTS PAGE I. General Notes & Guidelines. 3-4 II. Gutter and Mullion Assembly.. 5 III. End
Installation Instructions
 www.marlite.com Effective Date 03/01/2018 ARTIZAN FRP, SYMMETRIX FRP, ENVUE FRP, STANDARD FRP Installation Instructions Statements expressed in this technical bulletin are recommendations for the application
Multi-wall Polycarbonate Installation Instructions
 Multi-wall Polycarbonate Installation Instructions Multi-wall polycarbonate sheet can be used on both gable and arched style greenhouses. These easy to install panels can be attached directly to the greenhouse
Installation Instructions Split Shake, Staggered Shake, Shingle, Perfection Shingle, and Shapes
 Installation Instructions Split Shake, Staggered Shake, Shingle, Perfection Shingle, and Shapes General Guidelines These instructions show one type of installation and are intended for the professional
Steel Reinforced Joining Thank you for choosing Andersen. Please leave this guide with building owner.
 Steel Reinforced Joining (Horizontal/Vertical) for Andersen 400 Series Woodwright & Tilt-Wash Double-Hung, Picture, and Transom Windows and 400 Series Double-Hung Half Circle and Flexiframe Specialty Windows
GROWING BETTER THROUGH DESIGN. 6ft Lean-To LEAN-TO. Assembly Instructions 04/02
 GROWING BETTER THROUGH DESIGN 6ft Lean-To LEAN-TO Assembly Instructions 04/02 6ft Lean-To Greenhouse Base Plan Introduction/Tools/Contents / / Contents This is a copy of our Lean-To greenhouse base plan.
GENERAL INSTALLATION GUIDELINES
 1551 MT. ROSE AVENUE YORK PA 17403-2909 (717) 849-8100 GENERAL INSTALLATION GUIDELINES For Receptor Systems Approved 9/29/2017 Installation Guideline Disclaimer This document contains general installation
Installation Guide. Step 3. Valley Flashing. Step 7. Transition Flashings and Accessories. Step 6. Hip and Ridge Installation
 Step 7. Transition s and Accessories Step 3. Valley Step 6. Hip and Ridge Installation Step 2. Rake Trim Step 5. Installing the Shingles Step 1. Eave Starter Installation Step 4. Endwall s Installation
GENERAL INSTALLATION GUIDELINES
 1551 MT. ROSE AVENUE YORK PA 17403-2909 (717) 849-8100 GENERAL INSTALLATION GUIDELINES For Receptor Systems Approved 08/31/2018 Installation Guideline Disclaimer This document contains general installation
PAT installation of a Sun Dome over a in-ground
 PAT. 3766573 Installation of Sun Domes for in-ground pool GENERAL INSTRUCTIONS: STEP 1. Read thru the entire instructional materials before beginning any installation. You will find that the installation
INSTALLATION INSTRUCTIONS LS X 12-2 X 7 1/2 FRAME LOAFING SHED
 INSTALLATION INSTRUCTIONS LS-24 24 X 12-2 X 7 1/2 FRAME ACTUAL FRAME BASE SIZE: 24 X 12-2 LOAFING SHED Our unique assembly process quickly transforms the individual pieces into a finished structure that
Tuff-Rib. Installation Manual. Nationwide supplier of quality metal roofing. Toll-Free (800) S. Lee Hwy. Cleveland, TN 37311
 S. Lee Hwy. Cleveland, TN 37311") Installation Manual Nationwide supplier of quality metal roofing. 65 S. Lee Hwy. Cleveland, TN 7.. www.bestbuymetals.com Toll-Free (800) 78-00 IMPORTANT NOTICE This manual contains suggestions and guidelines
Installation Manual Nationwide supplier of quality metal roofing. 65 S. Lee Hwy. Cleveland, TN 7.. www.bestbuymetals.com Toll-Free (800) 78-00 IMPORTANT NOTICE This manual contains suggestions and guidelines
Assembly Instructions 10 X 10 Aluminum Frame Building
 Assembly Instructions 10 X 10 Aluminum Frame Building 27 97 9 8 47 36 74 52 10 10 X 10 Square Building W/ Dome Includes: The Steel Entry Door with a Dead Bolt Lock assembly and Aluminum Door Frame. Metal
Installation Guide Simplicity Alfresco. V1.9 Lu070318
 0333 305 5272 www.canoports.co.uk Installation Guide Simplicity Alfresco V1.9 Lu070318 Tools Required Below is a list of tools that you will require to install your the Simplicity Alfresco System. Cordless
14000 I/O Series Flush Glaze. Fabrication and Installation Instructions
 14000 I/O Series Flush Glaze Fabrication and Installation Instructions Last saved on 12/18/2009 Table of Contents GENERAL CONSTRUCTION NOTES...3 EXTRUDED ALUMINUM PARTS...4 ACCESSORIES...5 OVERVIEW...6
SKIN SYSTEM ORDER FORM NOTES AND REQUIREMENTS
 SKIN SYSTEM ORDER FORM NOTES AND REQUIREMENTS STRUCTURAL SUPPORTS It is recommended that all rafter centers be no greater than 24 and mullions required every 4ft down the slope. Slope Distances - Maximum
SILVERBACK INSTALLATION MANUAL
 SILVERBACK INSTALLATION MANUAL R-SERIES SOLAR RACKS T OLL FREE 866-766-3727 WWW.ROOFSCREEN.COM Introduction... 2 The Silverback Solar Racking System... 2 This manual... 2 Application... 2 System Overview...
Steel Roofing & Siding INSTALLATION GUIDE
 Steel Roofing & Siding INSTALLATION GUIDE Your Authorized Dealer is: WASHINGTON Auburn (800) 700-7228 WASHINGTON Spokane (866) 321-5954 www.nuraymetals.com CALIFORNIA Redlands (800) 806-8729 CONTENTS BEFORE
CROSSBAR RAFTER ISOMETRIC
 Super Sky Products' typical glazing system consists of glass panels or "lites" which are attached to the main framing members using extruded aluminum "retainers" or "pressure plates". These retainers are
Installation Guidelines
 Page 1 Tools You ll Need 4 ft. Carpenter s level Chalk line (to mark U channel locations) Cordless drill/nut driver Caulking gun Chop saw with a metal cutting blade on it (required to make accurate and
GIRTS ON BACK OF BUILDING
 GIRTS ON BACK OF BUILDING ALL GIRTS ARE 1 1/2 SQUARE TUBE. GIRT LENGTHS FOR 12, 20, 24, AND 30 WIDE BUILDINGS: ON 12 WIDE BUILDINGS GIRTS ARE 67 3/4 LONG ON 20 WIDE BUILDINGS GIRTS ARE 56 3/4 LONG ON 24
CONTENTS OVERVIEW. For a complete set of CAD drawing details, please visit LaminatorsInc.com. 1 Essential Equipment. 1 Essential Supplies
 LaminatorsInc.com CONTENTS 1 Essential Equipment 1 Essential Supplies 2 Panel Preparation 4 Panel Extrusion Preparation 5 Panel Assembly 6 Wall Sheathing Preparation (Over Plywood) 6 Wall Sheathing Preparation
Installation Guidelines
 Page 1 Tools You ll Need 4 ft. Carpenter s level Chalk line (to mark U channel locations) Cordless drill/nut driver Caulking gun Chop saw with a metal cutting blade on it (required to make accurate and
 SUPREME WALL GARDEN ASSEMBLY INSTRUCTIONS 24/08/16 www.hallsgreenhouses.com Please refer to website for the most up to date instructions. SAFETY WARNING 1. Always wear protective glasses, shoes, gloves
INSTALLATION INSTRUCTIONS LS X 12-2 X 7 1/2 FRAME LOAFING SHED
 INSTALLATION INSTRUCTIONS LS-30 30 X 12-2 X 7 1/2 FRAME ACTUAL FRAME BASE SIZE: 30 X 12-2 LOAFING SHED Our unique assembly process quickly transforms the individual pieces into a finished structure that
AWNING / PATIO COVER INSTALLATION INSTRUCTIONS
 AWNING / PATIO COVER INSTALLATION INSTRUCTIONS Before You Begin Read the installation instructions thoroughly before beginning the installation procedure. Perspective In the Awning Instructions, Back means
TREX PERGOLA INSTALLATION INSTRUCTIONS
 RECOMMENDED TOOLS/SUPPLIES: Pencil 4' Level Measuring Tape Framing Square/Speed Square 8' High Step Ladder (Two recommended) Hacksaw or Bolt Cutters Socket Wrench with 9/16" Socket and 3/4" Deep Socket
Aluminum Clad Wood Window 1/2 Reinforced Field Mulling and Stacking Supplement
 Aluminum Clad Wood Window 1/2 Reinforced Field Mulling and Stacking Supplement 1 Aluminum Clad Wood Window 1/2 Reinforced Field Mulling and Stacking Supplement The following instructions are a supplement
INSTALLATION INSTRUCTIONS FRAMELESS CONTINUOUS HINGE SHOWER ENCLOSURE QCI5233
 INSTALLATION INSTRUCTIONS FRAMELESS CONTINUOUS HINGE SHOWER ENCLOSURE QCI5233 QCI5233 Rev 0 Page 1 Certified 06/20/2016 INSTALLATION NOTES: Unpack your unit carefully and inspect for freight damage. Lay
TABLE OF CONTENTS A. PBR
 TABLE OF CONTENTS A. PBR Panel 1. PBR Panel Architect/Engineer Information....................................... 2 2. PBR Panel UL 90 Requirements............................................... 3 3. PBR
LUX INSTALLATION GUIDE. LUX Panel V Groove Installation. Installation Guide. February
 LUX Panel V Groove Installation Installation Guide February 2017 www.luxpanel.ca LUX Panel V Groove Installation LUX panel steel cladding is designed to be installed vertically, horizontally, diagonally
Table of Contents. Fasteners... 4 Venting Preparation Installation with Battens - DECRA Tile & DECRA Shake 1
 Table of Contents DECRA Tile & Shake Roof Overview... 2 Introduction... 3 Safety... 3 Tools.... 3 Estimating Sheets... 4 Codes & Requirements... 4 Roof Slope... 4 Underlayment... 4 Deck Preparation....
Panel Guard Installation For Adhesive Attachment
 For Adhesive Attachment 1. Clean roof surface with isopropyl alcohol where snow guard is to be attached-ensure area is completely dry before attaching snow guard 2. Cut tip of adhesive nozzle (Surebond
DW HORIZONTAL INSTALLATION
 AR-PJ-01-DW2H 2" HORIZONTAL PANEL JOINT AR-PJ-02-DW2H 2" VERTICAL PANEL JOINT AR-PJ-03-DW2H 3" HORIZONTAL PANEL JOINT AR-PJ-04-DW2H 3" VERTICAL PANEL JOINT AR-PJ-05-DW2H CUSTOM REVEAL AR-PJ-06-DW2H DW-2000S
DUTCH GABLE FREESTANDING CARPORT
 DUTCH GABLE FREESTANDING CARPORT STRATCO OUTBACK ASSEMBLY INSTRUCTIONS. Your complete guide to building a FREESTANDING Outback DUTCH GABLE CARPORT BEFORE YOU START Carefully read these instructions. If
E-Z BUILD STEEL BARN 12' 12' 12' 16' 12' 20'
 E-Z BUILD STEEL BARN 12' 12' 12' 16' 12' 20' BUILD You can construct your own E-Z frame barn with the help of this step by step guide. North American softwood dimensional lumber sizes: Nominal Actual in
INSTALLATION INSTRUCTIONS FRAMELESS CONTINUOUS HINGE SHOWER ENCLOSURE QCI5232
 INSTALLATION INSTRUCTIONS FRAMELESS CONTINUOUS HINGE SHOWER ENCLOSURE QCI5232 QCI5232 Rev 0 Page 1 Certified 06/20/2016 INSTALLATION NOTES: Unpack your unit carefully and inspect for freight damage. Lay
INSTALLATION INSTRUCTIONS LS X 12-2 X 7 1/2 FRAME LOAFING SHED
 INSTALLATION INSTRUCTIONS LS-12 12 X 12-2 X 7 1/2 FRAME ACTUAL FRAME BASE SIZE: 12 X 12-2 LOAFING SHED Our unique assembly process quickly transforms the individual pieces into a finished structure that
Revision Date: April 01, Paramount Enclosure
 Paramount Enclosure www.urbanindustries.com 15 Urban Industries, Inc. 2008 Tools The following tools are recommended for the installation of the Paramount Aluminum Enclosure and roof. 1 2 Level 1 4 Level
Barrel Vault Counter Batten and Batten
 Barrel Vault Counter Batten and Batten INSTALLATION GUIDE www.gerardusa.com INSTALLATION NOTIFICATION The installation procedures demonstrated in this manual are recommended methods for the installation
TOLL FREE:(888) FAX:(941) ASSEMBLY of ProTEC CONCRETE STRUCTURAL INSULATED PANEL
 FAX:(941) ASSEMBLY of ProTEC CONCRETE STRUCTURAL INSULATED PANEL") ASSEMBLY of ProTEC CONCRETE STRUCTURAL INSULATED PANEL The ProTEC panels are manufactured with grooves on all four sides to accept the steel components. This grooving applies to the regular panel whose
ASSEMBLY of ProTEC CONCRETE STRUCTURAL INSULATED PANEL The ProTEC panels are manufactured with grooves on all four sides to accept the steel components. This grooving applies to the regular panel whose
With Illustrations, Drawings & Step By Step Details. Click Here To Download 12,000 Shed Plans. 1 P a g e Download 12,000 More Shed Plans
 With Illustrations, Drawings & Step By Step Details Click Here To Download 12,000 Shed Plans 1 P a g e Download 12,000 More Shed Plans Table of Contents OVERVIEW... 3 MATERIALS & CUTTING LISTS... 4 DRAWINGS,
TABLE OF CONTENTS A-1
 TABLE OF CONTENTS PAGE NUMBER: DETAIL DESCRIPTION A-1...TABLE OF CONTENTS A-2...GENERAL NOTES B-1...GENERAL INFORMATION C-1...EAVE DRIP DETAIL C-2...EAVE DRIP with GUTTER DETAIL C-3 & C-4...FIXED RIDGE
SUNLITE Plus. Installation Instructions for Greenhouses. Multiwall Polycarbonate Sheet with Built-in Condensation Control
 SUNLITE Plus Multiwall Polycarbonate Sheet with Built-in Condensation Control Installation Instructions for Greenhouses www.palram.com SUNLITE Plus Contents Chapter Page Sheet Dimensions 2 Distance Between
Installation Guide Contemporary Alfresco V1.3 LU
 Installation Guide Contemporary Alfresco V1.3 LU 010818 Tools Required Below is a list of tools that you will require to install you're the Contemporary Alfresco System. Cordless Drill Mastic Gun Spirit
BARRELL VAULT BATTENLESS
 i BARRELL VAULT BATTENLESS INSTALLATION GUIDE INSTALLATION NOTIFICATION The installation procedures demonstrated in this manual are recommended methods for the installation of the Gerard Barrel Vault battenless
CONTENTS. Transitions Board and Batten Vertical Installation... 10,11
 INSTALLATION MANUAL CONTENTS Important Notes... 2-4 Weather Protective Barriers... 2 Storage and Transportation... 2 Tools and Equipment... 2 Fastener Choices... 3 Wall Preparation... 3,4 Flashing... 4
8 Ft Wide Enclosure Assembly Guide
 www.rmfiberglass.com 8 Ft Wide Enclosure Assembly Guide RM Products Ltd 1-800-363-0867 www.rmfiberglass.com Table of Contents 1. Parts and Tools List page 3 2. Hardware page 4 3. Maintenance page 5 4.
4. Partially open the operating panel and tilt the top toward the interior of the door (Figure 4). Lift the panel off the sill and set it aside.
. Lift the panel off the sill and set it aside.") Effective Date: 10/1/2017 Tools Needed Kit Contents Hardware Kit Safety Glasses Cordless drill Phillips screw bit Two-step drill bit (3/8-1/8 ) utility knife Interior Mullion Exterior Mullion Cover clamps
Effective Date: 10/1/2017 Tools Needed Kit Contents Hardware Kit Safety Glasses Cordless drill Phillips screw bit Two-step drill bit (3/8-1/8 ) utility knife Interior Mullion Exterior Mullion Cover clamps
HOLLOW CORRUGATED SHEETS
 P R O D U C T C A T A L O G U E HOLLOW CORRUGATED SHEETS www.tuflite.com Bangalore (Head Office) #240/1, Ganesh Krupa, 18th Cross, Sadashivanagar, Bangalore- 560 080, India P: +91 80 4252 5252 F: +91 80
14000 Series. Fabrication and Installation Instructions
 14000 Series Fabrication and Installation Instructions 14000 Series Revision December 01, 2009 Table of Contents GENERAL CONSTRUCTION NOTES... 3 EXTRUDED ALUMINUM PARTS... 4 ACCESSORIES... 7 OVERVIEW...
900 SERIES WALL PANELS
 CI-DS-01-900 CI-PP-01-900 CI-PJ-01-900 CI-PJ-02-900 CI-PJ-03-900 CI-BS-01-900 CI-BS-02-900 CI-BS-03-900 CI-BS-04-900 CI-BS-05-900 CI-OC-01-900 CI-OC-02-900 CI-IC-01-900 CI-FO-01-900 CI-FO-02-900 CI-FO-03-900
INTEX Millwork Solutions SECTION EXTERIOR PVC PERGOLAS (IBC Compliant)
") SECTION 066030 EXTERIOR PVC PERGOLAS (IBC Compliant) PART 1 - GENERAL 1.1 RELATED DOCUMENTS A. Drawings and other Contract Documents, listed in the agreement between the Owner and Contractor, apply to
SECTION 066030 EXTERIOR PVC PERGOLAS (IBC Compliant) PART 1 - GENERAL 1.1 RELATED DOCUMENTS A. Drawings and other Contract Documents, listed in the agreement between the Owner and Contractor, apply to
Storing, Handling, and Cutting Steel Panels
 Storing, Handling, and Cutting Steel s Storing Specifically check your quantities, colors, and lengths All materials should be used as soon as possible Steel bundles should be stored indoors with enough
Installation Instructions
 Installation Instructions Alcove Enclosure Before Installation please check that your shower enclosure system is undamaged Please read these instructions carefully March 2015 TOOLS REQUIRED Electric or
12, 14 & 16 Wide Enclosure Assembly Guide
 www.rmfiberglass.com 12, 14 & 16 Wide Enclosure Assembly Guide RM Products Ltd 1-800-363-0867 www.rmfiberglass.com Table of Contents 1. Handling and Storage page 3 to 5 2. Parts and Tools List page 7 3.
FOLDING DOOR - FOR FACTORY ASSEMBLED JAMBS WITH APPLIED SILL
 FOLDING DOOR - FOR FACTORY ASSEMBLED JAMBS WITH APPLIED SILL READ SPECIFIC INSTALLATION INSTRUCTIONS COMPLETELY BEFORE STARTING ANY INSTALLATION Failure to install and maintain our product according to
E N G L I S H GARDEN SHED. Assembly Instructions. Suitable for Models WITH VARYING DEPTHS
 GARDEN SHED Assembly Instructions Suitable for Models 6' Wide 8' Wide 0' Wide WITH VARYING DEPTHS GI0003 November 0 INSTALLATION ADVICE It's Not That Difficult! The construction of your shed isn't as complicated
Radon 07 Installation Instructions & Parts List
 Radon 07 Installation Instructions & Parts List Illustration Radon 07, H1 Handle Right Hand: Open Out 14/06/2016 Revision 1.1 Page 1 of 21 IMPORTANT This shower screen / enclosure must be installed by
Curium 19H Installation Instructions & Parts List
 Curium 19H Installation Instructions & Parts List Illustration Curium 19H Right Hand Page 1 of 15 01/07/2016 Revision 2.1 IMPORTANT This shower screen / enclosure must be installed by suitably qualified
Block Frame Inovo Patio Door/Transom/Sidelite Field Mulling Instructions. simonton.com/installation. If mulling sidelites, skip to Step 5.
 Effective Date: 10/1/17 Tools Needed Kit Contents Safety Glasses Cordless Drill Phillips Screw Bit Two-step Drill Bit (3/8-1/8 ) Utility Knife Interior Mullion Exterior Mullion Cover Hardware Kit Clamps
Building Instructions
 Building Instructions Tools Required Tape measure Straight edge Pencil/pen Jigsaw Table Saw Circular Saw Electric drill 1 Hole saw bit Saw horses/table Protractor Staple gun Caulk gun Paint brush Wrenches
VENTED GABLE DETAIL ROOF PANEL GABLE FLASHING 24" C/C MAX. BUTYL SEALANT TAPE ROOF PURLIN FLASH AB-1, AB-2, AB-3, OR AB-4
 GABLE FLASHING FASTENER @ 24" C/C MAX. ROOF PURLIN BUTYL SEALANT TAPE FLASH AB-1, AB-2, AB-3, OR AB-4 FASTENER @ EVERY MAJOR RIB OR 12" C/C MAX. F-J TRIM FABRAL ALUMINUM SOFFIT FASTENER 24" C/C MAX. BUTYL
Installation Instructions for Siding
 Smart-Shingle TM System "The new smart way to install cedar shingles." - This Old House Installation Instructions for Siding V3.2 INSTALLATION GUIDE MARKS Shingle-Strip 0 1 2 3 4 5 6 7 8 9 10 11 12 13
METL-VISION WINDOW SYSTEM FOR HORIZONTAL WALL PIONEERING INSULATED METAL PANEL TECHNOLOGY
 METL-VISION WINDOW SYSTEM FOR HORIZONTAL WALL Window assembly GUIDE PIONEERING INSULATED METAL PANEL TECHNOLOGY PIONEERING INSULATED METAL PANEL TECHNOLOGY CONTENTS DETAIL TITLE FILE NO. PAGE NO. INTRODUCTION..................................................................
Dubnium 11 Installation Instructions & Parts List
 Dubnium 11 Installation Instructions & Parts List Illustration Dubnium, H1 Handle Right Hand: Open Out Page 1 of 25 IMPORTANT This shower screen / enclosure must be installed by suitably qualified individuals.
Plexidor Pet Door Wall Kit Instruction for All Sizes Plexidor : S, M, L, XL; BiteGuard KennelPlex TM 1113,1418, 1419 & 1825 and Plexidor Electronic LG
 Plexidor Pet Door Wall Kit Instruction for All Sizes Plexidor : S, M, L, XL; BiteGuard KennelPlex TM 1113,1418, 1419 & 1825 and Plexidor Electronic LG Congratulations on your purchase of the Plexidor Pet
8 x 10 Timber-frame Garden Shed
 8 x 10 Timber-frame Garden Shed Includes: Step-By-Step Instructions, Complete Details & Materials Lists Timber-framing is a traditional building method that uses a simple framework of heavy timber posts
Installation Tips. Bayer MaterialScience Makrolon multi UV multiwall sheets. multi UV
 Installation Tips Bayer MaterialScience Makrolon multi UV multiwall sheets multi UV Makrolon multi UV multiwall sheets Tips for installing Makrolon multi UV multiwall sheets High impact-resistant including
Effective February, 2015
 Effective February, 2015 Table of Contents Ensuring System Performance 1 Components 2 Frequently Asked Questions 3 List of Tools 3 Before you Begin Preparation 3 Quality Tips 4 Cold Weather Tips 4 Cleaning
Sliding Glass Door Assembly and Installation Guide
 Sliding Glass Door Assembly and Installation Guide Index Door System Components and Hardware The following components are needed to complete the installation of your Sliding Patio Door unit. Check all
Premium Solar Star Greenhouse
 Premium Solar Star Greenhouse Assembly Instructions SKU# 104901 2006 ClearSpan All rights reserved. Reproduction without permission is prohibited. Revision date: March 2006g Contact your sales representative
Allora ALCOVE ENCLOSURE INSTALLATION BEFORE INSTALLATION CHECK THAT YOUR ALLORA SHOWER ENCLOSURE SYSTEM IS UNDAMAGED
 Allora ALCOVE ENCLOSURE INSTALLATION BEFORE INSTALLATION CHECK THAT YOUR ALLORA SHOWER ENCLOSURE SYSTEM IS UNDAMAGED ALCOVE SHOWER Your shower can be installed to open Left hand or Right hand by rotating
FRAMED PANEL / DOOR / PANEL CONTINUOUS HINGE SHOWER ENCLOSURE INSTALLATION INSTRUCTIONS
 FRAMED / DOOR / CONTINUOUS HINGE SHOWER ENCLOSURE INSTALLATION INSTRUCTIONS QCI5229 Rev 0 6 INSTALLATION NOTES: Unpack your unit carefully and inspect for freight damage. Lay out and identify all parts
Metal & Vinyl, Flush Mount and Recessed Fin Windows Recommended Installation Instructions
 PO Box 480 Ph: 417-235-7821 Monett, MO 65708 Fax: 417-737-7140 Metal & Vinyl, Flush Mount and Recessed Fin Windows Recommended Installation Instructions These installation instructions are recommendations
10 x 10 Flat Top Pergola
 0 x 0 Flat Top Pergola A S S E M B L Y G U I D E Models: Venetian, Tuscany, Luxor, Acadia O P T I O N A L A C C E S S O R I E S Arch Kit System ( Arches) Privacy Fence Panel System ( Panels & Middle Post)
Balustrade Systems / Installation Instructions
 A. PARTS AND SUPPLIES NEEDED FOR INSTALLATION Hardware included for each 10 section of rail: 2 3 x 1-1/2 L-brackets 4 1-3/4 x 3/16 Blue hex-head screws for anchoring the L-brackets to the newel cap, column
Installation Guidelines For Quaker Window Products Aluminum flange fin sub sill & receptor system using a T mulled twin window unit.
 Installation Guidelines For Quaker Window Products Aluminum flange fin sub sill & receptor system using a T mulled twin window unit. Installer: Read these instructions completely before starting any installation.
Sheet Steel Facts. Most common head design for self-drilling, self-tapping screws.
 Sheet Steel Facts Fastener Guide for Sheet Steel Building Products August, 2003 Fastener Materials Fasteners are manufactured from several materials and coatings. For the purpose of this fact sheet, the
12-16 Ft Wide Enclosure Assembly Guide
 www.rmfiberglass.com 12-16 Ft Wide Enclosure Assembly Guide RM Products Ltd 1-800-363-0867 www.rmfiberglass.com Handling and Storage 2 P a g e Handling and Storage: 3 P a g e Before You Begin Contact RM
HipMaster Installation Instructions
 Mid-America, Plus and HipMaster Installation Instructions New applications for metal, slate and wood shingle roofs (see page 7) CAUTION: Before beginning installation read all general guidelines, special
Installation Guidelines
 Page 1 Two inch () Porch Screening System Extruded Screen Walls Only Kit Installation Guidelines Tools You ll Need 4 ft. Carpenter s level Chalk line (to mark U channel locations) Chop saw with a metal
10 x 10 Flat Top Two Tone Pergola
 0 x 0 Flat Top Two Tone Pergola Models: Bordeaux ASSEMBLY GUIDE OPTIONAL ACCESSORIES Arch Kit System ( Arches) Privacy Fence Panel System ( Panels & Middle Post) Bolt Down Bracket Kit ( for Pergola) Ver.0-00
6x6 Maximizer Storage Shed Assembly Manual Version #9 Feb 26th, 2015
 6x6 Maximizer Storage Shed Assembly Manual Version #9 Feb 26th, 2015 Thank you for purchasing a 6x6 Maximizer Storage Shed. Please take the time to identify all the parts prior to assembly. Please Note-
Design & Install Guide. The New Standard for Commercial Roof Laps. End-Lap Solution for Insulated Panel Roofing AS WEATHER RESISTANCE
 End-Lap Solution for Insulated Panel Roofing AS4046.9 WEATHER RESISTANCE The New Standard for Commercial Roof Laps SecureLap provides a solution to the troublesome sheet to sheet endlap and offers a real
AG-TUF Corrugated PVC Liner Panels
 AG-TUF Corrugated PVC Liner Panels Installation Guide A Profile Dimensions: Table 1 Distance between Corrugations Rib Depth Panel Width Number of Corrugations Coverage Overlap Overlap mm mm mm mm Corrugations