installation guide 1 GUIDE#: pwb-assault-001
|
|
|
- Winfred Lawrence
- 6 years ago
- Views:
Transcription

1 assault WAKEBOARD tower installation guide INSTALLATION SUPPORT 1
2 important information This Aerial wakeboard tower fits motor boats with inch wide beam widths. This measurement is taken from the Port to Starboard mounting points. Do not fold the tower without having the top section securely fastened to the side sections with the fasteners provided. Do not fold the tower by yourself. Do not assemble tower on the ground and then try to install it on the boat. Do not use impact drivers to install any hardware. Torque set screws to 35ft-lbs Torque shoulder bolts 50 ft-lbs Torque tower foot all-thread to 65 ft-lbs Check the top section for burr s before installing side sections to prevent the scratching and marking of tubes. Aerial does not cover damage caused by burr s during installation. If the area of the deck where the tower will be mounted has a fiberglass thickness of less than ¼ inch, a backing plate kit must be purchased and installed to provide adequate support. Please leave the foam wrap on the tower until the installing is complete. Please note that when towing your boat you may notice what appears to be movement in your tower. It is important to understand that the boat is also moving on the trailer and that this movement can be visually deceiving. cleaning Frequently wash your tower with soap and water. As required, use Mothers Mag & Aluminum polish to restore your tower to its original finish. warning BE CAREFUL when assembling this product. We CANNOT be liable for any burring or scratching that may occur when sliding sections in and out of each other. NEVER modify this product in any way. NEVER climb, stand or ride on this product. NEVER tow watersport tubes or inflatable s with this or any other Aerial Wakeboard Tower. ALWAYS use caution with approaching bridges or overpasses. ALWAYS inspect this product for loose bolts, fittings or damage before each use. Always carefully CONSULT the user manual for proper installation, maintenance and usage. Aerial is not liable for personal injury or property damage from the use of this or any other Aerial product. 2


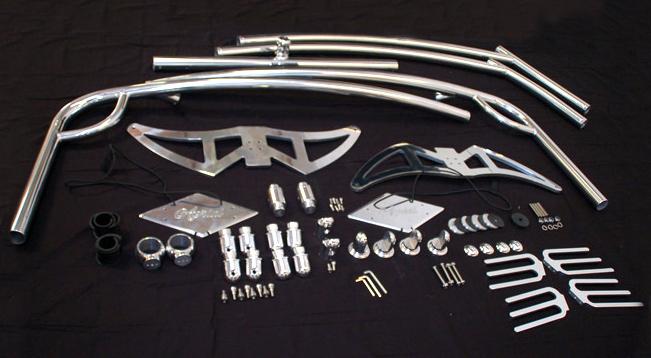
3 TOOLS REQUIRED PARTS LIST 3


4 step 1 side rail The mounting feet will need to be assembled to the side rail fittings, followed by attaching them to the side rails. fitting mount step 2 Tape off all the areas that may potentially come into contact with the side rails. step 3 Once the feet are connected to the side rails, hold the side rail up to your boat. Once the rail is aligned with your windshield use a small piece of tape to mark the position of the mounting feet. 4


5 step 4 Once the desired position is achieved, place one of the backing plates over the piece of tape and trace around it with a permanent marker. step 5 Transferring marks from the other side. This step is very important! After taping the second side of the boat in approximately the same areas as the first side you will need to measure the distance that you marked on the first side of the boat step 2 It is best to take measurements from the back of the boat and mark with blue tape. Be sure to measure from the same point on both sides. 5


6 step 6 Drilling Once you have marked your 4 holes, check the underside of the deck for wires. step 2 If necessary, you should move the wires out of the way while you drill. We recommend drilling a small pilot hole which will keep the 5/8 drill bit from walking (moving). A small rat tail file can be used to ease the edge and keep the gel coat from chipping. Be careful of wires! step 7 Attaching the side rails Insert the four all thread screws into the side rail feet. 6


7 step 7 - continuted... mount nylon washer rubber boat deck reinforcement backing plate washer nylon lock nut Install the tower mounts to the boat deck in the order shown in the diagram. Note: in the case where the deck of your boat is less than 1/4 thick, a reinforcing kit is required to thicken and reinforce the deck in the mounting locations. Remove just enough blue tape for your tower feet to snugged up to your boat. step 2 step 8 Measuring from your windshield, check the distance to the side rail to make sure both sides are symmetric. 7

 1 x Clamps 1 x Socket Cap Head Screw 1 x Lower Base Start at the top")

8 step 8 - Continued... The side rails need to be mounted straight up and down. If they are leaning in or out, this will cause a problem with the tower when you want to fold it. step 9 Assembling the Switch Blade (Rear Leg) Parts needed: 2 x Threaded Lap Joints 2 x Trim Washers 2 x Shoulder Bolts (The longer bolts supplied) 1 x Clamps 1 x Socket Cap Head Screw 1 x Lower Base Start at the top of the switch blade and attach the trim washer, shoulder bolt and threaded lap joint. step 10 You will then need to attach the lower base to the threaded lap joint. This is then followed by attaching the clamp to the lower base (using the stainless steel socket head cap screw.) 8
.")
.")

9 step 11 The lower section of the switch blade can now be assembled to the lower fittings and clamp using the trim washer, shoulder bolt and threaded lap joint. step 12 step 2 Insert the front leg hinge joint into the lower section of the front arm (repeat for the other side). Its important not to completely tighten the fittings as some adjustment will necessary before the installation is complete. Before inserting the top-section, make sure there are no burrs in the top-section (Some soap or grease will allow the arms to slide in easier). Someone will need to hold the top-section for you as you insert the front right arm into the top-section and fit the hinge into the side rail. Once the sides and top section are assembled the fittings that connect to the ends of the front legs can now be firmly tightened so that they do not rotate. step 13 The rear switch blades can now be installed by attaching the top switch blade fitting to the fitting located on the upper section of the front leg. The clamp located on the base of the switch blade will be connected to the lower side rail. We recommend making sure that the clamps on both sides of the tower are located the same distance from the end of the side rail so that your tower looks symmetrical. 9

 to make a pilot hole.")
10 step 14 Drilling the H-section. The X measurement is a great way to make sure that your tow point is in the center of your boat. To do this, measure from the tow point to your rear foot, then to your other foot. Cover your boat with an old sheet or old cover to make removing the metal shavings easy. Someone should hold the H-section while you drill. step 15 Using the pre-drilled holes in the top section tube, mark the drilling positions on the front leg tubes. We then recomend drilling the holes with a smaller drill bit (smaller than the 3/8 drill bit) to make a pilot hole. step 16 Following the pilot holes you just drilled, use a 3/8 drill bit to create the clearance hole for the joining bolts. As each hole is drilled we recommend inserting each bolt so that it keeps the parts aligned while drilling the next hole. 10


11 step 17 Once all the holes are drilled and all the fasteners are inserted the nuts can be installed and all of the fasteners and nuts can be firmly tightened. You may need to vacuum up the debris and aluminum shavings. Note: We recommend using Red Loctite Threadlocker when installing these fasteners and any other fasteners that will not require loosening once installed. step 18 To install the board rack fingers, use the socket head cap screws provided and attach the fingers to the diamond shaped plate. This diamond plate will then be installed to the rear switch blade legs. step 19 - lowering the tower Lowering the tower requires at least 2 people. Never trailer your boat with the tower in the lowered position. Always check to make sure all fasteners are tight and secure before using the tower again. OPTION A DISCONNECT loosen OPTION B DISCONNECT loosen 11
12 step 20 - installing the navigation light The navigation light is shipped separately. It is designed to be installed on the top of the tow point. For a clean wiring installation the wires supplied can be passed through the center of the tow point, along the inside of the top-section and down inside the front leg tube. The wires will need to exit the front leg tube just above the fittings and then be passed over the fittings before entering back into the side rail front tube. Finally the wires will exit the side rail front tube just above the mounting foot and then enter the deck of the boat (through a hole that will need to be drilled) so that they can be connected to a switch and power source. navigation light (shipped separately) Note: The tower is not supplied with pre-drilled wiring holes as each customer may have a different wiring requirement depending on how they fold their tower or the accessories that they will mount to the tower. Questions? 12
installation guide 1 GUIDE#: pwb-wwtowv1-pol-003
 g300 WAKEBOARD tower installation guide INSTALLATION SUPPORT 1 important information This WakeWorks wakeboard tower fits motor boats with 76-108 inch wide beam widths. This measurement is taken from the
installation guide 1 GUIDE#: pwb-assault-004
 assault WAKEBOARD tower installation guide INSTALLATION SUPPORT 1 important information This Aerial wakeboard tower fits motor boats with 76-108 inch wide beam widths. This measurement is taken from the
installation guide 1 GUIDE#: PWB-wwpontoon-pol-004
 f250 pontoon WAKEBOARD tower installation guide INSTALLATION SUPPORT 1 important information This WakeWorks tower fits Pontoon boats with 96 to 102 inch wide beam widths. This measurement is taken from
 www.bigairwaketowers.com Ice Tower Installation and Instruction Manual (Rev K hidden connection ) Big Air Waketowers Inc. 5305 Robert Lee Rd Duncan, OK 73533 580-252-5314 Toll free: 855-252-5314 www.bigairwaketowers.com
Monster Tower Phone: U.S. Hwy 411 S. HS1. Installation Instructions and Owner s Manual CAUTION
 Monster Tower Phone: 877-778-6937 5714 U.S. Hwy 411 S. www.monstertower.com Maryville, TN 37801 info@monstertower.com HS1 Installation Instructions and Owner s Manual Your HS1 uses many common parts and
A Few Helpful Hints: A Word Of Caution:
 Thank you for purchasing a Tsunami Wakeboard Tower by Extreme Marine Products, Inc. Please read and understand the instructions before proceeding to install. Inspect the package for missing or damaged
INSTALLATION INSTRUCTIONS GRILLE GUARD RAM 1500 PART # 5058/5058-2
 INSTALLATION INSTRUCTIONS GRILLE GUARD PART # 5058/5058-2 PARTS LIST: Qty Description Qty Description 1 Grille Guard 8 12-1.75mm x 35mm Hex Bolts 2 Upper Frame Mounting s (for trucks without tow hooks
INSTALLATION INSTRUCTIONS 3 BULL BAR 99-04, 04 "HERITAGE" F-150/250LD 2WD, 97-04, 04 "HERITAGE" 4WD WD EXPEDITION/ WD EXPEDITION PART
 INSTALLATION INSTRUCTIONS 3 BULL BAR PART #B-F1971;B-F2971 PARTS LIST: 1 Bull Bar 2 12-1.75mm x 130mm x 40mm Hex Bolts 1 Driver/Left Mounting Bracket 4 12-1.75mm x 35mm Hex Bolts 1 Passenger/Right Mounting
INSTALLATION INSTRUCTIONS
 INSTALLATION INSTRUCTIONS R5 STEP BOARD APPLICATION: 2009-2017 Dodge Ram 1500 Quad / Crew Cab 2010-2017 Dodge Ram 2500/3500 Crew Cab PART NUMBER: 28-51040, 28-51045, 28-51050, 28-51055 ITEM QUANTITY DESCRIPTION
INSTALLATION INSTRUCTIONS GRILLE GUARD 09-ON DODGE RAM PART #
 INSTALLATION INSTRUCTIONS GRILLE GUARD 09-ON DODGE RAM PART # PARTS LIST: Qty Description Qty Description 1 Grille Guard 8 12-1.75mm x 35mm Hex Bolts 2 Brackets (for trucks without 22 12mm x 30.1mm OD
Removing the Z-Axis lead screw
 Page 1 of 8 TITLE: Sabre Z-Axis Lead Screw Replacement Procedure Gerber FastFact #: 5048 Supplied by: Gerber Hardware Support Last Modified: June 14, 2007 Summary: Tools used: The following procedure explains
INSTALLING YOUR NEW SPRING LIFT ARM KIT
 INSTALLING YOUR NEW SPRING LIFT ARM KIT 1. Measure the distance that the roof is to be raised. [If your lift system is completely non-functional, you will need to calculate or estimate this distance as
INSTALLATION INSTRUCTIONS CONTOURED LIGHT BAR APPLICATION: CHEVY EQUINOX/ GMC TERRAIN PART NUMBERS: ,
 INSTALLATION INSTRUCTIONS CONTOURED LIGHT BAR APPLICATION: 2010-2014 CHEVY EQUINOX/ GMC TERRAIN PART NUMBERS: 32-21020, 32-21025 ITEM QUANTITY DESCRIPTION TOOLS NEEDED 1 1 CONTOUR BAR TORQUE WRENCH 2 1
RBP-1215B-RX DODGE RAM QUAD CAB RX3
 RBP-1215B-RX3 2002-2017 DODGE RAM 15-3500 QUAD CAB RX3 Passenger side RX-3 Side Step Drill Template Passenger side rear Modular Bracket (6) L Support Brackets Driver side rear Modular Bracket Driver side
INSTALLATION INSTRUCTIONS
 INSTALLATION INSTRUCTIONS SPORTSMAN WINCH MOUNT GRILLE GUARD APPLICATION: 2016-2018 Toyota Tacoma PART NUMBER: 40-93885, 45-93880, 46-23885 ITEM QUANTITY DESCRIPTION TOOLS NEEDED 1 1 WINCH TRAY 15MM SOCKET
Installing A Carver Bimini Top
 Installing A Carver Bimini Top How To Prolong The Life Of Your Bimini Top Avoid letting water or snow stand on the top. Always travel with top in the stored position. Allow Bimini Top to dry thoroughly
INSTALLATION MANUAL FRONT. See pages 2 and 3 of this manual for configuration options. Level of Difficulty. Product Photo (center section only)
") INSTALLATION MANUAL FRONT Level of Difficulty Moderate Product Photo (center section only) All hardware listed below will be provided with the bumpers center section. Additional hardware will be supplied
INSTALLATION MANUAL FRONT Level of Difficulty Moderate Product Photo (center section only) All hardware listed below will be provided with the bumpers center section. Additional hardware will be supplied
US RACK, Inc Falcon Drive, Madera, CA
 US RACK, Inc - 2850 Falcon Drive, Madera, CA 93637-559-661-3050 INSTALLATION AND USE INSTRUCTIONS for Long-John Extension Ladder Rack WARNING: Do NOT attempt to install or use this rack without following
Usage and Assembly Instructions
 Instructions #1037447 Product #795234 Revision D Usage and Assembly Instructions Rear Fork (Buttstock) Rear Fork Lock Knob Rail Lock Knob Front Fork (Forend) Rails Tilt Friction Knob Rail Extension Locks
Installation Instructions:
 NOTE: Carefully read entire instructions thoroughly before attempting to install this part. Parts Included: Qty 93-326EP009 Front Armor: Drvr 1 93-326EP010 Front Fender: Pass 1 90-6774m Hardware Pack:
1. TOOLS + MATERIALS REQUIRED
 R INSTALLATION INSTRUCTIONS PRODUCT: BALDUR + ODEN CONFIGURATION: BI-PARTING DOOR MOUNT: TOP MOUNT Product is covered by U.S. patents. For more information visit www.krownlab.com. TOOLS + MATERIALS REQUIRED
Pickup Box Utility Rack Package Installation (Instruction ID: )
") 017 Chevrolet Colorado Pickup - WD (VIN S) Canyon, Colorado Accessory Installation Manual N America Document ID: 3966961 Pickup Box Utility Rack Package Installation (Instruction ID:3144879) Installation
017 Chevrolet Colorado Pickup - WD (VIN S) Canyon, Colorado Accessory Installation Manual N America Document ID: 3966961 Pickup Box Utility Rack Package Installation (Instruction ID:3144879) Installation
INSTALLATION INSTRUCTIONS GRILLE GUARD CHEVY TAHOE / AVALANCHE 1500/ SUBURBAN 1500 PART # /502795
 (W) INSTALLATION INSTRUCTIONS GRILLE GUARD PART # 502794/502795 PARTS LIST: 1 Grille Guard 2 12-1.75mm x 140mm Hex Bolts 2 Frame Mounting Brackets 8 12-1.75mm x 30mm Hex Bolts 2 Lower Support Brackets
U.S. RACK, Inc Falcon Drive, Madera, CA
 U.S. RACK, Inc. - 2850 Falcon Drive, Madera, CA 93637-559-661-3050 INSTRUCTIONS for FIFTH WHEEL RACK Models 2010-4ADC and 2010-4ADCD WARNING: Do NOT attempt to install or use this rack without following
400A 40113V, 401A 40120V, & 401AL 40120VL ALUMINUM VERTICAL 4000 LB LIFT INCLUDES SCREW LEG ASSEMBLY INSTRUCTIONS
 12/11/07 PAGE 1 OF 12 400A 40113V, 401A 40120V, & 401AL 40120VL ALUMINUM VERTICAL 4000 LB LIFT INCLUDES SCREW LEG ASSEMBLY INSTRUCTIONS Thank you for purchasing our product! *Please read these instructions
Usage and Assembly Instructions
 Instructions #1037447 Product #795234 Revision C Usage and Assembly Instructions Rear Fork (Buttstock) Rear Fork Lock Knob Rail Lock Knob Front Fork (Forend) Rails Tilt Friction Knob Rail Extension Locks
INSTALLATION INSTRUCTIONS FOR FRONT CASTING DECK RAIL Ranger
 INSTALLATION INSTRUCTIONS FOR FRONT CASTING DECK RAIL Ranger TOOLS REQUIRED FOR INSTALLATION: Drill motor, (1) 5/16 inch drill bit, (1) 13/64 drill bit, (1) 3/16 inch hex wrench (1) 3/32 inch hex wrench.
Contractors Rack Assembly and Installation Instructions
 Part # 18601 & 16601 Contractors Rack Assembly and Installation Instructions 4751 Littlejohn St. Unit A, Baldwin Park, CA 91706 Page 1 of 12 11/13/08 Thank you for purchasing the Paramount Restyling Contractors
Assembly Instructions 10 X 10 Aluminum Roof Support
 Assembly Instructions 10 X 10 Aluminum Roof Support Aluminum Roof Support Bolt Package 16-5/16 X 2 ¼ SS Bolt 24-5/16 X 1 SS Bolt 40-5/16 SS Nylon Lock Nuts 16-5/16 SS Flat Washers 28-4 ½ Wood Screws 36-1
CTTR Tire Rack Required tools
 CTTR Tire Rack Required tools Torque wrench, ratchet, 9/16 socket, tape measure, and square edge. ASSEMBLY REQUIREMENTS *Torque all T-bolt nuts to 35-40 foot pounds. Failure to follow the assembly instructions
Medium HoneyBadger Chase Rack Installation Instructions
 PREPARATION Medium HoneyBadger Chase Rack Installation Instructions 1. Disconnect the negative terminal on the battery. Park the vehicle on level ground and set the emergency brake. 2. We recommend reading
JEEP JK ( 5 DOOR ) SLIMLINE II - FULL TRAY EXTREME RACK KIT
 SLIMLINE II - FULL TRAY EXTREME RACK KIT") JEEP JK ( 5 DOOR ) SLIMLINE II - FULL TRAY EXTREME RACK KIT FAJK001 / KRJW014T INSTALL TIME: 2.5 Hours NOTE: Your Jeep JK (5 Door) Extreme Roof Rack Kit consists of four boxes. (1) the Tray, (2) the Roll
JEEP JK ( 5 DOOR ) SLIMLINE II - FULL TRAY EXTREME RACK KIT FAJK001 / KRJW014T INSTALL TIME: 2.5 Hours NOTE: Your Jeep JK (5 Door) Extreme Roof Rack Kit consists of four boxes. (1) the Tray, (2) the Roll
VIEWPOINT ALUMINUM RUNNING BOARD TOYOTA RAV4
 PARTS LIST: VIEWPOINT ALUMINUM RUNNING BOARD 1 Driver/Left Running Board 4 10-1.5mm x 50mm T-Bolt 1 Passenger/Right Running Board 12 10mm Plastic Retainers 1 Driver/Left Bracket 2 10-1.50mm x 40mm Hex
ASSEMBLY INSTRUCTIONS FOR HAULER II SERVICE BODY A RACK
 ASSEMBLY INSTRUCTIONS FOR HAULER II SERVICE BODY A RACK T12USBA-1 shown above Package Contents: HARDWARE KIT PARTS (4) 3/8-16 x 3 CARRAIGE BOLTS (1) RAIL DRIVER S SIDE ASSEMBLY (20) 3/8-16 x 2 CARRAIGE
INSTALLATION INSTRUCTIONS SIDE BAR FORD ESCAPE & MAZDA TRIBUTE PART #
 INSTALLATION INSTRUCTIONS SIDE BAR 2008-2010 FORD ESCAPE & MAZDA TRIBUTE PART # 50136 50137 PARTS LIST: 1 Driver/Left Sidebar 2 10-1.50mm x 35mm Bolt Plate 1 Passenger/Right Sidebar 2 10-1.50mm x 30mm
TIRE RACK INSTALLATION INSTRUCTIONS Dodge Sprinter
 Aluminess Products Inc 9402 Wheatlands Ct. #A Santee, CA 92071 619-449-9930 TIRE RACK INSTALLATION INSTRUCTIONS 07-11 Dodge Sprinter Please read before beginning Stainless steel hardware may bind together
Installation Instructions Kit, Base Rail Bracket Part # 31413
 Installation Instructions Kit, Base Rail Bracket Part # 31413 Dealer / Installer: Provide a copy of these Instructions to the end user of this product. These Instructions provide important operating and
MODULAR BUMPER INSTALLATION MANUAL
 MODULAR BUMPER INSTALLATION MANUAL Parts List* 1 Center section 1 Side extension, passenger / right 1 Side extension, driver / left 1 Side cap, passenger / right 1 Side cap, driver / left 1 Brush guard,
SUT-1000CLC ASSEMBLY REQUIREMENTS
 SUT-1000CLC Torque wrench, carpenters square, wire cutters, Phillips screwdriver, 7/16, 9/16, and 3/4 combination wrenches, ratchet, 9/16, 3/4, 13/16, and 7/8 sockets. ASSEMBLY REQUIREMENTS *Torque all
INSTALLATION INSTRUCTIONS
 INSTALLATION INSTRUCTIONS E-SERIES STEP BARS / 4 OVAL STEP BARS APPLICATION: 2011-2017 Jeep Grand Cherokee PART NUMBER: 23-3610, 23-3615, 21-3610, 21-3615, 23-73610 ITEM QUANTITY DESCRIPTION TOOLS NEEDED
INSTALLATION INSTRUCTIONS
 TEL:1-866-XANATOS INSTALLATION INSTRUCTIONS PART#: 17A110200MSS\17A110200MA MODULAR GRILL GUARD FOR NISSAN FRONTIER 05-10//PATHFINDER 05-07 1 guard, center section 1 brush guard, left side 1 brush guard,
Installing A Carver Bimini Top
 Installing A Carver Bimini Top How To Prolong The Life Of Your Bimini Top Avoid letting water or snow stand on the top. Always travel with top in the stored position. Allow Bimini Top to dry thoroughly
Page 1. SureMotion Quick-Start Guide: LACPACC_QS 1st Edition - Revision A 03/15/16
 R K C T I Repair Kit Product Compatibility Repair Kit # Linear Actuator Assembly # LACPACC-002 LACPACC-003 LACP-16TxxLP5 (0.5-in lead screw pitch) LACP-16TxxL1 (1-in lead screw pitch) C P I R K 4 ea Flanged
ASSEMBLY INSTRUCTIONS FOR SERVICE BODY A MOUNT RACKS
 ASSEMBLY INSTRUCTIONS FOR SERVICE BODY A MOUNT RACKS T12 Service Body A shown with optional middle crossbar Package Contents: HARDWARE KIT PARTS (8) 3/8-16 x 3 CARRAIGE BOLTS (1) RAIL DRIVER S SIDE ASSEMBLIES
INSTALLATION INSTRUCTIONS
 INSTALLATION INSTRUCTIONS Trans4mer Grille Guard/Winch Mount Kit 39680 (Black) & 39681 (Chrome) For Ford 4x4 F150, F250 Light Duty & Expedition As you read these instructions, you will see NOTES, CAUTIONS
2-Door EXO-Top Roof Rack System
 Page 1/29 Part 13516.01 2-Door EXO-Top Roof Rack System! WARNING The EXO-Top Roof Rack System is rated to a dynamic 300 lb, evenly distributed load. Further loading could result in serious injury or death.
INSTALLATION INSTRUCTIONS
 INSTALLATION INSTRUCTIONS Trans4mer Mounting System Dodge Ram Kit No. 65220, 73132, 75525, 76253 (black) or 65221, 73133, 75530, 76254 (stainless) As you read these instructions, you will see NOTES, CAUTIONS
CNC Router Parts PRO Machine Kit Cable Track Installation Instructions
 1 1 X CABLE TRACK TRAYS & BRACKETS The cable track on the side of the system is supported by a metal tray (or multiple trays for longer systems such as a PRO4896). These trays hang from brackets on the
INSTALLATION INSTRUCTIONS / DODGE RAM CREW CAB 2500/3500
 INSTALLATION INSTRUCTIONS 225019 / 225019-2 2010 DODGE RAM CREW CAB 2500/3500 PARTS LIST: Qty Description Qty Description 1 Driver/Left Side Bar 4 Plastic Square Retainer 1 Side Bar 2 12mm x 120mm Hex
MAG-CONV Basic, 48, 48R & Midline Front Mount
 Parts Required: Tools Used: Mag Wheels Brakes Brake Rods Mounting Bracket Anti Tippers 7/16" Wrench Screw Driver Rubber Mallet 5/8 Wrench 5mm Allen Wrench Step Execution Figures 1 Remove front 5" total
INSTALLATION MANUAL WEEKENDER STEEL LADDER RACK
 TRUCK STORAGE SOLUTIONS SECURING YOUR REPUTATION INSTALLATION MANUAL WEEKENDER STEEL LADDER RACK STEEL & ALUMINUM SIDE BOX WITH PACK RAT DRAWER UNITS MODELS ATTENTION: PLEASE READ AND UNDERSTAND ALL INSTRUCTIONS
INSTALLATION INSTRUCTIONS
 INSTALLATION INSTRUCTIONS Trans4mer Grille Guard/Winch Mount For Chevrolet Silverado 1500HD & 2500 Kit 68162 This WARN Trans4mer system can be customized to give your Chevy Silverado a wide variety of
GlideRite Retractable Cover System For Hot Spot Spas (SE & SLX only)
") List of Contents Quantity Description 12 #10 x 1 ½ Flat Head Phillips Screw (see pg. 2) 2 #10 x ½ Pan Head Phillips Screw (see pg. 2) 8 ¼ x 2 ½ Lag Bolt (see pg. 2) 7 ¼ 20 x 5 / 8 Hex Head Bolt (see pg.
List of Contents Quantity Description 12 #10 x 1 ½ Flat Head Phillips Screw (see pg. 2) 2 #10 x ½ Pan Head Phillips Screw (see pg. 2) 8 ¼ x 2 ½ Lag Bolt (see pg. 2) 7 ¼ 20 x 5 / 8 Hex Head Bolt (see pg.
SAFETY. Injury hazard
 SAFETY Installation Guidelines Your safety and the safety of others is very important. In order to help you make informed decisions about safety, we have provided installation instructions and other information.
Passenger/Right Front Mounting Bracket
 PARTS LIST: 1 Driver side running board 1 8mm Insert Installation Tool 1 Passenger side running board 4 10-1.50mm x 35mm Hex Bolt 1 Driver 10 10mm x 24mm OD x 2.2mm Flat Washer 1 Passenger 6 10mm Lock
Instruction Guide 4A90L
 Instruction Guide 4A90L Kargo Master Rancho Cordova, CA 95742 800-343-7486 CustomerService@KargoMaster.com DATE: *PLEASE READ ALL INSTRUCTIONS AND WARNINGS PRIOR TO ASSEMBLING, INSTALLING, AND USING THIS
Fishmaster Pro Series Folding T-Top Installation Instructions And Owners Manual
 Fishmaster Pro Series Folding T-Top Installation Instructions And Owners Manual Fishmaster, Inc. Phone: 877-777-8693 or 678-679-1462 www.fishmaster.com Support@Fishmaster.com Reference 20FEB18 THANK YOU
southpaw enterprises, inc.
 southpaw enterprises, inc. Store these instructions with the enclosed maintenance checklist in a safe place. You may also access them on our website. Instruction Sheet Wood Joist 2-1/2 Ft. Drop Ceiling
Customer Notice: Congratulations again on your SawStop purchase, and thank you! -SawStop Tualatin, OR
 Customer Notice: Congratulations on the purchase of this Sliding Crosscut Attachment. As the owner of a SawStop saw, you are familiar with our high standards for quality, fit and finish. Different from
Krypt Pro Air EXPLODED VIEW OF THE PRO AIR TOWER
 Krypt Pro Air EXPLODED VIEW OF THE PRO AIR TOWER STEP 1: Unpack and check the contents of the box. Check the parts list and the Instruction Guide correspond with the product you purchased. Ensure you have
CHEVY/GMC SuperRail Mounting Kit #3117
 CHEVY/GMC SuperRail Mounting Kit #3117 #3100 SuperGlide (12K) Gross Trailer Weight (Maximum) Vertical Load Weight (Max. Pin Weight) 12,000 lbs. 3,000 lbs. Installation Instructions SPECIFICATIONS Fits
00108/00110 INSTRUCTION MANUAL
 00108/00110 INSTRUCTION MANUAL Removable and Adjustable Mudflap System IMPORTANT! Exhaust Systems Note: Any modifications to the factory installed exhaust system may void your manufacturer s warranty.
Star Trac Turbo Trainer Assembly & Setup
 Star Trac Turbo Trainer Use the following procedures to unpack and assemble your Turbo Trainer manufactured by Star Trac. UNPACKING AND PARTS LIST Position the shipping carton so the Heavy End logo is
CHEVY/GMC SuperRail Mounting Kit #4423
 CHEVY/GMC SuperRail Mounting Kit #4423 #4100 SuperGlide (16K) #4400 SuperGlide (20K) Gross Trailer Weight (Maximum) Vertical Load Weight (Max. Pin Weight) 16,000 lbs. 4,000 lbs. Gross Trailer Weight (Maximum)
GlideRite Retractable Cover System For HotSpring & Tiger River Spas (except Classic & pre-2000 Landmark Spas)
") List of Contents Quantity Description 12 #10 x 1 ½ Flat Head Phillips Screw (see pg. 2) 2 #10 x ½ Pan Head Phillips Screw (see pg. 2) 8 ¼ x 2 ½ Lag Bolt (see pg. 2) 7 ¼ 20 x 5 / 8 Hex Head Bolt (see pg.
List of Contents Quantity Description 12 #10 x 1 ½ Flat Head Phillips Screw (see pg. 2) 2 #10 x ½ Pan Head Phillips Screw (see pg. 2) 8 ¼ x 2 ½ Lag Bolt (see pg. 2) 7 ¼ 20 x 5 / 8 Hex Head Bolt (see pg.
10-1.5mm x 40mm Hex Bolt 1 Driver/Left Front Inner Support Bracket (2WD & 4WD Vehicles W/O Skid Plate Only) 2
 2") PARTS LIST: 1 Driver/Left sidebar 4 12mm x 32mm OD x 3mm Flat Washer 1 Passenger/Right sidebar 4 12mm x 24mm OD x 2.5mm Flat Washer 1 Driver/Left Mounting Bracket 6 12mm Lock Washers 1 Passenger/Right
PARTS LIST: 1 Driver/Left sidebar 4 12mm x 32mm OD x 3mm Flat Washer 1 Passenger/Right sidebar 4 12mm x 24mm OD x 2.5mm Flat Washer 1 Driver/Left Mounting Bracket 6 12mm Lock Washers 1 Passenger/Right
Installing A Carver Bimini Top
 Installing A Carver Bimini Top How To Prolong The Life Of Your Bimini Top Carver Bimini Tops are a classy way to protect yourself and your boat from the elements. They also add style and color to your
INSTALLATION INSTRUCTIONS
 INSTALLATION INSTRUCTIONS Trans4mer Grille Guard/Winch Mount For Toyota Tundra Kit 68505 This WARN Trans4mer system can be customized to give your Toyota Tundra a wide variety of looks, front-end protection
INSTALLATION INSTRUCTIONS
 INSTALLATION INSTRUCTIONS Trans4mer Grille Guard/Winch Mount Kit 645 For Chevrolet Silverado 500HD & 3500 This WARN Trans4mer system can be customized to give your Chevy Silverado a wide variety of looks,
PRODUCT: LOKI INSTALLATION INSTRUCTIONS. Product is covered by U.S. patents. For more information visit
 R INSTALLATION INSTRUCTIONS PRODUCT: LOKI CONFIGURATION: SINGLE DOOR MOUNT: GLASS MOUNT Product is covered by U.S. patents. For more information visit www.krownlab.com . TOOLS + MATERIALS REQUIRED TOOLS
HONDA RIDGELINE (KIT #601) Installation Instructions (to be used in addition to owners manual)
 Installation Instructions (to be used in addition to owners manual)") HONDA RIDGELINE (KIT #601) Installation Instructions (to be used in addition to owners manual) IMPORTANT NOTE: Read before beginning installation. These instructions replace all of Step 1 of the instructions
HONDA RIDGELINE (KIT #601) Installation Instructions (to be used in addition to owners manual) IMPORTANT NOTE: Read before beginning installation. These instructions replace all of Step 1 of the instructions
Sliding Crosscut Table installation guide
 Sliding Crosscut Table installation guide model tsa-sa48 A Note About Color Variations Among Anodized Aluminum Components Congratulations on the purchase of this SawStop Sliding Crosscut Table. We at SawStop
INSTALLATION INSTRUCTIONS
 TEL -866-XANATOS INSTALLATION INSTRUCTIONS PART#: 7D5000SS\7D500A GRILL GUARD FOR DODGE SPRINTER 07-09 PARTS LIST: 8 6 Grille Guard Driver/Left Frame Mounting Passenger/Right Frame Mounting Driver/Left
Installation Instructions TMW Antenna Tower Mount for 4ft (1.2m) Antennas.
 Antennas.") Description The following pages show the steps required to assembly and fit the antenna mount to a vertical tower pipe of diameter 48 to 115 mm (1.9 to 4.5"). This mount provides ±20 azimuth or ±15 elevation
Description The following pages show the steps required to assembly and fit the antenna mount to a vertical tower pipe of diameter 48 to 115 mm (1.9 to 4.5"). This mount provides ±20 azimuth or ±15 elevation
JEEP JK ( 5 DOOR ) SLIMLINE II - FULL TRAY EXTREME RACK KIT
 SLIMLINE II - FULL TRAY EXTREME RACK KIT") JEEP JK ( 5 DOOR ) SLIMLINE II - FULL TRAY EXTREME RACK KIT FAJK002 / KRJW014T INSTALL TIME: 5 Hours NOTE: Your Jeep JK (5 Door) Extreme Roof Rack Kit consists of four boxes. (1) the Tray, (2) the Roll
JEEP JK ( 5 DOOR ) SLIMLINE II - FULL TRAY EXTREME RACK KIT FAJK002 / KRJW014T INSTALL TIME: 5 Hours NOTE: Your Jeep JK (5 Door) Extreme Roof Rack Kit consists of four boxes. (1) the Tray, (2) the Roll
RH-412 STEEL DOORS INSTALLATION INSTRUCTIONS
 RH-412 STEEL DOORS INSTALLATION INSTRUCTIONS By following the steps outlined below, the assembly, installation and adjustment of the steel doors, will be a simple process. Let s start with the Driver Side.
May 14, Installation Manual
 May 14, 2012 Installation Manual Contents MAG TRACKER Components...1 Mount Installation...7 Module Installation & Grounding...11 Maintenance...14 Warranty......14 Contact Information......14 May 14, 2012
00108/00110 INSTRUCTION MANUAL
 00108/00110 INSTRUCTION MANUAL Removable and Adjustable Mudflap System IMPORTANT! Please Read this Instruction Booklet prior to assembly of your Rock Tamer Kit. IMPORTANT! Exhaust Systems Note: Any modifications
model tsa-sa48 Sliding Crosscut Table installation guide
 model tsa-sa48 Sliding Crosscut Table installation guide A Note About Color Variations Among Anodized Aluminum Components Congratulations on the purchase of this SawStop Sliding Crosscut Table. We at SawStop
8mm x 25mm "Z" Bolt Plates. (2) Tube Spacers. (2) 12mm Bolt Plates w/ Nut
 Tube Spacers. (2) 12mm Bolt Plates w/ Nut") PARTS LIST: 1 Grille Guard 10 12mm Lock Washers 1 Driver/Left Side Frame Mounting Bracket 8 12mm Hex Nuts 1 Passenger/Right Side Frame Mounting Bracket 2 10-1.50mm x 25mm Button Head Bolts 1 Driver/Left
PARTS LIST: 1 Grille Guard 10 12mm Lock Washers 1 Driver/Left Side Frame Mounting Bracket 8 12mm Hex Nuts 1 Passenger/Right Side Frame Mounting Bracket 2 10-1.50mm x 25mm Button Head Bolts 1 Driver/Left
CRITICAL INFORMATION:
 IMPORTANT ALERT: GM uses a very strong thread-locking compound on all body bolts. Use of an air assisted impact ratchet can cause damage to the threads on factory body mount bolts and the internal nut
INSTALLATION INSTRUCTIONS RH 412 STEEL DOORS
 By following the steps outlined below, the assembly, installation and adjustment of the steel doors, will be a simple process. Let s start with the Driver Side. Note: Having the hood open makes the job
17MAY18 U.S. RACK, Inc Falcon Drive, Madera, CA
 17MAY18 U.S. RACK, Inc. - 2850 Falcon Drive, Madera, CA 93637-559-661-3050 INSTRUCTIONS for FIFTH WHEEL RACK Model 2010-4AD WARNING: Do NOT attempt to install or use this rack without following all instructions.
Wheelchair Attachment
 Wheelchair Attachment Set-Up Guide and Registration Pages 1-4: Steps to Set-Up your FreeWheel Page 5: Page 6: Page 7: Page 5: Page 9: Back: Clamp Plate Footrests and TiLite Angle-Adjustable Footrest Modifications
U.S. Rack, Inc Falcon Drive, Madera, CA APR17 INSTALLATION AND USE INSTRUCTIONS for SIDE-MOUNT LADDER RACK
 U.S. Rack, Inc. 2850 Falcon Drive, Madera, CA 93637 15APR17 INSTALLATION AND USE INSTRUCTIONS for SIDE-MOUNT LADDER RACK WARNING: Do NOT attempt to install or use this rack without following all instructions.
Kawasaki Teryx 750 Cab Kit* Caution: Before using this product, read this manual and follow all Safety Instructions.
 Owner s Manual Model: Kawasaki Teryx 750 Kawasaki Teryx 750 Cab Kit* Caution: Before using this product, read this manual and follow all Safety Instructions. Safety Instructions Cab Kit Contents Hardware
WATSON RACING 4- & 6-POINT ROLL BAR Mustang Coupe p/n WR-BOLTINCAGE p/n WR-BOLTINCAGE6PT
 WATSON RACING 4- & 6-POINT ROLL BAR 2005-2014 Mustang Coupe p/n WR-BOLTINCAGE p/n WR-BOLTINCAGE6PT The Watson Racing 4-Point & 6-Point Roll Bars were designed for superior strength while allowing for installation
INSTALLATION INSTRUCTIONS
 INSTALLATION INSTRUCTIONS Trans4mer Grille Guard/Winch Mount Kit 6334 For Chevrolet Silverado 500HD & 3500 This WARN Trans4mer system can be customized to give your Chevy Silverado a wide variety of looks,
N2 Custom Wakeboard Tower. Installation Manual
 Fluid Concepts 6142 W. Detroit St. #3 Chandler, AZ 85226 (800) 284-6615 (480) 609-1182 Fax (480) 609-1195 info@fluidconcepts.net www.fluidconcepts.net N2 Custom Wakeboard Tower Installation Manual Congratulations
HILGARD Part Number Spectrum Lane ~ Missoula MT ~
 HILGARD Part Number 20121 7100 Spectrum Lane ~ Missoula MT 59808 800.791.8056 ~ www.spectrumproducts.com 20121 Rev A You have purchased a Spectrum Products Hilgard Guard Chair. Providing the unit is installed
Warnings. Description. Prior to Installation Tools Needed
 Warnings Failure to act in accordance with the following may result in death or personal injury. The JT Strong Arm Stabilizer System is intended to eliminate chassis movement in travel trailers and fifth
US RACK, Inc Falcon Drive, Madera, CA
 US RACK, Inc. - 2850 Falcon Drive, Madera, CA 93637-559-661-3050 INSTRUCTIONS for MOTORCYCLE RACK with Cradling Wheel Chocks WARNING: Do NOT attempt to install or use this rack without following all instructions.
GRILLE GUARD SPRINTER VAN (EXCLUDES X4) INCLUDES MERCEDES, FREIGHTLINER AND DODGE PARTS LIST:
 INCLUDES MERCEDES, FREIGHTLINER AND DODGE PARTS LIST:") PARTS LIST: 1 Grille Guard 8 12mm Hex Nuts 1 Driver/Left Side Frame Mounting Bracket 2 10-1.50mm x 25mm Button Head Bolts 1 Passenger/Right Side Frame Mounting Bracket 4 10mm x 20mm OD x 2mm Flat Washers
PARTS LIST: 1 Grille Guard 8 12mm Hex Nuts 1 Driver/Left Side Frame Mounting Bracket 2 10-1.50mm x 25mm Button Head Bolts 1 Passenger/Right Side Frame Mounting Bracket 4 10mm x 20mm OD x 2mm Flat Washers
ROOF RACK INSTALLATION INSTRUCTIONS (35, 45, 55 RAIL LENGTHS)
") ROOF RACK INSTALLATION INSTRUCTIONS (35, 45, 55 RAIL LENGTHS) ROOF RACK INSTALLATION INSTRUCTIONS (35, 45, 55 RAIL LENGTHS) NOTE: Perrycraft s products are manufactured to be installed into the skin of
ROOF RACK INSTALLATION INSTRUCTIONS (35, 45, 55 RAIL LENGTHS) ROOF RACK INSTALLATION INSTRUCTIONS (35, 45, 55 RAIL LENGTHS) NOTE: Perrycraft s products are manufactured to be installed into the skin of
Installation Instructions
 Installation Instructions Challengers Rumble Seat Slide 60 in (1524 mm) Installation Preparation Recommended Crew:... Three (3) adults Installation Time:... 3 man-hours Concrete Required:... 0.06 cubic
Please read these Installation Instructions in their entirety prior to installing or operating this equipment.
 2014-2017 Ram 2500 (All beds) Please read these in their entirety prior to installing or operating this equipment. This hitch is rated to 30,000 lbs. Gross Towing Weight and 7,500 lbs. Tongue Weight Bolt
Be sure any accessory used will fit with the soft upper doors before installing. Not all accessories will be compatible.
 Company Name: Spike Power Sports Vehicle Name: Polaris General 2P Product Description: Soft Upper Doors Part Number: 58-1600 Revision: R01 09/19/2018 Contents: 655 Elm Ridge Ave, Canal Fulton OH, 44614
INSTALLATION INSTRUCTIONS DODGE RAM 2 & 4WD 1500 PART # P5058
 INSTALLATION INSTRUCTIONS 2009-13 DODGE RAM 2 & 4WD 1500 PART # P5058 PARTS LIST: Qty Description Qty Description 1 Grille Guard 12 12-1.75mm Hex Nuts 2 Upper Frame Mounting s (for trucks without tow hooks
w w w. h d o n l i n e s h o p. d e AUTOMATIC COMPRESSION RELEASE TOOL GENERAL INSTALLATION -J04654 REV Kit Number Models
 -J05 REV. 008-0- GENERAL Kit Number 98-08 Models AUTOMATIC COMPRESSION RELEASE TOOL For model fitment information, see the P&A Retail Catalog or the Parts and Accessories section of www.harley-davidson.com
ASSEMBLY INSTRUCTIONS
 Universal Top-of-Pole Mount 8 Modules (UTPM8) Module Type G ASSEMBLY INSTRUCTIONS step-by-step assembly and installation Version 1, Rev A PCN 022714-1 Universal Top-of-Pole Mount 8 Modules (UTPM8) for