Wooden Hinge Plans by Roger Gifkins
|
|
|
- Imogene Bridges
- 6 years ago
- Views:
Transcription


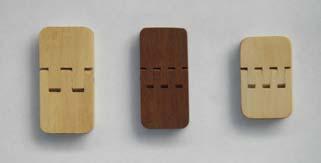
1 Single Action Hinge Wooden Hinge Plans by Roger Gifkins Double Action Hinge
2 Single Action Hinge Over the past 7 years I have produced two types of wooden hinges, a single action hinge (that is in effect a finger joint with a pin through it) and a double action hinge which has two pins. The advantages of the double action hinge are that it will open out 180, and you can set it in flush with the back of the box. With the single action hinge, it will only open just past 90, and it can only be rebated into the box to half it s thickness, but it is much simpler to make than the double. These plans will describe making and fitting the single action hinge in detail, and I will write plans for the double action hinge at a later date. These hinges are best made as a small batch with pieces put aside for future use, rather than setting up to make just one pair. For work at this scale you need will need a small solid carbide spiral cutter (3.2 mm diameter) and a 2 mm spur point drill. These items are available from Gifkins Dovetail. You also need dial or digital callipers, a ruler is not accurate enough. Hinge Sizes I will describe the hinge for small work, such that I have made for a box 120 mm x 120 mm x 60 mm. I have used this same size on a box 300 mm x 250 mm x 150 mm. There is no reason why the hinge could not be scaled up or down to suit other sized boxes. The actual dimensions will depend on the size of the cutter you use for the finger joints, as the width of the hinge will be an odd whole number multiple of the cutter diameter: eg for a 3.2 mm cutter you might use stock 16 mm wide (3.2 x 5), or for a 2.4 mm cutter use stock 17 mm wide (2.4 x 7). I will use a 3.2 mm cutter and 16 mm stock in the following description
3 Selecting & Preparing Stock As with all small work, the more accurately you prepare your stock, the better the end results will be. Ideally we want a timber that will not split easily. It is worth experimenting to see how your wood behaves, as most woods split more readily along the rings than across the rings. As we will be drilling holes from one side to the other, the timber will be less inclined to split in line with the hole if we use quarter sawn timber. Timbers I have used successfully for these hinges include: Ebony, Hornbeam, Satin Box, Jarrah and Rosewood. I have used softer timbers like Red Cedar and Mahogany successfully, but they may not wear as well as the harder timbers. Thickness your wood to 6 mm, trying to get as clean a finish as possible on both sides. The thickness needs to be uniform, so it is best not to use the end 50 mm or so from either end of the board. TIP: For thicknessing stock less than about 13 mm, I find I get better results if I use an accurately thicknessed board under the workpiece, so that the two pieces are fed through together. A piece of 18 mm pine that is longer and wider than the workpiece is ideal. Don t forget to add 18 mm to the thickness you want when setting the thicknesser! Keep this backing board for future use. You don t need cleats on the bottom board to hold the workpiece they will feed through together OK just stacked on top of one-another. Once thicknessed, joint one edge flat and square and then cut a strip at 16 mm width or just a bit over. It can be cleaned up to width later. NOTE: When workpieces are this small, it is much safer to cut to width on a bandsaw (with a fine blade, say 6 or 8 TPI) than on the table saw. Dock your stock to lengths of about 150 mm or 200 mm, ready for finger jointing, making sure the ends are cut accurately square. NOTE: The drop saw is ideal for cutting small pieces accurately. See fence ideas for the drop saw at Jig for Slotting Whilst you could use an incra jig for slotting, I find I get better results with a fixed fence on the router table and a set of shims that are thicknessed to twice the diameter of the cutter. These need to be prepared very accurately, but once done they can be used time and again. You will need to cut trial finger joints when thicknessing these shims, so it is best to make up the jig for the finger joints before thicknessing the shim. The dimensions given for this jig are only a guide, and do not need to be followed accurately. I use a block of 100 mm x 50 mm hardwood, jointed flat and square before thicknessing. Cut one end flat and square, and glue and screw a piece of 12 mm craftwood to the end as shown. A strip of 12 mm craftwood is then glued and screwed to the edge such that it is accurately vertical. Make sure any screws are safely above the cutter. To use the jig, the workpiece is clamped in place as shown, and a straight fence is clamped to the table. Set the height of the 3.2 mm cutter slightly higher than the thickness of your timber, say 6.25 mm for 6 mm stock. Position the fence to get the layout of the joint that you want, so that the outside of the cutter is in line with the outside of the workpiece. With the router going, run over the cutter, cutting through the workpiece and into the craftwood. A stop block clamped to the table so you don t go too far is worthwhile. Instead of sliding the jig 2
4 back off the cutter, I prefer to lift the front of the jig off the cutter (with the cutter still running) and then move the jig back away from the cutter. This way there is no risk that the cutter will widen the slot as you slide the jig back. We would then insert one shim (which we haven t made yet!) between the jig and the fence and repeat the cutting, then a second shim etc. Work Piece Fence clamped to table Stop block Router Table Shims We can now get back to the shims. Thickness some strips of hardwood for the shims (running through the thicknesser on a backing board) to a little thicker than twice your cutter diameter, say 6.6 mm, and keep this setting on the thicknesser. Cut two trial sets of finger joints and test for fit (they should be too tight). Now, using the same setting on the thicknesser, run the shims through again with a sheet of paper between the shim and the backing board. This will decrease the shim by the thickness of the paper. This method gives you very fine control over the final thickness. NOTE: Standard photocopy paper (80 gsm) is 0.1 mm thick. Keep decreasing the thickness (adding sheets of paper) till the finger joints fit together easily but without any free play. NOTE: When using the jig, it is vital to keep the router table as clean as possible, as any dust on the shims or between the fence and the jig will destroy the fit. Once the jig is working the way you want, machine finger joints on one end of each workpiece. We then turn the workpiece end for end, but before we clamp it in place, insert a 3.2 mm spacer between the work and the jig to move the workpiece 3.2 mm further away from the fence side of the jig. Work Piece Work Piece 3.2 mm spacer This spacer will offset the second set of finger joints by the finger width, to give us two pieces that will go together with their edges flush. 3
5 If making lots of hinges, dock both ends off accurately at 20 mm and machine fingers again on the shorter strips. Continue till you have enough, remembering that some pieces will be rejected in the drilling process, so have plenty of spares. NOTE: When docking to length, we want the cleanest cut possible, so I use offcuts of MDF underneath and behind the wood to prevent tearout on the table saw. Seeing that we are dealing with such a small workpiece, I also use a hold-down block above the workpiece to keep my fingers well away from the saw: Cross cut fence Hold down workpiece MDF to prevent tearout With small workpieces I prefer to run the work onto the saw, and then stop the saw before I pull the work back off the blade. This is not only safer but also results in cleaner cutting. Drilling For this we need a 2 mm spur point drill, as an ordinary twist drill will run off line and tend to follow the grain. It is possible to grind your own spur points, but at 2 mm diameter this is difficult to do accurately. Set a marking gauge to the centre of the wood (3 mm) and scribe a line from both sides. Readjust the gauge if these lines do not overlap. Once set to the centre of the wood, scribe a line along a trial piece and also across the end as shown. See page 8 for alternative hole position. Using a fence and stop block on the drill press, drill a trial hole and check that it is central to the scribe marks both top and bottom: Positioning of the hole is critical for the hinge to work well, so the drilling should be done as slowly as possible. Whilst it is possible to drill the two halves of the hinge together, I have found that the drill is more likely to run off. Try it both ways and see which works best for you. If drilling the two halves together, it is necessary to use a 0.25 mm spacer (paper or cardboard) to stop the fingers going right home: 4
6 Spur point drill ¼ mm spacer Remember that we allowed 0.25 extra depth when cutting the fingers. This extra depth allows the hinge to swing freely without the ends of the fingers catching on the bottom of the corresponding slot. Hinge Pins Whilst you could use brass, stainless steel or sterling silver for the pins, I feel that having gone to the trouble of making a wooden hinge, it should be all wood! I use bamboo for the pins, as it has long fibres and is less likely to break than solid timber. Remember we are working at 2 mm diameter here! I buy bamboo skewers from the supermarket which are about 3 mm diameter (look for ones that appear solid with no loose fibres). To bring them down to 2 mm I hold a 50 mm length in the drill press and plunge it through a 2 mm hole in a piece of mild steel, with the bamboo spinning. This shaves the outside off, leaving a perfectly round 2 mm bamboo pin. Some bamboo twists as it goes through the hole. If this happens, try a different brand of skewers! NOTE: To get exactly the fit I want for the pin (firm without being tight), I use a 2.1 mm hole in the steel and then hand sand the pin to give the required fit. You can get fractional sized drill bits from Engineering Suppliers. Before assembling the hinge it is necessary to round over the hinge fingers and the outside corners of the block: Round overs 6 mm radius 3.2 mm radius We need to round over the ends of the fingers (both sides) and also the outside corners of the hinge pieces. The radius of the cutter for the fingers should be ½ the thickness of your stock, or a bit more. In this case a 3.2 mm radius would be fine. For the top corners of the block, the round over should match the cutter you plan to use for the hinge rebate. In this case I would use a 12 mm diameter straight cutter for rebate, so I would use a 6 mm radius cutter for the round over. This round over needs to be done carefully as we want the hinge to be a good fit when rebated into the box. Use a square push blocks and a good fence for these Round overs, and do trial cuts to set things just right: 5
7 Fence just clear of cutter Table insert NOTE: In the drawing above I have used a table insert to give support right up to the cutter, and the fence is only cut away just enough for the cutter to spin freely. With such a small workpiece it needs to be fully supported as it goes past the cutter. Assembly Check for protruding fingers You can now assemble a hinge and test it s movement. With the fingers cut 0.25 mm longer than the thickness, the hinge should open out just over 90. If you want it to open further, you could allow more depth to the fingers when machining them. If the bamboo is a tight fit, sand it lightly till it is free to slide in and out easily. If the outside edges of the two halves do not align flush, clean this up now on a shooting board before we make the following jig. It is vital that the fingers do not protrude on the inside face of the hinge as the hinge opens, as this would prevent the hinge from opening when it is glued in place. If they do protrude, hold one end of the hinge flat on a sheet of sandpaper and swing the other end back and forth till the fingers are flush. Repeat this process for the other end. Jig for Hinge Rebate The jig I use for the hinge rebate is a remarkably useful device and is a jig that I make again and again for all sorts of hollowing out operations. It is quick to make, so I make up a new one for each different job, and keep them aside for future use. To make the jig we need some 12 mm MDF and some 25 mm chipboard screws. NOTE: For this jig to work you need a plunge router with a round base. Measure the outside diameter of your router base accurately (for Makita 3600 this is 160 mm). Subtract the diameter of the cutter to be used for the hinge rebate (12 mm, as noted above in the round over section), to give us the figure X. That is: X = Diameter of router base diameter of cutter Start with a square piece of MDF about 200 mm bigger than the router base. To this we screw down 50 mm strips of MDF as shown below (pre-drill the strips at 4.5 mm, there is no need to pre-drill the backing board if using chipboard screws). 6
8 TIP: Screw the left hand strip in place. With a steel rule and a knife, measure from this strip and put a knife mark at (X + width of hinge). Do this top and bottom, so we have two knife marks to line up the right hand strip on. With the RH strip pre-drilled, clamp it in place along these knife marks and then screw in place. With this method we can get the strips accurately parallel and accurately spaced. It is better to err on the side of too close together, as then we can adjust the jig to size by planing the inside edges of the strips on a shooting board. Repeat the process for the top and bottom strips, making sure that the third strip is at 90 to the first two. X + width of hinge X + height of hinge 50 mm x 50 mm cleat on underside of jig Clamp the jig over the edge of your workbench, or support the jig over some waste material, so that when we plunge the router through the middle we do not plunge into the bench. With the 12 mm cutter in the router, run around the inside edge of the strips in a clockwise direction, cutting a hole in the board the same size as the hinge. Do this in two passes, only going half way through the first time. It is good to have dust extraction on your router for this jig. Try the hinge in the hole and adjust the position of the strips if necessary. We want the hinge to be a firm fit in both the height and the width. If the hole is too big, it is easier to shim the inside edges of the strips than to move the strips in. Cutting Hinge Rebate To locate the jig on the box, we will screw a 50 mm x 50 mm cleat to the underside of the jig, so that when the bottom of the box is against the cleat, the join between the bottom of the box and the top of the box runs across the exact centre of the hinge hole in the jig. It is important to do this accurately! This cleat is screwed down from above, making sure the screws are countersunk below the surface of the jig. Mark out the hinge positions on the back of the box, so that we can use these marks to position the jig. To use the jig, hold the box in the vice with the hinge side up, and place the jig on top, with the cleat against the bottom of the box. Position the hole in the jig over one hinge position mark, and clamp the jig to the box as shown: 7
9 box Join between top & bottom of box 50 x 50 cleat With the router sitting on the jig and NOT turned on, lower the cutter till it just touches the box, and lock the depth in this position. Now set the depth gauge on the router to 3 mm below this point (half the thickness of the hinge lower). Unlock the router to bring the cutter up clear of the box. We are now ready to route the hinge rebate, once again going clockwise around the inside of the jig. Move the jig to the other side of the box and repeat for the second hinge rebate. TIP: If you place a sheet of paper between the box halves before you clamp it in the vice, this will make the finished hinge rebate slightly lower than the height of the hinge. This way the box will still close fully at the front, but the back edges will be clear by 0.1 mm, which avoids any issues with the edges binding on one another. Fitting Hinges All that is now left to do is to fix the hinges in place. It would be possible to screw the hinges in place from inside the box, which would give you the option of taking the box apart again if adjustment is necessary. However I prefer to glue the hinges in place, once again making everything of wood rather than introducing metal. You do have to get everything just right first time, as there is very little adjustment you can make once the hinges are glued in. It is important that you don t get any glue on the finger part of the hinge, or it would glue the hinge shut, so only apply a light smear of glue to the top and bottom areas of the hinge rebate. I use white PVA and clamp the hinges in place while the glue dries. You need to brace the inside of the box in line with the hinge if clamping the hinge for gluing. Make sure you will still be able to open the glued up the box with the bracing in place, as some bracing will prevent the lid from swinging open! Alternative position for holes It is possible to make the hinge stronger by cutting longer fingers (say 8 mm long in 6 mm stock). We would then position the holes 4 mm in from the end of the fingers, so the hole is still located in half way back on the fingers. This means that when the hinge opens, the fingers protrude 1 mm past the back of the hinge. When it comes to the round over, only do this on the front (outside) of the hinge, leaving the back surface square. When we cut the rebate in the box, we will cut it as described above, then we will increase the depth of the centre section of the rebate to accommodate the protruding fingers. To do this, cut two strips of MDF that are 12 mm wide (i.e.: 20 mm hinge block less 8 mm fingers) and about X + Width of hinge wide, and use these to block off the jig, top and bottom, as shown: 8
10 12 mm strip 12 mm strip With these strips in place on the jig, increase the depth setting by just over 1 mm and route the centre portion of the hinge rebate deeper. It is then necessary to clean up the corners for this deeper section with a chisel so we have square corners, rather than round from the cutter. This version of the hinge can now be finished off and fitted in the same manner as described above. 9

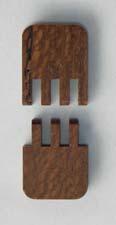
11 Double Action Hinge These plans describe my Double Action Hinge which has 2 hinge pins, allowing the lid of a box to open out to 180º. It is ideal where the box is split in half in the middle, so that the lid opens flat on the table. This way the lid doesn t need any supports or stays to hold it in the open position. Whilst the hinge is somewhat complicated to make and needs to be made very accurately, once you have mastered the techniques, the components can be made up as a batch in advance. This way, fitting the hinges and finishing a box is very quick and simple. These plans should be seen as a continuation of my Single Action Wooden Hinge plans, and I will assume that you are familiar with the techniques and jigs I described for making them. I will refer back to these earlier plans from time to time. With the Single Action hinge, the spacing between the fingers needs to be exactly the same as the width of the fingers (i.e. a finger joint). However the Double Action hinge consists of 2 identical parts, and the spacing between the fingers is not important. This make the fingers much easier to set up for, as we don t need the accurately thicknessed shims as described on page 3. If you have already made the Single Action hinge, you may as well use the same shims, as their spacing also looks good for the Double hinge. If not, the shims can be whatever thickness you want. The only important point is that they should all be cut from the same board, to ensure they are all exactly the same thickness as one-another. The size of these hinges can be adjusted to suit the size of your project, however I will give sizes of the large and small ones that I have made: For A4 document Box (see photo above) - 50 x 29 x 8 mm with 3.2 mm slots For smaller box 40 x 17 x 6 mm with 2.4 mm slots or 40 x 23 x 6 with 3.2 mm slots 10


12 The width of the hinge should be calculated to give equal width fingers on both sides of the pieces, as shown in the photo above. This means there will always be one more finger than there are slots. Timber selection As a starting point, the timber used should be tough and not prone to splitting, but with that said I have made them out of Red Cedar and Huon Pine, as well as Rosewood, Ebony, Hornbeam and Satin Box. My favourites are Hornbeam and Satin Box as I like the contrast in colour when making the box out of a dark timber. Keep in mind that the timber should be long enough to run through the thicknesser, in my case at least 250 mm long. The direction the rings are running is vital, especially in the small interconnecting wafers. Most timbers will split much more readily along the rings than across the rings, which is handy to know when splitting firewood with an axe! This being the case, we want to drill the holes across the rings rather than parallel to the rings. This means that we can prepare all our timber as quarter sawn boards 6 mm (or 8 mm) thick. We will then cut some of this into narrow strips for the interconnecting leaves. These narrow strips will then be back sawn, but the holes will be across the rings as required. Hole running across the rings 6 mm or 8 mm quarter sawn boards Cutting the fingers This is exactly the same process as before (see Jig for Slotting on pages 2-3), except that this time we don t offset the second half with the 3.2 mm spacer as described on page 3. All the pieces we cut are identical. The height of the cutter should be set to the thickness of the timber we are slotting, or just a fraction more. Once again we would slot both ends of a board, then cut both ends off to length (at 20 mm for the small hinge or 25 mm for the big one) and repeat this process till you have enough pieces (including some spares). You may get a cleaner finish if you do the round over across the outside of the fingers before you slot the fingers (see below). Round overs For the double hinge we only need to round over the outside end of the fingers, whereas with the single hinge we rounded over both the inside and outside. Use the same procedure as before (page 5), using a 3.2 mm radius round over bit for 6 mm timber or a 4.8 mm bit for 8 mm timber. The corners at the opposite end to the fingers should be rounded over to match the radius of the cutter you will use for cutting the hinge rebates. 11

13 Interconnecting Leaves For the leaves, start with a quarter sawn board the same thickness as the hinge finger blocks and long enough to be able to run through the thicknesser. I have always used the same timber for the leaves and the finger blocks, but using contrasting timber could give an interesting appearance. We want to slice this into thin strips, a little thicker than the gap between the fingers. If using a 3.2 mm cutter for the fingers, cut the strips at about 3.5 mm thick. A shooting board is useful here, so you can shoot both edges flat and square before cutting a 3.5 mm slice off each edge on the bandsaw. Keep repeating this process till you have a bundle of strips 6 or 8 x 3.5 x at least 250 mm. Thicknessing Leaves Cut quarter sawn board into 3.5 mm strips To thickness the strips, use the same method as for the spacer shims in the Single Action Hinge plans on the bottom of page 3. Set the thicknesser a bit more than 3.2 mm and use paper shims between the strips and the backing board to bring them down to 3.2 mm. We want the strips to be a tight fit in the finger stops, so it is important to cut the fingers before thicknessing the strips. Ideally the strips should be so tight that they are difficulty to get in by hand. We will loosen them later! Cutting Leaves to length Once thicknessed, we wrap the strips up in a bundle with packaging tape or Sellotape, covering all 4 sides over the full length. This way, when we cut the leaves to length, we have little bundles of leaves still taped together, making them easier to handle than the individual leaves. We can now cut the leaves to length, on the saw bench (as on page 4) or the drop saw. The length should be twice the depth of the slots between the fingers, or just a fraction less. Keep the bundles wrapped up for the next operation. Rounding over leaves For rounding over the ends of the leaves, we need a round over bit whose radius is half the thickness of the hinge, or just a bit more. 4.8 mm radius is good for 8 mm thick hinges, and 3.2 mm is good for 6 mm. Seeing our little packets are so small, extra care needs to be taken with this operation. You need a fence for the router table that is only cut away exactly where the cutter is, with no gap between the fence and the cutter. You also need full support on the table surface right up to the cutter, again with no gap between the table and the cutter. For this you need a table inserts or a false top on your router table. For the fence, use the swinging fence idea in my router table plans ( It is best to remove the bearing, cut a small slot for the bearing spigot across the fence and then swing the fence over the cutter. Whilst there is some work involved in setting up for this cut, it is important to take the time to set up properly. You will need to do trial cuts on some offcuts (the same thickness!) to get the height of the cutter and the position of the fence just right. We can then use a push block behind the bundle and another push block to hold the bundle down, and run over all 4 corners of each bundle. Assembling Hinges For the hinge to work smoothly it is vital that the leaves are tighter in one end of the hinge than the other. It doesn t matter which way around, so long as both hinges are the same way around when we glue them in place. If you 12


14 make the hinges equally loose at both ends, the action of the hinge when opening the box is clumsy, and the lid flops sideways as it opens. After rounding over the little packets of leaves, take them apart and hand sand to bring them down in thickness. We want one end a tight fit and the other a loose fit. Start by sanding till a firm fit on both ends, them selectively sand one end to bring it down to a loose fit. This can be done with the sandpaper flat on the bench, and dragging the leaf across the paper pressing on one end only. Use 320 or 400 grit paper and keep trying the fit often, as we don t want it too loose. Drilling Set a marking gauge to half the thickness of the hinge and scribe a line top, bottom and across the end, as for the Single Action Hinge. Set up the drill press with a good solid fence that is square to the table. Use a stop block and adjust the position of the fence and stop block till the spur point drill sits exactly on the cross lines. It is best to drill the hinge blocks first without the leaves in place, and then redrill with the leaves. When re-drilling with the leaves, make sure all the leaves are around the right way (all tight at the same end). Use 0.25 mm spacers of cardboard (eg. business card) at both ends to position the leaves centrally. Ideally with the cardboard spacers in place, the two hinge blocks should not quite touch one another. It is important to retain the layout of the pieces, so mark the outside face with a pencil. These marks can be sanded off later. Bamboo Pins As for the Single Action hinge, I use bamboo for the hinge pins, using exactly the same method as described on page 5. Once you have the pins made, check the action, making sure the leaves don t protrude as the hinge opens. See page 6 for details. Rebates in Box To cut rebates in the back of the box we use the same jig as described on pages 6 8, although you will have to make up a new jig to match the size of your new hinges. The only difference when cutting the rebates is that we can set the hinge into the box to its full thickness, so the finished hinge is flush with the back surface of the box. It doesn t hurt if the rebate if very slightly smaller than the finished hinge, it is then easy to sand or trim the hinge down to give a good tight fit. You may need to round the back edges of the box slightly so they don t catch as the box is opened. With these hinges a mitred lining in the bottom half of the box that sits a few mm higher than the sides works well to locate the lid accurately as the lid closes. 13

15 Fitting Hinges Trial fit the hinges into the rebates, and adjust the hinge size and corner round overs to get a good tight fit. Once you are happy with the fit you can glue them in place, clamping lightly to make sure they are seated to the bottom of the rebate. When gluing the hinges in place, take care not to get any glue the interconnecting leaves. With a project this complicated, don t expect to get it right the first time. Try making some and fitting them, and, most importantly, look at what is happening as you work. This way you can make adjustments to the techniques to get the results you want. Roger Gifkins 2006 Gifkins Dovetail gifkins@midcoast.com.au 14
Plan #1 Wooden hinge, single action
 Plan #1 Wooden hinge, single action There are two types of wooden hinges, a single action hinge (that is in effect a finger joint with a pin through it) and a double action hinge which has two pins. The
15 Dovetail Jig. Instruction Manual. Part # 3452
 15 Dovetail Jig Instruction Manual Part # 3452 CAUTION: Please read, understand, and follow all manufacturers instructions, guidelines and owners manuals that come with your power tools. Peachtree Woodworking
Extendable Large Dovetail Jig
 Extendable Large Dovetail Jig Instruction Manual Part # 3458 CAUTION: Please read, understand, and follow all manufacturers instructions, guidelines and owners manuals that come with your power tools.
Complete Dovetail Jig Instructions
 Complete Dovetail Jig Instructions 15 18 4 3 1 12 13 8 19 17 16 6 14 5 9 11 10 2 9 PARTS LIST - Complete Dovetail Jig Introduction Your new dovetail jig will cut Full Through Dovetails and three varieties
Variable joint spacers (VJS)
") Variable joint spacers (VJS) Instructions for the variable joint spacer (VJS) Gifkins Dovetail has a system that makes it possible to cut variable sized dovetails on a fixed template! With variable joint
Variable joint spacers (VJS) Instructions for the variable joint spacer (VJS) Gifkins Dovetail has a system that makes it possible to cut variable sized dovetails on a fixed template! With variable joint
Hinge Mortising Jig. One of the make it or break it parts of building a. 6 ShopNotes No. 74
 Hinge Mortising Jig A Mortise for a Hinge. Quick, clean, and accurate that s the only way to describe the mortise you get with a trim router and this hinge mortising jig. One of the make it or break it
86N80.10 Economy Dovetail Jig
 86N80.10 Economy Dovetail Jig IMPORTANT: Before using your dovetail jig, it should be securely fastened to a workbench. For a temporary setup, attach the jig to a piece of ¾ thick plywood or MDF long and
Woodline USA Woodline Spacer Fence System
 Woodline USA Woodline Spacer Fence System MADE IN THE USA Includes: (1) ¼ Spacer Fence (1) 3/8 Spacer Fence (1) ½ Spacer Fence (1) Hardware Package (1) 3 Piece Brass bar set (2) Setup Blocks Visit Us Online
Framework joints FABRICATION - WOOD JOINTS. Corner joints. Tee joints. Worksheet 15a. Cable Educational Ltd
 FABRICATION - WOOD JOINTS The word: fabricate means to join together. Most wooden products are held together with adhesive. Adhesive works very well when the edge of a piece of wood is being glued to the
CHAPTER 10. Half-Blind Dovetail Procedures
 CHAPTER 0 Half-Blind Dovetail Procedures 6 Chapter 0 D User Guide HALF-BLIND DOVETAIL PROCEDURES Chapter Foreword In these instructions for using the Leigh Dovetail Jig, we have recommended using certain
Mortise & Tenon Routing Procedures
 See Appendix I for complete joint specifications and guide and bit selection FMT PRO CHAPTER 4 Mortise & Tenon Routing Procedures Single Mortise & Tenon, Test Production Procedures Production Procedures
Essential BOX JOINT JIG
 Essential BOX JOINT JIG Home in on precise finger joints with this table saw sled. By Ken Burton The box (or finger) joint is a remarkably strong, interlocking corner joint that can be quickly made on
Ten Essential. These bits will conquer the majority of woodworking tasks. b y G a r y R o g o w s k i. Operating: handheld vs.
 Ten Essential Router Bits These bits will conquer the majority of woodworking tasks b y G a r y R o g o w s k i You ve bought a new router, unpacked it, and even found the switch on it. But that s only
Copyright 2007 MLCS 1
 Copyright 2007 MLCS 1 REFERENCE GUIDE and SPECIFICATIONS: Edge Guides: This 12 Dovetail Template comes complete with 2 Edge Guide Sets one set for Half Blind and one set for Rabbeted Half Blind Dovetails.
Single Pass Half-Blind Dovetails
 9 DR Pro - CHAPTER Single Pass Half-Blind Dovetails Why rout single pass dovetails on a variable spaced Leigh jig? Well, you just may need to reproduce or restore a late 9th or early 0th century drawer
Silverware Chest Plan
 Silverware Chest Plan 05L14.01 Introduction 1. Measure the space required for your cutlery before beginning this project to be sure that it will fit in the drawers and top compartment. The best way to
WARNING: Read these instructions before using the machine DOVETAIL JIG MODEL NO: CDTJ12 / CDTJ24 PART NO: ,
 WARNING: Read these instructions before using the machine DOVETAIL JIG MODEL NO: CDTJ12 / CDTJ24 PART NO: 6462170, 6462175 OPERATION & MAINTENANCE INSTRUCTIONS LS0111 INTRODUCTION Thank you for purchasing
Adjustable Box Joint Jig. Richard Hicks on 8/24/2015. Box or Finger Joints
 Adjustable Box Joint Jig Richard Hicks on 8/24/2015 Box or Finger Joints Adjustable Box Joint Jig Richard Hicks on 8/24/2015 Box Joints are also called Finger Joints Because they have interlocking fingers
Greene & Greene. Mailbox. by Seth Keller. Signature details create an elegant box. 2 AmericanWoodworker.com
 Greene & Greene Mailbox by Seth Keller Signature details create an elegant box. 2 AmericanWoodworker.com We needed a new mailbox, but I couldn t find an off-the-shelf version that I liked. So I decided
End-On-End Dovetails D4R - CHAPTER 12
 D4R - CHAPTER End-On-End Dovetails 4 While you have the router set up for half-blind dovetails, it is a good time to try end-on-end dovetails. If you have not yet routed half-blind dovetails or read through
REINFORCING THE CORNERS OF FLAT FRAMES
 REINFORCING THE CORNERS OF FLAT FRAMES There are a number of different methods that may be used to join flat frame sides together. As most Woodworkers know, end grain glue joints are not nearly as strong
Copyright MLCS 1
 Copyright 2007. MLCS 1 WORKING WITH BOX JOINTS Box joints (AKA "Finger Joints") provide a simple, yet equally effective, alternative to dovetail joinery. In particular, they serve well for applications
Grade 11 Woods Lift Lid Coffee Table. Based on Under the big Top from Popular Mechanics Website
 Grade 11 Woods Lift Lid Coffee Table Based on Under the big Top from Popular Mechanics Website TABLE TOP 1. Select enough lumber to construct a top that is between 22 ½ and 24 wide after jointing. Ensure
Half-Blind Isoloc Joint Procedures
 ISOLOC - CHAPTER 6 Half-Blind Isoloc Joint Procedures 6- Always use scrap boards to practice and test for fit. Rip the boards to width to suit the chosen template. The pin boards should not be less than
Ways to get the most out of your
 5 Ways to get the most out of your router table When you mount a router on a table, you expand your shop s potential. To help you take advantage of this potential, we assembled five router table techniques
CHAPTER 8. Through Dovetail Procedures
 CHAPTER Through Dovetail Procedures 52 Chapter D4 User Guide THROUGH DOVETAIL PROCEDURES Chapter Foreword In these instructions for using the Leigh Dovetail Jig, we have recommended using certain cutters
Perfect Tapers. on the Tablesaw. Make tapered legs of all types, quickly and safely
 Perfect Tapers on the Tablesaw Make tapered legs of all types, quickly and safely B Y S T E V E L A T T A 30 F I N e W o o D W o r K I N G COPYRIGHT 2012 by The Taunton Press, Inc. Copying and distribution
Serving Tray. When some good friends got married recently, An exercise in template-making yields a great gift project that s easy to duplicate
 Serving Tray An exercise in template-making yields a great gift project that s easy to duplicate END Create from 3 8 2 8" piece. By Geoff Noden When some good friends got married recently, I decided to
Carcase Construction. Choosing and making the right joints. by Tage Frid
 Carcase Construction Choosing and making the right joints by Tage Frid Furniture construction is broken down into two main categories: frame and carcase. In frame construction, relatively narrow boards
Floating-Top Table. Creative joinery adds spark to this versatile piece
 Floating-Top Table Creative joinery adds spark to this versatile piece By Michael Pekovich 28 FINE woodworking This is one of those projects that almost wasn t. Rachel, my wife, had asked for a small,
Mid-Century Credenza Thoughtful details and modern joinery merge in this sleek design
 Mid-Century Credenza Thoughtful details and modern joinery merge in this sleek design BY LIBBY SCHRUM Mid-Century Modern furniture has not been wildly popular since, well, the mid-century. But fashion
A Unique Cutting Board
 A Unique Cutting Board When I was asked to make a cutting board as a special gift, I wanted to do something new and eye-catching. Tired of squares and straight lines, I envisioned curving accents not shallow
Shoulder Plane. dovetailed. fine tools. Make an heirloom tool and learn the secret to creating double dovetails in metal it s easier than you think.
 fine tools dovetailed Shoulder Plane Make an heirloom tool and learn the secret to creating double dovetails in metal it s easier than you think. I ve always been fascinated by old, metal hand planes.
Pivot-Door Downdraft Cabinet Plans
 Pivot-Door Downdraft Cabinet Plans Finished Cabinet Closed Open Exploded View Introduction This simple downdraft-style dust collection cabinet is a great way to keep your shop cleaner and keep your router
Ahead of the curve 2 Part
 F&C PROJECT Ahead of the curve 2 Part In the second part of this series, Chris Tribe constructs the table for his stylised cabinet which we looked at last month in F&C Accuracy in turning the legs for
The Universal Table Saw Sled
 The Universal Table Saw Sled Do Precision Work Even with Inexpensive Table Saws! Table saw blades always tend to move the wood while the cut is being made. This is why it's so difficult to get accurate
 America s leading woodworking authority To download these plans, you will need Adobe Reader installed on your computer. If you want to get a free copy, visit: http://adobe.com/ reader. Having trouble downloading
ARTS AND CRAFTS CHAIR
 ARTS AND CRAFTS CHAIR 491 MATERIALS LIST--DINING CHAIR Key No. Size and description (use) A 2 1-3/4 x 1-3/4 x 16-1/4'' oak (front leg) B 2 1-3/4 x 3-3/4 x 40-1/2'' oak (rear leg) C 1 1-3/4 x 3-3/16 x 15''
Make a cupboard as a BCATS
 National Certificate in Building, Construction, and Allied Trades Skills (BCATS) Make a cupboard as a BCATS project Unit Standard 25921 Level 2, Credit 6 Name: Contents Reference Page What you need to
Shaker Classic Change the legs to change the look
 Shaker Classic Change the legs to change the look 2 Ways B Y C H R I S T I A N BECKSVOORT not long ago, a couple ordered a set of cherry side tables from me, one for each side of their pencil-post bed.
Shop Projects. Plans NOW. Each Built from One Sheet of Plywood!
 Plans NOW www.plansnow.com 5 Shop Projects Each Built from One Sheet of Plywood! Tool Tote - Sawhorse - Workbench - Wood Bin - Wall Cabinet PLUS: 7 SHOP SECRETS Working with Plywood Dread the thought of
135 ROLLTOP DESK 515
 135 ROLLTOP DESK 515 For the person who hates to clear off a desk, who wants to leave everything where it is overnight yet still have the clutter hidden, a rolltop desk is a godsend. The tambour hides
Kitchen Step Stool. Premium Plan. In this plan you ll find: America s leading woodworking authority
 America s leading woodworking authority Premium Plan In this plan you ll find: Step-by-step construction instruction. A complete bill of materials. Construction drawings and related photos. Tips to help
Tilt-Top Table Elegant project builds hand-tool and machine skills
 Tilt-Top Table Elegant project builds hand-tool and machine skills BY M A R I O R O D R I G U E Z As a woodworking instructor, I m always looking for interesting and challenging projects to present in
Right-Angle Sled. Owner s Manual 05J U.S. Patent No. 5,890,524
 Right-Angle Sled Owner s Manual 05J24.01 U.S. Patent No. 5,890,524 Introduction The Veritas Right-Angle Sled straddles the Veritas Router Fence, giving rock solid support to the right-angle arm. As with
CHAPTER 11 3/4" Box (Finger) Joints
 Joints") 53 RTJ400 OPERTION CHPTER 11 3/4" ox (Finger) Joints IMPORTNT SFETY NOTE efore using your Leigh RTJ400 you must have completed the preparatory steps listed in the previous pages, including reading the
53 RTJ400 OPERTION CHPTER 11 3/4" ox (Finger) Joints IMPORTNT SFETY NOTE efore using your Leigh RTJ400 you must have completed the preparatory steps listed in the previous pages, including reading the
Classic Project. Two-drawer Platform Bed. In this plan you ll find: Step-by-step construction instruction. A complete bill of materials.
 America s leading woodworking authority Classic Project In this plan you ll find: Step-by-step construction instruction. Two-drawer Platform Bed A complete bill of materials. Construction drawings and
WOODWORKING GUIDE: BASIC JOINERY
 WOODWORKING GUIDE: BASIC JOINERY Close isn't really good enough. A perfect fit is what counts. When building furniture, there are many ways to construct joints. The simplest are those that use mechanical
GENERAL NOTES: Page 1 of 9
 Laminating A Zia Into A Turning Blank by W. H. Kloepping, Jan. 2009 This describes how a zia (the New Mexico state symbol) can be laminated into a turning blank. Materials needed: Square Turning Block
This is a solid wood cabinet. The only plywood used is for the back and drawer bottoms.
 Sideboard Sideboard Overview: This project requires basic woodworking skills and access to woodworking machines. Woodworking machines have sharp cutting edges and are NOT forgiving. You should be properly
Workbench. Process Guide
 Workbench Process Guide Design, Lumber, Tools & Nails Made entirely from 2x and 4x construction lumber Hardware speeds up the consturction while also reduces the amount of planing we have to do by using
Router Table-Mate. Everything you'd want in a router table for just $50.
 Router Table-Mate Everything you'd want in a router table for just $50. Commercially made router tables are everywhere these days. Some of them come with more gizmos and gadgets than a 59 Edsel. By the
Assembly. Insert stem and then fix/lock using the grub screw as in picture.
 Assembly Parts list: (Boxed set) Body inc hinge plate x1 M33 x 3.5 16 tpi + depth stop collar x1 1 stem + collar x1 HSS cutter x1 Bristol handle x1 Twist handle x1 4mm Allen key x1 3mm Allen key x 1 Instruction
BUILDING A STORM DOOR
 BUILDING A STORM DOOR BY NEAL BARRETT Illustrations by George Retseck If you're in the market for a storm door, you probably know that there are many styles and models available. However, most of them
Build your own Drawer unit. D3 / D4
 Page1 Build your own Drawer unit. D3 / D4 1: Introduction. This guide will give you the plans, materials and how to information to build your own drawer unit. The dimensions given will fit a D3 or D4,
woodworkersjournal.com MATERIAL LIST
 MATERIAL LIST T x W x L 1 Legs (2) 1 1 2" x 3 1 2" x 36 7 16" 2 End Uprights (2) 1 1 2" x 3 1 2" x 32 1 2" 3 Stringers (4) 1 1 2" x 3 1 2" x 42" 4 Top Cladding, Long (2) 3/4" x 7 1 4" x 65 3 4" 5 Side
Chess board. The true origins of chess are. from old wood scraps Michael T Collins makes a chessboard and a box to store the pieces
 What you will need: Combination plane with 3mm, 6mm and 13mm cutters Rip and cross cut saw Block and jack plane Marking gauge and knife Card scraper optional and try square Chess board from old wood scraps
The WoodWorker s Edge
 The WoodWorker s Edge Draw-leaf Game Table 1. 2. Layout the area for the tenons. The tenons are 3/8 thick x 4-1/2 long x 1-1/4 deep and offset to the inside. Create the tenons using the step method to
Instructables Butcher Block Top
 Instructables Butcher Block Top Project Overview: This project requires basic woodworking skills and access to woodworking machines. Woodworking machines have sharp cutting edges and are NOT forgiving.
About.com :
 http://woodworking.about.com/gi/dynamic/offsite.htm?sit...//www.popularwoodworking.com/features/fea.asp%3fid=1088 (1 of 8)1/28/2004 12:05:01 AM Modern Storage Tower The last thing I want to do when starting
Tools and Tips: ( 1 )
") Tools and Tips: As you build instructions will show in my many picture manual how to assemble. You can use your own methods as you desire, my results are very good. A smooth, flat work surface is very
Tools and Tips: As you build instructions will show in my many picture manual how to assemble. You can use your own methods as you desire, my results are very good. A smooth, flat work surface is very
Hand Tools. 1. Marking Out Tools
 Hand Tools 1. Marking Out Tools Steel Rule Used for measuring Measure twice, cut once, golden rule of woodwork Rule should begin from the edge of the metal Millimetres are used, nothing else will do 10mm
Making a snap lid box By Jeffrey A Lavine
 Making a snap lid box By Jeffrey A Lavine Some call them boxes, some call them lidded bowls, others call them vessels or containers but whatever you call them they are both enjoyable and a challenge to
Clock 35 - Toyland. Construction instructions for Clock 35
 This clock has been designed for children, it is a stand-alone unit and can be positioned on a shelf or cabinet out of the reach of very young hands who may be tempted to touch. The clock is shown in two
Wood Duck Nest Box Design & Assembly Directions
 Wood Duck Nest Box Design & Assembly Directions Instructions, Illustrations & Photos Courtesy of MWDI and Scott Jasion, Harford County Chapter, Ducks Unlimited Side door opening design for easy mounting
INSTALLATION MANUAL FORTRESS SERIES
 Guardian Security Structures TEL 1-406-212-2334 EMAIL rg@gssdoors.com WEB www.gssdoors.com FORTRESS SERIES GENERAL INSTALLATION GUIDELINES 1. The door frame is installed using 16 bolt screws 7,5 mm in
Join Neck and Body Wednesday, January 16, :08 PM
 ASL Breakdown Page 1 Join Neck and Body Wednesday, January 16, 2013 10:08 PM 1. 2. 3. 4. Charles did the following steps to speed things up: Lightly sanded the top of the lower bout with an orbital sander.
Durable Outdoor Table
 54 F I N E W O O D W O R K I N G Durable Outdoor Table Ipé table will seat six and weather many seasons B Y D A V I D B E D R O S I A N Last summer brought a new pool to our backyard. With it came more
Half-Blind Dovetails in Half the Time
 Half-Blind Dovetails in Half the Time Get the hand-cut look with the speed and consistency of machines B Y S T E P H E N H A M M E R Bandsawn tails Zip, zip. A simple jig delivers accurate and uniform
Shaker Shop Stool. By Glen D. Huey
 Shaker Shop Stool By Glen D. Huey By the turn of the decade following Mother Ann Lee s visit in 1783, the Massachusetts Shaker community known as Hancock began its existence. From a small gathering of
Installing your new Bevella Top. L Shaped Countertop with Joints No Finished Ends (Fits Between Four Walls)
") Installing your new Bevella Top L Shaped Countertop with Joints No Finished Ends (Fits Between Four Walls) Bevella RTI Countertops are engineered and manufactured to the highest quality standards, built
Installing your new Bevella Top L Shaped Countertop with Joints No Finished Ends (Fits Between Four Walls) Bevella RTI Countertops are engineered and manufactured to the highest quality standards, built
Box Bits # 10. Routed Boxes
 Routed Boxes Introduction When routed boxes are mentioned, a lot of people think of the type of box where the inner space of the box is removed using a router as shown in Figure 1. Figure 1 Whilst this
Klamp Trak. Instructions (39052)
") Klamp Trak TM Instructions (39052) ITEM# KKS1020 - Klamp Trak TM Getting Started There are three main methods for installing Klamp Trak in your workshop. In all three methods, your goal will be to construct
Klamp Trak TM Instructions (39052) ITEM# KKS1020 - Klamp Trak TM Getting Started There are three main methods for installing Klamp Trak in your workshop. In all three methods, your goal will be to construct
Installation Instructions
 Supafold Slide Aside System Three Fold Room Divider Installation Instructions Distinctive Doors Ltd Supafold Slide Aside Internal Folding System IMPORTANT: Before proceeding with the installation, and
TELESCOPIC GATE MANUFACTURING AND INSTALLATION MANUAL.
 TELESCOPIC GATE MANUFACTURING AND INSTALLATION MANUAL. Telescopic gates have been manufactured for many years essentially in the same way they are largely today. In recent years hardware suppliers have
Traditional glass-pane and wood-muntin doors highlight this free-standing piece.
 Bookcase Traditional glass-pane and wood-muntin doors highlight this free-standing piece. As the saying goes, there's nothing like good books. But they can present some storage problems--especially if
Hornsby Woodworking Men s Shed. Guide to the Shed s Woodworking Machines
 Guide to the Shed s Woodworking Machines SP00 Purpose The primary purpose of this document is to assist the induction of new members of the Hornsby Woodworking Men s Shed in the identification and understanding
ULTIMATE ROUTER TABLE PLANS. By Dan Phalen
 ULTIMATE ROUTER TABLE PLANS By Dan Phalen January 2017 Ultimate Router Table Plans. Copyright 2012-2017 by Daniel Phalen. Published by Creston Hall Publishing Company. All rights reserved. No part of this
Jimmy s 2 nd demonstration was what he called an African Drum style box made from Iroko with a cocobolo insert in the lid with inlaid sterling silver.
 Jimmy s 2 nd demonstration was what he called an African Drum style box made from Iroko with a cocobolo insert in the lid with inlaid sterling silver. He started by roughing out the block with a roughing
ENJOY THIS SELECTION FROM. Woodworking 101. Includes Step-by-Step Instructions for 8 Projects. Woodworking
 W ENJOY THIS SELECTION FROM Woodworking 101 Includes Step-by-Step Instructions for 8 Projects Woodworking 101 Aimé Fraser, Matthew Teague, and Joe Hurst-Wajszczuk To purchase your copy of Woodworking 101,
CROSS CUT SLED Page 1
 CROSS CUT SLEDPage 1 Contents Introduction 3 Required Tooling 3 Optional Tooling (though recommended) 3 Parts 3 Hardware Kits 3 Other Hardware 4 Wood 4 Customising it to your saw 4 Base Layout 5 Cutting
Step-by-Step Instructions for Making the Wall-hung Bookcase
 Step-by-Step Instructions for Making the Wall-hung Bookcase When a piece of furniture has an air and look of simplicity, you can be sure that it deftly conceals the complexity of its making. I wanted this
DTU Animal Cart Programme
 DTU Animal Cart Programme TECHNICAL 25 LIGHT STEEL AND WOOD DONKEY CART RELEASE Development Technology Unit, Department of Engineering, University of Warwick, Coventry, CV4 7AL UK, tel: +44 (0)203 523523
OWNER S MANUAL. But that s just half the story. The fence INCRA Miter Gauge really does work
 From the makers of the INCRA JIG! Please read this owner s manual before use and keep it at hand for reference. Your new INCRA Miter Gauge at long last solves that frustrating problem all too familiar
Charles Neil Dovetail Jig Instructions
 Charles Neil Dovetail Jig Instructions Thank you for purchasing the Charles Neil (CN) Dovetail Jig. This is an easy to use and flexible jig for cutting through dovetails. These instructions complement
Perfect Hinges. Pick the. for Your Boxes. Selecting just the right hinges to fit each special box can be a daunting task.
 Pick the Perfect Hinges for Your Boxes The right choice will help you design and build better boxes by Doug Stowe Selecting just the right hinges to fit each special box can be a daunting task. There are
Arched. Building an. Passageway. Although my company specializes in high-end jobs
 Building an Arched Passageway All photos by Brian Striegler This straightforward approach combines basic shop methods with simple site joinery to create an elegant frame-and-panel archway by Gary Striegler
Butterfly Leaf Dining Table Plans
 Butterfly Leaf Dining Table Plans Part 1 An attractive dining table with a secret: the leaf folds and stores inside the table. Season 1, Episode 7 P a g e 2 I first saw a butterfly leaf table in a back
User Manual. CMT650 Kitchen Worktop Jig CMT Part no:
 User Manual CMT650 Kitchen Worktop Jig www.cmtuk.com Part no:200650 www.axminster.co.uk CMT650 Index of Contents... Page No. Index of Contents...02 What s in the Box.........03 What else you will need...
Classic Mitered Jewelry Box
 America s leading woodworking authority Premium Plan In this plan you ll find: Step-by-step construction instruction. A complete bill of materials. Construction drawings and related photos. Tips to help
router table sled 2012 August Home Publishing Co.
 router table sled 2012 August Home Publishing Co. best-built jigs & fixtures router Table Sled Packed with features, this sled makes it easy to rout perfect-fitting joints. A router table is a great tool
A Day House. A View of One Way to Finish the Exterior of The Day House. Read these instructions all the way through before beginning this project.
 A Day House A View of One Way to Finish the Exterior of The Day House Read these instructions all the way through before beginning this project. General Comments For the purposes of this project, the standard
Single MJ Splitter Installation Manual - 1Si
 SP1 Single MJ Splitter Installation Manual - 1Si Micro Jig, Inc. PO Box 195607 Winter Springs, FL 32719, USA. Tel: 1-407-696-6695 Web site: www.microjig.com Email: sales@microjig.com Copyright 2004 Micro
curved-lid treasure box
 curved-lid treasure box 20 ugust Home Publishing o. Feature Project urved-lid Treasure Box The curved lid and ebonized sides of this attractive box show off the highly figured wood and your woodworking
WPS crew Doors Installation instructions
 WPS-132-133 crew Doors Installation instructions ORDER OF INSTALLATION FOR A COMPLETE ENCLOSURE OF A CREW WPS (Weather Protection System) IS AS FOLLOWS: 1. Heater 2. Rear Thresholds - Right Hand & Left
Making a Windsor Stool
 Brian Clifford A Windsor Stool - page 1 Making a Windsor Stool The Windsor style The Windsor style is the name of a particular type of traditional English chair. Within this style there are a variety of
PRAZI USA. Model PR-3900 Owners Manual. Please read this manual in its entirety before using the PRAZI ChestMate.
 PRAZI USA Model PR-3900 Owners Manual Please read this manual in its entirety before using the PRAZI ChestMate. PRAZI USA 214 Rear South Meadow Rd (800)-262-0211 Plymouth MA, 02360 www.praziusa.com ChestMate
Patrol Box Plans by David J. Yarusso Troop 609
 Patrol Box Plans by David J. Yarusso Troop 609 Materials List: 1. One 4 x8 sheet of ½ thick cabinet grade (birch or oak) or AC plywood. If using AC grade, use the A grade surface on the outside for a clean
I I. . i1 AD JUSTABLE SHELVES
 ADJUSTABLE SHELVES HAD BEEN TRYNG TO WORK out a really simple (read "fast") way to make an elegant wooden version of the old standby, metal standards and brackets. Although have seen many commercial versions
Build the Spitfire: Step-By-step. Pack 3 Stages 21-30
 Pack Stages 2-0 Contents Stage Page Number 2 72-74 22 75-78 2 79-8 24 82-84 25 85-88 26 89-9 27 92-94 28 95-97 29 98-00 0 0-05 Editorial and design by Continuo Creative, 9-4 North Road, London N7 9DP All