Perimeter Guard Systems. Safety. Products. Products & Solutions
|
|
|
- Egbert Morton
- 6 years ago
- Views:
Transcription


1 Products & Solutions Flotronics Automation Safety Products Automation Conveyors Doors Enclosures Gantries Perimeter Guard Systems Solar Test Stands Work Stations Other

2 Featuring The Patented Powerlock Fastener With a load capacity of over 1300 lbf (900 lbf in UL) Adjustable No Drilling Of Hole For Connection The Joint Is Invisible From The Outside Secured Against Rotation i


3 Table Of Contents 3. About Us 4. Guarding Solutions 5. Fence Varieties - Guard Types 6. Materials & Construction 7. Door Types 8. Fence Varieties - Add-Ons 11. Machine Guarding Accessories 12. Machine Guarding Accessories (Continued) 13. How it Works How MiniTec Goes Together 15. Assembly Overview 16. Assembly Instructions 17. Install Team 18. Build, Pack & Ship Option 19. Other Solutions 21. Contact Us ii 1


 cuts profiles to length.")
4 About Us About Modular Aluminum Technology Custom Aluminum Solutions Thank you from all of us here at Modular Aluminum Technology for taking an interest in our company. Modular Aluminum Technology sells MiniTec aluminum profile for industrial, commercial, and residential applications. We custom design and build an extensive range of modular systems, large and small utilizing our various extrusions. We offer in-house Engineering, Construction, Run-off, and on-site installation services. We also sell bulk materials and pre-engineered kits if prefer to process or assemble yourself. In addition to considerable cost savings, our modular profile systems insure strength, versatility, simplicity and flexibility. Precision Cutting Our State-of-the art- High Precision Elumatic Saw (calibrated monthly to 1/10mm) cuts profiles to length. Inventory Our stock inventory of all profiles, assembly parts and mesh allows fast delivery. Assembly Floor Over 15,000 sq. ft. of assembly space provides space for up to 15 skilled tradesmen. Design Engineers Our staff of 4 BSME engineers headed by Michael Schmaltz is highly skilled to assist in your design requirements. 3


5 Guarding Solutions Purchase Options Complete Assemblies Most of our customers utilize our talented sales team and innovative engineers to help take your ideas and produce a finished product in the shortest time. These complete solutions range from basic guards to complex automation systems. Complete solutions are designed and built and shipped direct to your door. Complete Assemblies Kits Want to assemble the product yourself? Our sales team and engineers will help as with Complete solutions but to let your tradesmen do the final assembly we will furnish a KIT with all parts and assembly drawings. KITS can be more easily shipped than Complete Assemblies. Kits Bulk Purchases All parts inclusive of Profile - Fasteners - Hinges - Wheels - Feet - etc. can be ordered as individual parts for your total control of cutting to length-machining and assembly. Purchasing parts can be the least costly approach if you are equipped for design, machining and assembly. Bulk Purchases Our large inventory will allow us to ship just what you need. 4 2


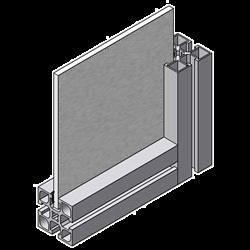
 To reduce about 10 % cost from the standard noted above, we replace the 45mm X 45mm top and side sections with 19mm X 45mm profile.")
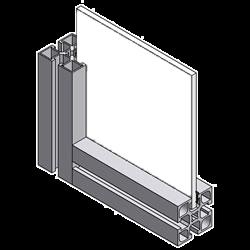
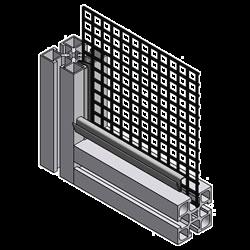
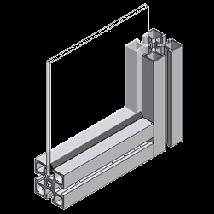
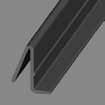
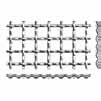
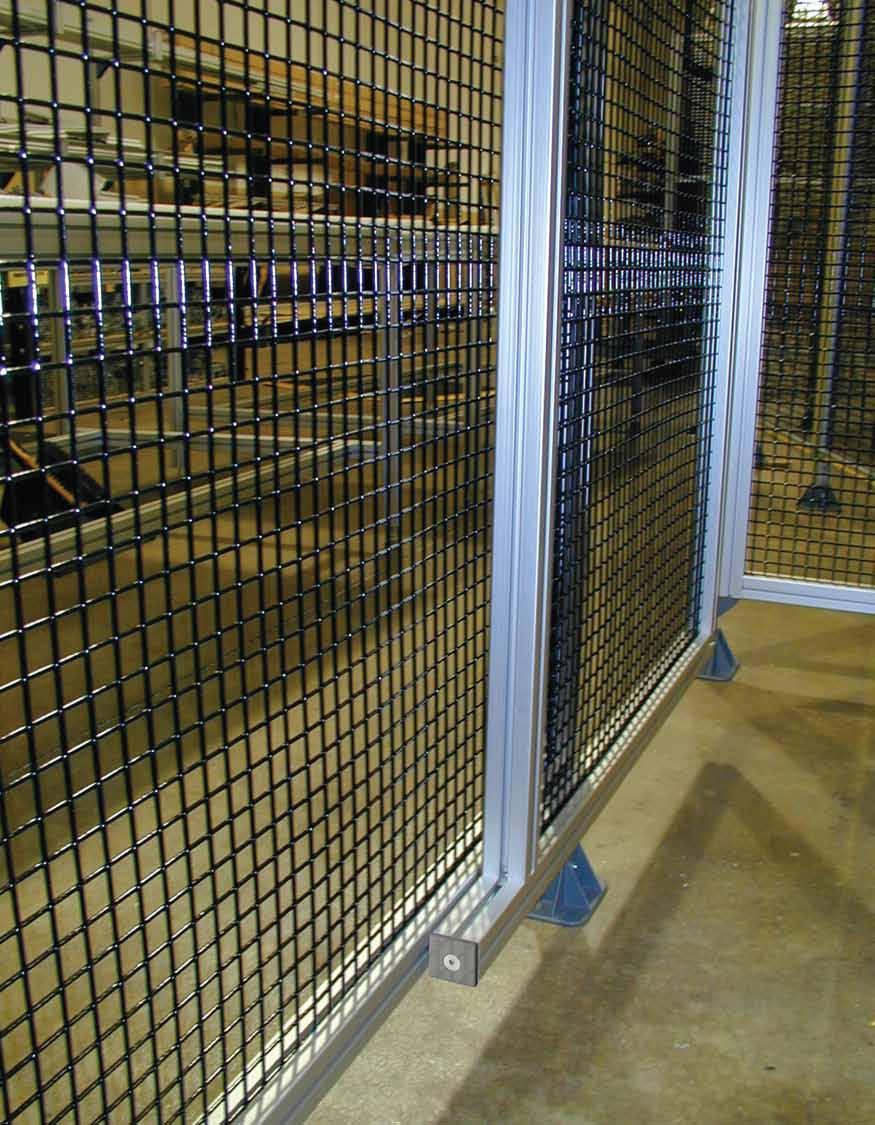
6 Fence Varieties - Guard Types Integrated Post/Panel Integrated Post/Panel Economy Modular Guarding Modular Aluminum Perimeter Guard System Modular Aluminum Technology has developed three different types of Guarding varieties to help meet your individual needs at the most economical price and quick delivery. We can provide these sections completely assembled and shipped to you on a flat skid for you to erect or we will build up into complete wall sections for reduced work on your part. The typical types of Guarding sections are: Integrated Post and Panel This is our most rugged design and also our most common type of guard section. While we show common standard dimensions we will build sections to your individual needs with the same low cost and fast delivery. Integrated Post and Panel (Economy Version ) To reduce about 10 % cost from the standard noted above, we replace the 45mm X 45mm top and side sections with 19mm X 45mm profile. We still use the heavy duty 45mm X 45mm Post. NAAMS Style Post and Panel North American Automotive Metric Standard - Modular Aluminum Technology offers an aluminum profile version based on the dimensions and installation intent of that standard used by some industries. This design uses individual posts and separate panels installed between these posts. This design allows individual panels to be installed and removed from stationary posts. NAAMS Style Post & Panel Applications Machine Protection Robot Barriers Laser and Welding Protection Overhead Gantry Protection Shop Partitions Options Sliding Doors Double Doors Clear Lexan Wall Panels and Dog Houses Lift-off and Removable Panels for Access Barrier Guarding Sintra Panels (Many Colors Available) Technical Data Completely Assembled Panel Designed to fit applications Guarding Doors: For all of the three designs we offer the same door system. Note this door system includes both side posts and also a header. If the header is not desired then we can provide the door separately from the posts. While only a very limited number of our customers order to these standard numbers, these designs offer a quick and easy to understand concept of the options available. These show our standard 1" welded PVC mesh but polycarbonate is a quick substitute at a slightly higher price. Modular Guarding provides custom design and quick installation for operator protection against moving parts. Modular Aluminum Technology Mesh Machine Guarding and Perimeter Guarding Systems help protect and separate equipment, property and personnel. 5


7 Materials & Construction Modular Guarding Construction Our products panels are most commonly made with Wire Welded Mesh, Polycarbonate, Sintra and also Solid Steel which is framed together by Anodized Aluminum Extrusion. Mesh Plastic coated steel Polycarbonate Materials Sintra PVC foam board Solid Metal 6 1


8 Fence Varieties - Door Options Door Types Swing Door A Single Door allows access inside the Guarding Cell. It can be a left or right handed door, Mounted with Hinges. Double Swing Door This type of door allows a bigger opening to allow access inside the guarding cell. It is commonly used when space is limited to left or right of door this would cancel out the slide or rolling door. Sliding Door A Sliding Door is used when space is limited and a Swing Door is not acceptable. Allows for access in Guarding Cell by sliding door to the left or right. Cylinders can be used in this application or opened manually. Roller Door A Roller Door is a hanging door held in at the top in a roller track. It has the same functions of a Sliding Door but is mounted with rollers instead of a slide shaft. 7


 M8x20 to secure cable")

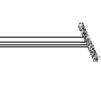
9 Fence Varieties - Add-Ons Optional Items for Perimeter Guarding Minitec Perimeter Guard Systems allow for customization with many add-ons to insure optimal safety. Some add-ons are as follows: Dog House Dog House The purpose of a dog house is to cover an opening created for conveyor passage to stop anyone from reaching through to the area of moving parts inside the guarding cell. Cable Tray Supports Cable Tray Supports Cable Tray Supports mount around the top or sides of the guarding cell depending on where the customer wants them. Comes with angles 45 GD-Z for mounting along with end caps and (2) M8x20 to secure cable tray to brackets. Removable Panels Removable Panels Removable Panels provide easy access to enclosures, particularly where a swinging door is in the way. A door can be lifted using the 1/4 turn latch. For larger doors, handles are often added. Panels can also be added after the frame is built. 8 1

10


11 Machine Guarding Accessories Guard Unit Fixing Angle 45 AL /0 Hinge 45 S /0 Ball Latch /0 Ball Latch support /0 Ball latch /0 Ball latch support /0 Door Catch /1 Snap bolt /0 Angle bracket for floor fastening /0 Strengthening element /0 Angle bracket for floor fastening /0 Signal profile /2 Security Switch AZ 16 ZVR K /0 Actuating bow for security switch B /2 Actuating bow for security switch B /3 Security switch with lock /0 Conduit 45 AL /0 End cap for conduit 45 AL /1 Edge protection for conduit 45 AL /1 Internal angle bracket of conduit 45 AL /1 Cable clip /0 Conduit /0 Conduit 45 AL /0 Power lock "N" /0 45x45 UL /0 45x90 UL /0 45x /0 Distance Profile /0 Yellow Cover Profile /0 Orange Cover Profile /0 Cable Tray Support Bracket 1 Mesh /0 1/4 Poly Carb /0 End cap End cap Foot 45 GD /0 11


12 Machine Guarding Accessories Foot 45 GD open /0 Foot 90 GD /0 Foot 45 GDS /0 Powerlock Fastener /0 Guarding Unit Fixing Angle GD-K /0 Angle 45 GD-Z /0 Connecting Plate 45x /0 Guard Unit Fixing Angle 45 AL Handle 180 Grey /1 Hinge Door Stop S /0 Twist Stop /0 Handle 45 Without Profile Cylinder Lock /3 Door Lock /3 M6 Square Nut /0 M8 Square Nut /0 M6 Square Nut with Position Fix /2 M8 Square Nut with Position Fix /2 12 1


13 How it Works... Steps Of The Process Step 1 Customer Supplied Drawing Step 2 We provide 3D model for approval Step 3 We make assembly model for install 13


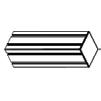
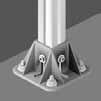
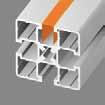
14 How MiniTec Goes Together Components & Assembly With MiniTec Profile and Power Lock Fastening System Power Lock Provides for extremely strong power-lock connection, accurate location of the profiles, integrated mounting aid, moveable, low-cost due to minimal processing. Can be used for all types of constructions. 1mm mm Distance Profile Full length, weld wire retention with uniquely designed distance profile Only MiniTec has the patented Powerlock fastener, by far the easiest and fastest locking mechanism. The easiest system to adjust and reuse. 8mm T-Slot on 90% of extrusion. The MiniTec design CD, see info, is not just a set of section drawings but a complete design system to save you time and money. The use of standard metric nuts and fasteners Yellow Insert Designed for use with MiniTec's standard t-slot as well as extra deep safety slot of clamp profile 32x32 & clamp profile 45x32 Fixing of square mesh or 6mm panels into t-slots Self sufficient construction software for modern machinery! Usable even without CAD-System, icad generates more than 50 different formats in 2D or 3D. Wire Mesh Distance Profile T-Slot Foot - 45 GD-Z Suitable for profiles up to dimension 45mm x 45mm Floor mounting of guard units, information plates and frames Aluminum Profile Assembly Insert profile into foot. Insert the square nut with spring steel sheet into the profile groove - Preassemble the screws. Fix the foot on the floor or on the wall - For this purpose use high-performance anchors or universal dowels with hexagon screws. Tighten the fastening screws. 14 1


15 Assembly Overview Self Assembly Want to assemble the product yourself? Our sales team and engineers will help as with Complete solutions but to let your tradesmen do the final assembly we will furnish a KIT with all parts and assembly drawings. KITS can be more easily shipped than Complete Assemblies. Your packet will contain: Build anything fast using our huge assortment of T-slotted Aluminum Profiles along with Minitec s Revolutionary Power-Lock Fastener A Bill of Materials Assembly and Detail Drawings Tips for Inserting Power-Lock Fasteners A List of Recommended Tools Most assembly instructions can be found in the catalog by looking up the part number or part name. If you need any further assistance please call our facility to speak with a trained customer service representative. Recommended Tools G Series Profiles Have Tear Away T-slots. T-slots Where You Need Them & A Smooth Surface When You Don't 1. Power drill - For inserting powerlock. 2. 5mm drive bit - For inserting powerlock screw. 3. C-Clamp or adjustable clamp - For holding profiles while driving in powerlocks. 4. 4mm & 5mm allen wrenches - For tightening of connecting screws. 5. Rubber mallet - For end cap, yellow cover insert and gray distance installation. 6. Diagonal cutters - For cutting gray distance profile, yellow cover insert profile, and mesh or panel corners. 7. Adjustable crescent wrench - For securing leveling feet nuts and door handles. 8. Metric drill bit set - For drilling clearance holes for set-screw insertion. 9. Tape measure 10. Square 15
16 Assembly Instructions 1. Secure the extrusion by clamping it down to a table or work stand. This will prevent the extrusion from twisting or turning when driving in the powerlock fastener. 2. Put the M8x25mm BHCS through the powerlock block, oriented so that the underside of the head of the screw is resting on the long flat surface of the powerlock block. 3. Use a power drill and an M5 driver to run powerlocks into the center hole in the end of each connecting horizontal profile piece. You do not have to tap the end. The screws will selfthread into the aluminum. Orient multiple powerlocks in the same direction to each other, allowing them to slide into parallel T-slots. For 45mm x 90mm and larger extrusions, where more than one powerlock will be at each end, they must be opposite each other. Example: 90mm x 90mm has four powerlocks at each end. On one end, two will be facing in one direction, and two will face the opposite direction. This will allow powerlocks to slide into the extrusion together. 4. DO NOT RUN POWERLOCK DOWN TIGHT. THE POWERLOCK SHOULD HAVE ROUGHLY A 1/16" (2mm) MOVEMENT IN IT. When attaching pieces to each other you will be able to tell if the powerlock is too tight (the powerlock will not slide very well into the t-slot) or too loose (when you tighten the set screw the two pieces will not be touching). 6. When using powerlocks with any type of panel element, it is best (if possible) to face the powerlocks away from the panel being used in the t-slot. This will allow for tightening without having to cut the corner off the panel. 7. Attach the top pieces first. Face powerlocks away from where the mesh will be. 8. Slide the mesh into the t-slots and install bottom pieces with the powerlocks facing away from the mesh. Standard sweep height from the bottom should be 6" (150mm). 9. Cut the gray distance profile to size with diagonal cutters and install on the outside of the guard. The plastic should push into the t-slot and help lock mesh into place. Sometimes it is necessary to pound the Distance Profile in with a rubber hammer; if so use a plastic or wooden block of some kind so as not to damage the panel. 10. The yellow cover profile can be cut and installed on the face of the guard. Pound the Cover Profile in with a rubber mallet. End caps can also be installed with a rubber mallet. 11. Install the feet using the hardware provided. 5. When attaching pieces that have powerlocks at each end, it is usually desirable to have them facing up or down depending on accessibility. Example: A table with four legs will have horizontal pieces connecting the legs. If the powerlocks are all facing upward and are tightened, when the tabletop is installed there will be no way to get at the powerlocks without removing the top. 16
17 Install Team Install Team Option NEEP PICS/MORE CONTENT Our install team can assemble guarding on your shop floor after it s built in sections at Modular Aluminum Technology. We request that you have all equipment away from where install team will be setting up guarding to give them room to work. The install team provides their own Personal Protection Equipment. The customer is responsible for supplying upto-date drawings or available information as requested. Once the system is fully installed and/or operational, as described, Modular Aluminum Technology can provide support at the Time and Material Rates listed below. 17

")


18 Build, Pack & Ship Option Summary After Drawing is approved by customer, it is released to the shop, where it is built in sections and palletized prior to shipping. All guarding sections are securely fastened to a pallet, banded (strapped) together and shrink wrapped to avoid any damage during shipping. For larger assemblies that use multiple pallets, the pallets are loaded on a delivery truck from our loading dock, to allow the delivery driver to properly secure the pallets to avoid tipping or movement during shipping. While a KIT is much easier to ship, most of our assembly projects are too complex and of size that customers request that we assemble and ship complete. Our packing--strapping and loading on a truck is done by experienced hands. For guarding we have developed a special wood stand to facilitate delivery and protection during transit. Guarding is staged to customer specifications to allow assembly in the order as removed from the pallet. 18 1


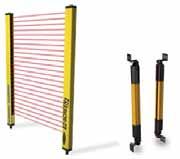


19 Other Solutions Other Safety Solutions Machine Guarding Light Curtains RFID Controls Perimeter Guard Systems Lockout/Shut Off Valves Laser Booths LED Tower Enclosures Safety Mats Machine Guarding 1 19
20 20
 625-8890 Fax: (248) 625-8818 E-mail:")


21 Contact Us Ortonville Rd. Clarkston, MI Phone: (248) Fax: (248) Web: Gateway Park Drive Clarkston, Michigan Phone: Fax: Web: Free Sample Pack Contact us and request the free sample pack shown above. Products & Solutions Custom Aluminum Solutions Automation Conveyors Doors Enclosures Gantries Machine Guarding Perimeter Guard Systems Solar Test Stands Work Stations Other 1 21
Oxford Stalls Installation Instructions
 Oxford Stalls Installation Instructions RAMM Horse Fencing and Stalls 13150 Airport Hwy. Swanton, OH 43558-9615 1-800-434-8456 Rev. 8/15/17 Before You Start Typical stall sizes are 10 x 10, 12 x 12 or
FEET, WHEELS, FLOOR FASTENINGS, SUPPORTS
 SYSTEM COMPONENTS FEET, WHEELS, FLOOR FASTENINGS, SUPPORTS s t r oppu S, s gn i n e t s af r oo l F, s l eehw, t e ef FEET, WHEELS, FLOOR FASTENINGS, SUPPORTS 136 MINITEC PROFILE SYSTEM BASE AND TRANSPORT
Fast, Flexible, Functional
 FA ZTEK T H E S H A P E O F T H I N G S T O C O M E T-Slotted Aluminum Solutions Fast, Flexible, Functional FAST Prompt, timely shipments Shortest possible turnaround Large in-stock inventory of standard
a.k.a. casegoods instructions
 a.k.a. casegoods instructions a a.k.a. workwall installation IMPORTANT NOTES Failure to install product according to installation instruction will result in loss of warranty. Tools required for assembly
NEWS Part. N /0 MINITEC NEWS
 NEWS 2009 Part. N 95.0423/0 MINITEC NEWS 2009 1 TABLE OF CONTENT INTRODUCTION CONTENTS 3 END CAP Z WITH HAMMER TAPS 3 END CAP 45X45 VA 4 ANGLE 25 GD-Z 4 ANGLE 45X90 GD-Z 5 ANGLE 90 GD-Z 5 HINGE 19 S 6
11 MACHINING SERVICES
 11 MACHINING SERVICES Machining your TSLOTS is an alternate way of assembling your project. Rather than using brackets and joining plates you can have your TSLOTS machined and ready in kit form for quick
Installation Instructions
 Contents Page General Information and Installer Tips.......... 2 Panels & Posts............................. 3 Enclosure Description..................... 4 Hinge Door Hardware................... 4-5 Step-by-Step
EmagiKit. Privacy Pod Plus. Quiet. Easy. Affordable. INSTRUCTIONS ASSEMBLY
 EmagiKit Privacy Pod Plus Quiet. Easy. Affordable. INSTRUCTIONS ASSEMBLY DIMENSIONS AND COMPONENTS 47 47 Ceiling Unit 2-B 2-L 2-R Glass Door Corner Trim Door Handle 90 Adjustable Height Work Surface 1-B
Qwik-Fence Installation Instructions
 Qwik-Fence Installation Instructions 1 Tools Required The following installation instructions should be used as a guide for installing Folding Guard Qwik-Fence Partitions. Good common sense and appropriate
Panels, Panel Mounting & Other Accessories
 Panels, Panel Mounting & Other Accessories Wire mesh guarding on assembly conveyor line Machine safety enclosure using Lexan panels 108 Multiblock Al 1-105 1-3 Various fastening options for panels on Multiblock
General Guidelines:
 ASSEMBLY INSTRUCTIONS Congratulations on your new Patriot Dock purchase. This manual contains instructions to assemble basic dock configurations for use at typical residential shoreline application. Please
mk Profile Technology
 mk Profile Technology One Construction Kit, Many Options Base Technology Profile Technology Conveyor Technology Factory Equipment Linear Motion better products, better solutions One basic technology, four
aluminium profile system
 aluminium profile system 63 AME System aluminium profiles overview series profiles introduction 80x80 x80 x80/180 x Aluminium profiles are provided with longitudinal grooves which can be used in conjunction
Miter Saw Super Stand
 Quality Power Tool Accessories OWNER S MANUAL Miter Saw Super Stand Models 2875/2875XL IMPORTANT Read and understand all safety guidelines and instructions carefully before operating. GENERAL INFORMATION
3/8-16 x 3/4 cap screw. 3/8-16 hex nut for above screws. 1/4-20 x 3/4 socket cap screw. 3/16 short arm hex key (not to scale)
") Super Slab Roller 24, 30 and 36 models Worktable Assembly Directions P.O. Box 89 Cheney, WA 99004 USA 509.235.9200/800.23.7896 Fax: 509.235.9203 www.northstarequipment.com Revised September, 2006. All
Super Slab Roller 24, 30 and 36 models Worktable Assembly Directions P.O. Box 89 Cheney, WA 99004 USA 509.235.9200/800.23.7896 Fax: 509.235.9203 www.northstarequipment.com Revised September, 2006. All
Assembly Instructions 10 X 10 Aluminum Roof Support
 Assembly Instructions 10 X 10 Aluminum Roof Support Aluminum Roof Support Bolt Package 16-5/16 X 2 ¼ SS Bolt 24-5/16 X 1 SS Bolt 40-5/16 SS Nylon Lock Nuts 16-5/16 SS Flat Washers 28-4 ½ Wood Screws 36-1
Dublin Stalls Installation Instructions
 Dublin Stalls Installation Instructions RAMM Horse Fencing and Stalls 13150 Airport Hwy. Swanton, OH 43558-9615 1-800-434-8456 Rev. 9/13/17 Part Identification Round Track Bracket (4) (Not Painted) Round
TOOL LIST FOR TAILGATE HIDDEN LATCH & LINK ASSY FOR FORD FLARESIDE TRUCKS
 TOOL LIST FOR TAILGATE HIDDEN LATCH & LINK ASSY FOR 53-87 FORD FLARESIDE TRUCKS Vise Grip Clamps C-clamps Sharpie Marker Ball Peen Hammer Center Punch 3/8 or 1/2 Drill 5/32, 7/32, 9/32, and 3/8 Drill Bits
Melamine Plastic Laminate. Toilet Partition Installation Manual
 Melamine Plastic Laminate Toilet Partition Installation Manual PHONE: FAX: 1-866-317-2786 ATTENTION DO NOT MIX FASTENER PACKS EACH FASTENER PACK HAS THE NECESSARY BOLTS, BARRELS AND SCREWS TO INSTALL THE
General Features. Low Profile. The SMART BOXX stands only 1.5 off of the bed of your truck so cargo space is maximized
 General Features Low Profile. The SMART BOXX stands only 1.5 off of the bed of your truck so cargo space is maximized Two Sizes Short Box :74 L X 47 W X 7 T and Long Box 92 L X 47 W X 7 T All Aluminium
Assembly Instructions 10 X 10 Aluminum Frame Building
 Assembly Instructions 10 X 10 Aluminum Frame Building 27 97 9 8 47 36 74 52 10 10 X 10 Square Building W/ Dome Includes: The Steel Entry Door with a Dead Bolt Lock assembly and Aluminum Door Frame. Metal
In a class of its own:
 www.gsmotion.com In a class of its own: Easy To Design Easy To Install Take the safe route. The incredibly solid and wear resistant safety fence system guarantees the highest level of quality, longevity,
Copyright Black Box Corporation. All rights reserved Park Drive Lawrence, PA Fax
 Copyright 2003. Black Box Corporation. All rights reserved. 1000 Park Drive Lawrence, PA 15055-1018 724-746-5500 Fax 724-746-0746 JULY 2003 RM3010A RM315-R2 RM323-R2 RM329 RM451 RM457 RM3020A RM316 RM324-R2
Leveling Feet, Base Plates and Casters
 Leveling Feet, Base Plates and Casters 77 Leveling Foot 1 1 Fastening to profile end Fastening in T-slot of profile For leveling tables and light equipment. Ratchet-type height adjustment requires no tools.
Laminate Cabinet Installation Instructions
 Laminate Cabinet Installation Instructions www.easygaragestorage.com/installation How To Use These Instructions Thank you for your purchase! Please read each step of this manual thoroughly to ensure proper
GrowSpan Series 500 Door Kits
 GrowSpan Series 500 Door Kits Double Swinging Door Finished Grade Finished Grade Diagram shows a double-swinging door centered and installed in an end wall frame. The door kit includes materials for the
CAB END BEDTRAX (SIDE VIEW)
") Supplied Hardware: (8-14) 1/4-20 Allen head bolts, (12-18) UHMW mount blocks, (4) D-ring tie downs Tools Needed: Allen head wrench GET TO IT. INSTALLATION INSTRUCTIONS STEP 1. INSERT (2) MOUNT BLOCKS INTO
Supplied Hardware: (8-14) 1/4-20 Allen head bolts, (12-18) UHMW mount blocks, (4) D-ring tie downs Tools Needed: Allen head wrench GET TO IT. INSTALLATION INSTRUCTIONS STEP 1. INSERT (2) MOUNT BLOCKS INTO
SLIDE 06 Solutions Document/Installation Manual
 SLIDE 06 Solutions Document/Installation Manual 1 The Slide 06 door system from 3form is a completely unframed panel door that uses the same sophisticated, tried-and-true rollers and track as Slide 05.
WireCrafters, LLC. General Information
 WireCrafters, LLC. General Information 6208 Strawberry Lane 502/363-6691 www.wirecrafters.com Louisville, Kentucky 40214 502/361-3857 FAX 1-800-626-1816 The following General Installation Instructions
Dura-Lock Roof System
 DLR-14 Dura-Lock Roof System Assembly and Installation Instructions Read the instructions before starting the job. They explain the steps required to produce a finished product that will meet factory specifications.
Assembly Instructions
 Unite Panel System Hinge Door July 2016 #12 x / slotted hex washer head bolt Figure 1 threshold bracket frame Detail F threshold bracket threshold bracket (installed) #12 x / slotted hex washer head bolt
EZ-MATRIX I N S TA L L AT I O N I N S T R U C T I O N S EZ-MATRIX
 TM I N S TA L L AT I O N I N S T R U C T I O N S READ THESE INSTRUCTIONS page 2 Installer Tips: Installation is best completed with the help of one or two people. Prior to beginning, please read through
Versatrac Bypass Door Units, Conventional and Top Track, 300 and 400 Series
 Versatrac Bypass Door Units, Conventional and Top Track, 300 and 400 Series TM Rough opening width (finished opening width plus 9/16") Notch for top track units (used as frame header) Rough opening height
Twin-Wall Double Swinging Door Kit
 105105 Twin-Wall Double Swinging Kit YOU MUST READ THIS DOCUMENT BEFORE YOU BEGIN TO ASSEMBLE THE DOOR KIT. Thank you for purchasing this GrowSpan door kit. When properly assembled and maintained, this
Mighty Mo GX Series Cabinet Installation Guide. OR Rev /11
 Mighty Mo GX Series Cabinet Installation Guide OR-71601787 Safety and Warning ATTENTION The exclamation point within an equilateral triangle is intended to alert the user to the presence of important operating
CNC Router Parts PRO Machine Kit Cable Track Installation Instructions
 1 1 X CABLE TRACK TRAYS & BRACKETS The cable track on the side of the system is supported by a metal tray (or multiple trays for longer systems such as a PRO4896). These trays hang from brackets on the
TOOLS REQUIRED: HARDWARE INCLUDED: 13MM FLAT WRENCH FOR LEVELING THE STRUCTURE RATCHET WITH 5MM HEX BIT FOR CORNER SCREWS ON TOP TRAVERSE BEAMS
 1 TOOLS REQUIRED: RATCHET WITH 5MM HEX BIT FOR CORNER SCREWS ON TOP TRAVERSE BEAMS 13MM FLAT WRENCH FOR LEVELING THE STRUCTURE RUBBER MALLET FOR INSERTING PANELS 8MM HEX BIT WITH EXTENSION FOR HEX BOLT
Twin-Wall Double Swinging Door Kit
 115021 Twin-Wall Double Swinging Kit READ THIS DOCUMENT BEFORE YOU BEGIN Thank you for purchasing this GrowSpan door kit. When properly assembled and maintained, this product will provide years of reliable
Spring Loaded All Season Roll-Up Doors
 Spring Loaded All Season Roll-Up Doors STAND-OFF MOUNTING METHOD INSTALLATION INSTRUCTIONS READ THIS FIRST Carefully examine the crate(s) for damage before opening. If the carton is damaged, immediately
HOUSE PARTS PACKED IN HOUSE BOX PARTS IN PLASTIC BAG (HARDWARE) PARTS IN SMALL PLASTIC BAG (FLOOR CLIPS) PARTS PACKED IN BUNDLE
 PARTS IN SMALL PLASTIC BAG (FLOOR CLIPS) PARTS PACKED IN BUNDLE") Check parts against this list before starting assembly. Refer to illustrations on pages 6 and 7 to view house parts. If any shortages are found, refer to Packing Slip for claim instructions. Item 3 5 6
Check parts against this list before starting assembly. Refer to illustrations on pages 6 and 7 to view house parts. If any shortages are found, refer to Packing Slip for claim instructions. Item 3 5 6
400A 40113V, 401A 40120V, & 401AL 40120VL ALUMINUM VERTICAL 4000 LB LIFT INCLUDES SCREW LEG ASSEMBLY INSTRUCTIONS
 12/11/07 PAGE 1 OF 12 400A 40113V, 401A 40120V, & 401AL 40120VL ALUMINUM VERTICAL 4000 LB LIFT INCLUDES SCREW LEG ASSEMBLY INSTRUCTIONS Thank you for purchasing our product! *Please read these instructions
PREASSEMBLED ELEMENTS FOR LIFTING AND SLIDING DOORS
 PROFILE SYSTEM PRE-ASSEMBLED ELEMENTS FOR LIFTING AND SLIDING DOORS s r ood gni d i l s dna gni t f i l r o f s t neme l e de l bme s s a - er P PREASSEMBLED ELEMENTS FOR LIFTING AND SLIDING DOORS MINITEC
compile system INSTALLATION GUIDE Updated January 2019
 INSTALLATION GUIDE Updated January 09 compile system Table of Contents Panels 0 Quick Connect Clips 0 Lock Clips 0 Panel Trims 0 Privacy Glass 0 Post Base Covers 04 Electrical 04 Power Distribution Harness
Gared Pro-S Portable Backstop
 Models: 9616 & 9618 Installation, Operation and Maintenance Instructions Please read all instructions before attempting installation or operation of these units SAVE THESE INSTRUCTIONS FOR FUTURE USE PUBLICATION
IPS ID 92*14* Series. 40 Series. 28 Series. 30 Series. 40 Series. Catalog 1816 Introduction, En México llame. . Nextel.
 Catalog 86 Introduction, En México llame. Nextel. 498 0846 ID 92*4*72847... I 20 Series 2-20 p34 40 Series 2-020 p34 2-24 p34 2-040 p34z 2-26 p34 2-08 p34 2-2 p34 0-04 p3 0-042 p3 0-083 p20 28 Series 2-028
Your order will be shipped with the supports and rail components packaged inside the ramp package. Each accessory package is labeled.
 instructions About Your Order. Your order will be shipped with the supports and rail components packaged inside the ramp package. Each accessory package is labeled. Check the Order Before the Carrier leaves!
re3d Assembling Gigabot: "Flatpack"
 re3d Assembling Gigabot: "Flatpack" Your Gigabot was assembled, calibrated, tested, and taken apart for shipping purposes. All you need to do is reassemble it, and you're ready to go! Written By: Chris
Mounting the 6 or 12 Indexer on PRS Gantry Tools
 Page 1 Mounting the 6 or 12 Indexer on PRS Gantry Tools About this guide: This document illustrates several options for mounting an indexer onto your ShopBot. You can choose the technique that works best
3 D Printer Enclosure Assembly Instructions
 3 D Printer Enclosure Assembly Instructions Tools Required: 2.5 mm Allen wrench (included) Phillips screwdriver Adjustable Wrench Parts Included: Plexiglas Back with fan and filters installed (29.5 x 35.5
GrowSpan Estate Pro I Greenhouse
 GrowSpan Estate Pro I Greenhouse Photo may show a different but similar model. 2016 Growers Supply All Rights Reserved. Reproduction is prohibited without permission. STK# DIMENSIONS 104564 11'-8" W x
Installation Guide. Evolve bi-fold. 8. Door restrictor- optional p9. 1. Before you start p2. 9. Adjustment. 2. Measuring and surveying p2
 Evolve bi-fold Installation Guide 1. Before you start p2 8. Door restrictor- optional p9 2. Measuring and surveying p2 3. Configuration details p4 4. Installation p5 5. Glazing p5 6. Glazing packer details
Shop Style Miter Saw Stand Kit
 Quality Power Tool Accessories OWNER S MANUAL Assembled Unit Shown Without Shelves & Wings Assembled With Shelves & Wings Shop Style Miter Saw Stand Kit Model 2850 IMPORTANT Read and understand all safety
Installation Instructions
 Supafold Slide Aside System Three Fold Room Divider Installation Instructions Distinctive Doors Ltd Supafold Slide Aside Internal Folding System IMPORTANT: Before proceeding with the installation, and
This document will provide detailed specifications, BOM information, and assembly instructions for the Official Competition Field.
 This document will provide detailed specifications, BOM information, and assembly instructions for the Official Competition Field. Teams who do not need an official field should refer to the separate low-cost
Sliding Door Kit
 YOU MUST READ THIS DOCUMENT BEFORE YOU BEGIN TO ASSEMBLE THE DOOR KIT. Thank you for purchasing this GrowSpan door kit. When properly assembled and maintained, this product will provide years of reliable
Spring Loaded SCREEN-PRO. All Season Roll-Up Doors IN-JAMB MOUNTING METHOD INSTALLATION INSTRUCTIONS READ THIS FIRST
 Spring Loaded SCREEN-PRO All Season Roll-Up Doors IN-JAMB MOUNTING METHOD INSTALLATION INSTRUCTIONS READ THIS FIRST Carefully examine the crate(s) for damage before opening. If the carton is damaged, immediately
Read Below! Read Below! Read Below! Read Below! Read Below! Read Below! STOP READ TIPS BELOW TO MAKE ASSEMBLY MUCH EASIER
 Read Below! Read Below! Read Below! Read Below! Read Below! Read Below! STOP READ TIPS BELOW TO MAKE ASSEMBLY MUCH EASIER Here are some guidelines to help make assembling your unit much easier: -Read and
Modular Bi-File Lateral
 Modular Bi-File Lateral Installation Instructions 920-563-6362 E-mail: ssc@spacesaver.com Internet: www.spacesaver.com Contents Hardware Identification..................................3 Pre-Installation........................................6
Modular XP Ramp Assembly Manual
 Modular XP Manual 1 Contents Overview... 2-5 Section 1: 1.1 Tools required...6 1.2 Hardware list...6 Ramp & Platform Standard Parts 2.1 Ramp Parts...7 2.2 Platform Parts...8 2.3 Standard Platform Configurations...
Clopay Models 835/837 Sliding Door System Installation Guide
 Clopay Models 835/837 Sliding Door System Installation Guide The aim of this instruction is to guide you through the process of construction and fitting of Sliding Doors. Due to the number of sizes available
INSTALLATION INSTRUCTIONS
 INSTALLATION INSTRUCTIONS SOLID PHENOLIC TOILET PARTITIONS 1080 DuraLine Series 1180 DuraLine Series Class-A Fire Rated IMPORTANT: Review these instructions thoroughly prior to installation. FLOOR ANCHORED
Knock Down Patio Door Assembly Instructions Regular & Impact
 Knock Down Patio Door Assembly Instructions Regular & Impact 72 x 80 72 x 82 72 x 96 96 x 80 96 x 82 96 x 96 Impress the Weather KD Patio Door Regular & Impact Sizes 72 x 80 72 x 82 72 x 96 96 x 80 96
Playground Assembly Instructions
 Before You Begin Playground Assembly Instructions Locate the playground set on firm, level ground. Assemble the playground on or close to its permanent location Two people are recommended to assemble the
CertainTeed INSTALLATION GUIDE SIMTEK FENCE PRODUCTS. Fence Installation Guide 3', 4' & 6' High
 CertainTeed INSTALLATION GUIDE SIMTEK FENCE PRODUCTS Fence Installation Guide 3', 4' & 6' High INSTALLATION GUIDE These instructions are designed to assist both professional installers and do-it-yourselfers
BY ALIEN TECHNOLOGIES CORP
 BY ALIEN TECHNOLOGIES CORP Assembly Instructions TopLift Pros YOU MAY ALSO REVIEW OUR ASSEMBLY VIDEO, PLAY AND PAUSE AT YOUR CONVENIENCE. JUST VISIT US AT WWW.TOPLIFTPROS.COM AND GO TO Customer Support
Parts list continues on Page 2 HOUSE PARTS PACKED IN HOUSE BOX PARTS IN SMALL PLASTIC BAG (HARDWARE) POST PARTS PACKED IN THIS BOX (LARGE PLASTIC BAG)
 POST PARTS PACKED IN THIS BOX (LARGE PLASTIC BAG)") Form 05-07 Instructions and Parts List MSS- Martin Safety System NOTES: () A complete system is packed in two boxes post box and house box. House box contains hardware for both post and house assembly.
Form 05-07 Instructions and Parts List MSS- Martin Safety System NOTES: () A complete system is packed in two boxes post box and house box. House box contains hardware for both post and house assembly.
Modular XP Ramp Assembly Manual
 Modular XP Manual 1 Contents Overview... 2-5 1.1 Tools required...6 1.2 Hardware list...6 Ramp & Platform Standard Parts 2.1 Ramp Parts...7 2.2 Platform Parts...8 2.3 Standard Platform Configurations...
Aluminium Structural Framing
 info@smoothedge.co.za a division of Smoothedge SA (Pty) Ltd. Aluminium Structural Framing Aluminium vs Steel How do T-slots compare to welded steel products? T-slots were created to build structures faster
ClearSpan End Frame Kit 26' Wide x 12' High
 ClearSpan End Frame Kit 26' Wide x 12' High Diagram shows the end frame kit for an end wall without a door. (Door and end panel are purchased separately.) Rafter and struts shown in the above diagram are
Franklin Mills Stackable Movable Lateral Instructions
 Franklin Mills Stackable Movable Lateral Instructions Table of Contents: Table of contents...1 Tools Required...2 Stationary Shelving Assembly...3-7 Mobile Shelving Assembly...8-16 Rail Assembly...8-11
WPS crew Doors Installation instructions
 WPS-132-133 crew Doors Installation instructions ORDER OF INSTALLATION FOR A COMPLETE ENCLOSURE OF A CREW WPS (Weather Protection System) IS AS FOLLOWS: 1. Heater 2. Rear Thresholds - Right Hand & Left
GrowSpan Single Swinging Door Black-Out Door Kit
 GrowSpan Single Swinging Door Black-Out Door Kit ATTENTION: Door kit includes materials for door only. All other components shown in the diagram above and diagrams throughout this guide are not included
Assembly instructions. 6x4. Model GH1354A. 6x6. Model GH1357A. 6x8. Model GH1360A. 6x10. Walk-in Greenhouse. Model GH1363A
 ssembly instructions x Model GH x Model GH7 x8 Model GH0 x0 Model GH Walk-in Greenhouse Statement ear Customer! May we congratulate you on your new Greenhouse. We feel sure that by following the detailed
Stainless Steel 95C34 Series
 Stainless Steel 95C34 Series Toilet Partition Installation Manual PHONE: FAX: 866-317-2786 ATTENTION DO NOT MIX FASTENER PACKS EACH FASTENER PACK HAS THE NECESSARY BOLTS, BARRELS AND SCREWS TO INSTALL
Installation Instructions - Model V4JSD 1
 Installation Instructions - Model V4JSD 1 Support Assemblies: Parts list: (Note see enclosed cut sheet for quantities and dimensional information) A vertical structural member (1 ½ x 1 ½ modular frame)
Read Below! Read Below! Read Below! Read Below! Read Below! Read Below! STOP READ TIPS BELOW TO MAKE ASSEMBLY MUCH EASIER
 Read Below! Read Below! Read Below! Read Below! Read Below! Read Below! STOP READ TIPS BELOW TO MAKE ASSEMBLY MUCH EASIER Here are some guidelines to help make assembling your unit much easier: -Read and
Installation And Care Instructions. Vertical Honeycomb Shades
 Installation And Care Instructions Vertical Honeycomb Shades Rev 5/2013 Table Of Contents Getting Started... 3 Parts Overview... 4 Materials Required... 5 Tools Required... 6 Outside Mount Installation...
PROFILE Flat Panel Console System Installation Manual
 PROFILE Flat Panel Console System Installation Manual Table of Contents Page Introduction... 2 Important Safety Information...3, 4 Installation Overview... 4, 5, 6 Single Sided/Single Unit... 7 Double
IMPORTANT!!! ASSEMBLY ASSEMBLY INSTRUCTIONS. (Internal Dimensions)
") ASSEMBLY ASSEMBLY INSTRUCTIONS (Internal Dimensions) Ent Spec Edition Ltr v-0- Overall dimensions including base: 7. L x 9 W x 0 H cms 97.5" L x 7" W x 8.7" H IMPORTANT!!! Please read these instructions
ASSEMBLY ASSEMBLY INSTRUCTIONS (Internal Dimensions) Ent Spec Edition Ltr v-0- Overall dimensions including base: 7. L x 9 W x 0 H cms 97.5" L x 7" W x 8.7" H IMPORTANT!!! Please read these instructions
This procedure will cover the steps to properly pack up the ARES for shipment.
 TA Instruments Packing the ARES Instrument This procedure will cover the steps to properly pack up the ARES for shipment. Packing Materials Provided: Standard LS Shipping carton Shipping carton Shelf for
southpaw enterprises, inc.
 southpaw enterprises, inc. Instruction Sheet C-STAND 7100 Store these instructions in a safe place or with the enclosed maintenance checklist Take time to familiarize yourself with the use and maintenance
RH-412 STEEL DOORS INSTALLATION INSTRUCTIONS
 RH-412 STEEL DOORS INSTALLATION INSTRUCTIONS By following the steps outlined below, the assembly, installation and adjustment of the steel doors, will be a simple process. Let s start with the Driver Side.
Important Loading Information. Tools Required. Meridian Lateral Files Instructions
 Y Meridian Lateral Files Instructions! WARNING Failure to observe stated capacities below will result in unsafe usage conditions, causing possible product damage or personal injury. Important Loading Information
C-Series & S-Series Classic Frame with Transom (Single or Pair)
") 1. TOOLS REQUIRED Tape measure 6' magnetic level 3' magnetic level Safety Glasses Screw gun #2 Screwdriver tip #3 Screwdriver tip Philips Head screwdriver (Used to move frame on wall using oval slots on
1. TOOLS REQUIRED Tape measure 6' magnetic level 3' magnetic level Safety Glasses Screw gun #2 Screwdriver tip #3 Screwdriver tip Philips Head screwdriver (Used to move frame on wall using oval slots on
4-lite Patio Door. Installation Instructions
 4-lite Patio Door Installation Instructions IMPORTANT: Read the instructions and familiarize yourself with the door parts and pieces before beginning assembly and installation. Note: Only the 5-0 x 6-8
INSTALLATION INSTRUCTIONS RH 412 STEEL DOORS
 By following the steps outlined below, the assembly, installation and adjustment of the steel doors, will be a simple process. Let s start with the Driver Side. Note: Having the hood open makes the job
Congratulations! Your dog is going to love you!
 DIY INSTRUCTIONS Congratulations! Your dog is going to love you! Thank you for ordering your non-electric dog fence kit from Pet Playgrounds. In less than a day you will have your very own personal dog
NX7 SERIES 5-1/2 HANDRAIL
 STORAGE & HANDLING The handrails are shipped unassembled. Upon receipt, immediately check all material for any damage that may have occurred in transit and verify that all of the items and quantities are
GROWING BETTER THROUGH DESIGN. 6ft Lean-To LEAN-TO. Assembly Instructions 04/02
 GROWING BETTER THROUGH DESIGN 6ft Lean-To LEAN-TO Assembly Instructions 04/02 6ft Lean-To Greenhouse Base Plan Introduction/Tools/Contents / / Contents This is a copy of our Lean-To greenhouse base plan.
Linear Hook- on Worksurfaces
 Linear Hook- on Worksurfaces Linear Hook-On Worksurfaces come in three depths and seven lengths. Different worksurfaces have different reqirements for installation that are outlined below. 27 inch deep
13MM FLAT WRENCH FOR LEVELING THE GLIDES OF STRUCTURE 6MM ALLEN KEY FOR ROOF CLIPS PHILLIPS HEAD BIT FOR SCREWS FOR DOOR FRAME
 1 TOOLS REQUIRED: MOVING CART/DOLLY FOR TRANSPORTING PANELS, ROOF, AND POSTS TWO 9 FT. STEP LADDERS FOR INSTALLING ROOF & PANELS REVERSIBLE RATCHET 1/4 DRIVE FOR CORNER SCREWS ON TOP TRAVERSE BEAMS ALTERNATIVE
INSTRUCTIONS TS93 GSR PT RIGHT HAND ACTIVE LEFT HAND INACTIVE RIGHT HAND INACTIVE LEFT HAND ACTIVE
 INSTRUCTIONS ATTENTION!!! Before you begin, determine installation type (RIGHT HAND ACTIVE OR INACTIVE). Door coordinator suitable for door from 59 to 98 in width. Inactive door width in the case of unequal
Low/High Tunnel Greenhouse Plans
 Low/High Tunnel Greenhouse Plans Tools Needed (See the complete list of Greenhouse Tools) Hacksaw or Reciprocating Saw Socket Wrench, Adjustable Wrench or Nut Drivers Electric Drill with Drill Bits Sledge
table of contents Sliding Door Accessories Page Latches & Snuggers Stay Rollers Brackets & Stops
 table of contents Square Track & Accessories Pages 4-7 Square Track Options Page 4 Light Duty Track Page 4 Square Track Brackets Page 5 Square Track Accessories Page 5 Square Track Trolleys Page 6-7 Offset
BioPrism Solid Surface
 Please read all instructions before installing products. These instructions are intended for use with InPro s standard toilet partitions, which include 58 high doors and wall panels, when deviating from
MATRIX GUARD. I nstallation I nstructions TERMS AND CONDITIONS. Call or visit
 TERMS AND CONDITIONS It is the intent of Wireway Husky Corp. that any product received by our Customers fully meets their expectations. MATRIX GUARD Wireway Husky product is Marketed and Distributed by
Installation Manual for Metal Toilet Partitions Standard Series
 For Video instructions http://www.hadrian-inc.com/tech-data/installation/toilet-partitions.aspx P a g e 1 Table of Contents Page General Notes and Tools Required 3 STEP 1: Establish Floor Bracket Locations
CRP700 Benchtop Basic CNC Machine Assembly Instructions. Updated 10/24/2014 SHEET 1 of 24
 CRP700 Benchtop Basic CNC Machine Assembly Instructions Updated 0//0 SHEET of NOTE: This piece of extrusion is mounted wide side up Quick Tip: Lay extrusion on table as shown for easy assembly BASE ASSEMBLY:.
Section 4 Panels & Doors
 Contents Section 4 101-10 Rolling Door Profile 110 Wire Mesh 101 Sliding Door Profiles 111 Sliding Door Set 114 Sliding Door Guide 115 Panel Mounting Blocks 103-106 Bifold Door Glide 11-113 Mesh Retainers
Installation Instructions for Vista Air Vertically Folding Walls
 Installation Instructions for Vista Air Vertically Folding Walls Use these instructions in conjunction with your shop drawings to see the specifics that are particular to the model you are installing.