9MAY15 U.S. RACK, Inc Falcon Drive, Madera, CA
|
|
|
- Ruth Sanders
- 5 years ago
- Views:
Transcription

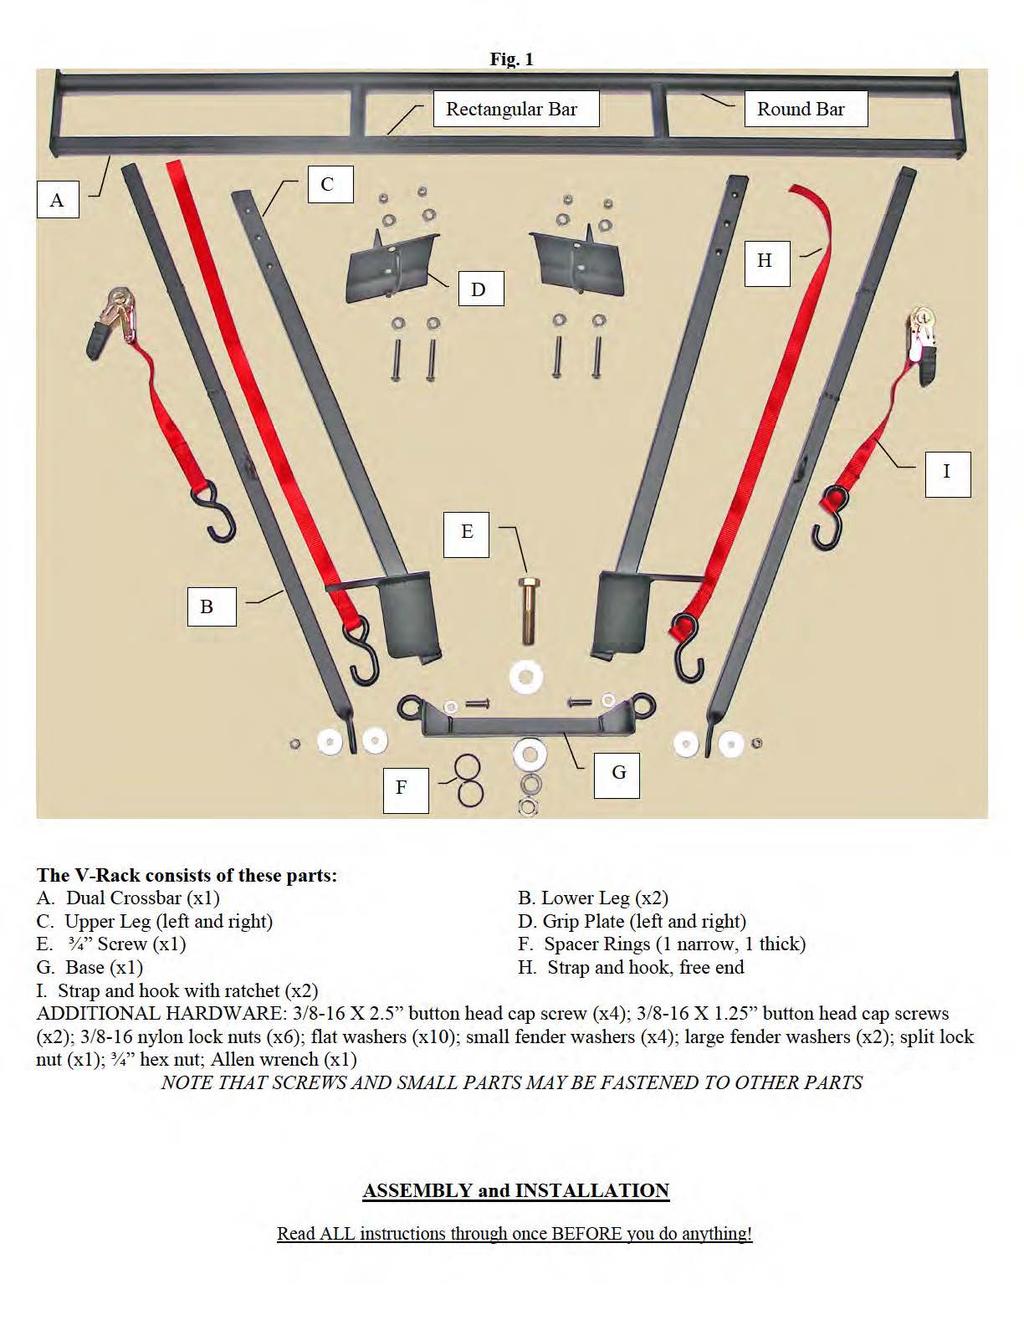
1 9MAY15 U.S. RACK, Inc Falcon Drive, Madera, CA INSTRUCTIONS for the V-RACK WARNING: Do NOT attempt to install or use this rack without following all instructions. SPECIFICATIONS and SAFE LOADING REQUIREMENTS These instructions are intended for use upon pickup trucks that have a hole in the rear bumper which has a hole for mounting a trailer hitch ball. This rack is designed to carry canoes and kayaks but can also carry ladders, lumber, or other cargo. This load must not exceed a total of 250 lbs., where a least half of the load is carried by a roof or other rack and when the load on the V-Rack does not exceed 125 lbs. This rack is designed to carry loads, which are spread across the width of the crossbar and shared evenly between the front and rear crossbars. It is not designed to carry loads where a force of over 100 lbs. is concentrated on any space less than 12 inches wide along the crossbar. This product is not warranted for use off-road or on unimproved or poorly maintained or bumpy roads. All loads must be tied down securely to the rack to prevent them from vibrating or sliding forward, backward, laterally or being blown off or broken by wind. This rack relies upon the proper functioning of the tailgate. Check the latch mechanism to ensure that the tailgate does not open unless the release handle is activated. The manufacturer does NOT warranty any automotive product and does not warranty truck bed rails against damage caused by the weight of excessive loads being applied to them when the rack is installed on a vehicle. The manufacturer is not responsible for injury or property damage resulting from the rack being improperly installed or improperly loaded, nor is it responsible for injury or property damage resulting from loads or parts of loads falling or being blown off a vehicle. Loads extending beyond the rear bumper of the vehicle must be designated with a red flag during daylight or red light during darkness in accordance with the state vehicle code. BE SAFE: Carrying any load can be hazardous. Make sure all parts of all loads are securely tied down against unexpected winds and vibrations caused by road hazards such as potholes. Check each time you install the rack, load the rack, as well as daily to ensure that all connections are tight. Avoid roll over. As with all racks, ensure that loads are not top-heavy. Loads should be placed so that the center of mass of the load is no closer that 24 from the ends of the crossbar. High loads must be transported with GREAT CAUTION to prevent loads from striking low overhead objects and from tipping during turns, abrupt stops, or high winds. WARRANTY This product is warranted for a period of one year against all structural defects in materials and workmanship provided that they are assembled, installed, and used in accordance with all manufacturer s specifications and instructions. The manufacturer cannot warrant the powder-coating on its products. Normal use of any powdercoated rack and exposure to weather can result in scratching of the surface, exposing metal below; therefore, maintenance on your rack will be required. To prevent rust, spot paint any scratches or breaks in the surface with a high quality metal paint. Merchandize must be returned in the original box and packaging. See return policies and procedures at INVENTORY Your safety is paramount. Before assembling the rack, inventory and inspect all parts. Visually check each part to ensure it corresponds to the inventory list and check all welds for signs of cracking or weakness. If you do not have all the correct parts or if any parts appear to be defective, STOP! Do NOT install the rack. Contact customer service at to replace missing or defective parts. If you have any questions about installation, call customer service. We will be happy to help.
2

3


4 2. Attach Ratchet Straps. Examine the Strap and hook with the ratchet (I). Lower the tailgate part way and feed the hook of each ratchet strap down in the crack between the bed and the tailgate so that the hooks align with the rings on the Base plate. Attach the ends of the hooks through the rings and pull up on the ratchet end to take up the slack as shown in Figs. 6 and 7. Close the tailgate and lay the ratchets down in the bed as shown in Fig. 8. Fig. 6 Fig. 7 Fig Attach Legs. Pick up and examine the Lower Legs (B) and Upper Legs (C). Notice that the Upper Legs are mirror images of each other. Notice also that the top end of the Lower Legs can be inserted into the bottom of the Upper Legs and that the bottom of each Lower Leg has a hole in it. As shown in Fig. 9, use a short button head cap screw, two flat head washers, a fender washer and a nylon lock nut to attach the bottom of the Lower Leg to the Base. Note that the Lower Leg is on the OUTSIDE of the Base, and that the larger fender washer is sandwiched between the Leg and the Base. Ensure that when connected, the Legs flare outward. After attaching the Lower Legs to the Base, slide the Upper Leg down onto the end of the Lower Leg. Notice that there is a long flat narrow horizontal plate that is attached to the Upper Leg. As you slide the Upper Leg down onto the Lower Leg, allow the plate to rest on top of the tailgate. As shown in Fig. 10, take the hook with the strap and the free end and insert the hook into the ring at the bottom of the Upper Leg. Pull the strap toward the outside of the vehicle and loop it over into the truck bed. Ensure that the strap goes over the top of the plate and then down toward the ratchet in the bed. Attach the free-end strap into the ratchet and tighten as shown in Fig. 11. Attach the other Leg in the same manner and tighten both ratchet straps securely so that both Legs are pulled securely against the back of the tailgate and down onto the top of the tailgate. Fig. 9 Fig. 10

 on these screws.")


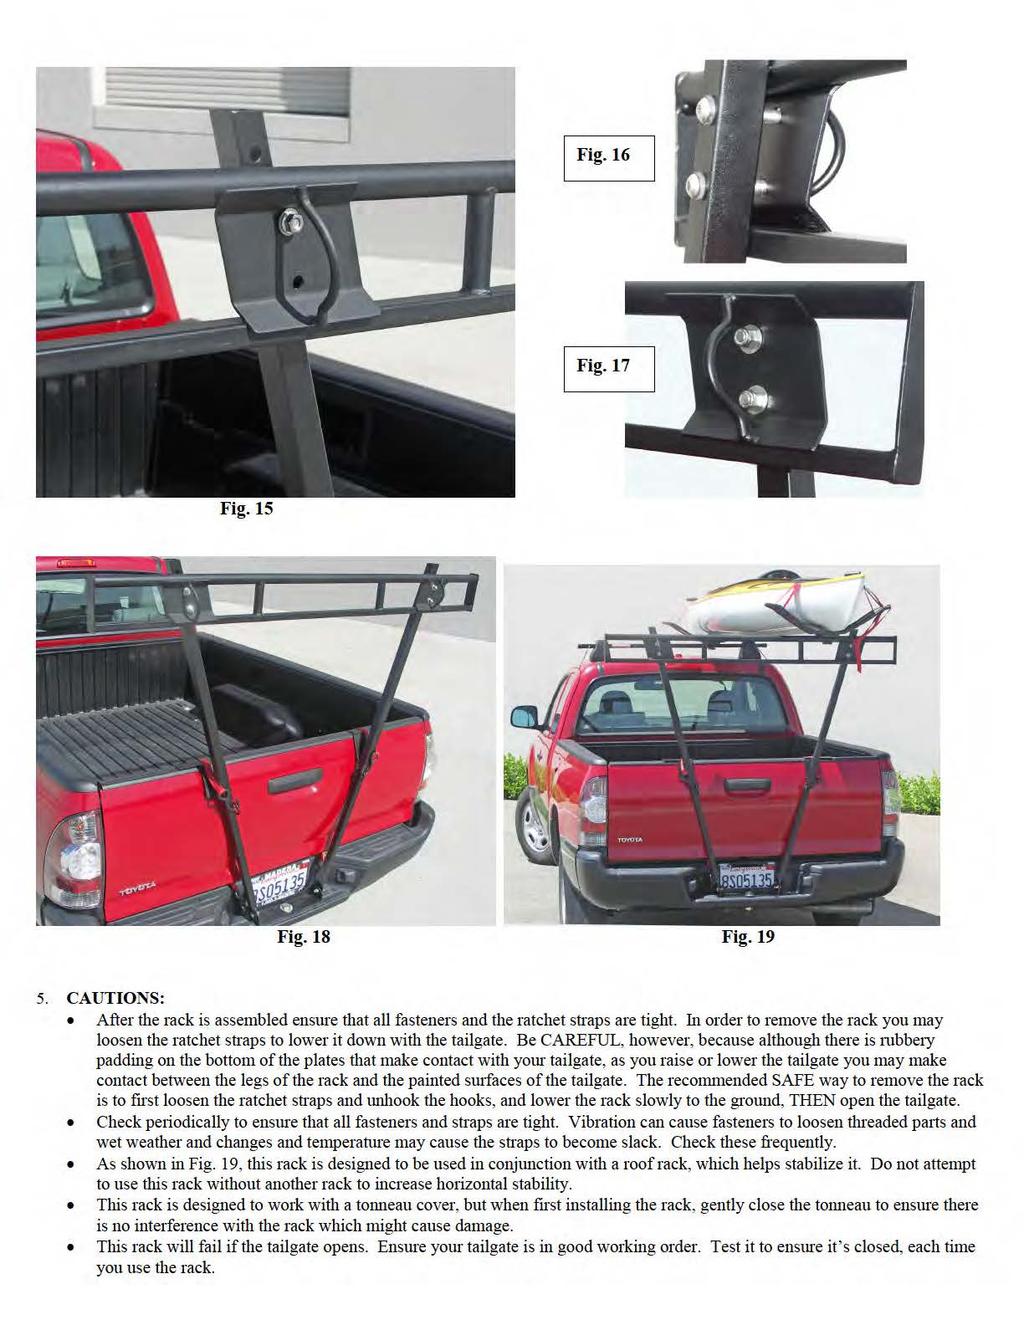
5 Fig. 11 Fig Attach Dual Crossbar to the Legs. Place a metal washer on a long button head cap screw and insert it all the way through the middle hole near the top of each Leg as shown in Fig. 13. As shown in Fig. 14, CAREFULLY hang the Dual Crossbar (A) on these screws. Put the rectangular bar on top if you have Thule accessories, and put the round tube on top if you have Yakima or other brand accessories. Examine the Grip Plates (D) and notice that they are a mirrored pair. If you hold them by the metal loop in front of the screws, you will notice that the hole pattern leans either to the left or to the right. Align the holes in one of the Grip Plates with the hole pattern in the Leg. You may have to turn the Grip Plate upside down or move to the other Leg to align the holes. If you wish to place the crossbar in the low position, which is used for most trucks, CAREFULLY slide the hole at the top of the Grip Plate over the end of the screw; add a metal washer and then screw on a nylon lock nut as shown in Fig. 15. If you wish to place the crossbar in the high position, which is used for trucks with extra tall cabs, CAREFULLY slide the hole at the bottom of the Grip Plate over the end of the screw; add a metal washer and then screw on a nylon lock nut. Secure the other end of the crossbar to the Leg with a Grip Plate in a similar manner. Add an additional screw with washers and a nut to each of the Grip Plates as shown in Figs. 16, 17 and 18. Fig. 13 Fig. 14
6
8MAY15 U.S. Rack Inc Falcon Drive, Madera, CA
 8MAY15 U.S. Rack Inc. 2850 Falcon Drive, Madera, CA 93637 1-888-877-2257 INSTRUCTION for GALLEON OVERHEAD STAKE POCKET RACK WARNING: Do NOT attempt to install or use this rack without following all instructions.
17MAY18 U.S. RACK, Inc Falcon Drive, Madera, CA
 17MAY18 U.S. RACK, Inc. - 2850 Falcon Drive, Madera, CA 93637-559-661-3050 INSTRUCTIONS for FIFTH WHEEL RACK Model 2010-4AD WARNING: Do NOT attempt to install or use this rack without following all instructions.
INSTRUCTIONS for WOODY RACK ON STANDARD FLEETSIDE TRUCKS WARNING: Do NOT attempt to install or use this rack without following all instructions.
 8JUL15 U.S. RACK, Inc. - 2850 Falcon Drive, Madera, CA 93637-559-661-3050 INSTRUCTIONS for WOODY RACK ON STANDARD FLEETSIDE TRUCKS WARNING: Do NOT attempt to install or use this rack without following
US RACK, Inc Falcon Drive, Madera, CA
 US RACK, Inc - 2850 Falcon Drive, Madera, CA 93637-559-661-3050 INSTALLATION AND USE INSTRUCTIONS for Long-John Extension Ladder Rack WARNING: Do NOT attempt to install or use this rack without following
27APR18 U.S. RACK, Inc Falcon Drive, Madera, CA
 27APR18 U.S. RACK, Inc. - 2850 Falcon Drive, Madera, CA 93637-559-661-3050 INSTRUCTIONS for FIFTH WHEEL RACK Model 2010-4ADC WARNING: Do NOT attempt to install or use this rack without following all instructions.
U.S. Rack, Inc Falcon Drive, Madera, CA APR17 INSTALLATION AND USE INSTRUCTIONS for SIDE-MOUNT LADDER RACK
 U.S. Rack, Inc. 2850 Falcon Drive, Madera, CA 93637 15APR17 INSTALLATION AND USE INSTRUCTIONS for SIDE-MOUNT LADDER RACK WARNING: Do NOT attempt to install or use this rack without following all instructions.
U.S. RACK, Inc Falcon Drive, Madera, CA
 U.S. RACK, Inc. - 2850 Falcon Drive, Madera, CA 93637-559-661-3050 INSTRUCTIONS for FIFTH WHEEL RACK Models 2010-4ADC and 2010-4ADCD WARNING: Do NOT attempt to install or use this rack without following
INSTRUCTIONS for STAKE POCKET RACK WARNING: Do NOT attempt to install or use this rack without following all instructions.
 28SP11 U.S. Rack Inc. 2850 Falcon Drive, Madera, CA 93637 1 888 877 2257 INSTRUCTINS for STAK PCKT RACK WARNING: Do NT attempt to install or use this rack without following all instructions. SPCIFICATINS
US RACK, Inc Falcon Drive, Madera, CA
 US RACK, Inc. - 2850 Falcon Drive, Madera, CA 93637-559-661-3050 INSTRUCTIONS for MOTORCYCLE RACK with Cradling Wheel Chocks WARNING: Do NOT attempt to install or use this rack without following all instructions.
FOLDING TONNEAU RACK. 1. Rack Rail Assembly
 FOLDING TONNEAU RACK Package Contents (2) Load Bars (4) Load Bar End Caps (4) ¼-20 x 9/16 Narrow Shoulder Hex Head Screw (28) ¼ Flat Washers (24) ¼ Split Lock Washers (20) ¼-20 x ¾ long Button Head Screws
M ACS Instructions
 APPLICABLE MODELS: Nissan Frontier 2005 and up short bed with Utili-Trak mounting rails PACKAGE CONTENTS 00-0060-M-01-1205 ACS Instructions Leitner Designs 25675 Taladro Circle Unit E Mission Viejo, CA
OPERATORS MANUAL WEEKENDER STEEL LADDER RACK
 OPERATORS MANUAL WEEKENDER STEEL LADDER RACK WWW.WEATHERGUARD.COM MODELS 1450 & 1475 1475 Shown INSTALLATION TIME Approximate installation time: 60 minutes (depending on truck equipment installation experience
INSTALLATION MANUAL WEEKENDER STEEL LADDER RACK
 TRUCK STORAGE SOLUTIONS SECURING YOUR REPUTATION INSTALLATION MANUAL WEEKENDER STEEL LADDER RACK STEEL & ALUMINUM SIDE BOX WITH PACK RAT DRAWER UNITS MODELS ATTENTION: PLEASE READ AND UNDERSTAND ALL INSTRUCTIONS
Contractors Rack Assembly and Installation Instructions
 Part # 18601 & 16601 Contractors Rack Assembly and Installation Instructions 4751 Littlejohn St. Unit A, Baldwin Park, CA 91706 Page 1 of 12 11/13/08 Thank you for purchasing the Paramount Restyling Contractors
2-Door EXO-Top Roof Rack System
 Page 1/29 Part 13516.01 2-Door EXO-Top Roof Rack System! WARNING The EXO-Top Roof Rack System is rated to a dynamic 300 lb, evenly distributed load. Further loading could result in serious injury or death.
Please read and understand the OnBoard Timpani Cart Owner s Manual before using the Timpani Cart.
 Assembly and Owner s Manual OnBoard Timpani Cart Performance Position Towing Position CONTENTS Important User Information...........................2 General......................................2 Manufacturer.................................2
PRORAC CONTRACTOR SERIES UNIVERSIAL STEEL TRUCK / CAP RACK INSTALLATION INSTRUCTIONS
 PRORAC CONTRACTOR SERIES UNIVERSIAL STEEL TRUCK / CAP RACK INSTALLATION INSTRUCTIONS 1000 Lb. Capacity Bed Mount 750 Lb. Capacity Cap Mount Package Contents: Parts Hardware (4) Legs (12) 3/8-16 x 1-1/4
Installation Manual Roof Zone Ladder Rack
 Installation Manual Roof Zone Ladder Rack 102113,E1346 Installation Time: About 90 minutes. Depending on truck and Do-it-Yourself experience level Tools Required: Electric Drill with 1/2 Chuck 1/2 & 7/32
Check us out on-line! Installation Instructions
 Installation Instructions 2 OPTIONAL ACCESSORIES Order Quantum Rack Accessories Online at www.dawsbetterbuilt.com Cargo Lock Kit Secure Your Load Cargo Locks can easily be installed and adjusted left or
4-Door EXO-Top Roof Rack System
 Page 1/31 4-Door EXO-Top Roof Rack System 13516.02! WARNING The EXO-Top Roof Rack System is rated to a dynamic 300 lb, evenly distributed load. Further loading could result in serious injury or death.
Hip Roof Canopy Instructions
 Hip Roof Canopy Instructions - PUT SAFETY FIRST. NOT COMPLYING WITH THE PROCEDURES AND PRECAUTIONS OUTLINED IN THIS MANUAL MAY RESULT IN PERSONAL INJURY AND WILL INVALIDATE THE WARRANTY.. Before attempting
400A 40113V, 401A 40120V, & 401AL 40120VL ALUMINUM VERTICAL 4000 LB LIFT INCLUDES SCREW LEG ASSEMBLY INSTRUCTIONS
 12/11/07 PAGE 1 OF 12 400A 40113V, 401A 40120V, & 401AL 40120VL ALUMINUM VERTICAL 4000 LB LIFT INCLUDES SCREW LEG ASSEMBLY INSTRUCTIONS Thank you for purchasing our product! *Please read these instructions
INSTALLATION MANUAL PACK RAT DRAWER UNITS MODELS NOTICE WARNING DANGER CAUTION
 TRUCK STORAGE SOLUTIONS SECURING YOUR REPUTATION INSTALLATION MANUAL ALUMINUM STEEL & ALUMINUM & STEEL SIDE HI-SIDE/SUPER-SIDE BOX WITH BOX PACK RAT DRAWER UNITS MODELS ATTENTION: PLEASE READ AND UNDERSTAND
Agri-Fab OWNERS MANUAL MODEL NO CU. FT. FARM/YARD CART. CAUTION: Read Rules for Safe Operation and Instructions Carefully
 Agri-Fab OWNERS MANUAL MODEL NO. 45-01772 CAUTION: Read Rules for Safe Operation and Instructions Carefully 14 CU. FT. FARM/YARD CART Safety Assembly Operation Maintenance Parts the fastest way to purchase
Hardware and Components:
 Hardware and Components: (A) 5/16 x 2 Hex Bolt (B) 5/16 x 2-1/4 Hex Bolt (C) 5/16 x 2-1/2 Hex Bolt (D) 4X 5/16 x 3/4 Hex Bolt (E) 4X 5/16 x 1-1/4 Hex Bolt (F) 11X 5/16 Flat Washer (G) 12X 5/16 Nylock Nut
INSTALLATION MANUAL WEEKENDER STEEL LADDER RACK
 TRUCK STORAGE SOLUTIONS SECURING YOUR REPUTATION INSTALLATION MANUAL WEEKENDER STEEL LADDER RACK STEEL & ALUMINUM SIDE BOX WITH PACK RAT DRAWER UNITS MODELS ATTENTION: PLEASE READ AND UNDERSTAND ALL INSTRUCTIONS
LifeGear G1 /HOME GYM ITEM NO.: 63100
 LifeGear G1 /HOME GYM ITEM NO.: 63100 OWNER S MANUAL IMPORTANT: Read all instructions carefully before using this product. Retain this owner s manual for future reference. The specifications of this product
OnBoard Bass Drum/Gong Cart
 Assembly and Owner s Manual OnBoard Bass Drum/Gong Cart CONTENTS Important User Information...................................................................2 Safety...................................................................................3
31082 INSTALLATION INSTRUCTIONS
 08 INSTALLATION INSTRUCTIONS Safety glasses should be worn at all times while installing this product. YEARS: 07-CURRENT MAKE: HONDA MODEL: RIDGELINE STYLE: TRUCK WARNING: NEVER EXCEED YOUR VEHICLE MANUFACTURER'S
INSTALLATION INSTRUCTIONS
 INSTALLATION INSTRUCTIONS R5 STEP BOARD APPLICATION: 2009-2017 Dodge Ram 1500 Quad / Crew Cab 2010-2017 Dodge Ram 2500/3500 Crew Cab PART NUMBER: 28-51040, 28-51045, 28-51050, 28-51055 ITEM QUANTITY DESCRIPTION
Lange Crank Hoist-a-top Assembly Instructions
 Lange Crank Hoist-a-top Assembly Instructions Installation Time: 1-4 Hours depending on skill level Tools Required: Cordless Drill Level Stud Finder Ratcheting wrench 9/16 socket or wrench 11/16 socket
VACUSEAL MODEL 200. HOT TUB PRODUCTS 233 Carrington Road Bethany CT
 VACUSEAL MODEL 200 J G F G H L HOT TUB PRODUCTS 233 Carrington Road Bethany CT 06524 860-469-2580 www.vacusealcoverlift.com www.hottubproducts.com Made in USA H K E D C I A P B 10 9 8 7 6 5 4 3 2 1 0 SPAS
Showpiece Cabinet Integrated Stand For 32" - 52" LCD HDTV
 Showpiece Cabinet Integrated Stand For 32" - 52" LCD HDTV Installation and Assembly Instructions 2009 Incredible Technologies Inc. Version 0109 Showpiece Cabinet Integrated Stand for 32" - 52" LCD HDTV
4-Piece Table Tennis Table
 Item# 45-6074 4-Piece Table Tennis Table Please keep this instruction manual for future reference If you have any problems with your new product, please contact Triumph Sports USA at 1-866-815-4173, or
PLANISHING HAMMER STAND OWNER S MANUAL
 PLANISHING HAMMER STAND OWNER S MANUAL WARNING: Read carefully and understand all INSTRUCTIONS before operating. Failure to follow the safety rules and other basic safety precautions may result in serious
C L A S S I C. Deluxe. Snow Thrower Cab. Assembly and Care Instructions
 C L A S S I C Deluxe Snow Thrower Cab Assembly and Care Instructions Deluxe Snow Thrower Cab Assembly and Care Instructions Before you begin please unpack the carton and check that you have all your parts.
ROOF RACK INSTALLATION INSTRUCTIONS (35, 45, 55 RAIL LENGTHS)
") ROOF RACK INSTALLATION INSTRUCTIONS (35, 45, 55 RAIL LENGTHS) ROOF RACK INSTALLATION INSTRUCTIONS (35, 45, 55 RAIL LENGTHS) NOTE: Perrycraft s products are manufactured to be installed into the skin of
ROOF RACK INSTALLATION INSTRUCTIONS (35, 45, 55 RAIL LENGTHS) ROOF RACK INSTALLATION INSTRUCTIONS (35, 45, 55 RAIL LENGTHS) NOTE: Perrycraft s products are manufactured to be installed into the skin of
ETX Powered Loudspeaker Accessories
 ETX Powered Loudspeaker Accessories ETX-BRKT10, ETX-BRKT12, ETX-BRKT15, ETX-TCA-S, ETX-TCA-L, and ETX-BRKT35 en Installation Guide en 3 Table of contents 1 Safety 4 2 Installation 6 2.1 Wall mount bracket
EKX Full-Range Loudspeaker Accessories
 EKX Full-Range Loudspeaker Accessories EKX-BRKT12, EKX-BRKT15, and EKX-TCA en Installation Note en 3 Table of contents 1 Safety 4 1.1 Safety point 6 2 Installation 7 2.1 Wall mount bracket 7 2.2 Truss
Hollywood Swing Away 2 and 4 Bike Racks Assembly and Installation Guide
 Hollywood Swing Away 2 and 4 Bike Racks Assembly and Installation Guide Tools Required: two adjustable wrenches, pliers, ¾ socket wrench recommended Note: please do assembly near your vehicle as you Can
Installation Instructions BestRail Ladder Rack Must be used with BestRail Accessories: Overhead Rack
 Installation Instructions BestRail Ladder Rack Must be used with Accessories: 42791 Can be used with Accessories: 42793 Tie Down 42794 Retractable Tie Down The channels in the Ladder Rack are the same
INSTALLATION INSTRUCTIONS UTV LIGHT BAR KIT Part Number: and Application: All UTV s*
 INSTALLATION INSTRUCTIONS UTV LIGHT BAR KIT Part Number: 83970 and 84360 Application: All UTV s* * does not include Arctic Cat vehicles Your safety, and the safety of others, is very important. To help
Classic Roll Tarp. Installation Instructions. Attention Dealers: Please give this owners manual to the customer when the product is delivered.
 Serving the Truck & Trailer Industry Since 1944 Classic Roll Tarp Attention Dealers: Please give this owners manual to the customer when the product is delivered. Call 800-535-9545 www.aeroindustries.com
6' x 8' x 6'6" Quad-Vent Greenhouse-in-a-Box Assembly Instructions
 6' x 8' x 6'6" Quad-Vent Greenhouse-in-a-Box Assembly Instructions Description Model # 6' x 8' x 6'6" Quad-Vent Greenhouse-in-a-Box 70652 Recommended Tools Please read instructions COMPLETELY before assembly.
Classic Roll Tarp. Installation Instructions. Attention Dealers: Please give this owners manual to the customer when the product is delivered.
 Serving the Truck & Trailer Industry Since 1944 Classic Roll Tarp Attention Dealers: Please give this owners manual to the customer when the product is delivered. Call 800-535-9545 www.aeroindustries.com
MODEL T28173/T28174 ROLLER TABLES INSTRUCTIONS
 MODEL T28173/T28174 ROLLER TABLES INSTRUCTIONS FOR MODELS MFD. SINCE 10/17 For questions or help with this product contact Tech Support at (570) 546-9663 or techsupport@grizzly.com Rails Rollers Reversible
Desk/Wall-Mount Rack
 Desk/Wall-Mount Rack Patent(s) Pending Installation Instructions Post P/N: 119-1752 119-1781 119-1782 119-4014 Frame P/N: 119-1591 119-1754 119-1755 Kit Contents (2) Frames (4) Posts Assembly Hardware
43107 Rhino Jerry Can Holder Rhino Jerry Can Holder - Horizontal
 Important: Please read these instructions carefully prior to installation. Check the contents of kit before commencing fitment and report any discrepancies. Clean the alloy tray prior to installation.
ASSEMBLY INSTRUCTIONS for : G Trade Center Drive Rancho Cordova, CA DON'T OVERLOAD YOUR VEHICLE! 100" = 3 X lbs. 35" = X lbs.
 ASSEMBLY ISTRUCTIOS for : PRO-III& IV (916) 638-8703 (800) 343-7486 11253- G Trade Center Drive Rancho Cordova, CA 95742 DO'T OVERLOAD YOUR VEHICLE! LBS. @ 100" = 3 X lbs. OVERTUR FORCE LBS. @ 35" = X
IMPORTANT! Recommended Tools. 7/16 Deep socket Phillips screwdriver
 IMPORTANT! Read all instructions carefully before commencing any work. Always wear proper safety equipment. Some installation steps will require two or more installers. Recommended Tools Ratchet 10-mm
HITCH MOUNT BICYCLE CARRIER Model BC-102
 HITCH MOUNT BICYCLE CARRIER Model BC-102 MAXIMUM LOADING CAPACITY 60 LBS Recommended Tools for Assembly: Open Wrench (2 pc.) Open Wrench (2 pc.) Open Wrench (2 pc.) Size=17mm Size=19mm Size=24mm Assembly
ASSEMBLY INSTRUCTIONS FOR SOFTOP SHADE COVER
 ASSEMBLY INSTRUCTIONS FOR SOFTOP SHADE COVER Our unique assembly process quickly transforms individual pieces into a finished structure that will give you a lifetime of service. Great care has been taken
Thank you for purchasing our product! *Please read these instructions and follow them step by step.*
 07/07/08.rev1 PAGE 1 OF 11 601AL VERTICAL 60120VL LIFT W/CHAIN DRIVE WINCH Thank you for purchasing our product! *Please read these instructions and follow them step by step.* Step 1. Separate and group
INSTALLATION INSTRUCTIONS Medium Flat Panel Model MSP-SI1
 INSTALLATION INSTRUCTIONS Medium Flat Panel Model MSP-SI1 IMPORTANT! : The MSP-S11 Mount is designed for use with Sharp 45" LCD displays that have a 200mm x 200mm mounting pattern. IMPORTANT! : The mount
ASSEMBLY INSTRUCTIONS FOR MAR-K BEDSIDES AND GM FLUSH TAILGATE WITH HANDLE
 ASSEMBLY INSTRUCTIONS FOR MAR-K BEDSIDES AND 41-53 GM FLUSH TAILGATE WITH HANDLE Build the box assembly according to the MAR-K assembly instructions. When installing the tailgate and latching mechanisms
Installation Manual. SKU# TracVan Double SKU# TracVan Double SKU# TracVan Triple
 Installation Manual SKU# 29054 TracVan Double SKU# 29055 TracVan Double SKU# 29056 TracVan Triple TRACVAN INSTALLATION INSTRUCTIONS SKU# 29054, 29055 & 29056 TracVan installation is straightforward, and
CRYSTEEL S. this manual must be included with the vehicle after completing the installation.
 Website: www.tbei.com E-mail: sales@tbei.com CRYSTEEL S Grain Tipper mounting and operating instructions this manual must be included with the vehicle after completing the installation. Web Site E-Mail
ASSEMBLY AND INSTALLATION INSTRUCTIONS
 ASSEMBLY AND INSTALLATION INSTRUCTIONS Model 1425 Aluminum Swivel Rack IMPORTANT BEFORE YOU BEGIN Read these instructions and warnings completely before installation. CAPACITY 200 lbs. MAXIMUM NOTE: This
ASSEMBLY INSTRUCTIONS FOR SERVICE BODY A MOUNT RACKS
 ASSEMBLY INSTRUCTIONS FOR SERVICE BODY A MOUNT RACKS T12 Service Body A shown with optional middle crossbar Package Contents: HARDWARE KIT PARTS (8) 3/8-16 x 3 CARRAIGE BOLTS (1) RAIL DRIVER S SIDE ASSEMBLIES
PRO - III & IV K M K N H A D J M J 1/2", 9/16", & 3/4" 2004 KargoMaster-'Pro 3' _2.1. com
 PRO - III & IV B L G M D E M 4 2 F 1 F L H D C 3 H A 8 M 7 1/2", 9/16", & 3/4" drawitforyou com 2004 argomaster-'pro 3' _2.1 A (4 ea.) 1/2" x 3 1/2" Hex Bolt B (2 ea.) 1/2" x 2 1/4" Button Head Bolt C
INSTALLATION & OWNER S MANUAL
 Rev. O p. 1 of 16 INSTALLATION & OWNER S MANUAL V4213 BALL CAGE KIT INSTALLATION & OWNER S MANUAL The contents of this envelope are the property of the owner. Be sure to leave with the owner when installation
N. 15th Street, Middlesboro, KY FLIP TARP DUMP BODY INSTALLATION INSTRUCTIONS
 1-800-248-7717 1002 N. 15th Street, Middlesboro, KY 40965 FLIP TARP DUMP BODY INSTALLATION INSTRUCTIONS Congratulations on your purchase of a Mountain Flip Tarp Dump Body tarping system. With tarping systems
HARVIL 3-IN-1 FLIP TABLE ASSEMBLY INSTRUCTIONS
 HARVIL 3-IN-1 FLIP TABLE ASSEMBLY INSTRUCTIONS NGD1018/1022 THANK YOU! Thank you for your purchase of this Harvil product. We work around the clock and around the globe to ensure that Harvil products maintain
Agri-Fab. Model No "ATV" DUMP CART H.D. 17 CU. FT. CAUTION: Read Rules for Safe Operation and Instructions Carefully
 Agri-Fab owners manual Model No. 45-02172 190-521-100 "ATV" DUMP CART H.D. 17 CU. FT. CAUTION: Read Rules for Safe Operation and Instructions Carefully Assembly Operation Maintenance Repair Parts the fastest
OWNERS MANUAL. Model No UTILITY CART
 OWNERS MANUAL Model No. 45-00 UTILITY CART CAUTION: Read Rules for Safe Operation and Instructions Carefully Assembly Operation Maintenance Repair Parts PRINTED IN USA FORM NO. 46274 LOOSE PARTS IN CARTON
INSTALLATION GUIDE 2009-CURRENT HUMMER H3T PRODUCT CODE:
 INSTALLATION GUIDE 2009-CURRENT HUMMER H3T PRODUCT CODE: 268 June 22, 2010 TOOLS NEEDED COMPONENTS INCLUDED P2 Tip 3/8" Drill Rubber Gasket(s) x 2 Bracket(s) x 2 1/2" Drill Bit Bulkhead Flange #2 Phillips
12'W x 10'H RoundTop Frame Assembly Please read and understand instructions completely before assembly.
 12'W x 10'H RoundTop Frame Assembly Please read and understand instructions completely before assembly. Layout out frame parts as shown and match up items with quantity to make sure no parts are missing.
MM340 Installation Instructions IMPORTANT SAFETY INSTRUCTIONS - SAVE THESE INSTRUCTIONS
 MM30 Installation Instructions IMPORTANT SAFETY INSTRUCTIONS - SAVE THESE INSTRUCTIONS Please read this entire manual before you begin. Do not unpack any contents until you verify all requirements on PAGE.
MantelMount. TM1A Installation Instructions IMPORTANT SAFETY INSTRUCTIONS - SAVE THESE INSTRUCTIONS
 MantelMount TMA Installation Instructions IMPORTANT SAFETY INSTRUCTIONS - SAVE THESE INSTRUCTIONS TM Thank you for choosing the MantelMount television wall mount. Please read this entire manual before
Open shipping crate and separate all of the different parts. Over The Top Shelters LLC
 ASSEMBLY INSTRUCTIONS FOR MODEL SH122110GN and SH122110GY Open shipping crate and separate all of the different parts. Count each part and match up with parts list. Shortages or damaged parts should be
INSTALLATION INSTRUCTIONS
 INSTALLATION INSTRUCTIONS PROTRAXX OVAL STEP BAR APPLICATION: 2009-2017 Dodge Ram 1500 Crew/Quad Cab 2010-2017 Dodge Ram 2500/500 Crew Cab PART NUMBER: 21-550, 21-555, 21-50, 21-55 AUTOMOTIVE PRODUCTS,
ASSEMBLY INSTRUCTIONS FOR HAULER II UNIVERSAL CAMPER SERIES RACKS
 ASSEMBLY INSTRUCTIONS FOR HAULER II UNIVERSAL CAMPER SERIES RACKS C11U2873-1 shown above Package Contents: HARDWARE KIT PARTS (4) 3/8-16 x 3 CARRAIGE BOLTS (1) RAIL DRIVER S SIDE ASSEMBLY (20) 3/8-16 x
Hardware and Components:
 Hardware and Components: (A) 4X 5/16 x 1 Carriage Bolt (B) 2X 5/16 x 2-1/4 Carriage Bolt (C) 2X 5/16 x 3-1/4 Hex Bolt (D) 2X 5/16 x 3/4 Hex Bolt (E) 2X 5/16 x 1-1/4 Hex Bolt (F) 5/16 x 2-1/4 Hex Bolt (G)
Roof Rack Installation Instructions
 Roof Rack Installation Instructions CAUTION: Do not use the mounting hardware contained in this roof rack kit for installation on Fiberglass or Composite Plastic surfaces. Supplemental hardware pack, part#
MM540 Installation Instructions IMPORTANT SAFETY INSTRUCTIONS - SAVE THESE INSTRUCTIONS
 MM50 Installation Instructions IMPORTANT SAFETY INSTRUCTIONS - SAVE THESE INSTRUCTIONS Please read this entire manual before you begin. Do not unpack any contents until you verify all requirements on PAGE.
owners manual CAUTION: Read Rules for Safe Operation and Instructions Carefully Safety Assembly Operation Maintenance Parts
 owners manual Model No. 45-0350 (ATV) 45-0351 (FARM) (45-0350 SHOWN) TANDEM AXLE CART CAUTION: Read Rules for Safe Operation and Instructions Carefully IMPORTANT! The wheel bearings are not pre lubricated.
SAFETY. Read and understand all safety precautions and instructions before installing this product.
 SAFETY Your safety and the safety of others is very important. In order to help you make informed decisions about safety, we have provided installation instructions and other information. These instructions
INSTALLATION INSTRUCTIONS
 PART NO. 3373MB 3373MC 3373MH PRODUCT DESCRIPTION: 3000 SERIES STEP GUARD BLACK (GRILLE GUARD & BRUSH GUARDS) 3000 SERIES STEP GUARD CHROMED (GRILLE GUARD & BRUSH GUARDS) 3000 SERIES STEP GUARD BLACK/CHROMED
ATV CULTIVATOR OWNER S MANUAL
 ATV CULTIVATOR OWNER S MANUAL WARNING: Read carefully and understand all ASSEMBLY AND OPERATION INSTRUCTIONS before operating. Failure to follow the safety rules and other basic safety precautions may
KEEP FOR FUTURE REFERENCE STOWAWAY TILT TABLE READ ALL INSTRUCTIONS AND WARNINGS BEFORE USING THIS TABLE
 KEEP FOR FUTURE REFERENCE INSTRUCTIONS International Version P.O. Box 368 908 West Main Laurel, MT USA 59044 phone 800-548-7341 phone 406-628-8231 fax 406-628-8354 MODEL NUMBER: STT1 SERIAL NUMBER: (please
ASSEMBLY INSTRUCTIONS for :
 ASSEMBLY INSTRUCTIONS for : 800 0 TMCS_3:1 (916) 638-8703 (800) 343-7486 11261 Trade Center Drive Rancho Cordova, CA 95742 www.kargomaster.com Tools Needed Hardware Pack Cont' 8' Tape Measure 1/2" End
SUMMERHOUSE PERGOLA ASSEMBLY INSTRUCTIONS. Toll-free: MODEL NO
 SUMMERHOUSE PERGOLA MODEL NO. 088-1759-2 INSTRUCTIONS Toll-free: 1-888-670-6684 IMPORTANT: Please read this manual carefully before beginning assembly of this product. Keep this manual for future reference.
CAB END BEDTRAX (SIDE VIEW)
") Supplied Hardware: (8-14) 1/4-20 Allen head bolts, (12-18) UHMW mount blocks, (4) D-ring tie downs Tools Needed: Allen head wrench GET TO IT. INSTALLATION INSTRUCTIONS STEP 1. INSERT (2) MOUNT BLOCKS INTO
Supplied Hardware: (8-14) 1/4-20 Allen head bolts, (12-18) UHMW mount blocks, (4) D-ring tie downs Tools Needed: Allen head wrench GET TO IT. INSTALLATION INSTRUCTIONS STEP 1. INSERT (2) MOUNT BLOCKS INTO
ASSEMBLY & INSTALLATION GUIDE
 ASSEMBLY & INSTALLATION GUIDE APPLICATION GM Truck (Full-size Trucks) PART # 74805-00A (Silver) 74805-0A(Black) INSTALLATION TIME Hour SKILL LEVEL 2 3 4 = Easy TOOLS REQUIRED Phillips screw driver Torx
======================================================================================== ( DR / DR) JK WRANGLER MOD RACK
 JK WRANGLER MOD RACK") (10984 4DR / 10982 2DR) JK WRANGLER MOD RACK INSTALLATION SHEET Important Notes: Some brands of windshield light brackets and snorkels may not be compatible with the 10984 MOD Rack System. Body lifts are
(10984 4DR / 10982 2DR) JK WRANGLER MOD RACK INSTALLATION SHEET Important Notes: Some brands of windshield light brackets and snorkels may not be compatible with the 10984 MOD Rack System. Body lifts are
Medium HoneyBadger Chase Rack Installation Instructions
 PREPARATION Medium HoneyBadger Chase Rack Installation Instructions 1. Disconnect the negative terminal on the battery. Park the vehicle on level ground and set the emergency brake. 2. We recommend reading
Sunset Swings By Health in Motion, LLC
 Sunset Swings By Health in Motion, LLC Model 421 Lounge Swing Assembly and Operation Manual Record Serial Number Here www.sunsetswings.com by Health In Motion, LLC. 11/6/2009 421 Owners Assembly and Operation
ASSEMBLY INSTRUCTIONS FOR T-10, T-11 & T-12 SERIES RACKS
 ASSEMBLY INSTRUCTIONS FOR T-10, T-11 & T-12 SERIES RACKS T12SHD-1 with 26 Legs shown above. Package Contents: HARDWARE KIT PARTS (8) 3/8-16 x 3 CARRAIGE BOLTS (1) RAIL DRIVER S SIDE ASSEMBLIES (20) 3/8-16
INSTALLATION INSTRUCTIONS
 POST THIS WARNING IN A CONSPICUOUS PLACE, CLEARLY VISIBLE TO ALL STORE PERSONNEL Install all components according to installation instructions. READ BEFORE ASSEMBLING WARNING FOR YOUR SAFETY Installation
Owner s Manual LSV1364
 Owner s Manual LSV1364 1300 lb, 64" Beam Vertical Lift READ CAREFULLY - FAILURE TO FOLLOW INSTRUCTIONS AND SAFETY RULES MAY RESULT IN SERIOUS INJURY Manufacturers of Lakeshore Products 855 East Chicago
22'W x 13'H Peak Style Shelter Frame Assembly Instructions
 22'W x 13'H Peak Style Shelter Frame Assembly Instructions Recommended Tools Please read instructions COMPLETELY before assembly. This shelter MUST be securely anchored. THIS IS A TEMPORARY STRUCTURE AND
(2) Plastic Plugs (2) Frame Bracket. Spacers. License Plate Bracket. (2) 12mm Single Bolt Plates. (2) 12mm Double Bolt Plates
 Plastic Plugs (2) Frame Bracket. Spacers. License Plate Bracket. (2) 12mm Single Bolt Plates. (2) 12mm Double Bolt Plates") LDB-CSIL26-FB PARTS LIST: 1 LD1 Bumper Assembly 10 12mm Hex Nuts 1 Driver/left Frame Mounting 6 10-1.5mm x 35mm Hex Bolts 1 Passenger/right Frame Mounting 12 10mm x 27mm OD x 3mm Flat Washers 2 Spacers
LDB-CSIL26-FB PARTS LIST: 1 LD1 Bumper Assembly 10 12mm Hex Nuts 1 Driver/left Frame Mounting 6 10-1.5mm x 35mm Hex Bolts 1 Passenger/right Frame Mounting 12 10mm x 27mm OD x 3mm Flat Washers 2 Spacers
IN-BED FRAME MOUNT INSTALLATION INSTRUCTIONS
 Lit. No. 13666, Rev. 05 December 5, 2005 IN-BED FRAME MOUNT INSTALLATION INSTRUCTIONS FOR SINGLE-STAGE AND TWO-STAGE TAILGATE SPREADERS Read Owner's Manual before operating or servicing spreader. Empty
GroundControl. Follow instructions contained in this manual. Incorrect installation could result in serious injury or damage to property.
 GroundControl TM use supplied hardware Use only hardware supplied in your GroundControl kit or supplied by an authorized YAKIMA dealer. Use of unauthorized parts in the GroundControl system could result
4" Oval Nerf Bar. Part No. A1007S/B. PARTS LIST: Qty Part Description Qty Part Description
 4" Oval Nerf Bar Part No. A1007S/B Fits: 2009 - Current Dodge Ram 1500 Crew Cab 2001 - Current Dodge Ram 2500/3500 Crew Cab REMOVE CONTENTS FROM BOX. VERIFY ALL PARTS ARE PRESENT. 60-180 min Cutting Not
Model No.'s B
 owners manual Model No.'s 45-01012 190-653B UTILITY CARTS (SEE SPECIFICATIONS ON PAGE 7) CAUTION: Read Rules for Safe Operation and Instructions Carefully Assembly Operation Maintenance Repair Parts the
ASSEMBLY INSTRUCTIONS FOR HAULER II SERVICE BODY A RACK
 ASSEMBLY INSTRUCTIONS FOR HAULER II SERVICE BODY A RACK T12USBA-1 shown above Package Contents: HARDWARE KIT PARTS (4) 3/8-16 x 3 CARRAIGE BOLTS (1) RAIL DRIVER S SIDE ASSEMBLY (20) 3/8-16 x 2 CARRAIGE
OWNER'S MANUAL. Bunk Bed NOTE: THIS INSTRUCTION BOOKLET CONTAINS IMPORTANT SAFETY INFORMATION PLEASE READ AND KEEP FOR FUTURE REFERENCE.
 OWNER'S MANUAL Bunk Bed Model No.: DASE3618P- PINE DASE3618W- WALNUT NOTE: THIS INSTRUCTION BOOKLET CONTAINS IMPORTANT SAFETY INFORMATION PLEASE READ AND KEEP FOR FUTURE REFERENCE. RECEIPT OF PURCHASE:
Star Trac Turbo Trainer Assembly & Setup
 Star Trac Turbo Trainer Use the following procedures to unpack and assemble your Turbo Trainer manufactured by Star Trac. UNPACKING AND PARTS LIST Position the shipping carton so the Heavy End logo is
Plasma Presenters Cart (PPC-2000)
") I N S T R U C T I O N M A N U A L (PPC-2000) The (PPC) is designed to assist the presenter in showrooms, boardrooms, and trade show exhibits. The PPC provides agile mobility for screens weighing up to
I N S T R U C T I O N M A N U A L (PPC-2000) The (PPC) is designed to assist the presenter in showrooms, boardrooms, and trade show exhibits. The PPC provides agile mobility for screens weighing up to