Installation Instructions Student 101 Fume Cupboard
|
|
|
- Dale Johnson
- 5 years ago
- Views:
Transcription
 Assemble the bench frame (drawing page3) by attaching the rails to the end trestles with tek screws.")
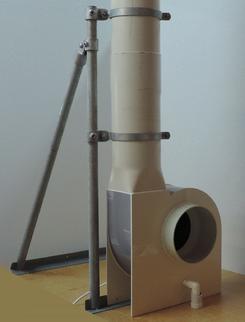
1 Installation Instructions Student 101 Fume Cupboard Refer drawing on next page 0. If your fume cupboard is supplied with a flatpack bench frame, see step1. If your fume cupboard will be mounted on an existing bench, go to step (Optional bench frame) Assemble the bench frame (drawing page3) by attaching the rails to the end trestles with tek screws. Set the bench frame in position. Check that the lower cross bar is at the rear. Adjust the feet for level and height (870mm) Place fume cupboard on bench frame. Align, and screw through lugs on frame into base of fume cupboard Maximum screw length 20mm! Go to Step Place fume cupboard on bench If your fume cupboard has a water tap and drip cup, include step 3. See drawing page 3 for plumbing connections. 3. (Optional water tap and drain) If your fume cupboard has holes in the bottom for a water tap and drip cup, mark these holes on the under-bench. Move the fume cupboard out of the way to cut out the under-bench top, then replace the fume cupboard in position. 4. From the duct outlet on top of the fume cupboard, plumb up to the ceiling. Mark and cut 210mm dia hole through ceiling and roof for the exhaust duct. 5. Above the roof, locate a purlin within about 1m above the hole. Place the fan with the inlet in line with the hole, and fix the steel fan bracket to the purlin. (See drawing). Fix the bracing base plate in line with the fan on the next purlin uphill. Slide the swivel end of the brace over the fan mast, and attach the other end of the brace to the base plate. Slide the swivel brace until the mast is vertical, and tighten the locking screws. 6. Fit the 150mm diameter flue pipe into the fan outlet. Adjust for vertical, and secure the duct clamp to the mast. 7. Temporarily hold 200mm pipe bend in line with fan inlet and roof penetration. Measure up from fume cupboard outlet to bend. Allow for sockets at each end. Cut 200mm dia duct to length. Ensure ends are cut square. De-burr edges. 8. Lower duct through roof. Fit the ceiling flange over the bottom end of the duct, and fit the duct to the fume cupboard outlet. Fix the flange to the ceiling with screws or adhesive. 9. Fit the "Dektite" flashing over the top end of the duct, and fix to the roof with sealant and screws or rivets. 10. Temporarily fit the bend to the riser duct. Measure from the socket of the bend to the fan inlet, allowing a gap of 80mm between the fan and duct for the flexible connector. Cut 200mm dia duct to length. Ensure ends are cut square. De-burr edges. 11. Fix the duct into the bend with PVC solvent cement, or hot-air welding, and connect the duct to the fan with the flexible connector. Fasten the stainless steel clamp bands. 12. Fit the trap to the fan drain.
2
3 Installation of Optional Accessories for Student 101
 a 5Vdc power supply, a delay off timer, a pressure switch There is a smaller box for")
4 Electrical Connections for Student 101 Fume Cupboard The alarm box is a grey plastic enclosure located on top of the fume chamber. Refer the diagram. The control box contains strip connectors for Line, Neutral, Earth, and Load (Fan and Light) a 5Vdc power supply, a delay off timer, a pressure switch There is a smaller box for 3 x AA batteries on the lid.
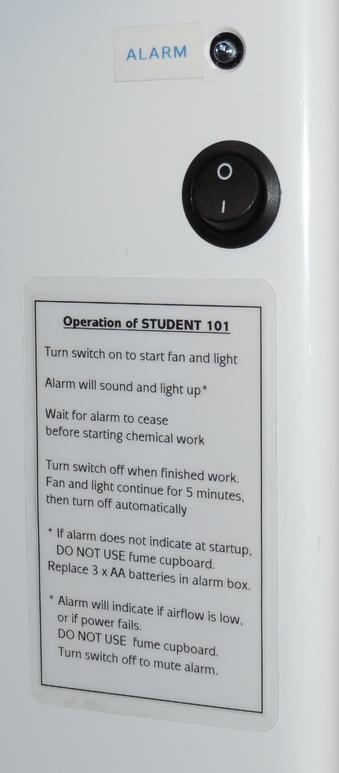
5 Operating Instructions
 positions 100mm 100+ + +100 100+ + +100 100mm The average velocity (sash open) should be more than 0.5m/sec Measure the airflow Record the velocity measurements in a commissioning report.")
6 COMMISSIONING Refer the operating instructions Turn the power on Measure the airflow Raise the sash to the maximum operating position (sash stop) Measure the air velocity in the plane of the sash at six (6) positions 100mm mm The average velocity (sash open) should be more than 0.5m/sec Measure the airflow Record the velocity measurements in a commissioning report. Conduct a smoke test (AS ) and record the observations. Adjust the airflow alarm sensor (pressure switch): The pressure switch adjustment is seen through the hole in the alarm box lid Adjust the white plastic cross-head screw clockwise to raise the set point (more sensitive) or anticlockwise to reduce the set point (less sensitive). A practical guide: Turn the set point up until the Airflow alarm sounds If the alarm does not sound, replace the (3 x AA) batteries in the alarm box. Turn the set-screw down until the alarm stops. To check the alarm, pull the clear PVC pilot tube out of the duct. The alarm should sound after 2-3 seconds. Ensure the pilot tube is re-fitted in the duct. 3 x AA Airflow alarm
aluminium profile system
 aluminium profile system 63 AME System aluminium profiles overview series profiles introduction 80x80 x80 x80/180 x Aluminium profiles are provided with longitudinal grooves which can be used in conjunction
VERTICAL BALANCED FLUE SYSTEM INSTALLATION INSTRUCTIONS
 VERTICAL BALANCED FLUE SYSTEM INSTALLATION INSTRUCTIONS ROOM SEALED NON-CONDENSING COMBINATION/SYSTEM BOILERS AND WATER HEATERS 24i 47 311 37/38 9/14 CBi 41 311 50/51 28i 47 311 54 14/19 CBi 41 311 52/53
STANDARD GRAVITY BOX TARP INSTALLATION
 OPERATORS MANUAL Rev. 9.9.2016 STANDARD GRAVITY BOX TARP INSTALLATION J. & M. Mfg. Co., Inc. 284 Railroad Street - P.O. Box 547 Fort Recovery, OH 45846 Ph: (419) 375-2376 Fax: (419) 375-2708 www.jm-inc.com
Riser Extension INSTALLATION GUIDE 40100AX35 / 40100AX18. Manual 40100X35-8
 Riser Extension INSTALLATION GUIDE 40100AX35 / 40100AX18 Manual 40100X35-8 3 2 4 Access covers with bolts supplied with Interceptor 1 5 14 6 11 15 Sampling Port/Cleanout cap supplied with Interceptor 12
INSIDE PANEL NOT SHOWN TO DETAIL ANCHORING SYSTEM
 SIX INCH ALPHA MODULE INSTALLATION KEWAUNEE SCIENTIFIC CORPORATION SIX INCH ALPHA MODULE ANCHORING SYSTEM After Alpha module has been set in desired location. Adjust the four adjustment bolts until the
Kwik-Lock. Installation Instructions. Attention Dealers: Please give this owners manual to the customer when the product is delivered.
 Serving the Truck & Trailer Industry Since 1944 Installation Instructions Attention Dealers: Please give this owners manual to the customer when the product is delivered. Call 800-535-9545 www.aeroindustries.com
Index Pipe Hangers and Straps
 Index Pipe Hangers and Straps Fig. 1 Standard Clevis Hanger MSS-SP-69, Type 1 WW-H-171E, Type 1 Page 14 Fig. 1CI Clevis Hanger for A.W.W.A. Page 16 Fig. 81 Clevis Hanger WW-H-171E, Type 12 Page 70 Fig.
North East Toilet Cubicles Ltd.
 200 200 850 120 1170 850 2400 1180 1180 North East Toilet Cubicles Ltd. Tel: 01429 277500 Fax: 01429 868590 Email: info@netoiletcubicles.co.uk Urinal Duct Panel System The following drawings are provided
Dura-Lock Roof System
 DLR-14 Dura-Lock Roof System Assembly and Installation Instructions Read the instructions before starting the job. They explain the steps required to produce a finished product that will meet factory specifications.
Code Product Qty 1 Top Vertex 3 2 Hot End Housing 1 3 Bottom Vertex 3 4 Print Platform Lock 3 5 End Stop Holder 3 6 Filament Feeder Motor Bracket 1 7
 List of Parts Code Product Qty 1 680mm Extrusion 3 2 Power Supply 1 3 240mm Extrusion 9 4 42mm Nema 17 Stepper Motor 3 5 Slider-Hotend Connecting Rod 6 6 48mm Nema 17 Stepper Motor 1 7 Linear Rail with
Quick-Drain Installation Requirements Large Volume Drainage Models
 Quick-Drain Installation Requirements Large Volume Drainage Models Installation of the Quick-Drain-QFLV and Quick-Drain-HFLV Fluid Management Systems is a straightforward process. These installation instructions
Vanity Installation Instructions
 Vanity Installation Instructions Segments of these instructions will relate to your vanity. Please read these instructions thoroughly and ensure the appropriate instructions are used during the installation
Model 209 Fireback Replacement
 Model 209 Fireback Replacement Please read all the instructions before you begin the procedure. Confirm that you have all the necessary tools and materials. If you have any questions, technical support
Aluminum Clad Wood Window 1/2 Reinforced Field Mulling and Stacking Supplement
 Aluminum Clad Wood Window 1/2 Reinforced Field Mulling and Stacking Supplement 1 Aluminum Clad Wood Window 1/2 Reinforced Field Mulling and Stacking Supplement The following instructions are a supplement
Vanity Installation Instructions
 Vanity Installation Instructions Segments of these instructions will relate to your vanity. Please read these instructions thoroughly and ensure the appropriate instructions are used during the installation
Copper Tubing Hangers Clevis Hangers. Copper Tubing Hangers
 Copper Tubing Hangers Clevis Hangers Copper Tubing Hangers Fig. CT-69 Adjustable Swivel Rug Fig. CT-138R Fig. CT-65 Fig. CT-109 Extension Split Light Weight Adjustable Clevis Fig. CT-99 & CT-99C Split
Installation and Maintenance Manual IM 770-1
 Installation and Maintenance Manual IM 770-1 Group: Applied Air Systems Part Number: IM 770 Date: March 2014 Skyline Outdoor Air Handler Roof Curb Table of Contents General Description... 3 Curb-Ready
General Prisoner Transport Install Instructions PT-2-INST
 General Prisoner Transport Install Instructions PT-2-INST 50 or 60 high x 80, 100 & 120 inch long / Double Compartment Inserts Also refer to PT-A-3XX instructions for vehicle specific mounting measurements
Fireball Fab Welded Baluster Insert Panel System Installation Instructions
 Fireball Fab Welded Baluster Insert Panel System Installation Instructions Prior to construction, check with your local regulatory agency for special code requirements in your area. Common railing height
WOOD FIRE FLUE KIT AND ACCESSORIES MANUAL
 WOOD FIRE FLUE KIT AND ACCESSORIES MANUAL Masport Limited 1-37 Mt Wellington Highway Panmure Auckland 6 Ph: 09 571 1200 Fax: 09 571 5864 www.masport.com 2005 CONTENTS Ordering Information... Page 3 Freestanding
GE Monogram. Installation. Instructions. 36" Vent Hood. Model ZV750. Call anywhere in the US and Canada -
 at :: rangehoods. com GE Monogram Instructions Model ZV750 GE Monogram at:: rangehoods. com is a division of CAUTION WARNING Before you begin Read these instructions completely and carefully. IMPORTANT:
HOUSE PARTS PACKED IN HOUSE BOX PARTS IN PLASTIC BAG (HARDWARE) PARTS IN SMALL PLASTIC BAG (FLOOR CLIPS) PARTS PACKED IN BUNDLE
 PARTS IN SMALL PLASTIC BAG (FLOOR CLIPS) PARTS PACKED IN BUNDLE") Check parts against this list before starting assembly. Refer to illustrations on pages 6 and 7 to view house parts. If any shortages are found, refer to Packing Slip for claim instructions. Item 3 5 6
Check parts against this list before starting assembly. Refer to illustrations on pages 6 and 7 to view house parts. If any shortages are found, refer to Packing Slip for claim instructions. Item 3 5 6
CHICKEN COOP & CHICKEN RUN. Tools required for assembly (not included)
") CHICKEN COOP & CHICKEN RUN ASSEMBLY MANUAL SKU# 6839 Tools required for assembly (not included) Distributed by: TRACTOR SUPPLY COMPANY 0 VIRGINIA WAY, BRENTWOOD, TN 3707 For customer support, call: -888-376-960
CHICKEN COOP & CHICKEN RUN ASSEMBLY MANUAL SKU# 6839 Tools required for assembly (not included) Distributed by: TRACTOR SUPPLY COMPANY 0 VIRGINIA WAY, BRENTWOOD, TN 3707 For customer support, call: -888-376-960
ECOVENT USA CHIMNEY MODEL EV-SHT 5"-8" DIAMETER INSTALLATION INSTRUCTIONS
 ECOVENT USA CHIMNEY MODEL EV-SHT 5"-8" DIAMETER INSTALLATION INSTRUCTIONS A MAJOR CAUSE OF CHIMNEY RELATED FIRES IS FAILURE TO MAINTAIN REQUIRED CLEARANCES (AIR SPACES) TO COMBUSTIBLE MATERIALS. IT IS
150 MM FREE STANDING WOOD FIRE FLUE KIT INSTALLATION INSTRUCTIONS
 www.jayline.co.nz www.fisherstoves.co.nz 150 MM FREE STANDING WOOD FIRE FLUE KIT INSTALLATION INSTRUCTIONS WARNING: This flue kit has been manufactured in accordance with as/nzs 2918:2001 and tested to
Quick-Drain Installation Requirements
 Quick-Drain Installation Requirements Installation of the Quick-Drain-QF and Quick-Drain-HF Fluid Management Systems is a straightforward process. These installation instructions are written in a general
Installation Instructions
 Installation Instructions Alpha SolarSmart On Roof Kits for the Installation of Alpha Solar Collectors onto Tile and Slate Type Roofs For Technical help or for Service call... ALPHA HELPLINE Tel: 0 77
Assembly Instructions
 Selling Station Assembly Instructions View from above without top A B C D Rounded finished corners on A & D Square unfinished 3-sides on B & C Selling Station Components (2) 2' x 6' Side s Have a channel
LE7000 Provincial Built-in (Zero Clearance) Kit Instructions.
 Kit Instructions.") LE7000 Provincial Built-in (Zero Clearance) Kit Instructions. LE7000 Provincial ZC Kit contains: Part No. Quantity Description Picture 503259 4 Self Threading Screw 13mm 503459 6 Self Threading Screw Timbertites
LE7000 Provincial Built-in (Zero Clearance) Kit Instructions. LE7000 Provincial ZC Kit contains: Part No. Quantity Description Picture 503259 4 Self Threading Screw 13mm 503459 6 Self Threading Screw Timbertites
INSTALLATION INSTRUCTIONS
 STRIP DOORS AIR DOORS INSTALLATION INSTRUCTIONS BULK PVC FILM STRIP SHEET PANEL SCREENS, CURTAINS and ENCLOSURES MEGA-PRO SWINGING DOORS DOCK ACCESSORIES IMPORTANT Carefully examine the carton(s) for damage.
THANK YOU FOR PURCHASING FROM HERITAGE PATIOS
 Installation Guide THANK YOU FOR PURCHASING FROM HERITAGE PATIOS Your purchase is engineered by nearly a half century of commercial and residential product design proudly manufactured in the USA from responsibly
Installation Instructions
 READ BEFORE INSTALLING UNIT For Slider Casement Air Conditioners To avoid risk of personal injury, property damage, or product damage due to the weight of this device and sharp edges that may be exposed:
Jabiru Installation instructions
 Page 1 of 5 s Step Description 1 Mark out centre line of the installation 2 Align centre line of installation with the centre line of the "Front Panel Cut out" template. Align "FLOOR" on template with
PowerLock. Installation Instructions. Attention Dealers: Please give this owners manual to the customer when the product is delivered.
 Serving the Truck & Trailer Industry Since 1944 FOR Attention Dealers: Please give this owners manual to the customer when the product is delivered. Call 800-535-9545 www.aeroindustries.com Indianapolis,
Installation Instructions - Model V4JSD 1
 Installation Instructions - Model V4JSD 1 Support Assemblies: Parts list: (Note see enclosed cut sheet for quantities and dimensional information) A vertical structural member (1 ½ x 1 ½ modular frame)
1: profile cross section. FD- profile. for sidewalls + backwalls. eaves profile. curved roof profile. Z - profile (alongside frame) L 60 x 60
 L 60 x 60") 1: profile cross section FD- profile for sidewalls + backwalls eaves profile curved roof profile Z - profile (alongside frame) L 60 x 60 for backwall Image 2: 1.) Insert feet from below in square tubes
1: profile cross section FD- profile for sidewalls + backwalls eaves profile curved roof profile Z - profile (alongside frame) L 60 x 60 for backwall Image 2: 1.) Insert feet from below in square tubes
Copyright Black Box Corporation. All rights reserved Park Drive Lawrence, PA Fax
 Copyright 2003. Black Box Corporation. All rights reserved. 1000 Park Drive Lawrence, PA 15055-1018 724-746-5500 Fax 724-746-0746 JULY 2003 RM3010A RM315-R2 RM323-R2 RM329 RM451 RM457 RM3020A RM316 RM324-R2
SHINGLE ROOF SUMMARY INSTALLATION MANUAL METHOD 1 CONVENTIONAL ORIENTATION, ALTERNATING HEADERS
 Distributed and serviced in the USA by Hot Sun Industries Inc 13460 Cayuga Dr., Poway CA 92064 858-627-9007 e-mail: ken@h2otsun.com web site: http://www.h2otsun.com Safety First! Note: Most occupational
ICC INDUSTRIAL CHIMNEY COMPANY INC. ST-JEROME, QUÉBEC, CANADA, J7Y 4B7 TEL: (450) FAX: (450)
 FAX: (450)") ICC INDUSTRIAL CHIMNEY COMPANY INC. ST-JEROME, QUÉBEC, CANADA, J7Y 4B7 TEL: (450) 565-6336 FAX: (450)565-6519 www.icc-rsf.com INSTALLATION AND OPERATION INSTRUCTIONS "Model VIP" CHIMNEY TYPE: FACTORY BUILT
ICC INDUSTRIAL CHIMNEY COMPANY INC. ST-JEROME, QUÉBEC, CANADA, J7Y 4B7 TEL: (450) 565-6336 FAX: (450)565-6519 www.icc-rsf.com INSTALLATION AND OPERATION INSTRUCTIONS "Model VIP" CHIMNEY TYPE: FACTORY BUILT
A. Radius elbows with a construction radius of 1.5 the duct width are preferred to square elbows.
 SECTION 233100 DUCTWORK 1.0 Acoustical duct lining in any part of the duct system is prohibited. All ductwork requiring insulation shall be externally insulated (Refer to the Sheet Metal Ductwork Insulation
Installation Instructions For Slider Casement Air Conditioners
 Installation Instructions For Slider Casement Air Conditioners NOTE: These instructions describe installation in a typical wood framed window with a wood SLIDE-BY sash, or installation in a metal CASEMENT
HEARTH PRODUCTS KITS AND ACCESSORIES VERTICAL TERMINATION KITS FOR SECURE FLEX VERTICAL VENTING
 HEARTH PRODUCTS KITS AND ACCESSORIES 750052M Rev. C 05/2014 VERTICAL TERMINATION KITS FOR SECURE FLEX VERTICAL VENTING INSTALLATION INSTRUCTIONS FOR SECURE FLEX VERTICAL TERMINATION KITS (CATALOG NO. 56L74
Installation and Maintenance Manual
 Installation and Maintenance Manual IM770 Group: pplied ir Part Number: IM770 Date: pril 2003 Roof Curb for Skyline TM Outdoor ir Handlers 2013 Daikin pplied IM 770 Page 1 Table of Contents General Description...
Installation Manual. This installation is for the Odyssey H1800 Series Ventilation System.
 Installation Manual This installation is for the Odyssey H1800 Series Ventilation System. This installation is limited to roofs with pitches between 3 and 35. This instruction assumes that there is a power
Kocked Down with Ends Assembled
 Installation Instructions for Quarter Round (QR) Kocked Down with Ends Assembled Note: Prior to starting Installation, check unit/parts for damage. Please read entire Installation Instructions & review
PACKING LIST MACO V-5000
 PACKING LIST MACO V-5000 PART QTY O.D. SIZE LENGTH DESCRIPTION CHECKLIST T47P 4 5/8.050 36 Aluminum Tubing _ T43P 1 7/8.050 48 Aluminum Tubing _ T18P 1 3/4.050 48 Aluminum Tubing _ T15P 1 5/8.050 48 Aluminum
Clopay Models 835/837 Sliding Door System Installation Guide
 Clopay Models 835/837 Sliding Door System Installation Guide The aim of this instruction is to guide you through the process of construction and fitting of Sliding Doors. Due to the number of sizes available
Parts list continues on Page 2 HOUSE PARTS PACKED IN HOUSE BOX PARTS IN SMALL PLASTIC BAG (HARDWARE) POST PARTS PACKED IN THIS BOX (LARGE PLASTIC BAG)
 POST PARTS PACKED IN THIS BOX (LARGE PLASTIC BAG)") Form 05-07 Instructions and Parts List MSS- Martin Safety System NOTES: () A complete system is packed in two boxes post box and house box. House box contains hardware for both post and house assembly.
Form 05-07 Instructions and Parts List MSS- Martin Safety System NOTES: () A complete system is packed in two boxes post box and house box. House box contains hardware for both post and house assembly.
WASHING MACHINE AND WASHER-DRIER
 GB 99-11-03/01 1-14 Index 1 CONFORMITY OF APPLIANCE 3 2 DIMENSIONS OF WASHING MACHINE/WASHER-DRIER AND HOUSING SPACE 3 3 UNPACKING 4 4 LEVELLING 5 5 FITTING THE FRONT PANEL AND INSERTING THE MACHINE INTO
TRADITIONAL GABLE ATTACHED PATIO AND CARPORT. Your complete guide to building an ATTACHED Outback TRADITIONAL GABLE PATIO or CARPORT
 TRADITIONAL GABLE ATTACHED PATIO AND CARPORT STRATCO OUTBACK ASSEMBLY INSTRUCTIONS. Your complete guide to building an ATTACHED Outback TRADITIONAL GABLE PATIO or CARPORT BEFORE YOU START Carefully read
Side "A" Stake here. Side "C" Side "D" Side "B" Here Shirley and I are setting up a 10 X 16 ground work.
 Choosing the Location It is always best to locate your greenhouse so that it can receive maximum sunlight at all times of the year especially in winter months. If Possible orient the long side towards
Installation Manual For ToddPod Outdoor Shower Enclosures
 Installation Manual For ToddPod Outdoor Shower Enclosures Contact us at 888-545-9763 or email us at office@toddpod.com with any questions during the installation process. Our service team is available
This product is designed for a water supply pressure range of 20 psi (137kPa) minimum to 80psi (550 kpa) maximum.
 minimum to 80psi (550 kpa) maximum.") We appreciate your commitment to Kohler quality. Please take a few minutes to review this manual before you start installation. If you encounter any installation or performance problems, please don t hesitate
We appreciate your commitment to Kohler quality. Please take a few minutes to review this manual before you start installation. If you encounter any installation or performance problems, please don t hesitate
Ford Pick Up Rear leaf Spring Kit Installation Instructions
 1948-1956 Ford Pick Up Rear leaf Spring Kit Installation Instructions 1-800-984-6259 www.totalcostinvolved.com Parts 48 inch leaf (2) springs (4) U-bolts 3/8-24 x l 1/4bolts (16) & nuts (2) 1/2-20 x 4
Installation Instructions
 Installation Instructions READ BEFORE INSTALLING UNIT For Slider Casement Air Conditioners INSTALLATION WARNINGS AND CAUTION Carefully read the installation manual before beginning. Follow each step as
Installation Manual FLUSH MOUNT - Shingle, Slate,etc. Questions? Call Us! +1 (800)
") www.trasnowandsun.com S Installation Manual FLUSH MOUNT - Shingle, Slate,etc. At TRA Snow and Sun we engineer and layout each project upon request free of charge. Just give us the project details and we
www.trasnowandsun.com S Installation Manual FLUSH MOUNT - Shingle, Slate,etc. At TRA Snow and Sun we engineer and layout each project upon request free of charge. Just give us the project details and we
PowerLock. Installation Instructions. Attention Dealers: Please give this owners manual to the customer when the product is delivered.
 Serving the Truck & Trailer Industry Since 1944 FOR Attention Dealers: Please give this owners manual to the customer when the product is delivered. Call 800-535-9545 www.aeroindustries.com Indianapolis,
INS A KSCR INSTALLATION INSTRUCTIONS STANDARD PROCEDURE. 1. Unpacking the KSCR Splicing the KSCR (If Required)...
...") INS-88.500-0A KSCR INSTALLATION INSTRUCTIONS STANDARD PROCEDURE 1. Unpacking the KSCR... 2 2. Splicing the KSCR (If Required)... 4 3. Assemble Curb and Rail Corners... 5 4. Install Cross Bracing (If Required)...
INS-88.500-0A KSCR INSTALLATION INSTRUCTIONS STANDARD PROCEDURE 1. Unpacking the KSCR... 2 2. Splicing the KSCR (If Required)... 4 3. Assemble Curb and Rail Corners... 5 4. Install Cross Bracing (If Required)...
WHITE - Accessories. Series 500 Greenhouse Kit w/blackout System, Ventilation & Evaporative Cooling
 Series 500 Greenhouse Kit w/blackout System, Ventilation & Evaporative Cooling WHITE - Accessories 2016 Growers Supply All Rights Reserved. Reproduction is prohibited without permission. Revision date:
INS A KSR INSTALLATION INSTRUCTIONS STANDARD PROCEDURE. 1. Verify Curb Installation Required Installation Tools...
 INS-88.300-0A KSR INSTALLATION INSTRUCTIONS STANDARD PROCEDURE 1. Verify Curb Installation... 2 2. Required Installation Tools... 2 3. Unpacking the KSR... 3 4. Attach KSR Bottom Rail to Curb... 5 5. Attach
Easy Step by Step Manual
 Easy Step by Step Manual Teletower Mini XL Wall-Floor installation The tower packages #1-#2-#3 Open Base Package #1 for the main tower parts. Here you see the three tower tubes (H-Head, M-Middle, F-Feed)
HOW TO INSTALL HORIZONTAL ROD RAILING TREX SIGNATURE STANDARD
 HOW TO INSTALL HORIZONTAL ROD RAILING NOTES:» Adjust drill power to lowest setting that will drive screw. DO NOT OVER TORQUE 6 STAINLESS STEEL STAINLESS FASTENERS.» NEVER use impact tools on 6 Stainless
CRYSTEEL S. this manual must be included with the vehicle after completing the installation.
 Website: www.tbei.com E-mail: sales@tbei.com CRYSTEEL S Grain Tipper mounting and operating instructions this manual must be included with the vehicle after completing the installation. Web Site E-Mail
BioPrism Solid Surface
 Please read all instructions before installing products. These instructions are intended for use with InPro s standard toilet partitions, which include 58 high doors and wall panels, when deviating from
AWNING SYSTEM INSTALLATION INSTRUCTIONS ALL VERTICAL WALLS
 INSTALLATION MANUAL AWNING SYSTEM INSTALLATION INSTRUCTIONS ALL VERTICAL WALLS TABLE OF CONTENTS Table of Contents... 3 Components... 4 System Components... 6 Attachment Components... 7 Module Compatibility...
2009 MODEL ASSEMBLY, INSTALLATION AND MAINTENANCE INSTRUCTIONS
 2009 MODEL ASSEMBLY, INSTALLATION AND MAINTENANCE INSTRUCTIONS It is important that these instructions are adhered to in their entirety. Please read the instructions fully before starting installation
COLIBRITM. Ceiling. Square ceiling diffuser with discs for supply air. Quick guide
 COLIBRITM Ceiling Square ceiling diffuser with discs for supply air Quick facts Adjustable discs flexible spread pattern Can be used for vertical air diffusion Swirl function Also available in the exhaust
ProBuilder Linear CoolSmart TV (42PB - sku# )(54PB - sku# )(72PB - sku# )
(54PB - sku# )(72PB - sku# )") Compatibility ProBuilder Linear CoolSmart TV ProBuilder Series Linear Fireplaces (42PB, 54PB & 72PB) Packing List Convection Manifold (with grill and mounting brackets pre-attached) 5 Diameter Aluminum
Compatibility ProBuilder Linear CoolSmart TV ProBuilder Series Linear Fireplaces (42PB, 54PB & 72PB) Packing List Convection Manifold (with grill and mounting brackets pre-attached) 5 Diameter Aluminum
Mounting a BalanceBox 400 to a brick wall
 Unpack the BalanceBox 400 and remove the Wall frame cover and its bag of screws. Slide the cover out at the top. NOTE: the cover is NOT included with the BalanceBox 400H LOCK SCREW HOLE MOBILE STAND MOUNTING
TABLE OF CONTENTS A-1
 TABLE OF CONTENTS PAGE NUMBER: DETAIL DESCRIPTION A-1...TABLE OF CONTENTS A-2...GENERAL NOTES B-1...GENERAL INFORMATION C-1...EAVE DRIP DETAIL C-2...EAVE DRIP with GUTTER DETAIL C-3 & C-4...FIXED RIDGE
Assembly Instructions
 InTandem Table System November 20 InTandem Table System - Worksurface #4 x/" 4 wood screw power beam Tools Provided T-0 Extended Torx Driver T-25 Torx Driver Additional Tools Required Soft protective
PORCH-LOC INSTALLATION INSTRUCTIONS
 PORCH-LOC INSTALLATION INSTRUCTIONS 2017 HB&G Building Products, Inc. Porch-Loc Installation Instructions NOTE: DISCARD THE INSTALLATION INSTRUCTIONS AND HARDWARE THAT CAME IN YOUR PERMAPOST PACKAGING
Installation Guide Simplicity Alfresco. V1.9 Lu070318
 0333 305 5272 www.canoports.co.uk Installation Guide Simplicity Alfresco V1.9 Lu070318 Tools Required Below is a list of tools that you will require to install your the Simplicity Alfresco System. Cordless
SECTION THERAPEUTIC POOL ACCESSORIES
 PART 1 - GENERAL 1.1 DESCRIPTION: SECTION 13 17 23.11 THERAPEUTIC POOL ACCESSORIES SPEC WRITER NOTES: Delete between // // if not applicable to project. Also, delete any other item or paragraph not applicable
ClearSpan PolyMax Windbreak Wall
 ClearSpan PolyMax Windbreak Wall Photo may show a different but similar model. 2007 ClearSpan All Rights Reserved. Reproduction is prohibited without permission. Revision date: April 2007ldg STK# DIMENSIONS
GSE INTEGRATION INSTALLATION MANUAL For photo-voltaic systems partially covering the roof
 GSE INTEGRATION INSTALLATION MANUAL For photo-voltaic systems partially covering the roof V 7.5 WWW.GSEINTEGRATION.COM Contents STEP BY STEP Presentation of system p.4 Contents of kit p.5 GSE Integration
GLENBROOK/GLENGUARD VITREOUS CHINA DRINKING FOUNTAIN/CUSPIDOR
 GLENBROOK/GLENGUARD VITREOUS CHINA DRINKING FOUNTAIN/CUSPIDOR BEFORE YOU BEGIN HOW TO USE THESE INSTRUCTIONS Please read these instructions carefully to familiarize yourself with the required tools, materials,
WPS crew Doors Installation instructions
 WPS-132-133 crew Doors Installation instructions ORDER OF INSTALLATION FOR A COMPLETE ENCLOSURE OF A CREW WPS (Weather Protection System) IS AS FOLLOWS: 1. Heater 2. Rear Thresholds - Right Hand & Left
Installation Guide Contemporary Alfresco V1.3 LU
 Installation Guide Contemporary Alfresco V1.3 LU 010818 Tools Required Below is a list of tools that you will require to install you're the Contemporary Alfresco System. Cordless Drill Mastic Gun Spirit
Linear Drain Installation Guide
 Linear Drain Installation Guide Carefully review all installation options and instructions before proceeding. bronte LINEAR DRAIN INCLUDES: Base and Strainer Grate Kits ordered separately. Both are required
BBF Series Blower Base Frame Assembly Instructions Rev.: BFA-9105
 BBF Series Blower Base Frame Assembly Instructions Rev.: BFA-9105 These assembly instructions are to be used as a general reference guide to facilitate assembly. Please consult the blower, bushing, sheave,
Installation Instructions Kit, Base Rail Bracket Part # 31413
 Installation Instructions Kit, Base Rail Bracket Part # 31413 Dealer / Installer: Provide a copy of these Instructions to the end user of this product. These Instructions provide important operating and
For additional assistance call
 The following pages will help guide you through the process of assembling your new 48 custom prize wheel. Choose an assembly area with plenty of room to lay your pieces on the floor and also a bench or
Qwik-Fence Installation Instructions
 Qwik-Fence Installation Instructions 1 Tools Required The following installation instructions should be used as a guide for installing Folding Guard Qwik-Fence Partitions. Good common sense and appropriate
Section 11 CABLE & ROD SYSTEMS, SIGN FIXING & SIGN STANDOFFS. Web. acrylicdesign.ie .
 Section 11 CABLE & ROD SYSTEMS, SIGN FIXING & SIGN STANDOFFS Web. acrylicdesign.ie Email. sales@acrylicdesign.ie Acrylic Design 2004-2015 Mobile Cable System Components Single panel clamp Stand Off for
STEP 1 STEP 2 LEVELER KIT OPTION MOBILE CASTER KIT OPTION
 B SERIES INDUSTRIAL BENCHES TOOLS REQUIRED FOR ASSEMBLY Socket set, Open end wrench set, Cordless drill with 3/8" socket bit (Magnetic recommended). BEFORE ASSEMBLY Read through the assembly instructions
ClearSpan PolyMax Windbreak Wall
 ClearSpan PolyMax Windbreak Wall Photo may show a different but similar model. 2007 ClearSpan All Rights Reserved. Reproduction is prohibited without permission. Revision date: February 2007ldg STK# DIMENSIONS
SS13R SAFARI R-SPEC SNORKEL Nissan GQ Patrol with 4.2L TD42 Diesel Engine and Horizontal Pre-Cleaner.
 SS13R SAFARI R-SPEC SNORKEL Nissan GQ Patrol with 4.2L TD42 Diesel Engine and Horizontal Pre-Cleaner. Parts List 01/04/2015 ITEM PART NO DESCRIPTION QTY 1 470-133-200R BODY - SNORKEL 1 2 000-135-800 3
Manufacturing and installation instruction. Solidare Verso. Pergola awning (bottom mounted)
") Manufacturing and installation instruction Solidare Verso Pergola awning (bottom mounted) Solidare Verso pergola awning 11-05-2017 * * A T T E N T I O N * * AVZ accepts no liability for any errors in this
Manufacturing and installation instruction Solidare Verso Pergola awning (bottom mounted) Solidare Verso pergola awning 11-05-2017 * * A T T E N T I O N * * AVZ accepts no liability for any errors in this
Table and Furniture Base Fittings Plinth Adjusting Fittings
 Adjusting screw with M8 or M thread Rigid, for glide inserts, steel thread Finish/Colour: Black, thread galvanized Version: With acceptance Ø30 mm Thread M8 650.22.381 M 650.22.382 Packing: 1 or 0 pcs.
Moveable Workstations. Enterprise KEWAUNEE. encouraging new discovery...worldwide
 Enterprise Moveable Workstations KEWAUNEE encouraging new discovery...worldwide Movable Workstations Self-supporting workstations Single and double sided Adjustable height worksurfaces Integrated shelving
Never fill any required clearance space with insulation or any other building materials surrounding the chimney.
 INSTALLATION AND MAINTENANCE INSTRUCTIONS 1700ºF Air-Cooled Temp/Guard Chimney Sizes 8-16 Listing No. MH8251 Tested to UL103/ULC-S604 A MAJOR CAUSE OF RELATED FIRES IS FAILURE TO MAINTAIN REQUIRED CLEARANCE
Downtown Rack. Custom logo option available
 Custom logo option available Downtown Rack The Downtown Rack uses thick, square-tube construction that can t be cut with a pipe cutter. The extended width of the Downtown Rack makes for easy bike parking
MOUNT KIT PERSONAL PLOW
 February 15, 2011 Lit. No. 64645, Rev. 02 31303 MOUNT KIT PERSONAL PLOW Nissan Titan 2004-09 Installation Instructions Read this document before installing the snowplow. See your sales outlet/web site
TITAN2-EDGE Public Access Computer Station Dual Track
 TITAN2-EDGE Public Access Computer Station Dual Track TITAN2-EDGE Rev A 6/17 Model TITAN2-EDGE ASSEMBLY AND ADJUSTMENT TITAN2-EDGE PARTS AND TOOLS PLEASE REVIEW these instructions before beginning the
INSTALLATION INSTRUCTIONS
 INSTALLATION INSTRUCTIONS TOOLS REQUIRED Rechargeable, variable speed drill 3/8 diameter drill bit 3 Robertson bits #0, #1 and #2 Slot screwdriver Non marring hammer with 1 head Level Caulk or sealant
Spring Loaded All Season Roll-Up Doors
 Spring Loaded All Season Roll-Up Doors STAND-OFF MOUNTING METHOD INSTALLATION INSTRUCTIONS READ THIS FIRST Carefully examine the crate(s) for damage before opening. If the carton is damaged, immediately
TREX REVEAL RAILING Installation Instructions
 TREX REVEAL RAILING NoteS:» Reveal railings are designed to be attached with posts installed at a clear span of 6' (.8 m) or 8' (.44 m).» If installing at exact span lengths of 6' (.8 m) or 8' (.44 m),
1369 & 1379 MOUNT KITS
 November 15, 2014 Lit. No. 64573, Rev. 01 1369 & 1379 MOUNT KITS 1369 Ford Bronco, F 150 4X4 1992-96 1379 Ford F 250/350 4X4 1992-97 Ford F 250 2WD (over 8,500 GVWR) 1992-97 Ford F 350 2WD (over 10,000
Omnidirectional Antenna Vertical Polarization Indoor and outdoor use
 db Omnidirectional Antenna and outdoor use 17 27 Omni 17 27 6 2dBi 8 41 N female Connector position Bottom or top 17 27 MHz SWR < 1.8 2 dbi Intermodulation IM < 15 dbc (2 x 4 dbm carrier) ertical 5 W (at