VACUUM MARAUDERS V1.0
|
|
|
- Maud Barrett
- 5 years ago
- Views:
Transcription

1 VACUUM MARAUDERS V PAUL KNICKERBOCKER FOR LANE COMMUNITY COLLEGE In this game we will learn the basics of the Game Maker Interface and implement a very basic action game similar to Space Invaders. This game will focus on: Loading Resources (sprites, backgrounds, sounds) Object creation Room Creation Movement Controls Event handling Animation Collision Detection In order to have access to all the options in Game Maker needed for this and all future games, turn on the Advanced Mode under the File menu. Save your work often!

2 1.LOADING RESOURCES While the Game Maker software will be used to handle the actual operation of the game, it must first be feed all the artwork and sounds it needs to use within the game. In this step we will load all the artwork and music needed for the game s characters and special effects. We will start by loading the Sprites. Sprites are the images which represent the characters within the game (i.e. the enemies, fireballs, the player, etc.). A single sprite may be used many different times in a game, like with a group of enemies that all look the same. To load a sprite click the button on the toolbar, which will bring up the new sprite box: From here you will click the Load Sprite button and select the file you wish to use. In this sprite we will load the player s ship, which will result in something like this:
3 Game Maker will display the image and give you details on the file such as its dimensions in pixels (dots on the screen) and its number of subimages (images within the image that are used for animation). We will want to change some the sprite s other properties: The Name of the sprite is the unique name that Game Maker uses to refer to the sprite and is very important in many features. It is a good idea to give the sprite a descriptive name that starts with sprite_. We ll name this sprite sprite_player The Transparent box makes the background of the image disappear when used in the game, this is used so that the square image doesn t look like a clunky block. Most sprites are transparent so we will check this box. (Note: When the transparency box is checked, Game Maker takes whatever color is in the lower left-hand corner and changes all instances of that color to transparent. If the background color is not different from the colors used in the rest of the sprite, holes will appear in the sprite. The Origin box defines where the center of this sprite is, or point (0,0) on the coordinate plane. By default this is in the upper left hand corner of the image, but by clicking the Center button you can place it in the center of the image. When working with the co-ordinate system it is often easier to have (0,0) in the center of the sprite, so we will click the Center button. The other check boxes have to do with collision detection and displaying the image. Precise Collision Detection turns the Bounding Box on and off. The Bounding Box is the outline of the core of the sprite (in this case the spaceship) and is what is actually used for collision detection. Preload Textures is used on large sprites for Speed. Keep Precise turned on. The result is:

4 Repeat this process using the same settings to create sprites: sprite_enemy1 Enemy Image sprite_enemy2 - Enemy Image sprite_enemy3 Enemy Image sprite_shot1 Player Bullet Image So that we have: We will also load a special sprite, an explosion, that contains animation. Animation in Game Maker is done using animated GIF files, which basically operate like a flipbook. The image itself is composed of numerous subimages and the animation is created by changing the image over time. If we load an explosion image into a new sprite named sprite_exp and configure it like the previous sprites we get:

5 Notice that the number of subimages is 21, and if you click the Edit Sprite button you can see all the subimages that make up the animation: When this sprite is displayed in the game, it will automatically start and loop the animation sequence.

6 Now we will load in the Background Image that will be used to give the impression that the player s ship is in space. Backgrounds are loaded using the button. Click the Load Background button and select the image file. Rename the background to background_space so that you have: Transparent works just like sprite transparency. Leave this unchecked. Smooth Edges attempts to make the image less blocky. Leave this unchecked. Preload Texture speeds up gameplay. Leave this unchecked. Use as tile set is used for making tiles (like sprites for the background). Leave unchecked.

7 Loading sounds is done with the button. Use the Load Sound button to load in the sound file. The default settings for the sounds will be fine for now. Load the following sound effects: sound_exp the sound of an explosion sound_player_fire the sound of the player firing sound_enemy_fire the sound of the enemy firing sound_music the background music With all the resources loaded, our file should look similar to this:
.")
8 2. CREATING THE PLAYER With the sprites, background and sounds loaded, we can move on to creating the player object. The Object is the core programming unit of the Game Maker software, it defines all the behaviors and actions for an element used in the game (i.e. the player s ship, the enemy, fireballs, etc.). The object will dictate what the game should do when something happens to the element, like when it collides with another element. While a sprite may be the visual representation of the character, the object controls all the behavior of that character. Though objects are often associated with a single sprite, but may switch between several sprites during the course of the game or have none at all (being invisible to the user). Objects are created using the button. Rename the new object object_player and use the button in the Sprite area below to select sprite_ship as the sprite associated with the object. Giving: This object is now set up to display the ship sprite whenever it is used in the game.
9 The Visible checkbox must also be checked in order for the ship to be visible (the box is used with special objects that do things behind the scenes of the game). The Solid checkbox is used in collision detection. It does not have to be checked Depth is used to determine what object is displayed on top when 2 or more objects overlap. The higher the number the deeper the object is, so an object with depth 10 would be displayed on top of an object of depth 100. Keep depth at 0. Persistent determines whether the object resets when rooms in the game are changed. Parent is used to establish inheritance among objects, this is discussed in a later version. Keep it at <no parent> Mask us used for making a collision detection shape that is different from the sprite s shape. We will return to the player object later to add movement controls.

10 3. CREATING A ROOM In Game Maker all the action happens inside of Rooms. Rooms are used for Intro screens, completion screens and the levels of the game. After creating a room, you populate it with the objects and set various settings to give it a distinctive look. By default, when the game starts the first room will be loaded. All the action in this game will happen in the same room. A new room is created using the button. Rename the room to room_main in the Settings tab and set the Width = 480 and Height = 640 (making the room 480 X 640 pixels in dimension). We also want to set Giving something like: Caption is the text that will be displayed in the top of the window of the Game. This can be set to Vacuum Marauders is desired. Speed dictates how many Steps (explained later) the room will take in a second, and controls the speed of gameplay in this room. Leave it at 30.
11 Persistant has to do with whether this room s status will be maintained when the game moves to a different room. Leave this unchecked. Creation code provides access to Scripts (explained later) that can be used to perform advanced behaviors when the room is loaded. Don t use this now. We will now set the background for the room so that instead of the dull grey, it uses our starscape. Click the Backgrounds tab and select Background 0 from the list. Now click the button and select our background_space background. Ensure the Visable when room starts box is checked and you should have: Draw background color is used when no background image is used and the background should be a solid color, that color is defined using the Color box beneath the checkbox. Up to 8 backgrounds can be loaded into a room (Background 0 7), this is useful when backgrounds change during gameplay or for layering images. Foreground image defines the background as being in front of all the objects on the screen. Tile Hor/Vert is used when the background uses tiles. Not used here. Stretch will automatically scale the background image to fill the room. Out background is the same dimensions as the room so this is not needed here. Hor/Vert Speed are used for scrolling the background. Not used here.
12 The last thing to do is place the ship object in our room. Go to the objects tab and select the object_player object with the button. At the top of the window is the box. This box defines the size of the grid in the room. You want to set the grid to be a multiple of the size of the sprites you are using. For example, our ship and enemy sprites are 40 X 40, so set the Snap X and Snap Y to be 20. This will make our ship line up better in the grid and make placing objects easier. Grids can also be used to align objects during the game (explained later). You should now have something like:
13 To place the space ship in the room just move the mouse to some place near the bottom of the room and click the mouse button, Like: We only want one ship so if you accidentally put in 2 ships, you can remove the extra object by right-clicking on it.

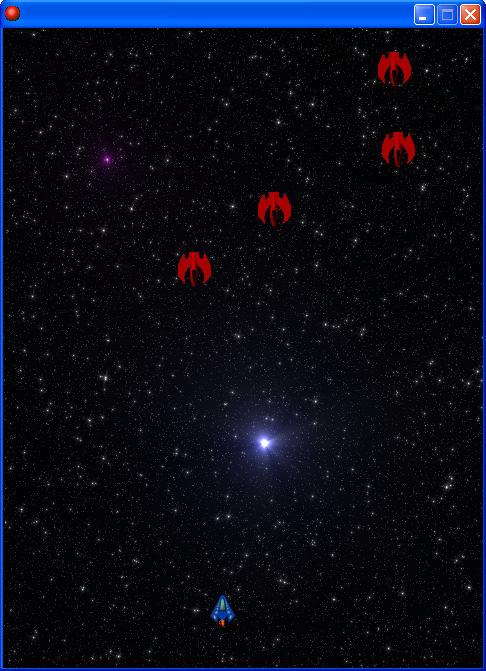
14 We can now press the button to test our game, we get something like: The ESC button will quit the game.
15 4. MOVEMENT CONTROLS While our game now runs, it s not very interesting because it doesn t really do anything. So to add keyboard control of our ship we will begin adding Events and Actions to our player object. If we look at our player object we see that Events and Actions are side by side: Events are any event that happens during the course of the game creation of the object, collision with another object, pressing the <Space> key, moving outside the room, etc. The events act as triggers for controlling the game, for example: if my missile hits an enemy (collision event) I want to have the game destroy that enemy. We dictate how the game behaves by giving it Actions to perform when an event happens.

16 Actions are the actual commands that we give to the game to control individual objects and the game as a whole. Actions are connected to an event and are executed when that event is triggered, usually events have quite a few actions associated with them. We want to add movement to our ship when we press the arrow keys, so we will add the Key Press event our player object. This way we can add movement actions to the event so that the object begins to move when we press a key. To add events press the choose from: button, this will bring up a menu of events to The Create event is triggered when the object is created if the object has been placed in the room (like object_player ), this will happen when the room starts. Destroy is triggered when the object is destroyed, it is the last thing the object does before it dies. Alarm goes off when an alarm is triggered, this is discussed later. Step goes off at each step of the game and is usually used to monitor conditions inside a game. This event is constantly executed. Collision is triggered by Game Maker s collision detection, often used to destroy enemies and assign points. You can specify what object you are colliding with. Keyboard is any key pressed on the keyboard (specific keys can be selected). This differs from Key Press because it executes as long as the key is held down. Mouse handles mouse input, i.e. clicking, movement, scroll wheels. Other contains a collection of less frequently used events. Draw is called whenever the image is redrawn. This is used to change object sprites and write to the screen. Discussed Later. Key Press/Key Release execute once when a key is pressed, and once when it is released (respectively).

17 For our movment we will use the Key Press Event. Clicking on Key Press will bring up a list of keys to use: First we will handle Left Movement, select <Left>. This will enter into the event list like so:
18 From here we can drag-and-drop (or right click) from the buttons on the right into the Actions box to define what happens when the key is pressed. We will be using the Move Fixed action which is represented by the will pop up the dialog: button. Moving the button to the Action box By clicking the directional buttons we can dictate what direction the object can go, and the Speed box defines how fast. Set the Speed to 6 and press in the left directional button:

19 Relative determines whether this resets movement or should be applied to objects current movement, this is an important concept and shows up in many of the actions. We want Relative off because we only want the ship to move at a fixed speed. If we set the speed to 6 and clicked Relative, every time the <left> button was pressed the ship would have its speed increased by 6 (i.e. 6 -> 12 -> 18 -> 24.). This would quickly give us an out of control ship. Applies to is an important box and is mainly used during collision events ad is explained later. For now keep it on Self. You should now have:

20 Now Create an Key Press event for <right> and add a Move Fixed event to it where Speed = 6 and the right directional button is pressed, giving:

21 From here we can test our game and see that the ship moves to the left and right when the direction buttons are pressed: OH NO!!!! While our ship will move left and right, it will not stop once it gets moving and it flies right off the screen. This is because we never told the ship to stop and we never did anything to keep it from flying off the screen. Game Maker will not assume anything about your game - anything you want (or don t want) to happen has to be defined using actions and events.

22 First Bug Not Stopping: We want the spaceship to move while the <left> or <right> buttons are pressed and stop when they are released. One of the events available to us is the Key Release event which will run whenever a specific key pressed down is released, which is exactly when we want to stop the ship. Add a event for the <Left> key and add a Move Fixed ( ) action to it. The moved Fixed should have Speed = 0, and the center direction button depressed. Like this: This will set the speed back to 0 and set the direction of movement to no direction. This has the immediate effect of stopping the ship. Perform the identical steps for the event for the <Right> key. Second Bug Running off the screen Game Maker will not automatically keep your objects in the room because there are many times it is useful to have things move outside the room, or come in from outside of the room. There is an easy way of dealing with this problem through the use of the Intersect Boundary event: The Intersect Boundary event for an object is triggered whenever that object runs into one of the 4 walls of the room. It is found under the button along with some


23 other lesser used events. What we will do when this event happens is to stop the ship from moving, exactly as we did in fixing the last bug. While we could repeat the process of adding a Move Fixed to the Intersect Boundary event like we did with Key Release, we will instead introduce a time saving device, the Duplicate Events. If we right-click on either of the Key Release events we will get the option of Duplicating Events : After selecting this it will pop up the events box, from which you can select Intersect Boundary: This will create an exact copy of the actions of the duplicated event only under a new event. This is very handy for events like movement that contain an identical set of actions with just a few different settings (i.e. speed, direction, etc.), you can copy the event then just change the settings in the actions. All Fixed Test the game to make sure the ship stops at the right places.
24 5. THE ENEMYS While we have movement down, we now need something destroy. Our first enemies will be very simple, bouncing back and forth at the top of the screen. Create a new object named object_enemy and assign it one of the enemy sprites: We want this enemy to start moving automatically when it pops into existence, so we will user the Create event ( ). This event happens as soon as the object is created and is often used to start movement and set up elements the object will need to use. In this case we want to set the enemy moving either to the left or right. We can do this with a Move Fixed, we set Speed = 4 and select both the left and right arrows:

25 With both arrows selected the object will randomly choose one of the directions, this means about 50% of the enemies will go left and the other 50% will go right. We also need to make sure the enemies bounce against the sides of the room we do this the same way we stopped our ship from leaving the room: Intersect Boundary. Create a Intersect Boundary event and add the Reverse Horizontal action ( ) to it. Reverse Horizontal sends the object off in the opposite direction at the same speed, making the object appear to bounce. From here we just need to put the enemies into the room. Place 3 or 4 near the top: When we start and test the game we get bouncing enemys:
26

27 6. COLLISION DETECTION While we have the player and enemies in close proximity to each other, there is no way for the player to destroy the enemies. We will have to give the player something to shoot at the enemy. For this create a new object called object_shot and give it a missile sprite: Make sure you set Depth = 10 on this object. This ensures that when the object is launched by the player object, it appears to be under the ship and not on top of it. The whole point of the missile is to travel straight up and collide with the enemy, so we will have it start moving up the screen as soon as it is created. Add a Create event, and put in a Move Fixed with the arrow going up and Speed = 8:

28 This is all we really need for the missile object, but we will add one more event/action pair for good housekeeping. Game Maker has to track all the objects in the game for as long as they exist in the game, the amount of memory and computer resources it uses depends on how many objects it is tracking. The less objects, the faster the game - the more objects, the more lag. This is why it is very important to remember: Game Maker will track an object until you specifically destroy it. So for every object you make you should have some code that destroys it when it isn t needed. In this case we will be creating a lot of missiles, but once they leave the room they are no longer needed. If we don t destroy these missiles when they leave the room, Game Maker will use up memory tracking them. So to get rid of the missiles we are creating we add the Outside Room event, which is in the button. Inside that event we add the Destroy Instance action (, found in the Main1 tab of the actions). Outside Room executes whenever the missile object is outside the room s boundaries, and in this case destroys itself. Adding a destroy event becomes very important when lots of objects are being used in a game. Now we need the player to shoot the missiles Open object_player and add a Key Press event for the <Space> bar. Inside the event, add Create Instance action (, found in the Main1 tab). An Instance is a unique copy of an object in the game, while there is only one object_enemy defined in the game there are several instances of that object all acting independently. The Create Instance is just like placing an object in the room using the room s setup box (like we did for enemies and the players ship), only it is done while the game is in progress. Here, we are creating a new missile in the room so we the object to be object_shot and X=0, Y=0, making sure we check the Relative box:
 which is in the upper left hand corner.")
29 The X and Y determine where the object will be created. We use Relative because we want it to appear at object_player s point (0,0) which is the center of its ship sprite. If we had Relative off, it would always appear at the ROOM s (0,0) which is in the upper left hand corner. Relative always says that you are referring the CURRENT state of the object you are putting the action into. If we test out our game we see:


30 OH NO!!! Even though we have missiles shooting, nothing happens when the missiles impact. This is because we never defined what happens when missiles and enemies collide. Again, Game Maker makes no assumption about what collisions mean in your game. We handle collisions using the event and we can define what objects we collide with. In this instance we want a collision between a missile and a enemy result in both being destroyed. We could do this with a collision event in both the enemy and missile, but when handling collisions it is often best to have just one object handle all the collision actions. This is so that if something goes wrong it is easier to debug and it also avoids problems about which collision event happens first. We will handle all the actions through the Enemy object, so open object_enemy and add a collision event for object_shot : Under the event add the Destroy Instance ( ) action, but this time switch Applies to = Other
31 This makes the Destroy Instance apply to the instance that the enemy COLLIDED WITH, the missile. Using the Other setting on any action that allows it will have it apply to the instance that the instance declaring the action collided with. This process destroys the missile that hit the enemy. Now add a Destroy Instance with Applies to = Self. This will destroy the enemy itself. It is very important you do it in this order once the enemy is destroyed the program stops processing actions (so the missile would never get destroyed). Now test your game and you should have enemies that disappear when hit. 7. SPECIAL EFFECTS Though the missiles destroy the enemies, they do it in a fairly unspectacular manner. To add some spice we will create an explosion object, an object who whole purpose is to display an explosion and disappear. Create an object object_exp and give it the sprite sprite_exp. Add the event Animation End (which is under the button) and inside that event put the Destroy Instance ( ) action applied to Self:
32 Animation End is an event used when an object has an animated sprite (like sprite_exp ), it is triggered when the animation finishes displaying its last sub-image. Normally, if an object has an animated sprite that animation will loop endlessly. Our object lets the animation run just once then has the object destroy itself. To display an explosion we just have to create an instance of the object, the rest will take care of itself. The explosion object is also good for handling the sound effects associated with the explosion. Add a Create event and place in it a Play Sound action (, in the main1 tab). This will cause that explosion to always add in the sound when it appears. Set the action to play sound_exp and set Loop = False:
 above the two Destroy Instance events.")

33 Now that we have and explosion lets add it into our collision event in object_enemy. Use drag and drop to put a Create Instance action ( ) above the two Destroy Instance events. Create the instance object_exp at point (0,0) Relative: This will create a self-destructing animation at the exact point the enemy was. Again, the order of the actions is very important the Create Instance must happen before the Destroy Instance actions or the enemy object will be destroyed before the Create Instance can make an explosion. By default, new actions go to the bottom of the list so you may have to drag the action to the top of the list once it s created:
34 This is also a good time to add in the shooting sound effect. We can do this by adding a Play Sound action ( ) to the Key Press <Space> in the object_player or to the Create event in object_shot. While adding it to object_player may be tempting, the Create event of object_shot is a better fit because it makes our game more flexible. What if we were to add an ammo counter for shots? Pressing the key may make a sound without producing a missile. In general: try to keep as many of the actions associated with the object IN the object. (A notable exception being collisions) Add Play Sound to the object_shot Create event, set the sound to be sound_player_fire and Looping = False. FINISHING UP Now we should have the following features implemented: A moving ship that stays within the room Moving enemies the bounce off the sides Missiles shot by the player that can destroy enemies Explosion animations and sound effects
Your First Game: Devilishly Easy
 C H A P T E R 2 Your First Game: Devilishly Easy Learning something new is always a little daunting at first, but things will start to become familiar in no time. In fact, by the end of this chapter, you
CONCEPTS EXPLAINED CONCEPTS (IN ORDER)
") CONCEPTS EXPLAINED This reference is a companion to the Tutorials for the purpose of providing deeper explanations of concepts related to game designing and building. This reference will be updated with
CONCEPTS EXPLAINED This reference is a companion to the Tutorials for the purpose of providing deeper explanations of concepts related to game designing and building. This reference will be updated with
Objectives: Create Sprites Create Sounds Create Objects Create Room Program simple game
 GAME:IT Bouncing Ball Objectives: Create Sprites Create Sounds Create Objects Create Room Program simple game All games need sprites (which are just pictures) that, in of themselves, do nothing. They are
Tutorial: A scrolling shooter
 Tutorial: A scrolling shooter Copyright 2003-2004, Mark Overmars Last changed: September 2, 2004 Uses: version 6.0, advanced mode Level: Beginner Scrolling shooters are a very popular type of arcade action
GAME:IT Junior Bouncing Ball
 GAME:IT Junior Bouncing Ball Objectives: Create Sprites Create Sounds Create Objects Create Room Program simple game All games need sprites (which are just pictures) that, in of themselves, do nothing.
GAME:IT Junior Bouncing Ball
 GAME:IT Junior Bouncing Ball Objectives: Create Sprites Create Sounds Create Objects Create Room Program simple game All games need sprites (which are just pictures) that, in of themselves, do nothing.
GAME:IT Bouncing Ball
 GAME:IT Bouncing Ball Objectives: Create Sprites Create Sounds Create Objects Create Room Program simple game All games need sprites (which are just pictures) that, in of themselves, do nothing. They are
Star Defender. Section 1
 Star Defender Section 1 For the first full Construct 2 game, you're going to create a space shooter game called Star Defender. In this game, you'll create a space ship that will be able to destroy the
2D Platform. Table of Contents
 2D Platform Table of Contents 1. Making the Main Character 2. Making the Main Character Move 3. Making a Platform 4. Making a Room 5. Making the Main Character Jump 6. Making a Chaser 7. Setting Lives
More Actions: A Galaxy of Possibilities
 CHAPTER 3 More Actions: A Galaxy of Possibilities We hope you enjoyed making Evil Clutches and that it gave you a sense of how easy Game Maker is to use. However, you can achieve so much with a bit more
Game Maker: Platform Game
 TABLE OF CONTENTS LESSON 1 - BASIC PLATFORM...3 RESOURCE FILES... 4 SPRITES... 4 OBJECTS... 5 EVENTS/ACTION SUMMARY... 5 EVENTS/ACTION SUMMARY... 7 LESSON 2 - ADDING BACKGROUNDS...8 RESOURCE FILES... 8
Tutorial: Creating maze games
 Tutorial: Creating maze games Copyright 2003, Mark Overmars Last changed: March 22, 2003 (finished) Uses: version 5.0, advanced mode Level: Beginner Even though Game Maker is really simple to use and creating
COMPUTING CURRICULUM TOOLKIT
 COMPUTING CURRICULUM TOOLKIT Pong Tutorial Beginners Guide to Fusion 2.5 Learn the basics of Logic and Loops Use Graphics Library to add existing Objects to a game Add Scores and Lives to a game Use Collisions
Game Maker Tutorial Creating Maze Games Written by Mark Overmars
 Game Maker Tutorial Creating Maze Games Written by Mark Overmars Copyright 2007 YoYo Games Ltd Last changed: February 21, 2007 Uses: Game Maker7.0, Lite or Pro Edition, Advanced Mode Level: Beginner Maze
Overview. The Game Idea
 Page 1 of 19 Overview Even though GameMaker:Studio is easy to use, getting the hang of it can be a bit difficult at first, especially if you have had no prior experience of programming. This tutorial is
TEMPLE OF LOCKS V1.0
 TEMPLE OF LOCKS V1.0 2009 PAUL KNICKERBOCKER FOR LANE COMMUNITY COLLEGE In this game we will expand our look at Game Maker and deal with some of the complexities involved in making moving objects using
Space Invadersesque 2D shooter
 Space Invadersesque 2D shooter So, we re going to create another classic game here, one of space invaders, this assumes some basic 2D knowledge and is one in a beginning 2D game series of shorts. All in
Scrolling Shooter 1945
 Scrolling Shooter 1945 Let us now look at the game we want to create. Before creating a game we need to write a design document. As the game 1945 that we are going to develop is rather complicated a full
1 Shooting Gallery Guide 2 SETUP. Unzip the ShootingGalleryFiles.zip file to a convenient location.
 1 Shooting Gallery Guide 2 SETUP Unzip the ShootingGalleryFiles.zip file to a convenient location. In the file explorer, go to the View tab and check File name extensions. This will show you the three
04. Two Player Pong. 04.Two Player Pong
 04.Two Player Pong One of the most basic and classic computer games of all time is Pong. Originally released by Atari in 1972 it was a commercial hit and it is also the perfect game for anyone starting
Competitive Games: Playing Fair with Tanks
 CHAPTER 10 Competitive Games: Playing Fair with Tanks Combat arenas are a popular theme in multiplayer games, because they create extremely compelling gameplay from very simple ingredients. This can often
The Beauty and Joy of Computing Lab Exercise 10: Shall we play a game? Objectives. Background (Pre-Lab Reading)
") The Beauty and Joy of Computing Lab Exercise 10: Shall we play a game? [Note: This lab isn t as complete as the others we have done in this class. There are no self-assessment questions and no post-lab
The Beauty and Joy of Computing Lab Exercise 10: Shall we play a game? [Note: This lab isn t as complete as the others we have done in this class. There are no self-assessment questions and no post-lab
KEEPING SCORE: HOW TO USE SCORES, LIVES AND HEALTH
 KEEPING SCORE: HOW TO USE SCORES, LIVES AND HEALTH A game isn t much of a game unless you can measure how well you re doing. How well players are doing in a game is often measure by their score, how many
PING. Table of Contents. PING GameMaker Studio Assignment CIS 125G 1. Lane Community College 2015
 PING GameMaker Studio Assignment CIS 125G 1 PING Lane Community College 2015 Table of Contents SECTION 0 OVERVIEW... 2 SECTION 1 RESOURCES... 3 SECTION 2 PLAYING THE GAME... 4 SECTION 3 UNDERSTANDING THE
THE TECHNOLOGY AND CRAFT OF COMPUTER GAME DESIGN An introductory course in computer game design
 THE TECHNOLOGY AND CRAFT OF COMPUTER GAME DESIGN An introductory course in computer game design TUTORIALS, GRAPHICS, AND COURSEWARE BY: MR. FRANCIS KNOBLAUCH TECHNOLOGY EDUCATION TEACHER CONWAY MIDDLE
G54GAM Lab Session 1
 G54GAM Lab Session 1 The aim of this session is to introduce the basic functionality of Game Maker and to create a very simple platform game (think Mario / Donkey Kong etc). This document will walk you
GameMaker. Adrienne Decker School of Interactive Games and Media. RIT Center for Media, Arts, Games, Interaction & Creativity (MAGIC)
") GameMaker Adrienne Decker School of Interactive Games and Media (MAGIC) adrienne.decker@rit.edu Agenda Introductions and Installations GameMaker Introductory Walk-through Free time to explore and create
GameMaker Adrienne Decker School of Interactive Games and Media (MAGIC) adrienne.decker@rit.edu Agenda Introductions and Installations GameMaker Introductory Walk-through Free time to explore and create
House Design Tutorial
 House Design Tutorial This House Design Tutorial shows you how to get started on a design project. The tutorials that follow continue with the same plan. When you are finished, you will have created a
Using Game Maker. Getting Game Maker for Free. What is Game Maker? Non-event-based Programming: Polling. Getting Game Maker for Free
 Using Game Maker Getting Game Maker for Free Click here Mike Bailey mjb@cs.oregonstate.edu http://cs.oregonstate.edu/~mjb/gamemaker http://www.yoyogames.com/gamemaker What is Game Maker? Non-event-based
Experiment 02 Interaction Objects
 Experiment 02 Interaction Objects Table of Contents Introduction...1 Prerequisites...1 Setup...1 Player Stats...2 Enemy Entities...4 Enemy Generators...9 Object Tags...14 Projectile Collision...16 Enemy
5.0 Events and Actions
 5.0 Events and Actions So far, we ve defined the objects that we will be using and allocated movement to particular objects. But we still need to know some more information before we can create an actual
Using Game Maker. Oregon State University. Oregon State University Computer Graphics
 Using Game Maker Mike Bailey mjb@cs.oregonstate.edu http://cs.oregonstate.edu/~mjb/gamemaker What is Game Maker? YoYo Games produced Game Maker so that many people could experience the thrill of making
GameSalad Basics. by J. Matthew Griffis
 GameSalad Basics by J. Matthew Griffis [Click here to jump to Tips and Tricks!] General usage and terminology When we first open GameSalad we see something like this: Templates: GameSalad includes templates
Meteor Game for Multimedia Fusion 1.5
 Meteor Game for Multimedia Fusion 1.5 Badly written by Jeff Vance jvance@clickteam.com For Multimedia Fusion 1.5 demo version Based off the class How to make video games. I taught at University Park Community
Step 1 - Setting Up the Scene
 Step 1 - Setting Up the Scene Step 2 - Adding Action to the Ball Step 3 - Set up the Pool Table Walls Step 4 - Making all the NumBalls Step 5 - Create Cue Bal l Step 1 - Setting Up the Scene 1. Create
For more information on how you can download and purchase Clickteam Fusion 2.5, check out the website
 INTRODUCTION Clickteam Fusion 2.5 enables you to create multiple objects at any given time and allow Fusion to auto-link them as parent and child objects. This means once created, you can give a parent
Getting Started. with Easy Blue Print
 Getting Started with Easy Blue Print User Interface Overview Easy Blue Print is a simple drawing program that will allow you to create professional-looking 2D floor plan drawings. This guide covers the
Photoshop CS6 automatically places a crop box and handles around the image. Click and drag the handles to resize the crop box.
 CROPPING IMAGES In Photoshop CS6 One of the great new features in Photoshop CS6 is the improved and enhanced Crop Tool. If you ve been using earlier versions of Photoshop to crop your photos, you ll find
Key Abstractions in Game Maker
 Key Abstractions in Game Maker Foundations of Interactive Game Design Prof. Jim Whitehead January 19, 2007 Creative Commons Attribution 2.5 creativecommons.org/licenses/by/2.5/ Upcoming Assignments Today:
Annex IV - Stencyl Tutorial
 Annex IV - Stencyl Tutorial This short, hands-on tutorial will walk you through the steps needed to create a simple platformer using premade content, so that you can become familiar with the main parts
House Design Tutorial
 House Design Tutorial This House Design Tutorial shows you how to get started on a design project. The tutorials that follow continue with the same plan. When you are finished, you will have created a
Kodu Game Programming
 Kodu Game Programming Have you ever played a game on your computer or gaming console and wondered how the game was actually made? And have you ever played a game and then wondered whether you could make
Game Design Curriculum Multimedia Fusion 2. Created by Rahul Khurana. Copyright, VisionTech Camps & Classes
 Game Design Curriculum Multimedia Fusion 2 Before starting the class, introduce the class rules (general behavioral etiquette). Remind students to be careful about walking around the classroom as there
House Design Tutorial
 Chapter 2: House Design Tutorial This House Design Tutorial shows you how to get started on a design project. The tutorials that follow continue with the same plan. When you are finished, you will have
ADDING RAIN TO A PHOTO
 ADDING RAIN TO A PHOTO Most of us would prefer to avoid being caught in the rain if possible, especially if we have our cameras with us. But what if you re one of a large number of people who enjoy taking
House Design Tutorial
 Chapter 2: House Design Tutorial This House Design Tutorial shows you how to get started on a design project. The tutorials that follow continue with the same plan. When you are finished, you will have
COLLISION MASKS. Collision Detected Collision Detected No Collision Detected Collision Detected
 COLLISION MASKS Although we have already worked with Collision Events, it if often necessary to edit a sprite s collision mask, which is the area that is used to calculate when two objects collide or not
Adding in 3D Models and Animations
 Adding in 3D Models and Animations We ve got a fairly complete small game so far but it needs some models to make it look nice, this next set of tutorials will help improve this. They are all about importing
Scratch for Beginners Workbook
 for Beginners Workbook In this workshop you will be using a software called, a drag-anddrop style software you can use to build your own games. You can learn fundamental programming principles without
BE SURE TO COMPLETE HYPOTHESIS STATEMENTS FOR EACH STAGE. ( ) DO NOT USE THE TEST BUTTON IN THIS ACTIVITY UNTIL THE END!
 DO NOT USE THE TEST BUTTON IN THIS ACTIVITY UNTIL THE END!") Lazarus: Stages 3 & 4 In the world that we live in, we are a subject to the laws of physics. The law of gravity brings objects down to earth. Actions have equal and opposite reactions. Some objects have
Lazarus: Stages 3 & 4 In the world that we live in, we are a subject to the laws of physics. The law of gravity brings objects down to earth. Actions have equal and opposite reactions. Some objects have
DESIGN A SHOOTING STYLE GAME IN FLASH 8
 DESIGN A SHOOTING STYLE GAME IN FLASH 8 In this tutorial, you will learn how to make a basic arcade style shooting game in Flash 8. An example of the type of game you will create is the game Mozzie Blitz
Instructions for using Object Collection and Trigger mechanics in Unity
 Instructions for using Object Collection and Trigger mechanics in Unity Note for Unity 5 Jason Fritts jfritts@slu.edu In Unity 5, the developers dramatically changed the Character Controller scripts. Among
Key Abstractions in Game Maker
 Key Abstractions in Game Maker Foundations of Interactive Game Design Prof. Jim Whitehead January 24, 2008 Creative Commons Attribution 3.0 creativecommons.org/licenses/by/3.0 Upcoming Assignments Today:
MAKING THE FAN HOUSING
 Our goal is to make the following part: 39-245 RAPID PROTOTYPE DESIGN CARNEGIE MELLON UNIVERSITY SPRING 2007 MAKING THE FAN HOUSING This part is made up of two plates joined by a cylinder with holes in
Beginner s Guide to Game Maker 4.3 Programming. Beginner s Guide to Game Maker 4.3 Programming
 Beginner s Guide to Game Maker 4.3 Programming This is a tutorial in how to start programming using Game Maker 4.0. It is meant for beginners with little or no knowledge about computer programming languages.
The editor was built upon.net, which means you need the.net Framework for it to work. You can download that here:
 Introduction What is the Penguins Editor? The Penguins Editor was used to create all the levels as well as the UI in the game. With the editor you can create vast and very complex levels for the Penguins
MIRROR IMAGING. Author: San Jewry LET S GET STARTED. Level: Beginner+ Download: None Version: 1.5
 Author: San Jewry Level: Beginner+ Download: None Version: 1.5 In this tutorial, you will learn how to create a mirror image of your work. Both sides will look exactly the same no matter how much you tweak
Duplicate Layer 1 by dragging it and dropping it on top of the New Layer icon in the Layer s Palette. You should now have two layers rename the top la
 50 Face Project For this project, you are going to put your face on a coin. The object is to make it look as real as possible. Though you will probably be able to tell your project was computer generated,
Chief Architect X3 Training Series. Layers and Layer Sets
 Chief Architect X3 Training Series Layers and Layer Sets Save time while creating more detailed plans Why do you need Layers? Setting up Layer Lets Adding items to layers Layers and Layout Pages Layer
House Design Tutorial
 Chapter 2: House Design Tutorial This House Design Tutorial shows you how to get started on a design project. The tutorials that follow continue with the same plan. When we are finished, we will have created
Alright! I can feel my limbs again! Magic star web! The Dark Wizard? Who are you again? Nice work! You ve broken the Dark Wizard s spell!
 Entering Space Magic star web! Alright! I can feel my limbs again! sh WhoO The Dark Wizard? Nice work! You ve broken the Dark Wizard s spell! My name is Gobo. I m a cosmic defender! That solar flare destroyed
Module 4 Build a Game
 Module 4 Build a Game Game On 2 Game Instructions 3 Exercises 12 Look at Me 13 Exercises 15 I Can t Hear You! 17 Exercise 20 End of Module Quiz 20 2013 Lero Game On Design a Game When you start a programming
SAVING, LOADING AND REUSING LAYER STYLES
 SAVING, LOADING AND REUSING LAYER STYLES In this Photoshop tutorial, we re going to learn how to save, load and reuse layer styles! Layer styles are a great way to create fun and interesting photo effects
Introducing Scratch Game development does not have to be difficult or expensive. The Lifelong Kindergarten Lab at Massachusetts Institute
 Building Games and Animations With Scratch By Andy Harris Computers can be fun no doubt about it, and computer games and animations can be especially appealing. While not all games are good for kids (in
Instruction Manual. Pangea Software, Inc. All Rights Reserved Enigmo is a trademark of Pangea Software, Inc.
 Instruction Manual Pangea Software, Inc. All Rights Reserved Enigmo is a trademark of Pangea Software, Inc. THE GOAL The goal in Enigmo is to use the various Bumpers and Slides to direct the falling liquid
How to Make Smog Cloud Madness in GameSalad
 How to Make Smog Cloud Madness in GameSalad by J. Matthew Griffis Note: this is an Intermediate level tutorial. It is recommended, though not required, to read the separate PDF GameSalad Basics and go
A retro space combat game by Chad Fillion. Chad Fillion Scripting for Interactivity ITGM 719: 5/13/13 Space Attack - Retro space shooter game
 A retro space combat game by Designed and developed as a throwback to the classic 80 s arcade games, Space Attack launches players into a galaxy of Alien enemies in an endurance race to attain the highest
Getting Started. Right click on Lateral Workplane. Left Click on New Sketch
 Getting Started 1. Open up PTC Pro/Desktop by either double clicking the icon or through the Start button and in Programs. 2. Once Pro/Desktop is open select File > New > Design 3. Close the Pallet window
NOVA. Game Pitch SUMMARY GAMEPLAY LOOK & FEEL. Story Abstract. Appearance. Alex Tripp CIS 587 Fall 2014
 Alex Tripp CIS 587 Fall 2014 NOVA Game Pitch SUMMARY Story Abstract Aliens are attacking the Earth, and it is up to the player to defend the planet. Unfortunately, due to bureaucratic incompetence, only
How to blend, feather, and smooth
 How to blend, feather, and smooth Quite often, you need to select part of an image to modify it. When you select uniform geometric areas squares, circles, ovals, rectangles you don t need to worry too
Modeling Basic Mechanical Components #1 Tie-Wrap Clip
 Modeling Basic Mechanical Components #1 Tie-Wrap Clip This tutorial is about modeling simple and basic mechanical components with 3D Mechanical CAD programs, specifically one called Alibre Xpress, a freely
Target the Player: It s Fun Being Squished
 CHAPTER 4 Target the Player: It s Fun Being Squished Our third game will be an action game that challenges players to make quick decisions under pressure and if they re not fast enough then they ll get
No Evidence. What am I Testing? Expected Outcomes Testing Method Actual Outcome Action Required
 No Evidence What am I Testing? Expected Outcomes Testing Method Actual Outcome Action Required If a game win is triggered if the player wins. If the ship noise triggered when the player loses. If the sound
ADD A REALISTIC WATER REFLECTION
 ADD A REALISTIC WATER REFLECTION In this Photoshop photo effects tutorial, we re going to learn how to easily add a realistic water reflection to any photo. It s a very easy effect to create and you can
The original image. Let s get started! The final rainbow effect. The photo sits on the Background layer in the Layers panel.
 Add A Realistic Rainbow To A Photo In this Photoshop photo effects tutorial, we ll learn how to easily add a rainbow, and even a double rainbow, to a photo! As we ll see, Photoshop ships with a ready-made
C# Tutorial Fighter Jet Shooting Game
 C# Tutorial Fighter Jet Shooting Game Welcome to this exciting game tutorial. In this tutorial we will be using Microsoft Visual Studio with C# to create a simple fighter jet shooting game. We have the
Step 1: Create A New Photoshop Document
 Film Strip Photo Collage - Part 2 In part one of this two-part Photoshop tutorial, we learned how Photoshop s shape tools made it easy to draw a simple film strip which we can then use as a photo frame,
7.0 - MAKING A PEN FIXTURE FOR ENGRAVING PENS
 7.0 - MAKING A PEN FIXTURE FOR ENGRAVING PENS Material required: Acrylic, 9 by 9 by ¼ Difficulty Level: Advanced Engraving wood (or painted metal) pens is a task particularly well suited for laser engraving.
Creating Photo Borders With Photoshop Brushes
 Creating Photo Borders With Photoshop Brushes Written by Steve Patterson. In this Photoshop photo effects tutorial, we ll learn how to create interesting photo border effects using Photoshop s brushes.
CS 251 Intermediate Programming Space Invaders Project: Part 3 Complete Game
 CS 251 Intermediate Programming Space Invaders Project: Part 3 Complete Game Brooke Chenoweth Spring 2018 Goals To carry on forward with the Space Invaders program we have been working on, we are going
CISC 1600, Lab 2.2: More games in Scratch
 CISC 1600, Lab 2.2: More games in Scratch Prof Michael Mandel Introduction Today we will be starting to make a game in Scratch, which ultimately will become your submission for Project 3. This lab contains
Sketch-Up Guide for Woodworkers
 W Enjoy this selection from Sketch-Up Guide for Woodworkers In just seconds, you can enjoy this ebook of Sketch-Up Guide for Woodworkers. SketchUp Guide for BUY NOW! Google See how our magazine makes you
WORN, TORN PHOTO EDGES EFFECT
 Photo Effects: CC - Worn, Torn Photo Edges Effect WORN, TORN PHOTO EDGES EFFECT In this Photoshop tutorial, we ll learn how to take the normally sharp, straight edges of an image and make them look all
SolidWorks Tutorial 1. Axis
 SolidWorks Tutorial 1 Axis Axis This first exercise provides an introduction to SolidWorks software. First, we will design and draw a simple part: an axis with different diameters. You will learn how to
Getting Started. Before You Begin, make sure you customized the following settings:
 Getting Started Getting Started Before getting into the detailed instructions for using Generative Drafting, the following tutorial aims at giving you a feel of what you can do with the product. It provides
Create Your Own World
 Create Your Own World Introduction In this project you ll learn how to create your own open world adventure game. Step 1: Coding your player Let s start by creating a player that can move around your world.
Transforming Your Photographs with Photoshop
 Transforming Your Photographs with Photoshop Jesús Ramirez PhotoshopTrainingChannel.com Contents Introduction 2 About the Instructor 2 Lab Project Files 2 Lab Objectives 2 Lab Description 2 Removing Distracting
CS Problem Solving and Structured Programming Lab 1 - Introduction to Programming in Alice designed by Barb Lerner Due: February 9/10
 CS 101 - Problem Solving and Structured Programming Lab 1 - Introduction to Programming in lice designed by Barb Lerner Due: February 9/10 Getting Started with lice lice is installed on the computers in
A. creating clones. Skills Training 5
 A. creating clones 1. clone Bubbles In many projects you see multiple copies of a single sprite: bubbles in a fish tank, clouds of smoke, rockets, bullets, flocks of birds or of sheep, players on a soccer
Perspective Shadow Text Effect In Photoshop
 Perspective Shadow Text Effect In Photoshop Written by Steve Patterson. In this Photoshop text effects tutorial, we ll learn how to create a popular, classic effect by giving text a perspective shadow
We recommend downloading the latest core installer for our software from our website. This can be found at:
 Dusk Getting Started Installing the Software We recommend downloading the latest core installer for our software from our website. This can be found at: https://www.atik-cameras.com/downloads/ Locate and
15 TUBE CLEANER: A SIMPLE SHOOTING GAME
 15 TUBE CLEANER: A SIMPLE SHOOTING GAME Tube Cleaner was designed by Freid Lachnowicz. It is a simple shooter game that takes place in a tube. There are three kinds of enemies, and your goal is to collect
12. Creating a Product Mockup in Perspective
 12. Creating a Product Mockup in Perspective Lesson overview In this lesson, you ll learn how to do the following: Understand perspective drawing. Use grid presets. Adjust the perspective grid. Draw and
ITEC185 INTRODUCTION TO DIGITAL MEDIA
 1 ITEC185 INTRODUCTION TO DIGITAL MEDIA ADOBE PHOTOSHOP ITEC185 - Introduction to Digital Media ITEC185 - Introduction to Digital Media 2 What is Adobe Photoshop? Photoshop is the leading professional
Topic: Compositing. Introducing Live Backgrounds (Background Image Plates)
") Introducing Live Backgrounds (Background Image Plates) FrameForge Version 4 Introduces Live Backgrounds which is a special compositing feature that lets you take an image of a location or set and make
Introducing Live Backgrounds (Background Image Plates) FrameForge Version 4 Introduces Live Backgrounds which is a special compositing feature that lets you take an image of a location or set and make
TEXT PERSPECTIVE SHADOW EFFECT
 TEXT PERSPECTIVE SHADOW EFFECT In this Photoshop text effects tutorial, we ll learn how to create a popular, classic effect by giving text a perspective shadow as if a light source behind the text was
33-2 Satellite Takeoff Tutorial--Flat Roof Satellite Takeoff Tutorial--Flat Roof
 33-2 Satellite Takeoff Tutorial--Flat Roof Satellite Takeoff Tutorial--Flat Roof A RoofLogic Digitizer license upgrades RoofCAD so that you have the ability to digitize paper plans, electronic plans and
Making Your World with the Aurora Toolset
 Making Your World with the Aurora Toolset The goal of this tutorial is to build a very simple module to ensure that you've picked up the necessary skills for the other tutorials. After completing this
Copyright 2017 MakeUseOf. All Rights Reserved.
 Make Your Own Mario Game! Scratch Basics for Kids and Adults Written by Ben Stegner Published April 2017. Read the original article here: http://www.makeuseof.com/tag/make-mario-game-scratchbasics-kids-adults/
user guide for windows creative learning tools
 user guide for windows creative learning tools Page 2 Contents Welcome to MissionMaker! Please note: This user guide is suitable for use with MissionMaker 07 build 1.5 and MissionMaker 2.0 This guide will