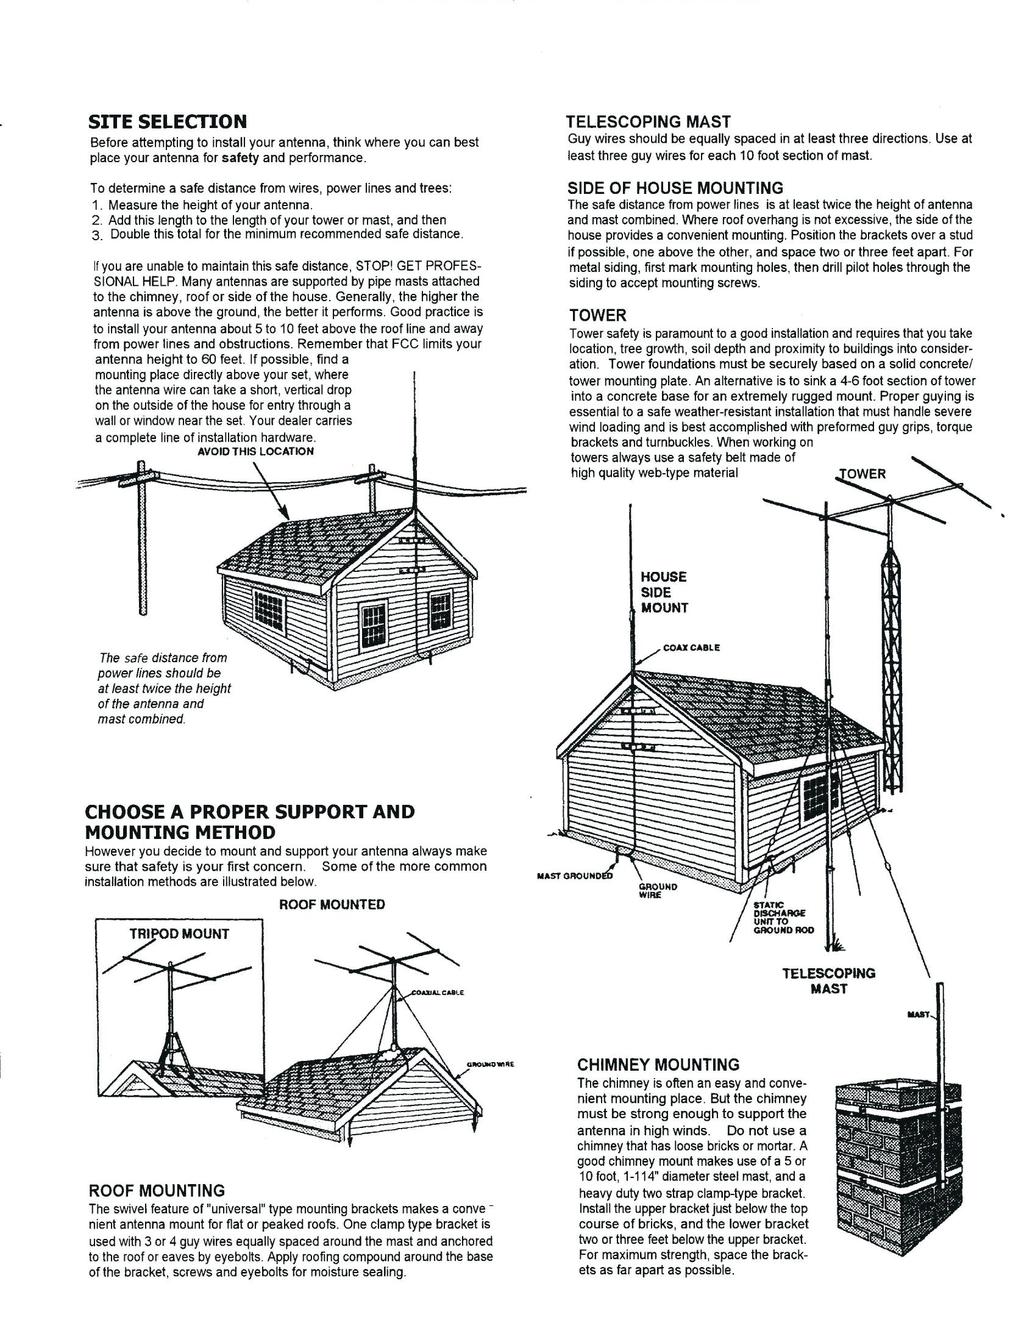
Cushcraft. Amateur Radio Antennas BOLP Element 5 Band Optimized Log Periodic Antenna INSTRUCTION MANUAL
|
|
|
- Mariah Parker
- 6 years ago
- Views:
Transcription
1 Cushcraft Amateur Radio Antennas BOLP Element 5 Band Optimized Log Periodic Antenna INSTRUCTION MANUAL CAUTION: Read All Instructions Before Operating Equipment VERSION 1A Cushcraft Amateur Radio Antennas 308 Industrial Park Road Starkville, MS USA Tel: Fax: COPYRIGHT C 017 Hy-gain.
2 Theory of Operation The design of the BOLP-1013 is based on a 13 element log-periodic dipole array with computer optimization on each of the 0,17,15,1,10 and meter bands. This gives the antenna more gain and better swr at each of these frequencies. Large feed tubes and high power balun make this antenna easily handle legal limit power. Boom supports and high grade tubing make this antenna strong enough to handle high winds and icing Tubing List 7/1 X 8 7/1 X 0 7/1 X 0-3/ 7/1 X 5-1/ 7/1 X 31-1/ 7/1 X 19 7/1 X 5 X.10 X 5-3/ SW 1 Preparation for Assembly When unpacking your antenna, check inside of all tubing for smaller diameter tubes and other small parts. To conserve space, these smaller parts are sometimes packed inside larger pieces. Check all parts against the parts list to ensure no parts are missing. The hardware supplied with this antenna is bagged to aid in assembly when possible. You may want to sort the aluminum tubing for the elements before assembly. This makes element assembly much easier. The table shows tubing size length, and quantity. A good practice is to mark the tube with a sharpie so that it can be identified quickly and verified once the antenna is assembled. Marking the elements once assembled will also help. Some rubber bands will hold the tubes nicely until needed. At the beginning of the Assembly section, a list of parts and diagrams showing the locations used has been supplied. This separation of parts is to make the assembly less confusing because of all the parts used. The QTY number on the bags is the actual number of parts needed to assemble the antenna. The number of parts actually in the bag may exceed this number so don t worry if you have a few left over when your done. The few extra parts included are on purpose just in case some are lost during assembly. Tubing List /8 X X.10 X 81 SW /8 X 35-1/ /8 X /8 INSERT /8 X 0-1/ X.09 X /8 X 15-1/ X.10 X 80-3/ /8 X 5-1/ FEED TUBE FEED TUBE FEED TUBE X FEED TUBE SA 1-1/ X.058 X FEED TUBE SA 1-1/ X.058 X FEED TUBE Short BETA ROD 1/ rod x 0" SWAGE /8 X 15-1/ SWAGE
3 /8 x.10 x 80-3/ x x /8 3.5 x.10 x swage to.09 x.09 x 7 bn-000 Choose a large, clear area to assemble your antenna. The area must be at least 8' x 38' (8.5 m x 11. m). You may wish to use a temporary mast or sawhorses to support the boom during assembly. A concrete driveway or parking area is an excellent area for assembly. If you assemble this antenna over a grassy area, precautions should be taken so that hardware is not accidentally lost during assembly. We have included some extra small parts with this product, just in case some are lost. All tubing supplied with the BOLP-1013 antenna telescopes together. Make all measurements to the given dimensions, plus or minus no more than 1/8 inch (3 mm). TOOLS: The following tools are required for easy assembly. Tape measure, 30 feet...1 Adjustable wrench, 8 inch.... Nut Driver, 5/1 (element compression clamps)..1 Nut Driver, 3/8 (#10 hardware)...1 Nut Driver, 7/1 (element-to-boom clamps)...1 Nut Driver or open-end wrench, ½ (boom-to-mast) 1 We suggest that the assembly of this product be done over at least a 3 day period. We further suggest that you read this manual thoroughly, in its entirety, and then go through the manual a second time and identify and familiarize yourself with all of the antenna components. Start assembling the antenna when you are prepared. A few extra minutes invested in the assembly process will ensure many years of satisfaction with this antenna. Installation Planning The Hy-Gain BOLP-1013 Log-Periodic Antenna requires a supporting tower structure which is at least 0' (.1 m) in height above ground level and which will support at least 1 sq. ft. (1.5 sq. m) wind surface area. A support mast is not supplied with this antenna. Mast height will vary according to installation. A standard 10 foot mast will suffice in most cases. This antenna may also be installed atop buildings or other structures. In these cases, the antenna should be at least 10' (3 m) above a peaked roof and at least 0' (.1 in) above a large flat roof. Performance may be degraded at less than these heights, depending upon the amount of metal in the roof and/or attic. Other nearby antenna structures, power lines, and guy wires may also affect the performance of this antenna. The BOLP-1013 also requires a suitable rotator, if not installed in a fixed azimuth. Suitable rotators include Hy-Gain models TX and HDR- 300/A. Corrosion Precautions The BOLP-1013 antenna is designed to be relatively maintenance free for most environments. All hardware is made of passivated stainless steel, typically grade 30. The internal tooth-type lockwashers used in this antenna are grade 10 stainless steel, and are slightly magnetic. The element tubing clamps are grade 30 stainless steel. Most other metallic parts are aluminum. All insulators exposed to sunlight are made from U.V. resistant black polyethylene or black Cycolac. P/N -750S QTY 3 1/-0 x -3/ Bolt To the right is an example of one of the parts pack labels. You will find the rest on the next few pages. These labels give the part number along with the quantity of items in the bag. There are a total of 19 parts packs that have divided the parts, when possible, into bags that are associated with a step in the process of assembly
4 P/N 505 QTY 110 1/-0 X 3/ HEX BOLT P/N ITEM 8 QTY 13 1/-0 X 3/8 HEX BOLT P/N ITEM 7 QTY 13 1/-0 Square Nut #1 or #13 Bracket Only used on top of brackets 1/-0 x 3/8 1-1/, 7/8 or 5/8 Insulator #1 or #13 Bracket 7 75 Square Nut P/N QTY 130 1/-0 HEX nut P/N 377 ITEM QTY 1 7/8 INSULATOR 70 #1 or #13 Bracket 1-1/, 7/8 or 5/8 Insulator 1/-0 nut 1/-0 nut #13 Bracket 7/8 Insulator /-0 nut 1/-0 nut P/N 5833 ITEM QTY 1-1/ INSULATOR Used in #1 Bracket P/N 1057 ITEM QTY 5/8 INSULATOR Used in #13 Bracket P/N s ITEM QTY # hose clamp P/N s ITEM QTY # hose clamp P/N s ITEM QTY 3 #10 hose clamp 7/8 uses #13 bracket 1-1/ uses #1 bracket # 5/8 # #10 3/ 1-1/8 OR 1
5 P/N 555 ITEM QTY inch end cap P/N 55 ITEM QTY 7/1 inch end cap 7/1 Element Tip P/N QTY short pigtail -1/ All Other Elements P/N QTY long pigtail 9-1/ Element # Only P/N 8705 QTY pigtail -1/8 Balun Connection Balun All other Elements Element # Boom ends P/N QTY 1 1/-0 x 1-3/ Bolt P/N 591 QTY 130 1/ Internal lock washer 1/-0 x 1-3/ 1/-0 x 1-3/ Boom support tubes #1 or #13 Bracket 1/ lock 1/ lock 1/ lock 1/ lock 7 7 1/-0 x 1-3/ 1/-0 x 1-3/ 1/ lock 1/ lock P/N 5595 ITEM QTY 8 FEED INSULATOR BOTTOM P/N 500 ITEM QTY 8 FEED INSULATOR TOP P/N ITEM QTY 8 FEED INSULATOR CLAMP P/N ITEM 3 QTY x hex bolt FEED INSULATORS P/N QTY 5/1 X 5 HEX BOLT P/N 5100 QTY 1 5/1 X HEX BOLT P/N QTY 5/1 X 3 HEX BOLT P/N 5098 QTY 5/1 X -3/ HEX BOLT BOTTOM TOP inch bolt optional /
6 P/N QTY 1 5/1 hex nut P/N 579 QTY 1 5/1 lock washer 5/1 Nut P/N 1895 QTY 1-1/ clamp P/N QTY 1 7/8 clamp P/N QTY 5/8 clamp 1-1/ 7/8 5/8 5/1 Lock Elements 1,, / clamp Elements,5,,7,8,9,10, ----7/8 clamp (Element #11 for 10 meter option) Elements 11,1, /8 clamp (For meter option) Element clamp Element P/N QTY shorting clamp P/N QTY 8 channel bracket Bracket P/N QTY 10- x 1-1/ hex bolt P/N 5009 QTY 10- x 1 hex bolt P/N QTY 10- hex nut P/N 5597 QTY #10 internal lock 5 1 inch Element clamps 1,,3 Element clamps -13 used on all 10- bolts used on all 10- bolts 1 or 1-1/ Lockwasher Nut P/N QTY 8 #8 Internal lock washer P/N 50 QTY 8 #8 SELF TAPPING SCREW Bracket P/N QTY 8 FEED TUBE SPLICE Element clamp Element Pigtail connnection to Feed Tubes
7 Congratulations on your purchase of the BOLP An Extra surprise has been included with your product. This box contains enough tubing for two antenna designs. 0- meter option 0-10 meter option With Enhanced 10 meter operation
8 A light amount of clear lacquer or an acrylic spray may be used to coat the exterior surface of the element assemblies if this antenna is to be installed near a sea coast. Tighten all joints securely before coating! Also, if installed near a sea coast, the solder lugs on the pigtail wire assemblies should not touch the aluminum tubing or clamp directly. Each solder lug should be between stainless steel flatwashers (not supplied). Tighten these connections securely and competely coat with Scotchkote or RTV. NOTE: Only use alcohol-based RTV (non-corrosive). The acid-based RTV (which releases acetic acid and smells like vinegar) will corrode metal. If a UHF connector (PL-59) is used with the BN-000 balun, seal the connector with Coax- Sea1TM or black electrical tape for rain protection. Type N connectors are designed to be weatherresistant if tightened securely. Assembly of the Boom Slide the boom insert into the boom ends, as shown in Figure 1. Select the boom to mast bracket and clamp parts. Loosely assemble them on the boom ends. Secure the boom ends and brackets together with four 1/-0 x 3/ bolts, lockwashers and nuts, and two 5/1 x -3/ bolts, lockwashers and nuts. Tighten these six bolts securely. the casting to boom bracket may deform slightly when the four 1/ bolts are tightened. This is normal. Assemble the two cast aluminum brackets on your temporary mast about feet above the ground. An eight foot length of ABS or PVC plastic drain pipe makes an inexpensive temporary mast. Secure the two brackets together using two 5/1 x 3 bolts, lockwashers and nuts. tighten these two bolts evenly until the brackets are snug. 5/1 x 5 Note: If you use a galvanized 1-1/ schedule 0 or 80 pipe as a mast, it has an O.D. of 1.9. You will need to put two split lockwashers under the 5/1 nuts on the four long bolts. 5/1 x -3/ 1/-0 x 3/ ( places) 5/1 x 5 5 5/1 x 3-3/ 3 3-3/ 1/-0 x 3/ 5 5 MAST ( Supplied by customer ) ( 1.9 to.5 diameter ) Boom Insert ( ) 5/1x Inch bolt is optional Mast must be drilled to use this option x x 81
9 1-1/8 1-1/8 3.5 Loosley attach () two mast brackets to the mast approximately feet above the boom with () two 5/1" x 3" bolts and hardware, and the top () two 5/1" x 5" bolts and hardware. Attach the channel bracket ends of the spliced front and rear boom support tubes to the mast bracket on the bottom () 5/1" x 5" bolts. Slide the mast brackets up and down to line up the holes, then attach with 1/" x 1 3/" bolts and hardware. Tighten all hardware on the channel brackets and boom. Snug all hardware on the mast bracket so they do not vibrate off. 5/1 X 3 1 5/1 X /1 Nut 5/1 Washer Detail A 1/-0 nut and lockwasher Boom support assembly ( assemblies ) /-0 x 1-3/ Boom Insert ( ) Rear Front x.10 x 80-3/ x x 81 x.10 x 55 x.09 x 7 1/-0 x -3/ 1/-0 lock washer 1/-0 nut 1/-0 x -3/ 1/-0 lock washer 1/-0 nut 1/-0 x -3/ 1/-0 lock washer 1/-0 nut CHANNEL BRACKET 1-1/ X BOOM SUPPORT 1-1/ X CHANNEL BRACKET 1-1/ X x x 81 x.10 x swage to.09 x.09 x 7 Rear Front
10 #13 Bracket 7/8 Insulator # Bracket No Insulator Feed point Front of antenna 33-5/8 in 95-5/8 in 71-7/8 in 9-1/8 in 09-3/8 in Assembly at this point can go two ways. If your not interested in six meter operation on this antenna, then you have the option of leaving it off and installing a ten meter parasitic element instead. This parasitic will add gain and F/B performance on ten meters without affecting the other bands. The feed point of the antenna will move to bracket # 10 if you choose this option. A shorter feed tube pair has been included in the box for this. The diagram on the left shows the element placement for the ten meter option. Each measurement is from the rear of the bracket to the rear of bracket #1. Install the #1 bracket about 1-1/ inch from the end of the boom. The rear of bracket #1 is the Zero point for all measurements to the other brackets. Use a marking pen to draw a line on the boom at each of the measurements before installing the brackets. Each bracket should be in front of this line. Brackets can move during assembly and this line will be a reference for final adjustments when aligning the elements. Three different element brackets and two different insulators are used in this configuration. The parasitic element (11) does not have an insulator and is not connected to the feed line. Do not install anchor bolts on the bottom of the brackets. NOTE: Anchor Bolt only used on top of brackets. 1-1/ in 5 1-1/ in / in #1 or #13 Bracket / in 1-1/, 7/8 or 5/8 Insulator 7 #1 Bracket 1-1/ Insulator All measurements from rear of first bracket 35-1/ in Rear of antenna in

11 Feed point Meter option #13 Bracket 5/8 Insulator #13 Bracket 7/8 Insulator Front of antenna 39-3/ in 30 in /1 in 95-5/8 in 71-7/8 in 9-1/8 in 09-3/8 in The diagram to the left shows the bracket locations for the six meter option. Use the same installation method as described for the ten meter option. This configuration uses different brackets and 3 sizes of insulators. All the elements are fed in this layout and the feed point is at element #13 which is at the very front of the antenna. There will be a few inches of boom left on the front. This is where the BN-000B will mount later. Install the brackets on the boom snug but not tight as the elements will still need to be pushed into the insulators. The marks on the boom will help in case the bracket moves when installing the elements. All measurements on this version are the same as the ten meter version on elements Enough parts have been included to make either version of the antenna so you will have extra parts left over when your done. If your tape measure does not have inch increments but rather feet and inches, then you can convert these numbers by dividing by 1 to get the number of feet and the remainder will be the number of inches. For example, 30 divided by 1 is. So the feet number is. What is left over is the inch number so feet = 31 inches x 1 = 31 To get to 30 you need 8 more inches = 8 so 30 inches = feet 8 inches NOTE: Anchor Bolt only used on top of brackets. 1-1/ in 5 1-1/ in / in #1 or #13 Bracket / in 1-1/, 7/8 or 5/8 Insulator 7 #1 Bracket 1-1/ Insulator All measurements from rear of first bracket 35-1/ in Rear of antenna in

12 Size No. 5/8 Figure 3/ or 7/8 1-1/8 or 1 Installation of Tubing Clamps on Elements Select the proper size tubing clamps as shown in Figure. When installing the clamps, place the clamp near the tube end with the top of the clamp over the slot in the tube as shown in Figure. After adjustment of the tubing lengths, tighten the clamp with a 5/1 inch nut driver, socket or open end wrench until the tubing will not twist or telescope. DO NOT overtighten! Also, if you loosen and re-tighten a clamp more than 5 times, we suggest that you replace the clamp. After repeated tightenings, these clamps may become difficult to completely tighten. Should you need to replace these clamps, use only high quality stainless steel clamps to ensure proper torque.
13 Element Assembly Use the diagrams to select the tubing for each element. If you previously sorted the tubing, this step will be much easier. Each element uses two identical element halves. Assemble both halves of each element at the same time. Remember that because there are two versions of this antenna that some tubing will be left over no matter which version you assemble. Take your time an lay the elements in order on the ground as you finish each pair. Start with the longest element (#1) and largest tube. The first 3 elements have a double wall tube at the boom. Insert the 1 inch tube into the 1-1/8 end of the double wall tube. Allow the tubes to overlap 3 inches. Use a hose clamp to secure the tubes together. Repeat this with each tube. The 7/1 tubing is used to adjust the final length of the entire element so the overlap may be much greater or less than 3 inches. Use the chart to assemble the rest of the elements. Element lengths are from center of the boom to the tip of the 7/1 tubes so you wont be able to adjust the 7/1 tube until the elements are mounted into the brackets. Remember to slide the electrical connection clamps over the inside tube closest to the boom before inserting the element into the bracket. If you forget, the clamps can be stretched open to allow them to slide over the tube. 7/1 X 0 # Clamp # Clamp Element #1 example Overlap here is used for tuning final length of element. 3 in overlap # Clamp 3 in overlap Element # 1 Example 7/8 X 3 # Clamp 3 in overlap 1 X 3 #10 Clamp 1-1/ X 35-1/ 3 in overlap Double wall Tube Clamp
14 10 METER VERSION 8 7/1 X 19 7/8 X /8 in Use this page to verify element placement and length for the Ten meter option 8 7/1 X 19 7/8 X /8 in Install both sides of each element at the same time if possible. This will balance the antenna and prevent the bracket from moving on the boom 7/1 X / 7/8 X 15-1/ /8 in 7/1 X 31-1/ 107-1/ 7/8 X 15-1/ 8 9-1/8 in 7/1 X / 7/8 X 15-1/ /8 in 7/1 X 0 7/1 X 5-1/ 19-3/ 1-3/ 7/8 X 15-1/ 7/8 X 0-1/ 1-1/ in Mast Bracket 5 1-1/ in 7/1 X / 7/8 X 35-1/ 107-1/ in 7/1 X -3/ 19 7/8 X 3 1 X 3 1-1/ X 5-1/ / in 7/1 X -3/ 0-3/ 7/8 X 3 1 X 3 1-1/ X 35-1/ 35-1/ in 7/1 X / 7/8 X 3 1 X 3 1-1/ X 35-1/ 1 0 in
15 METER VERSION Use this page to verify element placement and length for the six meter option Install both sides of each element at the same time if possible. This will balance the antenna and prevent the bracket from moving on the boom 7/1 X / 7/1 X -3/ 5/8 X 15-1/ 57-1/ 7/1 X 8 5/8 X 15-1/ 7/1 X 5-1/ 7-1/ 8 7/1 X 19 7/8 X / 7/8 X 15-1/ / in 30 in /1 in 95-5/8 in 71-7/8 in 7/1 X 31-1/ 107-1/ 7/8 X 15-1/ 8 9-1/8 in 7/1 X / 7/8 X 15-1/ /8 in 7/1 X 0 7/1 X 5-1/ 19-3/ 1-3/ 7/8 X 15-1/ 7/8 X 0-1/ 1-1/ in Mast Bracket 5 1-1/ in 7/1 X / 7/8 X 35-1/ 107-1/ in 7/1 X -3/ 19 7/8 X 3 1 X 3 1-1/ X 5-1/ / in 7/1 X -3/ 0-3/ 7/8 X 3 1 X 3 1-1/ X 35-1/ 35-1/ in 7/1 X / 7/8 X 3 1 X 3 1-1/ X 35-1/ 1 0 in
16 Feedline Assembly Select the ten 3/ feed line tubes, eight 7/8 x splice tubes, pigtail wire assemblies, support clamps, insulators and hardware as shown in the diagrams below. Identify each feed tube by the color band on it. If your building the ten meter version, feed tube 1 will not be used. If your building the six meter version, feed tube will not be used. Feed tube is much shorter than the other feed tubes. Start at the rear of the antenna with feed tubes #5 and work forward. At each junction place the tube splice over the end and connect it to the next tube. Add a feed tube support insulator at each junction. Each feed tube should have a pre-drilled hole close to the center of each bracket. Verify the holes are in the correct location before moving to the next tube. Rear of Antenna All the holes in the feed tube must point downward. Leave the insulator brackets loose enough to twist them on the boom. The two insulator brackets close to the mast will need to be tilted to one side to avoid feed line connection to the mast bracket X1 #10 lockwasher 10- nut Element # 1 Element First support insulator here at the start of the feedline. Feed tube #5 Feed tube 1 = Brown Feed tube = Red Feed tube 3 = Orange Feed tube = Yellow Feed tube 5 = Green Feed tube = Blue # Element This pigtail wire is longer than the rest Splice tubes Use #8 self tapping screw and #8 lock washer to connect pigtails to feed line. Feed tube #
17 Detail A View from bottom of antenna 10- nut #10 lockwasher Boom clamp Bottom insulator 7 Detail A Top insulator 10- x Mast bracket Feed tubes must not contact bracket. Twist insulators until there is a 3/ gap between the edge of tube and bottom of bracket. 3/ inch gap between edge of tube and bottom of bracket Figure 11 The balun will mount in a different location based on which version you have built. BN meter option balun mount location Feed tube # meter option balun mount location BN Feed tube # Feed tube #


18 Once the feed tubes are installed, select the pigtails and connect them to the antenna element clamps and the feed line. Start at the front of the antenna and alternate the connection from straight to crossed on each element. Refer to the picture for an example. The balun is connected at the front of the antenna, as shown, to the same point as the #13 element. Use the u-bolt and nuts supplied to fasten the balun to the boom. It is a good idea to have one of the feed line insulators at this point where the balun connects. The balun connection is straight to element #13. Elements 13,11,9,7,5,3 and 1 are all straight connections. Elements 1,10 8,, and are crossed connections. The pre-drilled holes in the feed line should line up with the brackets when assembled correctly. When making the cross connection, make sure the wires do not touch each other or the opposite feed tubes. Arch them in opposite directions to ensure proper power handling. Element bracket # requires a longer pigtail than the rest because it is wider and the elements are crossed. Elements that are not crossed may have slack in the wire. This is not a problem and does not affect operation. If you wish, you can move the clamps outward on the element to remove the slack. Do not make the wire tight enough to strain it or touch where it should not. The chart below applies to both versions of antenna ELEMENT # CONNECTION STRAIGHT CROSS STRAIGHT CROSS STRAIGHT CROSS STRAIGHT CROSS STRAIGHT CROSS STRAIGHT CROSS STRAIGHT Six mtr only Six mtr only Balun connection View from bottom of antenna Element #13 meter version shown Straight and Cross Connections View from bottom of antenna Element #1 Cros connect ion Stra igh t Connec tion 10- #10 lock Element #11 There are 3 clamp sizes. 1-1/, 7/8 and 5/8 Elements 1,, / clamp Elements,5,,7,8,9, /8 clamp Elements 11,1,13 (mtr)-----5/8 clamp Element 11 on 10 meter version requires a 7/8 clamp Element clamp 10- nut Element

19 ½ inch A shunt has been provided to improve SWR on the lower bands. This shunt mounts to the #1 element using the same connection point as the pigtail assemblies. 10- x 1 inch bolts Move clamps outward to remove slack in pigtails if needed. Insert rod here Element clamp 10-x1-1/ Element 10- nut #10 lockwasher Final Inspection The antenna should now be completely assembled. Make final alignment adjustments on each element and ensure that it is level. Place the plastic end caps over all the elements and boom ends. Punch a small hole in each of the caps to allow water to drain from the tubes. Orientate this hole at the bottom of the tube. Check that all hardware is tight and secure all clamps.
20 CHAPTER Antenna Installation IMPORTANT: The BOLP-1013 is a very large and heavy antenna and requires consideration as to how you are going to get it to the top of your tower. Thoroughly read this section before beginning to install your antenna! Installation on a Crank-Up Tower Crank the tower completely down or as low as it will go and block all sections from moving by using a " x " piece of wood or a solid iron bar for heavier towers. The block should be inserted through the lattice structure before the tower is completely down, then the tower can be cranked down until the block takes the weight off of the winch cable. ALL sections must be prevented from moving! WARNING: Installation of this product near power lines is dangerous! For your safety, follow the instructions provided with your tower and the instructions in this manual. Use a ladder to reach the top of the tower. NEVER CLIMB THE LATTICE STRUCTURE OF ANY CRANK-UP TOWER!! Attach the mast to the tower and rotator. The cast aluminum boom-tomast brackets should be removed from your temporary mast and installed on the permanent mast as shown in Figure 1. The center hole in the cast brackets should be used to pin the brackets to the mast. If you wish to use this feature, you must drill a 5/1" hole through your mast at this location. Attach a gin pole to the tower or support structure to assist in lifting the antenna. You may wish to install the antenna, mast and boom support as one assembly. In this case, use a large gin pole or crane to lift this assembly onto your tower. Installation on Guyed Towers When installing the BOLP-1013 on a guyed tower, you may wish to use a guide system. If you have insulators on your guy wires, you will need to keep the antenna away from the guy wires as well as the tower during the raising process. You can use two ropes attached together at the top of the tower and attached to the ground about 15 to 0 feet apart. These two ropes can be used to slide the antenna on as it is also being lifted. The two ropes will need to be far enough from the tower base to allow some sag and still support the antenna away from the guy wires. Remember that this antenna weighs 10 pounds! Trim any tree branches that might interfere with the installation process. Remove the cast boom-to-mast brackets from your temporary mast and install on your permanent mast. Drill 5/1" holes in your mast if you wish to pin the castings to the mast. This will ensure that your antenna does not twist on the mast in high winds. Attachment of Coaxial Feedline Use a good quality 50 ohm coaxial transmission line such as Times RG- 13/U (solid), or Belden 87 (solid). Belden 9913 or 81 is not required but may be used with careful connector installation. Belden 9913 should NOT be used above the rotator or on crank-up towers!! Take extra care when soldering connectors to foam dielectric coaxial cable. RG-13[U "TYPE" cable is not recommended because it usually has less shielding than better quality RG-13/U. Weatherproof all UHF connectors which will be exposed to rain or ice, with Coax-Seal C19 or another similar substance. Coax-Seal is a registered trademark of Universal Electronics,
21 Pre-attach a 5' length of transmission line to the BN-000 balun and tighten the connector securely. Tape the coax to the boom about every 3 feet (1 m) and provide suitable strain relief. Allow enough coax to reach your tower or other support structure. Attaching the Antenna to the Mast Attach the lifting rope to the balance point of the antenna. Be careful not to damage the feedline assembly next to the boom-to-mast clamp. The lifting rope should be fed through the gin pole or other pulley arrangement attached to the tower. The other end should be at ground level, available to the ground crew for lifting. Guide ropes may be LOOSELY looped over the boom ends and used by the ground crew to guide the antenna away from the tower, guy wires, tree branches or ladder. The guide rope's two loose ends should be held by the ground crew, so that the guide rope can be retrieved later. When the antenna reaches the mast bracket, the top two 5" bolts should be inserted through the top two holes in the aluminum castings and secured using 5/1" - 18 lockwashers and nuts. NOTE: Use a few drops of heavy motor oil or grease on the stainless steel threads to prevent galling! If these threads gall, you may have to cut the bolts with a hacksaw to remove the antenna! The other two remaining 5/1"-18 x 5" bolts should now be installed and secured with lockwashers and nuts. Tighten all bolts securely. The bolt heads must be on the same side of the boom-to-mast brackets as the feedline tubing. Attach the boom support brackets and support tubes to the mast and adjust to level the boom. Lightning Protection For proper lightning protection, you must ground your antenna supporting structure. Grounding will also help with noise reduction. A proper ground consists of a 1/" x 8 foot copper clad steel ground rod driven into the ground approximately 1" (0.3 m) away from the concrete tower base. Connect the tower to the ground rod using #8 copper wire and commercial non-corrosive ground clamps. VSWR Curves These VSWR curves are typical for the antenna mounted feet above the ground and fed with 100 feet of RG-13/U cable. Similar curves can be expected for this antenna mounted between 50 and 100 feet above ground. DO NOT TRY TO TUNE THIS ANTENNA FOR LOW VSWR AT GROUND LEVEL. Higher VSWR can be expected if mounted at less than 0 feet or within 0 feet of a large roof or metallic structure. Guy wires within 10 feet of this antenna should be broken into non-resonant lengths (less than 1 foot lengths) and insulated from the tower. Other antennas which are resonant somewhere in the 3-0 MHz range should be kept at least 10 feet above or below this antenna. Antennas which are resonant above 0 MHz can be mounted as close as 3 feet from this antenna. The measured VSWR may also be affected by strong local broadcast signals. Extreme care must be used if you use an airdielectric coaxial cable such as Belden Water intrusion can easily raise the VSWR and loss. NOTE: There will be considerable boom sag until the boom support tubes are adjusted.
22 Operation Connect the end of your transmission line to a good quality VSWR meter and then to your transmitter. While using low power ( less than 100 watts output), check the VSWR across the MHz range. Use your authorized frequencies when applicable. Record this information for future comparison. Record the antenna azimuth and other environmental factors along with the VSWR. Check the VSWR periodically to ensure proper operation. The front-to-back ratios may be checked by using a steady carrier transmitted by a local station at least 1 mile distant. You may also use the signal from WWV on 15 and 0 MHz to check gain and frontto-back. Other time/frequency standard stations may be used where applicable. Converting American Measurements to Metric Use this scale to identify lengths of bolts, diameters of tubes, etc. The American inch (1") and foot (1') can be converted to centimeters in 1 inch (1 ") =.5 cm 1 foot (1') = 30.8 cm Example: " x.5 = 10.7 FRACTION AND METRIC EQUIVALENT FOR ONE INCH FRAMONAL FRACTIONAL INCH MILLMMEERS INCH MILLIMETERS 1/ / / / / / /.350 3/ / / / /8.5 7/ / /
23 Tubing List /1 X /8 X /1 X /8 X 35-1/ /1 X 0-3/ /8 X 0-1/ /1 X 5-1/ /8 X 15-1/ /1 X 31-1/ /8 X 5-1/ /1 X 19 7/1 X X.10 X 5-3/ SW X X.10 X 81 SW SA 1-1/ X.058 X /8 X /8 INSERT SA 1-1/ X.058 X X.09 X 75 X.10 X 80-3/ BETA ROD 1/ rod x 0" FEED TUBE FEED TUBE FEED TUBE FEED TUBE FEED TUBE FEED TUBE Short SWAGE /8 X 15-1/ SWAGE
24 Parts Pack List QTY PART DESCRIPTION #13 BRACKET 1590 #1 BRACKET 137 # BRACKET /-0 X 3/ /-0 X 3/ /-0 SQUARE NUT /-0 HEX NUT / INSULATOR /8 INSULATOR /8 INSULATOR S # HOSE CLAMP S # HOSE CLAMP S #10 HOSE CLAMP 55 7/1 TUBE CAP 555 INCH TUBE CAP CHANNEL BRACKET 8705 Balun Pigtail SHORT PIG TAIL LONG PIG TAIL 1 BN-000B BEAM BALUN PACK / X 1-3/ BOLT / LOCK WASHER BOOM SUPPORT INSULATOR BOTTOM INSULATOR TOP
25 Parts Pack List QTY PART DESCRIPTION /1X /1X /1X-3/ /1X /1 NUT /1 LOCK / CLAMP /8 CLAMP /8 CLAMP X BOLT INSULATOR CLAMP BETA MATCH CLAMP X 1-1/ #10 LOCK NUT x 1-1/ x /-0X-1/ SELF TAPPING SCREW #8 LOCK WASHER FEED TUBE SPLICE 1073 CAST BRACKET MAST BRICK U-CLAMP EXTRUSION BRACKET
26
27
28
Cushcraft. Amateur Radio Antennas LFA-6M5EL. 6 Meter 5 Element Loop Feed Antenna INSTRUCTION MANUAL
 Cushcraft Amateur Radio Antennas LFA-6M5EL 6 Meter 5 Element Loop Feed Antenna INSTRUCTION MANUAL CAUTION: Read All Instructions Before Operating Equipment VERSION 1A Cushcraft Amateur Radio Antennas 308
DB Duo-Monoband Beam 7 - Element, 12 and 17 Meter INSTRUCTION MANUAL. General Description
 308 Industrial Park Road Starkville, MS 39759 USA Ph: (662) 323-9538 FAX: (662) 323-6551 DB- 1217 Duo-Monoband Beam 7 - Element, 12 and 17 Meter INSTRUCTION MANUAL General Description The Hy-Gain DB-1217
DIR-73K. Discoverer 73 Director 40-Meter Kit for DIS-72. Instruction Manual
 DIR-73K Discoverer 73 Director 40-Meter Kit for DIS-72 Instruction Manual 308 Industrial Park Road Starkville, MS 39759 USA PH: 662-323-9538 FAX: 662-323-6551 TABLE OF CONTENTS Page General Description......1-1
INSTRUCTION MANUAL VB-66DX. 6-Meter 6-Element Beam. Preparation For Assembly. General Description
 VB-66DX 308 Industrial Park Road Starkville, MS 39759 USA Ph: (662) 323-9538 FAX: (662) 323-6551 6-Meter 6-Element Beam INSTRUCTION MANUAL General Description The Hy-Gain Model 66DX is a full sized 6-
INSTRUCTION MANUAL. Specifications Electrical. Front-To-Back Ratio VSWR at Resonance Less than 1.5:1 Nominal Impedance. Mechanical
 300 Industrial Park Road, Starkville, MS 39759 Ph: (662) 323-8538 FAX: (662) 323-6551 TH-3JRS Tri-band HF 3 Elements Beam Covers 10, 15 and 20 Meters INSTRUCTION MANUAL WARNING Installation of this product
LJ element beam for 10 or 12 meters INSTRUCTION MANUAL. CAUTION: Read All Instructions Before Operating Equipment
 LJ-113 3 element beam for 10 or 1 meters INSTRUCTION MANUAL CAUTION: Read All Instructions Before Operating Equipment 308 Industrial Park Road Starkville, MS 39759 USA Tel: 66-33-9538 Fax: 66-33-6551 VERSION
INSTRUCTION MANUAL. Model VB-215DX MECHANICAL DESIGN GENERAL DESCRIPTION ELECTRICAL DESIGN. 2 Meter 15 Element Yagi for SSB/CW
 Model VB-215DX 2 Meter 15 Element Yagi for SSB/CW INSTRUCTION MANUAL GENERAL DESCRIPTION The Hy-Gain Model 215DX is a high performance yagi antenna for SSB/CW DXing in the Amateur 2 meter band. It features
Cushcraft. Amateur Radio Antennas DB-46M8EL. Dual band 6 and 4 Meter, 8 Element Beam Antenna INSTRUCTION MANUAL
 Cushcraft Amateur Radio Antennas DB-46M8EL Dual band 6 and 4 Meter, 8 Element Beam Antenna INSTRUCTION MANUAL CAUTION: Read All Instructions Before Operating Equipment VERSION 1B Cushcraft Amateur Radio
INSTRUCTION MANUAL ORDER NO. V3R MODEL V3R. Collinear Gain Vertical for MHz
 ORDER NO. V3R MODEL V3R Collinear Gain Vertical for 216-225 MHz INSTRUCTION MANUAL General Description The new Hy-Gain V3R VHF antenna is a collinear 5/8-wave omnidirectional vertical antenna for the 216-225
INSTRUCTION MANUAL V-42R. Dual Band Collinear Gain Vertical for MHz and GENERAL DESCRIPTION
 308 Industrial Park Road, Starkville, MS 39759 USA Ph: (662) 323-9538 FAX: (662) 323-6551 V-42R Dual Band Collinear Gain Vertical for 144-148 MHz and 436-450 INSTRUCTION MANUAL GENERAL DESCRIPTION The
MODEL DB-1015A 10- and 15-Meter Duo-Band Antenna Order No. 330
 MODEL DB-1015A 10- and 15-Meter Duo-Band Antenna Order No. 330 HY-GAIN ELECTRONICS CORPORATION 8601 Northeast Highway 6 Lincoln, Nebraska 68505 Telephone 464-9151 Area Code 402 TABLE OF CONTENTS page SECTION
INSTRUCTION MANUAL for MODEL TH6-DX "THUNDERBIRD" (389)
") INSTRUCTION MANUAL for MODEL TH6-DX "THUNDERBIRD" (389) HY-GAIN ELECTRONICS CORPORATION, N. E. Hwy #6 at Stevens Creek, Lincoln, Nebraska 65801 Telephone 434-6331 INTRODUCTION Ely-Gain's new Model TH6-DX
INSTRUCTION MANUAL for MODEL TH6-DX "THUNDERBIRD" (389) HY-GAIN ELECTRONICS CORPORATION, N. E. Hwy #6 at Stevens Creek, Lincoln, Nebraska 65801 Telephone 434-6331 INTRODUCTION Ely-Gain's new Model TH6-DX
TZ-RD-1740 Rotary Dipole Instruction Manual
 TZ-RD-1740 17/40m Rotary Dipole Instruction Manual The TZ-RD-1740 is a loaded dipole antenna for the 40m band and a full size rotary dipole for the 17m band. The antenna uses an aluminium radiating section
Model VB-23FM 2-Meter 3-Element Beam
 308 Industrial Park Road Starkville, MS 39759 USA Ph: (662) 323-9538 FAX: (662) Model VB-23FM 2-Meter 3-Element Beam [ INSTRUCTION MANUAL Figure 1 Overall View and Boom Detail GENERAL DESCRIPTION This
INSTRUCTION MANUAL. Specifications Mechanical. 1 5/8 to 2 1/16 O.D. (41mm to 52mm)
") 308 Industrial Park Road Starkville, MS 39759 USA Ph: (662) 323-9538 FAX: (662) 323- General Description Model VB-25FM 2-Meter 5 Elements Beam INSTRUCTION MANUAL This antenna is a 5-element, 2-meter beam
308 Industrial Park Road Starkville, MS 39759 USA Ph: (662) 323-9538 FAX: (662) 323- General Description Model VB-25FM 2-Meter 5 Elements Beam INSTRUCTION MANUAL This antenna is a 5-element, 2-meter beam
Assembly Instructions: Bencher Skylark
 Assembly Instructions: Bencher Skylark Tools Required: Pop Rivet Tool Tape Measure Hex Wrenches Screwdriver Several Disposable Rags Two Saw Horses Several boxes or bowls to hold fasteners and small parts
INSTRUCTION MANUAL. Model 18AVQII Five Band Vertical Antenna 10, 15, 20, 40, 80 Meter. General Description. Theory of Operation
 Model 18AVQII Five Band Vertical Antenna 10, 15, 20, 40, 80 Meter 308 Industrial Park Road Starkville, MS 39759 (662) 323-9538 Fax: (662) 323-5803 INSTRUCTION MANUAL General Description The Hy-Gain 18AVQII
K1FO 12 ELEMENT 144/147 MHz YAGI
 K1FO 12 ELEMENT 144/147 MHz YAGI WARNING: INSTALLATION OF THIS PRODUCT NEAR POWER LINES IS DANGEROUS. FOR YOUR SAFETY FOLLOW THE INSTALLATION DIRECTIONS. Ariane Arrays, Inc. Copyright 2006 201 Hopedale
TELEX. iiilhiijiri INSTRUCTION MANUAL ORDER NO. 411 TELEX COMMUNICATIONS, INC ALDRICH AVE SO. MINNEAPOLIS. MN U.SA.
 TELEX. iiilhiijiri TELEX COMMUNICATIONS, INC. 9600 ALDRICH AVE SO. MINNEAPOLIS. MN 55420 U.SA. INSTRUCTION MANUAL ORDER NO. 411 Base Station, 5-Element Beam Antenna This antenna is a five element, Citizens
TELEX, liutiiilio"i TELEX COMMUNICATIONS, INC ALDRICH AVE. SO. MINNEAPOLIS. MN USA
 TELEX, liutiiilio"i TELEX COMMUNICATIONS, INC. 9600 ALDRICH AVE. SO. MINNEAPOLIS. MN 55420 USA INSTRUCTION MANUAL ORDER NO. 410 General This antenna is a five-element, Citizens Band beam with a forward
M2 Antenna Systems, Inc. Model No: 20M6-125
 M2 Antenna Systems, Inc. Model No: 20M6-125 SPECIFICATIONS: Model... 20M6-125 Frequency Range... 14.0 14.350 MHz *Gain, (FS) / Over gnd... 11.19dBi / 16.6dBi @70 Front to back... 25 db Typical Beamwidth...
Directive Systems & Engineering 2702 Rodgers Terrace Haymarket, VA
 Directive Systems & Engineering 2702 Rodgers Terrace Haymarket, VA 20169 1628 www.directivesystems.com 703 754 3876 K1JX DESIGNED 6 ELEMENT 50 MHZ YAGI, DSEJX6 50 INTRODUCTION The Directive Systems DSEJX6-50
M2 Antenna Systems, Inc. Model No: KT31WARC
 M2 Antenna Systems, Inc. Model No: KT31WARC SPECIFICATIONS: Model... KT31WARC Frequency Range... 10.1-10.15 MHz **Selectable Frequency Range... 14.0-14.35 MHz **Selectable... (175 KHz / 2:1 VSWR Nominal)
PAC-12 Kit Contents. Tools Needed Soldering iron Phillips screwdriver Wire stripper Wrenches, 7/16 and 1/2 Terminal crimp tool Pliers Solder
 PAC-2 Kit Contents Part Quantity Screws: 8/32 x 3/8 Screws: 8-32 x 5/6 Screw: 8-32 x /4 #8 internal tooth washers #8 solder lug ring terminals Bolt: Aluminum, /4-20 x.5 /4 internal tooth washer Nut: Aluminum
M2 Antenna Systems, Inc. Model No: 2M7
 M2 Antenna Systems, Inc. Model No: 2M7 SPECIFICATIONS: Model... 2M7 Frequency Range... 144 To 148 MHz *Gain... 12.3 dbi Front to back... 20 db Typical Beamwidth... E=43 H=50 Feed type... T Match Feed Impedance....
Hy-gain. Method 1 : Completely assemble the antenna on the ground then hoist it into position using a setup as shown in Figure 1.
 Hy-gain The Hy-Gain TH6-DXX "Super Thunderbird" is a 6-element beam designed to operate on 10, 25 and 20 meters. It has four active elements on 10-meters and three active elements on 15 and 20 meters.
M2 Antenna Systems, Inc. Model No: 2M4
 M2 Antenna Systems, Inc. Model No: 2M4 SPECIFICATIONS: Model... 2M4 Frequency Range... 144 To 148 MHz *Gain... 9.6 dbi Front to back... 20 db Typical Beamwidth... E=54 H=74 Feed type... T Match Feed Impedance....
M2 Antenna Systems, Inc. Model No: YAGI ANTENNA
 M Antenna Systems, Inc. Model No: 4.5-7 YAGI ANTENNA SPECIFICATIONS: Model... 4.5-7 Frequency Range... 4.0 To 4.5 MHz *Gain... 0 To 7 dbi Front to back... 0 db over the rear 80 Beamwidth... E=44 H=50 typical
JK M Hi-Q Coil Loaded Rotatable Dipole Version
 JK-401 40M Hi-Q Coil Loaded Rotatable Dipole 2018 Version 72 Grays Bridge Road, Unit D, Brookfield, CT 06804 845.228.8700 (TEL) 845.279.5526 (FAX) info@jkantennas.com LAST UPDATED: 02-01-2018 JK Antennas
PACKING LIST MACO V-5000
 PACKING LIST MACO V-5000 PART QTY O.D. SIZE LENGTH DESCRIPTION CHECKLIST T47P 4 5/8.050 36 Aluminum Tubing _ T43P 1 7/8.050 48 Aluminum Tubing _ T18P 1 3/4.050 48 Aluminum Tubing _ T15P 1 5/8.050 48 Aluminum
M2 Antenna Systems, Inc. Model No: 2M5WL
 M2 Antenna Systems, Inc. Model No: 2M5WL SPECIFICATIONS: Model... 2M5WL Frequency Range... 144 To 148 MHz *Gain... 16.84 dbi Front to back... 22 db Typical Beamwidth... E=26 H=29 Feed type... T Match Feed
M2 Antenna Systems, Inc. Model No: 20M5LD
 M2 Antenna Systems, Inc. Model No: 20M5LD SPECIFICATIONS: Model... 20M5LD Frequency Range... 14.0 14.350 MHz *Gain (Full Band)... 10.2 dbi Typical Front to back... 23 db Typical Beamwidth... E=50 / H=66
MA5B 20 / 17 / 15 / 12 / 10 Meter Beam Antenna
 ASSEMBLY AND INSTALLATION INSTRUCTIONS NE 20 / 17 / 15 / 12 / 10 Meter Beam Antenna 951485_GF_AB WARNING THIS ANTENNA IS AN ELECTRICAL CONDUCTOR. CONTACT WITH POWER LINES CAN RESULT IN DEATH, OR SERIOUS
DB-2345 INSTRUCTION MANUAL. 308 Industrial Park Road Starkville, MS USA ph:(662) Fax: (662) Made in USA
 Fax: (662) Made in USA") 308 Industrial Park Road Starkville, MS 39759 USA ph:(662) 323-9538 Fax: (662) 323-5803 DB-2345 INSTRUCTION MANUAL Made in USA Hy-Gain DB2345 Dual-Band Beam INTRODUCTION The Hy-Gain DB2345 is a compact
308 Industrial Park Road Starkville, MS 39759 USA ph:(662) 323-9538 Fax: (662) 323-5803 DB-2345 INSTRUCTION MANUAL Made in USA Hy-Gain DB2345 Dual-Band Beam INTRODUCTION The Hy-Gain DB2345 is a compact
INSTRUCTION MANUAL. Model 18AVQII Five Band Vertical Antenna 10, 15, 20, 40, 80 Meter
 Model 18AVQII Five Band Vertical Antenna 10, 15, 20, 40, 80 Meter 308 Industrial Park Road Starkville, MS 39759 (662) 323-9538 Fax: (662) 323-5803 INSTRUCTION MANUAL General Description The Hy-Gain 18AVQII
CP6 6 Band Trap Vertical 80-6m
 CP6 6 Band Trap Vertical 80-6m Instruction Sheet The CP6 is a multi-band trap-vertical antenna for HF bands, covering the 80*, 40, 20, 15, 10m & 6m amateur bands. Made from heavy duty aluminum, the CP6
TELEX COMMUNICATIONS, INC ALDRICH LIVE SO. MINNEAPOLIS. MN U S A. /~g-~~~~r iu IORDER NO. 337s
 IkEfEX N TELEX COMMUNICATIONS, INC. 300 ALDRICH LIVE SO. MINNEAPOLIS. MN 55420 U S A /~g-~~~~r iu IORDER NO. 337s MAN A I MODEL V4S Collinear Gain Vertical for 420450 MHz PN801910 General Description The
Directive Systems & Engineering 2702 Rodgers Terrace Haymarket, VA
 Directive Systems & Engineering 2702 Rodgers Terrace Haymarket, VA 20169-1628 www.directivesystems.com 703-754-3876 25 Element 7.4 wl. K1FO Designed Yagi, Model DSEFO432-25 ELECTRICAL SPECIFICATIONS Frequency
M2 Antenna Systems, Inc. Model No: 436CP30
 M2 Antenna Systems, Inc. Model No: 436CP30 SPECIFICATIONS: Model... 436CP30 Frequency Range... 432 To 440 MHz *Gain... 15.50 dbic Front to back... 18 db Typical Elipticity... 1.5 db Typical Beamwidth...
MFJ-2982 Feather-Lite 80-6 Meter Vertical Antenna
 MFJ-2982 Feather-Lite 80-6 Meter Vertical Introduction: The MFJ-2982 is a lightweight 31-foot fiberglass antenna designed to mount on any convenient post, mast, or a suitable wide-stance tripod such as
M2 Antenna Systems, Inc. Model No: 10-30LP8
 M2 Antenna Systems, Inc. Model No: 10-30LP8 SPECIFICATIONS: Model... 10-30LP8 Frequency Range... 10-30 MHz Continuous *Gain free space / 65... 5.2 dbi / 10.5 dbi 10-30 Front to back... 15 db 10-30 MHz
Array Solutions OCF Series Dipoles
 OCF Series Dipoles Fig 1 Thank you and congratulations on your purchase of the, Off- Center Fed HF Dipole Antenna System. This antenna was built with the same quality workmanship and attention to detail
CP6A. 6 Band Trap Vertical 75-6m
 CP6A 6 Band Trap Vertical 75-6m Instruction Sheet The CP6A is a multi-band trap-vertical antenna for HF bands, covering the 75*, 40, 20, 15, 10m & 6m amateur bands. Made from heavy duty aluminum, the CP6A
JK-65 Five Element 6M Yagi
 JK-65 Five Element 6M Yagi PO Box 266, Croton Falls, NY 10519-0266 845.228.8700 (TEL) 845.279.5526 (FAX) info@jkantennas.com Page 1 of 8 JK Antennas Limited Warranty and Liability JK Antennas ( Manufacturer
AV-12AVQ Triband HF Vertical 10, 15, 20-Meter INSTRUCTION MANUAL
 308 Industrial Park Starkville, MS 39759 USA Ph: (662) 323-9538 FAX: (662) 323-6551 AV-12AVQ Triband HF Vertical 10, 15, 20-Meter INSTRUCTION MANUAL General Description This vertical antenna is designed
EH-20 20m antenna. By VE3RGW
 EH-20 20m antenna By VE3RGW Equivalent circuit of EH-20 antenna system. Upper cylinder Lower cylinder Phasing coil Common mode radiator Tune coil RF choke or 14MHz trap 50ohm coaxial cable 0-150pF (case
HFp. User s Guide. Vertical. entenna. 7 MHz 30 MHz Amateur Radio Antenna Plus 6-Meters
 User s Guide HFp Vertical 7 MHz 30 MHz Amateur Radio Antenna Plus 6-Meters The Ventenna Co. LLC P.O. Box 2998, Citrus Heights, CA, 956 www.ventenna.com entenna Table of Contents The HFp Antenna -------------------------------------------------------------------
THIS SHOULD TWEAK YOUR IMAGINATION
 10-27-05 THIS SHOULD TWEAK YOUR IMAGINATION SPECIFICATIONS FOR SINGLE ANTENNA MODEL NUMBER... 432EME-12 FREQUENCY... 430-436 MHz GAIN... 14.4 dbd FRONT TO BACK... 23 db VSWR... 1.2:1 TYPICAL BEAMWIDTH...
Side Winder R o u t e r L i f t.
 Woodpeckers PRECISION WOODWORKING TOOLS Side Winder R o u t e r L i f t. INSTALLATION INSTRUCTIONS The wrench handle must be pointing left in order to fully insert or remove it. Lift Wrench Once fully
Cisco Aironet 13.5-dBi Yagi Mast Mount Antenna (AIR-ANT1949)
") Cisco Aironet 13.5-dBi Yagi Mast Mount Antenna (AIR-ANT1949) Overview This document describes the 13.5-dBi Yagi mast mount antenna and provides instructions for mounting it. The antenna operates in the
Cisco Aironet 13.5-dBi Yagi Mast Mount Antenna (AIR-ANT1949) Overview This document describes the 13.5-dBi Yagi mast mount antenna and provides instructions for mounting it. The antenna operates in the
Installation Instructions Hustler 6-BTV Trap Vertical
 Installation Instructions Hustler 6-BTV Trap Vertical ASSEMBLY 1. Check the package contents against the parts list on page 2. 2. WARNING. Installation of this product near power lines is dangerous. For
MI: (Secure this number someplace, for possible future need) SPECIFICATIONS:
 SPECIFICATIONS:") 6C ASSEMBLY INSTRUCTIONS ANTENNA MODEL T6 MI: 030927 (Secure this number someplace, for possible future need) SPECIFICATIONS: FORWARD GAIN 5.1 dbd F:B RATIO 15-25 db (Rises with frequency) FREQUENCY COVERAGE
6C ASSEMBLY INSTRUCTIONS ANTENNA MODEL T6 MI: 030927 (Secure this number someplace, for possible future need) SPECIFICATIONS: FORWARD GAIN 5.1 dbd F:B RATIO 15-25 db (Rises with frequency) FREQUENCY COVERAGE
Mast and Antennas for Field Day & Emergencies
 Mast and Antennas for Field Day & Emergencies John A. Allocca, WB2LUA, July 2005 This is a 27 feet 1.5 diameter portable guyed mast with a 28 feet diameter footprint. It breaks down into four 6 feet sections
Alpha Delta Communications, Inc. Model DX-OCF Off-Center-Fed 7 Band Antenna
 Alpha Delta Communications, Inc. Model DX-OCF Off-Center-Fed 7 Band Antenna 75/80, 40, 20, 17, 12, 10, and 6 meters (50.0-51.0 MHz) NO TUNER REQUIRED! Installation Instructions One leg is 45 ft., the other
A short, off-center fed dipole for 40 m and 20 m by Daniel Marks, KW4TI
 A short, off-center fed dipole for 40 m and 20 m by Daniel Marks, KW4TI Version 2017-Nov-7 Abstract: This antenna is a 20 to 25 foot long (6.0 m to 7.6 m) off-center fed dipole antenna for the 20 m and
M2 Antenna Systems, Inc. Model No: 2MCP22
 M2 Antenna Systems, Inc. Model No: 2MCP22 SPECIFICATIONS: Model... 2MCP22 Frequency Range... 144 To 148 MHz *Gain... 14.39 dbic Front to back... 25 db Typical Elipticity... >3db Beamwidth... 38 Feed type...
Standard Pole Mount Parabolic Antenna Mounting Instructions 3 ft. (90cm) & 4 ft. (120cm)
 & 4 ft. (120cm)") 495 R Billerica Ave. N. Billerica, MA 01862 USA Tel: (978) 459-8800 Fax: (978) 459-3310 / 8814 www.radiowavesinc.com email: sales@radiowavesinc.com Standard Pole Mount Parabolic Antenna Mounting Instructions
495 R Billerica Ave. N. Billerica, MA 01862 USA Tel: (978) 459-8800 Fax: (978) 459-3310 / 8814 www.radiowavesinc.com email: sales@radiowavesinc.com Standard Pole Mount Parabolic Antenna Mounting Instructions
Assembly Instructions for the 10N6RDB Antenna
 Assembly Instructions for the 10N6RDB Antenna The 10N6RDB antenna comes from the factory almost completely assembled. All you have to do is install the 1/2 inch Aluminum tubing at both ends of the 10 Meter
M2 Antenna Systems, Inc. Model No: 456CP34
 M2 Antenna Systems, Inc. Model No: 456CP34 SPECIFICATIONS: Model... 456CP34 Frequency Range... 435 To 470 mhz *Gain... 16.0 dbi Front to back... 23 db Typical Beamwidth... 30 Circular Feed type... T Match
REP Design LLC. 193 Winding Ridge Rd, Southington, CT INSTALLATION INSTRUCTIONS:
 REP Design LLC 193 Winding Ridge Rd, Southington, CT 06489 1-860.426.1894 n7emw@cox.net www.repdesign.us INSTALLATION INSTRUCTIONS: SHD-SO239 Super Heavy Duty SO-239Antenna Mounting System Thank you for
M2 Antenna Systems, Inc. Model No: 40M3L
 M2 Antenna Systems, Inc. Model No: 40M3L SPECIFICATIONS: Model... 40M3L Frequency Range... 7.0-7.3 MHz X 150 khz Gain... 6.6 dbi Front to back... 23 db Beamwidth... E=62 Feed type... Hair pin match Feed
M2 Antenna Systems, Inc. Model No: 450CP26
 M2 Antenna Systems, Inc. Model No: 450CP26 SPECIFICATIONS: Model... 450CP26 Frequency Range... 445 To 455 mhz *Gain... 16.5 dbi Front to back... 21 db Typical Beamwidth... 30 Circular Feed type... T Match
M2 Antenna Systems, Inc. Model No: 10-30LP8
 M2 Antenna Systems, Inc. Model No: 10-30LP8 VSWR 2:1 TYPICAL VSWR @ 70 FT. 2:1 1.5:1 1.5:1 1.2:1 1.2:1 10 14 MHz 11 12 13 17 15 16 18 19 20 21 22 23 24 25 26 27 28 29 30 SPECIFICATIONS: Model...10-30LP8
Cisco Aironet 2.4-GHz/5-GHz 8-dBi Directional Antenna (AIR-ANT2588P3M-N)
") Cisco Aironet.4-GHz/5-GHz 8-dBi Directional Antenna (AIR-ANT588P3M-N) This document outlines the specifications for the Cisco Aironet AIR-ANT588P3M-N.4/5-GHz 8-dBi 3-Port Directional Antenna with N-connectors
Cisco Aironet.4-GHz/5-GHz 8-dBi Directional Antenna (AIR-ANT588P3M-N) This document outlines the specifications for the Cisco Aironet AIR-ANT588P3M-N.4/5-GHz 8-dBi 3-Port Directional Antenna with N-connectors
M2 Antenna Systems, Inc. Model No: 450CP34
 M2 Antenna Systems, Inc. Model No: 450CP34 SPECIFICATIONS: Model... 450CP34 Frequency Range... 435 To 455 mhz *Gain... 16.0 dbi Front to back... 22 db Typical Beamwidth... 28 Circular Feed type... T Match
Model #SH & CH SH Pine CH Naturaline
 Model #SH304-101 & CH304-101 Assembly Manual SH304-101 Pine CH304-101 Naturaline Component Parts A 2 ea. Angled Rail - 2 x 4 x 107-1/8" B 1 ea. Center Angled Rail - 2 x 4 x 107-1/8" C 9 ea. Rock Board
Installation Instructions Hustler 6-BTV Trap Vertical
 Installation Instructions Hustler 6-BTV Trap Vertical ASSEMBLY 1. Check the package contents against the parts list on page 2. 2. WARNING. Installation of this product near power lines is dangerous. For
ASSEMBLY AND INSTALLATION INSTRUCTIONS R , 12, 15, 17, 20, 30, 40 Meters (5/99) COMMUNICATIONS ANTENNAS
 COMMUNICATIONS ANTENNAS") ASSEMBLY AND INSTALLATION INSTRUCTIONS R7000 10, 12, 15, 17, 20, 30, 40 Meters COMMUNICATIONS ANTENNAS 951465 (5/99) WARNING THIS ANTENNA IS AN ELECTRICAL CONDUCTOR. CONTACT WITH POWER LINES CAN RESULT
ASSEMBLY AND INSTALLATION INSTRUCTIONS R7000 10, 12, 15, 17, 20, 30, 40 Meters COMMUNICATIONS ANTENNAS 951465 (5/99) WARNING THIS ANTENNA IS AN ELECTRICAL CONDUCTOR. CONTACT WITH POWER LINES CAN RESULT
PREPARATION FOR ASSEMBLY
 GENERAL DESCRIPTION The Hy-Gain Model 216 SAT is a high-performance "OSCAR" (Orbiting Satellite Carrying Amateur Radio) satellite antenna for the 145.8-146.0 MHz frequency hand. It features polarization
JK NAVASSA-5. 5-Band Yagi (20M/17M/15M/12M/10M) Optional 6M Add-on Kit Available
 Optional 6M Add-on Kit Available") JK NAVASSA-5 5-Band Yagi (20M/17M/15M/12M/10M) Optional 6M Add-on Kit Available 72 Grays Bridge Road, Unit D, Brookfield, CT 06804 845.228.8700 (TEL) 845.279.5526 (FAX) info@jkantennas.com Last Updated:
JK NAVASSA-5 5-Band Yagi (20M/17M/15M/12M/10M) Optional 6M Add-on Kit Available 72 Grays Bridge Road, Unit D, Brookfield, CT 06804 845.228.8700 (TEL) 845.279.5526 (FAX) info@jkantennas.com Last Updated:
MFJ-1799 INSTRUCTION MANUAL. 2,6,10,12,15,17,20,30,40,80 METER Vertical Antenna. CAUTION: Read All Instructions Before Operating Equipment
 MFJ-799,6,0,,5,7,0,30,40,80 METER Vertical Antenna INSTRUCTION MANUAL CAUTION: Read All Instructions Before Operating Equipment 300 Industrial Park Road Starkville, MS 39759 USA Tel: 66-33-5869 Fax: 66-33-655
CSS Central Mount System
 CSS-20 Installation Manual CSS-20 Safety Notifications Below are the installation instructions for the CSS-20-2 Long Span Beam Mounting System. Please read these safety notifications prior to beginning
MHz. ANT150D, D3, D6-9 DIPOLE AND DIPOLE ARRAY 1 TO 9 dbd
 138-174 MHz ANTD, D3, D6-9 DIPOLE AND DIPOLE ARRAY 1 TO 9 dbd The Telewave ANTD series consists of single, dual, and 4-element di pole array antennas with a precision phasing harness for optimum per formance.
INSTRUCTION MANUAL. Model BN-4000B. High Power Balun for Beams with Type SO-239. Construction. General Description. Mounting on Boom or Mast
 308 Industrial Park Starkville, MS 39759 USA Ph: (662) 323-9538 FAX: (662) 323 6551 Model BN-4000B High Power Balun for Beams with Type SO-239 INSTRUCTION MANUAL General Description The BN-4000 is a current-type
This file was downloaded from the website of G7SYW.
 This file was downloaded from the website of G7SYW http://www.g7syw.co.uk ASSEMBLY AND INSTALLATION INSTRUCTIONS Five-Band High-Performance Mini-Vertical Antenna 951495 (8/01) WARNING THIS ANTENNA IS AN
M2 Antenna Systems, Inc. Model No: 40M2L
 M2 Antenna Systems, Inc. Model No: 40M2L SPECIFICATIONS: Model...40M2L Frequency Range...6.9-10 MHz X 150 khz Gain...5.5 dbi Front to back...13 15 db Beamwidth...E=74 Feed type...hair pin match Feed Impedance....50
Cisco Aironet Omnidirectional Mast Mount Antenna (AIR-ANT2506)
") Cisco Aironet Omnidirectional Mast Mount Antenna (AIR-ANT2506) This document outlines the specifications, describes the omnidirectional mast mount antenna, and provides instructions for mounting it. Designed
Cisco Aironet Omnidirectional Mast Mount Antenna (AIR-ANT2506) This document outlines the specifications, describes the omnidirectional mast mount antenna, and provides instructions for mounting it. Designed
TABLE OF CONTENTS REQUIRED TOOLS
 TABLE OF CONTENTS SECTION SECTION TITLE PAGE NO. 1 2 3 4 5 Assembling Mounting Structure Installing Bicycle Supports Mounting Rack to Wall Adding Sections Customizing Rack Configuration REQUIRED TOOLS
Kwik-Lock. Installation Instructions. Attention Dealers: Please give this owners manual to the customer when the product is delivered.
 Serving the Truck & Trailer Industry Since 1944 Installation Instructions Attention Dealers: Please give this owners manual to the customer when the product is delivered. Call 800-535-9545 www.aeroindustries.com
The Bowflex Revolution XP Home Gym Assembly Instructions. P/N: Rev ( /0 )
") P/N: 001-7057 Rev ( /0 ) The Bowflex Revolution XP Home Gym Assembly Instructions 2 Table of Contents Before You Start... 2 Tools You Will Need / Hardware Contents... 3 Box Contents... 6 Assembling Your
P/N: 001-7057 Rev ( /0 ) The Bowflex Revolution XP Home Gym Assembly Instructions 2 Table of Contents Before You Start... 2 Tools You Will Need / Hardware Contents... 3 Box Contents... 6 Assembling Your
General Array Layout Sketch
 General Array Layout Sketch Cold TO Panels Hot FROM Panels OR Cold TO Panels Hot FROM Panels 1 Introduction This document describes how to install EZ series panels. The EZ series panels are designed to
Yagi and Omni Antennas Installation Manual
 Yagi and Omni Antennas Installation Manual 25500445 Rev. A0 0218 Printed in U.S.A. Copyright 2018 Federal Signal Corporation Limited Warranty This product is subject to and covered by a limited warranty,
ASSEMBLING MANUAL LS 86. HF Log Periodic Antenna MHz
 ASSEMBLING MANUAL LS 86 HF Log Periodic Antenna 14 30 MHz ACOM LS86 HF Log-periodic Antenna ASSEMBLING MANUAL 1. GENERAL INFORMATION ACOM manufactures a range of antennas designed and produced to give
Circularly Polarized FM Broadcast Antenna
 Circularly Polarized FM Broadcast Antenna Versa2une (SLV) 6 to 12-bay, full-wave-spaced Instruction Manual Installation, Operation, & Maintenance Congratulations! Thank you for purchasing one of the finest
DESCRIPTION & FEATURES
 INTRODUCTION Introducing the Tilt-N-Raise antenna mounting mount, a safer way to mount portable communications antenna and supports. The Tilt-N-Raise is a safe and effective way to put up a support mast
C O R P O R A T I O N
 ASSEMBLY AND INSTALLATION INSTRUCTIONS A4S 20 / 5 / 0 MeterBeam C O R P O R A T I O N 95279 (8/98) WARNING THIS ANNNA IS AN ELECTRICAL CONDUCTOR. CONTACT WITH POWER LINES CAN RESULT IN DEATH, OR SERIOUS
installation guide 1 GUIDE#: pwb-assault-004
 assault WAKEBOARD tower installation guide INSTALLATION SUPPORT 1 important information This Aerial wakeboard tower fits motor boats with 76-108 inch wide beam widths. This measurement is taken from the
WARNING EXTREME CARE MUST BE USED FOR YOUR SAFETY
 WARNING EXTREME CARE MUST BE USED FOR YOUR SAFETY PLANNING Plan your installation carefully. If you use volunteer helpers be sure that they are qualified to assist you. Make certain that everyone involved
MFJ-2100 INSTRUCTION MANUAL. CAUTION: Read All Instructions Before Operating Equipment
 MFJ-2100 INSTRUCTION MANUAL CAUTION: Read All Instructions Before Operating Equipment 300 Industrial Park Road Starkville, MS 39759 USA Tel: 662-323-5869 Fax: 662-323-6551 COPYRIGHT C 2015 MFJ Enterprises
Rayport G Eco Dealer Kit
 Rayport G Eco Dealer Kit Installation Guide www.aetenergy.com Supporting a Cleaner, Greener Tomorrow 1. Table of Contents 1. Table of Contents P2 2. Installer Notes P3 3. Parts List P4-7 4. Tool List P8
400A 40113V, 401A 40120V, & 401AL 40120VL ALUMINUM VERTICAL 4000 LB LIFT INCLUDES SCREW LEG ASSEMBLY INSTRUCTIONS
 12/11/07 PAGE 1 OF 12 400A 40113V, 401A 40120V, & 401AL 40120VL ALUMINUM VERTICAL 4000 LB LIFT INCLUDES SCREW LEG ASSEMBLY INSTRUCTIONS Thank you for purchasing our product! *Please read these instructions
87.5 TO MHz BAND II 2 WAY 4.8dBi STACKED DIPOLE ANTENNA
 87.5 TO 108.0 MHz BAND II 2 WAY 4.8dBi STACKED DIPOLE ANTENNA 1. INTRODUCTION 3 1.1. GENERAL INFORMATION 3 1.2. UNPACKING AND CHECKING 3 1.3. WARRANTY 3 1.4. USER SAFETY RESPONSIBILITY 4 1.5. INSTALLATION
M2 Antenna Systems, Inc. Model No: 2M HO LOOP
 M2 Antenna Systems, Inc. Model No: 2M HO LOOP SPECIFICATIONS: Model... 2M HO LOOP Frequency Range... 144 To 144.5 MHz Gain, Typical @ 10 ft.... 4 dbd @ 10 deg. Gain, 2 STK @ 82 & 132... 8 dbd @ 9 deg.
MFJ-1762 Instruction Manual
 MFJ-1762 Instruction Manual INTRODUCTION Thank you for purchasing the MFJ-1762 three-element six-meter Yagi. The MFJ-1762 is a light-weight directional antenna especially designed for installation with
Deck Mount Installation with Bench
 Deck Mount Installation with Bench 1. Mark track with square. 2. Cut tracks with saw. 3. Drill ¼ hole (if needed.) 4. Countersink track. 5. Countersink all track 6. File all track ends. ends. 7. Lay out
Installation Instructions for Vista Air Vertically Folding Walls
 Installation Instructions for Vista Air Vertically Folding Walls Use these instructions in conjunction with your shop drawings to see the specifics that are particular to the model you are installing.
HANDLING AND ASSEMBLY INSTRUCTIONS FOR TRUE FOCUS 3.0M, 3.8M AND 4.2M ANTENNAS WITH POLAR MOUNT
 HANDLING AND ASSEMBLY INSTRUCTIONS FOR TRUE FOCUS 3.0M, 3.8M AND 4.2M ANTENNAS WITH POLAR MOUNT Introduction SECTION 1 Thank you for purchasing one of our fine True Focus products. This manual covers the
FOR PROFESSIONAL GARAGE DOOR INSTALLERS
 Composite Garage Doors Installation Instructions FOR PROFESSIONAL GARAGE DOOR INSTALLERS Tools required Screwdriver Claw Hammer Locking Pliers Power Drill Level with a 3/32" Drill Bit Utility Knife 9/16",
User Guide for the Alpha Loop Sr Antenna
 User Guide for the Alpha Loop Sr Antenna Manufactured by: Alpha Antenna 1.888.482.3249 Website: http://alphaantenna.com Available from: Amateur Radio Store Website: https://amateurradiostore.com User Guide
Warnings. Description. Prior to Installation Tools Needed
 Warnings Failure to act in accordance with the following may result in death or personal injury. The JT Strong Arm Stabilizer System is intended to eliminate chassis movement in travel trailers and fifth