EMTtEmawaT OWNER' MANU EAT. NO TRC PLEASE READ BEFORE USING THIS EQUIPMENT CUSTOM MANUFACTURED FOR TANDY CORPORATION
|
|
|
- Lucy Simmons
- 5 years ago
- Views:
Transcription

1 D EMTtEmawaT TRC OWNER' MANU PLEASE READ BEFORE USING THIS EQUIPMENT EAT. NO CUSTOM MANUFACTURED FOR TANDY CORPORATION
2 Your REALISTIC TRC is a completely solid-state AM/SSB Transceiver designed for the Citizens Band Radio Service. It uses a trequency synthesizing circuit with Digital Phase Locked Loop techniques to provide crystal-controlled transmit and receive operation on all 18 channels. The PLL circuitry assures ultra-precise frequendy tontrol. You can use your TRC Transceiver on any one of the 18 channels in the conventional AM mode, plus the same 18 channels in either the Upper Single Sideband mode or the Lower Single Sideband mode. This flexibility not only doubles the effective number of channels from 18-54, but SSB also increases the effective range of communication because all the power is concentrated in one sideband to provide 100% talk-power. Single Sideband reception also adds advantages in sensitivity and selectivity, plus lower single-to-noise. This of course also contributes to an increase in operating range. The TRC has been carefully designed for ease of operation. You can select AM, Upper Sideband or Lower Sideband with the simple change of a 3-position switch. Transmission is simple too just press the microphone button. Ordinarily an SSB signal will reach farther and be heard more clearly than an equivalent AM signal. SSB reception is simple just adjust the CLARIFIER control to bring in the voice Transmissions. We've added all the other most wanted features for optimum communications RF Gain control, Squelch, Clarifier, PA, switchable Automatic Noise Limiter and Noise Blanker circuits, R F-S meter, Crystal Lattice Filter, Instant Channel button and LED Channel indicator. The Squelch circuit is a special hysterisis type. This means it.is immune to signal fading which often results in squelch -chopping". Another special feature from Radio Shack. The TRC is designed to operate from 12 volt DC negative or positive ground electrical systems, or from 240 Volt AC power. For your own protection, we urge you to record the Serial Number of this unit in the space provided. You'll find the Serial Number on the back panel of the unit. Serial Number WARNING: To prevent fire or shock hazard, do not expose this Transceiver to rain or moisture. GENERAL: Channels Frequency Range Frequency Control Frequency Accuracy Operating Temperature Range Power Requirements Antenna Microphone Speaker SPECIFICATIONS 18 Channels for AM, Upper Side Band and Lower Side Band, utilizing Digital Circuitry MHz to MHz Digital (Phase Lock Loop) Synthesizer ±135 Hz -20 C to +50 C 13.8V DC (12-16 volts DC, negative or positive ground) or 240V AC (50 Hz) 52 ohm (Coaxial connector) 600 ohm Dynamic Type 8 ohm, 2.5 Watt
3 Size Weight Accessories RECEIVER: Max Sensitivity Sensitivity for 10 db MI AGC Figure of Merit 100 mv for 10 db Change in Audio Output Overload AGC Characteristics from 100 mv to 1000 mv Overall Audio Fidelity at 6 db Down Adjacent Channel Selectivity Image Rejection (42.6 MHz) IF Rejection Maximum Audio Output Power Squelch Range Receiver Clarifier Range Battery Drain at no Signal Battery Drain at Max. Output Power AC Power Drain 4"(H) x 13-1/2"(W) x 11-1/2 (D) 10 x 34 x 29 cm 14 Lbs. (approx.) (6.5 kg) : DC Cord with in-line Fuse, Microphone and Microphone Hanger and Mounting Brackets AM, 0.5 µv SSB, 0.25 AM, 0.5 µv or better SSB, 0.25 µv or better 90 db ±3 db Hz 70 db 90 db 85 db 4 Watts Adjustable to 1 mv ±1.25 khz, variable 500 ma 1,500 ma At no Signal 40 Watts At Max. Output Power 60 Watts TRANSMITTER: Max. Output Power Spurious Emission Modulation Frequency Response (1 khz, 0 db reference) Lower at 450 Hz, EIA Upper at 2.5 khz, El A Microphone Sensitivity AM : For 50% Mod. SSB : For 4 Watts PEP Microphone Amplifier Circuit Dynamic Range Battery Drain AC Power Drain AM, 4 Watts FCC SSB, 12 Watts FCC -65 db or better AM, -6 db AM, -6 db AM, 0.4 mv SSB, 0.4 mv AM, 60 db (between 98% and 80% modulation) SSB, 60 db (between 12W P.E.P. and 10W P.E.P.) At no Modulation AM/Less than 2,400 ma SSB/Less than 1,000 ma At Max. Output Power AM/Less than 3,000 ma SSB/Less than 2,700 ma At no Modulation AM/65 Watts SSB/45 Watts At Max. Output Power -- AM/100 Watts SSB/100 Watts PUBLIC ADDRESS AMPLIFIER: Maximum Output Power 4 Watts
4 INSTALLATION CAUTION: Do not attempt to operate your Transceiver without an Antenna or dummy-load connected to the ANTENNA jack. To do so may damage your Transceiver. For fixed or base station operation, simply connect the AC power plug of the Transceiver to a source of 240 volt 50 Hz AC power and set DC-AC switch on the back of the Transceiver to AC. The only other thing you require is an Antenna connection. Safety and convenience are the primary considerations for mounting any piece of mobile equipment. All controls must be readily available to the operator without interfering with the movements necessary for safe operation of the vehicle. Be sure all cables are clear of the brake, clutch and accelerator. Also, thought must be given to the convenience of passengers (will they have adequate leg room?). Another extremely important requirement is the ease of installation and removal (for service and maintenance). Mount the transceiver so it can be slipped in and out very easily. The most common mounting position for a transceiver of this size is under the dashboard directly over the driveshaft hump. Do not mount the transceiver in the path of the heater or airconditioning air stream. Be sure the chassis of the transceiver is electrically connected to the ground system of the vehicle or boat. Use a separate ground wire to be sure. When you have determined the best location for mounting, temporarily mount the brackets to the side of the unit. Use the unit, with brackets installed, as a template to mark where the holes are to be drilled. Take care when you drill holes that you do not drill into wiring, trim or other accessories. Remove the brackets from the unit and assemble them to the dash as shown in the illustration. Mount the Transceiver in position with bolts, lockwashers and nuts or self-threading screws. /%;-% /* V V/ /V VV VV // V V 13.8 DC AC DC FUSE 240 VAC ANTENNA PA SPEAKER EXT SPEAKER FOR BASE INSTALLATION
5 MOBILE INSTALLATION For Negative Ground Electrical Systems: Connect the Black with stripe wire (with in-line fuse holder) to the Accessory terminal on the ignition switch of your vehicle. Make a good mechanical and electrical connection to the frame of the vehicle for the black (negative) wire. Set DC-AC switch to the DC position. For Positive Ground Electrical Systems: Connect the Black wire to the Accessory switch "hot" terminal and connect the Black with stripe Wire to the metal frame of the vehicle. Thus, Black always goes to negative (-) and Black with stripe! always goes to positive (+). Set DC-AC switch to the DC position. You can use an auto accessory plug (Radio Shack Catalog No ) to connect your Transceiver to the vehicle's cigarette lighter socket. However, it is better to connect the DC power cord directly to the accessory terminal of the ignition switch. This will prevent unauthorized usage of the Transceiver, and will also prevent you from leaving the Transceiver on unintentionally. FOR MOBILE INSTALLATION
6 ANTENNA SYSTEM The antenna system includes the transmission line, and it is very important that you use the correct type of transmission line. The transmission line should be of the coaxial type and should have an impedance equal to the antenna impedance. Since your Transceiver is designed to operate most efficiently into a 50 ohm load, it is best to use a type of coaxial cable with an impedance of 50 ohms. We suggest type RG-58/U for short lengths and RG-8/U for long lengths. Generally speaking, you should keep the length of the transmission line to a minimum. Remember that line losses increase with frequency. Use foam-insulation coax for best results. The above discussion is as important for reception as it is for transmission. If a mismatch exists between the antenna and the receiver, the excellent sensitivity and signal-to-noise ratio of the receiver circuitry will be defeated. FIXED STATION ANTENNAS The most popular fixed station antenna is a complex colinear or ground plane. Beam antennas provide maximum gain and maximum directivity. The directivity can be a disadvantage unless a rotor is used. Since a beam antenna is directional, it greatly reduces noise and interference from all other directions. This can be a decided advantage on the CB bands where man-made noise is a problem. GROUND PLANE DUAL 6-ELEMENT BEAM VERTICAL BEAM BASE STATION ANTENNAS Your Radio Shack store carries a complete line of base station CB antennas and accessories. For maximum efficiency, we strongly recommend using an SWR meter to aid in the proper matching between your antenna and Transceiver. The antenna system should be adequately grounded. Always use a lightning arrester for your antenna system. MOBILE STATION ANTENNAS Mobile CB antennas are one of two types. a full-length or a loaded whip. Your Radio Shack store carries a complete line of both types of mobile antennas. The location of the antenna has a great effect on the antenna efficiency and directivity. Antennas mounted in the center of the roof radiate equally in all directions. A bumper-mounted antenna radiates in a pattern directly in front of and to the rear of the vehicle, with maximum radiation directly away from the vehicle, in a horizontal plane.
7 Since the normal 1/4 wavelength whip antenna is too long (102" [2.6m] ) for roof mounting on a vehicle, the antenna is shortened and a loading coil is utilized to provide the proper electrical length. As a result, the overall efficiency is reduced and the nondirectional advantage is defeated. Thus, a bumper-mounted full-length whip antenna will normally give the best results. ROOF MOUNT FRONT COWL MOUNT REAR DECK MOUNT BUMPER MOUNT A few general rules should be followed for proper installation of any mobile antenna: 1. Keep it as far as possible from the main bulk of the vehicle. 2. Keep as much of it as possible above the highest point of the vehicle or boat. 3. During operation, it must be vertical. Thus, it should be mechanically rigid so it will maintain a vertical position when the vehicle or boat is in motion. 4. Mount it as far as possible from sources of noise (ignition system, gauges, etc.) and convenient for transmission line routing away from these noise sources. An antenna mounted in a boat requires a ground. This can be either the metal hull or a ground made of tin-foil or copper sheeting. This ground should cover an area of 12 square feet (1 m2 ) or more. Be sure the transceiver has an adequate ground as well. If you use Radio Shack's 102" (2.6 m) Fiberglass Marine Antenna (21-912), you won't need a ground; it has been designed with its own "ground" system. NOISE Your vehicle or boat can be the cause of much noise interference. Your TRC incorporates a switchable Automatic Noise Limiter circuit for AM and a Noise Blanker for both AM and SSB reception. Also, it has built-in power supply filtering. These circuits can help to reduce and/or eliminate annoying noise. Remember, your Transceiver has a very sensitive receiver and it will pick up even the smallest trace of ignition noise. Any noise that you hear in the Transceiver is almost totally from external sources. The receiver itself is exceptionally quiet. Steady high noise levels can not be eliminated by the internal Automatic Noise Limiter and Noise Blanker circuits. Noise problems can not be solved internally (in the Transceiver); they must be solved at the source of the noise. 11 you wonder if the noise is from your ignition system, the Transceiver or an external` source, try this simple test. Turn your ignition switch off and set it to ACC (accessories). This turns off the ignition, but supplies power to the Transceiver. Most of the noise will disappear indicating that the source of noise is your ignition system. This interfering noise can be generated anywhere in the electrical system of the vehicle or boat. The first step in reducing or eliminating this noise is to locate the source of the noise.
8 IGNITION SYSTEM The most common source of noise is the ignition system. This noise can be identified by the fact that, it varies with the speed of the engine. It consists of a series of popping sounds occurring at a regular rate that will vary with the speed of the engine and stop when the ignition is turned off. There are a number of things that can be done to reduce this type of noise: 1. Use only the "radio suppression type" high voltage ignition wire. Most new cars come already equipped with this type of wire. 2. Inspect the high voltage ignition wire and all connections made with this wire. Old ignition wire may develop leakage, resulting in hash. 3. If noise still persists, replace the spark plugs with spark plugs that have suppressor resistors built-in. Be sure to use the correct type for your vehicle. Other sources of noise are: generator/alternator, regulator, gauges and static discharge. Most of these types of noise can be effectively reduced or eliminated by using bypass capacitors at the various output voltage points. Once again, we suggest you check your Radio Shack store for a selection of noise reduction accessories.

9 CONTROLS AND THEIR FUNCTIONS This short description of the function of each control and jack supplies background information for proper operation. For actual Operating Instructions, refer to Using Your Transceiver. MICrophone... The dynamic microphone must be connected to this jack. To Transmit, press the button on the mic and talk into the mic. To Receive, release the button. When transmitting, hold the microphone at an angle, two or three inches (5-7.5 cm) from your mouth and speak clearly in a normal voice. Your Transceiver features a new locking type microphone connector. This insures that you won't accidentally pull out or loosen the plug connection (when extending the MIC cable while moving about). To release the MIC connector, you must press the small Tab (see illustration above) on the Top and then pull out. PHONES... Plug in communications type headphones for private listening, or in areas where background noise is excessive (factories, at the scene of an accident or fire, etc.). When you plug in the headphones, it automatically disconnects the internal speaker (or an external speaker). Channel Selector... use to select any one of the standard 18 CB channels. VOLUME with "ON/OFF" switch... Turn clockwise to apply power to the unit and then adjust for the desired level of sound from the speaker. When using PA, it controls the level of the PA output. SQUELCH... Sets the level of the internal Squelch circuitry to cut out the background noise when no signal is being received. When properly set, it allows signals to come through, but cuts off the receiver sound when no signal is being received, thus eliminating annoying background/atmospheric noise during standby and monitoring conditions. If set too high, you may miss some of the weaker signals. Operating conditions will determine the best setting. RF GAIN... Varies the sensitivity of the RF amplifier stages of the Receiver circuitry. For normal operation, set RF GAIN to maximum and adjust VOLUME for a suitable listening level. Under highsignal conditions, you may want to turn RF GAIN down a little and raise VOLUME as required. CLARIFIER... Functions as a "fine tuning" (or "delta" tuning) for reception of Single Sideband and AM signals when the Mode switch is set to either LSB or USB. This permits you to tune your receiver to exactly the same frequency of any other station or stations which you are communicating with. AM-USB-LSB Mode Switch... set this switch to the desired mode of operation for both transmit and receive. When in the AM position, both transmitter and receiver sections are operative for AM. When set to the LSB position, the Receiver operates to receive only the lower sideband portion of a signal; the Transmitter will transmit only the lower sideband of the modulated waveform. In the USB position, the Receiver operates only to receive the upper sideband portion of a signal; the Transmitter will transmit only the upper sideband of the modulated waveform.

10 PA push-button... Controls the function of the audio amplifier/modulation circuitry when the Microphone button is pressed. When the PA button is in the "out" position, the Microphone button turns the Transmitter on for normal transmissions. When you press the button in, the Transmitter will not function the Microphone turns on the Public Address Amplifier function. For PA operation you must have a PA speaker connected to the PA jack on the rear chassis. ANL/NB push button... press in to cut out annoying hash-type and impulse-type noises. Press again to release this function. NB(Noise Blanker) is particularly effective for ignition noise on both AM and SSB, while AN L(Automatic Noise Limiter) is effective for AM signals. RF-S Meter... gives visual indication of signal strengths. When receiving, the RF-S Meter shows the strength of incoming signals; a change of one "S" unit indicates a change of 6 db in signal strength. The meter is set up so that a 100 microvolt signal will produce a reading of S-9. When Transmitting, the RF-S meter gives a relative indication of output power from the Transmitter. PA + CB RECEIVE push button.. press in both ANL/NB and PA to activate PA operation plus CB RECEIVE function; you can monitor the CB signal from your PA speaker when the microphone button is released. CH 5 Switch... Press in and you instantly jump to channel 5. Press again to release this function and Transceiver will return to the previously selected channel. Channel 5 Indicator LED... Lights up when you are using the "instant" Channel 5 function. THE REAR PANEL PA SPeaKeR Jack... connect an 8-ohm Public Address speaker to this jack for PA use. We recommend Radio Shack's , weatherized, rugged PA Speaker, as an ideal unit for either PA or External Speaker application. EXTernal SPeaKeR Jack... if you want to use an external speaker, plug it into this jack. You should use a standard 8 ohm type. When a miniature (9/64", 3.5 mm) phone plug is inserted into this jack, the built-in speaker is automatically disconnected. ANTENNA Coax Connector... connect your CB antenna to this (S0-239 type, accepts PL-259 connectors). FUSE... is for protection of the Transceiver and its source of AC power. If the Transceiver does not operate from AC power, check this fuse replace only with the same type and value (5 amp). 13.8V DC Connector and Power Cable with in-line fuse... this cable is to be connected to a source of volts DC power, negative or positive ground. The Black with stripe wire with the in-line fuse must be connected to the + side and the Black wire to the - side. 240V AC POWER CORD... plug into a source of 240 volts, 50 Hz AC power. DC-AC Switch... selects the power source, DC or AC.
11 USING YOUR TRANSCEIVER Note: For detailed information on Installing, refer to INSTALLATION. Do not transmit without an Antenna or suitable load connected. Do not operate the PA function without a speaker connected to the PA SPKR jack. Your Transceiver can be used either as a base or mobile unit. For base operation, connect the AC power plug to a source of 240 volts, 50 Hz AC power. Set the DC- AC switch on the back of Transceiver to AC position. Connect coaxial transmission cable from your antenna to the ANTENNA coax connector on the rear panel. For most efficient operation and safety, use a separate ground wire connection between the chassis of your Transceiver and a cold water pipe or ground rod. For mobile operation, use the 12-volt DC power cable and set DC-AC switch to the DC position. Also connect Antenna and ground and make all necessary mounting requirements. TO RECEIVE AM SIGNALS 1. Set RF GAIN control maximum clockwise. 2. Set SQUELCH control maximum counterclockwise. 3. Set Mode to AM. 4. Turn power "on" by rotating VOLUME clockwise. 5. Set Channel Selector to the desired channel. 6. Adjust SQUELCH to cut out annoying background noise when no signal is being received. To do this, set Channel Selector to a channel where no signals are present (or wait till signals cease on your channel). Then, rotate SQUELCH in a clockwise direction to the point where the background noise just stops. Now, when a signal is present, you will hear it, but will not be disturbed by noise on the channel in between signals. When properly set, SQUELCH will keep the receiver "dead" until a signal comes in on that channel. Do not set SQUELCH too high, or weak signals will not be able to "open" the Squelch circuit. To receive weak signals, it is best to leave SQUELCH set to the minimum position (maximum counterclockwise). 7. Use CLARIFIER to tune in slightly off-frequency stations, or to tune out adjacent channel interference caused by a station on the next channel (which may be too close to your channel). 8. Adjust VOLUME for a suitable listening level. 9. Push ANL/NB button in if your reception is disturbed by interference from impulse-type noise (ignition noise and other man-made electrical noise) or hash-type noise(fluorescent light and other types of constant broad-frequency type noise). 10. Use CH 5 switch to instantly check Channel 5 activity.
12 For most distinct reception, plug communications-type headphones (such as Radio Shack Catalog Number ) into PHONES jack. This will be particularly helpful when operating in high noise surroundings (factory, construction site, etc.) Often you'll find an external/remote speaker will be most advantageous. We've made provisions for connecting such a speaker just connect it to the EXT SPKR jack on the back. Radio Shack sells a number of fine speakers for this purpose we recommend Catalog Number When you connect a speaker to this jack it automatically disconnects the internal speaker. TO RECEIVE SSB OR DSB SIGNALS 1. Set RF GAIN maximum clockwise. 2. Set SQUELCH maximum counterclockwise Set Mode to either LSB (lower sideband) or USB (upper sideband), depending on which sideband is being used by the transmitting station. NOTE: When receiving DSB (double sideband) signals, you can use either LSB or USB. 4. Turn power "on" by rotating VOLUME clockwise. 5. Set Channel Selector to the desired channel. 6. Adjust SQUELCH as noted above. 7. Use CLARIFIER to tune in the SSB signal. SSB tuning takes practice; it is not difficult, it just takes a little experience. When first listening to an SSB signal, it probably will not be understandable; the voice may sound like "Donald Duck", or just a low guttural sound. In either case, very slowly adjust CLARIFIER to bring the signal into its natural voice tonal range. If the signal is Donald Duck type, tune so the signal tones become lower in tone; careful tuning will make the voice sound natural. If the signal is low and guttural, tune for higher tones. NOTE: If you try the above procedure and are not able to make the signal intelligible, it may be an SSB signal operating on the other sideband try the other SSB Mode (LSB or USB as the case may be). 8. Adjust VOLUME for a suitable listening level. Use ANL/NB to reduce or eliminate noise interference. Notes on Receiving An SSB signal will produce a fluttering, unintelligible sound when receiving in the AM mode; in such a case, use either the LSB or USB mode and adjust CLARIFIER for intelligibility. You can tune AM signals when the Mode switch is in the USB or LSB position; tune CLARIFIER control to eliminate the steady tone caused by the AM carrier ("zero-beat" the tone so it disappears). Remember that adjustment of CLARIFIER only shifts the Receiving frequency, not the Transmitting frequency. When receiving an extremely strong SSB signal, you will find it best to use the RF GAIN control to vary the volume (rather than using VOLUME).
13 TRANSMITTER OPERATION 1. Be sure PA button is out. 2. Plug the Microphone into the MICrophone jack. 3. Set Mode Switch to the desired position. 4. Select the desired channel of operation. 5. Press the push-to-talk button on the side of the Microphone and speak in a normal voice into the Microphone. Best results will be obtained when you hold the mic 1 to 4" ( cm) from your mouth and turned at about a 45 angle (not straight on). 6. When transmitting, the meters will turn red. The RF-S Meter will indicate the relative level of output power. 7. To receive, release the push-to-talk button. USING THE PUBLIC ADDRESS AMPLIFIER FEATURE You can use your Transceiver to provide 4-6 watts of audio power as a Public Address amplifier. To use this function, you must connect an 8 ohm public address type speaker to the PA SPeaKeR jack on the rear of this unit. We recommend Radio Shack's ; it's a weatherized 4" (10 cm) speaker, specifically made for PA use. 1. Be sure an 8 ohm speaker is connected to the PA SPeaKeR jack. 2. Push in PA button. 3. Turn the Transceiver "on" with the VOLUME control. 4. Connect the microphone and press the push-to-talk button and talk into the mic. Adjust VOLUME as required for the appropriate level of sound Even though you have your Transceiver set for PA operation, you can still monitor CB signals press in both PA and ANL/NB buttons, and CB signals will be heard through the PA speaker. This way you won't miss any important calls, even while using PA. To defeat the receiver sound, press ANL/NB button again to release it. 6. To return to normal Transceiver operation, press PA button to release it.
14 SSB (SINGLE SIDEBAND). WHAT IS IT? We thought you'd be interested in knowing and understanding something about the SSB function and capability of your Transceiver. To understand SSB, we need to know what an AM (Amplitude Modulated) signal is. Amplitude Modulation is a form of heterodyning mixing 2 signals together electrically. In the process of mixing, 3 signals result. Example: An R.F. signal at MHz (channel 1 C.B.) is mixed with (modulated by) a 1000 Hz tone. The resulting signals MHz = original or "carrier" signal MHz 1000 Hz (27,015,000 minus 1000) = MHz, the Lower Sideband MHz Hz (27,015,000 plus.1000) = MHz, the Upper Sideband CARRIER j MHz AMPLITUDE LOWER SIDEBAND MHz UPPER SIDEBAND MHz FREQUENCY Notice that the communication or intelligence (the 1000 Hz tone) is contained in each sideband. The Carrier contains no intelligence. This fact is vital! For the sake of communication, all we need to receive is the 1000 Hz tone. The receiver only needs to recover one signal, and yet we are transmitting 3 signals. Not only are we sending 3 signals, but also we are wasting most of our power in one of them (which carries none of the intelligence, i.e. the carrier, MHz) and the other two signals duplicate each other! Thus, if we can eliminate the carrier (not needed for communication) and can send only one of the sidebands (since they duplicate each other's information anyway), we could concentrate all of the transmitting power into one sideband. This is exactly what Single Sideband accomplishes. Single Sideband transmissions incorporate only one of the sidebands i.e. in the example above, only the upper sideband at MHz or only the lower sideband at MHz. The second sideband and the carrier are eliminated in the early stages of the transmitter circuitry. SSB LOWER SIDEBAND SSB UPPER SIDEBAND CARRIER (SUPPRESSED) UPPER SIDEBAND / (SUPPRESSED) A M PLITUDE CARRIER (SUPPRESSED) LOWER SIDEBAND (SUPPRESSED) \ FREQUENCY FREQUENCY When only one sideband is transmitted, we can concentrate all of the available power in this one sideband, greatly increasing the effective power of an SSB signal as compared to an AM signal. See Advantages of SSB Over Normal AM. 14
15 ADVANTAGES OF SSB OVER NORMAL AM A theoretically perfect AM transmitter used in the Citizens Band Radio Service as permitted by the P. & T. will have the following maximum output power specification: Carrier watts with the capability of slightly less than 100% modulation In order to fully Amplitude Modulate a 4 watt carrier, a full 2 watts of audio power is required. In this case, only 1 watt of power can exist in each sideband. Since the carrier contains no intelligence, and the sidebands duplicate each other, really only one sideband is required to transmit the required intelligence. If we take the above transmitter and convert it to Double Sideband operation (eliminate the carrier power), we can increase the power in the sidebands to 2 watts each, without overloading the circuitry. Further, if we eliminate one of the two sidebands, we can put the full 4 watts of power into the remaining sideband. Thus, while an AM transmitter has only 1 watt of power in one sideband, an SSB transmitter can have 4 watts of power in one sideband or 4 times the power of an AM transmitter. Thus, effectively an SSB transmitter with the same power limitations is 4 times more powerful than an AM transmitter. One further advantage, which is not often mentioned. Not only does the SSB signal take up only 1/2 of the frequency spectrum space of an AM signal (only 1 sideband instead of 2), thus permitting twice the number of stations to be in the same amount of band space but also, at the receiving end, the receiver only picks up 1/2 of the total AM bandwidth. This means that 50% less noise is amplified along with the signal. This results in a 50% improvement in signal-to-noise figures; or, in more technical terms, a 3 db improvement. Thus, given equal limitations and conditions, an SSB signal will be 4 times more powerful and will have 2 times the signal-to-noise advantage of an AM signal-8 times as effective. in technical terms, a 9 db advantage. Thus, for an AM transmitter to be equivalent in effectiveness it would have to be rated at 32 watts! Enough said! We hope you're enthused.
16 MAINTENANCE Since only the finest quality parts are used throughout your Transceiver (and these are all conservatively rated), you will need little or no service or repair of the unit. Be sure you treat it with the care deserving of such a piece of electronic equipment. It is rugged and designed for either base or mobile use but do not abuse it. Be sure you always make proper connections and adequate mounting provisions. If you run into problems with the unit, we recommend you check the following: 1. If trouble is experienced with receiving. Check the VOLUME On/Off switch setting. Be sure SQUELCH is adjusted properly. Is it over-squelched? Check if the unit is switched to an operating channel. 2. If trouble is experienced with transmitting. Check if the transmission line is securely connected to the ANTENNA Connector. Check to be sure the antenna is OK. Are all transmission line connections secure and free of corrosion? Make sure you are fully pressing the. Push-To-Talk Button on the Mic. Be sure Mic connector is firmly pressed into its jack. 3. If the Transceiver is completely inoperative. Check the power cable and in line fuse (4A). Be sure DC-AC switch is in correct position. If these checks don't solve the trouble, do NOT attempt repairs or adjustments yourself. The unit should be serviced only by a qualified radio technician. Whenever possible, return the unit to the store from which it was purchased. WARNING Do not open up the Transceiver to make any internal adjustments. Only a technician qualified and recognized by Department of Communication can make internal adjustment of a CB unit.
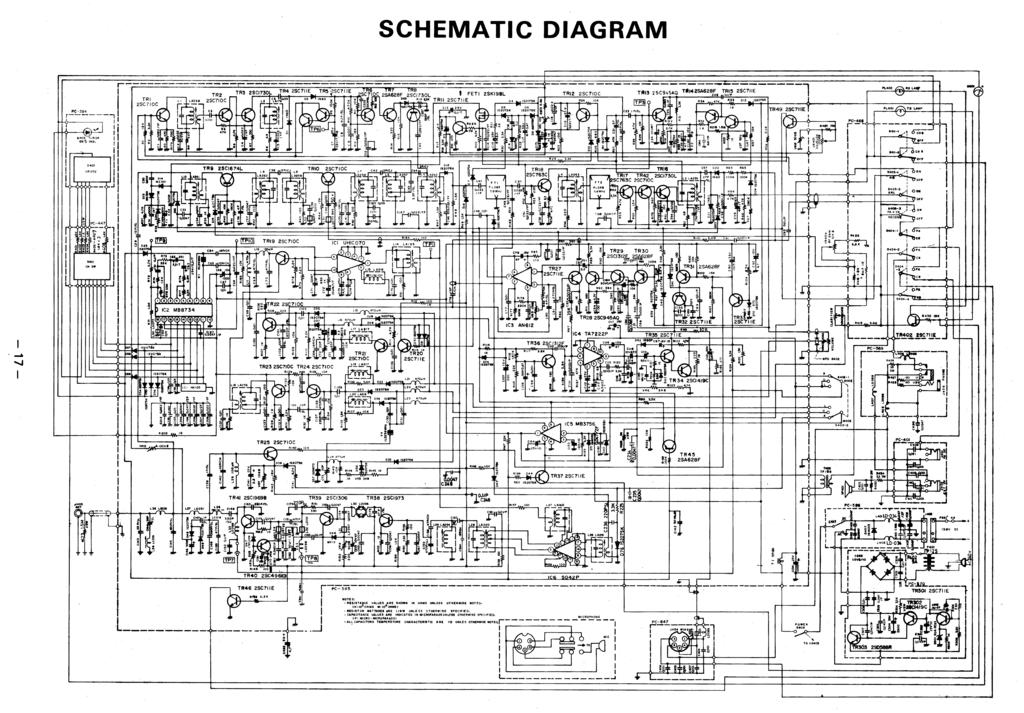
17
18 4411kAlbiAg paakalka \' TANDY LIMITED WARRANTY This equipment is warranteed against defects for 90 days from date of purchase. Within this period, we will repair it without charge for parts and labor. Simply bring your sales slip as proof of purchase date to any TANDY store. Warranty does not cover transportation costs. Nor does it cover equipment subjected to misuse or accidental damage. This Warranty gives you specific legal rights and you may also have other rights which vary from state to state. We Service What We Sell For service, return this set to your nearest TANDY ELECTRONICS store. AUSTRALIA Head Office: TANDY CORPORATION VICTORIA ROAD RYDALMERE, N.S.W RYDALMERE, N.S.W TANDY CORPORATION BELGIUM U.K. PARC INDUSTRIEL DE NANINNE BILSTON ROAD 5140 NANINNE WEDNESBURY,STAFFSWS1O 7JN 6A9 Printed in Taiwan

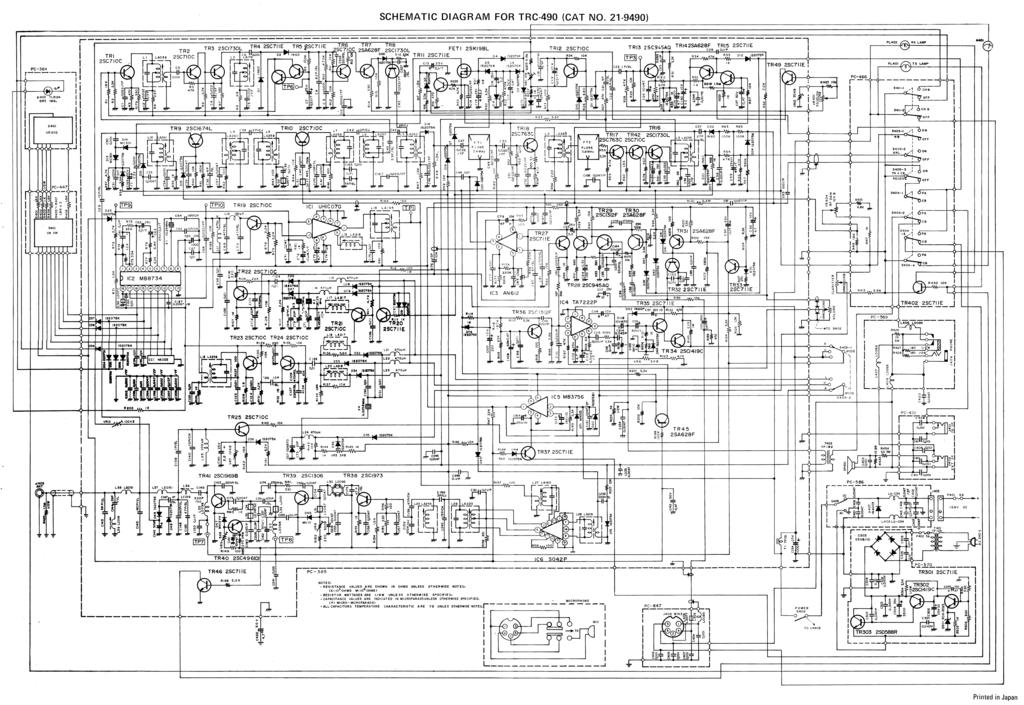
19 REVISION FOR AUSTRALIAN MODEL OF TRC CATALOG NUMBER: Fvco MHz MHz IC I V. C.O MHz FL TRI9 Mixer A AMP 1.05 MHz MHz 3.0V MHz 2.0V chi Ch 113 r LOW PASS Filter Filter IC 2 PHASE Detector 0.84MHz I.05MHz 10 khz 1/1024 D When servicing Australian model of TRC (catalog number ), refer to the SERVICE MANUAL for TRC-490 (catalog number ) as well as the following revision: 1. SPECIFICATIONS PAGE 3 GENERAL: Channels Frequency Range MEASUREMENT CONDITION: 18 Channels MHz Measuring Channel Channel BLOCK DIAGRAM PAGE 7 AC power source should be 240V 50 Hz. 4. CIRCUIT DESCRIPTION PAGE 8 1. PLL Replace the PLL BLOCK DIAGRAM below. PAGE 9 CH X ital 4 AM : MHz USB: I I.3258MHz LSB: MHz TR 24 OSC TR23 Tripler MIT 3. CHANNEL SELECTION PROGRAM 3Fo Vp-p 10kHz t Programmable Divider /N Channel Selector Switch I 0.24MHz RE F.OSC ) MHz The clause at 8th column should be Pins 12 and 14 are "high" level N=4+16+(64)=84 In the same manner, the Divided Ratio N for Ch. 1 through 18 is determined as shown in the Frequency Chart. For example, when the unit is transmitting on Channel 15, the frequency will be as shown in following table: ANTENNA OUTPUT FREQUENCY 1/N INPUT FREQUENCY PIN NO. OF IC2 _J LOCAL OSC OUTPUT FREQUENCY AM. RX USB&AM.TX LSB
 STEP PRESET TO CONNECTION ADJUSTMENT 1 2 3 CH: 18 USB, RX, Clarifier in center Same as step 1. CH: 1. Same as step 1. CH: 10 4 Same as step 3.")
20 7. ALIGNMENT INSTRUCTIONS PAGE 14 ALIGNMENT OF PLL AND CARRIER OSCILLATOR 2. Alignment Procedure: (See page 13) STEP PRESET TO CONNECTION ADJUSTMENT CH: 18 USB, RX, Clarifier in center Same as step 1. CH: 1. Same as step 1. CH: 10 4 Same as step 3. TP-9 (lead of R-72) TP-9 TP-10 (lead of R-193) TP-1 (lead of R157) Adjust L-13 for 3.5V DC reading on Oscilloscope. (Oscilloscope in DC mode) Check that the voltage is more than 2V DC on Oscilloscope. Adjust L-18 for maximum reading on Oscilloscope. (Oscilloscope in AC mode). Adjust L 14 for maximum reading on Oscilloscope. 5 Same as step 3. TP-1 Adjust CT-3 for MHz ±-20 Hz Same as step 3. AM. Same as step 3. LSB. Same as step 3. LSB, TX. Same as step 3. LSB, RX. Same as step 3. USB, R X. Same as step 3. AM, TX. TP-1 TP-1 TP -1 TP-3 (lead of R-101) TP-3 TP-3 Adjust L-20 for MHz -±20 Hz. Adjust L-19 for MHz ±20 Hz. Adjust VR-3 for MHz ±-20 Hz. Adjust CT-2 for MHz Hz. Adjust CT-1 for MHz +05 Hz. Adjust L-17 for MHz ±-5 Hz. PAGE 15 ALIGNMENT OF TRANSMITTER SECTION 2. Alignment Procedure: (See page 13) STEP PRESET TO ADJUSTMENT REMARKS 1 CH:19, PA/CB: CB USB mode, TX Si and S2: OFF VR8 2 Same as step 1 VR9 3 After STEPs 1 and 2, restore circuit at TP8 and TP7. Same as step 1 OSC1: 500 Hz OSC2: 2400 Hz S1,S2: ON L26,27,28 and L29 4 Same as step 3 L28 and L Same as step 1 AM mode OSC1: 1 khz Si: ON, S2: OFF Same as step 1 S1,S2: OFF Same as step 3 OSC1: 500 Hz S1,S2: ON Same as step 1 AM mode Si and S2: OFF L36 V R 5 VR7 VR6 9 Same as step 8 VR10 10 Same as step 8 L39 11 AC/DC switch: AC Break circuit at TP8, place DC ma meter in series. Adjust for 30 ma +(:5) ma. If you can not obtain 30 ma, set VR8 for max. current. Break circuit at TP7, place DC ma meter in series. Adjust for 60 malma. If you can not obtain 60 ma, set VR9 for max. current. Set VR7 to full CW rotation (ALC "off" condition(. Keep the AF ATT for approx. 20V reading on RF VTVM. Then adjust coils for max. reading. Repeat this adjustment several times, reducing the AF input level to the microphone circuit. Set the core of L29 at the bottom. Adjust L28 for max. reading on RF VTVM. Then adjust L29 for max. reading. Check the power difference between CH1 and CH18. If it is over 1V on RF VTVM, readjust L29 to obtain within 1V. Adjust level of OSC1 for 5 mv reading on AF VTVM, then adjust L36 for maximum reading on RF VTVM. Adjust for minimum carrier leakage for both USB and LSB on Spectrum Analyzer or Oscilloscope. Adjust OSC1 and OSC2 for 5 mv reading on AF VTVM, then adjust VR7 for 24.5V reading on RF VTVM. Adjust for 4.0W reading on RF Power meter. Adjust so the pointer needle of Transceiver's meter between white and red zone. Adjust for minimum 2'nd harmonic (54 MHz) on Spectrum Analyzer or Monitor receiver. Connect the AC power cord to AC 240V, check the AM TX power, if it is far lower than 4 watts, it may be caused by low output voltage from the DC power supply.
21 PAGE 16 ALIGNMENT OF RECEIVER SECTION 2. Alignment Procedure: (See page 13) STEP PRESET TO ADJUSTMENT PROCEDURE 1 Channel : 10 Clarifier : center Volume : fully CW. RF GAIN : fully CW.. Squelch : fully CCW. NB/ANL : off Mode : AM 2 Same as step 1 L10,9,8,7,6,5,4 and 3. 3 Same as step 1 L8 and 9. 4 Same as step 1 except squelch isfully CW. VR12 5 Same as step 1 V R1 6 Same as step 1 except NB/ANL switch is ON. Ll and TROUBLESHOOTING HINTS PAGE 18 PLL TROUBLESHOOTING HINTS Set the SG on channel 10, MHz with 1 khz, 30%modulation. Adjust the level of SG to obtain 2V reading on AF VTVM. Then adjust coils for maximum reading on AF VTVM. Repeat this step reducing the SG output. Set the core of L8 at the bottom. Adjust L9 for max. reading on AF VTVM. Then adjust L8 for max. reading. Check the sensitivity difference between CH1 and 4Q If it is over 1 db, re-adjust L8 to obtain within 1 db. Set the level of SG to 1000µV. Then adjust VR12 so that the AF signal will just appear on Oscilloscope. Set the level of SG to 100 µv. Then adjust for "S-9" reading on Transceiver's meter. Connect the Oscilloscope to TP6 (lead of R-9). Adjust the level of SG to approx. 1.6 pv. Then adjust for max. DC reading. (Oscilloscope in DC operation( "Check whether voltage is 3.5 volts on TP-9 at CH 40" should be read as "check whether voltage is 3.0 volts on TP-9 at CH 18." IC2 MB8734 Pin No Voltage Pin No Voltage CHANNEL SWITCH P.C. BOARD PAGE 23 Refer to the attached revision. 13. LED P.C. BOARD PAGE 23 Refer to the attached revision. 20. MAIN P.C. BOARD (TOP VIEW) PAGE 25 Refer to the attached revision. 22. ADDITIONAL PARTS ON THE BOTTOM PAGE 27 and VOLTAGE CHART PAGE 29 PAGE 19 Measureed at CH10. IC1 UHIC-070 Pin No Voltage Refer to the attached revision. 23. WIRING DIAGRAM Refer to the attached revision.

22 12. CHANNEL SWITCH 13. LED P.C. BOARD 20. MAIN P.C. BOARD PAGE 23 P.C. BOARD PAGE 23 (TOP VIEW) PAGE 25 (TOP VIEW) PC 384M 1 ILl 4 MARKI N G SIDE ar PC- 44.7CA Att,11
 PC - 3 85 TR 34 2SCI419C d. 0.")
23 22. ADDITIONAL PARTS ON THE BOTTOM (for page 27) (for page 28) PC TR 34 2SCI419C d C23$ N PC- 385

24 PAGE WIRING DIAGRAM SQUELCH vr401 looka VOLUME, POW EK pc-31348a VR403 /OKA S402 C. S. M401.5 S. S/RF METER f I -1 a ; c4o3 cra w 8,, cg,.. Lc....,, z IA S P401 3 P 030 T401 TF/Zg W96 13L1c. -80-p, j I W92 '(EL 5-So-PJ 1 r _i_will.org, 2 _ OP, J GRY 5-80-P j : 6, 3i1-1 r I i WNW EILKOD P.. R423 ill ISM 1/2W PC -401M PC I- NW L _ J CAMPER WIRE 4.1 PA SP EXT. SP 2405 ANTENNA F402 5 A
25 24. ELECTRICAL PARTS LIST 42 AC Power Cord WZ-053 Deleted AC Power Cord (WZ-013 for CANADA). WWZY REF. MFRS PAGE NO. DESCRIPTION PART NO. 31 C-82 Capacitor, Mylar µF 50V K CQMZ C-105 Capacitor, Ceramic 10pF 50V D CH CCBZ C-159 Capacitor, Ceramic 470pF 50V K UJ CCUZ C-181 Capacitor, Ceramic /F 50V Z ZF CKCZ C-212 Capacitor, Ceramic 0.022pF 50V M YF CKDZ C-233 Capacitor, Ceramic 330pF 50V K SL CKDZ R-182 Carbon Film Resistor 220 ohm 1/8W J RUBZ R-186 Carbon Film Resistor 470 ohm 1/8W J RUBZ R-403 Carbon Film Resistor 1K ohm 1/2W J RPBZ R-419 Carbon Film Resistor 1.8K ohm 1/8W J RUBZ Deleted R Deleted R-148, R-160 and R Deleted R-188, R-224, R-409 to R-413, R-423(for USA) and R S-401 Switch, Rotary (CH) SR-230 SSRY Deleted S-402(for CANADA) T-401 Transformer, Power TF-125 TTFY Deleted T-401(for CANADA) TR-12 Transistor 2SC710-C DDBY TR-13 Transistor 2SC945A-Q DDBY VR-401 Variable Resistor, RV K ohm B (Squelch) RRVY VR-402 Variable Resistor, RV-311 Deleted VR-403(for CANADA) PC Board Ass'y (MAIN) PC Board Ass'y (CH SW) PC Board Ass'y (LED) PC Board Ass'y (Mic Jack) PC Board Ass'y (PWR Supply) PC Board Ass'y (SP Jack) PC Board Ass'y (Push Switch) PC Board Ass'y (Phone Jack) PC Board Ass'y (Filter) 20K ohm B (Clarifier) RRVY G-PC G-PC G-PC G-PC G-PC G-PC G-PC G-PC G-PC-586 C-243 C-246 C-240 C-239 C-241 C-245 C-244 REF. PAGE NO THE FOLLOWING PARTS ARE NEWLY ADDED Capacitor, Electrolytic Capacitor, Mylar Capacitor, Ceramic Capacitor, Ceramic Capacitor, Ceramic Capacitor, Ceramic Capacitor, Ceramic 47µF 0.112F 15pF 270pF 0.001/1F /./F 0.01µF Terminal Block, TP-037 (SAA) 16V Z 50V K 50V K CH 50V K SL 50V M YD 50V M YD 50V M YD 25. MECHANICAL PARTS LIST Optical Filter, Display Nameplate, Control Nameplate, Control ID Plate, PTD DESCRIPTION Deleted 6 (for USA), 31 (for CANADA), 33 (for CANADA), 34 (for CANADA) and 78 (for USA) CELZ CQMZ CCCZ CCGZ CKDZ CKDZ CKDZ JTPY MFRS PART NO. MDMP MDNP MDNP MDNP Optical Shielding Cloth 0.3t MDNP A
26
CON NEX HP. OWNER'S MANUAL Full Channel AM/FM Amateur Mobile Transceiver TABLE OF CONTENTS TUNING THE ANTENNA FOR OPTIMUM S.W.R..
 TABLE OF CONTENTS PAGE SPECIFICATIONS... 2 INSTALLATION... 3 LOCATION... 3 CON NEX - 4300HP MOUNTING THE RADIO... 3 IGNITION NOISE INTERFERENCE... 4 ANTENNA... 4 TUNING THE ANTENNA FOR OPTIMUM S.W.R..
DELUXE 18CHANNEL SSB/AM CB TRANSCEIVER OWNER'S GUIDE
 DELUXE 18CHANNEL SSB/AM CB TRANSCEIVER OWNER'S GUIDE General Description The Bush Ranger is a combination transmitter and receiver designed for use in the Australian 27 MHz Citizens radio service. It is
DX 33HP. 10 Meter Amateur Mobile Transceiver OWNER S MANUAL. Download this Manual Free of Charge at
 DX 33HP SIG 1 3 TX PWR 5 7 9+30dB POWER HI NB/ANL MED LO HI LO BAND ECHO RX/TX VOL SQ MIC RF FM PA AM D/A E/B F/C ECHO TIME BAND 10 Meter Amateur Mobile Transceiver Download this Manual Free of Charge
VvV MODEL-309 OWNER'S MANUAL. 40 channel CB Transceiver. Professional Quality And Performance Standards Advanced Circuitry With PLL Synthesis
 VvV MODEL-309 OWNER'S MANUAL 40 channel CB Transceiver Professional Quality And Performance Standards Advanced Circuitry With PLL Synthesis GENERAL INSTRUCTIONS Your model is an all solid-state SSB/AM
DX 33HML. Full Channel AM/FM Mobile Transceiver OWNER S MANUAL. Printed In Malaysia AT H PD000802
 DX 33HML Full Channel AM/FM Mobile Transceiver Printed In Malaysia AT3601014H PD000802 OWNER S MANUAL TABLE OF CONTENTS Page Specification.................................... 2 Installation Location.....................................
DX 29HP. 10 Meter Amateur Mobile Transceiver OWNER S MANUAL PRINTED IN MALAYSIA PN:A412308CNA
 DX 29HP 10 Meter Amateur Mobile Transceiver OWNER S MANUAL PRINTED IN MALAYSIA PN:A412308CNA TABLE OF CONTENTS Page Specification.................................... 2 Installation Location.....................................
Operation Manual. SlJPER ST AR Channel Mobile 5-Mode Transceiver -----~- --:.. KTSS200NXX ,, I
 Operation Manual!.,, SlJPER ST AR 2000 200 Channel Mobile 5-Mode Transceiver -----~- --:.. KTSS200NXX General Description l Frequency/Channel Chart The Super Star -2000 is a combination transmitter-receiver
OWNER'S MANUAL Channels All-Mode AM/FM/USB/LSB Built in Frequency Counter Mobile Transceiver with Roger Beep
 SUPER STAR 7QOODX OWNER'S MANUAL 3360 Channels All-Mode AM/FM/USB/LSB Built in Frequency Counter Mobile Transceiver with Roger Beep TABLE OF CONTENTS Page Specifications... 2 Installation Location... 4
SUPERSTAR TABLE OF CONTENTS AM/FM/USB/LSB/CW AMATEUR MOBILE TRANSCEIVER WITH BUILT-IN FREQUENCY COUNTER OWNER S MANUAL
 SUPERSTAR TABLE OF CONTENTS AM/FM/USB/LSB/CW AMATEUR MOBILE TRANSCEIVER WITH BUILT-IN FREQUENCY COUNTER PAGE CHAPTER 1 Specifications............................................... 2 CHAPTER 2 Installation.................................................
Installation... 3 Installing The Radio... 3 Ignition Noise Interference... 4 Antenna... 4 External Speaker... 4 Public Address...
 TABLE OF CONTENTS CHAPTER 1 Specifications.............................................. 2 PAGE BIG RIG SERIES S 1 MOD PW R 20 0 3 SW R 40 1 5 5 60 1.5 7 10 2 9 20 80 3 30 +20 40 50 +40 100% MAX db +60
Zeon PDF Driver Trial
 401 W. 35th Street, Suite B National City, CA 91950 (800)446-5778. FAX( 619)426-3788 Email : rci@rangerusa.com http : //www.rangerusa.com Printed In Malaysia AT6960A11A PD000619 TR-936 SOLID STATE CITIZENS
DX AM FM SSB CW PA Amateur Base Station Transceiver OWNER S MANUAL RX / TX 2 4 POWER NF CHANNEL MODE RF POWER OFF CAL OFF OFF CALIBRATE
 1 2 3 6 4050 ULA 6070 TI 80 90 100 9 DX 2517 2517 RX / TX 0 2 4 SWR WATTS SET 81012 22 1 010 3 2030 5 MOD 7 ON dbover 9 SIGNAL +20 +40+60 PA FM AM USB LSB CW POWER ON SWR NB / ANL R.BEEP +10KHz NF CHANNEL
DX 66V OWNER S MANUAL. Full Channel AM/FM Mobile Transceiver Built in Frequency Counter with Roger Beep
 WARRANTY This radio is covered by a two year limited parts and labor warranty. Limited means that we will repair problems caused by factory defects or normal use at no charge. Before returning a radio
RCI-6300F25/150. Owner's Manual. AM/FM Amateur Transceiver With Built-in Frequency Counter. Table of Contents. Downloaded from
 Table of Contents RCI-6300F25/150 AM/FM Amateur Transceiver With Built-in Frequency Counter PAGE Chapter 1 Specifications...... 2 Chapter 2 Installation...... 3 Installing the Radio... 3 Ignition Noise
DX 73V OWNER S MANUAL FULL FEATURED AM/FM MOBILE TRANSCEIVER. WARRANTY This radio is covered by a two year limited parts and labor warranty.
 WARRANTY This radio is covered by a two year limited parts and labor warranty. Limited means that we will repair problems caused by factory defects or normal use at no charge. Before returning a radio
18-CHANNEL MOBILE CB TRANSCEIVER MODEL CB-845
 18-CHANNEL MOBILE CB TRANSCEIVER MODEL CB-845 INSTRUCTION HANDBOOK RAll JEFFERSOn CITIZEN BAND RADIO MESSAGE TO THE OWNER CONGRATULATIONS! As the new owner of Ray Jefferson Model CB-845 CB Mobile Transceiver,
Downloaded from
 TABLE OF CONTENTS Installation... 2 Location... 2 Mounting the Connection... 2 Ignition Noise Interference... 2 Antenna... 2 Tuning the Antenna for Optimum SWR... 3 External Speaker... 4 Replacing fuse...
Zeon PDF Driver Trial
 401 W. 35th Street, Suite B National City, CA 91950 (800)446-5778. FAX( 619)426-3788 Email : rci@rangerusa.com http : //www.rangerusa.com Printed In Malaysia AT6960A11B PD000619 TR-966 SOLID STATE CITIZENS
DX 99V OWNER S MANUAL. Full Channel AM/FM/SSB Mobile Built in Frequency Counter with Roger Beep
 WARRANTY This radio is covered by a two year limited parts and labor warranty. Limited means that we will repair problems caused by factory defects or normal use at no charge. Before returning a radio
Please read before using this equipment
 Please read before using this equipment DRAGON MODEL : SS-485H OWNER'S MANUAL 10 METER AM/FM/SSB MOBILE RADIO FEATURES Your SS-485H 10 Meter Amateur Transceiver is a two-way 28 MHz radio for use in your
AM/FM 10 METER MOBILE AMATEUR TRANSCEIVER OPERATING MANUAL
 AM/FM 10 METER MOBILE AMATEUR TRANSCEIVER OPERATING MANUAL INTRODUCTION Congratulations on your purchase of a Magnum S-6 AM/FM 10 meter transceiver. Your Magnum S-6 is designed to provide years of enjoyment
Installation and operating accessories furnished with your Midland CB:
 1 Your 40 channel CB represents the state of the art in high tech engineering. This unit is not only a full feature CB transceiver but incorporates a high performance 10 channel NOAA weather bureau VHF
Downloaded from
 Owner s Manual AM/FM 40 CHANNEL & TONE SQUELCH CITIZENS BAND TRANSCEIVER Downloaded from www.cbradio.nl Characteristics of C-Five 1. Improved audio sensitivity by adopting audio compressing and decompressing
DX 929 OWNERS MANUAL. Two Way Citizens Band Mobile Transceiver With StarLite Face Plate TABLE OF CONTENTS CHAPTER 1 CHAPTER 2 CHAPTER PAGE
 TABLE OF CONTENTS DX 929 CHAPTER 1 Specifications................................................ 2 PAGE CHAPTER 2 Installation.................................................. 3 Installing The Radio..........................................
Midland 248XL I NSTRUCTION GUI DE
 Midland 248XL I NSTRUCTION GUI DE INDEX Introduction...2 Function and location of the controls...3 Installation...7 Power supply...7 Installing an antenna...7 How to use your Midland 248XL...8 Frequency
Technician Licensing Class. Lesson 4. presented by the Arlington Radio Public Service Club Arlington County, Virginia
 Technician Licensing Class Lesson 4 presented by the Arlington Radio Public Service Club Arlington County, Virginia 1 Quiz Sub elements T6 & T7 2 Good Engineering Practice Sub element T8 3 A Basic Station
5001z. 40 Channel Citizen Band Mobile Radio Owner s Manual.
 5001z 40 Channel Citizen Band Mobile Radio Owner s Manual Table of Contents Welcome to the World of Midland Electronics Major 5001z Features Installation Location Mechanical Mounting Power Wiring Mounting
DX 979 OWNERS MANUAL. AM / SSB Two Way Citizens Band Mobile Transceiver With StarLite Face Plate TABLE OF CONTENTS CHAPTER 1 CHAPTER 2 CHAPTER
 TABLE OF CONTENTS DX 979 CHAPTER 1 Specifications................................................ 2 PAGE CHAPTER 2 Installation.................................................. 3 Installing The Radio..........................................
200GTL ALIGNMENT REVISION: 1.0 BURKE MODEL: 200GTL REVISION: 1.2 DATE: 02/14/06. Total Pages: 6 pages. Page:1 print date: 9/23/09
 ALIGNMENT PROCEDURE MODEL: 200GTL REVISION: 1.2 DATE: 02/14/06 PREPARED BY: BURKE Total Pages: 6 pages Page:1 print date: 9/23/09 1 TEST CONDITION: 200GTL ALIGNMENT INSTRUCTION 1.0. TEST TEMPERTAURE: 77
The 21st Century R-390A/URR Reference Y2K-R3 Edited 7/09: No Technical Changes Chapter 2 - Operation. Page Table Of Contents 2-1
 Edited 7/09: No Technical Changes Chapter 2 - Operation Page Table Of Contents 2-1 2.1 Introduction. 2-2 2.2 Controls and Indicators 2-2 2.3 Operating Instructions And Control Settings 2-9 2.3.1 Pre-operational
DX 93T OWNER S MANUAL. 10 Meter Amateur Mobile Transceiver With Built-in Frequency Counter & StarLite Face Plate TABLE OF CONTENTS CHAPTER 1 CHAPTER 2
 PAGE CHAPTER 1 Specifications.............................................. 2 Twin Turbine S 1 PW R 3 20 0 SW R 40 1 5 5 60 1.5 7 10 2 9 20 80 3 30 +20 40 50 DX 93T +40 100% MAX db +60 DX 93T B A SW R
OWNERS MANUAL. Solid State Citizens Band AM Mobile Transceiver With Blue Illuminated Lite TABLE OF CONTENTS CHAPTER 1 CHAPTER 2 CHAPTER 3 PAGE
 TABLE OF CONTENTS PAGE CHAPTER 1 Specifications................................................ 2 DX-939 Solid State Citizens Band AM Mobile Transceiver With Blue Illuminated Lite OWNERS MANUAL CHAPTER
DX 2547 AM/ SSB Two Way Citizen Band Base Station Transceiver OWNER S MANUAL
 DX 2547 POWER S 1 3 20% 5 7 40% 9 60% +20 80% 100% +40 db +60 NORMAL 9 19 TALKBACK MOD PWR 0 SWR 1 3 1.5 6 2 9 AM / SSB Base Station CB Radio 3 12 15 MAX CHANNEL GNF R.B. PA USB AM LSB ANL NB OFF DX 2547
Electrophone. Model TX Channel 27MHz AM/SSB Deluxe Mobile 2-way CB. Instruction Manual. lectrephone AWSSI3 TRANSCEIVER MODEL IX 560
 Electrophone Model TX-560 40-Channel 27MHz AM/SSB Deluxe Mobile 2-way CB lectrephone AWSSI3 TRANSCEIVER MODEL IX 560 Instruction Manual General description Thank you for your confidence in selecting an
MFJ-752C SIGNAL ENHANCER II
 MFJ-752C SIGNAL ENHANCER II INTRODUCTION The improved MFJ-752C SIGNAL ENHANCER II is comprised of two tunable audio filtering systems designed to clarity and remove interfering signals from both voice
BLOCK DIAGRAM - I J Li) N 6. w IS) AF D RIVE R R F D RIVE R R F P OWE R AMP PL L OSC UNIT. LL co X X X Lti X. C X W N O C..) 4 C.
 N 6. w IS) AF D RIVE R R F D RIVE R R F P OWE R AMP PL L OSC UNIT. LL co X X X Lti X. C X W N O C..) 4 C.") MODEL 1-632 BLOCK DIAGRAM tl LL co a. LL O ox X X X X < X C.) W N C U) LL CO aa 1.11 t O - I J Ul Li) Lti N w IS) 1 X. C X Ir t AF D RIVE R X - LL C.) CD r.--1111 MOP U) N N 6 PL L OSC UNIT R F D RIVE
MODEL 1-632 BLOCK DIAGRAM tl LL co a. LL O ox X X X X < X C.) W N C U) LL CO aa 1.11 t O - I J Ul Li) Lti N w IS) 1 X. C X Ir t AF D RIVE R X - LL C.) CD r.--1111 MOP U) N N 6 PL L OSC UNIT R F D RIVE
SUBELEMENT T4. Amateur radio practices and station set up. 2 Exam Questions - 2 Groups
 SUBELEMENT T4 Amateur radio practices and station set up 2 Exam Questions - 2 Groups 1 T4A Station setup: connecting microphones; reducing unwanted emissions; power source; connecting a computer; RF grounding;
You must activate your warranty Do not call to register your radio.
 INTRODUCTION Congratulations on your purchase of a Stryker 10 meter mobile amateur transceiver. Your Stryker is designed to provide years of enjoyment and trouble-free service.there are many features and
CONTENTS FUNCTIONS & FEATURES...1 STANDARD ACCESSORIES...2
 CONTENTS FUNCTIONS & FEATURES...1 STANDARD ACCESSORIES...2 OPTIONA ACCESSORIES...2 INSTAATION...2 GETTING ACQUAINTED...6 OW TO USE YOUR RADIO...8 SIDE SWITCES...9 ERROR CODE...10 SPECIFICATIONS...11 FUNCTIONS
LBI-31564A. Mobile Communications. DELTA - SX MHz RADIO COMBINATIONS (NEGATIVE GROUND ONLY) Maintenance Manual
 Maintenance Manual") A Mobile Communications DELTA - SX 136-174 MHz RADIO COMBINATIONS (NEGATIVE GROUND ONLY) Maintenance Manual TABLE OF CONTENTS MILITARY AND SYSTEM SPECIFICATIONS................................. 2-3 COMBINATION
A Mobile Communications DELTA - SX 136-174 MHz RADIO COMBINATIONS (NEGATIVE GROUND ONLY) Maintenance Manual TABLE OF CONTENTS MILITARY AND SYSTEM SPECIFICATIONS................................. 2-3 COMBINATION
hallicrafters PERFORMANCE SPECIFICATIONS MODEL: SR-2000 LATEST REVISION: 18 JAN 66 Code ident # Specification #
 hallicrafters PERFORMANCE SPECIFICATIONS MODEL: SR-2000 LATEST REVISION: 18 JAN 66 Code ident # 26916 Specification # 093-002154 I. GENERAL A. Power input 117V 50-60 cycles from a source capable of delivering
PPR Channel AM Mobile CB Radio OWNER S MANUAL CONTENS. PAGE Specifications... 2
 CONTENS PGE Specifications................................... 2 PPR-125 40 Channel M Mobile CB Radio Installation..................................... 3 Location...................................... 3
Introduction Pag. 1. Function and location of the controls Pag. 2. Installation Pag. 3. Power supply Pag. 3. Installing an antenna Pag.
 ALAN 121 INDEX Introduction Pag. 1 E N G L I S H Function and location of the controls Pag. 2 Installation Pag. 3 Power supply Pag. 3 Installing an antenna Pag. 4 How to operate with your transceiver Pag.
TRC Channel Mobile CB Radio. with Channel 9/19 Priority Switch OWNER S MANUAL. Cat. No A. Please read before using this equipment.
 21-1703a.fm Page 1 Thursday, August 5, 1999 4:41 PM Cat. No. 21-1703 A OWNER S MANUAL Please read before using this equipment. TRC-503 40 Channel Mobile CB Radio with Channel 9/19 Priority Switch 21-1703a.fm
Owner s Manual. Printed in China U01UT389ZZA(0)
") 680 Owner s Manual Printed in China U01UT389ZZA(0) Contents SAFETY NOTICE...3 Unpacking...3 Description...3 Emergency Operation...4 Controls and Functions...4 Installation...6 MOBILE STATION INSTALLATION...
680 Owner s Manual Printed in China U01UT389ZZA(0) Contents SAFETY NOTICE...3 Unpacking...3 Description...3 Emergency Operation...4 Controls and Functions...4 Installation...6 MOBILE STATION INSTALLATION...
AM/FM/SSB/CW 12 & 10 METER MOBILE AMATEUR TRANSCEIVER OWNER S MANUAL
 AM/FM/SSB/CW 12 & 10 METER MOBILE AMATEUR TRANSCEIVER OWNER S MANUAL TABLE OF CONTENTS Warranty...2 Introduction...3 Installation... 4-5 Front Panel Controls... 6-8 Microphone...8 Menu Settings... 9-11
Mirage B-320-G FEATURES
 Mirage B-320-G The Mirage B-320-G is a VHF power amplifier designed for 2 meters covering 144-148 MHz. The Hi and Lo input selector switch makes this amp useable for both handheld and mobile transceivers.
User Manual. Specifications...3. Control and Operation Microphone...8. Installation...9. Installation of Main Unit...9
 Contents Specifications...3 Control and Operation...4-7 Microphone...8 Installation...9 Installation of Main Unit...9 Antenna Installation...9 Operational test...9 Frequency Bands Table...10 Frequency
FT-897 Alignment. Local Oscillator Adjustment. PLL Adjustment
 FT-897 Local Oscillator Adjustment Reference Frequency Adjustment a. Connect a frequency counter to TP1032. b. Adjust the trimmer capacitor (TC5001) for 67.875000MHz ±5Hz on the frequency counter. c. Connect
CITIZENS BAND SSB/AM 2-WAY MOBILE RADIO
 OPERATING INSTRUCTIONS FOR YOUR 40 CHANNEL CITIZENS BAND SSB/AM 2-WAY MOBILE RADIO Model 148 GTL Nothing comes close to a Cobra PRINTED IN CHINA 2002 COBRA ELECTRONICS CORPORATION 480-046-P 6500 WEST CORTLAND
WARNING WELCOME TO USE RESET
 WARNING Please install the antenna (connect to the location B on the back panel of the radio) and set the SWR (Standing Wave Ratio) before transmitting. Failure to do so may result in destruction of the
The amazing evolution of the 706 series
 The amazing evolution of the 706 series The IC-706MKIIG carries on the 706 series tradition of base station performance and features in a mobile reg-sized package. Building on this legacy, frequency coverage
The Uniden Grant XL Owners Site
 The Uniden Grant XL Owners Site Modifications page for the Grant XL (For Informational purposes only) The author of this site takes NO responsibility for illegal modifications and/or use of illegally modified
TR 7800 TRIO KENWOOD VHF TRANSCEIVER
 TR 7800 TRIO KENWOOD VHF TRANSCEIVER SECTION 1 INSTALLATION 1-1 INTERCONNECTION Connect the antenna and power supply as shown in Fig. 1-1 for fixed station. 1-2 FIXED STATION Installation, [general] Power
MODEL FS-4 INSTRUCTION MANUAL R.L. DRAKE COMPANY, MIAMISBURG, OHIO, U.S.A.
 MODEL FS-4 F R E Q U E N C Y S Y N T H E S I Z E R INSTRUCTION MANUAL R.L. DRAKE COMPANY, MIAMISBURG, OHIO, U.S.A. LIMITED WARRANTY R. L. DRAKE COMPANY warrants to the original purchaser that this product
IF frequency 1st IF: MHz
 Your Hy-Range Model IV is a full 23-channel transceiver designed and licensed for Class 0 Citizen Band operation as designated by the Federal Communications Commission (F.C.C.). The Hy-Range IV is completely
AT-5555N 10 METER RADIO
 AT-5555N 10 METER RADIO CONTENTS FUNCTIONS & FEATURES...1 STANDARD ACCESSORIES...2 INSTALLATION...2 GETTING ACQUAINTED...5 HOW TO USE YOUR RADIO...7 KEYPAD FUNCTION...9 BACKGROUND FUNCTION MENU OPERATION...12
WARNING: DO NOT PROCEED WITHOUT READING THIS PAGE.
 WARNING: DO NOT PROCEED WITHOUT READING THIS PAGE. The B-1030-G produces at least 300 watts of VHF R.F. power and is not to be taken lightly. Severe R.W. burns can be sustained at this power level! Power
Frequency Coverage MHz RF Power Output 30W SSB / 9W AM/ 30W FM Dual Finals on Heat Sink Modes AM, FM, USB, LSB Microprocessor
 MAGNUM M-257 30W AM/ /FM/SSB 10--11 Meterr Mobile Trranscei ivverr n Prri iiccee: : US$ 250..00 eexx ssttoocckk JJaakkaarrttaa (Arrrri ( iivvi iinngg 2 d weeeekk iinn i Maarrcchh) ) SPECIFICATIONS Frequency
HAMTRONICS TB901 FM EXCITER INSTALLATION, OPERATION, & MAINTENANCE
 HAMTRONICS TB901 FM EXCITER INSTALLATION, OPERATION, & MAINTENANCE GENERAL INFORMATION. The TB901 is a single-channel low power fm transmitter (exciter) designed to provide 300-600 milliwatts continuous
RU210. Dual Multi-UHF Wireless System. Item ref: UK, UK User Manual. Version 1.0
 RU210 Dual Multi-UHF Wireless System Item ref: 171.970UK, 171.971UK User Manual Version 1.0 Caution: Please read this manual carefully before operating Damage caused by misuse is not covered by the warranty
WARNING: DO NOT PROCEED WITHOUT READING THIS PAGE.
 WARNING: DO NOT PROCEED WITHOUT READING THIS PAGE. The B-2530-G produces at least 300 watts of VHF R.F. power and is not to be taken lightly. Severe R.W. burns can be sustained at this power level! Power
BEFORE YOU OPERATE THE HR-07-NZ 10 METER AMATEUR RADIO
 CONGRATULATIONS on your purchase of a HURACAN HR-07-NZ 10meter amateur radio. Your HURACAN HR-07-NZ transceiver radio is designed to provide trouble-free service and state of the art, high performance
MFJ-219/219N 440 MHz UHF SWR Analyzer TABLE OF CONTENTS
 MFJ-219/219N 440 MHz UHF SWR Analyzer TABLE OF CONTENTS Introduction...2 Powering The MFJ-219/219N...3 Battery Installation...3 Operation Of The MFJ-219/219N...4 SWR and the MFJ-219/219N...4 Measuring
Introduction. Understanding Power Ratings. Peak Reading SWR/Wattmeter
 Introduction The MFJ-962D is a "T" network roller inductor tuner with built-in antenna switching, RF power and SWR metering and a 1:1 balun. The largest amplifiers that can safely be used include the Heathkit
TRC Channel Mobile CB Radio with WX Alert and SAME OWNER S MANUAL. Cat. No Please read before using this equipment.
 21-1709.fm Page 1 Monday, January 29, 2001 10:29 AM Cat. No. 21-1709 OWNER S MANUAL Please read before using this equipment. TRC-519 40-Channel Mobile CB Radio with WX Alert and SAME 21-1709.fm Page 2
ENCORE 200 VHF Bass Wireless Microphone System
 ENCORE 200 VHF Bass Wireless Microphone System Nady Wireless Systems are type accepted under FCC rules parts 90, 74 and 15. The device complies with RSS-210 of Industry & Science Canada. Operation is subject
32 CHANNEL SELECTABLE CH MHZ DOWN VOLUME
 KARAOKE Professional UHF Wireless Microphone System VM-92U Operating Instructions UHF Frequency 64 Selectable Better Music Builder UHF MIC WIRELESS SYSTEM VM-92U 32 CHANNEL SELECTABLE 248 13.10 CH MHZ
Synthesized Base Station Transmitter
 BST-25 OPERATOR S MANUAL (216 MHz) Synthesized Base Station Transmitter 357 West 2700 South Salt Lake City, Utah 84115 Phone: (800) 496-3463 Fax: (801) 484-6906 http://www.comtek.com INTRODUCTION BST-25
Treetop Circuits Owner s Manual for SB-SB-600 Adapter Version 1
 The SB-600 SSB adapter from Treetop Circuits (Fig. 1) is designed specifically as an accessory to the Hammarlund SP-600 series of receivers. It provides enhanced performance on SSB and CW signals, using
Preliminary Information (There will be updates)
") This Manual is provided by CBTricks.com Someone who wanted to help you repair your equipment put together this information. Cobra150GTL DX If you would like to help us put more manuals online support us.
This Manual is provided by CBTricks.com Someone who wanted to help you repair your equipment put together this information. Cobra150GTL DX If you would like to help us put more manuals online support us.
Model 7000 Low Noise Differential Preamplifier
 Model 7000 Low Noise Differential Preamplifier Operating Manual Service and Warranty Krohn-Hite Instruments are designed and manufactured in accordance with sound engineering practices and should give
Elmer Session Hand Out for 3/3/11 de W6WTI. Some Common Controls Found On Amateur Radio Transceivers. (From ARRL web site tutorial)
") Elmer Session Hand Out for 3/3/11 de W6WTI Some Common Controls Found On Amateur Radio Transceivers. (From ARRL web site tutorial) The placement of the controls may vary from manufacturer to manufacturer
Elmer Session Hand Out for 3/3/11 de W6WTI Some Common Controls Found On Amateur Radio Transceivers. (From ARRL web site tutorial) The placement of the controls may vary from manufacturer to manufacturer
AE 497 W (25-30 W-Version)
") User Manual AE 497 W (25-30 W-Version) 10-Meter Amateur Radio Base Station Legal notes and general information This amateur radio base station complies to the minimum requirements of the EU directives
User Manual AE 497 W (25-30 W-Version) 10-Meter Amateur Radio Base Station Legal notes and general information This amateur radio base station complies to the minimum requirements of the EU directives
PV 1 VHF. Wireless microphone system
 PV 1 VHF Wireless microphone system 1 CONTENTS 2 INTRODUCTION 3 IMPORTANT SAFEGUARDS 3 USING THIS MANUAL 4 SYSTEM FEATURES 4 PV-1 RECEIVER 5 PV-1 HANDHELD MIRCROPHONE TRANSMITTER 7 PV-1 LAVALIER/LAPEL
Guide. Installation. Wilson Electronics, Inc. In-Building Wireless Amplifi er. Contents:
 Amplifier Installation Guide In-Building Wireless Amplifi er Contents: Guarantee and Warranty 1 Antenna Options and Accessories 2 Before Getting Started / How It Works 3 Installation Overview 4 Installing
Guide. Installation. Wilson Electronics, Inc. Direct Connection High Power iden Amplifi er 800 MHz Band. Contents:
 Amplifier Installation Guide Direct Connection High Power iden Amplifi er 800 MHz Band Contents: Guarantee and Warranty 1 Before Getting Started / How it Works 3 Installing a Wilson Outside Antenna - In-Vehicle
TABLE OF CONTENTS. Magnum International PO Box 445 Issaquah, WA 98027
 OPERATING MANUAL TABLE OF CONTENTS Limited Warranty... 2 Introduction... 3 Installation...3-4 Front Panel Controls and Functions...4-7 Other Features... 7 Specifications... 8 LIMITED WARRANTY Magnum International
HAMTRONICS RWWV RECEIVER: INSTALLATION, OPERATION, & MAINTENANCE
 HAMTRONICS RWWV RECEIVER: INSTALLATION, OPERATION, & MAINTENANCE GENERAL INFORMATION. The RWWV is a compact, dedicated receiver module for reception of the 10.000 MHz WWV time and frequency standard broadcasts
RITEK RIT for Collins KWM-2/2A 10/01/2002
 RITEK RIT for Collins KWM-2/2A 10/01/2002 The RITEK RIT (receiver incremental tuning) control was developed for KWM-2/2A in 1992 to "clarify" received signals differing from the transmit frequency indicated
Sigtronics Auto Squelch Intercom System Installation and Operating Instructions Models SAS-440 and SAS-640
 Sigtronics Auto Squelch Intercom System Installation and Operating Instructions Models SAS-440 and SAS-640 INTRODUCTION ATTENTION INSTALLER: To assure a trouble free installation, please read the entire
Lesson 9: Base Stations
 Lesson 9: Base Stations Preparation for Amateur Radio Technician Class Exam Topics Home Stations Basic Station Layout RTTY and Data Communications Station Accessories Wavelengths Feed Lines Impedance-matching
4W MOBILE CB TRANSCEIVER INSTRUCTION MANUAL
 4W MOBILE CB TRANSCEIVER INSTRUCTION MANUAL www.ttikorea.co.kr CONTENTS 1. Introduction 2. Supplied Accessories 3. Installation 4. Transceiver Controls and Functions 1) Microphone Jack 2) LCD Display 3)
Operation Manual. Model SG Elenco Precision Wide Band Signal Generator
 99 Washington Street Melrose, MA 02176 Phone 781-665-1400 Toll Free 1-800-517-8431 Visit us at www.testequipmentdepot.com Elenco Precision Wide Band Signal Generator Model SG-9000 Operation Manual CONTENTS
Synthesized Base Station Transmitter
 BST-75 OPERATOR S MANUAL (72-76 MHz) Synthesized Base Station Transmitter 357 West 2700 South Salt Lake City, Utah 84115 Phone: (800) 496-3463 Fax: (801) 484-6906 www.comtek.com TABLE OF CONTENTS Introduction...
PRO505XL Professional Mobile CB Radio
 PRO505XL Professional Mobile CB Radio 2016 Uniden America Corp. Printed in Vietnam Irving, Texas U01UT386ZZA(1) INTRODUCTION Welcome to the world of Citizens Band radio communications. Your Uniden radio
QUICK REFERENCE GUIDE
 QUICK REFERENCE GUIDE Installation 1. Install a ground system for DC noise suppression and RFI suppression 2. Install your DC power supply 3. Install lightning protection. This will help protect more than
Maintenance Manual. MTD SERIES 900 MHz, 10-WATT, DATA ONLY MOBILE RADIO. Mobile Communications LBI TABLE OF CONTENTS
 Mobile Communications MTD SERIES 900 MHz, 10-WATT, DATA ONLY MOBILE RADIO TABLE OF CONTENTS RF BOARD............................... LBI-38545 AUDIO BOARD............................ LBI-38546 LOGIC BOARD............................
Professional UHF Rechargeable Wireless Microphone System POWER ON/OFF BATTERY CHARGE. Green Light (Full) Better Music Builder DOWN VOLUME
 Better Music Builder DOWN VOLUME") Green Light (Full) KARAOKE Professional UHF Rechargeable Wireless Microphone System VM-93C Operating Instructions UHF Frequency 64 Selectable POWER ON/OFF CHARGE Better Music Builder VM-93C CHARGER UHF
Green Light (Full) KARAOKE Professional UHF Rechargeable Wireless Microphone System VM-93C Operating Instructions UHF Frequency 64 Selectable POWER ON/OFF CHARGE Better Music Builder VM-93C CHARGER UHF
MFJ-969 Versa Tuner II Instruction Manual
 MFJ-969 Versa Tuner II Instruction Manual General Information The MFJ-969 is a 300 watt RF output power antenna tuner that will match any transmitter or transceiver to virtually any antenna. Peak or average
MobileRadio. Owner'sManual
 EMH MobileRadio Owner'sManual TABLE OF CONTENTS Introduction... 1 Basic Operation... 2 Code Guard Operation... 3 EMH Radio Controls... 4 Button Functions... 4 Built-in Features... 7 Keypad Microphone Operation...
PDWM4400 VHF WIRELESS SYSTEM PDWM4400 VHF WIRELESS SYSTEM OPERATION MANUAL
 A.Overall system Oscillation mode: Quartz controlled Carrier Frequency Range: VHF 169-270MHz Stability: 0.005% Max Deviation: 56KHz with level limiting Dynamic Range: 100dB S/N Ratio: 80dB T.H.D: 0.5%
MFJ SIGNAL ENHANCER II
 MFJ SIGNAL ENHANCER II Model MFJ-752D INSTRUCTION MANUAL CAUTION: Read All Instruction Before Operating Equipment MFJ ENTERPRISES, INC. P.O. BOX 494, MISSISSIPPI STATE, MS 39762, USA 925-0037D-752D-REV
MXT100. GMRS Radio OWNER S MANUAL. midlandusa.com
 MXT100 GMRS Radio OWNER S MANUAL Welcome to the World of Midland electronics Congratulations on your purchase of a high quality MIDLAND product. Your 2-way radio represents state-of-the-art high-tech engineering.
THEORY OF OPERATION. TM308EUL for Cobra Nov 06,2006
 THEORY OF OPERATION TM308EUL for Cobra Nov 06,2006 This PLL controlled VHF marine mobile transceiver provides an accurate and stable multi-channel operation. The transceiver consists of 15 main sections
INSTRUCTION MANUAL LCS TX
 INSTRUCTION MANUAL LCS TX 4 Channel Transmitter LCS1 Single Channel Transmitter Cardio Theater Inc Service 1-800-776-6695 Sales 1-800-CARDIO-1 1 Introduction CONGRATULATIONS on your choice of this product
TS-590S ADJUSTMENT. Updating the Firmware. Required Test Equipment. Preparation
 Updating the Firmware The firmware of the main MCU and DSP can be updated using the TS590 Update update software. Update the firmware according to the procedure displayed in update software. Refer to the
TS-930: Installing the Inrad Roofing Filter Mod
 TS-930: Installing the Inrad Roofing Filter Mod The TS-930 roofing filter mod consists of a 6 pole, 4 to 5 khz wide filter followed by a high dynamic range, feedback amplifier. The amplifier provides enough
Cellular Signal Booster Multi-User Tri-Band
 weboost Drive AM100-Pro Cellular Signal Booster Multi-User Tri-Band ! THE Drive AM100-Pro SIGNAL BOOSTER MAY REMAIN ON, IN VEHICLES WHOSE 12V DC POWER SOURCES DO NOT AUTOMATICALLY SHUTDOWN WHEN THE VEHICLE
On-Line Cardio Theater Wireless Digital Transmitter Installation and Instruction Manual
 On-Line Cardio Theater Wireless Digital Transmitter Installation and Instruction Manual Full installation instructions accompany your Cardio Theater equipment order. This On-Line version of our Installation/Instruction