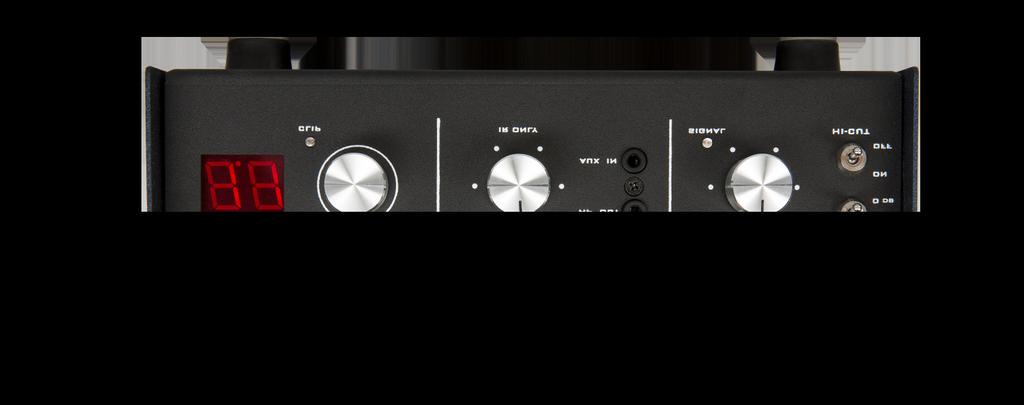
H.P. Level I.R. Select. Aux Input. H.P. Output. D.I. Level. Bank Number. Signal Boost. Cab Number. Hi-Cut. Clip light. Signal Light. I.R.
|
|
|
- Austin Nichols
- 5 years ago
- Views:
Transcription

1 User Guide
2 Table of Contents Overview Front panel overview Rear panel overview How to connect to a DAW (Digital Audio Workstation) How to silently practice with headphones Live set-up with stage volume How to slave an amp Impulse Response Section Headphone Section D.I. Section Managing impulse responses with a computer Impulse responses included with Reactive Load I.R Technical Block Diagram Technical Specifications Warranty


3 Thank you for purchasing the Suhr Reactive Load I.R. Please take the time to read this User Guide to get the most out of the Reactive Load I.R. The more you familiarize yourself with the features of this unit, the more you will enjoy its benefits and maximize its potential. Overview The new Reactive Load I.R. builds upon the legacy of what is already widely regarded as the industry standard for accurate speaker cabinet load replacement: the original Suhr Reactive Load. Reactive Load I.R. incorporates exciting new features into the groundbreaking design of the original Reactive Load making it the ultimate all-in-one solution for speaker cabinet replacement. As the name suggests, Reactive Load I.R. adds impulse response technology to the original Reactive Load, allowing you to quickly and easily access an array of expertly mic d speaker cabinets. It comes preloaded with 16 Suhr speaker cabinet impulse responses captured by Celestion. Reactive Load I.R. is an open system, so you can load 3rd party impulse responses via the USB port. 3

 Signal Boost Boosts signal 6db, most useful with low wattage amps Cab Number Displays selected Cab")
4 H.P. Level I.R. Select Turn to select between 4 banks of 4 Impulse Responses for a total of 16 different CAB choices Push and hold to 'lock' your selected I.R., this prevents accidentally changing to another I.R. even when you turn the unit on and off Turn to adjust volume of IR output through headphones Aux Input 1/8 ' Stereo Auxiliary Input for connecting smart-phone or other audio device H.P. Output 1/8 ' Stereo Headphone output for easy monitoring or practice D.I. Level Turn to control volume of Balanced/Unbalanced Outputs Bank Number Displays selected Bank (1-4) Signal Boost Boosts signal 6db, most useful with low wattage amps Cab Number Displays selected Cab I.R. (1-4) I.R. Lock light Only lights up when I.R. selection is locked. (see page 10) Clip light Only lights up when I.R. input signal begins clipping Signal Light Illuminates when signal is present Hi-Cut Adjusts impedance curve, most useful when slaving an amp
 Input (From Amp) Plug in 1/4 speaker cable from 8 ohms Speaker Out of amp (Generally 4 ohms is ok, but consult your amp manufacturer) Thru (To Speaker) Connect 1/4 to DAW or mixer (FOH) This signal")
5 DI/Line Out (I.R.) Input (From Amp) Plug in 1/4 speaker cable from 8 ohms Speaker Out of amp (Generally 4 ohms is ok, but consult your amp manufacturer) Thru (To Speaker) Connect 1/4 to DAW or mixer (FOH) This signal is filtered through the impulse response, meaning you will hear the tone with your selected I.R. (optional) Connect to external speaker cabinet Using this option disables the internal load. If a 1/4 cable is plugged in to this jack MAKE SURE the other end is plugged in to a load or damage may occur USB Connect to computer to manage impulse responses saved on device DI/Line Out (Un-filtered) Connect 1/4 to DAW or mixer (FOH) This is an unfiltered (dry) signal with NO impulse response affecting the tone Power Connect to 9V DC power adapter (center negative)
6 This guide will show the ways you can connect your Reactive Load I.R. to a digital audio workstation. Steps: 1. Plug in the provided 9Vdc power adapter. 2. Connect your amplifier's 8Ω speaker out via 1/4" speaker cable to Reactive Load I.R.'s INPUT FROM AMP jack. 3. Connect the DI / LINE OUT IR to record a signal that is affected by the I.R. filter. 4. Adjust DI LEVEL (D.I. Section in detail, page 12) 5. Turn the IR SELECT knob to pick an I.R. How to connect to a DAW (Digital Audio Workstation) Optional connections (dotted lines on diagram) 6. Connect the DI / LINE OUT UN-FILTERED to record a signal that is NOT affected by the I.R. filter, meaning it is just your amp s tone (with no speaker filtration), for later processing in your DAW. If you'd still like to run a speaker cabinet, connect the THRU TO SPEAKERS jack using a 1/4" speaker cable to a speaker cabinet. (Optional) (Optional)! IMPORTANT NOTE: Using the THRU TO SPEAKERS output disconnects the internal load of the Reactive Load I.R. To optimize performance and avoid damage, match the impedance of your amplifier to the connected speaker cabinet. NEVER CONNECT THIS OUTPUT TO INSTRUMENT, MIC OR LINE LEVEL INPUTS. 6 Interface
7 This section will explain how to use the Reactive Load I.R. to practice silently through headphones. Steps: 1. Plug in the provided 9Vdc power adapter. 2. Connect your amplifier's 8Ω speaker out via 1/4" speaker cable to Reactive Load I.R.'s INPUT FROM AMP jack. 3. Connect HP OUT via 1/8" stereo cable to any headphones. 4. Adjust DI LEVEL (D.I. Section in detail, page 12) 5. Turn the IR SELECT knob to pick an I.R. Enjoy practicing with your favorite tube amp, quietly with headphones. How to silently practice with headphones -Optional connection- (dotted lines on diagram) 6. Connect a smart-phone or other audio source via 1/8" stereo cable (Optional)! IMPORTANT NOTE: The signal from the AUX IN will only be sent through the HP OUT (headphones), NOT the DI / LINE OUT. HELPFUL TIP: Use your audio source's on board volume controls to set the levels you hear through the HP OUT. i.e. if you need to hear more of your smart-phone, turn up the volume on the device, NOT the HP LEVEL on the Reactive Load I.R. 7
8 This section will explain how to use the Reactive Load I.R. in a live setting with stage volume from a cab and a D.I. signal (with an I.R.) going to front of house. Steps: 1. Plug in the provided 9Vdc power adapter. Live set-up with stage volume 2. Connect your amplifier's 8Ω speaker out via 1/4" speaker cable to Reactive Load I.R.'s INPUT FROM AMP jack. 3. Connect the DI / LINE OUT I.R. jack to mixer. 4. Connect the THRU TO SPEAKER jack via 1/4" speaker cable to a speaker cabinet for stage volume. 5. Adjust DI LEVEL (D.I. Section in detail, page 12) 6. Turn the IR SELECT knob to pick an I.R. 7. (Optional) Push and Hold for 2 seconds to "lock" your selected I.R. to keep it from changing inadvertently. (see page 10)! IMPORTANT NOTE: Using the THRU TO SPEAKERS output disconnects the internal load of the Reactive Load I.R. To optimize performance and avoid damage, match the impedance of your amplifier to the connected speaker cabinet. NEVER CONNECT THIS OUTPUT TO INSTRUMENT, MIC OR LINE LEVEL INPUTS. 8
9 How to slave an amp What is slaving? Slaving is a way of controlling the volume of a high wattage, non-master volume amp. In addition, slaving can be used to add effects after the preamp section in amps that lack an effects loop. This section will explain how to crank a 100-watt amp into the Reactive Load I.R. and send it to a slave amp for volume control. This allows you to retain the power distortion of the primary amp, while using a secondary slave amp to yield lower volumes. Steps: 1. Plug in the provided 9Vdc power adapter. 2. Connect your primary amplifier's 8Ω speaker out via 1/4" speaker cable to Reactive Load I.R.'s INPUT FROM AMP jack. 3. Plug in the DI / LINE OUT UN-FILTERED to the Effects Loop Return of the slave amp. 4. Connect the slave amplifier's 8Ω speaker out via 1/4" speaker cable to your speaker cabinet. 5. (Optional) Use HI-CUT. This works by altering the impedance curve to reduce extra high-end that may occur Effects Loop 16Ω 8Ω 8Ω 4Ω 4Ω SEND RETURN (Optional) when slaving to another amp. 9 Interface
10 This section will explain in more detail the I.R. capabilities of the Reactive Load I.R. Things to know: 1. Turn IR Select knob to select between 4 banks of 4 impulse responses for a total of 16 different cab choices. 2. Push and Hold for 2 seconds to "lock" your selected I.R., this will freeze the number on the display, even when the unit is powered on and off, protecting you from accidentally changing I.R.s. The LOCK INDICATOR LED on the 7 segment display will illuminate when your I.R. selection is "locked". 3. Push and Hold again for 2 seconds to "unlock" and you can freely change to another I.R. 4. The CLIP light provides a visual representation of when excess signal is fed to the IR section, which will cause clipping of the IR output and HP OUT. If this occurs, reduce the signal by turning down the DI LEVEL. 5. To see a full list of the preloaded impulse responses see page 14. Impulse Response Section LOCK INDICATOR 10
11 This section will explain in more detail the headphones section of the Reactive Load I.R. Things to know: 1. Turn HP LEVEL to increase the volume of the impulse response filtered signal sent to the headphone out, meaning you will only hear the signal that is affected by the impulse response chosen on the 7 segment display. 2. Connect a smart-phone or other audio source via 1/8" stereo cable 3. The signal from the AUX IN will only be sent through the HP OUT (headphones), NOT the DI / LINE OUT. 4. Use your device's on-board volume controls to set the levels you hear through the HP OUT, i.e. if you need to hear more of your smart-phone, turn up the volume on the device, NOT the HP LEVEL on the Reactive Load I.R. Headphone Section 11
12 This section will explain in more detail the D.I. section of the Reactive Load I.R. The DI LEVEL is used to optimize the amount of signal the Reactive Load delivers to your device. Things to know: D.I. Section 1. Adjusting DI LEVEL using CLIP light - While using your loudest desired amp setting and performance style, turn DI LEVEL knob until CLIP light illuminates intermittently, then, back off the DI LEVEL knob until the CLIP light no longer illuminates. 2. SIGNAL BOOST - Increases signal by +6dB passively by altering the internal padding. This helps with low wattage amps to get a suitable level. 3. HI-CUT - Works by altering the impedance curve to reduce high end. This is also very useful when slaving to another amp.! IMPORTANT NOTE: It is NORMAL for the Reactive Load I.R. and amplifier to make some physical noise when playing. The Reactive Load I.R. contains an internal fan which is powered by your amplifier s speaker output voltage and designed to maintain the temperature of the Reactive Load I.R.s internal components. The fan automatically turns on/off based on the amount of power delivered to the unit s Input. 12
13 Steps: 1. Plug in the provided 9Vdc power adapter 2. Connect Reactive Load I.R. to computer via USB cable 3. The Reactive Load I.R. will appear on your computer as "SUHR_RL" 4. Click "SUHR_RL" to find 4 folders named "Bank_1" - "Bank_4"! IMPORTANT NOTE: Save a backup of the original "SUHR_RL" folder to a safe place on your computer in case you want to restore Reactive Load I.R. to factory settings. HELPFUL TIP: Close mic impulse responses work best. I.R.s greater than 20.5 milliseconds (ms) will be truncated to 20.5 ms. Managing impulse responses with a computer 5. Each "Bank_x" folder will contain 4 folders named "Cabinet_1"-"Cabinet_4" these are where you will find the impulse responses in the form of.wav files. 6. After doing so, you can delete any existing I.R. (.WAV file) and simply drag and drop any 3rd party impulse response (.WAV, Mono, 24bit, 48kHz) in to its place. Use only one I.R. file (.WAV) per cabinet folder.! IMPORTANT NOTE: After making ANY changes to the I.R.s loaded on the device, the unit MUST be power cycled in the following manner - Eject (unmount) "SUHR_RL" from your computer. If "SUHR_RL" reappears on computer after ejecting, it IS safe to disconnect, as long as no files are transferring at the time. - Disconnect USB from the Reactive Load I.R. to your computer. - Power cycle the Reactive Load I.R. (Unplug 9v power, wait for 3 seconds and plug back in) 7. Your Reactive Load I.R. now is filled with your own I.R.s 13
14 Impulse responses included with Reactive Load I.R. Bank 1: (1.1) Cab 1 : Suhr G12M Greenback 4x12 C SM57 Balanced Celestion (1.2) Cab 2 : Suhr G12M Greenback 4x12 C Hi-Gn Celestion (1.3) Cab 3 : Suhr G12M Greenback 4x12 C SM57 Fat Celestion (1.4) Cab 4 : Suhr G12M Greenback 4x12 C Lo-Gn Celestion Bank 2: (2.1) Cab 1 : Suhr V30 4x12 C SM57 Balanced Celestion (2.2) Cab 2 : Suhr V30 4x12 C Hi-Gn Celestion (2.3) Cab 3 : Suhr V30 4x12 C SM57 Fat Celestion (2.4) Cab 4 : Suhr V30 4x12 C Lo-Gn Celestion Bank 3: (3.1) Cab 1 : Suhr PT G12-75H Creamback 2x12 C SM57 Fat Celestion (3.2) Cab 2 : Suhr PT G12-75H Creamback 2x12 C Hi-Gn Celestion (3.3) Cab 3 : Suhr Hedgehog G x12 O SM57 Fat Celestion (3.4) Cab 4 : Suhr Hedgehog G x12 O Hi-Gn Celestion Bank 4: (4.1) Cab 1 : Suhr Badger V30 1x12 C SM57 Balanced Celestion (4.2) Cab 2 : Suhr Badger V30 1x12 C Hi-Gn Celestion (4.3) Cab 3 : Suhr Bella V-Type 1x12 O SM57 Dark Celestion (4.4) Cab 4 : Suhr Bella V-Type 1x12 O Hi-Gn Celestion 14
15 AMP IN Technical Block Diagram AMP THRU DI LEVEL BALANCED/UNBALANCED OUT UNFILTERED REACTIVE LOAD IR DSP BALANCED/UNBALANCED OUT IR SIGNAL LEVEL HIGH CUT SIGNAL LED CLIP LED IR SELECT IR OUTPUT HEADPHONE LEVEL MIXER HEADPHONE OUTPUT AUX IN (STEREO) R L (STEREO) 15
16 Technical Specifications Impedance: 8Ω Balanced Line Output Impedance: 600Ω (Maximum) Unbalanced Line Output Impedance: 600Ω (Maximum) Maximum recommended input power: 100 Watts RMS I.R. Format:.WAV, Mono, 24bit, 48kHz, 20.5 ms (I.R.s greater than 20.5 ms will be truncated to 20.5 ms) I.R. Output Latency: 1.2 milliseconds Power Connector: 9Vdc, center negative, 2.1mm x 5.5mm Operating Voltage: 9Vdc Maximum Voltage: 12Vdc Reverse Battery Protection: Yes Over Voltage Protection: Yes Current Consumption: <200mA Dimensions: 8.8" Width x 8.9" Depth x 3.6" Height Weight: 6.7 lbs. ROHS Compliant: Yes *All specifications subject to change without prior notice Warranty JS Technologies, Inc. (JST) warrants for lifetime from date of purchase by the initial retail purchaser that this product shall be free from defects in workmanship. Electronic components such as capacitors, resistors, filters, transformers, jacks, and pots are covered for 5 years. Any parts determined defective by JST within the five (5) year term shall be repaired or replaced by JST without charge for parts and labor provided the unit is returned, transportation costs prepaid, to JS Technologies, Inc., 601 Crane Street, Unit A, Lake Elsinore, CA 92530, or to such facility authorized by JST. JST will pay shipping costs to return the unit to its owner. Defects in workmanship will be determined by JST for limited lifetime coverage. This warranty does not cover damage caused by accident, misuse, abuse, neglect, unauthorized or improperly performed repairs, alterations, and/or wear and tear occasioned by use of the product, and does not include any expense for inconvenience or loss of use while the product is being repaired or replaced. JST expressly disclaims any liability for consequential damages arising from the sale, use, or inability to use the product. Any warranty implied by law, including any warranty of merchantability or fitness, is expressly limited to the one (5) year warranty term for the parts on our amplifiers and electronic products. The foregoing statements of warranty are exclusive and in lieu of all other remedies. Workmanship lifetime warranty is limited strictly to the original retailer purchaser of the instrument registered with JST within 10 days of purchase from an authorized JST dealer or distributor. JST will pay shipping costs to return the unit to its owner within the mainland U.S. The above warranty policy only applies to customers in USA. If you are an international customer, please check with your distributor and the dealer in your country for warranty matters. Warranty issues must be handled through your dealer or distributor. If you are an international customer who purchased (or plan to purchase) from a US dealer, we can handle warranty matters direct but you will be responsible for shipping both ways. We encourage international customers to purchase through your local distributor or dealer for this reason. Our international distributors are set up to handle warranty issues in their respective countries. If you do not have an authorized Suhr dealer in your country, please contact us direct for further details. 16
17 NOTE: This equipment has been tested and found to comply with the limits for a Class B digital device, pursuant to part 15 of the FCC Rules. These limits are designed to provide reasonable protection against harmful interference in a residential installation. This equipment generates, uses and can radiate radio frequency energy and, if not installed and used in accordance with the instructions, may cause harmful interference to radio communications. However, there is no guarantee that interference will not occur in a particular installation. If this equipment does cause harmful interference to radio or television reception, which can be determined by turning the equipment off and on, the user is encouraged to try to correct the interference by one or more of the following measures: - Reorient or relocate the receiving antenna. - Increase the separation between the equipment and receiver. - Connect the equipment into an outlet on a circuit different from that to which the receiver is connected. - Consult the dealer or an experienced radio/ TV technician for help. Changes or modifications not expressly approved by the party responsible for compliance could void the user s authority to operate the equipment. This device complies with part 15 of the FCC Rules. Operation is subject to the following two conditions: (1) This device may not cause harmful interference, and (2) this device must accept any interference received, including interference that may cause undesired operation.
Table of Contents. Overview... 3
 User Guide Table of Contents Overview.................................................... 3 Powering A.C.E............................................... 4 Inputs & Outputs..............................................
Overview. Thank you for purchasing the Suhr Eclipse Dual Overdrive/Distortion Pedal.
 User Guide Table of Contents Overview 3 Getting Connected 4 Channel Selection / Bypass 5 Controls 6 Battery Monitor 7 FX Link (External Control) 8 Sample Settings 9 Technical Specifications 10 Warranty
RIOT DISTORTION USER GUIDE
 RIOT DISTORTION USER GUIDE Thank you for purchasing the Suhr Riot Distortion Pedal. Please take the time to read this manual to get the most out of the Riot. The more you familiarize yourself with the
JIM KELLEY POWER ATTENUATOR USER MANUAL
 JIM KELLEY POWER ATTENUATOR USER MANUAL Thank you for purchasing the Jim Kelley Power Attenuator. Please take time to read this manual to get the most out of your attenuator. The more you familiarize yourself
Shiba Drive USER MANUAL
 Shiba Drive USER MANUAL Thank you for purchasing the Suhr Shiba Drive pedal. Please take the time to read this manual to get the most out of your pedal. The more you familiarize yourself with the features
THE JIM KELLEY USER GUIDE SINGLE-CHANNEL MODEL. Limited Edition
 THE JIM KELLEY SINGLE-CHANNEL MODEL Limited Edition USER GUIDE THE JIM KELLEY AMPLIFIER The Jim Kelley Single-Channel Model is a 60 watt all-tube amplifier designed to retain your guitar s natural tonal
Badger 18 USER MANUAL
 Badger 18 USER MANUAL Badger 18 This 18-watt, all-tube amplifier offers a wide range of classic guitar sounds. Driven by a cathode biased EL-84 power section and features a 5Y3GT tube rectifier, the Badger
Badger 35 USER MANUAL
 Badger 35 USER MANUAL Badger 35 - an innovative mid-wattage amp designed to deliver classic tones at any volume. Sonically, Badger 35 imparts a distinctly British flavor with its quad EL-84 power section.
OVERVIEW EXCLUSIVE FEATURES GETTING CONNECTED POWER REQUIREMENTS BATTERY MONITOR
 RUFUS USER GUIDE Thank you for purchasing the Suhr Rufus Reloaded. Please take some time to read through this guide to familiarize yourself with its many features and applications. OVERVIEW Rufus Reloaded
SL-68 HAND WIRED USER GUIDE
 SL-68 HAND WIRED USER GUIDE SL-68 Hand Wired Amp Each SL68 amp features hand wired construction, four EL-34 s (which deliver 100 watts), four inputs, two channels, a Low Power switch, Master Volume control,
OD-100 CLASSIC PLUS USER GUIDE
 OD-100 CLASSIC PLUS USER GUIDE OD-100 CLASSIC PLUS Thank you for purchasing the OD-100 Classic Plus Guitar Amplifier. The OD-100 CL+ captures the era of arena rock and the days when 100-watt amplifiers
Darkglass Suite. Disclaimer
 USER MANUAL Darkglass Suite Download the free Darkglass Suite software from www.darkglass.com/suite to configure the pedal, load new impulses and download firmware updates. Darkglass Suite comes with a
Darkglass Suite. Disclaimer
 USER MANUAL Darkglass Suite Download the free Darkglass Suite software from www.darkglass.com/suite to configure the pedal, load new impulses and download firmware updates. Darkglass Suite comes with a
Document Version 1.2
 Document Version 1.2 INTRODUCTION The X-LOAD LB-2 Reactive Load Box is a high-quality passive load box from Fractal Audio Systems. It offers a range of great features including front-panel output level
TONE ALERT RECEIVER MODEL 2TR9A. P.O. Box West Pacific. Lexington, NE 68850
 TONE ALERT RECEIVER MODEL 2TR9A P.O. Box 480 1311 West Pacific Lexington, NE 68850 Phone: (800)445-0007 (308)324-6661 Fax: (308)324-4985 www.veetronix.com Tomorrow's Technology Today CONTROLS AND FUNCTIONS
Darkglass Suite. Disclaimer
 USER MANUAL Darkglass Suite Download the free Darkglass Suite software from www.darkglass.com/suite to configure the pedal, load new impulses and download firmware updates. Darkglass Suite comes with a
OWNER S MANUAL. SimmonsDrums.net
 SimmonsDrums.net OWNER S MANUAL TABLE OF CONTENTS WELCOME AND CONGRATULATIONS!... 3 FRONT PANEL... 4 FEATURES...5 SPECIFICATIONS...6 SIGNAL FLOW DIAGRAM...6 WARRANTY...7 2 WELCOME AND CONGRATULATIONS!
User s Guide FM Transmitter
 TM 12-634 User s Guide FM Transmitter Please read this user s guide before using your new FM Transmitter. 12-634_en.indd 1 Package contents FM Transmitter USB Cable User s Guide Quick Start IMPORTANT SAFETY
900MHz Digital Hybrid Wireless Outdoor Speakers
 4015004 900MHz Digital Hybrid Wireless Outdoor Speakers User s Manual This 900 MHz digital hybrid wireless speaker system uses the latest wireless technology that enables you to enjoy music and TV sound
SP GHz Digital Wireless Speakers. User s Manual. Please read before using the equipment. Please visit for details.
 SP1390 2.4GHz Digital Wireless Speakers User s Manual Please read before using the equipment. Please visit www.promowide.com for details. INTRODUCTION This 2.4G digital wireless speakers system uses latest
INSTRUCTION MANUAL. MODEL: Vintage 60R. Vintage Series Guitar Amplifi er
 INSTRUCTION MANUAL MODEL: Vintage 60R Vintage Series Guitar Amplifi er 2 INTRODUCTION Thank you for choosing this Johnson amplifier. Please read this manual carefully and completely before operating your
900 MHz Digital Wireless Indoor/Outdoor Speakers
 4015007 900 MHz Digital Wireless Indoor/Outdoor Speakers User s Manual This 900 MHz digital hybrid wireless speaker system uses the latest wireless technology that enables you to enjoy music and TV sound
PM-16 Personal Monitoring System. User Guide South D Street Fort Smith, AR
 PM-16 Personal Monitoring System User Guide www.elitecoreaudio.com info@elitecoreaudio.com 920 South D Street Fort Smith, AR 72901 855-276-2673 i Important Safety Instructions WARNING: To ensure a long
Trace Elliot Elf Bass Instrument Amplifier
 Trace Elliot Elf Bass Instrument Amplifier Owner s Manual FCC Compliancy Statement This device complies with Part 15 of the FCC rules. Operation is subject to the following two conditions: (1) this device
MAX Series Bass Amplifiers
 MAX Series Bass Amplifiers Operating Manual www.peavey.com FCC Compliancy Statement This device complies with Part 15 of the FCC rules. Operation is subject to the following two conditions: (1) this device
A-16D A-Net Distributor
 A-16D A-Net Distributor For use with the Personal Monitor Mixing System Information in this document is subject to change. All rights reserved. Copyright 2003 Aviom, Inc. Printed in USA Document Rev. 1.03
DSL1CR & DSL1HR OWNER S MANUAL
 DSL1CR & DSL1HR OWNER S MANUAL INTRODUCTION Congratulations on your purchase of this Dual Super Lead (DSL) amplifier from Marshall Amplification. The DSL provides the legendary Marshall tone, allowing
AM/FM Stereo Headset Radio
 User s Guide 12-590 AM/FM Stereo Headset Radio Thank you for purchasing your AM/FM Stereo Headset Radio from RadioShack. Please read this user s guide before installing, setting up, and using your new
Black Oak / Light Oak / Cherrywood Wireless Panel Speaker
 4015115/4015116/4015117 Black Oak / Light Oak / Cherrywood Wireless Panel Speaker With Infrared Remote Control USER GUIDE For use with: Introduction These 900 MHz stereo wireless speaker system uses the
User Guide DIRECT-DRIVE
 DIRECT-DRIVE User Guide 1588 Kebet Way, Port Coquitlam BC V3C 5M5 Tel: 604-942-1001 Fax: 604-942-1010 Email: info@radialeng.com JDX Direct-Drive Amp Simulator and Direct Box Overview... 1 Features... 2
CCR24T CCR24R. User s Guide WIRELESS TRANSMITTER SYSTEM WARRANTY SERVICE CARD WARRANTY CARD
 WARRANTY SERVICE CARD WARRANTY CARD PRODUCT NAME Wireless Transceiver System PERIOD MODEL NAME CCR24GEN YEAR PURCHASE DATE.. 200_ From the date of WARRANTY PERIOD.. 200_ purchase. CUSTOMER S ADDRESS :
Hi-Fi Shelf System *MFL * SIMPLE MANUAL
 ENGLISH SIMPLE MANUAL Hi-Fi Shelf System Please read this manual carefully before operating your set and retain it for future reference. To view the instructions of advanced features, visit http://www.lg.com
Important Safety Information
 Owner's Manual Important Safety Information FCC Notice This equipment has been tested and found to comply with the limits for a Class B digital device, pursuant to Part 15 of the FCC Rules. These limits
EQ-AMP60 60W Mixer Amplifier
 EQ-AMP60 60W Mixer Amplifier Instruction Manual 4091 AMTC Center Drive Clearwater, FL 33764-6976 (727)531-3105 (727)531-3965 www.amtc.com Features 1. MIC 1 input with front- and rear-panel connectors 2.
6505 MICRO. Amplifier. Operating Manual.
 6505 MICRO Amplifier Operating Manual www.peavey.com FCC/ICES Compliancy Statement This device complies with Part 15 of the FCC rules and Industry Canada license-exempt RSS Standard(s). Operation is subject
Manual and User Guide
 Manual and User Guide TV Talker FM System Model WFM 260 Model WFM 270 Transmitter Model WFM TX260 Receiver Model WFM RX260 Receiver Model WFM RX270 MAN 151H 2011 Williams Sound, LLC Contents Page System
MWC2-9. Operation Manual. MWC MHz Receiver with FM Radio Option. Radio. manmwc29_v7
 Radio MWC2-9 MWC2-9 900MHz Receiver with FM Radio Option Operation Manual manmwc29_v7 www.myeclubtv.com CONTENTS FCC Compliance Statement... 3 Canada Compliance Statement.. 3 Specifications. 3 Receiver
HEDGEHOG 50 USER GUIDE
 HEDGEHOG 50 USER GUIDE IMPORTANT SAFETY INSTRUCTIONS 1. Read these instructions 2. Keep these instructions 3. Heed all warnings 4. Follow all instructions 5. Do not use this apparatus near water 6. Clean
AIS 300 Installation Instructions
 Use these instructions to install the Garmin AIS 300 Automatic Identification System (AIS) Class B receiver device. Compare the contents of this package with the packing list on the box. If any pieces
Thank you for purchasing the Empress Buffer+ Stereo. This pedal
 user manual Thank you for purchasing the Empress Buffer+ Stereo. This pedal was designed to be the complete I/O interface for your pedalboard while maintaining the highest fidelity of your guitar signal.
RFTX-1 Installation Manual
 RFTX-1 Installation Manual complete control Universal Remote Control RFTX-1 Installation Manual 2009-2014 Universal Remote Control, Inc. The information in this Owner s Manual is copyright protected. No
Mini Hi-Fi Audio *MFL * SIMPLE MANUAL
 ENGLISH SIMPLE MANUAL Mini Hi-Fi Audio To view the instructions of advanced features, visit http://www.lg.com and then download Owner s Manual. Some of the content in this manual may differ from your unit.
Mini Hi-Fi Audio *MFL * SIMPLE MANUAL
 ENGLISH SIMPLE MANUAL Mini Hi-Fi Audio To view the instructions of advanced features, visit http://www.lg.com and then download Owner s Manual. Some of the content in this manual may differ from your unit.
Field Hub Installation Guide. P/N Rev. C 05/15
 Field Hub Installation Guide P/N016-0171-380 Rev. C 05/15 E21714 Copyright 2015 Disclaimer While every effort has been made to ensure the accuracy of this document, Raven Industries assumes no responsibility
Mini Hi-Fi System *MFL * SIMPLE MANUAL
 ENGLISH SIMPLE MANUAL Mini Hi-Fi System Please read this manual carefully before operating your set and retain it for future reference. To view the instructions of advanced features, visit http://www.lg.com
HX-3 Headphone Distribution Amplifier
 SOUND DEVICES HX-3 Headphone Distribution Amplifier User Guide and Technical Information Sound Devices, LLC 300 Wengel Drive Reedsburg, WI 53959 USA Voice 608.524.0625 Fax 608 524.0655 www.sounddevices.com
Ambient Weather WR-77 Compact Emergency Radio with AM/FM/WeatherBand, Flashlight, Smart Phone Charger User Manual
 Ambient Weather WR-77 Compact Emergency Radio with AM/FM/WeatherBand, Flashlight, Smart Phone Charger User Manual Table of Contents 1. Introduction... 2 2. Controls... 2 3. Warnings... 2 5. Features...
CONCERT-1 CONCERT-2. Instrument DI. The World s Finest Transformers
 Owner s Manual CONCERT-1 CONCERT-2 Instrument DI Jensen Transformers Inc 9304 Deering Ave. Chatsworth, CA 91311 Tel: 818-374-5857 Email: info@jensen-transformers.com www.jensen-transformers.com Concert-1
HX-3. Headphone Distribution Amplifier User Guide and Technical Information
 HX-3 Headphone Distribution Amplifier User Guide and Technical Information Sound Devices, LLC 300 Wengel Drive Reedsburg, WI USA +1 (608) 524-0625 fax: +1 (608) 524-0655 Toll-Free: (800) 505-0625 www.sounddevices.com
Schooners II. Weatherproof Wireless 900MHz Speaker System. User Guide. Model no.: GDI-AQSHR200 / AQSHR21
 Schooners II Weatherproof Wireless 900MHz Speaker System User Guide Model no.: GDI-AQSHR200 / AQSHR21 IMPORTANT: Please read your User s Guide before using your system INTRODUCTION Your SCHOONERS II speaker
A W Table-Top Amplifier. with Built-in Bluetooth streaming
 A0361 100W Table-Top Amplifier with Built-in Bluetooth streaming 17 The A0361 Table-Top Amplifier can be used with Channel Vision s CAT5 audio hubs to provide a powerful 100 Watt Amplifier, 50Watts per
Ai1 OWNER S MANUAL. Getting Started:
 Ai1 OWNER S MANUAL Thank you for your purchase. We have developed a quality DI with preamp for use by professional musicians with added features for home or private practice. Features: The Ai1 is a quality
Owner s Manual DKW-3 GT. Wireless VHF Instrument System
 Owner s Manual DKW-3 GT Wireless VHF Instrument System Contents Introduction... 2 System Features... 2 Operation... 3 Specifications... 6 Service Information... 6 Warranty... 7 Introduction Thank you for
Using the USB Output Port to Charge a Device
 Table of Contents ----------------------------------- 2 Features ----------------------------------------------- 3 Controls and Functions ---------------------------------- 4 ER210 Power Sources -----------------------------------
DSL100HR & DSL40CR OWNER S MANUAL
 DSL100HR & DSL40CR OWNER S MANUAL INTRODUCTION Congratulations on your purchase of this Dual Super Lead (DSL) amplifier from Marshall Amplification. The DSL provides the legendary Marshall tone, allowing
PA WATT PORTABLE PA SYSTEM PRODUCT MANUAL
 PA-5150 5 150-WATT PORTABLE PA SYSTEM PRODUCT MANUAL THANK YOU FOR CHOOSING POLSEN. The Polsen PA-5150 is an active PA system that s ideal for solo performers or vocalists. It can be used as a PA system
Warning: Electrical Hazard... 3 Safety Instruction Sheet for STG Product Overview What s in the box?... 4
 STG-2412 User Guide Warning: Electrical Hazard... 3 Safety Instruction Sheet for STG-2412... 3 Product Overview... 4 What s in the box?... 4 Using STG-2412 for Mixing, Processing, and Recording... 5 Software
PHIL JONES BASS PJB BP-800
 PHIL JONES BASS PJB BP-800 OWNER S MANUAL Thank you for purchasing the PJB BP-800. A great deal of dedication and passion went into designing and building this no compromise, high-performance compact amplifier.
OWNER S MANUAL OPERATING INSTRUCTIONS
 OWNER S MANUAL OPERATING INSTRUCTIONS CONGRATULATIONS! Thank You For Choosing Wi Digital Systems Congratulations on your purchase of the Wi Pro AudioMatrix 2.4GHz Stereo Digital Multicast Wireless Audio
Classic Series Public Address Amplifiers C10 & C20 Models
 Classic Series Public Address Amplifiers C10 & C20 Models Installation and Use Manual 2009 Bogen Communications, Inc. All rights reserved. Specifications subject to change without notice. 54-5978-01B 0901
Rock Sounders. Weatherproof Wireless 900MHz Speaker System. User Guide. Model no.: GDI-AQRCK400 / AQRCK41
 Rock Sounders Weatherproof Wireless 900MHz Speaker System User Guide Model no.: GDI-AQRCK400 / AQRCK41 Please read before using the equipment IMPORTANT: Please read your User s Guide before using your
Tone King Ironman. User s Manual 1.0 7/23/2013
 Tone King Ironman User s Manual 1.0 7/23/2013 Tone King Amplifiers A division of Premier Builders Guild LLC 4401 Eastern Avenue, Bldg 46-3G, Box 38 Baltimore, Maryland 21224 www.toneking.com mail@toneking.com
301 & 601 Mic/Line Mixers Operation Manual
 301 & 601 Mic/Line Mixers Operation Manual Biamp Systems 9300 S.W. Gemini Drive Beaverton, OR 97008 USA +1.503.641.7287 www.biamp.com 301 & 601 TABLE OF CONTENTS Introduction Front Panel Rear Panel Remote
Sporty s Air Scan. Operator s Manual Sportsman s Market, Inc.
 Sporty s Air Scan Operator s Manual 2017 Sportsman s Market, Inc. Simplified Directions. 1. Turn the unit on (push and hold red power button for 2 seconds). 2. Select AIR (Aviation), AUX (wired auxiliary
TONE TATTOO ANALOG MULTI-EFFECT PEDAL featuring METAL MUFF, NEO CLONE & MEMORY TOY
 TONE TATTOO ANALOG MULTI-EFFECT PEDAL featuring METAL MUFF, NEO CLONE & MEMORY TOY Congratulations on your purchase of the fully analog Electro-Harmonix TONE TATTOO, the first true multi-effect from Electro-Harmonix!
DAC6820N (4) Balanced/unbalanced. AES to Analog Audio Converter USER MANUAL
 Balanced/unbalanced. AES to Analog Audio Converter USER MANUAL") DAC6820N (4) Balanced/unbalanced AES to Analog Audio Converter USER MANUAL Product Information Model: DAC6820N Balanced/unbalanced AES to Analog Audio Converter DAC6820N4 Balanced/unbalanced AES to Analog
DAC6820N (4) Balanced/unbalanced AES to Analog Audio Converter USER MANUAL Product Information Model: DAC6820N Balanced/unbalanced AES to Analog Audio Converter DAC6820N4 Balanced/unbalanced AES to Analog
DA560D COMPACT SERIES. INSTALLATION / OWNER'S MANUAL Mobile Power Amplifiers
 DA560D COMPACT SERIES INSTALLATION / OWNER'S MANUAL Mobile Power Amplifiers Preparation Please read entire manual before installation. Due to the technical nature of amplifiers, it is highly recommended
PDB4. Four Channel Passive Direct Box USER'S GUIDE
 PDB4 Four Channel Passive Direct Box USER'S GUIDE IMPORTANT SAFETY INSTRUCTIONS - READ FIRST This symbol, wherever it appears, alerts you to important operating and maintenance instructions in the accompanying
HTA125A/250A. Power Amplifiers. Installation & Use Manual
 HTA125A/250A Power Amplifiers Installation & Use Manual Specifications subject to change without notice. 2010 Bogen Communications, Inc. All rights reserved. 54-5832-04B 1011 NOTICE: Every effort was made
MWC5-98. Operation Manual. MWC /800MHz Cloning Receiver with FM Radio Option. Radio. man_mwc598_v11b
 Radio MWC5-98 MWC5-98 900/800MHz Cloning Receiver with FM Radio Option Operation Manual man_mwc598_v11b www.myeclubtv.com CONTENTS FCC Compliance Statement... 3 Canada Compliance Statement.. 3 Specifications.
Model CC4041. CC Series Amplifier. Installation and Use Manual
 BASS 0 TREBLE 0-12 +12-12 +12 INPUT 1 INPUT 2 INPUT 3 INPUT 4 PEAK SIGNAL POWER POWER CC Series Amplifier Model CC4041 Installation and Use Manual 2012 Bogen Communications, Inc. All rights reserved. Specifications
The Alpha Omega 900 amplifies the best qualities of one of the most powerful and distinct Darkglass pedals ever made.
 OWNER S MANUAL The Alpha Omega 900 takes the best elements of our most successful distortion preamplifier ever, combined with state-of-the-art features to make a monstrous 900-watt amplifier with earth-shattering
ACT-IR220L/LE IrDA Serial Port Adapter
 ACT-IR220L/LE IrDA Serial Port Adapter Product Specification Summary ACTiSYS Corp. 48511 Warm Springs Blvd, Suite 206 Fremont, CA 94539, USA TEL: (510) 490-8024, FAX: (510) 623-7268 E-Mail: irda-support@actisys.com
DA604D DA954D DA501D DA801D COMPACT SERIES. INSTALLATION / OWNER'S MANUAL Mobile Power Amplifiers
 DA604D DA954D DA501D DA801D COMPACT SERIES INSTALLATION / OWNER'S MANUAL Mobile Power Amplifiers Preparation Please read entire manual before installation. Due to the technical nature of amplifiers, it
User Guide SW212 Mity-Vox Wireless PA
 User Guide SW212 Mity-Vox Wireless PA Thank you for choosing the SW212 Mity-Vox Wireless PA from AmpliVox Portable Sound Systems. We are excited in introducing this truly unique system. Our system combines
DIGITAL AUDIO AMPLIFIER WITH BLUETOOTH. Model: DAA User Manual
 DIGITAL AUDIO AMPLIFIER WITH BLUETOOTH Model: DAA User Manual IMPORTANT INSTRUCTIONS When using electrical products, basic precautions should always be followed, including the following: WARNING: Risk
Pocket Weatheradio with Tone and Vibrating Alert
 Pocket Weatheradio with Tone and Vibrating Alert OWNER S MANUAL Please read before using this equipment. Your RadioShack Pocket Weatheradio is designed to receive National Weather Service (NWS) broadcasts,
USER MANUAL. Sens it SENS IT 2.4
 USER MANUAL www.sensit.io Sens it SENS IT 2.4 SUMMARY SAFETY INSTRUCTIONS 4 I. CONTENT OF THE PACK 4 II. PRESENTATION 5 III. HOW TO START 8 IV. TECHNICAL SPECIFICATIONS 9 V. WARNING STATEMENTS 10 VI. CREDITS
TRYM. TR-1 Tremolo Pedal. USER MANUAL TRYM TR- 1 User Manual rev , November, 2015
 TRYM TM TR-1 Tremolo Pedal USER MANUAL TRYM TR- 1 User Manual rev. 1.0.3, November, 2015 CONGRATULATIONS! You are now the owner of the TRYM TR- 1 tremolo pedal! TRYM is a high- quality, custom aluminum
ACT-IR220Li/220LN IrDA Serial Port Adapter
 ACT-IR220Li/220LN IrDA Serial Port Adapter Product Specification Summary ACTiSYS Corp. 48511 Warm Springs Blvd, Suite 206 Fremont, CA 94539, USA TEL: (510) 490-8024, FAX: (510) 623-7268 E-Mail: irda-support@actisys.com
ER200 COMPACT EMERGENCY CRANK DIGITAL WEATHER ALERT RADIO OWNER S MANUAL
 ER200 COMPACT EMERGENCY CRANK DIGITAL WEATHER ALERT RADIO OWNER S MANUAL Table of Contents -------------------------------------- 2 Features ----------------------------------------------- 3 Controls and
VACUUM TUBE GUITAR AMPLIFIER MODEL D60H OWNERS MANUAL
 VACUUM TUBE GUITAR AMPLIFIER MODEL D60H OWNERS MANUAL WELCOME TO THE FAMILY Congratulations and thank you for choosing the VHT Deliverance Sixty Guitar Amplifier! At VHT we I know you are constantly searching
We recommend you keep the following records for reference, as well as a copy of your sales receipt: Serial number: Date of purchase:
 Owner's Manual Introduction Congratulations on your purchase of the Samson G-Track Pro USB Microphone with Audio Interface. The G-Track Pro features dual 1 ultra thin capsules with selectable polar patterns,
XPR522 XPR540. XPR SERIES INSTALLATION / OWNER'S MANUAL Mobile Power Amplifiers
 XPR522 XPR540 XPR SERIES INSTALLATION / OWNER'S MANUAL Mobile Power Amplifiers Preparation Please read entire manual before installation. Due to the technical nature of amplifiers, it is highly recommended
CONNECT SYSTEMS INCORPORATED 1802 Eastman Ave., Suite 116 Ventura, Ca FLEX SERIES UNIVERSAL CONTROLLER
 CONNECT SYSTEMS INCORPORATED 1802 Eastman Ave., Suite 116 Ventura, Ca. 93003 Phone (805) 642-7184 Fax (805) 642-7271 FLEX SERIES UNIVERSAL CONTROLLER SIMPLEX REPEATER MIX With Voice Prompts User s Instruction
441 DUAL CHANNEL 15 BAND 2/3 OCTAVE GRAPHIC EQUALIZER 451 SINGLE CHANNEL 31 BAND 1/3 OCTAVE GRAPHIC EQUALIZER
 441 DUAL CHANNEL 15 BAND 2/3 OCTAVE GRAPHIC EQUALIZER 451 SINGLE CHANNEL 31 BAND 1/3 OCTAVE GRAPHIC EQUALIZER 455 DUAL CHANNEL 31 BAND 1/3 OCTAVE GRAPHIC EQUALIZER The new ART 400 Series of Precision Graphic
MULTIPLE OUTPUT DIGITAL DELAY
 Operating Instruction Manual MULTIPLE OUTPUT DIGITAL DELAY Model 310D Toa Electric Co., Ltd. KOBE, JAPAN Contents Precautions...1 General Description...2 Features...2 Front Panel...3 Rear Panel...4 Sample
Twinline Effects Loop Router User Guide True to the Music
 www.radialeng.com Twinline Effects Loop Router User Guide 1588 Kebet Way, Port Coquitlam British Columbia, Canada, V3C 5M5 Tel: 604-942-1001 Fax: 604-942-1010 Email: info@radialeng.com Radial Twinline
Warranty Terms & Conditions
 Warranty Terms & Conditions Is my guitar under warranty? How long, what specific parts? Ibanez Electric Guitars and Basses Limited Warranty Ibanez Electric Guitars and Basses sold in the United States
Model CC4052. CC Series Amplifier. Installation and Use Manual
 CC Series Amplifier Model CC4052 Installation and Use Manual 2012 Bogen Communications, Inc. All rights reserved. Specifications subject to change without notice. 54-2216-01A 1303 NOTICE: Every effort
Product Manual. Getting Started with Roadie 2.
 MOL NUMBER RD200 Product Manual Getting Started with Roadie 2. This manual is a quick start guide for Roadie 2. Please read the following instructions and conditions before using Roadie 2. For a more comprehensive
Inline Antenna Signal Amplifier
 1500528 User s Guide Inline Antenna Signal Amplifier We hope you enjoy your In-Line Antenna Signal Amplifier from RadioShack. Please read this user s guide before using your new signal amplif ier. Package
XPA2100 XPA4100 XPA6100. XPA SERIES INSTALLATION/OWNER S MANUAL Mobile Power Amplifiers
 XPA2100 XPA4100 XPA6100 XPA SERIES INSTALLATION/OWNER S MANUAL Mobile Power Amplifiers XPA SERIES INSTALLATION Preparation Please read entire manual before installation. Due to the technical nature of
KRAMER ELECTRONICS LTD. USER MANUAL MODEL: 912 Power Amplifier. P/N: Rev 2
 KRAMER ELECTRONICS LTD. USER MANUAL MODEL: 912 Power Amplifier P/N: 2900-000684 Rev 2 Contents 1 Introduction 1 2 Getting Started 2 2.1 Achieving the Best Performance 2 3 Overview 3 3.1 Defining the 912
NV-P2100. Audio Amplifier Owner s Manual
 NV-P21 Audio Amplifier Owner s Manual NV-P21 Audio Amplifier Congratulations on your purchase of the NuVo P21 audio amplifier. The P21 brings advanced technology of superior home sound together with
14 CHANNEL FAMILY RADIO SYSTEM MODEL # FR142
 14 CHANNEL FAMILY RADIO SYSTEM MODEL # FR142 2001 Audiovox Electronics Corp., Hauppauge, NY 11788 Printed in China 128-6020 052FR142104 BEFORE OPERATING THIS PRODUCT PLEASE READ THESE INSTRUCTIONS COMPLETELY
AMP SELECTOR Owner s Manual
 AMP SELECTOR Owner s Manual Version 1.0 VOODOO LAB AMP SELECTOR User s Manual Introduction The Voodoo Lab Amp Selector is the ultimate stand-alone tool for switching your guitar into multiple amplifiers.
PTT- Z or PTT-U PUSH-TO-TALK Specification
 Federal Communication Commission Interference Statement This equipment has been tested and found to comply with the limits for a Class B digital device, pursuant to Part 15 of the FCC Rules. These limits
Classic Series Amplifiers C35, C60, & C100 Models
 Classic Series Amplifiers C35, C60, & C100 Models Installation and Use Manual 2009 Bogen Communications, Inc. All rights reserved. Specifications subject to change without notice. 54-5979-02E 1203 Notice:
User Manual. ProRF Encoder Transmitter & Receiver
 User Manual ProRF Encoder Transmitter & Receiver WARRANTY Accurate Technology, Inc. warrants the ProScale Systems against defective parts and workmanship for 1 year commencing from the date of original