BEFORE PROCEEDING INSURE:
|
|
|
- Stephany Flynn
- 5 years ago
- Views:
Transcription
1
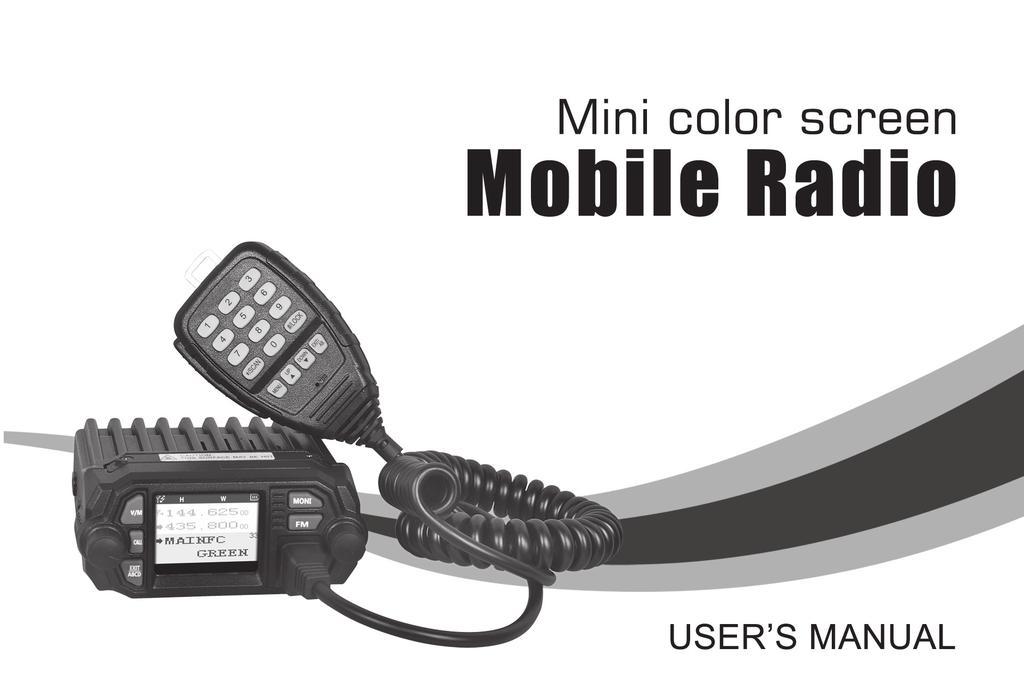
2 Thank you for your purchase of the product. This multi-band radio will deliver instant reliable communication. Please read this manual carefully before use! BEFORE PROCEEDING INSURE: Qualified technicians shall service this equipment only. Do not modify the radio for any reason. Use only orginal supplied or approved accessories. Turn off your radio prior to entering any area with explosive and flammable materials. Do NOT USE your transceiver at a gas/fuel station. For vehicles with an air bag, do not mount your radio in the area over an air bag or in the air bag deployment area. Do not expose the radio to direct sunlight over a long time, nor place it close to a heating source. If the unit emits smoke or an odor, you should immediately cut off the power supply. Then send the radio to the nearest service center or dealer. Do not operate the mobile transceiver on high power unless it is necessary. Do not transmit for long periods of time, as it may overheat the transceiver. Keep the unit away from dusty, damp and wet environments. Use the correct power supply (~13.8V); do not use incorrect or higher voltage (e.g. 24V).
3 Table of Contents Getting Started Getting Started...1 Unpacking and Inspecting...1 Overview of the Front Panel...2 Overview of the Rear Ports...4 Hand Held MIC Keys and Description...5 Color Display and Icon Descriptions...7 Antenna Basics...9 Basic Shortcuts And Use Pound # Key (Keypad Lock) Star Key Turning the unit ON Turning the unit Adjusting the volume Making a call...12 Channel selection...12 Monitor Both VFO & MR Modes...13 Menu Quick Review...14 Quick Menu Settings...14 Menu definitions...21 Programming...28 Frequency Mode vs. Channel Mode...28 Other Settings...29 Toggle from High to Low Power...29 Storing an FM Radio Station and Scanning Keypad Lock-out...29 PTT ID Setting...29 DTMF RX Settings...29 DTMF TX Settings...29 Remote Stun...30 Remote Kill...30 Remote Revive...31 DTMF Receive Settings, Transmit Setting (Call Key) TONE Receive Settings, Transmit Setting (Call Key) Tone Receive Settings, Transmit Setting (Call Key)...32 Scanning modes...32 Technical Specifications...33 Unpacking and Inspecting Please check the packaging of your radio for any signs of damage. Carefully open the box, and confirm your received the items listed below. If you find the radio or the included accessories are damaged or lost, immediately contact your dealer. What?s in the Box Mobile Radio Mounting Screws and Fuse Microphone Mounting Bracket Power Cable Getting Started 1
4 Overview of the Front Panel Model 1 a b c Model 2 a b c d d e f g h i RJ45 Connector a Data Input e b RPT CTRL f c MIC g d MIC Ground h PTT GND +8V DC Out Null e f g h i RJ45 Connector a Data Input e b RPT CTRL f c MIC g d MIC Ground h PTT GND +8V DC Out Null a. Power, On/Off Press + Volume Knob b. V/M Mode Switch (Channel/Frequency) c. Confirm Key Press +Main Selector (Menu Knob) d. Monitor function e. FM radio function key f. Display screen g. Call key h. Exit Menu + A/B/C/D signal switching + alarm function i. Microphone Connector [ ]: when in standby, press to send caller ID (ANI) in the selected signaling mode; while transmitting, press to send activate signaling. [ ]: press to turn on the squelch, repeat to turn off the squelch. [ ]: press to switch between channel mode and frequency mode. [ ]: press to choose between A,B,C or D frequencies --- Or exit function mode. [ ]: press to enter and exit FM radio. a. Power, On/Off Press + Volume Knob b. V/M Mode Switch (Channel/Frequency) c. Monitor function d. Confirm Key Press +Main Selector (Menu Knob) e. Exit Menu + A/B/C/D signal switching + alarm function f. Call key g. Display screen h. FM radio function key i. Microphone Connector [ ]: when in standby, press to send caller ID (ANI) in the selected signaling mode; while transmitting, press to send activate signaling. [ ]: press to turn on the squelch, repeat to turn off the squelch. [ ]: press to switch between channel mode and frequency mode. [ ]: press to choose between A,B,C or D frequencies --- Or exit function mode. [ ]: press to enter and exit FM radio. 2 Getting Started Getting Started 3
5 Overview of the Rear Ports Hand Held MIC Keys and Description a. TRRS Line Out: Includes PTT/Microphone/Audio-out/GND b. DATA, Programming Jack c. Cooling Fan d. SO-239 RF Antenna Connector: Connects to PL-259 Antennas e. DC Power Input (13.8V 7A Peak) a e b c d a b c d TRRS Line-Out Connector a. GND b. SP c. MIC d. PTT a. MENU : Function key VFO/MR Toggle (Long Press) b. UP : Higher frequency c. DOWN : Lower frequency d. EXIT : Exit the AB channel switch, alarm function Alarm Activate (Long Press) e. */SCAN : Scanning function f. #/LOCK : High / Low Power Toggle Keyboard Lock (Long Press) g. 0 : Number 0 h. 1 : Number 1 i. 2 : Number 2 j. 3 : Number 3 k. 4 : Number 4 l. 5 : Number 5 m. 6 : Number 6 n. 7 : Number 7 o. 8 : Number 8 p. 9 : Number 9 h i k n o e a b j m l p f g d c 4 Getting Started Getting Started 5
6 Color Display and Icon Descriptions a. MENU : Function key VFO/MR Toggle (Long Press) b. UP : Higher frequency c. DOWN : Lower frequency d. EXIT : Exit the AB channel switch, alarm function Alarm Activate (Long Press) e. */SCAN : Scanning function f. #/LOCK : High / Low Power Toggle Keyboard Lock (Long Press) g. 0 : Number 0 h. 1 : Number 1 i. 2 : Number 2 j. 3 : Number 3 k. 4 : Number 4 l. 5 : Number 5 m. 6 : Number 6 n. 7 : Number 7 o. 8 : Number 8 p. 9 : Number 9 b a h i k l n o c d e j g m f p The Top Line on the LCD will show the current selected channel s settings at a glimpse: Current Channel Setting Current Selected Channel Selection in Menu (applies to current selected channel) Icon Description Icon Description Icon Description Channel allowed to TX & RX DCS DCS Enabled (TX,RX or Both) + Positive Offset (Freq. Mode) Channel allowed to RX Only L Transmit Power: Low - Negative Offset (Freq. Mode) Channel allowed to TX Only H Transmit Power: High ± Offset Enabled (Chan. Mode) Channel disabled to TX or RX 2T 2Tone Calling Enabled N Channel set to Narrowband Keypad is Locked 5T 5Tone Calling Enabled W Channel set to Wideband CT CTCSS Enabled (TX, RX or Both) DT DTMF Calling Enabled R Channel Reverse Enabled Battery Strength (Weak Battery Indicator) 6 Getting Started Getting Started 7
7 Main frequency indicator Alternate watched frequencies indicator Strength Meter for the incoming signal Numerical scale for the incoming transmission intensity Antenna Basics Your Mobile Radio Kit does not include an Antenna. It is VERY Important to NOT transmit without a antenna or dummy load attached to the mobile radio. Doing so, will cause harm to the internal components of your radio. You will want to choose a suitable antenna for the bands you plan on transmitting and receiving on. If you plan on transmitting on 145MHz you will want to ensure you have picked an antenna that states it is capable of working with 145MHz. If an antenna is not properly tuned for the frequency you transmit on it can cause damage with the reflected power going back into the radio. Dual, Tri or Quad Watch selected in Menu 0: TMR. Custom Boot Message-editable via PC Programming Current Voltage detected from the power source Meter for the transmit output power - (High or Low Power inidcator) Numerical scale for microphone transmit audio level intensity Microphone transmit audio level intensity Pick an antenna with SWR of less than 1.5:1 to safely transmit. Grounding Plane Antennas require an appropriate grounding plane to properly work. Magnetically Mounted Antennas These antennas must be grounded to a metal surface, such as a vehicle body. Magnetic base antennas do not properly operate unless they are fully magnetically grounded first. NMO or PL-259 Base Antennas These antennas will normally require a base or mobile hardware kit. These kits are grounded either through: drill or clamp inserts on vehicles, magnetically mounted, or available as stationary base hardware kits. Some antennas may include a base station grounding plane kit. 8 Getting Started Getting Started 9
8 Antenna Requirements Antenna SWR Rating : 1.5:1 or less (on the radio frequencies in use.) Antenna Impedance : 50 ohm (use 50 ohm rated coax and coax connectors). Antenna Grounding : Ensure the antenna is mounted with a grounding plane. RRVisually Inspect Coax/Connectors for any Slits or Damage moisture should not be allowed to penetrate fittings or your coax. RRTo maximize the life of your radio, it is important to understand antenna basics before transmitting on your radio, transmitting without an antenna, or with high SWR (Standing Wave Ration) can void warranty support. RRAn Active SWR Meter is a great tool to have when selecting an antenna for your needs. You can monitor and confirm that your SWR is within safe levels when setting up your radio for the first time (periodically checking SWR and your antenna set-up is advised). Pound # Key (Keypad Lock) To enable or disable the keypad lock, press and hold the [#/LOCK] key for about two seconds. A quick toggle of the # will alternate power levels from High power to Low power. The keypad lock will lock both the main radio buttons itself and also the handheld keypad. The PTT/MONI and Power Buttons will not be locked when enabled. Star Key A short momentary press of the key enables the reverse function (reverses the TX/RX settings according to Offset settings). When listening to broadcast FM a momentary press will start the scanning. Scanning in broadcast FM will stop as soon as an active station is found. To enable scanning, press and hold the [ /SCAN] key for about two seconds. Basic Shortcuts And Use Turning the unit ON To turn the unit on, simply push and hold the volume knob until it turns on. If your radio powers on correctly there should be an audible tone after about one second and the display will show a message or flash the LCD depending on settings. Turning the unit To turn the unit off, simply push and hold the volume knob until it turns off. The unit is now off. Adjusting the volume To turn up the volume, turn the volume knob clockwise. To turn the volume down, turn the volume/power knob counter-clock-wise. R R By using the monitor function (MONI button), you can more easily adjust your volume by adjusting it to the un-squelched static. 10 Getting Started Basic Shortcuts And Use 11
9 Making a call Press and hold the PTT button on the side of the handheld mic to transmit. While transmitting, speak approximately 3-5cm (1-2 inches) from the microphone. When you release the PTT your transceiver will go back to its receive mode. Channel selection There are two modes of operation: Frequency (VFO) mode, and Channel or Memory (MR) mode. For everyday use, Channel (MR) mode is going to be a whole lot more practical than Frequency (VFO) mode. However, Frequency (VFO) mode is very handy for experimentation out in the field. Frequency (VFO) mode is also used for programming channels into memory. For details on how to program your transceiver see Chapter 4, Programming. Ultimately which mode you end up using will depend entirely on your use case. DDFrequency (VFO) mode In Frequency (VFO) mode you can navigate up and down the band by using the [UPY] and [DOWNZ] keys (or rotating the selector knob). Each press (or rotation click) will increment or decrement your frequency according to the frequency step you've set your transceiver to (Menu Item 1: Step). You can also input frequencies directly on your numeric keypad with kilohertz accuracy. However, the radio will floor to the nearest frequency that corresponds to your frequency step, in other words, when you input frequencies with greater than 1kHz resolution (such as MHz in the example below), always round your input up. RRJust because you can program in a channel does not mean you're automatically authorized to use that frequency. RRTransmitting on frequencies you're not authorized to operate on is illegal, and in most jurisdictions a serious offence. If you get caught transmitting without a license you can and will get fined, and in worst case sent to jail. RRHowever, it is legal in most jurisdictions to listen. Contact your local regulatory body for further information on what laws, rules and regulations apply to your area. DDChannel (MR) mode The use of Channel (MR) mode is dependent on actually having programmed in some channels to use. To find out more on how to program channels see Chapter Programming. Once you have channels programmed and ready, you can use the [UPY] and [DOWNZ] keys to navigate between channels (or Rotate the Selector Knob).!If you have channels programmed with Transmit power set to Low, you can use the key to momentarily switch over to high power if you're having trouble getting through. Monitor Both VFO & MR Modes You can toggle from VFO and MR (Memory Recall) mode by either pressing the [V/M] button on the front of your radio, or you can toggle modes from the Handheld Mic by a long press of the [MENU] button. The VFO/MR mode will only toggle on the current selected A/B/C/D line while the other channel lines will remain on channel or memory mode as they were selected. This allows you to monitor channel and frequency mode simultaneously. 12 Basic Shortcuts And Use Basic Shortcuts And Use 13
10 Quick Menu Settings To set the Menu options from the Mobile body use the M Press the selector knob on the radio body (or the Menu Key on the microphone) to select and confirm the changes, while rotating the selector knob (or using the microphone arrow keys) will change your settings. 0. [Enter Menu]+[0]: TMR This mode selects what displays are monitored in the background besides the primary selected channel. You can mix and match between all or partial channels to allow dual, tri, or quad watch. 1. [Enter Menu]+[1]: STEP Set the frequency increments step in VFO mode: 2.5kHz, 5kHz, 6.25kHz, 10kHz, 12.5kHz, 25kHz selectable. 2. [Enter Menu]+[2]: SQL Sets the receiver squelch level: 0 is, 1 is the lowest setting through 9 which is the highest setting. Menu Quick Review 3. [Enter Menu]+[3]: TXP Sets the transmit power setting from HIGH to LOW. 4. [Enter Menu]+[4]: SCR Scrambler (Optional Function) Please confirm with the supplier before use whether this function can be used. 5. [Enter Menu]+[5]: TOT Transmission time-out timer. Sets the maximum transmit time from 15 to 600 seconds (15 second steps). 6. [Enter Menu]+[6]: APO Auto Power Off powers off the radio after a predetermined time with no receiver activity. (30 > 300 minutes) 7. [Enter Menu]+[7]: WN WIDE or NARROW band width settings (12.5/25khz). 8. [Enter Menu]+[8]: ABR Unused Setting. 9. [Enter Menu]+[9]: BEEP Turns key beeps or ON. 10. [Enter Menu]+[1]+[0]: R-DCS DCS receive/squelch settings. Options include the D023N-D754N positive sequence and the D023I-D754I reversed sequence. 11. [Enter Menu]+[1]+[1]: R-CTCS CTCSS receive/squelch settings. Selectable from 67.0HZ-254.1HZ. you can use the keypad to quickly enter in the desired setting. 12. [Enter Menu]+[1]+[2]: T-DCS DCS transmit settings. Options include the D023N-D754N positive sequence and the D023I- D754I reversed sequence. 13. [Enter Menu]+[1]+[3]: T-CTCS CTCSS transmit settings. Selectable from 67.0Hz-254.1Hz. you can use the keypad to quickly enter in the desired setting. 14. [Enter Menu]+[1]+[4]: DTMFST DTMF transmit tone settings. : No tones heard through the speaker when transmitting. KEY : Only manually keyed DTMF codes are heard. ANI : Only automatically keyed DTMF codes are heard. BOTH : All DTMF codes are heard. 15. [Enter Menu]+[1]+[5]: BCL Busy channel lock- out. If you have this turned on the transmitter will not transmit if a channel is receiving at the time. 16. [Enter Menu]+[1]+[6]: SC-ADD Scan settings. : This removes the channel from the scan list. ON: This adds the channel to scanning list. 17. [Enter Menu]+[1]+[7]: SC-REV Scanning settings. TO : Time out scan, after the stopping on an active signal, scanning will resume after a few seconds. CO : Scanning will stop on a carrier channel and will resume after the carrier channel stops receiving. SE : Scanning will stop once an active carrier channel is found. 14 Menu Quick Review Menu Quick Review 15
11 18. [Enter Menu]+[1]+[8]: OPTSIG Turn on the optional signaling. the channel or mode will not use optional signaling. DTMF : DTMF signaling required. 2TONE : 2 tone signaling required. 5TONE : 5 tone signaling required. (PC programming is required to specify the DTMF, 2Tone, and 5Tone settings.) 19. [Enter Menu]+[1]+[9]: SPMUTE Squelch settings when combining standard and optional tones. QT : The squelch will open for just a CTCSS or DCS Receive tone. AND : This requires both the optional tone settings (Menu 20) and CTCSS/DCS settings to be received. OR : If a either the DCS/CTCSS or optional signaling is received the squelch will open. 20. [Enter Menu]+[2]+[0]: PTT-ID PTT-ID transmit setting. : no ID code sent when transmitting. BOT : send ID code at Beginning of Transmit. EOT : send ID code at End of Transmit. BOTH : send ID code at both beginning and end of transmit. (PTTID code information can only be set by the PC software) 21. [Enter Menu]+[2]+[1]: PTT-LT PTT-ID transmit delay setting. (Delay Time range is 0-30 seconds.). This is the delay time before transmitting the PTTID. 22. [Enter Menu]+[2]+[2]: S-INFO Signal information and automatic dialing memory group signal code/decode memory. The memory list is programmed through software. 23. [Enter Menu]+[2]+[3]: EMC-TP Alarm mode settings. ALARM : turns on the alarm sound on the device itself. ANI : Sends the Alarm and PTT ID through the Transmitter. BOTH : combines both of the options above. : Disables alarm. 24. [Enter Menu]+[2]+[4]: EMC-CH Alarm channel setting. This is the channel that the alarm will transmit the PTTID and Alarm sound on. 25. [Enter Menu]+[2]+[5]: SIG-BP Pager Ring at Reception of Matching 2Tone/ 5Tone/DTMF. (on/off) 26. [Enter Menu]+[2]+[6]: CHNAME Channel name edit. 27. [Enter Menu]+[2]+[7]: CA-MDF Display Mode (Display A) FREQ : displays Frequency. CH : displays channel number. NAME : displays assigned channel name. 28. [Enter Menu]+[2]+[8]: CB-MDF Display Mode (Display B) FREQ : displays Frequency. CH : displays channel number. NAME : displays assigned channel name. 29. [Enter Menu]+[2]+[9]: CC-MDF Display Mode (Display C) FREQ : displays Frequency. CH : displays channel number. NAME : displays assigned channel name. 30. [Enter Menu]+[3]+[0]: CD-MDF Display Mode (Display D) FREQ : displays Frequency. CH : displays channel number. NAME : displays assigned channel name. 31. [Enter Menu]+[3]+[1]: LANGUA Language Display Mode (English or Chinese) 32. [Enter Menu]+[3]+[2]: AUTOLK Keypad auto-lock setting. This activates the keypad auto-lock feature, which lock the keypad after 8 seconds of no use; pressing the # key for 2 seconds will release the auto lock. 33. [Enter Menu]+[3]+[3]: MAINFC Main LCD Display Foreground, Text Color: Color options are BLACK, WHITE, RED, BLUE, GREEN, YELLOW, INDIGO, PURPLE, GRAY. 34. [Enter Menu]+[3]+[4]: MAINBC Main LCD Display Background Color: Color options are BLACK, WHITE, RED, BLUE, GREEN, YELLOW, INDIGO, PURPLE, GRAY. 16 Menu Quick Review Menu Quick Review 17
12 35. [Enter Menu]+[3]+[5]: MENUFC Menu LCD Display Foreground, Text Color: Color options are BLACK, WHITE, RED, BLUE, GREEN, YELLOW, INDIGO, PURPLE, GRAY. 36. [Enter Menu]+[3]+[6]: MENUBC Menu LCD Display Background Color: Color options are BLACK, WHITE, RED, BLUE, GREEN, YELLOW, INDIGO, PURPLE, GRAY. 37. [Enter Menu]+[3]+[7]: STA-FC Status Bar LCD Display Foreground, Text Color: Color options are BLACK, WHITE, RED, BLUE, GREEN, YELLOW, INDIGO, PURPLE, GRAY. 38. [Enter Menu]+[3]+[8]: STA-BC Status Bar LCD Display Background Color: Color options are BLACK, WHITE, RED, BLUE, GREEN, YELLOW, INDIGO, PURPLE, GRAY. 39. [Enter Menu]+[3]+[9]: SIG-FC Signal Bar LCD Display Foreground, Text Color: Color options are BLACK, WHITE, RED, BLUE, GREEN, YELLOW, INDIGO, PURPLE, GRAY. 40. [Enter Menu]+[4]+[0]: SIG-BC Signal Bar LCD Display Background Color: Color options are BLACK, WHITE, RED, BLUE, GREEN, YELLOW, INDIGO, PURPLE, GRAY. 41. [Enter Menu]+[4]+[1]: RX-FC Receive Active Channel Foreground, Text Color: Color options are BLACK, WHITE, RED, BLUE, GREEN, YELLOW, INDIGO, PURPLE, GRAY. 42. [Enter Menu]+[4]+[3]: TX-FC Transmit Active Channel Foreground, Text Color: Color options are BLACK, WHITE, RED, BLUE, GREEN, YELLOW, INDIGO, PURPLE, GRAY. 43. [Enter Menu]+[4] +[3]: Transmit Display Status Bar Numerical Display Options (Power Level or Mic Level) 44. [Enter Menu]+[4]+[4]: MEM-CH Saves the selected channel. 45. [Enter Menu]+[4]+[5]: DEL-CH Deletes the selected channel. 46. [Enter Menu]+[4]+[6]: SFT-D Frequency difference direction setting. : no frequency difference. (+) : Transmit offset amount will be a positive offset (higher than the receive frequency). ( ) : Transmit offset will be a negative offset (amount will be lower than the receive frequency). 47. [Enter Menu]+[4]+[7]: SET Difference between the transmit and receive frequency. 48. [Enter Menu]+[4]+[8]: ANI Displays the radio ID code. Code only can set by PC software. 49. [Enter Menu]+[4]+[9]: ANI-L ID code length. Length = 3, 4, [Enter Menu]+[5]+[0]: REP-S Tone burst repeater settings. Pressing CALL will send a predetermined tone. Options are 1000 Hz, 1450 Hz, 1750 Hz, 2100 Hz. 51. [Enter Menu]+[5]+[1]: REP-M Repeater forwarding mode setting. Used in conjunction with two radios connected as a repeater. : turned off. CARRI : forwards after it receives a carrier call. CTDCS : forwards after it receives correct CT/DCS tone. TONE : forwards after it receives the correct 2Tone or 5Tone. DTMF : forwards after it receives the assigned DTMF code. 52. [Enter Menu]+[5]+[2]: TMR-MR Transmit Delay Return time. Delay time before returning to the primary channel after the secondary signal is clear. (PTT Return Time) 53. [Enter Menu]+[5]+[3]: STE Squelch Tail Elimination at the end of a received signal. Requires both transmitting radios to have the option ON. 54. [Enter Menu]+[5]+[4]: RP-STE Repeater Squelch Tail Elimination requires a repeater with this function ON. (Reverses the CT/DCS settings at the end of a transmission to quickly turn of the squelch) 18 Menu Quick Review Menu Quick Review 19
13 55. [Enter Menu]+[5]+[5]: RPT-DL Repeater Squelch Tail Eliminator Delay time. (use with Menu 46) 56. [Enter Menu]+[5]+[6]: DTMF-G Adjust the gain of the DTMF tones. Selectable from being the quietest level and 60 being the loudest modulated DTMF tones. 57. [Enter Menu]+[5]+[7]: RESET Reset all VFO settings or ALL settings. (channels deleted and VFO settings cleared) Menu definitions 0 TMR Transmit Multi Receive M+A M+B M+C M+D M+A+B M+A+C M+A+D M+B+C M+B+D M+C+D M+A+B+C M+A+B+D M+A+C+D M+B+C+D A+B+C+D This mode selects what displays are monitored in the background besides the primary selected channel. You can mix and match between all or partial channels to allow dual, tri, and quad watch. Selected Memory + Displays (A,B,C,D) M = Selected Memory A = Display A B = Display B C = Display C D = Display D 1 STEP Frequency Step Size Setup 2.5 to 25kHz 2.5, 5, 6.25, 10, 12.5, 25kHz 2 SQL Squelch Level 00 > 09 3 TXP Transmit Power High Low 10 squelch levels 00 = minimum / normally open Full Power Reduced Power 20 Menu Quick Review Menu Quick Review 21
14 4 SCR Scrambler ON Scrambler Function Enabled Scrambler Function Disabled 5 TOT TX Time Out Timer 15 > 600 secs 15 second steps 6 APO Auto Power Off 7 WN Bandwidth 8 ABR Unused Setting 30, 60 > 300 minutes Wideband Narrowband Time Set that radio will Power Off after last signal received. Turn off APO Option 25.0 khz 12.5 khz 9 BEEP Keypad Voice Prompt ON / Turn ON / keypad voice prompt 10 R-DCS 11 R-CTCS Receive - Digital Coded Squelch Receive - Analog Tone Squelch 12 T-DCS Transmit - DCS Code 13 T-CTCS Transmit - CTCSS Code 14 DTMFST Determines when DTMF codes are heard through speaker D023N > D754I Squelch opens when proper DCS code is detected No DCS code required 67.0 > 254.1Hz Squelch opens when proper CTCSS tone detected D023N > D754I No CTCSS tone required Transmits specified code No DCS code transmitted 67.0 > Hz Transmits specified tone DS-ST ANI-ST DT-ANI No CTCSS tone transmitted No DTMF tone heard Only manually keyed DTMF codes are heard Only automatically keyed DTMF codes are heard All DTMF codes are heard 15 BCL Busy Channel Lockout 16 SC-ADD Add Scan Channel 17 SC-REV Scan Resume Method 18 OPTSIG Optional Signaling 19 SPMUTE Speaker Mute Settings ON ON TO CO SE DTMF 2TONE 5TONE QT AND OR Prevents transmit if active signal on the channel No lockout Add channel to scan list Remove channel from scan list (Time Operation) Scan stops when signal detected. The scan resumes after approximately 5 seconds (even if the channel is still active). (Carrier Operation) Scan stops when signal detected. Scan resumes when signal disappears. (Search Operation) Scan stops when signal detected. Scanning will not resume. No optional signaling DTMF signaling selected 2TONE signaling selected 5TONE signaling selected Squelch opens for CTCSS/DCS tones only. Squelch opens when CTCSS/DCS tone is recognized along with the optional signaling. Squelch opens when either the CTCSS/DCS tone OR the optional signaling is recognized. 22 Menu Quick Review Menu Quick Review 23
15 20 PTT-ID PTT ID - When to send BOT EOT BOTH Do not send Send at Beginning of Transmission Send at the End of Transmission Send at both Beginning and End 21 PTT-LT PTT ID - Transmit Delay 0 > 30 Set Delay Time before transmitting PTT-ID 22 S-INFO Auto Group Dialing Group Signal Code Memory 1 > 15 (Can only be set with software) 23 EMC-TP Alarm Mode ALARM ANI BOTH Turn on Alarm sound Send Alarm code and ID code Both of the above Alarm Mode Completely Disabled 24 EMC-CH Alarm Channel 000 > 199 Specified Alarm Channel 25 SIG-BP Signal Beep ON Pager Ring at Reception of Matching 2Tone/5Tone/ DTMF Tone 26 CHNAME Channel Name Edit In Channel Mode, edit the Current Name 27 CA-MDF Channel A Display Mode 28 CB-MDF Channel B Display Mode FREQ CH NAME FREQ CH NAME In Channel Mode, display the selected format in display A In Channel Mode, display the selected format in display B 29 CC-MDF Channel C Display Mode 30 CD-MDF Channel D Display Mode 31 LANGUA Language 32 AUTOLK Auto Keypad Lock 33 MAINFC 34 MAINBC 35 MENUFC 36 MENUBC 37 STA-FC 38 STA-BC MAIN LCD Display Foreground Color (Text) MAIN LCD Display Background Color On Screen Menu Foreground Color (Text) On Screen Menu Background Color Status (Top) Bar Display Foreground Color (Text) Status (Top) Bar Display Background Color FREQ CH NAME FREQ CH NAME English Chinese ON Select Color Select Color Select Color Select Color Select Color Select Color In Channel Mode, display the selected format in display C In Channel Mode, display the selected format in display D Screen Prompts Display Keypad Auto Lock Enabled Keypad Auto Lock Disabled BLACK, WHITE, RED, BLUE, GREEN, YELLOW, INDIGO, PURPLE, GRAY BLACK, WHITE, RED, BLUE, GREEN, YELLOW, INDIGO, PURPLE, GRAY BLACK, WHITE, RED, BLUE, GREEN, YELLOW, INDIGO, PURPLE, GRAY BLACK, WHITE, RED, BLUE, GREEN, YELLOW, INDIGO, PURPLE, GRAY BLACK, WHITE, RED, BLUE, GREEN, YELLOW, INDIGO, PURPLE, GRAY BLACK, WHITE, RED, BLUE, GREEN, YELLOW, INDIGO, PURPLE, GRAY 24 Menu Quick Review Menu Quick Review 25
16 39 SIG-FC 40 SIG-BC 41 RX-FC 42 TX-FC Bottom Bar Display Foreground Color (Text) Bottom Bar Display Background Color Main LCD Receiving Color Foreground Color (Text) Main LCD TX Color Foreground Color (Text) 43 TXDISP Transmit Display Select Color Select Color Select Color Select Color POWER MIC-V BLACK, WHITE, RED, BLUE, GREEN, YELLOW, INDIGO, PURPLE, GRAY BLACK, WHITE, RED, BLUE, GREEN, YELLOW, INDIGO, PURPLE, GRAY BLACK, WHITE, RED, BLUE, GREEN, YELLOW, INDIGO, PURPLE, GRAY BLACK, WHITE, RED, BLUE, GREEN, YELLOW, INDIGO, PURPLE, GRAY Display Power Level on Bottom Graph Display Mic Audio Level on Bottom Graph 44 MEM-CH Memorize Channel 000 > 199 Indicates channel number to be stored. 45 DEL-CH Delete Channel 000 > 199 Indicates channel number to be deleted. 46 SFT-D Frequency Shift Direction 47 SET Frequency Shift Offset Amount No Offset (simplex) + Plus frequency shift - Minus frequency shift > Frequency shift in MHz 48 ANI ANI ID Code Can only be set with software 49 ANI-L ANI Length 3, 4, 5 Length of ANI ID code 50 REP-S Repeater Activation Tone 1000Hz, 1450Hz, 1750Hz, 2100Hz Audible tone for repeater activation 51 REP-M Repeater Forwarding Mode 52 TMR-MR 53 STE 54 RP-STE TMR - Return Time Delay to Primary Channel; Sets the PTT to the last received transmission channel. Time delay selectable Squelch Tail Elimination, Requires both radios have function ON. Repeater Squelch Tail Elimination, Requires a repeater using this function. 55 RPT-DL Repeater squelch tail delay. CARRI CTDCS TONE DTMF 1 > 50 seconds ON Function Forward after receiving Carrier Forward after receiving correct CTDCS Forward after receiving correct mono audio (Menu 42) Forward after receiving assigned DTMF code (ANI) Function - Transmits always on Primary Channel This is the delay time before returning to the primary channel after secondary signal is clear. Function Eliminates squelch tail at end of transmission. Function 1 > 10 Delay Time Function 1 > 10 Delay Time 56 DTMF-G DTMF Gain/Audio Level 0 > 60 0 = Lowest Audio Gain; 60 = Highest Gain 57 RESET Initialize to Factory Defaults VFO ALL Menu Initialization Menu and Channel Initialization 26 Menu Quick Review Menu Quick Review 27
17 Programming Other Settings Frequency Mode vs. Channel Mode Switch between Modes by Using the V/M Front Panel Button. These two modes have different functions and are often confused. Frequency Mode (VFO) Used for a temporary frequency assignment, such as a test frequency or quick field programming if permitted. Channel Mode (MR) Used for selecting preprogrammed channels. RRAll programming must be initially done in the frequency mode (VFO) only. From there you have the option of assigning the entered data to a specific channel for access in the channel mode. RRCall tones, TX/RX tones, squelch, and power settings are adjustable on saved channels in channel mode. RRProgramming channels are different from the VFO settings; the offset settings are not stored, instead you enter a TX frequency directly (e.g RX with an offset of (+). 600 Would be a TX frequency of ). Toggle from High to Low Power A quick press of the Microphone [#/LOCK] will alternate power levels from High power to Low power. Storing an FM Radio Station and Scanning Use PC software to store FM radio channels names, you can name the FM channel and instead of display the frequency your FM station will display the name. (software FM option (FM channels are not stored, only the channel names are)) Press the microphone [ /SCAN] Key to scan the FM radio. Keypad Lock-out Hold the microphone [#/LOCK] for 2 seconds at standby to turn on/off the keypad lock-out function. (The Lock icon appears, when the radio is locked out) PTT ID Setting 1. Use PC software to change PTT-ID code. 2. Set the Menu 18 settings on the radio to select the PTTID signal mode (2Tone, 5Tone, or DTMF). 3. Set the Menu 20 settings to select when the PTTID is transmitted. 4. Set the Menu 21 settings to program the PT- TID transmit delay time. 5. When all the settings are set, when you transmit (Press the PTT) The radio will transmit the PTTID. DTMF RX Settings This radio has DTMF coding and decoding. Use the PC software to set the DTMF signal settings first. DTMF TX Settings In two-way radio systems, DTMF is most commonly used for automation systems and remote 28 Programming Other Settings 29
18 control. A common example would be in amateur radio repeaters where some repeaters are activated by sending out a DTMF sequence (usually a simple single-digit sequence). DTMF frequencies and corresponding codes 1209Hz 1336Hz 1477Hz 1633Hz 697Hz A - [MENU] 770Hz B - [UPY] 852Hz C - [DOWNZ] 941Hz * 0 # D - [EXIT/AB] The product has a full implementation of DTMF, including the A, B, C and D codes. The numerical keys, as well as the [ /SCAN] and [#/LOCK], keys correspond to the matching DTMF codes as you would expect. The A, B, C and D codes are located in the [MENU], [UPY], [DOWNZ] and [EXIT/AB] keys respectively (+). Manually TX DTMF Tones: To manually send DTMF codes, press the key(s) while holding down the PTT key. Automatically TX DTMF Tones: Save it to Memory and Transmit: You can also program a DTMF tone to the saved calling list (requires the PC software) to the one of the 15 Memory call banks in the radio. To transmit select the Pre-set DTMF saved setting on Menu 22 and then press the call key to send the saved DTMF TX tone. Remote Stun First set the DTMF Remote Stun Tone and Master Control ID in Software: When your radio receives the DTMF Remote Stun Tone Sequence (Set by software) (Requires Menu 18 and 19 to accept DTMF signaling) it will command the radio to disable transmitting abilities. The Master ID station must first identify and send the PTTID (set in software as Master ID ) once the Master Station identifies itself, the radio is set to receive command tones, if the Monitor Remote Stun tone is received - the radio will no longer be able to transmit. Both the master ID station and remote stun signal must be set up in software. Remote Kill First set the DTMF Remote Kill Tone and Master Control ID in Software: When your radio receives the DTMF Remote Kill Tone Sequence (Set by software) (Requires Menu 18 and 19 to accept DTMF signaling) it will command the radio to disable transmitting and receiving. The Master ID station must first identify and send the PTTID (set in software as Master ID ) once the Master Station identifies itself, the radio is set to receive command tones, if the Monitor Remote Kill tone is received - the radio will no longer be able to transmit or receive. Both the master ID station and remote stun signal must be set up in software. Remote Revive First set the DTMF Remote Revive Tone and Master Control ID in Software: When your radio receives the DTMF Remote Revive Tone Sequence (Set by software) (Requires Menu 18 and 19 to accept DTMF signaling) it will reactivate the radio after it has been remotely stunned or killed. The Master ID station must first identify and send the PTTID (set in software as Master ID ) once the Master Station identifies itself, the radio is set to receive command tones, if the Monitor Remote Kill tone is received - the radio will revived from a stun/kill command. Both the master ID station and remote stun signal must be set up in software. DTMF Receive Settings, Transmit Setting (Call Key) 1. Press [MENU] Key select 18 OPTSIG, press [MENU] Key select DTMF function. 2. Press [MENU] Key select 22 S-INFO, press [MENU] Key select pre-code signal group (1-15). (The DTMF Signal must be saved first in the PC software setting under DTMF settings. 3. If properly set up (on Menu 18 and 19), your radio will open the squelch when it receives the required DTMG signal. 4. Press [CALL] Key to send the same DTMF you have selected in Menu 22. 2TONE Receive Settings, Transmit Setting (Call Key) 1. Press [MENU] Key select 18 OPTSIG, press [MENU] Key select 2TONE function. 2. Press [MENU] Key select 22 S-INFO, press [MENU] Key select pre-code signal group (1-15). (The 2Tone Signal must be saved first in the PC software setting under 2TONE settings) 3. If properly set up (on Menu 18 and 19), your radio will open the squelch when it receives the 30 Other Settings Other Settings 31
19 required 2TONE signal. 4. Press [CALL] Key to send the same 2TONE you have selected in Menu 22. 5Tone Receive Settings, Transmit Setting (Call Key) 1. Press [MENU] Key select 18 OPTSIG, press [MENU] Key select 5TONE function. 2. Press [MENU] Key select 22 S-INFO, press [MENU] Key select pre-code signal group (1-15). (The 5Tone Signal must be saved first in the PC software setting under 5TONE settings) 3. If properly set up (on Menu 18, and 19), your radio will open the squelch when it receives the required 5TONE signal. 4. Press [CALL] Key to send the same 5TONE you have selected in Menu 22. Scanning modes The scanner is configurable to one of three ways of operation: Time, carrier or search, each of w hich is explained in further details in their respective section below. Setting scanner mode 1. Press the [MENU] key to enter the menu. 2. Enter 17 on your numeric keypad to come to scanner mode. 3. Press the [MENU] key to select. 4. Use the [UPY] and [DOWNZ] keys to select scanning mode. 5. Press the [MENU] key to confirm and save. 6. Press the [EXIT/AB] key to exit the menu. Time operation: In Time Operation (TO) mode, the scanner stops when it detects a signal, and after a factory preset time out, it resumes scanning. Carrier operation: In Carrier Operation (CO) mode, the scanner stops when it detects a signal, and after a factory preset time with no signal it resumes scanning. Search operation: In Search Operation (SE) mode, the scanner stops when it detects a signal. To resume scanning you must press and hold the key again. Specification Frequency Range (MHz) Memory channels 200 Frequency stability Frequency step (khz) Squelch Setup Antenna impedance Operating temperature Supply voltage Dimension Weight Operating Temperature Technical Specifications GENERAL Value VHF: 136~174MHz (220~260MHz) UHF: 400~480MHz (350~390MHz) ±2.5ppm 2.5K/5.0K/6.25K/10.0K/12.5K/25.0K CARRIER / CTCSS / DCS / 5Tone / 2TONE / DTMF 50 Ohm -20 C to +60 C 13.8V DC±15%: 98(W) x 43(H) x 126(D) mm / 103(W) x 47(H) x 126(D) mm 448g -5 F F 32 Other Settings Technical Specifications 33
20 RECEIVER Broadband Narrow band Sensitivity 0.25μV 0.35μV Channel choice 70dB 60dB Intermodulation 65dB 60dB Spurious Rejection 70dB 70dB Audio response +1~-3dB (0.3-3KHz) +1~-3dB (0.3~2.55KHz) Signal to noise ratio 45dB 40dB Audio Distortion 5% Audio output power 2W±10% TRANSMIT Broadband Narrow band Output power 25W / 20W (VHF / UHF) Modulation Mode 16KΦF3E 11KΦF3E Channel Power 70dB 60B Signal to noise ratio 40dB 36dB Parasitic harmonic 60dB 60dB Audio response +1--3dB (0.3-3KHz) +1--3dB ( KHz) Audio distortion 5% 34 Technical Specifications
21
DUAL BAND MOBILE RADIO USER S MANUAL
 DUAL BAND MOBILE RADIO USER S MANUAL Thank you for your purchase of the product. This dual band radio will deliver to you secure instant reliable communication. Please read this manual carefully before
THANK YOU FOR YOUR PURCHASE OF THE UV THIS DUAL BAND RADIO WILL DELIVER TO YOU SECURE INSTANT RELIABLE COMMUNICATION.
 Copyright 2016 by BTECH; https://baofengtech.com All rights reserved. No part of this publication may be reproduced, distributed, or transmitted in any form or by any means, including photocopying, recording,
Reference for UV-5R Menus by Jim Unroe - KC9HI 2-April-2014
 Long Name / Description / / Notes / 0 SQL Carrier Squelch Mutes the speaker of the transceiver in the absence of a strong signal. VHF squelch is either OFF or ON. UHF squelch is either OFF or one of 9
UV-5R Manual. pofung UV-5R
 pofung UV-5R Pre conditions 1 Charge Battery 2 Attach antenna 3 Take Note of: , , , , 4 Orange VFO/MR, BlueA/B, Black BAND, 5 10 Key Number Pad. Used to enter key numbers
USER S MANUAL. VHF-UHF Mobile transceiver for radioamateur
 USER S MANUAL VHF-UHF Mobile transceiver for radioamateur This appliance is marked with the symbol for selective sorting of waste electrical and electronicequipment. This meansthatthis product must be
Content. Maintenance. Features ENGLISH. 1 transceiver 1 antenna 1 battery pack 1 belt clip 1 fast desktop charger User manual
 ENGLISH Content 1 transceiver 1 antenna 1 battery pack 1 belt clip 1 fast desktop charger User manual If any items are missing, contact your dealer. Maintenance Your Two Way Radio is an electronic product
SET MENU DESCRIPTION:
 COMMAND/KEY DEFINITIONS: [PTT] (PUSH-TO-TALK): Press and hold to transmit; release to receive. SK-SIDE KEY1/[CALL]: - Press the [CALL] button, to activate the FM Radio. Press it again to deactivate the
If any item is missing or have been damaged during the shipment, please notify your MIDLAND dealer.
 Content 1 CT 790 transceiver 1 high gain antenna 1 Li-ion battery pack 1 desktop charger 1 belt clip 1 hand strap If any item is missing or have been damaged during the shipment, please notify your MIDLAND
DJ-MD5 PC Software Guidance
 DJ-MD5 PC Software Guidance Ver, 1.00 2018/08/16 1 Appendix I Public... 4 1. Channel... 4 1 Frequency, call type, power... 4 2 Digital Channel Setting... 5 3 Analog Channel Setting... 6 2. Zone... 7 3.
RL /430MHZ DUAL BAND FM TRANSCEIVER OPERATION INSTRUCTION
 RL-502 144/430MHZ DUAL BAND FM TRANSCEIVER OPERATION INSTRUCTION RoHS Table of Contents Packing List...1 Cautions...2 Parts Name & Functions...3 Fitting & Removing the Battery Pack...4 Installation the
INSTRUCTION MANUAL VHF FM TRANSCEIVER TK-2206 UHF FM TRANSCEIVER TK-3206 B (M,M3 )
") INSTRUCTION MANUAL VHF FM TRANSCEIVER TK-2206 UHF FM TRANSCEIVER TK-3206 B62-1763-00 (M,M3 ) 09 08 07 06 05 04 03 02 01 00 THANK YOU We are grateful you chose KENWOOD for your land mobile radio applications.
INSTRUCTION MANUAL VHF FM TRANSCEIVER TK-2206 UHF FM TRANSCEIVER TK-3206 B62-1763-00 (M,M3 ) 09 08 07 06 05 04 03 02 01 00 THANK YOU We are grateful you chose KENWOOD for your land mobile radio applications.
THANK YOU FOR YOUR PURCHASE OF THE BF-F8HP. THIS DUAL BAND RADIO WILL DELIVER YOU SECURE INSTANT RELIABLE COMMUNICATION.
 Copyright 2014 by BaoFeng Tech All rights reserved. No part of this publication may be reproduced, distributed, or transmitted in any form or by any means, including photocopying, recording, or other electronic
Baofeng UV-5RTips And Hints For Eyes-Free Operation
 Baofeng UV-5RTips And Hints For Eyes-Free Operation Buddy Brannan, KB5ELV, buddy@brannan.name Last Updated: 2 July 2012 Updates And Modifications 2 July 2012: From Jim Unroe, KC9HI: Corrected information
RMV25 / RMV50 RMU25 / RMU45
 RMV25 / RMV50 RMU25 / RMU45 Owner's Manual TABLE OF CONTENTS INTRODUCTION... 3 FCC Requirements... 3 SAFETY WARNING INFORMATION... 3 CONTROLS and INDICATORS... 5 FRONT PANEL... 5 LCD Icons and Indicators...
THANK YOU FOR YOUR PURCHASE OF THE UV-82HP. THIS DUAL BAND RADIO WILL DELIVER YOU SECURE INSTANT RELIABLE COMMUNICATION.
 Copyright 2015 by BaoFeng Tech All rights reserved. No part of this publication may be reproduced, distributed, or transmitted in any form or by any means, including photocopying, recording, or other electronic
DUAL BAND/DUAL DISPLAY RADIO OPERATING MANUAL UV-82
 DUAL BAND/DUAL DISPLAY RADIO OPERATING MANUAL UV-82 http://www.baofengradio.us 2 PREFACE Thank you for purchasing the UV-82 Amateur Portable Radio from Baofeng Radio US, the official Baofeng distributor
SUBELEMENT T4. Amateur radio practices and station set up. 2 Exam Questions - 2 Groups
 SUBELEMENT T4 Amateur radio practices and station set up 2 Exam Questions - 2 Groups 1 T4A Station setup: connecting microphones; reducing unwanted emissions; power source; connecting a computer; RF grounding;
INSTRUCTION MANUAL VHF FM TRANSCEIVER TK-7102H UHF FM TRANSCEIVER TK-8102H KENWOOD CORPORATION B (M)
") INSTRUCTION MANUAL VHF FM TRANSCEIVER TK-7102H UHF FM TRANSCEIVER TK-8102H KENWOOD CORPORATION B62-1596-00 (M) 09 08 07 06 05 04 03 02 01 00 THANK YOU! We are grateful you chose KENWOOD for your personal
INSTRUCTION MANUAL VHF FM TRANSCEIVER TK-7102H UHF FM TRANSCEIVER TK-8102H KENWOOD CORPORATION B62-1596-00 (M) 09 08 07 06 05 04 03 02 01 00 THANK YOU! We are grateful you chose KENWOOD for your personal
Cat. No OWNER S MANUAL. HTX-212 Two-Meter Mobile Transceiver. Please read before using this transceiver.
 19-1125.fm Page 1 Tuesday, August 3, 1999 9:47 AM Cat. No. 19-1125 OWNER S MANUAL HTX-212 Two-Meter Mobile Transceiver Please read before using this transceiver. 19-1125.fm Page 2 Tuesday, August 3, 1999
DUAL BAND/DUAL DISPLAY RADIO O PERATING M ANUAL - F9V2+
 DUAL BAND/DUAL DISPLAY RADIO O PERATING M ANUAL BF - F9V2+ http://baofengradio.us http://www.baofengradio.us 2 PREFACE Thank you for purchasing the BF-F9V2+ Amateur Portable Radio from Baofeng Radio US,
DUAL BAND/DUAL DISPLAY RADIO O PERATING M ANUAL BF - F9V2+
 DUAL BAND/DUAL DISPLAY RADIO O PERATING M ANUAL BF - F9V2+ 2 Contents Preface... 4 Declaration by Manufacturer... 4 License and Legal Information... 4 Safety Information... 5 Features and Functions...
TK-D740 TK-D740H TK-D740HV TK-D840 TK-D840H TK-D840HU
 TK-D740 TK-D740H TK-D740HV TK-D840 TK-D840H TK-D840HU VHF DIGITAL TRANSCEIVER UHF DIGITAL TRANSCEIVER USER MANUAL B5A 0925-00/01 Contents PREPARATION... 4 Connecting the power cable... 4 Installing the
DC-1122 Compact 5W UHF CB Radio
 DC-1122 Compact 5W UHF CB Radio Instruction Manual Introduction! NOTE Use of the citizen band radio service is licensed in Australia by ACMA Radio communications (Citizen Band Radio Stations) Class Licence
OWNER S MANUAL FM HANDHELD TRANSCEIVER
 , OWNER S MANUAL RPU4200A FM HANDHELD TRANSCEIVER NOTE, OWNER S MANUAL RPU4200A FM HANDHELD TRANSCEIVER We are very grateful for your purchasing brand twoway radios produced by Relm Wireless Corporation.
i410pro ADVANCED MANUAL UHF CB TRANSCEIVER INTRODUCTION 1 ACCESSORIES AND INSTALLATION 2 BASIC OPERATION 3 SET MODE 4 REPEATER OPERATION 5 SCAN
 ADVANCED MANUAL INTRODUCTION 1 ACCESSORIES AND INSTALLATION 2 BASIC OPERATION 3 SET MODE UHF CB TRANSCEIVER i410pro 4 REPEATER OPERATION 5 SCAN 6 TONE SQUELCH AND POCKET BEEP 7 SELCALL (Selective Calling)
AT-5555N 10 METER RADIO
 AT-5555N 10 METER RADIO CONTENTS FUNCTIONS & FEATURES...1 STANDARD ACCESSORIES...2 INSTALLATION...2 GETTING ACQUAINTED...5 HOW TO USE YOUR RADIO...7 KEYPAD FUNCTION...9 BACKGROUND FUNCTION MENU OPERATION...12
THANK YOU! MODELS COVERED IN THIS MANUAL
 THANK YOU! Thank you for your purchase of Hytera mobile radio TM-600. We believe this easy-to-use radio will provide you with dependable and reliable communications at peak efficiency. Please read this
HR MHZ AM-FM AMATEUR RADIO HF TRANSCEIVER OWNER'S MANUAL. Content of the packaging
 HR-2800 28 MHZ AM-FM AMATEUR RADIO HF TRANSCEIVER OWNER'S MANUAL NOTICE! It is recommended to carefully read this owner s manual before using the product. This will also help to prevent illegal use of
KENWOOD SKY COMMAND SYSTEM
 KENWOOD SKY COMMAND SYSTEM Operation Manual KENWOOD COMMINICATIONS CORPORATION KENWOOD COMMUNICATIONS CORPORATION This operation manual is used for the KENWOOD SKY COMMAND SYSTEM (hereinafter referred
User Manual. Specifications...3. Control and Operation Microphone...8. Installation...9. Installation of Main Unit...9
 Contents Specifications...3 Control and Operation...4-7 Microphone...8 Installation...9 Installation of Main Unit...9 Antenna Installation...9 Operational test...9 Frequency Bands Table...10 Frequency
AnyToneTech.com. Package and Product Designed in U.S.A. MADE IN CHINA
 A1.150126 Package and Product Designed in U.S.A. MADE IN CHINA AnyToneTech.com Copyright 2015 by AnyTone Tech All rights reserved. No part of this publication may be reproduced, distributed, or transmitted
OPERATING GUIDE VHF TRANSCEIVER. Iç-G88
 OPERATING GUIDE VHF TRANSCEIVER Iç-G88 INTRODUCTION PREFACE We appreciate you choosing Icom for your communication needs. The MDC 1200 signaling system is built into your IC-G88 vhf transceiver. IMPORTANT
i2820h (USA) ie2820(europe)
 ie2820(europe)") January 2007 DUAL BAND TRANSCEIVERS i2820h (USA) ie2820(europe) The above photo shows the IC-2820H. The IC-E2820 differs slightly from this photo. Icom proudly announces the debut of the new dual band
January 2007 DUAL BAND TRANSCEIVERS i2820h (USA) ie2820(europe) The above photo shows the IC-2820H. The IC-E2820 differs slightly from this photo. Icom proudly announces the debut of the new dual band
INSTRUCTION MANUAL FM HANDHELD TRANSCEIVER
 INSTRUCTION MANUAL PT558 FM HANDHELD TRANSCEIVER NOTE INSTRUCTION MANUAL PT558 FM HANDHELD TRANSCEIVER We are very grateful for your purchasing brand twoway radios produced by Kirisun Electronics (Shenzhen)
Yaesu FT-25R 2-Meter Handheld Transceiver
 Yaesu FT-25R 2-Meter Handheld Transceiver Reviewed by Dan Wall, W1ZFG ARRL LoTW Administration w1zfg@arrl.org The latest entry into the field of small, inexpensive handhelds is the Yaesu FT-25R. This is
Lava LP-4011-E P1 P2 USER MANUAL
 Lava LP-4011-E P1 P2 USER MANUAL Introduction Thank you for purchasing Lava LP-4011-E. Lava LP-4011-E is a PMR-product (Private Mobile Radio) that lets you talk to as many people you wish, as often as
This mobile radio offers latest design, enhanced features, solid performances and
 Thanks for buying the KG-UV920P-E mobile radio. This mobile radio offers latest design, enhanced features, solid performances and easy accessibility. We believe you will be pleased with the high quality
CON NEX HP. OWNER'S MANUAL Full Channel AM/FM Amateur Mobile Transceiver TABLE OF CONTENTS TUNING THE ANTENNA FOR OPTIMUM S.W.R..
 TABLE OF CONTENTS PAGE SPECIFICATIONS... 2 INSTALLATION... 3 LOCATION... 3 CON NEX - 4300HP MOUNTING THE RADIO... 3 IGNITION NOISE INTERFERENCE... 4 ANTENNA... 4 TUNING THE ANTENNA FOR OPTIMUM S.W.R..
Technical Equipment Specification
 STATE OF CALIFORNIA Office of the State Chief Information Officer Public Safety Communications Division Technical Equipment Specification Equipment Type: Transmitter/Receiver Mobile Relay/Base/Control
AT-D868UV CodePlug Programming Guide
 INTRODUCTION The AnyTone D868UV radio is a VHF and UHF radio with both Digital DMR (Tier I and II) and Analog capabilities. It offers a total of 4,000 channels (Analog and Digital) and up to 130,000 contacts,
Notice Please use the transceiver in compliance with local regulations.
 Notice Please use the transceiver in compliance with local regulations. To User Thank you for purchasing the Mobile transceiver. We trust this transceiver will give you convenient and reliable communication
BCM-440 User Manual. By BridgeCom Systems, Inc.
 BCM-440 User Manual By BridgeCom Systems, Inc. Copyright 2017 BY Bridge Embedded Systems, Inc Version 1.1, Jan 2017 All rights reserved. Printed in the United States of America. Windows is a registered
OPERATING GUIDE VHF DIGITAL TRANSCEIVERS. if1000d. series UHF DIGITAL TRANSCEIVERS. if2000d series. The photo shows the VHF transceiver.
 OPERATING GUIDE VHF DIGITAL TRANSCEIVERS if1000d UHF DIGITAL TRANSCEIVERS series if2000d series The photo shows the VHF transceiver. TABLE OF CONTENTS 1. PANEL DESCRIPTION Front, top and side panels 1-2
What s in the box 1. Main features 2. Installing the radio 3
 Index What s in the box 1 Cautions 1 Main features 2 Installing the radio 3 Installation 3 Power supply 3 Replacing fuses 4 Connecting the microphone 4 Installing an antenna 4 External speakers 4 Controls
TX4400 UHF CB RADIO INSTRUCTION MANUAL TX4400 INSTRUCTION MANUAL PAGE 1
 TX4400 UHF CB RADIO INSTRUCTION MANUAL TX4400 INSTRUCTION MANUAL PAGE 1 TABLE OF CONTENTS GENERAL................................... 3 FEATURES.................................. 3 BASIC OPERATION...4 Front
INSTRUCTION MANUAL. 144/440 MHz FM DUAL BANDER TM-V708A KENWOOD CORPORATION B (K) TM-V708
 TM-V708") INSTRUCTION MANUAL 44/440 MHz FM DUAL BANDER TM-V708A TM-V708 KENWOOD CORPORATION B62-834-00 (K) 09 08 07 06 05 04 03 02 0 00 THANK YOU! Control Head Replacement We are grateful you decided to purchase
INSTRUCTION MANUAL 44/440 MHz FM DUAL BANDER TM-V708A TM-V708 KENWOOD CORPORATION B62-834-00 (K) 09 08 07 06 05 04 03 02 0 00 THANK YOU! Control Head Replacement We are grateful you decided to purchase
Instruction Manual PMR-101TX. Private Mobile Radio. TTI Tech. 446MHz, 8 Channels
 PMR-101TX Instruction Manual Private Mobile Radio 446MHz, 8 Channels? 38 CTCSS Sub Tone? 8 Channels? VOX Mode? Scanning? Monitor? Key Pad Lock? Dual Watch? Auto Power Save Mode? Battery Status Indicator?
SMH250D/SMU250K User s Guide
 SMH250D/SMU250K User s Guide WIRELESS CORPORATION 7100 Technology Drive West Melbourne, FL 32904 2000 RELM Wireless Corporation. All Rights Reserved ULZZ01101ZZ RELM WIRELESS CORPORATION 7100 Technology
DC Instruction Manual. Professional FM Transceiver
 DC-1074 Professional FM Transceiver Instruction Manual Use of the citizen band radio service is licensed in Australia by ACMA Radiocommunications (Citizen Band Radio Stations) Class Licence and in New
PC Tune PC Tune Test Procedures for 5100 Series Portable Radios
 PC Tune PC Tune Test Procedures for 5100 Series Portable Radios Part Number 002-9998-6513014 August 2008 Copyright 2006, 2007, 2008 by EFJohnson Technologies The EFJohnson Technologies logo, PC Configure,
Downloaded from
 Downloaded from www.cbradio.nl WARNING Please install the antenna (connect to the location B in the back panel of the radio) and set the SWR (Standing Wave Ratio) before transmitting. Otherwise it may
BCH-270 Owner s Manual
 BCH-270 Owner s Manual By BridgeCom Systems, Inc. TABLE OF CONTENTS CHAPTER 1: INTRODUCTION... 4 WELCOME... 4 SPECIFICATIONS... 4 CHAPTER 2: UNPACKING AND PREPARATION... 5 PARTS LIST... 5 CHARGING THE
Easy Operation Instructions
 Easy Operation Instructions I. Panel Description 1 PWR DAIL : Power Switch PWR /Volume Adjustment VOL /Frequency Adjustment/ MENU Key/Enter Key etc. Operation: Power Switch PWR : To switch the transceiver
INSTRUCTION MANUAL VHF FM TRANSCEIVER TK-7100 UHF FM TRANSCEIVER TK-8100 B (K,M,M2)
") INSTRUCTION MANUAL VHF FM TRANSCEIVER TK-7100 UHF FM TRANSCEIVER TK-8100 B62-1778-00 (K,M,M2) 09 08 07 06 05 04 03 02 01 00 THANK YOU! We are grateful you chose KENWOOD for your personal mobile applications.
INSTRUCTION MANUAL VHF FM TRANSCEIVER TK-7100 UHF FM TRANSCEIVER TK-8100 B62-1778-00 (K,M,M2) 09 08 07 06 05 04 03 02 01 00 THANK YOU! We are grateful you chose KENWOOD for your personal mobile applications.
4W MOBILE CB TRANSCEIVER INSTRUCTION MANUAL
 4W MOBILE CB TRANSCEIVER INSTRUCTION MANUAL www.ttikorea.co.kr CONTENTS 1. Introduction 2. Supplied Accessories 3. Installation 4. Transceiver Controls and Functions 1) Channel Selector 2) Dual Watch 3)
MIDLAND PROGRAMING G14
 MIDLAND PROGRAMING G14 1. PROGRAMMING CAPABILITY Welcome to the MIDLAND Programming software! It s a programming software specifically designed for G14 and must be used in conjunction with the dedicated
RPS-9000 Programming Software for the TYT TH-9000
 for the TYT TH-9000 Memory Types Memories Limit Memories VFO Channels Receive Frequency Transmit Frequency Offset Frequency Offset Direction Channel Spacing Name Tone Mode CTCSS Rx CTCSS DCS Rx DCS Memory
Instruction Manual. Model: TX-446. Tech Private Mobile Radio (PMR)446MHz
446MHz") Instruction Manual Tech Private Mobile Radio (PMR)446MHz Model: TX-446 TTI TECH CO., LTD. Eundo Bldg, 737-19, Banpo-1dong, Seocho-ku, Seoul, Korea, 137-041 http://www.ttikorea.co.kr TABLE OF CONTENTS 1.
Instruction Manual Tech Private Mobile Radio (PMR)446MHz Model: TX-446 TTI TECH CO., LTD. Eundo Bldg, 737-19, Banpo-1dong, Seocho-ku, Seoul, Korea, 137-041 http://www.ttikorea.co.kr TABLE OF CONTENTS 1.
PMR446 Radio Instruction Manual
 Tectalk PRO PMR446 Radio Instruction Manual Thank you for purchasing this radio. All our products are built to offer excellent value by combining advanced features, great design and manufacturing quality.
INSTALLATION AND OPERATION GUIDE
 VHF Marine Radio RT-311 INSTALLATION AND OPERATION GUIDE Navicom plaisance: Z.A. des Boutries, 78700 Conflans Ste Honorine Tel: 01.39.72.19.90 Fax: 01.39.19.28.98 Navicom Pro: 3, rue J. Cugnot, Z.A.C Petit
MobileRadio. Owner'sManual
 EMH MobileRadio Owner'sManual TABLE OF CONTENTS Introduction... 1 Basic Operation... 2 Code Guard Operation... 3 EMH Radio Controls... 4 Button Functions... 4 Built-in Features... 7 Keypad Microphone Operation...
Midland 248XL I NSTRUCTION GUI DE
 Midland 248XL I NSTRUCTION GUI DE INDEX Introduction...2 Function and location of the controls...3 Installation...7 Power supply...7 Installing an antenna...7 How to use your Midland 248XL...8 Frequency
SAFETY INFORMATION FOR USER
 USER MANUAL SAFETY INFORMATION FOR USER CRT transceiver is excellently designed with advanced technology. Please observe the following precautions to perform your obligation, prevent personal injury and
ATP-588 Programming Software for the Anytone AT-588
 for the Anytone AT-588 Memory Channel Functions Memory Types Memories Limit Memories VFO Receive Frequency Transmit Frequency Offset Frequency Offset Direction Channel Spacing Name Tone Mode CTCSS Rx CTCSS
4W MOBILE CB TRANSCEIVER INSTRUCTION MANUAL
 4W MOBILE CB TRANSCEIVER INSTRUCTION MANUAL www.ttikorea.co.kr CONTENTS 1. Introduction 2. Supplied Accessories 3. Installation 4. Transceiver Controls and Functions 1) Microphone Jack 2) LCD Display 3)
INSTRUCTION MANUAL VHF FM TRANSCEIVER TK-6110 B (K,K2)
") INSTRUCTION MANUAL VHF FM TRANSCEIVER TK-6110 B62-1216-20 (K,K2) 09 08 07 06 05 04 03 02 THANK YOU! We are grateful you chose KENWOOD for your land mobile applications. We believe this easy-to-use transceiver
INSTRUCTION MANUAL VHF FM TRANSCEIVER TK-6110 B62-1216-20 (K,K2) 09 08 07 06 05 04 03 02 THANK YOU! We are grateful you chose KENWOOD for your land mobile applications. We believe this easy-to-use transceiver
OPERATING GUIDE OPERATING GUIDE FOR IC-F5060/F6060 SERIES BIIS 1200/MDC 1200 SYSTEM/ LTR /IDAS OPERATION
 OPERATING GUIDE OPERATING GUIDE FOR IC-F060/F6060 SERIES BIIS 100/MDC 100 SYSTEM/ LTR /IDAS OPERATION IMPORTANT Thank you for purchasing this Icom transceiver. The BIIS 100/MDC 100 system/ltr /IDAS (Icom
Greaval GV-8S. User Manual
 Greaval GV-8S User Manual Version 2017 A B C D E F G LED Indicator Lights red during transmit, green when receiving a signal Channel Switch Rotate to select a channel. No. 16 is the scanning channel Power
WARNING WELCOME TO USE RESET
 WARNING Please install the antenna (connect to the location B on the back panel of the radio) and set the SWR (Standing Wave Ratio) before transmitting. Failure to do so may result in destruction of the
DMR Application Note Testing MOTOTRBO Radios On the R8000 Communications System Analyzer
 DMR Application Note Testing MOTOTRBO Radios On the R8000 Communications System Analyzer April 2 nd, 2015 MOTOTRBO Professional Digital Two-Way Radio System Motorola and MOTOTRBO is registered in the U.S.
FTM-3100R/E. Advance Manual VHF FM TRANSCEIVER DIAL VOL
 FTM-3100R/E Advance Manual VHF FM TRANSCEIVER Contents Basic Operation... 3 Microphone Gain Setting... 3 RF Squelch... 3 Advanced Operation... 4 Programming the Key Assignments... 4 Tone Search... 6 DCS
AM/FM/SSB/CW 12 & 10 METER MOBILE AMATEUR TRANSCEIVER OWNER S MANUAL
 AM/FM/SSB/CW 12 & 10 METER MOBILE AMATEUR TRANSCEIVER OWNER S MANUAL TABLE OF CONTENTS Warranty...2 Introduction...3 Installation... 4-5 Front Panel Controls... 6-8 Microphone...8 Menu Settings... 9-11
TABLE OF CONTENTS. Keypad Programming Manual 1
 TABLE OF CONTENTS How To Program Radios...2 Keypad Programming...2 A. Navigation...3 1. Group Parameters (CH 00)...4 2. Channel Parameters (CH 01 - CH20)...4 3. Global Parameters (GRP 00)...5 B. Group
Introduction. Included
 CONTENTS Introduction........01 Included.............01 Main Features...........02 Technical Information.......03 Know the Radio..........05 Preparation before using.....06 Basic Functions......11 Function
VX-4100/4200SERIES. VHF/UHF Mobile Radios
 VX-4100/4200SERIES VHF/UHF Mobile Radios HIGH POWER OUTPUT (50W VHF/45W UHF) WIDE FREQUENCY SPAN 134-174 MHz (VX-4104/4204) 400-470 MHz / 450-520 MHz (VX-4107/4207) 501 CHANNELS/32 GROUPS (VX-4200 SERIES)
ATP-5189 Programming Software for the Anytone AT-5189
 for the Anytone AT-5189 Memory Types Memories Limit Memories VFO Receive Frequency Transmit Frequency Offset Frequency Offset Direction Channel Spacing Name Tone Mode CTCSS Rx CTCSS DCS Memory Channel
Application Note: DMR Application Note Testing MOTOTRBO Radios On the Freedom Communications System Analyzer
 : DMR Application Note Testing MOTOTRBO Radios On the Freedom Communications System Analyzer MOTOTRBO Professional Digital Two-Way Radio System Motorola and MOTOTRBO is registered in the U.S. Patent and
TWO-WAY RADIO. Þ ß Ô ² ú RPV516/RPU416. Owner's Manual
 TM TWO-WAY RADIO Þ ß Ô ² ú RPV516/RPU416 Owner's Manual Thank you! We are grateful that you choose RELM for your land mobile applications. We believe this easyto-use transceiver will provide dependable
CHIPSWITCH DOC S RADIO REPAIR OWNERS MANUAL. HR2510 / HR2600 / LINCOLN 10 Meter Amateur Transceiver.
 DOC S RADIO REPAIR HR2510 / HR2600 / LINCOLN 10 Meter Amateur Transceiver CHIPSWITCH OWNERS MANUAL Revised August 28th, 2000 http://hr2510.freeservers.com/ - 1 - Table of Contents FIRST TIME INSTALL /
User Guide Oricom UHF Channel UHF CB Radio
 User Guide Oricom UHF050 40 Channel UHF CB Radio Downloaded from www.cbradio.nl Table of contents Important Information 4 Please read before installing or operating your Oricom Radio 4 Safety Warning
TC-271 Compact Multifunctional VHF/UHF FM Transceiver Frequency range: MHZ MHZ MHZ Max. RF output power: 50W/35W 60W/40W DTMF
 TC-271 Compact Multifunctional VHF/UHF FM Transceiver Frequency range: 136 174MHZ 400-430MHZ 440-480MHZ Max. RF output power: 50W/35W 60W/40W DTMF luminous hand-held Microphone for operating at night Front
VHF FM TRANSCEIVER/ UHF FM TRANSCEIVER INSTRUCTION MANUAL ÉMETTEUR-RÉCEPTEUR FM VHF/ ÉMETTEUR-RÉCEPTEUR FM UHF MODE D EMPLOI
 TK-2202/ TK-3202 VHF FM TRANSCEIVER/ UHF FM TRANSCEIVER INSTRUCTION MANUAL ÉMETTEUR-RÉCEPTEUR FM VHF/ ÉMETTEUR-RÉCEPTEUR FM UHF MODE D EMPLOI TRANSCEPTOR DE FM VHF/ TRANSCEPTOR DE FM UHF MANUAL DE INSTRUCCIONES
INSTRUCTION MANUAL VHF FM TRANSCEIVER/ UHF FM TRANSCEIVER TK-7302/ TK-8302 TK-7302H/ TK-8302H B (M,M2)
") INSTRUCTION MANUAL VHF FM TRANSCEIVER/ UHF FM TRANSCEIVER TK-7302/ TK-8302 TK-7302H/ TK-8302H B62 2150 10 (M,M2) 09 08 07 06 05 04 03 02 01 Thank You We are grateful you have chosen Kenwood for your personal
INSTRUCTION MANUAL VHF FM TRANSCEIVER/ UHF FM TRANSCEIVER TK-7302/ TK-8302 TK-7302H/ TK-8302H B62 2150 10 (M,M2) 09 08 07 06 05 04 03 02 01 Thank You We are grateful you have chosen Kenwood for your personal
OPERATING GUIDE OPERATING GUIDE FOR IC-F5060/F6060 SERIES BIIS 1200/MDC 1200 SYSTEM/ LTR /IDAS NXDN OPERATION
 OPERATING GUIDE OPERATING GUIDE FOR IC-F060/F6060 SERIES BIIS 100/MDC 100 SYSTEM/ LTR /IDAS NXDN OPERATION IMPORTANT Thank you for purchasing this Icom transceiver. The BIIS 100/MDC 100 system/ltr /IDAS
INSTRUCTION MANUAL UHF C.R.S.TRANSCEIVER. i41s
 INSTRUCTION MANUAL UHF C.R.S.TRANSCEIVER i41s IMPORTANT READ ALL INSTRUCTIONS carefully and completely before using the transceiver. SAVE THIS INSTRUCTION MANUAL This instruction manual contains important
WORLD BAND RADIO. AM/FM/SW/L W/AIR Band /SSB radio with LCD backlight OWNER S MANUAL
 WORLD BAND RADIO AM/FM/SW/L W/AIR Band /SSB radio with LCD backlight display and keypad direct entry OWNER S MANUAL WARNING Do not expose this appliance to rain or moisture Do not submerge or expose to
TH-78A 144/430MHz FM Dual Bander TH-78E INSTRUCTION MANUAL. 144/430 MHz FM Dual Bander 144/440 MHz FM Dual Bander KENWOOD CORPORATION
 144/430 MHz FM Dual Bander 144/440 MHz FM Dual Bander TH-78A 144/430MHz FM Dual Bander TH-78E INSTRUCTION MANUAL KENWOOD CORPORATION @PRINTED IN JAPAN B62-0248-30(W)(MC) 94/654321 93/1211 1098765432 ACCESSORIES...
Read this Owner s Manual carefully and you ll get the most out of your two-way wrist watch communicator.
 User s Manual CONGRATULATIONS! You have purchased one of the smartest and smallest devices with a unique hand-flexing operation feature. The lightweight and compact wrist watch style device can be operated
FTM-3200DR/DE. Advance Manual C4FM/FM VHF DIGITAL/ANALOG TRANSCEIVER DIAL VOL TXPO DW SETUP MW
 FTM-3200DR/DE Advance Manual VHF DIGITAL/ANALOG TRANSCEIVER C4FM/FM Contents Basic Operation... 3 Microphone Gain Setting... 3 RF Squelch... 3 Advanced Operation... 4 Programming the Key Assignments...
Battery Informationy/Antenna and Other Accessories Charging the Battery
 Thank You Thank you for your purchase of HYT portable two-way radio. HYT portable radios will provide you with clear and reliable communications in high efficiency. Please read this manual before your
Pair of PMR446 Two-Way Personal Radios Model: TP391
 Pair of PMR446 Two-Way Personal Radios Model: TP391 USER MANUAL MANUALE D USO MANUEL DE L UTILISATEUR BEDIENUNGSANLEITUNG MANUAL DE USUARIO MANUAL DO USUÁRIO HANDLEIDING BRUKSANVISNING P/N:086L004722-016
DX AM FM SSB CW PA Amateur Base Station Transceiver OWNER S MANUAL RX / TX 2 4 POWER NF CHANNEL MODE RF POWER OFF CAL OFF OFF CALIBRATE
 1 2 3 6 4050 ULA 6070 TI 80 90 100 9 DX 2517 2517 RX / TX 0 2 4 SWR WATTS SET 81012 22 1 010 3 2030 5 MOD 7 ON dbover 9 SIGNAL +20 +40+60 PA FM AM USB LSB CW POWER ON SWR NB / ANL R.BEEP +10KHz NF CHANNEL
Operating Guide SMH 1525DT SMU 4525KT Technology Drive West Melbourne, FL RELM Wireless Corporation. All Rights Reserved CC OG 23
 W I R E L E S S C O R P O R AT I O N Operating Guide 7100 Technology Drive West Melbourne, FL 32904 2000 RELM Wireless Corporation. All Rights Reserved CC OG 23 ULUD01083ZZ RELM WIRELESS CORP. 7100 Technology
RP3600 Series Field Programming Manual
 Preliminary RP3600 Series Field Programming Manual P/N FLDPRGMANRP36 Ref. # 0301-309XX-XXX Rev. 06-05 GENERAL INFORMATION Introduction This manual contains information about field programming through
Application Note: Testing P25 Conventional Radios Using the Freedom Communications System Analyzers
 : Testing P25 Conventional Radios Using the Freedom Communications System Analyzers FCT-1007A Motorola CPS and Tuner Software Motorola provides a CD containing software programming facilities for the radio
Instruction Manual CS800 Mobile Radio
 Instruction Manual CS800 Mobile Radio (This is a revised Version of the CSI Manual. The Information contained was created by Independent Radio Operator. Connect Systems does not have any responsibility
Introduction Mechanical radio operation... 12
 Operation Manual Contents Introduction... 5 Purpose of application notes...5 Product description...5 Operating frequencies...5 Feature List...5 Warnings...5 Unpacking information...6 Antenna installation...6
TSC-100RA INSTRUCTION MANUAL. MULTIBAND SCANNING RECEIVER. Manufactured by
 MULTIBAND SCANNING RECEIVER Manufactured by www.ttikorea.co.kr CONTENTS. CAUTIONS.... SUPPLIED EQUIPMENT... 5. INSTALLING THE BATTERIES... 5. CONTROLS... 6 Power On/Off Lock Button... 7 Antenna... 7 Squelch
98xx LOW TIER LTR /CONVENTIONAL OPERATING MANUAL
 98xx LOW TIER LTR /CONVENTIONAL OPERATING MANUAL Part No. 002-9801-201 November 1999 LAND MOBILE PRODUCT WARRANTY - The manufacturer s warranty statement for this product is available from your product