500 Watts of Clear Stereo Sound
|
|
|
- Jade Carter
- 5 years ago
- Views:
Transcription


1
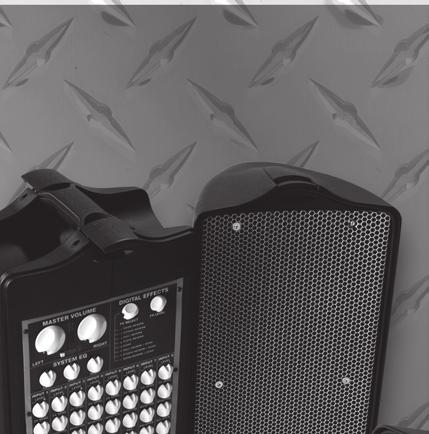
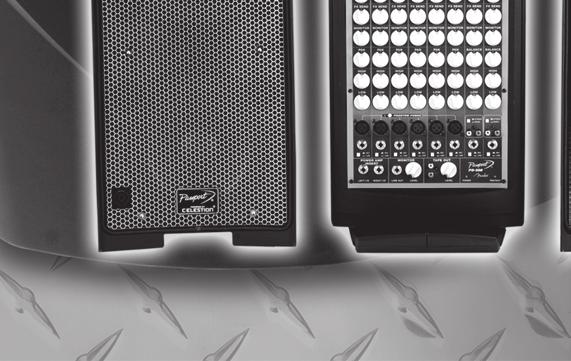
2 F e n d e r P a s s p o r t P D I M P O R T A N T S A F E T Y I N S T R U C T I O N S This symbol warns the user of dangerous voltage levels localized within the enclosure. This symbol advises the user to read all accompanying literature for safe operation of the unit. Read, retain, and follow all instructions. Heed all warnings. CAUTION: No user serviceable parts inside, refer servicing to qualified personnel only. WARNING: To prevent damage, fire or shock hazard, do not expose this unit to rain or moisture. Do not drip nor splash liquids, nor place liquid filled containers on the unit. Only connect the power supply cord to an earth grounded AC receptacle in accordance with the voltage and frequency ratings listed under INPUT POW- ER on the rear panel of this product. This product may be equipped with a polarized plug (one blade wider than the other). This is a safety feature. If you are unable to insert the plug into the outlet, contact an electrician to replace your obsolete outlet. Do not defeat the safety purpose of this plug. During operation: Maintain at least 6 inches (15.25 cm) of unobstructed air space around the unit to allow for proper ventilation and cooling of the unit; do not block any vents in the unit chassis. This product should be located away from heat sources such as radiators, heat registers, or other products that produce heat. This product should be serviced by qualified service personnel when: the power supply cord or the plug has been damaged; or objects have fallen, or liquid has been spilled onto the product; or the product has been exposed to rain; or the product does not appear to operate normally or exhibits a marked change in performance; or the product has been dropped, or the enclosure damaged. Protect the power supply cord from being pinched or abraded. The power supply cord of this product should be unplugged from the outlet when left unused for a long period of time, or during electrical storms. Unplug the power supply cord before cleaning the unit exterior (use a damp cloth only). Wait until the unit is completely dry before reconnecting it to power. This product should only be used with a cart or stand that is recommended by the manufacturer. Fender amplifiers and loudspeaker systems are capable of producing very high sound pressure levels which may cause temporary or permanent hearing damage. Use care when setting and adjusting volume levels during use. I N T R O D U C T I O N 500 Watts of Clear Stereo Sound Custom Designed Neo-Precision Loudspeakers with Celestion drivers Built in 32 bit DSP Digital Effects: Room Reverb Studio Reverb Hall Reverb Plate Reverb Echo Room Reverb+Echo Studio Reverb+Echo Hall Reverb+Echo Patent Pending Feedback Killer Automatically detects and eliminates feedback Six Mono Microphone / Line Inputs each With An XLR, a 1/4 Balanced Line Input and Line/Mic Switch, +48V Phantom Power for microphone inputs 1-6 Switching Power Supply Allows Use Almost Anywhere In the World Power Amp In/Out Connections Everything You Need To Get Started: Passport Powered Mixer Section Two P-51 Dynamic Microphones & Cables Two 22' (6.5m) Speaker Cables with Neutrik Speaker connectors IEC Power Cable Rugged, Portable Enclosure Congratulations on your purchase of the Fender Passport Deluxe PD 500. The PD 500 is the most innovative portable PA of its type. The PD 500 is perfect if you re playing in a band, making a presentation, using it for a school play, law enforcement and military training or as a second PA for your church. The PD 500 outclasses its competition in its easy to transport, black luggage style case. The case protects the PD 500 from the elements while moving or in storage, providing you with years of use. Unlatch the top hinges to discover that the PD 500 expands into three pieces; two speakers and one center tower. The tower conveniently holds an 8 channel mixer, digital FX and a lightweight power amp. The PD 500 s mixer features 6 mic/line channels and 2 stereo line/mic channels. Channels 7 and 8 can be used for either stereo or mono operation. The mixer also features +48 Volt phantom power, one touch patent pending Feedback Killer and 32 bit DSP professional digital FX. Enclosed in the center tower is a 500 Watt class D power amp that provides powerful, full sound without the hassle of the extra weight of an ordinary amplifier. Rounding out the PD 500 are the specially designed Neo-Precision speakers, powered by Celestion drivers. The long excursion NeoPrecision speakers use neodymium motor structures for high performance and dramatically reduced weight. 2


 Feedback Killer circuitry that targets and eliminates the annoying squeal that s triggered by microphones or instruments coming too close to the")
3 P o r t a b l e S o u n d S y s t e m E A S Y S E T U P D I A G R A M S LIVE BAND PERFORMANCE SETUP The above diagram shows a typical band setup. Microphones and instruments are plugged into separate channels. An external effects processor is connected to the Insert jacks as described in the Power Amp Insert - Further Explanation section under External Loop Back Configuration. Finally a 1270P powered monitor takes advantage of the Monitor Line Out jack. LIVE BAND RECORDING SETUP Use the tape out to record your performance as shown above. The recording device can be a computer, or a tape recorder, or anything that can accept a line level signal. Got Feedback? Simply press in the Feedback Killer button! Your PD 500 comes equipped with (patent pending) Feedback Killer circuitry that targets and eliminates the annoying squeal that s triggered by microphones or instruments coming too close to the system speakers. For more information on Passport products and accessories log on to: PRESENTATION SETUP The PD 500 is shown above in a presentation scenario. Use the headphones output on your laptop computer as output to the PD 500. Connect to the RCA jacks of channel 7 or 8 using 1/8" stereo-to-dual RCA adapter cables. Note: Some computers require a direct box with a ground lift to eliminate noise generated from the computer s power supply. 3
4 F e n d e r P a s s p o r t P D G E T T I N G S T A R T E D C O N N E C T I O N S Read this manual completely to determine appropriate connections and switch positions. To Open: release the Safety Latch {A} with your finger tip, then lift up on Main Latch {B}. Remove both speakers from the tower. To close: position the speaker on the tower foot {C} then tilt the speaker up towards the tower and close the Main Latch. The Safety Latch automatically engages. Note: Your Passport case is precision engineered and careful alignment of the parts will ensure easy operation. The Passport case is weather resistant in the closed transport mode. However, when operating outdoors, take care to fully protect the Power Tower in the event of exposure to rain. Remember to allow free air flow through the front air inlet located at the bottom of the front panel on the Passport power tower. M I C & C A B L E S T O R A G E Located on the rear of the Passport tower, simply lift the latch to pull open the door. If you remove the microphones and cables, you will see a narrow metal strip located on the back wall of the storage compartment. This protective cover for the optional wireless mic receiver module connector should only be removed if the module is to be installed. Before plugging in, turn both Master Level controls down to their zero 0 positions (fully counterclockwise). Next, make sure all EQ, Pan and Balance controls are set to the center notched positions. Position the speakers so that the cables can be routed to them safely, and no microphones are aimed into the speaker. Connect the speakers to the appropriate Speaker Outputs on the rear of the Passport using the provided cables. Plug in all sources, such as microphones, tape decks, keyboards, to the Passport Inputs. After all connections are made, adjust the volume up from 0 as described in the Setting Levels section. P O W E R O N NOTE: Plug all sound system equipment into the same outlet or power strip to enhance system safety and performance. TIP: If you have other powered equipment connected to the Passport, it is important to switch the Passport ON last when setting up and then OFF first when finished to prevent harmful popping sounds from the Passport speakers each time something is switched on or off. Switch the Power Switch to the ON position. The Power LED should illuminate GREEN, if not, see TROUBLESHOOTING at the end of this section. S E T T I N G L E V E L S To set system volume and operating levels, it is helpful to have an assistant in the audience area checking levels to ensure full coverage. Slowly rotate the large Left and Right Master volume controls up to the position at 5. Use a microphone (or other source) in the same position as it will be used on stage and in the same manner in which it will be used for the event. Start out with Feedback Killer off, then slowly turn up the channel input level control to the desired level (see Peak Indicator section on the next page). Be ready to quickly turn down the level if you hear the onset of feedback or howling. Some environments may require that you engage Feedback Killer to obtain the desired volume level. Repeat this for each input channel. Once each channel level has been set, you can adjust the volume of all channels together using the Left and Right Master Volume controls. Considering the application and needs of the event, set the system EQ controls and select digital effects as appropriate. This is best achieved by playing recorded material of the same type as your performance and then adjusting levels to accommodate your performance and the space. 4
5 P o r t a b l e S o u n d S y s t e m P E A K I N D I C A T O R Adjusting the channel volume and channel EQ using the Peak Indicator: The PEAK indicator will light up green when it senses that there is a signal present on the input connector. You can adjust the channel LEVEL control up or down to achieve the desired volume relative to the other channels. As long as the Peak indicator remains green, the signal is being amplified and mixed appropriately to provide clean output sound. The PD 500 provides a mechanism to get the maximum level from each channel without distorting the signal. Play your program material, or speak into the microphone and slowly increase the channel volume and EQ levels until the peak indicator occasionally flashes red. It will be easiest to adjust the EQ to the desired levels at lower volume, and then increase the channel volume to the optimal waveform. The peak indicator will be solid red if you raise the channel volume too high. This indicates that the signal is over-amplified. Turn the LEVEL control down to prevent the signal from being clipped and distorted. Too much clipping can be aurally unpleasant as well as potentially dangerous to your speakers. C H A N N E L S ( I N P U T S ) 1 6 LEVEL - Adjusts the volume level for each channel. Use in conjunction with the Master Volume controls. If the LEVEL control is up too high, the PEAK indicator will light up red. PEAK INDICATOR The PEAK indicator will light up green when there is a signal present. Reduce LEVEL if the PEAK LED illuminates red, which indicates that the signal may be clipped. FX SEND - Adjusts the effects level for each channel. Use in conjunction with the Digital Effects FX LEVEL master control. MONITOR - Adjusts the Monitor volume level for each channel. Use in conjunction with the master Monitor Level control at the MONITOR OUT jack. PAN/BALANCE -Use the PAN control (BALANCE for channels 7 8) to adjust the amount of signal sent to each speaker (left & right). Adjusting this control allows you to adjust the position of the sound source within the horizontal plane, left or right of center stage. Set to the center dot for equal amounts to the left and right speakers. HIGH and LOW - These EQ controls allow the user to boost or cut the bass and treble for the individual channel. Start with the channel EQ controls in the center position, then adjust only as much as needed to sound good. (To adjust the sound for all channels, use the System EQ controls.) PHANTOM POWER - For condenser microphones that require phantom power press this switch IN. MIC INPUT - This three pin XLR balanced female input connector can accept high- and low-level microphone inputs, and also balanced line inputs. Phantom Power will be applied to the XLR connector if the Phantom Power switch is on and the MIC/LINE switch is in the MIC position. 1/4" PHONE JACK INPUT - This 1/4" balanced mono input jack is capable of accepting high or low impedance microphones, keyboards, drum machines, outboard effects, etc. MIC/LINE SWITCH - Set this switch to the MIC position for low impedance microphones, phantom powered microphones, and very low-level input signals. Set the switch to the LINE position for high impedance microphones and high level signals. Always turn down the corresponding channel level control before pressing the MIC/LINE switch to prevent a loud outburst. 5

6 F e n d e r P a s s p o r t P D C H A N N E L S ( I N P U T S ) 7 8 STEREO/MONO SWITCH - Selects the mode of operation for the RCA inputs below. MONO mode mixes stereo sources together into a mono signal. TIP: Use MONO mode with sources having only one RCA output to enable output through both of the Passport speakers. RCA INPUT - The RCA jacks accept either stereo or mono inputs and are intended for use with a tape player, CD player, etc. Note: The RCA inputs are not affected by the MIC/LINE switch. 1/4" PHONE JACK INPUT - This 1/4" balanced mono input jack is capable of accepting high or low impedance microphones, keyboards, drum machines, outboard effects, etc. MIC/LINE SWITCH - Set this switch to the MIC position for low impedance microphones, and low level input signals. Set the switch to the LINE position for high-impedance microphones and high-level signals. Note: This switch only affects the 1/4" phone jack. M A S T E R C O N T R O L S MASTER VOLUME - Adjusts the overall volume output from the Left and Right main Speakers. Optimum Passport performance is generally achieved with and set between 4 and 6, (about half volume). Operate outside the 4 6 range if adjusting the individual channel level controls becomes insufficient. SYSTEM EQ - Adjusts the overall tone of the amp in three frequency bands. Generally, operate with these controls at their notched center positions. Adjust the individual channel EQ controls first, then adjust SYSTEM EQ controls for overall sound. FEEDBACK KILLER - Press this button in to eliminate feedback. Feedback can also be prevented by keeping microphones (and instruments with pickups) behind the system speakers or increasing the distance from the speakers. D I G I T A L E F F E C T S Digital Effects can be used to enhance the sound quality of any performance where appropriate and desired. Keep in mind that while Reverb or effects can enhance a musical performance or presentation, too much can make the same performance unintelligible or muffled. Keep your audience in mind when setting effects levels. FX SELECT - Selects the active Digital Effect. Each selection creates the sensation of a different acoustic environment: Room Reverb - Simulates the warm ambience of a small room. It has the shortest decay time, meaning the reverberation is the shortest. This setting works great with acoustic guitars, or an acoustic combo. Studio Reverb - Simulates the sound of a medium sized, bright studio recording room. This works great for drums and acoustic guitar. Hall Reverb - Simulates the sound of a large hall or church. This setting has the longest decay time and is best used for vocals. Adjust the Hall Reverb level so the reverb sound is lower than the main vocal sound. Plate Reverb - Perfect for vocals; this setting simulates a bright analog plate reverb. Echo - A multi-tap digital delay at 250 ms. Works very well on acoustic guitar. FX LEVEL - Adjusts the level of the selected Digital Effect for all channels together. Optimum performance is generally achieved between 4 and 6. Adjust outside the 4 6 range when the individual FX SEND controls become insufficient. 6
7 P o r t a b l e S o u n d S y s t e m P O W E R A M P I N S E R T S POWER AMP INSERTS - These jacks provide a connection for an equalizer, or other external equipment. Each jack accepts a TRS (Tip/Ring/Sleeve) plug with Send=Tip, Return=Ring and Ground=Sleeve. When nothing is connected to the Power amp insert, the PD 500 operates normally, with the mixer signal going directly to the internal PD 500 amplifier. To use the internal amplifier PLUS an external amplifier, plug a 1/4" mono cable half way into the Amp Insert. To use just the PD 500 mixer (bypassing the amplifier) and connect to an external amplifier, plug a 1/4" mono cable completely into the amp insert. To use an external source with the PD 500 internal amplifier, use a TRS-to-dual-TS cable Y adapter. Plug your external mixer into the mono plug connected to the ring of the stereo plug. The other mono plug can be input to a channel of the external mixer to add an input to the PD 500. To use the amplifier insert as an effects loop, use two TRS-to-dual-TS cable Y adapters. Connect the TRS plug ends into left and right Insert jacks. Then connect each tip TS plug to the (left/right) inputs of your effects processor, and each ring TS plug to the corresponding effect outputs, as shown. 7
8 F e n d e r P a s s p o r t P D L I N E O U T P U T S R E A R P A N E L MONITOR - This jack provides an output for connecting a stage monitor speaker. Use the LEVEL control in conjunction with the MONITOR level controls of each channel. TAPE OUT - These RCA outputs provide an output for connecting recording equipment. Use the LEVEL control to accommodate the input requirements of your external equipment. R E A R P A N E L SPEAKER OUTPUTS - Connect these outputs to each of your Passport speaker enclosures using the provided speaker cables. POWER SOCKET and FUSE HOLDER - Connect the Power Socket to a grounded AC outlet using the provided IEC power cord. To replace the main fuse, unplug the power cord from the unit, then pry the fuse holder out from the power socket using a small screwdriver. A spare fuse is located in the holder. Replace fuses only with the type and rating specified. Always carry spare fuses! POWER SELECTOR - Select the proper voltage according to your local power supply: Select 115 for 110V 120V AC power outlets. Select 230 for 220V 240V AC power outlets POWER SWITCH - Turns your Passport PD 500 on-off. SPEAKON LOCKING CONNECTORS Use the supplied Speakon cables to connect your NeoPrecision Speakers to the PD 500. The PD 500 Speakon connectors and cables provide superior power transfer efficiency and secure locking connections. To connect the Speakon locking connectors, rotate the Speakon plug to align it with the input slots, then fully insert the plug. Rotate the plug clockwise until it locks into place. To disconnect the Speakon locking connectors, pull back on the grey locking ring while rotating the plug counter-clockwise. Pull the plug out from the Speakon socket. For more technical information, log on to the Passport Glossary at: 8
9 P o r t a b l e S o u n d S y s t e m P D B L O C K D I A G R A M CHANNEL 1 CHANNEL 2 BASS LEVEL EQ TREBLE BASS LEVEL EQ TREBLE MONITOR PAN FX SEND MONITOR PAN FX SEND FX L R MON FX L R MON DSP SYSTEM EQ HIGH MID LOW DAC DAC DAC MASTER VOLUME Left Right SYSTEM EQ Lo Mid Hi FBK Indicator FBK Enable INFRASONIC FILTER EFFECTS CH1 CH2 CH3 CH4 CH5 CH6 CH7 CH8 PK PK PK PK PK PK PK PK Level FX Select FX Level FX Send FX LED Indicators Monitor PAN/BAL EQ Hi EQ Lo Control Interface AMP LEVEL METER LED LEVEL METER DETECTOR DRIVER SPEAKER OUT 250W AMP 250W AMP SPEAKER OUT AMP INSERT DIGITAL VOLUME TAPE OUT LEVEL TAPE OUT LINE DRIVER LINE DRIVER MONITOR LEVEL MONITOR OUT BAL. LINE DRIVER R L R L CHANNELS 1-6 (MONO) INPUT PAD INPUT PAD 48V PHANTOM POWER INPUT AMP AMP(S) MONO AMP(S) LOW NOISE ADC LOW NOISE ADC LOW NOISE ADC CHANNEL 7 CHANNEL 7 BASS LEVEL EQ TREBLE BASS LEVEL EQ TREBLE MONITOR BALANCE FX SEND 32 Bit Digital Effects Feedback Killer MONITOR MONITOR R L CHANNEL 7-8 (STEREO) 9
10 F e n d e r P a s s p o r t P D T R O U B L E S H O O T I N G The POWER LED does NOT illuminate: Switch the Power OFF, then check the power connections and retry. If the Power LED still does NOT illuminate, disconnect all cables and check the fuse (see FUSE HOLDER above). If the Power LED still does NOT illuminate after 5 seconds, turn off the system and take the Passport to an authorized Fender Service center. The PROTECT LED illuminates: The system is in protection mode caused by an overload or overheating. Switch the Power OFF and wait for 10 minutes to allow the system to cool and reset. If the PROTECT LED does not turn off, take the Passport to an authorized Fender Service center. No audio is present in one of the speakers: Check to see if your control settings are correct. Next, try switching speaker cables to determine if the cable is at fault. Part Numbers Fuse type Power Requirement Frequency Response Distortion Signal to Noise Ratio Power Output (120VAC 60Hz) USA & CAN (240VAC 50Hz) AUS (230VAC 50Hz) UK (220VAC 50Hz) ARG (230VAC 50Hz) EUR (100VAC 50Hz) JPN T10A H, 250V 750Watts 20Hz to 20kHz ± 1 db (Tape, Monitor, Amp Insert) 50Hz to 20kHz ± 1 db (Speaker output) < 0.1%, 50Hz to 20kHz (Tape, Monitor, Amp Insert) < 0.5%, 50Hz to 20kHz (Speaker output) > 1W, A weighted 500W (2x 4Ω per channel) Input Impedance Mic: 2kΩ / Line: 50kΩ (Ch 1-6) Mic: 2kΩ / Line: 100kΩ / RCA: 47kΩ (Ch 7-8) Maximum Input Levels Mic: -10dBu / Line: +10dBu (Ch 1-6) Mic: -4dBu / Line: +16dBu (Ch 7-8) RCA stereo: +16dBu / RCA mono: +19dBu (Ch 7-8) Woofers Compression Drivers S P E C I F I C A T I O N S 8 diameter diaphragm, Neodymium motor structure 1 diameter diaphragm, Neodymium motor structure Microphones Microphone Cable Speaker Cables Passport System Dynamic Cardioid, balanced output XLR (male) to XLR (female); 6 m (20 ft) Speakon NL2FC; 6.5 m (22 ft)16 AWG stranded copper Width: 840 mm (33.7 in) Height: 615 mm (24.2 in) Depth: 300 mm (11.8 in) Weight: 24 kg (53 lb) Note: 0 dbu is referenced to volts rms Product specifications are subject to change without notice. PD-500 Passport Speaker Frequency Response Curve 10
Important Safety Instructions ENGLISH - PAGES ESPAÑOL - PAGINAS FRANÇAIS - PAGES ITALIANO - PAGINE...
 ENGLISH - PAGES........... 6-8 Important Safety Instructions This symbol warns the user of dangerous voltage levels localized within the enclosure. This symbol advises the user to read all accompanying
Important Safety Instructions ENGLISH - PAGES ESPAÑOL - PAGINAS FRANÇAIS - PAGES ITALIANO - PAGINE
 ENGLISH - PAGES........... 6-7 Important Safety Instructions This symbol warns the user of dangerous voltage levels localized within the enclosure. This symbol advises the user to read all accompanying
PA WATT PORTABLE PA SYSTEM PRODUCT MANUAL
 PA-5150 5 150-WATT PORTABLE PA SYSTEM PRODUCT MANUAL THANK YOU FOR CHOOSING POLSEN. The Polsen PA-5150 is an active PA system that s ideal for solo performers or vocalists. It can be used as a PA system
M-300 Mono power amplifier User s guide
 M-300 Mono power amplifier User s guide M-300 Mono power amplifier User s guide Specifications: Contents: Power output: 8Ω: 290W, 0.01% THD SPECIFICATIONS Page 2 Input impedance: Gain: 4Ω: 580W, 0.01%
CSP & CSL-SERIES MIXING CONSOLES. Item ref: UK, UK, UK, UK, UK, UK User Manual. Version 2.
 CSP & CSL-SERIES MIXING CONSOLES Item ref: 170.841UK, 170.843UK, 170.845UK, 170.851UK, 170.853UK, 170.855UK User Manual Version 2.0 Caution: Please read this manual carefully before operating Damage caused
KXR. Owner, s Manual. One hundred KEYBOARD EXTENDED RANGE TYPE: PR 262 P/N
 THE SOUND THAT CREATES LEGENDS KEYBOARD EXTENDED RANGE KXR One hundred TYPE: PR 262 Owner, s Manual P/N 047761 KXR 100 Owner s Manual Congratulations on your purchase of the Fender KXR 100 keyboard amplifier.
POWERED MIXER DIGITAL ECHO EFFECT ECHO LEVEL ECHO LEVEL ECHO LEVEL ECHO LEVEL ECHO VOL REPEAT MPM CHANNEL POWERED MIXER OWNER S MANUAL
 POWERED MIXER DIGITAL ECHO EFFECT ECHO LEVEL ECHO LEVEL ECHO LEVEL ECHO LEVEL ECHO VOL REPEAT MPM 480 4-CHANNEL POWERED MIXER OWNER S MANUAL MPM 480 4-CHANNEL POWERED MIXER Congratulations! You have just
User Manual. MA 240 Mixing amplifier
 User Manual MA 240 Mixing amplifier Safety instructions When using this electronic device, basic precautions should always be taken, including the following: 1 Read all instructions before using the product.
Z44R. Multi-purpose Rack Mixer. Item ref: User Manual
 Z44R Multi-purpose Rack Mixer Item ref: 953.020 User Manual 2 balanced microphone inputs Lo-cut rumble filters 3-band EQ per Mic channel Switchable 48V phantom power 2 x A/B selectable stereo line inputs
User Manual. imix 63 Stereo mixing preamplifier
 User Manual imix 63 Stereo mixing preamplifier Safety instructions When using this electronic device, basic precautions should always be taken, including the following: 1 Read all instructions before using
i3speakers LX503 MK2 User Manual
 i3speakers LX503 MK2 User Manual Index Introduction 5 Precautions 6 Safety requirements 6 Caution servicing 7 EC Declaration of Conformity 7 Waste of Electrical and Electronic Equipment (WEEE) 7 Chapter
STEREO POWER AMPLIFIER OWNER MANUAL PR-150 DESIGNED IN U.K. PDF created with FinePrint pdffactory trial version
 STEREO POWER AMPLIFIER OWNER MANUAL PR-150 DESIGNED IN U.K. INTRODUCTION Congratulations on your purchase of MA PR-150 Stereo Power Amplifier. The performance of PR-150 is perfect for any audio application,
ECA COMMERCIAL AMPLIFIER OWNER S MANUAL ECA-70MIXAMP V / 70V / 4Ω Amplifier ECA-70MIXAMP-1-60 OUTPUT LEVEL POWER MASTER MIC 1
 OWNER S MANUAL ECA COMMERCIAL AMPLIFIER ECA-MIXAMP--6 V / V / Ω Amplifier TEMP PROT OUTPUT LEVEL ECA-MIXAMP--6 6 POWER MIC MIC MIC MIC AUX AUX BASS TREBLE 5 5 5 5 5 6 6 6 6 6 MASTER 5 6 ON OFF + - + -
IMPORTANT SAFETY INSTRUCTIONS
 IMPORTANT SAFETY INSTRUCTIONS When using this electronic device, basic precautions should always be taken, including the following: 1. Read all instructions before using the product. 2. Do not use this
Professional Tube Amplifier PRO-18 User Manual
 Professional Tube Amplifier PRO-18 User Manual WWW.NACEAMPS.COM 1 PRO-18 USER MANUAL REV A TABLE OF CONTENTS CHAPTER 1 IMPORTANT SAFETY INSTRUCTIONS... 3 CHAPTER 2 FIRST TIME OUT OF THE BOX SETUP AND PLAY...
CABINET POWERED MIXING CONSOLE
 R SHS AUDIO SPMU- 00 CABINET POWERED MIXING CONSOLE USER'S MANUAL SAFETY INSTRUCTIONS SPECIFICATIONS Inputs Input modes Input Impedance Rated Input level Connector WARNING - TO REDUCE THE RISK OF FIRE
User Manual. ia480x Power amplifier
 User Manual ia480x Power amplifier Safety instructions When using this electronic device, basic precautions should always be taken, including the following: 1 Read all instructions before using the product.
SAGA PRO SERIES STEREO POWER AMPLIFIER OPERATION MANUAL
 SAGA PRO SERIES STEREO POWER AMPLIFIER OPERATION MANUAL INSTALLATION Use care in unpacking the amplifier, and be sure to save the carton and packing materials so that you can use them for moving, storing,
User Manual. MA 21 Two zone mixing amplifier
 User Manual MA 21 Two zone mixing amplifier Safety instructions When using this electronic device, basic precautions should always be taken, including the following: 1 Read all instructions before using
DSR-3. Bedienungsanleitung User Guide
 DSR-3 Bedienungsanleitung User Guide EN Introduction The invention of the Hammond organ in the last century's mid 30s resulted in a need for artificial reverb. This led to the development of spring reverberation
Z-LUX. Manual. Model: ZA-38.
 Z-LUX Manual Model: ZA-38 www.drzamps.com This symbol warns the user of dangerous voltage levels localized within the enclosure. This symbol advises the user to read all accompanying literature for safely
Model CC4041. CC Series Amplifier. Installation and Use Manual
 BASS 0 TREBLE 0-12 +12-12 +12 INPUT 1 INPUT 2 INPUT 3 INPUT 4 PEAK SIGNAL POWER POWER CC Series Amplifier Model CC4041 Installation and Use Manual 2012 Bogen Communications, Inc. All rights reserved. Specifications
Ai1 OWNER S MANUAL. Getting Started:
 Ai1 OWNER S MANUAL Thank you for your purchase. We have developed a quality DI with preamp for use by professional musicians with added features for home or private practice. Features: The Ai1 is a quality
MAZ 18/MAZ 38. Manual. Model: ZA-8 / ZA-5.
 MAZ 18/MAZ 38 Manual Model: ZA-8 / ZA-5 www.drzamps.com This symbol warns the user of dangerous voltage levels localized within the enclosure. This symbol advises the user to read all accompanying literature
WX-1 & WX-3 OPERATING MANUAL AND USER GUIDE. Professional Power Amplifier. WX-1 and WX-3.indd :23:16
 WX-1 & WX-3 Professional Power Amplifier OPERATING MANUAL AND USER GUIDE 3 www.wharfedalepro.com WX-1 and WX-3.indd 1 2014-7-16 10:23:16 TABLE OF CONTENTS TABLE OF CONTENTS... 1 IMPORTANT WARNINGS & SAFETY
Fender Musical Instruments 7975 North Hayden Road, Scottsdale, Arizona U.S.A.
 Fender Musical Instruments 7975 North Hayden Road, Scottsdale, Arizona 85258 U.S.A. Since 1946, Fender realized the importance of your amplifier. You see, your amplifier is more than just a combination
plifier D-501 otion Am Tactile M
 Tactile Motion Amplifier D-501 IMPORTANT SAFETY INSTRUCTIONS WARNING: 1. Read and keep these instructions for future reference. 2. Do not use this apparatus near water. 3. Clean only with a dry cloth.
LA-SERIES LOOP AMPLIFIERS. Item ref: UK, UK User Manual
 LA-SERIES LOOP AMPLIFIERS Item ref: 952.864UK, 952.867UK User Manual Caution: Please read this manual carefully before operating Damage caused by misuse is not covered by the warranty SAFETY SYMBOL AND
EPA152/252/502. User Manual.
 EPA152/252/502 User Manual www.audac.eu ADDITIONAL INFORMATION This manual is put together with much care, and is as complete as could be on the publication date. However, updates on the specifications,
PM800 powermixer. user manual
 PM800 powermixer user manual Musikhaus Thomann e. K. Treppendorf 30 96138 Burgebrach Germany Telephone: +49 (9546)-9223-0 email: info@thomann.de Internet: www.thomann.de 17.11.2011 Table of contents Table
mix 502, mix 802, mix 1202FX mixer user manual
 mix 502, mix 802, mix 1202FX mixer user manual Musikhaus Thomann Thomann GmbH Hans-Thomann-Straße 1 96138 Burgebrach Germany Telephone: +49 (0) 9546 9223-0 E-mail: info@thomann.de Internet: www.thomann.de
PM800 powermixer. user manual
 PM800 powermixer user manual Musikhaus Thomann Thomann GmbH Hans-Thomann-Straße 1 96138 Burgebrach Germany Telephone: +49 (0) 9546 9223-0 E-mail: info@thomann.de Internet: www.thomann.de 16.02.2016, ID:
MIC MECHANIC 2. Ultra-Simple Battery-Powered Vocal Effects Stompbox with Echo, Reverb and Pitch Correction. User Manual
 MIC MECHANIC 2 Ultra-Simple Battery-Powered Vocal Effects Stompbox with Echo, Reverb and Pitch Correction User Manual 2 MIC MECHANIC 2 User Manual Important Safety Instructions Terminals marked with this
As a discerning guitarist, you know the road to great tone begins with great components.
 OWNER S MANUAL Dear Customer, Thank you for your purchase of a Amplifiers, LLC. amplifier from Two-Rock As a discerning guitarist, you know the road to great tone begins with great components. Our Classic
RM4 MODULAR TUBE PREAMP OWNERS MANUAL
 A M P L I F I E R S RM4 MODULAR TUBE PREAMP OWNERS MANUAL Dear Randall Owner, Congratulations on the purchase of your new Randall Amplifier, and thank you for the support of our product line. Randall amps
IMPORTANT SAFETY INSTRUCTIONS
 IMPORTANT SAFETY INSTRUCTIONS When using this electronic device, basic precautions should always be taken, including the following: 1. Read all instructions before using the product. 2. Do not use this
Model CC4052. CC Series Amplifier. Installation and Use Manual
 CC Series Amplifier Model CC4052 Installation and Use Manual 2012 Bogen Communications, Inc. All rights reserved. Specifications subject to change without notice. 54-2216-01A 1303 NOTICE: Every effort
INTRODUCTION. Please read this manual carefully for a through explanation of the THETA Head and its functions. PRECAUTIONS
 INTRODUCTION Congratulations on your purchase of the THETA Head. You are now the owner of the most innovative guitar amplifier ever produced. The THETA Head was designed to provide the maximum possible
3400 Watt Stereo Power Amplifier
 3400 Watt Stereo Power Amplifier OWNER'S MANUAL Copyright 2014, Samson Technologies Corp. v1.1 Samson Technologies Corp. 45 Gilpin Ave Hauppauge, NY 11788 www.samsontech.com Important Safety Information
ZM-6. Professional 19 Rack Mixer USER MANUAL. Content
 Professional 19 Rack Mixer ZM-6 USER MANUAL Thank you for buying an LD Systems audio product. Please read these operating instructions carefully before you use the product for the first time and keep them
As a discerning guitarist, you know the road to great tone begins with great components.
 OWNER S MANUAL Dear Customer, Thank you for your purchase of a Guild. amplifier from Premier Builders As a discerning guitarist, you know the road to great tone begins with great components. Our Classic
Block-800B bass head. user manual
 Block-800B bass head user manual Musikhaus Thomann Thomann GmbH Hans-Thomann-Straße 1 96138 Burgebrach Deutschland Telephone: +49 (0) 9546 9223-0 E-mail: info@thomann.de Internet: www.thomann.de 08.03.2018,
KLASIK NEAR FIELD ACTIVE STUDIO MONITOR
 USER S MANUAL KLASIK NEAR FIELD ACTIVE STUDIO MONITOR CONTENTS page INTRODUCTION GENERAL INFORMATION 3 REAR PANEL REAR PANEL 4 INPUTS 5 SWITCHES 5 TECHNICAL SPECIFICATIONS TECHNICAL SPECIFICATIONS 7 SAFETY
PROFESSIONAL FOUR-CHANNEL AUDIO MIXER WITH DSP PROCESSOR
 PROFESSIONAL FOUR-CHANNEL AUDIO MIXER WITH DSP PROCESSOR Thank you for purchasing the professional four-channel audio mixer with DSP processor! For the best results and the utmost satisfaction from your
As a discerning guitarist, you know the road to great tone begins with great components.
 OWNERS MANUAL Dear Customer, Thank you for your purchase of a Guild. amplifier from Premier Builders As a discerning guitarist, you know the road to great tone begins with great components. Our Classic
WM-SYS3/WM-SYS3D/WM-SYS4/WM-SYS4D
 WM-SYS3/WM-SYS3D/WM-SYS4/WM-SYS4D Wireless Kit For Active Speakers WIRELESS TRANSMITTER WM60 SIG/CLIP ON OFF ENGLISH User s Manual IMPORTANT SAFETY INSTRUCTIONS The apparatus shall not be exposed to dripping
PRE16/26 AUDAC PROFESSIONAL AUDIO EQUIPMENT. PRE16/26 6 Channel Pre-Amplifier Single/Double Output Zone. User Manual & Installation Guide
 PRE16/26 AUDAC PROFESSIONAL AUDIO EQUIPMENT PRE16/26 6 Channel Pre-Amplifier Single/Double Output Zone User Manual & Installation Guide AUDAC PROFESSIONAL AUDIO EQUIPMENT User Manual & Installation Guide
3.Avoid spilling liquids or allowing materials to enter the cabinet
 PUBLIC ADDRESS MIXER POWER AMPLIFIER INSTRUCTION MANUAL PL-260A 260 WATT RMS RISK OF ELECTRIC SHOCK, DO NOT OPEN! CAUTION: TO REDUCE THE RISK OF ELECTRIC SHOCK, DO NOT OPEN COVER. NO USER SERVICEABLE PARTS
PROLUDE AMPLIFICATION D750. User s manual for the tube preamplifier version
 PROLUDE AMPLIFICATION D750 User s manual for the tube preamplifier version 1 2 Table of contents 1 INTRODUCTION...1 4 1.1 SOME WORDS TO THE CUSTOMER...1 4 1.2 SOME WORDS ABOUT ME...1 4 2 SAFETY INSTRUCTIONS,
Power Amplifier D2 D3 D4 D5 AUDAC PROFESSIONAL AUDIO EQUIPMENT. Dual Channel Power Amplifier D2 D3 D4 D5. User Manual & Installation Guide
 Power Amplifier D2 D3 D4 D5 AUDAC PROFESSIONAL AUDIO EQUIPMENT Dual Channel Power Amplifier D2 D3 D4 D5 User Manual & Installation Guide AUDAC PROFESSIONAL AUDIO EQUIPMENT User Manual & Installation Guide
10 WATT GUITAR COMBO
 10 WATT GUITAR COMBO Caution: To reduce the hazard of electrical shock, do not remove cover or back. No user serviceable parts inside. Please refer all servicing to qualified personnel. WARNING: To reduce
IMPORTANT SAFETY INSTRUCTIONS
 IMPORTANT SAFETY INSTRUCTIONS The apparatus shall not be exposed to dripping or splashing and that no objects with liquids, such as vases, shall be placed on the apparatus. The MAINS plug is used as the
Big Bang. B B O w n e r s M a n u a l. Power Amplifiers. SpeakerCraft BB2125 POWER ACTIVE PROTECTION L
 Big Bang Power Amplifiers SpeakerCraft BB2125 ACTIVE POWER PROTECTION L R B B 2 1 2 5 O w n e r s M a n u a l SAFETY INSTRUCTIONS APPLICABLE FOR USA, CANADA OR WHERE APPROVED FOR USAGE CAUTION: To reduce
EPA104/254. User Manual.
 EPA104/254 User Manual www.audac.eu ADDITIONAL INFORMATION This manual is put together with much care, and is as complete as could be on the publication date. However, updates on the specifications, functionality
IMPORTANT SAFETY INSTRUCTIONS
 WR-11 Version 1 IMPORTANT SAFETY INSTRUCTIONS 1. Read these instructions. 2. Keep these instructions. 3. Heed all warnings. 4. Follow all instructions. 5. Do not use this apparatus near water. 6. Clean
USER MANUAL APG DYNAMIC PROCESSORS MATRIX ARRAY SYSTEMS 4000SP 6000SP 9000SP
 USER MANUAL APG DYNAMIC PROCESSORS MATRIX ARRAY SYSTEMS 4000SP 6000SP 9000SP SAFETY INSTRUCTIONS This symbol, wherever it appears, alerts you to the presence of uninsulated dangerous voltage inside the
IMPORTANT SAFETY INSTRUCTIONS
 WR-1 Version 1 IMPORTANT SAFETY INSTRUCTIONS 1. 2. 3. 4. 5. 6. 7. 8. 9. Read these instructions. Keep these instructions. Heed all warnings. Follow all instructions. Do not use this apparatus near water.
T L Audio. User Manual EQ1 VALVE EQUALISER. Tony Larking Professional Sales Limited, Letchworth, England.
 T L Audio User Manual EQ1 VALVE EQUALISER Tony Larking Professional Sales Limited, Letchworth, England. Tel: 01462 490600, International +44 1462 490600. Fax: 01462 490700, International +44 1462 490700.
HARMONY SINGER 2. Battery-Powered Vocal Effects Stompbox with Guitar-Controlled Harmony, Reverb and Tone. User Manual
 HARMONY SINGER 2 Battery-Powered Vocal Effects Stompbox with Guitar-Controlled Harmony, Reverb and Tone User Manual 2 Harmony Singer 2 User Manual Important Safety Instructions Terminals marked with this
Classic Series Public Address Amplifiers C10 & C20 Models
 Classic Series Public Address Amplifiers C10 & C20 Models Installation and Use Manual 2009 Bogen Communications, Inc. All rights reserved. Specifications subject to change without notice. 54-5978-01C 1106
DA216S DISTRIBUTION AMPLIFIER
 DISTRIBUTION AMPLIFIER IMPORTANT SAFETY INSTRUCTIONS 1. Read these instructions. 2. Keep these instructions. 3. Heed all warnings. 4. Follow all instructions. 5. Do not use this apparatus near water. 6.
Classic Series Public Address Amplifiers C10 & C20 Models
 Classic Series Public Address Amplifiers C10 & C20 Models Installation and Use Manual 2009 Bogen Communications, Inc. All rights reserved. Specifications subject to change without notice. 54-5978-01B 0901
Spider. Pilot s Handbook Manuel de pilotage Pilotenhandbuch Pilotenhandboek Manual del Piloto 取扱説明書
 Spider IV Pilot s Handbook Manuel de pilotage Pilotenhandbuch Pilotenhandboek Manual del Piloto 取扱説明書 Get free lessons and tones! Join Spider Online! www.line6.com/spideronline 40-00-0186 Pilot s Handbook
TPS 16P / 16A.UB / 16AM.UB
 TPS 16P / 16A.UB / 16AM.UB 2 13 Notas Introduction Features Control Element Installation Description Connection Diagram Frequency Response Diagram Block Diagram Presets List Wire Connections Technical
HTA125A/250A. Power Amplifiers. Installation & Use Manual
 HTA125A/250A Power Amplifiers Installation & Use Manual Specifications subject to change without notice. 2010 Bogen Communications, Inc. All rights reserved. 54-5832-04B 1011 NOTICE: Every effort was made
INSTRUCTION MANUAL POWERED MIXER MX-628
 INSTRUCTION MANUAL POWERED MIXER MX-628 Please follow the instructions in this manual to obtain the optimum results from this unit. We also recommend that you keep this manual handy for future reference.
THE NEW FACE OF BASS PRO BASS SYSTEM U30, U60, U120. Owner s Manual
 152420M-1 07/18 THE NEW FACE OF BASS Blackstar Amplification Ltd, Beckett House, 14 Billing Road, Northampton, NN1 5AW, UK For the latest information go to: www.blackstaramps.com PRO BASS SYSTEM U30, U60,
COMBO COMBO A70 A100
 A7 A1 B A SERIES A S S COMBO Hartke Caution: To reduce the hazard of electrical shock, do not remove cover or back. No user serviceable parts inside. Please refer all servicing to qualified personnel.
* * * * * * * * * * * * * * *
 17 * * * * * * * * * * * * * * * * * * * * CAUTION RISK OF ELECTRIC SHOCK DO NOT OPEN 16 1 2 15 12 CHANNEL LINE MIXER BLOCK DIAGRAM INTRODUCTION The RMX112 is a professional compact mixer preamplifier.
SA 125 mixer amplifier. user manual
 SA 125 mixer amplifier user manual Musikhaus Thomann Thomann GmbH Hans-Thomann-Straße 1 96138 Burgebrach Germany Telephone: +49 (0) 9546 9223-0 E-mail: info@thomann.de Internet: www.thomann.de 27.10.2016,
auro X12D X15D 1,000 WATT ACTIVE LOUDSPEAKER OWNER'S MANUAL
 auro X12D X15D 1,000 WATT ACTIVE LOUDSPEAKER OWNER'S MANUAL Copyright 2014 - Samson Technologies Corp. V1 Samson Technologies Corp. 45 Gilpin Avenue Hauppauge, New York 11788-8816 Phone: 1-800-3-SAMSON
Antidote. Manual. Model: ZA-35.
 Antidote Manual Model: ZA-35 www.drzamps.com This symbol warns the user of dangerous voltage levels localized within the enclosure. This symbol advises the user to read all accompanying literature for
REVAMP4100 Instruction manual
 REVAMP4100 Instruction manual REVAMP4100 Instruction manual 3 REVAMP4100 manual 4 CLASS-D POWER AMPLIFIER IMPORTANT SAFETY INSTRUCTIONS 1. Read these instructions 2. Keep these instructions 3. Heed all
MIXER POWER AMPLIFIER BG-130
 OPERATING INSTRUCTIONS MIXER POWER AMPLIFIER BG-115 BG-130 TO REDUCE THE RISK OF ELECTRICAL SHOCK, DO NOT REMOVE COVER. NO USER SERVICEABLE PARTS INSIDE. REFER SERVICING TO QUALIFIED SERVICE PERSONNEL
Operating Instruction Manual ELECTRONIC MUSIC AMPLIFICATION SYSTEM. Model KD-1. Toa Electric Co., Ltd. KOBE, JAPAN
 Operating Instruction Manual ELECTRONIC MUSIC AMPLIFICATION SYSTEM Model KD-1 Toa Electric Co., Ltd. KOBE, JAPAN Contents Precautions... 1 General Description... 2 Features... 2 Front Panel: Names of components
Trace Elliot Elf Bass Instrument Amplifier
 Trace Elliot Elf Bass Instrument Amplifier Owner s Manual FCC Compliancy Statement This device complies with Part 15 of the FCC rules. Operation is subject to the following two conditions: (1) this device
Mini-Z. Manual. Model: ZA-21.
 Mini-Z Manual Model: ZA-21 www.drzamps.com This symbol warns the user of dangerous voltage levels localized within the enclosure. This symbol advises the user to read all accompanying literature for safely
KLD Guitar AMP GT-40H(M) Tube Guitar Amplifier Manual. Kailing Electronic Co.,Ltd
 Tube Guitar Amplifier Manual. Kailing Electronic Co.,Ltd") KLD Guitar AMP GT-40H(M) Tube Guitar Amplifier Manual Kailing Electronic Co.,Ltd http://www.kldguitar.com Intended to alert the user to the presence of un-insulated dangerous voltage within the product
KLD Guitar AMP GT-40H(M) Tube Guitar Amplifier Manual Kailing Electronic Co.,Ltd http://www.kldguitar.com Intended to alert the user to the presence of un-insulated dangerous voltage within the product
Carmen Ghia. Manual. Model: ZA-07.
 Carmen Ghia Manual Model: ZA-07 www.drzamps.com This symbol warns the user of dangerous voltage levels localized within the enclosure. This symbol advises the user to read all accompanying literature for
REVAMP2250 Instruction manual
 REVAMP2250 Instruction manual REVAMP2250 Instruction manual 3 REVAMP2250 Manual 4 CLASS-D POWER AMPLIFIER IMPORTANT SAFETY INSTRUCTIONS 1. Read these instructions 2. Keep these instructions 3. Heed all
FLAMINGO.1 OPERATOR'S MANUAL. Version
 FLAMINGO.1 OPERATOR'S MANUAL Version 1.1 20090110 LTD. 2117 East 5th Street Superior, WI 54880 USA tel: 715-398-3627 fax: 715-398-3279 www.cranesong.com 2004, 2005, 2006, 2009 Crane Song, LTD. Subject
Owner s Manual. ZT Amplifiers. Lunchbox Acoustic. Acoustic/Vocal Amplifier LBA1
 Owner s Manual ZT ZT Amplifiers Lunchbox Acoustic Acoustic/Vocal Amplifier LBA1 Features 1 2 3 4 Top Panel I N S T R U M E N T VOLUME GAIN BASS TREBLE REVERB 3 2 1 OFF FEEDBACK CUT M I C R O P H O N E
PJB BASS CUB OWNER S MANUAL
 PJB BASS CUB OWNER S MANUAL Thank you for purchasing the PJB BASS CUB. A great deal of dedication and passion went into designing and building this no compromise, high performance compact-combo amplifier.
DPA74/154 AUDAC PROFESSIONAL AUDIO EQUIPMENT. DPA74/154 Quad Channel Class-D Amplifier. User Manual & Installation Guide
 DPA74/154 PROFESSIONAL AUDIO EQUIPMENT DPA74/154 Quad Channel Class-D Amplifier AUDAC User Manual & Installation Guide AUDAC PROFESSIONAL AUDIO EQUIPMENT User Manual & Installation Guide AUDAC http://www.audac.eu
As a discerning guitarist, you know the road to great tone begins with great components.
 OWNERS MANUAL Dear Customer, Thank you for your purchase of a Two-Rock amplifier from Premier Builders Guild. As a discerning guitarist, you know the road to great tone begins with great components. Our
Custom VIBRASONIC s Manual P/N
 THE SOUND THAT CREATES LEGENDS Custom VIBRASONIC Owner, TM s Manual P/N 049515 INTRODUCTION The Fender Amp Custom Shop is dedicated to creating high quality amplification to serve top artists and discriminating
19'' Rack Mount 300 Watt Power Amplifier/ Mixer w/70v Output & Mic Talkover USER MANUAL
 19'' Rack Mount 300 Watt Power Amplifier/ Mixer w/70v Output & Mic Talkover USER MANUAL Your new PYRAMID PA305 300 Watt P.A. Amplifier gives you the power and versatility you need in a professional sound
A Channel Amplifier
 Installation Manual A2150 2 Channel Amplifier Table of Contents Installation Requirements and Recommendations 1 What s included 1 Speaker Wire Recommendations 1 Setup 2 Rack Mounting 2 Individually Protected
JAM combo amplifier for acoustic instruments
 JAM combo amplifier for acoustic instruments IMPORTANT SAFETY INSTRUCTIONS THE LIGHTNING FLASH WITH ARROWHEAD SYMBOL, WITHIN AN EQUILATERAL TRIANGLE, IS INTENDED TO ALERT THE USER TO THE PRESENCE OF UNINSULATED
the future has been drawn
 The UL 3 cabinets Thank you and congratulations on your purchase of a new UL3 cabinet. Epifani is based in Brooklyn, New York, with design and manufacturing in America. We design innovative products that
MODEL A1. PackLite TM POWER AMPLIFIER
 MODEL A1 PackLite TM POWER AMPLIFIER Svenska Nederlands Italiano Français Español Deutsch Dansk English Important Safety Instructions 1. Read these instructions. 2. Keep these instructions. 3. Heed all
!!! WARNING!!! TO REDUCE THE RISK OF FIRE OR ELECTRIC SHOCK, DO NOT EXPOSE THIS UNIT TO RAIN OR MOISTURE.
 SAFETY PRECAUTIONS!!! WARNING!!! TO REDUCE THE RISK OF FIRE OR ELECTRIC SHOCK, DO NOT EXPOSE THIS UNIT TO RAIN OR MOISTURE. Avoid exposing rain, water, or any form of liquid to this unit. IMMEDIATELY unplug
USER MANUAL MG-TA1000 POWER AMPLIFIER
 USER MANUAL MG-TA1000 POWER AMPLIFIER INDEX: INTRODUCTION SAFETY INSTRUCTIONS OPERATING PRECAUTIONS FEATURES OF PANAL CONTROLS FRONT & REAR PPANEL DISPLAY CONNECTING INPUTS SPEAKER CONNECTIONS INTRODUCTION:
Spider Valve. Pilot s Guide Manuel de pilotage Pilotenhandbuch Pilotenhandboek Manual del Piloto 取扱説明書
 Spider Valve MKII Pilot s Guide Manuel de pilotage Pilotenhandbuch Pilotenhandboek Manual del Piloto 取扱説明書 40-00-0233 Pilot s Handbook available @ www.line6.com/manuals Rev D Important Safety Instructions
H A 6 6 CHANNEL STEREO HEADPHONE AMPLIFIER INSTALLATION AND OPERATION MANUAL
 H A6 6 CHANNEL STEREO HEADPHONE AMPLIFIER INSTALLATION AND OPERATION MANUAL IMPORTANT SAFETY INFORMATION 1. Save the carton and packing material even if the equipment has arrived in good condition. Should
MIXING CONSOLE CX-124 CX-164. TOA Corporation. Operating Instructions
 MIXING CONSOLE Operating Instructions CX-124 CX-164 Please follow the instructions in this manual to obtain the optimum results from these units. We also recommend you to keep this manual handy for future
ZM 84 Audio Mixer. User Manual. Order code: CRAM41. Audio Mixer ZM 84 AUX 3 AUX 1 AUX 2 AUX 4 MASTER 1 MASTER 2 OFF BASS BASS TREBLE TREBLE BASS BASS
 ZM 84 Audio Mixer User Manual -20-10 0 +10 +20-20 -10 0 +10 +20 POWER L R 0 0 ON ZM 84 Audio Mixer AUX 4 MIC/LINE 1 MIC/LINE 1 MIC/LINE 2 MIC/LINE 3 MIC/LINE 4 THR THR +6 +10 +6 AUX 3 AUX 1 AUX 2 AUX 4
Spider IV 15. Pilot s Handbook Manuel de pilotage Pilotenhandbuch Pilotenhandboek Manual del Piloto 取扱説明書
 Spider IV 15 Pilot s Handbook Manuel de pilotage Pilotenhandbuch Pilotenhandboek Manual del Piloto 取扱説明書 Get free lessons and tones! Join Spider Online! www.line6.com/spideronline 40-00-0187 Pilot s Handbook
UA ª 35T II Utility Amplifier OPERATING INSTRUCTIONS
 OPERATING INSTRUCTIONS Intended to alert the user to the presence of uninsulated "dangerous voltage" within the product's enclosure that may be of sufficient magnitude to constitute a risk of electric
T-link8. SPLITTER/MIXER T-link8. T-link8
 SPLITTER/MIXER CH CH CH CH CH CH Technical Specifications AUDIO INPUTS AUDIO OUTPUTS SYSTEM SPECIFICATIONS FUNCTION CONTROLS FUNCTION SWITCHES INDICATORS POWER SUPPLY PHYSICAL Connectors Type Impedance