OPERATOR INSTRUCTION MANUAL
|
|
|
- Martin Boone
- 5 years ago
- Views:
Transcription


1 OPERATOR INSTRUCTION MANUAL


2 Model: MOJAVE Serial Number: Date Purchased: Dealer: Under the copyright laws this documentation may not be copied, photocopied, reproduced, translated or reduced to any electronic or machine-readable form, in whole or in part, without the prior written consent of Tesoro Electronics Incorporated, except in the manner described in this documentation Tesoro Electronics Incorporated. All rights reserved. Printed in the United States. Tesoro Electronics, Incorporated 715 White Spar Road Prescott, AZ
3 MOJAVE OPERATOR INSTRUCTION MANUAL Congratulation in the Purchase of your Tesoro Mojave Metal Detector. You ve taken the first step to be successful in treasure hunting, purchasing a high quality metal detector. The second step is to learn to use your metal detector properly. Please take the time to read and understand the manual. It will walk you through assembly, the controls, an air test, and field use. The third step is to hunt where treasure may be found. Your local dealer may provide insight, as well as treasure hunting magazines and books. Your research about locations and history will be as important as your choice of detectors. The final step is to be persistent. There is no substitute for time in the field. Your success should grow with your experience and confidence. All of us at Tesoro wish you success and enjoyment in your treasure hunting experience. Vince Gifford TESORO ELECTRONICS, INC. i
4 CONTENTS GETTING STARTED Unpacking the Box...1 Installing the Battery...2 Attaching Lower Poles to the Coils...3 Assembling Your Detector...5 CONTROLS Sensitivity...9 Ground Condition Switch - High/Low...9 Discrimination Level - 3 Zones...9 AIR TEST - SELF GUIDED TUTORIAL Introduction...10 Step Step Step Step FIELD USE Adjusting the Pole and Search Coil...14 Tuning Your Detector...14 Audio Battery Test...15 Setting the Sensitivity Level...15 Setting the Discrimination Level Color Zones...17 Ground Condition Selector Control: High/Low...19 High Ground Conditions vs. Low Ground Conditions...19 Ground Sample Testing for High or Low...20 Recognizing False Signals...21 Controlling Audio Volume...21 Handling Your Detector...22 ii MOJAVE MANUAL
5 FIELD USE (cont'd) Pinpointing a Target...23 Recovering a Target...23 Planting a Test Garden...24 Audio Reactive...24 GENERAL INFORMATION Basic Care...26 Protecting Your Investment...26 Search Coils...29 Tesoro Search Coils...30 Tesoro Accessories...30 Scuff Covers...31 Headphones...31 Recommended Recovery Methods...32 Metal Detectorist's Code of Ethics...34 Specifications...35 Trouble Shooting...36 Warranty Service/Description...Back Cover TESORO ELECTRONICS, INC. iii
6 Notes: iv MOJAVE MANUAL
7 GETTING STARTED UNPACKING THE BOX Your Mojave Metal Detector was shipped with the following: 1 - Upper Pole Assembly Fully assembled, including upper pole stem with handle grip, padded arm bracket, pole lock and control housing 1 - Middle Pole Assembly with Pole Lock 1 - Lower Pole Assemblies Fully assembled nylon pole complete with two friction washer, wing bold, and wing nut 1-7" Precision Concentric Coil 1-9 volt Alkaline Battery 1 - One Wrap Velcro Strips (to hold coil cables) 1 - Operator Instruction Manual 1- Tesoro Warranty Card TESORO ELECTRONICS, INC. 1


8 GETTING STARTED If any of these items are missing, immediately contact the Tesoro Authorized Dealer where you purchased your detector. Assembly of the Mojave is simple and requires no special tools. Just install the battery, mount the search coils on the lower pole assemblies, connect the pole assemblies together, wrap the excess cable around the pole and plug the cable into the control housing. Finally adjust the pole length and search coil angle and you re ready! INSTALLING THE BATTERY To install or replace the battery, first make sure the Sensitivity control is set to OFF - turned completely counter clockwise past the click. Remove the battery door from the back of the control housing. Do this by pressing your thumb firmly on the louvered square - at the bottom of the battery door - and sliding the batter door upward (in the direction of the arrow) while pushing. Check the polarity on the battery and on the diagram inside the battery compartment. Make sure they match when you insert the fresh 9 volt alkaline battery into the compartment. Replace the battery door by sliding it into place making sure the upper mount slots are in line and the lock tongue is snapped in place. Figure 1 Battery Diagram 2 MOJAVE MANUAL

.")
9 GETTING STARTED ATTACHING LOWER POLES TO THE COILS 1. On a lower pole assembly, remove the mounting screw and thumb nut from the black nylon pole. Press the friction washers in the recessed feature of the pole tip. Figure 2 Remove Mounting Screw and Thumb Nut 2. Insert the pole tip between the mounting ears of the search coil and align the holes of the pole tip and friction washers with those of the mounting ears. NOTE: The pole tip should fit very snugly into the mounting ears with friction washers in place (a splash of water on friction washers helps). Figure 3 Pole Tip In Search Coil Mounting Ears 3. Insert the mounting screw through the holes in the mounting ears and pole tip. TESORO ELECTRONICS, INC. 3


10 GETTING STARTED 4. Install the thumb nut on the mounting screw and tighten by hand. Figure 4 Mounting Coil to Lower Pole NOTE: Do not over tighten the thumb nut. It should be snug, but not too difficult to loosen up. 5. Wrap the cable around the pole and use one-wrap Velcro strip to hold cable per Figure 5. This will prevent the cable from flopping while not in use. Figure 5 Lower Poles Properly Attached to Coils 4 MOJAVE MANUAL


11 ASSEMBLING YOUR DETECTOR GETTING STARTED 1. Loosen the pole lock on the upper pole assembly. Depress the two spring buttons on the middle pole assembly and slide the middle pole assembly into the upper pole assembly until the spring buttons click into the holes, locking the two assemblies into place. Tighten the pole lock to secure the two assemblies together. Figure 6 Attach Middle and Upper Pole Assemblies 2. Remove one-wrap Velcro strip from lower pole assembly. Loosen the pole lock on the middle pole assembly. Depress the first two spring buttons on the lower pole assembly and slide lower pole into the middle pole, depress the second two spring buttons and slide until spring buttons click into a set of adjustment holes. Select the adjustment holes that give you the proper overall hole length you require (only one set of spring buttons will be in adjustment holes depending on your length setting). Turn pole lock to tighten, locking the assembly into place. 3. Wrap the cable around the pole leaving enough slack near the search coil to permit search coil adjustment. (See Figure 8) NOTE: Do not allow the cable to flop loosely over the search coil. Since the detector is sensitive enough to see the wires in the cable, a floppy cable can cause false signals as the search coil senses the moving wires. TESORO ELECTRONICS, INC. 5


12 GETTING STARTED 4. Plug the male cable end into the female connector on the control housing and tighten the cable thumb nut. You are Finished! Figure 7 Connecting the Cable NOTE: You will want to adjust the pole length and the search coil angle to your preference. See Field Use Section, Page MOJAVE MANUAL


13 GETTING STARTED Figure 8 Properly Assembled Mojave TESORO ELECTRONICS, INC. 7

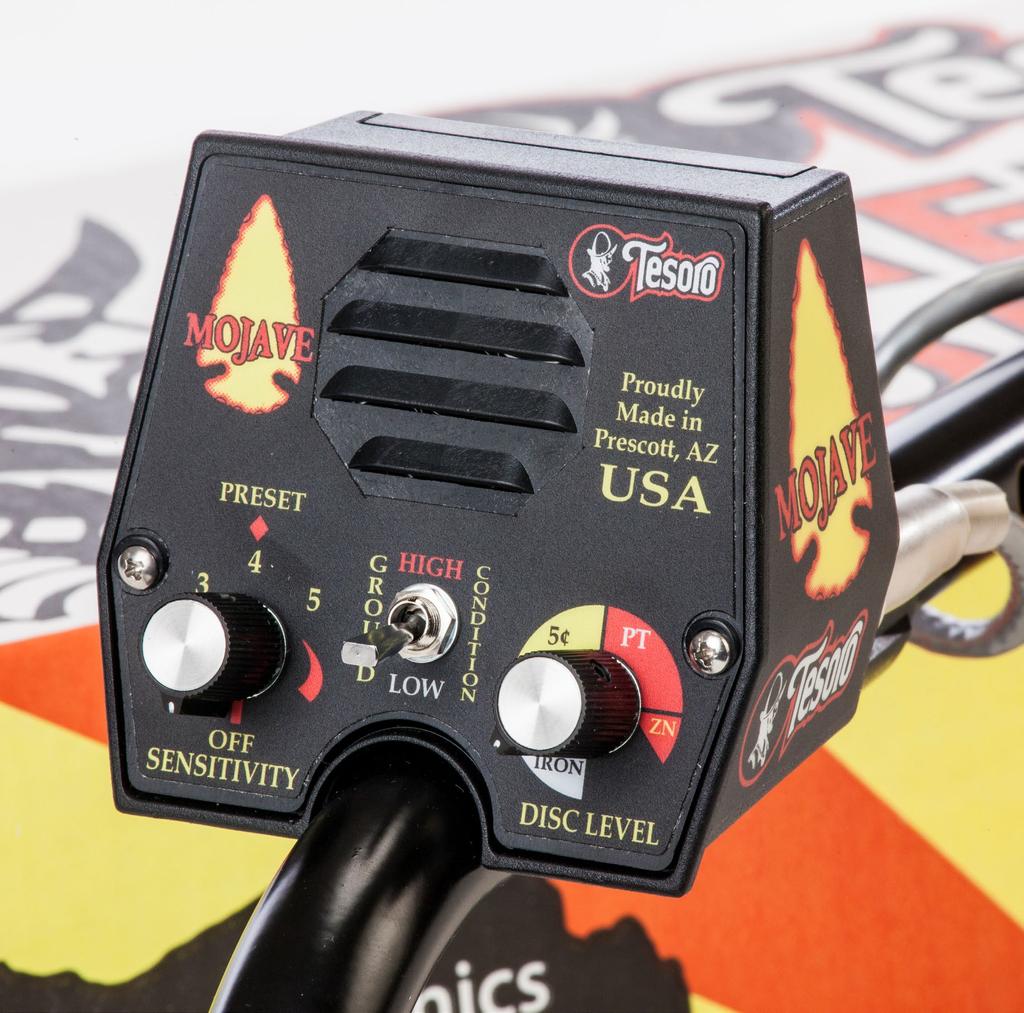
14 CONTROLS The Mojave Metal Detector has only three controls, all mounted on the front panel of the housing for fingertip adjustment. How these controls should be set for peak performance will depend on the type on metal you are searching for, search site conditions, mineral content of the soil and so forth. Use the information in this section and the Field Use Section Tuning Your Detector as a basis for setting the controls on your detector. Using your Mojave Metal Detector in the field will allow you to learn the detector s responses to various conditions and will guide you in fine tuning the detector s operating controls. Figure 9 Mojave Controls 8 MOJAVE MANUAL
15 SENSITIVITY CONTROLS This rotary control switch has three functions: Turns the detector ON and OFF Activates the automatic Audio Battery Test Adjusts the sensitivity level from number 1-5 and the RED area Turning the knob clockwise from the OFF position turns the detector on. It also activates the automatic battery test. The battery test is an audio tone. Turning the knob completely counter-clockwise until it clicks turns the detector off. The volume and duration of the tone is related to the battery strength. When the battery test is no longer heard, the 9V battery needs to be replaced. Continue to turn the knob clockwise will increase the sensitivity in the discrimination (DISC LEVEL) zones. GROUND CONDITION SWITCH HIGH/LOW This two-position switch has two functions: HIGH LOW HIGH is used for moderate to high ground mineralization. LOW is used for low to moderate ground mineralization. DISCRIMINATION - 3 ZONES This rotary control has one function: Set the level of discrimination in the three colored zones Turning the knob counter clockwise to 6 o'clock will lower the amount of discrimination to all metal, lowering the amount of targets discriminated out. Turning the knob clockwise (MAX) will increase the amount of discrimination, increasing the type of targets discriminated out. TESORO ELECTRONICS, INC. 9

16 AIR TEST - SELF GUIDED TUTORIAL INTRODUCTION The air test is designed to introduce the use of controls for the Mojave Metal Detector. If you have never owned a metal detector before, follow each step carefully. You will need: Fully assembled Mojave Metal Detector Three newer coins: a penny (1984 or newer), a nickel and a quarter A non-metal table or counter surface Approximately 20 minutes to complete the Air Test Prepare for the Air Test: Place your assembled Mojave Metal detector on the non-metal surface as shown in Figure 10 Make sure there are no metal objects near the coil Remove any jewelry from your hands and wrists Figure 10 Mojave on Non-metal Surface 10 MOJAVE MANUAL
17 AIR TEST - SELF-GUIDED TUTORIAL Do the following steps: 1. Turn on Mojave with the SENSITIVITY knob and perform an audio battery test 2. Set SENSITIVITY to preset (#4) 3. Set GROUND CONDITION switch to HIGH 4. Adjust the discrimination (DISC LEVEL) to WHITE ZONE at 6 o'clock position Step 1 - Perform an Audio Battery Test When the unit is first turned on, the Mojave Metal Detector will automatically activate the audio battery test. Turn the SENS control from OFF to 1. A Solid tone will be heard for up to 6 seconds. The length and the volume of the tone indicate the strength of the battery. When the tone stops, the detector is up and running and the control can be adjusted. If there is no tone at all, the battery needs to be replaced. Now you should understand that when the unit is first turned on, the duration of the tone indicates the health of your battery. Step 2 - Adjust the SENSITIVITY PRESET SENSITIVITY MARKER is a Red Diamond marker just above the number 4. This will give you a reference for starting out and adjustments can be made up or down depending on your hunt conditions. Sensitivity control allows the operator to adjust the overall sensitivity on how the coil will respond on targets and amount of depth in the ground. As you move from the numbers 1-5 and a Red Zone the audio become more sensitive to detect smaller objects in deeper coverage. In areas with electromagnetic interference you will need to reduce the overall sensitiv- TESORO ELECTRONICS, INC. 11
18 AIR TEST - SELF-GUIDED TUTORIAL ity to smooth out the operation of the detector. At or near the RED zone you may encounter chirping and erratic sounds. By reducing the sensitivity control the audio responses to become clearer and have better target response but you will have a reduction in depth. Using lower numbers means you can hunt with less sensitivity while searching for surface targets that may be shallow or just below the surface. When searching areas with heavy trash use a reduction of sensitivity creating better pinpointing and separation of targets. With practice each operator can find that sweet spot for a balance of Sensitivity and Discrimination and make the necessary adjustments for a smoother operation. The Preset on the Sensitivity should give you a good depth and a smooth operation over a wide range of ground conditions. As you increase towards the RED Zone, you will increase the overall sensitivity but the unit may become erratic depending on ground minerals or electromagnet interference. The certain areas with electromagnetic interference will need a reduction in the sensitivity to smooth out the operation. Depending on the area being hunted you can try different levels with the sensitivity control to be turned down for smoother operation or turned up for greater depth. Running higher levels of sensitivity as where the audio is totally unstable can cause you to miss those deeper targets. When detecting surface targets that are too close to the coil you can have multiple blips or a machine gun audio response. When this occurs, simply raise the coil a few inches above the target to eliminate this response. Step 3 - GROUND CONDITION SWITCH For the Air Test it is not important if it is in high or low but for this example have the GROUND CONDITION switch in HIGH mode. Since it is not important which setting the ground condition switch is during the AIR TEST, more information will be provided in the FIELD TEST section. 12 MOJAVE MANUAL
19 AIR TEST - SELF-GUIDED TUTORIAL Step 4 - ADJUST THE DISCRIMINATION LEVEL The Discrimination (DISC LEVEL) is used to block certain metal or targets from being detected. When you increase the DISC LEVEL further clockwise into the colored zones, then different metals are discriminated out. For example if you wave a 5 cent nickel above the coil and dial the Discrimination (DISC LEVEL) clockwise in the yellow zone, there will be a spot on the dial where the 5 cent nickel is no longer accepted and hear no audio response. By lowering the DISC LEVEL below the 5 marker in the YELLOW ZONE, it will start to respond once more. Try different metals and targets such as pull tabs, nails, screw caps and different coins. The PRESET setting for the DISC LEVEL is at the 9 o'clock position and is a great starting point for all around hunting. Nickel coins and almost all gold rings are accepted by the audio at this 9 o'clock setting. The Mojave will respond when moving a coin across the coil and produce a target response. The response will start out loud and sharp. If you stop over the coil, then the response will stop. This is because the Mojave is MOTION ACTIVATED over the targets. Motion is required in order to detect the targets. You can speed up, slow down, or stop and notice the response. Move the coin further away from the coil and you will notice the audio response will become smaller. Now increase the sensitivity control higher and the audio will become stronger when further away from the coil. Use a coin and note on how wide or sharp the target response becomes. Items like nails will start to respond wider and start detection before the target reaches the edge of the coil. Coins will start detection on the inside of the coil. It is important to learn how the audio responds with different targets. This will apply to targets in the ground as well. Practice will allow you to learn how wide, sharp, choppy, broken, or smooth responding targets sounds, which is the key to learning the audio response. Let your ears discern a targets identity before you dig. When increasing the sensitivity you may encounter electrical interference to where the signal has become chatty and you may need to lower the sensitivity for smoother audio when testing and sampling targets. TESORO ELECTRONICS, INC. 13
20 FIELD USE ADJUSTING THE POLE AND SEARCH COIL The pole length should be adjusted so that the detector does not become uncomfortable or tiring after long periods of use. The detector grip should rest in your hand with your arm relaxed, your elbow straight but not locked, with the pole extending out in front of you at the approximate angle show in the photo. You should be able to swing the detector back and forth in front of you - using relaxed shoulder movement- while keeping the search coil as close to the ground as possible. This swinging movement is often called a sweep. The search coil should not touch the ground during your sweep. The pole length should be adjusted to allow this without having to lift the detector with your elbow or shoulder. The search coil should rest about one inch above the ground while you are standing erect; the angle of the search coil should allow the bottom to be parallel to the ground. The pole length is adjusted by loosening the pole lock, then depressing the spring buttons and extending or shortening the pole until the spring buttons click into the set of holes that give you the most comfortable pole length. To adjust the search coil angle, loosen the search coil thumb nut slightly and move the search coil into the desired position: tighten the search coil thumb nut by hand so that the search coil will hold in place. TUNING YOUR DETECTOR Tuning your Mojave can be done is 4 simple steps: 1. Wait up to 6 seconds until the Audio Battery Test is complete once the detector is turned on. 2. Setting the Sensitivity Level. 3. Setting the Discrimination Zone using the DISC control. 4. Set the HIGH/LOW switch. 14 MOJAVE MANUAL
21 FIELD USE AUDIO BATTERY TEST When you first turn the unit from OFF to ON, the automatic battery test circuit is activated. You will hear an audio tone, the volume and duration relating to the battery strength. When the battery test is no longer heard, the 9 V battery needs to be replaced. See Installing the Battery in the GETTING STARTED section. Your Mojave is equipped with an automatic battery test circuit so you can always be sure you are getting top performance from it. The battery should be checked after the detector has been on for about 10 minutes and then periodically if you are using it for long periods. To activate the Audio Battery Test, simply turn the detector off momentarily and then back on again. If the battery is fresh, the detector should emit a continuous and loud beep sound that lasts for about 4 or 5 seconds, and then slowly fades into silence. As the battery ages, this is less intense and fades out more quickly. When you hear only a brief buzz or no sound at all, replace the battery with a fresh one. If you prefer, a rechargeable Nickel-Cadmium (Ni-Cad) batter can be substituted for the standard 9 volt alkaline battery. Individual 9 volt size Ni-Cad cells, as well as the chargers for them, are readily available at most electronic supply stores. They are installed into your detector in the same manner as non-rechargeable batteries. The Battery Test sound on a Ni-Cad will be weaker than an alkaline in the beginning, but will not weaken as much with use. SETTING THE SENSITIVITY LEVEL In light to moderate mineralized ground, you can usually set the Sensitivity (SENS) control as high as 5 (normal maximum setting). In the right conditions, you can move the Sensitivity into the MAXBoost (red) area past the 5 for increased depth. TESORO ELECTRONICS, INC. 15
22 FIELD USE To adjust the Sensitivity Level to your search conditions, first turn the Sensitivity (SENS) control clockwise as far as possible until the detector just begins to chirp intermittently. If the chirping is too frequent, simply turn the control counter clockwise just enough to cause the chirping to subside. Once set, this control should not require readjusting unless site conditions change. Occasionally you may need to reduce the SENSITIVITY setting to eliminate false signals cause by difficult conditions. Some of the many things that can cause the response of the detector to become erratic during regular use are very large targets, highly mineralized ground on trashy sites, intense ground mineralization changes, CB radios, radio and TV broadcasting antennas, and nearby sources of electrical interference. False signals are generally short, choppy, or broken sounds that are not repeatable and therefore can easily be distinguished from a good target response sound. They can be distracting though, and reducing the Sensitivity Level will help reduce these signals with an accompanying loss of target sensitivity. Extreme conditions such as wet salt sand may require you to lower your Sensitivity setting into the 1 to 4 range. Overall, you should always set the Sensitivity Control as high as possible, while still having smooth operation. SETTING THE DISCRIMINATION LEVEL The DISCRIMINATION ZONE control is used to adjust the detector s response to unwanted trash metal when operating in the Discrimination MODE. At the lowest setting (MIN), the detector will still respond to light foil, bottle caps, pull tabs and all other metal objects. As the Discrimination Level is increased in each zone, more of these trash metal objects are ignored and give no target response sound when inside the search coils range. The DISCRIMINATION ZONE should be set to your desired rejection level for the particular area you searching. We recommend start- 16 MOJAVE MANUAL

23 FIELD USE ing at a low setting if you are unsure how much trash is in the area. Adjust the level higher if you find yourself digging more trash than you like. Remember that with any metal detector, you will lose target response to small gold rings and nickels when Discrimination is set at the pull tab rejection level. So, digging some trash will increase your number of good finds. Figure 11 Discrimination (DISC) Level Settings In Figure 11, DISC settings are shown where many of the common metal objects are ignored by a typical detector. Each detector can vary a little due to manufacturing tolerances so you should experiment with your detector and become familiar with its rejection levels for these trash metal objects. 3 COLOR ZONES The Mojave has 3 different color zones to make it quick and easy for you to determine the level of discrimination desired. The Tri-Colored zones will set the level of rejection for specific targets that fall into that zone. TESORO ELECTRONICS, INC. 17
24 FIELD USE WHITE ZONE: Discrimination is at its lowest setting when the dial is turned fully counter-clockwise and stops at the 6 o'clock position. This allows the coil to pick up and give a signal for all metals. As you increase the dial into the White Zone you will begin to eliminate small iron targets such as nails, wire, etc. Advancing into the foil range starts the rejection of tinfoil and most iron will be eliminated as well. In the WHITE ZONE the MAJORITY of all metal will still be detected including jewelry, gold rings, pennies, 5 cent nickels, dimes, quarter, 50 cent pieces, dollars, pull tabs, etc. YELLOW ZONE: At the start of the YELLOW ZONE, or the 9 o'clock position, the coil will still accept 5 cent nickels up to the 5 mark. As you turn the dial clockwise past the 5 mark the coil will start to reject 5 cent nickels along with iron, foil and any target designated in the WHITE ZONE. When you pass the 5 mark you will also see a majority of jewelry and rings also start to be rejected. As you reach the top of the Yellow Zone, near the 12 o'clock position, the coil will start to reject the small square aluminum pull tabs. To insure recovery of gold rings and jewelry it is best to use a lower setting (below the 5 mark or around the 9 o'clock position). Some thin, white gold, or smaller platinum ring may need even lower setting in order to detect them. RED ZONE: Starting at the 12 o'clock position the coil will begin rejection of square aluminum pull tabs (PT) and screw caps along with all the metal in the WHITE and YELLOW ZONE targets. The older style beaver tail tabs will be eliminated around the 1-2 o'clock position, and increasing into the ZN setting you will eliminate Zinc and Indian head pennies. As you move to the 4 o'clock position certain aluminum screw caps will be eliminated, but coins such as copper pennies, dimes, quarters, halves and dollars will still be detected. NOTE: The YELLOW ZONE is to be used with caution! When 5 nickel is being rejected many gold rings and jewelry could also be rejected. 18 MOJAVE MANUAL
25 FIELD USE GROUND CONDITION SELECTOR CONTROL: HIGH/LOW The Earth minerals and ground conditions will greatly vary around mountains, streams, desert, seas, etc. To adjust for the change in minerals the Mojave has a 2 position switch for high and low. The HIGH setting will tackle the worst ground conditions making it capable to hunt any types of mineralized soils. The LOW setting is suited for low to moderate ground mineralized conditions and have better overall depth where the low ground conditions exist. HIGH GROUND CONDITIONS vs. LOW GROUND CONDITIONS Checking the ground to determine for which setting is to be used in HIGH or LOW is simple. Select GROUND CONDITION control to LOW, set the discrimination into the WHITE ZONE at the 6 o'clock position and power on the sensitivity to #4 at the RED Diamond ( )preset marker. Then pump the coil up and down in a metal free area. If you have very little or no response to the ground, then the LOW position is suitable for this area. If you have a major reaction in the audio when raising and lowing the coil: Then the audio will have a rebounding or boomerang effect. This is telling you that the LOW setting may NOT be suitable for the ground conditions you are searching. If this occurs, then place the GROUND CONDITION to HIGH and sample the ground once more. The audio should not change when lowering or raising the coil and you are best suited to search in the HIGH Ground Condition. This will eliminate false signals with the ground and make the unit smoother for operation. Different types of ground vary greatly from coast to coast. It is easy to test in high or low Ground Condition to determine which mode performs TESORO ELECTRONICS, INC. 19
26 FIELD USE best for you. If when using the Mojave in the LOW setting the unit becomes chattier and responsive to the ground, then select the HIGH position and these audio responses will be eliminated. Salt water beaches at the splash line and dry sands will vary due to the positive effects of the salt water. Testing for HIGH or LOW is the same as on dry land and you can select either the HIGH or LOW to sample. Be aware that both HIGH and LOW will be somewhat erratic and the mode that produces the least amount of false signals should be used. Be sure not to touch the coil to the wet sands as it will respond like a target. While searching wet sand, try keep the coil at a consistent height to get an even reading. You can try to slightly increase or decrease your discrimination range to smooth out some of the erroneous signals. Dry sands above the splash line should have smoother operation and be more forgiving in audio responses. GROUND SAMPLE TESTING FOR HIGH or LOW 1. Turn on and adjust sensitivity to preset and set the discriminate control at 6 o'clock for all metals. 2. Select LOW ground setting and hold coil about 10" above ground. 3. Pump the coil up and down from 10 inches to ground level. Listen for any major audio reaction. If you have very little or NO audio reaction: then LOW is suitable for this ground. This is GOOD! 4. If you have a LARGE or BIG audio reaction to the ground: then the LOW setting is NOT suitable for this ground condition. 5. Switch to HIGH setting and sample ground once more and you should not have any reaction to ground. 20 MOJAVE MANUAL
27 FIELD USE RECOGNIZING FALSE SIGNALS When operating the Mojave, some false signals may be caused: 1) heavy concentrations of trash metal objects, 2) very large trash metal objects or 3) electrical interference. These signals are generally short, choppy sounds and sound different than good signals (good target response sounds). At the end of your sweep, as you reverse the coil direction, the detector is most susceptible to trash-induced noise. There is a simple way to tell whether these sounds are good deep signals or trash noise. Trash-induced noises will not be regular as you sweep the coil over the suspected target several times, whereas a good target response will be repeatable. Note that a coin close to the surface can give a double beep sound, but it is regular and repeatable. Raising the coil an inch or two will restore the signal beep on surface targets. It is best not to use a high Discrimination Level setting than necessary. Nickel and most smaller rings are rejected when the Discrimination Level is set to reject pull tabs. If you don t dig any junk at all, you are surely passing up a lot of good finds as well. Set the Discrimination Level only high enough to suit the conditions where you are searching. If there is any doubt whether a target is good or not, dig it. CONTROLLING AUDIO VOLUME The speaker in the Mojave does not have a volume control. The volume should be sufficient to accurately hear the target response sound in most environments. If more or less volume is requited in your particular situation, we recommend using a set of good quality headphones with a built-in volume control. TESORO ELECTRONICS, INC. 21
28 FIELD USE HANDLING YOUR DETECTOR The detector should be held in a position that is comfortable for you as shown in the Getting Started section on Page 7. Swing the detector from side to side in about a three foot arc, overlapping succeeding strokes well. This motion is called a sweep. The Mojave was designed to get maximum depth without the frantic pace requited of earlier motion detectors, so go at a pace that is comfortable with you. In fact, trying to hunt too fast may even cause a loss of depth in heavily mineralized locations. Try to keep your search coil height constant and close to the ground. Most people tend to raise the coil at the end of a sweep - Much like a pendulum - especially if they are hurrying. Try to avoid this, as any increase in height from the ground will cause a corresponding loss of depth. In areas with well-kept lawns, the easiest way to maintain a constant search coil height is to allow the coil to rest on the grass as you sweep from side to side. In rough and rocky areas it is best not to scrub the coils on the ground, as the rocks will act like abrasives and wear away the coil bottom (an optional coil scuff will protect against this). Sweep the coil as close to the ground as possible without touching. Hitting the ground or rocks may cause a false signal much like a desired target would. Sweeping the coil too high above the ground results in a loss of depth. 22 MOJAVE MANUAL
29 FIELD USE PINPOINTING A TARGET A good method for pinpointing is X-ing the target with the search coil. Remember that the target s response sound is always greatest when the target is directly under the center of the search coil. To X a target, sweep the search coil over the target from side to side and then from front to back until you can identify the center of the X - the spot on the ground where the target response sound is the greatest. That spot is where the target is located. Another easy method is to sweep the coil from side to side across the target in very short sweeps as you slowly move forward and backwards across the target. Slow down the sweep rage and shorten the sweeps until you just barely get a response at one spot. The target will be directly below the coil center at this response time. Finally, raising the search coil during pinpointing can also help by narrowing the response to the target. Practice pinpointing often, and you will soon become fore accurate and faster. RECOVERING A TARGET If the target is shallow and the soil is soft, you may be able to probe and find the exact location of the target before you dig it. Since filling holes after you recover the target is so important digging a small precise hole is best. If the target is deep, you may need to dig a larger hole. As you dig, occasionally check the hole with your detector to see if you have moved the object, can probe it or have already dug it. Be sure to fill all holes after you recover the target. Two methods are shown on pages 32 and 33 that work most everywhere. Be sure to protect your hobby by leaving the site cleaner than you found it with the holes filled. TESORO ELECTRONICS, INC. 23
30 FIELD USE PLANTING A TEST GARDEN To better learn how your detector will perform in the field, it would be helpful to bury some coins and trash metal junk items in an area that you know is clear of other metal objects. Check the area with Discrimination Level set at MIN to be sure it s clear of trash, then bury the targets at least 1 foot apart from 2 to 4 inches deep to start. Make a map of the area to be sure you know what each target is and how deep it is. Practice on these targets to familiarize yourself with the detector s target response. This will also help you learn the proper sweep speed for the best operation. This type of practice area is often called a test garden or test bed and is on of the best tools to help you develop your metal detecting skills. AUDIO REACTIVE The Mojave has a unique analog audio response. Depending on the target, size and depth will vary on how the audio reacts, that can be very strong or slight in response. Coins that are deeper in the ground will give you less audio response but it will be a smooth and rounded tone. Where as shallow targets close to the surface will respond with a strong audio response than can be somewhat broken if the search coil is too close or there is too much sensitivity is being used. Quick Tip: When getting a broken audio response raise the search coil slightly higher over the targets center to check if the target audio response cleans up. 24 MOJAVE MANUAL
31 FIELD USE The audio will take some time in learning all the different sounds and response the Mojave will make. As you spend more time with your Mojave you will notice that each target will have its own audible signature. With more practice your hearing will develop and you will learn the audio patterns. Coins will sound like coins and you will be able to distinguish the other targets as they will be slightly different in response. For example, bad targets that are being rejected may have choppy, broken or crackling audio responses. Targets such as nails, foil, bottle caps, and pull tabs will have its own audio difference. 1 cent or a 5 cent nickel will audibly respond different than a 25 cent or half dollar. Gold rings vary to their size, thickness, gold content, and even yellow verses white gold will differ as well. Aluminum pull tabs is one of the biggest challenge as there has been many different styles over the years. The early pop ring with the beaver tail is a lot tougher to reject than the new square style. The square tab and beaver tails will respond very similar in the audio. Some difference is when the beaver tail is missing the tab or the tab is bent around the ring. Other mixed metals target may sound good when they are bad, rusty bottle caps are a good example of that. Other examples include a flattened aluminum screw caps that respond like a 50 cent or silver dollar, and chopped up aluminum cans will be a mixed bag due to chunks or strips of aluminum. TESORO ELECTRONICS, INC. 25
32 GENERAL INFORMATION BASIC CARE The Mojave is a sturdy instrument, but it is not designed to withstand abuse. In caring for your Mojave, there are several important DO NOT's to remember. DO NOT use it to pry rocks loose or to beat bushes out of the way. DO NOT drop the machine into water. DO NOT use it unprotected in the rain. DO NOT leave it exposed at night where dew could for on it. DO NOT store it in places that could get extremely hot (next to a wood stove or in an attic). DO NOT leave it in the trunk of a car or in the back of a hatchback-style car where high temperatures could build up. DO NOT store it with the battery installed as batteries may leak. DO NOT spray lubricants such as WD-40, or any types of cleaners, solvents, sealants or there chemicals into or onto the electronic parts, switches, or controls. And finally, DO NOT attempt to modify or repair the detector s electronics as this will void your detector s warranty. THE WARRANTY DOES NOT COVER DAMAGE RESULTING FROM AN ACCIDENT, NEGLECT OR ABUSE. PROTECTING YOUR INVESTMENT Often detectorists are disappointed when their new detector slowly becomes less and less responsive and seems to have lost some of its original peak performance. You can help avoid this from happening to your detector by following these basic care and protection guidelines: Operate your detector exactly as recommended in the operator instruction manual. Use only high-quality alkaline batteries of the correct voltage. Never substitute a different voltage. When using a Ni-Cad battery, always use a separate convertible pack with the proper voltage output for the detector s design. Remove the battery from the detector after each use. This will prevent damage to the detector if the battery leaks. 26 MOJAVE MANUAL
33 GENERAL INFORMATION The search coil cable is hardwired to the search coil and protected by a strain relief. It is very important that the strain relief remains intact and should never be adjusted or tampered with or removed. Keep cables properly wound about the pole stems and protect them during use. Floppy, pinched, or cables that become snagged during use may short, causing erratic noises or unnecessary replacement of the search coil. Sweep the search coil carefully, especially when using around rocks and building foundations. Avoid hitting the search coil against hard, solid objects and surfaces. Keep your search coil slightly off the ground during the sweep, especially when using in gravel or hard, rocky dirt. Always use a properly designed protective scuff cover on the search coil. (See Optional Accessories on the next page). Remove and clean out scuff covers periodically to avoid buildup of mineralized dirt particles which will affect performance. The search coil is waterproof and can be submerged in either fresh or salt water. After the search coil is used in salt water, rinse it and the lower stem assembly well with fresh water to prevent corrosion. The search coil is waterproof but the electronics are not, so always prevent any moisture or water from entering the control housing and never allow the cable connectors to become submerged in water. If there is a possibility of rain or spray, use a Tesoro rain jacket or protective weather resistant pouch. If you use anything other than the Tesoro rain jacket, leave the bottom open. The control housing needs to breath to prevent condensation on the electronic board. After each use, clean the detector with a soft cloth to remove dust, moisture, or other contaminants. TESORO ELECTRONICS, INC. 27
34 GENERAL INFORMATION When transporting the detector in a car during hot weather, store it on the floor of the passenger compartment if possible. Using a carry bag gives additional protection. In any case, never allow the detector to roll around unprotected in the trunk or back of a pickup truck. Protect your detector from dust, moisture, and extreme temperatures during storage. When shipping, use the original factory carton or similar heavy-duty container and provide a minimum one inch of padding around all parts. Treat your detector as you would any sensitive electronic instrument. Though ruggedly constructed and designed to withstand the demands of normal treasure hunting, proper care is essential. Tesoro metal detectors and genuine Tesoro accessories are sold only through independent Tesoro Authorized Dealers, who are almost always metal detectorists themselves. They can answer your questions about your Tesoro detector, what accessories may be helpful, and about metal detecting in general. See your Tesoro Authorized Dealer for more information and prices on optional accessories. 28 MOJAVE MANUAL
35 GENERAL INFORMATION SEARCH COILS A smaller search coil like the 4" or 5.75" give better target separation, meaning a more distinct target response for metal objects buried closely together. Which is very useful when hunting trashy sites with multiple targets in the same area. Small search coils can also deliver the best response to tiny targets that are close to the surface such as fine gold chains. Medium sized search coils like the 7" or 8" coils is a good midrange coil thats still gives "target separation" while adding depth and more ground coverage. The medium sized coils packs the greatest punch and are optimum for all around metal detecting in all types ground minerals. Larger search as the 9x8" and 12x10" concentric coils give a wider sweep to cover more ground quickly and provide greater depth especially on larger objects; however, they may not detect very small or tiny objects and will also have difficulty in very trashy areas. Be aware that large coils are more susceptible to electronic interference which may create false signals. Wide scan search coils such as the 11x8" or 12x10" ignore ground mineralization better than concentric search coils and may offer improved performance in extreme ground conditions. Like with the concentric, the larger the coil the more susceptible to outside electronic interference. Selecting the right optional search coil depends on factors such as what you are searching for and search site conditions, which is why NO one search coil is better than the rest. Several optional interchangeable search coils are available for the Mojave. They are all easy to mount and require no special tools. See the next page for a list of these search coils with the Tesoro part # and description. TESORO ELECTRONICS, INC. 29
36 GENERAL INFORMATION TESORO SEARCH COILS Tesoro Part # COIL-3x18W-SW-LITE-E COIL-4RC-SW-E COIL-5.75RC-SW-E COIL-7RW-SW-E COIL-8RC-SB-E COIL-8.5RW-LW-E COIL-9x8C-SW-E COIL-11x8W-SW-E COIL-12x10C-SW-E Description 3x18 rectangular, wide scan, with scuff, white, short cable 4 round concentric, white, short cable 5.75 round concentric, with scuff, white, short cable 7 round wide scan, white, short cable 8 round concentric, brown, short cable 8.5 round wide scan, white, long cable 9x8 oval/spoked, concentric, white, short cable 11x8 oval, wide scan, white short cable 12x10 oval/spoked, concentric, white, short cable 12x10 oval, widescan, white, short cable COIL-12x10W-SW-E Optional scuff covers are also available for all Tesoro search coil. Also available with a long cable. TESORO ACCESSORIES Rain jackets are also available at your Tesoro Dealer. We recommend using a rain jacket during inclement weather or if there is a possibility that the control housing could be sprayed or showered upon. The Part # for the rain jacket that fits the Mojave is ACCS-RAIN JACKET-SMALL. The small detector bag provides a small convenient way to transport or to store your unit; however, the poles must be taken apart to fit in the bag. The large detector bag will take a detector without separating the poles. Part # for the large bag is ACCS-CARRYBAG-LARGE Part # for the small bag is ACCS-CARRYBAG-SMALL 30 MOJAVE MANUAL
37 SCUFF COVERS We highly recommend using the scuff cover to protect your coil during use. Since the scuff cover will take the wear and tear that would otherwise damage your coil, it will eventually need to be replaced. The part number for the 7" Precision Scuff is: HEADPHONES SCUFF-7R-BLK-THIN GENERAL INFORMATION Most metal detectorists prefer to use headphones instead of the detector s built-in speaker. Headphones help block out background noise (such as wind) and make it easier to hear faint signals. Headphones with a built in volume control will allow you to adjust the sound volume to your preference. The headphone jack is located on the bottom of the Mojave housing. TESORO ELECTRONICS, INC. 31
38 GENERAL INFORMATION RECOMMENDED RECOVERY METHODS Adapted from Tools N Techniques by Robert H. Sickler Used in lawns (with very little moisture) Where targets are not so deep (one to four inches) and the "Plugging" method is objectionable. The Probe and Driver Method requires more practice but it much less damaging to grass than Method 2. The probe used can be a non metallic probe such as a modified fiberglass fishing rod or a metallic probe such as a blunt ice pick. A non-metallic probe will be the lease damaging to the target. After pinpointing target, use the probe to locate target depth (Fig. 1A). Next insert eight-inch screwdriver on center and just above target and rotate slightly to open ground (Fig.1B). Now insert screwdriver just under target at an angle and lever target to surface (Fig. 1C). Brush all loose dirt back in the hole and close by exerting pressure all around opening (Fig.1D). 32 MOJAVE MANUAL

39 GENERAL INFORMATION RECOMMENDED RECOVERY METHODS Adapted from Tools N Techniques by Robert H. Sickler Used only where allowed in natural wooded areas and very moist lawn areas. Plugging in hard dry ground can damage grass roots, leaving yellow "dead spots" in time. After pinpointing target, cut three sides of a four-inch cuber around target center using a six-inch sturdy hunting knife (Fig. 2A). Cutting a "hinged" cube rather than a cone shaped plug will properly orient its return, prevent removal by lawnmower, and lessen the chance of scratching the target. With the knife blade, carefully pry against the cube side opposite the "hinge" (uncut side) and fold back (Fig. 2B). Scan search coil over plug and hole to isolate target location. If target is in plug, carefully probe until located. If target is in the hole and not visible, probe bottom and sides until located and remover (Fig. 2C). Repeat scan for additional targets. Replace all loose dirt with plug. Seat plug firmly with foot (Fig 2D). TESORO ELECTRONICS, INC. 33
40 GENERAL INFORMATION METAL DETECTORIST S CODE OF ETHICS 1. Always check federal, state, county, and local laws before searching. It is your responsibility to know the law. 2. Abide by all laws, ordinances, or regulations that may govern your search or the are you will be in. 3. Never trespass. Always obtain permission prior to entering private property, mineral claims, or underwater salvage leases. 4. Do not damage, deface, destroy, or vandalize any property (including ghost towns and deserted structures), and never tamper with any equipment at the site. 5. Never litter. Always pack out what you take in and remove all trash dug in your search. 6. Fill all holes, regardless how remote the location, and never dig in a way that will damage, be damaging to, or kill vegetation. 7. Do not build fires, camp, or park in non-designated or restricted areas. 8. Leave all gates and other accesses to land as found. 9. Never contaminate wells, creeks, or any other water supplies 10. Be courteous, considerate, and thoughtful at all times. 11. Report the discover of any items of historic significance to the local historical society or proper authorities. 12. Uphold all finders, search, and salvage agreements. 13. Promote responsible historical research and artifact recovery and the sharing of knowledge with others. 34 MOJAVE MANUAL
41 SPECIFICATIONS Operating Frequency... Search Coil... Cable Length... Audio Frequency... Audio Output... Headphone Compatibility... Weight (may vary slightly)... Battery Requirement... Battery Life (typical)... Optimum Temperature Range... Optimum Humidity... Operating Modes khz Precision 7 Concentric Approximately 3 Approximately 630 Hz 36mm (approximately 1 1/2 ) Speaker & Headphone Jack 1/4 Stereo Plug 2.2 lbs. One 9 volt DC (Alkaline) 15 to 18 Hours 30 to 100 F 0 to 75% R.H. ON/OFF/Fully Adjustable Sensitivity Silent Search Discrimination High/Low Ground Condition Selector Switch TESORO ELECTRONICS, INC. 35
42 Trouble Shooting SYMPTOM NO POWER ERRATIC RESPONSES NO SPEAKER RESPONSES STILL STUMPED? SOLUTION Check battery and make sure the correct orientation with the 9 volt is positive side up or replace with a new Alkaline 9 volt battery. Check and make sure the coil connector is plugged in and connected and locking ring is finger tight. Check coil wire and make sure that the coil wire is not wrapped loosely to the search coil. EMI interference from houses with WI-FI, cell phone, or other sources may cause chatter. Move sensitivity control to lower setting and increase the discrimination level slightly higher. Tesoro has a 1/4" earphone jack. Some people use light weight headphones that use an adapter. Be sure adapter is removed from the socket. You will not have any speaker function when you only unplug the headphones and leave the adapter in the socket. Give a call to Tesoro's Technical Support if you have any further questions or problems. (928) MOJAVE MANUAL
43 Your Finds Date: Item: Location: Notes: Attach Receipt Here

44 WARRANTY SERVICE Your Tesoro metal detector is covered by a Lifetime Warranty, the terms of which are listed below. If your metal detector should require service, you may return it to the Tesoro factory at the address below. WARRANTY DESCRIPTION This warranty gives you specific legal rights, and you may have other rights which vary from state to state. This instrument is warranted to be free of defects in material and workmanship as long as it is owned by the original consumer purchaser. This warranty is not transferable and is valid only if the warranty registration card has been completed and mailed within 10 days of purchase. TESORO will, at its option, repair or replace any instrument covered by this warranty, without charge, except for transportation charges, at its factory in Prescott, Arizona. This warranty excludes batteries, damage caused by leaky batteries, cable breakage due to flexing on body mount units, and wear of the search coil housing. Also excluded are instruments which have been abused, altered, or repaired by an unauthorized party. For warranty service, call or write: Tesoro Electronics, Inc. Service Department 715 White Spar Road Prescott, AZ (928)
GC-1032 Metal Detector OWNER S MANUAL
 GC-1032 Metal Detector OWNER S MANUAL 1 With your GC-1032 metal detector, you can hunt for coins, relics, jewelry, gold, and silver just about anywhere. The detector comes with high sensitivity and strong
The Golden µmax is a precision electronic instrument that will last for years if properly cared for. Treat it right and it won t let you down.
 GOLDEN µmax OPERATOR INSTRUCTION MANUAL CONGRATULATIONS! Your new Tesoro Golden µmax metal detector is part of a new series of detectors designed to provide you with many happy hours of enjoyment in the
Fully assembled, including upper pole stem with handle grip, padded arm bracket and control housing.
 CIBOLA OPERATOR INSTRUCTION MANUAL CONGRATULATIONS! Your new Tesoro Cibola metal detector is part of a new series of detectors designed to provide you with many happy hours of enjoyment in the most rewarding
CONTENTS Preparation Functions and Indications Operation
 CONTENTS Features 3 Preparation Parts of the detector 4 Assembling the detector 4 Adjusting the search coil 6 Installing the batteries 6 Using the headphones 7 Functions and Indications Parts of the control
The Vaquero is a precision electronic instrument that will last for years if properly cared for. Treat it right and it won t let you down.
 VAQUERO OPERATOR INSTRUCTION MANUAL CONGRATULATIONS! Your new Tesoro Vaquero metal detector is part of a new series of detectors designed to provide you with many happy hours of enjoyment in the most rewarding
The Name That Means Treasure
 The Name That Means Treasure OPERATOR INSTRUCTION MANUAL PREFACE ii VAQUERO OPERATOR INSTRUCTION MANUAL CONGRATULATIONS! Your new Tesoro Vaquero metal detector is part of a new series of detectors designed
SAND SHARK OPERATOR INSTRUCTION MANUAL
 SAND SHARK OPERATOR INSTRUCTION MANUAL CONGRATULATIONS! Your new TESORO metal detector was designed to provide you with many happy hours of enjoyment in the most rewarding hobby I can think of treasure
Treasure Cove Metal Detector
 Treasure Cove Metal Detector Fortune Finder 1023 OWNER S MANUAL www.treasure-cove.com 805-658-2328 With your 1023 metal detector, you can hunt for coins, relics, jewelry, gold, and silver just about anywhere,
PLEASE READ THIS MANUAL CAREFULLY BEFORE ATTEMPTING TO USE YOUR TRACKER III METAL DETECTOR
 Bounty Hunter Corporation, Treasure Recovery System Detectors are warranted against defects in workmanship or materials under normal use for five years from date of purchase to the original user. Liability
OPERATOR INSTRUCTION MANUAL
 "The Name That Means Treasure" OPERATOR INSTRUCTION MANUAL PREFACE ii TEJÓN OPERATOR INSTRUCTION MANUAL CONGRATULATIONS! Your new Tesoro Tejón metal detector is part of a new series of detectors designed
MD9200 Metal Detector
 1580 N Harmony Circle Anaheim, Ca. 92807 714-701-9671 Fax 714-701-9672 MD9200 Metal Detector Instruction Manual MAJOR PARTS OF THE MD9200: 1. Search coil 2. Stem connector & knob 3. Lower stem 4. Stem
MD9300 Metal Detector OWNER S MANUAL
 Famous Trails Anaheim, California Phone (714) 701-9671 Fax (714) 701-9672 Toll Free: (877) 97SCOPE www.famoustrails.com MD9300 Metal Detector OWNER S MANUAL CONTENTS Assembling the Detector----------------------------------------------------------
TIGER SHARK OPERATOR INSTRUCTION MANUAL
 TIGER SHARK OPERATOR INSTRUCTION MANUAL CONGRATULATIONS! Your new TESORO metal detector was designed to provide you with many happy hours of enjoyment in the most rewarding hobby I can think of - treasure
OPERATOR INSTRUCTION MANUAL
 MOST IMPORTANT WHEN RETURNING UNIT FOR SERVICE 1. All units returned under warranty must be accompanied by copy of original dated invoice. Failure to do this will incur repair charges. 2. Please include
1) Do Not Use Indoors. Household appliances generate electromagnetic fields, which can interfere with the detector.
 Do Not Use Indoors. Household appliances generate electromagnetic fields, which can interfere with the detector.") OWNER S MANUAL Your Surveyor is an advanced technology Metal Detector. If you are new to the hobby or have never used a metal detector before, we recommend that you: 1) Do Not Use Indoors. Household appliances
OWNER S MANUAL Your Surveyor is an advanced technology Metal Detector. If you are new to the hobby or have never used a metal detector before, we recommend that you: 1) Do Not Use Indoors. Household appliances
NEXUS Metal Detectors. Telephone +44(0) User Manual
 User Manual") NEXUS Metal Detectors Telephone +44(0)7909895085 User Manual General Coronado Groundfix is a tuned in resonance Analogue Induction Balance (IB) metal detector that operates in the audio frequency range
NEXUS Metal Detectors Telephone +44(0)7909895085 User Manual General Coronado Groundfix is a tuned in resonance Analogue Induction Balance (IB) metal detector that operates in the audio frequency range
OPERATOR INSTRUCTION MANUAL
 MOST IMPORTANT WHEN RETURNING UNIT FOR SERVICE 1. All units returned under warranty must be accompanied by copy of original dated invoice. Failure to do this will incur repair charges. 2. Please include
LOBO SUPER TRAQ OPERATOR INSTRUCTION MANUAL. To be successful in gold nugget prospecting with a detector you must:
 LOBO SUPER TRAQ OPERATOR INSTRUCTION MANUAL CONGRATULATIONS! Your new Tesoro LOBO SuperTRAQ Metal Detector is designed to provide you with many happy hours of gold nugget prospecting and metal detecting.
NEXUS Metal Detectors. Telephone +44(0) User Manual
 User Manual") NEXUS Metal Detectors Telephone +44(0)1442780922 User Manual GENERAL DESCRIPTION The Nexus Standard SE is an Analogue Induction Balance (IB) metal detector that operates in the very low frequency (VLF)
NEXUS Metal Detectors Telephone +44(0)1442780922 User Manual GENERAL DESCRIPTION The Nexus Standard SE is an Analogue Induction Balance (IB) metal detector that operates in the very low frequency (VLF)
OWNER S MANUAL. DO NOT TEST ON THE FLOOR Most floors contain metal, which will interfere with the target s signal.
 OWNER S MANUAL The Basics of Metal Detecting Your Fast Tracker Metal Detector is a MOTION metal detector; movement over an object is required in order for the machine to detect an object and emit a tone.
METAL DETECTOR INSTRUCTION GUIDE
 METAL DETECTOR INSTRUCTION GUIDE SET UP STEP 1. STEP 2. Your NATIONAL GEOGRAPHIC detector requires no assembly or tools. Simply remove the detector from the box. Press down the red UNLOCK button on both
OWNER S MANUAL. Important Facts to Know about your Metal Detector.
 OWNER S MANUAL Important Facts to Know about your Metal Detector. 1. This is a MOTION detector. You must sweep the searchcoil from side-to-side to detect metal. A motionless searchcoil over a metal object
ASSEMBLING YOUR DETECTOR
 ASSEMBLING YOUR DETECTOR 1. On the lower rod assembly, remove the mounting screw and thumb nut from the rod tip. 2. Insert the rod tip between the mounting ears of the search coil and align the holes of
CS2MX. Operating Instructions
 CS2MX Operating Instructions CS2MX 17 15 19 18 16 10 11 1 12 13 14 7 Identifying the Parts 6 1. Control box mounting clip 2. On/Off/Sensitivity control 3. Loudspeaker 4. Pin-point push button 5. All-metal/discrimination
User s Manual ACCESSORIES. Pouch & Digger Combo...$ Pouch with 2 large pockets & 9 heavy duty digging tool. TPKIT-W
 User s Manual ACCESSORIES Pouch & Digger Combo...$ 24.95 Pouch with 2 large pockets & 9 heavy duty digging tool. TPKIT-W Pin Pointer...$ 69.95 Pinpoints the exact location of buried metal objects. Audio
CREDO metal detector. User Manual
 CREDO metal detector User Manual Table of contents. 1. General description page 3, 4 2. Assembly & Preparation page 5 3. Controls page 6, 7 - Discrimination Control page 6 - Ground Balance Control page
User s Manual. Use 9-volt ALKALINE batteries. Do not use Heavy Duty batteries. Do not use ordinary Zinc Carbon batteries.
 User s Manual Use 9-volt ALKALINE batteries. Do not use Heavy Duty batteries. Do not use ordinary Zinc Carbon batteries. To get the most enjoyment from your Metal Detector, we suggest you do the following:
CS4PI. operating instructions
 CS4PI operating instructions CS4PI 18 19 17 1) Control box mounting clip 2) On/Off/sensitivity control 3) Loudspeaker 4) Signal intensity LED 5) Pulse frequency control 6) Battery compartment 7) 8 x AA
Treasure Hunter Bronze Metal Detector PHMD1
 Treasure Hunter Bronze Metal Detector PHMD1 www.pyleaudio.com Instruction Manual This Metal Detector is a versatile and easy-to-use metal detector. It has higher sensitivity and has the ability to differentiate
ACE 250 Key Features. 18 Garrett Metal Detectors
 ACE 250 Key Features 1. POWER Pushbutton (press and hold to reset to factory recommended settings) Press and release to switch the unit ON and resume hunting with the same settings and modifications used
1) Do Not Use Indoors. Household appliances generate electromagnetic fields, which can interfere with the detector.
 Do Not Use Indoors. Household appliances generate electromagnetic fields, which can interfere with the detector.") OWNER S MANUAL Your Tracker II is an advanced technology Metal Detector. If you are new to the hobby or have never used a metal detector before, we recommend that you: 1) Do Not Use Indoors. Household
OWNER S MANUAL Your Tracker II is an advanced technology Metal Detector. If you are new to the hobby or have never used a metal detector before, we recommend that you: 1) Do Not Use Indoors. Household
LAND STAR CARE & FEEDING. Metal Detector OWNER S MANUAL KEY POINTS. First Texas Manufacturing Montana Ave. El Paso, TX (915)
") TREASURE HUNTER S CODE OF ETHICS: CARE & FEEDING 1. Respect the rights and property of others. 2. Observe all laws, whether national, state or local. 3. Never destroy historical or archaeological treasures.
TREASURE HUNTER S CODE OF ETHICS: CARE & FEEDING 1. Respect the rights and property of others. 2. Observe all laws, whether national, state or local. 3. Never destroy historical or archaeological treasures.
CS4MX. Operating Instructions
 CS4MX Operating Instructions 19 CS4MX 20 6 21 18 Identifying the Parts 22 8 13 14 15 16 1) On Off/ Sensitivity control 2) Ground Level control 3) Pinpoint/ Discrimination 1/ Discrimination 2 switch 4)
DETECTORS. USER MANUAL
 DETECTORS www.noktadetectors.com USER MANUAL INTRODUCTION Thank you for choosing and purchasing our 109 Deep Pro detector. Manufacturing high-tech metal detectors since 2001, Nokta Detectors has played
R E L I C S C A N Professional pulse induction metal detector
 REX TM Metal Detectors R E L I C S C A N Professional pulse induction metal detector User s guide www.rexmetaldetectors.com made in Bulgaria 1 In order to use the device for a maximum long time and without
FIRST TEXAS PRODUCTS, LP 5-YEAR LIMITED WARRANTY
 TREASURE HUNTER S CODE OF ETHICS: 1. Respect the rights and property of others. 2. Observe all laws, whether national, state or local. 3. Never destroy historical or archaeological treasures. 4. Leave
1225-X. Automatic Metal Detector. Operating Manual
 1225-X Automatic Metal Detector Operating Manual F I S H E R R E S E A R C H L A B O R A T O R Y CONTENTS About Your 1225-X... pg. 1 Setting Up... pg. 2 Control Functions... pg. 4 Discrimination Points...
TERMINOLOGY...3 ASSEMBLY...4 BATTERIES...5 QUICK-START DEMO...6 BASIC OPERATION...7 & 8 SUMMARY OF OPERATING MODES...9 LCD TARGET DISPLAY...
 TABLE OF CONTENTS TERMINOLOGY..............................3 ASSEMBLY..................................4 BATTERIES.................................5 QUICK-START DEMO..........................6 BASIC OPERATION........................7
www. makrodetector. com
 U S E R G U I D E www. makrodetector. com CAUTION! PLEASE READ CAREFULLY BEFORE OPERATING THE DEVICE! You have to follow local legislation and regulations while using the device. This device must not be
4. BASIC OPERATION AND DESCRIPTION
 3. FEATURES Rugged high-impact plastic enclosure with aluminum sensor pole Powerful magnetic speaker with waterproof Mylar cone Lightweight, comfortably balanced for easy handling Easy view LCD display
OWNER S MANUAL ACCESSORIES. Important Facts to Know about your Metal Detector. Carry Bag Rugged double-stitched construction - CBAG-W
 ACCESSORIES Carry Bag Rugged double-stitched construction - CBAG-W Pouch & Digger Combo Pouch with 2 large pockets & 9 heavy duty digging tool. TP-KIT-W Bounty Hunter Stereo Headphones Use with Bounty
Owner s Manual. Deep-seeking True All Metal Mode Performance for All Terrain Prospecting! AT GOLD Owner s Manual
 Deep-seeking True All Metal Mode Performance for All Terrain Prospecting! AT GOLD Owner s Manual 1881 W. State Street Garland, Texas 75042 Tel: 1.972.494.6151 Email: sales@garrett.com Fax: 1.972.494.1881
QUEST. metal detectors
 QUEST metal detectors 40 QUICK START IN THE BOX ASSEMBLE QUICK START For the first time using. You need a philip screw driver to assemble the unit. Follow the steps illustrated and set a comfortable distance
OWNER S MANUAL. If you do not have prior experience with a metal detector, we strongly recommend that you:
 OWNER S MANUAL If you do not have prior experience with a metal detector, we strongly recommend that you: 1) Adjust the Sensitivity to a low setting in the event of false signals. Always begin use at a
FIRST TEXAS PRODUCTS, LP 5-YEAR LIMITED WARRANTY
 TREASURE HUNTER S CODE OF ETHICS: 1. Respect the rights and property of others. 2. Observe all laws, whether national, state or local. 3. Never destroy historical or archaeological treasures. 4. Leave
METAL DETECTOR MD-5008
 #211, 2 nd floor, Mainbuilding, Chinoy Trade Center (CTC), Parklane, Secunderabad, A.P., India 500003. Telephone No.: 040-27818386, Mobile No.: 9640791016 E mail Id: velturn@outlook.com METAL DETECTOR
5. The Eureka Gold Controls
 Page 1 The Minelab Eureka Gold 5. The Eureka Gold Controls This section gives detailed descriptions of the controls of the Eureka Gold detector and their functionality. Having knowledge of these controls
OWNER S MANUAL. DO NOT TEST ON THE FLOOR Most floors contain metal, which will interfere with the target s signal.
 OWNER S MANUAL The Basics of Metal Detecting Your Fast Tracker Metal Detector is a MOTION metal detector; movement over an object is required in order for the machine to detect an object and emit a tone.
OWNER S MANUAL. Important Facts to Know about your Metal Detector.
 OWNER S MANUAL Important Facts to Know about your Metal Detector. 1. This is a MOTION detector. You must sweep the searchcoil from side-to-side to detect metal. A motionless searchcoil over a metal object
READ CAREFULLY BEFORE OPERATING THE DEVICE!
 READ CAREFULLY BEFORE OPERATING THE DEVICE! LEGAL DISCLAIMERS Comply with the laws and regulations in force within the area while using the device. Do not use the device in protected or archeological sites
Target I.D. Metal Detector. Operating Manual F I S H E R R E S E A R C H L A B O R A T O R Y
 ID Edge Target I.D. Metal Detector Operating Manual F I S H E R R E S E A R C H L A B O R A T O R Y CONTENTS About Your Detector... pg. 1 Setting Up... pg. 2 Control Panel... pg. 4 4 Tone Audio System...
OWNER S MANUAL. If you do not have prior experience with a metal detector, we strongly recommend that you:
 OWNER S MANUAL If you do not have prior experience with a metal detector, we strongly recommend that you: 1) Adjust the Sensitivity to a low setting in the event of false signals. Always begin use at a
AG19 10 OC Cantilever. Assembly and Operation Guide
 AG19 10 OC Cantilever Assembly and Operation Guide Thank you for your purchase of Treasure Garden s AG19 Cantilever Umbrella. Please remove all contents from the package, inspect and review checklist.
User s Manual. Model # MX200 DIGITAL METAL DETECTOR. 602 Fountain Parkway Grand Prairie, TX
 DIGITAL METAL DETECTOR 602 Fountain Parkway Grand Prairie, TX 75050 800.847.8269 Ground EFX and Swarm are TM trademarks of WGI Innovations, LTD. Sport Responsible is a TM trademark of WGI Innovations,
Vision Field Guide. all you need to know
 Vision Field Guide all you need to know Navigation UP/DOWN moves the Cusor vertical to select from a list. SIDE/SIDE moves the highlighted selection horizontally. MENU/TAB brings up menu or moves the Cursor
PT-1. Pipe Tracker OPERATION MANUAL 1010 JW FISHERS MFG INC 1953 COUNTY ST. E. TAUNTON, MA USA
 Pipe Tracker OPERATION MANUAL 1010 JW FISHERS MFG INC 1953 COUNTY ST. E. TAUNTON, MA 02718 USA (508) 822-7330; (800) 822-4744; FAX (508) 880-8949 Email: jwfishers@aol.com WEB: www.jwfishers.com MAINTENANCE
OWNER S MANUAL THE FORTUNE HUNTER HAS TWO TYPES OF OPERATING MODES:
 OWNER S MANUAL Your Fortune Hunter Metal Detector is an advanced microprocessor-controlled metal detector. This motion detection system requires movement over an object in order for the machine to detect
INTRODUCTION. Fortune Hunter FEATURES
 ACCESSORIES Bounty Hunter Carry Bag Rugged double-stitched construction CBAG-W Bounty Hunter Pouch & Digger Combo Pouch with 2 large pockets & 9 heavy duty digging tool. TP-KIT-W Stereo Headphones Use
Golden Mask. User Guide UK. Models:
 Golden Mask Models: + + UK User Guide 2 3 About the Golden Mask Metal Detectors Series - GM, GM+ and GM+ UK edition The Golden Mask series metal detectors are very simple to operate, yet very effective
Spectra. V 3 Field Guide
 Spectra V 3 Field Guide all you need to know White s Electronics, Inc. 1011 Pleasant Valley Rd Sweet Home, Oregon 97386 USA Navigation UP/DOWN moves the Cursor vertical to select from a list. SIDE/SIDE
CS990XD. Operating Instructions
 CS990XD 2 CS990XD INTRODUCTION To protect your investment complete both sections of the enclosed guarantee card and return to C-Scope. This is particularly important in order to obtain the four years parts
OPERATING INSTRUCTIONS: A2B AND ADS GOLDHUNTER GROUND HOG Series Detectors
 OPERATING INSTRUCTIONS: A2B AND ADS GOLDHUNTER GROUND HOG Series Detectors CONTROL FUNCTIONS Power On-Off/Sensitivity Knob: Turn clockwise to ON position. Detector is operating at maximum depth. Rotate
MD 6035 METAL DETECTOR OWNER S MANUAL
 MD 6035 METAL DETECTOR OWNER S MANUAL MD6035 metal detector is a fully functional, detection capability, professional equipment for treasure hunter lovers. Through electronic technology, MD6035 gets the
READ CAREFULLY BEFORE OPERATION OF THE DEVICE
 WARNINGS READ CAREFULLY BEFORE OPERATION OF THE DEVICE LEGAL DISCLAIMERS Comply with applicable laws and regulations governing use of metal detectors while using this detector. Do not use the detector
STRINGING MACHINE OWNER'S MANUAL. Copyright 1998 GAMMA Sports - All Rights Reserved
 6002 STRINGING MACHINE OWNER'S MANUAL Issue 3 - June 20, 1998 Copyright 1998 GAMMA Sports - All Rights Reserved 6002 OWNER'S MANUAL TABLE OF CONTENTS PAGE 1... WARRANTY PAGE 2... FEATURES PAGE 3... ASSEMBLY
1) Read this manual. Most importantly, review the Summary of Operating Modes.
 Read this manual. Most importantly, review the Summary of Operating Modes.") TREASURE HUNTER S CODE OF ETHICS: Always check Federal, State, County and local laws before searching. Respect private property and do not enter private property without the owner s permission. Take care
TREASURE HUNTER S CODE OF ETHICS: Always check Federal, State, County and local laws before searching. Respect private property and do not enter private property without the owner s permission. Take care
Gold Bug 2 Prospector s Metal Detector
 Gold Bug 2 Prospector s Metal Detector Operating Manual FISHER RESEARCH LABORATORY CONTENTS About Your Gold Bug-2... pg. 1 Setting Up... pg. 4 Hipmounting... pg. 5 Control Panel... pg. 6 Mode and Mineralization
Installing Your Electronic Deadbolt
 Ultra Security Plus Electronic Deadbolt Installation Instructions http://www.hberger.com/video-gallery/electronic-deadbolt New Installation Lock Location Preparation (Skip this section if you door has
MAX. Push your limits to the. Owner s Manual English / Spanish / French / German. AT MAX International Owner s Manual
 TM Push your limits to the MAX AT MAX International Owner s Manual 1881 W. State Street Garland, Texas 75042 Tel: 1.972.494.6151 Email: sales@garrett.com Fax: 1.972.494.1881 2017 Garrett Electronics, Inc.
Please Do Not Return This Product To The Store!
 MODEL NOS. T8512 TOURNAMENT SERIES 3 TABLE TENNIS TABLE OWNER'S MANUAL 1. Read this manual carefully before starting assembly. Read each step completely before beginning each step. 2. Some smaller parts
OWNER S MANUAL. If you do not have prior experience with a metal detector, we strongly recommend that you:
 OWNER S MANUAL If you do not have prior experience with a metal detector, we strongly recommend that you: 1) Adjust the Sensitivity to a low setting in the event of false signals. Always begin use at a
READ CAREFULLY BEFORE OPERATION OF THE DEVICE
 WARNINGS READ CAREFULLY BEFORE OPERATION OF THE DEVICE LEGAL DISCLAIMERS Comply with applicable laws and regulations governing use of metal detectors while using this detector. Do not use the detector
CONTENTS. Accessories and Components System Unit and Joystick Assembly and Charging the Battery Jeotech Using Phases...
 CONTENTS Accessories and Components... 3 System Unit and Joystick... 4 Assembly and Charging the Battery... 6 Jeotech Using Phases... 9 What is ground setting and how it is done?... 11 Steps for the Ground
M E T AL D E T E C T O R
 METAL DETECTOR MODEL NO.: GC1035 1 This metal detector is a professional metal detector. As a sophisticated electronic device, the most difficult aspects in metal detecting have been automated. If you
INDEX. Accessories and Components System Unit and Joystick Assembly and Charging the Battery Using with LED System...
 USER GUIDE INDEX Accessories and Components... 4 System Unit and Joystick... 6 Assembly and Charging the Battery... 9 Using with LED System... 11 What is Ground Setting and How It Is Done... 14 Ground
TM 808. Instruction Manual. (English Edition)
") TM 808 Instruction Manual (English Edition) NOTE: To locate large metal in normal conditions, set the controls as shown above. Walk briskly, noting areas that produce an increase in sound - beep. Cross
TM 808 Instruction Manual (English Edition) NOTE: To locate large metal in normal conditions, set the controls as shown above. Walk briskly, noting areas that produce an increase in sound - beep. Cross
The Most Advanced Metal Detector
 The Most Advanced Metal Detector This metal detector is a professional metal detector. As a sophisticated electronic device, the most difficult aspects in metal detecting have been automated. If you are
OWNER'S MANUAL Issue 2 - December 14, 2000
 OWNER'S MANUAL AL Issue 2 - December 14, 2000 Copyright 2000 GAMMA Sports - All Rights Reserved Provided by www.gssalliance.com OWNER'S MANUAL TABLE OF CONTENTS PAGE 1... WARRANTY PAGE 2...FEATURES PAGE
OWNER S MANUAL 1) Adjust the Sensitivity to a low setting in the event of false signals. 2) Do not use indoors.
 Adjust the Sensitivity to a low setting in the event of false signals. 2) Do not use indoors.") OWNER S MANUAL The Pioneer EX is an easy to use detector. The most difficult aspects of metal detecting have been automated. However if you are new to the hobby, we strongly recommend that you: 1) Adjust
OWNER S MANUAL The Pioneer EX is an easy to use detector. The most difficult aspects of metal detecting have been automated. However if you are new to the hobby, we strongly recommend that you: 1) Adjust
OWNER S MANUAL. 1) Watch the video. It is 21 minutes long.
 Watch the video. It is 21 minutes long.") OWNER S MANUAL The Pioneer 505 is a professional metal detector. The concepts and terminology can be quite unfamiliar if you are new to the hobby. To understand it quickly and to get the most enjoyment
OWNER S MANUAL The Pioneer 505 is a professional metal detector. The concepts and terminology can be quite unfamiliar if you are new to the hobby. To understand it quickly and to get the most enjoyment
Headset Intercom System. Operating Instructions
 Headset Intercom System Model C1025 Operating Instructions Headset and Transceiver Pack Base Station Model C1025 Table of Contents Intended Use...iii FCC Information...iii Service...iii System Descriptions...1
ACCESSORIES. DISCRIMINATE: Eliminates iron and trash items with the use of the DISC/NOTCH knob.
 ACCESSORIES Carry Bag Rugged double-stitched construction - CBAG-W Pouch & Digger Combo Pouch with 2 large pockets & 9 heavy duty digging tool. TP-KIT-W Bounty Hunter Stereo Headphones Use with Bounty
Golden Mask DEEP HUNTER Pro3
 Golden Mask DEEP HUNTER Pro3 Golden Mask Deep Hunter Pro3 is a professional metal detector designed to detect deeply buried large metal objects (larger than 8 cm). It has the ability to indicate the type
OWNER S MANUAL. First Texas Products L.L.C H Henry Brennan El Paso, TX (915) FIRST TEXAS PRODUCTS, LLC 5-YEAR LIMITED WARRANTY
 FIRST TEXAS PRODUCTS, LLC 5-YEAR LIMITED WARRANTY") TREASURE HUNTER S CODE OF ETHICS: Always check Federal, State, County and local laws before searching. Respect private property and do not enter private property without the owner s permission. Take care
TREASURE HUNTER S CODE OF ETHICS: Always check Federal, State, County and local laws before searching. Respect private property and do not enter private property without the owner s permission. Take care
GROUND BALANCE & PINPOINT BUTTON MODIFICATION By Sven Stau October 2008
 TESORO CIBOLA GROUND BALANCE & PINPOINT BUTTON MODIFICATION By Sven Stau October 2008 Get some added performance by replacing the internal factory fixed GB with an external user friendly, fully adjustable
Assistive Listening Systems. RX-6 User s Guide
 Assistive Listening Systems RX-6 User s Guide Page ii RX-6 User s Guide Copyright Information Contents Introduction 1 Controls 2 Installing Batteries 3 Operation 3 Tuning the RX-6 4 Changing Preset Channels
ASSEMBLY OF THE COIL AND TURNING THE DETECTOR ON
 SSP-5100 G ASSEMBLY OF THE COIL AND TURNING THE DETECTOR ON CONGRATULATIONS FOR PURCHASING YOUR SUPER SENSITIVE PENETRATOR-5100G PULSE INDUCTION METAL DETECTOR. Take the coil out of the leather bag. The
2. DISCRIMINATE, NOTCH, and AUTO NOTCH Modes. Eliminates iron and trash items with the use of the DISC/NOTCH knob.
 OWNER S MANUAL Your Quick Draw II Metal Detector incorporates patented microprocessorcontrolled technology. The Quick Draw II is a motion detector; movement over an object is required in order for the
READ CAREFULLY BEFORE ASSEMBLY / OPERATION OF THE DETECTOR
 USER MANUAL READ CAREFULLY BEFORE ASSEMBLY / OPERATION OF THE DETECTOR LEGAL DISCLAIMERS Comply with applicable laws and regulations governing use of metal detectors while using this detector. Do not use
AKZ13 13 OC Cantilever. Assembly and Operation Guide
 AKZ13 13 OC Cantilever Assembly and Operation Guide Thank you for your purchase of Treasure Garden s AKZ13 Cantilever Umbrella. Please remove all contents from the package, inspect and review checklist.
TREASURE-FINDER AUTOMATIC
 MODEL # TF MADE USA, OPERATING MANUAL TREASURE-FINDER AUTOMATIC Discovery Electronics, Inc. 1415 Poplar Street Sweet Home, Oregon 97386 Discovery Electronics, Inc. P.O. Box 502 Lebanon, Oregon 97355 Phone:
THE MINELAB EXPLORER. Quickstart
 Quickstart However experienced you are at using a metal detector, it is important that you read this chapter to understand how to use the Explorer in Quickstart mode. 3 www.minelab.com.au GETTING STARTED
RING CUTTING SYSTEM OPERATOR S MANUAL
 . RING CUTTING SYSTEM OPERATOR S MANUAL INTRODUCTION GEM is not a modified power tool; rather, it s a device that has been designed specifically to cut rings quickly and safely. The abrasive quality of
AT PRO INTERNA TIONAL
 TM Owner s Manual THANK YOU FOR CHOOSING GARRETT METAL DETECTORS! Congratulations on the purchase of your new Garrett AT Pro metal detector. This enhanced metal detector has been specifically designed
SFP-1 and MFP-1 PINGER
 SFP- and MFP- PINGER OPERATION MANUAL 40 JW FISHERS MFG INC 93 COUNTY ST. E. TAUNTON, MA 078 USA (08) 8-7330; (800) 8-4744; FAX (08) 880-8949 Email: info@jwfishers.com WEB: www.jwfishers.com SPECIFICATIONS
Master-200 Edition Metal Detector. Master-200 Edition Metal Detector 8/15 BC436
 Master-200 Edition Metal Detector Master-200 Edition Metal Detector 8/15 BC436 Notes Before Use CONTENTS Terminology 4 Preparation 5 Parts of the Metal Detector 5 Assembly 5 Batteries 6 Control Panel 7
U.S. Rack, Inc Falcon Drive, Madera, CA APR17 INSTALLATION AND USE INSTRUCTIONS for SIDE-MOUNT LADDER RACK
 U.S. Rack, Inc. 2850 Falcon Drive, Madera, CA 93637 15APR17 INSTALLATION AND USE INSTRUCTIONS for SIDE-MOUNT LADDER RACK WARNING: Do NOT attempt to install or use this rack without following all instructions.
PR-216. High Performance Personal Receiver PR-216 OPERATOR S MANUAL
 PR-216 OPERATOR S MANUAL PR-216 High Performance Personal Receiver 357 West 2700 South Salt Lake City, Utah 84115 Phone: (800) 496-3463 Fax: (801) 484-6906 http://www.comtek.com TABLE OF CONTENTS Introduction...
Golden Mask Deep Hunter LE
 Golden Mask Deep Hunter LE Golden mask Deep Hunter LE is a pulse induction detector, designed for easy detection of deeply buried large metal objects (larger than 8 cm or 3 ) with LED indication for the
FX-3. Operating Manual. Q U A L I T Y Fisher detectors are renowned for their quality. Each detector is hand crafted in the USA with pride
 Q U A L I T Y Fisher detectors are renowned for their quality. Each detector is hand crafted in the USA with pride P E R F O R M A N C E The worldwide underground utility industry relys on Fisher. Our