Warnings. Elite Series Waterproof Amplifiers
|
|
|
- Todd Fletcher
- 5 years ago
- Views:
Transcription


1 Warnings Read these instructions and keep them for future reference. Carefully follow instructions and follow directions carefully. Keep the amplifier dry, as some liquids may contain minerals that corrode electronics circuitry. Clean amplifier housing only with a slightly damp cloth. No chemicals or solutions. Do not block any of the ventilation openings. Install in accordance with the manufacturer's instructions. Do not install near any heat source such as radiators, stoves, or other electrical devices that produce heat. Prevent any cables, wired or power cord from being walked on, bent, stretched or pinched, particularly at the plug or at the point where connects to the amplifier. When uncertain about specifications, please first consult the Pyle Audio website and see the FAQs. Ensure this unit is placed on a stable and flat surface and can accommodate the weight of this unit. Unplug this unit during lightning storms or when it is unused for an extended period of time. Do not leave this device unattended when powered on. Refer all servicing to qualified service personnel. Servicing is required when the device has been damaged or malfunctions in any manner. This would include damage to the power supply cord or plug. If the unit is likely to undergo excess vibration through use, your must properly install the unit securely. Damage caused by insufficient support is not covered by the warranty. To prevent damage to the unit's panels, always use protective plastic cups or washers before tightening mounting bolts. Service may be obtained from an authorized Pyle Audio service center. Contact Pyle Audio and make sure you have a receipt as proof of purchase along with the defective unit. You will be then instructed to send or deliver the malfunctioning unit to an authorized center. They will handle the necessary paperwork and repair. Remember to transport your unit in the original factory packaging. PLEASE NOTE: Users must ensure that any type of smoke and related substances are not allowed to enter the amplifier. Smokey air is corrosive and prolonged exposure will cause irreparable damage to your amplifier. Take precaution before reconnecting to a power supply. Be aware that when any equipment is taken from a cold to humid location, condensation may occur inside. Always allow time for the equipment to attain the same temperature as its environment before reconnecting to a power supply.
2 Testing & Connections After all the connections have been made. turn on your stereo and listen for the amplifier to turn on. If there are any unusual noises from the speakers then turn the system off and recheck all the wiring. After you have connected your radio or equalizer to the amplifier, you may adjust the gain control to match the output level of your radio: (A) Set the volume control on your radio to 2/3 position. (B) Adjust the gain control for an average listening level. (C) Turn the radio volume all the way down and listen for background noise. (D) Start your vehicle and listen for electrical noise. (E) Making fine adjustments to the sensitivity can reduce background noise and some engine noise. (F) CAUTION: Never turn the sensitivity up any farther than you need to get clear sound at 2/ 3 volume. (G) This adjustment only needs to be made once. NOTE: CARE MUST BE TAKEN AGAINST BATTERY OVER-DISCHARGE CAUSED BY LONG OPERATION Of THE SET AT A HIGH SOUND LEVEL WHEN THE ENGINE IS NOT RUNNING OR IDLING. Maintenance Keep the amplifier dry. If it gets wet, wipe it dry immediately. liquids can contain minerals that corrode electronic circuits. Use the amplifier only in normal temperature environments. Temperature extremes of heat or cold can shorten the life of electronic devices and distort or melt plastic parts. Handle the amplifier gently and carefully. Dropping it can damage circuit boards and cases and can cause the amplifier to work improperly. Keep the amplifier away from dust and dirt. which can cause premature wear of parts. Wipe the amplifier with a damp cloth occasionally to keep it looking new. Do not use harsh chemicals, cleaning solvents, or strong detergents to clean the amplifier. After all the connections have been made. turn on your stereo and listen for the amplifier to turn on. If there are any unusual noises from the speakers then turn the system off and recheck all the wiring.
3 PLMRA210BT - System Layout RCA (Low Level Input) Input Gain Control Bridging Capability Speaker Connectors (High Level Input) Power Supply Terminal PLMRA210BT This unit Is provided with RCA Input jacks. Couple the RCA Input with the car stereo or equalizer outputs using RCA type connector cables. These are NOT Your amplifiers volume controls. They are a sophisticated device which is to be utilized when matching the Input signal of your head unit or equalizer to their amplifier. Can be bridged to a high power one channel unit. Make sure that you have a speaker or series of speakers on the bridged channel capable of handling at least 200 Watts of RMS power. This unit is provided with terminal inputs. Couple the terminals with a standard car stereo output system wither common ground to floating ground type originally output to speakers. The speaker wires of the car stereo should be connected to "L " and "R " terminals respectively. H the car stereo comes out with three wires only, connect the "COMMON" wire to both "L" and "R" input of the amplifier. Connect the + 12V DC power supply Into the terminal by lugs and screws accessible at the panel of this amplifier.
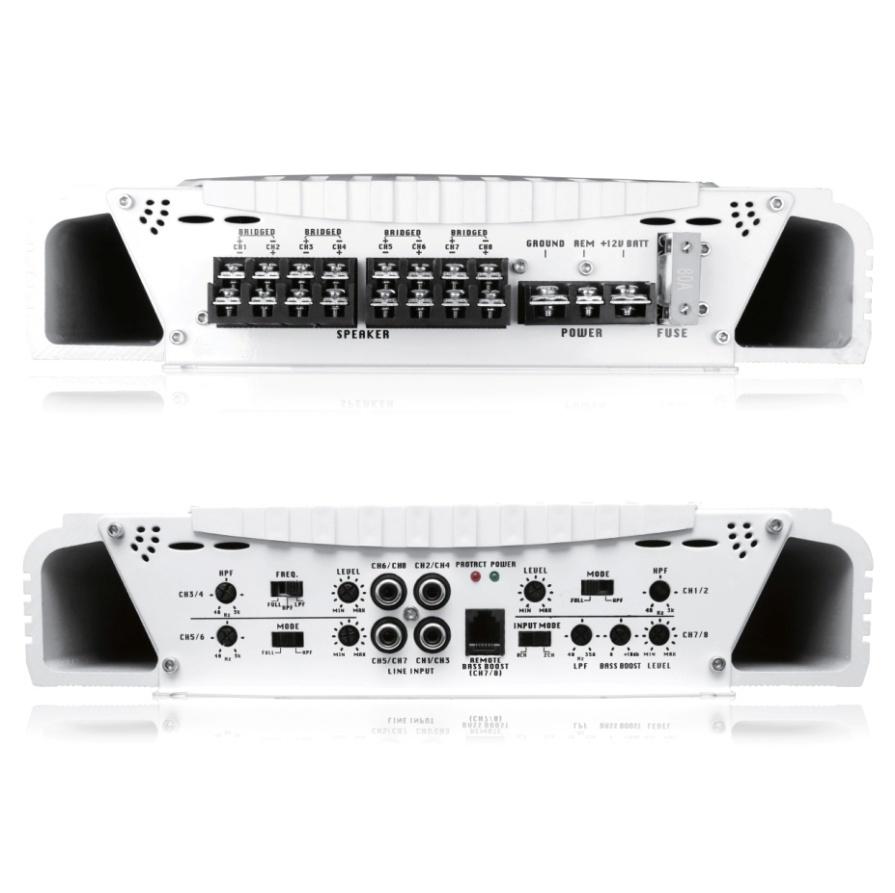
4 BATT +12V GROUND REMOTE 6 Power on LED 7 Protection LED 8 Power Fuse Speaker Terminals Crossover Frequency Circuit Crossover On/Off Switch Connect+ 12V DC power supply wire Into the terminal from the terminal of the fuse at battery. (Fuse preferably installed 1 foot within 1 foot from the battery). Ground terminal connect the ground wire to the chassis of the automobile, boat or other vehicle. Remote terminal connects the control wire which provides remote turn-on and power off. When the amp is properly grounded and has proper power and Is receiving Its remote power signal the green LED will light up indicating power conditions are correct. This Is Indicator Is Illuminated when built-in protection circuitry Is activated. Power fuse protects both this amplifier and the automobile electrical system from wrong electrical conditions. The speaker terminals are silver-plated for high conductivity and minimum Impedance loss. Be sure to strip just enough Insulation off your speaker wires that will fit under the screw plate to help ensure against speaker wire short circuits. The amp can support an impedance load as low as 2 ohms per channel or 4 ohms in the bridged mode, though a 4 ohm stereo load and 8 ohms bridge load will greatly Increase the life expectancy of the amplifier. Lets you adjust the crossover frequency from Hz for both channels. Allows for operation to run at full range or with built-in crossover use. The Pyle Elite Series Amps feature options and configurations that vary among the various models in the amplifier line availability. Refer to the specific model number for detailed amplifier connection options and features. Visit us online for detailed specifications and more information.

5 Stereo Input Connection RCA Type Terminals High Impedance Low Level Inputs Stereo Input Connection - RCA Type The Elite Series Amps feature plated RCA terminals for low level input connections to match radios and equalizers with line level output. Couple the RCA input with the car stereo/equalizer output using RCA type connector cables. Mono Input Connection RCA Type Terminals Bridge-Ability *Not available on all PLMRA amp models.
6 Mono Input Connection - RCA Type Select Elite Series Amps may easily be bridged for mono operation by feeding the same signal to both LEF T and RIGHT Input terminals. The simplest way to achieve this is by using a Y-adaptor to connecting your car stereo output. Speaker Connection - Stereo Amp System Connect the output terminals to the corresponding LEFT and RIGHT Speakers. (Fig. 1 below shows a pair of speakers connected in stereo) Speaker Connection - Mono Amp System Select Elite Series Amps may be bridgeable from a 2 channel amplifier to a one channel amplifier. The ideal speaker impedance for optimum operation is 4 ohms. The amplifier will provide stable operation when operated between 2 and 8 ohms loads. The minimum recommended speaker load is 2 ohms for each channel in normal operation. When operating in the bridged mode the minimum recommended speaker load is 4 ohms for each bridged channel. Operation of the amplifier below this impedance load can damage both the amplifier and your speaker and will void your warranty. Stereo Amp Connection 2-8 Ohm Mono Amp Connection 4-8 Ohm
7 Speaker negative terminals on the amplifier are not used in the bridged mode. Bridging is done by using multiple channels of an amplifier to drive a common load. Bridging means that you will use more than one source of power to drive a load (speaker). The sources of power are the independent channels of the amplifier. Some users may automatically set the gain to maximum because they want their music loud, by doing so, they are also increasing the chance of burning out their amplifiers. Please follow the instructions found in this manual to help match the signals correctly. Your system can also become extremely sensitive to noise conditions when you have a high signal level coming Into the amplifier, from your connected source, which should be adjusted accordingly. Avoid problems and match your system levels correctly! Power Connection Power Connection Connect the +12V of the amp to your vehicle's battery (+) Connect the GND of the amp to your vehicle's battery (-), ground properly Users may also reinforce the ground connection by adding another connection of gauged wire from the (-) negative battery terminal to the chassis of the stereo unit. Connect the 'Remote' of the amp to your vehicle's external switch for a positive 12V ON/OFF connection. This may be connected to the receiver power antenna lead (Amp turn on) - typically blue in color.

8 PLMRA210BT - Wiring Stereo Amp Connection Mono Amp Connection
 Four Speaker Output Mode Floating Ground Type")
9 PLMRA410BT - Wiring Stereo Input Connection RCA Input High Level - Speaker Level (BTL or Common Ground) Four Speaker Output Mode Floating Ground Type
10 PLMRA410BT - Wiring Common Ground Type Two Speaker Output Mode Floating Ground Type *High and Low impedance inputs cannot be used at the same time. Note: Elite Series Ampshave built-in short circuit protection. If you mistakingly connect any speaker wires to ground, or positive power ( +) and (-) Wires short together, the protection circuit will operate automatically and cut-off output. In case of this, you must switch OFF the whole system immediately double check speaker wire connections and isolation before switching on the amplifier again.
11 PLMRA410BT - Wiring Power Connection Connect the speaker output terminals to the corresponding speakers. The speakers must be high quality and capable of handling high power. Separated return paths and strong wires are required. 1. Connect the B+12V pole of power supply directly to the battery(+) position terminal (In-line fuse 1 foot from battery). 2. Connect the GND pole of power supply directly to the (-) negative ground battery terminal or vehicle chassis. 3. To make a good grounding and prevent motor boating noise problem connect another 12 gauge minimum wire from the (-) negative battery terminal to chassis of stereo unit. 4. Connect the 'Remote' pole to external switch for positive 12V ON/OFF. This may be connected to the receiver power antenna lead.

12 PLMRA430BT - Wiring Power Connection
13 PLMRA430BT - Wiring 4 Channel Input Connection Low Level Inputs 2 Channel Input Connection Low Level Inputs High Level Wiring 4 Channel Connection Floating Ground
14 PLMRA430BT - Wiring 4 Channel Mono Connection Low Level Inputs 2 Channel Connection Low Level Inputs 4 Channel Mono Connection Floating Ground
15 PLMRA430BT - Wiring 4 Channel Output Mode Bridged Dual Mono Output 2-8 Ohm 4 Channel Stereo Output Mode with Mono Bridged Subwoofer Output 4-8 Ohm
16 PLMRA630BT - Wiring
17 PLMRA630BT - Wiring Electrical Connection 4 Channel Inputs RCA Low Level Mono Input Connection 6 Channels
18 PLMRA630BT - Wiring Speaker Connection 6 Channel Output Mode 2-8 Ohm 2-8 Ohm Speaker Connection Mono Bridged Subwoofer Output
19 PLMRA830BT - Wiring
20 PLMRA830BT - Wiring Electrical Connection Multi Channel Input Connection
21 PLMRA830BT - Wiring 8 Channel Output Mode 2-8 Ohm Mono Bridged Subwoofer Output 2-8 Ohm
22 Elite Series Bluetooth Connection When searching for the amp via your smartphone or other Bluetooth-enabled device, the Bluetooth amp network name will appear as 'Pyle Amp' in your device list. The amp will not require a password to connect. Once successfully paired with your compatible Bluetooth-enabled device, you will be able to control music streaming ability into the Pyle amp. Choose from streaming audio to adjusting volume controls -- all from your device. Your amp comes with all required mounting hardware. When determining a suitable location in your vehicle for the amp, please remember that this is a high-power electronic device that is capable of generating high temperatures Mounting Mounting Always choose a mounting location which will be susceptible to the least amount of vibration, provides adequate ventilation, free of dust and moisture. Be sure to mount the amp in such a manner as to allow reasonable airflow around the unit. Mark the location for the mounting screw holes by positioning the amp in the desired location. Located on the outer edges of the amps, you will find notches in the heatsink that allow for the amp to be fastened. Mark the location for the mounting screw holes by positioning the amp where you wish to install it. Use a scribe (or one of the mounting screws) inserted in each of the mounting holes to mark the mounting surface. If the mounting surface is carpeted, measure the hole centers and mark with a felt tip pen. Before attempting to drill the mounting holes and securing your amp, take note of any wires, lines or other devices within your vehicle which may be located behind the mounting surface. Be sure as to not interfere with any of your vehicle's safety features, wiring or other electrical systems. Then, drill the pilot holes in the mounting surface for the mounting screws. Tighten screws securely.
23 Mounting... When making electrical connections with your amplifier and vehicle battery, please take precaution and have a professional, or install under the supervision of a professional. Use the proper gauge wire for power and ground connections. Wire the amplifier directly to the car battery. For ground connection, use the shortest possible wire to a secure chassis ground. Wire the remote connection to the auto start lead of your head unit, equalizer, or power antenna. Circuitry Protection Built-in fuse systems and circuitry protection protect both the amplifiers and your vehicle's electrical systems. If you ever need to replace the fuse, or feel your system has become faulty, please contact Pyle technical support, or consult the assistance of a trained professional. When replacing fuses, be sure to use ONLY a fuse of the exact same type and rating, otherwise may result in damage or fire. The built-in protection circuitry in the amplifiers will disable the amplifier if it senses an input overload. a speaker short circuit, or extreme temperature conditions. When the protection circuit is activated by any of these conditions, the Protection LED will be illuminated. If this occurs, carefully inspect the system to determine the source of the problem. If the shutdown was a result of a thermal overload condition, allow the amplifier to cool down before attempting to restart. If the shutdown was a result of an input overload. or speaker short circuit, be sure to correct the condition before restarting. The amplifier can be restarted by turning the remote power OFF and then ON again.
24 Troubleshooting No output. Confirm that all terminal strip connections are secure and tight. Check both In-line and built-in fuses. Both the + 12V am the Remote terminals must have + 12V referenced to chassis ground. Confirm that the audio signal source (car radio, equalizer, etc.) is connected and is supplying output signal. To check if the amp is supplying signal, unplug the cables from the signal source (but leave them plugged into the amp). Briefly tap the center pin of each of the disconnected RCA plugs with your finger. This should produce a noise (feedback) in your speakers. Only one channel works. Confirm that all terminal strip connections are secure and tight. Check the Balance control on the head unit (or other source) to verify that it is set to its midpoint If you are using the Low Level RCA input, reverse the input plugs at the amplifier (ie., switch the L with the R). If the channels which is silent switches to the other side, the problem is either in the signal source (head unit) or the other connecting cables. Weak output. Readjust the Input Level Control(s) to better suit the Input signal. Noise in the audio. If the noise is a "whine" whose pitch follows the engine speed, confirm that the amplifier and any other signal sources (head unit, etc.) are properly grounded. If the noise is a ''clicking'' or ''popping'' noise whose rate follows the engine speed, this usually means that the vehicle is equipped with resistor spark plugs and wires, or that the ignition is in need of service. Check the routing of the speaker and input wires to make sure they are not adjacent to wires which interconnect lights and other accessories. If the above steps fall to Improve or clear noise Precautions Do not operate the amplifier when it is un-mounted. Attach all audio system components securely within the vehicle to prevent damage, especially in an accident. Do not mount this amplifier so that the wire connections are unprotected, or in a pinched condition, or likely to be damaged by nearby objects. Before making or breaking power connections in your system, disconnect the vehicle battery. Confirm that your head unit or other equipment is turned off while connecting the input jacks and speaker terminals. If you need to replace the power fuse, do so with a fuse identical to that supplied with the amplifier. Using a fuse of a different type or rating may result in damage that isn't covered in the manufacturer's warranty.
25 Pyle Elite Series - Models & Specs

26 Find more Pyle products on our website. Discover other marine electronics and navigation on our website.
When you check the list of features offered by the PLMRA220,PLMRA420 you ll know you made the right choice with a Pyle Marine amplifier.
 congratulations... on your purchase of a Pyle Marine Series amplifier. This amplifier extends the Pyle tradition into a totally new series of amps, designed from the ground up to deliver the power, performance
damage. expiration date. also include a check or money order for $18.00 for return shipping, and R.A. number
 limited warranty policy a m p l i f i e r s All Pyle products are carefully constructed and thoroughly tested before shipment. Products purchased in the USA are warranted to be free of defects in material
user s manual PLA2170 PLA2270 PLA2370 PLA2470 PLA2570 PLA4170 PLA4270 PLA4370 limited warranty policy Brooklyn, NY 11204
 limited warranty policy a m p l i f i e r s All Pyle products are carefully constructed and thoroughly tested before shipment. Products purchased in the USA are warranted to be free of defects in material
INTRODUCTION FEATURES SPECIFICATIONS. Built-in Crossover
 INTRODUCTION Congratulations on your purchase of a LEGACY ICON Car Amplifier. The unit is the result of an extensive engineering project to create the finest automotive high fidelity product available.
LK 705. Troubleshooting -12-
 Troubleshooting Before removing your amplifier, refer to the list below and follow the suggested procedures. Always test the speakers and their wires first. No Output Only one channel works Confirm that
series Oweners Manual Limited Warranty:
 Limited Warranty: RE Audio warrants all manufactured electronic products to be free from defects in material and workmanship for a period not to exceed ONE YEAR from the date of purchase. IMPORTANT WARRANTY
BRIDGEABLE MOSFET POWER AMPLIFIERS BZA-2290/BZA-2390 BZA-2490/BZA-4190 OWNER'S MANUAL
 BRIDGEABLE MOSFET POWER AMPLIFIERS BZA-2290/BZA-2390 BZA-2490/BZA-4190 OWNER'S MANUAL Table of Contents Table of Contents 1 2 3~7 8 9~11 9 10~11 Troubleshooting 12 Wiring 13 Introduction & Features Introduction
************* OWNER'S MANUAL STAX1250/2 STAX1800/2 STAX2200/2 STAX1200/4 STAX1600/4 STAX2300/4 STAX2000/1D STAX4000/1D STAX5500/1D
 ************* OWNER'S MANUAL STAX1250/2 STAX1800/2 STAX2200/2 STAX1200/4 STAX1600/4 STAX2300/4 STAX2000/1D STAX4000/1D STAX5500/1D INTRODUCTION Power Acoustik amplifiers provide high-performance sound
DD1-1300S. 500 Watts RMS Watts RMS Watts RMS- 1. Mono-Bloc Digital Power Amplifier
 DD1-1300S Mono-Bloc Digital Power Amplifier 500 Watts RMS- 4 900 Watts RMS- 2 Ultimate Sound, Inc. 1300 Watts RMS- 1 Ultimate Europe AB Ultimate Sound, Inc Ultimate Europe AB 163 University Parkway Flojelbergsgatan
HT Watt 6 Channel Class D amplifier OWNER S MANUAL
 HT-6 900 Watt 6 Channel Class D amplifier OWNER S MANUAL Congratulations! Thank you for purchasing the Wet Sounds Hydro-Tech TM series amplifier. Wet Sounds represents the ultimate in high performance
HT Watt 4 Channel Class D amplifier OWNER S MANUAL
 HT-4 600 Watt 4 Channel Class D amplifier OWNER S MANUAL Congratulations! Thank you for purchasing the Wet Sounds Hydro-Tech TM series amplifier. Wet Sounds represents the ultimate in high performance
Lanzar Audio Inc rd Street, Brooklyn, NY (718)
") Lanzar Audio Inc. 1600 63rd Street, Brooklyn, NY 11204 (718) 236-8000 www.lanzar.com Features and Controls Congratulations on your purchase of a Lanzar MAX PRO amplifier. You have purchased a quality product
Lanzar Audio Inc. 1600 63rd Street, Brooklyn, NY 11204 (718) 236-8000 www.lanzar.com Features and Controls Congratulations on your purchase of a Lanzar MAX PRO amplifier. You have purchased a quality product
MA6004 MA6002 MARINE AUDIO POWER AMPLIFIER OWNER S MANUAL. The Official Brand of Live Music.
 MA6004 MA6002 MARINE AUDIO POWER AMPLIFIER OWNER S MANUAL The Official Brand of Live Music. INSTALLATION THANK YOU for purchasing a JBL marine amplifier. In order that we may better serve you should you
SERIES. Owners Manual & Installation Guide. Limited Warranty: 2-Channel High Speed Digital Stereo Amplifier
 Limited Warranty: RE Audio warrants all manufactured electronic products to be free from defects in material and workmanship for a period not to exceed ONE YEAR from the date of purchase. 2-Channel High
Owner s Manual PB444X PB446X PB448X PB449X
 Owner s Manual PB444X PB446X PB448X PB449X Super Blue 2 ch amp PB444X PB446X PB449X 4champPB448X specifications PB444X 2 ch amplifier PB446X 2 ch amplifier PB448X 4 ch amplifier PB449X 2 ch amplifier output
RAZOR. Class D Full Range & Monoblock Amplifiers RZ4-1200D RZ4-2000D RZ1-1500D RZ1-2300D
 RAZOR Class D Full Range & Monoblock Amplifiers RZ4-1200D RZ4-2000D RZ1-1500D RZ1-2300D WWW.POWERACOUSTIK.COM 4 Channel RZ4-1200D & RZ4-2000D Full MOSFET PWM Power Supply SMD Technology on Double Sided
LFA4-840 / LFA / LFA LFA1-2000D / LFA1-4000D / LFA1-5500D LFA2-420 / LFA2-600 / LFA2-800 LFA / LFA / LFA / LFA2-2600
 OWNERS MANUAL LFA4840 / LFA41200 / LFA41600 LFA12000D / LFA14000D / LFA15500D LFA2420 / LFA2600 / LFA2800 LFA21250 / LFA21800 / LFA22200 / LFA22600 INTRODUCTION Power Acoustik amplifiers provide highperformance
HIGH PERFORMANCE MARINE AUDIO HTX SERIES HTX-1, HTX-2, HTX-4, HTX-6 OWNER'S MANUAL. wetsounds.com
 HIGH PERFORMANCE MARINE AUDIO HTX SERIES HTX-1, HTX-2, HTX-4, HTX-6 OWNER'S MANUAL wetsounds.com CONGRATULATIONS! Thank you for purchasing the Wet Sounds Hydro-Tech TM X (HTX) series amplifier. Wet Sounds
plifier D-501 otion Am Tactile M
 Tactile Motion Amplifier D-501 IMPORTANT SAFETY INSTRUCTIONS WARNING: 1. Read and keep these instructions for future reference. 2. Do not use this apparatus near water. 3. Clean only with a dry cloth.
MODEL: Duo Product id:duomk214f Duo OWNER S MANUAL
 MODEL: Product id:duomk214f OWNER S MANUAL Introduction We thank you for purchasing our amplifiers. Your decision to be part of something different is what we strive for. Our products reflects who we are,
SYN-DX SERIES FULL RANGE CLASS-D AMPLIFIERS SYN-DX 2, SYN-DX 2.3 HP, SYN-DX 4, SYN-DX 6 OWNER'S MANUAL. wetsounds.com HIGH PERFORMANCE MARINE AUDIO
 HIGH PERFORMANCE MARINE AUDIO SYN-DX SERIES FULL RANGE CLASS-D AMPLIFIERS SYN-DX 2, SYN-DX 2.3 HP, SYN-DX 4, SYN-DX 6 OWNER'S MANUAL REV DATE FEB 2017 wetsounds.com CONGRATULATIONS! Thank you for purchasing
AMPLIFIERS. Bi2200Tx Bi4200Fx. Bi1400Mx Bi2400Mx Bi3000Mx
 LIMITED WARRANTY Bass Inferno warrants any products purchased in the U.S.A. from an authorized Bass Inferno dealer. All products are warranted to be free from defects in material and workmanship under
AMPLIFIERS BI BI BI BI4400.4
 LIMITED WARRANTY Bass Inferno warrants any products purchased in the U.S.A. from an authorized Bass Inferno dealer. All products are warranted to be free from defects in material and workmanship under
XIA3145 INSTALLATION/OWNER S MANUAL 2/1-Channel Mobile Power Amplifier
 XIA3145 INSTALLATION/OWNER S MANUAL 2/1-Channel Mobile Power Amplifier XIA3145 INSTALLATION Preparation Please read entire manual before installation. Due to the technical nature of amplifiers, it is highly
BAK1500 INSTALLATION/OWNER'S MANUAL. Compact Amplified Subwoofer
 BAK1500 INSTALLATION/OWNER'S MANUAL Compact Amplified Subwoofer PREPARATION Getting Started Thank you for purchasing the Dual BAK1500 compact amplified subwoofer. Although Dual has attempted to ensure
PLANNING YOUR SYSTEM
 INTRODUCTION HERTIAGE amplifiers provide high-performance sound reinforcement for your mobile audio equipment. Its versatility enables compatibility with optional Equalizers, Frequency Dividing Crossover
CLASS D MONO AMPLIFIER GM-D8601 GM-D9601. Owner s Manual
 CLASS D MONO AMPLIFIER GM-D8601 GM-D9601 Owner s Manual Before you start BE SURE TO OBSERVE THE FOLLOWING GUIDELINES:! Do not turn up the volume so high that you can t hear what s around you.! Use caution
INTRODUCTION & FEATURES... 1 FEATU RES & CONTROLS... 3 SPECIFICATION... 4 CONTROLS & FUNCTIONS... 5 SYSTEM WIRING TROUBLESHOOTING,...
 TRBL.E OF C:ONTENTS TRBL.E OF C:ONTENTS INTRODUCTION & FEATURES... 1 FEATU RES & CONTROLS... 3 SPECIFICATION... 4 CONTROLS & FUNCTIONS... 5 SYSTEM WIRING... 6-8 TROUBLESHOOTING,... 9 WI RI NG... 10-1-
XPR522 XPR540. XPR SERIES INSTALLATION / OWNER'S MANUAL Mobile Power Amplifiers
 XPR522 XPR540 XPR SERIES INSTALLATION / OWNER'S MANUAL Mobile Power Amplifiers Preparation Please read entire manual before installation. Due to the technical nature of amplifiers, it is highly recommended
DA560D COMPACT SERIES. INSTALLATION / OWNER'S MANUAL Mobile Power Amplifiers
 DA560D COMPACT SERIES INSTALLATION / OWNER'S MANUAL Mobile Power Amplifiers Preparation Please read entire manual before installation. Due to the technical nature of amplifiers, it is highly recommended
PLA3000D. user s manual. limited warranty policy. Class-D mono block car audio amplifier. Brooklyn, NY
 limited warranty policy a m p l i f i e r s All Pyle products are carefully constructed and thoroughly tested before shipment. Products purchased in the USA are warranted to be free of defects in material
XPA2100 XPA4100 XPA6100. XPA SERIES INSTALLATION/OWNER S MANUAL Mobile Power Amplifiers
 XPA2100 XPA4100 XPA6100 XPA SERIES INSTALLATION/OWNER S MANUAL Mobile Power Amplifiers XPA SERIES INSTALLATION Preparation Please read entire manual before installation. Due to the technical nature of
MODEL: M1u Product id:m1ud13 M1u OWNER S MANUAL
 MODEL: Product id:m1ud13 OWNER S MANUAL Foreword We congratulate you with your decision to purchase our reveered niche amplifiers. Every product developed by implements the keystones of our company philosophy;
Owner s Manual 7000 WATTS RMS WATTS RMS COMPETITION D HIGH CLASS D AMPLIFIER HIGH CLASS D AMPLIFIER MADE IN KOREA
 Owner s Manual COMPETITION 7000.1D 7000 WATTS RMS HIGH CLASS D AMPLIFIER COMPETITION 12000.1D 12000 WATTS RMS HIGH CLASS D AMPLIFIER MADE IN KOREA Manual size : 150 x 210mm 2 Installation If you intend
DA604D DA954D DA501D DA801D COMPACT SERIES. INSTALLATION / OWNER'S MANUAL Mobile Power Amplifiers
 DA604D DA954D DA501D DA801D COMPACT SERIES INSTALLATION / OWNER'S MANUAL Mobile Power Amplifiers Preparation Please read entire manual before installation. Due to the technical nature of amplifiers, it
F O R T H E L O V E O F M U S I C LP100 OWNER'S MANUAL AND INSTALLATION GUIDE INTRODUCTION
 F O R T H E L O V E O F M U S I C LP100 OWNER'S MANUAL AND INSTALLATION GUIDE INTRODUCTION You have purchased an amplifier that leads the way with sound quality, reliability, and features. These high performance
AQ-AD300.2-MICRO 2 CHANNEL WATERPROOF AMPLIFIER for Harley-Davidson Motorcycles USER / INSTALLATION MANUAL
 AQ-AD300.2-MICRO 2 CHANNEL WATERPROOF AMPLIFIER for Harley-Davidson Motorcycles USER / INSTALLATION MANUAL PLEASE READ THIS INSTRUCTION MANUAL BEFORE INSTALLATION AND OPERATION Table of Contents 1 Getting
MANUAL AQA430SL AQA430WT MODELS: '~.,t::r's
 ) '~.,t::r's MANUAL MODELS: AQA430SL AQA430WT INTRODUCTION Our Amplifiers provide high-performance sound reinforcement for your mobile audio equipment. Its versatility enables compatibility with optional
MODEL 302IQ (1991-MSRP $149.00)
") F O R T H E L O V E O F M U S I C MODEL 302IQ (1991-MSRP $149.00) OWNER'S MANUAL AND INSTALLATION GUIDE INTRODUCTION Latest technology, high sound quality, powerful delivery, and LINEAR POWER reliability
F O R T H E L O V E O F M U S I C MODEL 302IQ (1991-MSRP $149.00) OWNER'S MANUAL AND INSTALLATION GUIDE INTRODUCTION Latest technology, high sound quality, powerful delivery, and LINEAR POWER reliability
PB 700 PB 1000 PB 1100 PB 1500 PB 2600 PB 1200 PB 1700 PB 2200 PB 2700 USER'S MANUAL.
 PB 700 PB 1000 PB 1100 PB 1500 PB 2600 PB 1200 PB 1700 PB 2200 PB 2700 USER'S MANUAL www.pyramidcaraudio.com congratulations... on your purchase of a Pyramid America Series amplifier. This amplifier extends
Owner s manual & Installation manual Mode d emploi et manuel d installation Manual de instrucciones y de instalación XC6210 XC6410
 Owner s manual & Installation manual Mode d emploi et manuel d installation Manual de instrucciones y de instalación XC6210 XC6410 XC AMPLIFIERS AMPLIFICATEURS XC AMPLIFICADORES XC INTRODUCTION The Clarion
TA4252 Owner s Manual
 TA4252 Owner s Manual Introduction Thank you for choosing MTX to help reach the ultimate goal with your vehicle. Adding MTX amplifiers and matching MTX speakers and subwoofers with StreetWires connections
poly-planar ME-51 Subwoofer Amplifier Waterproof Marine Audio
 ME-51 Subwoofer Amplifier 1 ME-51 Subwoofer Amplifier Introduction: The ME-51 is a dual channel mono audio amplifier capable of delivering 50W RMS (100W total music power). It is designed to be used with
CLASS D MONOBLOCK AMPLIFIER DM1500, DM2500 OWNER S MANUAL
 CLASS D MONOBLOCK AMPLIFIER DM1500, DM2500 OWNER S MANUAL INTRODUCTION Thank you for purchasing a DD Audio amplifier. DD Audio amplifiers are painstakingly designed to provide years of high-performance
DA6002D-DA10004D. INSTALLATION / OWNER'S MANUAL Mobile Power Amplifiers
 DA6002D-DA10004D INSTALLATION / OWNER'S MANUAL Mobile Power Amplifiers Preparation Please read entire manual before installation. Due to the technical nature of amplifiers, it is highly recommended that
BRIDGEABLE FOUR-CHANNEL POWER AMPLIFIER GM-A6604 GM-A4604. Owner s Manual
 BRIDGEABLE FOUR-CHANNEL POWER AMPLIFIER GM-A6604 GM-A4604 Owner s Manual Section 01 Before you start Thank you for purchasing this PIONEER product To ensure proper use, please read through this manual
Full FET Class AB Amplifier
 Full FET Class AB Amplifier INTRODUCTION & FEATURES... 2 FEATURES & CONTROLS... 3-4 specification... 5 installation & precautions... 5 SYSTEM WIRING...6-13 2channel SYSTEM WIRING...6-8 4channel SYSTEM
RXA 1000 D CLASS D MONO AMPLIFIER USER S MANUAL
 RXA 1000 D CLASS D MONO AMPLIFIER USER S MANUAL Please read the user s manual carefully before the installation and the first operation of the amplifier. SPECIFICATIONS Output Power RMS Output Power Max.
NAUTIC. Installation Manual NA180.2 / NA360.4 / NA710.5 / NA540.6
 NAUTIC Installation Manual Congratulations! By purchasing an amplifier from MB Quart, you have decided on a product of the highest technical quality. MB Quart wishes you great enjoyment with your amplifier.
PROAUDIO AMPLIFIERS BI2400PRO BI3400PRO
 LIMITED WARRANTY Bass Inferno warrants any products purchased in the U.S.A. from an authorized Bass Inferno dealer. All products are warranted to be free from defects in material and workmanship under
O P T I O W N E R ' S M A N U A L
 OPTI OWNER'S MANUAL 1. Contents 2. Introduction 3. Features 4. Specifications 5. Amplifier installation 6. 7. Features and controls 8.9.System wiring 10.11. Troubleshooting OPTI OWNER'S MANUAL - 1 Thank
TA3202 Owners Manual. Input Sensitivity Switch: 100mV-1V/1V-10V Crossover: Hi, 12dB / Low, 85Hz, Defeatable
 TA3202 Owners Manual Introduction Thank you for choosing MTX to help reach your ultimate goal with your vehicle. Adding MTX amplifiers and matching MTX speakers and subwoofers with StreetWires connections
OPTI OWNER'S MANUAL - 1
 1. Contents 2. Introduction 3. Features 4. Specifications 5. Amplifier installation 6. 7. Features and controls 8.9.System wiring 10.11. Troubleshooting OPTI OWNER'S MANUAL - 1 Thank you for purchasing
Quota OWNER S MANUAL
 MODEL: MKII Product id:quotad12 OWNER S MANUAL Foreword We congratulate you with your decision to purchase our reveered niche amplifiers. Every product developed by implements the keystones of our company
F O R T H E L O V E O F M U S I C SERIES 218 DPS200 OWNER'S MANUAL AND INSTALLATION GUIDE INTRODUCTION
 F O R T H E L O V E O F M U S I C SERIES 218 DPS200 OWNER'S MANUAL AND INSTALLATION GUIDE INTRODUCTION You have purchased an amplifier that leads the way with sound quality, reliability, and features.
This amplifier is designed for low-frequency information only and it is not capable of reproducing any mid/high-frequency information.
 Thank you for purchasing the Lanzar OPTI Class-D amplifier. Rest assured you have purchased a quality product designed and engineered to give you many years of uncompromised musical service. The OPTI Class-D
ENCOUNTER AMPLIFIER MANUAL EN-1502 EN-3001 EN-3004
 ENCOUNTER ENCOUNTER AMPLIFIER MANUAL EN-1502 EN-3001 EN-3004 ENGLISH AMPLIFIER SPECIFICATIONS EN-3004 (4 Channel) Class Class-AB Class-AB EN-1502 (2 Channel) Power 1800 Watts 1000 Watts Frequency Response
TA5604 Owner s Manual
 TA5604 Owner s Manual Introduction Thank you for choosing MTX to help reach the ultimate goal with your vehicle. Adding MTX amplifiers and matching MTX speakers and subwoofers with StreetWires connections
R-Series R235LS 2-Channel Power Amplifier with Local Source Switching
 R-Series R235LS 2-Channel Power Amplifier with Local Source Switching User s Manual On Off R235LS POWER A MPLIFIER IMPORTANT SAFEGUARDS WARNING TO REDUCE THE RISK OF FIRE OR ELECTRIC SHOCK, DO NOT EXPOSE
English KS-DR3005D POWER AMPLIFIER: INSTRUCTION MANUAL
 KS-DR005D POWER AMPLIFIER: INSTRUCTION MANUAL B5E-009-00/00 [W] WARNING If the fuse blows, first make sure the wires aren t touching to cause a short circuit then replace the old fuse with one with the
SXD SXD SXD SXD Dynamic Audio
 SXD SXD SXD SXD SXD 1000.1 2000.1 1100.2 1600.4 Dynamic Audio Company Message Congratulations on the purchase of your new SXD Series amplifier. Our engineers designed your amplifier with performance in
NAUTIC. Installation Manual NA180.2 / NA360.4 / NA710.5 / NA540.6
 NAUTIC Installation Manual Congratulations! By purchasing an amplifier from MB Quart, you have decided on a product of the highest technical quality. MB Quart wishes you great enjoyment with your amplifier.
STEREO POWER AMPLIFIER OWNER MANUAL PR-150 DESIGNED IN U.K. PDF created with FinePrint pdffactory trial version
 STEREO POWER AMPLIFIER OWNER MANUAL PR-150 DESIGNED IN U.K. INTRODUCTION Congratulations on your purchase of MA PR-150 Stereo Power Amplifier. The performance of PR-150 is perfect for any audio application,
CXA CXA CXA CXA CXD M. Dynamic Audio
 CXA CXA CXA CXA CXD 640 1040 820 1220 2800M Dynamic Audio Company Message Congratulations on the purchase of your new CX Series amplifier. Our engineers designed your amplifier with performance in mind,
Owner's Manual WARNING 65-C5009-MA INTRODUCTION FEATURES
 65-C5009-MA Model No.: SRX-D0504; SRX-D1501; SRX-D2501; SRX-D4001 :A3 INTRODUCTION Amplifiers provide high-performance sound reinforcement for your mobile audio equipment. It s versatility enables compatibility
MS-AM402. User/Installation Manual FUSIONENTERTAINMENT.COM
 MS-AM MARINE AMPLIFIER User/Installation Manual FUSIONENTERTAINMENT.COM Contents Feature Overview...Pg 3 Control Descriptions.................................Pg Installation.........................................Pg
AQ-SWA8-1BT - ACTIVE SUBWOOFER USER / INSTALLATION MANUAL. with Bluetooth & Full Range Speaker Outputs
 AQ-SWA8-1BT - ACTIVE SUBWOOFER with Bluetooth & Full Range Speaker Outputs USER / INSTALLATION MANUAL PLEASE READ THIS INSTRUCTION MANUAL BEFORE INSTALLATION AND OPERATION Table of Contents 1 Introduction...
HIGH PERFORMANCE CAR AMPLIFIER
 NS-1 HIGH PERFORMANCE CAR AMPLIFIER Digital Class-D Linkable Mono Block Amplifier Dual MOS-FET PWM Power Supply 1 Ohm Stable Load 24 db/octave - Variable Low Pass Filter 24 db/octave - Variable Subsonic
D CHANNEL A MPLIFIER
 PA D5000.5 5 -CHANNEL A MPLIFIER TOOLS OF THE TRADE Listed next are the majority of the tools required to perform an installation. Having the proper tools will make the installation that much easier. Phillips
XES-M50 Operating Instructions
 3-859-268-11(1) XES-M50 Operating Instructions 1997 by Sony Corporation Stereo Power Amplifier Operating Instructions Before operating the unit, please read this manual thoroughly and retain it for future
APSM-1300/APSM
 APSM-1300/APSM-1500 1 2 3 4 15 14 6 7 9 8 5 10 11 13 12 APSM-2000 1 2 3 4 15 14 6 7 9 8 5 10 11 13 12 1 Speaker connection Never connect the speaker cables with the chassis ground. This may destroy your
KX120.2 / KX150.2 / KX200.2
 KX120.2 / KX150.2 / KX200.2 Congratulations! You have just purchased the latest in amplifier technology to carry the famous KICKER name. Your KICKER KX series amplifier is designed and built to give you
EPA152/252/502. User Manual.
 EPA152/252/502 User Manual www.audac.eu ADDITIONAL INFORMATION This manual is put together with much care, and is as complete as could be on the publication date. However, updates on the specifications,
KX550.3 / KX KX Amplifier Features
 KX550.3 / KX700.5 Congratulations! You have just purchased the latest in amplifier technology to carry the famous KICKER name. Your KICKER KX series amplifier is designed and built to give you years of
MDseries. Owners Manual and Installation Guide
 MDseries Owners Manual and Installation Guide 2 Congratulations on your selection of a U.S.Amps MD series amplifier. We take pride in manufacturing our products and you can expect your new amplifier to
M-300 Mono power amplifier User s guide
 M-300 Mono power amplifier User s guide M-300 Mono power amplifier User s guide Specifications: Contents: Power output: 8Ω: 290W, 0.01% THD SPECIFICATIONS Page 2 Input impedance: Gain: 4Ω: 580W, 0.01%
POWER AMPLIFIER. Owner s Manual Mode d emploi Bedienungsanleitung Manual de instrucciónes CLIP SIGNAL TEMP PROTECTION POWER
 POWER AMPLIFIER Owner s Manual Mode d emploi Bedienungsanleitung Manual de instrucciónes TEMP PROTECTION POWER A CLIP SIGNAL B ON OFF M Introduction Thank you for purchasing a Yamaha C450/320/160 series
JAD SERIES OWNER S MANUAL. JAD Channel Full Range Class D Amplifier
 JAD SERIES OWNER S MANUAL JAD900.5 5 Channel Full Range Class D Amplifier Authorized Dealer Name: Purchase Date: Model Number: Serial Number: JAD900.5 PERFORMANCE MODEL: RMS Power (4 Ohms, Stereo) RMS
To achieve optimum performance, it is highly recommended that you read this Owners Manual defore beginning installation. WARNING
 Owner's manual Amplifier provide high-performance sound reinforcement for you mobile audio equipment. It's versatility enables compatibility with optional Equalizers. Frequency Dividing Network Crossovers,
WATERPROOF AMPLIFIER with
 4/3/2 CHANNEL WATERPROOF AMPLIFIER AQ-AD600.4 USER / INSTALLATION MANUAL WATERPROOF AMPLIFIER with PLEASE READ THIS INSTRUCTION MANUAL BEFORE INSTALLATION AND OPERATION Table of Contents 1 Important Information...
Owner's Manual WARNING 65-C5010-MA INTRODUCTION FEATURES
 65-C5010-MA Model No.: SRQ-D0504; SRQ-D1501; SRQ-D2501; SRQ-D4001 :A5 INTRODUCTION Amplifiers provide high-performance sound reinforcement for your mobile audio equipment. It s versatility enables compatibility
XETEC design group GmbH
 XETEC design group GmbH www.xetec.de 05.2003 XETEC Vector V 200.4 Congratulations for buying this XETEC product and thank you for your confidence! With this XETEC amplifier you have purchased an innovative
EPA104/254. User Manual.
 EPA104/254 User Manual www.audac.eu ADDITIONAL INFORMATION This manual is put together with much care, and is as complete as could be on the publication date. However, updates on the specifications, functionality
PB618/PB718/PB918/PB2518/PB3818
 OWNER'S MANUAL PB618/PB718/PB918/PB2518/PB3818 INTRODUCTION (PB618) Thank you for purchasing the Pyramid AMERICA High Speed Power Amplifier. The AMPLIFIER has been designed using the latest electronic
MYKRO RM440.4 / RM740.5 / RM Installation Manual
 MYKRO Installation Manual Congratulations! By purchasing an amplifier from MB Quart, you have decided on a product of the highest technical quality. MB Quart wishes you great enjoyment with your amplifier.
EVOLUTION OF POWER AMPLIFIERS M / M M / M / M M1500.1D / M2500.1D / M4000.1D
 R EVOLUTION OF AMPLIFIERS M16. / M3. M1. / M1. / M. M15.1D / M5.1D / M.1D GENERAL INSTALLATION PROCEDURE System Design The success of any car stereo system relies on several factors, such as the system
9 db/oct, variable bass boost
 Digital class-d linkable/dual mono block amplifier Dual MOS-FET PWM power supply Stable into 1 ohm load 24 db/oct, variable low pass filter 24 db/oct, variable subsonic filter 9 db/oct, variable bass boost
The ART SLA-2 Studio Linear Amplifier
 TABLE OF CONTENTS The ART SLA-2 Studio Linear Amplifier Safety Precautions... 2-3 Introduction... 4 Installation... 5 AC Power Hookup... 5 Audio Connections... 5 Security Cover... 6 Controls and Indicators...
Opus 21 s80 Integrated Amplifier Owner's Manual
 Opus 21 s80 Integrated Amplifier Owner's Manual r e s o l u t i o n From all of us at Resolution Audio, thank you for choosing the Opus 21 s80 amplifier. We went to great lengths to design and produce
ASA SERIES CLASS AB MONO BLOCK AMPLIFIER
 2-OHM STABLE DESIGN Minimum Impedance Load is 2-Ohms ASA3-400.1 ASA3-600.1 ASA SERIES CLASS AB MONO BLOCK AMPLIFIER Owners Manual Please read through this manual to familiarize yourself with your new amplifi
User Manual (English)
") Psvane TC5 Integrated KT120 Tube Amplifier User Manual (English) 1 P a g e Exclusively available at www.grantfidelity.com All copy rights reserved by Psvane Audio & Grant Fidelity page I Warnings: 1. Before
Psvane TC5 Integrated KT120 Tube Amplifier User Manual (English) 1 P a g e Exclusively available at www.grantfidelity.com All copy rights reserved by Psvane Audio & Grant Fidelity page I Warnings: 1. Before
2/1 CHANNEL POWER AMPLIFIER OPERATION INSTALLATION MANUAL
 2/1 CHANNEL POWER AMPLIFIER OPERATION INSTALLATION MANUAL DPX1001.2 Power System Amplifier TABLE OF CONTENTS Introduction.............................. 2 Description.............................. 3 Input
MOSFET POWER AMPLIFIERS
 MOSFET POWER AMPLIFIERS Installation Instructions / Owner's Manual AP400 AP600 AP1000 AP1200 AP2000 AP740 AP1040 AP700M AP1000M INTRODUCTION Congratulations on your purchase of a California state-of-the-art
Owner s Manual.
 P Z R 6 0 0 A m p l i f i e r P Z R 1 0 0 0 A m p l i f i e r Owner s Manual www.pyleaudio.com Your New Pyle Pro PZR series P.A. Amplifier gives you the power and versatility you need in a professional
SPX350X2 / SPX700X4. Amplifier Manual Manual de Amplificador. Features. Características
 SPX350X2 / SPX700X4 Amplifier Manual Manual de Amplificador Features RCA or High Level Signal Input Weather Resistant for Marine and Power Sports Ultra Compact Chassis High and Low Pass Crossovers Direct
Features COMPACT HIGH POWER MONO SUBWOOFER AMPLIFIER. Quick Start Guide
 Features Compact High Power Mono Subwoofer Amplifier High Current Design 1x175 Watts @ 4 Ohm, 1x300 Watts @ 2 Ohm 12 db/octave Linkwitz-Riley Alignment Crossover GTO Signal Sense PFM Subsonic Filter 2
Features and Controls VIBE 226/236/246/256/266/276/286
 Features and Controls Congratulations on your purchase of a anzar Viberant amplifier. You have purchased a quality product designed and engineered to give you many years of uncompromised musical service.
AV30MX-2 Operation Manual
 AV30MX-2 Operation Manual 1 Important safety instructions 1. Please read carefully prior to product installation or operation. 2. Read these instructions. 3. Keep these instructions. 4. Heed all warnings.
 Register your product and get support at www.philips.com/welcome User manual 2 Contents 1 Important 4 Safety 4 Notice 4 English 2 Your car power amplifier 5 Introduction 5 What s in the box 5 Overview
SAGA PRO SERIES STEREO POWER AMPLIFIER OPERATION MANUAL
 SAGA PRO SERIES STEREO POWER AMPLIFIER OPERATION MANUAL INSTALLATION Use care in unpacking the amplifier, and be sure to save the carton and packing materials so that you can use them for moving, storing,