In today s tutorial you will learn the basics of using fine art textures in your photography work.
|
|
|
- Buddy Kerry Rich
- 5 years ago
- Views:
Transcription
1 Applying Fine Art Textures to Your Photography Work WHAT WE RE CREATING: In today s tutorial you will learn the basics of using fine art textures in your photography work. If you re wondering exactly what a fine art texture is, then it is essentially a flat image file (usually a.jpg), which can be used as an overlay to your photographic or design work. For example, if you were looking to make a photo look worn and aged, then you could overlay a worn/aged texture file, and achieve the desired look in seconds. Using textures in your photography work certainly isn t vital, but when done right, can add a lovely grungy feel to your work. Ok, are you ready to explore the world of texture design? In today s lesson, I ll be showing you how some basic texture application can transform a regular photograph into a lovely vintage outcome:
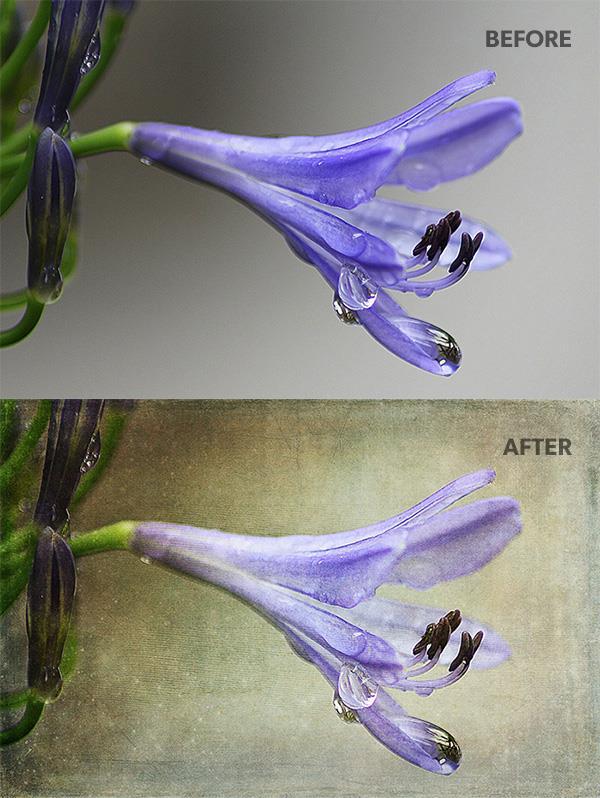
2 Step 1:
3 Start by downloading this lovely shot of a flower. Open up the image within Photoshop, and prepare to add to your textures. Of course we encourage you to try these techniques on your own photography work, but for the purposes of this tutorial, this is a great starting image. Step 2: Throughout this tutorial we ll be working with the fine art textures from 2 Lil Owls, which are widely considered to be the best textures in the world. We re currently offering 310 all new 2 Lil Owls textures at a 93% launch special discount. Be sure to check out the deal before it expires in just a few days though. If you re wondering what makes a good texture, then it generally falls into a few categories: Looking incredibly sharp, even at high resolutions (much as good photography should). Looking generally beautiful and artistic. The best textures often can stand alone as works of art. Plenty of lovely details and visual flourishes. These really add a lot to your work when used as an overlay. Denise, the owner at 2 Lil Owls has mastered the art of texture creation, and often will combine up to 50 surfaces to create her wonderful texture designs. She ll travel all over photographing interesting surfaces, such as abandoned warehouses and rusty train stations. The results are breath-taking!

4 Start by pasting in the texture Ancient Times 2, taken from our current massive texture deal, positioning it to fill your canvas like so. This texture will automatically be pasted onto a new layer in Photoshop. In your Photoshop layer palette, you ll see some options for this new layer. Change the layer blend mode from normal to overlay, and reduce the opacity from 100% to 60%.

5 This creates a lovely overlay effect, where the original photo shows through clearly, but many of the details and colour tints from the texture are combined with it: Step 3: Now paste in a new texture Burnished 3, and resize it to fit your canvas perfectly:

6 Change this new texture layer s blend mode from normal to overlay too, and reduce it s opacity to 20%. Again, this just applies an extra layer of detail and colour tinting for this image:

7 Step 4: As you can see by now, texturing work can be very simple, but easily let you create beautiful results. Typically you can experiment with layering up multiple textures, and with each texture see which layer blend mode and overlay setting produces the best results. It s really about having fun, and using trial and error to achieve a beautiful result. The great thing about textures is that your original photo will generally just contain one layer. By layering multiple textures you re essentially adding dozens, if not hundreds of surfaces over your original photo, but doing it in a way that lets the detail of the original photo show through clearly, all while adding the detail of these overlays to your end composition. Now, we re going to paste in another texture Cosmos 14 onto a new layer. Change this layer s blend mode to overlay and reduce it s opacity to 40%:
8 Step 5: As you can see by now, overlay is my favourite Photoshop blend mode, although of course there are many others that work well, including soft light, hard light, screen, multiply and more! Next, we re going to paste in Heirloom 1 as a new layer, again, resizing it to fit out canvas:

9 Change this layer s blend mode to overlay (you guessed it!) and reduce it s opacity to 25%.

10 Again, remember that texturing is about not going over the top. You don t want your image to appear totally fake and overdone, so it s a good idea to generally scale back the opacities of your textures to something more subtle, and then build them up over time. Step 6: Paste in Fire Cracker 5. The cool tones of this texture should compliment our photo well. Change this texture layer s blend mode to soft light and reduce it s opacity to 40%.
11 Step 7: Paste in this Forgotten 2 texture, fitting it nicely to your canvas.

12 Change this layer s blend mode to hard light and reduce it s opacity to 25%.

13 Step 8: Now drop in the final texture, Frenzy 2 : Change this layer s blend mode to soft light and drop the opacity to 25%.

14 Step 9: Select all of the layers in your layers palette, including your original photo background layer. Once all of the layers are selected, right click on any one of them, and select duplicate layers.


15 Once you ve clicked to duplicate layers you ll see all of your duplicated layers copied above the original layers. They will all be selected automatically, so right click on them and select merge layers. This will merge these duplicate layers into a single layer. Rename this layer sharpen : Step 10:

16 With your sharpen layer selected, go to the filter menu, and then other > high pass. Select a radius of 1.0 pixels. Your image will go a strange shade of grey, but not to worry, this all part of the process! You ll see some of the finer details and edges of your photo showing through. This high-pass technique is used to give you lots of sharpening control over your images. Now, set this layer s blend mode to overlay. This will hide all of the neutral grey colour, and only let the sharper edges show through. This gives your photo a subtle, but effective sharpen. We do this, as applying textures will lose a little of the sharpness of your original photo. This is a great way to bring back that crisp look.

17 Step 11: Finally, we want to add a vignette effect, in order to frame our photo, as draw attention towards the centre. Create a new layer called vignette, and fill your canvas with any colour (I chose red):
18 Now right click on this layer within your layer s palette and choose blending options. Within this menu select inner glow. Apply the settings shown below, to apply a nice black inner glow:

19 Here s the result of this glow, against our red background:


20 Now, with this vignette layer selected, reduce the layer fill opacity to 0%. You ll see that the main layer opacity is kept at 100%, but the fill opacity, directly beneath it is reduced to 0%. The effect of this is that the red fill is hidden, but the black inner glow is still visible:
21 Now, reduce the main layer opacity from 100% to 10%. This will make your inner glow vignette much more subtle. However, it does help to draw the eye into the centre of your piece, and give more precedence to the subject. AND WE RE DONE And here s our final textured design: I really hope that this tutorial opened your eyes to some of the potential of fine art textures for your photography work.
This isn t as intimidating as it sounds, and I ll walk you through the basic steps needed to achieve multiple texture application.
 Apply Your Textures to Multiple Photos Using Photoshop Actions WHAT WE RE CREATING: We re all agreed that textures can add depth and beauty to our photography and design work. However, what if you want
GIMP Simple Animation Tutorial
 GIMP Simple Animation Tutorial Banner size: 690 x 200 transparent background layer There are really two parts to making an animated banner. The first is to set up the banner all the components besides
Inverted Colors Photo Effect With Photoshop
 Inverted Colors Photo Effect With Photoshop Written by Steve Patterson. In this Photoshop Effects tutorial, we re going to look at how to invert the colors in an image to create interesting photo effects.
Painting Special Effects on Photographs
 TUTORIAL 7 Painting Special Effects on Photographs In this tutorial you will learn how to transform a photo into a striking color composition with paintbrushes, masks, blending modes, color, and paper
OLD FASHIONED HAND TINTED EFFECT
 OLD FASHIONED HAND TINTED EFFECT In this Photoshop tutorial, we re going to learn how to easily create an old-fashioned, hand-tinted photo effect. All it takes is an adjustment layer, a layer blend mode,
PHOTOSHOP INVERTED COLORS PHOTO EFFECT
 Photo Effects: Photoshop Inverted Colors Photo Effect PHOTOSHOP INVERTED COLORS PHOTO EFFECT Most people would agree that taking a stroll through the forest can be very calming and peaceful, with all of
Advanced Photography. Topic 3 - Photoshop Filters. Learning Outcomes
 Topic 3 - Photoshop Filters Learning Outcomes In this lesson, we're going to take a look at some techniques that make use of some of the more practical filters. We are also going to learn how to convert
Realistic Skin Smoothing
 TIP SHEET #7 Realistic Skin Smoothing I think it s fair to say when it comes to retouching techniques, the number of different ways to smooth skin is seemingly endless. From blurring techniques through
Post-Processing/Editing Page 1
 All images need a little something to help re-create or re-imagine what you think a particular image should look like. Whether it is adding a digital gradient to a sky to help saturate and deepen the colours
Create a Beautiful Abstract Portrait in Photoshop - Psd Premium Tutorial
 Create a Beautiful Abstract Portrait in Photoshop - Psd Premium Tutorial By: Wojciech Pijecki In this tutorial we will combine several stock images to create an artistic, abstract portrait of a woman.
Add Transparent Type To An Image With Photoshop
 Add Transparent Type To An Image With Photoshop Written by Steve Patterson. In this Photoshop Effects tutorial, we re going to learn how to add transparent type to an image. There s lots of different ways
The original image. The final effect. The Layers palette showing the original photo on the Background layer.
 Photo Effects: Gritty, Overprocessed Photo Effect GRITTY, Overprocessed Photo Effect In this Photoshop photo effects tutorial, we re going to look at how to give a photo a gritty, overprocessed look to
ADD TRANSPARENT TYPE TO AN IMAGE
 ADD TRANSPARENT TYPE TO AN IMAGE In this Photoshop tutorial, we re going to learn how to add transparent type to an image. There s lots of different ways to make type transparent in Photoshop, and in this
Central Photography [INSTAGRAM EFFECTS]
![Central Photography [INSTAGRAM EFFECTS]](/thumbs/96/129260346.jpg "Central Photography [INSTAGRAM EFFECTS]") 1 1. Open Photoshop. 2. Go to File/New (Ctrl+N). 3. Name your file. 4. Set the Width to 11 inches. 2 5. Set the Height to 8.5 inches. 6. Set your Resolution to 200 pixels/inch. 7. Set your Background Contents
1 1. Open Photoshop. 2. Go to File/New (Ctrl+N). 3. Name your file. 4. Set the Width to 11 inches. 2 5. Set the Height to 8.5 inches. 6. Set your Resolution to 200 pixels/inch. 7. Set your Background Contents
How to Create Fake Shadows
 TIP SHEET #8 How to Create Fake Shadows As well as the colour, it s the shadows in a picture that help to give it mood and atmosphere so in this tutorial I want to show you how you can add in extra shadows.
Blend Photos With Apply Image In Photoshop
 Blend Photos With Apply Image In Photoshop Written by Steve Patterson. In this Photoshop tutorial, we re going to learn how easy it is to blend photostogether using Photoshop s Apply Image command to give
Add Excitement to Your Photos with Textures
 IMAGE DIANA DAY Add Excitement to Your Photos with Textures By Diana Day You may have noticed that applying textures to photos is a trend that s pretty hot on the Web these days. Whether you use them for
Custom Brushes. Custom Brushes make the trip a lot more enjoyable and help you make
 Custom Brushes make the trip a lot more enjoyable and help you make Custom your Brushes Lava Castle images unique Kim Taylor, X-Men 3 artist, shares the importance of custom brushes and how they can help
Preparing Images For Print
 Preparing Images For Print The aim of this tutorial is to offer various methods in preparing your photographs for printing. Sometimes the processing a printer does is not as good as Adobe Photoshop, so
Part 2: Spot Color Lessons
 Why White? The importance of white in color printing is often overlooked. The foundation of color printing is based on applying Cyan, Magenta, Yellow and Black (CMYK) onto white paper. The paper s white
photoshop filters kelly ludwig assistant professor
 photoshop filters kelly ludwig assistant professor sharpening images reducing noise correcting distortions in images practical filters There are over 100 filters that ship with Photoshop and they're all
Super Nova. 1. Create a Background. Photoshop Textures Assignment # 3
 Photoshop Textures Assignment # 3 Super Nova 1. Create a Background First, start by creating a new document, I ve used a document size of 400 x 400 pixels here, but you might want to use something much
POLAROID EMULATION INCREASED CONTRAST, SATURATION & CLARITY
 POLAROID EMULATION The Polaroid SX-70 Camera was a sensational tool. It took photographs in real time. But just the color balance of the film and they way it developed had a unique look. Here are some
Creative Cut-Outs. 1Go to File>New>Blank File to create a new document and enter. Projects EXTRAS: GET MORE ONLINE!
 ALL IMAGES MIKE RODRIGUEZ Creative Cut-Outs By Mike Rodriguez Are you interested in applying some of your rapidly developing layer skills? In the May/June issue, we covered the basics of layers (Layers
ADD A REALISTIC WATER REFLECTION
 ADD A REALISTIC WATER REFLECTION In this Photoshop photo effects tutorial, we re going to learn how to easily add a realistic water reflection to any photo. It s a very easy effect to create and you can
Turning Photograph Into Cartoon-Style Picture. Digital Media I West High School Susan M. Raymond
 Turning Photograph Into Cartoon-Style Picture Digital Media I West High School Susan M. Raymond Part 1: Creating Outline Wondering how those guys on the internet turn photograph into a nice cartoon-style
Tips & Techniques - Materials
 Tips & Techniques - Materials Materials: How to Create a Spherical Map With Corrections For Distortion Download: Project Works with: GO, SE, XL Requires: Version Special Notes: Special Thanks to Chris
 http://blog.spoongraphics.co.uk/tutorials/how-to-intensify-your-landscape-photos-in-photoshop This post was originally published in 2011 THE TIPS AND TECHNIQUES EXPLAINED MAY BE OUTDATED. The post-processing
Sharpening is an essential final step before output. But sometimes, you don t want to
 Sharpening is an essential final step before output. But sometimes, you don t want to sharpen your entire image equally. Skin tones, clouds, noisy areas - it s best to apply less sharpening to these areas,
Lesson 16 Text, Layer Effects, & Filters
 Lesson 16 Text, Layer Effects, & Filters Digital Media I Susan M. Raymond West High School In this tutorial, you will: Create a Type Layer Add and Format Type within a Type Layer Apply Layer Effects Apply
Sports Jersey Mania, Part 2 By Joel Day
 Sports Jersey Mania, Part 2 By Joel Day jersey. We ll continue with all the finer details to create our basketball jersey template and at the end we ll show you a Home and Away STEP THIRTEEN: In this step,
INTRO TO LAYERS (PART 2)
") Adobe Photoshop Elements INTRO TO LAYERS (PART 2) By Dave Cross In Part 1, we talked about the main concept behind layers and why they re so important. Now we ll take it a step further and show how to
Adobe Photoshop Elements INTRO TO LAYERS (PART 2) By Dave Cross In Part 1, we talked about the main concept behind layers and why they re so important. Now we ll take it a step further and show how to
Doing More with Photoshop
 Doing More with Photoshop Topic 7 Layer Masks Learning Outcomes In this lesson, we will take a look at layer masks in Photoshop. By the end of this lesson, you will have a good understanding of what layer
SAVING, LOADING AND REUSING LAYER STYLES
 SAVING, LOADING AND REUSING LAYER STYLES In this Photoshop tutorial, we re going to learn how to save, load and reuse layer styles! Layer styles are a great way to create fun and interesting photo effects
How to create beautiful B&W images with Adobe Photoshop Elements 12
 How to create beautiful B&W images with Adobe Photoshop Elements 12 Whether it s an Instagram snap or a film portrait, black and white photography is never out of style. Today, there are a number of ways
The original photo. The final result.
 giving a photo painted edges In this Adobe Photoshop tutorial, we re going to combine a couple of different effects. First, we ll give the photo easy-tocreate painted edges, and then we ll make it look
UNDERSTANDING LAYER MASKS IN PHOTOSHOP
 UNDERSTANDING LAYER MASKS IN PHOTOSHOP In this Adobe Photoshop tutorial, we re going to look at one of the most essential features in all of Photoshop - layer masks. We ll cover exactly what layer masks
Teton Technique C H A P T E R 3
 C H A P T E R 3 Teton Technique TRY IT AT HOME: TetonTechnique.psd SIT BACK AND WATCH: TetonTechnique.mov Ladies and gentlemen, girls and boys of all ages, welcome to the Grand Teton National Park. But
DIGITAL ECLIPSE. Eclipse photos courtesy of Fred Espanak 1998
 If you ve ever experienced a total solar eclipse, then you know that film truly cannot capture the entire visual experience. Many have tried, using complex darkroom printing techniques, but now Adobe Photoshop
EXTREME CONTRAST PHOTO EFFECT
 EXTREME CONTRAST PHOTO EFFECT In this Photoshop tutorial, we re going to learn how to use layers, layer blend modes, some noise, a little sharpening, and a simple adjustment layer to easily give a photo
Contents: Bibliography:
 ( 2 ) Contents: Sizing an Image...4 RAW File Conversion...4 Selection Tools...5 Colour Range...5 Quick Mask...6 Extract Tool...7 Adding a Layer Style...7 Adjustment Layer...8 Adding a gradient to an Adjustment
Tutorial Another Rainy Day
 For this tutorial I wanted to take people through the process that I go through when painting buildings. In this tutorial I will be showing you how to paint A Rainy Day in four easy to follow steps...
ADDING RAIN TO A PHOTO
 ADDING RAIN TO A PHOTO Most of us would prefer to avoid being caught in the rain if possible, especially if we have our cameras with us. But what if you re one of a large number of people who enjoy taking
Here s the image I ll be working with:
 FOCUS WITH LIGHT - The Lighting Effects FILTER In this Photoshop tutorial, we ll learn how to add focus to an image with light using Photoshop s Lighting Effects filter. We ll see how easy it is to add
Composite Master Class Blend two images together to create a seamless collage
 Composite Master Class Blend two images together to create a seamless collage By Liz Ness Whether it s a custom senior photo, an album cover, or a basic digital collage, combining two or more images to
Name the layer you rotated in step 3 Stripe and lower the opacity to 43%.
 Step 1 Open Photoshop and create a new file 1085 649 pixels. Fill the layer with a bright blue color (#0095db) by pressing Shift + F5. This will be the background for our pop art scene. Step 2 Let s create
Reveal the mystery of the mask
 Reveal the mystery of the mask Imagine you're participating in a group brainstorming session to generate new ideas for the design phase of a new project. The facilitator starts the brainstorming session
Masking with Transparent Overlays
 Masking with Transparent Overlays digitalscrapper.com/blog/qt-masking-overlays/ Jen White Masking with Transparent Overlays by Jen White Use the magic formula of 50% gray combined with a contrast blend
Advanced Diploma in. Photoshop. Summary Notes
 Advanced Diploma in Photoshop Summary Notes Suggested Set Up Workspace: Essentials or Custom Recommended: Ctrl Shift U Ctrl + T Menu Ctrl + I Ctrl + J Desaturate Free Transform Filter options Invert Duplicate
Colouring in CAD s. Photoshop. December 2012
 Colouring in CAD s in Photoshop December 2012 You will need to colour in fashion CAD flats for your range plans. The easiest way to do this is to download CAD flats from WGSN and colour them in Photoshop.
FLAMING HOT FIRE TEXT
 FLAMING HOT FIRE TEXT In this Photoshop text effects tutorial, we re going to learn how to create a fire text effect, engulfing our letters in burning hot flames. We ll be using Photoshop s powerful Liquify
Using Adobe Photoshop
 Using Adobe Photoshop 6 One of the most useful features of applications like Photoshop is the ability to work with layers. allow you to have several pieces of images in the same file, which can be arranged
Okay, that s enough talking. Let s get things started. Here s the photo I m going to be using in this tutorial: The original photo.
 add visual interest with the rule of thirds In this Photoshop tutorial, we re going to look at how to add more visual interest to our photos by cropping them using a simple, tried and true design trick
Reflection Project. Please start by resetting all tools in Photoshop.
 Reflection Project You will be creating a floor and wall for your advertisement. Before you begin on the Reflection Project, create a new composition. File New: Width 720 Pixels / Height 486 Pixels. Resolution
RETRO User guide RETRO. Photoshop actions. For PS CC, CS6, CS5, CS4. User Guide
 RETRO Photoshop actions For PS CC, CS6, CS5, CS4 User Guide CONTENTS 1. THE BASICS... 1 1.1. About the effects... 1 1.2. How the actions are organized... 1 1.3. Installing the actions in Photoshop... 2
WORN, TORN PHOTO EDGES EFFECT
 Photo Effects: CC - Worn, Torn Photo Edges Effect WORN, TORN PHOTO EDGES EFFECT In this Photoshop tutorial, we ll learn how to take the normally sharp, straight edges of an image and make them look all
4 layer BASiCS lesson overview 104
 4 layer basics Lesson overview In this lesson, you ll learn how to do the following: Organize artwork on layers. Create, view, hide, and select layers. Rearrange layers to change the stacking order of
How to make non-destructive textured maps in Photoshop
 How to make non-destructive textured maps in Photoshop This tutorial assumes that you are reasonably familiar with using photoshop. E.g. You know how to create layers, layer styles, masks etc. After you
In this Adobe Photoshop tutorial, we re going to look at a way to give a photo a more ghostly appearance.
 GHOSTING AN IMAGE In this Adobe Photoshop tutorial, we re going to look at a way to give a photo a more ghostly appearance. I m a fan of horror films, but I admit I m a bit shallow in that I usually just
Exploring Photoshop Tutorial
 Exploring Photoshop Tutorial Objective: In this tutorial we will create a poster composed of three distinct elements: a Bokeh, an image and title text. The Bokeh is an effect which is sometimes seen in
Quick Mask Setting Up your Work Environment Setting Up the Quickmask Parameters
 Quick Mask Quickmask gets its name from the fact that as you create your selection area, Photoshop masks that area off, tinting it with a colored mask to show what has been selected. When you're finished
Challenge Image: Blur the Background
 Challenge Image: Blur the Background Challenge Image: Blur the Background In this lesson, we re going to work on a challenge image that was submitted by a Masters Academy member. The image features a little
Module All You Ever Need to Know About The Displace Filter
 Module 02-05 All You Ever Need to Know About The Displace Filter 02-05 All You Ever Need to Know About The Displace Filter [00:00:00] In this video, we're going to talk about the Displace Filter in Photoshop.
First things first, we need a 'Before' shot. I quickly scanned the net for something appropriate and came up with the following:
 Mizuno's Super Airbrush PP Tutorial! First things first, we need a 'Before' shot. I quickly scanned the net for something appropriate and came up with the following: A pretty girl, with some skin blemishes,
CREATE A BURNT EDGE EFFECT
 CREATE A BURNT EDGE EFFECT One of the all-time classic effects in Photoshop is the burnt edge, and there s lots of different ways to create it, but in this Adobe Photoshop tutorial, we re going to look
Turning a Photo into a Painting by Jack Davis & Linnea Dayton
 Turning a Photo into a Painting by Jack Davis & Linnea Dayton WITH VERSION 7, PHOTOSHOP CAN FINALLY PAINT! Using the new capacities built into Photoshop s Brush engine and the settings you can save as
Easily Smooth And Soften Skin In A Photo With Photoshop
 Easily Smooth And Soften Skin In A Photo With Photoshop Written by Steve Patterson OPEN THE START FILE BY RIGHT CLICKING THE.JPG FILE AND CHOOSING OPEN WITH ADOBE PHOTOSHOP. SAVE AS: X_lastname_firstname_Smooth_Soft
2Click the Symbol XX
 Adjustment Layers, Channels and Layer Masks 2Click the Symbol XX ( Adjustment Layer ) and choose Channel Mixer. 3Check the box Monochrome and choose the values R=30, G=60, B=10. Thus you ll get a grayscale
CREATE A SPECTACULAR GRASS TEXT EFFECT IN PHOTOSHOP
 CREATE A SPECTACULAR GRASS TEXT EFFECT IN PHOTOSHOP Tutorial from http://psd.tutsplus.com/ Compiled by INTRODUCTION Ever wanted to make text out of grass? Well with Photoshop you can. In this
Here is a 100% zoom close up. Name in Popsicles
 Here is a 100% zoom close up Name in Popsicles Step 1 Let s start by creating a new Photoshop document. Mine is 2560 1440 pixels. Fill the background with a color of your choice (it s not important at
1. INTRODUCTION. What you will need:
 CONTENTS 1. INTRODUCTION... 2 2. EXPORT FROM TSR WORKSHOP... 3 3. TEXTURE... 5 3.1. Preparation... 5 3.2. Multiplier... 8 3.2.1. Grayscale Equalization... 11 3.2.2. Adding Texture to the Bottoms of Skirts
SIMPLE POP ART EFFECT
 SIMPLE POP ART EFFECT In this Photoshop tutorial, we re going to see how to turn a photo into a simple 1950 s and 60 s pop art-style effect. If you can make a selection with the Lasso tool and you understand
MAGAZINE MOCK-UPS. made by andre28
 Hi! First of all, THANK YOU for purchasing this item and supporting me! I hope it will fit perfectly with your needs. This is a complete Set of Magazine Mock-ups; this pack allow you to obtain a realistic
PHOTOSHOP TUTORIAL: DIGITAL DARKROOM TECHNIQUES
 PHOTOSHOP TUTORIAL: DIGITAL DARKROOM TECHNIQUES STEP BY STEP TRAINING Learn by doing step by step exercises. Includes downloadable class files that work on Mac & PC. EDITION 1 Copyright Info Published
Organizing artwork on layers
 3 Layer Basics Both Adobe Photoshop and Adobe ImageReady let you isolate different parts of an image on layers. Each layer can then be edited as discrete artwork, allowing unlimited flexibility in composing
Thank you for spending your evening with me! Truly enjoyed chatting and sharing image blending.. :)
") easymail Webmail :: Texture Blending Notes 1 of 2 9/4/2016 8:38 PM Subject From To Date Texture Blending Notes Denise Silva Denise Silva 2016-09-02 8:10 am Texture
easymail Webmail :: Texture Blending Notes 1 of 2 9/4/2016 8:38 PM Subject From To Date Texture Blending Notes Denise Silva Denise Silva 2016-09-02 8:10 am Texture
XXXX - ILLUSTRATING FROM SKETCHES IN PHOTOSHOP 1 N/08/08
 INTRODUCTION TO GRAPHICS Illustrating from sketches in Photoshop Information Sheet No. XXXX Creating illustrations from existing photography is an excellent method to create bold and sharp works of art
Town and Village Tutorial
 Town and Village Tutorial For Adobe Photoshop by Lerb This tutorial will take you through the basic techniques I use when creating village and town maps in Adobe Photoshop. The techniques can also be used
Creating a Watercolor Painting From a Photo. Open the photo you want to appear to be a watercolor painting. I am using the photo below:
 Creating a Watercolor Painting From a Photo Open the photo you want to appear to be a watercolor painting. I am using the photo below: Make any adjustments as needed like cropping the photo before preceding
Clipping Masks And Type Placing An Image In Text With Photoshop
 Clipping Masks And Type Placing An Image In Text With Photoshop Written by Steve Patterson. In a previous tutorial, we learned the basics and essentials of using clipping masks in Photoshop to hide unwanted
VECTOR PAINTINGS - User Guide VECTOR PAINTINGS. For Adobe Photoshop Elements 2019, 2018, 15, 14, 13, 12, 11. User Guide
 VECTOR PAINTINGS For Adobe Photoshop Elements 2019, 2018, 15, 14, 13, 12, 11 User Guide CONTENTS 1. THE BASICS...1 1.1. About the effects...1 1.2. How the actions are organized...1 1.3. Downloading and
Step 1. Facebook Twitter Google+ Find us on Facebook. Vectortuts+ How to Create a Curious Owl in Illustrator CS4 Vectortuts+
 Joomla developers needed - Long term potential in India Copywriter Email Campaigns Wordpress Creative design Social media in UK More Freelance Jobs... Facebook Twitter Google+ Find us on Facebook Step
The horse image used for this tutorial comes from Capgros at the Stock Exchange. The rest are mine.
 First off, sorry to those of you that are on the mailing list or RSS that get this twice. I m finally moved over to a dedicated server, and in doing so, this post was lost. So, I m republishing it. This
4 LAYER BASICS. Lesson overview
 4 LAYER BASICS Lesson overview In this lesson, you ll learn how to do the following: Organize artwork on layers. Create, view, hide, and select layers. Rearrange layers to change the stacking order of
Preparing your artwork for clear Zipper Pulls using Illustrator
 Preparing your artwork for clear Zipper Pulls using Illustrator This tutorial contains everything you need to know about creating your own, printed clear acrylic zipper pulls. Including how to format your
A quick note: We hope that you will find something from the Tips and Tricks that will add a little pizazz to your yearbook pages!
 A quick note: The following pages are tips and tricks for Basic Photoshop users. You may notice that some instructions indicate that non-awpc fonts were used, and that some colors were created using the
How to Create a Curious Owl in Illustrator
 How to Create a Curious Owl in Illustrator Tutorial Details Program: Adobe Illustrator Difficulty: Intermediate Estimated Completion Time: 1.5 hours Take a look at what we're aiming for, an inquisitive
Design a Halloween Pumpkin Wallpaper in Photoshop
 Design a Halloween Pumpkin Wallpaper in Photoshop By: Alvaro Guzman Halloween is near! So let's take a pumpkin image, carve it up, and light it for this coming holiday. You'll learn how to get this nice
Black (and White) Magic
 Magic") Black (and White) Magic Close your eyes, take a deep breath, and imagine a future where you no longer shoot both color and black and white images. Instead, you capture only color. Then, following the shoot,
Black (and White) Magic Close your eyes, take a deep breath, and imagine a future where you no longer shoot both color and black and white images. Instead, you capture only color. Then, following the shoot,
How to Draw a Realistic iphone 4 with
 Home Freebies Submit Your Work Contact Us How to Draw a Realistic iphone 4 with Photoshop Jan 3 2011 By Mohammad Jeprie 34 Comments In this tutorial, we will draw a realistic-looking iphone 4 using Photoshop.
3. Notice how you can barely see my leaf brush? And what you can see is extremely transparent. But it s there. Now, to get rid of that transparency.
 Some brushes were made to be transparent, others were not. And because of the nature of Photoshop (or PSP/GIMP) brushes, sometimes they end up looking that way when they shouldn t. This tutorial will explain
The original image. The final rainbow effect.
 ADD A realistic rainbow to a photo In this Photoshop photo effects tutorial, we re going to learn how to easily add a rainbow, even a double rainbow, to a photo. Of course, as with most photo effects,
Creating your Clear Acrylic Standee using Photoshop
 Creating your Clear Acrylic Standee using Photoshop This tutorial contains all of the information needed to create your very own clear acrylic Standee using Adobe Photoshop. 1. Download our templates To
Introduction to Layers
 Introduction to Layers By Anna Castano A layer is an image or text that is piled on top of another. There are many things you can do with layer and it is easy to understand how it works. Through the introduction
Create A Starry Night Sky In Photoshop
 Create A Starry Night Sky In Photoshop Written by Steve Patterson. In this Photoshop effects tutorial, we ll learn how to easily add a star-filled sky to a night time photo. I ll be using Photoshop CS5
Tech Savvy Senior Selfie
 Tech Savvy Senior Selfie Commercial Design II Teacher : Mrs. Stroud Due: 10/13/2017 Overview & Purpose Create a futuristic portrait of yourself in 2058 in an old fashioned style of bubble glass portraits
An Introduction to Layers, Masks and Channels in Photoshop
 An Introduction to Layers, Masks and Channels in Photoshop Roy Killen, GMAPS, EFIAP, GMPSA (c) 2017 Roy Killen Layers, Masks and Channels Page 1 Two approaches to image editing When images are edited in
Glowing Surreal Planet Design. Final Image Preview
 Glowing Surreal Planet Design Final Image Preview. Step 1 First, go to the S:\ drive and locate the folder called Glowing Planet Design. Copy the City Skyline file and paste it in your Glowing Planet Design
PHOTOTUTOR.com.au Share the Knowledge
 THE DIGITAL WORKFLOW BY MICHAEL SMYTH This tutorial is designed to outline the necessary steps from digital capture, image editing and creating a final print. FIRSTLY, BE AWARE OF WHAT CAN AND CAN T BE
Extreme Makeovers: Photoshop Retouching Techniques
 Extreme Makeovers: Table of Contents About the Workshop... 1 Workshop Objectives... 1 Getting Started... 1 Photoshop Workspace... 1 Retouching Tools... 2 General Steps... 2 Resolution and image size...