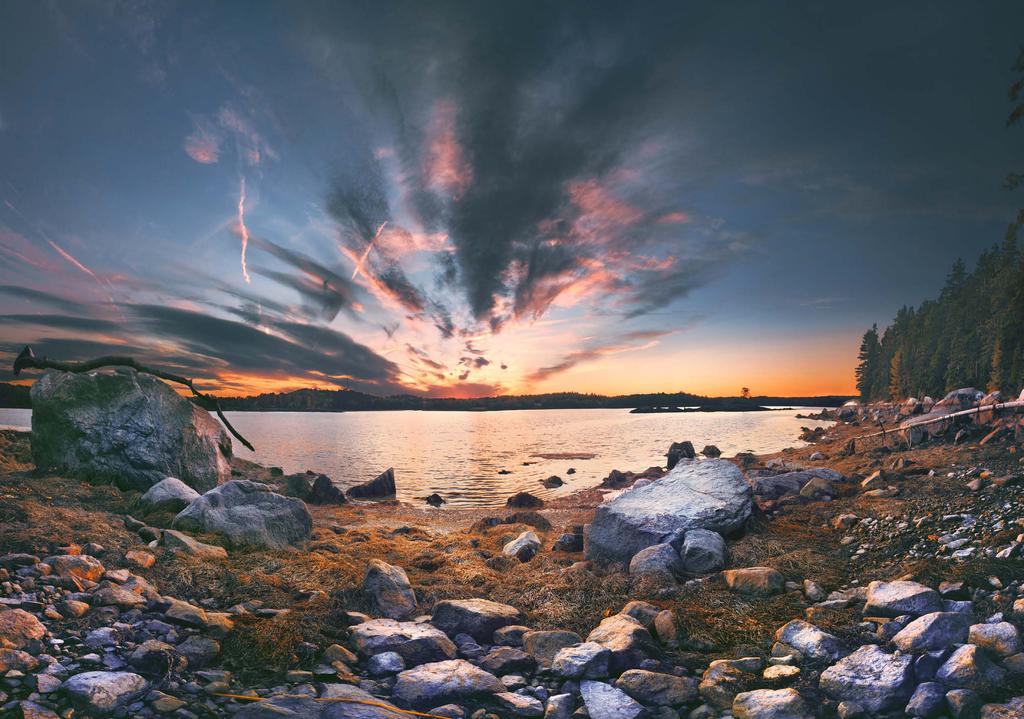
Simply put, in order to capture the full tonal range of a scene that extends outside of what your sensor can render, you ll need to combine different
|
|
|
- Monica Brooks
- 5 years ago
- Views:
Transcription


1 HDR Field Guide
2 All material in this ebook, unless otherwise noted below, is Copyright Christopher O Donnell/creativeRAW, All Rights Reserved worldwide under the Berne Convention. This book may not be copied or distributed without prior written permission, except for brief excerpts for the purpose of a review. Purchasers are allowed to print one copy of this ebook for their own personal use. Apple, iphone, ipad are trademarks of Apple Inc., registered in the U.S. and other countries. This ebook is an independent publication and has not been authorized, sponsored, or otherwise approved by Apple Inc. Microsoft and Windows are either registered trademarks or trademarks of Microsoft Corporation in the United States and/or other countries. This ebook is an independent publication and is not affiliated with, nor has it been authorized, sponsored, or otherwise approved by Microsoft Corporation. Photoshop, Adobe and Acrobat are either registered trademarks or trademarks of Adobe Systems Incorporated in the United States and/or other countries. This ebook is not endorsed or sponsored by Adobe Systems Incorporated, publisher of Adobe Acrobat.

3 introduction
4 HDR exposure blending is a revolutionary digital darkroom technique that will assist you in overcoming the limitations of your camera and capture a scene with the full tonal range you witnessed in the field. This is a common challenge for any area of photography, but landscape photographers find this especially difficult since we typically can not manipulate or alter the ambient light. You ve probably recognized this challenge in your own work: an overexposed sky, a foreground with crushed shadows, or a disappointing combination of the two. The incredible detail and light you witnessed in person has disappeared, and you instead go home with a lackluster representation of the beauty you intended to capture. Since your camera sensor (the digital equivalent to a negative) is limited to one aperture and one shutter speed across the same frame, it s difficult to capture a scene with a dynamic tonal range without some areas falling outside of your selected exposure, which produce blown highlights and/or crushed shadows. Exposure blending is one way to recover this lost data for a more accurate rendering of your scene. 65
, one for your")
5 Simply put, in order to capture the full tonal range of a scene that extends outside of what your sensor can render, you ll need to combine different exposures together. The number of exposures you need depends on how large your tonal range is, but typically you ll have one exposure metered for your highlights (a faster shutter speed to limit light), one for your shadows (a slower shutter speed to let more light in), and one as your base exposure (the average metering between your highlights and shadows). This is where the term bracketing comes in since you re creating a bracket that encapsulates your entire tonal range, from brightest to darkest. brightest tones darkest tones

6 Exposure blending can also be referred to as HDR blending in the sense that we re expanding the tonal range, however this method will create a more natural looking image than tone-mapping with automated software. With HDR blending, you have much more control over the end result by manually choosing what groups of tones you want to adjust, and at what strength you want that blend to be. It s a method that is entirely customizable to your scene, which will produce a more pleasing result.
 foreground (EV")
7 sky (EV -2) middleground (ev +/-0) foreground (EV +2)

8 The group of images on the previous page shows how you can take three different exposures of the same scene and combine the best parts of each one to create a final image that has no loss of data for a complete tonal range. In this field guide, I will go over step-by-step how to properly capture your brackets for HDR blending, so you can fully enjoy your photography by overcoming your camera limitations.
9 before you autobracket

10 ev -2 ev 0 The need to bracket a scene in order to capture the entire tonal range is quite common, which is why camera manufacturers have made it easy to photograph the same subject at different exposures. Autobracketing is a fantastic feature available on most DSLRs, which allows you to take multiple exposures automatically without having to change your shutter speed manually. When you set your camera to autobracket, it takes three (sometimes more) sequential images at different shutter speeds, usually 2 full stops apart. This helps to streamline your workflow when presented with a wide tonal range that one exposure can not contain. The amount of stops between ev +2 each exposure can be adjusted depending on your scene, and for most situations three different exposure values (EV) capturing a four stop range will be sufficient: your base exposure (EV +/-0), an exposure to recover blown highlights (EV -2), and another to recover any crushed shadows (EV +2).

11 sky detail from ev -2 middleground detail from ev +/- 0 foreground detail from ev +2
12 the power of raw Your exposure blending capabilities depend greatly on the quality of your brackets; a basic image format will give you basic results. However, the more data you have to work with, the easier it will be to blend multiple exposures together. This is especially important for expansive tonal ranges which require a more intricate blending workflow. In other words, the best exposure blend begins with the strongest foundation to build your image upon, and that foundation is RAW format. A RAW file is the digital equivalent of a film negative before it is printed onto paper; it s the raw state of your image that you can t really use as a photo, but all the information you need to create a photo is there. You can t upload a RAW file to your website or it to others without special viewing software, but you can take that RAW file and turn it into a universal format (such as TIFF or JPG) once you have finished with your processing. There are many specific benefits of RAW format over JPG, but it all comes down to a higher-quality image as you are working in the pure, uncompressed state of your photograph, which is essential for exposure blending. 13
13 bit depth RAW format is notable for its enormous color depth (also known as bit depth) when compared to the more universal JPG. With a RAW image, you are working with a minimum of 12-bits (usually higher), which translates to 4,096 tones for each of the three color channels (red, green, and blue). However, JPG is limited to 8-bits, which gives you only 256 tones for each channel. Technically, RAW format is immensely superior to JPG as there is much more data contained for each color channel. While 4,096 tones for each channel may seem excessive, consider this: the more data you have to work with, the easier it is to maintain color integrity. When blending different exposures together, this becomes extremely important as you may need to call on that extra data to recover your crushed shadows and blown highlights. If you have the ability to use a more sophisticated format, it makes sense to use it as exposure blending is entirely dependent on recovering as much detail as possible. For the purpose of exposure blending, this additional data gives you an enormous advantage over JPG when adjusting your exposure, and will also reduce processing artifacts (such as posterization) later on if you decide to process your image further after blending. 14
14 Here you can see how the expanded color depth of RAW can benefit your photography. This sunset image was originally overexposed for the sky, and as a result important cloud detail was lost to blown highlights. To reverse this, I would need to reduce my exposure and bring back that lost sky interest. exposure reduced by 2 stops as jpg When I work in JPG mode and reduce the exposure by two full stops (top), not much detail has been recovered since an 8-bit file has a very limited range to work with. However, when I use a RAW file of the same exact photograph (bottom), which is uncompressed, you can see how much more detail is recovered when I adjust the exposure down by two full stops. exposure reduced by 2 stops as raw file
15 raw adjustments vs. autobracketing With RAW being such a versatile format, why is there a need to autobracket when you can create multiple exposures straight from one RAW file? It would save time spent on setting up a tripod, taking three (or more) images, and also save on disk space. Isn t RAW a magical exposure recovery tool? It s always best to capture the optimal exposure for a scene in-camera simply because you ll have more data in a correctly exposed image than one that has been adjusted artificially, even if it s in RAW. The more data that is rendered onto your sensor, the more detail your image will have. RAW has its limitations; it does not give you the power to shoot blindly with no regard to exposure. One substantial benefit to bracketing a scene vs. adjusting a RAW file is that the exposure recovery power of RAW is typically limited to +/- two full stops before the quality begins to deteriorate. Depending on the tonal range of your scene, you may need 3 stops, 5 stops, or even more between your longest and shortest bracket in order to recover all of the detail. Recovery limits aside, capturing an exposure that has been adjusted in-camera vs. adjusting a RAW file by the same number of stops will always give you the higher quality photograph.

16 unrecovered details exposure reduced by 2 stops as raw file recovered details exposure reduced by 2 stops as a bracket The recovery capabilities of RAW format should not be a replacement for bracketing a scene, and here we can see why. The top image is the same example used on page 15: a RAW file that has been reduced by two full stops in processing. The bottom frame is the same exact scene, but is a bracket that was captured two stops less in-camera, so no exposure adjustment was needed in process. When you compare the cloud detail between each example, you can see how much more data was recovered around the sun by bracketing. This comparison shows that instead of trying to recover missing detail in processing, you ll obtain a better result if you adjust your exposure in the field.
17 why autobracket in raw? If it s better to adjust your exposure in-camera rather than as a RAW file, why even bother with RAW at all and instead autobracket in JPG? Although RAW can not replace autobracketing, it s still a file format that has many benefits over JPG and should be used when you bracket. Not only is there more data in RAW format, but you ll greatly increase your tonal range for editing. If you autobracket in JPG format, you ll typically be taking three images: your base image, one taken two stops faster, and another two stops slower, for a total range of four stops. However, if you shoot in RAW format, you can increase or decrease your brackets by two stops in process. That safety net will add another two full stops to your range on both ends of your bracket, bringing your total tonal range up to eight stops (assuming you capture three brackets in two-stop increments). 18
18 Blending exposures using one RAW file is best for those candid shots where you didn t have enough time to set up a tripod but need to correct some blown highlights, or simply want to brighten/ darken parts of your image - like in wedding or action photography. It s a fantastic way to save an otherwise unusable photo, but if you have the time and ability to autobracket your landscape for exposure blending, this is the method which will give you the highest quality output with the largest tonal range. highlights in water reflections, bring back detail lost to the shadow of a tree, or to blend a brighter foreground with a darker background (like under stormy, overcast skies). Another popular use of this technique is to blend different long exposures together - for example, blending an extended exposure that captures moving clouds with an image that shows stationary grass that would otherwise be windswept if taken at the same shutter speed as the sky. Exposure blending and bracketing is not just for combining bright skies with dark foregrounds; you can use it in many different ways as part of a non-destructive workflow. You can recover blown Now that you know why we autobracket for exposure blending, it s time to go over the in-camera workflow; the process I go through to capture those bracketed images to later blend in process.

19 The success of your exposure blending is entirely dependent on how accurately you autobracket your scene. Exposure blending is a method of recovery and can not create a stunning photo for you, but it can greatly improve what you have already photographed. In this section, I ll explain how to autobracket the correct way so you can capture the entire tonal range of your scene. I ll also discuss how to bracket your images manually for those instances where autobracketing is too limiting for your environment.

20 stabilization The smallest amount of prevention can save you much frustration during the blending process, and it starts with camera stability. Since you re blending multiple exposures together of the same scene, it s necessary to have each exposure align perfectly in order to combine them without errors, such as ghosting (which I will explain later). The key to perfect alignment is (1) a solid mount for your camera and (2) the prevention of any vibrations, even the most minor, which could slightly alter your composition or soften your focus.
21 the tripod While you can certainly capture your scene handheld (if you have enough light), a stable camera mount is almost mandatory for bracketing. When you bracket a scene, it s of the utmost importance that each image will align perfectly when you blend them together later in the digital darkroom. A stable tripod will ensure that your camera can not move, and that each exposure you photograph will be identical in composition as even the most minor movement can produce errors in blending. Composition aside, a tripod will eliminate any chance of soft focus due to camera shake, allowing you to concentrate more on your composition to learn more about camera shake and shutter speed). While your initial metering may produce a shutter speed fast enough to use handheld, your longest exposure (metered for your shadow detail) may be on the cusp of that limit, and could produce soft focus for that bracket. This is especially true for golden hour images where you ll typically be using a small aperture for a deep depth of field, be in an environment with limited available light, and be working with a wide range of exposure values to capture all of your tones. Instead of finding this out after you begin your bracketing - or even worse, once you get home and look at your brackets in greater detail - it s far easier to prevent this in the field by using a stable camera mount.
22 When I originally chose my tripod, I selected a model that offered supreme stability since I use exposure blending often in my work. The Manfrotto 055CXPRO3 carbon fiber tripod legs has several wonderful features that I knew would greatly benefit my exposure blending workflow. The greatest feature I found with these particular legs was how fluid and easily you can switch the center column from vertical to horizontal mode, allowing me to get extremely close to ground level. To switch, it s simply a matter of fully extending the center column, pressing a button, and folding the column down. When working in horizontal mode with the legs fully extended, you can achieve a ground height of only 4.5 inches, which is an impressive vantage point to have with a stable camera mount (left).
23 With my older Manfrotto model, I had to completely disassemble the center column and carefully align it horizontally. I can tell you from much experience that attempting to do this while racing the dissipating light of a sunset or in subzero temperatures with bulky gloves is not an ideal situation. I often work at ground level, so for my particular workflow, this was a huge improvement and has saved me much time and frustration in the field. Since this is a Manfrotto, there are certain qualities you come to expect, and the Manfrotto 055CXPRO3 carbon fiber tripod legs are no exception. The most basic and important function of a tripod is a stable mount and the elimination of any vibrations, which is essential for bracketing. The 055CXPRO3 is one of their larger models (these legs can reach a max height of 68.9 inches fully extended), and a larger model equates to a more stable, secure mount: the max load of 17.6 lbs gives you plenty of breathing room for your heavier lenses. Despite the larger size, carbon fiber construction is light in weight; not only has this made it easy for me to carry on extended hikes, but it also performs fantastically at absorbing vibrations. 24

24 To be able to quickly realign my composition (fantastic for stitching) without having to adjust a knob on my tripod head each and every time has been a huge advantage to my in-the-field workflow. When I was looking to upgrade my older model, I first viewed its successor, the Manfrotto 327RC2 Joystick Head, and knew I found the perfect replacement. The quick-release plate allows you to easily attach your camera to the tripod with no fuss or delay, and the locking pin secures your camera into place. My favorite part about the this lens is the joystick design; it s not only ergonomic, but allows you to simply grip and reposition along both vertical and horizontal axes at once as opposed to adjusting knobs for each and every movement. Despite the free-flowing design, precision movement is another great feature as you can still achieve controlled adjustments for your composition. By using this tripod or one of similar construction, you can have the confidence that your composition is locked into place and any environmental vibrations will be absorbed to a great capacity. Your blending result is entirely dependent on the quality of your brackets, and taking every precautionary step to ensure that your camera is on a solid mount will save you much time and frustration during process later.
25 how to autobracket

26 Now that you have a stable and reliable mount, you can begin to autobracket your scene. Before you adjust your camera settings, you need to ensure that your mount is secure and your focus is set properly. Unsuccessful brackets are usually the result of small and preventable errors, so it s worth the extra time spent to prepare than to walk away with an unsatisfactory set of exposures. Before you mount your camera on your tripod, make sure all joints are secure and your quick-release plate is firmly locked onto your camera. If it s particularly windy out, consider a lower vantage point as vibration absorption and stability is greater when your tripod is not fully extended. Alternatively, you can add some additional weight to your center column (if possible) which will help to redistribute the weight of your tripod for more secure footing.

 feature of certain lenses can actually cause vibrations if your camera is mounted.")
27 At times, small vibrations can come from unexpected sources. Usually, our intent is to shield our camera from environmental vibrations - such as wind, unsecured footing, or the photographer themselves. However, the source of these vibrations are quite often directly from the camera. The image stabilization (vibration reduction for Nikon users) feature of certain lenses can actually cause vibrations if your camera is mounted. This fantastic feature is designed for handheld shots when you re walking that shutter speed line between a sharp focus and one that has been softened from camera shake. However, since your camera will be mounted securely, IS/VR is redundant and should be turned off as it has been proven to actually produce minor vibrations.

28 Dangling camera straps are often the culprit of unknown vibrations that soften the focus, so they should be removed before you begin your bracket. I have found much happiness with using a camera handstrap in lieu of the neckstrap, finding it more natural to carry my camera than to have it wrapped around my neck. Lens hoods are also notorious for causing vibrations during windy conditions. Another item attached to your camera that could possibly vibrate your mount is the remote cable release. Strong winds can bounce this around, which can send up vibrations to your camera. You can shorten the length of the cable by wrapping it around your tripod a few times, or simply use a wireless cable release.

29 A remote cable release (wired or wireless) is a necessity for accurate bracketing and general camera stability for any shutter speed where camera shake could potentially become an issue. The simple act of pressing the shutter button sends vibrations to your camera, which can soften your focus. The remote cable release will allow you to press your shutter via a remote so you re not actually touching your camera, essentially eliminating any chance of movement. Another great benefit of the remote cable release is the ability to lock your shutter button into place, allowing you to create long exposures without having to physically hold the shutter button down during bulb mode. For my workflow, I prefer the Canon remote cable release since it s simple to operate, and the chance that it could fail in the field is far less than a battery-operated wireless release, which is dependent on a functioning infrared or radio frequency connection. Since my subject is landscape photography, there isn t much need to trigger my shutter wirelessly as I am always in close vicinity to my camera.

30 proper focus In order to ensure that you get a proper exposure and uniform depth of field with your set of brackets, I have a few focusing tips for you to follow before you press the shutter.

31 Most (if not all) digital SLRs have several auto focus points that you see through your viewfinder. The camera will automatically use these points as a reference to decide where the main point of focus should be, meaning the sharpest point of your image. While this is a helpful invention, you re basically playing a guessing game with your point of focus, which is something you should avoid - especially when shooting shallow depths. The easiest solution here is to pick one focus point instead of allowing your camera to randomly select them for you (your camera manual will show you how this is done). This gives you much more control over where your point of focus will be. You can then easily aim the camera at your subject, do a prefocus, and reposition the camera accordingly to get the composition you want. I use the center focus point only for my camera as it is not only convenient, but it s also the most accurate point to select. 32

32 Once you find a strong composition (and with the correct focus), switch to manual focusing just after you prefocus so that your lens doesn t automatically refocus when taking multiple shots. This is less important if you re using a deep depth of field, but still should be practiced since even the smallest discrepancy can throw off your entire focus, leading to inconsistencies when exposure blending. If you follow these important focusing steps, you ll ensure that your slice of focus will be pinpoint accurate, and always where you want it to be - and just as important, that it won t change when taking multiple exposures.

33 At this point, your camera should be set up securely on your tripod, your scene composed, and focused properly on your subject. Make sure to attach your remote camera release, and if it s wired, tie up any dangling cord around your tripod to prevent unwanted vibrations, but leave enough slack so you can trigger your shutter without pulling on the cord (left). Also, ensure that your camera is set to RAW for image quality. Now you re ready to go into your camera menu options and activate your autobracketing features. Each camera model has a slightly different way of accessing this feature, so it would be best to refer to your camera manual before proceeding. I ll be using remote camera release my camera, the Canon 6D DSLR, as the example for this section.

34 setting the autobracket Here you can see the menu for selecting my autobracketing function. The Canon 6D has an autobracketing range of up to 3 stops +/- my base exposure, which is typically enough of a range for most scenes. To activate this function, I press the SET button to bring up the autobracketing submenu for further customization. 35

35 I can adjust the range of my autobracketing by turning my dial near the shutter button, which determines how wide of a tonal range you want to capture: anywhere from +/- 1/3 of a stop between each exposure to +/- 3 full stops. In the screenshot here, I ve chosen three brackets taken at 2 stop increments. I can also choose how many brackets my camera takes in one set, anywhere from 2 images to 7. The most common range is three brackets (your base exposure, one underexposed for highlight recovery, and another overexposed for shadow recovery), but there are certainly situations where you would want to capture more than three brackets. For example, if your tonal range is five full stops, then the gap between each bracket could be too large to recover all of the missing detail. In order to bridge the distance between each exposure, you would select 5 or 7 brackets for each set so that important data isn t skipped over as your camera changes shutter speeds.
36 The availability of these features depend on your camera model. Older models may be limited to only a 2-stop range for autobracketing, and three brackets for each set. If you find this too limiting for the scene you want to capture, then a manual bracket is needed, which I go over in a later section. Now that you have your autobracketing set, switch into aperture priority mode. You want to be in this mode as it keeps a consistent aperture of your choosing and will adjust the shutter speed automatically to compensate for the different brackets it renders. You don t want to change your aperture between exposures as it will give you an inconsistent depth of field. Select your aperture and ISO, and ensure your white balance is manually set and will not automatically adjust between exposures.


37 Working in aperture priority mode does not guarantee that the shutter speed your camera chooses will be the best to serve as your base exposure. Take a test shot and view the histogram: are most values somewhere in the middle, or is there a significant amount of tones grouped on either end of your graph? The ideal goal of your base exposure is to be the middle point of your bracket set, the average between your slowest and fastest exposure needed to capture the entire tonal range. If your base exposure has a large percentage of underexposed tones, then the reach of your longest bracket may not be enough to pull all of the underexposed detail out of the shadows. In the examples below, the best shutter speed to serve as your base exposure would be 1/200s since that histogram displays most tones away from the edges. If you chose 1/800s as your base, then the fastest bracket would be useless since there are no tones overexposed at 1/800s. 1/800 seconds 1/200 seconds 1/50 seconds

38 If you re satisfied with your base exposure, make a note of the shutter speed and switch into manual mode, inputting the settings you just metered. Although you could stay in aperture priority mode to execute your autobracket, I prefer to switch into manual mode to ensure that my settings will not automatically change. For example, if I capture a set of brackets and decide to adjust my composition, my camera may grab a different meter read and change my shutter speed without my knowledge. While this may not make a huge difference, I prefer to have full control over my settings and not let my camera decide a new shutter speed for me once I ve already settled on the best one.

39 live view However, if your camera has live view capabilities, you can skip this step entirely and go directly to manual mode as soon as you set your autobracket options in the menu. Live view has some fantastic benefits for your photography in general, but offers some specific workflow enhancements for autobracketing.

40 1. Live view eliminates the need to lock your mirror. As you may already know, the mirror in your camera can cause some unwanted vibrations as it flips up to expose your sensor. To counteract this vibration during longer exposures, DSLRs are equipped with a mirror lockup feature which flips your mirror up independently from the shutter. Separating these two steps during the exposure process allows for any vibrations to dissipate before the image is rendered onto your sensor. Newer DSLR bodies have taken this a step further with live view. Since your mirror and shutter are already open to give you the live preview on your LCD screen, mirror lock-up mode is redundant.


41 2. Live view has an on-screen histogram which allows you to bypass taking test shots. With live view, you can overlay a live histogram onto your LCD screen that will update for every new meter read. Since you can see the histogram change as you adjust your shutter speed, you ll save much time in the field as you ll be able to see how your histogram reacts to exposure changes instantly without having to take any test shots. Instead, you can judge your manual settings right on your LCD screen and choose a shutter speed that will serve as a solid base for your bracket. In the examples to the right, notice how the live histogram shifts to the left when I increase my shutter speed from 1/6s (top) to 1/30s (bottom).
42 executing the autobracket Whether or not you have live view capabilities, it s time to capture your brackets. Set your shooting mode to burst and hold down the remote cable release to begin capturing your set. Your camera will execute your bracket in sequential images as quickly as possible, reducing the time between each exposure. This will help to avoid any differences between each bracket if your frame includes any moving subjects, which makes for an easier blending experience later. Review your brackets and ensure that the histograms show that any missing detail has been recovered: your shortest bracket should have no blown highlights and your longest bracket should have all shadows pulled away from the left wall of your histogram (examples on next page). In other words, a successful set of images will have bracketed all available tones so you can blend them together for a complete tonal range of your scene. Make sure to check your histograms before you remove your camera from the tripod so in the event you need to take more brackets, your composition won t unintentionally shift.

43 checking your autobrackets all shadows recovered all highlights recovered
44 autobracketing review 1. After selecting your subject, mount your camera onto your tripod securely. Secure any joints and locks, and remove any items that could cause vibrations: such as lens hoods or camera straps. Attach your remote camera release and tie up any loose cable. 2. Compose and set your focus. 3. Activate your autobracketing and set both the number of brackets you wish to capture and the breadth of your tonal range between your fastest and longest shutter speed. IF YOU HAVE LIVE VIEW Switch into manual mode and set your ISO and aperture. Activate your live histogram and choose the best shutter speed to serve as your base exposure. Once you settle on the best shutter speed, begin to execute your set of brackets. IF YOU DO NOT HAVE LIVE VIEW Lock your mirror and switch to aperture priority mode. Set your ISO and aperture and take a test shot, viewing the histogram afterwards. If your histogram is balanced well, make note of the shutter speed and switch into full manual mode. Input your manual settings and begin to execute your set of brackets.
45 manual bracketing At times, you may find that your autobracketing system is too limiting for the tonal range you wish to capture. This can be especially true during the golden hours, where the disparity between highlights and shadows are at their highest. If at the end of your autobracket you still have tones peaking on either end of your histogram (indicating blown highlights and/or crushed shadows), you can adjust your settings manually to regain any detail that still falls outside of your brackets. Make note of the shutter speed your camera metered for your longest exposure (the one exposed for shadow recovery). Simply input that number and gradually decrease your shutter speed until all shadows have been recovered. Reverse this process for highlight recovery: input your fastest shutter speed and gradually increase this speed until all tones have been pushed away from the right side of your histogram. Remember, if the gap between each bracket is more than a few stops, make sure to take an additional exposures between in order to bridge them together. This will ensure that you capture any important details that you may have skipped over.

46 notes on highlight recovery When bracketing to recover highlights, you may bump up against the fastest shutter speed possible for your camera. This happens more often when working with shallow depths of field since more light is allowed to hit your sensor as your aperture widens. If you find that you still have highlights that need to be recovered and your shutter speed is at its fastest, use an ND filter to limit the amount of light that enters your lens, then autobracket as normal. Also note that the sun itself is one subject that you should not aim to recover fully. Not only will your attempts look unnatural when blending, but the sun is a direct light source and is expected to be incredibly bright. You should, however, recover any cloud interest surrounding the sun.

47 Not every scene needs to be bracketed, so a bit of critical thinking can save you some unneccesary work later on. I use this often when I m presented with minor exposure differences, ones that did not call for the need to bracket my scene. In the example photo to the right, my entire frame was exposed correctly except for the slightly overexposed green tree buds on the right side of my frame. Instead of autobracketing for this, I knew I could just blend two different exposures of the same RAW file together by dropping my exposure down and combining it with the original image. For a recovery as small as this, there isn t much need to go through the entire bracketing process as the loss of data from blending one RAW file is not noticeable in this example. blown highlights blended in

48 about christopher Through my work, I like to show a vantage point that is rarely seen in reality; a show of beauty, emotion, and serenity. There are countless mesmerizing scenes among us that are often hidden from society. My goal is to expose them to the world so that I may share the wonders I have seen. My work changes like the seasons of New England, which always presents me with surreal opportunities to create something unique.
Produce stunning. Pro photographer Chris Humphreys guides you through HDR and how to create captivating natural-looking images
 Masterclass: In association with Produce stunning HDR images Pro photographer Chris Humphreys guides you through HDR and how to create captivating natural-looking images 8 digital photographer 45 masterclass4produce
Capturing Realistic HDR Images. Dave Curtin Nassau County Camera Club February 24 th, 2016
 Capturing Realistic HDR Images Dave Curtin Nassau County Camera Club February 24 th, 2016 Capturing Realistic HDR Images Topics: What is HDR? In Camera. Post-Processing. Sample Workflow. Q & A. Capturing
A Beginner s Guide To Exposure
 A Beginner s Guide To Exposure What is exposure? A Beginner s Guide to Exposure What is exposure? According to Wikipedia: In photography, exposure is the amount of light per unit area (the image plane
Lesson 1 Course Notes
 4 Week Online Photography Course An Introduction to Digital Photography A Guide to Getting the Best from Your Digital Camera Lesson 1 Course Notes By David Taylor Click Here to Book Course PAGE 2 Introduction
CHAPTER 7 - HISTOGRAMS
 CHAPTER 7 - HISTOGRAMS In the field, the histogram is the single most important tool you use to evaluate image exposure. With the histogram, you can be certain that your image has no important areas that
Camera Exposure Modes
 What is Exposure? Exposure refers to how bright or dark your photo is. This is affected by the amount of light that is recorded by your camera s sensor. A properly exposed photo should typically resemble
Introduction to 2-D Copy Work
 Introduction to 2-D Copy Work What is the purpose of creating digital copies of your analogue work? To use for digital editing To submit work electronically to professors or clients To share your work
Funded from the Scottish Hydro Gordonbush Community Fund. Metering exposure
 Funded from the Scottish Hydro Gordonbush Community Fund Metering exposure We have looked at the three components of exposure: Shutter speed time light allowed in. Aperture size of hole through which light
SPOT METERING. Copyright Hairy Goat Ltd 2015 Ä
 How to fine tune your exposure with spot metering Metering is often something that leads to great confusion in newbie photographers (and often in more experienced ones, too). Basically, metering refers
NATURAL LIGHT & FOLIAGE
 AUTUMN Field Guide All material in this ebook, unless otherwise noted below, is Copyright Christopher O Donnell/creativeRAW, All Rights Reserved worldwide under the Berne Convention. This book may not
Blue Hour and HDR Tutorial by John Strung
 Blue Hour and HDR Tutorial by John Strung the Blue Hour is a wonderful time of night when photography can yield images of intense blue colours. Blue Hour is a bit of a misnomer for two reasons. There are
FOCUS, EXPOSURE (& METERING) BVCC May 2018
 BVCC May 2018") FOCUS, EXPOSURE (& METERING) BVCC May 2018 SUMMARY Metering in digital cameras. Metering modes. Exposure, quick recap. Exposure settings and modes. Focus system(s) and camera controls. Challenges & Experiments.
FOCUS, EXPOSURE (& METERING) BVCC May 2018 SUMMARY Metering in digital cameras. Metering modes. Exposure, quick recap. Exposure settings and modes. Focus system(s) and camera controls. Challenges & Experiments.
Photography Help Sheets
 Photography Help Sheets Phone: 01233 771915 Web: www.bigcatsanctuary.org Using your Digital SLR What is Exposure? Exposure is basically the process of recording light onto your digital sensor (or film).
Take Control of Your Camera
 Take Control of Your Camera With all of the technology packed into our cameras, it is easy to hand over control & blame our equipment when our images don t meet our expectations.. In this workshop we will
Name Digital Imaging I Chapters 9 12 Review Material
 Name Digital Imaging I Chapters 9 12 Review Material Chapter 9 Filters A filter is a glass or plastic lens attachment that you put on the front of your lens to protect the lens or alter the image as you
CAMERA BASICS. Stops of light
 CAMERA BASICS Stops of light A stop of light isn t a quantifiable measurement it s a relative measurement. A stop of light is defined as a doubling or halving of any quantity of light. The word stop is
Intro to Digital SLR and ILC Photography Week 1 The Camera Body
 Intro to Digital SLR and ILC Photography Week 1 The Camera Body Instructor: Roger Buchanan Class notes are available at www.thenerdworks.com Course Outline: Week 1 Camera Body; Week 2 Lenses; Week 3 Accessories,
ONE OF THE MOST IMPORTANT SETTINGS ON YOUR CAMERA!
 Chapter 4-Exposure ONE OF THE MOST IMPORTANT SETTINGS ON YOUR CAMERA! Exposure Basics The amount of light reaching the film or digital sensor. Each digital image requires a specific amount of light to
Film Cameras Digital SLR Cameras Point and Shoot Bridge Compact Mirror less
 Film Cameras Digital SLR Cameras Point and Shoot Bridge Compact Mirror less Portraits Landscapes Macro Sports Wildlife Architecture Fashion Live Music Travel Street Weddings Kids Food CAMERA SENSOR
HDR is a process for increasing the range of tonal values beyond what a single frame (either film or digital) can produce.
 can produce.") HDR HDR is a process for increasing the range of tonal values beyond what a single frame (either film or digital) can produce. It can be used to create more realistic views, or wild extravagant ones What
HDR HDR is a process for increasing the range of tonal values beyond what a single frame (either film or digital) can produce. It can be used to create more realistic views, or wild extravagant ones What
Introduction to camera usage. The universal manual controls of most cameras
 Introduction to camera usage A camera in its barest form is simply a light tight container that utilizes a lens with iris, a shutter that has variable speeds, and contains a sensitive piece of media, either
One Week to Better Photography
 One Week to Better Photography Glossary Adobe Bridge Useful application packaged with Adobe Photoshop that previews, organizes and renames digital image files and creates digital contact sheets Adobe Photoshop
Dynamic Range. H. David Stein
 Dynamic Range H. David Stein Dynamic Range What is dynamic range? What is low or limited dynamic range (LDR)? What is high dynamic range (HDR)? What s the difference? Since we normally work in LDR Why
Basic Camera Craft. Roy Killen, GMAPS, EFIAP, MPSA. (c) 2016 Roy Killen Basic Camera Craft, Page 1
 2016 Roy Killen Basic Camera Craft, Page 1") Basic Camera Craft Roy Killen, GMAPS, EFIAP, MPSA (c) 2016 Roy Killen Basic Camera Craft, Page 1 Basic Camera Craft Whether you use a camera that cost $100 or one that cost $10,000, you need to be able
Basic Camera Craft Roy Killen, GMAPS, EFIAP, MPSA (c) 2016 Roy Killen Basic Camera Craft, Page 1 Basic Camera Craft Whether you use a camera that cost $100 or one that cost $10,000, you need to be able
DIGITAL PHOTOGRAPHY CAMERA MANUAL
 DIGITAL PHOTOGRAPHY CAMERA MANUAL TABLE OF CONTENTS KNOW YOUR CAMERA...1 SETTINGS SHUTTER SPEED...2 WHITE BALANCE...3 ISO SPEED...4 APERTURE...5 DEPTH OF FIELD...6 WORKING WITH LIGHT CAMERA SETUP...7 LIGHTING
Presented to you today by the Fort Collins Digital Camera Club
 Presented to you today by the Fort Collins Digital Camera Club www.fcdcc.com Photography: February 19, 2011 Fort Collins Digital Camera Club 2 Film Photography: Photography using light sensitive chemicals
OUTDOOR PORTRAITURE WORKSHOP
 OUTDOOR PORTRAITURE WORKSHOP SECOND EDITION Copyright Bryan A. Thompson, 2012 bryan@rollaphoto.com Goals The goals of this workshop are to present various techniques for creating portraits in an outdoor
Until now, I have discussed the basics of setting
 Chapter 3: Shooting Modes for Still Images Until now, I have discussed the basics of setting up the camera for quick shots, using Intelligent Auto mode to take pictures with settings controlled mostly
PTC School of Photography. Beginning Course Class 2 - Exposure
 PTC School of Photography Beginning Course Class 2 - Exposure Today s Topics: What is Exposure Shutter Speed for Exposure Shutter Speed for Motion Aperture for Exposure Aperture for Depth of Field Exposure
How to Photograph Fireworks
 How to Photograph Fireworks Whether you're celebrating Independence Day, Guy Fawkes Day, or Diwali, it's always tempting to take pictures of the fireworks exploding in air. After all, a good firework show
These aren t just cameras
 Roger Easley 2016 These aren t just cameras These are computers. Your camera is a specialized computer Creates files of data Has memory Has a screen display Has menus of options for you to navigate Your
Photomatix Light 1.0 User Manual
 Photomatix Light 1.0 User Manual Table of Contents Introduction... iii Section 1: HDR...1 1.1 Taking Photos for HDR...2 1.1.1 Setting Up Your Camera...2 1.1.2 Taking the Photos...3 Section 2: Using Photomatix
CHAPTER 12 - HIGH DYNAMIC RANGE IMAGES
 CHAPTER 12 - HIGH DYNAMIC RANGE IMAGES The most common exposure problem a nature photographer faces is a scene dynamic range that exceeds the capability of the sensor. We will see this in the histogram
Table of Contents. 1. High-Resolution Images with the D800E Aperture and Complex Subjects Color Aliasing and Moiré...
 Technical Guide Introduction This Technical Guide details the principal techniques used to create two of the more technically advanced photographs in the D800/D800E brochure. Take this opportunity to admire
PHIL MORGAN PHOTOGRAPHY
 Including: Creative shooting Manual mode Editing PHIL MORGAN PHOTOGRAPHY A free e-book to help you get the most from your camera. Many photographers begin with the naïve idea of instantly making money
DIGITAL PHOTOGRAPHY FOR OBJECT DOCUMENTATION GOOD, BETTER, BEST
 DIGITAL PHOTOGRAPHY FOR OBJECT DOCUMENTATION GOOD, BETTER, BEST INTRODUCTION This document will introduce participants in the techniques and procedures of collection documentation without the necessity
Technical Guide Technical Guide
 Technical Guide Technical Guide Introduction This Technical Guide details the principal techniques used to create two of the more technically advanced photographs in the D800/D800E catalog. Enjoy this
Creating Stitched Panoramas
 Creating Stitched Panoramas Here are the topics that we ll cover 1. What is a stitched panorama? 2. What equipment will I need? 3. What settings & techniques do I use? 4. How do I stitch my images together
Understanding and Using Dynamic Range. Eagle River Camera Club October 2, 2014
 Understanding and Using Dynamic Range Eagle River Camera Club October 2, 2014 Dynamic Range Simplified Definition The number of exposure stops between the lightest usable white and the darkest useable
3 Exposure Techniques for Beginners By Gary Tindale
 3 Exposure Techniques for Beginners By Gary Tindale Introduction You are the proud owner of a DSLR, and it s full of features that can be disconcerting, several of which are geared towards controlling
This histogram represents the +½ stop exposure from the bracket illustrated on the first page.
 Washtenaw Community College Digital M edia Arts Photo http://courses.wccnet.edu/~donw Don W erthm ann GM300BB 973-3586 donw@wccnet.edu Exposure Strategies for Digital Capture Regardless of the media choice
Digital camera modes explained: choose the best shooting mode for your subject
 Digital camera modes explained: choose the best shooting mode for your subject On most DSLRs, the Mode dial is split into three sections: Scene modes (for doing point-and-shoot photography in specific
PHOTOGRAPHING THE LUNAR ECLIPSE
 1/29/18 PHOTOGRAPHING THE LUNAR ECLIPSE NICK SINNOTT CHICAGO PHOTOGRAPHY CLASSES PREPARATION TIMING AND FINDING LOCATION https://www.timeanddate.com/moon/phases/ - Dates of Lunar Phases 1 PREPARATION TIMING
HIGH DYNAMIC RANGE IMAGING Nancy Clements Beasley, March 22, 2011
 HIGH DYNAMIC RANGE IMAGING Nancy Clements Beasley, March 22, 2011 First - What Is Dynamic Range? Dynamic range is essentially about Luminance the range of brightness levels in a scene o From the darkest
The Fundamental Problem
 The What, Why & How WHAT IS IT? Technique of blending multiple different exposures of the same scene to create a single image with a greater dynamic range than can be achieved with a single exposure. Can
So far, I have discussed setting up the camera for
 Chapter 3: The Shooting Modes So far, I have discussed setting up the camera for quick shots, relying on features such as Auto mode for taking pictures with settings controlled mostly by the camera s automation.
Step 1: taking the perfect shot
 HDR MY WAY On demand of many people who like my way of making high dynamic range images from one single RAW file, I hereby present what I think is the best way to do it. For others that may very well not
To start there are three key properties that you need to understand: ISO (sensitivity)
") Some Photo Fundamentals Photography is at once relatively simple and technically confusing at the same time. The camera is basically a black box with a hole in its side camera comes from camera obscura,
Some Photo Fundamentals Photography is at once relatively simple and technically confusing at the same time. The camera is basically a black box with a hole in its side camera comes from camera obscura,
Dusk Photography. The Blue 15 minutes. Presented to Charlottesville Camera Club June 29, 2011 Deb Snelson 2011
 Dusk Photography The Blue 15 minutes Presented to Charlottesville Camera Club June 29, 2011 Deb Snelson 2011 It s All about When Gorgeous Blue sky Only lasts about 15 minutes Cannot be seen by the naked
Aperture & Shutter Speed Review
 Aperture & Shutter Speed Review Light Meters Your camera s light meter measures the available light in a scene. It does so by averaging all of the reflected light in the image to find 18% gray. By metering
Understanding Histograms
 Information copied from Understanding Histograms http://www.luminous-landscape.com/tutorials/understanding-series/understanding-histograms.shtml Possibly the most useful tool available in digital photography
Which equipment is necessary? How is the panorama created?
 Congratulations! By purchasing your Panorama-VR-System you have acquired a tool, which enables you - together with a digital or analog camera, a tripod and a personal computer - to generate high quality
High Dynamic Range (HDR) Photography in Photoshop CS2
 Photography in Photoshop CS2") Page 1 of 7 High dynamic range (HDR) images enable photographers to record a greater range of tonal detail than a given camera could capture in a single photo. This opens up a whole new set of lighting
Page 1 of 7 High dynamic range (HDR) images enable photographers to record a greater range of tonal detail than a given camera could capture in a single photo. This opens up a whole new set of lighting
HDR. High Dynamic Range Photograph
 HDR High Dynamic Range Photograph HDR This is a properly exposed image. HDR This is a properly exposed image - if I meter off the mountain side. HDR If it s properly exposed, why can t I see details in
1. This paper contains 45 multiple-choice-questions (MCQ) in 6 pages. 2. All questions carry equal marks. 3. You can take 1 hour for answering.
 in 6 pages. 2. All questions carry equal marks. 3. You can take 1 hour for answering.") UNIVERSITY OF MORATUWA, SRI LANKA FACULTY OF ENGINEERING END OF SEMESTER EXAMINATION 2007/2008 (Held in Aug 2008) B.Sc. ENGINEERING LEVEL 2, JUNE TERM DE 2290 PHOTOGRAPHY Answer ALL questions in the answer
UNIVERSITY OF MORATUWA, SRI LANKA FACULTY OF ENGINEERING END OF SEMESTER EXAMINATION 2007/2008 (Held in Aug 2008) B.Sc. ENGINEERING LEVEL 2, JUNE TERM DE 2290 PHOTOGRAPHY Answer ALL questions in the answer
Quick Tips for Taking Better Portraits
 JANUARY 5, 2019 BEGINNER Quick Tips for Taking Better Portraits Suggested Lens choices, exposure settings and focus modes Featuring GARY SMALL D300, AF-S NIKKOR 24-85mm f/2.8-4d IF lens, 1/30 sec., f/2.8,
Impact With Smartphone Photography. Smartphone Camera Handling. A Smartphone for Serious Photography?
 A Smartphone for Serious Photography? DSLR technically superior but photo quality depends on technical skill, creative vision Smartphone cameras can produce remarkable pictures always at ready After all
Photographing Waterfalls
 Photographing Waterfalls Developed and presented by Harry O Connor oconnorhj@yahoo.com July 26, 2017* All photos by Harry O Connor * Based on May 2012 topic Introduction Waterfall photographs are landscapes
Drive Mode. Details for each of these Drive Mode settings are discussed below.
 Chapter 4: Shooting Menu 67 When you highlight this option and press the Center button, a menu appears at the left of the screen as shown in Figure 4-20, with 9 choices represented by icons: Single Shooting,
Histograms& Light Meters HOW THEY WORK TOGETHER
 Histograms& Light Meters HOW THEY WORK TOGETHER WHAT IS A HISTOGRAM? Frequency* 0 Darker to Lighter Steps 255 Shadow Midtones Highlights Figure 1 Anatomy of a Photographic Histogram *Frequency indicates
How to capture the best HDR shots.
 What is HDR? How to capture the best HDR shots. Processing HDR. Noise reduction. Conversion to monochrome. Enhancing room textures through local area sharpening. Standard shot What is HDR? HDR shot What
Photographing your dog running towards you.
 Photographing your dog running towards you. There is a reason that I didn t start off with action. You need a strong foundation in the other aspects of photography. The guidelines here are based on the
HDR Bracket Shooting with the Nintendo DS
 HDR Bracket Shooting with the Nintendo DS Assuming you have constructed or obtained the appropriate cable to interface your camera to the DS, we can begin shooting HDR sequences. The DS software will make
silent seat ecourse & ebook
 silent seat ecourse & ebook Heyyyy!!! Welcome to learn manual mode, a momtographer crash course. I am seriously so excited to help you take your camera out of auto and into manual and start getting those
Autumn. Get Ready For Autumn. Technique eguide. Get Ready For
 Get Ready For Autumn Blink and you may have missed it, but our summer is behind us again and we re back into the short days and long nights of autumn. For photography however, the arrival of autumn means
Improve Your Photography by using Simple Camera Settings and Techniques
 Improve Your Photography by using Simple Camera Settings and Techniques Francis J Pullen 2012 +44 (0)7768 364 567 images@francispullen.co.uk www.francispullen.co.uk Introduction Digital Cameras offer tremendous
This has given you a good introduction to the world of photography, however there are other important and fundamental camera functions and skills
 THE DSLR CAMERA Before we Begin For those of you who have studied photography the chances are that in most cases you have been using a digital compact camera. This has probably involved you turning the
Mastering Y our Your Digital Camera
 Mastering Your Digital Camera The Exposure Triangle The ISO setting on your camera defines how sensitive it is to light. Normally ISO 100 is the least sensitive setting on your camera and as the ISO numbers
Part One In The Camera A Beginner s Guide to Improving Your Photography by John Strung
 Part One In The Camera A Beginner s Guide to Improving Your Photography by John Strung New members to the club are often puzzled as to why their wonderful images score only 18s in the club competitions
Chapter 6-Existing Light Photography
 Chapter 6-Existing Light Photography All of these images were taken with available light. Painting with light-using available light Photography that includes artificial light which naturally exists in
Photomanual TGJ-3MI. By: Madi Glew
 Photomanual TGJ-3MI By: Madi Glew i Table of Contents Getting to know Your Camera... 1 Shutter Speed... 3 White Balance... 4 Depth of Field... 5 Aperture Settings... 7 ISO (Film Speed)... 9 3-Point Portrait
Shooting Manual. Set your shooting mode to M
 Shooting Manual WHY Shooting Manual Set your shooting mode to M Shooting Manual 3 variables that determine your exposure: 1. ISO 2. Aperture 3. Shutter Speed Shooting Manual 1. ISO The camera s general
Infrared Photography. John Caplis. Joyce Harman Harmany in Nature
 Infrared Photography John Caplis & Joyce Harman Harmany in Nature www.harmanyinnature.com www.savingdarkskies.com Why do infrared photography? Infrared photography offers many unique creative choices you
L I F E L O N G L E A R N I N G C O L L A B O R AT I V E - FA L L S N A P I X : P H O T O G R A P H Y
 L I F E L O N G L E A R N I N G C O L L A B O R AT I V E - F A L L 2 0 1 8 SNAPIX: PHOTOGRAPHY SNAPIX OVERVIEW Introductions Course Overview 2 classes on technical training 3 photo shoots Other classes
Aperture & Shutter Speed Review
 Aperture & Shutter Speed Review Light Meters Your camera s light meter measures the available light in a scene. It does so by averaging all of the reflected light in the image to find 18% gray. By metering
Fireworks. Colin White 2016
 Fireworks Colin White 2016 Australia day is coming up, and photographers will feel an urge to have a go at photographing the fireworks. If this description fits you, then my experience from last year may
Topic 2 - A Closer Look At Exposure: ISO
 Getting more from your Camera Topic 2 - A Closer Look At Exposure: ISO Learning Outcomes In this lesson, we will revisit the concept of ISO and the role it plays in your photography and by the end of this
Presented by Craig Stocks Arts by Craig Stocks Arts
 Presented by Craig Stocks Arts www.craigstocksarts.com 2010 by Craig Stocks Arts Basic camera settings for point and shoot cameras (resolution, quality) Resolution - how much can you enlarge a picture?
Photographing Waterfalls
 Photographing Waterfalls Developed and presented by Harry O Connor oconnorhj@yahoo.com May 3, 2010 All photos by Harry O Connor Introduction Waterfall photographs are landscapes Typical landscape considerations
Zone. ystem. Handbook. Part 2 The Zone System in Practice. by Jeff Curto
 A Zone S ystem Handbook Part 2 The Zone System in Practice by This handout was produced in support of s Camera Position Podcast. Reproduction and redistribution of this document is fine, so long as the
METERING FOR A BETTER PHOTOGRAPH
 METERING FOR A BETTER PHOTOGRAPH By Janet Steyer 2 8 15 INTRODUCTION This program is geared toward the photographer who has a camera with manual controls. Most of this information is based on the controls
DSLR Essentials: Class Notes
 DSLR Essentials: Class Notes The digital SLR has seen a surge in popularity in recent years. Many are enjoying the superior photographic experiences provided by these feature packed cameras. Interchangeable
TAKING BETTER PHOTOS ON ANY DEVICE
 TAKING BETTER PHOTOS ON ANY DEVICE Sarah Dudik Public Information & Marketing HOW TO TAKE BETTER PHOTOGRAPHS The device you use isn t as important as how you are looking through it Any device can be used
Capturing God s Creation Through The Lens. Session 3 From Snap Shots to Great Shots January 20, 2013 Donald Jin
 Capturing God s Creation Through The Lens Session 3 From Snap Shots to Great Shots January 20, 2013 Donald Jin donjin@comcast.net Course Overview Jan 6 Setting The Foundation Jan 13 Building Your Craft
Aperture Priority Mode
 Chapter 3: Shooting Modes for Still Images 23 The Program Shift function is available only in Program mode; it works as follows. Once you have aimed the camera at your subject, the camera displays its
Extending the Dynamic Range of Film
 Written by Jonathan Sachs Copyright 1999-2003 Digital Light & Color Introduction Limited dynamic range is a common problem, especially with today s fine-grained slide films. When photographing contrasty
LANDSCAPE PHOTOGRAPHY TECHNIQUES, COMPOSITION, AND PROCESSING
 LANDSCAPE PHOTOGRAPHY TECHNIQUES, COMPOSITION, AND PROCESSING Tom Price LANDSCAPE PHOTOGRAPHY TIPS AND TRICKS Wide angle lens desirable 16-18 mm good focal length for APC-C sensor Telephoto also produce
ISO 200 1/500 sec. f/11 82mm lens
 4 ISO 200 1/500 sec. f/11 82mm lens The Creative Zone Taking Your Photography to the Next Level The Creative zone is the name given by Canon to the shooting modes that offer you the greatest amount of
Travel & Landscapes. Introduction
 Introduction Landscape photography captures the natural environment, but can also include man made features within that environment. A striking and breathtaking landscape image will appeal to all our senses
Introduction to Digital Photography
 Introduction to Digital Photography with Nick Davison Photography is The mastering of the technical aspects of the camera combined with, The artistic vision and creative know how to produce an interesting
Topaz Labs DeNoise 3 Review By Dennis Goulet. The Problem
 Topaz Labs DeNoise 3 Review By Dennis Goulet The Problem As grain was the nemesis of clean images in film photography, electronic noise in digitally captured images can be a problem in making photographs
FUNDAMENTALS OF DIGITAL PHOTOGRAPHY FOR FIRE INVESTIGATORS
 FUNDAMENTALS OF DIGITAL PHOTOGRAPHY FOR FIRE INVESTIGATORS Ryan M Cox, B.Sc. FPET, CFEI, CFI, CFPS Kodiak Fire & Safety Consulting, USA ABSTRACT A photograph is worth 1000 words is a saying that is believed
How to combine images in Photoshop
 How to combine images in Photoshop In Photoshop, you can use multiple layers to combine images, but there are two other ways to create a single image from mulitple images. Create a panoramic image with
AF Area Mode. Face Priority
 Chapter 4: The Shooting Menu 71 AF Area Mode This next option on the second screen of the Shooting menu gives you several options for controlling how the autofocus frame is set up when the camera is in
Landscape Photography
 Landscape Photography Francis J Pullen Photography 2015 Landscape photography requires a considered approach, and like fine wine or food, should not be rushed. You may even want scout out the desired location
This talk is oriented toward artists.
 Hello, My name is Sébastien Lagarde, I am a graphics programmer at Unity and with my two artist co-workers Sébastien Lachambre and Cyril Jover, we have tried to setup an easy method to capture accurate
Autofocus Problems The Camera Lens
 NEWHorenstein.04.Lens.32-55 3/11/05 11:53 AM Page 36 36 4 The Camera Lens Autofocus Problems Autofocus can be a powerful aid when it works, but frustrating when it doesn t. And there are some situations
Photography for the Lighting Designer
 Photography for the Lighting Designer Lighting designers not only have the challenge of creating emotion, space, motion, and a pretty image but we also have the challenge of selling our services to the
ACTION AND PEOPLE PHOTOGRAPHY
 ACTION AND PEOPLE PHOTOGRAPHY These notes are written to complement the material presented in the Nikon School of Photography Action and People Photography class. Helpful websites: Nikon USA Nikon Learn
Realistic HDR Histograms Camera Raw
 Realistic HDR Histograms Camera Raw Wednesday September 2 nd 2015 6:30pm 8:30pm Simsbury Camera Club Presented by Frank Zaremba Gcephoto@comcast.net 1 There are no bad pictures; that's just how your face