Photoshop: Manipulating Photos
|
|
|
- Ashley Sutton
- 5 years ago
- Views:
Transcription
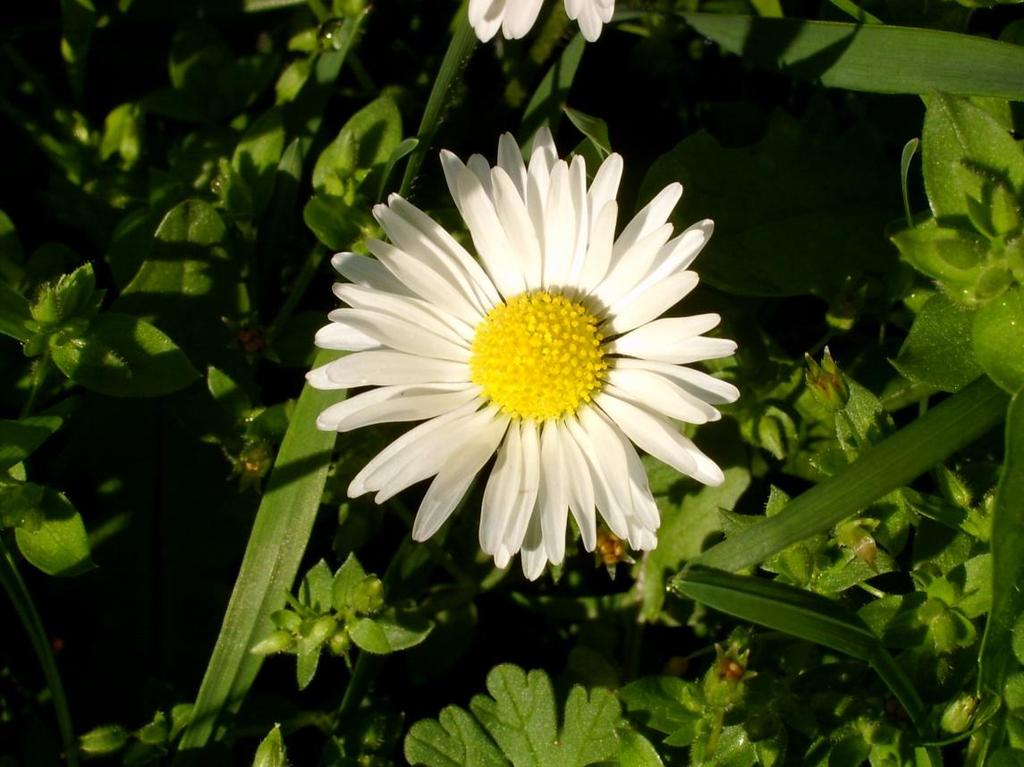
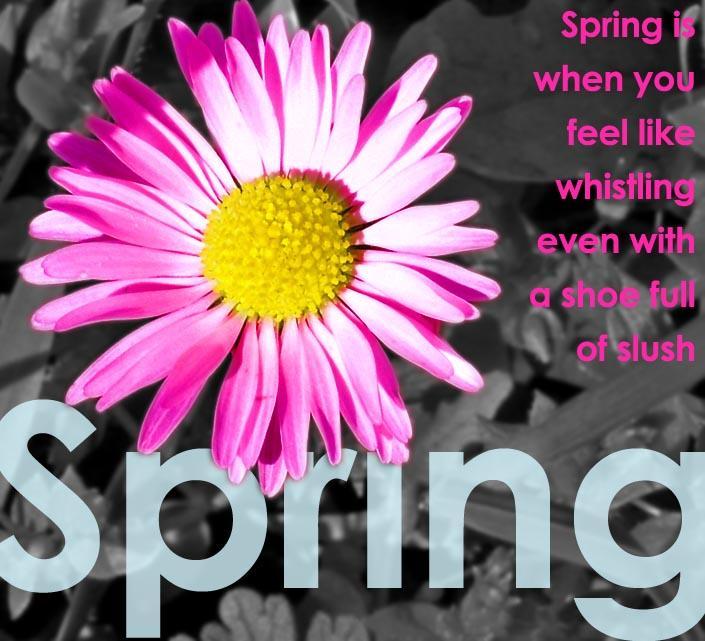
1 Photoshop: Manipulating Photos All Labs must be uploaded to the University s web server and permissions set properly. In this lab we will be manipulating photos using a very small subset of all of Photoshop s capabilities. 1. In Photoshop, open Flower.jpg (file->open->flower.jpg ) 2. To see where we re headed, look at the end of this lab. We re going to convert Flowers.JPG to Spring.JPG. 3. Note in the title bar that this image is at 33.3% size (it s possible yours will be different) and it s colors are stored as RGB. Resize 4. This image is huge. The first thing we want to do is resize the image. a. Under the Image menu at the top, choose Image Size b. The image is 2272x 1704 pixels (huge!) and the resolution is 96 pixels per inch. c. Change resolution to 72 pixels/inch. (Note the size in inches changes. Why?) d. At the bottom, click on Resample Image (make sure Constrain Proportions is still selected) e. Under Document Size, by inches to the right of width, click on the drop-down arrow f. Select percent g. Change the width from 100% to 50% h. Hit return. The image should get a bunch smaller on your screen. 5. We want to see the whole image. Select the magnification tool from the Toolbar. Click on the image until the top bar says 100%. Put your mouse pointer on the lower right corner and drag the image down until you can see the entire image of the elephant. Cropping Image 6. There s an awful lot of green background in this image. We want to focus on the flower, so we re going to crop away a lot of the green background. 7. Choose the crop tool from the Toolbar 8. Position the crop tool (your mouse pointer) at the top left of the area you want to select. 9. Drag it down and to the right until you ve selected the entire flower, but cropped out some of the green around the edges. (Not too much you want to leave a little background to play with. I personally left a bit more background showing on the bottom and on the right, so the flower was located a bit more towards the left top.) 10. Adjust your selection by clicking and dragging the square boxes that occur at the corners and in the center of the dotted lines that demark your selection. 11. When you are happy with your selection, click on the selection tool in the Toolbar.
2 12. An alert box will crop up asking, Crop this image? 13. Select Crop if you are happy, Don t Crop if you don t want to crop the image, and Cancel if you want to play more with your selection. Adjust Color 14. Under the Image menu at the top, coose Adjustments from the dropdown menu, then choose Levels 15. We can see that this looks fairly well balanced on both sides, but isn t centered as nicely as we might want. Drag the center arrow under input to the left a bit (to about 1.31). Already the color range looks nicer. 16. I might want to adjust the blue channel as well. At the top, of the adjustment box, you currently see RGB. Choose Red and adjust the middle arrow to around Feel free to play with the red and green channel as well until you think the colors are suitable. I, for instance, might want to drag the green center arrow over to the right a tad and drag the blue right arrow over to the left a bit. 17. When happy, hit OK 18. We also might want to manipulate the brightness/contrast. Under the image menu at the top, choose brightness/contrast. 19. Drag the brightness arrow to the right to about +11 (or whatever you think makes the image look good. 20. Play with the contrast arrow as well. I personally feel the image looks good with contrast as it is (at 0), but if you like it at another level, adjust it to the level you like. 21. When happy, hit OK 22. Under Image menu choose Shadow/Highlight 23. Slide the two sliders around until you are happy (I personally might slide the shadow up to about 65-70% to see the background more clearly and/or slide the highlights up to about 7 to see more detail in the flower, which is peaking out, but this is your choice). 24. When happy, hit OK. 25. Under Images menu, choose Color balance. 26. Slide the three sliders around until you are happy with the color (Watch the color of the flower you may want to come back to this step later). 27. When happy, hit OK 28. Under Image menu, choose Hue/Saturation/Lightness 29. Slide the three sliders around until you are happy with the color 30. Finally, you can always look at Variations under the Image menu. 31. If you see a variation you like, click on it and choose OK 32. Now you should be fairly happy with your colors. If not, feel to play with these or other options under the Image menu to adjust the colors more precisely.
3 Undoing steps 33. You can always undo something you don t like. The simplest way is to go under the Edit Menu across the top and hit Undo. 34. As an alternative (AND THIS IS EXTREMELY USEFUL!!!!) you can use the History Window 35. If the History Window isn t visible, under the Window Menu across the top, click on History to make sure it has a check next to it. 36. In the History Window, you will see a list of the steps you have taken so far in creating your image. You can click on any one of those steps to go back to the state your image was at when you did that state. 37. You can click on each of those steps until you find the state you want to back up to, then just continue working. 38. Note that when you continue working, you lose all states that you d done after that state. You are creating a new series of steps. 39. I CANNOT EMPHASIZE ENOUGH THIS IS VERY USEFUL. PLEASE LEARN HOW TO USE THE HISTORY OPTION. Layers 40. We may want to make the flower stand out from the background. There are a couple of ways to do this, but 41. for now we ll use layers. 42. Choose the quick selection tool from the Toolbar. 43. With the quick select tool, click on petals in the flower until the entire flower (including the center) has been selected. 44. We want the edges to be soft, so we re going to feather the edges 45. Under Select Menu across the top, choose Modify->Feather. Make the feather be 3 pixels. 46. Now let s put the flower on its own layer. 47. Under Edit Menu across the top, choose copy. 48. Under Edit Menu across the top, choose paste 49. Look at your Layers window. If the Layers Window is not visible, Under the Window Menu across the top, click on Layers. You should then be able to see the Layers Window. 50. You should see 2 layers in your Layers Window, one that has just the flower in it and one that has the entire picture. The entire picture should be the bottom layer. The flower is on top of it, and thus changes we make to the bottom layer will not affect what we see on the second layer. 51. Let s change the background. 52. In the Layers window click on the background layer to make sure that s the layer we re changing. 53. Let s blur the background. 54. Under the Filter Menu at the top, choose Blur->Gaussean Blur. 55. In the Gaussian Blur Box, play around a bit to get the amount of blur you want. I chose 1.8 as the amount of blur I liked. Notice how the background blurs, but the flower stays nice and
4 sharp. That s because it is on a layer on top of the background, and changes we make to the background layer don t affect the layer wit h the flower in it. 56. I think we want to desaturate the background a bit. I can do this in a bunch of ways. a. Under the Image Menu, Choose Adjustments -> Hue/Saturation/Lightness b. Slide the Saturation slider to the left until you are happy c. Slide the lightness slider to the right to make the background lighter d. When happy Click OK 57. OR if you want to just completely desaturate the background: a. Under the Image Menu choose Adjustments->Desaturate (This is what I chose). 58. I m pretty happy with this. But We might want to add color to the flower (while leaving the center that beautiful yellow). To do so we ll repeat a lot of the steps we ve already done. 59. Click on the flower layer in the Layers Window to select the flower layer. 60. With the quick selection tool, select the yellow center. 61. Feather the selection using Select->Modify->Feather. Again, feather by about 3 pixels. 62. Put the selection on its own layer. Choose Edit->Copy, then Edit->Paste. The yellow center should be on its own top layer (so there should be 3 layers now). 63. Click on the flower layer in the Layers Window so we re adjusting the flowers and not the yellow center. 64. Under the Image Menu, chose Color Balance. 65. With Midtones selected under Tone Balance, slide the top slider towards red (to about +50). 66. Slide the middle slider towards Magenta (to about -46) 67. Slide the bottom slider towards blue (by about +5). 68. Select Highlights under Tone Balance 69. Slide the top slider to about +29 (towards Red) 70. Slide the middle slider towards Magenta by about Slide the bottom slider towards Blue by about Choose Shadows under Tone Balance 73. Slide towards red to about Slide towards Magenta by about Slide towards blue by about If you want to play more, feel free. If you re happy, click OK. Eraser Tool 77. Notice how the yellow center layer includes some of the flower petals in the upper right side. We might want to erase this. This is a fairly small area, so let s use the eraser tool. 78. Make sure you choose the yellow center layer in the Layers Window by clicking on it. 79. Choose the Eraser tool from the Toolbar 80. Look right under the Menus across the top of the Adobe Photoshop Window. Probably next to Brush: has a circle with a number under it and a little drop-down arrow. If it s a large number (like, say, 100), we ll want to change it to something more manageable. Click on the dropdown
. 82. We want some of the layer below to show through, but perhaps not all.")
 over the shadow petal part of the yellow center until you ve erased what you want. Adding Text 84. Finally, let s add some Text. Select the Text tool. 85.")
5 arrow next to the circle. 81. Choose Soft Round 17 pixels (we want soft edges when we erase because soft edges are more forgiving. Hard edges are exact, so if we want to be precise, we d pick hard edges). 82. We want some of the layer below to show through, but perhaps not all. So we ll make our eraser s opacity be 50% (then it will be 50% opaque and 50% transparent, letting the layer below show through. 83. Now we have the eraser tool set to how we want it. Run your mouse pointer (the eraser) over the shadow petal part of the yellow center until you ve erased what you want. Adding Text 84. Finally, let s add some Text. Select the Text tool. 85. Click on the bottom right of the image and type the word, Spring. 86. It s probably pretty small. Let s make it big and obvious. 87. Make sure the Type layer is selected in your Layers window (the type layer will have a big T in it and will say Spring next to it). 88. If your Character Window isn t showing, under the Window Menu at the top, make sure Character is checked by clicking on it.

6 89. Change the font size (in the above window, font size is represented by two differently-sized T s and is set at 14 pt) to something much larger that will fill your image. I ended up with 256 pt, but you may want to play until it is the right size for your window. 90. If you want, change the font face (in the above window, font face is set to Arial), click on the drop-down menu arrow next to the Font face selector (the arrow next to Arial) and choose some different fonts to see what they look like. Pick one you like. I chose Century Gothic. 91. I changed my font from Regular to bold (the drop-down menu next to Regular in the above window). 92. You may wish to change the color of the font. Mine defaulted to white, but yours may default to black or another color. There are a bunch of ways to choose a color. One way is with the eye dropper. a. Click on color in the Character Box b. A new Select Text Color box will pop up. c. Run your mouse pointer over the image (the flower/yellow center/background) d. Notice how your mouse pointer changes to an eyedropper. e. Click on different places in your images. See how the color box changes to your current selection? f. When you re happy with your color, hit OK g. Notice how the text color changes to that color. h. Repeat if you re not happy with the color. 93. OR a. Click on color in the Character Box b. A new Select Text Color box will pop up. c. In the box is a bar with a rainbow and a slider. Slide the slider up and down the rainbow until you re happy with the general color range. d. Then in the large color box to the right of the rainbow bar, drag the circle around until you find a color you like. e. Repeat until happy. f. (I ended up picking a pale blue-green, R=213, G=247, B=255) g. When happy, hit OK 94. This layer was too strong for me. I wanted it to be a bit softer so I want to change the Text Layer s opacity
 to below Layer 1 but above the background. 97. Now I may want to reposition the word Spring on the page.")
7 95. With the Text layer selected in the Layers Window, highlight 100% and change it to 80% (like above). 96. Still not happy. I want the flower to be more prominent than the word Spring. So in the layers window, I m going to drag the Text layer (Spring) to below Layer 1 but above the background. 97. Now I may want to reposition the word Spring on the page. I need to click on the selection tool in the toolbar. 98. Drag the text Spring around your image until it s in a position you like. I put mine centered on the bottom and slightly under the flower petals. 99. We re almost there. But let s add more text. We re going to put a short phrase over along the right side Click on the Text tool in the Toolbar 101. Position your mouse pointer (text pointer) near the top of the flower on the right side. Click down and, without releasing, drag the mouse down and right until you ve created a text box In the newly created text box, type Spring is when you feel like whistling even with a shoe full of slush You probably can t see much. This is because your font is still huge. Select all the text in the text box In the Character window change the text to something that lets you see all the text. I ended up with 35 pt If you want, change the color of the text. Highlight the text and play with color. I ended up with a fuscia-ping color I got from the shadows in the petals We may want to change the alignment. Click on the Paragraph tab in the Character Window With the text still highlighted click on the right alignment view. Text will now be aligned to the right Finally, you may want to change the space between lines. Go back to the Character window by clicking on the character tab Space between paragraphs is represented as 2 A s on top of each other with an arrow between them.
8 110. Change it to something larger than the font size you chose. I ended up with 54 pts between my paragraphs If you re happy, you re done!! We just need to save it. Saving files 112. We re assuming you re saving this for the web. If so, you have a limited number of options for saving. You can either save it as a.gif file or a.jpg file. This is a photo with a lot of gradations. As such we ll want to save it as a JPG file Under the File Menu, choose Save for Web and Devices. A huge window will pop up Make sure JPG is selected In the upper left corner, make sure the Optimized tab is selected. Then you can see the actual quality of the image Over in the left bar, try changing the quality to low, medium, high, and maximum. Notice how each of these choices affects the quality of your image Adjust the quality. Choose 10, 20,30 90,100 and see how that affects the quality of your image Be aware that the higher the quality, the larger your image will be when you save it. The larger your image is, the longer it will take to download Choose a quality that makes you happy. I found that 50-60% made me happy Hit Save 121. Change the name to SpringDY.jpg (replace DY with your initials) Wow! You did it! Also Save the file as a.psd file. Under File Menu choose Save As, then call it SpringDY.psd Create a folder called Lab3, and move all your saved lab3 files into Lab Upload to the University s web server Lab3, with the lab files inside it Make sure you have permissions set properly 127. Submit the URL of lab3 to sakai Make sure you ve got a copy of the lab3 folder on your flash drive, and remove it from the University s computer.
9 To
Photoshop: Manipulating Photos
 Photoshop: Manipulating Photos All Labs must be uploaded to the University s web server and permissions set properly. In this lab we will be manipulating photos using a very small subset of all of Photoshop
Photoshop: Manipulating Photos
 Photoshop: Manipulating Photos All Labs must be uploaded to the University s web server and permissions set properly. In this lab we will be manipulating photos using a very small subset of all of Photoshop
Photoshop 1. click Create.
 Photoshop 1 Step 1: Create a new file Open Adobe Photoshop. Create a new file: File->New On the right side, create a new file of size 600x600 pixels at a resolution of 300 pixels per inch. Name the file
Lab 2 Assignment Part 2: (Due two weeks following the fluorescence lab) (10 points)
 (10 points)") Lab 2 Assignment Part 2: (Due two weeks following the fluorescence lab) (10 points) Each individual should prepare one set of corresponding phase contrast and fluorescent images and an accompanying figure
Lab 2 Assignment Part 2: (Due two weeks following the fluorescence lab) (10 points) Each individual should prepare one set of corresponding phase contrast and fluorescent images and an accompanying figure
Recitation 2 Introduction to Photoshop
 Recitation 2 Introduction to Photoshop What is Adobe Photoshop? Adobe Photoshop is a tool for creating digital graphics either by starting with a scanned photograph or artwork or by creating the graphics
Retouching Portraits in Photoshop
 Retouching Portraits in Photoshop I Removing Blemishes When removing blemishes, acne or other imperfections on the skin, our goal is to maintain as much of the original skin texture as possible. That way,
ITNP80: Multimedia Adobe Photoshop Practical Weeks commencing 26 January and 2 February 2015.
 ITNP80: Multimedia Adobe Photoshop Practical Weeks commencing 26 January and 2 February 2015. The aims and objectives of this practical are four-fold: To give you some practical experience of some of the
Extreme Makeovers: Photoshop Retouching Techniques
 Extreme Makeovers: Table of Contents About the Workshop... 1 Workshop Objectives... 1 Getting Started... 1 Photoshop Workspace... 1 Retouching Tools... 2 General Steps... 2 Resolution and image size...
Digital Design and Communication Teaching (DiDACT) University of Sheffield Department of Landscape. Adobe Photoshop CS5 INTRODUCTION WORKSHOPS
 University of Sheffield Department of Landscape. Adobe Photoshop CS5 INTRODUCTION WORKSHOPS") Adobe INTRODUCTION WORKSHOPS WORKSHOP 1 - what is Photoshop + what does it do? Outcomes: What is Photoshop? Opening, importing and creating images. Basic knowledge of Photoshop tools. Examples of work.
Adobe INTRODUCTION WORKSHOPS WORKSHOP 1 - what is Photoshop + what does it do? Outcomes: What is Photoshop? Opening, importing and creating images. Basic knowledge of Photoshop tools. Examples of work.
Rendering a perspective drawing using Adobe Photoshop
 Rendering a perspective drawing using Adobe Photoshop This hand-out will take you through the steps to render a perspective line drawing using Adobe Photoshop. The first important element in this process
Photoshop Elements Hints by Steve Miller
 2015 Elements 13 A brief tutorial for basic photo file processing To begin, click on the Elements 13 icon, click on Photo Editor in the first box that appears. We will not be discussing the Organizer portion
Photoshop CC 2018 Essential Skills
 Photoshop CC 2018 Essential Skills Adobe Photoshop Creative Cloud 2018 University Information Technology Services Learning Technology, Training, Audiovisual and Outreach Copyright 2018 KSU Division of
ADOBE PHOTOSHOP CS 3 QUICK REFERENCE
 ADOBE PHOTOSHOP CS 3 QUICK REFERENCE INTRODUCTION Adobe PhotoShop CS 3 is a powerful software environment for editing, manipulating and creating images and other graphics. This reference guide provides
How to Create Website Banners
 How to Create Website Banners In the following instructions you will be creating banners in Adobe Photoshop Elements 6.0, using different images and fonts. The instructions will consist of finding images,
Introduction to Photoshop Elements
 John W. Jacobs Technology Center 450 Exton Square Parkway Exton, PA 19341 610.280.2666 ccljtc@ccls.org www.ccls.org Facebook.com/ChesterCountyLibrary Introduction to Photoshop Elements Chester County Library
Lesson 16 Text, Layer Effects, & Filters
 Lesson 16 Text, Layer Effects, & Filters Digital Media I Susan M. Raymond West High School In this tutorial, you will: Create a Type Layer Add and Format Type within a Type Layer Apply Layer Effects Apply
Photoshop fun CS3 Lab.docx 02/02/09
 Starting Off - with Adobe Photoshop CS3 Create a new folder in your StudentBackup storage area (or on your USB drive). Name this new folder with your last name and first initial (lastnamefirstinitial Photoshop
INTRO TO LAYERS (PART 2)
") Adobe Photoshop Elements INTRO TO LAYERS (PART 2) By Dave Cross In Part 1, we talked about the main concept behind layers and why they re so important. Now we ll take it a step further and show how to
Adobe Photoshop Elements INTRO TO LAYERS (PART 2) By Dave Cross In Part 1, we talked about the main concept behind layers and why they re so important. Now we ll take it a step further and show how to
Adobe Photoshop PS2, Part 3
 Adobe Photoshop PS2, Part 3 Basic Photo Corrections This guide steps you through the process of acquiring, resizing, and retouching a photo intended for posting on the Web as well as for a print layout.
GETTING STARTED MAKING A NEW DOCUMENT
 Accessed with permission from http://web.ics.purdue.edu/~agenad/help/photoshop.html GETTING STARTED MAKING A NEW DOCUMENT To get a new document started, simply choose new from the File menu. You'll get
Photoshop CC Editing Images
 Photoshop CC Editing Images Rotate a Canvas A canvas can be rotated 90 degrees Clockwise, 90 degrees Counter Clockwise, or rotated 180 degrees. Navigate to the Image Menu, select Image Rotation and then
Adobe Photoshop CC 2018 Tutorial
 Adobe Photoshop CC 2018 Tutorial GETTING STARTED Adobe Photoshop CC 2018 is a popular image editing software that provides a work environment consistent with Adobe Illustrator, Adobe InDesign, Adobe Photoshop,
Duplicate Layer 1 by dragging it and dropping it on top of the New Layer icon in the Layer s Palette. You should now have two layers rename the top la
 50 Face Project For this project, you are going to put your face on a coin. The object is to make it look as real as possible. Though you will probably be able to tell your project was computer generated,
The horse image used for this tutorial comes from Capgros at the Stock Exchange. The rest are mine.
 First off, sorry to those of you that are on the mailing list or RSS that get this twice. I m finally moved over to a dedicated server, and in doing so, this post was lost. So, I m republishing it. This
15 Photoshop Tips. Changing Photoshop rulers from inches to picas
 5 Photoshop Tips Changing Photoshop rulers from inches to picas What s the difference between inches and picas? a 6x inch RGB JPEG file is.9 MB a 6x pica RGB JPEG file is. MB a 6x inch RGB TIFF file is.
Mullingar Camera Club Basic introduction to Digital Printing using Photoshop CC.
 Mullingar Camera Club Basic introduction to Digital Printing using Photoshop CC. Table of Contents Course aims: 1 Course presentation notes: 1 Introducing Photoshop: 1 Adjusting the Brightness or Contrast
PHOTOSHOP. pixel based image editing software (pixel=picture element) several small dots or pixels make up an image.
 several small dots or pixels make up an image.") Photoshop PHOTOSHOP pixel based image editing software (pixel=picture element) several small dots or pixels make up an image. RESOLUTION measurement of the total number of pixels displayed determines the
Photoshop PHOTOSHOP pixel based image editing software (pixel=picture element) several small dots or pixels make up an image. RESOLUTION measurement of the total number of pixels displayed determines the
OLD FASHIONED HAND TINTED EFFECT
 OLD FASHIONED HAND TINTED EFFECT In this Photoshop tutorial, we re going to learn how to easily create an old-fashioned, hand-tinted photo effect. All it takes is an adjustment layer, a layer blend mode,
Photoshop CS part 2. Workshop Objective. Getting Started Quit all open applications Single click Adobe Photoshop from the Dock
 pg. 1 Photoshop CS part 2 Photoshop is the premier digital photo editor application used for photo retouching, creating web images, film/video compositing, and other pixel/vector-based imagery. Workshop
Using Photoshop Elements
 Using Photoshop Elements Created By: Rick Williams August 2004 Table of Contents Photoshop Element Tools...Page 1 Tool Descriptions... Page 3 Starting Photoshop Elements... Page 7 Resizing an Image...
Adobe Photoshop CS2 Workshop
 COMMUNITY TECHNICAL SUPPORT Adobe Photoshop CS2 Workshop Photoshop CS2 Help For more technical assistance, open Photoshop CS2 and press the F1 key, or go to Help > Photoshop Help. Selection Tools - The
Preparing Images For Print
 Preparing Images For Print The aim of this tutorial is to offer various methods in preparing your photographs for printing. Sometimes the processing a printer does is not as good as Adobe Photoshop, so
Introduction to Adobe Photoshop 5.0
 Introduction to Adobe Photoshop 5.0 Fall 2000 Prepared by Soumaia Ahmed Al Ayyat Adobe Photoshop is a powerful, professional image-processing tool. It processes a variety of image formats. The quality
Learning Photo Retouching techniques the simple way
 Learning Photo Retouching techniques the simple way Table of Contents About the Workshop... i Workshop Objectives... i Getting Started... 1 Photoshop Workspace... 1 Setting up the Preferences... 2 Retouching
By Washan Najat Nawi
 By Washan Najat Nawi how to get started how to use the interface how to modify images with basic editing skills Adobe Photoshop: is a popular image-editing software. Two general usage of Photoshop Creating
Adobe Photoshop CS5 Tutorial
 Adobe Photoshop CS5 Tutorial GETTING STARTED Adobe Photoshop CS5 is a popular image editing software that provides a work environment consistent with Adobe Illustrator, Adobe InDesign, Adobe Photoshop
METAL TEXT EFFECT. Step 1: Create A New Document. Step 2: Fill The Background With Black
 METAL TEXT EFFECT In this text effects tutorial, we ll learn how to easily create metal text, a popular effect widely used in video games and movie posters! It may seem like there s a lot of steps involved,
ADD TRANSPARENT TYPE TO AN IMAGE
 ADD TRANSPARENT TYPE TO AN IMAGE In this Photoshop tutorial, we re going to learn how to add transparent type to an image. There s lots of different ways to make type transparent in Photoshop, and in this
Create a Candy Cane. Create a new canvas with the size 8x10 inches at 300 pixel/inch. See image below Ctrl + N
 Create a Candy Cane The Basic Candy Cane Canvas and Shape 1. Create a new folder, name it Candy Cane your name. Create a new canvas with the size 8x10 inches at 300 pixel/inch. See image below Ctrl + N
In the following sections, if you are using a Mac, then in the instructions below, replace the words Ctrl Key with the Command (Cmd) Key.
 Key.") Mac Vs PC In the following sections, if you are using a Mac, then in the instructions below, replace the words Ctrl Key with the Command (Cmd) Key. Zoom in, Zoom Out and Pan You can use the magnifying
Mac Vs PC In the following sections, if you are using a Mac, then in the instructions below, replace the words Ctrl Key with the Command (Cmd) Key. Zoom in, Zoom Out and Pan You can use the magnifying
Adobe PhotoShop Elements
 Adobe PhotoShop Elements North Lake College DCCCD 2006 1 When you open Adobe PhotoShop Elements, you will see this welcome screen. You can open any of the specialized areas. We will talk about 4 of them:
PHOTOSHOP. Introduction to Adobe Photoshop
 PHOTOSHOP You will; 1. Learn about some of Photoshop s Tools. 2. Learn how Layers work. 3. Learn how the Auto Adjustments in Photoshop work. 4. Learn how to adjust Colours. 5. Learn how to measure Colours.
ArcSoft PhotoImpression Table of Contents:
 ArcSoft PhotoImpression Table of Contents: 1. Welcome to PhotoImpression 2. Highlights of PhotoImpression 3. System Requirements 4. Installing PhotoImpression 5. Working with PhotoImpression Getting Started
ADOBE PHOTOSHOP CS TUTORIAL
 ADOBE PHOTOSHOP CS TUTORIAL A D O B E P H O T O S H O P C S Adobe Photoshop CS is a popular image editing software that provides a work environment consistent with Adobe Illustrator, Adobe InDesign, Adobe
Making a Printable Business Card Using Pixelmator
 Page 1 of 8 In this project, I will demonstrate for you how to design a simple business card in Pixelmator that will be ready for print. Step 1 Creating a New Document Things sent to commercial printers
Challenge Image: Blur the Background
 Challenge Image: Blur the Background Challenge Image: Blur the Background In this lesson, we re going to work on a challenge image that was submitted by a Masters Academy member. The image features a little
VERY. Note: You ll need to use the Zoom Tools at the top of your PDF screen to really see my example illustrations.
 VERY This tutorial is written for those of you who ve found or been given some version of Photoshop, and you don t have a clue about how to use it. There are a lot of books out there which will instruct
Selective Edits in Camera Raw
 Complete Digital Photography Seventh Edition Selective Edits in Camera Raw by Ben Long If you ve read Chapter 18: Masking, you ve already seen how Camera Raw lets you edit your raw files. What we haven
PhotoText. PhotoText is a great introduction to Photoshop.
 1 is a great introduction to Photoshop. To earn an A, you ll need to have the complete the following tasks within your : Downloaded and installed font. All photos are student taken and appropriate. Textures
GETTING STARTED. 0 P a g e B a s i c s o f A d o b e P h o t o s h o p A g a P r i v a t e I n s t i t u t e f o r c o m p u t e r s c i e n c e
 GETTING STARTED 0 P a g e B a s i c s o f A d o b e P h o t o s h o p Adobe Photoshop: is a popular image editing software that provides a work environment consistent with Adobe Illustrator, Adobe InDesign,
How to prepare your files for competition using
 How to prepare your files for competition using Many thanks to Margaret Carter Baumgartner for the use of her portrait painting in this demonstration. 2015 Christine Ivers Before you do anything! MAKE
Corel PHOTO-PAINT BERNINA Page 1 DL
 Corel PHOTO-PAINT 2018 BERNINA Page 1 Corel PHOTO-PAINT Corel PHOTO-PAINT is part of BERNINA Embroidery Software and gives users many tools for editing photos or bitmap artwork. Corel PHOTO- PAINT can
Basic Digital Dark Room
 Basic Digital Dark Room When I took a good photograph I almost always trying to improve it using Photoshop: exposure, depth of field, black and white, duotones, blur and sharpness or even replace washed
Add Transparent Type To An Image With Photoshop
 Add Transparent Type To An Image With Photoshop Written by Steve Patterson. In this Photoshop Effects tutorial, we re going to learn how to add transparent type to an image. There s lots of different ways
Bramhall Photographic Society
 Bramhall Photographic Society PHOTOSHOP ELEMENTS ADJUSTMENT LAYERS EXPLAINED (WHAT THEY DO) (This technique will work in any version of Elements although the screenshots may vary slightly) There are a
IT154 Midterm Study Guide
 IT154 Midterm Study Guide These are facts about the Adobe Photoshop CS4 application. If you know these facts, you should be able to do well on your midterm. Photoshop CS4 is part of the Adobe Creative
Contents: Bibliography:
 ( 2 ) Contents: Sizing an Image...4 RAW File Conversion...4 Selection Tools...5 Colour Range...5 Quick Mask...6 Extract Tool...7 Adding a Layer Style...7 Adjustment Layer...8 Adding a gradient to an Adjustment
Camera Raw software is included as a plug-in with Adobe Photoshop and also adds some functions to Adobe Bridge.
 Editing Images in Camera RAW Camera Raw software is included as a plug-in with Adobe Photoshop and also adds some functions to Adobe Bridge. Camera Raw gives each of these applications the ability to import
Using Adobe Photoshop
 Using Adobe Photoshop 4 Colour is important in most art forms. For example, a painter needs to know how to select and mix colours to produce the right tones in a picture. A Photographer needs to understand
Photoshop CC: Essentials
 Photoshop CC: Essentials Summary Workspace Overview... 2 Exercise Files... 2 Selection Tools... 3 Select All, Deselect, And Reselect... 3 Adding, Subtracting, and Intersecting... 3 Working with Layers...
Photoshop CS6 Basics. Using Layers to Create a Magazine Cover
 Photoshop CS6 Basics Using Layers to Create a Magazine Cover If you re using Photoshop Elements to do this project, the steps I cover in this tutorial will hopefully be useful to you as a guide Photoshop
Adobe Photoshop CS5 Layers and Masks
 Adobe Photoshop CS5 Layers and Masks Email: training@health.ufl.edu Web Page: http://training.health.ufl.edu Adobe Photoshop CS5: Layers and Masks 2.0 Hours The workshop will cover creating and manipulating
Painting Special Effects on Photographs
 TUTORIAL 7 Painting Special Effects on Photographs In this tutorial you will learn how to transform a photo into a striking color composition with paintbrushes, masks, blending modes, color, and paper
NMC Second Life Educator s Skills Series: How to Make a T-Shirt
 NMC Second Life Educator s Skills Series: How to Make a T-Shirt Creating a t-shirt is a great way to welcome guests or students to Second Life and create school/event spirit. This article of clothing could
Viewing Landsat TM images with Adobe Photoshop
 Viewing Landsat TM images with Adobe Photoshop Reformatting images into GeoTIFF format Of the several formats in which Landsat TM data are available, only a few formats (primarily TIFF or GeoTIFF) can
VECTOR ART - User Guide VECTOR ART. For Adobe Photoshop CC, CS6, CS5, CS4. User Guide
 VECTOR ART For Adobe Photoshop CC, CS6, CS5, CS4 User Guide TABLE OF CONTENTS 1. THE BASICS... 1 1.1. About the effects... 1 1.2. How the actions are organized... 1 2. INSTALLATION & TROUBLESHOOTING...
Digital Photography 1
 Digital Photography 1 Photoshop Lesson 3 Resizing and transforming images Name Date Create a new image 1. Choose File > New. 2. In the New dialog box, type a name for the image. 3. Choose document size
A lthough it may not seem so at first
 Photoshop Selections by Jeff The Wizard of Draws Bucchino www.wizardofdraws.com A lthough it may not seem so at first glance, learning to use Photoshop is largely about making selections. Knowing how to
Central Photography [INSTAGRAM EFFECTS]
![Central Photography [INSTAGRAM EFFECTS]](/thumbs/96/129260346.jpg "Central Photography [INSTAGRAM EFFECTS]") 1 1. Open Photoshop. 2. Go to File/New (Ctrl+N). 3. Name your file. 4. Set the Width to 11 inches. 2 5. Set the Height to 8.5 inches. 6. Set your Resolution to 200 pixels/inch. 7. Set your Background Contents
1 1. Open Photoshop. 2. Go to File/New (Ctrl+N). 3. Name your file. 4. Set the Width to 11 inches. 2 5. Set the Height to 8.5 inches. 6. Set your Resolution to 200 pixels/inch. 7. Set your Background Contents
MS Word Training Formatting Pictures
 Introduction MS Word Training Formatting Pictures There are many ways to format pictures in Word. For instance, you can change the size or shape of an image to better suit your document. You can also enhance
Photo Story Tutorial
 Photo Story Tutorial To create a new Photo Story Project: 1. Start 2. Programs 3. Photo Story 4. Begin a New Story 5. Next 6. Import Pictures 7. Click on your Flash Drive s name from the window on the
Essential Post Processing
 Essential Post Processing By Ian Cran Preamble Getting to grips with Photoshop and Lightroom could be described in three stages. One is always learning and going through stages but there are three main
INTERMEDIATE PHOTOSHOP: FAMILY PHOTOS
 INTERMEDIATE PHOTOSHOP: FAMILY PHOTOS What is Photoshop Elements? Photoshop Elements is a streamlined version of Adobe Photoshop CC. Despite missing some more advanced features, it is a robust piece of
Improve your photos and rescue old pictures
 PSPRO REVISTED Nov 5 2007 Page 1 of 7 Improve your photos and rescue old pictures This guide gives tips on how you can use Paint Shop5 and similar free graphic programmes to improve your photos. It doesn
PowerPoint 2016: Formatting Pictures. Introduction
 PowerPoint 2016: Formatting Pictures Introduction There are a variety of ways to format the pictures in your slide show. The picture tools in PowerPoint make it easy to personalize and modify the images
CSCI Lab 6. Part I: Simple Image Editing with Paint. Introduction to Personal Computing University of Georgia. Multimedia/Image Processing
 CSCI-1100 Introduction to Personal Computing University of Georgia Lab 6 Multimedia/Image Processing Purpose: The purpose of this lab is for you to gain experience performing image processing using some
ADDING A RAINBOW TO A PHOTOGRAPH
 ADDING A RAINBOW TO A PHOTOGRAPH This assignment will cover how to add a simple rainbow (or if you want to go crazy, a double rainbow) to any photograph. This will give us some great work with gradients,
Resizing Images in Photoshop
 Resizing Images in Photoshop Dr Roy Killen, EFIAP, GMPSA, GMAPS, APSEM (c) 2017 Roy Killen Resizing images v4.0 1 Resizing Images in Photoshop CC Roy Killen, EFIAP, GMPSA, GMAPS, APSEM These notes assume
Launch Photoshop and use File>Open from the Photoshop menu to open an image file.
 PREPARING IMAGES FOR ART 620 DOCUMENTATION This paper details the procedure for preparing images for Art 620 documentation according to the Art 620 Guidelines, pp. 6-7. It assumes you have taken digital
Organizing artwork on layers
 3 Layer Basics Both Adobe Photoshop and Adobe ImageReady let you isolate different parts of an image on layers. Each layer can then be edited as discrete artwork, allowing unlimited flexibility in composing
The original image. Let s get started! The final rainbow effect. The photo sits on the Background layer in the Layers panel.
 Add A Realistic Rainbow To A Photo In this Photoshop photo effects tutorial, we ll learn how to easily add a rainbow, and even a double rainbow, to a photo! As we ll see, Photoshop ships with a ready-made
Digital Imaging - Photoshop
 Digital Imaging - Photoshop A digital image is a computer representation of a photograph. It is composed of a grid of tiny squares called pixels (picture elements). Each pixel has a position on the grid
Resizing for ACCC Competition. Rev 1.0 9/12/2011
 Resizing for ACCC Competition Rev 1.0 9/12/2011 This document contains instructions for resizing your images to comply with the new Digital Image Competition Guidelines. In this document we have attempted
Now we ve had a look at the basics of using layers, I thought we d have a look at a few ways that we can use them.
 Stone Creek Textiles stonecreektextiles.co.uk Layers Part 2 Now we ve had a look at the basics of using layers, I thought we d have a look at a few ways that we can use them. In Layers part 1 we had a
Photoshop Elements 6 Scrapbooking
 Photoshop Elements 6 Scrapbooking This lesson will apply things you have learned to creating a digital scrapbook page. This lesson will use some digital scrapbooking elements downloaded from the Shabby
Photoshop Blending Modes
 Photoshop Blending Modes https://photoshoptrainingchannel.com/blending-modes-explained/#when-blend-modes-added For those mathematically inclined. https://photoblogstop.com/photoshop/photoshop-blend-modes-
Composite Master Class Blend two images together to create a seamless collage
 Composite Master Class Blend two images together to create a seamless collage By Liz Ness Whether it s a custom senior photo, an album cover, or a basic digital collage, combining two or more images to
How to Create a Landscape Wallpaper for your Desktop
 How to Create a Landscape Wallpaper for your Desktop Why not create a vector landscape wallpaper? In this simple tutorial, you will learn how to create an eye-appealing wallpaper quickly and effectively.
ITEC185 INTRODUCTION TO DIGITAL MEDIA
 1 ITEC185 INTRODUCTION TO DIGITAL MEDIA ADOBE PHOTOSHOP ITEC185 - Introduction to Digital Media ITEC185 - Introduction to Digital Media 2 What is Adobe Photoshop? Photoshop is the leading professional
11 Advanced Layer Techniques
 11 Advanced Layer Techniques After you ve learned basic layer techniques, you can create more complex effects in your artwork using layer masks, path groups, filters, adjustment layers, and more style
Introduction to Layers
 Introduction to Layers By Anna Castano A layer is an image or text that is piled on top of another. There are many things you can do with layer and it is easy to understand how it works. Through the introduction
Photoshop Elements 3 Graphics
 Photoshop Elements 3 Graphics So far we have concentrated on modifying photographs. Photoshop Elements also can be used to create and modify graphics images that do not necessarily begin with a photograph.
Project 25 Page 1 ` JAZZ POSTCARD
 Project 25 Page 1 ` JAZZ POSTCARD Reset all tools! Create the Background 1. Create a new RGB document, 4.25 in. wide by 5.75 in. high at 100 dpi with a white background. 2. Click the foreground color swatch
Movie Merchandising. Movie Poster. Open the Poster Background.psd file. Open the Cloud.jpg file.
 Movie Poster Open the Poster Background.psd file. Open the Cloud.jpg file. Movie Merchandising Choose Image>Adjustments>Desaturate to make it a grayscale image. Select the Move tool in the Toolbar and
PHOTO 11: INTRODUCTION TO DIGITAL IMAGING
 PHOTO 11: INTRODUCTION TO DIGITAL IMAGING Instructor: Sue Leith Exam Review On your camera, what are the following and what are they used for? WB matches the color temperature of light ISO - The sensitivity
Students will be able to create movement through the use of line or implied line and repetition.
 Title of Unit Digital Imaging Title of Lesson Self Portrait Montage in Photoshop Course Graphic Design 1 Instructor Heidi Stachulak hstachulak@hf233.org Objectives: Composition Students will be able to
Key Terms. Where is it Located Start > All Programs > Adobe Design Premium CS5> Adobe Photoshop CS5. Description
 Adobe Adobe Creative Suite (CS) is collection of video editing, graphic design, and web developing applications made by Adobe Systems. It includes Photoshop, InDesign, and Acrobat among other programs.
Overview of Photoshop Elements workspace
 Overview of Photoshop Elements workspace When you open Photoshop Elements, the Welcome screen offers you two options (Figure 1): The Organize button opens the Organizer. In the Organizer you organize and
ADD A REALISTIC WATER REFLECTION
 ADD A REALISTIC WATER REFLECTION In this Photoshop photo effects tutorial, we re going to learn how to easily add a realistic water reflection to any photo. It s a very easy effect to create and you can
Superhero. Here s the image I ll be using for this Photoshop tutorial:
 Superhero Here s the image I ll be using for this Photoshop tutorial: The original image. Obviously, this little guy sees himself as a mighty super hero, so let s help him out by projecting a super hero