adjust your f-stop as needed for greater DOF or blurred background. your TTL converter will control the strobe power
|
|
|
- Colleen McLaughlin
- 6 years ago
- Views:
Transcription
1 Manual mode, Base ISO (usually ISO 100 or 200), F13, 1/200th (or whatever your maximum shutter sync speed is); single-spot focus; center-weighted metering. Aperture may need to be lowered to F7-F8 or a larger aperture for fish shots. When shooting small objects, shoot at a smaller aperture (up to F29) for more DOF. Macro, shooting with a TTL converter: adjust your f-stop as needed for greater DOF or blurred background. your TTL converter will control the strobe power Macro, strobes in manual mode (you don't have a TTL converter): When starting out, leave your strobes on 1 power setting (full power or half power, depending on how strong your strobe is). Adjust your f-stop depending on the distance to the subject, and other factors. For example, F22 for very close up, F11 for 1ft away, F8 for 2 ft away, etc. Important: you need to get used to changing your f-stop (aperture) for different kinds of shots. It is very important how the aperture effects your shot, depth of field, and the background. Make sure you review the aperture & depth of field section. Note on settings: people will give different opinions on the best initial setting for macro with a dslr. Some will say shoot at F22, others will say F14, etc etc etc. The truth is, you should learn the difference between these apertures. I'm constantly changing my aperture on different shots, depending on what I want to accomplish, changing from F2.8 to F32. If you haven't read the aperture section, please do. Please see the section Changing settings during the dive for more details on changing these settings during a dive.
2 Using a DSLR Change your aperture depending on the depth of field you want. In generally, you'll be dialing in a smaller aperture (e.g. F16-F29) for very close subjects, and dialing back down (F5.6 - F11) for fish further away. Note - a common mistake is trying to shoot a fish far away at F22. It will be very underexposed, since your strobes won't have the necessary power. you must "dial down" to a larger aperture first. Use a single focus point, and move the focus point around as needed to properly compose and focus on the key area of the subject. Settings for Wide angle: Full Manual mode I strongly suggest using manual mode. Manual mode, Base ISO (usually ISO 100 or 200), F7, 1/100th; maximum number of focus points; matrix metering During the dive, adjust shutter speed up or down for desired background color. Changing the shutter speed only effects the background exposure. This is because your strobes fire almost instantaneously. Other modes for wide-angle Experienced users can also try aperture priority or shutter priority modes under special circumstances. Aperture priority mode, F7, exposure compensation at 1 or 1 ½. This is helpful if your background lighting is constantly changing (e.g. trying to shoot fish that may be above or below you). If you are shooting fast-moving subjects, and are worried that will not be completely lit by the strobe, you can use shutter priority mode, 1/125 th (or faster), exposure compensation at 1 or 1 ½. Please see the section Changing settings during the dive for more details.
3 Settings on night dives: On night dives, there is no ambient light, except from your dive light. Set a fast shutter speed to block out the light from dive lights. If you are shooting with TTL, you can simply shoot away, and adjust your aperture as needed. Otherwise, you can leave either your strobe at one power, and change the aperture to get the right exposure, or fix the aperture at one setting and change the strobe power as needed. Underwater camera settings Before going further, I want to talk about one thing. People who just get new dslr's are constantly asking me what settings I use, are there any custom menu settings I need to know about. After mastering aperture and shutter speed, you should try to think about the photographic process, about your composition, subject selection, lighting, etc. I don't think the other 100 settings on a dslr will have much effect on your photos compared to understand the photographic / creative process behind photography. On my D80/D300 (for macro or wide angle), I set the following: Quality: RAW + large fine JPEG. Read about choosing raw or jpeg White Balance: Auto white balance. ISO 200 (Base ISO). Read more about choosing ISO Light metering I use matrix metering for wide angle, and center-weighted for macro. If you are shooting with your strobes on manual, this will have no effect.
4 White balance (effects JPEGs only) First, read more about color temperature. I set my white-balance to auto when using a flash or strobe. If you are using a dslr, and you are not happy with the white balance you are getting, you can set a custom kelvin white balance to the color temps of your strobes. For example, 4800K for ikelite DS- 125s, 5500K for Inon Z240s. If you are shooting in Raw, you can adjust the white balance after the fact. Use a manaul white balance (custom white balance) with a white, gray, or silver object when shooting ambient light. Read more about manual white balance and setting white balance in the lighting section. Focus metering mode I often use center spot focus for macro, and all focus points for wide-angle shots. If you are in center spot-focus mode, and your camera allows you to move the focus point, I highly recommend you take advantage of this feature. Focus priority mode If your camera has continuous focus mode, also called servo-focus mode, that means the camera will continuously focus, and allow you to release the shutter at any time. I often use this mode with low-contrast subjects, in low-light, and when doing supermacro. This article on low-contrast underwater photography may be helpful. I adjust this with my C/S/M switch on my Nikon D300, and I use this switch often. Macro mode (for compact users) Most compacts have a macro mode for shots closer then inches. Trying to take macro shots without going into macro mode is guaranteed to cause many
5 headaches! Make sure you understand the range of your lens when in macro mode, and out of macro mode. Color space (for dslr users, effects JPEGs only) dslrs have the option for shooting in adobe RGB, or srgb. Adobe is a larger color space, is better for printing, and is the recommended color space. However, you might have to convert to srgb for posting photos to the web. srgb is the color space used on monitors. There are also other color space options, but these are beyond the scope of this guide. There are entire books out on color spaces. Vivid mode (effects JPEGs only) When shooting in JPEG, UW photos often look better in vivid mode, especially since color saturation is sometimes reduced lost when light travels underwater. Give it a try, you can always turn it off if you think your photos are coming out too saturated. Objects that are very red can get oversaturation, so if you are shooting JPEGs, you might want to turn this setting off, or make sure you don't overexpose. High ISO noise reduction (effects JPEGs only) Many dslrs have a setting for High ISO noise reduction, which will be turned on only for ISO above a certain number, e.g. ISO 800 or above on the D300. I leave mine on normal, but some people prefer low or off, since the noise reduction is in effect slightly blurring the photo. Sharpness (effects JPEGs only) I usually keep this at normal.
6 Custom Menu Settings I turn off my AF-assist light (A9 on my D300) I turn my flash-sync speed to 1/320th (E1) My dynamic auto-focus area is on 51 points (A3). My LCD illumination is turned on (D8) Some settings specifically for compact cameras: Make sure you set the camera to ISO 100. Don t have AUTO ISO on. Set your White balance to auto, sunny, or "flash" when using the internal flash or a strobe Set Macro mode on when shooting within 2ft, or within the macro distance of your lens. (very important)
7 Changing Settings on a dive Changing settings during a dive Here are some ideas for how to vary your settings during a dive. Please see the section "initial settings'" for how to initially set up all of your settings for macro or WA. Some of the settings from that section are repeated here for clarity. Shooting macro DSLR Change your aperture depending on the depth of field you want. In generally, you'll be dialing in a smaller aperture (e.g. F16-F29) for very close subjects, and dialing back down (F5.6 - F11) for fish further away. Note - a common mistake is trying to shoot a fish far away at F22. It will be very underexposed, since your strobes won't have the necessary power. you must "dial down" to a larger aperture first. Use a single focus point, and move the focus point around as needed to properly compose and focus on the key area of the subject. Compact camera Keep your f-stop at F8 for maximum depth of field. Make sure you are in macro mode. Get close, get low. Think about your composition. Adjust your strobe power as needed based on the subject to lens distance. Press the shutter half-way to focus, recompose and shoot Shooting supermacro Get your camera lens to "hunt", then wait until the magnification is 1:1, or at its maximum. Switch to manual focus. Find a subject, then rock back and forth, take the shot when the subject is in focus.
8 Alternatively, use a focus ring, or use continuous focus mode and shoot when the subject is in focus Adjust the aperture according to the aperture section. Shooting reefs, Wide Angle Focus at hyperfocal distance for greatest DOF Direct your dive buddy behind the subject if you want a model in the shot. Remember the basics - changing your shutter speed effects your background exposure. I'll usually keep my aperture around F7 or F8, however... For subjects very close to the dome port, you might want to increase your f-stop to F11 or F16 for maximum depth of field. Also, when shooting into the sun, I'll put my shutter speed at the fastest it can go (strobe sync speed), and stop my aperture down to F11 - F22, depending on the brightness of the sun, and make sure my strobes are close to the subject. Alternatively, turn your strobes off, turn them out to the sides, or set your shutter speed faster than the camera sync speed for a silhouette shot without any strobe-lit subject. When shooting with strobes, I have to remind myself to do this more often. Remember to get low, shoot up, try to get a prominent subject in the photo. Check your histogram afterwards and change settings, reshoot if needed You can also read the articles on basic macro and wide-angle composition, wide-angle technique, or shooting close-focus wide angle. Checking your histogram Check for blown-out highlights via the histogram or highlights screen Expose slightly to the right Read the histogram section for more details Waiting for pelagics preset your aperture, shutter speed, and strobe positions if you think you might see a fast-moving pelagic
9 you might even want to prefocus and switch to manual focus, so there will be no delay from your lens hunting. Shooting action, switch to burst mode on your dslr to shoot at several frames a second. set strobes on low power for faster recycle time. increase ISO if needed, do a test to see how fast you can shoot as still have your strobes keep up. The higher your ISO, the quicker your strobes will recycle. Remember as you increase your ISO, you'll have to make your shutter speed faster to block out ambient light. What if there is nothing of value to photograph? - explore the scene from all angles - look for abstract designs, textures - look for opportunities you usually don't shoot, maybe black and white, silhouettes, panning shots, or designs that can be post-processed Underwater - focusing on your subject Most people use a focus light to help their camera focus on the subject. I personally prefer to use a dive light such as a wrist-mounted canister light, or a small bright dive light such as a 6AA Ikelite PCa. This allows me to signal buddies to show them subjects, the light doubles as a night light, and don't have to continuously readjust my focus light. Some photographers worry about getting hot spots from dive lights, but I have never had that problem, due to usually shooting at higher apertures. If I shoot at a lower aperture, I'll move the dive light out of the way at the last second before pressing the shutter.
10 Aperture Aperture and F-stops The aperture of your lens is an opening that can be made smaller or larger. Each lens will have a largest aperture, e.g. F2.8, which lets in the most amount of light. The size of an aperture is referred to as an F-stop. Here is a slightly more techincal explanation. As the aperture is made smaller, the F-stop increases in number (e.g. F8, F11, F16) and the amount of light that enters through the lens decreases. So remember - a small F-stop (e.g ) is a large aperture. As the F-stop number gets larger (e.g. F22), the aperture gets smaller. Decreasing the aperture by one "stop" will let in 50% less light. Let's look at the apertures that have a 1-stop difference, going from a large aperture to a small aperture. F2.8 F4 F5.6 F8 F11 F16 F22 F32 Making the aperture smaller, e.g. going from F2.8 to F4, is called "stopping down", or closing the aperture. F4 is one stop away from F2.8, so we "stopped down 1 stop". Defining Depth of Field Depth of field (DOF) is an important concept. The depth of field is the area of a photo that is in focus. Areas outside of the DOF are blurry, with the blurriness increasing the further away they are. The sharpest area of the photo is the location your camera focused on. This area, parallel to your camera lens, is called the focal plane. The depth of field extends in front of this point, towards the camera, and behind this point. Look at the 1st two photos below, in the last section on this page, and you can clearly see the areas that are in focus, which lie within the depth of field. In nature
11 photography, people are often told that the depth of field lies 1/3 in front of the focal point (closer to the camera), and 2/3 behind the focal point. This is sometimes true, when doing macro photography, the DOF lies equally in front and behind the focal point. Depth of field and compact cameras Compact cameras, with their small sensors, will have more depth of field than a dslr. This means it will be more difficult to get a blurred background. For best results at getting a blurred background, shoot wide open at F2.8, zoom all the way out (so your lens is "telephoto", not "wide"), and get close to the subject. The examples in the photos below are from a dslr. The smallest aperture on a compact is usually F8. This should give you plenty of depth of field. Changing the aperture does the following: Affects ambient light and strobe light. The smaller the aperture, the less light that enters the lens from all sources. Smaller apertures (e.g. - F22) result in larger depth of fields. In general, closing the aperture by 1 stop, e.g. changing from F11 to F16, will give you approximately 40% more depth of field. Smaller apertures on a dslr, around F20 & greater, will result in loss of sharpness (Diffraction) at 100% magnification. Aperture controls the bokeh, or blur, of the background. A large aperture such as F2.8 will heavily blur the background. A very small aperture will keep the background almost in focus. Aperture will effect the performance of lens, especially zoom lens and non-prime lenses. Lenses often perform best when stopped down 1 or 2 stops. A quick rule of thumb, known as "F8 and be there", says shoot at F8 when you want maximum sharpness and don't care about depth of field or the background. Using too small an aperture will prevent your strobes from lighting the subject if they are not close enough, due to strobe falloff. It s very common for beginners to try to shoot something 2ft away with an aperture of F22. Unless you have a very powerful strobe, the subject will be underexposed. If you are shooting a close-up at F22, and
12 then you want to shoot something further away, you have to quickly dial down your aperture Changes affecting Depth of Field, and other facts As I stated above, making your aperture 1 stop smaller will give you 40% more depth of field. Making your aperture 2 stops smaller (e.g. changing from F8 to 16) will give you 96% more depth of field. Getting closer to your subject will give you less depth of field Backing away from your subject gives you more depth of field. Backing up, snapping a photo, and cropping is a trick used to get more depth of field for a subject, especially when you don't need a large print. The smaller the aperture, the less defined the boundary between the "in focus" area and the "Blurred" area. Diffraction Light waves traveling through the lens aperture get dispersed when the aperture is very small. This causes a loss of sharpness at small apertures, known as diffraction. Stated another way, diffraction is an effect that happens when light passes through a very small opening. The smaller the opening, the more this effect results in the image getting blurred. At some point, usually around F29-F32 on a cropped sensor dslr, increase of depth of field does not compensate much for the loss of sharpness. Diffraction happens much earlier on a compact point and shoot camera, because of their small sensors. This is why the smallest aperture is usually F8. The effects of diffraction are normally not noticed when posting photos "on the web", but you will notice the difference at 100% magnification. Please view the results of my diffraction tests in my Nikon 105mm lens review. Choosing your aperture for macro shots When taking a photo underwater, I usually think about three things when choosing an aperture:

 and Bokeh Depth of field is related to the aperture of a lens used, the focal length of a lens, and how close you are")

13 How much depth of field do I want for this shot? Do I want the background blurred or in focus? Am I worried about losing a little sharpness to diffraction? Am I shooting near 1:1 or supermacro? If so, your depth of field is tiny, so use larger apertures such as F8 at your own risk, even for flat subjects parallel to your camea. Understanding Depth Of Field (DOF) and Bokeh Depth of field is related to the aperture of a lens used, the focal length of a lens, and how close you are to the subject. WA lens have large DOFs, while macro photos taken at 1:1 magnification will have very small depths of field. Also, note the difference in bokeh, or background blur in the following photos. Goby at Catalina island, taken at F4. Only the eyes are in focus, and the backgroun is blurred very smoothly. Ronquil, F7.1, California. Heavy blur in the background. By changing from F4 to F7, we get the mouth and eyes in focus.


14 Mantis shrimp, Anilao at F8. The entire front is in focus, with the background nicely blurred. Goby taken at F11, Anilao. F11 got both the eyes and mouth in focus, and a little of the next. Still, the entire background is blurred. This is partially because I am so close to the goby. The larger this ratio is - background-to-subject distance / subject-to-camera distance, the more blurred the background will be. Vase Tunicate, F18. 60mm lens. I wanted to get the entire vase in focus, so I used a smaller aperture, but I didn't want diffracction to ruin the tiny details. As a byproduct, the colored background is not blurred, but is still a little out of focus.


15 Pillow starfish shrimp, Maui. 60mm lens. F18 gave a good enough depth of field for this shot. The shrimp lives under the starfish. Nudibranchs, F25, Anilao. The rhinophores and the gills are in focus, but now the background is distracting. That's what happens with a small aperture. Starfish at Catalina, california. F29. There is a large depth of field, and the background is also very prominent. In this photo I find the background distracting. I use this aperture only when I need all of that depth of field.


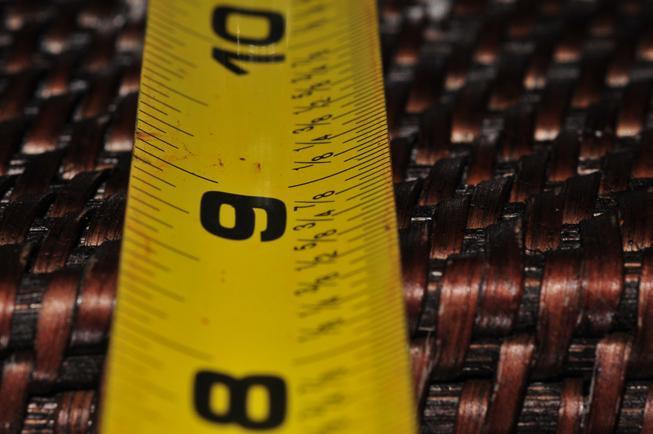
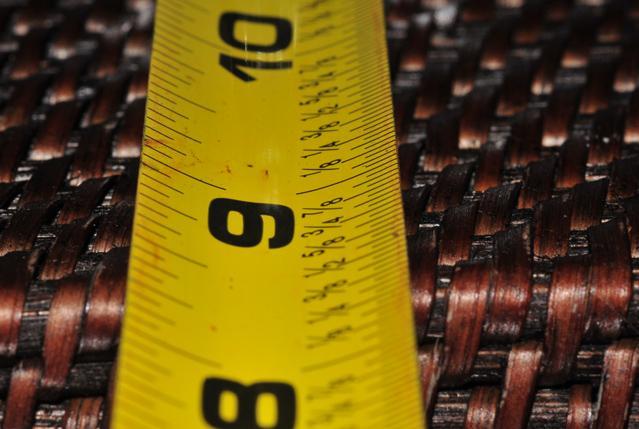
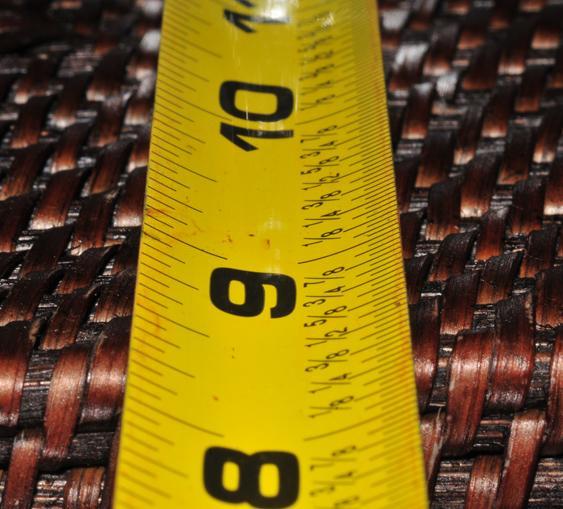
16 100% crop of the photo above, at the point of focus. As you can see, diffraction is causing it to loose a little bit of sharpness. Depth of field test on a Nikon 60mm lens This test is not designed to show you a precise measurement of the depth of field, since the ruler is actually at an angle. It simply shows you how the depth of field increases. Notice how the boundary between the in-focus area and the out-of-focus area becomes less defined as the aperture gets smaller. The test is done fairly close to 1:1 magnification. 60mm lens at F4

17 F5.6 F8
18 F11
19 F16
20 F22
21 F32
22 F40
23 Intermediate Composition Intermediate underwater composition: the "rules" 1) Rule of thirds The rule of thirds says that if a photo is divided up into "thirds" by lines, the key elements of the composition should be placed near the intersection of the lines. Using the rule of thirds helps give a photo a sense of balance. This rule is often broken, especially with extreme close up shots, but it is still useful for many compositions. If you are having trouble getting good compositions, use the rule of thirds to help your compositions achieve balance. As your experience progresses, you will not need to think about rules, but use your own intuition for what makes a good design. Many excellent images do not follow the rule of thirds, so don t be afraid to go against the rule.

24 In this photo, the white lines divides the photo up into thirds. The rule of 3rds states that the key part of the main subject, in this case the eyes, should be places near one of the four intersections. This photo follows the rule perfectly. Photo by Mike Bartick. 2a) Wide Angle composition basics Try for a strong foreground and a strong background Shooting the foreground - get close, shoot up, light properly. Try to get within 2ft of the foreground subject. Use as wide a lens as possible.


25 Choosing the background - wait for a school of fish, have a diver swim by, or have a colorful reef, kelp forest, or wreck in the background. This cabezon has the oil rigs silhouetted in the background. See the section on close-focus wide angle for more details and examples. 2b) Macro composition - shooting low, in focus subject, and colored, black, or camouflaged background. - the foreground should be sharp - having proper separation between the foreground and background, via DOF or color, will make the difference between a good photo and an excellent photo. Having a black or blue background is an excellent way to isolate your subject. - keep the shot as simple as possible, without distractions in the photo. A distracting background can ruin a macro image. This macro photo is simple, and is shot from down low, not from above. An out of focus background allows the viewer to concentrate on the subject, a xenia soft coral mimic nudibranch, while still maintaining a sense that it lives on a reef, which is lost in the more artistic black background composition.
26 A straight-forward macro composition. Sharp, clear subject, colorful.
 Supermacro composition There are 3 compositions for super macro shots that I'd like to highlight here: #1 - since the depth of field will be very small in a super macro")
27 A "classic" macro shop. Colorful, sharp, in focus, eyes in focus, it's clear what the subject is, and it is almost filling the frame. Taken in Bali, D80, 105mm lens. F14, ISO 200, 1/160th 2c) Supermacro composition There are 3 compositions for super macro shots that I'd like to highlight here: #1 - since the depth of field will be very small in a super macro shot, try to align the focal plane of your camera with the key areas of the subject. These could be the eyes, the eyes and the rhinophores, the eyes and the mouth, etc. Or it could be the entire side of the subject.


28 I tried to shoot with this crab parallel to my focus plane, to get it all in focus. F13, 1/250th, ISO 200 #2 - Straight on facing the subject, getting low Lemon nudibranch, F16, 1/200th

29 #3 - align the subject at an angle to the focal plane. The key part of the subject must be in focus. The rest will be thrown out of focus, resulting in a dramatic photo. Many attempts sometimes must be made to find one that results in a pleasing blurring of the out-of-focus area of the subject. Tiny nudibranch, carefully composed. The front is in fous, and the rear slowly goes out of focus. Photo by Kevin Lee. - Supermacro shots are sometimes centered and ignore the rule of 3rds. See what works best for your photograph. 3) Shoot in portrait You should shoot in portrait as much as you can. An ultra-light pivot tray can be used to keep strobes in the same position while you turn your body. Try to get both eyes visible in the photos and in focus. Magazine covers are always shot in portrait.

30 The walls of a reef are a great place to start taking portrait shots. 4) Use the viewfinder to compose. Look through your viewfinder and adjust your position to get the composition you want, pay attention to distractions on the edge of the viewfinder. 5) Examine edges for distractions Recompose if necessary. 6) Cropping Use as a tool, not as a crutch. Try to get it right "in camera". 7) Choose your background wisely.

31 Reposition if needed. Use the right lens for the desired effect. A longer focal length will isolate the background; a shorter focal length will show more of the background. Read about the effect of lenses on composition Use depth of field selectively as necessary. I passed over many gobies before finding one on a red sponge. Only one approach led to this composition, and I kept creeping forward while taking shots.
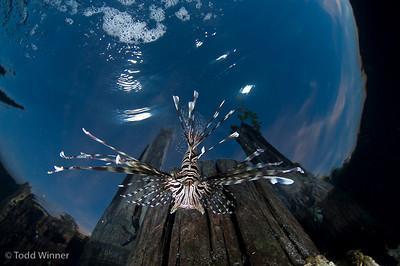
32 Wide Angle Photography - an interview Shooting wide Angle underwater I spoke with Todd Winner at length on the phone regarding his approach to shooting wide angle underwater. Todd shot film for 14 years, before switching to digital in Check out Todd s latest book Shipwrecks of Truk Lagoon, available here and his website at Here are some excerpts from our discussion, rewrote in my own words: About Todd s equipment: I use a Nikon D2X in a Nexus housing, a 7-inch acrylic dome port with the 12-24mm and 10.5mm & a 4-inch glass dome port with the 10-17mm fisheye lens, and 2 Ikelite SS200 strobes, usually with diffusers. The small dome port lets me get really close up to subjects the way I like. For wide angle I use a 6" and a 9" arm on each side. About settings: I shoot manual exposure. Aperture, shutter speed, and strobe power are all set manually. I usually shoot at base ISO, ISO 100. To determine the shutter speed, I meter off the blue water. I use spot metering or center-weighted metering. I point the camera
33 towards a bright blue, not right at the sun, but near the sun, about 30 to 40 degrees from the center, and adjust the shutter speed until the exposure meter is centered. My aperture is usually between F5.6 and F11, sometimes as high as F22 if I m shooting right into the sun. Now that my shutter speed and aperture is set, I only have to worry about strobe power. My strobe power changes all the time sometimes ¼ power, ½ power, sometimes full power. I usually know what power to set the strobe on based on the subject distance and my F-stop. The #1 mistake people make is not shooting close enough. I usually shoot from 6 inches away to 3ft away, quite often at a 6-inch distance. About lighting: I shoot a ton of verticals. When I shoot vertically, one strobe is above the camera, one is to the side but I move my strobes around a lot. If the water is clear, I ll point the strobes right at the subject. If the vis is not great, I point them straight out or slightly outwards, and pull them in a little bit. If I am shooting horizontal, I typically have my strobes out to the sides. When you are shooting a fisheye at 10mm, you really have to pay attention to the corners, and watch out for flair from your strobes. When using my Tokina 10-17mm, it's much easer to control the backscatter at the 17mm range, so that s a good option when you have lots of particulates in the water.
34 About composition: The rule of thirds is important, I try to pay attention to this rule, and put the key area of my subject at one of the intersecting points. You should make sure your horizon is straight, keep your angles straight, and avoid sloping sands. For example, in stingray city, I know the sand is flat, but some people shoot it at awkward angels. I also like having diagonal and "S" lines in my photos if possible. A strong shot has a lit foreground subject, and a strong silhouette in the background, like the oil rigs structure or a wreck or boat. If I see something cool like a large wreck that I can use as a silhouetted background, I ll look for something to put in the foreground. I also like using the sun in my photos. Having a big reef in the background sometimes works, sometimes doesn t. If it s just a big black blob it won t look good. If I see a good foreground subject, sometimes I ll wait until something interesting swims by I can use as a good background. On improving your photography: If I m in a rut, I ll just shoot ambient light for a while. For someone trying to get better at wide-angle photography, this is what I recommend. First, start off just shooting blue water. Understand how to meter the water, understand what gives you the blue color that you prefer. Second, shoot the water with the sun in the photo. Find out what settings give you the results you like.


35 Third, shoot only silhouettes. You should have the blue color you like, and be comfortable getting nice dark silhouettes. Fourth, practice shooting foreground subjects; learn how to light them properly. Don t worry about the background. Last, combine steps 3 and 4, shoot foregrounds with a silhouette in the background. It should all come together. About future upgrades: I might upgrade to the D700X, if it ever comes out. I'd like a camera with more dynamic range than what I'm using now. Some Photos from Todd
36

37 Close Focus Wide Angle (CFWA) Close-focus wide angle (CFWA) Ultra wide-angle lenses can be very challenging for beginners. Lighting is difficult, and photos tend to have cluttered backgrounds, no distinct subject, or the subjects are made to look very small. The best use of an ultra wide-angle lens is photographing a subject in the foreground very close to the lens. This will give your photo a great sense of depth. CFWA shots should be done in manual mode. Your shutter speed will control the background lighting. Remember, after taking your shot, to review it, and adjust the shutter speed if needed. Make the shutter speed faster if your background is too bright, and slower if the background is too dark. Balancing the foreground and background light can seem difficult as first, but with some practise, you ll find it s easy. Remember strobes control the foreground, adjust the shutter speed for the background. Classic close-focus wide-angle shot, with a great background of schooling fish. Photo by Carol Yin, taken at Wakatobi. Canon 5D with Sigma 15mm FE, 1/160 at f7.1, ISO 125. Notes from Carol: "My camera was about 6 inches away from the edge of the corals. I like the sense of depth in this photo, due to the foreground. The diver in the photo and I were both shooting the corals, then the fish came by. I was amazed, however, that he then stopped shooting. I asked him why afterward, and he said he was waiting for the fish to get out of the picture!"
38 Close-focus Wide Angle Tips Use a 10.5 or 10-17mm fisheye lens for best results (15mm on a full-frame camera), INON UCL-165 fisheye on a compact camera I suggest getting very, very close (1-2ft away) to a prominent foreground subject (sea fan, metridium, large starfish,etc.), get very low, and shoot upwards to get a bright background. This is easier said then done, this works best if the subject is on a mound, top of a wall, or on an oil rig beam. With experience your eye will look for foreground subjects that work well. Put an interesting background into your CFWA shot, such as a diver, boat, wreck, school of fish, or sunburst. Position the subject not in the center, but off to the side (see the rule of thirds). If you are only using one strobe, position the object on the same side of the photo as your strobe, so you can light it with your strobe. Use a diffuser on your strobe to spread the beam out. If you want to get the foreground and background in focus in a CFWA shot, try to focus just beyond your foreground subject. Use your diffusers so your strobes cover a wider area always make sure objects in the foreground are sharp and properly exposed in a CFWA shot.

39 Cuttlefish, Bali. Tokina 10-17mm lens at 17mm. D300, F13, 1/160th, ISO 200. Strobes were out to the side, pointed slightly outwards. Cuttlefish, lionfish, turtles, large seahorses, and other medium-sized marine life make excellent CFWA subjects. Try to get low and get them with blue water behind them. It was hard work getting a shot with this cuttlefish off the reef, and out of 15 shots only 1 had the cuttlefish surrounded by water, when I got down low on the rocks, a few inches in front of these feather stars. CFWA Settings underwater Settings for wide-angle are covered under wide-angle underwater photography settings. The closer the subject is to my dome port, the smaller I usually set the aperture (down to F11 or F13), to ensure enough of depth of field. Full-frame users will need to stop down (make their aperture smaller) and extra 1 1/2 stops to get equivalent depth of field. More information on wide-angle photography

40 Complete interview on wide-angle technique underwater Understanding dome port optics Understanding shutter speed underwater Lens choices for underwater photography The featherduster worm in the lower right portion of the screen is actually only 3 inches across, I was only a few inches away from it, shooting up at an extreme angle.
41 This squid is just inches in front of the dome port. Nice choice of background, and use of vertical lines. Photo by Todd Winner. "Window" or "Portal shots" A special type of CFWA shot is the window shot. Window shots work well when a coral or structure can fill the outside of the frame, creating a "portal" that you shoot through. Shooting at the entrance to a cave, or from inside an encrusted wreck works well. Ideally you will can fish and/or a diver to appear in the portal.

42 My dive buddy in the oil rigs, surrounded by encrusted structure on almost all sides. This "portal" opening is actually fairly small.
43 Histograms Proper Exposure Proper exposure is very important. I recommend always having your histogram on display underwater so you can monitor your exposures. An underexposed image will have to be brightened afterwards, which can greatly increase noise. There is much more noise in the in the darker areas of the image than in the brighter areas. Overexposure will result in "clipping", or blown out highlights, which is lost data permanently set to the brightest pixel levels. Shooting in RAW will give you a couple extra stops of highlight data that can be recovered in the raw editor, so you can overexposure slightly more when shooting raw, but at some point highlights will still be permanently lost. Professional photographers often recommend "exposing to the left" when shooting jpeg, to minimize the change of blown out highlights, and "exposing to the right" when shooting RAW, still being careful not to expose too much to the right. This will minimize the noise present in the photo. Here is more information on "exposing to the right" when shooting raw: Reading the histogram Viewing your histogram underwater while taking photos is important. Learn how to get your histogram to show up next to your photo after taking each shot.
44 Histograms can be viewed as a single histogram, or as 3 histograms for red, green and blue. I usually just view the single histogram unless I am checking to see if my strobes are properly firing, in which case I will want to make sure the red histogram is strong. The left side of a histogram represents shadows, the mid-section mid-tones, and the right side highlights. You want to avoid "clipping" unless you are intentionally introducing very bright or dark areas into your photograph. Clipped data is lost data in a JPEG, and somewhat recoverable in a RAW file to a small extent. Shadow data lightened to bring it up to a proper exposure can show considerable noise, which is why its important to get exposure correct in the camera. A slight overexposure can be ok, as long as you are not blowing out highlights unintentionally. Blown highlights When shooting JPEG, and data to the right of the histogram is not recoverable, and is recorded as pure white. When shooting raw, you can usually recover one or two extra stops of data. what is a correct histogram? There is rarely a "correct" histogram, it is up to you how you want to portray an image. Use the histogram as a tool to tell you how the image was captured. If the histogram is showing you significant dark, bright, or blown out areas, make sure that is what you wanted. Understanding histograms: There is an excellent overview of histograms here, they've done an excellent job. I highly suggest you look this page over:
 Follow the bottom of the histogram from left to right. The data reaches all the way to the left and the right.")
45 Here are some of my own histogram examples: Evenly distributed exposure. Notice 2 things about this histogram. 1) Follow the bottom of the histogram from left to right. The data reaches all the way to the left and the right. this means the full spectrum from 0 to 255 (pure black to pure white) is utilized.


46 High contrast photo. Again, the full spectrum is used. If you look to the left, you'll see significant dark shadow areas. All the way to the right, along the right edge, you will notice a line that rises up one third of the way. This represents blown highlights. This photo has a greater dynamic range then can be recorded by in your jpeg file. If you are shooting in raw, some of this may be able to be recovered.


47 Exposure with a "black background". This photo was of a bright nudibranch. Notice that most of the photo is quite dark, but the full spectrum is used, the data along the bottom reaches all the way to the right, without any blown highlights. Exposure with some "hot spots". This photo has some white coral in the foreground that was blown out by the strobe. Notice the vertical line all along the right edge, this represent pure white (pixel value 255).
48 Probably an underexposed image. Notice that the data along the bottom does not reach all the way to the right edge. It could probably use a little more exposure, but it really depends on the photo.
FOCUS, EXPOSURE (& METERING) BVCC May 2018
 BVCC May 2018") FOCUS, EXPOSURE (& METERING) BVCC May 2018 SUMMARY Metering in digital cameras. Metering modes. Exposure, quick recap. Exposure settings and modes. Focus system(s) and camera controls. Challenges & Experiments.
FOCUS, EXPOSURE (& METERING) BVCC May 2018 SUMMARY Metering in digital cameras. Metering modes. Exposure, quick recap. Exposure settings and modes. Focus system(s) and camera controls. Challenges & Experiments.
Outline for Tutorials: Strobes and Underwater Photography
 Outline for Tutorials: Strobes and Underwater Photography I - Strobes Conquering the Water Column Water column - depth plus distance from camera to subject; presents challenges with color, contrast, and
L I F E L O N G L E A R N I N G C O L L A B O R AT I V E - FA L L S N A P I X : P H O T O G R A P H Y
 L I F E L O N G L E A R N I N G C O L L A B O R AT I V E - F A L L 2 0 1 8 SNAPIX: PHOTOGRAPHY SNAPIX OVERVIEW Introductions Course Overview 2 classes on technical training 3 photo shoots Other classes
Funded from the Scottish Hydro Gordonbush Community Fund. Metering exposure
 Funded from the Scottish Hydro Gordonbush Community Fund Metering exposure We have looked at the three components of exposure: Shutter speed time light allowed in. Aperture size of hole through which light
Camera Exposure Modes
 What is Exposure? Exposure refers to how bright or dark your photo is. This is affected by the amount of light that is recorded by your camera s sensor. A properly exposed photo should typically resemble
by Don Dement DPCA 3 Dec 2012
 by Don Dement DPCA 3 Dec 2012 Basic tips for setup and handling Exposure modes and light metering Shooting to the right to minimize noise 11/17/2012 Don Dement 2012 2 Many DSLRs have caught up to compacts
Intro to Digital SLR and ILC Photography Week 1 The Camera Body
 Intro to Digital SLR and ILC Photography Week 1 The Camera Body Instructor: Roger Buchanan Class notes are available at www.thenerdworks.com Course Outline: Week 1 Camera Body; Week 2 Lenses; Week 3 Accessories,
To start there are three key properties that you need to understand: ISO (sensitivity)
") Some Photo Fundamentals Photography is at once relatively simple and technically confusing at the same time. The camera is basically a black box with a hole in its side camera comes from camera obscura,
Some Photo Fundamentals Photography is at once relatively simple and technically confusing at the same time. The camera is basically a black box with a hole in its side camera comes from camera obscura,
Take Control of Your Camera
 Take Control of Your Camera With all of the technology packed into our cameras, it is easy to hand over control & blame our equipment when our images don t meet our expectations.. In this workshop we will
ONE OF THE MOST IMPORTANT SETTINGS ON YOUR CAMERA!
 Chapter 4-Exposure ONE OF THE MOST IMPORTANT SETTINGS ON YOUR CAMERA! Exposure Basics The amount of light reaching the film or digital sensor. Each digital image requires a specific amount of light to
Name Digital Imaging I Chapters 9 12 Review Material
 Name Digital Imaging I Chapters 9 12 Review Material Chapter 9 Filters A filter is a glass or plastic lens attachment that you put on the front of your lens to protect the lens or alter the image as you
Improve Your Photography by using Simple Camera Settings and Techniques
 Improve Your Photography by using Simple Camera Settings and Techniques Francis J Pullen 2012 +44 (0)7768 364 567 images@francispullen.co.uk www.francispullen.co.uk Introduction Digital Cameras offer tremendous
CAMERA BASICS. Stops of light
 CAMERA BASICS Stops of light A stop of light isn t a quantifiable measurement it s a relative measurement. A stop of light is defined as a doubling or halving of any quantity of light. The word stop is
Digital camera modes explained: choose the best shooting mode for your subject
 Digital camera modes explained: choose the best shooting mode for your subject On most DSLRs, the Mode dial is split into three sections: Scene modes (for doing point-and-shoot photography in specific
Basic Camera Craft. Roy Killen, GMAPS, EFIAP, MPSA. (c) 2016 Roy Killen Basic Camera Craft, Page 1
 2016 Roy Killen Basic Camera Craft, Page 1") Basic Camera Craft Roy Killen, GMAPS, EFIAP, MPSA (c) 2016 Roy Killen Basic Camera Craft, Page 1 Basic Camera Craft Whether you use a camera that cost $100 or one that cost $10,000, you need to be able
Basic Camera Craft Roy Killen, GMAPS, EFIAP, MPSA (c) 2016 Roy Killen Basic Camera Craft, Page 1 Basic Camera Craft Whether you use a camera that cost $100 or one that cost $10,000, you need to be able
Failure is a crucial part of the creative process. Authentic success arrives only after we have mastered failing better. George Bernard Shaw
 PHOTOGRAPHY 101 All photographers have their own vision, their own artistic sense of the world. Unless you re trying to satisfy a client in a work for hire situation, the pictures you make should please
Love Your Camera (Introduction to D-SLR)
") Love Your Camera (Introduction to D-SLR) Photography Workshops and Tours in New York City Phone: (646) 736-3231 Email: info@rememberforever.co Web: www.rememberforever.co Copyright 2009-2013 - Remember
Love Your Camera (Introduction to D-SLR) Photography Workshops and Tours in New York City Phone: (646) 736-3231 Email: info@rememberforever.co Web: www.rememberforever.co Copyright 2009-2013 - Remember
So far, I have discussed setting up the camera for
 Chapter 3: The Shooting Modes So far, I have discussed setting up the camera for quick shots, relying on features such as Auto mode for taking pictures with settings controlled mostly by the camera s automation.
TAKING GREAT PICTURES. A Modest Introduction
 TAKING GREAT PICTURES A Modest Introduction HOW TO CHOOSE THE RIGHT CAMERA EQUIPMENT WE ARE NOW LIVING THROUGH THE GOLDEN AGE OF PHOTOGRAPHY Rapid innovation gives us much better cameras and photo software...
One Week to Better Photography
 One Week to Better Photography Glossary Adobe Bridge Useful application packaged with Adobe Photoshop that previews, organizes and renames digital image files and creates digital contact sheets Adobe Photoshop
DSLR Essentials: Class Notes
 DSLR Essentials: Class Notes The digital SLR has seen a surge in popularity in recent years. Many are enjoying the superior photographic experiences provided by these feature packed cameras. Interchangeable
High Speed Sync: A Flash Technique To Add a Pro Touch to Your Photographs
 DECEMBER 6, 2017 ADVANCED High Speed Sync: A Flash Technique To Add a Pro Touch to Your Photographs Featuring KEVIN KUBOTA Kevin Kubota Kevin needed a fast shutter speed to balance the scene's ambient
Take Better Portraits
 SEPTEMBER 4, 2018 BEGINNER Take Better Portraits Learn the elements of a good portrait photograph Featuring GARY SMALL It can't be that difficult, right? Your friend/spouse/child asks you to take his/her
Super macro photography is when our image has a subject to sensor magnification
 Outline for Tutorials: Super Macro Underwater Photography 1. Introduction Super macro photography is when our image has a subject to sensor magnification ratio of greater than 1:1. Super macro opens up
Technical Guide Technical Guide
 Technical Guide Technical Guide Introduction This Technical Guide details the principal techniques used to create two of the more technically advanced photographs in the D800/D800E catalog. Enjoy this
1. This paper contains 45 multiple-choice-questions (MCQ) in 6 pages. 2. All questions carry equal marks. 3. You can take 1 hour for answering.
 in 6 pages. 2. All questions carry equal marks. 3. You can take 1 hour for answering.") UNIVERSITY OF MORATUWA, SRI LANKA FACULTY OF ENGINEERING END OF SEMESTER EXAMINATION 2007/2008 (Held in Aug 2008) B.Sc. ENGINEERING LEVEL 2, JUNE TERM DE 2290 PHOTOGRAPHY Answer ALL questions in the answer
UNIVERSITY OF MORATUWA, SRI LANKA FACULTY OF ENGINEERING END OF SEMESTER EXAMINATION 2007/2008 (Held in Aug 2008) B.Sc. ENGINEERING LEVEL 2, JUNE TERM DE 2290 PHOTOGRAPHY Answer ALL questions in the answer
Chapter 11-Shooting Action
 Chapter 11-Shooting Action Interpreting Action There are three basic ways of interpreting action in a still photograph: Stopping action (42) Blurring movement Combining both in the same image Any
SPOT METERING. Copyright Hairy Goat Ltd 2015 Ä
 How to fine tune your exposure with spot metering Metering is often something that leads to great confusion in newbie photographers (and often in more experienced ones, too). Basically, metering refers
Composing Photographs
 JANUARY 18, 2018 BEGINNER Composing Photographs Creatively photographing a salt marsh Featuring DIANE BERKENFELD In addition to zooming in on the details of the salt marsh, remember to take wide shots
TAKING GREAT PICTURES. A Modest Introduction
 TAKING GREAT PICTURES A Modest Introduction 1 HOW TO CHOOSE THE RIGHT CAMERA EQUIPMENT 2 THE REALLY CONFUSING CAMERA MARKET Hundreds of models are now available Canon alone has 41 models 28 compacts and
Photography Basics. Exposure
 Photography Basics Exposure Impact Voice Transformation Creativity Narrative Composition Use of colour / tonality Depth of Field Use of Light Basics Focus Technical Exposure Courtesy of Bob Ryan Depth
OUTDOOR PORTRAITURE WORKSHOP
 OUTDOOR PORTRAITURE WORKSHOP SECOND EDITION Copyright Bryan A. Thompson, 2012 bryan@rollaphoto.com Goals The goals of this workshop are to present various techniques for creating portraits in an outdoor
Quick Tips for Taking Better Portraits
 JANUARY 5, 2019 BEGINNER Quick Tips for Taking Better Portraits Suggested Lens choices, exposure settings and focus modes Featuring GARY SMALL D300, AF-S NIKKOR 24-85mm f/2.8-4d IF lens, 1/30 sec., f/2.8,
PHIL MORGAN PHOTOGRAPHY
 Including: Creative shooting Manual mode Editing PHIL MORGAN PHOTOGRAPHY A free e-book to help you get the most from your camera. Many photographers begin with the naïve idea of instantly making money
Introduction to Digital Photography
 Introduction to Digital Photography with Nick Davison Photography is The mastering of the technical aspects of the camera combined with, The artistic vision and creative know how to produce an interesting
Panoramas. Featuring ROD PLANCK. Rod Planck DECEMBER 29, 2017 ADVANCED
 DECEMBER 29, 2017 ADVANCED Panoramas Featuring ROD PLANCK Rod Planck D700, PC-E Micro NIKKOR 85mm f/2.8d, 1/8 second, f/16, ISO 200, manual exposure, Matrix metering. When we asked the noted outdoor and
Photography Help Sheets
 Photography Help Sheets Phone: 01233 771915 Web: www.bigcatsanctuary.org Using your Digital SLR What is Exposure? Exposure is basically the process of recording light onto your digital sensor (or film).
UNDERWATER PHOTOGRAPHY WORKSHOP.
 UNDERWATER PHOTOGRAPHY WORKSHOP www.images-underwater.net ANY QUESTIONS SHOUT! RICHARD BAILEY richard@images-underwater.net ALL IMAGES COPYRIGHT ENVIRONMENT TECHY BIT BASIC TIPS TYPES OF SHOT COMPOSITION
Until now, I have discussed the basics of setting
 Chapter 3: Shooting Modes for Still Images Until now, I have discussed the basics of setting up the camera for quick shots, using Intelligent Auto mode to take pictures with settings controlled mostly
Capturing God s Creation Through The Lens. Session 3 From Snap Shots to Great Shots January 20, 2013 Donald Jin
 Capturing God s Creation Through The Lens Session 3 From Snap Shots to Great Shots January 20, 2013 Donald Jin donjin@comcast.net Course Overview Jan 6 Setting The Foundation Jan 13 Building Your Craft
Part One In The Camera A Beginner s Guide to Improving Your Photography by John Strung
 Part One In The Camera A Beginner s Guide to Improving Your Photography by John Strung New members to the club are often puzzled as to why their wonderful images score only 18s in the club competitions
Table of Contents. 1. High-Resolution Images with the D800E Aperture and Complex Subjects Color Aliasing and Moiré...
 Technical Guide Introduction This Technical Guide details the principal techniques used to create two of the more technically advanced photographs in the D800/D800E brochure. Take this opportunity to admire
Aperture Explained. helping you to better understand your digital SLR camera SLR PHOTOGRAPHY GUIDE
 Aperture Explained helping you to better understand your digital SLR camera SLR PHOTOGRAPHY GUIDE WELCOME 1 helping you to better understand your digital SLR camera. This 4 part series will cover Aperture,
A Beginner s Guide To Exposure
 A Beginner s Guide To Exposure What is exposure? A Beginner s Guide to Exposure What is exposure? According to Wikipedia: In photography, exposure is the amount of light per unit area (the image plane
Introductory Photography
 Introductory Photography Basic concepts + Tips & Tricks Ken Goldman Apple Pi General Meeting 26 June 2010 Kenneth R. Goldman 1 The Flow General Thoughts Cameras Composition Miscellaneous Tips & Tricks
Topic 6 - Lens Filters: A Detailed Look
 Getting more from your Camera Topic 6 - Lens Filters: A Detailed Look Learning Outcomes In this lesson, we will take a detailed look at lens filters and study the effects of a variety of types of filter
silent seat ecourse & ebook
 silent seat ecourse & ebook Heyyyy!!! Welcome to learn manual mode, a momtographer crash course. I am seriously so excited to help you take your camera out of auto and into manual and start getting those
A Digital Camera Glossary. Ashley Rodriguez, Charlie Serrano, Luis Martinez, Anderson Guatemala PERIOD 6
 A Digital Camera Glossary Ashley Rodriguez, Charlie Serrano, Luis Martinez, Anderson Guatemala PERIOD 6 A digital Camera Glossary Ivan Encinias, Sebastian Limas, Amir Cal Ivan encinias Image sensor A silicon
AF Area Mode. Face Priority
 Chapter 4: The Shooting Menu 71 AF Area Mode This next option on the second screen of the Shooting menu gives you several options for controlling how the autofocus frame is set up when the camera is in
Moving Beyond Automatic Mode
 Moving Beyond Automatic Mode When most people start digital photography, they almost always leave the camera on Automatic Mode This makes all the decisions for them and they believe this will give the
ACTION AND PEOPLE PHOTOGRAPHY
 ACTION AND PEOPLE PHOTOGRAPHY These notes are written to complement the material presented in the Nikon School of Photography Action and People Photography class. Helpful websites: Nikon USA Nikon Learn
As can be seen in the example pictures below showing over exposure (too much light) to under exposure (too little light):
 to under exposure (too little light):") Hopefully after we are done with this you will resist any temptations you may have to use the automatic settings provided by your camera. Once you understand exposure, especially f-stops and shutter speeds,
Hopefully after we are done with this you will resist any temptations you may have to use the automatic settings provided by your camera. Once you understand exposure, especially f-stops and shutter speeds,
mastering manual week one
 THE PURPOSE OF THIS WORKSHOP IS TO PUT THE POWER AND CONTROL OF THE CAMERA INTO YOUR OWN HANDS. When we shoot in automatic, we are at the mercy of the camera s judgment and decisions. Learning the techniques
Presented to you today by the Fort Collins Digital Camera Club
 Presented to you today by the Fort Collins Digital Camera Club www.fcdcc.com Photography: February 19, 2011 Fort Collins Digital Camera Club 2 Film Photography: Photography using light sensitive chemicals
Photographing the Night Sky
 JANUARY 20, 2018 ADVANCED Photographing the Night Sky Featuring STEVE HEINER, DIANA ROBINSON, PETE SALOUTOS & DEBORAH SANDIDGE Deborah Sandidge Nikon D3, 16mm lens, 30 sec., f/2.8. Image is one of a series
Introduction to camera usage. The universal manual controls of most cameras
 Introduction to camera usage A camera in its barest form is simply a light tight container that utilizes a lens with iris, a shutter that has variable speeds, and contains a sensitive piece of media, either
Camera Triage. Portrait Mode
 Camera Triage So, you have a fancy new DSLR camera? You re really excited! It probably cost a small fortune. It s gotta be good, right? It better be good, right? Maybe you re having a ton of fun with your
Camera controls. Aperture Priority, Shutter Priority & Manual
 Camera controls Aperture Priority, Shutter Priority & Manual Aperture Priority In aperture priority mode, the camera automatically selects the shutter speed while you select the f-stop, f remember the
PHOTOGRAPHING THE LUNAR ECLIPSE
 1/29/18 PHOTOGRAPHING THE LUNAR ECLIPSE NICK SINNOTT CHICAGO PHOTOGRAPHY CLASSES PREPARATION TIMING AND FINDING LOCATION https://www.timeanddate.com/moon/phases/ - Dates of Lunar Phases 1 PREPARATION TIMING
TENT APPLICATION GUIDE
 TENT APPLICATION GUIDE ALZO 100 TENT KIT USER GUIDE 1. OVERVIEW 2. Tent Kit Lighting Theory 3. Background Paper vs. Cloth 4. ALZO 100 Tent Kit with Point and Shoot Cameras 5. Fixing color problems 6. Using
Dusk Photography. The Blue 15 minutes. Presented to Charlottesville Camera Club June 29, 2011 Deb Snelson 2011
 Dusk Photography The Blue 15 minutes Presented to Charlottesville Camera Club June 29, 2011 Deb Snelson 2011 It s All about When Gorgeous Blue sky Only lasts about 15 minutes Cannot be seen by the naked
Buxton & District U3A Digital Photography Beginners Group
 U3A Group Lesson 7: Controlling exposure / focal length / perspective / composition for a better picture & Taking Pictures of people 3 December 2013 Programme Buxton & District 19 September Exploring your
DIGITAL PHOTOGRAPHY FOR OBJECT DOCUMENTATION GOOD, BETTER, BEST
 DIGITAL PHOTOGRAPHY FOR OBJECT DOCUMENTATION GOOD, BETTER, BEST INTRODUCTION This document will introduce participants in the techniques and procedures of collection documentation without the necessity
Photomatix Light 1.0 User Manual
 Photomatix Light 1.0 User Manual Table of Contents Introduction... iii Section 1: HDR...1 1.1 Taking Photos for HDR...2 1.1.1 Setting Up Your Camera...2 1.1.2 Taking the Photos...3 Section 2: Using Photomatix
BLACK CAT PHOTOGRAPHIC RULES-OF- THUMB
 Page 1 of 5 BLACK CAT PHOTOGRAPHIC RULES-OF- THUMB These 50+ photo-cyber-tips are meant to be shared and passed along. Rules-of-thumb are a kind of tool. They help identify a problem or situation. They
DSLR FOCUS MODES. Single/ One shot Area Continuous/ AI Servo Manual
 DSLR FOCUS MODES Single/ One shot Area Continuous/ AI Servo Manual Single Area Focus Mode The Single Area AF, also known as AF-S for Nikon or One shot AF for Canon. A pretty straightforward way to acquire
capture outside Capture Your Holidays with Katrina Kennedy It s cold outside! I m sitting At the end of this lesson you will be able to:
 Capture Your Holidays with Katrina Kennedy LESSON 6 capture outside LESSON 6 OBJECTIVES: At the end of this lesson you will be able to: Photograph outdoor light displays. Expose correctly in a snowy scene.
5 Easy Composition Guidelines
 NOVEMBER 22, 2017 BEGINNER 5 Easy Composition Guidelines Featuring DIANE BERKENFELD You may not realize it, but every time you bring your camera up to your eye you're making decisions about composition.
Using Auto FP High-Speed Sync to Illuminate Fast Sports Action
 Using Auto FP High-Speed Sync to Illuminate Fast Sports Action by Today s sports photographer not only needs to capture the action, but oftentimes produce a unique feature image for a client. Using Nikon
1 / 9
 WWW.RICHIEHUG.COM 1 / 9 A Beginner's Guide to Digital Photography Version 1.2 By Richie Hug November 24, 2016. Most people owning a digital camera have never used other settings than just the AUTO mode.
Your objective: maximum control, maximum manageability
 Your objective: maximum control, maximum manageability Know how the light works Know how photography works Know the camera you re using Making the most of what you have to work with. ISO This is the first
CHAPTER 7 - HISTOGRAMS
 CHAPTER 7 - HISTOGRAMS In the field, the histogram is the single most important tool you use to evaluate image exposure. With the histogram, you can be certain that your image has no important areas that
9/19/16. A Closer Look. Danae Wolfe. What We ll Cover. Basics of photography & your camera. Technical. Macro & close-up techniques.
 A Closer Look Danae Wolfe What We ll Cover Basics of photography & your camera Technical Macro & close-up techniques Creative 1 What is Photography? Photography: the art, science, & practice of creating
Intro to Digital Compositions: Week One Physical Design
 Instructor: Roger Buchanan Intro to Digital Compositions: Week One Physical Design Your notes are available at: www.thenerdworks.com Please be sure to charge your camera battery, and bring spares if possible.
Autumn. Get Ready For Autumn. Technique eguide. Get Ready For
 Get Ready For Autumn Blink and you may have missed it, but our summer is behind us again and we re back into the short days and long nights of autumn. For photography however, the arrival of autumn means
10 TOP TIPS TO INSTANTLY IMPROVE YOUR NATURE PHOTOS
 10 TOP TIPS TO INSTANTLY IMPROVE YOUR NATURE PHOTOS THINK OUTSIDE THE BOX 1 Don t be afraid to break some rules and experiment. Nature photography doesn t need to follow the traditional methods that you
DIGITAL PHOTOGRAPHY CAMERA MANUAL
 DIGITAL PHOTOGRAPHY CAMERA MANUAL TABLE OF CONTENTS KNOW YOUR CAMERA...1 SETTINGS SHUTTER SPEED...2 WHITE BALANCE...3 ISO SPEED...4 APERTURE...5 DEPTH OF FIELD...6 WORKING WITH LIGHT CAMERA SETUP...7 LIGHTING
Aperture. The lens opening that allows more, or less light onto the sensor formed by a diaphragm inside the actual lens.
 PHOTOGRAPHY TERMS: AE - Auto Exposure. When the camera is set to this mode, it will automatically set all the required modes for the light conditions. I.e. Shutter speed, aperture and white balance. The
A collection of example photos SB-900
 A collection of example photos SB-900 This booklet introduces techniques, example photos and an overview of flash shooting capabilities possible when shooting with an SB-900. En Selecting suitable illumination
Working Notes Section One - Better Photos
 Working Notes Section One - Better Photos These notes are written to complement the material presented in the Nikon School of Photography Section One seminar rather than as stand-alone text. While the
Levels. What is a levels histogram? "Good" and "bad" histograms. Levels
 Levels One of the most powerful tools available in post-processing photos is the Levels editor. It displays the picture's levels histogram and allows you to manipulate it with a few simple but effective
Setting Up Your Camera Overview
 Setting Up Your Camera Overview Lecture #1B LOUDEN 1 Digital Shooting: Setting up your Camera & Taking Photographs Watch this Video: Getting to Know Some Controls on Your Camera (DSLR CAMERAS): http://www.youtube.com/watch?v=1wu63fbg27o&feature=rel
capture the tree Capture Your Holidays with Katrina Kennedy
 Capture Your Holidays with Katrina Kennedy LESSON 2 capture the tree LESSON 2 OBJECTIVES: At the end of this lesson you will be able to: Create a photo of your Christmas tree using a slow shutter speed.
Digital 1! Course Notes.
 Digital 1 Course Notes Anatomy of a DSLR Light' Enters' Camera 1. Lenshood: Used to control additional light entering the lens. 2. UV filter that is purchased separately from the lens. Screws onto the
Photographing Waterfalls
 Photographing Waterfalls Developed and presented by Harry O Connor oconnorhj@yahoo.com July 26, 2017* All photos by Harry O Connor * Based on May 2012 topic Introduction Waterfall photographs are landscapes
ISO 200 1/500 sec. f/11 82mm lens
 4 ISO 200 1/500 sec. f/11 82mm lens The Creative Zone Taking Your Photography to the Next Level The Creative zone is the name given by Canon to the shooting modes that offer you the greatest amount of
Fantasea CP-4 Pro & CP-4 Sport Camera Housings For Nikon Coolpix 4300 & Coolpix 885 Digital Cameras
 Fantasea CP-4 Pro & CP-4 Sport Camera Housings For Nikon Coolpix 4300 & Coolpix 885 Digital Cameras General Introduction: The Fantasea CP-4 Pro & Sport models are both designed for housing the Nikon Coolpix
Suggested FL-36/50 Flash Setups By English Bob
 Suggested FL-36/50 Flash Setups By English Bob Over a period of time I've experimented extensively with the E system and its flash capabilities and put together suggested flash setups for various situations.
Capturing Realistic HDR Images. Dave Curtin Nassau County Camera Club February 24 th, 2016
 Capturing Realistic HDR Images Dave Curtin Nassau County Camera Club February 24 th, 2016 Capturing Realistic HDR Images Topics: What is HDR? In Camera. Post-Processing. Sample Workflow. Q & A. Capturing
Source: (January 4, 2010)
") Source: http://www.slrgear.com/reviews/showproduct.php/product/101/cat/12 (January 4, 2010) Name Nikon 105mm ƒ/2d AF DC Nikkor Image Circle 35mm Type Telephoto Prime Defocus Control Focal Length 105mm
Source: http://www.slrgear.com/reviews/showproduct.php/product/101/cat/12 (January 4, 2010) Name Nikon 105mm ƒ/2d AF DC Nikkor Image Circle 35mm Type Telephoto Prime Defocus Control Focal Length 105mm
Digital Photography. For beginners. Week 5
 Digital Photography For beginners Week 5 In this session: Constructive Critique Manual & Auto Focus Focal lengths Field of View & Perspective The correct Lens Zoom & Zooming techniques Assignment 5 Manual
! 1! Digital Photography! 2! 1!
 ! 1! Digital Photography! 2! 1! Summary of results! Field of view at a distance of 5 meters Focal length! 20mm! 55mm! 200mm! Field of view! 6 meters! 2.2 meters! 0.6 meters! 3! 4! 2! ! 5! Which Lens?!
IMAGES OF MOVING SUBJECTS
 IMAGES OF MOVING SUBJECTS Capturing images of a scene where one or more subjects are in motion Charles Ginsburgh - Fotoclave 2017 (November 4 th, 2017 ) As you view these Images, think about What the Story
General Camera Settings
 Tips on Using Digital Cameras for Manuscript Photography Using Existing Light June 13, 2016 Wayne Torborg, Director of Digital Collections and Imaging, Hill Museum & Manuscript Library The Hill Museum
Autofocus Problems The Camera Lens
 NEWHorenstein.04.Lens.32-55 3/11/05 11:53 AM Page 36 36 4 The Camera Lens Autofocus Problems Autofocus can be a powerful aid when it works, but frustrating when it doesn t. And there are some situations
PHOTOGRAPHY Mohamed Nuzrath [MBCS]
![PHOTOGRAPHY Mohamed Nuzrath [MBCS]](/thumbs/80/82228500.jpg "PHOTOGRAPHY Mohamed Nuzrath [MBCS]") PHOTOGRAPHY Mohamed Nuzrath [MBCS] Coordinator HND IT / Senior Lecturer IT BCAS Kandy Campus Freelance Photographer Freelance Web/Software Developer PHOTOGRAPHY PHOTO - Light GRAPHY Drawing PHOTOGRAPHY
PHOTOGRAPHY Mohamed Nuzrath [MBCS] Coordinator HND IT / Senior Lecturer IT BCAS Kandy Campus Freelance Photographer Freelance Web/Software Developer PHOTOGRAPHY PHOTO - Light GRAPHY Drawing PHOTOGRAPHY
PHOTOTUTOR.com.au Share the Knowledge
 CAMERA BASICS BY MICHAEL SMYTH This tutorial is designed to introduce new photographers to the basics of cameras and camera operation. WHAT IS A CAMERA A BOX WITH A HOLE AND SOME LIGHT SENSITIVE MATERIAL
Lesson 1 Course Notes
 4 Week Online Photography Course An Introduction to Digital Photography A Guide to Getting the Best from Your Digital Camera Lesson 1 Course Notes By David Taylor Click Here to Book Course PAGE 2 Introduction
Creating Stitched Panoramas
 Creating Stitched Panoramas Here are the topics that we ll cover 1. What is a stitched panorama? 2. What equipment will I need? 3. What settings & techniques do I use? 4. How do I stitch my images together
Flash Photography. Malcolm Fackender
 Flash Photography Malcolm Fackender Speedlights (Flashes) Many of us will already have one or more speedlights (flashes) in our camera bag. Speedlights are small portable devices that can be used at home