INVENTORY MANUAL FOR J. CREW PIECE COUNT PASSWORD: ZEBRA RETAIL SOLUTIONS
|
|
|
- Buddy Scott
- 5 years ago
- Views:
Transcription


1 VERSION 5 ZEBRA ID = SYSTEM INVENTORY MANUAL FOR J. CREW PIECE COUNT PASSWORD: ZEBRA RETAIL SOLUTIONS FOR ASSISTANCE, CALL ZEBRA CLIENT CARE AT or UK # OR zrsclientcare@zebra.com
2
3 TABLE OF CONTENTS 1 1 OVERVIEW... 1 PREPARE THE MERCHANDISE... 2 FIXTURE STICKERS... 2 PLACE THE STICKERS... 4 RECEIVE COMPONENTS... 7 SET UP ACCESS POINT... 8 ABOUT THE SCANNERS REGISTER THE SCANNERS ENTER STICKER RANGE SCANNING BASICS IMPORTANT MESSAGES LOG OUT AND CLOSE OUT SCANNERS START SCANNING AND CHECKING HOW TO ACCESS REPORTS VIEW REPORTS CLOSE THE INVENTORY SHIP COMPONENTS TRAINING GUIDE EXHIBIT A - SCANNING INSTRUCTIONS EXHIBIT B - TRAINING STICKERS EXHIBIT C - INVENTORY SPECIFICATIONS & CONSIDERATIONS EXHIBIT D - CLIENT CARE PHONE NUMBERS EXHIBIT E PIECE COUNT PASSWORD FORM FIXTURE STICKER CONTROL LOG Copyright by Zebra Retail Solutions
4 OVERVIEW ZEBRA RETAIL SOLUTIONS supplies our Wireless Communication System and customized software for use by your associates to take a scanned inventory. ZEBRA RETAIL SOLUTIONS also supplies Fixture Stickers printed with consecutively numbered special bar codes. The stickers are placed on every fixture in advance of the inventory and are the key control to ensure that every fixture is inventoried. You will receive an access point, scanners and all the supplies you will need to conduct your inventory. The scanners will be communicating to the Host Computer at ZEBRA RETAIL SOLUTIONS using Wi-Fi via the access point. You simply connect the Ethernet cable from the primary access point into the Guest network port. The scanners are then Registered via the access point and are given to your associates. All the associates have to do for each fixture is: a. Scan the bar code on the Fixture Sticker. b. Scan or key the bar code on each piece of merchandise. c. Enter a quantity if required (allowed only on certain SKUs). d. Continue to scan/key tickets until all of the merchandise on the fixture is accounted for. e. Scan the Fixture Sticker to "END" the sticker. f. Enter the Piece Count. g. Write the totals displayed on the scanner screen on the Fixture Sticker. h Place a red flag on the sticker to show it has been counted. i. Repeat the steps above for the next sticker. The scanner will display the SAP ID # and the total scan count and will save all of the inventory details. The associate will write the totals on the fixture sticker and repeat these steps for each of the remaining fixtures. The scanners transmit the data to Zebra via Wi-Fi each time a sticker is ended. The scanners do not need to be cradled at any time. If the scanner is out of range of the access point, it will save and accumulate the stickers ended until it is back in range. Once the scanner is back in range, it will then transmit all of the details of the saved stickers. Reports will be available for display throughout the inventory by either accessing the ZRS Website or by using the Scanner to view the reports. These reports include a Missing Stickers Report which will inform you of any missed fixtures. When all of the fixtures are accounted for, you are finished! The final step is to re-pack the equipment for shipment back to ZEBRA RETAIL SOLUTIONS. This manual is designed to lead you step-by-step. It should be read and understood before Inventory Day. GOOD PREPARATION IS ALWAYS THE KEY TO A TIMELY AND ACCURATE INVENTORY. Page - 1
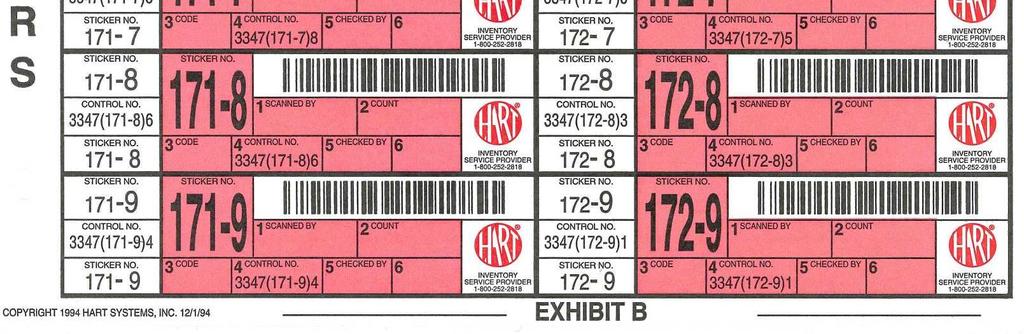
5 PREPARE THE MERCHANDISE DO WHATEVER YOU CAN TO SPEED UP THE SCANNING Make sure that all fixtures are neat and that the merchandise is arranged in a uniform manner. Pay special attention to displays. Check that all merchandise has a scannable bar code. Where possible, face tickets so that they can be easily seen and scanned. Double check for merchandise in out of the way nooks and crannies (under registers, in cabinets, back room, etc.); make sure it s ready to be counted. A FLOOR PLAN (MAP) OF YOUR STORE SHOULD BE CREATED You should create a detailed Floor Plan a few days before your scheduled inventory. Make sure that all of the merchandise fixtures in your store are represented on the Plan. You will be recording the sticker numbers for each fixture on the Floor Plan, so use paper large enough (a large piece of cardboard works well). FIXTURE STICKERS You will be using FIXTURE STICKERS to control the fixtures on the Floor Plan. The stickers are attached to Fixture Stickers Sheets. There are 3 columns of removable stickers on each sheet, which means that there are 30 sticker numbers on each sheet. Each sticker has a pre-printed 9-digit control number (printed in the box labeled CONTROL NO.). The first 4 digits are the series ; the next 4 digits in parentheses are the Sticker Number ; and the last digit is a control check-digit. For the most part, you will only be concerned with the 4-digit Sticker Number. Page - 2
 is part of the control number and is also printed separately on the sticker in the box labeled STICKER NO.")
6 FIXTURE STICKERS Continued... The Sticker Number is always 4 digits long. This 4-digit number (in the parentheses) is part of the control number and is also printed separately on the sticker in the box labeled STICKER NO. The first three numbers are the page number and the fourth number is the sequence of the sticker on the page (0-9). The picture below is an example of a Training Sticker, Exhibit B in this manual. On the Training Sticker below, the 9-digit control number is 3347(171-0)1; 3347 is the series, is the Sticker Number, and 1 is the check-digit. The sticker includes a scannable bar code and boxes for recording information. After a sticker has been ended, the scanner will remind the associate to write their SAP ID# in Box 1 ( Scanned By ) and the Scan Count of that sticker in Box 2 ( Count ). TRAINING STICKERS EXHIBIT B These stickers are only to be used for Training never live inventory. The system will not include the inventory data scanned on them in your final results. It will, however, include the sticker numbers on all inventory reports so that you may train with the system. You can identify Training Stickers in two ways. First, they are PINK in color and second, the series number on these stickers is always Page - 3
7 PLACE THE STICKERS Be sure to read this entire section before placing any stickers around the store. The Fixture Stickers are the key control to ensure that all merchandise is counted. Stickers MUST be in place before the inventory begins. This procedure could take a couple of hours, so plan accordingly. Do not skip sticker numbers. The stickers must be placed in a consistent manner. Start with the first sticker number in your pack of stickers and place the stickers in numerical order. The Fixture Sticker Control Log (Form # 001, in the back of the manual) may be used in addition to the Floor Plan to record the placement of the stickers. This log is used to record the stickers assigned to the fixtures in each area of the store. List each area and the beginning sticker number and the ending sticker number assigned for that area of the store. The Store Manager should be in charge of laying the stickers. This is a two person job, usually the Store Manager and another key associate. The stickers should be removed from the Fixture Sticker Sheets and attached to each fixture using a consistent method. The associate will place the sticker on the fixture, table, etc. and will call out the 4-digit sticker number to the Store Manager. The Store Manager will record the range of sticker numbers used in that specific area of the store on BOTH the Floor Plan AND the Fixture Sticker Control Log. This procedure makes it easy to locate specific stickers throughout the inventory and will help if a sticker becomes lost. The associates will be scanning from left to right as they move from one sticker to another. Lay the stickers so that it will be easy to see where one sticker ends and the next sticker begins. Section Markers can be used to aid with this. Page - 4
8 PLACE THE STICKERS Continued... SECTION MARKERS are the pads of red flags that you received with your supplies. They can be used to: Identify completed stickers. Place the section marker over the bar code on the fixture sticker when the sticker has been completed. This is a visual aid and prevents associates from re-scanning in error. To create clear section breaks. Place the Section Marker on the fixture vertically where you want the section break to be. Some fixtures will require more than one sticker. The number of stickers is usually determined by the amount of merchandise on the fixture or the size of the fixture. In general, the more stickers that are used, the better. As you walk through the store, make sure that all of the merchandise to be counted has been assigned a sticker. It should be easy to see which merchandise is assigned to which sticker. If you discover a fixture that does not have a sticker on it, use your remaining stickers. Be sure to use the very next sticker after the last sticker number used and recorded. This sticker must be recorded on the Fixture Sticker Control Log and the Floor Plan. Never destroy or throw away any stickers. Every sticker must be accounted for. If the bar code on the sticker is damaged, the sticker number can be key-entered. SET UP A TROUBLE RACK Designate a central location in the store as the Trouble Rack and assign a sticker to it. During the actual inventory, all un-ticketed merchandise that cannot be scanned or keyed, should be moved to the Trouble Rack. The scanning associates should not slow down their scanning to research these items. The items should be moved to the Trouble Rack when the sticker is completed. These items will be researched for the correct SKU. Page - 5
9 PLACE THE STICKERS Continued... ADDITIONAL TIPS FOR PLAYING STICKERS The sticker should be placed on the fixture as close as possible to the first piece of merchandise to be scanned. Do not place stickers directly on merchandise. If the merchandise is sold or moved, the sticker may be lost. The stickers will adhere to most surfaces. Place the sticker so that it can be easily reached and there is room for the scanner to scan the sticker. Place the stickers in number order. The system is designed to immediately alert the associate if a sticker number was skipped (but only if they are in order). Place the stickers so that they can easily be seen and written on. The person scanning the sticker will write directly on the sticker. Do not place the sticker on surfaces that might be damaged when you remove it. The best advice is - if you wouldn t use scotch tape on the surface, don t use a sticker on it. One sticker should be used for each shelf. One to two stickers should be used for each display case, depending on the amount of merchandise in the case. Each sticker should account for approximately 75 different items. The key is to sticker the store in a CONSISTENT manner and to make sure that the sections are small and easy for associates to scan. Page - 6
10 RECEIVE COMPONENTS You will receive one box that contains all of the components you will need. The box will be sealed with tape. Cut the tape with a knife, do not rip the tape off. When opening the box, be careful that it is not damaged because you will use the same box to return the components to Zebra Retail Solutions. Inside the equipment box(es) you will find: Next Generation Scanners (2) Access Points One is labeled Primary and one Secondary. Cradlepoint CP95 Access Points are shipped with USB air cards Cradlepoint CP1400 Access Points are shipped with USB air cards Cradlepoint IBR600 Access Points contain internal SIM cards; do not ship with air cards Scanner Chargers You will also receive the following: A Shipping Instructions envelope containing labels and documents to be used to ship the box back to Zebra Retail Solutions when the inventory is completed. If any equipment is missing, contact Zebra Client Care immediately at The white supply envelope contains the stickers and supplies for Inventory. Also included is the Wireless Control ID Bar Code for your store. You will need this form for setting up the scanners for your store. The supply envelope is sent separately from the equipment box(es). Page - 7

 and an electrical outlet. 1.")


11 SETUP ACCESS POINT To assist with setting up the Access Point, please refer to the Quick Start Poster that you received with your supplies. The Primary CradlePoint router ( access point ) needs to be connected to your Guest network jack (located in the manager s office) and an electrical outlet. 1. Clear a flat surface area on the manager s desk with access to the Guest network jack and close to a computer with Internet access. 2. Place the following items on the table: Access Point. Scanners Wireless Control ID - This form is the official documentation of the inventory and should be kept near the computer with Internet access. The ID bar code on the form will be scanned to set up the scanners. The form will then be completed at the END of your inventory. 3. Connect the power supply for the access point to an available power outlet. 4. Insert one end of the Ethernet cord into the Blue Port or WAN Port on the back of the access point. 5. Insert the other end of the Ethernet cord directly into your Guest network jack. WAN Port Cradlepoint 1400 Connect to Guest jack. OR Guest Network Jack OR Page - 8
12 Once the primary access point has been connected to the power outlet and your Guest network jack, the Power Status (green) WAN Status lights (orange/blue/green) and Wireless indicator (blue/green) should be lit. The Access Point is now ready to use! IBR Cradlepoint 1400 OR OR Cradlepoint 95 The access point must be connected in order to transmit. Make sure to connect the primary access point before scanning any live inventory data. IMPORTANT NOTES: SCANNING THE STOCKROOM - It is only necessary to have the Primary access point connected (if the Stockroom is near the manager s office). SCANNING THE SALES FLOOR - In addition to the Primary access point, it may be necessary to set up the Secondary access point in a central location on the Sales Floor. REMEMBER: The PRIMARY access point must be cabled into the Guest network jack and fully operational for the secondary access point to work. The secondary MUST be at least 150 feet or 46 meters from the primary. Page - 9
13 ABOUT THE SCANNERS NexGen Scanner - Powered by Zebra Retail Solutions Features & Benefits include: Scanning Imager maximizes scanning productivity. Omni-Directional technology lets you scan at any angle, with no need to line up any barcode. 12+ Hours of Battery Life will last for the entire Inventory. The back-up battery inside the Scanner ensures no data is lost, and no restart is necessary when batteries are charged. Touchscreen allows for easy & fast responses. Lightweight Scanner fits easily in your hand, allowing you to capture barcodes in small or tight spaces. Increased Memory allows for quicker file downloads. Wi-Fi Connectivity Updates Data in Real-Time. Page - 10


14 ABOUT THE SCANNERS Touch Screen Auxiliary Scan Button Auxiliary Scan Button ESC Press to clear an entire field SCAN Press to scan barcodes BKSP Press to clear a character at a time ENT Press to accept an entry ARROWS Press to navigate menu FUNC Function Button POWER Press to power Scanner on and off FUNC+5 = Increase screen brightness FUNC+8 = Decrease screen brightness FUNC+6 = Increase volume FUNC+9 = Decrease volume Stylus pen on back of Scanner Page - 11


15 SCREEN LEGEND Pending Stickers Indicator P = Scanner contains stickers to be transmitted to Zebra. Store# Team Member # Battery Strength Signal Strength Alpha/Numeric Indicator 1 = Numeric A = Alpha, UPPER a = Alpha, lower Page - 12


16 REGISTER SCANNERS When registering the scanners, it is only necessary to have the Primary Access Point Set-up and Operational. Now that the access point is up and running, you can start registering the scanners. The scanners utilize Wi-Fi Connectivity and transmit data via the access point. To Register the scanners: 1. Scan the Wireless Control ID barcode. 2. Key your Store Number and Press ENT (Enter). 3. The scanners will register shortly after pressing ENT. 4. After you tap the continue button, the Enter SAP ID screen will be displayed. 5. Repeat steps 1 and 2 for all scanners. 6. After entering the SAP ID#, the Scan Sticker screen will display. This is the point when the associates start scanning. Page - 13

17 REGISTER SCANNERS IMPORTANT: On the bottom of the Scanner screen, you may notice a P, followed by a number. This P means there is data pending in the Scanner that has not been transmitted to the Access Point. Eventually, the P numbers will decrease as the data is transmitted to the Access Point. Keep an eye out for P numbers as they could build if a Scanner is too far away from the Access Point. Always walk the Scanner closer to the Access Point as a first step in decreasing the P numbers. You should also check that your Access Point is properly connected. The scanners transmit the data to Zebra via Wi-Fi each time a sticker is ended. If the scanner is out of range of the access point, it will save and accumulate the stickers ended until it is back in range. Once the scanner is back in range, it will then transmit all of the details of the saved stickers. Page - 14
18 ENTER STICKER RANGES Before the start of inventory, you will need to key the Sticker Ranges that were used in the store. The sticker range is used for reporting and to determine the status of the your inventory. ENTERING AREA STICKER RANGES ONLINE Log onto Click on the button on the right side of the screen. Enter your User Name and Password (both entries must be in lowercase) and press ENTER or click on the OK button. Your User Name and Password will be provided to you prior to your inventory. Click in the Enter Store Number field and enter your store number. Press TAB or click in the Enter Password Field. Type the Store Specific Password. Press ENTER or click on the OK button. You will now be connected to the Inventory Overview for your store. Click on Inventory Functions from the menu bar. Click on Enter Sticker Ranges. Click on the area that the sticker range will be entered for; then click the OK button. Enter the first (lowest) 9-digit sticker control number used, in the Starting Sticker field on line 1; press the TAB key and enter the last (highest) 9-digit sticker control number in the Ending Field. The sticker control numbers are 9 digits long, for example, 1111(111-1)1 and are printed on the sheets that the stickers were peeled off of, in the boxes labeled CONTROL NO. They should also have been written on the Floor Plan and the Fixture Sticker Control Log while the stickers were being placed on the fixtures. Use these documents to aid in entering the starting and ending control numbers for the entire store. If more than one sticker range was used in the selected area, press the TAB key and enter starting and ending 9-digit sticker control numbers for the remaining ranges; up to 5 separate ranges may be entered for each area. When done entering the Sticker Ranges for an area, click on the OK button. The confirmation screen will be displayed. Click OK to accept the Sticker Ranges entered and then select the next area to enter Sticker Ranges, if required. During the inventory, you will be able to add or modify the Sticker Range based on additions and deletions of sticker numbers used. *** VERY IMPORTANT NOTE *** If a Sticker Range was not entered before you started scanning, the Inventory Overview will display a message Attention!! You have not entered a Sticker Range. Please enter a Sticker Range before continuing. Page - 15

19 ENTER STICKER RANGES Continued Page - 16
20 SCANNING BASICS Start a Sticker After entering the SAP ID, scan the Fixture Sticker. After scanning the Fixture Sticker, you must scan or key the SKUs for all of the merchandise on that fixture. A quantity of one (1) will automatically be accepted. Page - 17

21 SCANNING BASICS Review/Delete Items: 1. If you have lost your place in a sticker, or would like to verify previously scanned items, refer to the Review Grid, located in the center of the Scan Barcode screen. You can navigate through the Review Grid using the Arrow keys on the Scanner. 2. To delete a scanned item, locate the barcode in the Review Grid using the arrow keys. 3. Highlight the item and press the Delete Item button on the touchscreen. 4. Select Yes to confirm the deletion or press the ENT button. Page - 18


22 SCANNING BASICS Not on File Merchandise: 1. The Scanner will alert you if a scanned barcode is NOT on the Master File. 2. Try again or move item to the Trouble Rack. 3. If a correct SKU cannot be located, use a SKU from a like item to inventory the item. NOTE: Associates should not stop scanning when they encounter a Not on File item. They should finish the sticker and then move the item to the Trouble Rack. Incorrect Keying; If you keyed information incorrectly, make corrections by pressing the ESC (Escape) button to clear the entire field or BKSP (Backspace) to clear the field one character at a time. Page - 19


23 SCANNING BASICS Cancel a Sticker: Press the Cancel Sticker button on the touchscreen and follow the instructions. NOTE: You can only cancel the sticker you are currently scanning. You can not cancel a sticker that was ended. Create an Empty Sticker: If you encounter a stickered fixture for which there is no merchandise associated with it, you still need to account for the Fixture Sticker. Begin by starting a sticker, then immediately scan the sticker again to end the sticker. Page - 20


24 SCANNING BASICS Key UPC/SKU To key enter a UPC/SKU: Use the numeric Scanner buttons OR Double Tap the Scanner screen with the stylus and the on-screen keyboard will be displayed, as pictured to left. End a Sticker: After you have scanned all of the merchandise for a particular sticker, you must END the sticker - the Scanner will save all of the data and automatically transmit to Zebra. 1. Scan the Fixture Sticker again. 2. Select Yes to confirm by either pressing the button on the touchscreen or highlighting it using the arrows and pressing ENT (Enter). Page - 21


25 IMPORTANT MESSAGES Write on Sticker: Write the information displayed on the Scanner screen on the actual Fixture Sticker and select OK to continue. Once a sticker has been ended, the data is automatically transmitted to Zebra. Any data scanned, while out of range of the Access Point, will be saved and automatically transmitted once you are again in range. Pending Transmissions: When you have scanned more than four stickers, check the indicator at the Scan Sticker Screen. The P indicates the number of pending sticker transmissions. If you find that number is not decreasing, bring the Scanner closer to an Access Point. If you still cannot transmit, check the Access Point to ensure all plugs and connections are OK. Page - 22


26 IMPORTANT MESSAGES Review Scanned Stickers: The Scan Sticker screen will display the last six stickers scanned, in the Review Grid pictured left. To view all stickers in the Review Grid, use the arrow keys or stylus to scroll through the screen. Rescan Sticker: The System will recognize one occurrence of the same sticker number. If a sticker was scanned more than one, even with different scanners, the system will compare the date and time of the scan versions and accept only the most current version. A rescanned sticker will completely replace the original scanned version of that sticker. Page - 23

27 IMPORTANT MESSAGES Piece Counts: After Ending a sticker, a piece count must be entered into the scanner. To do this, manually count how many pieces are on the fixture, and at the Enter Piece Count screen, key in the quantity. If the scan count and piece count match the Write on Sticker screen will display. If the piece count does not equal the scan, you will have another chance to enter the piece count. However, if after the second attempt the piece count is still incorrect, the sticker will be cancelled. The sticker and all the merchandise will need to be rescanned. If an employee enters three incorrect piece counts in one session, a Supervisor Password will need to be entered. (85201). Page - 24

28 LOG OUT AND CLOSE OUT SCANNERS End Scanning Session: When an Employee has completed their scanning assignments, they should log-out and return the Scanner to the Manager. At the Scan Sticker screen press the Logout button on the touchscreen and the Scanner will return to the Enter SAP ID screen. NOTE: If there are stickers in the Scanner that have not yet been transmitted, (for example, Employee is logging out while out of range of the Access Point) the Scanner must be brought back into range before the Associate can log out. Close-Out Scanner: If a Scanner is no longer needed for your Inventory, it must be closed out. 1. From the Enter SAP ID screen, press the Close Scanner button on the touchscreen to close the Scanner. 2. Follow the Scanner instructions. The Scanner will return to the Scan Control ID screen. Page - 25
29 START SCANNING AND CHECKING The scanning associate s 6-digit SAP ID# must be entered into the scanner before it can be used. All scanning associates should be trained before they begin scanning. Spend a few minutes training the associates as a group before giving them their individual assignments. They should all be familiar with the various functions of the scanner as well as the proper inventory procedures. See the Training Guide (beginning on Page 36) for more information. START THE LIVE SCANNING See the NextGen Employee Quick Reference Guide for scanning instructions. Also, review Exhibit D - Inventory Specifications & Considerations for additional system information. Give the following items to each scanning employee: 1. A copy of the NextGen Employee Quick Reference Guide. 2. A pen or marker for writing on the Fixture Stickers. 3. Section Markers. 4. A Scanner. Page - 26
30 HOW TO ACCESS REPORTS After data has been sent to Zebra, it is processed on the Host Computer. Information about the inventory can then be reviewed in the form of various reports by viewing the reports online. These reports are very useful in controlling the various aspects of the inventory. ACCESSING THE REPORTS ONLINE Throughout your inventory, you can quickly obtain detailed information by viewing or printing the Stores Inventory Reports via the ZRS website. The ZRS website updates in real time so you will be able to obtain up-to-date information after the data from the scanners are transmitted to the Host Computer. To access the inventory reports via the web: 1. Log onto 2. Click on the button on the right side of the screen. 3. Enter your User Name and Password (both entries must be in lowercase) and press ENTER or click on the OK button. Your User Name and Password will be provided to you prior to your inventory. 4. Click in the Enter Store Number field and enter your store number. Press TAB or click in the Enter Password Field. 5. Type the Store Specific Password. Press ENTER or click on the OK button. 6. You will now be connected to the Inventory Overview for your store. Your store number and store name will be displayed on the top. Clicking on any of the underlined items will drill-down to more details in that category. 7. You can access additional reports for your store by clicking on All Reports, located at the upper left corner of the screen, and making your selection from the drop-down menu. 8. On the upper right hand side of the report screen is a button to format the report for printing. Click on this link if you wish to print any of the reports. 9. To exit out of one report, click on the CLOSE button at the top of the screen and that will bring you back to the Inventory Overview. NOTE: To Refresh a report you are currently viewing, simply click on the button at the top right of the screen. Page - 27

31 VIEW REPORTS Screenshot of All Reports Dropdown Viewed from Inventory Overview Page - 28
32 INTERNET REPORTS INVENTORY OVERVIEW Displays a summary of your inventory that includes the number of assigned stickers sent to Zebra, the number of Missing, Rescanned and Empty stickers, the total units for each area, as well as the total units for the entire store. NOTE: If a Sticker Range was not entered before data is transmitted Inventory Overview will display a message Attention!! You have not entered a Sticker Range. You will need to Enter a Sticker Range before continuing. ACTIVITY BY HOUR REPORT This report displays date/hour with the total number of stickers (including rescanned stickers), units, devices in use and the productivity per hour. In addition, the report will list any intervals between activity. DEVICE ACTIVITY REPORT This report lists the Date/Time, Device #, the Function the scanner was performing (i.e. register, sent data), as well as the total stickers, total units and the SAP ID of the employee using the scanner. Columns on this report can be sorted based on preference (ascending/descending order). EMPTY STICKER REPORT This report will list all of the empty stickers in the middle column. It will also lists the Previous sticker (scanned before the empty sticker) and the Following sticker (the one scanner after the empty sticker). This report is used to check that all fixtures that were scanned as empty are actually empty fixtures. (see Exhibit A side 2 for details.) HIGH UNIT STICKERS REPORT This report displays the Top 15 Stickers on which the Total Units equal or exceed 75 units. The stickers will be listed by Highest Total Units in a descending order. Columns on this report can be sorted based on preference (ascending/descending order). KEYED BARCODE REPORT This report displays all UPC/SKUs that were key-entered during the inventory. The report list the sticker number(s), the sequence in which the UPC/SKU appears, the description and the units entered. Columns on this report can be sorted based on preference (ascending/descending order). Page - 29
33 MERCHANDISE NOT ON SALES FLOOR REPORT This report will list the UPCs that were not scanned on the Sales Floor. The report provides the UPC and description, the sticker number the item was scanned on, the sequence number on the sticker, the area the sticker was scanned in, and the units scanned for that item. This report can be viewed by selecting Stock Room, Unassigned, or All Areas. Columns on this report can be sorted based on preference (ascending/descending order). MISSING STICKERS REPORT This report can be viewed by selected Area or by All Areas. The report will display a list of stickers that have not been scanned or sent to Zebra. Check the following items on this report: 1. Check that your first and last sticker used, are correctly identified on the report. If either one is not displayed, they must be scanned and sent to Zebra. 2. All stickers that are listed under the Missing Stickers heading must be either scanned or identified as Not Used. Process any Not Used stickers as Empty Stickers. (See Exhibit A side 2 for details.) MULTIPLE SCANNED SKU REPORT The report lists any SKU that has had more than 10 consecutive scans on a sticker. This report will display the sticker, SKU, description, line and units. At the end of the report, the screen will show the total multiple scanned SKUs, the total multiple scanned units and the total units on the sticker. Columns on this report can be sorted based on preference (ascending/descending order). PRODUCTIVITY ANALYSIS REPORT This report displays the total units scanned, total scan time and the units per hour for each SAP ID. Columns on this report can be sorted based on preference (ascending/descending order). PRODUCTIVITY BY DEVICE REPORT This report will display the inventory date, device number and the time of all devices used RESCANNED STICKER REPORT This report displays all stickers that were rescanned, Units, Date/Time, and the SAP ID of the employee who scanned each occurrence of a sticker. The occurrence that has been accepted is marked by three asterisks (***). Click on the date/time field to view the details of any version of the sticker. SKU LOOK UP REPORT You will need to key the UPC/SKU that you would like to view. This report displays ALL sticker locations for a SKU and associated quantities. You can use this report to determine the location's) of a SKU and to verify that quantities counted are accurate. Page - 30
34 STICKER DETAIL REPORT This report displays a line-by-line listing of every item on a particular sticker, in the order in which it was scanned or keyed. This report can be used to ensure that each employee is following the proper scanning procedures, and should be compared against the actual fixture. If you wish to review a particular SKU listed on a Sticker Detail Report, click on the SKU number and the SKU Detail Report will be displayed. This report can be viewed by: Viewing the Sticker Summary, then clicking on the selected sticker number, OR Selecting Sticker Detail from the Reports Menu, then keying the 4-digit Sticker Number. Columns on this report can be sorted based on preference (ascending/descending order). STICKER SUMMARY REPORT This report can be viewed by a Selected Area or for All Areas. The first screen of the report displays the areas available - highlight the area you wish to view and click OK. This report displays the total units scanned on each of the stickers sent to Zebra. When All Areas is selected, this report will display the Total Units in the entire store. Columns on this report can be sorted based on preference (ascending/descending order). STYLE/COLOR/SIZE SKU Look Up Report This report is available via a link from the Inventory Overview. It enables the user to look up a SKU by one of the following criteria: Style Color Size STICKER BY SAP ID REPORT This report displays the Total Units and Time Scanned for each sticker scanned by the selected associate s SAP ID. The 6-digit SAP ID must be entered to view the report. STICKERS OUTSIDE THE RANGE REPORT This report is available via a link from the Inventory Overview. It lists any stickers that were scanned and downloaded but were not entered into an area sticker range. Stickers listed on this report need to be entered into an area sticker range. Page - 31


35 CLOSE INVENTORY Once you have finished scanning all of the merchandise on every fixture in your store and all of your data has been sent to Zebra and you have reconciled all of the SKU variances, you can prepare to close the Inventory. You should review reports via the ZRS website and reconcile your Inventory results. You should have NO Missing Stickers - The system will not allow you to close the Inventory with missing stickers. You MUST Enter Sticker Ranges - ALL stickers that were used, must be entered into a sticker range. If you try to close without ranges, the system will alert you. Attention!! You have Not entered Sticker Ranges. You Must enter Sticker Ranges before Closing the Inventory. Please enter the Sticker Ranges from the Inventory Functions menu on the Inventory Overview. Press Continue button to return to the Inventory Overview. Close the Scanners As the Inventory is coming to completion and you no longer need the scanners, you can start to close the Scanners. Before closing the Scanners, make sure that you have: Finished scanning all of the merchandise on every fixture in your store. Confirmed there are no Pending transmissions in the Scanners ( P # on screen). The scanner will alert you if you try to close with Pending P s. Page - 32
36 CLOSE INVENTORY Continued... To Close the Scanners: At the Scan Sticker screen select Logout then answer Yes. At the Enter Employee ID screen select Close Scanner answer Yes. The Scan/Key Control ID screen is displayed. (Scanner is closed). Close the Inventory: Go to Inventory Functions When you have verified that the Inventory has been completed, you can close the Inventory via the ZRS website. 1. At the main Inventory Overview screen, Select Inventory Functions from the blue menu bar on top and click on CLOSE INVENTORY. 2. Follow the instructions and prompts that are displayed. Click the Close button at the top right corner and you will return to the Inventory Overview. You must resolve these issues before you can close the Inventory. Contact Zebra Client Care for assistance. con- You be required to confirm ALL areas were accounted for before closing. Click YES to firm all of the areas have been counted or NO to cancel. If there are any stickers scanned as empty, the screen will display the number of Empty Stickers. You will have the option of continuing with the Close Inventory process by selecting Yes. If you need to review the Empty Stickers report and confirm that these stickers contain no merchandise, select "No" to return to the Inventory Overview. Once all the Empty Stickers are verified, start the inventory close process again. All missing stickers must be accounted for. If there are any Missing Stickers, the screen will display the number of Missing Stickers. Verify that all missing stickers are in fact stickers that were not used and have no merchandise associated with them. If any of these stickers have no merchandise on the fixtures, they need to be scanned as empty stickers and the data transmitted to Zebra. To create an empty sticker: Scan the sticker and then END it immediately by scanning it again. The scanner will display a message instructing you to confirm that the sticker is empty. Press Y to accept the sticker as empty and send the data to Zebra. Continued on Next Page... Page - 33

37 CLOSE INVENTORY Continued... Once all the Missing Stickers are accounted for and the data sent to Zebra, start the inventory close process again. If you choose to continue closing the inventory with missing stickers, you must contact Zebra Client Care in order to continue with the inventory close process. You MUST Enter Sticker Ranges before Closing the Inventory. NOTE: A password will only be provided under certain conditions. To obtain a password, you will need to contact Zebra Client Care and provide the reference number displayed on the computer screen and the reason for the password. 3. Once the Close Inventory process has been completed, click the refresh button on the Inventory Overview and the Inventory status will be displayed as Finished and your Inventory Close Confirmation Number for the Inventory will be available. 4. Complete any required information on the Control ID Form. This is your official documentation of this Inventory. Once you receive your confirmation number, disconnect the access point! Page - 34
38 SHIP COMPONENTS Do NOT write on any of the original Zebra boxes. Before packing the boxes, read the shipping instructions printed on the Shipping Instructions envelope and any memos that may have been enclosed. All of the components will be shipped in the original boxes. First, place the Access Points back in the box. Be careful with the antennas. Second, place the scanners into the foam cavities. Third, place any paperwork in the box. Finally, remember to include all chargers, cables and power cords and place with the equipment. Tape up the boxes. ALL UNUSED SUPPLIES MUST BE SENT DIRECTLY BACK TO ZEBRA after your Inventory. NOTE: Zebra Retail Solutions has scheduled the equipment pickup for the day after inventory. It is very important that the equipment is shipped back according to the agreed upon shipping schedule. If you have any questions regarding the shipping of the equipment, please contact Zebra Client Care at (800) Be sure to retain your copies of the shipping receipts after the equipment has been shipped back to Zebra. You may need to refer to them at a later time to provide proof of shipment. Page - 35
39 TRAINING GUIDE Store managers should schedule a pre-inventory meeting prior to the inventory to review Physical Inventory procedures with the associates who will be scanning. PRE-INVENTORY MEETING: This meeting will cover learning and practicing the functions of the scanner as well as learning the procedural steps involved in scanning the merchandise. This training pertains to the associates who will actually be scanning the merchandise during the inventory. BEFORE TRAINING: Make sure that all of the scanners have been set up. Become very familiar with the scanner and its functions (see Exhibit A in this manual). Place the Stickers on all of the fixtures to be counted throughout the store. TRAINING: Assemble all of the scanning associates together and give the following materials to each of them: Copy of the NextGen Employee Quick Reference Guide Scanner A few sheets of section markers Pen THE TRAINING SESSION SHOULD TAKE ABOUT MINUTES. Give a short speech that touches on the following points: The scanner is a small computer with a built-in imager that reads barcodes. All of the inventory data will be communicated to Zebra as the Fixture Sticker is ended. Page - 36
40 TRAINING GUIDE The Fixture Stickers throughout the store represent individual fixtures, or sections of merchandise to be counted. Explain how the stickers were placed throughout the store. Use specific examples and show the differences between how the stickers are placed on the shelves or other types of areas. The SCANNING PROCEDURE is as follows: 1. Scan the Fixture Sticker. 2. Scan/Key the barcode on the merchandise ticket. 3. Enter a quantity if applicable (allowed only on certain SKUs). 4. Repeat step 2 for all the merchandise on the fixture. 5. Scan the Fixture Sticker again to End the Sticker. 6. Enter the Piece Count. 7. Write the totals displayed on the scanner screen on the Fixture Sticker. 8. Place a red flag on the sticker to show that it has been counted. 9. Repeat the steps above for the next sticker. The scanner normally makes a simple beep when you scan a barcode or key-enter information. If you hear any sound other than a simple beep, it means, Look at the scanner screen and follow the instructions. The scanner screen will become dark if it is not used for a couple of minutes. This does not affect any of the data in the scanner. When this happens, just press the Scan button and continue from where you left off. When scanning a sticker, it is important to know where the sticker begins and ends (that is, which merchandise is associated with that sticker). The sticker is placed as close to the first piece of merchandise as possible and it ends at the next Fixture sticker. The associate should take a step back before scanning the sticker to identify where the sticker begins and where it ends. When beginning a new section (an aisle, for instance), begin at the far left and work from top to bottom, left to right. The Fixture Stickers are consecutively numbered and, if scanned in order, the scanner will inform you if you have skipped one while scanning. The goal of the inventory is to count all of the merchandise in the store. If you see an area of merchandise that does not have a sticker placed on it, let the Store Manager know. If a barcode cannot be scanned (the scanner will not read the barcode or the barcode is rejected as Not Valid ), try to manually key-enter the number using the scanner keypad. When a Not On File Item is scanned, a message advising the item is not on the SKU file will be displayed. If an item does not have a barcode ticket or it has an unreadable ticket, it should be placed on the trouble rack. Page - 37
41 TRAINING GUIDE PRACTICE SCANNING: You may want to have the associates practice scanning, or simply watch you scan before beginning the live scanning. If so, you may choose an area of merchandise to practice scanning. SET THE SCANNER TO TRAINING MODE: At the Enter SAP ID screen, before you enter your SAP ID, Press the Menu button in the lower right corner. From the Pop-Up Menu, select Training Mode and then select Yes. At the Enter SAP ID screen, you will now see ***Training*** on the bottom of the screen. If you have already entered your SAP ID, you will need to select Logout on the scanner. The scanner will return to Set SAP ID screen where you can now select Training Mode. Scan the sticker and merchandise just as if it were live scanning. When a sticker is scanned, the scanner will remind you that Stickers scanned in Training Mode will not be sent and data will not be registered just press ENT (Enter). The employee should continue this practice scanning until they feel comfortable with the scanner and the scanning procedures. Remember: When the scanner is set for this Training mode, the stickers and the merchandise barcodes scanned or keyed will NOT be included on any reports or other output. After Training is completed, it is very important that the scanners are taken out of Training Mode for the Live scanning. The scanners will not transmit data in Training Mode! 1. To exit Training, press the Menu button located in lower right corner of the screen. 2. A popup menu will be displayed with Training Mode checked, tap on the screen and uncheck Training Mode. 3. Simply press Enter and you will return to the Enter SAP ID screen. ***Training*** should disappear from the bottom of the screen, and the scanner is now ready for live inventory. Page - 38
42 EXHIBIT A - J. CREW SCANNING INSTRUCTIONS SET UP SCANNER Before you begin to scan inventory, the 6-digit SAP ID must be entered and then press the Enter key : START A STICKER After entering the SAP ID, the SCAN STICKER screen will be displayed. SCAN TICKETS 1. You must Scan or Key the SKUs for all the merchandise on that fixture. 2. ALL merchandise on the sticker must be scanned or keyed individually. The screen displays Qty 1 Only. NOTE: There are some SKUs that have been designated by your Corporate for multiple quantities. When one of these SKU s are scanned or keyed the scanner will display Multi OK. See Exhibit E for more information on quantity parameters. If the scanner makes a special sound, follow instructions on the scanner screen (see screen at right for example). END A STICKER After you have scanned all the merchandise for a particular sticker, you must END the sticker - the scanner will save all of the data. 1. Scan the Fixture Sticker again to END the sticker. 2. If you are finished with the sticker press Y. If you are not finished with the sticker press N. 3. Enter the Piece Count for this sticker. 4. Write your SAP ID# in Box #1 on the sticker. 5. Write the Scan Count (total units) in Box #2 on the sticker. 6. Press C to Continue and go to a blank Scan Sticker screen. Copyright by Zebra Retail Solutions SIDE 1
43 ADDITIONAL SCANNER FUNCTIONS REVIEW PREVIOUS TICKET - If you have lost your place in a sticker, or would like to verify what you have already scanned: 1. Refer to the Review Grid, located in the center of the Scan Barcode screen. At a blank barcode screen, you can navigate through Review by using the Arrow keys on the scanner. DELETE TICKET - If you scanned or keyed an item incorrectly and you are now at a new barcode screen: 1. At a blank barcode screen, locate the barcode in the Review Grid using the arrow keys. 2. Highlight the item and press the Delete Item button, on the TouchScreen. CREATE AN EMPTY STICKER (No Merchandise on the Fixture) Perform START A STICKER and END A STICKER. Scan the Fixture Sticker and then END it immediately. INCORRECT KEYING If you keyed information incorrectly and you are still on the same screen, you can make corrections by pressing ESC and re-keying the information. BKSP (Backspace) deletes only the last character keyed. CANCEL STICKER (DELETE ALL RECORDS FOR THIS STICKER) Press the Cancel Sticker icon located in the lower left corner of the screen and follow instructions. (You can only cancel the sticker that you are scanning, you cannot cancel a sticker that was ended.) SPECIAL FUNCTION KEYS TO DARKEN THE SCREEN press the FUNC and 8 keys. TO LIGHTEN THE SCREEN press the FUNC and 5 keys. TO INCREASE THE VOLUME press the FUNC and 6 keys. TO DECREASE THE VOLUME press the FUNC and 9 keys. Copyright by Zebra Retail Solutions SIDE 2


44 Copyright by Zebra Retail Solutions
45 J. CREW INVENTORY SPECIFICATIONS & CONSIDERATIONS After each sticker is scanned the data is transmitted to Zebra. STICKERS After 999 records are scanned or keyed within a sticker, the sticker must be ended. The scanner will display the message, THIS STICKER MUST BE ENDED. NOTE: A record is created each time a new (different) barcode is scanned. There may be many quantities associated to one record. BAR CODES INTERLEAVED 2 OF 5 May be scanned or keyed and must be 12 digits in length. To ensure that the different styles, colors, and sizes for a particular merchandise item are being counted accurately, most merchandise on a fixture must be scanned or keyed individually. The scanner is programmed to accept a quantity of 1 Only for most of the merchandise on the item master file. IMPORTANT: The exceptions are the SKUs that have been designated by your Corporate Office to allow multiple quantities. QUANTITY When one of these SKUs is scanned/keyed the scanner will display Multi OK. This will enable multiple quantities to be entered for that item only. If you press ENTER to accept the quantity or the next item scanned is a non-multi SKU the scanner will return to Quantity 1 Only mode. For any same double digit entry (such as 11, 22, 33, 44, 55, 66, 77, 88 and 99), the scanner will display a message and the quantity will need to be verified. To avoid keying errors, the quantity will be accepted after two (2) successive matches. The Maximum Quantity allowed is 200, Re-Key is 99. NOT ON FILE If a scanned or keyed SKU is Not on File, the scanner will display a message indicating the item is Not On File and prompt you to move the item to the Trouble Rack. You will press ENT (enter) to continue. WIRELESS CONTROL ID This form is the official documentation of this inventory. Make sure that it is completed with the most current information at the END of the inventory. Follow the instructions printed on the form. Copyright by Zebra Retail Solutions SIDE 1
46 J. CREW INVENTORY SPECIFICATIONS & CONSIDERATIONS PIECE COUNTS After Ending a sticker, a piece count must be entered into the scanner. To do this, manually count how many pieces are on the fixture, and at the Enter Piece Count screen, key in the quantity. If the scan count and piece count match the Write on Sticker screen will display. If the piece count does not equal the scan, you will have another chance to enter the piece count. However, if after the second attempt the piece count is still incorrect, the sticker will be cancelled. The sticker and all the merchandise will need to be rescanned. If an employee enters 3 incorrect piece counts in one session, a Supervisor password will need to be entered. (85201 ). REVIEW OF STICKERS SCANNED At any time during the inventory you can check to see the last six fixtures that have been scanned in each scanner. At a blank Scan Sticker screen, the Review Grid will display the last six (6) fixtures (in the order scanned) that have been scanned in that scanner. Copyright by Zebra Retail Solutions SIDE 2
 252-2818/ UK #0808-189-04-48 Our Client Care Staff may be reached by calling the above numbers.")

47 ZEBRA RETAIL SOLUTIONS INVENTORY CLIENT CARE PHONE NUMBERS IF YOU HAVE ANY QUESTIONS, CONTACT ZEBRA RETAIL SOLUTIONS CLIENT CARE. (800) / UK # Our Client Care Staff may be reached by calling the above numbers. You may also contact Zebra Client Care via When sending an , please remember to include your: Company Name Store Location # Personal Name Phone Number, and A Brief Message, describing your question or issue. Zebra Client Care will respond to your within 10 minutes. Copyright by Zebra Retail Solutions
Inventory Manual. Version 3. Hart ID = Have a question? Call Hart Client Care at , or us at
 Version 3 Hart ID = 924-01 Inventory Manual Review Equipment & Supplies page 2 About Hart Scanners page 4 Register Scanners page 6 Place Fixture Stickers page 8 Enter Sticker Ranges page 14 Scanning Basics
Warehouse Instruction Guide
 Warehouse Instruction Guide Review Equipment & Supplies page 2 Set-Up Access Point page 6 Register Scanners page 8 Place Fixture Stickers/Enter Ranges page 10 Scanning Basics and Additional Keyboard Functions
ZEBRA RETAIL SOLUTIONS
 VERSION 03 ZEBRA ID = 370-01 INVENTORY MANAGER S REFERENCE MANUAL FOR ZEBRA RETAIL SOLUTIONS Copyright by Zebra Retail Solutions TABLE OF CONTENTS PAGE RECEIVE COMPONENTS AND SUPPLIES... 1 SET UP ACCESS
INVENTORY LEAD S INSTRUCTION MANUAL FOR
 SYSTEM VERSION 04 CLIENT ID = 233-01 INVENTORY LEAD S INSTRUCTION MANUAL FOR PAGE RECEIVE COMPONENTS & SUPPLIES 1 STORE PREPARATION 3 PLACING THE FIXTURE STICKERS 4 KEY STICKER RANGE 7 SET UP ACCESS POINTS
ZEBRA RETAIL SOLUTIONS
 VERSION 08 ZEBRA ID = 295-01 SYSTEM INVENTORY MANUAL FOR ZEBRA RETAIL SOLUTIONS TABLE OF CONTENTS PAGE OVERVIEW... 1 1 2 3 4 5 6 7 8 9 10 PREPARE THE MERCHANDISE... 2 FIXTURE STICKERS... 2 PLACE THE STICKERS...
RETAIL SOLUTIONS VERSION 09 STORE MANAGER S INSTRUCTION MANUAL FOR INVENTORY
 RETAIL SOLUTIONS VERSION 09 CLIENT ID = 235-01 SYSTEM STORE MANAGER S INSTRUCTION MANUAL FOR INVENTORY PAGE RECEIVE COMPONENTS & SUPPLIES 2 SET UP ACCESS POINTS 3 SET UP SCANNERS 12 PLACING THE FIXTURE
ZEBRA RETAIL SOLUTIONS
 VERSION 07 ZEBRA ID = 276-01 INVENTORY MANUAL FOR ZEBRA RETAIL SOLUTIONS TABLE OF CONTENTS PAGE OVERVIEW... 1 11 12 13 14 15 16 17 18 19 10 PREPARE THE MERCHANDISE... 2 INVENTORY FIXTURE STICKERS... 2
HART SYSTEMS, INC. INVENTORY MANUAL FOR VERSION 04 HART ID =
 VERSION 04 HART ID = 926-01 INVENTORY MANUAL FOR HART SYSTEMS, INC. TABLE OF CONTENTS PAGE OVERVIEW... 1 11 12 13 14 15 16 17 88 19 10 11 12 13 14 15 PREPARE THE MERCHANDISE... 2 HART AREA STICKERS...
HAVE A QUESTION? CALL ZEBRA CLIENT CARE
 SCANNER FUNCTIONS SET TEAM MEMBER Using the Stylus, Tap the scanner screen twice to display the Key board. Use the keyboard to Key the Team Member and press ENT (Enter). NOTE: When entering the Team Member
Physical Inventory System User Manual. Version 19
 Physical Inventory System User Manual Version 19 0 Physical Inventory System User Manual 1 Table of Contents 1. Prepare for Physical Inventory... 2. Chapter 1: Starting Inventory... 2.1. CDK/ADP... 3.
9/2/2013 Excellent ID. Operational Manual eskan SADL handheld scanner
 9/2/2013 Excellent ID Operational Manual eskan SADL handheld scanner Thank You! We are grateful you chose Excellent ID for your SADL scanner needs. We believe this easy-to-use scanner will provide dependable
RosterPro by Demosphere International, Inc.
 RosterPro by INDEX OF PAGES: Page 2 - Getting Started Logging In About Passwords Log In Information Retrieval Page 3 - Select Season League Home Page Page 4 - League Player Administration Page 5 - League
Overview... 3 Starting the Software... 3 Adding Your Profile... 3 Updating your Profile... 4
 Page 1 Contents Overview... 3 Starting the Software... 3 Adding Your Profile... 3 Updating your Profile... 4 Tournament Overview... 5 Adding a Tournament... 5 Editing a Tournament... 6 Deleting a Tournament...
nvision Actuals Drilldown (Non-Project Speedtypes) Training Guide Spectrum+ System 8.9 November 2010 Version 2.1
 Training Guide Spectrum+ System 8.9 November 2010 Version 2.1") nvision Actuals Drilldown (Non-Project Speedtypes) Training Guide Spectrum+ System 8.9 November 2010 Version 2.1 Table of Contents Introduction. Page 03 Logging into Spectrum.Page 03 Accessing the NVision
nvision Actuals Drilldown (Non-Project Speedtypes) Training Guide Spectrum+ System 8.9 November 2010 Version 2.1 Table of Contents Introduction. Page 03 Logging into Spectrum.Page 03 Accessing the NVision
MAXYM Mortiser Operating Manual
 MAXYM Mortiser Operating Manual Rev 2.112/16/02 Copyright MAXYM Technologies Inc. Table of Contents Visual Tour 1-2 Operating the Maxym Mortiser 3 Starting the Mortiser 3 Touch Screen Description 3 Mortise
Intralot 318 West Adams Street Suite 1104 Chicago, IL Tel:
 Intralot 318 West Adams Street Suite 1104 Chicago, IL Tel: 678-473-7200 www.intralot.com INTRALOT, 2008 All rights reserved. All copyright, intellectual and industrial rights in this document and in the
Switching to Sub Category and Collapsible Skins
 Switching to Sub Category and Collapsible Skins New programming enhancements and features are not compatible with the older Q-Net skins. If you are using either the original Drop Down skin or the Standard
Kodiak Corporate Administration Tool
 AT&T Business Mobility Kodiak Corporate Administration Tool User Guide Release 8.3 Table of Contents Introduction and Key Features 2 Getting Started 2 Navigate the Corporate Administration Tool 2 Manage
ES-400/ES-500W/ES-500WR User's Guide
 ES-400/ES-500W/ES-500WR User's Guide Contents ES-400/ES-500W/ES-500WR User's Guide... 7 Scanner Basics... 8 Scanner Parts Locations... 8 Scanner Parts... 8 Scanner Buttons and Lights... 11 User Replaceable
RESTAURANT MANAGEMENT for WINDOWS. GIFT CARD Version
 RESTAURANT MANAGEMENT for WINDOWS GIFT CARD Version 5.53.00 Introduction Overview What Profitek Gift Card Does? The Profitek Gift Card program will allow you to offer your customers a way of purchasing
Quick Start Guide. Contents
 1 Quick Start Guide Contents Powering on the Machine Login/Password Entry Jaw Set Up High Security Cut by Code High Security Jaw Set Up Edge Cut Cut by Code Edge Cut Cut by Decode Cutter Replacement Tracer
CIPHERLAB 1166 Bluetooth Scanner
 CIPHERLAB 1166 Bluetooth Scanner THESE SIX PAGES ARE IMPORTANT. Keep handy, perhaps laminated. The notes will save trawling through the enclosed disc. Encourage all personnel to spend a little time to
Accessing e-books with your e-reader
 e-reader 1 Accessing e-books with your e-reader What you need to know about library e-books is that each one is protected by Digital Rights Management (DRM). This means that access to e-books is restricted
Setup and Walk Through Guide Orion for Clubs Orion at Home
 Setup and Walk Through Guide Orion for Clubs Orion at Home Shooter s Technology LLC Copyright by Shooter s Technology LLC, All Rights Reserved Version 2.5 September 14, 2018 Welcome to the Orion Scoring
Enhanced Push-to-Talk Application for iphone
 AT&T Business Mobility Enhanced Push-to-Talk Application for iphone Standard Version Release 8.3 Table of Contents Introduction and Key Features 2 Application Installation & Getting Started 2 Navigating
CHAPTER 18 DOCUMENT IMAGING MODULE 18.0 OVERVIEW 18.1 REQUIREMENTS AND INSTALLATION Special Requirements Mapping Network Drive
 EXTENDED SERVICE OPTIONS CHAPTER 18 18.0 OVERVIEW Collection agencies frequently require the ability to save documents related to collection efforts. For example, agencies doing commercial collections
User Guide: PTT Application - Android. User Guide. PTT Application. Android. Release 8.3
 User Guide PTT Application Android Release 8.3 March 2018 1 1. Introduction and Key Features... 6 2. Application Installation & Getting Started... 7 Prerequisites... 7 Download... 8 First-time Activation...
Network Scanner Guide for Fiery S300 50C-KM
 Network Scanner Guide for Fiery S300 50C-KM Read this manual before printing. Keep readily available for reference. User's Guide Introduction Thank you very much for purchasing the Fiery S300 50C-KM. This
User Guide. PTT Radio Application. Android. Release 8.3
 User Guide PTT Radio Application Android Release 8.3 March 2018 1 Table of Contents 1. Introduction and Key Features... 5 2. Application Installation & Getting Started... 6 Prerequisites... 6 Download...
PLA Planner Student Handbook
 PLA Planner Student Handbook TABLE OF CONTENTS Student Quick Start Guide PLA Planner Overview...2 What is PLA Planner?...4 How do I access PLA Planner?...4 Getting to Know PLA Planner Home...5 Getting
Logging into Five9 Telephony
 Logging into Five9 Telephony VOICE AUTHENTICATE BEFORE ATTEMPTING TO LOG IN Go to the Citrix Home Page at https://trcforecast.westat.com/trccitrix/sitepages/home.aspx Select the Citrix Login link next
Kaseya 2. User Guide. Version 7.0
 Kaseya 2 vpro User Guide Version 7.0 May 30, 2014 Agreement The purchase and use of all Software and Services is subject to the Agreement as defined in Kaseya s Click-Accept EULATOS as updated from time
Pointstreak. Electronic Gamesheet. Scorekeepers Manual
 Pointstreak Electronic Gamesheet Scorekeepers Manual January 2005 Table of Contents Section 1 Introduction... 2 Section 2 Basic Operations... 3 Section 3 Logging In... 6 Section 4 Game Information Screen...
MYSA Direct Member Club Registration Setup Manual. Contents
 MYSA Direct Member Club Registration Setup Manual Contents Introduction... 1 Log into your Account... 2 Creating Teams... 3 Creating Players... 6 Placing Players on a Team... 10 Creating a Coach or Team
Click here to give us your feedback. New FamilySearch Reference Manual
 Click here to give us your feedback. New FamilySearch Reference Manual January 25, 2011 2009 by Intellectual Reserve, Inc. All rights reserved Printed in the United States of America English approval:
Scan Sat Network S.L.
 Scan Sat Network S.L. IPTV Issue Solver Guide No Signal on the screen with IPTV. My IPTV channels are stopping. My Radio is not working I don t get any sound on my channels No Signal on the screen with
Custom Mobile App Support
 Custom Mobile App Support FBBC by Samantha Taylor App Scheduling app for Fit Body Boot Camp and Samantha Taylor Fitness. You can prebook your workouts, check in for your workout or cancel it, all through
Table of Contents. Chapter 1: Software Installation...1. Chapter 2: Running the Software II. Daily Practical Operation...10
 Product Manual Table of Contents Chapter 1: Software Installation.................................1 Chapter 2: Running the Software............................... 2 I. The Initial Defining in Lock Management
Make sure you have these items handy
 Quick Start Guide Make sure you have these items handy What we ve sent you: A. Fetch box B. Ethernet Cable (3m) (You ll receive 3 of these if you ve ordered a Power Line Adaptor 1 x 3m & 2 x 1.5m) G.
SIMPLUX Standalone Wireless Lighting Control System Setup guide Light is OSRAM
 www.osram-americas.com SIMPLUX Standalone Wireless Lighting Control System Setup guide Light is OSRAM Setting up the SIMPLUX System! Only one phone should be used for SIMPLUX System configuration at any
GD&T Administrator Manual v 1.0
 The GD&T Professional Edition GD&T Administrator Manual v 1.0 800-886-0909 Effective Training Inc. www.etinews.com Introduction to the GD&T Administrator s Manual There are two Administration programs
The ideal K-12 science microscope solution. User Guide. for use with the Nova5000
 The ideal K-12 science microscope solution User Guide for use with the Nova5000 NovaScope User Guide Information in this document is subject to change without notice. 2009 Fourier Systems Ltd. All rights
Context-Aware Planning and Verification
 7 CHAPTER This chapter describes a number of tools and configurations that can be used to enhance the location accuracy of elements (clients, tags, rogue clients, and rogue access points) within an indoor
Welcome to JigsawBox!! How to Get Started Quickly...
 Welcome to JigsawBox!! How to Get Started Quickly... Welcome to JigsawBox Support! Firstly, we want to let you know that you are NOT alone. Our JigsawBox Customer Support is on hand Monday to Friday to
e-bos TM Version 2.1.x PowerPlay User s Manual June BOS TM 2.1.x Page 1 of 59
 e-bos TM Version 2.1.x Page 1 of 59 Important Notice This guide is delivered subject to the following conditions and restrictions: This guide contains proprietary information belonging to BK Entertainment.
TradeSchool Start Guide
 TradeSchool Start Guide Welcome to TradeSchool! TradeSchool is the computer program that your Committee uses to track your progress through your apprentice program. As an apprentice, you also have access
Quiver User Guide. Xcor-QUG-v /13/12
 Quiver User Guide Xcor-QUG-v.3.0.4 8/13/12 This document details the full features and functionality of Quiver. Included is information on the various modes of operation and instruction on how to best
GUIDE TO GAME LOBBY FOR STRAT-O-MATIC COMPUTER BASEBALL By Jack Mitchell
 GUIDE TO GAME LOBBY FOR STRAT-O-MATIC COMPUTER BASEBALL By Jack Mitchell Game Lobby (also referred to as NetPlay) is a valuable feature of Strat-O-Matic Computer Baseball that serves three purposes: 1.
Pointstreak. Electronic Gamesheet. Scorekeepers Manual
 Pointstreak Electronic Gamesheet Scorekeepers Manual January 2005 Table of Contents Section 1 Introduction... 2 Section 2 Basic Operations... 3 Section 3 Logging In... 6 Section 4 Game Information Screen...
Moving money forward. CASSIDA TillTally + TillTally Elite Money Counting Scales
 Moving money forward CASSIDA TillTally + TillTally Elite Money Counting Scales Table of contents: 1. INTRODUCTION 1.1 About the Cassida TillTally 2 1.2 Box contents 2 1.3 Front and rear views 3 1.4 Display
User Guide: PTT Radio Application - ios. User Guide. PTT Radio Application. ios. Release 8.3
 User Guide PTT Radio Application ios Release 8.3 December 2017 Table of Contents Contents 1. Introduction and Key Features... 5 2. Application Installation & Getting Started... 6 Prerequisites... 6 Download...
Mobile Application Training
 Mobile Application Training NPMStaffing.com Ready to Work on Your Terms? At NPM Staffing, your next job is now at your fingertips. Our mobile application is easy to use and allows you to work when you
EA SPORTS PGA TOUR Golf Team Challenge Upgrade Instructions
 EA SPORTS PGA TOUR Golf Team Challenge Upgrade Instructions Document Part #: 040-0126-01 This document describes how to upgrade your EA SPORTS PGA TOUR Golf Challenge Edition cabinets to the new Team Challenge
Push-to-talk ios User Guide (v8.0)
") Push-to-talk ios User Guide (v8.0) PTT 8.0 ios - Table of Contents 1 Activating PTT on your ios device... 4 How to activate PTT on your Android Smartphone... 4 How to Logout and Login to the PTT Service...
Push-to-talk ios User Guide (v8.0) PTT 8.0 ios - Table of Contents 1 Activating PTT on your ios device... 4 How to activate PTT on your Android Smartphone... 4 How to Logout and Login to the PTT Service...
CAST Application User Guide
 CAST Application User Guide for DX900+ Electromagnetic Multilog Sensor U.S. Patent No. 7,369,458. UK 2 414 077. Patents Pending 17-630-01-rev.b 05/24/17 1 Copyright 2017 Airmar Technology Corp. All rights
Endurance R/C Wi-Fi Servo Controller 2 Instructions
 Endurance R/C Wi-Fi Servo Controller 2 Instructions The Endurance R/C Wi-Fi Servo Controller 2 allows you to control up to eight hobby servos, R/C relays, light controllers and more, across the internet
Submittal Exchange Design Team User Guide
 Submittal Exchange Design Team User Guide Version 17 November 2017 Contents About This Guide... 9 Access/Permissions... 11 What is Submittal Exchange for Design?... 11 How Can I Get Submittal Exchange
AreaSketch Pro Overview for ClickForms Users
 AreaSketch Pro Overview for ClickForms Users Designed for Real Property Specialist Designed specifically for field professionals required to draw an accurate sketch and calculate the area and perimeter
Enhanced Push-to-Talk Application for iphone
 AT&T Business Mobility Enhanced Push-to-Talk Application for iphone Land Mobile Radio (LMR) Version Release 8.3 Table of Contents Introduction and Key Features 2 Application Installation & Getting Started
IMPORTANT: PLEASE DO NOT USE THIS DOCUMENT WITHOUT READING THIS PAGE
 IMPORTANT: PLEASE DO NOT USE THIS DOCUMENT WITHOUT READING THIS PAGE This document is designed to be a template for a document you can provide to your employees who will be using TimeIPS in your business
Start Here. Installing your Microtek ScanMaker i280
 Start Here Installing your Microtek ScanMaker i280 Step 1: Unpack Contents Unpack your scanner package and check for major components. 1. ScanMaker i280 scanner 2. Hi-Speed USB cable 3. Software CDs/DVDs
PaperCut VCA Cash Acceptor Manual
 PaperCut VCA Cash Acceptor Manual Contents 1 Introduction... 2 2 How PaperCut interfaces with the VCA... 2 3 Setup Phase 1: Device/Hardware Setup... 3 3.1 Networking/Firewall Configuration... 3 3.2 IP
Studuino Icon Programming Environment Guide
 Studuino Icon Programming Environment Guide Ver 0.9.6 4/17/2014 This manual introduces the Studuino Software environment. As the Studuino programming environment develops, these instructions may be edited
FLEX RETAILER REFERENCE GUIDE HOTLINE (800) Monday thru Saturday 7:00 AM to 8:00 PM
 Monday thru Saturday 7:00 AM to 8:00 PM") FLEX RETAILER REFERENCE GUIDE HOTLINE (800) 445-5825 Monday thru Saturday 7:00 AM to 8:00 PM CONTENTS THE FLEX TERMINAL...1 TERMINAL SCREENS...2 TERMINAL BUTTONS...3 SIGN ON...4 SIGN OFF & STOP...5 HELP...6
FLEX RETAILER REFERENCE GUIDE HOTLINE (800) 445-5825 Monday thru Saturday 7:00 AM to 8:00 PM CONTENTS THE FLEX TERMINAL...1 TERMINAL SCREENS...2 TERMINAL BUTTONS...3 SIGN ON...4 SIGN OFF & STOP...5 HELP...6
Legacy FamilySearch Overview
 Legacy FamilySearch Overview Legacy Family Tree is "Tree Share" Certified for FamilySearch Family Tree. This means you can now share your Legacy information with FamilySearch Family Tree and of course
QAM Snare Navigator Quick Set-up Guide- Wi-Fi version
 QAM Snare Navigator Quick Set-up Guide- Wi-Fi version v1.0 3/19/12 This document provides an overview of what a technician needs to do to set up and configure a QAM Snare Navigator Wi-Fi version for leakage
User Manual. P6 Barcode Scanner. English
 User Manual P6 Barcode Scanner English Contents IMPORTANT NOTICE 4 Safety Precaution 4 Maintenance Precaution 4 Overview of Inateck P6 barcode Scanner 4 Appearance 4 Features of the Scanner 5 Introduction
Technical Service Note
 Technical Service Note TSNK180 Zooter Installation Description Date February 13, 2014 Updated February 12, 2014 Owner Audience Allotted Time Environment Distributed Networks Zooter cabling installers 18-24
2012 Monitored Rehab Systems E1201 Manual Kneelax. Installation and user manual
 2012 Monitored Rehab Systems E1201 Manual Kneelax Installation and user manual Table of contents CHAPTER 1 Installation Manual... 3 1.1 Install Kneelax USB driver... 3 1.2 Detect COM-port... 6 1.3 Software
User Manual. User Manual. Version Last change : March Page 1 ID station User Manual
 User Manual Version 7.4.3 Last change : March 2017 Page 1 Introduction This is the user manual of the new fastid, the biometric ID and passport photo system. This user guide helps you in everyday use.
User Guide. PTT Radio Application. ios. Release 8.3
 User Guide PTT Radio Application ios Release 8.3 March 2018 1 Table of Contents 1. Introduction and Key Features... 5 2. Application Installation & Getting Started... 6 Prerequisites... 6 Download... 6
Connecting radios all over the world. Configuring and using SoftRadio on the dispatcher PC
 Connecting radios all over the world Configuring and using SoftRadio on the dispatcher PC Release date January 15, 2019 This guide will help with the configuration and daily use of your dispatcher PC in
Table of Contents. Lock-Off Rooms
 Table of Contents... 3 How to Create a Lock-Off Room... 4 How to Create Rates for... 9 How to Change a Lock-Off Room... 33 How to Delete a Lock-Off Room... 35 How to Create a Reservation for a Lock-off
DataCapture Transcript Module Getting Started Guide
 DataCapture Transcript Module Getting Started Guide Version: 6.6 Written by: Product Documentation, R&D Date: February 2011 ImageNow and CaptureNow are registered trademarks of Perceptive Software, Inc.
WEB I/O. Wireless On/Off Control USER MANUAL
 Wireless On/Off Control Technical Support: Email: support@encomwireless.com Toll Free: 1 800 617 3487 Worldwide: (403) 230 1122 Fax: (403) 276 9575 Web: www.encomwireless.com Warnings and Precautions Warnings
Calibration Instruction Manual Emerson 475 Field Communicator. Manual Revision FC.2
 Calibration Instruction Manual Emerson 475 Field Communicator Manual Revision FC.2 ABM 2 Wire Radar with HART ABM Sensor Technologies Inc 2013, all rights reserved. Emerson is a registered trademark of
EMC ViPR SRM. Alerting Guide. Version
 EMC ViPR SRM Version 4.0.2.0 Alerting Guide 302-003-445 01 Copyright 2015-2017 Dell Inc. or its subsidiaries All rights reserved. Published January 2017 Dell believes the information in this publication
EOS 80D (W) Wireless Function Instruction Manual ENGLISH INSTRUCTION MANUAL
 Wireless Function Instruction Manual ENGLISH INSTRUCTION MANUAL") EOS 80D (W) Wireless Function Instruction Manual ENGLISH INSTRUCTION MANUAL Introduction What You Can Do Using the Wireless Functions This camera s wireless functions let you perform a range of tasks wirelessly,
EOS 80D (W) Wireless Function Instruction Manual ENGLISH INSTRUCTION MANUAL Introduction What You Can Do Using the Wireless Functions This camera s wireless functions let you perform a range of tasks wirelessly,
INSTRUCTION MANUAL IP REMOTE CONTROL SOFTWARE RS-BA1
 INSTRUCTION MANUAL IP REMOTE CONTROL SOFTWARE RS-BA FOREWORD Thank you for purchasing the RS-BA. The RS-BA is designed to remotely control an Icom radio through a network. This instruction manual contains
Location Planning and Verification
 7 CHAPTER This chapter describes addresses a number of tools and configurations that can be used to enhance location accuracy of elements (clients, tags, rogue clients, and rogue access points) within
TRBOnet Mobile. User Guide. for ios. Version 1.8. Internet. US Office Neocom Software Jog Road, Suite 202 Delray Beach, FL 33446, USA
 TRBOnet Mobile for ios User Guide Version 1.8 World HQ Neocom Software 8th Line 29, Vasilyevsky Island St. Petersburg, 199004, Russia US Office Neocom Software 15200 Jog Road, Suite 202 Delray Beach, FL
MAXI Remote Location Kit MRLK 900 Installation and Configuration Manual
 MAXI Remote Location Kit MRLK 900 Installation and Configuration Manual 01/18 635079 Table of Contents Introduction... 3 Materials Included... 3 Setup Overview... 4 Radio Configuration Overview:... 4 FreeWaveTool
Step 3- Creating A Good Work Flow Floor Plan For Faster Production And Creating Process Manuals
 Step 3- Creating A Good Work Flow Floor Plan For Faster Production And Creating Process Manuals Creating A Well-Organized Floor Plan In Step I talked about Goals, Planning and your current Financial Status.
BBM for BlackBerry 10. User Guide
 BBM for BlackBerry 10 Published: 2019-01-15 SWD-20190115102527350 Contents What's new in BBM...5 What's new in BBM...5 Get started...6 About BBM...6 Signing in to BBM... 6 Change your BBM status or profile...
uavionix Ping2020 Transceiver
 uavionix Ping2020 Transceiver QUICK START GUIDE Install 1 Install the uavionix Ping App from the Apple App Store or Google Play. Search for uavionix Ping Installer or use the QR codes below. Connect the
YCE13. Dealer PC Programming Software Reference Manual. Attention!
 YCE13 Dealer PC Programming Software Reference Manual Attention! The YCE13 programing software can only be used with HX380/400 firmware version Ver. 2.00 or later. This software is used to program the
_ Programming Manual RE729 Including Classic and New VoX Interfaces Version 3.0 May 2011
 _ Programming Manual RE729 Including Classic and New VoX Interfaces Version 3.0 May 2011 RE729 Programming Manual to PSWx29 VoX.docx - 1 - 1 Content 1 Content... 2 2 Introduction... 2 2.1 Quick Start Instructions...
Digital Photo Guide. Version 8
 Digital Photo Guide Version 8 Simsol Photo Guide 1 Simsol s Digital Photo Guide Contents Simsol s Digital Photo Guide Contents 1 Setting Up Your Camera to Take a Good Photo 2 Importing Digital Photos into
ADI-100 Interrupter. Operator s Manual. 526 S. Seminole Bartlesville, OK /
 ADI-100 Interrupter Operator s Manual 526 S. Seminole Bartlesville, OK 74003 918/336-1221 www.sescocp.com ADI - 100 Interrupter FEATURES Clock Accuracy 100% during GPS lock Clock Drift 30 µsec per degree
DEVELOPING THE WORKFORCE
 DEVELOPING THE WORKFORCE Assessing the quality of death certification: Instructions for the online assessment tool Resources and Tools 3 November 2016 About this series Capacity-building resources and
Samsung Gear VR 4.0 Retail Experience. Setup & Installation Guide
 Samsung Gear VR 4.0 Retail Experience Setup & Installation Guide Before You Begin Users must follow the exact steps as outlined in the document. Users should not skip or ignore any steps outlined in the
Wireless Transceiver - Bell & Tone Scheduling Troubleshooting Guide
 Primex XR 72MHz Synchronized Time Solution Wireless Transceiver - Bell & Tone Scheduling Troubleshooting Guide 2018 Primex. All Rights Reserved. The Primex logo is a registered trademark of Primex. All
WIRES-X Portable Digital Node Function. Instruction Manual
 Wide-Coverage Internet Repeater Enhancement System WIRES-X Portable Digital Node Function Instruction Manual Please read this Instruction Manual carefully for appropriate procedure. Preparation Procedure
Figure 1 The Raith 150 TWO
 RAITH 150 TWO SOP Figure 1 The Raith 150 TWO LOCATION: Raith 150 TWO room, Lithography area, NanoFab PRIMARY TRAINER: SECONDARY TRAINER: 1. OVERVIEW The Raith 150 TWO is an ultra high resolution, low voltage
Lenovo 3300/3310 Inkjet Printer
 Lenovo 3300/3310 Inkjet Printer User s Guide for Windows Setup troubleshooting A checklist to find solutions to common setup problems. Printer overview Learn about the printer parts and the printer software.
Installation guide. Activate. Install your Broadband. Install your Phone. Install your TV. 1 min. 30 mins
 Installation guide 1 Activate Install your Broadband Install your TV 4 Install your Phone 1 min 0 mins 0 mins 5 mins INT This guide contains step-by-step instructions on how to: 1 Activate Before we do
SCOUT Mobile User Guide 3.0
 SCOUT Mobile User Guide 3.0 Android Guide 3864 - SCOUT February 2017 SCOUT Mobile Table of Contents Supported Devices...1 Multiple Manufacturers...1 The Three Tabs of SCOUT TM Mobile 3.0...1 SCOUT...1
i1800 Series Scanners
 i1800 Series Scanners Scanning Setup Guide A-61580 Contents 1 Introduction................................................ 1-1 About this manual........................................... 1-1 Image outputs...............................................
A Guide To Scoring Single Events With BridgePads. written by Cad Delworth, Carlton Bridge Club, Edinburgh
 A Guide To Scoring Single Events With BridgePads 1 A Guide To Scoring Single Events With BridgePads written by Cad Delworth, Carlton Bridge Club, Edinburgh This is revision number 8, saved at 09:11:00
CTI Products RadioPro Dispatch User Guide Document # S For Version 8 Software
 CTI Products RadioPro Dispatch Document # S2-61786-809 For Version 8 Software Contact Us Support, replacement part ordering, and service may be arranged by contacting our Cincinnati office. Parts for service