People In Spaces A Workshop on using Photoshop to introduce Entourage Elements into existing work.
|
|
|
- Randell Palmer
- 5 years ago
- Views:
Transcription

1 People In Spaces A Workshop on using Photoshop to introduce Entourage Elements into existing work. Peter M. Gruhn peter.gruhn@the-bac.edu Sponsored by Atelier and the Learning Resource Center 1


2 Layers There, that s all there is to know. You re done. Just do it with layers. Open up DemoScene.psd and have a look at the layers. The illustration over on the right side of this page is something of a lie. Each plant and person is not only its own layer, it is a collection of layers plus some extra stuff thrown on top. Turn them off and on to get an idea for what some of them do. Use the Selection Tool to move some around. Resize some. There is not much more to it than this. Just add people to your image. Isolate them from their backgrounds. Compose them well and integrate them correctly into the scene paying attention to direction of travel, lighting, shadow, color. Turn off the folder called Tints. See the important changes it makes to the colors of some plants. Look at the layers around Left Guy. See he has a Hue/Saturation correction that makes him just a little less peach colored and a little less vibrant. See he has his own hand crafted shadow. Close this file. Time to make our own composition. 2


3 Layer Tools The Select Tool is used to move and resize layers quickly. When you first run Photoshop you may have to pick the Selection Tool and go to the Control Panel at the top of the program and turn on Auto Select and Show Transform Controls. The Layer Panel is a panel that shows every layer in a document. You can use this panel to select layers and change the draw order. Layers higher up in the panel are drawn later, therefore on top of layers lower in the list. Use the panel to duplicate layers and add layer masks. Also use the panel to create clipping masks; either off the menu or by clicking on the line between two layers. The top layer becomes contained in or clipped by the lower layer. Alt-Click to make clipping Layer Masks Layer Masks are critical to the efficient use of Photoshop to combine images into collages. Each layer contains color pixel information. This is what you would normally think of as the layer, the part you can see. A layer can also have an associated mask that specifies the opacity of the layer; how see through is it. The mask can be painted on with regular Photoshop tools. Use the Create Mask button to add a mask to a layer. Paint on a mask with black to hide the layer. Paint on it with white to reveal the layer. If you alt-click on a mask in the layer palette you are shown the mask as a gray scale image. You can paint on it regularly. You can even paste other image data into the mask when it is visible. The mask does not need to be visible to be painted on. You can paint on the mask while looking at the color information. This is a very powerful way to tweak a mask. You just paint on it so it looks right. Spend some time making some layers and painting on them, painting their masks and otherwise manipulating them. Start to get familiar with the tools. These tools should become second nature to you in time. New Layer New Mask 3


4 Rules of Perspective When adding people to a scene, if you are interested in maintaining a believable look, you should remember some of your basic rules of perspective. Camera at eye level puts everybody s eyes on the horizon; camera above lowers eyes, camera below raises eyes. Parallel lines converge to a vanishing point on the horizon What if your parallel lines converge to different vanishing points? That s just a sign that your groups of lines aren t parallel in plan. No worries, they still converge on the horizon. 4


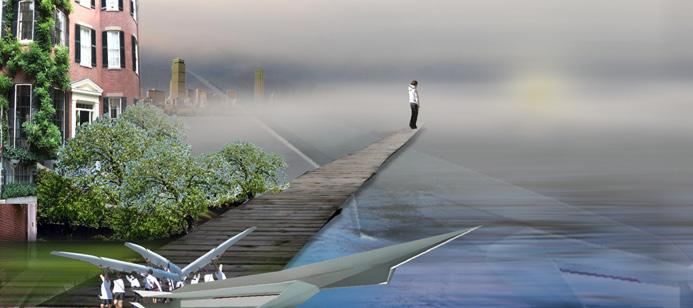
5 Give it a Try Open Skateback.jpg and skater.png in Photoshop. Tile the windows, either with Window: Arrange: Tile or use the buttons next to the menus. Just click on the skater. Hold the mouse button down and drag him into the scene. You don t get any visual feedback other than a drop cursor, but that s OK. Just drop him in the scene. And you there you are. Now ou can move and resize him until you are happy. You can use alt-move to make some quick copies. Use your favourite Photoshop techniques and filters to dress your scene up a bit. I guess this is a good time to mention that you don t have to use these skills just to plainly add people. This layer manipulation toolkit is pretty hand for more generic collage creation too. See next page... 5

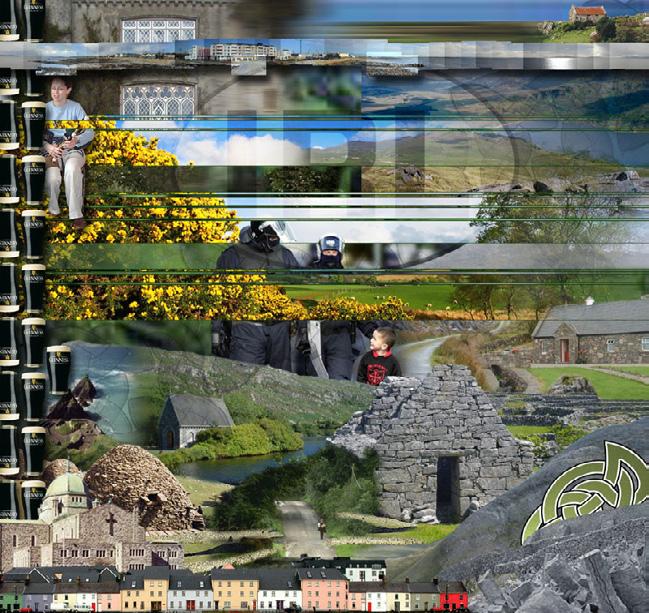
6 Some Collages 6

7 Smart Objects If you re sure you just want to bring in a layer, resize it and move on then that s OK. But if you aren t sure how you are going to place it and you might shrink it down. Then make it big. Then small. Then rotate... over the course of the final image s life, you should consider making your layer a Smart Object. A Smart Object is like an AutoCAD XREF or an InDesign image link. It is a link to a separate image document (this separate document can be contained inside this document or live in a separate file). It retains its full resolution even if you shrink it down very small. As a bonus, some filters such as Gaussian Blur are applied non-destructively to Smart Objects. This allows you to go back and tweak settings. Open up RSandSO.psd. One of the people is a normal layer, the other is a Smart Object. Resize them both very small. Resize them back large again. See the quality difference? You can make any layer a Smart Object just by right clicking on it in the layer panel and choosing Convert To Smart Object. 7


8 Motion Blur People in your scene may be moving. Sometimes you can add that extra touch of realism by having them blur either in whole or in part. Open up kitty.psd. I like to think this kitty s tail should be wagging. To show that, we ll add some blur to it. There are a number of ways to accomplish this and which one will work best depends on the image at hand. Usually the first thing to do is make a selection of the part that should be moving and copy it to its own layer. Three ways I ll mention right now: Radial Blur - on the menu under Filter: Blur: Radial Blur. Use a Blur Method of Spin and how ever much amount you want. Note that the blur center is relative to your whole image so it can take a bit of chasing to find it. This works best for things like arms, legs and tails that swing on an arc and have a still end and a blurrier end. Motion Blur - on the menu under Filter: Blur: Motion Blur. Just set an amount and an angle and you are done. This works best for whole objects moving along a path. Use it also for reflections in streaky material such as brushed metal or semi-glossy floors in perspective. Distort : Blur : Un-Distort - This is a little weird. Take the layer you want to add motion blur too, Distort it so one end is very wide. Blur or Motion Blur the layer. Then reverse the distortion so the layer returns to regular shape. When you shrink the wide part, you shrink the amount of blur it received. This is a way to create the appearance of variable motion blur. When you are finished with whatever technique you use for the blur, you will probably need to work some masks on the blurred layer and the base layer behind it to make the seam harder to see. If you re feeling rich, there are third party plug-ins for motion blur which might offer some better alternatives. 8

9 Tinting Since your base scene and your entourage come from different places, there is a chance that they won t match well in brightness and color cast. A poorly colored person can be as distracting to a scene as a circus clown. Open up foam.jpg and the two tintpeeps. Drag and drop the people into the foam image. (Ooops, looks like you have to do some quick masking to isolate the guy. That s OK, I ll wait... done? Cool.) We ll use two different approaches to changing the tint on these two people. Match Color - select the kimono lady. Go to the menu, Image: Adjustments: Match Color. For Source, pick foam.jpg, this very picture. For Layer pick background, the part of the image with the scene in it. See how the lady now blends in nicely. It s too much for me, so I use some Fade to make her look a little more human. This is up to you. Photo Filter - select the suit guy. Go to the menu, Image: Adjustments: Photo Filter. It defaults to a warming orange filter, but since this picture is so pink, let s try a magenta filter. For my taste, the built in magenta is just a bit too purple. You can click on the Color swatch and adjust it. I made mine a bit more red. Then for this guy, Preserve Luminosity is good and increase the density. Again, it s all to your taste. 9


10 Shadows Open crypt.jpg and sculpture.psd. Drop the sculpture into the crypt scene. The easiest way to make a shadow is to just duplicate the person s layer (go ahead, duplicate the layer). Then resize and stretch one of the copies to the right shape. Since the sun is not in the same place as your eye, this is horribly inaccurate and most of the time that doesn t matter. Once you have the duplicate placed where you want it, on the Layer panel click the Lock Transparency button; the first one after the word Lock. Now go to the Edit menu and pick Edit: Fill: Black. This fills the shadow in with black. Now unlock the transparency and maybe add some Gaussian Blur. Now set the transparency down low. Pay attention to the scene to see where the light is coming from and what the shadow quality is. Shadows can be very crisp and directional or very indistinct and fuzzy. Try to match the existing scene. Watch out for the feet. They like to not line up. If you re running into trouble there, when you are already resizing the layer, hit the Warp button on the control panel (or you can get it off the menu, Edit: Transform: Warp). 10

11 Reflections Reflections are the same as shadows only easier. You don t have to fill them in with black. They usually aren t at funny angles, they are just straight upside down. Open treebr02.jpg and UnhappyWoman.psd. Drop the woman into the bedroom in the free area. Resize her so she fits well. Duplicate the woman and stretch her so she is upside-down and her feet match up. Decrease the Opacity. Add a mask to the reflection and fill it with a gradient to make it fade away. Throw on some horizontal motion blur. I also put some Match Color on her to make her fit the room better. 11

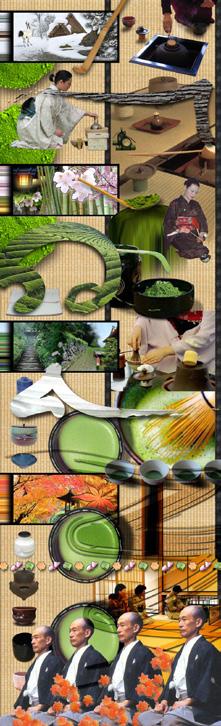
12 Tea House Just a quickie. Didn t even bother with shadows from the people. What I did do though is add some shadows cast on the two women in the middle to help pull them under the roof. Do this by creating an extra layer for the shadows. Put that layer above the person. Select the shadow layer. On the Layers panel tiny menu select Make Clipping Mask. Now turn down the transparency and maybe switch the blend mode of the shadow to Multiply or Overlay. You can paint black and white in the shadow layer and it will darken only the one layer below. 12

13 Rudolph Use the people rendering to help size and place your entourage correctly. The boy comes in with a background. You could get fancy and make a proper mask, that would be nice. But to be quick, just use Magic Wand to quickly grab all the white and hit backspace to delete it. There s probably a little fringe left, so Layers: Matting: Defringe and set it to 2 pixel. Now when you shrink him down he should look great. Make some quick distorted shadows. See how the shadow from the top of the roof is fuzzy, that lets you know you can get away with some fuzz. Since people are closer to the ground than roofs, you don t want too much. But people are skinnier than whole buildings so you can sneak in a little more. Shadows tend to be more blue than an overall scene, so rather than just make your shadows with black, use the eyedropper tool to pick up the color from an existing dark shadow. When you go to Edit: Fill, use Foreground Color instead of Black. That will help make your shadows look like they belong more than if they were hue neutral. 13
PHOTOSHOP DESIGN EFFECTS FOR INTERMEDIATE TO ADVANCED USERS
 PHOTOSHOP DESIGN EFFECTS FOR INTERMEDIATE TO ADVANCED USERS Copyright 2012, National Seminars Training Introduction This class is all about design effects in Adobe Photoshop. For example, let s say that
How to Create a Landscape Wallpaper for your Desktop
 How to Create a Landscape Wallpaper for your Desktop Why not create a vector landscape wallpaper? In this simple tutorial, you will learn how to create an eye-appealing wallpaper quickly and effectively.
The horse image used for this tutorial comes from Capgros at the Stock Exchange. The rest are mine.
 First off, sorry to those of you that are on the mailing list or RSS that get this twice. I m finally moved over to a dedicated server, and in doing so, this post was lost. So, I m republishing it. This
Digital Design and Communication Teaching (DiDACT) University of Sheffield Department of Landscape. Adobe Photoshop CS5 INTRODUCTION WORKSHOPS
 University of Sheffield Department of Landscape. Adobe Photoshop CS5 INTRODUCTION WORKSHOPS") Adobe INTRODUCTION WORKSHOPS WORKSHOP 1 - what is Photoshop + what does it do? Outcomes: What is Photoshop? Opening, importing and creating images. Basic knowledge of Photoshop tools. Examples of work.
Adobe INTRODUCTION WORKSHOPS WORKSHOP 1 - what is Photoshop + what does it do? Outcomes: What is Photoshop? Opening, importing and creating images. Basic knowledge of Photoshop tools. Examples of work.
Add Rays Of Sunlight To A Photo With Photoshop
 Add Rays Of Sunlight To A Photo With Photoshop Written by Steve Patterson. In this photo effects tutorial, we'll learn how to easily add rays of sunlight to an image, a great way to make an already beautiful
ADDING A RAINBOW TO A PHOTOGRAPH
 ADDING A RAINBOW TO A PHOTOGRAPH This assignment will cover how to add a simple rainbow (or if you want to go crazy, a double rainbow) to any photograph. This will give us some great work with gradients,
Introduction to Photoshop Elements
 John W. Jacobs Technology Center 450 Exton Square Parkway Exton, PA 19341 610.280.2666 ccljtc@ccls.org www.ccls.org Facebook.com/ChesterCountyLibrary Introduction to Photoshop Elements Chester County Library
Design a Halloween Pumpkin Wallpaper in Photoshop
 Design a Halloween Pumpkin Wallpaper in Photoshop By: Alvaro Guzman Halloween is near! So let's take a pumpkin image, carve it up, and light it for this coming holiday. You'll learn how to get this nice
Adobe Photoshop CC 2018 Tutorial
 Adobe Photoshop CC 2018 Tutorial GETTING STARTED Adobe Photoshop CC 2018 is a popular image editing software that provides a work environment consistent with Adobe Illustrator, Adobe InDesign, Adobe Photoshop,
Adobe Photoshop CS5 Layers and Masks
 Adobe Photoshop CS5 Layers and Masks Email: training@health.ufl.edu Web Page: http://training.health.ufl.edu Adobe Photoshop CS5: Layers and Masks 2.0 Hours The workshop will cover creating and manipulating
Challenge Image: Blur the Background
 Challenge Image: Blur the Background Challenge Image: Blur the Background In this lesson, we re going to work on a challenge image that was submitted by a Masters Academy member. The image features a little
A quick note: We hope that you will find something from the Tips and Tricks that will add a little pizazz to your yearbook pages!
 A quick note: The following pages are tips and tricks for Basic Photoshop users. You may notice that some instructions indicate that non-awpc fonts were used, and that some colors were created using the
Using Adobe Photoshop
 Using Adobe Photoshop 6 One of the most useful features of applications like Photoshop is the ability to work with layers. allow you to have several pieces of images in the same file, which can be arranged
photoshop filters kelly ludwig assistant professor
 photoshop filters kelly ludwig assistant professor sharpening images reducing noise correcting distortions in images practical filters There are over 100 filters that ship with Photoshop and they're all
IMAGE CORRECTION. You can find this and more information with video tutorials at
 IMAGE CORRECTION You can find this and more information with video tutorials at http://www.adobe.com/support/photoshop/ P H O T O S H O P T O O L S CLONE STAMP TOOL The Clone Stamp tool paints one part
Painting Special Effects on Photographs
 TUTORIAL 7 Painting Special Effects on Photographs In this tutorial you will learn how to transform a photo into a striking color composition with paintbrushes, masks, blending modes, color, and paper
Module All You Ever Need to Know About The Displace Filter
 Module 02-05 All You Ever Need to Know About The Displace Filter 02-05 All You Ever Need to Know About The Displace Filter [00:00:00] In this video, we're going to talk about the Displace Filter in Photoshop.
Glowing Surreal Planet Design. Final Image Preview
 Glowing Surreal Planet Design Final Image Preview. Step 1 First, go to the S:\ drive and locate the folder called Glowing Planet Design. Copy the City Skyline file and paste it in your Glowing Planet Design
Adobe Photoshop CS5 Tutorial
 Adobe Photoshop CS5 Tutorial GETTING STARTED Adobe Photoshop CS5 is a popular image editing software that provides a work environment consistent with Adobe Illustrator, Adobe InDesign, Adobe Photoshop
Undress a Giraffe in Photoshop
 Undress a Giraffe in Photoshop By: Alexandra Fomicheva Have you ever wanted to know what a Giraffe looks like without its spots? If so, this tutorial is for you, you pervert! Today, we will demonstrate
Essential Post Processing
 Essential Post Processing By Ian Cran Preamble Getting to grips with Photoshop and Lightroom could be described in three stages. One is always learning and going through stages but there are three main
CREATE A BURNT EDGE EFFECT
 CREATE A BURNT EDGE EFFECT One of the all-time classic effects in Photoshop is the burnt edge, and there s lots of different ways to create it, but in this Adobe Photoshop tutorial, we re going to look
prepared by Allison Hwang for T. Purdy 2011
 There are many ways to create material textures in Photoshop. In addition to using primarily the blending tool, you can also use filters to create textures. In this tutorial, the objective is to create
Rendering a perspective drawing using Adobe Photoshop
 Rendering a perspective drawing using Adobe Photoshop This hand-out will take you through the steps to render a perspective line drawing using Adobe Photoshop. The first important element in this process
Create a Beautiful Abstract Portrait in Photoshop - Psd Premium Tutorial
 Create a Beautiful Abstract Portrait in Photoshop - Psd Premium Tutorial By: Wojciech Pijecki In this tutorial we will combine several stock images to create an artistic, abstract portrait of a woman.
SURREALISM IN PHOTOSHOP
 SURREALISM IN PHOTOSHOP In this tutorial your aim is to create a surrealist inspired image using Photoshop. You will combine a selection of images in an illogical, non realistic manner. Set up a folder
INTRO TO LAYERS (PART 2)
") Adobe Photoshop Elements INTRO TO LAYERS (PART 2) By Dave Cross In Part 1, we talked about the main concept behind layers and why they re so important. Now we ll take it a step further and show how to
Adobe Photoshop Elements INTRO TO LAYERS (PART 2) By Dave Cross In Part 1, we talked about the main concept behind layers and why they re so important. Now we ll take it a step further and show how to
Extreme Makeovers: Photoshop Retouching Techniques
 Extreme Makeovers: Table of Contents About the Workshop... 1 Workshop Objectives... 1 Getting Started... 1 Photoshop Workspace... 1 Retouching Tools... 2 General Steps... 2 Resolution and image size...
15 Photoshop Tips. Changing Photoshop rulers from inches to picas
 5 Photoshop Tips Changing Photoshop rulers from inches to picas What s the difference between inches and picas? a 6x inch RGB JPEG file is.9 MB a 6x pica RGB JPEG file is. MB a 6x inch RGB TIFF file is.
ITEC185 INTRODUCTION TO DIGITAL MEDIA
 1 ITEC185 INTRODUCTION TO DIGITAL MEDIA ADOBE PHOTOSHOP ITEC185 - Introduction to Digital Media ITEC185 - Introduction to Digital Media 2 What is Adobe Photoshop? Photoshop is the leading professional
ADDING RAIN TO A PHOTO
 ADDING RAIN TO A PHOTO Most of us would prefer to avoid being caught in the rain if possible, especially if we have our cameras with us. But what if you re one of a large number of people who enjoy taking
Photoshop: Manipulating Photos
 Photoshop: Manipulating Photos All Labs must be uploaded to the University s web server and permissions set properly. In this lab we will be manipulating photos using a very small subset of all of Photoshop
FLAMING HOT FIRE TEXT
 FLAMING HOT FIRE TEXT In this Photoshop text effects tutorial, we re going to learn how to create a fire text effect, engulfing our letters in burning hot flames. We ll be using Photoshop s powerful Liquify
AGENDA :: MULTI- MEDIA TOOLS :: CLASS NOTES. :: Homework Critiques Best and Worst Websites. :: Photoshop Lesson 2 Things aren t what they seem
 CLASS :: 02 02.02 2018 AGENDA :: Homework Critiques Best and Worst Websites :: Photoshop Lesson 2 Things aren t what they seem I. PHOTO RETOUCHING: Before There Were Computers (Web Post) http://jmcolberg.com/weblog/2010/01/photoshop_before_there_were_computers_the_art_of_retouching_and_improving_negatives_and_prints/
TEXT PERSPECTIVE SHADOW EFFECT
 TEXT PERSPECTIVE SHADOW EFFECT In this Photoshop text effects tutorial, we ll learn how to create a popular, classic effect by giving text a perspective shadow as if a light source behind the text was
Adobe Illustrator. Mountain Sunset
 Adobe Illustrator Mountain Sunset Adobe Illustrator Mountain Sunset Introduction Today we re going to be doing a very simple yet very appealing mountain sunset tutorial. You can see the finished product
Compositing. Compositing is the art of combining two or more distinct elements to create a sense of seamlessness or a feeling of belonging.
 Compositing Compositing is the art of combining two or more distinct elements to create a sense of seamlessness or a feeling of belonging. Selection Tools In the simplest terms, selections help us to cut
The original image. The final rainbow effect.
 ADD A realistic rainbow to a photo In this Photoshop photo effects tutorial, we re going to learn how to easily add a rainbow, even a double rainbow, to a photo. Of course, as with most photo effects,
XXXX - MAKING A FLYER BOOKLET COVER 1 N/08/08
 INTRODUCTION TO GRAPHICS Making a flyer booklet cover Information Sheet No. XXXX Create a new document with these settings. Note that you will be using 300 dpi because this will be made for print. Keepit
Name the layer you rotated in step 3 Stripe and lower the opacity to 43%.
 Step 1 Open Photoshop and create a new file 1085 649 pixels. Fill the layer with a bright blue color (#0095db) by pressing Shift + F5. This will be the background for our pop art scene. Step 2 Let s create
ADD A REALISTIC WATER REFLECTION
 ADD A REALISTIC WATER REFLECTION In this Photoshop photo effects tutorial, we re going to learn how to easily add a realistic water reflection to any photo. It s a very easy effect to create and you can
Organizing artwork on layers
 3 Layer Basics Both Adobe Photoshop and Adobe ImageReady let you isolate different parts of an image on layers. Each layer can then be edited as discrete artwork, allowing unlimited flexibility in composing
WORN, TORN PHOTO EDGES EFFECT
 Photo Effects: CC - Worn, Torn Photo Edges Effect WORN, TORN PHOTO EDGES EFFECT In this Photoshop tutorial, we ll learn how to take the normally sharp, straight edges of an image and make them look all
Create a Candy Cane. Create a new canvas with the size 8x10 inches at 300 pixel/inch. See image below Ctrl + N
 Create a Candy Cane The Basic Candy Cane Canvas and Shape 1. Create a new folder, name it Candy Cane your name. Create a new canvas with the size 8x10 inches at 300 pixel/inch. See image below Ctrl + N
Creating Pastel Images and other effects in Photoshop
 Creating Pastel Images and other effects in Photoshop Martin Addison 2015 Creating pastel images Page 1 Martin Addison FRPS Using White Layers in Photoshop 1. Create a new empty Layer 2. Edit> Fill 3.
Color Correction and Enhancement
 10 Approach to Color Correction 151 Color Correction and Enhancement The primary purpose of Photoshop is to act as a digital darkroom where images can be corrected, enhanced, and refined. How do you know
HIGH KEY GLOW EFFECT IN PHOTOSHOP
 HIGH KEY GLOW EFFECT IN PHOTOSHOP In this Photoshop tutorial, we ll learn how to create a high key glow effect, which is a fancy way of saying we ll be applying a glow only to the highlights in an image.
Contents. Introduction
 Contents Introduction 1. Overview 1-1. Glossary 8 1-2. Menus 11 File Menu 11 Edit Menu 15 Image Menu 19 Layer Menu 20 Select Menu 23 Filter Menu 25 View Menu 26 Window Menu 27 1-3. Tool Bar 28 Selection
Reflection Project. Please start by resetting all tools in Photoshop.
 Reflection Project You will be creating a floor and wall for your advertisement. Before you begin on the Reflection Project, create a new composition. File New: Width 720 Pixels / Height 486 Pixels. Resolution
Ian Barber Photography
 1 Ian Barber Photography Sharpen & Diffuse Photoshop Extension Panel June 2014 By Ian Barber 2 Ian Barber Photography Introduction The Sharpening and Diffuse Photoshop panel gives you easy access to various
Photoshop CS2. Step by Step Instructions Using Layers. Adobe. About Layers:
 About Layers: Layers allow you to work on one element of an image without disturbing the others. Think of layers as sheets of acetate stacked one on top of the other. You can see through transparent areas
ADD TRANSPARENT TYPE TO AN IMAGE
 ADD TRANSPARENT TYPE TO AN IMAGE In this Photoshop tutorial, we re going to learn how to add transparent type to an image. There s lots of different ways to make type transparent in Photoshop, and in this
Photoshop CC Editing Images
 Photoshop CC Editing Images Rotate a Canvas A canvas can be rotated 90 degrees Clockwise, 90 degrees Counter Clockwise, or rotated 180 degrees. Navigate to the Image Menu, select Image Rotation and then
Photoshop: Manipulating Photos
 Photoshop: Manipulating Photos All Labs must be uploaded to the University s web server and permissions set properly. In this lab we will be manipulating photos using a very small subset of all of Photoshop
Now we ve had a look at the basics of using layers, I thought we d have a look at a few ways that we can use them.
 Stone Creek Textiles stonecreektextiles.co.uk Layers Part 2 Now we ve had a look at the basics of using layers, I thought we d have a look at a few ways that we can use them. In Layers part 1 we had a
CSCI Lab 6. Part I: Simple Image Editing with Paint. Introduction to Personal Computing University of Georgia. Multimedia/Image Processing
 CSCI-1100 Introduction to Personal Computing University of Georgia Lab 6 Multimedia/Image Processing Purpose: The purpose of this lab is for you to gain experience performing image processing using some
Stone Creek Textiles. Layers! part 1
 Stone Creek Textiles Layers! part 1 This tutorial is all about working with layers. This, to my mind, is one of the two critical areas to master in order to work creatively with Photoshop Elements. So,
Black (and White) Magic
 Magic") Black (and White) Magic Close your eyes, take a deep breath, and imagine a future where you no longer shoot both color and black and white images. Instead, you capture only color. Then, following the shoot,
Black (and White) Magic Close your eyes, take a deep breath, and imagine a future where you no longer shoot both color and black and white images. Instead, you capture only color. Then, following the shoot,
Introduction to Photoshop
 Introduction to Photoshop Instructional Services at KU Libraries A Division of Information Services www.lib.ku.edu/instruction Abstract: This course covers the basics of Photoshop, including common tools
Using Adobe Photoshop to enhance the image quality. Assistant course web site:
 Using Adobe Photoshop to enhance the image quality Assistant course web site: http://www.arches.uga.edu/~skwang/edit6170/course.htm Content Introduction 2 Unit1: Scan images 3 Lesson 1-1: Preparations
Selective Editing in Camera Raw 5
 Selective Editing in Camera Raw 5 The editing tools that you saw in the last chapter are global editing tools. That is, they affect all parts of the image. So, when you choose to, for example, brighten
PHOTOSHOP TUTORIAL: DIGITAL DARKROOM TECHNIQUES
 PHOTOSHOP TUTORIAL: DIGITAL DARKROOM TECHNIQUES STEP BY STEP TRAINING Learn by doing step by step exercises. Includes downloadable class files that work on Mac & PC. EDITION 1 Copyright Info Published
Step 1. Facebook Twitter Google+ Find us on Facebook. Vectortuts+ How to Create a Curious Owl in Illustrator CS4 Vectortuts+
 Joomla developers needed - Long term potential in India Copywriter Email Campaigns Wordpress Creative design Social media in UK More Freelance Jobs... Facebook Twitter Google+ Find us on Facebook Step
Perspective Shadow Text Effect In Photoshop
 Perspective Shadow Text Effect In Photoshop Written by Steve Patterson. In this Photoshop text effects tutorial, we ll learn how to create a popular, classic effect by giving text a perspective shadow
How To Change Eye Color In Photoshop
 Change Eye Color In An Image With Photoshop Learn how to easily change someone's eye color in a photo with Photoshop! We'll use a Hue/Saturation adjustment layer, a layer mask and a layer blend mode to
Create a Dreamlike Photo Manipulation of an Emotional Girl with a Dramatic Lighting in Photoshop. By Andrea Garcia - February 12,
 Create a Dreamlike Photo Manipulation of an Emotional Girl with a Dramatic Lighting in Photoshop By Andrea Garcia - February 12, 2015 396 11 Create a Dreamlike Photo Manipulation of an Emotional Girl with
SURREALISM IN PHOTOSHOP
 SURREALISM IN PHOTOSHOP In this tutorial your aim is to create a surrealist inspired image using Photoshop. You will combine a selection of images in an illogical, non realistic manner. Set up a folder
Make a Trendy Double Exposure Effect in Adobe Photoshop by Yulia Sokolova6 days ago
 Make a Trendy Double Exposure Effect in Adobe Photoshop by Yulia Sokolova6 days ago Difficulty:IntermediateLength:LongLanguages: Photo ManipulationAdobe PhotoshopPhoto EffectsDouble ExposureClipping Mask
The original image. Let s get started! The final result.
 Miniature Effect With Tilt-Shift In Photoshop CS6 In this tutorial, we ll learn how to create a miniature effect in Photoshop CS6 using its brand new Tilt-Shift blur filter. Tilt-shift camera lenses are
The original image. Let s get started! The final light rays effect. Photoshop adds a new layer named Layer 1 above the Background layer.
 Add Rays Of Light To A Photo In this photo effects tutorial, we ll learn how to quickly and easily add rays of sunlight to an image with Photoshop! I ll be using Photoshop CS5 throughout this tutorial
METAL TEXT EFFECT. Step 1: Create A New Document. Step 2: Fill The Background With Black
 METAL TEXT EFFECT In this text effects tutorial, we ll learn how to easily create metal text, a popular effect widely used in video games and movie posters! It may seem like there s a lot of steps involved,
4 PHOTOSHOP SPECIAL EFFECTS HACKS FROM SCOTT KELBY
 4 PHOTOSHOP SPECIAL EFFECTS HACKS FROM SCOTT KELBY You can do some pretty cool stuff in Photoshop, with most tiny tweaks taking no time at all. However, for some of us (myself included) it s hard to know
PanosFX CARTOONS User guide PANOSFX CARTOONS. Photoshop actions - for PS CC, CS6, CS5, CS4, CS3. User Guide
 PANOSFX CARTOONS Photoshop actions - for PS CC, CS6, CS5, CS4, CS3 User Guide CONTENTS 1. THE BASICS... 1 1.1. About the effects... 1 1.2. How the actions are organized... 1 1.3. Installing the actions
A Basic Guide to Photoshop CS Adjustment Layers
 A Basic Guide to Photoshop CS Adjustment Layers Alvaro Guzman Photoshop CS4 has a new Panel named Adjustments, based on the Adjustment Layers of previous versions. These adjustments can be used for non-destructive
Pacific New Media David Ulrich
 Pacific New Media David Ulrich pacimage@maui.net www.creativeguide.com 808.721.2862 Digital Imaging Workflow in Adobe Photoshop All color and tonal correction editing should be done in a non-destructive
Learning Photo Retouching techniques the simple way
 Learning Photo Retouching techniques the simple way Table of Contents About the Workshop... i Workshop Objectives... i Getting Started... 1 Photoshop Workspace... 1 Setting up the Preferences... 2 Retouching
How to Create a Curious Owl in Illustrator
 How to Create a Curious Owl in Illustrator Tutorial Details Program: Adobe Illustrator Difficulty: Intermediate Estimated Completion Time: 1.5 hours Take a look at what we're aiming for, an inquisitive
Your texture pattern may be slightly different, but should now resemble the sample shown here to the right.
 YOU RE BUSTED! For this project you are going to make a statue of your bust. First you will need to have a classmate take your picture, or use the built in computer camera. The statue you re going to make
Tutorial Resources. Combine a Crocodile with a Car to Create an Exotic Crocomobile Photoshop Tutorials
 Tutorial Resources Crocodile1 SXC Crocodile2 charadestock Crocodile3 frostdragon64 Old car achatinastock Background SXC Bird rml-stock sign1 discordia-stock Sign2 ecathe Step 1 Open the background image
Transparency and blending modes
 Transparency and blending modes About transparency Transparency is such an integral part of Illustrator that it s possible to add transparency to your artwork without realizing it. You can add transparency
PHOTO 11: INTRODUCTION TO DIGITAL IMAGING
 PHOTO 11: INTRODUCTION TO DIGITAL IMAGING Instructor: Sue Leith Exam Review On your camera, what are the following and what are they used for? WB matches the color temperature of light ISO - The sensitivity
Downloaded From : Working with Photoshop 7.0
 Adobe Photoshop 1. Introduction What is Adobe Photoshop? Adobe Photoshop is a web designing software used for giving effects and filters to an image to make it more appealing and attractive. Brought out
XXXX - ILLUSTRATING FROM SKETCHES IN PHOTOSHOP 1 N/08/08
 INTRODUCTION TO GRAPHICS Illustrating from sketches in Photoshop Information Sheet No. XXXX Creating illustrations from existing photography is an excellent method to create bold and sharp works of art
Photoshop Filters. Applying Filters from the Filter Menu
 Photoshop Filters Filters are easy to learn and use, and yet are one of Photoshop s most powerful features. When used properly, they can recreate a number of photographic and artistic effects, can enhance
Introduction to Layers
 Introduction to Layers By Anna Castano A layer is an image or text that is piled on top of another. There are many things you can do with layer and it is easy to understand how it works. Through the introduction
How to Create Fake Shadows
 TIP SHEET #8 How to Create Fake Shadows As well as the colour, it s the shadows in a picture that help to give it mood and atmosphere so in this tutorial I want to show you how you can add in extra shadows.
Digital Photography 1
 Digital Photography 1 Photoshop Lesson 3 Resizing and transforming images Name Date Create a new image 1. Choose File > New. 2. In the New dialog box, type a name for the image. 3. Choose document size
Super Nova. 1. Create a Background. Photoshop Textures Assignment # 3
 Photoshop Textures Assignment # 3 Super Nova 1. Create a Background First, start by creating a new document, I ve used a document size of 400 x 400 pixels here, but you might want to use something much
Clipping Masks And Type Placing An Image In Text With Photoshop
 Clipping Masks And Type Placing An Image In Text With Photoshop Written by Steve Patterson. In a previous tutorial, we learned the basics and essentials of using clipping masks in Photoshop to hide unwanted
Reveal the mystery of the mask
 Reveal the mystery of the mask Imagine you're participating in a group brainstorming session to generate new ideas for the design phase of a new project. The facilitator starts the brainstorming session
A Basic Guide to Photoshop Adjustment Layers
 A Basic Guide to Photoshop Adjustment Layers Photoshop has a Panel named Adjustments, based on the Adjustment Layers of previous versions. These adjustments can be used for non-destructive editing, can
By Washan Najat Nawi
 By Washan Najat Nawi how to get started how to use the interface how to modify images with basic editing skills Adobe Photoshop: is a popular image-editing software. Two general usage of Photoshop Creating
The original image. Let s get started! The final rainbow effect. The photo sits on the Background layer in the Layers panel.
 Add A Realistic Rainbow To A Photo In this Photoshop photo effects tutorial, we ll learn how to easily add a rainbow, and even a double rainbow, to a photo! As we ll see, Photoshop ships with a ready-made
ADOBE PHOTOSHOP CS TUTORIAL
 ADOBE PHOTOSHOP CS TUTORIAL A D O B E P H O T O S H O P C S Adobe Photoshop CS is a popular image editing software that provides a work environment consistent with Adobe Illustrator, Adobe InDesign, Adobe
Adobe PhotoShop Elements
 Adobe PhotoShop Elements North Lake College DCCCD 2006 1 When you open Adobe PhotoShop Elements, you will see this welcome screen. You can open any of the specialized areas. We will talk about 4 of them:
The original image. As I said, we ll be looking at a few different variations on the effect. Here s the first one we ll be working towards:
 DIGITAL PIXEL EFFECT In this Photoshop tutorial, we re going to look at how to create a digital pixel effect, which is often used in ads that sell anything to do with digital. We re going to first pixelate
Photoshop. Make a Spooky Halloween Pumpkin Text Effect in Photoshop - Photoshop tutorial PSDDude
 Photoshop October 4th,2017 1 2 Image size: 7 in wide x 3 in high 300 dpi Start with a simple black gradient background layer. Radial Gradiant, black to gray. Install the CREEPSVILLE font. Center and Type
Teton Technique C H A P T E R 3
 C H A P T E R 3 Teton Technique TRY IT AT HOME: TetonTechnique.psd SIT BACK AND WATCH: TetonTechnique.mov Ladies and gentlemen, girls and boys of all ages, welcome to the Grand Teton National Park. But
BRUSHES AND LAYERS We will learn how to use brushes and illustration tools to make a simple composition. Introduction to using layers.
 Brushes BRUSHES AND LAYERS We will learn how to use brushes and illustration tools to make a simple composition. Introduction to using layers. WHAT IS A BRUSH? A brush is a type of tool in Photoshop used
Photo Within A Photo - Photoshop
 Photo Within A Photo - Photoshop Here s the image I ll be starting with: The original image. And here s what the final "photo within a photo" effect will look like: The final result. Let s get started!